Installation Guide. Thank you for the purchase of our product. You have just unleashed infinite control, power and ability into your hands.
|
|
|
- Sybil Bridges
- 5 years ago
- Views:
Transcription

1 Installation Guide Thank you for the purchase of our product. You have just unleashed infinite control, power and ability into your hands. This product is for race use only by experienced engine tuners. Note that it is possible to damage your engine by choosing inappropriate tuning or set-up parameters. (ignition timing too advanced, fuel ratio too lean or extremely rich) Be sure to fully read and understand this document, and all associated tuning documents. Always use a good premium fuel. Version 1.1
2 Table Of Contents Section 1: Whats In The Box Section 2: Installation Harness A Harness B Exhaust Sensors Monster Ports Expansion Spare In / Outs Monster Spark Expansion Section 4: Stock Component Location Guide
 Universal Exhaust (O2) Sensor harness (connects to harness B) DVD (contains USB to Serial adaptor driver, Tune Monster tuning software, Data Logging")
3 Section 1: In the Box Tune Monster ECM: ECM Harness A, Engine Harness (black connector to ECM and all engine sensor / ATV connectors) Harness B, Expansion & Ground Harness (grey connector to ECM, engine ground eyelet and 4 expansion plugs) Universal Exhaust (O2) Sensor harness (connects to harness B) DVD (contains USB to Serial adaptor driver, Tune Monster tuning software, Data Logging Software and all manuals) USB to Serial Adaptor
 Universal IN / OUT port Harness Monster Spark Expansion: Ignition Module Spark Harness (connects to Harness B, ignition module and stock ignition")
4 And if Optionally Purchased Monster Ports Expansion: Micro Relay (to replace stock fan relay) Large Relay (New cooling fan relay) Cooling Fan Harness (connects to harness B, new relay and stock fan) Universal IN / OUT port Harness Monster Spark Expansion: Ignition Module Spark Harness (connects to Harness B, ignition module and stock ignition coil)
5 Section 2: Installation Notes: For novice users, it might be a lot easier to just install and set up the base ECM (fuel only) and harness. Once familiar with everything and the ATV is tuned, then install the Monster Ports and / or Monster Spark expansions. Learning in steps is easier than trying to learn too much at once. If you ride in deep water or mud, we recommend that you use dielectric grease (available at your local auto store) on all the connections. Just as you would on the stock machine. You don't need to pack the connector, the purpose of the grease is to just keep all seals lubricated. We also recommend that you double check every wire seal going into each connector to make sure there are no seals that are not pushed in quite far enough or that they are not pushed in too far exposing a terminal. Do this for both the stock harness and your new harnesses. Instructions: For each connection, unplug the appropriate stock connector and install the new harness inline. Remove plastic to access the stock ECM area. Remove the right side panel that runs by your leg and covers the top of the engine. The harness runs along the right side of the engine. String the harness from one connection location to the next. You can secure it anywhere you want with tie wraps. Find a suitable location up front for your new ECM. We recommend laying it on top of the stock ECM. Other places include in front of the right side of the airbox. Inward of the right shock above the coolant hoses. Behind the fuse box. Up behind the dashboard. Basically anywhere you want to put it. We do not recommend putting it behind the airbox, in front of the seat. This area gets extremely hot from the engine and exhaust. Over heating the ECM can shorten its life.

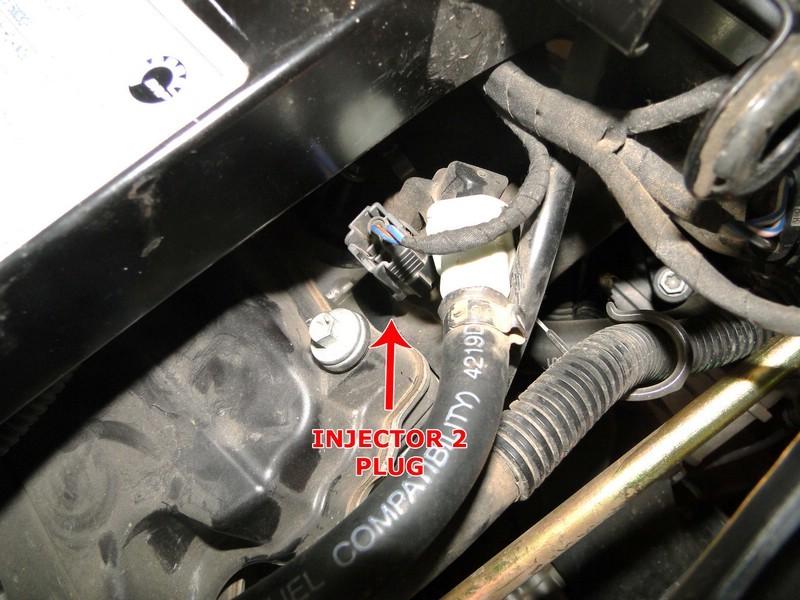
6 2-1: Starting with Harness A 1) The first connector is a black 12 pin that goes to the Tune Monster. 2) Next is the white 6 pin killswitch connector. Stock Killswitch connector is located in front handle bars on the bracket above the stock ECM. Its the first connector on the left, while sitting on the machine. 3) Next is a black 2 pin connector for the crank sensor. This is located on the right side, just in front of the airbox, below the gear shifter. 4) Next is the grey 2 pin Injector #1 connectors. Located on the end of the intake, on top of the front cylinder. 5) Next are both the MAPTS and TPS at the same branch. The TPS is the black 3 pin connector located in the throttle body. The MAPTS is the flat black 4 pin connector located on the side of the intake. 6) Next is the grey 2 pin Injector #2 connectors. Located on the end of the intake, on top of the rear cylinder. 7) The last connector is the black 2 pin coolant sensor. This is located on the rear cylinder head on the left side.

7 2-2 : Next is the B harness 1) The 12 pin grey connector goes to the Expansion (B) plug of the ECM. 2) The long ground wire, with the eyelet / ring terminal needs to be grounded to the engine block. Connect to the stock engine ground location behind the right engine side cover, between the cylinders. Or with a new bolt, connect it at the front of the engine block, in front of the oil filter cover and above the front drive shaft. There are 2 or 3 empty holes here. You can also remove any block bolt and install. It just needs to be a good connection to the engine block. (not cylinder head or cylinder as these are insulated with gaskets). It must be engine block or direct to battery negative. Clean the block with sand paper before connecting the new ground wire. 3) You are done installing the Tune Monster ECM. Mount ECM, Ignition Module & new fan relay anywhere you want. (With the exception of allowing any unit to be mounted where it could overheat from hot sources like the exhaust and do not mount the ignition module to the stock ignition coil) Secure with tie wraps or electrical tape.

 Pin 2 = O2 Sensor 2 input (blue wire) Pin 3 = Supplied Wideband Controller Ground (brown or grey) You must use the supplied ground to avoid")
8 2-3: Exhaust Sensors (O2 / Oxygen) The grey 3 pin connector out of harness B connects directly to the Monster Wideband. Optionally it can connect to any 5v analog wideband controller output. If using the Monster Wideband, just connect it. If using a different controller, follow the following pin outs and use the supplied universal jumper harness. Pin 1 = O2 Sensor 1 input (white wire) Pin 2 = O2 Sensor 2 input (blue wire) Pin 3 = Supplied Wideband Controller Ground (brown or grey) You must use the supplied ground to avoid ground offsets and inaccurate sensor readings. If using 2 controllers for 2 sensors the controllers must be the same / provide the exact same volts per AFR specification. Monster Wideband
. This relay MUST be used from now on.")
 Plug 1 pin connector to Harness B 3) Plug 2 Pin connectors inline with Cooling Fan.")
9 2-4: Monster Ports Expansion 1) Replace stock fan relay with new one supplied. (top left relay & shown on fuse box lid). This relay MUST be used from now on. This relay is in normally closed operation. 2) Plug 1 pin connector to Harness B 3) Plug 2 Pin connectors inline with Cooling Fan. 4) Install new fan relay to harness and mount anywhere convenient.
 Pin 3 = Triggered Input (green wire) 2-6: Monster Spark Expansion 1) Plug")
 Plug the single 3 pin connector into harness B.")
10 2-5: Spare Port Input / Output harness Pin 1 = Relay #1 output (yellow wire) Pin 2 = Relay #2 output (orange wire) Pin 3 = Triggered Input (green wire) 2-6: Monster Spark Expansion 1) Plug the 3 pin connectors inline with the ignition coil. 2) Plug the single 3 pin connector into harness B. 3) Plug the grey 8 pin connector to the ignition module and mount anywhere convenient.

11 Section 4: Stock Component Location Guide Killswitch Crank Sensor


12 Injector 1 TPS

13 MAPTS Injector 2


14 CTS (Coolant Sensor) Stock Engine Ground


15 Optional Engine Ground Cooling Fan


16 Stock Fan Relay Ignition Coil

17 Accessory / Winch Power
2011 Yamaha Apex Snowmobile
 PARTS LIST 2011 Yamaha Apex Snowmobile Installation Instructions quantity description 1 power commander 1 USB cable 1 cd-rom 1 installation guide 2 power commander decals 2 dynojet decals 2 velcro strip
2009 Yamaha Apex Snowmobile
 PARTS LIST 2009 Yamaha Apex Snowmobile Installation Instructions quantity description 1 power commander 1 USB cable 1 cd-rom 1 installation guide 2 power commander decals 2 dynojet decals 2 velcro strip
PLEASE READ ALL DIRECTIONS BEFORE STARTING INSTALLATION
 PARTS LIST 2013-2014 Honda CB500 / CBR500R Installation Instructions 1 Power Commander 1 USB Cable 1 Installation Guide 2 Power Commander Decals 2 Dynojet Decals 2 Velcro strips 1 Alcohol swab 1 Posi-tap
PLEASE READ ALL DIRECTIONS BEFORE STARTING INSTALLATION
 FUEL AND IGNITION 2011-2013 Suzuki Kingquad 400 Installation Instructions PARTS LIST 1 Power Commander 1 USB Cable 1 CD-ROM 1 Installation Guide 2 Power Commander Decals 2 Dynojet Decals 2 Velcro Strips
PLEASE READ ALL DIRECTIONS BEFORE STARTING INSTALLATION
 PARTS LIST 2014 SeaDoo Spark Installation Instructions 1 Power Commander Module 1 PCV Wiring Harness 1 USB Cable 1 Installation Guide 2 Power Commander Decals 2 Dynojet Decals 2 Dual Lock strips 1 Alcohol
PLEASE READ ALL DIRECTIONS BEFORE STARTING INSTALLATION
 PARTS LIST 2009 MV Agusta Brutale 1078 Installation Instructions 1 Power Commander 1 USB Cable 1 Installation Guide 2 Power Commander Decals 2 Dynojet Decals 2 Velcro strips 1 Alcohol swab 1 O2 Optimizer
PLEASE READ ALL DIRECTIONS BEFORE STARTING INSTALLATION
 PARTS LIST FUEL AND IGNITION 2002-2008 Honda VTX1800 models Installation Instructions 1 Power Commander 1 USB Cable 1 CD-ROM 1 Installation Guide 2 Power Commander Decals 2 Dynojet Decals 2 Velcro 1 Alcohol
PLEASE READ ALL DIRECTIONS BEFORE STARTING INSTALLATION
 PARTS LIST FUEL AND IGNITION 2017 Kawasaki Z125 Installation Instructions 1 Power Commander 1 USB Cable 1 Installation Guide 2 Power Commander Decals 2 Dynojet Decals 2 Velcro strips 1 Alcohol swab 1 Posi-tap
PLEASE READ ALL DIRECTIONS BEFORE STARTING INSTALLATION
 PARTS LIST 2010-2012 MV Agusta Brutale 1090 Installation Instructions 1 Power Commander 1 USB Cable 1 Installation Guide 2 Power Commander Decals 2 Dynojet Decals 2 Velcro strips 1 Dual Lock strip 1 Alcohol
PLEASE READ ALL DIRECTIONS BEFORE STARTING INSTALLATION
 PARTS LIST 2010-2011 MotoGuzzi V7 Installation Instructions 1 Power Commander 1 USB Cable 1 CD-ROM 1 Installation Guide 2 Power Commander Decals 2 Dynojet Decals 1 O2 optimizer 2 Velcro 1 Alcohol swab
Arctic Cat M8, M1000, F8, and F1000 Snowmobiles
 PARTS LIST 2009-2010 Arctic Cat M8, M1000, F8, and F1000 Snowmobiles Installation Instructions quantity description 1 power commander 1 USB A to mini B cable 1 cd-rom 1 installation guide 2 power commander
PLEASE READ ALL DIRECTIONS BEFORE STARTING INSTALLATION
 PARTS LIST FUEL AND IGNITION 2015 Kawasaki VN1700 Models Installation Instructions 1 Power Commander 1 USB Cable 1 Installation Guide 2 Power Commander Decals 2 Dynojet Decals 2 Velcro strips 1 Alcohol
PLEASE READ ALL DIRECTIONS BEFORE STARTING INSTALLATION
 2006-2011 Kawasaki EX650 / ER6n / Versys Installation Instructions PARTS LIST 1 Power Commander 1 USB Cable 1 Installation Guide 2 Power Commander Decals 2 Dynojet Decals 2 Velcro strips 1 Alcohol swab
PLEASE READ ALL DIRECTIONS BEFORE STARTING INSTALLATION
 PARTS LIST FUEL and IGNITION 2016-2018 Honda Pioneer 1000 Installation Instructions 1 Power Commander 1 USB Cable 1 Installation Guide 2 Power Commander Decals 2 Dynojet Decals 2 Velcro strips 1 Alcohol
PLEASE READ ALL DIRECTIONS BEFORE STARTING INSTALLATION
 PARTS LIST 2009-2010 Suzuki M109R / C109R I n s t a l l a t i o n I n s t r u c t i o n s 1 Power Commander 1 USB Cable 1 CD-ROM 1 Installation Guide 2 Power Commander Decals 2 Dynojet Decals 2 Velcro
PLEASE READ ALL DIRECTIONS BEFORE STARTING INSTALLATION
 PARTS LIST 2006-2014 Suzuki M109R / C109R Installation Instructions 1 Power Commander 1 USB Cable 1 Installation Guide 2 Power Commander Decals 2 Dynojet Decals 2 Velcro strips 1 Alcohol swab 1 Zip tie
PLEASE READ ALL DIRECTIONS BEFORE STARTING INSTALLATION
 PARTS LIST 2006-2008 MotoGuzzi Griso 1100 I n s t a l l a t i o n I n s t r u c t i o n s 1 Power Commander 1 USB Cable 1 CD-ROM 1 Installation Guide 2 Power Commander Decals 2 Dynojet Decals 1 O2 optimizer
PLEASE READ ALL DIRECTIONS BEFORE STARTING INSTALLATION
 PARTS LIST 2015 BMW S1000RR Installation Instructions 1 Power Commander 1 USB Cable 1 CD-ROM 1 Installation Guide 2 Power Commander Decals 2 Dynojet Decals 2 Velcro 1 Alcohol swab 2 Posi-taps THE IGNITION
PLEASE READ ALL DIRECTIONS BEFORE STARTING INSTALLATION
 PARTS LIST FUEL AND IGNITION 2014-2015 Yamaha Bolt 950 Installation Instructions 1 Power Commander 1 USB Cable 1 Installation Guide 2 Power Commander Decals 2 Dynojet Decals 2 Velcro strips 1 Alcohol swab
PLEASE READ ALL DIRECTIONS BEFORE STARTING INSTALLATION
 PARTS LIST 2007-2008 Suzuki GSXR1000 I n s t a l l a t i o n I n s t r u c t i o n s 1 Power Commander 1 USB Cable 1 CD-ROM 1 Installation Guide 2 Power Commander Decals 2 Dynojet Decals 2 Velcro 1 Alcohol
PLEASE READ ALL DIRECTIONS BEFORE STARTING INSTALLATION
 PARTS LIST 2010 MV Agusta Brutale 1090 Installation Instructions 1 Power Commander 1 USB Cable 1 CD-ROM 1 Installation Guide 2 Power Commander Decals 2 Dynojet Decals 2 Velcro 1 Dual Velcro 1 Alcohol swab
Ducati Monster Ducati Monster 796 (Euro Spec Only) Z-Fi QS Installation Instructions P/N S192S, S192R
 Z-Fi QS Installation Instructions P/N S192S, S192R") 2009-2011 Ducati Monster 696 2010-2012 Ducati Monster 796 (Euro Spec Only) Z-Fi QS Installation Instructions P/N S192S, S192R WARNING! USE ONLY IN RACE OR OTHER CLOSED COURSE APPLICATIONS AND NEVER ON
2009-2011 Ducati Monster 696 2010-2012 Ducati Monster 796 (Euro Spec Only) Z-Fi QS Installation Instructions P/N S192S, S192R WARNING! USE ONLY IN RACE OR OTHER CLOSED COURSE APPLICATIONS AND NEVER ON
PLEASE READ ALL DIRECTIONS BEFORE STARTING INSTALLATION
 PARTS LIST 2016-2017 Honda CRF1000L Installation Instructions 1 Power Commander 1 USB Cable 1 Installation Guide 2 Power Commander Decals 2 Dynojet Decals 2 Velcro strips 1 Alcohol Swab 2 Posi-taps 1 O2
PLEASE READ ALL DIRECTIONS BEFORE STARTING INSTALLATION
 PARTS LIST 2009-2011 Moto Guzzi Stelvio Installation Instructions 1 Power Commander 1 USB Cable 1 Installation Guide 2 Power Commander Decals 2 Dynojet Decals 1 O2 Optimizer 3 Velcro strips 1 Alcohol swab
PLEASE READ ALL DIRECTIONS BEFORE STARTING INSTALLATION
 PARTS LIST 2010-2012 Ducati Hypermotard 1100 EVO Installation Instructions 1 Power Commander 1 USB Cable 1 Installation Guide 2 Power Commander Decals 2 Dynojet Decals 2 Velcro strips 1 Alcohol swab 4
PLEASE READ ALL DIRECTIONS BEFORE STARTING INSTALLATION
 PARTS LIST 2016-2017 Triumph T120 2017 Bobber Installation Instructions 1 Power Commander 1 USB Cable 1 Installation Guide 2 Power Commander Decals 2 Dynojet Decals 2 Velcro 1 Alcohol swab 2 O2 Optimizers
PLEASE READ ALL DIRECTIONS BEFORE STARTING INSTALLATION
 PARTS LIST 2009-2010 MotoGuzzi Stelvio I n s t a l l a t i o n I n s t r u c t i o n s 1 Power Commander 1 USB Cable 1 CD-ROM 1 Installation Guide 2 Power Commander Decals 2 Dynojet Decals 1 O2 optimizer
PLEASE READ ALL DIRECTIONS BEFORE STARTING INSTALLATION
 PARTS LIST 2015 Yamaha FJ-09 Installation Instructions 1 Power Commander 1 USB Cable 1 Installation Guide 2 Power Commander Decals 2 Dynojet Decals 3 Velcro strips 1 Alcohol swab 1 Posi-tap 1 O2 Optimizer
PLEASE READ ALL DIRECTIONS BEFORE STARTING INSTALLATION
 PARTS LIST 2012 Honda CBR1000RR Installation Instructions 1 Power Commander 1 USB Cable 1 CD-ROM 1 Installation Guide 2 Power Commander Decals 2 Dynojet Decals 2 Velcro 1 Alcohol swab 1 O2 Optimizer THE
Please read ALL directions before starting installation
 Parts List 2009 Honda CB1000R I n s t a l l a t i o n I n s t r u c t i o n s 1 Power Commander 1 USB Cable 1 CD-ROM 1 Installation Guide 2 Power Commander Decals 2 Dynojet Decals 2 Velcro 1 Alcohol swab
PLEASE READ ALL DIRECTIONS BEFORE STARTING INSTALLATION
 PARTS LIST 2015-2017 Ducati Scrambler Installation Instructions 1 Power Commander 1 USB Cable 1 Installation Guide 2 Power Commander Decals 2 Dynojet Decals 2 Velcro strips 1 Alcohol swab 1 Posi-tap THE
PLEASE READ ALL DIRECTIONS BEFORE STARTING INSTALLATION
 PARTS LIST 2015 Ducati Scrambler Installation Instructions 1 Power Commander 1 USB Cable 1 Installation Guide 2 Power Commander Decals 2 Dynojet Decals 2 Velcro strips 1 Alcohol swab 1 Posi-tap THE IGNITION
PLEASE READ ALL DIRECTIONS BEFORE STARTING INSTALLATION
 2014-2016 Yamaha FZ-09 / MT-09 2015-2016 Yamaha FJ-09 Installation Instructions PARTS LIST 1 Ignition Module 1 Installation Guide 2 Velcro strips 1 Alcohol swab 1 CAN link cable 1 USB cable THE VEHICLE
PLEASE READ ALL DIRECTIONS BEFORE STARTING INSTALLATION
 PARTS LIST 2014 Kawasaki Z1000 Installation Instructions 1 Power Commander 1 USB Cable 1 Installation Guide 2 Power Commander Decals 2 Dynojet Decals 2 Velcro strips 1 Alcohol swab THE IGNITION MUST BE
PLEASE READ ALL DIRECTIONS BEFORE STARTING INSTALLATION
 PARTS LIST 2017 Victory 106 Models Installation Instructions 1 Power Commander 1 USB Cable 1 Installation Guide 2 Power Commander Decals 2 Dynojet Decals 2 Velcro strips 1 Alcohol swab 2 O2 Optimizers
Honda CBR600RR
 Parts List 2007-2012 Honda CBR600RR Installation Instructions 1 Power Commander 1 USB Cable 1 CD-ROM 1 Installation Guide 2 Power Commander Decals 2 Dynojet Decals 2 Velcro Strip 1 Alcohol Swab The ignition
PLEASE READ ALL DIRECTIONS BEFORE STARTING INSTALLATION
 PARTS LIST 2012-2015 Can-Am Renegade 500/800/1000 Installation Instructions 1 Power Commander 1 USB Cable 1 Installation Guide 2 Power Commander Decals 2 Dynojet Decals 2 Velcro strips 1 Alcohol swab THE
PLEASE READ ALL DIRECTIONS BEFORE STARTING INSTALLATION
 PARTS LIST 2011-2013 Kawasaki ZX-10R Installation Instructions 1 Power Commander 1 USB Cable 1 CD-ROM 1 Installation Guide 2 Power Commander Decals 2 Dynojet Decals 2 Velcro 1 Alcohol swab 1 Posi-tap THE
PLEASE READ ALL DIRECTIONS BEFORE STARTING INSTALLATION
 PARTS LIST 2013 Honda CBR600RR Installation Instructions 1 Power Commander 1 USB Cable 1 CD-ROM 1 Installation Guide 2 Power Commander Decals 2 Dynojet Decals 2 Velcro 1 Alcohol swab 1 O2 Optimizer THE
PLEASE READ ALL DIRECTIONS BEFORE STARTING INSTALLATION
 PARTS LIST 2006-2011 Yamaha MT-03 Installation Instructions 1 Power Commander 1 USB Cable 1 Installation Guide 2 Power Commander Decals 2 Dynojet Decals 2 Velcro strips 1 Alcohol swab 1 O2 Optimizer THE
PLEASE READ ALL DIRECTIONS BEFORE STARTING INSTALLATION
 PARTS LIST FUEL and IGNITION 2016 Yamaha Wolverine Installation Instructions 1 Power Commander 1 USB Cable 1 Installation Guide 2 Power Commander Decals 2 Dynojet Decals 2 Velcro strips 1 Alcohol swab
PLEASE READ ALL DIRECTIONS BEFORE STARTING INSTALLATION
 PARTS LIST FUEL AND IGNITION 2010-2013 Honda VT1300 models Installation Instructions 1 Power Commander 1 USB Cable 1 CD-ROM 1 Installation Guide 2 Power Commander Decals 2 Dynojet Decals 2 Velcro 1 Alcohol
PLEASE READ ALL DIRECTIONS BEFORE STARTING INSTALLATION
 PARTS LIST FUEL AND IGNITION 2010-2012 Ducati Multistrada 1200 Installation Instructions 1 Power Commander 1 USB Cable 1 Installation Guide 2 Power Commander Decals 2 Dynojet Decals 2 Velcro strips 1 Alcohol
PLEASE READ ALL DIRECTIONS BEFORE STARTING INSTALLATION
 PARTS LIST 2016 Suzuki GSX-S1000 Installation Instructions 1 Power Commander 1 USB Cable 1 Installation Guide 2 Power Commander Decals 2 Dynojet Decals 2 Velcro strips 1 Alcohol swab 1 O2 Optimizer THE
PLEASE READ ALL DIRECTIONS BEFORE STARTING INSTALLATION
 2014-2016 Yamaha Viper 2014-2016 Arctic Cat 7000 Installation Instructions PARTS LIST 1 Ignition Module 1 Installation Guide 2 Velcro strips 1 Alcohol swab 1 CAN link cable 1 USB cable THE VEHICLE S IGNITION
PLEASE READ ALL DIRECTIONS BEFORE STARTING INSTALLATION
 PARTS LIST 2012 Triumph Bonneville / T100 / Thruxton Installation Instructions 1 Power Commander 1 USB Cable 1 CD-ROM 1 Installation Guide 2 Power Commander Decals 2 Dynojet Decals 2 Velcro 1 Alcohol swab
PLEASE READ ALL DIRECTIONS BEFORE STARTING INSTALLATION
 PARTS LIST FUEL AND IGNITION 2012 Polaris RZR 570 Installation Instructions 1 Power Commander 1 USB Cable 1 CD-ROM 1 Installation Guide 2 Power Commander Decals 2 Dynojet Decals 2 Velcro 1 Alcohol swab
PLEASE READ ALL DIRECTIONS BEFORE STARTING INSTALLATION
 PARTS LIST 2008-2011 Yamaha TMax 500 Installation Instructions 1 Power Commander 1 USB Cable 1 Installation Guide 2 Power Commander Decals 2 Dynojet Decals 2 Velcro strips 1 Alcohol swab 1 O2 Optimizer
PLEASE READ ALL DIRECTIONS BEFORE STARTING INSTALLATION
 PARTS LIST 2008-2010 Polaris RZR 800 / S Installation Instructions 1 Power Commander 1 USB Cable 1 Installation Guide 2 Power Commander Decals 2 Dynojet Decals 2 Velcro strips 1 Alcohol swab 2 Zip ties
PLEASE READ ALL DIRECTIONS BEFORE STARTING INSTALLATION
 PARTS LIST 2009-2011 Ducati Streetfighter I n s t a l l a t i o n I n s t r u c t i o n s 1 Power Commander 1 USB Cable 1 CD-ROM 1 Installation Guide 2 Power Commander Decals 2 Dynojet Decals 2 Velcro
Harley Davidson Softail
 Parts List 2001-2006 Harley Davidson Softail Installation Instructions 1 Power Commander 1 USB Cable 1 CD-ROM 1 Installation Guide 2 Power Commander Decals 2 Dynojet Decals 3 Dual lock Velcro Strip 1 Zip
PLEASE READ ALL DIRECTIONS BEFORE STARTING INSTALLATION
 PARTS LIST 2012-2014 Honda CBR1000RR Installation Instructions 1 Power Commander 1 USB Cable 1 Installation Guide 2 Power Commander Decals 2 Dynojet Decals 2 Velcro strips 1 Alcohol swab 1 O2 Optimizer
PLEASE READ ALL DIRECTIONS BEFORE STARTING INSTALLATION
 PARTS LIST 2011-2013 KTM 690R Enduro Installation Instructions 1 Power Commander 1 USB Cable 1 Installation Guide 2 Power Commander Decals 2 Dynojet Decals 2 Velcro strips 1 Alcohol swab 3 Zip ties 1 O2
PLEASE READ ALL DIRECTIONS BEFORE STARTING INSTALLATION
 PARTS LIST 2007-2013 Arctic Cat 800cc and 1000cc Snowmobiles Installation Instructions 1 Power Commander 1 USB Cable 1 CD-ROM 1 Installation Guide 2 Power Commander Decals 2 Dynojet Decals 2 Velcro Strips
PLEASE READ ALL DIRECTIONS BEFORE STARTING INSTALLATION
 PARTS LIST 2010-2014 BMW S1000RR Installation Instructions 1 Power Commander 1 USB Cable 1 Installation Guide 2 Power Commander Decals 2 Dynojet Decals 2 Velcro strips 1 Alcohol swab 2 Posi-taps THE IGNITION
PLEASE READ ALL DIRECTIONS BEFORE STARTING INSTALLATION
 PARTS LIST 1998-2003 Suzuki TL1000R Installation Instructions 1 Power Commander 1 USB Cable 1 Installation Guide 2 Power Commander Decals 2 Dynojet Decals 2 Velcro strips 1 Alcohol swab THE IGNITION MUST
Please read ALL directions before starting installation
 Parts List 2009 Victory Vision I n s t a l l a t i o n I n s t r u c t i o n s 1 Power Commander 1 USB Cable 1 CD-ROM 1 Installation Guide 2 Power Commander Decals 2 Dynojet Decals 2 Velcro 1 Alcohol swab
PLEASE READ ALL DIRECTIONS BEFORE STARTING INSTALLATION
 PARTS LIST 2017 Kawasaki Z900 Installation Instructions 1 Power Commander 1 USB Cable 1 Installation Guide 2 Power Commander Decals 2 Dynojet Decals 2 Velcro strips 1 Alcohol swab THE IGNITION MUST BE
PLEASE READ ALL DIRECTIONS BEFORE STARTING INSTALLATION
 PARTS LIST FUEL AND IGNITION 2014 Suzuki GW250 Installation Instructions 1 Power Commander 1 USB Cable 1 CD-ROM 1 Installation Guide 2 Power Commander Decals 2 Dynojet Decals 2 Velcro strips 1 Alcohol
PLEASE READ ALL DIRECTIONS BEFORE STARTING INSTALLATION
 PARTS LIST 2005-2006 Kawasaki ZX-6R (636cc) & ZX-6RR (600cc) Installation Instructions 1 Power Commander 1 USB Cable 1 CD-ROM 1 Installation Guide 2 Power Commander Decals 2 Dynojet Decals 2 Velcro 1 Alcohol
2009 Yamaha YFZ450R. Parts List
 Parts List 2009 Yamaha YFZ450R Installation Instructions 1 Power Commander 1 USB Cable 1 CD-ROM 1 Installation Guide 2 Power Commander Decals 2 Dynojet Decals 2 Velcro 1 Alcohol swab The ignition MUST
PLEASE READ ALL DIRECTIONS BEFORE STARTING INSTALLATION
 PARTS LIST FUEL AND IGNITION 2006-2014 Yamaha Raptor 700 Installation Instructions 1 Power Commander 1 USB Cable 1 Installation Guide 2 Power Commander Decals 2 Dynojet Decals 1 Alcohol swab 2 Velcro strips
PLEASE READ ALL DIRECTIONS BEFORE STARTING INSTALLATION
 PARTS LIST 2010-2011 Aprilia RSV4 Installation Instructions 1 Power Commander 1 USB Cable 1 Installation Guide 2 Power Commander Decals 2 Dynojet Decals 2 Velcro strips 1 Alcohol swab 2 Posi-taps 1 Secondary
PLEASE READ ALL DIRECTIONS BEFORE STARTING INSTALLATION
 PARTS LIST FUEL AND IGNITION 2008-2011 Kawasaki Brute Force 750 Installation Instructions 1 Power Commander 1 USB Cable 1 CD-ROM 1 Installation Guide 2 Power Commander Decals 2 Dynojet Decals 2 Velcro
PLEASE READ ALL DIRECTIONS BEFORE STARTING INSTALLATION
 PARTS LIST FUEL AND IGNITION 2012 Kawasaki EX650 / ER6n / Versys Installation Instructions 1 Power Commander 1 USB Cable 1 CD-ROM 1 Installation Guide 2 Power Commander Decals 2 Dynojet Decals 2 Velcro
PLEASE READ ALL DIRECTIONS BEFORE STARTING INSTALLATION
 PARTS LIST FUEL AND IGNITION 2011-2012 CanAm Spyder RT/RTS Installation Instructions 1 Power Commander 1 USB Cable 1 CD-ROM 1 Installation Guide 2 Power Commander Decals 2 Dynojet Decals 1 O2 optimizer
PLEASE READ ALL DIRECTIONS BEFORE STARTING INSTALLATION
 PARTS LIST 2014 BMW R ninet Installation Instructions 1 Power Commander 1 USB Cable 1 Installation Guide 2 Power Commander Decals 2 Dynojet Decals 2 Velcro strips 1 Alcohol swab THE IGNITION MUST BE TURNED
WARNING! USE ONLY IN RACE OR OTHER CLOSED COURSE APPLICATIONS AND NEVER ON PUBLIC ROADS
 2010-2013 Ducati Multistrada 1200 Z-Fi INSTALLATION INSTRUCTIONS P/N F182 WARNING! USE ONLY IN RACE OR OTHER CLOSED COURSE APPLICATIONS AND NEVER ON PUBLIC ROADS Z-Fi products do not meet California CARB
PLEASE READ ALL DIRECTIONS BEFORE STARTING INSTALLATION
 PARTS LIST 2008-2013 Yamaha XJR1300 Installation Instructions 1 Power Commander 1 USB Cable 1 Installation Guide 2 Power Commander Decals 2 Dynojet Decals 3 Velcro 1 Alcohol swab 1 O2 Optimizer 1 Posi-tap
PLEASE READ ALL DIRECTIONS BEFORE STARTING INSTALLATION
 PARTS LIST FUEL AND IGNITION 2017-2018 Husqvarna 701SM Installation Instructions 1 Power Commander 1 USB Cable 1 Installation Guide 2 Power Commander Decals 2 Dynojet Decals 2 Velcro strips 1 Alcohol swab
SUZUKI SV
 SUZUKI SV650 2007-2011 Z-Fi Installation Instructions Part # F640 May result in the activation of the FI light (indicating injector fault) but does NOT cause actual running issues Parts List: Z-Fi Control
PLEASE READ ALL DIRECTIONS BEFORE STARTING INSTALLATION
 PARTS LIST FUEL AND IGNITION 2008-2011 Yamaha TMax 500 Installation Instructions 1 Power Commander 1 USB Cable 1 Installation Guide 2 Power Commander Decals 2 Dynojet Decals 2 Velcro strips 1 Alcohol swab
PLEASE READ ALL DIRECTIONS BEFORE STARTING INSTALLATION
 PARTS LIST FUEL and IGNITION 2015-2018 Honda Pioneer 500 Installation Instructions 1 Power Commander 1 USB Cable 1 Installation Guide 2 Power Commander Decals 2 Dynojet Decals 2 Velcro strips 1 Alcohol
PLEASE READ ALL DIRECTIONS BEFORE STARTING INSTALLATION
 PARTS LIST 2004-2007 Honda CBR1000RR I n s t a l l a t i o n I n s t r u c t i o n s 1 Power Commander 1 USB Cable 1 CD-ROM 1 Installation Guide 2 Power Commander Decals 2 Dynojet Decals 2 Velcro 1 Alcohol
PLEASE READ ALL DIRECTIONS BEFORE STARTING INSTALLATION
 PARTS LIST FUEL AND IGNITION 2014 Yamaha Grizzly 700 Installation Instructions 1 Power Commander 1 USB Cable 1 Installation Guide 2 Power Commander Decals 2 Dynojet Decals 2 Velcro strips 1 Alcohol swab
PLEASE READ ALL DIRECTIONS BEFORE STARTING INSTALLATION
 PARTS LIST FUEL AND IGNITION 2008-2013 Arctic Cat Thundercat 1000 / XT Installation Instructions 1 Power Commander 1 USB Cable 1 CD-ROM 1 Installation Guide 2 Power Commander Decals 2 Dynojet Decals 2
PLEASE READ ALL DIRECTIONS BEFORE STARTING INSTALLATION
 PARTS LIST 2012 Honda Crosstourer Installation Instructions 1 Power Commander 1 USB Cable 1 CD-ROM 1 Installation Guide 2 Power Commander Decals 2 Dynojet Decals 2 Velcro 1 Alcohol swab 2 O2 Optimizer
PLEASE READ ALL DIRECTIONS BEFORE STARTING INSTALLATION
 PARTS LIST 2009-2014 Yamaha YFZ450 R/X Installation Instructions 1 Power Commander 1 USB Cable 1 Installation Guide 2 Power Commander Decals 2 Dynojet Decals 2 Velcro strips 1 Alcohol swab THE IGNITION
PLEASE READ ALL DIRECTIONS BEFORE STARTING INSTALLATION
 2010-2014 BMW S1000RR 2014-2015 BMW S1000R Installation Instructions PARTS LIST 1 Ignition Module 1 Installation Guide 2 Velcro strips 1 Alcohol swab 1 CAN link cable 1 USB cable THE VEHICLE S IGNITION
PLEASE READ ALL DIRECTIONS BEFORE STARTING INSTALLATION
 PARTS LIST FUEL AND IGNITION 2017 Victory Octane Installation Instructions 1 Power Commander 1 USB Cable 1 Installation Guide 2 Power Commander Decals 2 Dynojet Decals 2 Velcro strips 1 Alcohol swab 2
SUZUKI SV
 SUZUKI SV650 2007-2011 Z-Fi QS (Quickshift) / Z-Fi TC (Traction Control) Installation Instructions Part # T640 May result in the activation of the FI light (indicating injector fault) but does NOT cause
Dynojet Research 2191 Mendenhall Drive North Las Vegas, NV (800)
") 007 Ducati 098 I n s ta l l a t i o n I n s t r u c t i o n s Parts List Power Commander CD-ROM Button Adjustment Display USB Cable Installation Guide Power Adapter Wire Tap Power Commander Decals Dynojet
007 Ducati 098 I n s ta l l a t i o n I n s t r u c t i o n s Parts List Power Commander CD-ROM Button Adjustment Display USB Cable Installation Guide Power Adapter Wire Tap Power Commander Decals Dynojet
Honda ST1300 Z-Fi Installation Instructions P/N F351
 2002-2012 Honda ST1300 Z-Fi Installation Instructions P/N F351 WARNING! USE ONLY IN RACE OR OTHER CLOSED COURSE APPLICATIONS AND NEVER ON PUBLIC ROADS Z-Fi products do not meet California CARB highway
Innovative Racing Electronics
 FOR IMMEDIATE RELEASE Contact: Dan Rudd Phone: 407.330.9727 FAX: 407.322.8632 E-Mail: sales@mpsracing.com Web: www.mpsracing.com Holley Commander 950 Universal 4 Cylinder Fuel Injection Kit Sanford, Florida,
2009 Harley Davidson Dyna Models
 Parts List 2009 Harley Davidson Dyna Models Installation Instructions 1 Power Commander 1 USB Cable 1 CD-ROM 1 Installation Guide 2 Power Commander Decals 2 Dynojet Decals 2 Velcro Strip 1 Alcohol Swab
PLEASE READ ALL DIRECTIONS BEFORE STARTING INSTALLATION
 PARTS LIST 2003-2006 Honda CBR600RR Installation Instructions 1 Power Commander 1 USB Cable 1 Installation Guide 2 Power Commander Decals 2 Dynojet Decals 2 Velcro strips 1 Alcohol swab THE IGNITION MUST
Ducati Monster Ducati Monster 796 (Euro Spec Only) Z-Fi Installation Instructions P/N F192
 Z-Fi Installation Instructions P/N F192") 2009-2013 Ducati Monster 696 2010-2013 Ducati Monster 796 (Euro Spec Only) Z-Fi Installation Instructions P/N F192 WARNING! USE ONLY IN RACE OR OTHER CLOSED COURSE APPLICATIONS AND NEVER ON PUBLIC ROADS
2009-2013 Ducati Monster 696 2010-2013 Ducati Monster 796 (Euro Spec Only) Z-Fi Installation Instructions P/N F192 WARNING! USE ONLY IN RACE OR OTHER CLOSED COURSE APPLICATIONS AND NEVER ON PUBLIC ROADS
PLEASE READ ALL DIRECTIONS BEFORE STARTING INSTALLATION
 PARTS LIST 2008-2011 Kawasaki VN2000 I n s t a l l a t i o n I n s t r u c t i o n s 1 Power Commander 1 USB Cable 1 CD-ROM 1 Installation Guide 2 Power Commander Decals 2 Dynojet Decals 2 Velcro 1 Alcohol
2011 KTM 690 Duke Z-Fi MX Installation Instructions P/N F580
 2011 KTM 690 Duke Z-Fi MX Installation Instructions P/N F580 WARNING! USE ONLY IN RACE OR OTHER CLOSED COURSE APPLICATIONS AND NEVER ON PUBLIC ROADS Parts List: Z-Fi MX Control Unit Fuel Harness Download
PLEASE READ ALL DIRECTIONS BEFORE STARTING INSTALLATION
 PARTS LIST FUEL AND IGNITION 2008-2017 Royal Enfield All EFI Models Installation Instructions 1 Power Commander 1 USB Cable 1 Installation Guide 2 Power Commander Decals 2 Dynojet Decals 1 Alcohol swab
PLEASE READ ALL DIRECTIONS BEFORE STARTING INSTALLATION
 PARTS LIST FUEL AND IGNITION 2008-2013 Arctic Cat Thundercat 1000 / XT Installation Instructions 1 Power Commander 1 USB Cable 1 Installation Guide 2 Power Commander Decals 2 Dynojet Decals 2 Velcro strips
INSTALLATION INSTRUCTIONS UNLEASH. THE SMARTEST PERFORMANCE TUNING TECHNOLOGY
 INSTALLATION INSTRUCTIONS R UNLEASH. THE SMARTEST PERFORMANCE TUNING TECHNOLOGY FUEL + QUICKSHIFT + TRACTION CONTROL MV AGUSTA F3 2013 BRUTALE 675 2013 T1641S, T1641R 1>READ WARNINGS > INSTALLING We strongly
TELORVEK III. WIRING INSTRUCTIONS FOR LT-40 LT-1 Fuel Injection System
 TELORVEK III WIRING INSTRUCTIONS FOR LT-40 LT-1 Fuel Injection System Page #1 Thank you for purchasing the absolute finest of wiring kits for the General Motors fuel injection. We have taken considerable
PLEASE READ ALL DIRECTIONS BEFORE STARTING INSTALLATION
 PARTS LIST 2007-2013 Yamaha Grizzly 700 Installation Instructions 1 Power Commander 1 USB Cable 1 Installation Guide 2 Power Commander Decals 2 Dynojet Decals 2 Velcro strips 1 Alcohol swab THE IGNITION
PLEASE READ ALL DIRECTIONS BEFORE STARTING INSTALLATION
 2002-2007 Suzuki Hayabusa Installation Instructions PARTS LIST 1 Ignition Module 1 Installation Guide 2 Velcro strips 1 Alcohol swab 1 CAN link cable 1 USB cable 1 Posi-tap THE VEHICLE S IGNITION MUST
PLEASE READ ALL DIRECTIONS BEFORE STARTING INSTALLATION
 PARTS LIST FUEL and IGNITION 2014 Yamaha Viking 700 Installation Instructions 1 Power Commander 1 USB Cable 1 Installation Guide 2 Power Commander Decals 2 Dynojet Decals 2 Velcro strips 1 Alcohol swab
PLEASE READ ALL DIRECTIONS BEFORE STARTING INSTALLATION
 PARTS LIST 2018 Honda CRF1000L Installation Instructions 1 Power Commander 1 USB Cable 1 Installation Guide 2 Power Commander Decals 2 Dynojet Decals 2 Velcro strips 1 Alcohol Swab 2 Posi-taps THE IGNITION
Instruction Manual P/N B Series COP Conversion Kit
 Instruction Manual P/N 30-2860 B Series COP Conversion Kit KIT CONTENTS 1 x 35-2840 IGNITER W/ BRACKET 1 x 30-3255 HONDA EPM 4 x 30-2850 COIL 1 x 35-3860 B SERIES COP HARNESS 1 x 35-3861 EPM HARNESS 2
PIMP Ford 5.0 Harness Installation Manual. Part Number: PM-75
 PIMP Ford 5.0 Harness Installation Manual Part Number: PM-75 Ron Francis Wiring 200 Keystone Rd Suite 1 Chester, PA 19013 800-292-1940 www.ronfrancis.com Pre-Installation Notes: This system is designed
MALLORY FIRESTORM CD MULTI COIL HARDWARE INSTALLATION - PN 69050S / 69050R
 FORM 69050S/R MALLORY FIRESTORM CD MULTI COIL HARDWARE INSTALLATION - PN 69050S / 69050R To ensure you are using the most current instruction sheet, please visit www.malloryfirestorm.com. CAUTION! The