MSD 6AL Ignition Module w/ Rev Control - Installation Instructions
|
|
|
- Amberlynn Lambert
- 5 years ago
- Views:
Transcription

1 MSD 6AL Ignition Module w/ Rev Control - Installation Instructions The below installation instructions work for the following products: MSD 6AL Ignition Module w/ Rev Control Please read through the instructions carefully before starting this project. Take the time to get all the materials together as well as all the safety equipment. Overview: The MSD 6AL ignition box is a good way to gain a few horsepower and improve fuel economy, as well as throttle response. Estimated installation time 3-4 hours. Tools needed: Phillips screwdriver Standard screwdriver ½ box wrench (to remove battery cables) Electrical tape Zip ties Mounting hardware Wire loom tubing 6-8 feet *If you re mounting box more than a few feet from the coil, you will need these supplies to extend wiring Wire strippers 4 feet 10 gauge black 4 feet 10 gauge red 8 feet 16 gauge black 8 feet 16 gauge red Wire crimp connectors (10 gauge-18 gauge)

2 Installation: 1. It is a good idea to hook up the box and make sure everything works FIRST, before you mount it and splice any wires. Before starting work, remove negative battery cable first, and then remove positive cable. 2. Your box needs to be mounted in a place that is away from extreme heat and liquids. The most common places are in the glove box, down by the ecu, or (if you have relocated your battery to the trunk) where the battery would go. 3. With my car s engine compartment layout, it was hard to find a place to mount the box since I have not relocated my battery and I don t want to lose glove box space. I decided to mount the box right under the air intake pipe of my BBK cold air intake. 4. Since this position is close to my headers, I decided to wrap the box with heat insulation wrap to protect it from the heat. Doing so will greatly extend the life of the part. 5. First, I made mounting brackets. They are just simple pieces of steel that I bent into shape and drilled to make an easy bracket to hold my ignition box. Or you can also purchase mounting plates online for around $30-40.


3 6. To access to the mounting location, it was necessary to remove the lower intake pipe and filter assembly.
 when mounting the box. 11.")
4 7. After positioning the metal brackets to the correct angles (angling the box at about a 45 angle) I used a magic marker to mark where to drill my holes. 8. Next drill holes in the marked locations. 9. Using a ¼ x1 nut and bolt set, secure the brackets to the sheetmetal into the new holes 10. Don t forget to use the black rubber vibrations dampeners (supplied) when mounting the box. 11. Replace the air intake pipe and filter 12. I only had about a ¼ gap between the air intake piping and the MSD box, so I used a small piece of rubber to keep them from rubbing and scratching one another. 13. With the box in place and mounted, now it s time to wire it up. 14. First you must cut the connectors that are already attached to the supplied wiring. 15. The supplied wiring isn t very long, so I added about 4 feet to each wire 16. When you add length to the wiring, you must use a higher gauge wire to extend it (10 gauge for battery wires, and 16 gauge for the rest) 17. Next I lengthened each wire by 4 feet using the wire stripper and wire connectors (I only had red 16 gauge wire around so I used that and marked the ends with electricians tape so I would know which is which. Using the correct colored wire will make things much easier for you.)

 If possible, secure the new")
5 18. Once you have your lengthened wires, you will need to route all of the wires around to the coil and battery. 19. Next, take off the top radiator support brackets 20. Slip all the wires into a wire loom tube, and use electricians tape, or zip ties, to keep the wiring tight and secure in the tubing 21. Slide the tubing down in front of the radiator (there should be tubing there from the factory as well) If possible, secure the new tubing to the existing tubing so that it s not touching the radiator 22. Replace the radiator support brackets


6 23. There is an optional wiring harness available from MSD p/n 8874 that will plug straight into the coil and make this part much easier.
 26.")
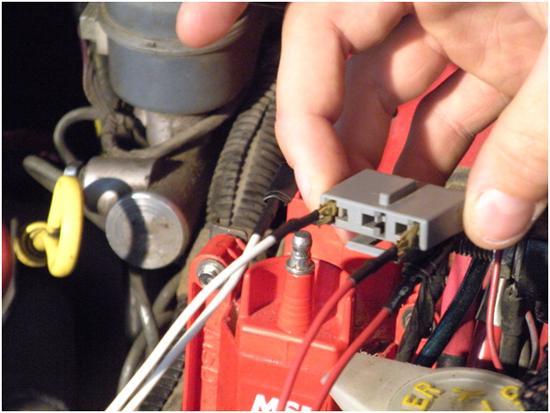
7 24. Next, you will need the 2 jumper connectors (supplied) 25. Unplug the connector from the coil, and insert the red jumper to the left (+) pin, and the white jumper to the right (-) pin. I used electricians tape to tape off the unused wire. (in the picture, look at the orientation of the plug to tell which pin is positive and negative) 26. The wires that were red and white coming out of the box connect here 27. The orange and black wires coming out of the box, will connect to the coil. 28. Orange wire connects to the left pin(+) in the coil. Black wire connects to the right pin(-) in the coil

8
 wire coming from the box to the battery. 33. Check all connections and make sure that no wires got damaged in the process. 34.")
9 29. Finally, connect your POSITIVE battery cable first. 30. Then connect the negative battery cable 31. Now you can connect the heavy 10 gauge Red (+) wire that is coming from the box to the battery. 32. Then you can connect the heavy 10 gauge black (-) wire coming from the box to the battery. 33. Check all connections and make sure that no wires got damaged in the process. 34. Now start up your mustang to make sure everything is working 35. If it doesn t run, check all wires and connections and make sure that you didn t mix up any of the sets of wires. The booklet included with your ignition has all the troubleshooting information you will need. 36. To set rev limiter, insert the jumper with desired RPM number into the side of box. Included jumpers were 3000, 6000, 7000, and Secure all loose wiring with zip ties, wire loom, and/ or electrical tape. 38. Enjoy your new horsepower and fuel economy!

10 Installation: Optional Theft Deterrent: 1. The MSD 6AL comes with a theft deterrent feature that lets you flip a switch, and won t let the car start. 2. Plug in the short Purple/green wiring into the magnetic pickup socket 3. Using any regular toggle switch, connect the purple wire to the switch, and connect the switch to ground. 4. When the purple wire is grounded, the car will turn over, but not start

11 Installation instructions provided by AmericanMuscle customer Noah Baker Find more how-tos, instructions and videos at
Accel 300+ Ignition Control System (84-95) - Installation Instructions
 - Installation Instructions") Accel 300+ Ignition Control System (84-95) - Installation Instructions The below installation instructions work for the following products: Accel 300+ Ignition Control System (84-95) Please read through
Accel 300+ Ignition Control System (84-95) - Installation Instructions The below installation instructions work for the following products: Accel 300+ Ignition Control System (84-95) Please read through
Mustang HID Headlight Installation Guide (9007)
") Mustang HID Headlight Installation Guide 1994-2004 (9007) The below installation instructions work for the following products: 9007 Bulb HID Headlight Coversion Kit 1994-2004 The following are a set of
Mustang HID Headlight Installation Guide 1994-2004 (9007) The below installation instructions work for the following products: 9007 Bulb HID Headlight Coversion Kit 1994-2004 The following are a set of
Mustang Headlight w/ CCFL Halo (05-09) - Installation Instructions
 - Installation Instructions") Mustang Headlight w/ CCFL Halo (05-09) - Installation Instructions The below installation instructions work for the following products: Chrome Mustang Headlight w/ CCFL Halo (05-09) Smoked Mustang Headlight
Mustang Headlight w/ CCFL Halo (05-09) - Installation Instructions The below installation instructions work for the following products: Chrome Mustang Headlight w/ CCFL Halo (05-09) Smoked Mustang Headlight
Dual Mustang Halo Projector Headlights - LED (99-04) - Installation Instructions
 - Installation Instructions") Dual Mustang Halo Projector Headlights - LED (99-04) - Installation Instructions The below installation instructions work for the following products: Black Dual Mustang Halo Projector Headlights - LED
Dual Mustang Halo Projector Headlights - LED (99-04) - Installation Instructions The below installation instructions work for the following products: Black Dual Mustang Halo Projector Headlights - LED
Professional Products Satin Upper Intake Plenum Installation Guide ( L 2V)
") Professional Products Satin Upper Intake Plenum Installation Guide (96-04 4.6L 2V) The below installation instructions work for the following products: Professional Products Satin Upper Intake Plenum (96-04
Professional Products Satin Upper Intake Plenum Installation Guide (96-04 4.6L 2V) The below installation instructions work for the following products: Professional Products Satin Upper Intake Plenum (96-04
Depress each tab as you pull the bezel off. The bezels are tight. L.H. shown.
 2013-2014 Ford Mustang V6 & Boss 302 Lower Valance Fog Light Kit Parts List: Quantity: Tool List: Fog light & bulb with bracket 2 Flat head & Phillips screwdriver Black bezels 2 Ratchet & Socket set OR
750 Paso Wiring Upgrade
 750 Paso Wiring Upgrade Supplies required: 2 Bosch 30A/12V Relays # #0 332 209 150 (with mounting tab) 1 30 Amp fuse holder 1 10 Amp fuse holder 12 inches of brown 12 gauge wire 60 inches of red 14 gauge
Installation Instructions
 Installation Instructions 4 PIN COIL OVER PLUG AEM EMS WITH CDI AND NO IGNITOR 2009 ATDSM 2 These instructions detail how to install a coil over plug (COP) setup on 1989-1999 Mitsubishi Eclipses, Eagle
Remove black panel shown. Save 6 retaining pins for re-install later. Pry up on center part of pin first. Then pry out entire retaining pin.
 2005-2009 Ford Mustang V6 Fog Light Wiring Kit Parts List: Quantity: Tools Required: Wiring harness 1 Flat head screwdriver Supplemental wire leads 2 Ratchet & Socket set OR Wire tap red 2 Adjustable Wrench
C&L Cold Air Intake (03-04 Mach 1) - Installation Instructions
 - Installation Instructions") C&L Cold Air Intake (03-04 Mach 1) - Installation Instructions The below installation instructions work for the following products: C&L Cold Air Intake (03-04 Mach 1) Please read through the instructions
C&L Cold Air Intake (03-04 Mach 1) - Installation Instructions The below installation instructions work for the following products: C&L Cold Air Intake (03-04 Mach 1) Please read through the instructions
Mustang One-Touch Convertible Top Module (2005+) - Installation Instructions
 - Installation Instructions") Mustang One-Touch Convertible Top Module (2005+) - Installation Instructions The below installation instructions work for the following products: Mustang One-Touch Convertible Top Module (2005+) Please
Mustang One-Touch Convertible Top Module (2005+) - Installation Instructions The below installation instructions work for the following products: Mustang One-Touch Convertible Top Module (2005+) Please
Irate Diesel Regulated Return install:
 Irate Diesel Regulated Return install: 1. Remove IC piping and intake Y. It may also be easier to remove the Downpipe and turbo to gain access to the back fittings. This will depend upon how much you want
SCT Mustang 4-Bank Eliminator Chip w/ Free Custom Tunes (88-04) - Installation Instructions
 - Installation Instructions") SCT Mustang 4-Bank Eliminator Chip w/ Free Custom Tunes (88-04) - Installation Instructions The below installation instructions work for the following products: SCT Mustang 4-Bank Eliminator Chip w/ Free
SCT Mustang 4-Bank Eliminator Chip w/ Free Custom Tunes (88-04) - Installation Instructions The below installation instructions work for the following products: SCT Mustang 4-Bank Eliminator Chip w/ Free
2015+ HELLCAT 6.2L HEMI System vehicle specific plate system xx
 These installation instructions will guide you through installing the Nitrous Outlet 2015+ Hellcat 6.2L Hemi Vehicle Specific Plate System on your vehicle. Before you get started, remember to never use
Ford Racing 4.6L 3V Crate Engine Control Pack
 Ford Racing 4.6L 3V Crate Engine Control Pack Installation Time: 3-6 hours on a Foxbody Mustang Tools Required: Basic English and Metric Socket and Wrench Set Flat and Phillips Screwdrivers Torx bits Hammer
IMPORTANT. Tools Needed: (depending upon vehicle) Phillips Screwdriver. Drill & Bit Set. Wire Stripper/ Crimp Tool
 Phillips Screwdriver. Drill & Bit Set. Wire Stripper/ Crimp Tool") Revision 3/14/05 Amplifier Installation Guide IMPORTANT Before starting, compare items on your invoice with items received. Carefully check through packaging material. If any item is missing, please call:
Revision 3/14/05 Amplifier Installation Guide IMPORTANT Before starting, compare items on your invoice with items received. Carefully check through packaging material. If any item is missing, please call:
80703 & Backside License Plate Mount for Jeep JK Wrangler (80707) & 10+ (80703)
 & 10+ (80703)") 80703 Backside Mount 80707 Backside Mount REQUIRED TOOLS 10mm SOCKET 13mm SOCKET 4mm HEX KEY WIRE CRIMPS WIRE STRIPPERS ELECTICAL TAPE SCREW DRIVER KIT CONTAINS BACKSIDE MOUNT LICENSE PLATE BRACKET WITH
80703 Backside Mount 80707 Backside Mount REQUIRED TOOLS 10mm SOCKET 13mm SOCKET 4mm HEX KEY WIRE CRIMPS WIRE STRIPPERS ELECTICAL TAPE SCREW DRIVER KIT CONTAINS BACKSIDE MOUNT LICENSE PLATE BRACKET WITH
Steeda Lightweight Tubular Radiator Support (05-09) - Installation Instructions
 - Installation Instructions") Steeda Lightweight Tubular Radiator Support (05-09) - Installation Instructions The below installation instructions work for the following products: Eibach Mustang Anti-Roll Kit (05-10) Please read through
Steeda Lightweight Tubular Radiator Support (05-09) - Installation Instructions The below installation instructions work for the following products: Eibach Mustang Anti-Roll Kit (05-10) Please read through
Mustang CDC Lightbar (94-04) - Installation Instructions
 - Installation Instructions") Mustang CDC Lightbar (94-04) - Installation Instructions The below installation instructions work for the following products: Classic Design Concepts Mustang Convertible Lightbar (94-04 Carbon Fiber) Classic
Mustang CDC Lightbar (94-04) - Installation Instructions The below installation instructions work for the following products: Classic Design Concepts Mustang Convertible Lightbar (94-04 Carbon Fiber) Classic
8G Brake Assembly Alignment
 8G Brake Assembly Alignment 8G (9-5250) This document explains how to do the 8G (9-5250) brake assembly alignment in order to eliminate noise in the drive system coming from the mis-aligned brake plates.
Air Conditioner for M915 A0/A1 Truck
 RD-2-4530-0 Air Conditioner for M915 A0/A1 Truck INSTALLATION INSTRUCTIONS Install refrigerant compressor per instructions provided with compressor mount kit. CAUTION: Edges of sheet metal can be sharp!
Installation Instructions
 Installation Instructions Jeep JK Unlimited (2007 Present) Mounting Bracket and Air Line System Kit for ARB On-Board Twin Air Compressor (CKMTA12) Made in the USA Kit Contents: 1 Bracket for ARB Compressor
INSTALLATION INSTRUCTIONS
 PART NO. 23100T PRODUCT DESCRIPTION: Front Winch Bumper, Center Section PRODUCT SAFETY & LEGAL DISCLAIMER IMPORTANT READ ALL INSTRUCTIONS CAREFULLY BEFORE INSTALLING, FAILURE TO DO SO MAY CAUSE PERSONAL
Backside License Plate Mount for Jeep JK Wrangler
 REQUIRED TOOLS 10mm SOCKET 13mm SOCKET 4mm HEX KEY WIRE CRIMPS WIRE STRIPPERS ELECTICAL TAPE SCREW DRIVER KIT CONTAINS BACKSIDE MOUNT LICENSE PLATE BRACKET WITH LEDS PLASTIC PASS-THROUGH GROMMET STAINLESS
Throttle Body Spacer (05-09 V6) - Installation Instructions
 - Installation Instructions") Throttle Body Spacer (05-09 V6) - Installation Instructions The below installation instructions work for the following products: Throttle Body Spacer (05-09 V6) Steeda 2005+ 4.0L V6 Intake Throttle Body
Throttle Body Spacer (05-09 V6) - Installation Instructions The below installation instructions work for the following products: Throttle Body Spacer (05-09 V6) Steeda 2005+ 4.0L V6 Intake Throttle Body
RANGER MIDSIZE WINCH KIT
 RANGER MIDSIZE WINCH KIT P/N 2881669 APPLICATION ALL MY RANGER 400; MY11 AND NEWER RANGER 500 EXCEPT CREW BEFORE YOU BEGIN Read these instructions thoroughly and make sure all parts and tools are accounted
INSTRUCTIONS. #82028 Diesel Nitrous System. Thank you for choosing ZEX products; we are proud to be your manufacturer of choice.
 1 INSTRUCTIONS #82028 Diesel Nitrous System Thank you for choosing ZEX products; we are proud to be your manufacturer of choice. Why our nitrous system is better: 2 Performance enthusiasts know the potential
FULL LENGTH HEADERS/ CATTED HEAD PIPES
 INSTALLATION INSTRUCTIONS INS232 2016-2018 CAMARO 6.2L V8 FULL LENGTH HEADERS/ CATTED HEAD PIPES Part #4044 and 40440 Special Tools required: 10mm, 12mm, 13mm, 15mm Socket and Wrenches, Pliers, Saw, Welder
2005 and 09 Mustang install instructions Sequential / Chase Unit Partial Plug-N-Play Kit Meter4it Eng. Updated: 3/28/09
 Updated: 3/28/09 Verify content of kit: 1- Unit with wiring harness 1- Red power wire with 15 amp fuse 1- Color instruction 2- Velcro for mounting 1-Driver taillight harness 1- Passenger taillight harness
Remove the 3-11mm nuts holding mirror on. Don t drop the nuts!
 2005-2012 Ford Mustang Puddle Lamp Kit Parts List: Quantity: Tool List: LED Lamps 2 Flat head screwdriver Seals 2 Ratchet & Socket set OR Nuts 2 Adjustable Wrench Wiring harness 1 Drill & 11/16 th bit
E31 HID Install for Euro Lights By: Faisal Ahmed
 E31 HID Install for Euro Lights By: Faisal Ahmed Parts Needed: H1 HID kit High Temp 9006 Light Socket set (Available at Auto Parts Store Thanks Laszlo) Spade Connectors set (Available at Auto parts store)
Installation of Auto Meter Cobalt Boost/Vacuum Gauge:
 Installation of Auto Meter Cobalt Boost/Vacuum Gauge: Fitment: All 79-14 models. This installation was completed on a 2004 Mustang GT, and should be identical for all 1999-2004 model Mustangs. Time needed:
Splice-In Mustang MIL Eliminators (96-04 GT) - Installation Instructions
 - Installation Instructions") Splice-In Mustang MIL Eliminators (96-04 GT) - Installation Instructions The below installation instructions work for the following products: Splice-In Mustang MIL Eliminators (96-04 GT) Please read through
Splice-In Mustang MIL Eliminators (96-04 GT) - Installation Instructions The below installation instructions work for the following products: Splice-In Mustang MIL Eliminators (96-04 GT) Please read through
R-SE JK 4 DOOR Step Slider Install Instructions. *If any parts listed are missing or damages please call prior to install.
 R-SE JK 4 DOOR Step Slider Install Instructions Parts List: 1 Divers side slider assembly 1 Passenger side slider assembly 1 wiring harness 1 control box 2 spacers 2 LED lights (optional) 10 SS Button
INSTALLATION INSTRUCTIONS
 INSTALLATION INSTRUCTIONS Honda Dealer: Please give a copy of these instructions to your customer. PARTS LIST (15) (8) (12) (14) (13) (10) (11) (18) (17) (1) Accessory Application Publications No. TRX500FA/FGA
BSR Magic Box Digital ignition control for 4, 6, or 8 cylinder engines
 BSR BSR Magic Box Digital ignition control for 4, 6, or 8 cylinder engines Features Digital Advance The main feature of the Magic Box is the digital advance that replaces conventional weights and springs.
Procharger Stage II Intercooled Supercharger System (11-14 GT)
") Procharger Stage II Intercooled Supercharger System (11-14 GT) Installation Time: Approximately one day. Installed on 2012 Mustang GT 5.0/Manual Required Tools 3/8 Socket Set (Standard and Metric) 1/2
Procharger Stage II Intercooled Supercharger System (11-14 GT) Installation Time: Approximately one day. Installed on 2012 Mustang GT 5.0/Manual Required Tools 3/8 Socket Set (Standard and Metric) 1/2
OEM Cruise Control Installation in GMC/Chevy NBS trucks
 OEM Cruise Control Installation in 99-02 GMC/Chevy NBS trucks May 2008 ~ Rampage_Rick Having just installed factory cruise control in my 00 Sierra, I thought I d share the fun. I followed the steps outlined
INSTALLATION INSTRUCTIONS
 Toyota 24-pin Dual Camera Blind Spot Monitoring System (Kit # 9002-2911) Please read thoroughly before starting installation and check that kit contents are complete. Items Included in the Kit: 2 Adjustable
Tusk Pannier Racks. Instructions and information KLR
 1 Tusk Pannier Racks Instructions and information KLR650 2008 + Congratulations on your purchase of the Tusk Pannier Racks. These racks are made to handle extreme adventure riding, but work great for the
INSTALLATION INSTRUCTIONS
 HIGH FLOW AIRFLOW METER INSTALLATION INSTRUCTIONS PART NUMBER D763-1600A APPLICATION: 2001-06 E46 M3 Parts List: Hose clamp 64Z (7) Plastic Rivets Air Filter Temp Sensor & Harness (2) Button Head Screws
Airaid Poweraid Throttle Body Spacer (11-13 V6):
:") Install Time: Less than 1 hour Required Tools: Flat blade screw driver ratchet 8mm socket 10mm socket Needle nose pliers or Channel locks Razor blade 2 small cable ties or electrical tape Airaid Poweraid
Install Time: Less than 1 hour Required Tools: Flat blade screw driver ratchet 8mm socket 10mm socket Needle nose pliers or Channel locks Razor blade 2 small cable ties or electrical tape Airaid Poweraid
INSTALLATION INSTRUCTIONS FUEL SURGE TANK KIT
 INSTALLATION INSTRUCTIONS FUEL SURGE TANK KIT BMW E46 3-Series, Excl Convertible Document: 19-0056 Support: info@radiumauto.com Relieve fuel pressure in vehicle before beginingthe installation. Disconnect
Raxiom Mustang Halo Projector Headlights (2010+) - Installation Instructions
 - Installation Instructions") Raxiom Mustang Halo Projector Headlights (2010+) - Installation Instructions The below installation instructions work for the following products: Raxiom Chrome Mustang Halo Projector Headlights (2010+)
Raxiom Mustang Halo Projector Headlights (2010+) - Installation Instructions The below installation instructions work for the following products: Raxiom Chrome Mustang Halo Projector Headlights (2010+)
M-TUNED COOLANT RE-ROUTE KIT
 M-TUNED COOLANT RE-ROUTE KIT Part # MC-RR-216, MC-RR-218 Applications: 90-93 Miata 1.6L B6 94-97 Miata 1.8L BP More detailed instructions: http://www.etdracing.com/m-tuned/reroute.pdf 1) Disconnect Negative
Peugeot 406 Coupe: Delocking your boot V.1 April 2005
 This is a first stab at a DIY guide to de-locking your 406 Coupe. It isn t a hard modification to do yourself, but you do need to be confident working on your cars electrics and removing and refitting
Small knife. Remove black panel shown. Save 6 retaining pins for re-install later.
 2005-2009 Ford Mustang V6 Fog Light Wiring Kit Parts List: Quantity: Tools Required: Wiring harness 1 Flat head screwdriver PB-3425 Parts Bag 1 Ratchet & Socket set OR Ford OEM Switch (if you 1 Adjustable
SR Performance Billet Aluminum Adjustable Motor Mounts (05-14 GT)
") SR Performance Billet Aluminum Adjustable Motor Mounts (05-14 GT) Tools Needed 1. Engine hoist and chains (only for Hoist method) 2. jack with a 2x4 piece of wood (only for jack method) 3. Wrench 4. Extensions
SR Performance Billet Aluminum Adjustable Motor Mounts (05-14 GT) Tools Needed 1. Engine hoist and chains (only for Hoist method) 2. jack with a 2x4 piece of wood (only for jack method) 3. Wrench 4. Extensions
Accessory Fuse Block. Please read this entire manual before proceeding with installation.
 Accessory Fuse Block Please read this entire manual before proceeding with installation. Kit Components: (1) Fuse Block Assembly (1) Harness (1) Positive power cable (1) Negative power cable (5) Pigtails
MAZDASPEED3 Intercooler Instructions
 MAZDASPEED3 Intercooler Instructions Congratulations on your purchase of the COBB Tuning Front Mount Intercooler System for your 2007-2009 Mazdaspeed3. The following instructions should assist you through
Connecting the rear fog light on the A4 Jetta, while keeping the 5 Light Mod
 Connecting the rear fog light on the A4 Jetta, while keeping the 5 Light Mod DISCLAIMER: I'm human and make mistakes. If you spot one in this how to, tell me and I'll fix it This was done on my 99.5 Jetta.
SuperTrapp SuperPak. SuperTrapp Makes It Super Easy. efficiently after adding the power upgrades.
 Super Trap:Layout 1 5/17/2007 8:58 PM Page 66 R D SuperPak Makes It Super Easy Photos By: Maverick Camera Crew Story By: Tim Wagner In the never ending search for extra power, the roads can lead you in
Retro it Steering Column
 Retro it Steering Column INSTALLATION INSTRUCTIONS for 1976-86 CJ5 & CJ7 FOR PART NUMBER S: 1520800010, 1520800020, 1520800051, 1526800010, 1526800020, 1526800051 S I NCE 1986 Instruction # 8000000010
Ford Racing Mustang K-Springs (05-09 GT) - Installation Instructions
 - Installation Instructions") Ford Racing Mustang K-Springs (05-09 GT) - Installation Instructions The below installation instructions work for the following products: Ford Racing Mustang K-Springs (05-09) Please read through the instructions
Ford Racing Mustang K-Springs (05-09 GT) - Installation Instructions The below installation instructions work for the following products: Ford Racing Mustang K-Springs (05-09) Please read through the instructions
Ford Mustang V6 OEM-Style Fog Light Kit Parts List: Quantity: Tool List:
 2015-2017 Ford Mustang V6 OEM-Style Fog Light Kit Parts List: Quantity: Tool List: LED Foglights/ Bezels 2 Flat head & Phillips screwdriver (if you ordered part#3600) Ratchet & Socket set OR Wiring harness
Steeda Sport Mustang Lowering Springs (2005+) - Installation Instructions
 - Installation Instructions") Steeda Sport Mustang Lowering Springs (2005+) - Installation Instructions The below installation instructions work for the following products: Steeda Sport Mustang Lowering Springs (2005+) Please read
Steeda Sport Mustang Lowering Springs (2005+) - Installation Instructions The below installation instructions work for the following products: Steeda Sport Mustang Lowering Springs (2005+) Please read
Trail Rocker Installation
 Trail Rocker Installation Instructions Customizable Trail Rocker Control System For Installing Painless Part Number: 57100 Manual #90616 Painless Performance Products recommends you, the installer, read
Ford Mustang GT-Style Fog Light Kit Parts List: Quantity: Tool List:
 2013-2014 Ford Mustang GT-Style Fog Light Kit Parts List: Quantity: Tool List: Fog light (Left& Right) 2 Flat head & Phillips screwdriver Upper grille with surround 1 Ratchet & Socket set OR Lower grille
C&L Cold Air Intake (05-09 V6) - Installation Instructions
 - Installation Instructions") C&L Cold Air Intake (05-09 V6) - Installation Instructions The below installation instructions work for the following products: C&L Cold Air Intake (05-09 V6) Please read through the instructions carefully
C&L Cold Air Intake (05-09 V6) - Installation Instructions The below installation instructions work for the following products: C&L Cold Air Intake (05-09 V6) Please read through the instructions carefully
2005+ Mustang Trunk Lid Release and Trunk Lights Installation
 There is no warranty expressed or implied by this document, you follow these instructions at your own risk. These instructions worked for me, but your experience may vary. The final product of these instructions
VELAR HITCH INSTALLATION INSTRUCTIONS TOW RANGE ROVER MODEL/ TRIM YEARS: WEIGHT CAPACITY to Present PARTS & SUPPLIES: TOOLS REQUIRES:
 HITCH INSTALLATION INSTRUCTIONS MAKE: RANGE ROVER YEARS: 2018 to Present MODEL/ TRIM VELAR PACKAGE: TOW WEIGHT CAPACITY TRAILER TONGUE 5300 LBS. 300 LBS. INSTALLATION TIME: 2 HOURS NO YES YES PARTS & SUPPLIES:
Setting the World s Performance Standards
 Setting the World s Performance Standards 743 East Iona Road, Idaho Falls, ID 83401, (208) 529-0244 Fax (208) 529-9000 Forced Air Hot Air Elimination Kit (Bed Fan Kit) For 800 RZR-4 P/N 67-165 Kit Contents:
Installation MKIV Headlight Housings with Fog Lamps (Procedures apply to both MKIV Jetta and Golf)
") Page 1 This tutorial is provided as a courtesy by ECS Tuning. Service Procedure Installation Proper service and repair procedures are vital to the safe, reliable operation of all motor vehicles as well
Page 1 This tutorial is provided as a courtesy by ECS Tuning. Service Procedure Installation Proper service and repair procedures are vital to the safe, reliable operation of all motor vehicles as well
SR Performance Twin 62mm Throttle Body for GT
 Required Tools: SR Performance Twin 62mm Throttle Body for 2005-2010 GT Flat-head screwdriver Ratchet Small extension 10mm socket 8mm socket T20 Torx bit Needle nose pliers 5mm allen wrench Recommended
Steeda Bumpsteer Kit (94-04) - Installation Instructions
 - Installation Instructions") Steeda Bumpsteer Kit (94-04) - Installation Instructions The below installation instructions work for the following products: Steeda Bumpsteer Kit (94-04) Please read through the instructions carefully
Steeda Bumpsteer Kit (94-04) - Installation Instructions The below installation instructions work for the following products: Steeda Bumpsteer Kit (94-04) Please read through the instructions carefully
Raxiom Factory GPS Rear Back-up Camera Kit (07-17 Wrangler)
") Raxiom Factory GPS Rear Back-up Camera Kit (07-17 Wrangler) Installation Time: 2.5-3Hrs Tools Required: 7mm Socket & Driver 10mm Socket 10mm Open end wrench Knife / Razor blade Zip-ties Wire Cutters Needle
Raxiom Factory GPS Rear Back-up Camera Kit (07-17 Wrangler) Installation Time: 2.5-3Hrs Tools Required: 7mm Socket & Driver 10mm Socket 10mm Open end wrench Knife / Razor blade Zip-ties Wire Cutters Needle
In This DIY We Will Show You How To Install Recon Backup Lamps (part # To Run On A Separate Switch & In Reverse.
 In This DIY We Will Show You How To Install Recon Backup Lamps (part # 264150 To Run On A Separate Switch & In Reverse. Please Note, There Are Many Ways of Installing These Lights, Including Wiring Methods,
INSTALLATION INSTRUCTIONS
 INSTALLATION INSTRUCTIONS PARTS LIST Accessory Application Publications No. TRX420 (All) MII 13032 WINCH KIT P/N 08L94-HP5-100 Accessory Weight 35 lbs (16 kg) Honda Dealer: Please give a copy of these
Triumph Street Triple VSM Grip Heater Install
 Triumph Street Triple VSM Grip Heater Install Introduction: With winter fast approaching and with painful memories of last winter riding with the club it was time to do something about getting some grip
Wiring Harness Relocation by Flopster Mar 2012
 Wiring Harness Relocation by Flopster843 21 Mar 2012 On my 2008 Ram, there is a gigantic blob of electrical wiring that Dodge decided to put between the engine and the brake master cylinder, just behind
Rostra Electronic Cruise Control Install On a Stratoliner or Roadliner
 Rostra Electronic Cruise Control Install On a Stratoliner or Roadliner MATERIALS LIST: 1 - Rostra Part # 250-1223 (www.brandondist.com/products/cruise1223.htm) 1 - Signal Splitter part # 250-4369 1 - Engagement
INSTALLATION INSTRUCTIONS
 Toyota 24-pin Dual Camera Blind Spot Monitoring System (Kit # 9002-2911) Please read thoroughly before starting installation and check that kit contents are complete. Items Included in the Kit: 2 Adjustable
V8 Gen. V Ford Mustang 2010 Update
 V8 Gen. V Ford Mustang 2010 Update There were several updates to the Ford Mustang in the 2010 model year. This document outlines the differences between the installation steps necessary for the 2010 Mustang
J&M Mustang Adjustable Panhard Rod (05-09) - Installation Instructions
 - Installation Instructions") J&M Mustang Adjustable Panhard Rod (05-09) - Installation Instructions The below installation instructions work for the following products: J&M Mustang Adjustable Panhard Rod (05-09) Please read through
J&M Mustang Adjustable Panhard Rod (05-09) - Installation Instructions The below installation instructions work for the following products: J&M Mustang Adjustable Panhard Rod (05-09) Please read through
PN PONTIAC FIREBIRD. Kit Contents: Four Panel Sequential LED Tail Light Kit Installation Guide
 1969 PONTIAC FIREBIRD Four Panel Sequential LED Tail Light Kit Installation Guide Kit Contents: 4 LED panels 4 rubber grommets 1 power wire 2 pigtail harness kits 2 crimp terminal kits PN 1100569 1969
Trail Rocker Installation Instructions
 Trail Rocker Installation Instructions Manual #90581 For Installing Painless Part Numbers: 57002 Painless Performance Products recommends you, the installer, read this installation manual from front to
Installation Instructions Diesel Nitrous System (#82028)
") Installation Instructions Diesel Nitrous System (#82028) Thank you for choosing ZEX. If at any time you have questions regarding this or any of our products, please call our Nitrous Help support line at
Installation Instructions Diesel Nitrous System (#82028) Thank you for choosing ZEX. If at any time you have questions regarding this or any of our products, please call our Nitrous Help support line at
Mishimoto Performance Aluminum Radiator w/ Stabilizer - Manual (97-04 GT, Mach 1; Cobra)
") Mishimoto Performance Aluminum Radiator w/ Stabilizer - Manual (97-04 GT, Mach 1; 97-01 Cobra) Installed on: 2000 Mustang GT (manual transmission) Tools: 8mm socket 10mm socket 13mm socket 3/4" wrench
Mishimoto Performance Aluminum Radiator w/ Stabilizer - Manual (97-04 GT, Mach 1; 97-01 Cobra) Installed on: 2000 Mustang GT (manual transmission) Tools: 8mm socket 10mm socket 13mm socket 3/4" wrench
Dodge Ram 09-Current CS-DTR SERIES BACKUP CAMERA INSTALLATION
 Dodge Ram 09-Current CS-DTR SERIES BACKUP CAMERA INSTALLATION Thank you for your purchase! These instructions cannot possibly cover every option group for every model year of RAM trucks so you may find
Trail Rocker Installation Instructions
 Trail Rocker Installation Instructions Manual #90580 For Installing Painless Part Numbers: 57000 and 57001 Painless Performance Products recommends you, the installer, read this installation manual from
RZ3-5K Polaris RZR XP 1000 & 900 Kicker 5 Speaker Audio Kit
 PO H PWER PO 5 O KIT I E D U A S A TS S I R LA R Z R R O SP pg 2 pg 9 pg 13 pg 25 pg 29 Disassembly, Wire and Amplifier Plate Installation Glovebox Subwoofer Installation Kick Panel Speakers Installation
(905)
") (905)953-9260 Marc@M-Tuned.com Coolant Reroute Kit *Professional Installation Recommended but not required 1) Disconnect Negative Terminal from Battery in trunk. 2) Drain Coolant from your cooling system.
(905)953-9260 Marc@M-Tuned.com Coolant Reroute Kit *Professional Installation Recommended but not required 1) Disconnect Negative Terminal from Battery in trunk. 2) Drain Coolant from your cooling system.
M-Tuned reroute kit XX
 M-Tuned reroute kit 14-161XX Manufactured and designed by: *Professional Installation Recommended but not required 1) Disconnect the negative terminal from the battery in the trunk. 2) Drain the coolant
Intake Kit Supplement for CRV and Pathfinder
 Intake Kit Supplement for CRV and Pathfinder This guide will briefly outline how to install the intake kits for the Honda CRV and Nissan Pathfinder. This is a pretty basic job, but for the average person
Installation Tips for your Crimestopper/ProStart Remote Start system (for GM vehicles) v1.01 updated 2/27/2012
 v1.01 updated 2/27/2012") Installation Tips for your Crimestopper/ProStart Remote Start system (for GM vehicles) v1.01 updated 2/27/2012 Thank you for purchasing your remote start from MyPushcart.com - an industry leader in providing
Installation Tips for your Crimestopper/ProStart Remote Start system (for GM vehicles) v1.01 updated 2/27/2012 Thank you for purchasing your remote start from MyPushcart.com - an industry leader in providing
Performance Inlet Manifold
 Performance Inlet Manifold Tools needed (some tools not required on some models): 13mm Combination Wrench Flat Blade Screwdriver T30 Torx Driver T25 Torx Driver 10mm Combination Wrench and/or Socket with
Remote Start Kit for GM Installation RS1/3/4/7 + ADS-DL Tip Sheet
 Remote Start Kit for GM Installation RS1/3/4/7 + ADS-DL Tip Sheet rev 1.4 12/16/2013 Thank you for purchasing your remote start from MyPushcart.com - an industry leader in providing remote starts to do-it-yourself
06-15 ECU, Battery and Washer Bottle Relocation
 06-15 ECU, Battery and Washer Bottle Relocation On the 2006-2015 MX-5, there is a very narrow middle section between the battery box and the air filter box to remove heat. For the most part, this design
Can-Am Spyder RT One-piece Seat and Passenger Backrest
 Can-Am Spyder RT 2010-2018 One-piece Seat and Passenger Backrest Hardware: Tools needed: Seat: Stock rear mounting bolts and box nuts ¼ 20 x 5 / 8 " Phillips screws x 2 (included) Metric hex wrenches (seat)
RZ3-5A Polaris RZR XP 1000 & 900 SSV Works 5 Speaker Audio Kit
 RZ3-5A Polaris RZR XP 1000 & 900 SSV Works 5 Speaker Audio Kit pg 2 Disassembly, Wire and Amplifier Plate Installation pg 9 Glovebox Subwoofer Installation pg 13 Kick Panel Speakers Installation pg 25
INSTALLATION INSTRUCTIONS
 INSTALLATION INSTRUCTIONS Accessory Application Publications No. AII 31716 HONDA (For ipod ) FIT Issue Date MAR 2006 PARTS LIST Attachment Kit P/N 08A28-1H1-800 4 Cushion tapes Honda Music Link Kit P/N
Special Note About The JDM High Performance Water Pump:
 Page 1 of 30 JDM Engineering, Inc. home Call Us! 732-780- 0770 back to Installation Instructions Electric Fan Upgrade Kit Electric Fan Wiring Diagram Thank you for your purchase of the JDM Engineering
INSTALLATION INSTRUCTIONS
 INSTALLATION INSTRUCTIONS Accessory Application Publications No. AII 26014 ODYSSEY Issue Date AUG 2003 PARTS LIST Hood Switch (sold separately) P/N 08E49-S0X-100G Illustration of the Hood Switch Installed
Installation Instructions
 Installation Instructions Jeep JK 2-Door (2011 Present) Mounting Bracket and Air Line System Kit for ARB On-Board Twin Air Compressor (CKMTA12) Made in the USA Kit Contents: 1 Flat Bracket 1 Formed Bracket
INSTALLATION INSTRUCTIONS
 COLD AIR INTAKE INSTALLATION INSTRUCTIONS PART NUMBER D760-0390C APPLICATION: 1999-2003 E39 M5 PARTS LIST 1 Left Aluminum Intake Tube 1 Air Pump Bracket (A) 1 Right Aluminum Intake Tube 1 Air Pump Bracket
INSTALLATION INSTRUCTIONS
 Dual Camera Blind Spot Monitoring System w/multi-camera Switcher (Kit # 9002-2904) Please read thoroughly before starting installation and check that kit contents are complete. Items Included in the Kit:
HOW TO FIT A KEYLESS ENTRY SYSTEM
 HOW TO FIT A KEYLESS ENTRY SYSTEM THE KITS ARE WIDELY AVAILABLE TO BUY FROM THE INTERNET AND OTHER GOOD STOCKISTS HERE IS AN IDEA OF WHAT YOU SHOULD RECIEVE IN YOUR KIT. PLUS WIRING DIAGRAM PLUS WIRING
Rear Parking Brake Cable (93 Cobra)
") Rear Parking Brake Cable (93 Cobra) Materials in the box: Brake Cable Tools Needed: One jack and four jack stands. One socket wrench with a 12mm, 13mm ( ½ inch, 12 point DEEP WALL DO NOT FORGET THIS) and
Rear Parking Brake Cable (93 Cobra) Materials in the box: Brake Cable Tools Needed: One jack and four jack stands. One socket wrench with a 12mm, 13mm ( ½ inch, 12 point DEEP WALL DO NOT FORGET THIS) and
Steeda Lower Control Arms ( )
") Steeda Lower Control Arms (2005-2012) NOTE: The following installation was performed on a 2007 Mustang GT/California Special. The control arms were previously sold in a blue color, but now they are sold
Steeda Lower Control Arms (2005-2012) NOTE: The following installation was performed on a 2007 Mustang GT/California Special. The control arms were previously sold in a blue color, but now they are sold
RZR WINCH KIT KIT P/N
 RZR WINCH KIT KIT P/N 2878787; 2879334 Application All RZR Models except RZR XP Before you begin, read these instructions twice and check to be sure all parts and tools are accounted for. Please retain