Dual Mustang Halo Projector Headlights - LED (99-04) - Installation Instructions
|
|
|
- Jesse Strickland
- 5 years ago
- Views:
Transcription
 Chrome Dual Mustang Halo Projector Headlights - LED (99-04) Please read")

1 Dual Mustang Halo Projector Headlights - LED (99-04) - Installation Instructions The below installation instructions work for the following products: Black Dual Mustang Halo Projector Headlights - LED (99-04) Chrome Dual Mustang Halo Projector Headlights - LED (99-04) Please read through the instructions carefully before starting this project. Take the time to get all the materials together as well as all the safety equipment. Intro: This is what the stock Mustang headlights look like. If you want to give your Mustang a custom look, these Halo projector headlights are what you need.

2 Tools needed: Wire Cutter/Stripper Wire Crimper or Pliers Electrical Tape 14 or 16 Gauge Wire Wire Connectors Phillips Head Screw Driver Installation: 1. The first thing you need to do is bundle all of the white wires and all of the black wires into connecters. The connecters used can be found at any auto parts store. They come in a pack with male and female ends, and will allow you to easily unplug the wires if needed. You can bundle the wires into either the male or female ends, just make sure that you do them the same. 2. Then connect about 6 of either 14 or 16 gauge wire to one of the connecters, using the opposite end of what you used to bundle the black and white wires.


3 3. Now you need to seal the light housing to prevent moisture from seeping in. Use a clear silicone sealant to fill the gap where the clear plastic cover meets the light housing. You just need to apply a bead of silicone into the gap. 4. It s a good idea to only do half of the light at a time. Start by sealing the tops of both lights and allow them to dry for about 30 to 45 minutes, or until the silicone is dry to the touch. 5. Then turn the lights over and seal the bottom half. Be careful not to get the silicone on the clear plastic on the front of the lights.

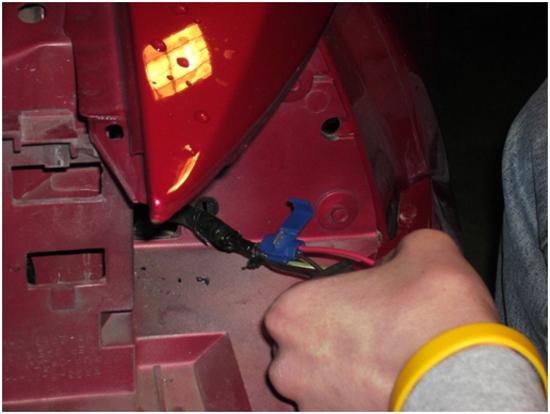
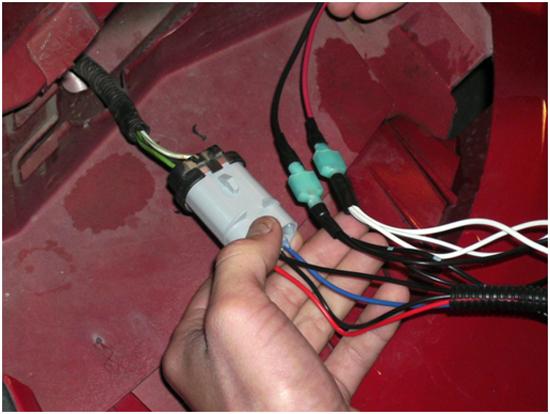
4 6. Now you can remove the stock headlights from the car. With the hood open pull up on the two retainer pins to remove the lights. 7. With the lights loose, unplug the light wires from the light housing. In order to protect your car s finish from scratches, you may want to put a towel or rag over the bumper. 8. At this point, you will need to either disconnect the battery or remove the fuses for the headlights. 9. Now strip the plastic tubing that bundles the wires for the running lights. This will be the wire that was connected to the amber lights. 10. Using the connecters provided splice the 14 or 16 gauge wire into the middle, brown wire and another wire into the black wire. This is done by sliding the provided connecter over the wire and then inserting the new wire into the connecter, then using pliers to crimp the connecter. (NOTE: This will be done on the wire that connects to the amber lights not the headlights.) 11. Connect the white wires from the new lights to the wire going to the brown wire and the black wires to the black wire.
5

6 12. Now plug the headlight and amber light connecters into the new light housing. You will need to use the amber light bulb from the stock light housing or you can just replace the amber lights bulbs. If they haven t been replaced recently, it s a good idea to replace the amber bulbs at this time. 13. Now the new light housing can be installed. Make sure all of the connections are secure and out of the way of the retainer pins. Make sure the housing is properly in place and re-insert the retainer pins. 14. Now reconnect the battery or fuses and test the lights. The halo lights and L.E.D. lights should come on with the park lights, if they don t come on, then you will need to check to be sure that all of your connecters are secure. 15. Enjoy! These lights will definitely make your Stang stand out from the rest. I hope you find this guide helpful in the installation of your new Halo projector headlights. Installation instructions provided by AmericanMuscle customer Levi Hallman Find more how-tos, instructions and videos at
Raxiom Mustang Headlights (94-98) - Installation Instructions
 - Installation Instructions") Raxiom Mustang Headlights (94-98) - Installation Instructions The below installation instructions work for the following products: Dark Smoked Mustang Headlights (94-98) Raxiom Chrome Mustang Headlights
Raxiom Mustang Headlights (94-98) - Installation Instructions The below installation instructions work for the following products: Dark Smoked Mustang Headlights (94-98) Raxiom Chrome Mustang Headlights
Mustang Headlight w/ CCFL Halo (05-09) - Installation Instructions
 - Installation Instructions") Mustang Headlight w/ CCFL Halo (05-09) - Installation Instructions The below installation instructions work for the following products: Chrome Mustang Headlight w/ CCFL Halo (05-09) Smoked Mustang Headlight
Mustang Headlight w/ CCFL Halo (05-09) - Installation Instructions The below installation instructions work for the following products: Chrome Mustang Headlight w/ CCFL Halo (05-09) Smoked Mustang Headlight
Raxiom Mustang Halo Projector Headlights (2010+) - Installation Instructions
 - Installation Instructions") Raxiom Mustang Halo Projector Headlights (2010+) - Installation Instructions The below installation instructions work for the following products: Raxiom Chrome Mustang Halo Projector Headlights (2010+)
Raxiom Mustang Halo Projector Headlights (2010+) - Installation Instructions The below installation instructions work for the following products: Raxiom Chrome Mustang Halo Projector Headlights (2010+)
Oracle Halo Headlight Conversion Kit - White (10-12 All)
") Oracle Halo Headlight Conversion Kit - White (10-12 All) Tools needed: Small flathead screwdriver Large flathead screwdriver Ratchet 7 mm, 8mm, and 10mm socket Oven Heat Gun 2 2x4 12 long (other will work,
Oracle Halo Headlight Conversion Kit - White (10-12 All) Tools needed: Small flathead screwdriver Large flathead screwdriver Ratchet 7 mm, 8mm, and 10mm socket Oven Heat Gun 2 2x4 12 long (other will work,
Mustang HID Headlight Installation Guide (9007)
") Mustang HID Headlight Installation Guide 1994-2004 (9007) The below installation instructions work for the following products: 9007 Bulb HID Headlight Coversion Kit 1994-2004 The following are a set of
Mustang HID Headlight Installation Guide 1994-2004 (9007) The below installation instructions work for the following products: 9007 Bulb HID Headlight Coversion Kit 1994-2004 The following are a set of
MSD 6AL Ignition Module w/ Rev Control - Installation Instructions
 MSD 6AL Ignition Module w/ Rev Control - Installation Instructions The below installation instructions work for the following products: MSD 6AL Ignition Module w/ Rev Control Please read through the instructions
Mustang CDC Lightbar (94-04) - Installation Instructions
 - Installation Instructions") Mustang CDC Lightbar (94-04) - Installation Instructions The below installation instructions work for the following products: Classic Design Concepts Mustang Convertible Lightbar (94-04 Carbon Fiber) Classic
Mustang CDC Lightbar (94-04) - Installation Instructions The below installation instructions work for the following products: Classic Design Concepts Mustang Convertible Lightbar (94-04 Carbon Fiber) Classic
Mustang Short Throw Sport Shifter (All 83 - Early 01 & V6 T-5/T-45 Transmission) - Installation Instructions
 - Installation Instructions") Mustang Short Throw Sport Shifter (All 83 - Early 01 & 01-04 V6 T-5/T-45 Transmission) - Installation Instructions The below installation instructions work for the following products: Mustang Short Throw
Mustang Short Throw Sport Shifter (All 83 - Early 01 & 01-04 V6 T-5/T-45 Transmission) - Installation Instructions The below installation instructions work for the following products: Mustang Short Throw
SCT Mustang 4-Bank Eliminator Chip w/ Free Custom Tunes (88-04) - Installation Instructions
 - Installation Instructions") SCT Mustang 4-Bank Eliminator Chip w/ Free Custom Tunes (88-04) - Installation Instructions The below installation instructions work for the following products: SCT Mustang 4-Bank Eliminator Chip w/ Free
SCT Mustang 4-Bank Eliminator Chip w/ Free Custom Tunes (88-04) - Installation Instructions The below installation instructions work for the following products: SCT Mustang 4-Bank Eliminator Chip w/ Free
Two panel Sequential LED Taillight kit installation guide
 1970 CHEVELLE Two panel Sequential LED Taillight kit installation guide Kit Contents: 2 LED panels 2 rubber grommets 1 power wire with t-tap 1 driver side LED harness, 24 1 passenger side LED harness,
Throttle Body Spacer (05-09 V6) - Installation Instructions
 - Installation Instructions") Throttle Body Spacer (05-09 V6) - Installation Instructions The below installation instructions work for the following products: Throttle Body Spacer (05-09 V6) Steeda 2005+ 4.0L V6 Intake Throttle Body
Throttle Body Spacer (05-09 V6) - Installation Instructions The below installation instructions work for the following products: Throttle Body Spacer (05-09 V6) Steeda 2005+ 4.0L V6 Intake Throttle Body
Professional Products Satin Upper Intake Plenum Installation Guide ( L 2V)
") Professional Products Satin Upper Intake Plenum Installation Guide (96-04 4.6L 2V) The below installation instructions work for the following products: Professional Products Satin Upper Intake Plenum (96-04
Professional Products Satin Upper Intake Plenum Installation Guide (96-04 4.6L 2V) The below installation instructions work for the following products: Professional Products Satin Upper Intake Plenum (96-04
Mustang One-Touch Convertible Top Module (2005+) - Installation Instructions
 - Installation Instructions") Mustang One-Touch Convertible Top Module (2005+) - Installation Instructions The below installation instructions work for the following products: Mustang One-Touch Convertible Top Module (2005+) Please
Mustang One-Touch Convertible Top Module (2005+) - Installation Instructions The below installation instructions work for the following products: Mustang One-Touch Convertible Top Module (2005+) Please
INSTALLATION INSTRUCTION
 1551 S. Vineyard Avenue Ontario, CA 91761 (909) 923-1973 INSTALLATION INSTRUCTION Club Car Precedent Installation Notes CURTIS 1234, 1236 OR 1238 AC INDUCTION MOTOR/ CONTROLLER REVISION: B This kit is
Splice-In Mustang MIL Eliminators (96-04 GT) - Installation Instructions
 - Installation Instructions") Splice-In Mustang MIL Eliminators (96-04 GT) - Installation Instructions The below installation instructions work for the following products: Splice-In Mustang MIL Eliminators (96-04 GT) Please read through
Splice-In Mustang MIL Eliminators (96-04 GT) - Installation Instructions The below installation instructions work for the following products: Splice-In Mustang MIL Eliminators (96-04 GT) Please read through
Moroso Mustang Aluminum Coolant Expansion Tank (96-04) - Installation Instructions
 - Installation Instructions") Moroso Mustang Aluminum Coolant Expansion Tank (96-04) - Installation Instructions The below installation instructions work for the following products: Moroso Mustang Aluminum Coolant Expansion Tank (96-04)
Moroso Mustang Aluminum Coolant Expansion Tank (96-04) - Installation Instructions The below installation instructions work for the following products: Moroso Mustang Aluminum Coolant Expansion Tank (96-04)
Front Bumper Installation Instructions
 Front Bumper Installation Instructions 1) Remove the factory bumper, air dam, and frame cover (optional). A) Remove the air dam by pulling on the plastic clips holding it in place with a set of pliers.
PONTIAC FIREBIRD
 1974-78 PONTIAC FIREBIRD Two Panel Sequential LED Tail Light Kit Installation Guide Kit Contents: 2 LED panels 2 LED panel mount kits 6 rubber grommets 1 power wire 1 pigtail harness Kit 1 crimp terminal
BBK Electric Mustang Fuel Pump Kit - (86-97 V8) - Installation Instructions
 - Installation Instructions") BBK Electric Mustang Fuel Pump Kit - (86-97 V8) - Installation Instructions The below installation instructions work for the following products: BBK Electric Mustang Fuel Pump Kit - 190 LPH (86-97 V8)
BBK Electric Mustang Fuel Pump Kit - (86-97 V8) - Installation Instructions The below installation instructions work for the following products: BBK Electric Mustang Fuel Pump Kit - 190 LPH (86-97 V8)
SALEEN SPEEDLAB BOOST AND WATER TEMPERATURE GAUGE POD KIT
 = SALEEN SPEEDLAB BOOST AND WATER TEMPERATURE GAUGE POD KIT INSTALLATION MANUAL: 2005-09 Mustang 4.6L 3V P/N: 10-8002-C12000B KIT P/N: 10-2903-B11511* Saleen Performance, Inc. 1225 East Maple Rd. Troy,
Ford Racing Mustang K-Springs (05-09 GT) - Installation Instructions
 - Installation Instructions") Ford Racing Mustang K-Springs (05-09 GT) - Installation Instructions The below installation instructions work for the following products: Ford Racing Mustang K-Springs (05-09) Please read through the instructions
Ford Racing Mustang K-Springs (05-09 GT) - Installation Instructions The below installation instructions work for the following products: Ford Racing Mustang K-Springs (05-09) Please read through the instructions
Installing LED lights in a Hypercharger By Keith Edwards Joker s Wild! (Wildjokr)
") Installing LED lights in a Hypercharger By Keith Edwards Joker s Wild! (Wildjokr) THINGS YOU WILL NEED: A Hypercharger (duh!) LEDs (The ones I got were from Benny Bryant at Fantasies on Wheels in Sylacauga,
Installing LED lights in a Hypercharger By Keith Edwards Joker s Wild! (Wildjokr) THINGS YOU WILL NEED: A Hypercharger (duh!) LEDs (The ones I got were from Benny Bryant at Fantasies on Wheels in Sylacauga,
BX8848 Installation Instructions 4 Diode Wiring Kit For Motorhomes With Red Tail Lights
 For Motorhomes With Red Tail Lights WARNG: Incorrect wiring may result in blown fuses, damaged wiring, fire, or bodily injury. Blue Ox recommends installation of this kit by a trained professional. Blue
Cervini's Functional Ram Air Kit (05-09) - Installation Instructions
 - Installation Instructions") Cervini's Functional Ram Air Kit (05-09) - Installation Instructions The below installation instructions work for the following products: Cervini's Functional Ram Air Kit for 05-09 Ram Air Hood Cervini's
Cervini's Functional Ram Air Kit (05-09) - Installation Instructions The below installation instructions work for the following products: Cervini's Functional Ram Air Kit for 05-09 Ram Air Hood Cervini's
J&M Mustang Rear Lower Control Arms (2005+) - Installation Instructions
 - Installation Instructions") J&M Mustang Rear Lower Control Arms (2005+) - Installation Instructions The below installation instructions work for the following products: J&M Mustang Rear Lower Control Arms (2005+) Please read through
J&M Mustang Rear Lower Control Arms (2005+) - Installation Instructions The below installation instructions work for the following products: J&M Mustang Rear Lower Control Arms (2005+) Please read through
Headlight Removal & Installation: VW Jetta Mk.4 / Bora
 Headlight Removal & Installation: 99-04 VW Jetta Mk.4 / Bora Disclaimer: Buyer assumes any and all risk and liability from the installation and use of this product. Seller, author, or any of their affiliates
Deep Space Lighting. VOLVO VNL BI-XENON HEADLAMP KIT Installation Instructions. Tools Needed: #2 Philips screwdriver 10mm socket and ratchet
 Deep Space Lighting VOLVO VNL BI-XENON HEADLAMP KIT Installation Instructions Estimated Installation Time: 15-45 minutes Tools Needed: #2 Philips screwdriver 10mm socket and ratchet Before starting, make
Steeda Billet Charge Motion Control Plates (05-08 GT) - Installation Instructions
 - Installation Instructions") Steeda Billet Charge Motion Control Plates (05-08 GT) - Installation Instructions The below installation instructions work for the following products: Steeda Billet Charge Motion Control Plates (05-08
Steeda Billet Charge Motion Control Plates (05-08 GT) - Installation Instructions The below installation instructions work for the following products: Steeda Billet Charge Motion Control Plates (05-08
PN EL CAMINO w/reverse Two panel Sequential LED Taillight kit installation guide. Kit Contents:
 1978-81 EL CAMINO w/reverse Two panel Sequential LED Taillight kit installation guide Kit Contents: 2 LED panels 1 power wire with t-tap 1 driver side LED harness, 24 1 passenger side LED harness, 48 2
The M7 Direct Flow Intercooler (DFIC) Installation Guide
 Installation Guide") The M7 Direct Flow Intercooler (DFIC) Installation Guide This information is meant only as a guide. The author of this information,, or any M7 Tuning employees assumes no liabilities for any outcomes resulting
The M7 Direct Flow Intercooler (DFIC) Installation Guide This information is meant only as a guide. The author of this information,, or any M7 Tuning employees assumes no liabilities for any outcomes resulting
Laser BILLET Main Grille
 Laser BILLET Main Grille Main grille - #6219420 / #6219421 2016 TOYOTA TACOMA Parts included (1) Billet Grille - Main Polished - Part #6219420 OR Black - Part #6219421 Hardware included (6) #8 0.7 Screws
4 pieces of silicone hose Unless you have AEM then you have 2 2.5, 1 3, and 1 3.5
 The parts in your kit: 3 pieces of Mandrel-Bent Aluminized Tubing: 1 Straight 1 45 degree bend with straight section 1 curved section 4 pieces of silicone hose 1 2.5 1 3.5 2 3 Unless you have AEM then
REAR STEEL BUMPER INSTALLATION INSTRUCTIONS Runner
 REAR STEEL BUMPER INSTALLATION INSTRUCTIONS 2010+ 4Runner Version 2.1.0 - September 2016 Thank you for purchasing the Southern Style OffRoad Toyota 4Runner 5 th Gen Modular Rear Plate Steel Bumper. It
INSTALLATION INSTRUCTIONS For 2007 and newer Jeep Wrangler JK
 7 LED sealed beam headlamp with switchback Halos and DRL INSTALLATION INSTRUCTIONS For 2007 and newer Jeep Wrangler JK SB7250XX-BLK, SB7250XX-CHR, SB7050BA-BLK, SB7060XX-BLK, SB7060XX-CHR, SB7160XX-CHR,
Accel 300+ Ignition Control System (84-95) - Installation Instructions
 - Installation Instructions") Accel 300+ Ignition Control System (84-95) - Installation Instructions The below installation instructions work for the following products: Accel 300+ Ignition Control System (84-95) Please read through
Accel 300+ Ignition Control System (84-95) - Installation Instructions The below installation instructions work for the following products: Accel 300+ Ignition Control System (84-95) Please read through
J&M Mustang Adjustable Panhard Rod (05-09) - Installation Instructions
 - Installation Instructions") J&M Mustang Adjustable Panhard Rod (05-09) - Installation Instructions The below installation instructions work for the following products: J&M Mustang Adjustable Panhard Rod (05-09) Please read through
J&M Mustang Adjustable Panhard Rod (05-09) - Installation Instructions The below installation instructions work for the following products: J&M Mustang Adjustable Panhard Rod (05-09) Please read through
Mustang Speed Calibrator Installation Guide
 Mustang Speed Calibrator Installation Guide The below installation instructions work for the following products: 1994-2004 Manual & 1994-1998 Automatic Speed Calibrator Parts included in the SpeedCal kit.
Luminator Low-Rise Headlight. Designed and built by Radioflyer Innovations
 Luminator Low-Rise Headlight system for C5 Corvette Designed and built by Radioflyer Innovations 1 Tools Required Phillips head screwdriver Flathead screwdriver Torx 15 screwdriver Torx 20 screwdriver
ProjectorZ II Xenon Headlight Installation Guide
 ProjectorZ II Xenon Headlight Installation Guide Written exclusively for Umnitza s ProjectorZ II Product This step-by-step guide is designed to be used in together with other available documentation including
750 Paso Wiring Upgrade
 750 Paso Wiring Upgrade Supplies required: 2 Bosch 30A/12V Relays # #0 332 209 150 (with mounting tab) 1 30 Amp fuse holder 1 10 Amp fuse holder 12 inches of brown 12 gauge wire 60 inches of red 14 gauge
Steeda Lightweight Tubular Radiator Support (05-09) - Installation Instructions
 - Installation Instructions") Steeda Lightweight Tubular Radiator Support (05-09) - Installation Instructions The below installation instructions work for the following products: Eibach Mustang Anti-Roll Kit (05-10) Please read through
Steeda Lightweight Tubular Radiator Support (05-09) - Installation Instructions The below installation instructions work for the following products: Eibach Mustang Anti-Roll Kit (05-10) Please read through
FORD MUSTANG. Two Panel Sequential LED Tail Light Kit Installation Guide
 1967-68 FORD MUSTANG Two Panel Sequential LED Tail Light Kit Installation Guide Kit Contents: 2 LED panels 2 rubber grommets 1 power wire with t-tap 1 driver side LED harness, 24 1 passenger side LED harness,
TrailGator REAR BUMPER INSTALLATION INSTRUCTIONS Runner
 TrailGator REAR BUMPER INSTALLATION INSTRUCTIONS 2010+ 4Runner Version 3.1.0 - December 2018 Thank you for purchasing the Southern Style OffRoad Toyota 4Runner 5 th Gen Modular Rear Plate Steel Bumper.
2015 Current F150/Raptor Venom Side Steps Installation Instructions
 2015 Current F150/Raptor Venom Side Steps Installation Instructions PREPARATION STEPS 1. Disconnect the negative terminal on the battery. Park the vehicle on level ground and set the emergency brake. 2.
LP-HP023. Towed Vehicle Lube Pump and Plumbing Installations Instructions
 The following make/model transmissions are approved and warranted for towing when equipped with - HARDWARE PACK # LP-HP023 Toyota Tacoma, RWD, V6 4.0L (A750E) 2005-2013 Toyota Tacoma, 4WD, V6 4.0L (A750F)
INSTALLATION INSTRUCTIONS
 INSTALLATION INSTRUCTIONS Accessory Application Publications No. BII 33322-36889 UNDER 2007 TL Issue Date MAY 2007 PARTS LIST Front under spoiler Left bracket (Marked L ) Right bracket (Marked R ) 8 Self-tapping
Max Motorsports Clutch Quadrant and Steeda Clutch Adjuster Installation Guide
 Max Motorsports Clutch Quadrant and Steeda Clutch Adjuster Installation Guide The below installation instructions work for the following products: Maximum Motorsports Aluminum Mustang Clutch Quadrant (79-04)
FR500 Mustang Steering Wheel Installation Guide
 FR500 Mustang Steering Wheel Installation Guide The below installation instructions work for the following products: Ford Mustang FR500 Style Steering Wheel Replacement This install guide is for the FR500
Stand Alone Fog Lights Installation Instructions
 Tools Required: 1. Trim Removal tool or protected flat screwdriver 2. #2 Phillips Screwdriver 3. 10mm socket 4. 10mm wrench 5. 8mm or 5/16 socket 6. Adjustable Pliers 7. Electrical Tape WARNING!!! Disconnect
SUT-250-S (These instructions are used for SUT-250-SCLC also)
") SUT-250-S (These instructions are used for SUT-250-SCLC also) Torque wrench, carpenters square, wire cutters, Phillips screwdriver, 7/16, 9/16, and 3/4 combination wrenches, ratchet, 9/16, 3/4, 13/16,
SUT-250-S (These instructions are used for SUT-250-SCLC also) Torque wrench, carpenters square, wire cutters, Phillips screwdriver, 7/16, 9/16, and 3/4 combination wrenches, ratchet, 9/16, 3/4, 13/16,
TOYOTA COROLLA L, LE FOG LIGHT (Halogen and LED) Part Number: TCO-314 / TCO-814
 Part Number: TCO-314 / TCO-814") TOYOTA COROLLA L, LE 2014-16 FOG LIGHT (Halogen and LED) Part Number: TCO-314 / TCO-814 Kit Contents Item # Quantity Reqd. Description 1 2 Light Housings 2 2 Fog Light bezels 3 1 Switch Assembly 4 1 Fog
TOYOTA COROLLA L, LE 2014-16 FOG LIGHT (Halogen and LED) Part Number: TCO-314 / TCO-814 Kit Contents Item # Quantity Reqd. Description 1 2 Light Housings 2 2 Fog Light bezels 3 1 Switch Assembly 4 1 Fog
Model EL8500 Series. Bagless Upright. Assembly/Disassembly Guide 1
 Model EL8500 Series Bagless Upright Assembly/Disassembly Guide 1 Table Of Contents Parts Removal / Installation Guide Belt & Brushroll Section A Page 3 Hood Assembly Section B Page 3 Main PCB Board Section
SHELBY GT500
 2007-2009 SHELBY GT500 Removal of Factory Unit WARNING: 1. Radiator fluid must be handled properly. Please observe local ordinances with regards to handling and disposal. 2. Allow vehicle and components
QUICK GUIDE. Table of Contents. Headlight Installation Guide - English P. 03
 3 Table of Contents Headlight Installation Guide - English P. 03 Headlight Installation Guide - Spanish P. 12 Registration Card - English P. 17 Registration Card - Spanish P. 18 Please contact Spyder Auto
Remove the 3-11mm nuts holding mirror on. Don t drop the nuts!
 2005-2012 Ford Mustang Puddle Lamp Kit Parts List: Quantity: Tool List: LED Lamps 2 Flat head screwdriver Seals 2 Ratchet & Socket set OR Nuts 2 Adjustable Wrench Wiring harness 1 Drill & 11/16 th bit
Remove 4 circled pins. Route wiring along dashed line. Remove the 2 9mm nuts and black retaining plate that secure extractor.
 2015 Ford Mustang Turn Signal Hood Kit Parts List: Quantity: Tool List: Bracket & pre-installed lamp 2 Flat head screwdriver Wiring harness 1 Phillips screwdriver PB-3660 Parts Bag 1 Ratchet & Socket set
CHEVY CAMARO Four panel Sequential LED Taillight kit installation guide
 1978-81 CHEVY CAMARO Four panel Sequential LED Taillight kit installation guide Kit Contents: 4 LED panels 1 power wire with t-tap 2 driver side LED harnesses, 24 2 passenger side LED harnesses, 48 4 LED
LP-HP001. Towed Vehicle Lube Pump and Plumbing Installation Instructions
 The following make/model transmissions are approved and warranted for towing when equipped with - HARDWARE PACK # LP-HP001 CHEVROLET Chevette (T-180) Chevette (T-180C) Nova (T-200) Impala / Corvette (T-350)
UNPACK AND IDENTIFY THE FOLLOWING PARTS.
 SUT-500-S ASSEMBLY REQUIREMENTS *Torque all T-bolt nuts to 35-40 foot pounds. *Check all lights before towing. *Tire pressure not to exceed recommendation on serial tag. *Re-torque wheel nuts after first
CHEVY MONTE CARLO. Two Panel Sequential LED Tail Light Kit Installation Guide
 1986-88 CHEVY MONTE CARLO Two Panel Sequential LED Tail Light Kit Installation Guide Kit Contents: 2 LED panels 4 rubber grommets 1 power wire 1 pigtail harness Kit 1 crimp terminal Kit 1 adhesive tube
GRILLE OVERLAY INSTALL. 1) Turn off engine and chalk tires with stop block. Open Hood. FIG 1 FIG 2
 Turn off engine and chalk tires with stop block. Open Hood. FIG 1 FIG 2") LASER BILLET grille 2018 mustang GT Parts included (1) Laser Billet - Main Part #6215500 - Polished or Part #6215501 - Black Hardware included START HERE BUMPER REMOVAL & Grille Installation Guide PLEASE
LASER BILLET grille 2018 mustang GT Parts included (1) Laser Billet - Main Part #6215500 - Polished or Part #6215501 - Black Hardware included START HERE BUMPER REMOVAL & Grille Installation Guide PLEASE
Maximum Motorsports Caster/Camber Plates Installation Guide (94-04)
") Maximum Motorsports Caster/Camber Plates Installation Guide (94-04) The below installation instructions work for the following products: Maximum Motorsports Caster/Camber Plates (94-04) Please read through
Maximum Motorsports Caster/Camber Plates Installation Guide (94-04) The below installation instructions work for the following products: Maximum Motorsports Caster/Camber Plates (94-04) Please read through
TOYOTA VENZA 2009 TRAILER WIRE HARNESS Procedure
 Part Number: PT791-0T099 Kit Contents Item # Quantity Reqd. Description 1 1 Trailer Wire Harness Module 2 1 4-Flat Harness 3 1 Battery Power Wire Harness 4 1 Mounting Bracket, 4-Flat 5 2 Screw #10-24 6
2016 HONDA 1000 Pioneer PN 3102 Turn signal / horn kit rev nc
 2016 Honda 1000 Pioneer STOP - THIS KIT IS DESIGNED SPECIFICALLY FOR 2016 HONDA 1000 PIONEER IF YOUR MACHINE IS NOT THIS MODEL DO NOT PROCEED. THIS KIT DOES NOT WORK ON THE PIONEER 500 nor 700 S. Contact
PN PONTIAC FIREBIRD. Kit Contents: Four Panel Sequential LED Tail Light Kit Installation Guide
 1969 PONTIAC FIREBIRD Four Panel Sequential LED Tail Light Kit Installation Guide Kit Contents: 4 LED panels 4 rubber grommets 1 power wire 2 pigtail harness kits 2 crimp terminal kits PN 1100569 1969
Procharger Stage II Intercooled Supercharger System (11-14 GT)
") Procharger Stage II Intercooled Supercharger System (11-14 GT) Installation Time: Approximately one day. Installed on 2012 Mustang GT 5.0/Manual Required Tools 3/8 Socket Set (Standard and Metric) 1/2
Procharger Stage II Intercooled Supercharger System (11-14 GT) Installation Time: Approximately one day. Installed on 2012 Mustang GT 5.0/Manual Required Tools 3/8 Socket Set (Standard and Metric) 1/2
C&L Cold Air Intake (05-09 V6) - Installation Instructions
 - Installation Instructions") C&L Cold Air Intake (05-09 V6) - Installation Instructions The below installation instructions work for the following products: C&L Cold Air Intake (05-09 V6) Please read through the instructions carefully
C&L Cold Air Intake (05-09 V6) - Installation Instructions The below installation instructions work for the following products: C&L Cold Air Intake (05-09 V6) Please read through the instructions carefully
GVW AGM Auxiliary Battery Kit for Vanagon Westfalia Full Camper
 GVW-253-700AGM Auxiliary Battery Kit for 1983-1991 Vanagon Westfalia Full Camper The purpose of this kit is to add an Interstate SLA1161 as an auxiliary battery under the driver's seat of 1983 to 1991
Ford Mustang V6 OEM-Style Fog Light Kit Parts List: Quantity: Tool List:
 2015-2017 Ford Mustang V6 OEM-Style Fog Light Kit Parts List: Quantity: Tool List: LED Foglights/ Bezels 2 Flat head & Phillips screwdriver (if you ordered part#3600) Ratchet & Socket set OR Wiring harness
Part Number: TBL-016S
 5/18/17 TOYOTA TACOMA 2016-2017 LED Bed Light Kit Part Number: TBL-016S Kit Contents Item # Quantity Reqd. Description 1 2 LED Bed Light Harness (10 ) 2 2 LED Bed Light Harness (5 ) 3 1 Y Harness Extension
Bachmann Digital Sound Decoder Installation Notes
 New Dimensions in Digital Sound Technology TM APPLICATION NOTE Bachmann 2-6-6-2 Digital Sound Decoder Installation Notes Overview This application note describes the installation of a DSD-090LC Digital
MAVERICK, PINTO. Two Panel Sequential LED Tail Light Kit Installation Guide
 1970-77 MAVERICK, 71-76 PINTO Two Panel Sequential LED Tail Light Kit Installation Guide Kit Contents: 2 LED panels 2 rubber grommets 1 power wire with t-tap 1 driver side LED harness, 24 1 passenger side
Installation Instructions - ECS Tuning Vent Pod Vacuum/Boost Gauge Kit
 Installation Instructions - ECS Tuning Vent Pod Vacuum/Boost Gauge Kit This tutorial is provided as a courtesy by ECS Tuning. Part Number for (2005-2008) Proper service and repair procedures are vital
Hawk HP Performance Brake Pads (94-98 GT/V6 Front Pair) - Installation Instructions
 - Installation Instructions") Hawk HP Performance Brake Pads (94-98 GT/V6 Front Pair) - Installation Instructions The below installation instructions work for the following products: Hawk HP Plus Performance Brake Pads (94-98 GT/V6
Hawk HP Performance Brake Pads (94-98 GT/V6 Front Pair) - Installation Instructions The below installation instructions work for the following products: Hawk HP Plus Performance Brake Pads (94-98 GT/V6
Gentex by VOXX Corporation Installation Instructions
 KIT CONTENTS: Item Qty Part Number Description 1 1: ADVGEN20A 7 Pin Auto-Dimming Mirror with Compass and Temperature 2 1 Gentex by VOXX Corporation Installation Instructions Contact VOXX Customer Service
Club Car 1510 to Curtis 1268 Conversion
 Club Car 1510 to Curtis 1268 Conversion Installation Instructions 62-12685501CKI Rev. 05 7/18/14 Page 1 of 7 1510 to Curtis 1268 Conversion Installation Instructions Before you start turn Tow/Run switch
Part Number: TBL-016S
 5/18/17 TOYOTA TUNDRA 2014-2017 LED Truck Bed Light Kit Part Number: TBL-016S Kit Contents Item # Quantity Reqd. Description 1 2 LED Bed Light Harness (10 ) 2 2 LED Bed Light Harness (5 ) 3 1 Y Harness
GENUINE PARTS INSTALLATION INSTRUCTIONS
 GENUINE PARTS INSTALLATION INSTRUCTIONS DESCRIPTION: APPLICATION: PART NUMBER: KIT CONTENTS: Illuminated Kick Plate Maxima (Applicable ONLY to U.S. Market Vehicles with Build Date June 2012 or later) 999G6
Amp & Speaker Upgrade Install Instructions for Batwing Fairing
 Amp & Speaker Upgrade Install Instructions for Batwing Fairing Tools Needed: 1/2 inch Socket Wire Cutters 7/16 inch Socket Wire Strippers 10 mm Socket Phillips Screwdriver 1/2 inch Ratchet Wrench T25 Torx
1968 PLYMOUTH ROAD RUNNER
 Sequential LED Tail Light Kit Installation Guide 1968 PLYMOUTH ROAD RUNNER PN 1200568 Please refer to Invoice for full warranty information DIGI-TAILS is not a licensed MOPAR product Note The LED boards
Installation Instructions for Recon Turn Signals with Amber LEDs (07-17 Wrangler JK)
") Installation Instructions for Recon Turn Signals with Amber LEDs (07-17 Wrangler JK) Installation Time: 1-2 Hours Tools Required: Phillips Head Screwdriver Flat Head Screwdriver Electrical tape Pliers
Installation Instructions for Recon Turn Signals with Amber LEDs (07-17 Wrangler JK) Installation Time: 1-2 Hours Tools Required: Phillips Head Screwdriver Flat Head Screwdriver Electrical tape Pliers
PA Performance Mustang Alternator Amp (03-04 Cobra) - Installation Instructions
 - Installation Instructions") PA Performance Mustang Alternator - 130 Amp (03-04 Cobra) - Installation Instructions The below installation instructions work for the following products: PA Performance Mustang Alternator - 130 Amp (03-04
PA Performance Mustang Alternator - 130 Amp (03-04 Cobra) - Installation Instructions The below installation instructions work for the following products: PA Performance Mustang Alternator - 130 Amp (03-04
Dash Procedure (Dash Cluster Corvette) for color upgrade
 for color upgrade") Dash Procedure (Dash Cluster 1984-1989 Corvette) for color upgrade Chapter 1 Please read all instructions before proceeding. 1. Disconnect negative battery cable. 2. Use small flat blade screw driver to
Dash Procedure (Dash Cluster 1984-1989 Corvette) for color upgrade Chapter 1 Please read all instructions before proceeding. 1. Disconnect negative battery cable. 2. Use small flat blade screw driver to
Jass.Performance Low Profiles Installation Manual
 Jass.Performance Low Profiles Installation Manual The Jass.Performance Low Profiles are featuring: Fully reversible upgrade of the stock headlight bodies. Premium branded E-signed, TÜV aprooved Hella Headlights
Sequential Tail Light System
 Sequential Tail Light System Installation Instructions Notice: Our conversion systems are intended for 1965-70 Ford Mustangs only. This is not a replacement system for Shelby Mustangs or Mercury Cougars
TOYOTA PRIUS FOG LIGHT (Halogen or LED)
") Part Number: TPR-413 / TPR-813 Kit Contents Item # Quantity Reqd. Description 1 2 Fog Lamps 2 1 Lower Grill 3 1 Switch Assembly 4 1 Fog Light Operation guide 5 1 Harness Bag Hardware Bag Contents Item
Part Number: TPR-413 / TPR-813 Kit Contents Item # Quantity Reqd. Description 1 2 Fog Lamps 2 1 Lower Grill 3 1 Switch Assembly 4 1 Fog Light Operation guide 5 1 Harness Bag Hardware Bag Contents Item
V6 Mustang BBK Long Tube Headers and Shorty X-Pipe:
 2011-2012 V6 Mustang BBK Long Tube Headers and Shorty X-Pipe: Time Required: Approximately 9 hours w/ 3 installers (highly recommended having help during install); process will be much faster with a lift
INSTALLATION INSTRUCTIONS
 7 LED sealed beam headlamp with white/amber halo ring INSTALLATION INSTRUCTIONS For 2007 and newer Jeep Wrangler JK SB7150FA-BLK, SB7250XX-BLK, SB7060XX-BLK, SB7160XX-BLK, SB7150FA-CHR, SB7250XX-CHR, SB7060XX-CHR,
Hush-O-Matic MRS Control Package
 Hush-O-Matic MRS Control Package 06-49192 Congratulations on your purchase! The Hush-O-Matic MRS Control package allows you to choose a few different modes including always quiet and always loud. Controlling
Brake and Tail Light Kit Workman 1100/2100 and Twister Utility Vehicles
 Form No. 5-90 Brake and Tail Light Kit Workman 00/00 and Twister Utility Vehicles Part No. 0 6697 Installation Instructions Important Before installing this kit, you must have Wiring kit number 99 79 installed
Ford Racing Laser Etched Valve Covers (05-10 GT, GT500)
") Applicable Part Numbers: M-6582-FR3VBL (Blue) M-6582-FR3VBLK (Black) M-6582-C543V (Chrome) List of Tools: 1/4 ratchet 3/8 ratchet 8mm socket 10mm socket 7mm socket 1/4 & 3/8 extensions Plastic gasket scraper
Applicable Part Numbers: M-6582-FR3VBL (Blue) M-6582-FR3VBLK (Black) M-6582-C543V (Chrome) List of Tools: 1/4 ratchet 3/8 ratchet 8mm socket 10mm socket 7mm socket 1/4 & 3/8 extensions Plastic gasket scraper
Ford Mustang GT-Style Fog Light Kit Parts List: Quantity: Tool List:
 2013-2014 Ford Mustang GT-Style Fog Light Kit Parts List: Quantity: Tool List: Fog light (Left& Right) 2 Flat head & Phillips screwdriver Upper grille with surround 1 Ratchet & Socket set OR Lower grille
ULTIMATE LIGHTBAR - Universal Fitment
 Page: 1 Revision: 9.3-08/11/2011 Install Time: 120 Minutes Use Blue Loctite on all hardware. Refer to owner's manual for any removal questions related to the stock headlight assembly and electrical. INCLUDED
I n s t a l l a t i o n I n s t r u c t i o n s
 MG Midget and Austin-Healey Sprite Supercharger Alternator Conversion FOR 1961-1967 Midget (up to car# G-AN4-60459) and Sprite (up to car# H-AN9-72040) PART # 130-108 440 Rutherford St. P.O. Box 847 Goleta,
Installation of Auto Meter Cobalt Boost/Vacuum Gauge:
 Installation of Auto Meter Cobalt Boost/Vacuum Gauge: Fitment: All 79-14 models. This installation was completed on a 2004 Mustang GT, and should be identical for all 1999-2004 model Mustangs. Time needed:
Mishimoto Performance Aluminum Radiator w/ Stabilizer - Manual (97-04 GT, Mach 1; Cobra)
") Mishimoto Performance Aluminum Radiator w/ Stabilizer - Manual (97-04 GT, Mach 1; 97-01 Cobra) Installed on: 2000 Mustang GT (manual transmission) Tools: 8mm socket 10mm socket 13mm socket 3/4" wrench
Mishimoto Performance Aluminum Radiator w/ Stabilizer - Manual (97-04 GT, Mach 1; 97-01 Cobra) Installed on: 2000 Mustang GT (manual transmission) Tools: 8mm socket 10mm socket 13mm socket 3/4" wrench
CHEVORLET IMPALA
 1962-64 CHEVORLET IMPALA Four Panel Sequential LED Tail Light Kit Installation Guide Kit Contents: 4 LED panels 1 deck lid harness 4 grommets 1 power wire 2 pigtail harness kits 2 crimp terminal kits PN
PN R CHEVY CAMARO w/reverse Two panel Sequential LED Taillight kit installation guide. Kit Contents:
 Two panel Sequential LED Taillight kit installation guide Kit Contents: 2 LED panels 4 rubber grommets 1 power wire with t-tap 1 driver side LED harness, 24 1 passenger side LED harness, 48 2 LED extension
BBK Liquid-Filled Fuel Pressure Gauge (86-93) - Installation Instructions
 - Installation Instructions") BBK Liquid-Filled Fuel Pressure Gauge (86-93) - Installation Instructions The below installation instructions work for the following products: BBK Liquid-Filled Fuel Pressure Gauge (86-93) Please read
BBK Liquid-Filled Fuel Pressure Gauge (86-93) - Installation Instructions The below installation instructions work for the following products: BBK Liquid-Filled Fuel Pressure Gauge (86-93) Please read
Conflicts. TOYOTA Prius Foglights. Part Number: Accessory Code: LF1. Factory Fog Lights
 TOYOTA Prius 2011- Foglights Part Number: 00016-47401 Accessory Code: LF1 Conflicts Factory Fog Lights Item # Quantity Reqd. Description 1 2 Fog Lamps 2 2 Fog Lamp s bezels 3 1 Switch Assembly 4 1 Fog