TOYOTA Highlander / Highlander HV 2017 TVIP V4 PREPARATION
|
|
|
- Robyn Hortense Gallagher
- 5 years ago
- Views:
Transcription
1 PREPARATION Part #: PT Conflict Do not install into Vehicles without Smart Key system. Recommended Sequence of Application Item# Quantity Description 1 1 V4 RES 2 1 V2 GBS or V5 RS3200 Plus Kit Contents Item# Quantity Description 1 1 V4 Wire Harness 2 1 RES ECU Mounting Bracket Hardware Bag Contents Item# Quantity Description 1 1 RES ECU PT AA 2 1 RES ECU Bracket 3 2 M6 Nut Additional Items Required For Installation Item# Quantity Description Wire Tie 5 2 Foam Tape 6 1 Vinyl Sheet 7 2 Key Tag English PT E 8 2 Key Tag Spanish PT S 9 2 Window Label English PT S 10 2 Window Label Spanish PT SL 11 1 Engine Room Label English PT EL 12 1 Engine Room Label Spanish PT SL 13 1 V4 Owner s Guide Hood Switch Kit (PT ) NOTE: Req d for all Vehicles without Factory Alarm (see page 6) Page 1 of 35 Recommended Tools Personal & Vehicle Protection Safety Glasses Safety Gloves Blankets, Parts Boxes Special Tools Techstream 1/4 Drive Torque Screwdriver (Req d for Hood Switch Kit) Installation Tools Screwdriver Nylon Panel Removal Tool Utility Knife Pliers Side Cutters Torque Wrench Socket Special Chemicals Cleaner Glass Cleaner Legend Description (Optional) Blankets, Parts Boxes Use latest version on TIS Included in the TPMS Tool Kit# TTPWS Toyota SST# TTPWS-03, #0 Phillips Hood Switch: 3.1 in lbf (0.35 N m) #2 Phillips, Flat Blade Jeweler s e.g. Panel Pry Tool #1 Toyota SST# Needle Nose Battery: 48 in lbf (5.4 N m), Hood Latch: 71 in lbf (8 N m), ECU: 71 in lbf (8 N m) 10mm, extension VDC Approved Cleaner Household Glass Cleaner STOP: Damage to the vehicle may occur. Do not proceed until process has been complied with. OPERATOR SAFETY: Use caution to avoid risk of injury. CAUTION: : A process that must be carefully observed in order to reduce the risk of damage to the accessory/vehicle and to ensure a quality installation. TOOLS AND EQUIPMENT: Used in Figures calls out the specific tools and equipment recommended for this process. REVISION MARK: This mark highlights a change in installation with respect to previous issue. SAFETY TORQUE: This mark indicates that torque is related to safety. WIRE TIE LOCATION: Wire Tie location number. PREVIOUS WIRE TIE LOCATION: This mark xx indicates a previously installed Wire Tie. Accessory Installation Practice (read before installation) Care must be taken when installing this accessory to ensure damage does not occur to the vehicle. The installation of this accessory should follow approved guidelines to ensure a quality installation. These guidelines can be found in the Accessory Installation Practices document. This document covers such items as: Vehicle Protection (use of covers and blankets, cleaning chemicals, etc.) Safety (eye protection, checking torque procedure, etc.) Vehicle Disassembly/Reassembly (panel removal, part storage, etc.) Electrical Component Disassembly/Reassembly (battery disconnection, connector removal, etc.) Please see your Toyota dealer for a copy of this document. xx
2 PREPARATION Table of Contents I. Preparation Table of Contents Wire Routing Overview...3 II. Procedure Hood Switch Confirmation Hood Switch Installation Vehicle Disassembly RES ECU Preparation and Installation V4 Harness Installation Registration Preparation Registration Complete the Installation Tag and Labels...32 III. Checklist Accessory Function Checks Vehicle Appearance Check Vehicle Function Checks...34 Page 2 of 35
3 Page 3 of 35 TOYOTA Highlander RES Wire Harness Outline* *Color of Harness on Overview corresponds with Colored Tape near Connectors on Harness. A F B W E C Z D TVIP Vehicle Description A 8P White B 18P Gray C 18P Gray D Ground Terminal E - 24P White F - 8P White W - White Tape Marker Z - RES ECU TOYOTA Highlander / Highlander HV 2017 TVIP V4 PREPARATION
4 PREPARATION TOYOTA Highlander without Factory Alarm TVIP Vehicle Description Y - Hood Switch H 2P Connector Y H Page 4 of 35
 LUGGAGE COMPARTMENT(FOR HV ONLY) 1 Disconnect all Corresponding Connectors. 1. Hood Switch Confirmation a. Verify if the Short Pin is installed.")
5 Disassembly Overview 1 DS Luggage Side Cover (for HV ONLY) 2 Engine Cover 2 3 PS Step Cover 4 PS Cowl Cover ENGINE ROOM COMPARTMENT 5 5 PS Dash Side Cover 6 Glove Box Under Cover 7 Glove Box VEHICLE INTERIOR (PASSENGER S SIDE) LUGGAGE COMPARTMENT(FOR HV ONLY) 1 Disconnect all Corresponding Connectors. 1. Hood Switch Confirmation a. Verify if the Short Pin is installed. If not, install now. Page 5 of 35
 WITHOUT Factory")
6 Confirm the following: Before beginning, close the Hood and the Doors. Press the remote control s lock button. Security LED Turns ON solid for 30 Seconds then starts blinking Security LED starts blinking Immediately WITH Factory Alarm (Vehicle has Hood Switch) WITHOUT Factory Alarm (Vehicle does not have Hood Switch) Page 6 of 35
 For Gas Vehicles the battery is in the Engine Compartment. d. Disconnect the Negative Battery Terminal.")

7 10mm Socket Fig. 1-2 Hybrid Vehicles (HV) b. Place the Vehicle in Park with the Parking Brake set. For Hybrid Vehicles the battery is in the Luggage Compartment. c. Remove the DS Luggage Side Cover. (for HV only) For Gas Vehicles the battery is in the Engine Compartment. d. Disconnect the Negative Battery Terminal. Note the Battery Cable Position as it will be re-installed in the same position. CAUTION: Do not touch the Positive Terminal. NOTE: If Vehicle is equipped with Factory Alarm, skip to Section 3 on Page 12. Gas Vehicles Vehicles Without Factory Alarm ONLY 2. Hood Switch Installation. a. Remove 1 Clip and rotate the passenger side Engine Cover. Page 7 of 35


8 Vehicles Without Factory Alarm ONLY b. Remove 1 Clip and rotate the driver side Engine Cover. c. Remove the Engine Cover. Remove 7 Clips. d. Dislodge the Hood Lock Assembly. Remove Bolt Cover. Remove 3 Bolts. Page 8 of 35


9 Vehicles Without Factory Alarm ONLY e. Remove the Hood Lock Cable from the Hood Lock Assembly. f. Remove the Hood Lock Assembly. Needle Nose Pliers Fig. 2-6 g. Release the Spring from the Hood Lock. Fig. 2-7 Make sure to hold the Hood Switch by its sides. Make sure the Hood Switch Lever is positioned properly. If the Hood Switch is Broken RES will not function. Page 9 of 35


10 Torque Screwdriver Fig. 2-8 Vehicles Without Factory Alarm ONLY h. Install the Hood Switch with the Switch Lever underneath the Hood Lock Trigger Lever. Torque: Tighten the Screw to 3.1 in lbf (0.35 N m). NOTE: Do not reuse the Screw once it is already installed. The effect of the adhesive becomes weak if used again. i. Route the Hood Switch Harness underneath the Hood Lock Cable Lever. Cleaner Fig mm j. Using VDC approved cleaner and cleaning method, clean the indicated area underneath the Hood Lock Assembly. k. Attach the Clamp underneath the Hood Lock Assembly. l. Secure the Hood Switch Harness using the Clamp. CAUTION: Do not overstress the Hood Switch Harness. 0mm Needle Nose Pliers Fig m. Reinstall the Spring to the Hood Lock. Page 10 of 35
. p.")

11 Vehicles Without Factory Alarm ONLY n. Reinstall the Hood Lock Cable to the Hood Lock Assembly. o. Reinstall the Hood Lock Assembly. Torque: Tighten the 3 Bolts to 71 in lbf (8.0 N m). p. Reinstall the Bolt Cover. q. Disconnect and discard the Dummy Connector from the Vehicle s Pre-Connector. r. Connect the Hood Switch Harness Connector to the Vehicle s Pre-Connector. Page 11 of 35


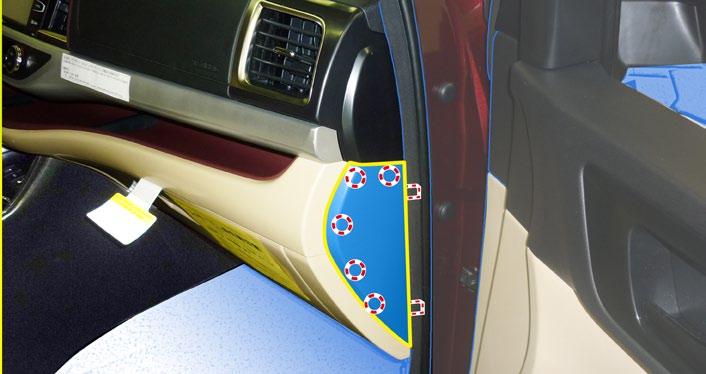
12 3. Vehicle Disassembly a. Remove the Passenger s Side Step Cover. b. Remove the Passenger s Side Cowl Cover. Remove 1 Nut. c. Remove the Passenger s Side Dash Cover. Page 12 of 35


13 d. Remove the Glove Box Under Cover. e. Remove 2 Bolts from the bottom of the Glove Box. f. Open the Glove Box. g. Dislodge the Glove Box. Remove 3 Screws. Page 13 of 35

14 h. Disconnect the Vehicle s Connectors. i. Remove the Vehicle clamp from the Glove Box. j. Remove the Glove Box. Utility Knife Fig /2 Foam Tape 4. RES ECU Preparation and Installation. a. Cut the Foam Tape into 1/2 pieces. 1/2 Foam Tape Tape Measure/Ruler, Scissors Fig. 4-2 Vinyl Sheet 30 mm b. Cut the Vinyl Sheet in half, then cut 1 (100 x 30mm) pieces from the 1 half piece as shown. c. Cut one of the remaining pieces in half to form 2 (50 x 30mm) as shown. 100 mm 50 mm 50 mm Page 14 of 35

 Vinyl Sheet 1/2 Foam Tape Fig. 4-4 f.")

15 (50 x 30mm) Vinyl Sheet Fig. 4-3 d. Use VDC approved cleaner to clean the RES ECU Bracket. e. Attach the 2 (50 x 30mm) Vinyl Sheets to the RES ECU Bracket. 0mm (50 x 30mm) Vinyl Sheet 1/2 Foam Tape Fig. 4-4 f. Attach the 1/2 Foam Tapes over the Vinyl Sheets on the RES ECU Bracket. 1/2 Foam Tape 0mm Fig. 4-5 g. Attach the RES ECU Bracket to the RES ECU. Page 15 of 35


16 0mm TOYOTA Highlander / Highlander HV 2017 TVIP V4 Fig. 4-6 h. Attach the Foam Tape to the RES ECU. 0mm Fig. 4-7 i. Plug in the V4 White 24P Connector to the RES ECU. j. Install the RES ECU using and the V4 Ground Wire Terminal using the supplied Nuts. NOTE: Verify that these Nuts are tightened securely. Torque: Tighten the Nuts to 8 N m (71 in lbf). Page 16 of 35
 is installed in the vehicle, skip to page 19 for V4/V2 Add-On")

17 5. V4 Harness Installation. V4 ONLY NOTE: If V2 (GBS) is installed in the vehicle, skip to page 19 for V4/V2 Add-On (steps l-z). a. Remove the Tape securing the Vehicle s 8P Pre-Connector. b. Connect the V4 White 8P Connector to the Vehicle s 8P Pre-Connector. c. Secure the V4 Harness s White Tape Marker to the Vehicle Harness using 1 Wire Tie (#1). (Fig. 5-3) Page 17 of 35
 NOTE: Place the 8P Connector in reference to the illustration. e.")
 NOTE: Rotate the ratchet end on Wire Ties (#2, #3) toward the rear of the Vehicle. f.")

18 V4 ONLY d. Secure the 8P Connectors to the Vehicle Harness using 1 Wire Tie (#2). (Fig. 5-4) NOTE: Place the 8P Connector in reference to the illustration. e. Secure the V4 Harness to the Vehicle Harness using 1 Wire Tie (#3). (Fig. 5-4) NOTE: Rotate the ratchet end on Wire Ties (#2, #3) toward the rear of the Vehicle. f. Route the V4 Harness toward the Passenger side Cowl area. g. Disconnect the Vehicle s Gray 18P Connector from the Connector Block. h. Connect the Vehicle s Gray 18P Connector to the V4 18P Connector. Page 18 of 35
. (Fig.")
. (Fig.")

19 V4 ONLY i. Plug in the V4 Gray 18P Connector to the Vehicle Connector Block. j. Secure the V4 Harness to the Vehicle Harness using 1 Wire Tie (#4). (Fig. 5-8) NOTE: Place the 8P Connector in reference to the illustration. k. Secure the 18P Connectors to the Vehicle Harness using 1 Wire Tie (#5). (Fig. 5-9) NOTE: Rotate the ratchet end on Wire Tie (#5) CAUTION: Do not secure to the Airbag Harness. NOTE: Place the 18P Connector in reference to the illustration. NOTE: Skip to Section 6 (p. 23) for Registration Preparation. Page 19 of 35


20 V4/V2 Add-on Only l. Cut the Wire Tie securing the V2 8P Connector. m. Disconnect the Vehicle s 8P Pre-Connector from the V2 8P Connector. n. Secure the V4 Harness s White Tape Marker to the Vehicle Harness using 1 Wire Tie (#1). (Fig. 5-12) Page 20 of 35


21 V4/V2 Add-on Only o. Connect the V4 White 8P Connector to the Vehicle s 8P Pre-Connector. p. Connect the V4 White 8P Connector to the V2 White 8P Connector. q. Cut the Wire Tie securing the V2 Harness. Page 21 of 35


22 V4/V2 Add-on Only r. Cut the Wire Tie securing the V2 Gray 18P Connector. s. Disconnect the Vehicle s Gray 18P Connector from the V2 18P Connector. t. Connect the V4 Gray 18P Connector to the V2 Gray 18P Connector. u. Connect the Vehicle s 18P Gray Connector to the V4 Gray 18P Connector. Page 22 of 35
. (Fig. 5-19) x. Secure the V2 8P Connector to the Vehicle Harness with 1 Wire Tie (#4).")
 toward the rear of the Vehicle. NOTE: Place the V2 8P Connector in reference to the illustration. y.")
. (Fig. 5-21) CAUTION: Do not secure to the Airbag Harness. aa.")
23 V4/V2 Add-on Only v. Secure the V4 8P Connector to the Vehicle Harness with 1 Wire Tie (#2). (Fig. 5-19) w. Secure the V4 8P Harness to the Vehicle Harness with 1 Wire Tie (#3). (Fig. 5-19) x. Secure the V2 8P Connector to the Vehicle Harness with 1 Wire Tie (#4). (Fig. 5-19) CAUTION: Reduce stress on Wire Tie (#4) and the 8P Connector s wire as shown. NOTE: Rotate the ratchet end on Wire Ties (#2, #3, #4) toward the rear of the Vehicle. NOTE: Place the V2 8P Connector in reference to the illustration. y. Secure the V2 Harness to the Vehicle Harness using 1 Wire Tie (#5). (Fig. 5-20) z. Secure the V4 Harness to the V2 Harness and Vehicle Harness using 1 Wire Tie (#6). (Fig. 5-21) CAUTION: Do not secure to the Airbag Harness. aa. Secure the V4 18P Connector to the V2 18P Connector and Vehicle Harness using 1 Wire Tie (#7). (Fig. 5-21) NOTE: Rotate the ratchet end on Wire Ties (#6, #7) toward the rear of the Vehicle. Page 23 of 35
24 10mm Socket, Extension, Phillips Screwdriver Fig Registration Preparation. a. Reassemble the Vehicle except for the passenger side Luggage Side Cover. VERIFY: That panels fit together properly, with no uneven gaps. VERIFY: That all Connectors are plugged in. ENGINE ROOM COMPARTMENT VEHICLE INTERIOR (PASSENGER S SIDE) LUGGAGE COMPARTMENT(FOR HV ONLY) Do not Install Page 24 of 35
25 10mm Socket Fig Registration. a. Open the Hood. b. Temporarily reconnect the Negative Battery Cable. CAUTION: Do not touch the Positive Terminal. Fig. 7-2 c. Open the Driver s Side Door. CAUTION: Leave the Door open until the registration is completed. d. With the Smart Key in your possession, press the Engine Start Stop Button twice to select the Ignition ON position. Techstream Fig. 7-3 e. Connect the Techstream Notebook to the Vehicle s Diagnostic Port. Page 25 of 35
26 Fig. 7-4 f. Start the TIS Techstream Application by clicking on the shortcut located on the Desktop. g. Click Connect to Vehicle. Fig. 7-5 h. Confirm that the information displayed on the Vehicle Connection Wizard is correct for the vehicle. If not verify that the Techstream is properly connected. i. Select option that applies to the Vehicle. j. Click Next>. Fig. 7-6 k. Select Smart Key. l. Click. Tehstream (Ver 7,30,025) File Function Setup TIS User Help System Select XXXX XXXXXXXX XXX-XXX Stored Data System Selection Menu Select desired system and then press the arrow button to access the ECU XXXXXX km XXXXXXXXXXXXXXXXX System System Yellow=ECU status unknown White=ECU communication OK Health Check *System White w/asterisk=ecu not supported or not responding Customize Setting All ECUs Powertrain Chassis Body Electrical Engine and ECT Cruise Control Air suspension VGRS Lane Departure Alent DRS ABS/VSC/TRAC Air Conditioner Four Wheel Drive SRS Airbag Tire Pressure Monitor Main Body EMPS Gateway ECU Reprogramming Accessory Gateway Sliding Roof D-Door Motor Tilt&Telescopic P-Door Motor Combination Meter RL-Door Motor Mirror L RR-Door Motor Mirror R Driver Seat Intutive P/A Master Switch HL AutoLeveling CAN Bus Check Smart Key Blind Spot Monetor Slave Power Source Control Telematics Occupsnt Detection Remote Engine Starter Starting Control Navigation System Blind Spot Monitor Master This ECU controls keyless entry and starting engine It determines whether or not to disable starting the engine depending on a comparison of the ID code and the vehicle's pre-registered code TIS Search Print Main Menu Page 26 of 35
27 Fig. 7-7 m. Click on Utility. Fig. 7-8 n. Select ECU Communication ID Registration. o. Click. Fig. 7-9 p. Click Next>. Tehstream (Ver 7,30,025) File Function Setup TIS User Help System Select Stored Data Smart Access Live XXXX XXXXXXXX XXX-XXX XXXXXX km XXXXXXXXXXXXXXXXX Trouble Codes Data List Active Test Modifay Utility Dual Data List Utility Selection Menu Select desired Utility and then press Next button Operation History Customize ECU Communication ID Registration Smart Code Registration(Classic) Smart Code Reset ECU Communication ID Registration(SMRT ) Help Wireless Door Lock Diagnosis Mode Commumication Check(Key Diag Mode) Welcome to ECU Communication Smart Code Erasure ID Smart Code Registration Registration wizard This function is used to perform the "hand shake" procedure Confirm the following conditions - The Power/Engine Switch is ON(IG) - Smart Cancel function is OFF Usage Use htis function in the following situation - Certification ECU has replaced Introduction This function regidters the communication ID between the ID Cide Box ECU and Certification ECU TIS Keyword Print Next > Cancel Close Page 27 of 35
28 Fig q. Select Remote Engine Starter. r. Click Next>. Fig CONFIRM: That the ECU Communication ID was completed successfully. s. Click Exit. Fig t. Click on System Select tab. u. Select Remote Engine Starter. Tehstream (Ver 7,30,025) File Function Setup TIS User Help System Select Stored Data v. Click. XXXX XXXXXXXX XXX-XXX System Selection Menu Select desired system and then press the arrow button to access the ECU XXXXXX km XXXXXXXXXXXXXXXXX System System Yellow=ECU status unknown White=ECU communication OK Health Check *System White w/asterisk=ecu not supported or not responding Customize Setting All ECUs Powertrain Chassis Body Electrical Engine and ECT Cruise Control Air suspension VGRS Lane Departure Alent DRS ABS/VSC/TRAC Air Conditioner Four Wheel Drive SRS Airbag Tire Pressure Monitor Main Body EMPS Gateway ECU Reprogramming Accessory Gateway Sliding Roof D-Door Motor Tilt&Telescopic P-Door Motor Combination Meter RL-Door Motor Mirror L RR-Door Motor Mirror R Driver Seat Intutive P/A Master Switch HL AutoLeveling CAN Bus Check Smart Access Blind Spot Monetor Slave Power Source Control Telematics Occupsnt Detection Remote Engine Starter Starting Control Navigation System Blind Spot Monitor Master This ECU controls the engine start from outside of car TIS Search Print Main Menu Page 28 of 35
29 Fig w. Click on Utility. Fig x. Select Remote Engine Starter Initial Registration. Fig y. Click Next>. Page 29 of 35
30 Fig z. Close the Hood within 30 seconds. Tehstream (Ver 7,30,025) File Function Setup TIS User Help System Select Stored Data Remote Engine Starter Live XXXX XXXXXXXX XXX-XXX Utility Selection Menu Select desired Utility and then press Next button Remote Engine Starter Initial Registration(RES ) XXXXXX km XXXXXXXXXXXXXXXXX Remote Engine Starter Initial Registration Help Trouble Codes Perform the following operation 1. Close the engine hood Data List Active Test When registration is complete, the screen will automatically change Modifay Utility Dual Data List Registering Usage To execute initiel registration of the Remote Enco Time Remaining 24 sec Introduction Registers vehicle intermation with the Remote En TIS Keyword Print < Back Next > Exit Close Fig aa. Click Exit. Tehstream (Ver 7,30,025) File Function Setup TIS User Help Fig IF THIS FAILED Click Yes. Start again from step y. System Select Stored Data Remote Engine Starter Live XXXX XXXXXXXX XXX-XXX Utility Selection Menu Select desired Utility and then press Next button Remote Engine Starter Initial Registration(RES ) XXXXXX km XXXXXXXXXXXXXXXXX Remote Engine Starter Initial Registration Help Trouble Codes Perform the following operation 1 Close the engine hood Data List Active Test When Error Remote registration Engine Starter is complete, Initial Registration the screen will automatically change Modifay Utility Dual Data List Remote Engine Starter Initial Registration has failed Do you want to try again? Registering Yes No Usage To execute initiel registration of the Remote Enco Time Remaining 17 sec Introduction Registers vehicle intermation with the Remote En TIS Keyword Print < Back Next > Exit Close Page 30 of 35
31 Fig ab. Press the ENGINE START STOP Button once to switch the ignition off. ON OFF 8. Complete the Installation. For Hybrid Vehicles the battery is in the Luggage Compartment. For Gas Vehicles the battery is in the Engine Compartment. a. Position the Negative Battery Cable at the original factory position. Torque: Tighten the Nut to 48 in lbf (5.4 N m) CAUTION: Do not touch the positive terminal. LUGGAGE COMPARTMENT(FOR HV ONLY) Fig. 8-2 b. Finish reassembling the Vehicle. c. Clean up and Remove trash. d. Sealed in its protective bag, place the Owner s Manual in the Glove Box. Page 31 of 35


32 Fig Tag and Labels. For US Vehicles use the English Tags and Labels, and discard the Spanish Tags and Labels. For Mexico Vehicles use the Spanish Tags and Labels, and discard the English Tags and Labels. a. Using VDC approved cleaner and cleaning method, clean the area indicated in the Underside of the Hood. b. Attach the Engine Room Label as shown. CAUTION: Do not touch the adhesive surface. Fig. 9-2 c. Attach the Key Tag. REPEAT: Step 9c on the other Smart Key. d. Use Household Glass Cleaner to clean the inside of the Front Door Window. e. Use a piece of Clear Tape to lift the Label off its protective backing. CAUTION: Do not touch the adhesive surface. f. Attach the Label as shown. NOTE: Make sure to Align according to Etching or Other Label. REPEAT: Steps 9d-9f on the other Front Door Window. Page 32 of 35
33 CHECKLIST these points MUST be checked to ensure a quality installation. Accessory Function Checks Close the hood, enter the vehicle and close all doors. Place the shift lever in the P (Park) position, set the parking brake and make sure the Vehicle is off. Perform 1 Press the remote control s lock button twice within 2 seconds, then press and hold the lock button for 3 seconds. 2 With the engine running, pull the hood release handle. Look For The hazard lights flash after 3 seconds. The engine starts. The hazard lights flash repeatedly for 10 seconds. The engine stops. The hazard lights flash once. The security alarm triggers. (Only if equipped with OE Factory Alarm, not Genuine Accessory alarm, and only if armed) Vehicle Appearance Check Perform After accessory installation and removal of protective cover(s), perform a visual inspection of the vehicle. Look For Ensure no damage (including scuffs and scratches) was caused during the installation process. (For PPO installations, refer to TMS Accessory Quality Shipping Standard.) Page 33 of 35
34 CHECKLIST these points MUST be checked to ensure a quality installation. Vehicle Function Checks Function Function Enter the Vehicle Dome/Courtesy Lights Horn Start the Vehicle Panel/Switch Illumination Gauges Check Engine Light If the warning light remains on, it may indicate a system malfunction. CHECK ABS Light (if equipped) If the warning light remains on, it may indicate a system malfunction. Lamp Failure Sensor If the warning light remains on, it may Track/Skid Control Light (if equipped) If the warning light remains on, it may indicate indicate a system malfunction. a system malfunction. Seat Belt Warning Light If the warning light remains on, it may Tire Pressure Monitoring System (TPMS). indicate a system malfunction. Air Bag Warning Light If the warning light remains on, it may indicate a system malfunction. Cruise Control Light (if equipped) Prior to TPMS activation and Pre-delivery Service (PDS) of the Vehicle the TPMS light will blink when IG is turned on. After TPMS activation and PDS of the Vehicle the TPMS light will illuminate for a few seconds and go off when IG is turned on. Using a Mirror or Assistant check the following. Trunk/Tailgate/Bed Lights (if equipped) Brake Lights Backup Lights Clearance Sonar (if equipped) Tail Lights Daytime Running Lights (if equipped) Marker Lights Turn Signal Lights Stop the Engine, Place the Vehicle s IG in the ON position. Hazard Lights Power Back Door/Hatch (if equipped) Head Light Fog Lights (if equipped) High Beams Power Side Mirrors (if equipped) Power Sliding Door (if equipped) Rear Sunshade (if equipped) Accessory Controls/Illumination (if equipped) Convenience Memory Settings (if equipped) Page 34 of 35
35 CHECKLIST these points MUST be checked to ensure a quality installation. Function Front Wiper/Washer Power Function Rear Wiper/Washer (if equipped) Sun/Moon Roof (if equipped) Rollover Side Curtain Air Bag Switch (RSCA) (if equipped) Clock (if equipped) Audio/Video (if equipped) Steering Wheel Audio Control (if equipped) HVAC Front Windshield Defogger (if equipped) Side Mirror Defogger (if equipped) Massage Seats (if equipped) Navigation System (if equipped) USB Connections (if equipped) Rear Window Defogger (if equipped) Accessory Power Socket (if equipped) Heated/Vented Seats (if equipped) Glove Box Light (if equipped) Trunk or Back Door/Hatch Cancel Switch (if equipped) Power Locks (if equipped) Power Seats (if equipped) Power Windows (if equipped) Key Sensor Buzzer Page 35 of 35
TOYOTA SIENNA w/smart Key and Factory Alarm 2015 TVIP V4 PREPARATION
 PREPARATION Part #: PT398-08150 Conflicts: Kit Contents Do not install into Vehicles without Smart Key and Factory Alarm. RES ECU RES ECU Bracket V4 Harness Nut Wire Tie Remote Label Key Tag x1 PT398-0T097
LEXUS RX 450h 2010 TVIP V4 PREPARATION
 PREPARATION Part #: PT398-48112 Conflicts: Kit Contents Will not Program with Techstream Lite. RES ECU RES ECU Bracket RES Harness Key Tag Engine Room Label Remote Label Window Label English x2 English
TOYOTA PRIUS V 2012 TVIP V4 PREPARATION
 PREPARATION Part #: PT398-47121 Conflicts: Will not program with Techstream Lite. Kit Contents Screw RES ECU RES ECU Bracket Hood Switch V4 Harness Remote Label (for Hood SW) Wire Tie PT398-0T097 x1 x1
TOYOTA VENZA w/smart 2009 TVIP V4 PREPARATION
 PREPARATION Part #: PT398-0T110 Conflicts: Will not program with Techstream Lite. Kit Contents RES ECU RES ECU Bracket RES Harness M6 Screw Wire Tie Splicing Connector Remote Label x1 x1 x1 x1 x5 x1 x2
TOYOTA Highlander / Highlander HV 2014 TVIP V2 PREPARATION
 PREPARATION Part #: PT398-48141 Conflicts: Do not install into Vehicles without Factory Alarm System. Kit Contents GBS ECU GBS ECU Bracket V2 Harness M6 Nut Bolt Jumper Connector Wire Tie DISCARD x1 08190-0C820
TOYOTA RAV4 w/smart 2009 TVIP V4 PREPARATION
 PREPARATION Part #: PT398-42110 Conflicts: Do not install into Vehicles manufactured from November 2012 and Onwards. Kit Contents RES ECU Gateway ECU RES ECU Bracket Gateway ECU Bracket Remote Label Key
TOYOTA PRIUS 2010 TVIP V4 PREPARATION
 PREPARATION Part #: PT398-47091 Conflicts: NOTE: Part number of this accessory may not be the same as the part number shown. Do not install into Manual Transmission Vehicles or Vehicles without RKE systems.
TOYOTA HIGHLANDER w/smart Key TVIP V4 REMOTE ENGINE STARTER (RES) Part Number: PT
 Part Number: PT") Preparation Part Number: PT398-48083 Conflicts Do not install into vehicles without RKE systems. Will not program with Techstream Lite. Recommended Sequence of Application Item # Accessory Kit Contents
Preparation Part Number: PT398-48083 Conflicts Do not install into vehicles without RKE systems. Will not program with Techstream Lite. Recommended Sequence of Application Item # Accessory Kit Contents
LEXUS CT 200h 2011 TVIP V2 PREPARATION
 PREPARATION Part #: PT398-76110 Conflicts: Kit Contents GBS ECU V2 Harness GBS ECU Bracket Nut Microphone Foam Tape Wire Tie x1 x1 x1 x1 x1 x2 x15 08190-0C820 08192-6C820 Window Label Owner s Guide PT398-60084
TOYOTA 4Runner w/o Smart 2012 TVIP V4 PREPARATION
 PREPARATION Part #: PT398-89140 Conflicts: Kit Contents Will not program with Techsream Lite. RES ECU RES ECU Bracket RES Harness Hood Switch Hood Switch Screw M6 Bolt Wire Tie x1 x1 x1 x1 PT398-89100-NS
TOYOTA LAND CRUISER 2016 TVIP V4 PREPARATION REMOTE ENGINE STARTER (RES)
") PREPARATION Part Number: PT398-60160 Kit Contents Item # Quantity Description 1 1 RES ECU 2 1 RES Bracket 3 1 Wire Harness Hardware Bag Contents Additional Item# Quantity Description 1 10 Wire Ties 2 1
PREPARATION Part Number: PT398-60160 Kit Contents Item # Quantity Description 1 1 RES ECU 2 1 RES Bracket 3 1 Wire Harness Hardware Bag Contents Additional Item# Quantity Description 1 10 Wire Ties 2 1
SCION tc 2014 TVIP V4 PREPARATION
 PREPARATION Part #: PT398-21111 Conflicts: Kit Contents Do not install into Vehicles with Smart key or Manual Transmission Vehicles. Will not program with Techstream Lite. Hood Switch RES ECU RES ECU Bracket
TOYOTA VENZA 2009 TVIP V2 PREPARATION
 PREPARATION Part #: PT398-0T092 Conflicts: Kit Contents Do not install into Vehicles without Factory Alarm System. GBS ECU GBS ECU Bracket GBS Harness GBS Microphone Wire Tie Foam Tape M6 Tapping Screw
LEXUS ES TVIP V2 PREPARATION
 PREPARATION Part #: PT398-33132 Conflicts: Kit Contents GBS ECU GBS ECU Bracket V2 Harness M6 Bolt Washer Wire Tie GBS Microphone x1 x1 x1 x1 x1 x5 08190-0C820 91651-60618 08192-6C820 x1 Foam Tape V2 Window
TOYOTA SEQUOIA TVIP V4 REMOTE ENGINE STARTER (RES)
") Preparation Part Number: PT398-34111 NOTE: Part number of this accessory may not be the same as the part number shown. Conflicts Do not install into vehicles without RKE system. Recommended Sequence of
Preparation Part Number: PT398-34111 NOTE: Part number of this accessory may not be the same as the part number shown. Conflicts Do not install into vehicles without RKE system. Recommended Sequence of
TOYOTA TUNDRA TVIP V5
 Preparation Part Number: PT398-34142 Conflicts Do not install into vehicles with Factory Alarm Systems or SR grade vehicles. Do not use Techstream Lite for Registration. Recommended Sequence of Application
TOYOTA PRIUS 2010 TVIP V5 PREPARATION
 PREPARATION Part #: PT398-47090 Conflicts: NOTE: Part number of this accessory may not be the same as the part number shown. Do not install into Manual Transmission Vehicles or Vehicles without RKE systems.
TOYOTA COROLLA 2010 TVIP V4 PREPARATION
 PREPARATION Part #: PT398-02080 or PT398-02100 NOTE: Part number of this accessory may not be the same as the part number shown. Conflicts: Do not install into Manual Transmission Vehicles or Vehicles
SCION tc 2011 TVIP V4 PREPARATION
 PREPARATION Part #: PT398-21111 Conflicts: NOTE: Part number of this accessory may not be the same as the part number shown. Do not install into Manual Transmission Vehicles or Vehicles without RKE systems.
TOYOTA COROLLA 2009 TVIP V4 PREPARATION
 PREPARATION Part #: PT398-02080 Conflicts: NOTE: Part number of this accessory may not be the same as the part number shown. Do not install into Manual Transmission Vehicles or Vehicles without RKE systems.
LEXUS RX TVIP V2 PREPARATION
 PREPARATION Part #: PT398-48090 Conflicts: NOTE: Part number of this accessory may not be the same as the part number shown. Do not install into Vehicles without Factory Alarm System. Kit Contents GBS
TOYOTA HIGHLANDER w/o Smart Key TVIP V4 REMOTE ENGINE STARTER (RES)
") Preparation Part Number: PT398-48111 Conflicts Do not install into vehicles without RKE systems. Recommended Sequence of Application Item # Accessory Kit Contents Item # Quantity Description 1 1 Wire Harness
Preparation Part Number: PT398-48111 Conflicts Do not install into vehicles without RKE systems. Recommended Sequence of Application Item # Accessory Kit Contents Item # Quantity Description 1 1 Wire Harness
TOYOTA TUNDRA TVIP V4 REMOTE ENGINE STARTER (RES)
") Preparation Part Number: 08586-OC910 Conflicts Do not install into vehicles without RKE systems. Recommended Sequence of Application Item # Accessory 1 TVIP/RES Any TVIP or RES system 2 XM Radio NOTE:
Preparation Part Number: 08586-OC910 Conflicts Do not install into vehicles without RKE systems. Recommended Sequence of Application Item # Accessory 1 TVIP/RES Any TVIP or RES system 2 XM Radio NOTE:
TOYOTA TUNDRA TVIP V5
 Preparation Part Number: 08586-OC890 Conflicts Do not install into vehicles with Factory Alarm Systems or without Immobilizer. Do not use Techstream Lite for Registration. Recommended Sequence of Application
TOYOTA CAMRY HYBRID TVIP V5 (RS3200 PLUS) Preparation
 Preparation") Preparation Part Number: 08586-3T940-AA Kit Contents Item # Quantity Reqd. Description 1 1 Wire Harness 3 1 ECU Mounting Bracket NOTE: Part number of this accessory may not be the same as the part number
Preparation Part Number: 08586-3T940-AA Kit Contents Item # Quantity Reqd. Description 1 1 Wire Harness 3 1 ECU Mounting Bracket NOTE: Part number of this accessory may not be the same as the part number
TOYOTA CAMRY TVIP V2 (GBS WITH ADD ON)
") Preparation Part Number: 08586-3T930 Kit Contents Item # Quantity Reqd. Description 1 2 Wire Harness (One wire harness is only for RS3200+) 2 1 GBS ECU 3 1 GBS Mounting Bracket 4 1 Microphone Hardware
Preparation Part Number: 08586-3T930 Kit Contents Item # Quantity Reqd. Description 1 2 Wire Harness (One wire harness is only for RS3200+) 2 1 GBS ECU 3 1 GBS Mounting Bracket 4 1 Microphone Hardware
TOYOTA TACOMA TVIP V5
 Preparation Part Number: PT398-35121 Conflicts Note: Must not be installed in Vehicles with Factory Alarm System and 2013- Vehicles with (4WD Double Cab 6MT and Off-Road Package). Kit Contents Item # Quantity
TOYOTA HIGHLANDER TVIP V2 (GBS ADD ON) Preparation
 Preparation") Preparation Part Number: 08586-48070 Kit Contents Item # Quantity Reqd. Description 1 1 Wire Harness 2 1 GBS ECU 3 1 ECU Mounting Bracket Hardware Bag Contents Item # Quantity Reqd. Description 1 1 Microphone
Preparation Part Number: 08586-48070 Kit Contents Item # Quantity Reqd. Description 1 1 Wire Harness 2 1 GBS ECU 3 1 ECU Mounting Bracket Hardware Bag Contents Item # Quantity Reqd. Description 1 1 Microphone
TOYOTA CAMRY wo/smart entry TVIP V4 REMOTE ENGINE STARTER (RES)
") Preparation Part Number: 08586-3T950 Kit Contents Item # Quantity Reqd. Description 1 1 Wire Harness 2 1 RES ECU 3 1 BUS ECU 4 1 ECU Mounting Bracket (A) 5 1 ECU Mounting Bracket (B) 6 1 Butyl Tape Hardware
Preparation Part Number: 08586-3T950 Kit Contents Item # Quantity Reqd. Description 1 1 Wire Harness 2 1 RES ECU 3 1 BUS ECU 4 1 ECU Mounting Bracket (A) 5 1 ECU Mounting Bracket (B) 6 1 Butyl Tape Hardware
TOYOTA RAV TVIP V5
 Preparation Part Number: 08586-42810 Kit Contents Item # Quantity Reqd. Description 1 1 Wire Harness 2 1 GBS ECU 3 1 Security ECU Mounting Bracket 4 1 GBS ECU Mounting Bracket 5 1 Status Monitor 6 1 Security
TOYOTA TACOMA TVIP V5
 Preparation Part Number: PT398-35090 Kit Contents Item # Quantity Reqd. Description 1 1 Wire Harness 2 1 Security ECU 3 1 GBS ECU 4 1 Status Monitor/Microphone 5 2 Warning Labels (English) 6 2 Warning
TOYOTA TUNDRA TVIP V4 Preparation
 Preparation Part Number: PT398-00100 PT398-00100-AA Conflicts Do not install into vehicles without RKE system. Recommended Sequence of Application Item # Accessory 1 TVIP/RES Any TVIP or RES system 2 XM
SCION xa LIMITED EDITION SECURITY WITH RKE (V3)
") Preparation Part Number: 08586-53840 Kit Contents Item # Quantity Reqd. Description 1 1 Wire Harness 2 1 V3 Security ECU 3 2 Remote Control Transmitters 4 1 Piezo Buzzer 5 1 Status Monitor 6 1 Radar Sensor
Preparation Part Number: 08586-53840 Kit Contents Item # Quantity Reqd. Description 1 1 Wire Harness 2 1 V3 Security ECU 3 2 Remote Control Transmitters 4 1 Piezo Buzzer 5 1 Status Monitor 6 1 Radar Sensor
SCION tc SECURITY (V5) Preparation
 Preparation") Preparation Part Number: PT398-21070 Kit Contents Item # Quantity Reqd. Description 1 1 2 1 GBS ECU Hardware Bag Contents Item # Quantity Reqd. Description 1 1 V5 Security ECU 2 1 ECU Mounting Bracket
Preparation Part Number: PT398-21070 Kit Contents Item # Quantity Reqd. Description 1 1 2 1 GBS ECU Hardware Bag Contents Item # Quantity Reqd. Description 1 1 V5 Security ECU 2 1 ECU Mounting Bracket
TOYOTA FJ CRUISER TVIP V5 Preparation
 Preparation Part Number: 08586-36822 Conflicts Do not be installed in vehicles with factory Anti-theft alarm, or Vehicle without Factory Keyless Entry Systems. Recommended Sequence of Application Item
TOYOTA YARIS HATCHBACK TVIP V3 (RS3200) Preparation
 Preparation") Preparation Part Number: 08586-53810 Kit Contents Item # Quantity Reqd. Description 1 1 V3 ECU 2 1 Piezo Buzzer 3 1 Wire Harness 4 1 ECU Mounting Bracket 5 2 Remote Control Transmitter 6 1 Butyl Tape 7
Preparation Part Number: 08586-53810 Kit Contents Item # Quantity Reqd. Description 1 1 V3 ECU 2 1 Piezo Buzzer 3 1 Wire Harness 4 1 ECU Mounting Bracket 5 2 Remote Control Transmitter 6 1 Butyl Tape 7
TOYOTA HIGHLANDER IMPACT SENSOR
 TOYOTA HIGHLANDER 2010 - IMPACT SENSOR Part Number : 00016-47031 Accessory Code: QG1 Conflicts Not for installation on vehicles with factory theft deterrent systems - hybrid. Kit Contents Item # Quantity
TOYOTA TACOMA 2005 TVIP V5 (RS3200 PLUS) Preparation
 Preparation") Preparation Part Number: 08586 04840 Kit Contents Item # Quantity Reqd. Description 1 1 Wire Harness 2 1 Security ECU 3 1 GBS ECU 4 1 Status Monitor 5 2 Warning Labels 6 1 Owner s Manual 7 1 Warranty Card
Preparation Part Number: 08586 04840 Kit Contents Item # Quantity Reqd. Description 1 1 Wire Harness 2 1 Security ECU 3 1 GBS ECU 4 1 Status Monitor 5 2 Warning Labels 6 1 Owner s Manual 7 1 Warranty Card
TOYOTA TUNDRA IMPACT SENSOR
 TOYOTA TUNDRA 2010 - IMPACT SENSOR Part Number: 00016-47031 Accessory Code: QG1 Kit Contents Item # Quantity Reqd. Description 1 1 Security Interface Module 2 1 Shock Sensor 3 1 Main Harness 4 1 Hardware
Conflicts. TOYOTA Camry XM Satellite Radio. Part Number: Code: RX30. Vehicle Service Parts (May be required for reassembly)
") TOYOTA 2013 - Part Number:00016-00076 Code: RX30 Conflicts 1. Entune 2. Vehicle s with factory XM radio Kit Contents Item # Qty Description 1 1 XM Module 2 1 XM Tuner Module 3 1 Wiring Harness 4 1 Hardware
TOYOTA 2013 - Part Number:00016-00076 Code: RX30 Conflicts 1. Entune 2. Vehicle s with factory XM radio Kit Contents Item # Qty Description 1 1 XM Module 2 1 XM Tuner Module 3 1 Wiring Harness 4 1 Hardware
Vehicle Service Parts (may be required for reassembly) Legend
 Legend") Toyota Part Number: 00016-32901 Accessory Code: KE1 Corolla 2014 Note: Not for installation on vehicles equipped with factory keyless entry Additional Items Required For Installation Item# Quantity Req.
Toyota Part Number: 00016-32901 Accessory Code: KE1 Corolla 2014 Note: Not for installation on vehicles equipped with factory keyless entry Additional Items Required For Installation Item# Quantity Req.
TOYOTA RAV TVIP V3
 Section I Installation Preparation Part Number: 08586-4A872 Section I Installation Preparation Kit Contents Item # Quantity Reqd. Description 1 1 Wire Harness 2 1 Status Monitor 3 1 Piezo Buzzer 4 1 V3
XM Adapter Cable (P/N: ) MUST be used for this vehicle.
 MUST be used for this vehicle.") TOYOTA 2013 - Part Number:00016-00076 Code: RX30 XM Adapter Cable (P/N: 00016-00076-10) MUST be used for this vehicle. Conflicts 1. Entune 2. Vehicle s with factory XM radio Kit Contents Item # Qty Description
TOYOTA 2013 - Part Number:00016-00076 Code: RX30 XM Adapter Cable (P/N: 00016-00076-10) MUST be used for this vehicle. Conflicts 1. Entune 2. Vehicle s with factory XM radio Kit Contents Item # Qty Description
Vehicle Service Parts (may be required for reassembly) Legend
 Legend") Toyota Corolla 2016 Part Number: 00016-32901 Accessory Code: KE1000 Conflicts Note: Not for installation on vehicles equipped with factory keyless entry Additional Items Required For Installation Item#
Toyota Corolla 2016 Part Number: 00016-32901 Accessory Code: KE1000 Conflicts Note: Not for installation on vehicles equipped with factory keyless entry Additional Items Required For Installation Item#
TOYOTA YARIS KEYLESS ENTRY SYSTEM
 TOYOTA YARIS 2011 - KEYLESS ENTRY SYSTEM Part Number: 00016-32901 Accessory Code: KE1 Conflicts Not for installation in vehicles equipped with factory installed keyless entry. Kit Contents Item # Quantity
TOYOTA TACOMA TVIP V3 (RS3200) Section I - Installation Preparation
 Section I - Installation Preparation") Section I - Installation Preparation Part Number: 08586-04810 Section I - Installation Preparation Kit Contents Item # Quantity Reqd. Description 1 1 Wire Harness 2 1 Status Monitor 3 1 Piezo Buzzer 4
Section I - Installation Preparation Part Number: 08586-04810 Section I - Installation Preparation Kit Contents Item # Quantity Reqd. Description 1 1 Wire Harness 2 1 Status Monitor 3 1 Piezo Buzzer 4
LEXUS RC 350/RC-F ILLUMINATED DOOR SILLS Preparation
 Preparation Part Number: PT944-24150 Kit Contents Item # Quantity Reqd. Description 1 2 Inner LED Scuff 2 2 Outer Scuff 3 1 Hardware Bag Hardware Bag Contents Item # Quantity Reqd. Description 1 15 20
Conflicts. TOYOTA Prius XM Satellite Radio. Part Number: Code: RX30. Vehicle Service Parts (May be required for reassembly)
") TOYOTA Prius 2013 - Part Number:00016-00076 Code: RX30 Conflicts 1. Entune 2. Vehicle s with factory XM radio Kit Contents Item # Qty Description 1 1 XM Module 2 1 XM Tuner Module 3 1 Wiring Harness 4
TOYOTA Prius 2013 - Part Number:00016-00076 Code: RX30 Conflicts 1. Entune 2. Vehicle s with factory XM radio Kit Contents Item # Qty Description 1 1 XM Module 2 1 XM Tuner Module 3 1 Wiring Harness 4
REMOTE ENGINE STARTER
 2008- LAND CRUISER TVIP V4 REMOTE ENGINE STARTER (RES) TROUBLESHOOTING GUIDE REMOTE ENGINE STARTER TROUBLESHOOTING GUIDE Rev. B 01/18/06 Remote Engine Starter Troubleshooting Guide Page 2 TABLE OF CONTENTS
TOYOTA PRIUS 2004 TVIP V2 (GBS ADD ON) Section I Installation Preparation
 Section I Installation Preparation") Section I Installation Preparation Part Number: 08586 47840 Section I Installation Preparation Kit Contents Item # Quantity Reqd. Description 1 1 Wire Harness 2 1 3 1 ECU Mounting Bracket Hardware Bag
Section I Installation Preparation Part Number: 08586 47840 Section I Installation Preparation Kit Contents Item # Quantity Reqd. Description 1 1 Wire Harness 2 1 3 1 ECU Mounting Bracket Hardware Bag
Conflicts. Scion FR-S Keyless Entry Upgrade Alarm Part Number: Code: YQ20. Vehicle Service Parts (may be required for reassembly)
") 2013 - Part Number: 00016-32910 Code: YQ20 Conflicts Kit Contents Item# Quantity Req. Description 1 1 Security Module 2 1 Shock Sensor, Dual Stage 3 1 LED / Valet Swicth 4 2 Window Warning Decals 5 1 Shock
2013 - Part Number: 00016-32910 Code: YQ20 Conflicts Kit Contents Item# Quantity Req. Description 1 1 Security Module 2 1 Shock Sensor, Dual Stage 3 1 LED / Valet Swicth 4 2 Window Warning Decals 5 1 Shock
SCION xa 2004 SECURITY WITH RKE (V3) Section I Installation Preparation
 Section I Installation Preparation") Section I Installation Preparation Part Number: 08586 52970 Section I Installation Preparation Kit Contents Item # Quantity Reqd. Description 1 1 Wire Harness 2 1 V3 Security ECU 3 2 Remote Control Transmitters
Section I Installation Preparation Part Number: 08586 52970 Section I Installation Preparation Kit Contents Item # Quantity Reqd. Description 1 1 Wire Harness 2 1 V3 Security ECU 3 2 Remote Control Transmitters
SCION xb 2004 SECURITY (V5) Section I Installation Preparation. Part Number:
 Section I Installation Preparation. Part Number:") Section I Installation Preparation Part Number: 08586 52960 Section I Installation Preparation Kit Contents Item # Quantity Reqd. Description 1 1 Wire Harness 2 1 Mounting Bracket 3 1 GBS ECU 4 1 Security
Section I Installation Preparation Part Number: 08586 52960 Section I Installation Preparation Kit Contents Item # Quantity Reqd. Description 1 1 Wire Harness 2 1 Mounting Bracket 3 1 GBS ECU 4 1 Security
Conflicts. Camry L (ECO Grade) Security System with Keyless Entry. Part Number: Accessory Code: QK1
 Security System with Keyless Entry. Part Number: Accessory Code: QK1") 2013- Part Number: 00016-32905 Accessory Code: QK1 Conflicts Note: NOT FOR INSTALLATION ON VEHICLES WITH FACTORY THEFT DETERRENT SYSTEMS. Kit Contents Item # Quantity Reqd Description 1 1 Keyless Security
2013- Part Number: 00016-32905 Accessory Code: QK1 Conflicts Note: NOT FOR INSTALLATION ON VEHICLES WITH FACTORY THEFT DETERRENT SYSTEMS. Kit Contents Item # Quantity Reqd Description 1 1 Keyless Security
TOYOTA TUNDRA TVIP V3 (RS3000) Section I - Installation Preparation
 Section I - Installation Preparation") Section I - Installation Preparation Part Number: 0886-34861 Section I - Installation Preparation Kit Contents Item # Quantity Reqd. Description 1 1 Wire Harness 2 1 Status Monitor 3 1 Piezo Buzzer 4 1
Section I - Installation Preparation Part Number: 0886-34861 Section I - Installation Preparation Kit Contents Item # Quantity Reqd. Description 1 1 Wire Harness 2 1 Status Monitor 3 1 Piezo Buzzer 4 1
TOYOTA TACOMA EC REARVIEW MIRROR Preparation
 Preparation Part Number: PT374-35052 Kit Contents Item # Quantity Reqd. Description 1 1 AD Mirror Assembly 2 1 Hardware bag Hardware Bag Contents Item # Quantity Reqd. Description 1 1 T-tap Connectors,
Kia Sedona. Installation Manual: Kia Sedona. Power Lift Gate System. Page 1 of 13
 Kia Sedona Installation Manual: Kia Sedona Power Lift Gate System Page 1 of 13 NOTE: Installation Precaution 1. It is recommended to have this product installed by a professional to avoid damage caused
TOYOTA TACOMA HANDS FREE BLU LOGIC Preparation. Item 5 Item 6 Item 7 Item 8. Item 4. General Applicability Note: Recommended Tools
 TOYOTA TACOMA 2008- HANDS FREE BLU LOGIC Preparation Part #: PT923-00098 Conflicts: JBL Audio, Factory Navigation Kit Contents: NOTE: Part number of this accessory may not be the same as the part number
TOYOTA 4Runner Keyless Entry Upgrade Alarm
 TOYOTA 4Runner 2013 - Keyless Entry Upgrade Alarm Part Number: 00016-32910 Accessory Code: QSNS10 Conflicts Note: NOT FOR INSTALLATION ON VEHICLES EQUIPPED WITH SMART KEY General Applicability Used on
TOYOTA im INTERIOR LIGHT KIT Preparation
 Preparation Part Number: PT922-12170 Kit Contents Item # Quantity Reqd. Description 1 1 Main Wire Harness 2 1 Switch 3 1 Switch Header 4 1 ECU 5 1 ECU Bracket 6 1 Hardware Kit 7 1 Instruction Card 8 1
Toyota Sienna. Installation Manual: Toyota Sienna. Power Lift Gate System. Page 1 of 12
 Toyota Sienna Installation Manual: Toyota Sienna Power Lift Gate System Page 1 of 12 NOTE: Installation Precaution 1. It is recommended to have this product installed by a professional to avoid damage
Conflicts. Prius C 2014 Keyless Entry Upgrade. TOYOTA Part Number: Code: QS10. Vehicle Service Parts (May be required for reassembly)
") TOYOTA Part Number:00016-47032 Code: QS10 Conflicts 1. Vehicle's with out factory immobilizer Kit Contents Item# Quantity Req. Description 1 1 Security Module 2 1 Shock Sensor, Dual Stage 3 1 LED / Valet
TOYOTA Part Number:00016-47032 Code: QS10 Conflicts 1. Vehicle's with out factory immobilizer Kit Contents Item# Quantity Req. Description 1 1 Security Module 2 1 Shock Sensor, Dual Stage 3 1 LED / Valet
LEXUS CT 200h ILLUMINATED DOOR SILLS Preparation
 Preparation Part Number: PT922-89100 Kit Contents Item # Quantity Req'd. Description 1 1 Door Sill, Front Right Hand 2 1 Door Sill, Front Left Hand 3 1 Door Sill, Rear Right Hand 4 1 Door Sill, Rear Left
Installation Manual: Honda CRV Power Lift Gate System
 Installation Manual: Honda CRV Power Lift Gate System Page 1 of 18 NOTE: Installation Precaution 1. It is recommended to have this product installed by a professional to avoid damage caused by improper
Installation Manual: Jeep Cherokee Power Lift Gate System
 Installation Manual: Jeep Cherokee Power Lift Gate System Page 1 of 11 NOTE: Installation Precaution Kit Details Power Cable 4120353 1. It is recommended to have this product installed by a professional
TOYOTA CAMRY HANDS FREE BLU LOGIC Preparation
 TOYOTA CAMRY 2008- HANDS FREE BLU LOGIC Preparation Part #: PT923-00111 Conflicts: JBL Audio, Factory Navigation NOTE: Part number of this accessory may not be the same as the part number shown. Kit Contents:
TOYOTA TUNDRA HANDS FREE BLU LOGIC Preparation
 TOYOTA TUNDRA 2008- HANDS FREE BLU LOGIC Preparation Part #: PT923-00111 Conflicts: JBL Audio NOTE: Part number of this accessory may not be the same as the part number shown. Kit Contents: For kits manufactured
General Applicability Note: Recommended Tools. Personal & Vehicle Protection Safety Goggles Seat Covers Floor Covers Special Tools. Installation Tools
 TOYOTA HIGHLANDER/HIGHLANDER HV 2008- Preparation Part #: PT923-00111 Conflicts: JBL Audio, Factory Navigation NOTE: Part number of this accessory may not be the same as the part number shown. Kit Contents:
Conflicts. TOYOTA Highlander CAR LINK (W/O Remote Start) Part Number: Accessory Code: QL1. Doc PIO / DIO Rev.
 Part Number: Accessory Code: QL1. Doc PIO / DIO Rev.") Doc. 06.107.00 PIO / DIO Rev. A 04/26/11 TOYOTA Highlander 2011 - CAR LINK (W/O Remote Start) Part Number: 00016-00077 Accessory Code: QL1 Conflicts Note: Kit Contents Item # Quantity Reqd. Description
Doc. 06.107.00 PIO / DIO Rev. A 04/26/11 TOYOTA Highlander 2011 - CAR LINK (W/O Remote Start) Part Number: 00016-00077 Accessory Code: QL1 Conflicts Note: Kit Contents Item # Quantity Reqd. Description
SCION xa AUTO-DIMMING MIRROR Preparation
 Preparation Part Number: PT374-52040 (Compass) PT374-21050 (Homelink) Kit Contents Item # Quantity Reqd. Description 1a 1 AD Mirror Assembly w/compass & Map Lights (P/N PT374-52040) 1b 1 AD Mirror Assembly
TOYOTA COROLLA ILLUMINATED DOOR SILLS Preparation
 Preparation Part Number: PT942-02140 Kit Contents Item # Quantity Reqd. Description 1 1 Illuminated Scuff plate, Front Right Hand 2 1 Illuminated Scuff plate, Front Left Hand 3 1 Door Scuff plate, Rear
Nissan Rogue. Installation Manual: Nissan Rogue. Power Lift Gate System. NOTE: Not for Rogue Sport Models. Page 1 of 13
 Nissan Rogue Installation Manual: Nissan Rogue Power Lift Gate System NOTE: Not for Rogue Sport Models Page 1 of 13 NOTE: Installation Precaution 1. It is recommended to have this product installed by
LEXUS GS 350/450h ILLUMINATED DOOR SILLS Preparation
 Preparation Part Number: PT922-30120 (GS350) PT922-30130 (GS450h) NOTE: Part number of this accessory may not be the same as the part number shown. Kit Contents Item # Quantity Req'd. Description 1 1 Illuminated
TOYOTA tc HANDS FREE BLU LOGIC Preparation
 TOYOTA tc 2011- HANDS FREE BLU LOGIC Preparation Part #: PT923-00111 Conflicts: JBL Audio, Factory Navigation NOTE: Part number of this accessory may not be the same as the part number shown. Kit Contents:
Ford Escape. Installation Manual: Ford Escape. Power Lift Gate System. Page 1 of 12
 Ford Escape Installation Manual: Ford Escape Power Lift Gate System Page 1 of 12 NOTE: Installation Precaution 1. It is recommended to have this product installed by a professional to avoid damage caused
TOYOTA im NAVIGATION UPGRADE Preparation
 Preparation Part Number: PT296-00170 PT296-12170 (Extension Module w/ AHA) Kit Contents Item # Quantity Reqd. Description 1 1 Extension Module 2 1 BT cable 3 1 DA/Ext Harness 4 1 GPS Antenna kit 5 6 Bolt
SCION tc PREMIUM AUDIO Preparation. Part Number: PT (Extension Module w/ AHA)
") Preparation Part Number: PT296-12160 Kit Contents Item # Quantity Reqd. Description 1 1 Extension Module 2 1 BT cable 3 1 DA/Ext Harness 4 1 GPS Antenna kit 5 6 Bolt (M5x8) 6 5 Wire tie (10 ) Hardware
Preparation Part Number: PT296-12160 Kit Contents Item # Quantity Reqd. Description 1 1 Extension Module 2 1 BT cable 3 1 DA/Ext Harness 4 1 GPS Antenna kit 5 6 Bolt (M5x8) 6 5 Wire tie (10 ) Hardware
SCION iq AUDIO Preparation
 Preparation Part Number: PT546-00140 (Base Radio) Kit Contents Item # Quantity Reqd. Description 1 1 Receiver Assembly, Radio Unit 2 1 Hardware Bag Hardware Bag Contents Item # Quantity Reqd. Description
Installation Manual: Hyundai Tucson Power Lift Gate System
 Installation Manual: Hyundai Tucson Power Lift Gate System Page 1 of 12 NOTE: Installation Precaution 1. It is recommended to have this product installed by a professional to avoid damage caused by improper
SCION tc Navigation System Preparation. Part Number: PT
 Preparation Part Number: PT611-21111 Kit Contents Item # Quantity Reqd. Description 1 1 Navigation System 2 1 GPS Antenna 3 1 Bluetooth Antenna 4 1 Wire Harness (Reverse / Park Brake) 5 1 RCA Relay Cable
SCION XB HANDS FREE BLU LOGIC Preparation
 SCION XB 2008- HANDS FREE BLU LOGIC Preparation Part #: PT923-00111 Conflicts: JBL Audio NOTE: Part number of this accessory may not be the same as the part number shown. Kit Contents: For kits manufactured
SCION im PREMIUM AUDIO Preparation
 SCION im 2016 - PREMIUM AU Preparation Part Number: PT296-12160 (Extension Module w/ AHA) Kit Contents Item # Quantity Reqd. Description 1 1 Extension Module 2 1 BT cable 3 1 DA/Ext Harness 4 1 GPS Antenna
TOYOTA HIGHLANDER TRAILER WIRE HARNESS Preparation
 Preparation Part Number: PT219-48111 Kit Contents Item # Quantity Reqd. Description 1 1 Converter 2 1 Flat 4-pin wire harness 3 5 Plastic tie 4 1 Special plastic tie for stud mount 5 1 Packing 6 2 Bolt
TOYOTA COROLLA ILLUMINATED DOOR SILLS Preparation
 Preparation Part Number: PT942-02140 Kit Contents Item # Quantity Reqd. Description 1 1 Illuminated Scuff plate, Front Right Hand 2 1 Illuminated Scuff plate, Front Left Hand 3 1 Door Scuff plate, Rear
Scion xb EC Rearview Mirror w/ Shift Light Preparation
 2008 - Preparation Part Number: 00016-79800 Accessory Code: YM10 Kit Contents Item # Quantity Reqd. Description 1 1 Mirror Assembly w/ PRNDL 2 1 Hardware bag 3 1 Installation Manual Hardware Bag Contents
TOYOTA VENZA HANDS FREE BLU LOGIC Preparation
 TOYOTA VENZA 2009- HANDS FREE BLU LOGIC Preparation Part #: PT923-00111 Conflicts: JBL Audio NOTE: Part number of this accessory may not be the same as the part number shown. Kit Contents: For kits manufactured
Scion xa SATELLITE RADIO TUNER Preparation
 Preparation Part Number: PTS31-00051 Kit Contents Item # Quantity Reqd. Description 1 1 Antenna, Interior 2 1 Antenna Tape Pad 3 1 Wire Harness 4 1 Bracket, Floor 5 3 Hardware Bags 6 3 Templates 7 1 SIRIUS
Conflicts: JBL Audio, Factory Navigation, Accessory XM Satellite Radio, and Accessory Sirius Satellite Radio
 TOYOTA YARIS SEDAN 2008- HANDS FREE BLU LOGIC Preparation Part #: PT923-00111 NOTE: Part number of this accessory may not be the same as the part number shown. Conflicts: JBL Audio, Factory Navigation,
SCION FR-S FOG LIGHTS
 Part #: PT413-18130 Conflicts: Lowering Springs PTR07-18130-LL (California only) Kit Contents: For Anniversary Edition, Monogram & RS 2.0 vehicles, additional parts need to be ordered (PT413-18130-LL)
SCION XB HANDS FREE BLU LOGIC Preparation. Item 4 Item 5 Item 6 Item 7. General Applicability. Note: Recommended Tools
 SCION XB 2008- HANDS FREE BLU LOGIC Preparation Part #: PT923-00090 Conflicts: JBL Audio NOTE: Part number of this accessory may not be the same as the part number shown. Kit Contents: Item 1 Item 2 Item
TOYOTA PRIUS XM SATELLITE RADIO Preparation
 Preparation Part Number: Mounting Kit PT546-4700 Tuner Assy 8680-0W03 NOTE: Part number of this accessory may not be the same as the part number shown. Tuner Assembly Kit Contents (8680-0W03) Item # Quantity
Chevrlot Equinox. Installation Manual: Chevrlot Equinox. Power Lift Gate System. Page 1 of 11
 Chevrlot Equinox Installation Manual: Chevrlot Equinox Power Lift Gate System Page 1 of 11 NOTE: Installation Precaution 1. It is recommended to have this product installed by a professional to avoid damage
TOYOTA YARIS XM SATELLITE RADIO Preparation (Sedan & Hatchback)
") Preparation (Sedan & Hatchback) Part Number: Mounting Kit PT546-52096 Tuner Assy 86180-0W031 Tuner Assy Kit Contents (86180-0W031) Item # Quantity Reqd. Description 1 1 Tuner Assy, Stereo Component Mounting
Preparation (Sedan & Hatchback) Part Number: Mounting Kit PT546-52096 Tuner Assy 86180-0W031 Tuner Assy Kit Contents (86180-0W031) Item # Quantity Reqd. Description 1 1 Tuner Assy, Stereo Component Mounting
TOYOTA RAV4/HV INTERIOR LIGHT KIT Preparation
 Preparation Part Number: PT413-42130 Kit Contents Item # Quantity Reqd. Description 1 1 Wire Harness 2 3 Hardware Bag Contents Item # Quantity Reqd. Description 1 20 Cable Tie 2 2 Scotchlok 3 2 Foam Pad
Installation Manual: Jeep Cherokee Power Lift Gate System
 Installation Manual: Jeep Cherokee Power Lift Gate System Page 1 of 11 NOTE: Installation Precaution 1. It is recommended to have this product installed by a professional to avoid damage caused by improper
Please note that these instructions apply to the Toyota Towing Wire Harness. The part you re looking for is PT
 This download was hosted by LanderFan.com, your source of tips, tricks, hacks, how-to articles, and other newsy tidbits related to the new (2014+) Toyota Highlander.! Please note that these instructions
LEXUS LC/LCh CARBON FIBER LOWER GRILLE Preparation
 Preparation Part Number: PT478-11175-05 Kit Contents Item # Quantity Reqd. Description 1 1 Carbon Fiber Lower Grille Insert 2 3 Hardware Bag Contents Item # Quantity Reqd. Description 1 2 3 Additional
TOYOTA Matrix XM SATELLITE RADIO Preparation
 Preparation Part Number: Mounting Kit PT546-12080 Tuner Assembly 86180-0W031 (Music Only) Tuner Assembly PT546-00090 (Music Plus Data) NOTE: Part number of this accessory may not be the same as the part
TOYOTA RAV TRAILER WIRE HARNESS Section I Installation Preparation
 Section I Installation Preparation Part Number: 08921-42900 Kit Contents Item # Quantity Reqd. Description 1 1 Converter 2 1 Wire harness 3 1 Sub wire harness No.1 4 2 Plastic Tie (300mm) 5 21 Plastic
SCION TC HANDS FREE BLU LOGIC Preparation
 SCION TC 2008- HANDS FREE BLU LOGIC Preparation Part #: PT923-00099 Conflicts: JBL Audio NOTE: Part number of this accessory may not be the same as the part number shown. Kit Contents: For kits manufactured