By Mark Schutzer NMRA National Convention, Sacramento, CA July 2011 Copies of this presentation can be found at
|
|
|
- Dorcas Lawson
- 6 years ago
- Views:
Transcription
1 Troubleshooting and dr Repairing i Brass Steam Locomotives By Mark Schutzer NMRA National Convention, Sacramento, CA July 2011 Copies of this presentation can be found at
2 Clinic Overviews Part 1 Troubleshooting and Repairing Brass steam locomotives have a reputation for running poorly. This clinic will discuss the common problems and show you how to fix them. A step by step example of a locomotive repair will be illustrated. This clinic is tailored to the beginner who wants learn how to improve the running of those cranky steam locomotives. Part 2 Rebuilding Steam Locomotives This clinic will show you how to turn those noisy growlers into prize runners that will silently creep down the track. Re-motoring and re-gearing g will be discussed and illustrated in detail. Topics include motor and gearbox selection, motor mount construction, and the use of universal joint couplings. July 2011 Troubleshooting Brass Mark Schutzer 2


3 The tale of three KTM locomotives A quick little demonstration Mountain 4355 Original condition, as obtained Pacific 2467 After completion of clinics i Re-motored Re-geared Universal coupling Decoder equipped Mountain 4353 After completion of clinics Re-motored Re-geared Universal coupling Decoder equipped July 2011 Troubleshooting Brass Mark Schutzer 3
4 Troubleshooting and Repairing Overview Common Problems Step by Step Process Tools and Materials Questions July 2011 Troubleshooting Brass Mark Schutzer 4
5 Common Problems Poor electrical pickup Electrical l shorts continuous or intermittently itt tl occurring Motor problems Gearbox problems Mechanism binding or loping Stiff or broken motor coupling Noisy Out of gauge wheels including narrow tread width July 2011 Troubleshooting Brass Mark Schutzer 5


6 Electrical Pickup July 2011 Troubleshooting Brass Mark Schutzer 6
7 Poor Electrical Pickup Dirty wheels, tender or locomotive Drawbar problems Broken or bent tensioning wire Oxidized brass drawbar Oxidized drawbar pin Missing or compressed spring at drawbar attachment point Oxidized tender truck bolsters Paint in the tender wheel journals Paint in the locomotive bearing contact areas Motor brush problems, incorrect brush tension Broken wire to motor connection July 2011 Troubleshooting Brass Mark Schutzer 7
8 Electrical Shorting Problems Continuous shorts Separate the tender from the locomotive and place each on the track one at a time. Does the short occur with the locomotive only? Check left side wheels Metal brake shoe touching wheels? Pilot wheel touching cylinder, or frame? Does the short occur with the tender alone? Check right side wheels Truck turned around? Does the short only occur with the locomotive and tender connected? Cbt Cab touching tender? Pinched motor or headlight wire? Boiler or weight touching motor brush? July 2011 Troubleshooting Brass Mark Schutzer 8
9 Intermittent shorts Electrical Shorting Problems Usually caused by motion Motion of wheels turning Motion of trucks around curves Isolate to locomotive or tender if possible Troubleshoot tby running slowly l and observing Watch and listen for spark at point of short Watch the motion of the trucks and wheels Detailed Troubleshooting in Appendix July 2011 Troubleshooting Brass Mark Schutzer 9
10 Motor Problems Dried out bearings and oil packings Commutator problems ring of fire Brush problems Out of position Missing brush insulator Excessive brush spring tension Broken wire to brush contact Poor slow speed running Inconsistent starting speed July 2011 Troubleshooting Brass Mark Schutzer 10
11 Step by Step Repairing
12 Step by step process Repair Example Remove boiler shell Remove motor Remove gearbox Pull rods and check quartering Reinstall rods Check for binds Disassemble, clean and lube gearbox Service motor, clean commutator and brushes, adjust brushes, and oil bearings Reinstall gearbox Reinstall motor, replace coupling Fix electrical contact issues Test and adjust coupling for minimum current draw, and minimum noise July 2011 Troubleshooting Brass Mark Schutzer 12


13 Boiler Removal Removing the boiler shell Most locomotives use three screws to attach the boiler shell to the frame. The location of the two cab screws vary, they are usually either in the back wall of the cab, or directly under the cab as in this case. The front of the boiler is often attached with a long screw that also serves as the mounting stud for the pilot truck. A 4mm deep socket is useful for removing this stud. July 2011 Troubleshooting Brass Mark Schutzer 13

14 Boiler shell removed Boiler removed July 2011 Troubleshooting Brass Mark Schutzer 14


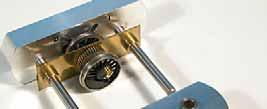
15 Problem areas Motor close-up Stiff and misaligned coupling Grease packed commutator Dry oil packings Misaligned brush July 2011 Troubleshooting Brass Mark Schutzer 15


16 Removing the motor Remove motor mounting screw Remove screws connecting to wire lugs Remove motor July 2011 Troubleshooting Brass Mark Schutzer 16


17 Removing the gearbox Remove two screws from gearbox cover. Turn over and lift out gearbox. July 2011 Troubleshooting Brass Mark Schutzer 17


18 Remove rods and valve gear Remove crank screws from wheels Remove rods and washers July 2011 Troubleshooting Brass Mark Schutzer 18
19 Write it down! Make a sketch of the rods and washers as you remove them to aid in reassembly. July 2011 Troubleshooting Brass Mark Schutzer 19


20 Remove Drivers Remove bottom cover plate You may need to remove brake shoes Lift out drivers Watch those springs! July 2011 Troubleshooting Brass Mark Schutzer 20


21 Keep things organized Get a storage box and separate the parts by where they go. July 2011 Troubleshooting Brass Mark Schutzer 21
22 Quartering Check the quartering In order for all the drivers to roll freely without binding they must all be quartered the same. Incorrect quartering is number one cause of binding and loping. Check the quartering of each driver set. The press fit of the driver on the axle is often loose allowing the quartering to change over time. Grasp the wheels on each driver set and gently twist the wheels in opposite directions, if the wheels move on the axle then the wheels need to be pulled, re-quartered and secured with Loctite. July 2011 Troubleshooting Brass Mark Schutzer 22


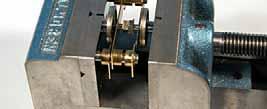
23 NWSL Quarterer Checking quartering NWSL Quarterer 2 Quartering vise July 2011 Troubleshooting Brass Mark Schutzer 23


24 Pulling Drivers NWSL Puller Arbor Press NWSL Sensipress PanaVise press July 2011 Troubleshooting Brass Mark Schutzer 24


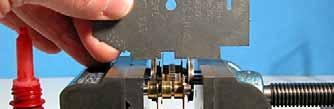
25 Pressing Drivers Quartering July 2011 Troubleshooting Brass Mark Schutzer 25


26 Reassembled mechanism Reattach Rods Test roll mechanism, make sure there are no binds or it interference issues. Interference Main rod was hitting crosshead guide, required a little filing of the crosshead guide to fix. July 2011 Troubleshooting Brass Mark Schutzer 26
27 Other problems Other Issues Occasionally you may have some binding problems even after the drivers have been quartered correctly. While fairly rare there can be some problems with the frame, and or the side rod spacing. The distance between the crank screw holes in the rods must exactly match the distance between the wheel journal bearings. If these distances don t match the drivers will bind. Measure these distances with a caliper and shim and adjust accordingly. Sometimes a crank screw will stick out too far and catch on the main rod. You may here a clicking sound. Usually occurs on curves. A missing crank screw washer may cause a rod to catch on a driver counterweight. Carefully check alligator style crosshead guides, if bent out of position these often can cause binding of the crosshead. Bend and adjust crosshead guide position to eliminate binding. July 2011 Troubleshooting Brass Mark Schutzer 27


28 Check gauge and lubricate Pilot and trailing trucks Narrow tread width on trailing truck wheelset July 2011 Troubleshooting Brass Mark Schutzer 28
29 Gearbox Disassemble, clean, and lube gearbox July 2011 Troubleshooting Brass Mark Schutzer 29


30 Motor Remove brushes Clean brushes and commutator with an alcohol soaked Qtip. Oil bearing areas and soak oil packings. Adjust brush spring tension, usually far to much tension causing excess drag and current draw. Reassemble when cleaned up. Test run Better solution Replace it! July 2011 Troubleshooting Brass Mark Schutzer 30


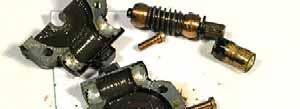
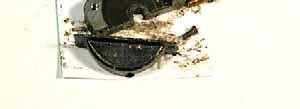
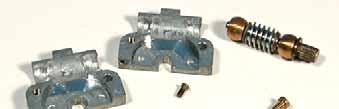
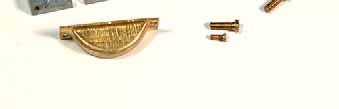
31 Drawbar fixes Original drawbar and pin Oxidized and dirty brass Oversized stiff brass wire contact spring Alternate Method: Use super flexible wire and connect in parallel with drawbar connection Silver plating drawbar and pin. Plated drawbar with phosphor bronze contact spring. July 2011 Troubleshooting Brass Mark Schutzer 31


32 Reassembled mechanism Note new coupling and motor shim. July 2011 Troubleshooting Brass Mark Schutzer 32
33 Test Run Connect the leads from a throttle to the locomotive and test run. Use a throttle with a built in ammeter. Run at medium speed and adjust motor and gearbox coupling for minimum current draw and minimum vibration. Push and pull llbetween motor and gearbox to adjust coupling position i and tension. July 2011 Troubleshooting Brass Mark Schutzer 33


34 Tender contact fixes Silver plate truck bolster areas and drawbar pin. Before plating Alternate method: Use super flexible wire and solder a wire from the tender frame to each of the trucks. After silver plating July 2011 Troubleshooting Brass Mark Schutzer 34
35 Summary Everything reassembled With the work done in this clinic the locomotive should run reasonably well and shouldn t have any binding in the mechanism. The locomotive should run reliably without t any electrical l pickup, or shorting issues. Given the limitation of the original motor and gearbox the locomotive will likely be noisy, and its slow speed performance may be limited. July 2011 Troubleshooting Brass Mark Schutzer 35
36 Tools and Materials
37 Tools and Other Stuff Tools Jeweler s screwdriver set, Radio Shack Tweezers Needle file set 4 mm deep socket or deep nut driver NWSL Items Quarterer, Quarterer 2 Puller, Puller 2, SensiPress Spare metric screws Spare wheel springs, medium, light, and wimpy Lubricants Labelle #102 gear oil Labelle #108 light oil Labelle #106 Teflon grease July 2011 Troubleshooting Brass Mark Schutzer 37
38 Silver Plating Kit Tools and Other Stuff Caswell Plating, Plug N Plate Silver plating kit Thread locking Loctite 271 (red) high strength Other Stuff NMRA track and wheel gauge g Silicon Fuel line, various sizes to match original motor / gearbox coupling.020 diameter Phosphor bronze wire (for drawbar tensioner) July 2011 Troubleshooting Brass Mark Schutzer 38
39 Plug N Plate Silver plating kit Sources: Route 31 Lyons NY USA Phone: Silver Plating Kit PNPSLV35 $46.99 SILVER PLATING KIT Ideal for repairing antiques with wear damage, or plating from scratch! Quickly puts a heavy layer of silver just where you want it. Headlight reflectors are easily done with this system. 1 x Plug N' Plate Power Supply 1 x 4oz Silver Solution 1 x Stainless Steel Wand 1 x Wand Bandage 1 x Instruction Booklet July 2011 Troubleshooting Brass Mark Schutzer 39
40 Questions? July 2011 Troubleshooting Brass Mark Schutzer 40
41 Appendix
42 Troubleshooting Shorts (detailed) Is the short continuous or intermittent? Continuous shorts Separate the tender from the locomotive and place each on the track one at a time. Does the short occur with the locomotive only? Check for anything touching the wheel treads on the left (fireman s) side such as metal brake shoes, or hanging details. Check clearance on the left side pilot wheels, make sure that the wheels are not contacting the pilot truck frame or brake shoes. Check clearance on the left side of the trailing truck wheels, make sure there is no contact t with the frame. Using an Ohmmeter check the continuity between each of the left side wheel treads and the frame of the locomotive. Are any of the wheelsets installed backwards? If nothing is touching the left side wheel tread and a wheel reads shorted the paper insulation between the driver and the wheel tread may be bad. Make sure that no part of the frame or pilot is touching the track. July 2011 Troubleshooting Brass Mark Schutzer 42
43 Troubleshooting Shorts (detailed) Continuous shorts (continued) Does the short occur with the tender alone? Is one of the tender trucks turned around backwards? This is very common as many tenders allow the trucks to spin completely around. Are any of the wheelsets installed backwards? Check the clearance between the frame and all the right side (engineer s) wheels. Make sure there is adequate clearance between the truck frames and the wheels. Measure the continuity between each right side wheel and the tender frame. Does the short only occur with the locomotive and tender connected? Check for any contact between the locomotive cab and the tender. The drawbar should be the only contact point. Check the insulating washers on the shouldered screw used to attach the drawbar to the locomotive. Make sure that nothing is shorting the brush contacts inside the boiler. Check to see that the motor wire is not pinched between the boiler and the frame. Make sure that the headlight wires and connections are not pinched or touching the weight or boiler. July 2011 Troubleshooting Brass Mark Schutzer 43
44 Troubleshooting Shorts (detailed) Intermittent shorts Some possible causes Intermittent shorts usually occur in response to motion, either the motion of the wheels turning, or motion on the track, such as the locomotive going around a curve. Inadequate clearances around insulated wheels may cause shorts as the wheelset rotates. Shorts that occur on curves are usually caused by the movement of the trucks. The pilot truck and the tender trucks rotate as the locomotive negotiates curves. Often this movement will allow an insulated wheel to contact a portion of the frame. Shorts may also occur due to the back of the locomotive cab touching the tender frame when negotiating curves. Connect the tender to the rear hole on the drawbar. Metal couplers not isolated from frame may also cause shorts, always use insulating draft gear boxes, or as an alternative use non conductive versions of couplers. July 2011 Troubleshooting Brass Mark Schutzer 44
45 Troubleshooting Shorts (detailed) Isolating and troubleshooting Troubleshoot by running the locomotive and tender over the troublesome track as slow speeds and carefully look over the truck areas. You should be able to see and hear a spark when the short occurs. Observing in dim light also helps. Look for sparks on the left side of the locomotive, and look on the right side of the tender. When the short occurs, remove the tender to see if you can isolate the short to locomotive, tender, or the combination of both. Follow the same process of elimination as in the continuous shorting case. July 2011 Troubleshooting Brass Mark Schutzer 45
Troubleshooting and Repairing Brass Steam Locomotives
 Troubleshooting and Repairing Brass Steam Locomotives By Mark Schutzer PCR Regional Convention, Concord, CA May 2005 Copies of this presentation can be found at http://www.markschutzer.com Clinic Overviews
Troubleshooting and Repairing Brass Steam Locomotives
 Troubleshooting and Repairing Brass Steam Locomotives By Mark Schutzer PCR Regional Convention, Santa Cruz, CA May 2007 Copies of this presentation can be found at http://www.markschutzer.com Clinic Overviews
Gearbox Assembly 101. Introduction. Before Beginning. By Mark Schutzer 4/13/06
 Gearbox Assembly 101 By Mark Schutzer 4/13/06 Introduction If you are planning to re-motor an old brass locomotive you may want to upgrade to a new gearbox at the same time. The early 60 s and 70 s gearboxes
DCC Decoders for Brass Steam Locomotives
 DCC Decoders for Brass Steam Locomotives By Mark Schutzer PCR Regional Convention, Concord, CA May 2005 Copies of this presentation can be found at http://www.markschutzer.com Clinic Overview Part 3 Installing
By Mark Schutzer PCR Regional Convention, San Luis Obispo May 2014 Copies of this presentation can be found at
 A Beginners Guide to Installing DCC Decoders By Mark Schutzer PCR Regional Convention, San Luis Obispo May 2014 Copies of this presentation can be found at http://www.markschutzer.com Clinic Overview Installing
INSTRUCTIONS FOR NYC K-11 PACIFIC KIT #100200
 INSTRUCTIONS FOR NYC K-11 PACIFIC 4-6-2 KIT #100200 These instructions provide photographs of completed model, exploded-view drawings, diagrams, step-by-step instructions and an itemized parts list. If
Upgrading Proto axle Geeps with Stewart Trucks. November 27, 2010 Mark Schutzer
 Upgrading Proto 2000 4 axle Geeps with Stewart Trucks November 27, 2010 Mark Schutzer Introduction Several years ago Proto 2000 made a bunch of 4 axle locomotives that used trucks that were a copy of an
Thank you for purchasing the Blackstone Models K-27!
 Operations Manual Thank you for purchasing the Blackstone Models K-27! Before your Mudhen whistles off, we want to tell you about a few things that will enhance your operating experience and ensure that
How to Replace the Main Axle Gear on the Bachmann Spectrum GScale using the NWSL # upgrade gear.
 How to Replace the Main Axle Gear on the Bachmann Spectrum GScale 4-4-0 and 2-6-0 Mogul (2001era), using the NWSL #2223-6 upgrade gear. By Paul M. Newitt (all text and photos Copyright Paul M. Newitt,
Instruction Manual SOUTHERN PACIFIC F4/F5 ELECTRIC
 Instruction Manual SOUTHERN PACIFIC 2-10-2 F4/F5 ELECTRIC ACCUCRAFT COMPANY 33268 Central Avenue Union City, CA 94587 Tel: 510-324-3399 Fax: 510-324-3366 Email: info@accucraft.com Copyright 2007 NOTES:
Hornby Railroad Hall EM Finescale Conversion.
 Hornby Railroad Hall EM Finescale Conversion. The subject of this sheet is the new (2015) Hornby Railroad Hall. There are several specification and livery variants, but all have a common chassis and as
East Penn Traction Club
 Michael Junod 10/22/2015 10/22/2015 1 Many HO scale Ready-to-Run (RTR) models (particularly older brass imports) will not provide satisfactory performance for the serious trolley modeler. Trolleys are
THE MOTOR. Page 1 of 9
 Page 1 of 9 The Bachmann HO Old Time 4-4-0 has been around a long time and suffers from two problems: the latest motor will burnout with a frying of the added DCC decoder and the pickup system is very
TCI Trans-Scat
 Page 1 of 5 Return to Instruction Sheet index TCI 400000 Trans-Scat Turbo Hydramatic 400-1965-Up This kit will allow you to re-program your transmission valve body. This kit will give you firm positive
7 Tracing Electrical Faults
 Part 8 Section 7 TRACING ELECTRICAL FAULTS Issued August 2000 7 Tracing Electrical Faults 7.1 General Electrical faults can be divided into two categories, Supply System Faults, which affect all trains
Maintenance Information
 Form 16575334 Edition 1 April 2005 Electric Screwdrivers EL, EP and ET 34V DC Series Maintenance Information Save These Instructions WARNING Maintenance procedures have the potential for severe shock hazard
REMOVAL & INSTALLATION
 REMOVAL & INSTALLATION CENTER BEARING SUPPORT ASSEMBLY Removal 1. With transmission in neutral and parking brake off, raise vehicle. Scribe alignment marks on all flange/yokes and slip joints to be disassembled
INSTALLATION INSTRUCTIONS
 INSTALLATION INSTRUCTIONS BIG ROTOR / CALIPER RELOCATION FRONT KITS SUM-BK1422, BK1423, BK1424 1999-2006 GM 1/2 Ton Trucks & SUVs Thank you for choosing SUMMIT RACING for your braking needs. Pleases take
Walthers/Life-Like USRA Steam Locomotive
 North Raleigh Model Railroad Club Installing Decoders in N Scale Locomotives Detailed Instructions Walthers/Life-Like USRA 2-8-8-2 Steam Locomotive by David Derway May 17, 2010 Table of Contents Introduction...
D&RGW C-16. ACCUCRAFT TRAINS Central Avenue Union City, CA 94587, USA Tel: Fax:
 ACCUCRAFT TRAINS 33268 Central Avenue Union City, CA 94587, USA Tel: 510 324-3399 Fax: 510 324-3366 email: info@accucraft.com D&RGW C-16 Thank you for selecting ACCUCRAFT TRAINS for your large scale modeling.
Self-Adjust Clutch Installation Guide
 Self-Adjust Clutch Installation Guide 0 STOP! READ CAREFULLY BEFORE INSTALLING CLUTCH This clutch must be installed by a qualified installer. Improper installation or failure to replace or resurface the
Ford C4 and C6 Floor Mount Automatic Transmission Shifter Installation Instructions
 Ford C4 and C6 Mount Automatic Transmission Shifter Installation Instructions Building American Quality With A Lifetime Warranty! TOLL FREE 1-877-469-7440 tech@lokar.com www.lokar.com Ford C4 and C6 Mount
Installation Instructions
 Preparing your vehicle to install your brake system upgrade 1. Rack the vehicle. 2. If you don t have a rack, then you must take extra safety precautions. 3. Choose a firmly packed and level ground to
ACCUCRAFT TRAINS Central Avenue Union City, CA 94587, USA Tel: Fax:
 ACCUCRAFT TRAINS 33268 Central Avenue Union City, CA 94587, USA Tel: 510 324-3399 Fax: 510 324-3366 E-mail: info@accucraft.com www.accucraft.com General information About Accucraft Model: This accurately
BASIC TROUBLE SHOOTING (PERFECTPASS FOR MECHANICAL ENGINES) How PerfectPass Works
 How PerfectPass Works") BASIC TROUBLE SHOOTING (PERFECTPASS FOR MECHANICAL ENGINES) How PerfectPass Works Through the in-dash display the driver sets the desired boat speed or engine RPM depending upon which mode of operation
BASIC TROUBLE SHOOTING (PERFECTPASS FOR MECHANICAL ENGINES) How PerfectPass Works Through the in-dash display the driver sets the desired boat speed or engine RPM depending upon which mode of operation
Southern Pacific GS No ELECTRIC
 ACCUCRAFT TRAINS 33268 Central Avenue Union City, CA 94544 Tel: 510 324-3399 Fax: 510 324-3366 email: info@accucraft.com Southern Pacific GS-4 4-8-4 No. 4449 - ELECTRIC Prototype Information: Californians
PROPELLER SHAFTS 16-1 PROPELLER SHAFTS CONTENTS
 Z PROPELLER SHAFTS 16-1 PROPELLER SHAFTS CONTENTS page GENERAL INFORMATION... 1 PROPELLER SHAFT REPLACEMENT... 7 SERVICE DIAGNOSIS/PROCEDURES... 3 page TORQUE SPECIFICATIONS... 14 UNIVERSAL JOINT REPLACEMENT...
Chrysler 727, 904, 518 Floor Mount Automatic Transmission Shifter Installation Instructions
 Chrysler 727, 904, 518 Mount Automatic Transmission Shifter Installation Instructions Building American Quality With A Lifetime Warranty! TOLL FREE 1-877-469-7440 tech@lokar.com www.lokar.com Release Button
Toyota Truck Park Brake Bellcrank Repair
 Toyota Truck Park Brake Bellcrank Repair Toyota trucks including Tacoma, T100 and Tundra with rear drum brakes use a bellcrank apparatus through the brake backing plate as part of the parking brake system.
INSTALLATION INSTRUCTIONS
 INSTALLATION INSTRUCTIONS INSTALLATION INSTRUCTIONS FOR A136 REAR DRUM TO DISC BRAKE CONVERSION KIT for 1970-75 Jeep, CJ SERIES with Dana 44 flanged axle Thank you for choosing STAINLESS STEEL BRAKES CORPORATION
Technical Support (707)
") Installation Instructions UNIMATIC SHIFTER Fits: GM, Powerglide, Ford and Chrysler Transmissions See Application Guide for Specific Vehicles Catalog # 80775 WORK SAFELY! For maximum safety, perform this
Installation Instructions UNIMATIC SHIFTER Fits: GM, Powerglide, Ford and Chrysler Transmissions See Application Guide for Specific Vehicles Catalog # 80775 WORK SAFELY! For maximum safety, perform this
Speedometer Repair & Lube Pt.1
 Speedometer Repair & Lube Pt.1 1. Begin disassembly on a clean area approximately 2' by 3' so you have plenty of room to layout parts as you disassemble them. I use a piece of white or light colored paper
Heljan EM Finescale Conversion.
 Heljan 02 2-8-0 EM Finescale Conversion. Before you start, it is a good idea to have some small containers or snap top poly bags to put screws and components in for safe keeping...much better than crawling
Clutch Installation Guide
 Clutch Installation Guide 0 STOP! READ CAREFULLY BEFORE INSTALLING CLUTCH This clutch must be installed by a qualified installer. Improper installation or failure to replace or resurface the flywheel,
For all Ram x4 Trucks, and all Ram x4 trucks.
 Dodge Off Road, LLC Specializing in Dodge Ram Solid-Axle 4x4 Suspension and Steering for Off Road Applications 855.9009.DOR sales@dodgeoffroad.com dodgeoffroad.com DODGE OFF ROAD 5 th GEN STEERING KIT
INSTALLATION INSTRUCTIONS
 INSTALLATION INSTRUCTIONS BIG ROTOR / CALIPER RELOCATION REAR KIT SUM-BK1423 1999-2009 GM 1/2 Ton Trucks & SUVs Thank you for choosing SUMMIT RACING for your braking needs. Pleases take the time to read
Real Trains, Inc. Owners Manual and Parts List. Steam Era Plane Bearing Freight Car Truck, 1 1/2 Scale Catalog Number 15T3A or 15T3B
 Owners Manual and Parts List Steam Era Plane Bearing Freight Car Truck, 1 1/2 Scale Catalog Number 15T3A or 15T3B Features Steel Wheels - IBLS Profile - Scale 33 (4 1/8 diameter) - Dished Both Sides More
GM Floor Mount Automatic Transmission Shifter Installation Instructions
 GM Mount Automatic Transmission Shifter Installation Instructions Building American Quality With A Lifetime Warranty! TOLL FREE 1-877-469-7440 tech@lokar.com www.lokar.com GM Mount Automatic Transmission
Go-ped ESR750 / ESR750EX Rear Brake Installation Instructions
 Go-ped ESR750 / ESR750EX Rear Brake Installation Instructions This kit provides all the parts you need to install a rear brake on your ESR750 or ESR750EX. It will not work on an ESR Sport, or other Go-ped
ST-100 DATA WIZARD USER MANUAL
 ST-100 DATA WIZARD USER MANUAL Full color manual can be downloaded at www.bellatrix.com 08/10/05 Contents Page SUPER WAND OVERVIEW 2 BUFFER BOX 3 ST-100 INSTALLATION 4 SETTING UP AND INITIALIZING 6 ERROR
Installation Instructions Unimatic Shifter
 Installation Instructions Unimatic Shifter Universal Shifter for Automatic Transmissions Part Number 80775 2000 by B&M Racing & Performance Products LLC The B&M Unimatic is a universal shifter that will
1991 Mazda MX-5 Miata. STARTER - DIRECT DRIVE ELECTRICAL Mazda Starters - Direct Drive ELECTRICAL Mazda Starters - Direct Drive
 DESCRIPTION STARTER - DIRECT DRIVE 1990-92 ELECTRICAL Mazda Starters - Direct Drive Nippondenso direct drive starter is a conventional 12-volt, 4-pole, brush-type starter. The integral solenoid is attached
Clutches for Automobiles and Light Trucks
 Clutches for Automobiles and Light Trucks What does the Clutch do? Connects the engine torque to transmission when ENGAGED Unhooks engine from transmission when DISENGAGED Where is the driver s foot when
70001 and Clutch Rebuild Instructions
 70001 and 70010 Clutch Rebuild Instructions Brinn, Incorporated 1615 Tech Drive Bay City, MI 48706 Telephone 989.686.8920 Fax 989.686.6520 www.brinninc.com Notice Use these instructions if you only want
BRAKE SYSTEM Toyota Celica DESCRIPTION DRUM BRAKES ADJUSTMENTS BRAKE PEDAL HEIGHT ADJUSTMENTS BRAKE PEDAL FREE PLAY ADJUSTMENTS
 BRAKE SYSTEM 1988 Toyota Celica 1988-89 BRAKES Toyota Celica, Corolla, MR2, Tercel DESCRIPTION The hydraulic brake system uses a tandem master cylinder with a vacuum power assist servo. MR2 and some Celica
Installation Instructions Unimatic Shifter
 Installation Instructions Unimatic Shifter Universal Shifter for Automatic Transmissions Part Number 80775 2010, 2000 by B&M Racing & Performance Products The B&M Unimatic is a universal shifter that will
Replacement Tach Board Manual
 Replacement Tach Board Manual 67-74 Dodge and Plymouth Cars that use electronics Internal to the tachometer. Real Time Engineering 19352 Hilton Rd. Springdale, AR 72764 (479) 756-3917 fax Rev8 www.rt-eng.com
Powerglide Automatic Floor Mount Shifter Installation Instructions
 Powerglide Automatic Mount Installation Instructions Building American Quality With A Lifetime Warranty! TOLL FREE 1-877-469-7440 (865) 966-2269 FAX (865) 671-1999 tech@lokar.com www.lokar.com Powerglide
INSTALLATION INSTRUCTIONS
 INSTALLATION INSTRUCTIONS REAR DISC BRAKE CONVERSION KITS A112, A112-1 & A112-93 1979-93 FORD MUSTANG with 7.5" & 8.8" AXLES Thank you for choosing STAINLESS STEEL BRAKES CORPORATION for your braking needs.
Throttle Cable Pull - Patent Pending By: NetGain Controls, Inc.
 Throttle Cable Pull - Patent Pending By: NetGain Controls, Inc. Powering the future! Installation Guide 2011 All Rights Reserved NetGain Controls, Inc. 1 of 8 Introduction Thank you for purchasing a NetGain
TECUMSEH/PEERLESS LTH Model Transaxle Supplement
 TECUMSEH/PEERLESS LTH Model Transaxle Supplement This supplemental repair manual has been created to provide service information for the LTH model transaxle. This information will be incorporated into
Pre-Trip Inspection 2017 PRESENTED BY DON WEST
 Pre-Trip Inspection 2017 PRESENTED BY DON WEST Everyone knows how to do a pre-trip We do it everyday I ve been driving for twenty years Complacent Were they grandfathered in? Starting your Pre-Trip As
Team Z Motorsports. K-Member installation instructions
 Team Z Motorsports K-Member installation instructions Parts Included: 1-Tubular K-Member Needed Items-Solid Steering Shaft Offset Steering Rack Bushings Optional-Heavy Duty Bolt Kit Tubular Front Lower
Slingshot Rotrex Supercharger Kit
 Slingshot Rotrex Supercharger Kit This supercharger kit improves on the Slingshot by forcing more dense air into the engine and creating more power. Installation time of the supercharger depends on you
HOW - TO WIRING & LIGHTING
 HOW - TO WIRING & LIGHTING Tool And Material Checklist Test Light Service Manual Penetrating Oil Long-Nose Pliers T-Square or Right Angle Screwdriver Black Electrical Tape Fuses Fuse Puller Cloth or Paper
Air Compressor/Water Pump IV - Pilot Valve Stem, Test & Installation
 Page 1 of 8 Air Compressor/Water Pump Part IV Pilot Valve Stem, Test & Installation Nelson Riedel Nelson@NelsonsLocomotive.com Initial: 1/13/04 Last Revised: 0 Valve Test: I decided to test the steam valves
Owners Manual and Parts List. Modern Ton 33" Wheel Roller Bearing Freight Car Truck, 1 1/2 Scale Catalog Number 15T1A or 15T1B
 Owners Manual and Parts List Modern 70-100 Ton 33" Wheel Roller Bearing Freight Car Truck, 1 1/2 Scale Catalog Number 15T1A or 15T1B Features True Roller Bearing Design - Same as Prototype - Double Sealed
HO Scale AC-12 Gear Box Replacement Instructions
 HO Scale AC-12 Gear Box Replacement Instructions Introduction Thank you for your purchase of the HO Scale AC-12 from InterMountain Railway Company. The enclosed gear box kit will increase the speed of
Our goal is to make the install a breeze. Please read the entire guide before beginning.
 www.airkewld.com Page 1 of 6 IRS Axle Kit Install IRS Axle Kit Install Our goal is to make the install a breeze. Please read the entire guide before beginning. KITS SHOULD INCLUDE 2 - Control-arm mounting
Maintenance. Education Program Basic Skills Series Module Eight
 Education Program Basic Skills Series Module Eight Maintenance The following pages introduce the essential elements of maintaining a model railway Maintenance tools Track maintenance Locomotive maintenance
Hornby GWR Star Class EM Finescale Conversion.
 Hornby GWR Star Class EM Finescale Conversion. Before you start, it is a good idea to have some small containers or snap top poly bags to put screws and components in for safe keeping...much better than
DBK FULL-SIZE CHEVY DISC BRAKE conversion KIT
 DBK5964 1959-1964 FULL-SIZE CHEVY DISC BRAKE conversion KIT impala, bel air, biscayne Installation Instructions does not fit 14" rims must ust 15" or larger for this kit to be installed correctly on your
SECTION ZF FRONT AXLE
 04-101.01/ 1 2011JA14 SECTION 04-101.01 6 3 5 1 2 9 1. Upper radius rod 2. Lower radius rod 3. Caliper 4. BRAKE Disk 5. Pneumatic connector 6. Hub 7. steering knuckle 8. Grease Fitting 9. Pneumatic connector
Bachmann GWR Earl (Dukedog) EM Finescale Conversion
 EM Finescale Conversion") Bachmann GWR Earl (Dukedog) EM Finescale Conversion Before you start, it is a good idea to have some small containers or snap top poly bags to put screws and components in for safe keeping...much better
Bachmann GWR Earl (Dukedog) EM Finescale Conversion Before you start, it is a good idea to have some small containers or snap top poly bags to put screws and components in for safe keeping...much better
Fluid-O-Tech ROTOFLOW ROTARY VANE PUMP REBUILD MANUAL
 Fluid-O-Tech PUMP TECHNOLOGY AT ITS BEST WWW.FLUID-O-TECH.COM Office: 161 Atwater St., Plantsville, CT 06479 Phone: (860) 276-9270 Fax: (860) 620-0193 ROTOFLOW ROTARY VANE PUMP REBUILD MANUAL 08/09 Ed.,
Throttling Pendulum Gate O-ring Replacement Procedure Rev. A, May 2012
 Throttling Pendulum Gate O-ring Replacement Procedure Rev. A, May 2012 This procedure covers the replacement of the gate O-ring of the Nor-Cal Pendulum Gate Valve, with the gate valve housing installed
20. ELECTRIC STARTER 20-1 SYSTEM DIAGRAM 20-2 STARTER MOTOR 20-6 SERVICE INFORMATION 20-3 STARTER RELAY SWITCH TROUBLESHOOTING 20-4 DIODE 20-15
 20. SYSTEM DIAGRAM 20-2 SERVICE INFORMATION 20-3 TROUBLESHOOTING 20-4 STARTER MOTOR 20-6 STARTER RELAY SWITCH 20-13 DIODE 20-15 20 20-1 SYSTEM DIAGRAM IGNITION SWITCH ENGINE STOP SWITCH CLUTCH SWITCH STARTER
Rekluse Motor Sports, Inc. The z-start Clutch. Husaberg ( )
") Rekluse Motor Sports, Inc. The z-start Clutch Husaberg (1989-2003) Installation Guide Copyright 2002-2004 Rekluse Motor Sports z-start Revision 3.000 RMS125 Husaberg 89-03 191-225 Manual Revision: 012805
Rekluse Motor Sports, Inc. The z-start Clutch Husaberg (1989-2003) Installation Guide Copyright 2002-2004 Rekluse Motor Sports z-start Revision 3.000 RMS125 Husaberg 89-03 191-225 Manual Revision: 012805
Service Handbook High-Pressure Washer Pump
 Service Handbook High-Pressure Washer Pump 9.120-014.0 2 A. Water Inlet Filter C. Nozzle Insert 1. Remove filter with a screwdriver. 2. Clean filter with warm water and mild soap. 3. Reinstall filter.
BOWSER - PARTS Air compresser mounting brkt Air compressor Back plate for LEAD Cast K Air tank.
 A 70044 Air compressor 70111 Air compressor 70192 Air compresser mounting brkt. B 15011 Bearing, driver 1/8" hole 15012 Bearing, driver, square, 1/8" hole, for.040 side rails on underframe 908 Brass bearing,
Instructions for Assembling Driving Wheels, Axles and Crankpins
 Instructions for Assembling Driving Wheels, Axles and Crankpins (Version 1; October 2008) Introduction These instructions explain how to assemble Exactoscale 4mm scale driving wheels, axles and crankpins
CYLINDER HEAD OVERHAUL
 ENGINE OVERHAUL PROCEDURES - GENERAL INFORMATION -2011 Mercedes-... Page 1 of 20 CYLINDER HEAD OVERHAUL * PLEASE READ THIS FIRST * Examples used in this article are general in nature and do not necessarily
This LED flashtube kit covers models 400, 404, 500, 504, 600, 680 & 506.
 L.E.D. INSTRUCTIONS I D T S O T U B I R M O C R Y N A P Kit contains: This LED flashtube kit covers models 400, 404, 500, 504, 600, 680 & 506. For the power supply: 1-LED power supply circuit board, 2
PRESENTER'S GUIDE "CRANE SAFETY" Part of the "SAFETY MEETING KIT" Series Quality Safety and Health Products, for Today...
 PRESENTER'S GUIDE "CRANE SAFETY" Part of the "SAFETY MEETING KIT" Series Quality Safety and Health Products, for Today...and Tomorrow OUTLINE OF MAJOR PROGRAM POINTS OUTLINE OF MAJOR PROGRAM POINTS The
Micro-Trains #1021/#1022 Low short profile coupler
 1 Micro-Trains #1021/#1022 Low short profile coupler Low short profile coupler, for locomotives and cars with limited mounting area, makes 2 pair of either (1021) Life-Like E8A Pilot or Bachmann 4-8-4
Electric motor testing
 Electric motor testing MOTOR (MODELS EJ4-4001 AND EJ8-4001A) 23 GENERAL INFORMATION The vehicle is equipped with a 48-volt DC, shunt-wound, reversible traction motor. The shunt-wound motor is designed
MAINTENANCE MANUAL DI 16
 MAINTENANCE MANUAL DI 16 0.2-1.6% Press Ctrl + L for full screen 1 STANDARD INSTALLATION Inlet Outlet Optional accessories: Pressure regulator Solenoid valves Water meter Flow restrictor 200 Mesh/ 80 micron
Modeling Ideas and techniques, by Bob Rohwer What is the right DCC Decoder for my Locomotive?
 Modeling Ideas and techniques, by Bob Rohwer What is the right DCC Decoder for my Locomotive? I hear this question a lot. Fortunately there are a lot of resources to answer the question. The best I have
This file is available for free download at
 This file is available for free download at http://www.iluvmyrx7.com This file is fully text-searchable select Edit and Find and type in what you re looking for. This file is intended more for online viewing
REPAIR INSTRUCTION - MP4120-SWS/MP4124-SWS
 Disassembly sequence REPAIR INSTRUCTION - MP4120-SWS/MP4124-SWS 1. With a 27mm wrench, remove the three discharge plugs (#48) and three inlet plugs (#42A) from the manifold (#43). 2. Inspect the plug o-rings
Bachmann 38 Ton Shay
 Bachmann 38 Ton Shay Phoenix Sound Systems, Inc. 3514 West Liberty Road Ann Arbor MI 48103 www.phoenixsound.com phone: 800-651-2444 fax: 734-662-0809 e-mail: phoenixsound@phoenixsound.com 2005-2008 Phoenix
Rekluse Motor Sports. The z-start Clutch CRF 250R. Installation Guide Copyright 2002 Rekluse Motor Sports z-start Revision RMS112 CRF 250R
 Rekluse Motor Sports The z-start Clutch CRF 250R Installation Guide Copyright 2002 Rekluse Motor Sports z-start Revision 3.000 RMS112 CRF 250R 191-212 Manual Revision: 091205 Rekluse Motor Sports, Inc.
INSTALLATION INSTRUCTIONS FOR THE MOTOR TRIKE GL1500 RAKE KIT
 INSTALLATION INSTRUCTIONS FOR THE MOTOR TRIKE GL1500 RAKE KIT Thank you for choosing the Motor Trike GL1500 Rake Kit. We ask that you read the directions before you start and follow them very closely.
INSTALLATION INSTRUCTIONS
 INSTALLATION INSTRUCTIONS REAR DISC BRAKE CONVERSION KIT A126-3 1988-98 CHEVY K1500 4WD 10" DRUMS Thank you for choosing STAINLESS STEEL BRAKES CORPORATION for your braking needs. Pleases take the time
The Magazine For Slot Car Enthusiasts
 The Magazine For Slot Car Enthusiasts Building the Tomy Super G+ By Milt Surratt Tomy Super G+ slot cars have been around in the current form for about 12 years. Out of the package, the Tomy HO slot car
Wheel Angle Sensor Kit Installation
 Wheel Angle Sensor Kit Installation Item Component Part Number Qty 1. WAS Bracket Kit 200-0247-02 1 2. WAS Assembly Kit 200-0468-01 1 3. Instruction Guide 602-0401-01 1 602-0401-01-A Overview Always shut
INSTALLATION INSTRUCTIONS
 INSTALLATION INSTRUCTIONS PERFORMANCE AT THE WHEELS KIT W155-5 CHRYSLER 8 3 /4" & 9 3 /4" REAR AXLES Thank you for choosing STAINLESS STEEL BRAKES CORPORATION for your braking needs. Please take the time
This file is available for free download at
 This file is available for free download at http://www.iluvmyrx7.com This file is fully text-searchable select Edit and Find and type in what you re looking for. This file is intended more for online viewing
80-96 Ford F150 / Bronco 4WD Class II 4"- 6" Suspension Lift Installation Instructions
 www.skyjacker.com Required Tool List: 80-96 Ford F150 / Bronco 4WD Class II 4"- 6" Suspension Lift Installation Instructions Safety Glasses Metric / Standard Wrenches & Sockets Floor Jack Jack Stands Measuring
TL4076 Top 5 Tips Get to know your TL4076
 TL4076 Top 5 Tips Get to know your TL4076 Thermal Break with Teflon liner (behind fan) Hot End Assembly Fan Heat Block Extruder with toothed gear(brass) and idler (steel) Filament Guide Tube Nozzle Cable
Ford 8, 9 Small Bearing Installation Instructions Rear Disc Conversion
 Ford 8, 9 Small Bearing Installation Instructions Rear Disc Conversion This kit is for Ford 9 rear axles with the small (2.835 ) style bearing and Ford 8 rear ends. This kit is designed to work with axles
Application Note. Athearn RTR SW-1000/SW-1500 Tsunami Digital Sound Decoder Installation Notes
 Application Note Athearn RTR SW-1000/SW-1500 Tsunami Digital Sound Decoder Installation Notes Overview This application note describes how to install a TSU-AT1000 Digital Sound Decoder into the HO Athearn
DESCRIPTION & OPERATION
 STARTER - REDUCTION GEAR 1997 STARTING & CHARGING SYSTEMS Mazda - Starters - Reduction Gear DESCRIPTION & OPERATION Reduction gear starter is a conventional 12-volt, 4-pole, brush-type starter. The integral
TONER CARTRIDGE REMANUFACTURING INSTRUCTIONS LASERJET P1505 SERIES TONER CARTRIDGE
 HP LASERJET P1505 TONER CARTRIDGE REMANUFACTURING INSTRUCTIONS HP LASERJET P1505 SERIES TONER CARTRIDGE 2010 UniNet Imaging Inc. All trademark names and artwork are property of their respective owners.
SEARAILS RR-XXX STEAM LOCOMOTIVES ASSEMBLY MANUAL
 SEARAILS RR-XXX 0-4-0 STEAM LOCOMOTIVES ASSEMBLY MANUAL 30 March 2015 T R Knapp Model Engineering 1 This diagram shows basic assembly of Nn3/Z Porter 0-4-0T 2 This diagram shows basic assembly of Baldwin
2007 Hummer H Driveline/Axle Propeller Shaft - H3. Fastener Tightening Specifications Specification Application
 2007 Driveline/Axle Propeller Shaft - H3 SPECIFICATIONS FASTENER TIGHTENING SPECIFICATIONS Fastener Tightening Specifications Specification Application Metric English Bolt - Front Propeller Shaft CV Joint
DIAGNOSIS AND TESTING
 DIAGNOSIS AND TESTING SUSPENSION AND STEERING SYSTEM 2007 SUSPENSION Suspension - Nitro CONDITION POSSIBLE CAUSES CORRECTION FRONT END NOISE 1. Loose or worn wheel bearings. 1. Replace wheel bearings.
Athearn SD40 Tsunami Digital Sound Decoder Installation Notes
 Athearn SD40 Tsunami Digital Sound Decoder Installation Notes Overview This application note describes how to install a TSU-AT1000 into an Athearn Ready-To-Roll HO SD40. Skill Level 2: The entire installation
BBK LONG TUBE HEADERS (99-04 GT, Mach 1, Bullitt)
") BBK LONG TUBE HEADERS (99-04 GT, Mach 1, Bullitt) Install Time: Approx. 8-10 hrs Parts Needed: BBK Long Tube Headers Shorty mid pipe X/H O2 wiring harness extensions Hi-temp thread locker Tools Required:
BBK LONG TUBE HEADERS (99-04 GT, Mach 1, Bullitt) Install Time: Approx. 8-10 hrs Parts Needed: BBK Long Tube Headers Shorty mid pipe X/H O2 wiring harness extensions Hi-temp thread locker Tools Required:
Timer. TipTop Timers. Installation and Operation Manual
 TipTop s E TM Installation and Operation Manual Sold by: TipTop s LLC 2225 North Dollar Road Spokane Valley, WA 99212 web: Model T Electronic - E E Conversion Kit Contents The Electronic conversion kit