INSTALLATION INSTRUCTIONS
|
|
|
- Gerard Boyd
- 5 years ago
- Views:
Transcription

1 INSTALLATION INSTRUCTIONS REAR DISC BRAKE CONVERSION KITS A112, A112-1 & A FORD MUSTANG with 7.5" & 8.8" AXLES Thank you for choosing STAINLESS STEEL BRAKES CORPORATION for your braking needs. Pleases take the time to read and carefully follow these instructions to insure the ease of your installation as well as the proper performance of the complete system. Before beginning your installation, please verify you have received all the parts indicated on the packing slip. If you believe anything to be missing or incorrect, please call our Customer Service Department at To assure your installation will go safely and smoothly, have the following items on hand to assist you: JACK & JACK STANDS LUG WRENCH TORQUE WRENCH SOCKET SET BRAKE CLEANER WRENCH SET TUBE WRENCHES MALLET GEAR OIL BRAKE FLUID These kits use the following pads: SSBC#: 1047 FMSI#: D-347 Revised to level 3 2/28/12 Stainless Steel Brakes Corporation Main Road Clarence, NY Phone: (800) (716) Fax: (716) info@ssbrakes.com
2 TIP: BEFORE BEGINNING INSTALLATION, SPRAY ALL FITTINGS & FASTENERS WITH PENETRATING OIL. 1. Drum Brake Removal a) Raise the car until the tires and wheels clear the floor and support the car on jack stands. Remove the tires and wheel assemblies from the drum. b) Pull the brake drums off the axle shafts. If the brake drum will not come off easily, retract the shoes by inserting a narrow screwdriver through the adjusting slot in the backing plate and back off the adjusting screw. c) Remove the brake shoes and all the hardware. d) Disconnect parking brake cable from the actuator and pull through the backing plate after compressing the retaining clip. e) Disconnect the rigid brake line from the back of the wheel cylinder. Always use a tube wrench on brake lines so not to strip the tube nut. 2. Removal of the Axles & Backing Plates a) Remove differential cover and drain all fluid into a drain pan. b) Working through the open case, remove the pinion shaft lock bolt. (7mm hex) c) Push pinion lock shaft out of the rear end housing. d) Push the axle shafts inward and remove the C locks from the ends of the axle shafts. e) Carefully pull the axle shafts out of the rear end being careful not to damage the axle bearings or seals. f) Remove the four nuts and bolts that secure the backing plates to the rear end housing and remove and discard the backing plates. Photo 1 3. Installation of Caliper Mounting Brackets a) Caliper brackets are marked Left and Right. Be sure to install them on the correct sides. b) Install the brackets so the calipers will point towards the rear of the car. The stepped part of the bracket should step in towards the center of the car. See Assembly Drawing. c) Secure the brackets to the axles using the 3/8-24 x 1-1/4 bolts and nuts suppled with the kit. 4. Installation of Axles Shafts and Rotors CAUTION: Prior to reinstalling axle shaft, measure the diameter of the axle flange. Occasionally, semi-finished axles with oversize outer flange diameters are installed in cars; this can prevent proper seating of the rotors which in turn may cause damage and excessive run-out. The diameter must not be greater than 5.82 (alternate measurement: flange circumference = 18-1/4 ). In the unusual event that this diameter is greater than 5.82 the axle diameter will require machining before proceeding. a) Reinstall the axle shafts, C-locks, lock pin and lock bolt in the reverse of removal. 1
3 BE SURE TO INSTALL A NEW DIFFERENTIAL GASKET AND REFILL THE REAR END WITH THE PROPER GEAR OIL TO THE PROPER LEVEL. b) Clean the rotors thoroughly with brake cleaner to remove the protective packing coating. c) Slide the rotors into position on the ends of the axle shafts and secure them with at least one lug nut. 5. Caliper Installation a) The calipers are marked Left and Right. Be sure to install them on the correct side. b) Place caliper over the rotor and secure it to the mounting brake using the 12mm bolts supplied. Torque the bolts to ft / lbs. The bleeder screws should be pointing up and the parking brake levers will point down. Photo 3 6. Inlet Tube and Support Clip a) Attach brass banjo fitting with special hollow bolt and two (2) copper washers. Be sure to install a copper washer on each side of the brass block. Tighten to ft/lbs. b) Attach rigid caliper inlet line to brass fitting and secure to axle with sheet metal clip and screw. Use existing hole, clip and screw that secured original brake tube to axle housing. Attach brass union to line. Photo 4 c) Connect original axle brake line to brass union. Be sure to use tube wrenches. You will need to hand bend original line so that it will reach caliper line neatly. Be sure not to kink the line. Use a tube bender. Photo 4 7. Parking Brake Cables a) Remove old parking brake cables. b) Install new cables (provided in kit) in the same manner as original cables. Make sure that housing snap clips are toward the front of the car. Route cables through floor pan gussets and assure that clips are securely seated (snapped) in floor pan holes, as in original installation. c) Route cable over guide grooves and then to parking brake lever (under console) as in original installation at one end and to caliper parking brake lever at the other end. d) Attach parking brake cables to caliper parking brake levers: 1) Push cable housings through holes in cast loop of each caliper and secure with e rings supplied. 2) Engage ends of cables into slots of caliper parking brake levers. 8. Master Cylinder NOTE: Mustangs, model years 1987 and later, are delivered with master cylinders having a smaller output capacity and metric fittings. When converting to rear discs, a larger master cylinder must be installed to prevent a spongy brake pedal condition. To prevent this, a larger capacity cylinder has been provided in the A112-1 kit. Since this master cylinder has SAS ports, a line adapter kit has also been included. Installation is as shown in Photo #5. 2
4 Follow instructions for 1987 and later cars as follows: 1) Remove three brake lines from the existing master cylinder. Note that one line is on the bottom of the unit. 2) Remove the mater cylinder from the booster, save lock nuts, discard original master cylinder. Make sure that no brake fluid is allowed to contact paint. 3) Remove two existing brake lines from distribution block, discard lines. Use a six point tube wrench. 4) Connect adapter TEE (provided) to third brake tube. This is the tube which was originally connected to the bottom of the master cylinder. Do not tighten fittings at this point. NOTE: Master cylinder must be bench bled prior to installation. 5) Install new master cylinder (0406*) on booster and secure with original lock nuts. (Installation is tight but will fit). 6) Install short elbow tube from adapter TEE (female nut) to larger port of the new master cylinder (male nut). 7) Install line from distribution block to adapter TEE. 8) Install line from distribution block to smaller port of the master cylinder. 9) Securely tighten all fittings before filling and bleeding hydraulic system. BE SURE TO CHECK FOR LEAKS AT ALL CONNECTIONS WITH THE PEDAL APPLIED, FOR MAXIMUM LINE PRESSURE, BEFORE DRIVING VEHICLE! 10) For all model year master cylinders: After installation is complete, the pedal height and firmness may be adjusted for best feel by slightly shortening or lengthening the booster output push-rod (one or two turns maximum). This adjustment can be made without breaking the hydraulic lines. However, care must be taken that brakes release properly when pedal is released. A dragging or locked-up brake is the result of an over length push rod. 9. Distribution Block and Proportioning Valve a) Unscrew plug from front side of distribution block. BE CAREFUL - it is spring loaded. Inside the unit is a spring, spring seat and piston Illustration #1. Pull out spring and piston (use needle nose pliers). Remove U-cup and spring from piston and discard. b) Reassemble using only the bare piston. Screw plug back into block. BE SURE TO LEAVE OUT SPRING AND U-CUP SEAL, BUT SEAL UNDER PLUG MUST REMAIN. c) If desired, an adjustable in-line proportioning valve is available from SSBC as an extra cost option. Refer to Photo #6. NOTE: BE CAREFUL THAT ALL HYDRAULIC COMPONENTS ARE KEPT CLEAN AND FREE OF DEBRIS INSIDE AND OUT. REMEMBER, DIRT IS THE ENEMY OF HYDRAULIC SYSTEMS AND WE WILL NOT BE RESPONSIBLE FOR SYSTEM FAILURES DUE TO UNCLEAN INSTALLATIONS! 3
5 10. Filling and Bleeding system a) It is advisable to replace the brake fluid if the color is brown or muddy. This is due to water that has been absorbed by the fluid which will eventually corrode the brake lines and master cylinder. This absorbed moisture can also cause a vapor lock situation under extreme braking conditions. Flush system with clean brake fluid and replace with a good grade of disc brake fluid. DOT 3 or DOT 4 fluids are acceptable. b) The simplest and most effective way to bleed your brakes is to use the gravity bleeding approach as follows: 1) With calipers installed, make sure all fittings are tight and master cylinder is topped off. 2) Open one bleeder screw at a time starting at the wheel farthest from the master cylinder and working your way back around the wheel closest to the master. With bleeder screw open, observe bleeder. At first the fluid will begin to escape with intermittent air bubbles. When the air bubbles stop and a steady flow of fluid is observed for several seconds, close the bleeder valve and move on to the next wheel. MAKE SURE TO KEEP A CLOSE WATCH OVER THE FLUID LEVEL INSIDE THE MASTER CYLINDER DURING THE BLEEDING PROCESS. NEVER LET THE RESERVOIR RUN DRY. ALWAYS KEEP IT AT LEAST 1/3 FULL. 3) After bleeding all four wheels and topping of the master cylinder make applications of the brake pedal. If a hard pedal is experienced, no further bleeding is required. If pedal is spongy, repeat bleeding process until a hard pedal is achieved. 4) With all bleeding complete, there should be approximately 3/4 to 1 of end play. 5) Power brake cars will experience a drop off of the pedal when the engine is started. This is a normal condition that signifies the booster is working. 6) Pedal end play can be adjusted under the dash on non power cars and between the booster and master on power brake cars. 11. Parking Brake Adjustment a) Advance pistons of calipers so that clearance between pads and rotors is 1/32-1/16. Piston should be advanced using hydraulic system instead of parking brake levers. About 40 pumps of the pedal are required to extend the pistons to the correct clearance. IF PISTON HAS BEEN EXTENDED TOO FAR, TURN PISTON BACK INTO CALIPER. IF DESIRED, USE SPECIAL TOOL KD-2545 AVAILABLE AT MOST PARTS STORES. A PAIR OF NEEDLE NOSE PLIERS WILL ALSO WORK. b) Pull up parking brake handle one click. c) Tighten cable at level until lever on caliper just begins to leave the stop (both sides.) d) Release parking brake handle. There should be no drag. 4

6 NOTE: 1987 AND LATER MUSTANGS INCORPORATE A SELF ADJUSTING PARKING BRAKE MECHANISM. IF THIS SYSTEM WILL NOT ALLOW ENOUGH ADJUSTMENT ON YOUR CAR FOR PROPER PARKING BRAKE OPERATION, AN ADJUSTABLE CABLE MAY BE PURCHASED FROM SSBC. THERE IS AN EXTRA COST ON THIS PART AND IT CAN BE PURCHASED FROM US OR DIRECTLY FROM FORD MOTORSPORT AS PART NO. M-2810-A. FINAL INSPECTION a) Once a hard pedal is achieved, all fittings and connections must be inspected to make sure there are no leaks. Also check the level in both reservoirs of the master cylinder and top off if needed. b) Put wheels back on the car and turn wheel by hand to insure that the wheel spins freely and does not interfere with any brake components. c) When you are sure there are no interferences and the pedal is firm, torque the lug nuts and lower the car back onto the ground. Test drive the car and apply the brakes frequently to seat the pads. NOTE: DO NOT USE ANTI-SQUEAK ADHESIVE ON BACKS OF PADS. THIS WILL DEGRADE THE PERFORMANCE OF THE CALIPER! DO NOT DRIVE IN TRAFFIC UNTIL THE BRAKES SAFELY STOP THE CAR A SAFE DISTANCE WITHOUT A SPONGY PEDAL FEEL! BRAKING TESTS SHOULD ALWAYS BE DONE IN A SAFE OPEN AREA! NOTE: For frequently asked questions and technical reference information please visit the tech section of our website at TECH LINE -- If technical help is required, please call NOW ENJOY TRUE PERFORMANCE BRAKING!! REPLACEMENT PARTS APPLICATION The calipers, brake pads and rotors used in this conversion kit are the same as those used from the factory on Ford Thunderbird Turbo Coupe. If you have a problem locating the correct replacement pads, have your parts store reference the FMSI #D347. 5
7 6


8 Photo #2 Caliper mounting bracket is now a casting. Photo #1 Photo #3 Photo #4 Caliper inlet line is now rigid. 7
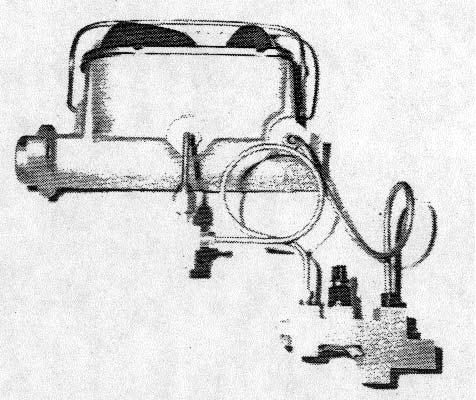
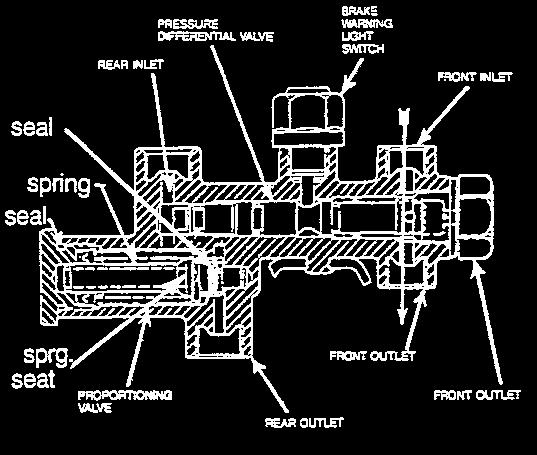
9 Photo #5 Illustration #1 - Combination Valve 8
10 How and why do I bench bleed a master cylinder? When installing or replacing a master cylinder, it is critical that all air is removed from the master cylinder. This can easily be done by bench bleeding the master cylinder prior to installation. Using the SSBC master cylinder bleeder kit (#0460): 1) Place your master cylinder in a vise by the ears (not body). Make sure it is level. 2) Attach a piece of clear plastic hose to the short end of one of the plastic nozzles. Do the same to the other hose and nozzle. 3) Clip the plastic bridge to the wall and push the ends of the hose through the holes so they are SUBMERGED in the reservoir on either side of the wall. 4) Press the tapered end of the nozzle FIRMLY into the cylinder port hole with a twisting motion. Repeat this procedure on the other port hole. 5) Fill the reservoir with CLEAN brake fluid recommended by the manufacturer. 6) Using full strokes, push the piston in, then release. Do this until ALL the air bubbles have disappeared from the clear plastic hose. (CAUTION-MASTER CYLINDER WILL NOT BLEED PROPERLY UNLESS HOSES ARE SUBMERGED IN BRAKE FLUID UNTIL THE BLEEDING PROCESS IS COMPLETED.) Now mount master cylinder and avoid brake fluid leaking out of front and rear ports during installation. Bleeding steps for Dual Port Master Cylinder If you have a master cylinder with dual port holes (4 port holes - 2 on each side), it is necessary to bleed both port sides of the master cylinder. If both sides of the master cylinder are not bled, there will be air trapped in the master cylinder and your brakes will not function properly. To bleed dual port master cylinders: 1) Follow steps 1-6 above on the side you will be hooking the brake lines to. Plug the other side. 2) Once the air bubbles are no longer visible in the plastic hose, open the bleeder screws in the supplied plugs and allow the mater cylinder to gravity bleed. DO NOT push the master cylinder piston in while the plugs are gravity bleeding. 3) When clear, steady streams of fluid are coming out of both bleeders, close and tighten the bleeders. Give the master cylinder piston several strokes, making sure there are still no bubbles present in the clear plastic tubes. 4) Remove the tubes and plastic fittings and mount the master cylinder on the vehicle being careful not to spill brake fluid on any painted surfaces.

11 C L WHEEL MOUNTING SURFACE DIMENSIONS ARE IN INCHES TEMPLATE NO. T-039 DO NOT SCALE DRAWING SSBC STAINLESS STEEL BRAKE CORP. CLARENCE, NEW YORK Ph: / ~ Fx: REV
INSTALLATION INSTRUCTIONS
 INSTALLATION INSTRUCTIONS REAR DISC BRAKE CONVERSION KIT A158 1994-97 Dodge Ram 1500 (2WD & 4WD) and REAR DISC BRAKE CONVERSION KIT A158-1 1998-01 Dodge Ram 1500 (2WD & 4WD) Thank you for choosing STAINLESS
INSTALLATION INSTRUCTIONS
 INSTALLATION INSTRUCTIONS REAR DISC BRAKE CONVERSION KIT A125-3 1965-72 GM A-BODY 10 & 12 BOLT AXLES Thank you for choosing STAINLESS STEEL BRAKES CORPORATION for your braking needs. Pleases take the time
INSTALLATION INSTRUCTIONS
 INSTALLATION INSTRUCTIONS REAR DISC BRAKE CONVERSION KIT A125-2 1955-70 FULL SIZE CHEVROLET Thank you for choosing STAINLESS STEEL BRAKES CORPORATION for your braking needs. Pleases take the time to read
INSTALLATION INSTRUCTIONS
 INSTALLATION INSTRUCTIONS PERFORMANCE AT THE WHEELS KIT W125-42 GM 10 & 12 Bolt Rear Axles with Staggered or non-staggered Shocks with C-Clips Thank you for choosing STAINLESS STEEL BRAKES CORPORATION
INSTALLATION INSTRUCTIONS
 INSTALLATION INSTRUCTIONS REAR DISC BRAKE CONVERSION KIT A157 1991-2004 Dodge Dakota 2WD 1991-2002 Dodge Dakota 4WD 1998-2002 Dodge Durango Thank you for choosing STAINLESS STEEL BRAKES CORPORATION for
INSTALLATION INSTRUCTIONS
 INSTALLATION INSTRUCTIONS FRONT BIG BRAKE CONVERSION KIT A112-5 1987-93 FORD MUSTANG Thank you for choosing STAINLESS STEEL BRAKES CORPORATION for your braking needs. Pleases take the time to read and
INSTALLATION INSTRUCTIONS
 INSTALLATION INSTRUCTIONS REAR DISC CONVERSION KIT A136-1 1976-86 AMC 20 AXLES WITH WARN FULL FLOATING AXLE CONVERSION Thank you for choosing STAINLESS STEEL BRAKES CORPORATION for your braking needs.
INSTALLATION INSTRUCTIONS
 INSTALLATION INSTRUCTIONS PERFORMANCE AT THE WHEELS KIT W155-5 CHRYSLER 8 3 /4" & 9 3 /4" REAR AXLES Thank you for choosing STAINLESS STEEL BRAKES CORPORATION for your braking needs. Please take the time
INSTALLATION INSTRUCTIONS
 INSTALLATION INSTRUCTIONS REAR DISC CONVERSION KIT A128-4 1997-2004 JEEP WRANGLER (TJ) WITH DANA 44 AXLES (non-abs) Thank you for choosing STAINLESS STEEL BRAKES for your braking needs. Pleases take the
INSTALLATION INSTRUCTIONS PERFORMANCE AT THE WHEELS KIT W125
 INSTALLATION INSTRUCTIONS PERFORMANCE AT THE WHEELS KIT W125 1968-81 CAMARO & FIREBIRD 10 & 12 BOLT W/"C" CLIPS Thank you for choosing STAINLESS STEEL BRAKES CORPORATION for your braking needs. Pleases
INSTALLATION INSTRUCTIONS
 INSTALLATION INSTRUCTIONS REAR CONVERSION KIT A111-2 (FORD 8" & 9" SMALL BEARING) & REAR CONVERSION KIT A111-3 (FORD 9 TORINO) Thank you for choosing STAINLESS STEEL BRAKES CORPORATION for your braking
INSTALLATION INSTRUCTIONS
 INSTALLATION INSTRUCTIONS REAR DISC BRAKE CONVERSION KIT A126-1 1973-87 CHEVROLET 1/2 TON 2WD Thank you for choosing STAINLESS STEEL BRAKES CORPORATION for your braking needs. Pleases take the time to
INSTALLATION INSTRUCTIONS
 INSTALLATION INSTRUCTIONS DISC BRAKE CONVERSION KIT A120-20, A120-21 1964 1 /2-66 Ford & Mercury Thank you for choosing STAINLESS STEEL BRAKES CORPORATION for your braking needs. Pleases take the time
INSTALLATION INSTRUCTIONS
 INSTALLATION INSTRUCTIONS FX4 ELITE REAR DISC CONVERSION KITS WITH INTERNAL PARKING BRAKE A110-14, A111-25, A111-29 for FORD 8" & 9" REAR ENDS Thank you for choosing STAINLESS STEEL BRAKES CORPORATION
INSTALLATION INSTRUCTIONS
 INSTALLATION INSTRUCTIONS REAR DISC CONVERSION KIT A128 1990-1995 JEEP WRANGLER (YJ) WITH DANA 35 AXLES (non-abs) Thank you for choosing STAINLESS STEEL BRAKES CORPORATION for your braking needs. Pleases
INSTALLATION INSTRUCTIONS
 INSTALLATION INSTRUCTIONS DISC BRAKE CONVERSION KITS A121-1, A121-2, A121-3, A121-4 1967-69 Ford & Mercury Thank you for choosing STAINLESS STEEL BRAKES CORPORATION for your braking needs. Pleases take
INSTALLATION INSTRUCTIONS
 INSTALLATION INSTRUCTIONS PERFORMANCE AT THE WHEELS KIT W120-22, W120-23 1964 1/2-69 MUSTANG Thank you for choosing STAINLESS STEEL BRAKES CORPORATION for your braking needs. Pleases take the time to read
INSTALLATION INSTRUCTIONS
 INSTALLATION INSTRUCTIONS FORCE 10 SPORT R1 REAR DISC CONVERSION KIT A126-50 2005-10 Chevrolet Silverado and GMC Sierra Thank you for choosing STAINLESS STEEL BRAKES CORPORATION for your braking needs.
INSTALLATION INSTRUCTIONS
 INSTALLATION INSTRUCTIONS R1 REAR DRUM TO DISC BRAKE CONVERSION KIT A130-3 JEEP CJ SERIES W/AMC-20 REAR AXLES AND 5 x 5-1/2" BOLT CIRCLE Thank you for choosing STAINLESS STEEL BRAKES CORPORATION for your
INSTALLATION INSTRUCTIONS
 INSTALLATION INSTRUCTIONS POWER FRONT DISC CONVERSION KIT A126-7 1963-66 CHEVY C10 PICKUP NON-POWER FRONT DISC CONVERSION KIT A126-8 1963-72 CHEVY C10 PICKUP Thank you for choosing STAINLESS STEEL BRAKES
INSTALLATION INSTRUCTIONS R1 REAR CONVERSION KIT
 INSTALLATION INSTRUCTIONS R1 REAR CONVERSION KIT INSTRUCTION FOR ASSEMBLY OF JEEP CJ SERIES W/AMC 20 REAR AXLES, 5 x 5-1/2" BOLT CIRCLE WITH A130-4 FULL FLOATING AXLE OR A130-5 (1 PIECE AXLE) Thank you
INSTALLATION INSTRUCTIONS
 INSTALLATION INSTRUCTIONS REAR DRUM TO DISC BRAKE CONVERSION KIT A118 pre-1985 Ford F150 (except 1983-1984 w/super H/D axle) Thank you for choosing STAINLESS STEEL BRAKES CORPORATION for your braking needs.
INSTALLATION INSTRUCTIONS
 INSTALLATION INSTRUCTIONS REAR DISC BRAKE CONVERSION KIT A126-3 1988-98 CHEVY K1500 4WD 10" DRUMS Thank you for choosing STAINLESS STEEL BRAKES CORPORATION for your braking needs. Pleases take the time
INSTALLATION INSTRUCTIONS
 INSTALLATION INSTRUCTIONS DISC BRAKE CONVERSION KITS A120-4 & A120-5 1964-1/2-66 Ford & Mercury Thank you for choosing STAINLESS STEEL BRAKES CORPORATION for your braking needs. Pleases take the time to
INSTALLATION INSTRUCTIONS
 INSTALLATION INSTRUCTIONS REAR DISC BRAKE CONVERSION KIT A117-1, A117-2 1991-97 S10 PICKUP & BLAZER 1985-02 ASTRO AND SAFARI VAN Thank you for choosing STAINLESS STEEL BRAKES CORPORATION for your braking
INSTALLATION INSTRUCTIONS
 INSTALLATION INSTRUCTIONS COMP CALIPER QUICK CHANGE KIT A213 1968-73 MUSTANG Thank you for choosing STAINLESS STEEL BRAKES CORPORATION for your braking needs. Pleases take the time to read and carefully
INSTALLATION INSTRUCTIONS
 INSTALLATION INSTRUCTIONS REAR DISC CONVERSION KIT A126-2 1988-98 C1500 2WD 10" REAR DRUM Thank you for choosing STAINLESS STEEL BRAKES CORPORATION for your braking needs. Pleases take the time to read
INSTALLATION INSTRUCTIONS
 INSTALLATION INSTRUCTIONS PERFORMANCE AT THE WHEELS KITS W156-6 & W156-7 1965-74 MOPAR B & E BODY Thank you for choosing STAINLESS STEEL BRAKES CORPORATION for your braking needs. Pleases take the time
INSTALLATION INSTRUCTIONS
 INSTALLATION INSTRUCTIONS FRONT DISC BRAKE CONVERSION KIT A129-2 1959-64 Full Size Chevrolet Car and FRONT DISC BRAKE CONVERSION KITS A129-3 & A129-4 1965-68 Full Size Chevrolet Car Thank you for choosing
INSTALLATION INSTRUCTIONS
 INSTALLATION INSTRUCTIONS REAR DRUM TO DISC BRAKE CONVERSION KIT A130 JEEP CJ SERIES W/AMC-20 REAR AXLES AND 5 x 5-1/2" BOLT CIRCLE Thank you for choosing STAINLESS STEEL BRAKES CORPORATION for your braking
INSTALLATION INSTRUCTIONS
 INSTALLATION INSTRUCTIONS INSTALLATION INSTRUCTIONS FOR A136 REAR DRUM TO DISC BRAKE CONVERSION KIT for 1970-75 Jeep, CJ SERIES with Dana 44 flanged axle Thank you for choosing STAINLESS STEEL BRAKES CORPORATION
INSTALLATION INSTRUCTIONS
 INSTALLATION INSTRUCTIONS FRONT DISC BRAKE CONVERSION KITS A148-9 & A148-15 1949-54 Chevy Trucks Thank you for choosing STAINLESS STEEL BRAKES CORPORATION for your braking needs. Please take the time to
INSTALLATION INSTRUCTIONS
 INSTALLATION INSTRUCTIONS INSTRUCTION FOR ASSEMBLY OF JEEP CJ SERIES W/AMC 20 REAR AXLES, 5 x 5-1/2" BOLT CIRCLE WITH A130-1 FULL FLOATING AXLE OR A130-2 (1 PIECE AXLE) Thank you for choosing STAINLESS
INSTALLATION INSTRUCTIONS
 INSTALLATION INSTRUCTIONS COMP. R AND COMP. S QUICK CHANGE KITS A200, A200-1 Thank you for choosing STAINLESS STEEL BRAKES CORPORATION for your braking needs. Pleases take the time to read and carefully
INSTALLATION INSTRUCTIONS
 INSTALLATION INSTRUCTIONS REAR DISC BRAKE CONVERSION KITS SUM-BK1329-X, SUM-BK1329-99904, SUM-BK1330-X, SUM-BK1330-99904 CHRYSLER 8 3 /4", 9 3 /4" and 2-PIECE REAR AXLES Thank you for choosing SUMMIT RACING
INSTALLATION INSTRUCTIONS
 INSTALLATION INSTRUCTIONS FRONT DISC BRAKE CONVERSION KITS: A132-1, A133, A133-1 A134, A134-1 1968-73 MUSTANG/FORD Thank you for choosing STAINLESS STEEL BRAKES CORPORATION for your braking needs. Please
INSTALLATION INSTRUCTIONS
 INSTALLATION INSTRUCTIONS REAR CONVERSION KITS SUM-BK1326-X, SUM-BK1326-99904, SUM-BK1327-X, SUM-BK1327-99904, SUM-BK1328-X, SUM-BK1328-99904 FORD 8 and 9 AXLES WITH GM & FORD BOLT PATTERN Thank you for
INSTALLATION INSTRUCTIONS
 INSTALLATION INSTRUCTIONS REAR DISC CONVERSION KIT SUM-BK1414-X 1997-2004 JEEP WRANGLER (TJ) WITH DANA 44 AXLES (non-abs) Thank you for choosing SUMMIT RACING for your braking needs. Pleases take the time
INSTALLATION INSTRUCTIONS
 INSTALLATION INSTRUCTIONS BIG ROTOR / CALIPER RELOCATION REAR KIT SUM-BK1423 1999-2009 GM 1/2 Ton Trucks & SUVs Thank you for choosing SUMMIT RACING for your braking needs. Pleases take the time to read
INSTALLATION INSTRUCTIONS
 INSTALLATION INSTRUCTIONS BILLET ALUMINUM ALL-IN-ONE MASTER CYLINDERS A0472, -1, -2, -3, -4, -5 A0473, -1, -2, -3, -4, -5 A0474, -1, -2, -3, -4, -5 Thank you for choosing STAINLESS STEEL BRAKES CORPORATION
INSTALLATION INSTRUCTIONS
 INSTALLATION INSTRUCTIONS BIG ROTOR / CALIPER RELOCATION FRONT KITS SUM-BK1422, BK1423, BK1424 1999-2006 GM 1/2 Ton Trucks & SUVs Thank you for choosing SUMMIT RACING for your braking needs. Pleases take
INSTALLATION INSTRUCTIONS
 INSTALLATION INSTRUCTIONS Disc Brake Spindle Kit SUM-BKA2447 1964-72 A-BODY 1967-69 F-BODY 1968-74 X-BODY Thank you for choosing SUMMIT RACING for your braking needs. Please take the time to read and carefully
INSTALLATION INSTRUCTIONS
 INSTALLATION INSTRUCTIONS FRONT DISC BRAKE CONVERSION KITS SUM-BK1200, SUM-BK1201, SUM-BK1202, SUM-BK1203 1964-72 A-BODY 1967-69 F-BODY 1962-74 X-BODY (NOTE: 62-64 X-BODY REQUIRES 5-LUG STEERING ARMS)
Installation Instructions
 Installation Instructions Rear Disc Brake Conversion Kit Item # RC4001, RC4001X Applications: Mopar 7.25, 8.25, 9.25 Axles Thank you for choosing Leed Brakes for your automotive product needs. Before you
Installation Instructions
 Installation Instructions Rear Disc Brake Conversion Kit Item # RC1001, RC1001X Applications: 64-72 A-body, 67 F-Body, 63-67 X-body with Non Staggered Shocks Thank you for choosing GPS Auto for your automotive
Installation Instructions
 Installation Instructions Rear Disc Brake Conversion Kit Item # RC2001, RC2001X Applications: Mopar 8-3/4 & 9-3/4 Rear Axles Thank you for choosing Leed Brakes for your automotive product needs. Before
INSTALLATION INSTRUCTIONS
 INSTALLATION INSTRUCTIONS BIG ROTOR / CALIPER RELOCATION KITS A126-67 2002-11 GM 2500/3500 Thank you for choosing STAINLESS STEEL BRAKES CORPORATION for your braking needs. Pleases take the time to read
INSTALLATION INSTRUCTIONS
 Stainless Steel Brakes Corporation INSTALLATION INSTRUCTIONS REAR DISC BRAKE CONVERSION KIT A125 1968-81 CAMARO & FIREBIRD 10 & 12 BOLT W/"C" CLIPS Thank you for choosing STAINLESS STEEL BRAKES CORPORATION
INSTALLATION INSTRUCTIONS
 INSTALLATION INSTRUCTIONS REAR DISC BRAKE CONVERSION KIT A155-2 1959-62 CHRYSLER REAR AXLES WITH 2 PIECE AXLE SHAFTS Thank you for choosing STAINLESS STEEL BRAKES CORPORATION for your braking needs. Please
INSTALLATION INSTRUCTIONS
 Stainless Steel Brakes Corporation INSTALLATION INSTRUCTIONS REAR DISC BRAKE CONVERSION KIT A155 CHRYSLER 8 3 /4" & 9 3 /4" REAR AXLES Thank you for choosing STAINLESS STEEL BRAKES CORPORATION for your
INSTALLATION INSTRUCTIONS
 Stainless Steel Brakes Corporation INSTALLATION INSTRUCTIONS FRONT BIG BRAKE CONVERSION KIT A112-5 1987-93 FORD MUSTANG Thank you for choosing STAINLESS STEEL BRAKES CORPORATION for your braking needs.
INSTALLATION INSTRUCTIONS
 Stainless Steel Brakes Corporation INSTALLATION INSTRUCTIONS REAR DISC BRAKE CONVERSION KIT A157 1991-2004 Dodge Dakota 2WD 1991-2002 Dodge Dakota 4WD 1998-2002 Dodge Durango Thank you for choosing STAINLESS
A /F/X Body Instruction Packet Rear Disc Conversion
 A /F/X Body Instruction Packet Rear Disc Conversion 64-72 A Body / 67-81 F Body / 62-74 X Body This kit is for axles with a 3 1/8 spread center to center on the top two bolt holes (pictured left). Rotor
INSTALLATION INSTRUCTIONS
 INSTALLATION INSTRUCTIONS REAR DISC BRAKE CONVERSION KIT A114 FORD RANGER & BRONCO II Thank you for choosing STAINLESS STEEL BRAKES CORPORATION for your braking needs. Pleases take the time to read and
INSTALLATION INSTRUCTIONS
 INSTALLATION INSTRUCTIONS REAR CONVERSION KIT A111-2 (FORD 8" & 9" SMALL BEARING) & REAR CONVERSION KIT A111-3 (FORD 9 TORINO) Thank you for choosing STAINLESS STEEL BRAKES CORPORATION for your braking
55-64 Full Size GM (Impala, Bel Air, etc.) This kit is for axles with a 3 3/8 spread center to center on the top two bolt holes (pictured left).
 This kit is for axles with a 3 3/8 spread center to center on the top two bolt holes (pictured left).") SUM-BK1624A Full Size GM Installation Instructions Rear Disc Conversion 55-64 Full Size GM (Impala, Bel Air, etc.) This kit is for axles with a 3 3/8 spread center to center on the top two bolt holes (pictured
SUM-BK1624A Full Size GM Installation Instructions Rear Disc Conversion 55-64 Full Size GM (Impala, Bel Air, etc.) This kit is for axles with a 3 3/8 spread center to center on the top two bolt holes (pictured
INSTALLATION INSTRUCTIONS
 INSTALLATION INSTRUCTIONS FX1 REAR DISC CONVERSION KITS A110-11, A111-20, A111-21 for FORD 8" & 9" REAR ENDS Thank you for choosing STAINLESS STEEL BRAKES CORPORATION for your braking needs. Pleases take
Mopar 8 3/4 & 9 3/4 (Dana) Installation Instructions Rear Disc Conversion
 Installation Instructions Rear Disc Conversion") Mopar 8 3/4 & 9 3/4 (Dana) Installation Instructions Rear Disc Conversion This kit is for either Mopar 8 ¾ or Mopar 9 ¾ (Dana). This kit is designed to work with axles with either GM 5 x 4.75 Bolt Pattern
Mopar 8 3/4 & 9 3/4 (Dana) Installation Instructions Rear Disc Conversion This kit is for either Mopar 8 ¾ or Mopar 9 ¾ (Dana). This kit is designed to work with axles with either GM 5 x 4.75 Bolt Pattern
INSTALLATION INSTRUCTIONS
 INSTALLATION INSTRUCTIONS REAR CONVERSION KIT A110-18 LINCOLN VERSAILLES REAR AXLES Thank you for choosing STAINLESS STEEL BRAKES CORPORATION for your braking needs. Pleases take the time to read and carefully
INSTALLATION INSTRUCTIONS
 Stainless Steel Brakes Corporation INSTALLATION INSTRUCTIONS FRONT BRAKE CONVERSION KITS A159 & A159-1 1966-75 Ford Bronco Thank you for choosing STAINLESS STEEL BRAKES CORPORATION for your braking needs.
INSTALLATION INSTRUCTIONS
 Stainless Steel Brakes Corporation INSTALLATION INSTRUCTIONS POWER FRONT DISC CONVERSION KIT A126-71 1967-72 CHEVY C10 PICKUP Thank you for choosing STAINLESS STEEL BRAKES CORPORATION for your braking
INSTALLATION INSTRUCTIONS
 INSTALLATION INSTRUCTIONS REAR DISC BRAKE CONVERSION KIT A117-1 1991-97 S10 PICKUP & BLAZER Thank you for choosing STAINLESS STEEL BRAKES CORPORATION for your braking needs. Pleases take the time to read
INSTALLATION INSTRUCTIONS
 INSTALLATION INSTRUCTIONS REAR DISC CONVERSION KIT A126-2 1988-98 C1500 2WD 10" REAR DRUM Thank you for choosing STAINLESS STEEL BRAKES CORPORATION for your braking needs. Pleases take the time to read
INSTALLATION INSTRUCTIONS
 Stainless Steel Brakes Corporation INSTALLATION INSTRUCTIONS FRONT DRUM TO DISC CONVERSION KITS A156-1 & A156-3 1965-74 MOPAR B & E BODY Thank you for choosing STAINLESS STEEL BRAKES CORPORATION for your
INSTALLATION INSTRUCTIONS
 INSTALLATION INSTRUCTIONS Front Force 10 SportTwin Kit A163-6 Chevrolet Cobalt and Saturn ION (4 lug) Front Force 10 SportTwin Kit A163-8 Chevrolet Cobalt and Saturn ION (5 lug) Thank you for choosing
INSTALLATION INSTRUCTIONS
 Stainless Steel Brakes Corporation INSTALLATION INSTRUCTIONS Force 10 Super Twin Kits A161 and A161-2 Ford Focus Front Thank you for choosing STAINLESS STEEL BRAKES CORPORATION for your braking needs.
INSTALLATION INSTRUCTIONS
 INSTALLATION INSTRUCTIONS FORCE 10 SPORT R1 REAR DISC CONVERSION KIT A126-50 2005-07 Chevrolet Silverado and GMC Sierra Thank you for choosing STAINLESS STEEL BRAKES CORPORATION for your braking needs.
INSTALLATION INSTRUCTIONS
 INSTALLATION INSTRUCTIONS QUICK CHANGE CALIPER UPGRADE KIT A186-1 1988-98 GM Trucks & SUVs Thank you for choosing STAINLESS STEEL BRAKES CORPORATION for your braking needs. Pleases take the time to read
Ford 8, 9 Small Bearing Installation Instructions Rear Disc Conversion
 Ford 8, 9 Small Bearing Installation Instructions Rear Disc Conversion This kit is for Ford 9 rear axles with the small (2.835 ) style bearing and Ford 8 rear ends. This kit is designed to work with axles
INSTALLATION INSTRUCTIONS
 Stainless Steel Brakes Corporation INSTALLATION INSTRUCTIONS REAR DRUM TO DISC BRAKE CONVERSION KIT A130 JEEP CJ SERIES W/AMC-20 REAR AXLES AND 5 x 5-1/2" BOLT CIRCLE Thank you for choosing STAINLESS STEEL
INSTALLATION INSTRUCTIONS
 INSTALLATION INSTRUCTIONS BILLET ALUMINUM MASTER CYLINDERS A0467, -1, -2, -3, -4, -5 A0468, -1, -2, -3, -4, -5 A0469, -1, -2, -3, -4, -5 Thank you for choosing STAINLESS STEEL BRAKES CORPORATION for your
INSTALLATION INSTRUCTIONS
 INSTALLATION INSTRUCTIONS DISC BRAKE CONVERSION KIT A120-20, A120-21 1964 1 /2-66 Ford & Mercury Thank you for choosing STAINLESS STEEL BRAKES CORPORATION for your braking needs. Pleases take the time
DISC BRAKE/DUAL MASTER CYLINDER CONVERSION. Tools, Equipment and Supplies Needed:
 Please take the time to read the enclosed instructions carefully. If you have any questions, call our Product Assistance personnel for clarification. It is important to note that these instructions contain
INSTALLATION INSTRUCTIONS
 Stainless Steel Brakes Corporation INSTALLATION INSTRUCTIONS Super Duty Drop Spindle Kits A141-1, A142-1, A143-1 A144-1, A145-1, A146-1 Thank you for choosing STAINLESS STEEL BRAKES CORPORATION for your
INSTALLATION INSTRUCTIONS
 INSTALLATION INSTRUCTIONS QUICK CHANGE KIT A189-2 2002-05 DODGE RAM 1500 2WD & 4WD Thank you for choosing STAINLESS STEEL BRAKES CORPORATION for your braking needs. Pleases take the time to read and carefully
INSTALLATION INSTRUCTIONS
 Stainless Steel Brakes Corporation INSTALLATION INSTRUCTIONS FRONT DISC BRAKE CONVERSION KIT A129-2 1959-64 Full Size Chevrolet Car and FRONT DISC BRAKE CONVERSION KITS A129-3 & A129-4 1965-68 Full Size
INSTALLATION INSTRUCTIONS
 INSTALLATION INSTRUCTIONS POWER DISC BRAKE CONVERSION KITS: A132-A & A132-M 1968-69 MUSTANG/FORD Thank you for choosing STAINLESS STEEL BRAKES CORPORATION for your braking needs. Please take the time to
INSTALLATION INSTRUCTIONS
 Stainless Steel Brakes Corporation INSTALLATION INSTRUCTIONS FRONT DISC BRAKE CONVERSION KIT A129-13 1965-70 Full Size Oldsmobile Thank you for choosing STAINLESS STEEL BRAKES CORPORATION for your braking
INSTALLATION INSTRUCTIONS
 INSTALLATION INSTRUCTIONS MASTER CYLINDER A0463 Thank you for choosing STAINLESS STEEL BRAKES CORPORATION for your braking needs. Pleases take the time to read and carefully follow these instructions to
INSTALLATION INSTRUCTIONS
 Stainless Steel Brakes Corporation INSTALLATION INSTRUCTIONS BIG ROTOR / CALIPER RELOCATION KITS A126-42 and A126-42A 1999-2005 GM 1/2 Ton Trucks & SUVs Thank you for choosing STAINLESS STEEL BRAKES CORPORATION
INSTALLATION INSTRUCTIONS
 INSTALLATION INSTRUCTIONS FX2 FRONT DISC BRAKE CONVERSION KITS A148-11A, 12A, 16A, 17A, 18A 1937-48 FORD SPINDLES 1948-56 FORD TRUCK Thank you for choosing STAINLESS STEEL BRAKES CORPORATION for your braking
ASSEMBLY INSTRUCTIONS
 ASSEMBLY INSTRUCTIONS FOR FORGED SUPERLITE BIG BRAKE FRONT HUB KIT WITH 3.00 DIAMETER VENTED ROTOR 968-969 FORD MUSTANG (DISC BRAKE SPINDLE ONLY) PART NUMBER GROUP 0-950 WARNING INSTALLATION OF THIS KIT
GM FULL SIZE REAR DISC BRAKE KIT
 GM FULL SIZE REAR DISC BRAKE KIT This kit is for axles with a 3 3/8 spread center to center on the top two bolt holes (pictured left). If your axle flange measures 3 1/8 from center to center, you need
Installation Instructions
 Preparing your vehicle to install your brake system upgrade 1. Rack the vehicle. 2. If you don t have a rack, then you must take extra safety precautions. 3. Choose a firmly packed and level ground to
SERVICE PROCEDURES FOR CLUTCH HYDRAULIC UNITS
 SERVICE PROCEDURES FOR CLUTCH HYDRAULIC UNITS SAFETY PROCEDURES Always follow the vehicle manufacturer's recommended safety procedures in your Shop and Owners Manual. REQUIRED TOOLS Flat blade screwdriver,
ASSEMBLY INSTRUCTIONS
 ASSEMBLY INSTRUCTIONS FOR DYNALITE PRO SERIES REAR PARKING BRAKE KIT WITH.9 DIAMETER VENTED ROTOR (. OFFSET) 005 - PRESENT MUSTANG 8.8 (5 LUG) PART NUMBER GROUP 0-98 INSTALLATION OF THIS KIT SHOULD ONLY
Tools, Equipment and Supplies Needed:
 153-162 DISC BRAKE/DUAL MASTER CYLINDER CONVERSION Please take the time to read the enclosed instructions carefully. If you have any questions, call our Product Assistance personnel for clarifi cation.
A/F/X Body GM Installation Instructions
 A/F/X Body GM Installation Instructions Rear Disc Conversion 64-72 A Body / 67-69 F Body / 62-74 X Body This kit is for axle with a 3 1/8 spread center to center on the top two bolt holes (pictured left).
Full Size GM Installation Instructions
 Full Size GM Installation Instructions Rear Disc Conversion 55 64 Full Size GM (Impala, Bel Air, etc.) This kit is for axle with a 3 3/8 spread center to center on the top two bolt holes (pictured left).
1969 Camaro. Concourse Style Disc Brake Conversion Kit Instllation Instructions
 Concourse Style Disc Brake Conversion Kit Instllation Instructions 1969 Camaro (1970 Chevelle Kit Shown) This document contains our regular disc brake conversion instructions with the addition of GM assembly
EGR Performance Brakes Assembly Instructions DODGE DANA 70 '87 - '93 (Will not fit stock sized dual rear wheels)
") EGR Performance Brakes Assembly Instructions DODGE DANA 70 '87 - '93 (Will not fit stock sized dual rear wheels) Got Brakes? Parts List (2) Vented Rotors (2) Multi hole Cable Mount & L Brkt (2) Axle Tube
EGR Performance Brakes Assembly Instructions DODGE DANA 70 '87 - '93 (Will not fit stock sized dual rear wheels) Got Brakes? Parts List (2) Vented Rotors (2) Multi hole Cable Mount & L Brkt (2) Axle Tube
A/F/X Body GM Installation Instructions Manual Disc Conversion
 A/F/X Body GM Installation Instructions Manual Disc Conversion 64-72 A Body / 67-69 F Body / 62-74 X Body DBMC09 & PVK71 pictured above (Booster, master & valve setups may vary by upgrades selected) Your
A/F/X Body GM Installation Instructions
 A/F/X Body GM Installation Instructions Power Disc Conversion 64-72 A Body / 67-69 F Body / 68-74 X Body 9 slimline booster pictured Your new disc brake conversion kit can be bolted up with standard hand
Triumph Brake Kit TR4A/TR250/TR6 PART # Rutherford St. P.O. Box 847 Goleta, CA FAX
 1. Lift the front of the car with a jack and place it on jackstands. Take off the front wheels. 2. Use two 9/16 combination wrenches to disconnect the soft brake line from the body and hard line connection
BRAKE SYSTEM Nissan 240SX DESCRIPTION BRAKE BLEEDING * PLEASE READ FIRST * BLEEDING PROCEDURES ADJUSTMENTS BRAKE PEDAL HEIGHT SPECS TABLE
 BRAKE SYSTEM 1990 Nissan 240SX 1990 BRAKE SYSTEMS Nissan Disc & Drum Axxess, Maxima, Pathfinder, Pickup, Pulsar NX, Sentra, Stanza, 240SX, 300ZX DESCRIPTION All brake systems are hydraulically operated
M-2300-T 6-Piston Mustang Brake Kit INSTALLATION INSTRUCTIONS
 Please visit www.fordracingparts.com for the most current instruction information!!! PLEASE READ ALL OF THE FOLLOWING INSTRUCTIONS CAREFULLY PRIOR TO INSTALLATION. AT ANY TIME YOU DO NOT UNDERSTAND THE
55-64 Full Size Chevy
 55-64 Full Size Chevy Installation Instructions Power Disc Conversion 9 slimline booster pictured Your new disc brake conversion kit can be bolted up with standard hand tools. The only tools you may not
ASSEMBLY INSTRUCTIONS
 ASSEMBLY INSTRUCTIONS FOR DYNALITE PRO SERIES REAR PARKING BRAKE KIT WITH.9 DIAMETER VENTED ROTOR (.36 OFFSET) BIG BEARING FORD PART NUMBER GROUP 0-739 INSTALLATION OF THIS KIT SHOULD ONLY BE PERFORMED
Mopar 8 3/4 & 9 3/4 (Dana) Installation Instructions Rear Disc Conversion
 Installation Instructions Rear Disc Conversion") Mopar 8 3/4 & 9 3/4 (Dana) Installation Instructions Rear Disc Conversion This kit is for either Mopar 8 ¾ or Mopar 9 ¾ (Dana). This kit is designed to work with axles with either GM 5 x 4.75 Bolt Pattern
Mopar 8 3/4 & 9 3/4 (Dana) Installation Instructions Rear Disc Conversion This kit is for either Mopar 8 ¾ or Mopar 9 ¾ (Dana). This kit is designed to work with axles with either GM 5 x 4.75 Bolt Pattern
A/F/X Body GM Installation Instructions Manual Disc Conversion
 A/F/X Body GM Installation Instructions Manual Disc Conversion 64-72 A Body / 67-69 F Body / 62-74 X Body DBMC09 & PVK71 pictured above (Booster, master & valve setups may vary by upgrades selected) Your