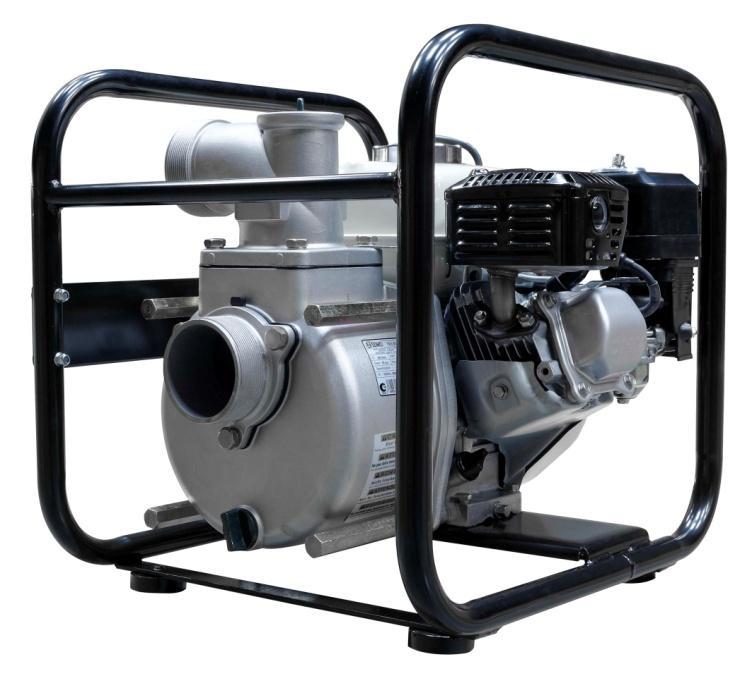
AQUALINE TR 3.60 H. (Vertaling van de oorspronkelijke handleiding) (Översättning av originalinstruktionerna) (Alkuperäisen käyttöohjeen käännös)
|
|
|
- Irma Hawkins
- 5 years ago
- Views:
Transcription
 Benutzer- und Wartungshandbuch (Übersetzung der Original-Anleitung) Gebruiks- en onderhoudshandleiding (Vertaling van de oorspronkelijke handleiding) Bruks- och underhållsanvisning")
 AQUALINE Naudojimo ir priežiūros vadovas (Versta iš originalo) Lietošanas un apkopes rokasgrāmata (Oriģinālās instrukcijas tulkojums) Инструкция за експлоатация")
1 anuel d'utilisation et d entretien (Notice originale) Instruction and maintenance manual (Translation of the original note) Manual de utilización y mantenimiento (Traducción de la información originall) Benutzer- und Wartungshandbuch (Übersetzung der Original-Anleitung) Gebruiks- en onderhoudshandleiding (Vertaling van de oorspronkelijke handleiding) Bruks- och underhållsanvisning (Översättning av originalinstruktionerna) Käyttö- ja huolto-opas (Alkuperäisen käyttöohjeen käännös) Руководство по эксплуатации и обслуживанию (Nеревод с оригинального уведомления) Kasutus-ja hooldusjuhend (Originaaljuhendi tõlge) AQUALINE Naudojimo ir priežiūros vadovas (Versta iš originalo) Lietošanas un apkopes rokasgrāmata (Oriģinālās instrukcijas tulkojums) Инструкция за експлоатация (превод на оригиналната инструкция) TR 3.60 H _0_1 12/2014


2 A


3 B C D


4 E F 1 x 2

.")
. In this manual, dangers are represented by the following two symbols: DANGER Immediate danger.")


5 CONTENTS 1 Preface 2 Key to illustrations 3 Preparation before use 4 Usage of the motor pump 5. Maintenance schedule 6. Maintenance procedures 7. Technical specifications 1 Preface Read this manual and the safety instructions also provided carefully before use. Keep them safe throughout the motor pump's service life and always adhere to the safety advice and the usage IMPORTANT and maintenance instructions contained in them. The information contained in this manual is taken from technical data available at the time of print (the photos shown in this manual are not legally binding). In line with our policy of continually improving the quality of our products, this information may be amended without warning. On request, we can supply our original manuals in French via our website ( In this manual, dangers are represented by the following two symbols: DANGER Immediate danger. Indicates an imminent danger which may result in death or serious injury. Failure to follow the instruction shown may pose serious risks to the health and life of those concerned. IMPORTANT Potential danger. Indicates a dangerous situation if the warning is not heeded. Failure to follow the instruction indicated may cause minor injuries to those concerned or damage to equipment. 1.1 Pictograms and labels on the motor pumps with their significance Danger Caution: risk of burns Caution: The motor pump is supplied without oil. Before starting up the motor pump, always check the oil level A = Model of the motor pump B = Max fuel flow at zero elevation B 1 - Caution: Refer to the documentation supplied with the motor pump. 2 - Caution: Emission of toxic exhaust gases. Never operate in a confined or poorly ventilated area. 3 - Stop the motor before filling with fuel. A D D = Maximum elevation height E = Weight of the motor pump C = Suction and discharge diameters C Example of an identification plate 1.2 Instructions and safety regulations (personal protection) E F F = Serial number Warning Never operate the motor pump without having ascended the covers and closed all access doors. Never remove the protective covers or open access doors if the water pump is running. 11/120

. Never carry out repairs or maintenance operations without the necessary experience and/or correct tools.")
. Never start the engine without an air filter or exhaust.")
6 1.2.1 General advice On receipt of the electric pump, check that the equipment is in good condition and that the order is complete. The handling of a motor pump should be done smoothly without brute force, taking care to prepare its installation or storage location in advance. Before each use: - learn how to stop the motor pump in an emergency, Warning - fully understand all the commands and manoeuvres. In the interests of safety, always adhere to the maintenance schedule (see maintenance table). Never carry out repairs or maintenance operations without the necessary experience and/or correct tools. Never allow any other person to use the motor pump without having been given the necessary instructions beforehand. Never allow a child to touch the motor pump, even when it is shut down. Avoid operating the motor pump in the presence of animals (fear, aggravation, etc.). Never start the engine without an air filter or exhaust. Never invert the positive & negative terminals while installing the batteries (if equipped): an inversion can cause serious damage to the electrical equipment. Never cover the motor pump with any material during its operation or immediately after stoppage (wait for the engine to cool down). Never coat the motor pump with oil, even to protect it from corrosion; preservative oils are inflammable & dangerous if inhaled. In all situations, follow current local regulations concerning the usage of motor pumps Safety guidelines to prevent fire Never operate the motor pump in an area containing explosive materials (risk of sparks). Remove all inflammable or explosive material (petrol, oil, cloth, etc.) during operation of the motor pump. Never cover the motor pump with any material during its operation or immediately after its Danger stoppage: always wait for the engine to cool down Safety guidelines against burns Never touch the engine or the exhaust silencer during operation of the motor pump or immediately after its stoppage. Warning Hot oil causes burns, avoid contact with the skin. Before any intervention, ensure that the system is no longer under pressure. Never start or run the engine without the oil filler plug (oil discharge risk) Danger of moving parts Danger Safety guidelines for exhaust gases Never go near a moving part that is in operation if you have loose clothing or long hair that is not enclosed in a protective hair net. Do not try to stop, slow down or impede a moving part when it is in operation. Carbon monoxide in the exhaust gases may lead to death if the concentration ratio is high than in the air that one breathes. Danger Always use the motor pump in a well ventilated area where the gases will not accumulate. Keeping safety in mind and for the proper operation of the motor pump, good ventilation is essential (risk of intoxication, engine overheating, accidents or damage to surrounding equipment and assets). If operation inside a building is necessary, it is absolutely imperative that exhaust gases are evacuated to the exterior, and that adequate ventilation is provided so that any people or animals present are in no way affected Protecting the environment Drain the engine oil into a container provided for that purpose: never drain or spill engine oil onto the floor. As far as possible, avoid sound reverberation onto the walls or other structures (amplification of volume). For motor pump usage in wooded or scrub areas or on grassy terrain, and if the exhaust silencer is not fitted with a spark arrester, clear a sufficiently large area and take extra care that the sparks cannot cause a fire Filling with fuel The fuel is highly flammable and its vapours are combustible. Filling should be carried out with the engine turned off. Smoking, using a naked flame or producing sparks are forbidden while the fuel tank is being filled. Danger All traces of fuel should be wiped off with a clean cloth. Storage and handling of petroleum products must be carried out in accordance with the law. Close the fuel tap (if fitted) each time the tank has been filled. Never top up with fuel when the electric pump is in operation or hot. Always position the electric pump on level, flat and horizontal ground to avoid fuel spillage on the engine. Top up the fuel tank with a funnel while taking care not to spill any fuel, then retighten the fuel tank cap. 12/120
7 2 Key to illustrations The cover illustrations can be used to identify the various components. The procedures in the manual refer to these illustrations using letters and numbers as identifiers, for example, "A; 1" refers to the number 1 on figure A. Fuel tank plug A - 1 Throttle lever A - 5 Air filter A - 9 Pump filler cap A - 2 Fuel tap A - 6 Exhaust silencer A - 11 Choke A - 3 Recoil starter A - 7 Motor contactor A - 4 Pump drain plug A - 8 Drain plug B - 1 Filler neck B - 3 Filler plug-dipstick B - 2 Black filler plug B - 4 Fuel drain plug C - 1 Seal C - 2 Sediment bowl C - 3 Cover wing nut D - 1 Elements wing nut D - 3 Foam element D - 5 Air filter cover D - 2 Paper element D - 4 Pump casing E - 1 Pump discharge port E - 3 Fittings for flexible hose E - 5 Pump suction port E - 2 Strainer E - 4 Pipe collar clamps E - 6 Spark plug A-10/F-1 Spark plug cap F /120

8 3 Preparation before use 3.1 Positioning the generating set for operation Place the motor pump on a sufficiently strong, flat and horizontal surface so that the electric pump cannot sink in (the inclination must not exceed 10 in any direction). Select a clean location, ventilated and protected from inclement weather, and provide an oil and fuel supply close to the place of motor pump usage, while still maintaining a safe distance. Select a location which will not impede the movement of people or vehicles. Make sure that the motor pump remains stable and immobile while in operation. Don t forget that the suction hose tends to pull the motor pump towards the water source during pumping. Place the motor pump as close as possible to the liquid being drawn-in. The shorter the vertical distance between the motor pump and the liquid surface, the more rapid the priming and the greater the volume of liquid pumped. Submerge the strainer completely within the liquid, taking care that it is not blocked. 3.2 Checking the oil level Before starting the generating set, always check the oil level. If the generating set was used beforehand, leave the generating set to cool for at least 30 minutes before checking the oil level. IMPORTANT Top up the tank with the recommended oil (see Specifications) using a funnel. 1. Remove the oil dipstick/filler plug (B - 2) by unscrewing it, and wipe the dipstick. 2. Insert the oil dipstick/filler plug in the filler neck (B - 3) without tightening it, then take it out again. 3. Check the level and top up if necessary. 4. Retighten the dipstick/filler plug fully in the filler neck. 5. Check that there are no oil leaks, and wipe away any traces of oil with a clean cloth. OR 1. Take out the oil filler cap (B - 4). The level should be at the filler neck overflow point. Top up if necessary. 2. Screw the oil filler cap back on fully 3. Check that there are no oil leaks, and wipe away any traces of oil with a clean cloth. 3.3 Checking the fuel level RISK OF EXPLOSION Respect the local regulations in force concerning the handling of petroleum products. Filling should be carried out with the engine switched off and cold. Smoking, using a naked flame or producing sparks are forbidden while the fuel tank is being filled. After filling, always check that the tank cap is properly tightened. Clean any traces of fuel with a clean cloth and wait until the vapours have dispersed before starting the engine. DANGER 1. Unscrew the fuel tank cap (A - 1). 2. Visually check the fuel level. 3. If necessary, top up with clean fuel free from water: Fill the fuel tank using a funnel, taking care not to spill any fuel. Do not overfill the tank (there should not be any fuel in the filler neck). 4. Screw the fuel tank cap back on. 3.4 Checking the air filter Leave the air inlet hose in place during the operation; never undo the air inlet hose clip. Never use petrol or flammable solvents for cleaning the air filter element (risk of fire or explosion). IMPORTANT 1. Remove the nut & the air filter cover (D - 1 & D - 2). 2. Remove the wing nut (D - 3) then the filtering elements (D - 5 & D - 4) & visually check their condition. 3. Clean or replace the elements if necessary (see. Clean or replace the air filter). 4. Refit the filter elements, wing nut, then the cover and its nut. 14/120
.")
9 4 Usage of the motor pump Warning 4.1 Assembly of pipings Before using: - learn how to stop the electric pump in an emergency, - fully understand all the commands and manoeuvres. To immediately stop the electric pump in an emergency, set the engine switch to OFF or O. Never use the motor pump without the appropriate strainer (risk of pump deterioration). Always ensure that the sealing joints of the couplings are firmly in place (risk of poor suction of the liquid). Caution 1. Pass the pipe fixing clamps (E - 6) around the suction & discharge hoses. 2. Mount the hose couplings (E - 5) on the suction (E - 2) & discharge of the pump (E - 3). 3. Fix the suction & discharge hoses on their respective couplings using the pipe fixing clamps. 4. Place one of the pipe fixing clamps around the other end of the suction hose. 5. Attach the strainer (E - 4) at the end of the suction hose. 6. Fix the strainer with a pipe fixing clamp. 4.2 Starting-up Always fill up the pump body before starting the engine. There must be liquid present in order to prime the pump and lubricate it (risk of damage). Warning 1. Complete immerse the suction strainer (E - 4) in the liquid to be aspirated. If there is a risk of blockage, place the strainer on a stone surface. 2. Unscrew the filler cap on the pump (A - 2). 3. Fill up the pump body (E - 1) with water. 4. Screw the pump filler plug back on. 5. Open the engine fuel tap A - 6). 6. Move the choke pull tab (A - 3) to the position " ". N.B: Do not use the choke when the engine is warm or when the atmospheric temperature is high. 7. Move the gas lever (A - 5) to 1/3 of the "MIN" position 8. Move the ignition switch (A - 4) to "ON". 9. Slowly pull the starter/recoil reel handle (A - 7) until there is some resistance, then let it return gently. Then pull the starter/recoil reel quickly and sharply until the engine starts. 10. Slowly move the choke pull tab to the position " " and wait until the engine temperature starts to rise then move the gas lever to the required position. If the engine does not start, repeat the operation until the engine starts. If the pump does not start running, switch off the unit and check the suction circuit. 4.3 Operation During the operation, don t allow any foreign bodies to block the suction or the discharge. Don t block the discharge pipe: don t allow any vehicle to park on the pipe. Caution Never close a valve abruptly: water-hammer action can seriously damage the pump. When the speed of the motor pump has stabilised (around 3 min), move the gas lever (A - 5) into position for the desired speed. The motor pump discharges the liquid not only according to the speed but also the elevation height for suction & discharge, and the quality of liquid to be drawn-in (clean / charged water). A = Elevation head (m) B = Flow rate (L/min) 15/120
10 4.4 Switching off 1. Restore the gas lever (A - 5) to its original position. 2. Set the engine switch (A - 4) to the OFF position. The motor pump stops. 3. Drain the motor pump then rinse it (see Rinsing) if its use is over for the day. Warning 4.5 Rinsing Always ensure suitable ventilation for the motor pump. Even after shut down, the engine continues to give off heat Once the motor pump is shutdown and cold: 1. Empty the suction & discharge hoses, allow the liquid to drain out. 2. Unscrew the drain plug from the pump (A - 8) in order to drain-out the pump housing (E - 1). 3. Screw the pump drain plug back on once drainage is complete. 4. Remove the pump filler plug (A - 2) and fill the pump housing with clean water. 5. Slowly pull the recoil starter handle several times (A - 7) till encountering resistance, allow it to return back gently. 6. Unscrew the pump drain plug and drain the pump housing. 7. Screw the pump fill & drain plugs back on. 8. Clean the strainer. 5 Maintenance schedule 5.1 Reminder of use All maintenance operations are to be carried out as described in the maintenance table. Their frequency is given for your information, for the motor pumps operating with fuel or oil in accordance with the specifications given in this manual. If the motor pump is used under extreme conditions, reduce the interval between maintenance operations. 5.2 Maintenance table Component Operations to be carried out at whichever deadline is reached first Calendar (months) After: 1 st month or first 20 hours Each time it is used Every 50 hours Every 100 hours Every 300 hours Fixings Check 6 Pipes, fittings, strainer, clamps Check 6 Engine oil Check the level Change 6 Check Air filter Clean 3 Replace 12 (1) Decanting bowl Clean 6 Glow plug Check/Adjust 6 Replace 12 Motor pump Clean 6 Spark arrester Clean* 6 Idle speed Check Adjust* 12 Valve clearance Check Adjust* 12 Combustion chamber Clean* Every 500 hours Fuel tank and fuel filter Clean* 6 Fuel pipe Check* 24 Replace if necessary * Operation(s) must only be carried out by one of our agents. (1) Only replace the paper element. The air filter must be cleaned more frequently if the generating set is being used in a dusty environment. 16/120
11 6 Maintenance procedures 6.1 Checking bolts, nuts and screws To prevent faults or breakdowns, carefully check all the nuts, bolts and screws on a daily basis. - Inspect the motor pump assembly before & after every start-up and usage. - Tighten any loose nuts or bolts. 6.2 Renewing the engine oil To ensure that the oil service is performed quickly and correctly, the oil must be changed when the engine is warm (start the generating set and allow it to run for a few minutes if necessary). Observe the environmental protection provisions (see Provisions for protecting the environment) and drain the oil into a suitable container. 1. With the engine still warm, place a suitable container under the oil drain screw (B - 1), then remove the oil dipstick/filler plug (B - 2) and the oil drain screw. 2. After draining completely, refit the oil drain plug. 3. Refill with the recommended oil (see Specifications) then check the level (see Checking the oil level). 4. Refit and tighten the oil dipstick/filler plug. 5. After filling, check that there are no oil leaks, and wipe away any traces of oil with a clean cloth. 6.3 Cleaning the sediment bowl 1. Close the fuel tap (A - 6). 2. Place a suitable container and a funnel underneath the carburettors shown in diagram C. 3. Unscrew the fuel drain plug (C - 1) to drain the fuel. 4. After draining, refit the fuel drain plug. 5. Remove the sediment bowl (C - 3) and the seal (C - 2). 6. Clean the sediment bowl with non-flammable solvent or solvent with a high flash point. Dry it completely. 7. Refit the seal and the sediment bowl. 8. Open the fuel tap and check that there are no leaks. 6.4 Cleaning the air filter Never use petrol or flammable solvents for cleaning the air filter element (risk of fire or explosion). IMPORTANT If the filter elements are excessively dirty or damaged (torn, pierced), it is essential to replace them with new elements. 1. Remove the nut and cover from the air filter (D - 1 & D - 2). 2. Remove the wing nut and filter elements (D - 3, D - 5 & D - 4) to clean them. 3. Wash the foam element in a solution of household cleaner and warm water and rinse thoroughly. OR: Wash the foam element with non-flammable solvent or solvent with a high flash point. 4. Allow the foam element to dry completely then soak it quickly in clean engine oil and remove the excess oil by wringing out the foam. If there is too much oil remaining in the foam, the engine will emit smoke when it is first started. 5. Gently tap the paper element several times on a hard surface to remove any excess dirt. Never try to remove dirt using a brush. 6. Carefully check that both elements are not ripped and have no holes; replace them if they are damaged. 7. Refit the filter elements, wing nut then the air filter cover and its nut. 6.5 Checking the spark plug 1. Remove the cap from the spark plug (F - 2), then remove the spark plug (A-10/F-1) with the help of a spark plug wrench. 2. Check the condition of the spark plug: If the electrodes are worn out or if the insulation has cracked or chipped off: 3. Replace the spark plug. 4. Install the new spark plug and screw it in by hand so as not to damage the threads. 5. With a spark plug wrench, tighten by 1/2 turn after seating the spark plug to compress the washer. 6.6 Cleaning the motor pump Otherwise: 3. Clean the spark plug with a wire brush. 4. With a shim, check the spacing X between the electrodes: it must be between 0.7 and 0.8 mm. 5. Check the condition of the washer. 6. Put back the spark plug and screw it in by hand so as not to damage the threads. 7. With a spark plug wrench, tighten by 1/8 1/4 turn after seating of the spark plug to compress the washer. Caution Cleaning with a water jet is not recommended. Cleaning with high pressure cleaning equipment is forbidden. 1. Remove all dust and particles around the exhaust silencer (A - 11). 2. Clean the motor pump, especially the air inlets & outlets of the engine, with a cloth and a brush. 3. Check the general condition of the motor pump and if change any defective parts. 17/120
12 6.7 Storing the motor pump Caution Never operate the motor pump without filling the pump body with water and immersing the strainer in the water beforehand. Using clean water rinse the motor pump and the pipes through (see Rinsing). In the event that the motor pump is not to be used for a long period, it must be stored in accordance with the guidelines below. 1. Undo the filler cap on the pump (A - 8) and drain the pump body (E - 1). 2. Clean inside the pump body using a water spray. 3. Screw the pump filler cap back on. 4. Drain the fuel tank and the carburettor a. Close the fuel tap (A - 6). b. Place a suitable container and a funnel underneath the carburettor to ensure no fuel is spilt. c. Undo the fuel filler cap (C - 1) and its seal d. Remove the sediment bowl (C - 3) and its O-ring e. Open the fuel tap. f. After draining, refit the following and tighten fully - the fuel filler cap and its seal, - the sediment bowl and its seal. 5. Change the engine oil 6. Remove the glow plug (A-10/F-1) (see Checking the glow plug), add a maximum of 5-10 cm 3 of oil to the cylinder then refit the glow plug 7. Pull the starter/recoil reel handle (A - 7) there is some resistance, then let it return gently to distribute oil in the cylinder. 8. Clean the outside of the generating set, apply a rust protection product to the damaged sections and cover it with a protective cover to protect it from dust. 9. Store the generating set in a clean, dry place. For a longer period of storage, it is recommended to contact your nearest agent. 6.8 Troubleshooting Problems Probable causes Possible solutions Engine does not start Engine stopped Priming fault Weak outflow Fuel tap closed. Open the fuel tap (A - 6). Fuel level too low Fill up with fuel (see Filling up with fuel). Air filter (A - 9) blocked. Clean the air filter (see Cleaning the air filter). Defective spark plug (A-10/F-1). Check the spark plug (see Checking the spark plug) and replace if necessary. Fuel supply blocked or leaking. Have it checked, repaired or replaced.* Fuel level too low Fill up with fuel (see Filling up with fuel). Air filter blocked. Clean the air filter (see Cleaning the air filter). Blocked ventilation inlets. Clean the air inlet and outlet guards. Liquid level insufficient for suction. Fully immerse the strainer. Insufficient water level inside the pump housing (E - 1). Add more water into the pump housing (see Start-up) Poor tightening of the pump drain plug (A - 8). Retighten the pump drain plug. Air entry from the suction side. Check the duct from the suction side. Poor rotation of the engine. Have it checked, repaired or replaced.* Air entry from the mechanical joint. Have it checked, repaired or replaced.* Pipe too long or kinked. Shorten or retighten the pipe. Too high on the suction side. Lower the usage height. Air entry from the suction side. Check the duct from the suction side. Leakage of liquid in the ducts. Fix the leak. Wheel clogged. Have it checked, repaired or replaced.* Wear & tear of the wheel. Have it checked, repaired or replaced.* Rupture of the mechanical joint. Have it checked, repaired or replaced.* Drop in engine power. Have it checked, repaired or replaced.* * Operation(s) to be entrusted to one of our agents. 18/120
13 7 Technical specifications 7.1 Specifications Equipment model TR 3.60H Engine type HONDA GX160 Recommended fuel/fuel tank capacity unleaded petroll / 3.1 L Recommended oil/oil sump capacity SAE 10W30 / 0.6 L Oil cut-out* o Spark plug NGK BPR6ES Dimensions l x w x h 50.5 x 39.8 x 46.6 cm Weight (without fuel) 29 kg Type of liquid Clear or slightly dirty water Particle size analysis of the aspirated liquid 8 mm Max elevation height 26 m Maximum suction height 8 m Suction diameter 80 mm Discharge diameter 80 mm Maximum outflow 900 L/min 54 m 3 /h o : Standard equipment X: impossible *Oil cut-out: If there is no oil in the engine sump or if the oil pressure is low, the oil cut-out automatically stops the engine to prevent any damage. If this occurs, check the engine oil level and top it up if necessary before looking for any other cause of the problem. 7.2 EC Declaration of conformity Name and address of manufacturer : SDMO Industries - 12 bis rue de la Villeneuve - CS BREST Cedex 2 France. Name and address of the person authorised to create and keep the technical file L. Courtès - SDMO Industries - 12 bis rue de la Villeneuve - CS BREST Cedex 2 France. Product description : Make : Type : Serial numbers: Motor pump SDMO TR 3.60H > L. Courtès, the manufacturer's authorised representative, hereby declares that the product conforms to the following EU Directives: 2006/42/EC Machinery Directive ; 2006/95/EC Low Voltage Directive ; 2004/108/EC Directive on Electromagnetic Compatibility ; 2000/14/EC Directive relating to the Noise Emission of Outdoor Equipment. For the directive 2000/14/EC : Compliance procedure : Measured Guaranteed sound power level: sound power level (LwA) : Max engine power / Suction height Appendix V db(a) 105 db(a) 4000 W / 1 m Brest, 01/01/2015 L. Courtès, Assistant Director, Design and Projects. 19/120
14 7.3 Conditions of warranty Guarantees - warranty entitlement for defects. The supplier undertakes to rectify all operating problems resulting from defects in design, materials and workmanship. The obligation of the supplier does not apply in case of problems arising either due to equipment supplied by the buyer, or from a design imposed by the buyer. All warranties are not applicable to events caused by exceptional circumstances or force majeure as well as for replacements or repairs resulting from normal wear and tear of the equipment, deterioration or accidents arising from negligence, insufficient monitoring or maintenance, or from the incorrect usage of this equipment. The guarantee is strictly limited to the free replacement or repair in our factory workshops of parts showing defects in materials or manufacture. The supplier cannot be held responsible for consequences arising directly or indirectly from the defectiveness of a part. Duration and starting point of the guarantee. Unless otherwise stipulated, this clause only applies to faults occurring within a period of 12 months. The guarantee period runs from the day on which the buyer is advised in writing by the supplier that the equipment is at his disposal. If dispatch is delayed, the guarantee period will be extended by the length of the delay. Damages. Any responsibility is strictly limited to the obligations so defined and it is by express agreement that the supplier shall not be bound by any indemnification towards the buyer for any losses incurred such as: accidents to people, damage to assets other than the subject of the contract or lost business opportunities. The clauses of the guarantee are applicable only to the first-hand buyer, and cannot be transferred to a second buyer. Insurance of personnel. In the case of accidents arising at any time and for any reason whatsoever, the responsibility of the supplier is strictly limited to his own staff and their equipment. Note: All written or verbally communicated orders, as well as acceptance of our offers, imply the formal acceptance of our conditions of sale. In the case of a claim under guarantee, carriage costs outward shall be borne by the buyer. Guarantee certificate The motor pump referenced below. Motor pump no.: Engine no.: Is guaranteed from this date. AGENT: Stamp and signature 20/120
HX 3000 TB UK GENERATING SET USER AND MAINTENANCE MANUAL _0_1
 HX 3000 TB UK GENERATING SET USER AND MAINTENANCE MANUAL 33522129801_0_1 A A 2 1 16 9 17 6 10 13 11 12 A 8 4 5 7 3 3 2/4 A B 1 15 14 3 2 C D 1 2 4 3 1 2 3/4 E F 4 5 6 2 1 2 3 1 7 8 G 4/4 1. Preface 2.
GENERATOR MODEL NO: FG2500 OPERATION & MAINTENANCE INSTRUCTIONS PART NO: LS0114
 GENERATOR MODEL NO: FG2500 PART NO: 8857727 OPERATION & MAINTENANCE INSTRUCTIONS LS0114 INTRODUCTION Thank you for purchasing this CLARKE Generator. Before attempting to use this product, please read this
5.5KVA GENERATOR MODEL NO: PG6500DVES OPERATION & MAINTENANCE INSTRUCTIONS PART NO: LS0616
 5.5KVA GENERATOR MODEL NO: PG6500DVES PART NO: 8857810 OPERATION & MAINTENANCE INSTRUCTIONS LS0616 INTRODUCTION Thank you for purchasing this CLARKE 5.5KVA Generator. Before attempting to use this product,
WARNING! Ensure that there are no naked flames around the product! Do not smoke while filling fuel and oil!
 Engine Oil and Fuel Engine Operation This product is equipped with a 4 stroke engine. Before operation you have to add proper fuel and engine oil. DO NOT MIXTURE THEM! 1. Place the product on a stable,
1200W INVERTER GENERATOR
 1200W INVERTER GENERATOR MODEL NO: IG1200 PART NO: 8877070 OPERATION & MAINTENANCE INSTRUCTIONS LS0117 INTRODUCTION Thank you for purchasing this CLARKE 1200W Inverter Generator. Before attempting to use
LDG6000SA DIESEL GENERATOR OWNERS MANUAL
 LDG6000SA DIESEL GENERATOR OWNERS MANUAL BEFORE OPERATING THIS EQUIPMENT PLEASE READ THESE INSTRUCTIONS CAREFULLY Preface Thank-you for purchasing this generator. This operation manual contains information
GENERATOR MODEL NO: FG3005 OPERATION & MAINTENANCE INSTRUCTIONS PART NO: LS0413
 GENERATOR MODEL NO: FG3005 PART NO: 8857707 OPERATION & MAINTENANCE INSTRUCTIONS LS0413 INTRODUCTION Thank you for purchasing this CLARKE Generator. Before attempting to use this product, please read this
GENERATOR MODEL NO: FG3000 OPERATION & MAINTENANCE INSTRUCTIONS PART NO: LS0609
 GENERATOR MODEL NO: FG3000 PART NO: 8857700 OPERATION & MAINTENANCE INSTRUCTIONS LS0609 INTRODUCTION Thank you for purchasing this CLARKE Generator. Before attempting to use this product, please read this
3KVA DUAL VOLTAGE GENERATOR MODEL NO: PG3800DV
 3KVA DUAL VOLTAGE GENERATOR MODEL NO: PG3800DV PART NO: 8857815 OPERATION & MAINTENANCE INSTRUCTIONS LS1016 INTRODUCTION Thank you for purchasing this CLARKE 3KVA Dual Voltage Generator. Before attempting
MTD OHV Series I15 FORM NO I. MTD Products Aktiengesellschaft Saarbrücken Germany
 MTD OHV Series I15 FORM NO. 769-01577I MTD Products Aktiengesellschaft Saarbrücken Germany 8 15 23 31 38 46 54 61 68 75 82 90 99 107 115 122 130 138 145 152 159 166 175 183 193 202 211 218 226 English
RedGum GP160 Splitter. Owner s Manual
 RedGum GP160 Splitter Owner s Manual Product Description & Intended Purpose: This Log Splitter / Wood Splitter is an outdoor product that splits wood logs for use as fuel in a fireplace or a woodstove.
Water pump Owner's Manual
 Water pump Owner's Manual Safety Precautions I. General Safeguards Please read this operation manual to have a thorough understanding of the content there before use the product. Failure to do so may lead
1100W PORTABLE GENERATOR
 1100W PORTABLE GENERATOR MODEL NO: G1200 PART NO: 8010110 OPERATION & MAINTENANCE INSTRUCTIONS LS0312 INTRODUCTION Thank you for purchasing this CLARKE 1100W Portable Generator. Before attempting to use
Owner s/operator s Manual
 Water Pump MP2533E2 Owner s/operator s Manual Completely read and understand this manual before using this product. Foreword This Owner s/ Operator s Manual is designed to familiarize the operator with
AIR-COOLED DIESEL GENERATOR OWNERʼS MANUAL. This manual contains important safety information. TDG2500E TDGW7000E TDG7000SE TDG4500E
 AIR-COOLED DIESEL GENERATOR OWNERʼS MANUAL This manual contains important safety information. TDG2500E TDGW7000E TDG7000SE TDG4500E TDG8000-3 TDG7000SE-3 TDG7000E TDG8000E TDGW7000SE TDG7000E3 TDGW8000E
KING CANADA 950W PORTABLE GENERATOR MODEL: KCG-951G INSTRUCTION MANUAL COPYRIGHT 2011 ALL RIGHTS RESERVED BY KING CANADA TOOLS INC.
 KING CANADA 950W PORTABLE GENERATOR MODEL: KCG-951G INSTRUCTION MANUAL COPYRIGHT 2011 ALL RIGHTS RESERVED BY KING CANADA TOOLS INC. WARRANTY & SERVICE INFORMATION 1-YEAR LIMITED WARRANTY FOR THIS 950W
1P88F-1 1P90F-1 1P92F-1. Owner's Manuel
 1P88F-1 1P90F-1 1P92F-1 Owner's Manuel EN 1 TABLE OF CONTENTS 1. General information... 1 2. Safety regulations... 1 3. Components and controls... 2 4. What you need to know... 3 5. Standards of use...
ENGINE DRIVEN 3 FULL TRASH PUMP
 ENGINE DRIVEN 3 FULL TRASH PUMP MODEL NO: PF75 PART NO: 7230165 OPERATION & MAINTENANCE INSTRUCTIONS ORIGINAL INSTRUCTIONS LS0117 ISS 2 INTRODUCTION Thank you for choosing this Clarke Pump. The function
PETROL GENERATOR PGH2200, PGH3000, PGH6500 OWNER S MANUAL FOR YOUR SAFETY PLEASE READ THESE INSTRUCTIONS CAREFULLY AND RETAIN THEM FOR FUTURE USE.
 PETROL GENERATOR OWNER S MANUAL PGH2200, PGH3000, PGH6500 FOR YOUR SAFETY PLEASE READ THESE INSTRUCTIONS CAREFULLY AND RETAIN THEM FOR FUTURE USE. WARRANTY GENERATOR SAFETY This generator is covered by
TP300 INDUSTRIAL TRASH PUMP OPERATOR S MANUAL
 TP300 INDUSTRIAL TRASH PUMP OPERATOR S MANUAL IT IS EXTREMELY IMPORTANT TO READ AND UNDERSTAND THE ENTIRE CONTENTS OF THIS OPERATOR S MANUAL BEFORE ATTEMPTING TO OPERATE THE PRODUCT. THIS EQUIPMENT IS
PETROL GENERATOR SPG2200, SPG3000, SPG6500 OWNER S MANUAL FOR YOUR SAFETY PLEASE READ THESE INSTRUCTIONS CAREFULLY AND RETAIN THEM FOR FUTURE USE.
 PETROL GENERATOR OWNER S MANUAL SPG2200, SPG3000, SPG6500 FOR YOUR SAFETY PLEASE READ THESE INSTRUCTIONS CAREFULLY AND RETAIN THEM FOR FUTURE USE. WARRANTY This generator is covered by a 24 month warranty
WARNING: Read these instructions before using the machine GENERATOR MODEL NO: IG3500F PART NO: OPERATION & MAINTENANCE INSTRUCTIONS
 WARNING: Read these instructions before using the machine GENERATOR MODEL NO: IG3500F PART NO: 8877100 OPERATION & MAINTENANCE INSTRUCTIONS ORIGINAL INSTRUCTIONS LS0217 INTRODUCTION Thank you for purchasing
142F 144F GASOLINE ENGINE SM-142F-01A INSTRUCTION MANUAL
 142F 144F GASOLINE ENGINE SM-142F-01A INSTRUCTION MANUAL Thank you for purchasing our engine. This manual covers the operation and maintenance of your engine. All information in this publication is base
Petrol Engine Powered Pump Instruction Manual
 Petrol Engine Powered Pump Instruction Manual BIA-WP10-804448 CONTENTS 1. Safety information 2 2. Location of warning labels 3 3. Name of components 4 4. Pre-starting operation 5-7 5. Starting the engine
720W PORTABLE GENERATOR
 720W PORTABLE GENERATOR MODEL NO: G720 PART NO: 8857800 OPERATION & MAINTENANCE INSTRUCTIONS LS0214 INTRODUCTION Thank you for purchasing this CLARKE 720W Portable Generator Before attempting to use this
INVERTER GENERATOR OWNER S MANUAL FOR YOUR SAFETY PLEASE READ THESE INSTRUCTIONS CAREFULLY AND RETAIN THEM FOR FUTURE USE.
 INVERTER GENERATOR OWNER S MANUAL FOR YOUR SAFETY PLEASE READ THESE INSTRUCTIONS CAREFULLY AND RETAIN THEM FOR FUTURE USE. GENERATOR SAFETY Only use outdoors! Never use during wet conditions! Do not smoke
Petrol Engine Powered Pump Instruction Manual
 Petrol Engine Powered Pump Instruction Manual BIA-WP20ABS - 804450 BIA-WP30ABS - 804451 CONTENTS 1. Safety information 3 2. Location of warning labels 4 3. Components 5 4. Pre-starting operation 6 5.
AG-HA-2500N GASOLINE GENERATOR
 AG-HA-2500N GASOLINE GENERATOR OWNER S MANUAL BEFORE OPERATING THIS EQUIPMENT PLEASE READ THESE INSTRUCTIONS CAREFULLY (I)WARNING 1. Read the operator s instruction manual. 2. Attention! Exhaust gases
Petrol Engine Powered Pump Instruction Manual
 Petrol Engine Powered Pump Instruction Manual BIA-HP15ABS - 804452 BIA-2HP15ABS - 804453 CONTENTS 1. Safety information 2 2. Location of warning labels 3 3. Components 4 4. Pre-starting operation 5 5.
PREFACE. Thank you for your purchase of the Böhler-AG Petrol Generator.
 1 PREFACE Thank you for your purchase of the Böhler-AG Petrol Generator. The Böhler-AG Petrol Generator is a Powerful, low fuel consumption, low pollution, low noise, simple to operate and easy to move.
PORTABLE TRASH PUMPS MDP200
 PORTABLE TRASH PUMPS MDP200 OPERATING & PARTS MANUAL INTRODUCTION This manual provides information and procedures to safely operate and maintain the engine and pump. For your own safety and protection
LAWN MOWER OWNER S MANUAL
 LAWN MOWER OWNER S MANUAL Woodies SKU: 1153279 & 1153280 CAUTION: Read and follow all Safety Rules and Instructions before operating this equipment Thank you for choosing our Gasoline Lawnmower. 1 To ensure
PORTABLE TRASH PUMPS MTP200 MTP300 MTP400
 PORTABLE TRASH PUMPS MTP200 MTP300 MTP400 OPERATING & PARTS MANUAL INTRODUCTION This manual provides information and procedures to safely operate and maintain the engine and pump. For your own safety and
Böhler-AG GASOLINE GENERATOR
 Böhler-AG GASOLINE GENERATOR Instruction Manual The generator is a potential source of electrical shock if misused. Do not expose the generator to moisture, rain or snow. DO not let the generator get wet,
EC DECLARATION OF CONFORMITY
 EC DECLARATION OF CONFORMITY 14 2500W INVERTER GENERATOR IM2500I CERTIFICATE OF GUARANTEE This product is guaranteed for a period of 1 Year, with effect from the date of purchase and applies only to the
Gasoline Inverter Generator
 user manual Gasoline Inverter Generator table of contents Preface Introduction... Safety Information Exhaust fumes are poisonous... Fuel is highly flammable and poisonous... Engine and muffler may be hot...
3 Petrol Water Pump. Please read and fully understand the instructions in this manual before operation. Keep this manual safe for future reference
 Please dispose of packaging for the product in a responsible manner. It is suitable for recycling. Help to protect the environment, take the packaging to the local amenity tip and place into the appropriate
USE and MAINTENANCE INSTRUCTION MANUAL AZ3 HTE2 AZ3 HTE2 HVLP GRAVITY. SPRAY GUN Series. en it fr es pt de se
 USE and MAINTENANCE INSTRUCTION MANUAL AZ3 HTE2 AZ3 HTE2 HVLP GRAVITY SPRAY GUN Series en it fr es pt de se TECHNICAL DATA Technical AZ3 HTE2 AZ3 HTE2 HVLP 1.0 80 180 1.3 10-15HTE 140 200 240 1.5 2.0 160
GX120 GX160 GX200 OWNER S MANUAL 32ZH X32-ZH Serial number and engine type HONDA EUROPE N.V.(EEC)
") GX120 GX160 GX200 Serial number and engine type OWNER S MANUAL 32ZH7620 00X32-ZH7-6201 1 HONDA EUROPE N.V.(EEC) Thank you for purchasing a Honda engine. This manual covers the operation and maintenance
GX120 GX160 GX200 Serial number and engine type OWNER S MANUAL 32ZH7620 00X32-ZH7-6201 1 HONDA EUROPE N.V.(EEC) Thank you for purchasing a Honda engine. This manual covers the operation and maintenance
8500M INDUSTRIAL GASOLINE GENERATOR OPERATOR S MANUAL
 8500M INDUSTRIAL GASOLINE GENERATOR OPERATOR S MANUAL IT IS EXTREMELY IMPORTANT TO READ AND UNDERSTAND THE ENTIRE CONTENTS OF THIS OPERATOR S MANUAL BEFORE ATTEMPTING TO OPERATE THE PRODUCT. THIS EQUIPMENT
Air Compressor. Operating & Maintenance Instructions 1110 ENGINE DRIVEN - 1 -
 Air Compressor ENGINE DRIVEN Operating & Maintenance Instructions 1110-1 - Read these safety instructions before using the equipment. INTRODUCTION Thank you for purchasing this Clarke portable compressor.
Owner s Manual ELECTRIC GENERADORS R7100DP / G7100G
 Owner s Manual ELECTRIC GENERADORS R7100DP / G7100G Thank you for choosing a generator set of our company. This manual contains the information on how to do that. Please read it carefully before operating.
OPERATION & MAINTENANCE INSTRUCTIONS
 WARNING Read the instructions before using the machine PETROL DRIVEN POWER WASHER MODEL NO: TIGER1700 PART NO: 7320054 OPERATION & MAINTENANCE INSTRUCTIONS LS0511 2 INTRODUCTION Thank you for purchasing
Honda WX10T OWNER S MANUAL
 Honda WX10T OWNER S MANUAL Original instructions MANUEL DE L UTILISATEUR Notice originale BEDIENUNGSANLEITUNG Originalbetriebsanleitung MANUAL DE EXPLICACIONES Manual original Thank you for purchasing
HOT WASHER MODEL NO: KING 125 OPERATION & MAINTENANCE INSTRUCTIONS PART NO: LS1009
 HOT WASHER MODEL NO: KING 125 PART NO: 7320170 OPERATION & MAINTENANCE INSTRUCTIONS LS1009 INTRODUCTION Thank you for purchasing this Hot Washer. This machine is a portable, high pressure power washer,
No part of this publication may be reproduced without written permission.
 Thank you for purchasing a Honda generator. This manual covers operation and maintenance of the EB3000 and EB4000 generators. All information in this publication is based on the latest product information
GENERATOR MODEL NO: FG4050ES / FG5100ES OPERATION & MAINTENANCE INSTRUCTIONS PART NO: , LS0310
 GENERATOR MODEL NO: FG4050ES / FG5100ES PART NO: 8857715, 8857720 OPERATION & MAINTENANCE INSTRUCTIONS LS0310 INTRODUCTION Thank you for purchasing this CLARKE Generator. Before attempting to use this
LAWNMOWER OWNER S MANUAL & Service Record Booklet HUT216
 LAWNMOWER OWNER S MANUAL & Service Record Booklet HUT216 Contents WARRANTY 2 SAFETY INSTRUCTIONS 3 COMPONENT IDENTIFICATION 5 SETUP INSTRUCTIONS 6 IMPORTANT: BEFORE YOU START THE MOWER 7 OPERATIONAL PROCEDURES
Commercial Series Generator Operator Manual (with Kohler Command series engines)
") Commercial Series Generator Operator Manual (with Kohler Command series engines) PN: 220880 PREFACE Thank you for purchasing a Wanco Commercial Series portable generator set. This manual contains important
Commercial Series Generator Operator Manual (with Kohler Command series engines) PN: 220880 PREFACE Thank you for purchasing a Wanco Commercial Series portable generator set. This manual contains important
GENERATOR INVERTOR 1000W 230V
 INSTRUCTIONS FOR: GENERATOR INVERTOR 1000W 230V MODEL No: G1000I INSTRUCTIONS FOR: GENERATOR INVERTER 1000W 230V MODEL No: G1000I Thank you for purchasing a Sealey product. Manufactured to a high standard,
WORKMATE TM Portable Generators
 Owner s Guide for WORKMATE TM Portable Generators We are pleased to advise that your ADVANCED POWER WORKMATE Portable Generator Set is covered by warranty for a period of 36 months* from the date of its
MTD OHV Series FORM NO B. jqa=mêççìåíë=^âíáéåöéëéääëåü~ñí= =p~~êäêωåâéå= =déêã~åó
 MTD OHV Series J15 FORM NO. 769-08890B jqa=mêççìåíë=^âíáéåöéëéääëåü~ñí= =p~~êäêωåâéå= =déêã~åó 4 11 19 27 35 43 51 58 65 72 79 87 96 104 112 119 126 134 141 148 155 162 171 179 188 197 206 213 221
POWER PACK W/OIL COOLER P/N 32800
 POWER PACK W/OIL COOLER P/N 32800 OPERATION AND MAINTENANCE MANUAL Copyright 2017 by All rights reserved. No part of this publication may be copied, reproduced or transmitted in any form whatsoever without
Genquip Gi1000 Digital Inverter Petrol Generator. Owners Manual
 Owners Manual page 1 Notes page 2 Table of Contents Control Function 4 Pre Operation Checklist 5 Fuel System Check Fuel Level Control Function 6 Engine Oil Oil Warning System Engine Switch DC Protector
Engine Owner s Manual. Models sx4000, i4000, i4500, i5000, i5500, i7000 & i7000xt. Operating & Maintenance Instructions
 Engine Owner s Manual Models sx4000, i4000, i4500, i5000, i5500, i7000 & i7000xt Operating & Maintenance Instructions BEFORE OPERATING ENGINE Read entire Operating & Maintenance Instructions AND the instructions
Submersible pump with flexible shaft PF 3 Operator s Manual
 www.wackergroup.com 0207866 001 2.2006 Submersible pump with flexible shaft PF 3 Operator s Manual Table of Contents 1 Foreword.......................................................... 5 2 Symbols used......................................................
SMQGZ F-02 PORTABLE WATER PUMP QGZ F INSTRUCTION MANUAL
 SMQGZ40-35-144F-02 PORTABLE WATER PUMP QGZ40-35-144F INSTRUCTION MANUAL The following information relates to protecting YOUR SAFETY and PREVENTING EQUIPMENT PROBLEMS. To help you recognize this information.
PW2750 HOT WATER HI PRESSURE WASHER INSTRUCTION MANUAL
 4/10/2012 PW2750 HOT WATER HI PRESSURE WASHER INSTRUCTION MANUAL READ ALL INSTRUCTIONS AND WARNINGS BEFORE USING THIS PRODUCT. This manual provides important information on proper operation & maintenance.
LA25 Lawn Aerator Operating Instructions
 LA25 Lawn Aerator Operating Instructions Before commissioning the machine, read operating instructions and observe warning and safety instructions. Machine Details Model: CAMON LA25 Lawn Aerator Serial
GENERATOR MODEL NO: DG6000DVES OPERATION & MAINTENANCE INSTRUCTIONS PART NO: LS1216
 GENERATOR MODEL NO: DG6000DVES PART NO: 8675000 OPERATION & MAINTENANCE INSTRUCTIONS LS1216 INTRODUCTION Thank you for purchasing this CLARKE Generator. Before attempting to use this product, please read
800W Generator. Original manual AFTER SALES SUPPORT MODEL: WGG-800, 07/2012, 7597
 ONTENTS or y handle lug key 800W Generator Original manual Now you have purchased a Workzone product you can rest assured in the knowledge that as well as your 3 year parts and labour guarantee you have
IMPORTANT: Read this manual fully before assembly and use and observe all safety rules and operating instructions
 PETROL ENGINE Model: MLR52 IMPORTANT: Read this manual fully before assembly and use and observe all safety rules and operating instructions Contents Technical Specification 2 Safety 3 Starting 5 Running
jqa=mêççìåíë=^âíáéåöéëéääëåü~ñí= =p~~êäê ÅâÉå= =déêã~åó
 jqa=mêççìåíë=^âíáéåöéëéääëåü~ñí= =p~~êäê ÅâÉå= =déêã~åó 1 Max. Min. Q R 1 2 1. 4. 1 2. 1 2 3 3. 5. 1 4 1 6 8. 8. 6. 5 7. 9. 1 2 English....................... 8 (Original operating instructions) Français......................
YK1900i DIGITAL INVERTER GASOLINE GENERATOR OWNER S MANUAL PLEASE READ THIS MANUAL CAREFULLY. IT CONTAINS IMPORTANT SAFETY INFORMATION.
 YK1900i DIGITAL INVERTER GASOLINE GENERATOR OWNER S MANUAL PLEASE READ THIS MANUAL CAREFULLY. IT CONTAINS IMPORTANT SAFETY INFORMATION. PREFACE Thank you for purchasing YANGKE generator. This manual covers
TC07 Turf Cutter Operating Instructions
 TC07 Turf Cutter Operating Instructions Before commissioning the machine, read operating instructions and observe warning and safety instructions. Manufacturer Details Tracmaster Ltd Sovereign Centre
This owner's manual is considered a permanent part of the engine and should remain with the engine if resold.
 Thank you for purchasing a water pump. Please reliably keep this Manual for your reference at any time. This owner's manual is considered a permanent part of the engine and should remain with the engine
AIR COMPRESSOR OPERATING INSTRUCTION AND PARTS LIST
 AIR COMPRESSOR OPERATING INSTRUCTION AND PARTS LIST BELT TYPE IMPORTANT PLEASE MAKE CERTAIN THAT THE PERSON WHO IS TO USE THIS EQUIPMENT CAREFULLY READS AND UNDERSTANDS THESE INSTRUCTIONS BEFORE STARTING
PETROL DRIVEN POWER WASHER
 WARNING: Read these instructions before using the machine PETROL DRIVEN POWER WASHER MODEL NO: TIGER 2500/2900 PART NO: 7320055/7320056 OPERATION & MAINTENANCE INSTRUCTIONS LS0513 INTRODUCTION Thank you
Voltmaster Centrifugal Trash Pumps
 Voltmaster Centrifugal Trash Pumps Model TSP2, TSP3 and TSP4 Owner s Manual February 2011 Table of Contents 1 Introduction............................ 1 1.1 Read before using..................... 1 1.2
WELDING INVERTER. PEGAS 160 E Smart PEGAS 200 E Smart OPERATING MANUAL. ALFA IN a.s. PEGAS E Smart Manual EN 04
 WELDING INVERTER PEGAS 160 E Smart PEGAS 200 E Smart OPERATING MANUAL PEGAS 160-200 E Smart Manual EN 04 2/12 CONTENT: 1. INTRODUCTION... 3 2. SAFETY INSTRUCTIONS AND WARNINGS... 4 3. TECHNICAL DATA...
General Power Products
 Portable Electric Generator Owners Manual MODEL: APP 6000 General Power Products IMPORTANT Please make certain the person who uses this Generator thoroughly reads these instructions and all other instructions
1-1/2 DIAMETER WATER PUMP
 1-1/2 DIAMETER WATER PUMP 2.2HP/79.8cc Engine MODEL # 101099 Operation Manual This safety alert symbol identifies important safety messages in this manual. Failure to follow this important safety information
USE and MAINTENANCE INSTRUCTION MANUAL W-300 W-300 WB LPH-300 GRAVITY. SPRAY GUN Series. en it fr es pt de se
 USE and MAINTENANCE INSTRUCTION MANUAL W-300 W-300 WB LPH-300 GRAVITY SPRAY GUN Series en it fr es pt de se TECHNICAL DATA High T.E.C. series Nozzle_Needle set Combination W-300 WB W-300 W-300-081G 0.8
Owner s Manual PORTABLE GENERATOR. Model: PR2800 PR6500
 PORTABLE GENERATOR Owner s Manual Model: PR2800 PR6500 ALLPOWER INDUSTRIES AUSTRALIA A.B.N 46 650 681 742 Unit 5, 102-128 Bridge Road, Keysborough, VIC 3173, Australia Telephone: +61 38726 1444 / 1800
PF-4000, PF-4010, PF-4210 MULTI-PURPOSE ENGINE
 PF-4000, PF-4010, PF-4210 MULTI-PURPOSE ENGINE Date 09-26-01 Supplier To The Outdoor Power Equipment Industry ISM, Inc. 1028 4 th Street SW Auburn, WA 98001 Phone: (253) 333-1200 Fax: (253) 333-1212 WWW.TANAKA-USA.COM
Hydraulic Immediate Need Power Pack
 Safety, Operation, and Maintenance Manual WARNING Improper use of this tool can result in serious bodily injury This manual contains important information about product function and safety. Please read
COLLECTOR 37 USER MANUAL
 COLLECTOR 37 USER MANUAL A B E F C D H 2 G ENGLISH INTRODUCTION POWERBOSS,Inc. leaders in the production of sweeping machines, are pleased to welcome you as an owner of the Collector 37 sweeper machine.
Preventive maintenance 4
 00 Series Preventive maintenance Preventive maintenance periods Use the procedures in this chapter to maintain your engine in accordance with the preventive maintenance schedule. Check the periods given
Part No FJ180V KAI. 4-stroke air-cooled gasoline engine OWNER, S MANUAL
 Part No. 99920-2280-02 FJ180V KAI 4-stroke air-cooled gasoline engine OWNER, S MANUAL SAFETY AWARENESS FOREWORD TABLE OF CONTENTS Whenever you see the symbols shown below, heed their instructions! Always
9500M. WARNING American Fab of SC, LLC Travelers Rest, SC OPERATOR S MANUAL INDUSTRIAL GASOLINE GENERATOR
 9500M INDUSTRIAL GASOLINE GENERATOR OPERATOR S MANUAL WARNING American Fab of SC, LLC Travelers Rest, SC It is extremely important to read and understand the entire contents of this operator s manual before
PETROL PRESSURE WASHER
 Thank you for purchasing a Sealey product. Manufactured to a high standard this product will, if used according to these instructions and properly maintained, give you years of trouble free performance.
Instruction Model 18537
 Instruction 738-556 Model 18537 LIMITED WARRANTY H. D. Hudson Manufacturing Company warrants to the original purchaser only that this product will continue to function as intended if used in accordance
PORTABLE CONCRETE VIBRATOR
 PORTABLE CONCRETE VIBRATOR OPERATION MANUAL MODEL PV45S INTRODUCTION We have taken care in the selection, testing and design of this product. Should service or spare parts be required this can be provided
Vehicle battery BATTERY WARNING SYMBOLS BATTERY CARE
 Vehicle battery BATTERY WARNING SYMBOLS On the battery label, the warning signs are as follows: BATTERY CARE No smoking, no naked flames, no sparks. The battery may emit explosive gas. Keep away from children
CROMMELINS COMPACTORS
 CROMMELINS COMPACTORS OPERATION & INSTRUCTION MANUAL Thank you for your selection of a CROMMELINS Compactor. This Operation Manual explains its use, installation, checking and maintenance. We highly recommend
3. INSPECTION/ADJUSTMENT
 3 3 INSPECTION/ADJUSTMENT SERVICE INFORMATION -------------------------------------------- 3-1 MAINTENANCE SCHEDULE ---------------------------------------- 3-2 FUEL LINE/FUEL FILTER -------------------------------------------
GPA520 PETROL AUGER OWNER S MANUAL FOR YOUR SAFETY PLEASE READ THESE INSTRUCTIONS CAREFULLY AND RETAIN THEM FOR FUTURE USE.
 GPA50 PETROL AUGER OWNER S MANUAL FOR YOUR SAFETY PLEASE READ THESE INSTRUCTIONS CAREFULLY AND RETAIN THEM FOR FUTURE USE. SPECIFICATION GENERAL SAFETY PRECAUTIONS MODEL No ENGINE SIZE MAX POWER MAX SPEED
AUTOMATIC AIRSPRAY GUN
 INSTRUCTION MANUAL AUTOMATIC AIRSPRAY GUN Manual : 0407 573.011.212 Date : 19/07/04 Supersede : KREMLIN REXSON - Site de Stains : 150, avenue de Stalingrad 93 245 - STAINS CEDEX - FRANCE Téléphone : 33
AIRMIX PUMP and LOW-PRESSURE PUMP air motor with reversing block
 INSTRUCTION MANUAL AIRMIX PUMP and LOW-PRESSURE PUMP air motor with reversing block Manual : 0306 573.002.212 Date : 12/06/03 Supersedes : 17/06/02 Modif. 1 + 4 added KREMLIN REXSON Site de Stains : 150,
TC07 TURF CUTTER Operating Instructions
 TC07 TURF CUTTER Operating Instructions Before commissioning the machine, read operating instructions and observe warning and safety instructions. Tracmaster Ltd CAMON TC07 Turf Cutter Manufacturer Details
Earth Auger MAG500 MAG500RS
 Earth Auger MAG500 MAG500RS US Owner s/operator s Manual Completely read and understand this manual before using this product. - 0 - Foreword This Owner s/ Operator s Manual is designed to familiarize
AIR CLEANER GENERAL REMOVAL. 1CAUTION Do not run engine without filter element in place. Debris could be drawn into the engine causing damage.
 AIR CLEANER GENERAL The air cleaner prevents foreign material from entering the carburetor and engine by trapping airborne dust and dirt in the filter element. Service air cleaner filter element every
Genquip Gi2000 Digital Inverter Petrol Generator. Owner s Manual
 Owner s Manual page 1 Notes page 2 Table of Contents Control Function 4 Pre-Operation Checklist 5 Fuel System Check Fuel Level Control Function Continued 6 Engine Oil Oil Warning System Engine Switch DC
Medusa T1101 Generator
 Please dispose of packaging for the product in a responsible manner. It is suitable for recycling. Help to protect the environment, take the packaging to the local amenity tip and place into the appropriate
NOTES FOR SAFETY OPERATOR-ONLY.
 NOTES FOR SAFETY Both the parents and their child must fully understand everything in this manual before riding. This vehicle is for OPERATOR-ONLY. This vehicle is only designed for operation on level,
Operating conditions of VRLA batteries in HVCBS and LVDBS Systems
 Operating conditions of VRLA batteries in HVCBS and LVDBS Systems 1 GENERAL INFORMATION It is required to mandatorily adhere to these Conditions of Operation. This document should be filled in (the last
ENGINE DRIVEN SEMI TRASH 3 PUMP MODEL NO: PS75
 ENGINE DRIVEN SEMI TRASH 3 PUMP MODEL NO: PS75 PART NO: 7230160 OPERATION & MAINTENANCE INSTRUCTIONS LS0817 - ISS 1 INTRODUCTION Thank you for choosing this Clarke Pump. The function of this pump is to
HOFFMANN POWER PRODUCTS PARTS LIST 2014
 HOFFMANN POWER PRODUCTS PARTS LIST 2014 VIBRATORY PLATE COMPACTOR ALL PARTS ARE SUBJECT TO STANDARD HOFFMANN TERMS AND CONDITIONS OF SALE 2010 Replacement parts are not manufactured, sold or warranted
SPECIFICATIONS SUBJECT TO CHANGE WITHOUT NOTICE
 PREFACE The following manual is only a guide to assist you and is not a complete or comprehensive manual of all aspects of maintaining and repairing your generator. The equipment you have purchased is
LAWNMOWER OWNER S MANUAL & Service Record Booklet
 LAWNMOWER OWNER S MANUAL & Service Record Booklet Models: HRU196PU HRU196DPU HRU19RPU HRU19DPU HRU197PU HRU197DPU HRU217DPU HRU216SU HRU216DSU Contents WARRANTY 2 SAFETY INSTRUCTIONS 3 COMPONENT IDENTIFICATION