CONCEPT MODELS WESTINGHOUSE SCHNABEL CAR 102/ Sheep Ranch Rd. Mountain Ranch, CA 95246
|
|
|
- Lee Taylor
- 5 years ago
- Views:
Transcription

1 CONCEPT MODELS Sheep Ranch Rd. Mountain Ranch, CA WESTINGHOUSE SCHNABEL CAR 102/301
2 2 CONCEPT MODELS Foreword As our name implies this kit gives the concept of the model. The object is to give the illusion of the model as it runs. We have molded in detail wherever possible and have made compromises in order to be able to manufacture this kit. We have worked from very sketchy details and the model drawings of our previously fabricated model. This kit is designed to merely be the basis for the model. PARTS LIST Item No. PART NO. DESCRIPTION QTY Girder Sides (pairs) Girder Top Spacer Girder End face Girder Stubs Girder Assembly Top (9 3 x34 6 ) 2 Ssupplied as sheet styrene with trim piece Main Span Bolster Bottom Main Span Bolster Top Traverse Frame & Carriage Yoke Bolster Decks (Ends) Truck Bolster, Rear Truck Bolster, Center Hydraulic Positioning Assy Roller Nest Girder Extension Girder Extension Faceplate End Sills Spacers (for connecting empty car) Traveling Hooks for empty car 2 GENERIC PARTS Item Qty Brake Reservoir 2 Brake Cylinder 8 Brake Valve 2 1/8 Styrene Tube 4 (10 6 ) 3/32 Tubing or Rod for 1 Spacers (6 ) Brake Stands 2 Brake Wheels 2 Load Brackets 4 1/ screws 2 1/8 ID Spacer Washers 8 1/ screws 8 Coupler Covers 2 Decals 1 Instructions 1 ½ 2-56 screws 4 Pins,small 2
3 3 CONCEPT MODELS WARNING Some parts have lead encapsulated within them. In the event the lead is exposed for any reason, do not allow it to remain on the skin. Dispose of any lead shavings that may result. Obey all safety precautions of all suggested cements and assembly materials. Tools All basic model workers tools files, motor-tool with fine burrs, hobby knife, 1/8 drill, Wood blocks for holding parts square, metal square. Files are needed to smooth the edges of the castings. The 1/8 drill is used to ream cast-in holes to correct diameter. Instructions 1x2 1x4 A gluing fixture is a great aid to assembly. It helps hold parts square while gluing. NOTE: This kit consists of resin castings and must be assembled with an ACC cement (not provided) both the thicker types as well as the thin. Solvent cements will NOT bond the parts together! Resin parts are more fragile than common styrene plastic used in injection molded models. Use reasonable care in handling and do not apply any solvents. The illustrations at the front show the general layout of parts for the car. Work very carefully when positioning the parts for gluing. ACC cements adhere very quickly and permanently. Gluing with ACC Cements USE WITH CARE ACC cements allow the modeler to work very quickly. A general rule is to use the thin cements to glue long joints taking advantage of capillary action that makes the cement run the length of the seam. The thicker cement is suited to applying large area parts to each other. An accelerator can be applied sparingly. One technique is to apply the glue to one part and the accelerator to the other part to be joined. I also use a Q-tip to apply a minute amount of accelerator to the glue after the parts have been joined. The accelerator triggers the ACC cement to set very quickly. It is only slightly slower with the thicker cement. IF YOU WANT PAINT TO STICK Wash the parts before assembling with a dish washing detergent such as Dawn. Rub lightly with a soft sponge the rinse.
4 4 CONCEPT MODELS GIRDER ASSEMBLIES All of the following assemblies are to be made in pairs. Both ends of the car are identical. 1 Prepare the girder assemblies as follows: a) File the back sides of the girders as shown with a straight file to get the profile as shown. b) Round off the recesses with a moto-tool as shown in the second panel. Check fit wth the tension load brackets as shown. c) Use a 1/8 brass rod (not supplied) to align the load bracket holes to the girder side and and glue the load bracket to the back or the girder. 2 Glue the top spacer block so that the back end is flush with the end of the girder. Trim from the front end or leave space to get the spacer end flush with the end. 3 Attach the other girder by gluing to the top spacer and the truss end face. 4 Glue the girder stub end to the assembly as shown.
5 5 CONCEPT MODELS 5 Bevel the bottom of the Girder End Face to 45 degrees and glue into the girder assembly. The end face is slightly recessed with the small boss at the top being flush with the end of the girder assembly. 6 Thread the 1/8 tube or rod through the girder sides and the load brackets (). Apply ACC cement to the load brackets and to the backside of the girder. DO NOT GET ANY CEMENT ON THE TUBE OR ROD. The tension load brackets from the load kit (sold separately) should mate and pivot freely. 7 Attach the Girder Assembly Top to the girder assembly. The raised portion on the top should be positioned as shown. Note: This is now supplied as styrene sheet and a separate trim piece.
6 6 CONCEPT MODELS MAIN SPAN BOLSTER/CARRIAGE 1 Use the thick ACC cement to glue the main span bolster top to the main span bolster bottom. The top should match up to the bottom outline. After the glue is set, trim off the overhang on the tapered end and file the top edge even with the top surface. 2 Drill a 1/8 hole in the top of the deck of the main span bolsters. Make sure you drill perpendicular to the top. Glue one of the 1/8 styrene tubes in place. Make sure you remove and extra cement from the top of the deck. The tube is too long but will be trimmed when the car is assembled.

7 7 CONCEPT MODELS TRAVERSE FRAME & POSITIONING ASSY. 1Fit the Yoke (9) to the clevis in the Traverse Frame & Carriage (8). Secure the parts with a pin made of a short length of 1/8 styrene tube. The tube should be an easy press-fit. If not, ream the hole slightly with an 1/8 drill bit by hand. The Yoke should be able to be moved. If the pin is too loose and needs to be secured, use ACC cement sparingly on the end that will be on the bottom. 2Thread the Traverse Frame & Carriage/Yoke assembly over the 1/8 tube on one of the Main Span Bolsters. The rounded roller ends are closest to the deck. Now add the Hydraulic Positioning Assembly (13) by threading it over the tube. The hydraulic rams should extend into the notches of the existing assembly. Next add the roller nest (14). Stake each of the pieces by using a little of the viscous ACC cement at the outside edges away from the center hole. 3 With the Traverse Frame in position, trime the pivot tube on the Main Span Bolster so that it extends ¼ above the Traverse Frame. Test the fit of the girder assembly. The tube should be trimmed just so the Girder Assembly rests on the Roller Nest.
8 8 CONCEPT MODELS
9 9 CONCEPT MODELS Truck Bolster - Rear 1 Attach the End Sill (17) to the Bolster Deck at what will be the low end. Carve the End Sill to fit over the bolster at the coupler end. Add the Brake stand and brake wheel with the wheel facing inboard. You may install the brake stand later if you desire. 2 Connect to center of the bolster to the rounded end of the Main Span Bolster with a 2-56 screw. Position the Bolster Deck to allow the bolster to swivel without the Bolster Deck conflicting with the movement of the Truck Bolster. 3 Attach the inboard short truck bolster with a 2-56 screw as shown. Attach trucks in positions shown with 2-56 screw and washer. Test the assembly for tracking. For shorter radii, notch the truck bolsters to give wheel clearance.
10 10 CONCEPT MODELS Girder Extensions These are the items used when a taller than normal load is hauled. 1 Position the Girder Extension Faceplate on the Girder Assembly as shown. Do not cement. This is to be a removable item. 2 Place the Girder Extension as shown. Do not cement to the Girder itself. Apply a minute amount of thick ACC cement at the top of the Girder Extension where it contacts the Girder Extension Faceplate. As soon as the cement sets, remove and add thin ACC cement to fill in the seam between Girder Extension and the Girder Extension Faceplate. Set aside.
11 11 CONCEPT MODELS Traveling Hooks & Spacers These are the items that allow the A & B ends of the car to be connected to run the car unloaded. 1 Cement a Traveling Hook to one of the 1/8 tubes. Use the cement sparingly! Make two. When the cement is dry, insert the tube through the holes in the Girder as shown. File the faces of the girder to allow the Traveling Hooks to engage. It may also be necessary to file the hooks slightly. 2Release the Traveling Hooks. Fit the two spacers with the 3/32 tubes provided. Do not cement yet. Install the spacers into the face of one of the Girder faces and engage the other Girder onto the other ends of the spacer tubes. Reposition the Girders face-to-face and engage the Traveling Hooks. 3 With the traveling hooks engaged and the spacers inserted into the holes in the girder face, check the girder sections. The tops should be aligned in a straight line across the top. If not remove the 3/32 tubes from the spacers and file to allow the girders to be closer together.
 as shown.")
 may be used to attached the brake wheel to the stand.")
 in the positions shown on the Inboard truck")
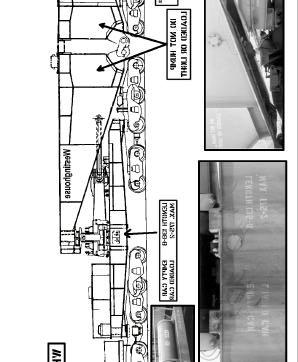
12 12 CONCEPT MODELS Details 1 Install the brake reservoir (20) and brake valve (22) as shown. 2 Install the brake stand (27) and brake wheel (28) in the position as shown. The small pin (37) may be used to attached the brake wheel to the stand. Trim the pin after installation. 3 Install brake cylinders (21) in the positions shown on the Inboard truck bolster as shown. Check for clearances. 4 Install brake cylinders (21) on the outboard span bolster as shown. Check for clearances.
13 13 CONCEPT MODELS PAINTING If you followed the instructions for cleaning the parts before assembly, you are ready to paint. A primer is recommended. Allow to dry overnight before proceeding with any of the color coats. When painting with white do not over dilute with thinner. Now that Floquil has left the scene I m buying primer from ACE hardware s enamel part of their rust proof line. A half pint goes a long way. Dark colors can be diluted more than Two coats with plenty of drying time in between are recommended. White on top of primer is recommended for light colors yellow through red. It improves the color. After painting, overcoat entire car with Testor s Glosscote prior to decaling. If you decal over the Glosscote as soon as it is just dry to the touch, decal adhesion is improved. 102 The 102 car has been seen painted in a number of colors. Many pictures show this car painted light blue. Other pictures the car looks gray which may be a function of fading. The latest paint scheme at this writing is a bright green. 301 The 301 car appears to have been painted a light blue in the photographs I have reviewed. It appears to be a darker blue than the 102 car but it is still a light blue. In order for decals to stand out I opted for a light blue which may be slightly darker than the actual car. My original formula was 50:50 Floquil White and Floquil Light Blue. Add more white to get closer to the prototype in a faded condition. My experience has been that the paint appears darker after Glosscoting prior to decaling. DECALING The decals provided are a very thin film decal film. Success with these decals depends on following these instructions. 1) Cut out the decal segment you are going to apply. 2) Dip the decal in warm water which has had 1 drop of DAWN kitchen detergent. Do not leave the decal to soak in the water. 3) Slide the decal directly onto the wetted surface with a small brush. Position with the brush. Remove excess water with a tissue. NOTE: The glue used for the decal sheet is different than what has been used in the past. The water does not dissolve the glue. Water causes a chemical reaction causing an almost immediate release of the decal. For this reason once the decal has been wetted it must be used quickly. It cannot be re-wetted later for use. 4) Top coat the decals with Testor s Dullcote for best results.

14 14 CONCEPT MODELS
PTRX GALLON DOT 113 CRYOGENIC TANKER CAR KIT
 CONCEPT MODELS Web Address: http://www.con-sys.com Email: concept_models@con-sys.com 8810 El Toro Way Stockton, BA 95210 S Scale PTRX 7004 34152 GALLON DOT 113 CRYOGENIC TANKER CAR KIT 2 CONCEPT MODELS
INSTRUCTIONS FOR PRODUCT: CAPX
 CONCEPT MODELS Web Address: http://www.con-sys.com Email: concept_models@con-sys.com 8331 Sheep Ranch Rd. Mountain Ranch, CA 95246 INSTRUCTIONS FOR PRODUCT: CAPX 1001 2 CONCEPT MODELS CAPX 1001 PARTS No.
CONCEPT MODELS CPOX 820 SCHNABEL CAR W. Canyon Creek Dr. Maricopa, AZ Web Address:
 CONCEPT MODELS Web Address: http://www.con-sys.com 44609 W. Canyon Creek Dr. Maricopa, AZ 85239-5019 CPOX 820 SCHNABEL CAR 2 CONCEPT MODELS PARTS Item No. PAR T NO. DESCRIPTION QTY. 1 6519-1 Right Girder
CONCEPT MODELS P.O. Box 604. Rosamond, CA
 http://www.con-sys.com CONCEPT MODELS P.O. Box 604. Rosamond, CA 93560-0604 WESTINGHOUSE WECX 200 SCHNABEL CAR 2 CONCEPT MODELS Tools All basic model workers tools files, motor-tool with fine burrs, hobby
S SCALE CONCEPT MODELS INSTRUCTIONS FOR PRODUCT S SCALE IAPX CRYOGENIC TANK CAR El Toro Way Stockton, CA 95210
 CONCEPT MODELS Web Address: http://www.con-sys.com Email: concept_models@con-sys.com 8810 El Toro Way Stockton, CA 95210 S SCALE INSTRUCTIONS FOR PRODUCT S SCALE IAPX 1028-37 CRYOGENIC TANK CAR 2 CONCEPT
The September, 1997 issue of Railroad Model Craftsman has an excellent article on these cars.
 TTX 60 flat cars The prototypes Pre-Size Model Specialties TTX is best known for it s fleets of intermodal and auto rack cars. The company started building a fleet of 60 flat cars in 1964. They purchased
Subaru SVX 1/43 Scale Model Assembly Instructions
 Subaru SVX 1/43 Scale Model Assembly Instructions Congratulations on your purchase of an unassembled 1/43 scale Subaru SVX! You now own a model that is even more rare than the car it represents. Currently
instructions 1:48 O-SCALE THROUGH PLATE GIRDER BRIDGE IN DURANGO CO 2017 John Palecki Structures rev 1.1
 instructions 1:48 O-SCALE THROUGH PLATE GIRDER BRIDGE IN DURANGO CO 2017 John Palecki Structures rev 1.1 CONGRATULATIONS ON YOUR BRIDGE PURCHASE! YOU ARE about to assemble a 1:48 O scale model kit of a
Building a 3-D Printed Coach by Al Mueller
 Gerry Dykstra has created an antebellum/civil War era coach on the Shapeways web site. Gerry used Inventor software to design the car. His finished product, in my opinion, is a much more accurate rendition
Instructions: PRR / PC Shops G43 Series Gondola Kit Tangent Part Numbers: through /2016
 Instructions: PRR / PC Shops G43 Series Gondola Kit Tangent Part Numbers: 17000-01 through 17002-02 8/2016 Thank you for purchasing the Tangent Scale Models PRR / PC Shops G43 Series Gondola Kit! A few
1:8 scale Koban Model Documentation
 1:8 scale Koban Model Documentation Gear-foot assembly The gear foot consists of three parts, the gear-foot, prop shaft, and propeller. Clean flash from castings being careful to keep the mating surfaces
Drag Race Roll Bar (MMRB-6, -7)
") 3430 Sacramento Dr., Unit D San Luis Obispo, CA 93401 Telephone: 805/544-8748 Fax: 805/544-8645 www.maximummotorsports.com 1994-04 Drag Race Roll Bar (MMRB-6, -7) The Maximum Motorsports 6-point Drag Race
3430 Sacramento Dr., Unit D San Luis Obispo, CA 93401 Telephone: 805/544-8748 Fax: 805/544-8645 www.maximummotorsports.com 1994-04 Drag Race Roll Bar (MMRB-6, -7) The Maximum Motorsports 6-point Drag Race
Instructions: Pullman-Standard PS-3 Coal Hopper Kit Tangent Part Numbers: through /2015
 Instructions: Pullman-Standard PS-3 Coal Hopper Kit Tangent Part Numbers: 15000-01 through 15001-01 10/2015 Thank you for purchasing the Tangent Scale Models Pullman-Standard PS-3 Coal Hopper Kit! A few
Figure 6 - This photo shows the two types of rods; the top one simulates the brake rod that connects to the brake equipment in the truck while the
 These two segments appeared as sidebars to two installments of Essential Freight Cars in the August and September, 2003 issues of Railroad Model Craftsman. Text and photos Ted Culotta. Distribution for
FUSELAGE ASSEMBLY SECOND SECTION (of three)
") FUSELAGE ASSEMBLY SECOND SECTION (of three) 1 FRONT FLOOR ASSEMBLY The front floor assembly is fabricated from three pieces of the two ply pre-pregnated panel material supplied. The basic floor panel and
FUSELAGE ASSEMBLY SECOND SECTION (of three) 1 FRONT FLOOR ASSEMBLY The front floor assembly is fabricated from three pieces of the two ply pre-pregnated panel material supplied. The basic floor panel and
Scratchbuilding an F25 Well Flat Car
 Scratchbuilding an F25 Well Flat Car By David J. Vinci (Flat Figure 1) Well flats are a pretty rare car type generally, but the Pennsy seems to have had the lion s share of variety. Most of these cars
Right On Replicas, LLC Step-by-Step Review * Mack Fire Pumper 1:32 Scale Revell Model Kit # Review
 Right On Replicas, LLC Step-by-Step Review 20150915* Mack Fire Pumper 1:32 Scale Revell Model Kit #85-1945 Review The Mack CF600 Pumper is a familiar fire truck that is still widely used in firehouses
Installation Instructions Supertop for Truck
 Installation Instructions Supertop for Truck Vehicle Application: Ford F-150 5.5 Ft. Styleside 2004 and newer Part Number: 76309 www.bestop.com - We re here to help! Visit our web site and click on Ask
Roll Bar (MMRB-6.1 to -6.7)
") 3430 Sacramento Dr., Unit D San Luis Obispo, CA 93401 Telephone: 805/544-8748 Fax: 805/544-8645 www.maximummotorsports.com 1994-04 Roll Bar (MMRB-6.1 to -6.7) NOTE: These instructions cover Roll Bars with
3430 Sacramento Dr., Unit D San Luis Obispo, CA 93401 Telephone: 805/544-8748 Fax: 805/544-8645 www.maximummotorsports.com 1994-04 Roll Bar (MMRB-6.1 to -6.7) NOTE: These instructions cover Roll Bars with
2018 RPM Chicagoland Mini-Kit FGEX Truss-Rod Reefer Series and 20000
 2018 RPM Chicagoland Mini-Kit FGEX Truss-Rod Reefer Series 14000 and 20000 Introduction All Model and Construction Photos by Frank Hodina Thank you for your interest in Resin Car Works and this kit. Resin
SERVICE MANUAL L130B / L4130 Series Logstacker Drive Axle With Bolt-On Stub End Retainer
 SERVICE MANUAL L130B / L4130 Series Logstacker Drive Axle With Bolt-On Stub End Retainer Page 1 Allied Form #80-930 Rev 07/2009 SERVICE MANUAL LOG STACKER DA202 DRIVE AXLE TABLE OF CONTENTS PROCEDURE FOR
AUSSIE LOCKER. Aussie lockers are 100% made in the USA. Installation Supplement for Carrier Clearance Dana 35 Models (XD & XD-13530)
") AUSSIE LOCKER Aussie lockers are 100% made in the USA. Installation Supplement for Carrier Clearance Dana 35 Models (XD-13527 & XD-13530) Table of Contents Table of Contents... 2 Introduction... 3 Installation
AUSSIE LOCKER Aussie lockers are 100% made in the USA. Installation Supplement for Carrier Clearance Dana 35 Models (XD-13527 & XD-13530) Table of Contents Table of Contents... 2 Introduction... 3 Installation
PARTS IDENTIFICATION AND ASSEMBLY INSTRUCTIONS
 The U.S. M10 ammunition trailer was used mostly by armored units to transport additional ammunition. It could be towed by many different vehicles, including 2 ½ ton trucks, half tracks, armored cars, self-propelled
Installation Instructions Supertop for Truck
 Installation Instructions Supertop for Truck US Patent 6827391 Vehicle Application: Dodge Ram 1500 / 2500 Regular / Quad / Mega Cab 6.5' Bed 2002 2011 Part Number: 76304 www.bestop.com - We re here to
Scratchbuilding a Class Fk Flat Car
 Scratchbuilding a Class Fk Flat Car The Class Fk flat car is apparently the last all wood flat car design adopted by the Pennsylvania. The design dates to 1898 and it appears to be the last all wooden
SUBARU FORESTER - SIDE STEP DIESEL VERSION INSTALLATION INSTRUCTIONS
 SUU FORESTER - SIDE STEP DIESEL VERSION INSTALLATION INSTRUCTIONS SS00 VEHICLE DESCRIPTION: PART NUMBER: SUU FORESTER SACC00 R 9 L 0 Care Instructions: Clean Side Steps with a mild detergent and water
Installation Instructions Supertop for Truck
 Installation Instructions Supertop for Truck Vehicle Application: Ford F-150 Regular / Super Cab 2004 2011 (6.5 ft.) Part Number: 76305 US Patent 6827391 www.bestop.com - We re here to help! Visit our
Instructions: General American 6,000 Gallon, 3-Compartment Tank Car Kit 11/2013
 Instructions: General American 6,000 Gallon, 3-Compartment Tank Car Kit 11/2013 Thank you for purchasing the Tangent Scale Models General American 6,000 Gallon, 3- Compartment Tank Car Kit! A few quick
CIRRUS AIRPLANE MAINTENANCE MANUAL
 MODEL SR PASSENGER AND CREW DOORS. DESCRIPTION AND OPERATION Serials 000 thru 00: The two crew/passenger doors incorporate a flush-mount outside door handle, key-operated door lock, and a conventional
Revell F-117 Stealth Fighter. 1/48 th Scale Kit # 5834
 Revell F-117 Stealth Fighter. 1/48 th Scale Kit # 5834 By Mark Murray I won t go into the history of this aircraft, as it s offered by many other sources, far better than I can expound upon. Suffice it
Turbinator-2 Build Manual
 Turbinator-2 Build Manual Thank you for your purchase of the Turbinator-2 sport jet by Boomerang RC Jets. This RC Jet IS NOT A TOY and should only be flown and operated by experienced RC Turbine Pilots.
OIL COOLER KIT INSTALLATION INSTRUCTIONS PART NUMBER D
 OIL COOLER KIT INSTALLATION INSTRUCTIONS PART NUMBER D570-0904 APPLICATION: 2011-2012 E90 335i/xi (N55 engine) with BMW standard bumper and with stock oil cooler Congratulations for being selective enough
Return to Instruction Sheet index. Installation Instructions For C-4 70 and Later, Except 70 Falcon
 Page 1 of 8 Return to Instruction Sheet index TCI 260100 Trans-Scat Automatic Transmission Installation Instructions For C-4 70 and Later, Except 70 Falcon TCI 260100 Kit Contains: Qty. Description One
GL1800 TRAILER HITCH - INSTALLATION INSTRUCTIONS #GL
 GL1800 TRAILER HITCH - INSTALLATION INSTRUCTIONS #GL18007-20 Read through these instructions completely before attempting installation, lay out all pieces including the numbered hardware bags to familiarize
Instructions: PRR Sam Rea Shops X58 Class Box Car Kit Tangent Part Numbers: XX through XX 9/2015
 Instructions: PRR Sam Rea Shops X58 Class Box Car Kit Tangent Part Numbers: 14000-XX through 14002-XX 9/2015 Thank you for purchasing the Tangent Scale Models PRR Sam Rea Shops X58 Class Box Car Kit! A
Detroit Speed, Inc. Rear QUADRAlink Conversion Kit Camaro/Firebird P/N:
 Detroit Speed, Inc. Rear QUADRAlink Conversion Kit 1982-92 Camaro/Firebird P/N: 041721 The Detroit Speed Inc. QUADRAlink Conversion Kit, eliminates the factory torque arm configuration. It features no-compromise
$1.00 FOR THE TQIO/RCIO
 $1.00 FOR THE TQIO/RCIO m mm HDBBYSHOP Champion Jay Halsey has an impressive track record. One of Jay's advantages is a whisper smooth tranny thanks to his dad, Jim. Now you can build a Halsey transmission!
2005+ Roll Bar (Mm5RB-20.1 to -20.6) Recommended Center punch 1/8" pilot drill 1-3/4" Hole saw 2" Hole saw
 Recommended Center punch 1/8 pilot drill 1-3/4 Hole saw 2 Hole saw") 3430 Sacramento Dr., Unit D San Luis Obispo, CA 93401 Telephone: 805/544-8748 Fax: 805/544-8645 www.maximummotorsports.com 2005+ Roll Bar (Mm5RB-20.1 to -20.6) Recommended Center punch 1/8" pilot drill
3430 Sacramento Dr., Unit D San Luis Obispo, CA 93401 Telephone: 805/544-8748 Fax: 805/544-8645 www.maximummotorsports.com 2005+ Roll Bar (Mm5RB-20.1 to -20.6) Recommended Center punch 1/8" pilot drill
Switchback Carrier Rack System
 Switchback Carrier Rack System Installation Instructions 1 Rocky Mountain Westy Ph. (970)310-3441 Introduction Thank you for purchasing the Rocky Mountain Westy Switchback Carrier Rack System. We pride
Factory Five Racing, Inc. 818 Kit Assembly manual revision 1i update
 Factory Five Racing, Inc. 818 Kit Assembly manual revision 1i update Pedal box...1 Cable Accelerator Pedal (2002-2005)...2 OEM seats...7 Windshield... 13 Center console... 19 Pedal box Attach the pedal
Stephenson's Valve Gear: 7mm cast white-metal kit 19 th Century swing-link version - non-working, cosmetic only. Instructions
 SER-Kits Stephenson's Valve Gear: 7mm cast white-metal kit 19 th Century swing-link version - non-working, cosmetic only Page 1 of 5 Instructions HEALTH & SAFETY: The castings contain some lead. Dispose
1st Generation K5 Blazer (1969 to 1972)
") 1st Generation K5 Blazer (1969 to 1972) Tools needed: 9/64 drill bit Tape measure Pencil Drill Wrenches Screwdrivers Contents: 2 - bedrails (2 pieces each) 2 - folding frame uprights 1 header bar 3 - cross-bows
1st Generation K5 Blazer (1969 to 1972) Tools needed: 9/64 drill bit Tape measure Pencil Drill Wrenches Screwdrivers Contents: 2 - bedrails (2 pieces each) 2 - folding frame uprights 1 header bar 3 - cross-bows
Global West Suspension 655 SOUTH LINCOLN AVE / SAN BERNARDINO CA PHONE / FAX Web address: globalwest.
 Global West Suspension 655 SOUTH LINCOLN AVE / SAN BERNARDINO CA. 92408 PHONE 877-470-2975 / FAX 909-890-0703 Web address: globalwest.net TracLink Installation Instructions -- TSF-93 and TSF-93A (aluminum
Scratchbuilding PRR Class Gd, Gn and Gg Wooden Hoppers By David J. Vinci
 Scratchbuilding PRR Class Gd, Gn and Gg Wooden Hoppers By David J. Vinci During the first 25 years of the 20 th century, the rolling stock mixture on the Pennsy was really interesting to
Instructions for Assembling Driving Wheels, Axles and Crankpins
 Instructions for Assembling Driving Wheels, Axles and Crankpins (Version 1; October 2008) Introduction These instructions explain how to assemble Exactoscale 4mm scale driving wheels, axles and crankpins
Dura Force Disc Brake System Service Manual
 TS 20809_a 3501 Shotwell Drive ISO/TS 16949:2002 Registered (PH): 937.743.8125 Franklin, OH 45005 www.waltheremc.com (FX): 937.743.8232 Table of Contents General Description 1 3 Fastener Torque Chart 4
**DO NOT EXCEED RECOMMENDED VEHICLE TOWING WEIGHT!** FORD F-250, F-350
 6065 SUBKIT 7/7/0 **DO NOT EXCEED RECOMMENDED VEHICLE TOWING WEIGHT!** FORD F-50, F-50 PAGE OF WARNING!! BRAKE, FUEL, AND ELECTRICAL LINES MAY NEED TO BE LOOSENED OR REPOSITIONED TO PROVIDE CLEARANCE FOR
1 Green Pressure Regulator Spring Automatic transmissions operate at temperatures between 150ºF and
 Installation Instructions for 603107 Valve Body Kit C-4 1970 & Later Tools Required Speed Handle or Ratchet 3/8 Drive 1/2 Socket 3/8 Drive 7/16 Socket 3/8 Drive 5/16 Socket 3/8 Drive Small Screwdriver
The H-MAC Heavy Metal Articulating Chassis Construction Guide
 The H-MAC Heavy Metal Articulating Chassis Construction Guide The Heavy Metal Chassis is constructed with two identical drive modules built using 10 mechanical sub-assemblies. The drive modules are integrated
LJ20 Distributor - Disassembly Inspection Repair
 LJ20 Distributor - Disassembly Inspection Repair Old Codger New To Old Suzuki Jeeps The odometer on this 1972 LJ20 indicated the distributor had less than 10,000 miles of wear but during that time it had
AA TRUCK TALK EQUIPMENT FOR THE 88-A PLATFORM
 AA TRUCK TALK EQUIPMENT FOR THE 88-A PLATFORM By Neil Wilson of Boulder, Colorado April 1998 (revised 12/24/99) revised 11/9/14 for aafords.com - "component" changed to "equipment" Illustration #1: 134-B
Installation Instructions Supertop for Truck
 Installation Instructions Supertop for Truck Vehicle Application: Toyota Tacoma Double Cab 2005 - Current (5 ft.) Part Number: 76308 US Patent 6827391 www.bestop.com - We re here to help! Visit our web
Installation Instructions Trektop
 Installation Instructions Trektop Vehicle Application Jeep Wrangler (JK) Unlimited 2007 Current Part Number: 56805 www.bestop.com - We re here to help! Visit our web site and click on Ask a Question. Click
TOYOTA SUPRA JZA80 HEADLIGHT LENS TUTORIAL
 TOYOTA SUPRA JZA80 HEADLIGHT LENS TUTORIAL Disclaimer: Original Motorsports takes no responsibility for any errors which may occur in your DIY project. This is simply a guide. If you are not confident
Page: REV 3: Add drill and tap information to Figure 4 DRILL #3, TAP 1/4-28 BOTH ENDS.
 REVISION DESCRIPTION: 1) Page: 32-03 MEMO: Step 4 should not be bold. Fix WD-1213 callout in Figure 3. Page: 32-04 REV 3: Add drill and tap information to Figure 4 DRILL #3, TAP 1/4-28 BOTH ENDS. Add make
OIL COOLER KIT INSTALLATION INSTRUCTIONS PART NUMBER D E92 335i/xi (N55 engine) with BMW Standard bumper and with stock oil cooler
 with BMW Standard bumper and with stock oil cooler") OIL COOLER KIT INSTALLATION INSTRUCTIONS PART NUMBER D570-0924 APPLICATION: 2011-12 E92 335i/xi (N55 engine) with BMW Standard bumper and with stock oil cooler Congratulations for being selective enough
OIL COOLER KIT INSTALLATION INSTRUCTIONS PART NUMBER D570-0924 APPLICATION: 2011-12 E92 335i/xi (N55 engine) with BMW Standard bumper and with stock oil cooler Congratulations for being selective enough
Scratchbuilding PRR Class FL Flat Cars By David J. Vinci
 Scratchbuilding PRR Class FL Flat Cars By David J. Vinci If you have been following the scratchbuilding freight car series I have been doing, you probably have noticed that most of the time
Dry Creek Models Historic Designs for California Railroads
 Dry Creek Models Historic Designs for California Railroads SP W-50-3 Hart Convertible Gondola Modified, 1926 and later Model 102: Open hopper doors. Model 103: Closed hopper doors. Contents: freight car
SEARAILS RR-XXX STEAM LOCOMOTIVES ASSEMBLY MANUAL
 SEARAILS RR-XXX 0-4-0 STEAM LOCOMOTIVES ASSEMBLY MANUAL 30 March 2015 T R Knapp Model Engineering 1 This diagram shows basic assembly of Nn3/Z Porter 0-4-0T 2 This diagram shows basic assembly of Baldwin
Installation Instructions Tigertop
 Installation Instructions Tigertop Vehicle Application Jeep CJ5 1955 1975 Part Number: 51405 Jeep M38, A1 1951 1971 Part Number: 51405 www.bestop.com - We re here to help! Visit our web site and click
How to Make Realistic Roads & Parking Lots
 How to Make Realistic Roads & Parking Lots Presented by Jeffrey Jarr Using Lightweight Spackling! Tools & Materials: Roads & Highways Red Devil Onetime Lightweight Spackling 3M All Purpose Sanding Sponge
INSTALLATION INSTRUCTIONS
 INSTALLATION INSTRUCTIONS Document# 19-0038 2004+ Lotus Elise (Series 2) Rear Clamshell Removal Kit Safely support the vehicle. This is a two-person job. Allow 1 to 2 hours for initial disassembly. Have
Installation Instructions Specialty Tigertop Includes Doors
 Installation Instructions Specialty Tigertop Includes Doors Vehicle Application Jeep CJ8 Scrambler 1981 1986 Part Number: 52309 www.bestop.com - We re here to help! Visit our web site and click on Ask
SunFlower Helicopter Rocket LUNAR Build Session: 9/25/08 By Tom Desmarais
 SunFlower Helicopter Rocket LUNAR Build Session: 9/25/08 By Tom Desmarais Contents of Kit: A. 3 1/16 x1 x11 basswood rotors B. 3 1/16 x2 x2 basswood fins C. 3 1/16 x5/16 x1/2 basswood hold spacer D. 3
**DO NOT EXCEED RECOMMENDED VEHICLE TOWING WEIGHT!** FORD F-250, F-350
 60647 SUBKIT 7/3/204 **DO NOT EXCEED RECOMMENDED VEHICLE TOWING WEIGHT!** FORD F-250, F-350 PAGE OF 4 WARNING!! BRAKE, FUEL, AND ELECTRICAL LINES MAY NEED TO BE LOOSENED OR REPOSITIONED TO PROVIDE CLEARANCE
Installation Instructions Sport Bar Covers
 Installation Instructions Sport Bar Covers Vehicle Application Jeep TJ Wrangler 2003-2006 Part Number: 80022 Jeep TJD Wrangler Unlimited 2004-2006 Part Number: 80023 www.bestop.com - We re here to help!
OIL COOLER KIT INSTALLATION INSTRUCTIONS PART NUMBER D E92 335is (N54 engine) with BMW M-Technic bumper and with stock oil cooler
 with BMW M-Technic bumper and with stock oil cooler") OIL COOLER KIT INSTALLATION INSTRUCTIONS PART NUMBER D570-0923 APPLICATION: 2011 E92 335is (N54 engine) with BMW M-Technic bumper and with stock oil cooler Congratulations for being selective enough to
OIL COOLER KIT INSTALLATION INSTRUCTIONS PART NUMBER D570-0923 APPLICATION: 2011 E92 335is (N54 engine) with BMW M-Technic bumper and with stock oil cooler Congratulations for being selective enough to
Premium Dry Freight (Plywood) Door Installation REFERENCE FIGURE 1
 Door Installation REFERENCE FIGURE 1") Premium Dry Freight (Plywood) Door Installation A Premium door can be identified as usually having a two-spring balancer, 2 diameter (nominal) rollers, and end hinges with removable covers. If your Whiting
Premium Dry Freight (Plywood) Door Installation A Premium door can be identified as usually having a two-spring balancer, 2 diameter (nominal) rollers, and end hinges with removable covers. If your Whiting
INSTRUCTIONS 1WARNING 6 SPEED TRANSMISSION SUPER KIT -J03481 REV General. Removal. Kit Number A
 INSTRUCTIONS -J03481 REV. 08-31-04 Kit Number 33100-03A 6 SPEED TRANSMISSION SUPER KIT General This kit fits 1990-1999 Softail and 1991-2000 Dyna model motorcycles. Requires separate purchase of cable
PYRTE. Building The Front Axle, Fork and Steering
 PYRTE Building The Front Axle, Fork and Steering The front axle on this traction engine is a very simple affair, in that it is a rectangular steel rod, sat on edge, with a pivot in the centre, which is
Installation Instructions Sunrider for Hardtop
 Installation Instructions Sunrider for Hardtop Installation Instructions Sunrider for Hardtop Vehicle Application: Jeep Wrangler / Wrangler Unlimited 2007- current Part Number 52450 Installation Tips Before
Right On Replicas, LLC SnapShot Review * Auto Transport Trailer 1:25 Scale Revell Model Kit # Review
 Right On Replicas, LLC SnapShot Review 20150717* Auto Transport Trailer 1:25 Scale Revell Model Kit #85-1509 Review An auto transport trailer is a type of semi-trailer designed to efficiently transport
TS1251 PRESSURE DISPENSER USER'S MANUAL
 TS1251 PRESSURE DISPENSER USER'S MANUAL TABLE OF CONTENTS SECTION DESCRIPTION PAGE NUMBER 1.0 CAUTIONS AND WARNINGS... 3 2.0 INTRODUCTION... 4 3.0 DESCRIPTION... 4 & 5 4.0 SET UP AND INSTALLATION... 6
INSTALLATION INSTRUCTIONS FOR: DECK LIFT KIT 629GN-001A
 INSTALLATION INSTRUCTIONS FOR: DECK LIFT KIT 629GN-001A 1. SHUT OFF THE ENGINE AND SET THE PARK BRAKE. 2. ROTATE THE FRONT CASTER WHEELS AWAY FROM THE DECK. (SEE ILLUSTRATION 3) 3. REMOVE THE DECK HEIGHT
AUTO REWIND AIR HOSE REEL
 Model #s 46845, 46848 AUTO REWIND AIR HOSE REEL OPERATOR S MANUAL STORE THIS MANUAL IN A SAFE PLACE FOR FUTURE REFERENCE!? NEED HELP? Save time, contact us first. 888-648-8665 support@tekton.com WARNING:
<THESE INSTRUCTIONS MUST BE GIVEN TO THE END USER> B&W
 B&W Trailer Hitches 1216 Hawaii Rd / PO Box 186 Humboldt, KS 66748 Turnoverball Gooseneck Hitch Installation Instructions MODEL 1314 2013 2014 RAM 3500
DODGE SuperRail Mounting Kit #0848
 DODGE SuperRail Mounting Kit #0848 #1200 Super 5 th (16K) #0800 Super 5 th (20.5K) Gross Trailer Weight (Maximum) Vertical Load Weight (Max. Pin Weight) 16,000 lbs. 4,000 lbs. Gross Trailer Weight (Maximum)
Walthers/Life-Like USRA Steam Locomotive
 North Raleigh Model Railroad Club Installing Decoders in N Scale Locomotives Detailed Instructions Walthers/Life-Like USRA 2-8-8-2 Steam Locomotive by David Derway May 17, 2010 Table of Contents Introduction...
Product Drive Cameron Park, CA PH: PRO LAUNCH INSTALLATION INSTRUCTIONS
 12-228 4130 Product Drive Cameron Park, CA 95682 PH: 1.530.642.9488 VIEW INSTALLATION VIDEO AT www.worksconnection.com/prolaunch/ 12-228 PRO LAUNCH INSTALLATION INSTRUCTIONS We at Works Connection Inc.
Installation Instructions Supertop with Tinted Side and Rear Windows
 Installation Instructions Supertop with Tinted Side and Rear Windows Vehicle Application: Jeep Wrangler TJ 1997 2006 Part Number: 54709 www.bestop.com - We re here to help! Visit our web site and click
4.6L Oil Filter Relocation Kit, (OC-7)
") 3430 Sacramento Dr., Unit D San Luis Obispo, CA 93401 Telephone: 805/544-8748 Fax: 805/544-8645 www.maximummotorsports.com 4.6L Oil Filter Relocation Kit, 2003-04 (OC-7) Filter Mount Installation 4. Remove
3430 Sacramento Dr., Unit D San Luis Obispo, CA 93401 Telephone: 805/544-8748 Fax: 805/544-8645 www.maximummotorsports.com 4.6L Oil Filter Relocation Kit, 2003-04 (OC-7) Filter Mount Installation 4. Remove
PARTS BOOK FLAIL HEADS 90 SIDE MID-MOUNT
 PARTS BOOK FLAIL HEADS 90 SIDE MID-MOUNT 5.0.8 DIAMOND MOWERS, LLC 350 E 60 th St. North Sioux Falls, SD 5704 FOR WARRANTY CALL DIAMOND MOWERS DIRECT: 888-960-0364 OUR TECHNICIANS WILL DIAGNOSE YOUR SITUATION
XD Aussie Locker XD Installation Supplement Dana 35 Ford TTB
 XD-13527 Aussie Locker XD-13527 Installation Supplement Dana 35 Ford TTB Thank you for your purchase of the XD-13527 Aussie Locker for Dana 35 Ford TTB The following installation review is from username
Unusual Prototypes and Core Kits. How to build that model that just isn t available in Plastic!
 Unusual Prototypes and Core Kits How to build that model that just isn t available in Plastic! BP1 Why do manufacturers choose their prototypes? Popularity numerous The Standard Railroad of The World UP
2005+ Drag Race Roll Bar (Mm5RB-20)
") 3430 Sacramento Dr., Unit D San Luis Obispo, CA 93401 Telephone: 805/544-8748 Fax: 805/544-8645 www.maximummotorsports.com 2005+ Drag Race Roll Bar (Mm5RB-20) Note that the NHRA DOES allow the door bars
3430 Sacramento Dr., Unit D San Luis Obispo, CA 93401 Telephone: 805/544-8748 Fax: 805/544-8645 www.maximummotorsports.com 2005+ Drag Race Roll Bar (Mm5RB-20) Note that the NHRA DOES allow the door bars
Base Kit Rochester Tri Power Carb small parts kit contents:
 910-11589 Base Kit Rochester Tri Power Carb small parts kit contents: Installation of Rochester 2 GC Tri-Power Base Kit Modifications to center (primary) carb 1) Remove, disassemble, and clean carb as
ADVANCED MODEL ROCKET
 Division of RCS Rocket Components, Inc. Assembly and Operation Instructions BEFORE YOU BEGIN: ADVANCED MODEL ROCKET COMPLETED INITIATOR ADVANCED MODEL ROCKET 19911-8091 Rev. 8/12/04 Study the illustrations
MF 9690, 9790, Challenger 660, 670
 Ag Leader Technology Parts List Note: Indented items indicate parts included in an assembly listed above Quantity by Model Part Name/Description Part No. MF 9690 MF 9790 Challenger 660 Challenger 670 Instruction
Flight Compartment. 1. General
 CIRRUS AIRPLANE MAINTENANCE MANUAL Flight Compartment CHAPTER 56-10: FLIGHT COMPARTMENT GENERAL 56-10: FLIGHT COMPARTMENT 1. General The windshield is manufactured of acrylic and is adhesive bonded to
Contents. Preparing the motor Winding the rotating secondary Winding the primary... 8
 120732-130389 Propeller Clock Construction Notes Revision E, December 2, 2013 Contents Preparing the motor... 2 Winding the rotating secondary... 5 Winding the primary... 8 UltiProp Clock (Elektor Dec.
Installation Instructions
 Installation Instructions Important INSTALLATION REQUIRES WELDING to the unibody chassis by a qualified welder or metal fabricator. A bolt-on installation is not possible for this product. CHECK STEERING
I n s t r u c t i o n M a n u a l. Instruction Manual SPECIFICATION
 I n s t r u c t i o n M a n u a l Instruction Manual SPECIFICATION - Wingspan: 3200mm (125,9 in) - Length: 1650mm (64,9 in) - Flying weight: 3000gr 3200gr - Wing area: 64.5 dm2 - Wing loading: 46g/dm2
MiG-15 ARF Assembly & Operation Manual
 INLET PREP The MiG-15 inlet system has been accurately assembled at BVM. The following steps are required by the modeler prior to installation in the model. The inlet duct system is not glued into the
REVISION DESCRIPTION:
 REVISION DESCRIPTION: 1) Page: 12-03 REV 1: Step 1: and Figure 1: Final-Drill s.b. Match-Drill. Step 4: Updated flox mixture description to match later description (removed "peanut butter-like" description).
Installation Instructions
 Installation Instructions Trektop Doors not included Vehicle Application Jeep Wrangler Unlimited 2007 2011 Part Number: 56805 www.bestop.com - We re here to help! Visit our web site and click on Ask a
Half Door Installation Instructions
 Half Door Installation Instructions For: CJ5 (1976-1983) Part Number: 53027 Congratulations on your purchasing decision. Bestop designed these Doors to give you years of dependability and performance with
UTLX Class X 6,500 Gallon Tank Car
 UTLX Class X 6,500 Gallon Tank Car UTLX 16285 shows the appearance of one of these 6500 gallon Class X cars after the addition of AB brakes. It s original arch bar trucks have been replaced with cast steel
2 Piece Soft Door Installation Instructions
 2 Piece Soft Door Installation Instructions For: Wrangler/TJ (1997-on) Part Number: 51789 Note: Use of this product will eliminate the factory side mirrors and requires the removal of the entry light bulbs.
Another Shay Steam Brake Valve Nelson Riedel Initial: 1/30/2004 Last Revised: 02/26/2006
 Page 1 of 5 Another Shay Steam Brake Valve Nelson Riedel NARiedel@Adelphia.net Initial: 1/30/2004 Last Revised: 0 I was not happy with the valve described in the brake valve section Shay Steam Brake Valve
Checker Unload Checkstand Installation Instructions
 Front-End Checkouts Commercial Refrigeration Equipment Display Merchandisers Store Fixtures Checker Unload Checkstand Installation Instructions Attention Store Manager: Please find enclosed in this packet