ELECTRIC BICYCLE OWNER S MANUAL.
|
|
|
- Julius Milton Taylor
- 5 years ago
- Views:
Transcription

1 ELECTRIC BICYCLE OWNER S MANUAL
2 Hello. 1 Assembly. 2 Overview. 2 Step One: Removing the Front Basket. 3 Step Two: Mounting the Handlebars & Display. 4 Step Three: Replacing the Front Basket. 5 Step Four: Mounting the Front Wheel. 6 Step Five: Installing Pedals. 8 Step Six (Recommended): Disconnect Speed Regulator. 9 Step Seven (Optional): Installing Sideview Mirrors. 9 Step Eight (Optional): Swap KM/H with MPH Display. 10 Finishing Up. 11 Diagram. 12 Specification. 14 Maintenance. 15 Battery. 15 Tires. 15 Chain. 15 Regulation. 16 Warranty. 17 Wattson Limited Warranty 17
3 Hello. Welcome to the Wattson family. Thank you for your purchase, we hope to see you out on the road. Be safe out there and remember, always wear a helmet. #ELECTRICBIKE #GOFREE If you d like to get in contact with us, send us an at hi@gowattson.com or reach out on social media. We re available on Facebook, Instagram, Twitter, and 1


4 Assembly. Overview. We ll have you setup in no time. For your convenience, we also have video assembly instructions online at Before we begin, you ll need the following tools: 1. Phillips Screwdriver 2. 16mm, 14mm, and 12mm Socket Wrench 3. 15mm, 14mm, and 12mm Wrench 4. Flathead Screwdriver 5. Scissors Begin by removing bubble wrap and packaging materials, having a scissor handy will be useful here. The handlebars and dashboard will not be attached to the bike and will resting to the side of the bike. The front fender and the sideview mirrors are wrapped together above the footplate. 2


5 The charging adapter and the pedals will be inside the front basket. There is also a finishing cover in the basket. The front wheel will be zip tied to the side of the bike. You can remove this wheel and set it aside. We highly recommend assembling the scooter on the base of the provided carton package as it assists in stabilizing the bike. The bike can be assembled by 1 person. Step One: Removing the Front Basket. To remove the front basket, use a Phillips screwdriver and unscrew the 4 bolts on the interior of the basket. There will be 2 bolts on the back side of the basket, and 2 bolts on the bottom of the basket. The 2 bottom bolts are held in place by nuts underneath the basket. Remove the basket and set it aside. 3
 and basket mount from the steering column.")


6 Step Two: Mounting the Handlebars & Display. Begin by removing the bolt (12mm) and basket mount from the steering column. When removed, there will be a bolt, a cylinder washer, and the basket mount. Place the Handlebars and Display assembly onto the steering column. Check to see the cables are properly situated: facing the front of the bike, the ribbed cable and black rear brake cable will be on the right side, and the front hydraulic brake line will be on the left. Mount the handlebar assembly by placing the bolt back through the steering column and handlebar assembly with the basket mount. Be sure the cylinder washer is properly sitting on the steering column before tightening. 4


7 Step Three: Replacing the Front Basket. Replace the basket onto the mounting brackets and screw the bolts back into place. The shorter bolts mount to the vertical mounting bracket. Longer bolts and nuts mount to the bottom basket mount. The front hydraulic brake line fits into a space to the left of the steering column and between the basket. The control line and rear brake line will fit into a space to the right of the steering column and between the basket. You may need to push and hold the basket in place while remounting bolts. This will not damage plastics unless excessive force is applied. Do not over tighten bolts and plastics as this may damage the plastics. 5


8 Attach the finishing cover on the rear of the basket. Screw in screws from the interior of the basket. Screw in a diagonal pattern and do not tightening completely until all 4 screws have been set into place. Tighten each screw diagonally to ensure a flush fit. Do not over tighten as this may damage plastics. Step Four: Mounting the Front Wheel. To begin mounting the front wheel, first untwist the wire straps around the rear swing arm. These cables hold the bike firmly to the packing carton. Place the bike on it s center stand to raise the bike higher in preparation for mounting the front wheel. 6

 using both included bolts (14mm).")

 on the handle bar.")
9 We find it useful to prop the front bike with something roughly the size of a gallon paint can. Secure the brake to the fork with brake mounting slots (left fork from the perspective of rider) using both included bolts (14mm). Place 1 washer (included on bolts) between the brake assembly and the fork. Remove the brake tab from between the brake pads. If it is difficult to remove, cut the zip tie holding the front brake (right handle from rider perspective) on the handle bar. The brake tab is only included to protect the brake pads during shipping and can be discarded. Remove the front axel (16mm nut and 12mm bolt) to prepare for mounting of the front wheel into the front fork. 7


10 When placing the front wheel into the front fork, ensure the disc is properly seated between brake pads. Slide the front axel back through the fork WITH the brake mount and through the long spacer and into the wheel. The short spacer will be on the side WITHOUT the brake, between the fork and the wheel. It may be useful to turn the fork slightly to make room for the short spacer. Push the axel through the fork and place the washer before tightening the locking axel nut (16mm nut and 12mm bolt). Do not over tighten. Once the front wheel is mounted, you can attach the front fender above the wheel. Remove the 4 small bolts and nuts placed towards the top of the forks. Take the front fender and gently squeeze the sides together to place it in-between the fork. The long side of the fender should face in the forward direction of the bike. Mount the front fender into place with the 4 small bolts and nuts. Tighten with a screwdriver. Do not over tighten. Step Five: Installing Pedals. The pedals are labeled with L and R on the base of the threaded portion. Be sure to install these in the correct corresponding cranks or the threads may be damaged. Left and Right pedals are determined from the perspective on the rider. Use a 15mm wrench to tighten. The left pedal must be turned counter-clockwise to tighten. 8


: Installing Sideview Mirrors.")

11 Step Six (Recommended): Disconnect Speed Regulator. Reach underneath the floor plate to find the thin grey cable connecting the regulator. This regulator limits the motor to 16 MPH. Disconnecting this will allow your to travel 20 MPH. Disconnecting the regulator is completely safe. Step Seven (Optional): Installing Sideview Mirrors. Install corresponding sideview mirrors into slots located on the handlebars. Rotate at least 4 full revolutions, then tighten to desired height and angle. Tighten nut (14mm wrench) to hold sideview mirror into place. Do not over tighten. Mirrors can be adjusted independently of mirror arms. Hand adjust until both left and right sides until both shoulders behind rider are viewable. 9


12 Step Eight (Optional): Swap KM/H with MPH Display. Remove both top screws on headlight and display assembly. Pull upwards at the top portion of the display cover. Gently use a flathead to twist and pop open the bottom of the display cover. Remove the 4 dark green screws (do not remove the metallic color screws) to pull out the KM/H display. Unplug the cable by pressing down the white clip. Replace the KM/H display with your included MPH display and screw back into place. Replace display cover by placing in the top portion first, then snapping the bottom portion into place. Fasten screws. Do not over tighten. 10

 to plug in the battery.")

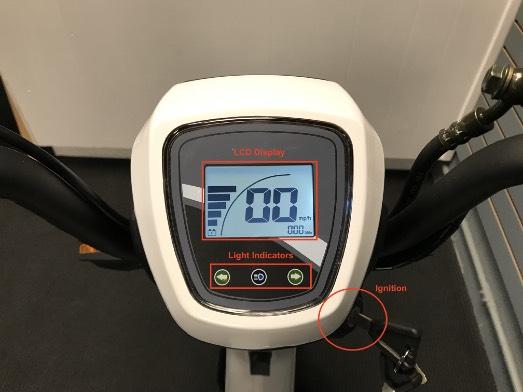
13 Finishing Up. Congratulations! You ve finished assembling your Wattson Spark! You can remove any remaining wraps or protection. Clip the zip ties around the brakes and take the keys to open the seat compartment (lock located at the rear of the bike) to plug in the battery. Simply roll the bike off the carton package base, insert the key into the ignition and you re ready to ride! We recommend charging your bike before riding as it may be low on battery. 11


14 Diagram. 12


15 Fill with DOT 3 or DOT 4 brake fluid. Tighten to increase rear brake strength. 13
16 Specification. Model: Dimensions: Net Weight: Battery Weight: Frame: Wheel: Tires: Throttle: Maximum Speed: Travel Range: Spark 66 Long x 28 Wide x 44 Tall 115 lbs 9 lbs Stainless Steel with Matte Black Paint 18 x 2.5 Stainless Steel Tube Tires Right Handlebar Twist Throttle and Pedal Assist 20mph (32km/h) 40 miles (64km) *Dependent on Load and Terrain Climbing Angle: 20 Charging Time: Seat: Load Capacity: Motor: Battery: Front Brake: Rear Brake: Display: Security: Storage: Lights: Stands: 4-6 hours Seats 2, with Rear Foot Pegs for Passenger 300 lbs 350W Brushless Hub Motor 48V 12Ah Lithium Ion Battery Disc and Caliper Brake Drum Brake Digital LCD Display Anti-theft Alarm Front Compartment Bin Front LED, Rear Brake LED, Front/Rear Turn Signal LED Kickstand and Centerstand 14
17 Maintenance. Battery. Store battery at room temperature to ensure proper lifespan of the battery. Extreme cold or hot temperatures may damage battery. Charge at least once every month. Failing to do so will lower the lifespan of the battery. Maintaining a full charge will help prolong the life of the battery. Tires. Keep tires filled at psi. Avoid large potholes and sharp objects. Abrasive surfaces will lower the lifespan of the tires. Chain. Keep chain clean and free of debris and apply grease periodically as necessary. Riding in dirt or particle prone surfaces, as well as riding during raining or wet conditions will require more frequent cleaning and lubrication of the chain to ensure the chain moves freely. 15
18 Regulation. Federal law regulates consumer products for low speed electric bicycles, however use of these products is regulated by state vehicle code and these vary from state to state. For a brief overview of all the states, visit: We recommended that you review your specific state vehicle codes in detail for more information. 16
19 Warranty. Wattson Limited Warranty Wattson Spark comes with a 1 Year Limited Manufacturer s Warranty on the frame and powertrain of the bicycle and a 6 month warranty on the battery. The warranty covers the cost of replacement parts and shipping. If the bicycle is brought to a Wattson store labor cost will be covered. Labor costs will not be covered or reimbursed outside of our Wattson stores. Your warranty for Spark is valid for faulty or defective parts within 1 year from the date of purchase. Limitations of the Warranty The Warranty is non-transferable after the initial sale. Any unapproved modifications to the product will void the warranty. Warranty does not cover water damage or weather related damage. Warranty does not cover shipping or towing charges. Defective parts must be exchanged for new replacement parts. Warranty does not cover minor cosmetic damage caused by use. Warranty does not cover negligent use or misuse of the product. Battery warranty for Spark is valid for 6 months from the date of purchase. Battery warranty does not cover water or weather related damage. Battery warranty does not cover negligence. Owner s Responsibility for Warranty As a Spark owner, you are responsible for the maintenance of the product. You may be denied a warranty claim due to failure to ensure proper maintenance. You may also be denied warranty coverage due to negligence, improper use, unapproved modifications, or improper maintenance. To submit a warranty claim or if you have any questions please us at cs@gowattson.com or call us at
Emmo Urban. Owner s Manual
 Emmo Urban Owner s Manual 2 P a g e Table of Contents E-bike MTO Label..3 Specifications...4 Charging Your E-bike. 5-9 Brakes, Tire Pressure, and Front Carrying Case.....10 Adjusting Brakes 11 Kickstand,
1 P a g e. Emmo Urban 2.0. Owner s Manual. T. Lac V 1.0
 1 P a g e Emmo Urban 2.0 Owner s Manual T. Lac V 1.0 2 P a g e Table of Contents E-bike MTO Label..3 Specifications...4 Charging Your E-bike. 5-9 Brakes...10 Back Drum Brakes and Tires.... 11 Pedals, Center
EW-09. Owner s Manual. (888) Customer Service. (888) Service
 Customer Service. (888) Service") EW-09 Owner s Manual www.ewheelsdealers.com (888) 305-0881 Customer Service (888) 571-2845 0 Service Table of Contents Page 2 - Feature Guide Page 3 - Product Specifications Page 4 - Operation of Scooter
EW-09 Owner s Manual www.ewheelsdealers.com (888) 305-0881 Customer Service (888) 571-2845 0 Service Table of Contents Page 2 - Feature Guide Page 3 - Product Specifications Page 4 - Operation of Scooter
EW-20 Black. Owner s Manual. (888) Sales (888) Service
 Sales (888) Service") EW-20 Black Owner s Manual www.ewheelsdealers.com (888) 305-0881 Sales 0 (888) 571-2845 Service Table of Contents Page 2 - Feature Guide Page 3 - Product Specifications Page 4 - Operation of Scooter Page
EW-20 Black Owner s Manual www.ewheelsdealers.com (888) 305-0881 Sales 0 (888) 571-2845 Service Table of Contents Page 2 - Feature Guide Page 3 - Product Specifications Page 4 - Operation of Scooter Page
INSTRUCTION MANUAL
 WWW.BIGCATUSA.COM 631 285 2298 INSTRUCTION MANUAL Congratulations On Your Purchase & Thank You For Choosing Big Cat Warning: This manual is only a guide to assist you. This Guide is not a complete or comprehensive
Table of Contents. Technical Information Warning Statement
 Table of Contents Technical Information-----------------------------------1 Warning Statement--------------------------------------2 Read Before Riding-------------------------------------3 List of Parts-----------------------------------------------4
EW-04. Owner s Manual. ewheels Service (888)
") EW-04 Owner s Manual ewheels Service (888) 571-2845 0 Table of Contents Page 2 - Feature Guide Page 3 - Technical Specifications Page 4 - Operation of Scooter Page 8 - Folding Instructions Page 9 - Charging
EW-04 Owner s Manual ewheels Service (888) 571-2845 0 Table of Contents Page 2 - Feature Guide Page 3 - Technical Specifications Page 4 - Operation of Scooter Page 8 - Folding Instructions Page 9 - Charging
Emmo S6. Owner s Manual
 Emmo S6 Owner s Manual 2 P a g e Table of Contents E-bike MTO Label..3 Specifications...4 Charging Your E-bike. 5-6 Brakes...7 Kickstand...8 Pedals 9 Greasing Bike Chain and Rear Drum Brakes..... 10 Front
KODA USER MANUAL. Please read before operating your new bicycle.
 KODA USER MANUAL Please read before operating your new bicycle. INTRODUCTION Congratulations on the purchase of your new e-bike! We want to make you happy and believe your new e-bike will bring you lots
ELECTRIC BICYCLE OWNER S MANUAL
 ELECTRIC BICYCLE OWNER S MANUAL For Owners of EG Kyoto 350 Electric Bicycle Table of Contents Descriptions: Page Installation Instructions 2 How to install the bicycle out of the box 2 Operation Instructions
Warning Statement Read Before Riding
 Table of Contents Technical Information-----------------------------------1 Warning Statement--------------------------------------2 Read Before Riding------------------------------------- List Of Parts-----------------------------------------------4
1 P a g e. Emmo GT80. Owner s Manual. T. Lac V 1.0
 1 P a g e Emmo GT80 Owner s Manual T. Lac V 1.0 2 P a g e Table of Contents E-bike MTO Label..3 Specifications...4 Charging Your E-bike. 5-6 Brakes...7 Kickstand...8 Pedals 9 Greasing Bike Chain and Rear
1 P age. Emmo Prestige. Owner s Manual. T. Lac V 1.0
 1 P age Emmo Prestige Owner s Manual T. Lac V 1.0 2 P age Table of Contents E-bike MTO Label..3 Specifications...4 Charging Your E-bike. 5-6 Brakes...7 Kickstand...8 Pedals 9 Greasing Bike Chain and Rear
Installation Manual TWM Performance Short Shifter Cobalt SS/SC, SS/TC, HHR SS, Ion Redline and Saab 9-3
 Page 1 Installation Manual TWM Performance Short Shifter Cobalt SS/SC, SS/TC, HHR SS, Ion Redline and Saab 9-3 Please Note: It is preferable to park on a flat surface, as you will have to engage and disengage
EW-66. Owner s Manual. (888) Customer Service Table of Contents (888) Service
 Customer Service Table of Contents (888) Service") EW-66 Owner s Manual www.ewheelsdealers.com (888) 305-0881 Customer Service Table of Contents (888) 571-2845 Service 0 Table of Contents 1. Before you operate your scooter...... 2 2. Scooter initial operation......
EW-66 Owner s Manual www.ewheelsdealers.com (888) 305-0881 Customer Service Table of Contents (888) 571-2845 Service 0 Table of Contents 1. Before you operate your scooter...... 2 2. Scooter initial operation......
This is the Unpacking Guide for the Optibike Pioneer Allroad electric bicycle. The Guide provides information required to remove the Allroad from the
 This is the Unpacking Guide for the Optibike Pioneer Allroad electric bicycle. The Guide provides information required to remove the Allroad from the box and assemble it. If you have not assembled a bicycle
1 P age. Emmo Titan. Owner s Manual. T. Lac V 1.0
 1 P age Emmo Titan Owner s Manual T. Lac V 1.0 2 P age Table of Contents E-bike MTO Label..3 Specifications...4 Charging Your E-bike. 5-6 Brakes...7 Kickstand...8 Pedals 9 Greasing Bike Chain and Rear
P R E M I U M E L E C T R I C B I C Y C L E S INSTRUCTION MANUAL
 WWW.BIGCATUSA.COM 631 285 2298 P R E M I U M E L E C T R I C B I C Y C L E S INSTRUCTION MANUAL Congratulations On Your Purchase & Thank You For Choosing Big Cat Warning: This manual is only a guide to
ELECTRIC ROSE USER MANUAL ELECTRIC BICYCLE MODEL #: JERO16 VERSION #: 1
 USER MANUAL ELECTRIC ROSE ELECTRIC BICYCLE MODEL #: JERO16 VERSION #: 1 Congratulations on your new Jetson Electric Rose Electric Bicycle! Before your first ride, please check whether the wheels are damaged,
Table of Contents. Technical Information Warning Statement
 Table of Contents Technical Information-----------------------------------1 Warning Statement--------------------------------------2 Read Before Riding-------------------------------------3 List of Parts-----------------------------------------------4
EW-27 Crossover Pre-Mobility Scooter
 EW-27 Crossover Pre-Mobility Scooter Owner s Manual www.ewheelsdealers.com Before (888) 305-0881 you operate Customer the Service scooter (888) 571-2845 Service 0 Locate the below listed materials in rear
1 P a g e. Emmo Knight GTS. Owner s Manual. T. Lac V 1.0
 1 P a g e Emmo Knight GTS Owner s Manual T. Lac V 1.0 2 P a g e Table of Contents E-bike MTO Label..3 Specifications...4 Charging Your E-bike. 5-6 Brakes...7 Kickstand...8 Pedals 9 Greasing Bike Chain
User Manual of Bagibike Electric Bicycles
 User Manual of Bagibike Electric Bicycles Model: Bagibike B16. http://www.bagibike.com Page 1 FOREWORD The following operation manual is a guide to assist you. This manual is not a complete document on
ELECTRIC BICYCLE OWNER S MANUAL
 ELECTRIC BICYCLE OWNER S MANUAL For Owners of EG Oahu 500EX and EG Maui 500EX Electric Bicycle Table of Contents Descriptions: Page Installation Instructions 2 How to install the bicycle out of the box
US Patent 0540, 400 Other Patents Pending. Read this manual completely before assembling and riding our PET PRO-FLEX 500. Always wear a Helmet!
 US Patent 0540, 400 Other Patents Pending Read this manual completely before assembling and riding our 500 Always wear a Helmet! Priority Electric Transportation, LLC. 1007 West College Ave. #293 Santa
User Manual. MB-6000-UD Rev. 1.03
 User Manual MB-6000-UD Rev. 1.03 Table of Contents I. The Controls II. III. IV. Unit Operations A. Folding the Unit B. Folding the Handlebars C. Unlocking and Unfolding D. Precautions and Starting E. Power
Ford Mustang V6 OEM-Style Fog Light Kit Parts List: Quantity: Tool List:
 2015-2017 Ford Mustang V6 OEM-Style Fog Light Kit Parts List: Quantity: Tool List: LED Foglights/ Bezels 2 Flat head & Phillips screwdriver (if you ordered part#3600) Ratchet & Socket set OR Wiring harness
Final Assembly Instructions Portside Cruiser
 Final Assembly Instructions Portside Cruiser Thank you for buying your new bicycle from L.L.Bean. Read these instructions carefully before beginning the final assembly. Prior to shipping, our expert cycling
Amtryke Model AM-12 & AM-16
 Amtryke Model AM-12 & AM-16 Carton Contents Carefully remove and lay out all parts from the carton so as not to scratch or lose any parts or pieces. The shipping carton should contain the pictured items
ELECTRIC BICYCLE OWNER S MANUAL
 ELECTRIC BICYCLE OWNER S MANUAL For Owners of EG Zurich 350 IX and 350 IX Step-thru Electric Bicycle Table of Contents Descriptions: Page Installation Instructions 2 How to install the bicycle out of the
EW-52. Owner s Manual. (888) Customer Service (888) Service
 Customer Service (888) Service") EW-52 Owner s Manual www.ewheelsdealers.com (888) 305-0881 Customer Service (888) 571-2845 Service 0 Table of Contents 1. Instrument Panel. 2 2. Music system operation. 3 3. Before you operate your scooter....
EW-52 Owner s Manual www.ewheelsdealers.com (888) 305-0881 Customer Service (888) 571-2845 Service 0 Table of Contents 1. Instrument Panel. 2 2. Music system operation. 3 3. Before you operate your scooter....
1 P age. Emmo Soho. Owner s Manual. T. Lac V 1.0
 1 P age Emmo Soho Owner s Manual T. Lac V 1.0 2 P age Table of Contents E-bike MTO Label..3 Specifications...4 Charging Your E-bike. 5-6 Brakes...7 Kickstand...8 Pedals 9 Greasing Bike Chain and Rear Drum
Installation Manual TWM Performance Short Shifter Subaru STi 2008+
 - 1 - Installation Manual TWM Performance Short Shifter Subaru STi 2008+ Please Note: It is preferable to park on a flat surface, as you will have to engage and disengage the hand brake and shift from
Daymak warranties, services, and stocks parts for everything it sells. We support our products.
 EC1 User Manual About Daymak Daymak is one of Canada s largest Alternative Vehicle providers. We design, engineer, manufacture, import and repair everything from recreational dirt bikes, go-karts and electric
Product Handbook FOR THE BLADEZ XTR Lite ELECTRIC POWER BOARD
 Portable Electric Power Board Product Handbook FOR THE BLADEZ XTR Lite ELECTRIC POWER BOARD PLEASE BE SAFE WHEN RIDING... ALWAYS WEAR A HELMET AND OBEY ALL LAWS! Page 1 IMPORTANT PLEASE READ THIS BEFORE
Assembly Instructions
 1/12 BEAST MANUAL Table of Contents Bike Specs - pg. 3 Bike Assembly: Assembling the Wheels- pg. 4 Assembling the Stem- pg. 5 Assembling the Handlebar- pg.6 Attaching the Seat- pg. 6 Attaching the Pedals-
A. Control Panel/Dash board buttons
 CONTENT I. Specifications II. Important Information III. Bike Overview IV. Safety guidelines V. Charging A. Indoor Charging B. Outdoor Charging VI. How to start the e-bike A. Key start B. Remote Start
Assembly Manual. Assembly Instructions Read Carefully 2.1. Parts included: Tools suggested: Electric Drill
 2.1 Assembly Manual Tools suggested: Parts included: Electric Drill 3/8ths bit 5/16ths bit Phillips screw driver Cutting pliers 1/2 inch socket wrench 1/2 inch wrench or crescent wrench 8 mm socket wrench
FUZION V1000 LITHIUM POWERED owner s manual. 500 W of Power 18 MPH Full Suspension Disc Brake
 FUZION V1000 LITHIUM POWERED 500 W of Power 18 MPH Full Suspension Disc Brake Maximum Weight: 220 lbs (100 kilograms) Manual Version 1A-2015 CONTENTS WELCOME / Before You Start page 1 Components & Parts
GADIS USER MANUAL. Please, read before operating your new bicycle
 GADIS USER MANUAL Please, read before operating your new bicycle INTRODUCTION Congratulations on the purchase of your new electric bicycle! We want to make you happy and believe your new bicycle will bring
1 P a g e. Emmo Steel. Owner s Manual. T. Lac V 1.0
 1 P a g e Emmo Steel Owner s Manual T. Lac V 1.0 2 P a g e Table of Contents E-bike MTO Label..3 Specifications...4 Charging Your E-bike. 5-6 Brakes...7 Kickstand...8 Pedals 9 Greasing Bike Chain and Rear
Two Seat Bicycle Trailer
 Two Seat Bicycle Trailer User s Manual This manual contains safety, assembly, use and maintenance instructions. Read these instructions carefully before use and keep them for future reference. Your child
Falcon. Owner s Manual
 Falcon Owner s Manual Your ebike can provide years of use as long as you take care of it. The most common issues you will face will be battery care and small hardware adjustments. The most important thing
Vermont 48V User Manual
 Vermont 48V User Manual About Daymak Daymak is one of Canada s largest Alternative Vehicle providers. We design, engineer, manufacture, import and repair everything from recreational dirt bikes, go-karts
OIL COOLER INSTALLATION GUIDE ULTRACOOL, INC. Web:
 ULTRACOOL, INC 68 South Rainbow Drive Bldg #10 Dayton, NV 89403 OIL COOLER Touring INSTALLATION GUIDE Models 1994-2008 2.0 Version - Includes Trikes 'Call for fitment on earlier models Direct: (775)-241-9155
Owner s Manual for 16 Slider
 Owner s Manual for 16 Slider This manual contains important safety, assembly, operation and maintenance information. Please read and fully understand this manual before operation. Save this manual for
PACE 500 OWNER S MANUAL
 PACE 500 OWNER S MANUAL AVENTON PACE 500 OWNER S MANUAL Thank you for purchasing an Aventon Pace 500 E-Bike! Before riding, please take a moment to review these instructions. Need service or support? Visit
AmTryke Adult Recumbent Model JT2000 #50-FC-2000
 AmTryke Adult Recumbent Model JT2000 #50-FC-2000 TOOLS Needed for Assembly 5 mm Allen Wrench 8 mm Socket or Wrench 10 mm Socket or Wrench 14 mm Socket or Wrench 15 mm Socket or Wrench 22 mm Socket or Adjustable
Assault Air Bike Assembly Instructions
 Assault Air Bike Assembly Instructions Tools Needed: Box Cutter 6mm Hex Wrench Phillips Screw Driver 13mm Wrench 22mm Wrench 15mm Wrench Step 1: Lay the Assault Airbike Bike box on the ground. Step 3:
Spirit Trailer with stroller attachment
 Spirit Trailer with stroller attachment User s Manual This manual contains safety, assembly, use and maintenance instructions. Read these instructions carefully before use and keep them for future reference.
Useful Information. About your scooter: Important Notice 2 SCOOTIX. Vehicle Identification Number (VIN) Registration Number: Date of Registration:
 Registration Number: Date of Registration:") Manual SPEED5000 Useful Information About your scooter: Vehicle Identification Number (VIN) Registration Number: Date of Registration: Name of Selling Dealer: Contact Number of Selling Dealer: Please take
Manual SPEED5000 Useful Information About your scooter: Vehicle Identification Number (VIN) Registration Number: Date of Registration: Name of Selling Dealer: Contact Number of Selling Dealer: Please take
Operation and Maintenance Instructions
 X-Treme TM Electric Moped Operation and Maintenance Instructions Electric Moped XM-3100 Revised 11/6/08 Operation and Maintenance Instructions We strongly recommend that you read this entire manual before
QiCycle Electric Folding Bike
 QiCycle Electric Folding Bike Overview Shifter Brake Handlebar Steering tube Steering tube fixer Steering tube fixer Headlight Front brake Motor Clip of saddle pin Backlight Saddle pin Saddle Schematic
Your G3 buggy is fitted with three switches on the front part of the body:
 CONTENTS Buggy operation... 3 General Maintenance... 5 Technical Maintenance... 6 Front wheel bearing replacement... 6 Rear wheel bearing replacement... 7 Chain replacement... 8 Chain Adjustment... 9 Brake
Owner s Manual. Important Safety and Product Information
 Owner s Manual Important Safety and Product Information TABLE OF CONTENTS WELCOME! Welcome! Contact Information Registration Warranty Battery Care and Maintenance Assembly Aries Aurora Luna Orion Riding
Single Seat Bicycle Trailer
 Single Seat Bicycle Trailer User s Manual This manual contains safety, assembly, use and maintenance instructions. Read these instructions carefully before use and keep them for future reference. Your
PLEASE BE SAFE WHEN RIDING ALWAYS WEAR A HELMET AND OBEY ALL LAWS!
 X-Treme TM Electric Scooters X-10 Electric Scooter Owner s Manual PLEASE BE SAFE WHEN RIDING ALWAYS WEAR A HELMET AND OBEY ALL LAWS! Page1 IMPORTANT BATTERY MAINTENANCE and CHARGING INSTRUCTIONS 1. You
Installation Manual TWM Performance Short Shifter 2008 Mitsubishi Lancer
 Page 1 Installation Manual TWM Performance Short Shifter 2008 Mitsubishi Lancer Please Note: It is preferable to park on a flat surface, as you will have to engage and disengage the hand brake and shift
Final Assembly Instructions Casco Bay Cruiser
 Final Assembly Instructions Casco Bay Cruiser Thank you for buying your new bicycle from L.L.Bean. Read these instructions carefully before beginning the final assembly. Prior to shipping, our expert cycling
Remove 4 circled pins. Route wiring along dashed line. Remove the 2 9mm nuts and black retaining plate that secure extractor.
 2015 Ford Mustang Turn Signal Hood Kit Parts List: Quantity: Tool List: Bracket & pre-installed lamp 2 Flat head screwdriver Wiring harness 1 Phillips screwdriver PB-3660 Parts Bag 1 Ratchet & Socket set
Triaxe Sport. By Enhance Mobility
 Triaxe Sport By Enhance Mobility User Manual April 2016 Thank you for choosing the Triaxe Sport Folding Scooter. Please read this manual carefully before operating the the Triaxe Sport. If you have any
Installation Manual TWM Performance Short Shifter Nissan 350Z, 370Z Infiniti G35, G37
 Installation Manual TWM Performance Short Shifter Nissan 350Z, 370Z Infiniti G35, G37 It is preferable to park on a flat surface, as you will have to engage and disengage the hand brake and shift from
Runabout Model 13-SC250/SC350 Trailer Owner s Manual
 Runabout Model 13-SC250/SC350 Trailer Owner s Manual Please keep this Owner s Manual for future reference. If you sell or give this product away, please include this Owner s Manual, and ask the new owner
GIO Electric Scooter Assembly Instructions. GIO Electric Scooter Assembly Instructions. 06 Italia 500w Electric Scooter Assembly Manual.
 GIO Electric Scooter Assembly Instructions GIO Electric Scooter Assembly Instructions 06 Italia 500w Electric Scooter Assembly Manual.indd 1 2/7/2014 11:24:55 PM 06 Italia 500w Electric Scooter Assembly
Quick N EZ. Two Seat Bicycle Trailer with Stroller Attachment
 Quick N EZ Two Seat Bicycle Trailer with Stroller Attachment User s Manual This manual contains safety, assembly, use and maintenance instructions. Read these instructions carefully before use and keep
SATURN KICK SCOOTER -MANUAL-
 SATURN KICK SCOOTER -MANUAL- 2 TABLE OF CONTENTS 1. INTRODUCTION 4 2. INCLUDED IN THE BOX 5 3. FEATURES AND SPECS 5 4. UNFOLDING AND FOLDING 6 5. ADJUSTING THE HANDLEBAR 7 6. HOW TO CHANGE BATTERIES 7
Short Shifter Installation Instructions For Miata, 6-speed Manual Transmission
 Short Shifter Installation Instructions For 2006-15 Miata, 6-speed Manual Transmission PART# 994-060 Required tools: 10mm deep socket Long extension Ratchet Small flathead screwdriver Phillips-head screwdriver
WARNING: the engine does not come with oil in it. Please fill the oil before starting. The 200cc hardknock requires 9/10 of a quart of oil.
 WARNING: the engine does not come with oil in it. Please fill the oil before starting. The 200cc hardknock requires 9/10 of a quart of oil. Things needed for assembly. -2 tubes of blue loc-tite. I don
PLEASE BE SAFE WHEN RIDING... ALWAYS WEAR A HELMET AND OBEY ALL LAWS!
 Powered Personal Transportation Electric Power Board Product Handbook FOR THE BLADEZ XTR Street ELECTRIC POWER BOARD Model: PB-SM1806 PLEASE BE SAFE WHEN RIDING... ALWAYS WEAR A HELMET AND OBEY ALL LAWS!
Rocket. Two Seat Bicycle Trailer. Model Number ACIS99ROCKTBLU
 Rocket Two Seat Bicycle Trailer Model Number ACIS99ROCKTBLU User s Manual This manual contains safety, assembly, use and maintenance instructions. Read these instructions carefully before use and keep
Contents Page General Instruction before riding Page 3 Point Inspection Page 4 Assembly Instructions Page 5 Technical Specifications
 TM Owner's Manual Ride the Future TM Operation and Maintenance Instructions We strongly recommend that you read this entire manual before using your vehicle for the first time Contents Page General Instruction
BrakeAway Products Inc. wishes you many years of cramp free cruising, ENJOY and ride SAFELY!!!
 Congratulations on the purchase of your new BrakeAway Motorcycle Cruise Control. At BrakeAway Products, we are committed to your complete satisfaction. With proper installation, use, and periodic maintenance,
e-bikes BY: technologies
 e-bikes USER MANUAL BY: technologies by: Wise Innovation Technologies INSTRUCTION MANUAL Maintenance and Warranty Welcome to Platinum e-bikes Maintenance and Warranty Brought to you by Wise Innovation
Product Handbook. Electric Power Board. Powered Personal Transportation. FOR THE BLADEZ XTR Lite 250 ELECTRIC POWER BOARD
 ` Powered Personal Transportation Electric Power Board Product Handbook FOR THE BLADEZ XTR Lite 250 ELECTRIC POWER BOARD Model: PB-SM805-S PLEASE BE SAFE WHEN RIDING... ALWAYS WEAR A HELMET AND OBEY ALL
CHAINGUARD REGAL ST COLOR
 DESOTO/ REGAL HAULER PARTS LIST Item Part # Description QTY Item Part # Description QTY 1 11871 REFLECTOR KIT TRIKE 1 32 11764 FENDER BRACE 24" MWT 1 2 12199 SCREW #14 x 3/4 4 33 12176 NUT5/16-24 HEX 2
Parts Lists - BE500 Qunsheng Baja 500watt Scooter (VIN PREFIX L4G)
") Page 1 of 9 Product Information Baja Web > Product Information > Parts Lists > SCOOTERS > BE500 Qunsheng Baja 500watt Scooter (VIN PREFIX L4G) BE500 Qunsheng Baja 500watt Scooter (VIN PREFIX L4G) BE500
Page 1 of 9 Product Information Baja Web > Product Information > Parts Lists > SCOOTERS > BE500 Qunsheng Baja 500watt Scooter (VIN PREFIX L4G) BE500 Qunsheng Baja 500watt Scooter (VIN PREFIX L4G) BE500
Amtryke Model AM-12 #50-HFC-0210 Amtryke Model AM-16 #50-HFC-0411 Note: Shown with Saddle Seat and Curved Plastic Seat Back
 Amtryke Model AM-12 #50-HFC-0210 Amtryke Model AM-16 #50-HFC-0411 Note: Shown with Saddle Seat and Curved Plastic Seat Back Carton Contents Carefully remove and lay out all parts from the carton so as
Installation Guide Currie Electro-Drive Conversion Kits 2, 3, & 4
 Installation Guide Currie Electro-Drive Conversion Kits 2, 3, & 4 1 Before you start... Use this information to determine whether one of our kits will fit your bike Drawing Ref. Fork Area Leg clearance
I N S TA L L AT I O N
 I N S TA L L AT I O N 5008 fits: H-D: '80-Up Electra glide, tour glide, road king, road glide or street glide PartS Included 1 Right Fork Mount Assembly 1 Left Fork Mount Assembly 2 H3 Driving Light Assemblies
Owner s Manual. Operation and Maintenance Instructions. Wisper 806fe. April st edition
 Owner s Manual Operation and Maintenance Instructions Wisper 806fe April 2009 1 st edition We strongly recommend that you read this entire manual before using your Wisper bike Wisper Limited - 1 - User
CHAINGUARD REGAL ST COLOR
 DESOTO/ REGAL HAULER PARTS LIST Item Part # Description QTY Item Part # Description QTY 1 11871 REFLECTOR KIT TRIKE 1 32 11762 FENDER BRACE 20" MWT 1 2 12199 SCREW #14 x 3/4 4 11764 FENDER BRACE 24" MWT
Mantis Infrared Tire Mantis Infrared Tire. User Manual
 Mantis Infrared Tire Mantis Infrared Tire Temperature Temperature Sensor Sensor User Manual 1 Contents Important Information About Your Mantis... 1 Installation... 3 Programming... 7 Replacement Parts
Hub Kit Fitting Guide 2016
 Hub Kit Fitting Guide 2016 Important: For your own safety you must read this manual before attempting to fit any part of the motor kit to your bike. You must also ensure that you fit the kit in strict
AmTryke Adult Recumbent Model HP1000 #50-HC-1000
 AmTryke Adult Recumbent Model HP1000 #50-HC-1000 TOOLS Needed for Assembly 5 mm Allen Wrench 8 mm Socket or Wrench 10 mm Socket or Wrench 14 mm Socket or Wrench 15 mm Socket or Wrench 22 mm Socket or Adjustable
INSTRUCTION MANUAL. Kids Ride-On Motorcycle SKY Ver. 3
 INSTRUCTION MANUAL Kids Ride-On Motorcycle Ver. 3 SKY785 + 89 Pg. 2 Thank you for choosing us! Since 2002, Best Choice Products has been bringing customers high-quality products at the absolute lowest
TSS Fit Kit Installation Instructions Timbersled Snow Bike System
 TSS Fit Kit Installation Instructions Timbersled Snow Bike System Information needed before you start: Read the entire installation instructions before starting. The instruction sheet is universal for
ekit User Manual Rear Kit Cyclotricity Electric Bike Conversion Kit EBC 2018 edition
 ekit User Manual Rear Kit Cyclotricity Electric Bike Conversion Kit EBC 2018 edition 1 Contents Part 1 Before Installation - Disclaimer - Battery care - Charger - Water - Specifications - Warranty - Exceptions
Electric Bike User Manual
 Electric Bike User Manual HAVE A QUESTION? NEED HELP? Contact us on Facebook for a quick reply. westhillbikes.com CLASSIC / ENERGISE / VOGUE WARRANTY Westhill bikes are covered by a limited 3-year warranty.
To be completed by Authorized ETON Dealership. Buyers Agreement Checklist Scooters
 To be completed by Authorized ETON Dealership Buyers Agreement Checklist Scooters As members of the Motor Vehicle industry, our staff and management would like to thank you for your purchase of an E-TON
INSTALLATION INSTRUCTIONS
 INSTALLATION INSTRUCTIONS Accessory Application Publications No. S P/N 08V31-S0X-100 1999-2001 ODYSSEY AII 20677 Issue Date AUG 1999 PARTS LIST 2 Fog lights Switch Fuse label Right bracket Relay B, 4-pin
Please make sure you pay close attention to any details in this manual for instructions on proper maintenance and overall usage of our product.
 NEW YORKER LAB Introduction Please always remember to wear an approved safety helmet and other safety gear when operating this electric bicycle. Make sure you comply with all road regulations and any local
Installation Manual TWM Performance Short Shift Kit 2006 and up Toyota Yaris
 Installation Manual TWM Performance Short Shift Kit 2006 and up Toyota Yaris 1. Unscrew the shift knob by rotating counter clockwise. 2. Remove the carpet or mat at the bottom of the cup holder at the
LGT-312L E-Z-Go TXT Light Bar Bumper Kit Installation Instructions
 LGT-312L E-Z-Go TXT 2014+ Light Bar Bumper Kit Installation Instructions Caution: Please read through the instructions carefully. Before starting this project, remove the system s positive and negative
Owner s Manual. CycloTricity Electric Bicycles. June 2016, 4 th edition. We strongly recommend you read this entire manual before using your bike.
 Owner s Manual CycloTricity Electric Bicycles June 2016, 4 th edition We strongly recommend you read this entire manual before using your bike. 1 Contents Part 1 Before use Page - Before first time use
Pasion e Bike E-Bike Conversion Kits Installation Manual Rear Wheel
 Pasion e Bike E-Bike Conversion Kits Installation Manual Rear Wheel Contents (1). Parts List....Page 3 (2). Tools needed..... Page 4 (3). Rear Wheel Removing and Installation...Page 5 (4). LCD Control
Installation Instructions
 Installation Instructions Periscope - Version A.3 Stelvio 8V Gimpo Garage UG, all rights reserved Table of Contents Introduction...3 Before you start...3 Mounting...7 Step 1/15: remove the windscreen...7
USER MANUAL QFT-7. Folding Bicycle. RILU Trading Pty
 P a g e 1 USER MANUAL QFT-7 Folding Bicycle RILU Trading Pty Unit 2, No 2 Caulson Close Maribyrnong 3032 Melbourne, Victoria Australia (03) 8395 2616 info@rilu-e-bike.com.au Rev.18.5409.QF7-UM P a g e
M-9603-FST FOCUS ST COLD AIR INTAKE KIT INSTALLATION INSTRUCTIONS
 M-9603-FST Please visit www.fordracingparts.com for the most current instruction information.!!! PLEASE READ ALL OF THE FOLLOWING INSTRUCTIONS CAREFULLY PRIOR TO INSTALLATION. AT ANY TIME YOU DO NOT UNDERSTAND
rungu juggernaut owners manual
 rungu juggernaut owners manual Congratulations on purchasing the Juggernaut 1! Before you ride and make new tracks, please read the following instructions carefully. IMPORTANT- Standard Bearer Machines
MachoMan Moped Assembly Instructions. If you have no mechanical experience, please have the unit professionally assembled.
 MachoMan Moped Assembly Instructions If you have no mechanical experience, please have the unit professionally assembled. Tools needed: #2 Phillips Screwdriver, 14mm Socket, 12mm Socket, 10mm Socket, 14mm