1 P a g e. Emmo Urban 2.0. Owner s Manual. T. Lac V 1.0
|
|
|
- Adrian Todd
- 5 years ago
- Views:
Transcription


1 1 P a g e Emmo Urban 2.0 Owner s Manual T. Lac V 1.0
2 2 P a g e Table of Contents E-bike MTO Label..3 Specifications...4 Charging Your E-bike. 5-9 Brakes...10 Back Drum Brakes and Tires Pedals, Center Stand and Bike Chain Seat Lock Ignition Remote Controller Right Handlebar Left Handlebar Dashboard.. 18 E-bike Registration Contact Information....20

3 3 P a g e E-bike MTO Label WARNING! Please make sure this MTO label is on your e-bike. If this label is not present, please ask your dealer to put one on. All electric bicycles are required to have this sticker on the bike for it to be a legal vehicle.
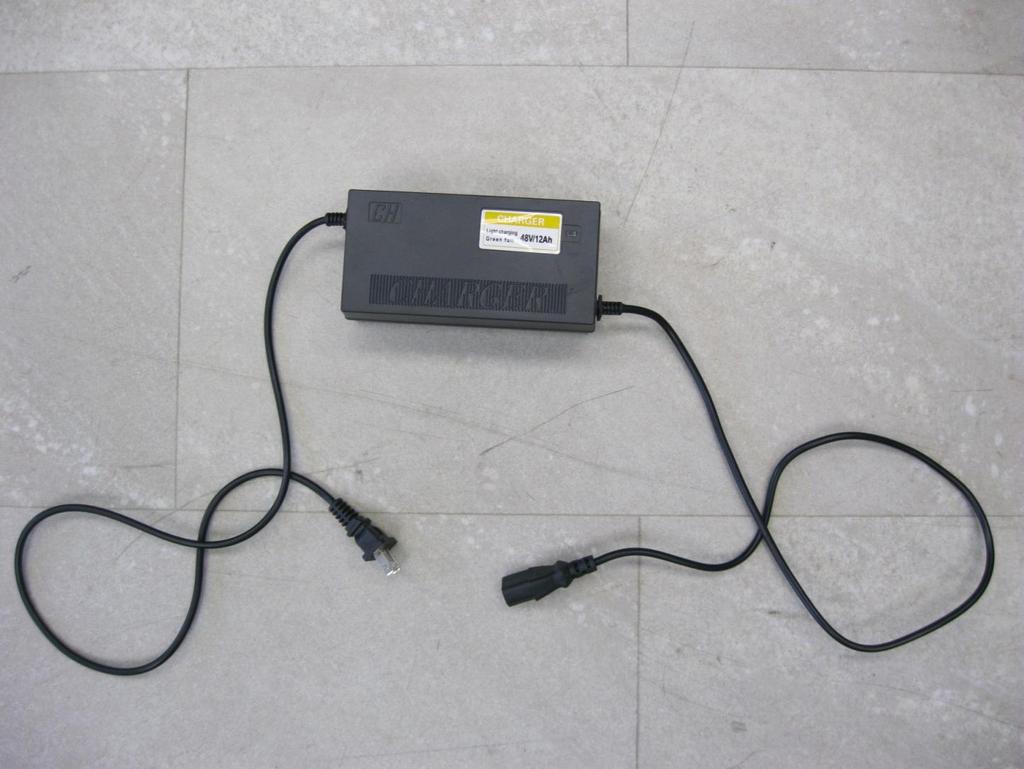
4 4 P a g e Specifications Color: Black, Red, White, Green Dimension (LxWxH): 162cm x 71cm x 120 cm Wheel Size: Net Weight: Maximum Speed: Travel Range: Charging Time: Climbing Angle: Load Capacity: Motor: Battery: Charger: Front Brake: Rear Brake: Lock System: Meter & Indicator: Lighting System: Storage: 16'' x 3.0'' kg (base on battery type) 32 km/h km* (base on battery type) 3 8 Hours 25 Degrees 220kg 48V/14Ah Lead Acid; 48V/14Ah or 20Ah Lithium 48V/20Ah AC V, Smart Charger (Battery maintained while charging) Drum Brake Drum Brake Remote Alarm / Remote Starter / Key Ignition Lock / Steer Lock / Motor Lock Speedometer, Battery Strength Indicator, Light Indicator Headlight w/high Beam, Turning Signals, Brake Light, Tail Light, Indicator Light Lockable Rear Box (optional) * Travel range is based on riding on level ground, no stops, no winds, warm temperatures for a 175lb rider with no extra cargo.(change if necessary)
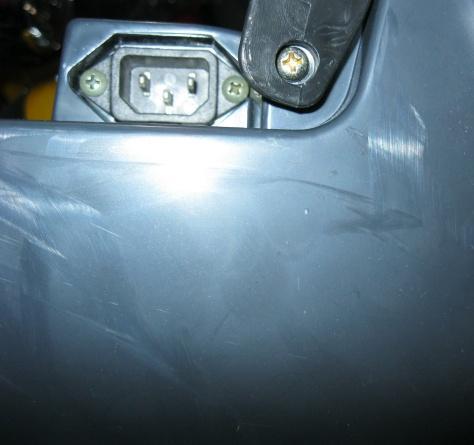
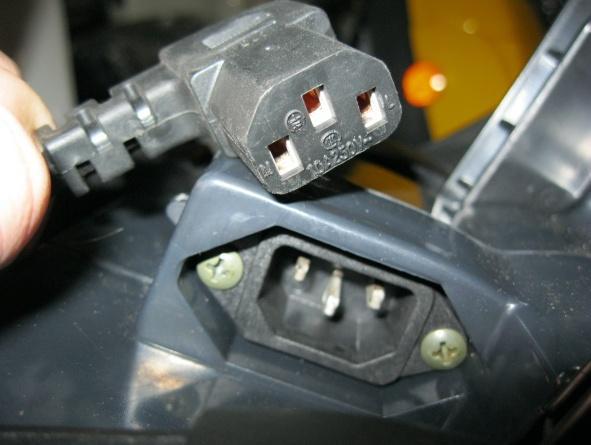
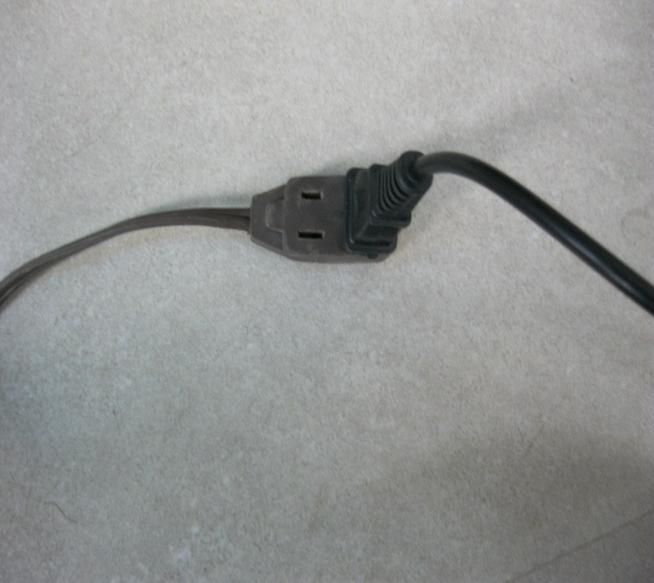
5 5 P a g e Charging the Bike (Lead Acid Battery) There are two different plugs on your charger: one end that goes into an 110V power outlet, and the other into the charger port. 1. Take one end of the charger and plug it into the charger port located on the bike (Please make sure that it is fully plugged in) 2. Plug the other end of the charger into the power outlet. 3. Confirm that the charging indicator turns red. Note: When the battery is fully charged, the charging indicator will turn green. 4. Unplug the charger from the power outlet. 5. Unplug the charger from the battery/bike. 6. Charging period is between 3-8 (3-6 for Lithium). Note: The charger light must be red when both plugs are plugged in. It will always turn red first if the bike has been used. It will turn green after it is fully charged. WARNING! Using any damaged or incompatible chargers or charging when moisture is present, can cause fire, electric shock, injury, or damage to the bike and other property.

6 6 P a g e
7 7 P a g e Charging the Bike (Lithium Battery) Charging the battery is done from the charger port located on the battery itself. The charger is separated into two different parts: A cable with one end that goes into a 110V power outlet, and the other end that goes into the charger box itself, the charger box with a cable that plugs into the bike (page 8-9). 1. Take the cable from the charger box and plug it into the charger port located on the bike/battery. Note: The LED1 light should turn red. 2. Plug one end of the separate cable into the charger box. 3. Plug the other end of the cable into a power outlet. 4. Confirm that the charging indicators turn red. (Both LED1 and LED2 lights should be red) Note: When the battery is fully charged, the LED2 light will turn green. 5. Unplug the charger from the power outlet. 6. Unplug the charger from the battery. Note: Both of the charger s LED lights should be red when the charger is fully connected (step 1-4) if the bike has been used. One light will turn green after it is fully charged. WARNING! Using any damaged or incompatible chargers or charging when moisture is present, can cause fire, electric shock, injury, or damage to the bike and other property. Lithium Battery Benefit There are many advantages of using Lithium Batteries instead of the standard Lead Acid Batteries: As Lithium batteries are lighter than Lead Acid batteries, there is less physical weight on the bike, and therefore it takes less power to operate the bike. As such, the bike achieves a greater travel distance with Lithium batteries than it would with Lead Acid batteries. Lithium batteries charge faster than Lead Acid batteries. (6 hours maximum charge time as compared to 8 hours maximum charge time for Lead Acid batteries) Lithium batteries have a longer lifespan than Lead Acid batteries. (3-4 years vs. 2 years) This model has the option of 48V/14Ah or 48V/20Ah lithium batteries as an option.


8 8 P a g e Lithium Battery Charger After plugging the separate cable into the charger box, plug the charger into the charger port on the bike. The LED1 light should turn red when the charger box is connected to the bike. Plug the other end of the cable into a 110V power outlet. The LED2 light should turn red when the power source is connected. The LED1 light stays red throughout, but the LED2 light turns green when the battery is fully charged.


9 9 P a g e WARNING! *CHARGING THE E-BIKE SHOULD TAKE A MAXIMUM OF 8 HOURS. *DO NOT CHARGE THE E-BIKE FOR MORE THAN 12 HOURS. OVERCHARGING WILL OVERCHARGE THE BATTERY, CAUSING DAMAGE TO THE BATTERY. *MAKE SURE TO FULLY CHARGE THE E-BIKE ONCE A MONTH DURING LONG PERIODS OF INACTIVITY (i.e. WINTERTIME).

10 10 P a g e Front Brake When this lever is pulled towards the rider, the front brake activates. Rear Brake To activate the rear brake, pull this lever towards the rider. Tire Pressure The recommended air pressure for the tires is 40 psi. Check the tire pressure once a month. Please note that the wheel is composed of two parts: the tire itself and the tube within. Tighten Breaks Turning this nut (shown by the white arrow) tightens or loosens the brake. Clockwise tightens the breaks while counter clockwise loosens the breaks Note: Please also make sure that both front and back brake are not over tighten after adjustments. When either brake is activated, all power to the motor will be disconnected. Always use the rear brake first, then the front brakes.(adjust this depending on what brakes are available on the bike)

11 11 P a g e Adjusting the Back Brake To tighten the back brake on the Urban 2.0, loosen the nut (as indicated by the white arrow) and pull the cable (as indicated by the gray arrow). After pulling the cable to the desired tightness, tighten the nut to secure position. To loosen the back brakes, simply loosen the nut, push in the cable to the desired tightness and then tighten the nut to secure the position.

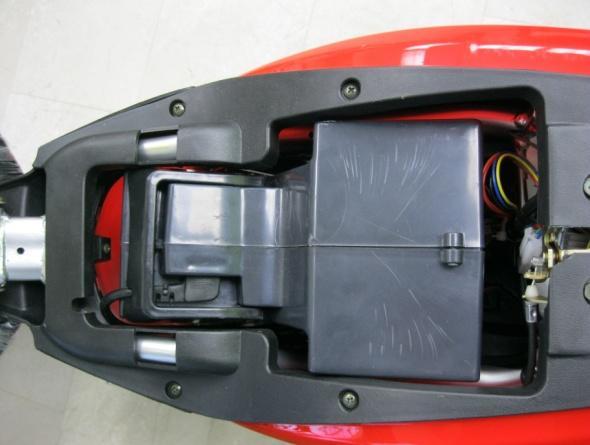
12 12 P a g e Bike Chain Remember to grease the chains once a month. Centre Stand The centre kick stand is better used for all situations. In order to engage the kickstand, apply pressure with your foot downwards and gently lift the bike upwards, NOT BACKWARDS. Pegs To have the pegs fold out, press the button indicated by the white arrow. To fold the pegs back in, simply push it back in and wait for the click sound WARNING! The law requires all e-bikes to have pedals installed. If the pedals are off, these vehicles will be considered a motorcycle which does not follow the same regulations as e-bikes.
 controls the power running through the bike from the battery.")

13 13 P a g e Seat Lock To open the seat, use the keyhole on the side of the bike (shown in the picture above on the left). Turn clockwise to unlock the seat. Power Cable The power cable (as indicated in the white arrow above, in the picture on the right) controls the power running through the bike from the battery. When the power cable is unplugged from the battery, it stops the power from flowing throughout the bike and vice versa. None of the electrical aspects will work on the bike if the power cable is unplugged. WARNING! FOR LEAD ACID BATTERY: In the winter time, fully charge the bike and unplug the battery for maintenance. Fully charge the battery once a month to ensure maximum battery life. Don t leave it uncharged for extended periods of time! FOR LITHIUM BATTERY: During long periods of inactivity, make sure that there is more than 25% power in the battery, then remove the battery from the bike.

. 2. This is the off position.")

14 14 P a g e Key Positions in Ignition 1. This is the handlebar lock position. This position is reached when the key is pushed in, and then turn to the left, from the off position. This locks the handlebar when it is turned half way to the left. (The handlebar must be turned half way to the left before the key will turn). 2. This is the off position. The key simply rests in the bike, and the bike is not turned on. 3. This is the on position. This position is reached when the key is turned to the right, from the off position. The bike will turn on, and all functions on the handlebars will work. WARNING! Do not turn on the bike without sitting on it first, otherwise you will risk touching the throttle by accident and having it run off by itself.

15 15 P a g e Note: If the bike is turned on using the remote start, it can only be turned off using the unlock button on the remote. Lock This button locks the bike. When the bike is locked, any physical movement or vibrations to the bike will cause the alarm to sound. If the back wheel is moved when the bike is locked, the back wheel will lock up and the alarm will sound loudly. Unlock This button unlocks the bike. It cancels all the functions of the lock button. (Alarm sounding, back wheel lock) It also turns the bike off when the remote start is activated. Bell When this button is clicked, the bell sounds. (Similar sound to the alarm) This button is useful for locating your bike. Remote Start This button turns on your bike, without the use of the key, when it is clicked twice in succession. This performs the same actions as manually turning the key to the right in the ignition. (All the functions on the handlebar can be used but this does not unlock any other features such as the seat).
 When the switch is in the middle, the dashboard light and tail light turns on.")
16 16 P a g e Light Switch This switch controls the amount of lightning on your bike. When the switch is pushed to the right, no extra lights are turned on. (Only brake lights work) When the switch is in the middle, the dashboard light and tail light turns on. When the switch is pushed to the left, the head-lights, tail-lights, and dashboard light are turned on. Throttle When the throttle is turned backwards (toward the rider) it makes the e-bike move forward. (The amount of speed that the rider gets depends on how far the throttle is pulled) Horn Pushing this button sounds the horn.

17 17 P a g e High/Low Beam Switch Pushing the switch up activates the high beams for the front headlights, pushing it down deactivate the high beams (make sure the light switch is on first). Flicking the button downwards causes the passing signals to Turning Signals Pushing the switch to either the left or right positions will turn on the respective front/rear turning signals. Horn Pushing this button sounds the horn.

18 18 P a g e Speedometer Light Indicators This shows the speed you are going at once the bike is running. Power Gauge This meter demonstrates the remaining amount of electricity available in your battery. Odometer This meter keeps track of how many kilometres the bike has traveled overall.
19 19 P a g e E-bike Registration Once you have purchased an Emmo E-bike, please register your vehicle with us to validate your warranty. In order to register your e-bikes, please follow the steps listed below: 1. Fill out the following form: Invoice Number: Purchase Date: Motor Number: E-bike Model and Colour: Store Location: Customer Name: Home Address: Phone Number: Survey: How did you find out about Emmo Inc.? (Please select the options that apply) Returning Customer Family/Friend Passing by Store Kijiji TERA Google Yelp Other 2. Send the information listed above to our info@emmo.ca 3. Wait for a confirmation from Emmo Inc.
20 20 P a g e Thank you for Choosing Connect With Us! Stay tuned for updates regarding new e-bike models, special deals and more! Official Website: info@emmo.ca Any laws/regulations regarding E-bikes can be found on the Ministry of Transportation website: If you have further questions, please contact us at: 438 Spadina Avenue, Toronto ON Toll Free: Tel: (416) Fax: (416) info@emmo.ca
Emmo Urban. Owner s Manual
 Emmo Urban Owner s Manual 2 P a g e Table of Contents E-bike MTO Label..3 Specifications...4 Charging Your E-bike. 5-9 Brakes, Tire Pressure, and Front Carrying Case.....10 Adjusting Brakes 11 Kickstand,
Emmo S6. Owner s Manual
 Emmo S6 Owner s Manual 2 P a g e Table of Contents E-bike MTO Label..3 Specifications...4 Charging Your E-bike. 5-6 Brakes...7 Kickstand...8 Pedals 9 Greasing Bike Chain and Rear Drum Brakes..... 10 Front
1 P age. Emmo Prestige. Owner s Manual. T. Lac V 1.0
 1 P age Emmo Prestige Owner s Manual T. Lac V 1.0 2 P age Table of Contents E-bike MTO Label..3 Specifications...4 Charging Your E-bike. 5-6 Brakes...7 Kickstand...8 Pedals 9 Greasing Bike Chain and Rear
1 P a g e. Emmo GT80. Owner s Manual. T. Lac V 1.0
 1 P a g e Emmo GT80 Owner s Manual T. Lac V 1.0 2 P a g e Table of Contents E-bike MTO Label..3 Specifications...4 Charging Your E-bike. 5-6 Brakes...7 Kickstand...8 Pedals 9 Greasing Bike Chain and Rear
1 P age. Emmo Soho. Owner s Manual. T. Lac V 1.0
 1 P age Emmo Soho Owner s Manual T. Lac V 1.0 2 P age Table of Contents E-bike MTO Label..3 Specifications...4 Charging Your E-bike. 5-6 Brakes...7 Kickstand...8 Pedals 9 Greasing Bike Chain and Rear Drum
1 P age. Emmo Titan. Owner s Manual. T. Lac V 1.0
 1 P age Emmo Titan Owner s Manual T. Lac V 1.0 2 P age Table of Contents E-bike MTO Label..3 Specifications...4 Charging Your E-bike. 5-6 Brakes...7 Kickstand...8 Pedals 9 Greasing Bike Chain and Rear
1 P a g e. Emmo Knight GTS. Owner s Manual. T. Lac V 1.0
 1 P a g e Emmo Knight GTS Owner s Manual T. Lac V 1.0 2 P a g e Table of Contents E-bike MTO Label..3 Specifications...4 Charging Your E-bike. 5-6 Brakes...7 Kickstand...8 Pedals 9 Greasing Bike Chain
1 P a g e. Emmo Steel. Owner s Manual. T. Lac V 1.0
 1 P a g e Emmo Steel Owner s Manual T. Lac V 1.0 2 P a g e Table of Contents E-bike MTO Label..3 Specifications...4 Charging Your E-bike. 5-6 Brakes...7 Kickstand...8 Pedals 9 Greasing Bike Chain and Rear
Emmo T350 MOBILITY SCOOTER. Owner s Manual
 Emmo T350 MOBILITY SCOOTER Owner s Manual 2 P a g e Table of Contents A Message from MTO...3 Specifications.....4 Charging Your E-bike.... 5-6 Gear Switch... 7 Tire and Brakes.....8 Ignition....9 Seat
A. Control Panel/Dash board buttons
 CONTENT I. Specifications II. Important Information III. Bike Overview IV. Safety guidelines V. Charging A. Indoor Charging B. Outdoor Charging VI. How to start the e-bike A. Key start B. Remote Start
ELECTRIC BICYCLE OWNER S MANUAL.
 ELECTRIC BICYCLE OWNER S MANUAL www.gowattson.com Hello. 1 Assembly. 2 Overview. 2 Step One: Removing the Front Basket. 3 Step Two: Mounting the Handlebars & Display. 4 Step Three: Replacing the Front
EW-09. Owner s Manual. (888) Customer Service. (888) Service
 Customer Service. (888) Service") EW-09 Owner s Manual www.ewheelsdealers.com (888) 305-0881 Customer Service (888) 571-2845 0 Service Table of Contents Page 2 - Feature Guide Page 3 - Product Specifications Page 4 - Operation of Scooter
EW-09 Owner s Manual www.ewheelsdealers.com (888) 305-0881 Customer Service (888) 571-2845 0 Service Table of Contents Page 2 - Feature Guide Page 3 - Product Specifications Page 4 - Operation of Scooter
2009 Yamaha FZ6R OWNER S MANUAL
 2009 Yamaha FZ6R OWNER S MANUAL 2 Table of Contents Get to Know Your Motorcycle... 3 Front View... 3 Right Side View... 4 Left Side View... 5 Rear View... 6 Right Handlebar... 7 Left Handlebar... 8 Dashboard...
Falcon. Owner s Manual
 Falcon Owner s Manual Your ebike can provide years of use as long as you take care of it. The most common issues you will face will be battery care and small hardware adjustments. The most important thing
Hub Kit Fitting Guide 2016
 Hub Kit Fitting Guide 2016 Important: For your own safety you must read this manual before attempting to fit any part of the motor kit to your bike. You must also ensure that you fit the kit in strict
User Manual. MB-6000-UD Rev. 1.03
 User Manual MB-6000-UD Rev. 1.03 Table of Contents I. The Controls II. III. IV. Unit Operations A. Folding the Unit B. Folding the Handlebars C. Unlocking and Unfolding D. Precautions and Starting E. Power
Electrically Assisted Pedal Cycles. Assembly Instructions
 Electrically Assisted Pedal Cycles Assembly Instructions Version 1 December 2005 Introduction Thank you for buying a PowaCycle Edinburgh electric bike. We hope it brings you many hours of enjoyment. For
Hub Kit Fitting Guide 36V/HL
 Hub Kit Fitting Guide 36V/HL Important: For your own safety you must read this manual before attempting to fit any part of the motor kit to your bike. You must also ensure that you fit the kit in strict
Triaxe Sport. By Enhance Mobility
 Triaxe Sport By Enhance Mobility User Manual April 2016 Thank you for choosing the Triaxe Sport Folding Scooter. Please read this manual carefully before operating the the Triaxe Sport. If you have any
ELECTRIC BICYCLE USER MANUAL
 ELECTRIC BICYCLE USER MANUAL 1 Main Technical Parameters and Specification Weight: 23 kg Wheel size: 20 Maximum speed: 25 km/h E BIKE URBAN Range: Up to 45km (with pedal assist) Type: lithium Voltage:
Compact, lightweight folding electric bike. User manual
 Compact, lightweight folding electric bike User manual Specification Bike Weight: 20 kg Wheel size: 20 Maximum speed: Range: 25 km/h Up to 40km (with pedal assist) Battery Type: Voltage: lithium 24V Capacity:
ETRIKE-LI 26/24 OWNER S MANUAL C H I T U M A A U S T R A L I A P T Y L T D
 12 C H I T U M A A U S T R A L I A P T Y L T D ETRIKE-LI 26/24 OWNER S MANUAL C H I T U M A A U S T R A L I A P T Y L T D 6 KLAUER ST SEAFORD VIC AUSTRALIA 3198 Phone: 1300 681 112 Fax: 61 03 97852347
Rickshaw Mobility Scooter. User Manual
 Rickshaw Mobility Scooter User Manual Preface Thank you for choosing Daymak s Rickshaw mobility scooter. The Rickshaw is the latest innovation in electric mobility providing absolute safety; for both its
EW-04. Owner s Manual. ewheels Service (888)
") EW-04 Owner s Manual ewheels Service (888) 571-2845 0 Table of Contents Page 2 - Feature Guide Page 3 - Technical Specifications Page 4 - Operation of Scooter Page 8 - Folding Instructions Page 9 - Charging
EW-04 Owner s Manual ewheels Service (888) 571-2845 0 Table of Contents Page 2 - Feature Guide Page 3 - Technical Specifications Page 4 - Operation of Scooter Page 8 - Folding Instructions Page 9 - Charging
User Manual of Bagibike Electric Bicycles
 User Manual of Bagibike Electric Bicycles Model: Bagibike B16. http://www.bagibike.com Page 1 FOREWORD The following operation manual is a guide to assist you. This manual is not a complete document on
SWX02 48V (REAR) Hub Kit Fitting Guide
 Hub Kit Fitting Guide") SWX02 48V (REAR) Hub Kit Fitting Guide Important: For your own safety you must read this manual before attempting to fit any part of the motor kit to your bike. You must also ensure that you fit the kit
SWX02 48V (REAR) Hub Kit Fitting Guide Important: For your own safety you must read this manual before attempting to fit any part of the motor kit to your bike. You must also ensure that you fit the kit
Welcome aboard. You re excited to get on the road, so we ll keep this brief!
 Welcome aboard. You re excited to get on the road, so we ll keep this brief! Let s get started. Ecoped Pulse gives you the freedom to move like never before. It combines the convenience of a bicycle with
Please make sure you pay close attention to any details in this manual for instructions on proper maintenance and overall usage of our product.
 NEW YORKER LAB Introduction Please always remember to wear an approved safety helmet and other safety gear when operating this electric bicycle. Make sure you comply with all road regulations and any local
BIKES/VEHICLES. Model # 970GKE-2
 970cc - FARMERS BUGGY / CAR / JEEP Model # 970GKE-2 Front Bull bar 4 x Flood Light (plus front headlights) Indicators, brake, reverse lights 4 Speed Manual (and reverse) PVC Leather Seats (Adjustable)
Platinum Folding Bike
 Platinum Folding Bike Thank you for purchasing a Dillenger Platinum Folding Bike, please read this manual before using your new electric bike. Before the first use, please fully charge the battery, this
INSTRUCTION MANUAL
 WWW.BIGCATUSA.COM 631 285 2298 INSTRUCTION MANUAL Congratulations On Your Purchase & Thank You For Choosing Big Cat Warning: This manual is only a guide to assist you. This Guide is not a complete or comprehensive
OWNER S MANUAL Soco TS1200R Soco TS800R
 OWNER S MANUAL Soco TS1200R Soco TS800R Version 1.0 May 2017 Congratulations on purchasing your Soco electric motorcycle. We wish you an enjoyable and safe riding experience. For your safety and comfort,
PACE 500 OWNER S MANUAL
 PACE 500 OWNER S MANUAL AVENTON PACE 500 OWNER S MANUAL Thank you for purchasing an Aventon Pace 500 E-Bike! Before riding, please take a moment to review these instructions. Need service or support? Visit
ATV-50/90/100 I/II/V OWNER S MANUAL
 1 ATV-50/90/100 I/II/V OWNER S MANUAL FOREWORD May we, the manufacturer, take this opportunity to thank you for choosing our ATV to serve you. This Owner s Manual is prepared for you the details as to
POST-REBUILD PREPARATIONS AND START-UP PROCEDURE FOR INDIAN WARRIOR
 POST-REBUILD PREPARATIONS AND START-UP PROCEDURE FOR INDIAN WARRIOR This procedure assumes the engine and gearbox are assembled properly and with assembly lube, installed in the bike frame, the electrical
USER MANUAL QFT-7. Folding Bicycle. RILU Trading Pty
 P a g e 1 USER MANUAL QFT-7 Folding Bicycle RILU Trading Pty Unit 2, No 2 Caulson Close Maribyrnong 3032 Melbourne, Victoria Australia (03) 8395 2616 info@rilu-e-bike.com.au Rev.18.5409.QF7-UM P a g e
OWNER S MANUAL Soco TS1200R Soco TS800R
 OWNER S MANUAL Soco TS1200R Soco TS800R Congratulations on purchasing your Soco electric motorcycle. We wish you an enjoyable and safe riding experience. For your safety and comfort, we recommend that
EW-20 Black. Owner s Manual. (888) Sales (888) Service
 Sales (888) Service") EW-20 Black Owner s Manual www.ewheelsdealers.com (888) 305-0881 Sales 0 (888) 571-2845 Service Table of Contents Page 2 - Feature Guide Page 3 - Product Specifications Page 4 - Operation of Scooter Page
EW-20 Black Owner s Manual www.ewheelsdealers.com (888) 305-0881 Sales 0 (888) 571-2845 Service Table of Contents Page 2 - Feature Guide Page 3 - Product Specifications Page 4 - Operation of Scooter Page
CITY III IMPORTANT OWNER S MANUAL. Monday 9am 5pm Tuesday 9am 5pm Wednesday CLOSED Thursday 9am 5pm Friday 9am 5pm Saturday 9am 2pm Sunday CLOSED
 CITY III OWNER S MANUAL Monday 9am 5pm Tuesday 9am 5pm Wednesday CLOSED Thursday 9am 5pm Friday 9am 5pm Saturday 9am 2pm Sunday CLOSED 16 1 IMPORTANT PLEASE READ THIS MANUAL BEFORE USING YOUR ELECTRIC
Portable Electric Scooter USER MANUAL. A new era in urban mobility PLEASE CAREFULLY READ THE USER MANUAL AND WARRANTY BOOK BEFORE USING!
 Portable Electric Scooter USER MANUAL A new era in urban mobility PLEASE CAREFULLY READ THE USER MANUAL AND WARRANTY BOOK BEFORE USING! The most economical vehicle in history ser Manual Page 1 / 20 04/2017
Gatto Electric Bik Rickshaw King e Manual
 Gatto Rickshaw Electric King Bike Manual User Manual Table of Contents About Daymak 3 Safety 4 Mobility Scooter Diagram 5 Riding Instructions 6 Starting The Vehicle 6 Steering Lock 6 Driving the Vehicle
P R E M I U M E L E C T R I C B I C Y C L E S INSTRUCTION MANUAL
 WWW.BIGCATUSA.COM 631 285 2298 P R E M I U M E L E C T R I C B I C Y C L E S INSTRUCTION MANUAL Congratulations On Your Purchase & Thank You For Choosing Big Cat Warning: This manual is only a guide to
XIAOMI-MI.COM. Xiaomi Yunbike C 1. Accessories XIAOMI-MI.COM. Battery Charging device Pedals х 2 Hex wrench Keys х 2 Wrench
 Xiaomi Yunbike C 1 Accessories Battery Charging device Pedals х 2 Hex wrench Keys х 2 Wrench 1. Wheel 2. Front sleeve 3. Fork 4. Front brake 5. Brake System 6. Headlights 7. Front steering cup 8. Wheel
Table of Contents. Technical Information Warning Statement
 Table of Contents Technical Information-----------------------------------1 Warning Statement--------------------------------------2 Read Before Riding-------------------------------------3 List of Parts-----------------------------------------------4
Thank you for purchasing a Dillenger F1 Folding Bike, please read this manual before using your new electric bike.
 F1 Folding Bike Thank you for purchasing a Dillenger F1 Folding Bike, please read this manual before using your new electric bike. Before the first use, please fully charge the battery, this can take up
Assembly Instructions
 1/12 BEAST MANUAL Table of Contents Bike Specs - pg. 3 Bike Assembly: Assembling the Wheels- pg. 4 Assembling the Stem- pg. 5 Assembling the Handlebar- pg.6 Attaching the Seat- pg. 6 Attaching the Pedals-
To be completed by Authorized ETON Dealership. Buyers Agreement Checklist Scooters
 To be completed by Authorized ETON Dealership Buyers Agreement Checklist Scooters As members of the Motor Vehicle industry, our staff and management would like to thank you for your purchase of an E-TON
ELECTRIC BICYCLE OWNER S MANUAL
 ELECTRIC BICYCLE OWNER S MANUAL For Owners of EG Zurich 350 IX and 350 IX Step-thru Electric Bicycle Table of Contents Descriptions: Page Installation Instructions 2 How to install the bicycle out of the
Roadstar. User Manual
 Roadstar User Manual About Daymak Daymak is one of Canada s largest Alternative Vehicle providers. We design, engineer, manufacture, import and repair everything from recreational dirt bikes, go-karts
Warning Statement Read Before Riding
 Table of Contents Technical Information-----------------------------------1 Warning Statement--------------------------------------2 Read Before Riding------------------------------------- List Of Parts-----------------------------------------------4
Daymak warranties, services, and stocks parts for everything it sells. We support our products.
 Falcon User Manual About Daymak Daymak is one of Canada s largest Alternative Vehicle providers. We design, engineer, manufacture, import and repair everything from recreational dirt bikes, go-karts and
Electric Bike User Manual
 Electric Bike User Manual HAVE A QUESTION? NEED HELP? Contact us on Facebook for a quick reply. westhillbikes.com CLASSIC / ENERGISE / VOGUE WARRANTY Westhill bikes are covered by a limited 3-year warranty.
The Juggernaut by. -Strength in numbers. Interested in what the Juggernaut is made of? Go to Specs to find out.
 1 The Juggernaut by Ride Now. Ride More. Ride Anywhere. -Strength in numbers. Interested in what the Juggernaut is made of? Go to Specs to find out. -Getting started. Unbox, power up, and take a ride.
rtable Electric Scooter USER MANUAL A new era in urban mobility PLEASE CAREFULLY READ THE USER MANUAL AND WARRANTY BOOK BEFORE USING!
 rtable Electric Scooter USER MANUAL A new era in urban mobility PLEASE CAREFULLY READ THE USER MANUAL AND WARRANTY BOOK BEFORE USING! The most economical vehicle in history User Manual Page 1 / 20 04/2017
PLEASE BE SAFE WHEN RIDING... ALWAYS WEAR A HELMET AND OBEY ALL LAWS!
 Powered Personal Transportation Electric Power Board Product Handbook FOR THE BLADEZ XTR Street ELECTRIC POWER BOARD Model: PB-SM1806 PLEASE BE SAFE WHEN RIDING... ALWAYS WEAR A HELMET AND OBEY ALL LAWS!
Useful Information. About your scooter: Important Notice 2 SCOOTIX. Vehicle Identification Number (VIN) Registration Number: Date of Registration:
 Registration Number: Date of Registration:") Manual SPEED5000 Useful Information About your scooter: Vehicle Identification Number (VIN) Registration Number: Date of Registration: Name of Selling Dealer: Contact Number of Selling Dealer: Please take
Manual SPEED5000 Useful Information About your scooter: Vehicle Identification Number (VIN) Registration Number: Date of Registration: Name of Selling Dealer: Contact Number of Selling Dealer: Please take
Owner s Manual for. Puma LPX & Lynx LPX. Lithium Polymer Powered Electric Folding Bikes
 Owner s Manual for Puma LPX & Lynx LPX Lithium Polymer Powered Electric Folding Bikes Model Shown PowaCycle Puma LPX Main Technical Specification Summary Bicycle Motor Weight: 17.8 kg Puma 20kg Lynx Type:
GT MAGNETIC POWER BICYCLES (SMART CYCLE)
") GT MAGNETIC POWER BICYCLES (SMART CYCLE) Congratulations on selecting the GT Magnetic Power Bicycle (Smart Cycle in short). In order to use and enjoy your Smart Cycle safely and to get the best performance
GT MAGNETIC POWER BICYCLES (SMART CYCLE) Congratulations on selecting the GT Magnetic Power Bicycle (Smart Cycle in short). In order to use and enjoy your Smart Cycle safely and to get the best performance
EW-27 Crossover Pre-Mobility Scooter
 EW-27 Crossover Pre-Mobility Scooter Owner s Manual www.ewheelsdealers.com Before (888) 305-0881 you operate Customer the Service scooter (888) 571-2845 Service 0 Locate the below listed materials in rear
May we, the manufacturer, take this opportunity to thank you for choosing our ATV to serve you.
 FOREWORD May we, the manufacturer, take this opportunity to thank you for choosing our ATV to serve you. This Owner s Manual is prepared for you the details as to operate and maintenance necessarily to
ODK U500 (V2) Electric Bicycle
 Electric Bicycle") ODK U500 (V2) Electric Bicycle Ownerʼs Manual (English) Juiced Riders Inc. R130101 8724 Approach Road, San Diego, CA 92154, U.S.A. mail@juicedriders.com Tel: +1 (619) 746-8877 www.juicedriders.com How
ODK U500 (V2) Electric Bicycle Ownerʼs Manual (English) Juiced Riders Inc. R130101 8724 Approach Road, San Diego, CA 92154, U.S.A. mail@juicedriders.com Tel: +1 (619) 746-8877 www.juicedriders.com How
GIO Electric Scooter Assembly Instructions. GIO Electric Scooter Assembly Instructions. 06 Italia 500w Electric Scooter Assembly Manual.
 GIO Electric Scooter Assembly Instructions GIO Electric Scooter Assembly Instructions 06 Italia 500w Electric Scooter Assembly Manual.indd 1 2/7/2014 11:24:55 PM 06 Italia 500w Electric Scooter Assembly
Electrically Assisted Pedal Cycles. Assembly Instructions
 Electrically Assisted Pedal Cycles Assembly Instructions Version 4 23 Sept 2005 Introduction Thank you for buying a PowaCycle Freeway electric bike. We hope it brings you many hours of enjoyment. For safe
Contents Page General Instruction before riding Page 3 Point Inspection Page 4 Assembly Instructions Page 5 Technical Specifications
 TM Owner's Manual Ride the Future TM Operation and Maintenance Instructions We strongly recommend that you read this entire manual before using your vehicle for the first time Contents Page General Instruction
ATV-320 R OWNER S MANUAL
 ATV-320 R OWNER S MANUAL FOREWORD May we, the manufacturer, take this opportunity to thank you for choosing our ATV to serve you. This Owner s Manual is prepared for you to properly operate in safety.
Australia s best value ebikes
 IMPORTANT NOTICE Read manual, Instructions and Terms carefully before use. It is the buyer s responsibility to make sure the drift trike is safe to ride. If necessary ask for help at any good local bicycle
Product Handbook. Electric Power Board. Powered Personal Transportation. FOR THE BLADEZ XTR Lite 250 ELECTRIC POWER BOARD
 ` Powered Personal Transportation Electric Power Board Product Handbook FOR THE BLADEZ XTR Lite 250 ELECTRIC POWER BOARD Model: PB-SM805-S PLEASE BE SAFE WHEN RIDING... ALWAYS WEAR A HELMET AND OBEY ALL
Foldable Electric E-bike Instruction Manual
 Foldable Electric E-bike Instruction Manual This manual contains important safety, assembly, operation and maintenance information. Please read this manual before operation and save this manual for future
QiCycle Electric Folding Bike
 QiCycle Electric Folding Bike Overview Shifter Brake Handlebar Steering tube Steering tube fixer Steering tube fixer Headlight Front brake Motor Clip of saddle pin Backlight Saddle pin Saddle Schematic
ELECTRIC BICYCLE OWNER S MANUAL
 ELECTRIC BICYCLE OWNER S MANUAL For Owners of EG Kyoto 350 Electric Bicycle Table of Contents Descriptions: Page Installation Instructions 2 How to install the bicycle out of the box 2 Operation Instructions
2010 INDIAN MOTORCYCLE PRE- DELIVERY AND INSPECTION
 2010 INDIAN MOTORCYCLE PRE- DELIVERY AND INSPECTION Table of Contents Introduction 1 Preparing the motorcycle.... 2 Pre-Delivery Checklist...... 4 Customer Acceptance........ 6 Introduction For your own
Coaster E-assist Motor Cargo Users Guide Version 1.1
 Coaster E-assist Motor Cargo Users Guide Version 1.1 Table of contents: Section: Page: Pictorial overview 2 Basic overview 3 Getting started 4,5 Initial battery power up 1,2,3 5,6 Understanding the main
The Grasshopper. Golf Buggy. Owners Manual Classic - Cobra - Junior (Twin Motor)
") The Grasshopper Golf Buggy Owners Manual Classic - Cobra - Junior (Twin Motor) Grasshopper Golf Buggies Ltd 86-88 Mason Street Sutton-in-Ashfield Nottinghamshire NG17 4HP Tel: (+44) 01623 404730 email:
The Grasshopper Golf Buggy Owners Manual Classic - Cobra - Junior (Twin Motor) Grasshopper Golf Buggies Ltd 86-88 Mason Street Sutton-in-Ashfield Nottinghamshire NG17 4HP Tel: (+44) 01623 404730 email:
AFT mid drive kit Trouble shooting guide For 24v to 48V Kelly Controller KBS 48101L-L 100 A peak
 Date: 2016-13-1 AFT mid drive kit trouble shooting guide Rev 1.7 Page 1 of 17 AFT mid drive kit Trouble shooting guide For 24v to 48V Kelly Controller KBS 48101L-L 100 Table of Contents 1. Safety... 2
Vermont 48V User Manual
 Vermont 48V User Manual About Daymak Daymak is one of Canada s largest Alternative Vehicle providers. We design, engineer, manufacture, import and repair everything from recreational dirt bikes, go-karts
POWER ASSISTED BICYCLES OWNERS MANUAL
 OWNERS MANUAL Simply explained this is how your e.life bike basically works. Firstly may we congratulate you on purchasing your new electric power assisted e.bike. Please take time to read your manual.
US Patent 0540, 400 Other Patents Pending. Read this manual completely before assembling and riding our PET PRO-FLEX 500. Always wear a Helmet!
 US Patent 0540, 400 Other Patents Pending Read this manual completely before assembling and riding our 500 Always wear a Helmet! Priority Electric Transportation, LLC. 1007 West College Ave. #293 Santa
E-P3 POLINI MOTOR USER S MANUAL
 E-P3 POLINI MOTOR USER S MANUAL - Thank you for choosing an E-bike equipped with E-P3 Polini motor - Only drive your vehicle using protective clothing CONTENTS 1.0- IMPORTANT NOTICE 1.1- Important information
USER MANUAL SUMMARY. Tipping Device p 2. Remote Control p 4. Motorised Rollers p 6. Ramp and Board p 8. Charge and Battery p 10
 USER MANUAL SUMMARY Tipping Device p 2 Remote Control p 4 Motorised Rollers p 6 Ramp and Board p 8 Charge and Battery p 10 Electric Circuit Diagram p 12 KLAVIER-ROLLER 353 rue des Marais F- 74410 SAINT-JORIOZ
Operation and Maintenance Instructions
 X-Treme TM Electric Moped Operation and Maintenance Instructions Electric Moped XM-3100 Revised 11/6/08 Operation and Maintenance Instructions We strongly recommend that you read this entire manual before
Daymak warranties, services, and stocks parts for everything it sells. We support our products.
 EC1 User Manual About Daymak Daymak is one of Canada s largest Alternative Vehicle providers. We design, engineer, manufacture, import and repair everything from recreational dirt bikes, go-karts and electric
ELECTRIC BICYCLE OWNER S MANUAL
 ELECTRIC BICYCLE OWNER S MANUAL For Owners of EG Oahu 500EX and EG Maui 500EX Electric Bicycle Table of Contents Descriptions: Page Installation Instructions 2 How to install the bicycle out of the box
Owner s Manual. CycloTricity Electric Bicycles. June 2016, 4 th edition. We strongly recommend you read this entire manual before using your bike.
 Owner s Manual CycloTricity Electric Bicycles June 2016, 4 th edition We strongly recommend you read this entire manual before using your bike. 1 Contents Part 1 Before use Page - Before first time use
This is the Unpacking Guide for the Optibike Pioneer Allroad electric bicycle. The Guide provides information required to remove the Allroad from the
 This is the Unpacking Guide for the Optibike Pioneer Allroad electric bicycle. The Guide provides information required to remove the Allroad from the box and assemble it. If you have not assembled a bicycle
ATV-320 S/U ATV-320SD S/U OWNER S MANUAL V
 ATV-320 S/U ATV-320SD S/U OWNER S MANUAL V1.0 2014.03.01 0 FOREWORD May we, the manufacturer, take this opportunity to thank you for choosing our ATV to serve you. This Owner s Manual is prepared for you
Owner s Manual and Service Guide
 Owner s Manual and Service Guide Roadster-2+2, Roadster-4+2, Roadster-6+2 August 2014 Table of Contents Specifications 2 Operation Vehicle layout 3 Dashboard 3 Switches 4 Pedals 5 Charging 5 Cigarette
C. Steering Columns. 1. Non-Folding Steering Column
 C. Steering Columns ElliptiGO cycles are equipped with two different types of steering columns based on the model. The first type is the Non-Folding Steering Column which is telescopically adjustable to
EW-52. Owner s Manual. (888) Customer Service (888) Service
 Customer Service (888) Service") EW-52 Owner s Manual www.ewheelsdealers.com (888) 305-0881 Customer Service (888) 571-2845 Service 0 Table of Contents 1. Instrument Panel. 2 2. Music system operation. 3 3. Before you operate your scooter....
EW-52 Owner s Manual www.ewheelsdealers.com (888) 305-0881 Customer Service (888) 571-2845 Service 0 Table of Contents 1. Instrument Panel. 2 2. Music system operation. 3 3. Before you operate your scooter....
Single Seater Golf Buggy Owners Manual
 Dedication to Excellence Dedication to Excellence Single Seater Golf Buggy Owners Manual www.i-motioncaddys.com sales@i-motioncaddys.com www.i-motioncaddys.com sales@i-motioncaddys.com Introducing i-m
Step 1: Parts List and Bike Preparation
 **NOTE** The table below is only a quick summary guide of all the CANopener features. See Step 1: Parts List and Bike Preparation the details of each feature throughout this manual. Summary of CANopener
HEAVY-DUTY SIZE MODEL User/Caregiver Manual FOLD & GO Wheelchairs A Division of OneKubedDESIGNS, LLC.
 HEAVY-DUTY SIZE MODEL User/Caregiver Manual 2018 FOLD & GO Wheelchairs A Division of OneKubedDESIGNS, LLC. INTRODUCTION Thank you for buying the FOLD & GO WHEELCHAIR, which is designed and manufactured
Power Assisted Bikes. Owner s Manual
 Power Assisted Bikes Owner s Manual Version 2 April 2016 Introduction Thank you for buying a PowaCycle Windsor electric bike. We hope it brings you many hours of enjoyment. For safe and compact shipping,
a new.wave.of city transport vesper.world
 a new.wave.of city transport vesper.world manual THANK YOU FOR PURHASING OUR PRODUCTS PLEASE CAREFULLY READ THE USER MANUAL AND WARRANTY BOOK BEFORE USING TO LOOK FOR NEW WAYS TO GET FROM A TO B QUICKLY
EN USER MANUAL
 R3 EN USER MANUAL - 01 - Check Packing Contents Bike body Tool Battery holder Charger Pedal Saddle components Instruction Packing list Bike body 1 pcs Tool 1 unit Charger 1 pcs Saddle components 1 unit
Product Handbook FOR THE BLADEZ XTR Lite ELECTRIC POWER BOARD
 Portable Electric Power Board Product Handbook FOR THE BLADEZ XTR Lite ELECTRIC POWER BOARD PLEASE BE SAFE WHEN RIDING... ALWAYS WEAR A HELMET AND OBEY ALL LAWS! Page 1 IMPORTANT PLEASE READ THIS BEFORE
B2 Car and it s handling
 1 / 21 CAR AND IT S HANDLING Dashboard Pedals Gears Parking brake Climate control Windscreen wiper Driving lights and indicators Meters Initial preparation Driving Engine and refueling B2 Training -material
PLEASE BE SAFE WHEN RIDING ALWAYS WEAR A HELMET AND OBEY ALL LAWS!
 X-Treme TM Electric Scooters X-10 Electric Scooter Owner s Manual PLEASE BE SAFE WHEN RIDING ALWAYS WEAR A HELMET AND OBEY ALL LAWS! Page1 IMPORTANT BATTERY MAINTENANCE and CHARGING INSTRUCTIONS 1. You
MOTORINI GP 50. User s Manual.
 MOTORINI GP 50 User s Manual www.motorini.co.uk Dear user: Thank you for choosing to buy a Motorini GP 50 This manual provides the correct operation and maintenance methods for safe riding and maintaining
Product Handbook. Electric Power Board. Powered Personal Transportation FOR THE BLADEZ ION 350 ELECTRIC POWER BOARD
 Powered Personal Transportation Electric Power Board Product Handbook FOR THE BLADEZ ION 350 ELECTRIC POWER BOARD PLEASE BE SAFE WHEN RIDING... ALWAYS WEAR A HELMET AND OBEY ALL LAWS! IMPORTANT BATTERY