Introduction. Special features
|
|
|
- Marianna Briggs
- 6 years ago
- Views:
Transcription


1
2 Introduction Thank you for purchasing this high-end competition charger. This charger is a high performance computerized battery maintenance system. Capable of charging, discharging, cycling and conditioning multiple rechargable battery types, with very high output power, a customized display with expertly designed software and programming controls, the Overloader2 is easily one of the smartest and most powerful R/C battery maintenance systems available! NOTE: You will find a transparent protective plastic film on the front plate. Please remove this film before the first usage. Special features - Perfect for electric cars, trucks, boats and planes - Handling NiCd / NiMH / Li-Ion / Li-Po / Pb battery types - Restart of charge and discharge after a loss ao power - Symbol aided graphical screens - Graphical display show charge, discharge and cycle curves - Storing up to 10 different battery configurations - Performs 1-10 cycles for NiCd / NiMH only, and stores capacity and voltage date for all 10 cycles - Break-in electric motors ( V, 10A constant) or operate commutator lathes - Heat glow plugs for nitro engines - Operate tire warmers - Intuitive program menus and simple pushbutton control - Intelligent cooling fan control system for better charge efficiency and extended charger life - Language, LCD contrast, fan operation, temp scale and sound cues are fully adjustable - Popups for information and warnings - packaged in a red-colored rugged, extruded aluminium case 2
3 Precautions! - Do not charge or discharge battery types other than nickel-cadmium (NiCd), - nickel-metal hydride (NiMH), Lithium-Ion (Li-Ion) or Lithium-Polymer (Li-Po) - rechargeable batteries. Damage may occur from other types of batteries. - Do not attempt to charge batteries at excessive fast charge currents. - Do not use automotive type battery chargers to power the charger. - Do not leave the charger unattended while charging. Disconnect the battery and - remove input power from charger immediatly if the charger becomes hot. - Allow the charger or battery to cool down before reconnecting. - Do not allow water, moisture or foreign objects into the charger. - Do not place the battery or the charger on or near a flammable object while in use. - Keep away from carpets, cluttered workbenches, etc. - Do not cover the air intake holes on the charger as this could cause the charger - to overheat. - Always disconnect charger from power source when not in use. Safety note for Li-Ion and Li-Po batteries! - Do not allow Li-Ion or Li-Po batteries to overheat! - It is very important to know the battery s nominal rated voltage before - charge or discharge. - Li-Po batteries: 2-cell pack wired in series -> total voltage will be 7.4 V (2x 3.7V) - Li-Ion batteries: 2-cell pack wired in series -> total voltage will be 7.2 V (2x 3.6V) - ALWAYS make sure to set the correct Li-Ion or Li-Po battery voltage - ( 3.6V per cell for Li-Ion and 3.7V per cell for Li-Po) - Do not attempt to use the NiCd or NiMH mode for Li-Ion or Li-Po batteries. - Do not attempt to charge Li-Ion or Li-Po batteries at greater than 1C rating - of the battery. - Do not attempt to repeatedly charge Li-Ion or Li-Po batteries. - If Li-Ion or Li-Po batteries overheat, please immediatly disconnect batteries - from the charger! 3
4 Specification Description Settings Step General Case type Aluminium, anodized Cooling system Aluminium heat sink, 3 x Fan 40mm Display type Graphic LCD, 128x64 Pixel Input type Input cable with banana plugs black/red Output type Banana jacks black/red Input voltage 11-15V Battery types NiCd, NiMH, LiPo, LiIon, Pb Battery memories 10 Powerlimit charge 120W Powerlimit discharge 180W Graph storage time up to 22h 45min 20sec Settings Name 15 characters, A-Z,a-z,0-9, special chars Language English, Geman, French Fan control Auto, On Temperature mode C, F Button sound Off, On Finish sound Finish sound repetitions Info sounds Off, On Graph resolution 1, 2, 5, 10s/p LCD contrast LCD backlight Off, On Motor break-in menu Off, On Glow-plug menu Off, On Tire warmers menu Off, On Motor break-in Run Time 1min - 23h 59min 1min Voltage 0,1-8,0V 0,1V Current max 10,0A Glow-plug Voltage 0,1-2,5V 0,1V Current max 10,0A Tire warmers Temperature C / F 1 C / 1 F Voltage 13,5V Current max 10,0A Profiles Profilnumber Profilname 8 characters, A-Z,a-z,0-9, special chars Capacity mAh 100mAh Charge current 0,1-10,0A 0,1A Discharge current 0,1-20,0A 0,1A Cutoff temperature C / F 1 C / 1 F maximum charge capacity % 1% 4
5 Specification Description Settings Step specific for NiMH/NiCd Charge mode Linear, Impulse, Reflex, Auto, 4-Step Cells deltapeak/cell 1-30mV 1mV Peak-Lock time 1-50min 1min Trickle current Off, mA 10mA Limits of discharge current 1-6 cells - max 20,0A 7 cells - max 17,0A 8 cells - max 15,0A 9 cells - max 13,5A 10 cells - max 12,0A 11 cells - max 11,0A 12 cells - max 10,0A Cutoff voltage/cell 0,5-1,2V 0,1V Cycle mode Off, C->D, D->C, (D)C->D Numbers of cycles Cycle wait mode Time, Temperature C->D Delay 1-240min 1min D->C Delay 1-240min 1min C->D temperature C / F 1 C / 1 F D->C temperature C / F 1 C / 1 F specific for LiPo Charge mode CC-CV Cells Charge end voltage/cell Limits of discharge current 4,2V 1-2 cells - max 20,0A 3 cells - max 13,5A 4 cells - max 10,0A Cutoff voltage/cell 2,7-3,7V 0,1V specific for Lixx Charge mode CC-CV Cells Charge end voltage/cell 3,3-4,3V 0,1V Limits of discharge current 1-2 cells - max 20,0A 3 cells - max 13,5A 4 cells - max 10,0A Cutoff voltage/cell 2,0-3,7V 0,1V specific for Pb Charge mode CC-CV Cells Charge end voltage/cell Limits of discharge current 2,35V 1-3 cells - max 20,0A 4 cells - max 15,0A 5 cells - max 12,0A 6 cells - max 10,0A Cutoff voltage/cell 1,8-2,3V 0,1V 5

 and the red input cord with the plus pole () of your power source.")
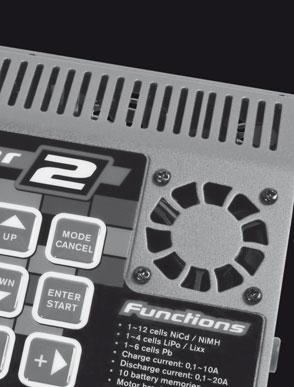
6 Charger general description Cooling Section Power Input LCD Display Cooling fan Serial PC connection Power output & temperature sensor Operating buttons The power input cord is equipped with 4mm connectors for using a power supply. Crocodile style connectors are also included. They are directly compatible with the 4mm power input cord connectors. This way you can easily use your Overloader2 with various input power sources (power supply, 12V car battery, ). PLEASE NOTE: it is very important that you connect the black input cord with the minus pole (-) and the red input cord with the plus pole () of your power source. For best connect ability and safe operations the temperature sensor is equipped with a strong magnet and therefore can be easily attached to most kind of common hobby batteries. Operating buttons 6
7 Menu - abstract Charge - starts charging the battery - Only one screen for all charge modes Discharge - starts discharging the battery - all information without scrolling Profiles - settings of the batteries - 10 x 4 battery types (NiCd/NiMh, LiPo, Lixx, Pb) - Cycle- and 4-step settings Motor break-in - Break-in electric motors - operate commutator lathes - can be disabled Nitro glow-plug - operation of glow plugs for nitro engines - can be disabled Tire warmers - temperature controlled operation of tire warmers - can be disabled Data view - information of the last charge, discharge, or cycle procedure - view the graph User setup - all settings of the device - name, language, sounds, LCD display, menus... 7
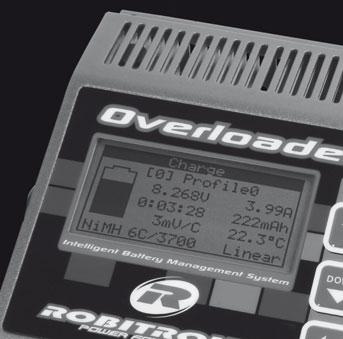
8 Charge profilenumber voltage of batt. charge time deltapeak/ charge end voltage battery type cells/ nom.capacity profilename est. charge time charge current set capacity added temperature of battery charge mode Charge in idle mode you are here, if you have just switched to charge menu. - Use and to select a suitable profile (0-9) for your battery. - The keys and changes the charge current with steps of 0.1A. - The button starts charging. - Use the button to switch to discharge menu. peaklock symbol charge current act. Charge in action The battery symbol is animated and the actual charge current is shown. - While charging and do not have any function. - and keep on changing the charge current. - The key switches to the charge graph view. - Press and hold the button to cancel charging. charge time voltage of batt. scroll mode voltage resolution time resolution Charge graph shows the battery voltage against the charge time - Use and to zoom. The number of seconds, one point represents (s/p) is changed. While changing the value is inverted. Note that voltage resolution is automatically set. The range of the voltage-axis is shown in Volt. -, and do not have any function at the charge graph. - Use to leave the charge graph. 8
9 Discharge profilenumber voltage of batt. discharge time cutoffvoltage battery type cells/ nom. capacity profilename est. discharge time discharge current set capacity removed temperature of battery average voltage Discharge in idle mode you are here, if you have just switched to discharge menu. - Use and to select a suitable profile (0-9) for your battery. - The keys and changes the discharge current with steps of 0.1A. - The button starts discharging. - Use the button to switch to the profile settings. battery resistance discharge current act. Discharge in action The battery symbol is animated and the actual discharge current is shown. - While discharging and do not have any function. average voltage - and keep on changing the discharge current. - The key switches to the discharge graph view. - Press and hold the button to cancel discharging. discharge time voltage of batt. scroll mode Discharge graph shows the battery voltage against the charge time voltage resolution time resolution - Use and to zoom. The number of seconds, one point represents (s/p) is changed. While changing the value is inverted. Note that voltage resolution is automatically set. The range of the voltage-axis is shown in Volt. -, and do not have any function at the charge graph. - Use to leave the charge graph. 9
10 Profiles setting value cursor scrollbar Profiles - general stores all your battery settings. Therea are 4 x 10 profiles available, which means for each profilenumber you can choose from 4 batterytypes. Each batterytype stores its own settings. Note, for each profilenumber only one batterytype can be activated simultaneously. - Use and to select the setting you would like to change. Note, there are dependencies between settings, so it is possible that some settings are not shown. - With, the value of the highlighted setting can be changed between its upper and its lower limit. Use press and hold to change the value more quickly. - Usually the key has no function. Except profilename and chargemode 4-step. - Depending on your settings switches to motor break-in, nitro glow-plug, tire warmers or data view menu. 10
11 Profiles Number of profile - values between 0 and 9 are available. - This number is linked with the profiles and is used to choose profiles in the charge and discharge menu. Profile name - Profilenames are used, to identify profiles more quickly. - To change the profilename press. The name setup menu appears. profilename positioncursor charactercursor character pool - Use and to set the positioncursor on the character you want to change. The charactercursor hightlights the selected character in the pool immediately. - and changes the selected character in the pool and in the string simultaneously. - To leave name setup menu press or. Battery type - 4 respectively 6 battery types are supported: nickel-cadmium (NiMH/Cd) nickel-metal-hydride (NiMH/Cd) lithium-polymer (LiPO) lithium-ion (Lixx) lead-acid (PB) gel-cell (PB) - So the values NiMH/Cd, LiPO, Lixx, PB are available. - Other profile settings depend on the selection of the battery type. - Note, that battery type Lixx needs an additional setting of the charge end voltage in the user setup menu. - Use only battery types suitable to your batteries. 11
12 Profiles Charge mode - 6 different charge modes are supported. linear charge (Linear) impulse charge (Impulse) reflex charge (Re-Flex) auto charge (Auto) 4-step charge (4-Step) constant current-constant voltage charge (CC-CV) - Available values are Linear, Impulse, Re-Flex, Auto, 4-Step und CC-CV. - You will find a brief description of the different charge modes at the end of this manual. - Note, that availability of charge modes depends on the selected battery type. - Note, that the charge mode setting will affect other profile settings. Set up 4-Step charge - When charge mode 4-step is selected, the button opens the 4-Step Setup menu. est. charge time graphical view current against capacity capacity threshold 1-2 / 2-3 / 3-4 / finish charge current per step 1. st. / 2. st. / 3. st. / 4. st. cursor - Select the value you want to change with and. - Use and to change the highlighted value. - First row values are the capacity thresholds. When the added capacity passes the capacity threshold, the next step beginns. - The charge currents in the second row belong to the steps 1 to 4. The setting in our example would to the following: The charger starts charging with a charge current of 3.0A. When the added capacity reaches 1000mAh, step 2 beginns and charge current is increased to 6.5A. At 3000mAh step 3 with 5.0A is in action. The last step is introduced with the capacity threshold of 3700mAh. The battery is charged with 4.0A. The last value of 4300mAh is the nominal capacity. In combination with the maximum capacity it is a charge end mechanism. - Note, that each following threshold must be higher than the previous one. threshold 1-2 < threshold 2-3 < threshold 3-4 < nominal capacity - Note, that nominal capacity of 4-step setup will overwrite the setting of the profile. - To leave the 4-step setup menu press or. 12
13 Profile Nominal Capacity - is adjustable between 100mAh and 9900mAh with a stepwidth of 100mAh and between 10000mAh and 25000mAh with a stepwidth of 1000mAh. Nominal capacity means the nominal capacity of the battery which is in use. - The value is used to calculate the estimated charge/discharge time. In combination with the maximum capacity it is a charge end mechanism. Cells - depending on the selected battery type values between 1-12, 1-4 or 1-6 are available. Set the number of cells in series your battery consists of. - Note, that this setting depends on previous settings and is maybe not shown. Charge current - depending on the selected charge mode the value is adustable between 0.1A and 10A or 8A with a stepwidth of 0.1A. - Note, there is no capacity-controlled limit of the charge current for LiPO batteries. General LiPO batteries should be charged with a maximum charge current of 1C, which means a battery with a nominal capacity of 5000mAh should be charged with a maximum charge current of 5A. - Note, that this setting depends on previous settings and is maybe not shown. deltapeak / cell - is adjustable between 1mV and 30mV with a stepwidth of 1mV. - DeltaPeak is the main charge end mechanism with NiMH/Cd batteries. - Note, that this setting depends on previous settings and is maybe not shown. Peak-locktime - is adjustable from 1min to 50min with a stepwidth of 1min. - Peak-locktime is a countdown started with the charge. During the countdown there is no check on deltapeak and the peaklock symbol is shown. This is very useful with old batteries which often generates a first peak at the beginning of the charge. - Note, that this setting depends on previous settings and is maybe not shown. 13
14 Profile Cut off temperature - adjustable between 20 C and 70 C with a stepwidth of 1 C or between 68 F and 158 F with a stepwidth of 1 F. - If the temperature of the external sensor reaches this limit, the charge will be finished. Trickle charge - the values Off and between 10mA and 400mA with a stepwidth of 10mA are available. - Trickle charge will only become active if charge ends with deltapeak or temperature. - When charge ends with temperature, the charger will wait till the battery becomes 2 C colder and then starts trickle charge. - Note, that this setting depends on previous settings and is maybe not shown. Discharge current - general it is adjustable from 0.1A to 20A with a stepwidth of 0.1A, - but dependent on the number of cells set, a limit of 17A, 15A, 13.5A, 12A, 11A or 10A become active, to prevent exceeding discharge power limit. - Note, there is no capacity-controlled limit of the discharge current for LiPO batteries. General LiPO batteries should be discharged with a maximum discharge current of 2C, which means a battery with a nominal capacity of 5000mAh should be discharged with a maximum discharge current of 10A. Cut off voltage / cell - depending on the selected battery type values between 0.5V - 1.2V, 2.7V - 3.7V, 2.0V - 3.7V or 1.8V - 2.3V with a stepwidth of 0.1V are available. - Note, that the cut off voltage is the only end mechanism with discharge. A too low cut off voltage will destroy your battery. Maximum capacity - adjustable from 100% to 140% with a stepwidth of 1%. - In combination with the nominal capacity it is a charge end mechanism. e.g.: The battery has a nominal capacity of 3700mAh. Maximum capacity is set to 120%. If added capacity reaches 4440mAh (3700mAh x 120% = 4440mAh) charge is finished. 14
15 Profiles Number of cycles - The number of cycles can be adjusted from 1 to PLEASE NOTE that this adjustment topic might not appear because of other already made adjustments. Character of cycle delay time - It is possible to choose between time (Time) and temperature (Temp) delay. - This adjustment determines if the delay time is defined by an adjusted time period or until an adjusted cooling-off temperature level is reached - PLEASE NOTE that this adjustment topic might not appear because of other already made adjustments. Delay time C > D - Here you can adjust the delay time before the discharge process from 1 min to 240 min in 1-minute increments. - The time should be chosen long enough for the battery to appropriately recover. - PLEASE NOTE that this adjustment topic might not appear because of other already made adjustments. Delay time D > C - Here you can adjust the delay time before the charge process from 1 min to 240 min in 1-minute increments. - The time should be chosen long enough for the battery to appropriately recover. - PLEASE NOTE that this adjustment topic might not appear because of other already made adjustments. Cooling-off temperature C > D - Here you can adjust the temperature the battery has to reach first before the next discharge process starts - from 20 C to 70 C resp. 68 F to 158 F in 1 increments. - PLEASE NOTE that this adjustment topic might not appear because of other already made adjustments. Cooling-off temperature D > C - Here you can adjust the temperature the battery has to reach first before the next charge process starts - from 20 C to 70 C resp. 68 F to 158 F in 1 increments. - PLEASE NOTE that this adjustment topic might not appear because of other already made adjustments. Guideline for the profile mode - You have the possibility to directly switch from the profile mode into the regarding charge/discharge mode without having to change completely into the regarding user interface. - Just continuously press the button for approx. 2 seconds and you will directly switch into the regarding mode. - If you have adjusted the charge-timer, it s popup window will open and the charge-countdown will start. - PLEASE NOTE that this function might not be always available because of other already made adjustments. This function is not activated when the marker is set on the topics Charge mode and Number of cycles 15
16 Motor break-in duration time break-in voltage amperage Set-up motor break-in This is where you are when you first enter the motor break-in mode. - With and you adjust the duration time for motor break-in from 0:01:00 to 9:59:00 in 1-minute increments. - The buttons and change the motor break-in voltage from 0.1V to 8.0V in 0.1 increments. - The button starts the motor break-in process. - With the button you will switch corresponding to the adjustment into the glow plug, tire heating or display mode. countdown real break-in voltage amperage motoranimation amperage visual display During motor break-in The motor animation symbolizes the running break-in process. The adjusted duration time runs down in a count down format. Instead of the adjusted motor break-in voltage now the REAL running voltage is displayed. The actual amperage is shown in graphic form (in relation to the maximum of 10A) and in digital figures, also. - The buttons and can still be used to readjust the duration time for the motor break-in. - With and you can still change the motor break-in voltage during the running process. - The button has no function during the running break-in process. - With you can always stop the break-in process. 16
17 Glow plug heating On/Off symbol glow plug voltage amperage Set-up glow plug heating This is where you are when you first enter the nitro glow plug hetaing mode. - The buttons and have no function in this set-up of the glow plug heating. - With and you adjust the glow plug heating voltage from 0.1V to 2.5V in 0.1 increments. - The button starts the plug heating process. - With the button you will switch corresponding to the adjustment into the tire heating or display mode. glow plug animation amperage visual display real glow plug voltage amperage During glow plug heating The glow plug animation symbolizes the running heating process. When a glow plug is connected to the system and it is correctly functioning (no defect plug) it is displayed with a glowing plug animation. Instead of the adjusted glow plug heating voltage now the REAL running voltage is displayed. The actual amperage is shown in graphic form and in digital figures, also. - The and buttons still can be used to readjust the glow plug heating voltage. - With you can always stop glow plug heating process. - The buttons, and have no function during glow plug heating process. 17
18 Tire heating control Set-up tire heating temperature Real tire temperature Amperage Set-up tire heating control This is where you are when you first enter the tire heating control mode. - The buttons and have no function in this set-up of the tire heating control. - With and you are still able to adjust the tire heating temperature from 45 C to 70 C resp. 113 F to 158 F in 1 increments. - The button starts the tire heating process. - PLEASE NOTE: the tire heating control only functions when the temperature sensor of the Overloader2 is activated and attached within the tire heating electric blankets. - With the button you will switch from here into the display mode. Heating animation Amperage Visual Display Set-up tire temperature Real tire temperature Amperage During tire heating process The smoking tire animation symbolizes the running heating process. During the running heating process both, the set-up tire temperature and the actual real temperature are displayed. The actual amperage is shown in graphic form and in digital figures, also. - With and buttons still can be used to readjust the tire heating temperature. - With the you can always stop the heating process. - The buttons, and have no function during the tire heating process. 18
19 Data view display Charge time Charged capacity Switch-off method Cycle number Discharge time Discharge capacity Average voltage Internal resistance Data view display This is where you are when you first enter the display data view mode or after the ending of a cycle program. The display menu appears in table format. The left data slot (Charge) includes the charge data, the right one (Disch.) the discharge data. - and buttons have no function in the data view mode. - With and you are able to turn the pages from 1 to 10. Each page corresponds to the regarding charge/discharge cycle. - switches to the display of the visual graphical illustration. - switches to the adjustments mode. Charge time Battery voltage Scrollmodus Resolution voltage Resolution time Visual graphical illustration (graph) Here you can see the battery voltage over the time axis. - With and you can use as a zoom. It will be adjusted, how many seconds are symbolized by one displayed point (s/p). PLEASE NOTE: the voltage is automatically scaled. The given voltage refers to the regarding visible part of the graphic illustration (graph). -, have no function here. - activates the scroll function. - is changing back to the data view display. Cursor time Cursor voltage Cursor position Graph with activated scroll function Every figure of the graph can be individually displayed. - The buttons and keep on having their zoom function. - With and the graph can be moved to the left or right. During moving the graph the displayed voltage and time corresponds to the cursor position. - ends the scroll function. MODE/ - is changing back to the data view display. 19
20 Adjustments Adjustments General Here you can make all adjustments for the general basis system management of the Overloader2. - With and the marker is positioned onto the adjustment you want to edit. Adjustment Adj. possibility Scroll bar Marker - The buttons and change the adjustment within the possible limits. Continuously pressing one of these buttons will move you faster through the range of possible adjustments. - As long as not different mentioned (e.g. name and melody) the button function in this section. has no - The button brings you into the charge mode. Name - For clear identification you can personalize the Overloader2 with your name in the starting display. Right after the start the display shows the current name. This is the time to change the name. - Press and the mode for changing the user name will now open. Name Position marker Symbol marker Possible symbols - With and you can place the position marker on the place you want to edit. At the same time the symbol marker jumps on the current symbol. - With and now you can choose the symbol of your choice by moving the symbol marker. At the same time your newly chosen symbol will already be shown at the marked position within the name. - To exit the name changing mode please press or. 20
21 Adjustments Language - The following languages are available: English, Deutsch and French. The language selection is effective within the complete system. Cooling fan - Can be switched on AUTO (Automatic) or ON. - In the ON position all 3 cooling fans are permanently running. - In the position AUTO the fans are automatically switch on depending on the load on the system. Temperature - Temperatures can be displayed in C or F. - PLEASE NOTE: by changing from one to the other ALL temperature readings will be mathematically transferred and rounding errors might be possible. Acoustical buttons - Can be switched ON or OFF. - Depending on the adjustment all button-use will be confirmed by an acoustical sound. Melody - You can choose between 9 different melody settings. - The melody will be played after each ending of a charge, discharge, cycle or break-in process. - With the button you can play the currently active melody. Melody repeat duration - Adjustments for repeat duration are possible from 1 to 10 times. Information acoustical sounds - Can be switched ON or OFF. - In the position OFF all sounds of the unit for the ending of processes are turned off. This also includes all sounds due to errors and wrong user inputs. Graph resolution - The following resolution steps are available: 1sec./point, 2s/P, 5s/P, 10s/P. This means for the practical use, that the voltage is stored for graphical use every second, every 2 seconds, every 5 seconds or every 10 seconds. - Depending on the setting the all over record time can vary from 2h 16m 32s (1s/P setting) to a total of 22h 45m 20s (10s/P setting). - PLEASE NOTE: that this adjustment has to be done BEFORE any charge, discharge or cycle process. - PLEASE NOTE: that by changing the graph resolution the graphic storage of the system will be deleted. 21
22 Adjustments LCD contrast - The brilliance/contrast can be adjusted from 1 to 15 (low to high). LCD light - The blue display light can be switched ON or OFF. Charge switch-off voltage Lixx - Can be adjusted from 3,3V to 4,3V in 0,1 V increments. - LiIon batteries are existing in quite many different variations and with different voltage switch-off requirements. The developments in this battery section are continuously going on. Therefore the Overloader2 is adjustable for this kind of battery technology within the necessary range. - This way the Overloader2 comes already prepared for further future developments in battery technology. - PLEASE NOTE: it is absolutely important, that the user adjusts the switch-off voltage for these types of battery exactly according to the instructions from the battery manufacturer. Read and follow the battery instructions! Motor break-in mode - Can be switched ON or OFF. - In position ON the motor break-in mode can be reached over the button. - In position OFF the motor break-in mode is not reachable over the navigation until it is activated again here in the adjustments section. - This speeds up the navigation by switching OFF functions, which are not in use. Glow plug heating mode - Can be switched ON or OFF. - In position ON the Glow plug heating mode can be reached over the button. - In position OFF the Glow plug heating mode is not reachable over the navigation until it is activated here in the adjustments. - This speeds up the navigation by switching OFF functions, which are not in use. Tire heating mode - Can be switched ON or OFF. - In position ON the Tire heating mode can be reached over the button. - In position OFF the Tire heating mode is not reachable over the navigation until it is activated here in the adjustments. - This speeds up the navigation by switching OFF functions, which are not in use. Software Version - There are no adjustments possible here. - This is just for information reasons only. It shows which software version is currently running on your Overloader2. 22
23 Popups Popup Symbol Popup Text Popups General Errors and other extra information are displays via popups. With the help of the popup symbol a popup can be easily associated with it s message. -,, and buttons are having no function when it comes to popups. - Some popups require a decision from your side (e.g. cycle mode continue?). - In such cases the button stands for YES (confirmation). - And the button for NO (exit). - Any popup with just an informative message (e.g. Done! ) can be deleted by any of the two buttons or - Popups referring to a significant error or system requirement (e.g. input out of range!) will only disappear after they were confirmed AND the regarding problem has been solved. - Charge time related popups display in form of a countdown for the charge start and will disappear from alone. - The countdown can be overruled by pressing the button. 23
24 Cycle charge & discharge How to start a cycle process To start a cycle process you have to choose a profile with an activated cycle function. This selection can be done in the charge or discharge mode. - The button within the charge or discharge mode will start the cycle charge & discharge dialog.. Current cycle - Confirms and starts the cycle according to the adjustment with charging resp. discharging the battery. - exits the cycle start. During a cycle You can see the number of the currently running cycle in the right hand upper corner of the screen. - Every button with the exception of can be used as usual, just like known from the regular charge or discharge mode. How to stop a running cycle - The button has to be pressed to stop a running cycle. To avoid an accidental stop of a running cycle, an additional dialog follows. - Pressing is a confirmation and stops the running cycle process. - Pressing ends the dialog and keeps the cycle process running. Between active cycle steps the system is waiting according to the adjustments until the battery has reached the adjusted cooling-off temperature or until the adjusted time delay has run out. Status information about the delay period is provided via popups. - The button overrules the adjusted cooling-off time or temperature and starts immediately the next cycle step. - PLEASE NOTE: that it might be possible, that after too short of an cooling-off time the following charging could be stopped way too early due to the high temperature of the battery. 24
25 Charging/discharging after an input electricity cut General - The Overloader2 is equipped with a protection function, which keeps the unit going with the same process that was running before the input electricity cut. This is especially important for racing. There is always the possibility of a short time electricity cut-off in the drivers pit area. The Overloader2 insures, that you are not missing a race due to a half empty battery after such an electricity cut in the pits. - This function is always active and cannot be switched off. - This function is working for charging, discharging and cycling. - The charge or discharge process after an input electricity cut is always running with the original (before the original start of the process) parameter adjustments. Later made changes (e.g. amperage) will not be taken into account. - All the process information (charge or discharge graphs, capacities, average voltage, internal resistance readings) will be still available, but minor allover errors in these figures are possible (but not more than the records from the last 60 seconds before the input electricity cut). - The records from the currently running cycle will be available, but the information from earlier cycles will be lost. 25
26 Charging techniques A) Linear charging - The charging takes place with constant and linear amperage. B) Impulse charging - With this method there is a short amperage spike (approx. 100ms) every full second during the entire charging time. The continuously appearing spikes are providing an amperage approx. 1.5 higher than the main charge adjustment. - This system was developed to reduce the oxidation within the batteries, which results in a better cell structure over longer time of using the batteries. Amps. 100ms 1s C) Reflex charging - This method is actually a reversed impulse charging. The spike comes every second also, but it is much shorter in time (approx. 4ms), much stronger (about 4 times higher) and it goes into the opposite direction. So actually it is a very short, quite strong discharge spike. - This system is especially good for older NiCd batteries to give them some sort of refreshment. Amps. 2s Time Time 26
27 Charging techniques D) Automatic charging - The automatic charge mode is only available for NiCd and NiMH batteries - In this mode the Overloader2 continuously meters the internal resistance of the battery, re-calculates and re-adjusts all parameters accordingly for best charging results. - The charge starts with a low amperage of 0,3A. - The Overloader2 recognizes automatically the number of cells and uses a deltapeak of 4mV/cell. - Switch-off criteria: deltapeak, the adjusted temperature or maximum capacity. E) CC/CV charging method - CC stands for Constant Current and CV for Constant Voltage. This combined method is used for LiPo, Lixx amd Pb batteries. - The unit charges with the adjusted, constant amperage until the batteries have reached their designated voltage: 4,2V/cell (LiPo), 3,3-4,3V/cell (Lixx) and 2,35V/cell (Pb). From this point on the Overloader2 charges the batteries with a constant voltage. This means, the amperage is permanently re-adjusted (reduced), so that the voltage of the batteries stays constant. This continues until the amperage drops lower than 1/10C (capacity of the battery divided by 10). After this the process goes over to trickle charge, the battery is ready for use. - PLEASE NOTE: it is absolutely important, that you adjust the switch-off voltage for these types of battery exactly according to the instructions from the battery manufacturer. - PLEASE NOTE: Read and follow all instructions from the manufacturer of your battery! F) Metering the internal resistance while Discharging - During discharge the Overloader2 can meter the internal resistance of the battery in process. - This procedure always takes place exactly 1 minutes after staring the discharge. This method ensures constant and comparable results. - The metered result is then displayed instead of the nominal battery capacity. 27

.")
28 Serial PC connection / LogView The Overloader2 is equipped with a serial PC connection slot on the right side of it s aluminum housing. With the article-number RS153 is an optional USB interface available. With a connection to you PC or laptop you can view, edit and file all of your charging and battery information data on your computer. You can also update your Overloader2 with newer software versions in the future. For handling the data transfer the Overloader2 is preset for LogView software ( LogView LogView is a free software and can be downloaded in the newest version under This software allows to monitor all relevant charge-, discharge- and cycle-parameters graphically in many different ways. You can compare different readings; edit them, store them for future references and print them. First steps in LogView In the moment the LogView software is only available in German user language, but it is possible that an English version will follow in the future. After you have installed and started the software, in the next step you have to choose the right Gerät (unit) and the right Port. For that you click in the menu bar on Geräte and in the opening window on Gerät und Port wählen. The Robitronic USB interface (RS153) has to be connected and the necessary driver has to be installed. The right driver is delivered together with the USB interface. 28


29 Serial PC connection / LogView Now the Gerätedialog opens, in which you have to choose the Ladegerät (charger type) and port. Of course you have to choose the Overloader2, the port number however varies with every PC. But the Robitronic USB interface will always be recognized as CP2101 USB to UART Bridge Controller, so it is easily to find. After making these two adjustments you can close this window. The last thing to do is now to click on Aufzeichnung starten on the menu bar (right, upper side on the screen) and to start a charge- or discharge-process with the Overloader2. Very fast you should receive the first data from the Overloader2 on your PC. 29

30 Serial PC connection / LogView After one charge or discharge has been finished, you should have a complete process graph on your LogView screen. Now you can handle your battery information just like you are used to handle files from other PC applications. Organize them, store them, compare them or print them out. In the following you can see a screenshot from a LiPo battery charging graph. On the left side of the program window you have various options regarding the process parameters and their way of being displayed in LogView. PLEASE NOTE: depending on the battery type and/or process type there might be some of the listed options without any data results. The LogView program includes many more option, but to get into them would go beyond the scope of these instructions. There is many more information to find on the LogView homepage including their active support forum. Both of those links can be directly used right out of the LogView program under the Hilfe (help) menu topic. 30
31 Notes 31
32 Robitronic Electronic GmbH Guntherstrasse 11, A-1150 Vienna, AUSTRIA Phone: , Fax:
HYPERION EOS 5i. User s Manual. Power, with Ease
 HYPERION EOS 5i User s Manual Power, with Ease HYPERION EOS 5i - User s Manual Please read the following instructions carefully, to insure safety and convenience EOS 5i Special Features *Powerful, yet
INTRODUCTION. Specifications. Operating voltage range:
 INTRODUCTION INTRODUCTION Thank you for purchasing the EcoPower Electron 65 AC Charger. This product is a fast charger with a high performance microprocessor and specialized operating software. Please
Programmable Charger, Discharger and Analyzer for R/C Cars, Trucks & Boats INSTRUCTION MANUAL
 Programmable Charger, Discharger and Analyzer for R/C Cars, Trucks & Boats INSTRUCTION MANUAL IntelliPeak Ice is a high performance computerized battery charger, discharger, and cycler. IntelliPeak Ice
Emperor L712B Pro. OpErAting instructions
 Emperor L712B Pro Thank you for purchasing this Fusion Emperor L712B Pro charger. We are sure you will be pleased with its performance and features. In order to ensure that you obtain the maximum benefit
HYPERION EOS0606i-B USER S MANUAL Visit for the newest manuals and news
 HYPERION EOS0606i-B USER S MANUAL Visit http://media.hyperion.hk/dn/eos for the newest manuals and news EOS 0606i Special Features (rev B ) *Powerful, yet compact and portable with wide support for battery
Instruction Manual BALANCE CHARGER/DISCHARGER FOR NICD/NIMH/LITHIUM/PB BATTERIES
 X6+ AC/DC CHARGER For Sales and support in the USA please contact: Neutronics 11421 West Bernardo Ct San Diego, California 92127 Phone: 858 674 2250 Web: www.neumotors.com E-mail: sales@neutronics.com
Intelligent Pulse Charger/Discharger KP-100W6 USER S MANUAL
 Intelligent Pulse Charger/Discharger KP-100W6 USER S MANUAL 1. Features... 1 2. Specifications... 1 3. Unit Exterior & Accessories... 2 4. Operation Intro.. 3 5. Lithium battery balance charging information...
UP100AC INSTRUCTION MANUAL
 UP100AC AC/DC Charger INSTRUCTION MANUAL 100W 10A TABLE OF CONTENTS Introduction... 2 Special Features... 4 Warning and Safety Notes... 6 Lithium Battery Connection Diagram... 10 Operation Diagram - Homepage...
AC/DC Dual Touch Charger Instruction Manual
 DTXP4261 AC/DC Dual Touch Charger Instruction Manual It is strongly recommended to completely read this manual before use! Damage resulting from misuse or modification will void your warranty. WARNING!!
Super Brain 989 The Pinnacle of Performance with Power to Spare User s Manual Model Rectifier Corporation
 Super Brain 989 The Pinnacle of Performance with Power to Spare User s Manual Temperature sensor jack Sensor included Model Rectifier Corporation Please read this entire manual including all Safety Cautions,
All specifications and figures are subject to change without notice. Printed in China Instruction Manual
 All specifications and figures are subject to change without notice. Printed in China 2009 Instruction Manual WARNING AND SAFETY NOTES The beep to confirm users' operation sounds every time a button is
Intelligent Digital Balance Charger
 SURE CHARGE 2000 www.racers-edge.com Intelligent Digital Balance Charger INTRODUCTION Thank you for purchasing the SureCharge 2000 LiPo Balance Charger by Racers Edge. This is a rapid charger with a high
2 Channels AC/DC Charger
 No. S2004 English 2 Channels AC/DC Charger OPERATING INSTRUCTION Please read this manual thoroughly. Keep this manual in a convenient place for quick and easy reference. - CONTENTS - BEFORE USE SUPPORT
Power Meter with Balancing INSTRUCTION MANUAL
 Power Meter with Balancing INSTRUCTION MANUAL INSTRUCTIONS The PowerMatch meter is a perfect device for matching electronic components to optimize electric fl ight performance and satisfaction. An easy-to-read
INSTRUCTIONS. N61e Quick Charger
 INSTRUCTIONS N61e Quick Charger Software version V 1.0 and higher Microprocessor Controlled Quick charger, Discharger, Balancer For Li-Po Li-Ion, Li-FePO4(A123), Ni-Cd, Ni-MH, Lead-Acid Up to 10 Amp charge,
HYPERION HP-0610i-DUO Connections and Flow Charts
 HYPERION HP-0610i-DUO Connections and Flow Charts 1. DUO CHARGER LAYOUT DC INPUT CABLE 2X16 LCD PC DATA PORT TEMP1 SENSOR OUTPUT PORT 1 OUTPUT PORT 2 TEMP2 SENSOR CH Output 1 6Cell Lithium Balancer Connector
Super Brain 992 Palm Charger
 Super Brain 992 Palm Charger INSTRUCTION MANUAL Features and Specifications DC charger with separate AC power supply included (DC input of 12V to 18V) Large backlit LCD Adjustable charge rate from 0.2
Overlander RC-8S PRO User s Manual
 Overlander RC-8S PRO User s Manual A Digital Programmable Balancing Charger/Discharger/Cycler. http://www.overlander.com 1 Contents. Page No. Introduction. 2 Specification. 2 Special Features. 2 Charger
User's Manual. Intelligent Charger/Discharger X6-Plus
 Intelligent Charger/Discharger X6-Plus User's Manual 1 INDEX Specifications........2 System Features...... 2 Warnings... 2 X6-Plus charger layout....3 General Setup & Notes...... 4 Li-Po, Li-Ion, Li-Mn,
G6P INSTRUCTION MANUAL AC/DC FAST CHARGER. G-FORCE, Inc. Professional Balance Charger / Discharger
 INSTRUCTION MANUAL Products by G-FORCE, Inc. www.gforce-hobby.jp Mare-kanda Bld.9F, 1-3-1, Kajicho, Chiyoda-ku, Tokyo, 1-0044, JAPAN Copyright 2014 G FORCE, Inc. All Right Reserved. Professional Balance
5006B 5008B 50010B for up to 10S LiPo & LiFe 5mV voltage accuracy 500W charge power 1.3A balance current 2.8 TFT LCD display
 5006B 5008B 50010B for up to 10S LiPo & LiFe 5mV voltage accuracy 500W charge power 1.3A balance current 2.8 TFT LCD display Thanks for your purchasing the 500W CHARGER for your RC. Read the ENTIRE instruction
INSTRUCTION MANUAL. UP650AC: 50W, 7.0A Multi Charger UP680AC: 80W, 7.0A Multi Charger
 INSTRUCTION MANUAL UP650AC: 50W, 7.0A Multi Charger UP680AC: 80W, 7.0A Multi Charger TABLE OF CONTENTS Warning and Safety Notes...2 Introduction...4 Specification...4 Special Features...6 Warning and Safety
FEATURES Charges two 6- to 8-cell NiCd/NiMH battery packs simultaneously Fully automatic operation Multi-color LEDs indicate state of charge at a
 FEATURES Charges two 6- to 8-cell NiCd/NiMH battery packs simultaneously Fully automatic operation Multi-color LEDs indicate state of charge at a glance 8-bit MHz CPU intelligence control Advanced Pulse
Cheali Charger v1.00 Manual / User Guide
 version: draft 001, February 2016 This document is a draft version. It is uncompleted and can contain mistakes. Please wait for official release before use. Cheali Charger v1.00 Manual / User Guide 1/22
Special Purpose for RC
 Special Purpose for RC Instruction Manual N61e Quick Charger Software Version V 1.0 and Higher Microprocessor Controlled Quick Charger, Discharger, Balancer For Li-Po Li-Ion, Li-FePO4(A123), NiCd, NiMH,
Operating Instructions e -STATION
 Operating Instructions e -STATION BC8DX Two identical and independent outputs with integrated balancer Charge current up to 9A, discharge current up to 5A, 1 to 8 series of LiIo/LiPo/LiFe, 1 to 22 cells
The flow chart of ULTRA DUO PLUS 45 Charger
 The flow chart of ULTRA DUO PLUS 45 Charger 0-1. PRODUCT STUCTURE Fan1 Graph-LCDisplay Fan2 Input1 Control keys Input2 Output1 Output2 USB interface Balancer connect Output2 Temperature sens1 Temperature
Turnigy FATBOY 8. User s Guide. Copyright 2012 Hobby King 01/18/2012
 Turnigy FATBOY 8 User s Guide Copyright 2012 Hobby King 01/18/2012 This Turnigy product manufactured in Singapore by LEO Energy Pte Ltd, www.revolectrix.com Contents Contents... 2 About FATBOY 8... 4 Using
NEVER CHARGE ON OR AROUND COMBUSTIBLE MATERIALS. NEVER CHARGE A DAMAGED BATTERY PACK.
 2 Table of contents Introduction...3 Warnings and Safety Notes...4 Charger Layout...10 Specifications...11 Features...12 Power Supply Connections...15 Battery Connections...16 Operating the X1 Pro...17
INSTRUCTIONS SPECIAL FEATURES
 INSTRUCTIONS Discharge Termination: auto-cut based on individual cell voltages 2.75V per cell in Quick-Balance Mode 3.0V per cell in Interface Mode with separate discharger Discharge Current: 120mA per
ULTRAMAT AC/DC EQ OPERATING INSTRUCTION
 ULTRAMAT AC/DC EQ OPERATING INSTRUCTION Prior to use, please read this manual thoroughly. Keep this manual in a convenient place for quick and easy reference. Contents BEFORE USE SUPPROT AND SERVICE Customer
UP120AC INSTRUCTION MANUAL
 UP0AC INSTRUCTION MANUAL x0w A TABLE OF CONTENTS Introduction... Special Features... 4 Warning and Safety Notes... 6 Lithium Battery Connection Diagram... 0 Operation Diagram - Homepage... Operation Diagram
Super Brain 969 Pro AC/DC Delta Peak Charger with Dual Output and Discharge Function Instruction Manual Model Rectifier Corporation
 Super Brain 969 Pro AC/DC Delta Peak Charger with Dual Output and Discharge Function Instruction Manual Model Rectifier Corporation Please read this entire manual, including all Safety Cautions and Warnings
100W 100W 10A. UP100AC DUO: 100W and 50W twin Charger
 100W 100W 50W 50W 10A UP100AC DUO: 100W and 50W twin Charger TABLE OF CONTENTS Warning and Safety Notes...2 Introduction...4 Specification...4 Special Features...6 Warning and Safety Notes...8 Lithium
HYPERION EOS0610iNET Ports & Net Cable
 HYPERION EOS0610iNET Ports & Net Cable CHARGER 1 (MASTER) CHARGER 2 (SLAVE) DC CABLE DC CABLE 2X16 LCD 2X16 LCD PC DATA PORT OUTPUT PORT PC DATA PORT OUTPUT PORT TEMP SENSOR TEMP SENSOR CHG to CHG Link
GT500 Multi Chemistry Charger User s Guide For firmware versions starting at v2.13
 GT500 Multi Chemistry Charger User s Guide For firmware versions starting at v2.13 Copyright 2015 Rev2.3 Contents About GT500... 3 Specifications... 5 Precautions... 6 Smart Power Management... 7 Regenerative
Computerized Charger, Discharger, Cycler INSTRUCTIONS
 Computerized Charger, Discharger, Cycler INSTRUCTIONS Based on the industry-leading original Triton charger from ElectriFly, Triton Jr. offers most of the key specifications and features, plus the same
5006B 5008B 50010B for up to 10S LiPo & LiFe 5mV voltage accuracy 500W charge power 1.3A balance current 2.8 TFT LCD display
 5006B 5008B 50010B for up to 10S LiPo & LiFe 5mV voltage accuracy 500W charge power 1.3A balance current 2.8 TFT LCD display Thanks for your purchasing the 500W CHARGER for your RC. Read the ENTIRE instruction
All specifications and figures are subject to change without notice.
 All specifications and figures are subject to change without notice. Table of Contents Introduction... 02 Charger Layout... 04 Special Features... 05 Warnings and Safety Information... 07 Default User
User Manual IQ338. We thank you that you have decided to purchase our intelligent charger.
 User Manual IQ338 Please read the manual carefully before using this charger. We thank you that you have decided to purchase our intelligent charger. 9 120004 642783 Please follow the safety and care instructions
INSTRUCTION MANUAL C SkyRC Technology Co., Ltd Version 1.0
 INSTRUCTION MANUAL C SkyRC Technology Co., Ltd. 2010 Version 1.0 TABLE OF CONTENTS TABLE OF CONTENTS Introduction 02 Special Features 03 Lithium Polymer Balance Charge Program Connection Diagram 05 Warning
Specifications. Special features
 Thank you for purchasing the 6Cell Charger. You get a rapid charger/discharger with a built-in balance, which is computerized with a high performance microprocessor and specialized operating software.
OPERATING INSTRUCTION
 OPERATING INSTRUCTION Prior to use, please read this manual thoroughly. Keep this manual in a convenient place for quick and easy reference. Contents BEFORE USE SUPPROT AND SERVICE Customer support Internet
Introduction Charger Layout Special Features Warnings and Safety Information Default User Preferences Setup...
 TABLE OF CONTENTS Introduction................................01 Charger Layout............................03 Special Features.....................04 Warnings and Safety Information....................06
INTRODUCTION. Specifications INTRODUCTION
 INTRODUCTION INTRODUCTION Thank you for purchasing the C6 Intelligent Balance Charger by XCEED-RC. This product is a rapid charger with a high performance microprocessor and specialized operating software.
Introduction Charger Layout Special Features Warnings and Safety Information Default User Preferences Setup...
 TABLE OF CONTENTS Introduction................................01 Charger Layout............................03 Special Features.....................04 Warnings and Safety Information....................06
CHARGER. G-FORCE, Inc. INSTRUCTION MANUAL. DC Balance Charger & Discharger. Products by
 DC Balance Charger & Discharger CHARGER INSTRUCTION MANUAL Products by G-FORCE, Inc. www.gforce-hobby.jp Mare-kanda Bld.9F, 1-3-1, Kajicho, Chiyoda-ku, Tokyo, 101-0044, JAPAN Copyright 2014 G FORCE, Inc.
C4012B for up to 12S LiPo & LiFe & LiTo 5mV voltage accuracy 1500W charge power at AC 500W charge power at DC 1.2A balance current 2.
 C4012B for up to 12S LiPo & LiFe & LiTo 5mV voltage accuracy 1500W charge power at AC 500W charge power at DC 1.2A balance current 2.8 TFT LCD display Thanks for your purchasing the 1500W CHARGER for your
PowerSTAR PS-2024-D. Maximum Power Point Tracking Solar Regulator. w w w. r o c s o l i d. c o m. a u. Contents
 w w w. r o c s o l i d. c o m. a u PowerSTAR PS-2024-D Maximum Power Point Tracking Solar Regulator Contents 1 Quick Start Guide... 2 2 Specifications... 3 2.1 General Operation... 3 2.2 Absolute Maximum
INSTRUCTION MANUAL. 2-YEAR LIMITED WARRANTY *USA and Canada Only
 Programmable Charger, Discharger and Analyzer for R/C System Batteries INSTRUCTION MANUAL Thank you for purchasing the Accu-Cycle Elite battery conditioner from Hobbico! Accu-Cycle Elite is a high performance
A IT IS HIGHLY RECOMMENDED THAT YOU UTILIZE A SAFETY DEVICE SUCH A IT IS HIGHLY RECOMMENDED THAT YOU KEEP AN OPERABLE CLASS A. Table of Contents:
 INSTRUCTION MANUAL WARNING: THE CHARGING AND DISCHARGING OF RC HOBBY BATTERIES CAN BE DANGEROUS. FAILURE TO FOLLOW 1 THE INSTRUCTIONS AND WARNINGS IN THIS MANUAL MAY RESULT IN PROPERTY DAMAGE AND/OR LOSS
Operating Instructions e -STATION
 Operating Instructions e -STATION BC8DP Microprocessor controlled high-performance rapid charger/discharger for NiCd/NiMH/Lithium/Pb batteries. Dual input power(ac/dc), USB PC link, temperature sensor
BLACKMAX. BALANCE CHARGER/DISCHARGER FOR LiFe/LiPo/LiIon/NiCd/NiMH/PB BATTERIES. BLACKMAX Users Guide
 Booma-RC BLACKMAX BALANCE CHARGER/DISCHARGER FOR LiFe/LiPo/LiIon/NiCd/NiMH/PB BATTERIES Dual Charge MAXPACK READY Charge 2 Booma MAXPACK Batteries Simultaneously BLACKMAX Users Guide BLACKMAX is a rapid
Specifications. Operating voltage range:
 INTRODUCTION INTRODUCTION Thank you purchasing the RC-6S AC PRO 80W Balance charger by OVERLANDER. This product is a rapid charger with a high performance microprocessor and specialized operating software.
Intelligent NiMH/NiCd/Li-ion Charger TN456
 Intelligent NiMH/NiCd/Li-ion Charger TN456 USER S MANUAL www.tenergy.com CONTENTS 1. Intended Use...3 2. Package Contents...4 3. Safety Instructions...4 3.1 Product Safety...4 3.2 Battery safety...4 4.
Operating Instructions
 Operating Instructions Introduction Thank you for purchasing the Power Peak D7 EQ-BID automatic battery charger from Hitec, a high-performance 400 W charging / discharging station for the demanding modeler.
INDEX SPECIFICATIONS
 The DuraTrax Onyx 210 charger is great for a wide variety of applications! Charge current options of 800mA, 1.5A, 3A, and 5 amps, plus 4 to 8 cell NiCd or NiMH compatibility makes this charger great for
Super Brain 977. AC/DC Charger with Dual Output and Discharge Function. User s Manual. Model Rectifier Corporation
 Super Brain 977 AC/DC Charger with Dual Output and Discharge Function User s Manual Model Rectifier Corporation 80 Newfield Avenue Edison, NJ 08837-3817 Phone: 732-225-6360 www.modelrectifier.com Please
User Manual Solar Charge Controller 3KW
 User Manual Solar Charge Controller 3KW Version: 1.3 CONTENTS 1 ABOUT THIS MANUAL... 1 1.1 Purpose... 1 1.2 Scope... 1 1.3 SAFETY INSTRUCTIONS... 1 2 INTRODUCTION... 2 2.1 Features... 2 2.2 Product Overview...
BRAKE TESTER DECELEROMETER
 OC3010_GBM_21009 BRAKE TESTER DECELEROMETER OWNER S MANUAL Version 8.++ ORBIT CONTROLS AG Zürcherstrasse 137 CH-8952 Schlieren/ZH Tel: + 41 44 730 2753 Fax: + 41 44 730 2783 info@orbitcontrols.ch www.orbitcontrols.ch
It is strongly recommended to completely read this manual before use! Damage resulting from misuse or modification will void your warranty.
 The DuraTrax Onyx 240 charger is two chargers in one! It s an excellent choice for electric powered models which use two NiCd or NiMH batteries simultaneously, or modelers who rotate through multiple batteries
Digital Charger & Discharger
 Digital Charger & Discharger INSTRUCTION MANUAL www.copterx.com Copyright 2008 KY MODEL Company Limited. MENU Table of content...........................................................................
Features: Enhanced throttle response, excellent acceleration, linearity and driveability
 120A/150A ESC X-Car 120A/150A Series Sensored/Sensorless Brushless ESC for 1:8 scale Car or Truck Thank you for purchasing the X-Car Brushless Electronic Speed Controller (ESC). The X-Car 1:8 Scale 120A/150A
AC/DC LIPO CHARGER INSTRUCTION MANUAL
 DTXP4195 AC/DC LIPO CHARGER INSTRUCTION MANUAL The Onyx 150 AC/DC LiPo balancing charger is the perfect entry-level LiPo charger for modelers using up to 3S LiPo batteries. Inexpensive and very easy to
C10325 v1.1. Thanks for your purchasing the intelligent and powerful charger.
 PFC programmable charger 90V~265VAC Input Thanks for your purchasing the intelligent and powerful charger. Read the ENTIRE instruction manual to become familiar with the features/functions of the device
Model 1:8 Beast-ZTWSS120A 1:8 Beast-ZTWSS150A. PN#Model Cont.Current 120A 150A. Burst Current 760A 1080A
 Alien Power System BEAST Series Sensored/Sensorless Brushless ESC for 1:8 scale Car or Truck Thank you for purchasing the Alien Power System Brushless Electronic Speed Controller (ESC). The Alien Power
VLE8 USER MANUAL 4 HANDLEIDING 18 MODE D'EMPLOI 33 MANUAL DEL USUARIO 48 BEDIENUNGSANLEITUNG 63 INSTRUKCJA OBSŁUGI 78 MANUAL DO UTILIZADOR 93
 LI-ION/POLYMER BALANCE CHARGER LI-ION/LIPO-BALANSLADER CHARGEUR ÉQUILIBREUR POUR ACCUS LI-ION/LIPO CARGADOR BALANCEADOR PARA BATERÍAS LI-ION/LIPO LADEGERÄT MIT BALANCER FÜR LI-ION-/LIPO-AKKUS ŁADOWARKA
80W. Operating Manual. Dual Power. Intelligent Balance Charger LiPo/LiFe/LiIon: NiMH/NiCd: Pb: Charge Power: Charge Rate: Discharge Rate:
 80W Dual Power /LiFe/LiIon NiMH/NiCd Pb Charge Power Charge Rate Discharge Rate 1-6S 1-16S 2-20V 80W 0.1-10.0A 0.1-2.0A Intelligent Balance Charger Operating Manual - 2 - Please read this operating manual
OPERATING MANUAL Digital Diesel Control Remote control panel for WhisperPower generator sets
 Art. nr. 40200261 OPERATING MANUAL Digital Diesel Control Remote control panel for WhisperPower generator sets WHISPERPOWER BV Kelvinlaan 82 9207 JB Drachten Netherlands Tel.: +31-512-571550 Fax.: +31-512-571599
2 CH DC CHARGER OPERATING INSTRUCTION
 2 CH DC CHARGER OPERATING INSTRUCTION Prior to use, please read this manual thoroughly. Keep this manual in a convenient place for quick and easy reference. - CONTENTS - BEFORE USE SUPPROT AND SERVICE
Functions and Displays
 Functions and Displays No. 4125 (12V/220V only - Euro-Connector) No. 4127 (12V/220V only - GB-Connector) No. 4129 (12V/110V only US/Japan-Connector) Dear Customer, thank you for purchasing this LRP product.
User Manual. User Manual IQ 328+
 User Manual IQ 328+ Please read the manual carefully before using this charger. We thank you that you have decided to purchase our intelligent charger. Please follow the safety and care instructions in
X2 Ultima Multi-Chemistry, High-Output, Dual-Charger System
 X2 Ultima Multi-Chemistry, High-Output, Dual-Charger System Hitec RCD 2010 Version 1.0 TABLE OF CONTENTS Introduction...02 Special features...04 Warning and safety notes...07 Initial parameter set up (users
Warnings: Specifications & Features:
 Hyperion EOS0720iNET Charger - User s Manual v1.2 Firmware version. Visit http://media.hyperion.hk/dn/eos for the newest manuals, firmware, and software Specifications & Features: 250W max CHARGE Output
WARNING: THE CHARGING AND DISCHARGING OF RC HOBBY BATTERIES CAN BE DANGEROUS. FAILURE TO FOLLOW THE INSTRUCTIONS AND WARNINGS IN THIS MANUAL MAY
 WARNING: THE CHARGING AND DISCHARGING OF RC HOBBY BATTERIES CAN BE DANGEROUS. FAILURE TO FOLLOW THE INSTRUCTIONS AND WARNINGS IN THIS MANUAL MAY RESULT IN PROPERTY DAMAGE AND/OR LOSS OF LIFE. Table of
When you finish the running, power off the receiver BEFORE turning off the transmitter.
 Thanks for purchasing Turnigy AQUASTAR ESC speed controllers. Turnigy AQUASTAR ESC are specifically developed to supply stable and strong power for r/c model boats beyond you expected. Please read the
Competition Electronics, Inc
 Competition Electronics, Inc Turbo35-GFX LiPo User s Manual Addendum 1 Introduction This enhancement makes it possible to charge 1,2 and 3 cell LiPo battery packs with the T35-GFX. Now you can have the
Manufactured by ProTek R/C
 Multi-Chemistry, High Output Dual Charger System With Dual 200Watt Outputs & Integrated Cell Balancers Manufactured by ProTek R/C All specifications and figures are subject to change without notice. Printed
New Charger X150 Released
 X150 AD Manual New Charger X150 Released www.imaxrc.com/x150.html AC Function DC Function Touch Screen Operation 3.0 inch touch screen make the operation more convenient 3.0 inch display screen 3.0 inch
Begin to Use The New ESC: Before use the new ESC please carefully check every connections are correct or not. Yellow motor wire B Blue motor wire A
 HIMOTO ZTW Brushless Electronic Speed Control for car or truck Thank you for purchasing ZTW Brushless Electronic Speed Controller(ESC). The ZTW electronic speed control (ESC) is specifically designed for
PowerView PV380-R2 Mechanical Configuration
 PowerView PV380-R2 Mechanical Configuration Operations Manual *Products covered in this document comply with European Council electromagnetic compatibility directive 2004/108/EC and electrical safety directive
EPAS Desktop Pro Software User Manual
 Software User Manual Issue 1.10 Contents 1 Introduction 4 1.1 What is EPAS Desktop Pro? 4 1.2 About This Manual 4 1.3 Typographical Conventions 5 1.4 Getting Technical Support 5 2 Getting Started 6 2.1
Glow Plug for E Series Only
 Charging the Battery - Do not charge the battery, with a charger using negative discharge pulses, when connected to the ECU. This will destroy the electronics of the ECU. The only method is to disconnect
SMART BALANCE CHARGER INSTRUCTION MANUAL
 C1 SMART BALANCE CHARGER INSTRUCTION MANUAL TABLE OF CONTENTS INTRODUCTION... 01 SPECIFICATION...03 MAIN FEATURES... 04 WARNING AND SAFETY NOTES...06 PROGRAM FLOW CHART...09 PROGRAM DESCRIPTION...10 OPERATING
2 Channels DC Charger
 No. S2003 English 2 Channels DC Charger OPERATING INSTRUCTION Please read this manual thoroughly. Keep this manual in a convenient place for quick and easy reference. 2014 Graupner/SJ USA OPENHOBBY LLC.
Professional Balance Charger / Discharger
 Professional Balance Charger / Discharger Manufactured by SKYRC TECHNOLOGY CO.,LTD. www.skyrc.com All specifications and figures are subject to change without notice. Printed in China 2011 SkyRC Technology
Model H30 Operation Manual
 Model H30 Operation Manual Model H30 Version 1.0 August 1, 2007 2 135 West Davenport Street Rhinelander WI 54501 Phone: 866.441.7997 Fax: 866.278.0036 info@houstonst.com www.houstonst.com 3 Table of Contents
2 x 50W DUAL OUTPUT PROFESSIONAL BALANCE CHARGER/DISCHARGER AC DC
 2 x 50W DUAL OUTPUT PROFESSIONAL BALANCE CHARGER/DISCHARGER AC DC For more information, please visit www.radientrc.com or scan the QR code with your smart phone. Part Numbers RDNA0396 Duplex 2 x 50W LCD
Copyright 2009 by Venom
 Copyright 2009 by Venom TABLE OF CONTENTS Introduction...2 Parts List / Specifications...3-4 Program Select MAP...5-6-7 Program Select USER SET PROGRAMING...8 Program Select LiPO BATTERY...9-10 Program
Great Chargers. Rating System. Bench-tested and editor-approved Text and photos by John Reid
 Great Chargers Bench-tested and editor-approved Text and photos by John Reid A charger is an essential investment that will pay dividends in the performance of your battery packs., safety features, and
Connection for Channel Asynchronous Mode Connection for Channel Synchronous Mode
 - 1-406DUO V1.2.0 406DUO User's Manual (V1.2.0) Index User Notice... - 4 - Safety Notes... - 4 - Copyright... - 5-406DUO Special Features... - 5 - Appearance Parameters... - 5 - Specifications... - 6 -
BMS SV 24S for 2S-24S LiPo, LiFe & LiTO&others Low power consumption High accuracy 2.8 TFT LCD display Programmable
 BMS SV 24S for 2S-24S LiPo, LiFe & LiTO&others Low power consumption High accuracy 2.8 TFT LCD display Programmable Thanks for your purchasing the for your vehicle. Read the ENTIRE instruction manual to
INSTRUCTION MANUAL. Item-No. C Watt. ONE Output. Li-Po HV 2-4. Li-Fe 2-4. Li-Po 2-4. Ni-Cd 6-8. Ni-MH 6-8. Li-Ion 2-4 PB 2-12V.
 Item-No. C-48485 100-240V AC 60 Watt ONE Output Charge Current 6A Li-Po 2-4 Li-Po HV 2-4 Li-Fe 2-4 Li-Ion 2-4 Ni-Cd 6-8 Ni-MH 6-8 PB 2-12V Worldwide INSTRUCTION MANUAL TABLE OF CONTENTS INTRODUCTION...03
BREEZE PLUS LX40. OpErATInG InSTrUCTIOnS Please keep for future reference
 BREEZE PLUS LX40 OpErATInG InSTrUCTIOnS Please keep for future reference Thank you for purchasing this Breeze Plus LX40 charger. We are sure you will be pleased with its performance and features. In order
Draft Unofficial description of the UNRC charger menus
 Table of contents 1. The main screen... 2 2. Charge modes overview... 2 3. Selecting modes... 3 4. Editing settings... 3 5. Choose default charge mode... 4 6. Edit memory banks... 4 7. Charge mode description...
SmartON / SmartON+ Installation and Use Manual
 SmartON / SmartON+ Installation and Use Manual Rev. Date Ver. Ver. Notes document document SmartON SmartViewII 1.0 06/04/2007 3.08 2.30 Pre-release 1.01 10/04/2007 3.08 2.30 Release 1.02 04/10/2007 3.09
MULTICHARGER INSTRUCTION MANUAL AC/DC INPUT, PROFESSIONAL BALANCE CHARGER DISCHARGER
 INSTRUCTION MANUAL AC/DC INPUT, PROFESSIONAL BALANCE CHARGER DISCHARGER MULTICHARGER : THE CHARGING AND DISCHARGING OF RC HOBBY BATTERIES CAN BE DANGEROUS. FAILURE TO FOLLOW 1 THE INSTRUCTIONS AND S IN
WARNING: THE CHARGING AND DISCHARGING OF RC HOBBY BATTERIES CAN BE DANGEROUS. FAILURE TO FOLLOW
 INSTRUCTION MANUAL AC/DC INPUT, PROFESSIONAL BALANCE CHARGER / DISCHARGER MULTICHARGER : THE CHARGING AND DISCHARGING OF RC HOBBY BATTERIES CAN BE DANGEROUS. FAILURE TO FOLLOW 1 THE INSTRUCTIONS AND S
KART TACH, LAP TIMER AND TEMPERATURE GAUGE.
 KART TACH, LAP TIMER AND TEMPERATURE GAUGE www.mychron4.com Congratulations on your new MyChron4 purchase! MyChron4 is an innovative instrument for karts, representing a revolutionary step in the development
SkyRC Technology Co., Ltd Version 1.0
 SkyRC Technology Co., Ltd. 2014 Version 1.0 TABLE OF CONTENTS INTRODUCTION SPECIAL FEATURES WARNING AND SAFETY NOTES PROGRAM FLOW CHART OPERATION OPERATING PROGRAM CHARGING PROGRAM BATTERY MEMORY SET AND