COMPOSITE-ARF EUROSPORT MODIFICATIONS
|
|
|
- Ferdinand Douglas
- 5 years ago
- Views:
Transcription

1 COMPOSITE-ARF EUROSPORT MODIFICATIONS Having supplied these Mod's to many over the months on a oneon-one basis, I thought I would compile a page of all the modifications I have done to the Eurosport for easy review. I will continue to add to this page as I begin to install the armament and tanks to my ES in preparation for it's new paint scheme. Feel free to me if you have any further questions... Enjoy! Todd


2 The center of the tanks are secured using a 2" wide velcro band attached to the fuse as seen here on the left. When the intakes are installed, they will lock the front of the tank in place as the taper of the intake just clears the tank. No further support is necessary.

3 Heat Shield The fuse was getting a bit too warm in the engine compartment during the initial engine runs. I painted the engine / pipe area with BVM heat shield then applied BVM ceramic blanket to the engine bay and pipe area. The blanket is held in place by applying beads of Permatex high temp RTV to the fuse and pressing the blanket in place. There is no heat transmitted to the fuse since I installed the blanket, cheap protection..


4 Intakes I have bee asked numerous times if the intakes are necessary, the answer is NO. While not required, I have had the opportunity to fly this plane both with and without them and can confirm that the intakes do improve the performance quite a bit. Without them there is substantial amount of buffeting within the airframe that you can physically see and feel in flight, not to mention the benefits of FOD protection. In addition, they are much more aesthetically pleasing.tams intakes are a simple two piece design, right and left halves are just trimmed and slid into place. To simplify service and access, I decided to make my intakes removable.


5 Using some aileron stock laminated with 1/16th ply, I made the mounting blocks to support the intake and give me something to screw them to. As you can see here, the blocks are glued to the bottom and sides of the fuse. The intakes are then screwed in place using small BVM flush mount screws. I also place a small bead of "Shoe Goo" to the bottom and side of the intake to bond the forward lip to the fuse. Should I need to remove the intakes I just score the "Goo" with a razor, remove the screws and they slide right out. In order for the intakes to be removable, the upper intake lip plate must be made removable as well. The intake lip plate is hollow, some support inside is required so the skin does not flex as the mounting screws are tightened. A simple solution to this was to drill three holes in the rear of the plate where I injected a puddle of Aeropoxy, enough to form a bead


6 between the top and bottom skin inside. Once the puddle set up, I drilled through the puddle into the fuse to accept 4-40 screws. I then counter sunk the screws by partially drilling into the aeropoxy puddle with a bit the same size as the screw head. Ply reinforcement plates were also fit to the fuse at the attachment points.

7 I have also made the intake "Splitter" removable. Here is what I did... I took some 1/4" balsa and cut it to the rough shape I wanted, I glued 1/4 x 3/8" spruce stick to the back edge. I then shaped the splitter to fit and made sure I left enough clearance to still remove the upper lip center screw. Once I had the splitter shaped I laminated both sides with 1/16th ply so the edge of the ply butted up against the intakes but the 1/4 spruce slid between the intakes. I then glassd the splitter and painted it. The splitter is held in place just like the intakes with BVM flush mount screws.

8 Gear Doors Nose gear door cylinder mounting took some thought. First, the cylinder needed to clear the nose gear. Second, I had to rig it in such a way that I could still have the intakes removable without having to detach the cylinder mount to remove the intakes. After about an hour of head scratching I finally came up with a mount that would work.

9 Just a quick shot here to help understand how I did the nose gear mount. As you can see it is just a simple plate contoured to the intake with a 4/40 bolt that holds the cylinder. To remove the intakes I just remove the nut and slide the cylinder off the bolt.

10 Nose gear in the retracted position... As you can see, the cylinder slips between the strut and the wheel, tight fit ;-)

11 Main gear doors are a fairly simple installation. Just cut the doors on the panel line and hinge with Sonic -Tronics offset hinges. The cylinders are mounted to a 4-40 bolt that passes through the forward engine former. Although I used some balsa to reinforce the gear doors, a better option would have been to reinforce all the gear door areas with carbon cloth before cutting them out, in addition to strengthening them it will also help them retain their shape. Pic Coming Soon! Canards During the early stages of playing with the euro, I managed to break (bend is more like it ) both canards. If I got too hard on my brakes one tended to grab better than the other during their break-in period. A slight tip to one side
 would be to laminate a 1/32 ply plate (med CA works fine) to both the top and bottom (internally, use the canard as a template then trim back an additional")
12 caused impact of the canard to the ground, since they are hollow they snapped just outward of the torsion rod. An easy fix for this (during the build) would be to laminate a 1/32 ply plate (med CA works fine) to both the top and bottom (internally, use the canard as a template then trim back an additional 1/4" on all sides) of the canard before assembling the torsion shaft and outer rib. This sufficiently reinforces the canard structure so they don't snap should you tip the plane. I was concerned about the canard linkage arrangement, the torsion shaft is 6mm in diameter and instructions call for you to drill a 3mm hole through the shaft and insert a bolt to provide the torsion linkage to the servo. Having less than 1.5mm of material on each side of the bolt to support the torsion of the canard did not seem optimal so I designed a
13 new linkage system with custom machined control horns that clamp the shaft instead. This also allows for easy removal of the canards for transport / service, simply loosen the clamp bolt and the canard slides right off. In addition, I made support blocks with bearings installed to place the shaft load on the bearing instead of the canard tube. The process to build the canards as per the manual is a tedious one at best, here is a much simpler way to assemble them. Install the shaft into the sleeve through the "P" bearing block (seen above) and then slide on the wheel collar (spacer) and control horn (custom made ones), lightly clamp the control horn to the shaft. Slide the root rib onto the shaft holding it against the "Blister" and making it parallel with the side of the fuse while pulling the shaft outward. Using medium CA, tack glue the root rib to the shaft. Once the glue has set remove the shaft with root rib attached. Test fit the shaft/root rib into the canard, mark location where the shaft is located inside the canard on the outside with some masking tape. Balance the canard with lead shot in the very leading edge, drop in lead and tack with thin ca, slide root rib/shaft in place and check. Canard should be balanced on the shaft so, trailing edge should not drop. Once balanced, secure lead with a thinned coat of epoxy. Rough up the canard torsion shaft from the root rib outward with 80 grit. Ok...Now that you have everything prepped you can glue the canards on... Using Aeropoxy, place a generous bead inside the canard top and bottom where the shaft lays (follow masking tape you put on earlier). Also aeropoxy the shaft to the root rib. Slide the shaft into the plane, the slide the canard over the shaft and root rib aligning the canard to the fuse with 1/32 to 1/16 gap front to back. When you have the canard aligned on the shaft perfectly, pinch the canard tightly where the root rib is and gently slide the entire assembly out. Using thin CA tack glue the perimeter of the root rib to the canard.

14 When the glue has set reinstall the canard and double check the fit. When satisfied all is correct, place a small bead of Aeropoxy around the perimeter of the root rib and your done!

15 Here is the final install of the custom canard horns, P-Bearing blocks and linkage. The bearings used for this application were 6mm x 12mm Duratrax that should be available from you local hobby shop. The custom machined horns are now being sold at DreamWorks Model Products
.")
16 Speed Brake I chose to install the speed brake mainly because I wanted easy access to my switches, charge leads, air fills etc... I thought this would be the best location for these items since it would allow me full access without having to remove the canopy. Not to mention the "Coolness" factor the speed brake adds ;-). My biggest concern was how I was going to actuate it since I needed to be able to open and close it manually when the system was powered off. After a bit of research, I found JetcatUSA sells a electronic valve made by JetTronic that vents all the air from the cylinder (not the tank!) when powered down, perfect! To cut out the brake the first thing I did was reinforce the area with carbon cloth. I then proceeded to cut the brake out with a xacto razor saw (backbone removed) using the panel line as a guide. At the pivot tabs I used tapered point dremel bit to score the glass then finished the cut with a #11 xacto blade.
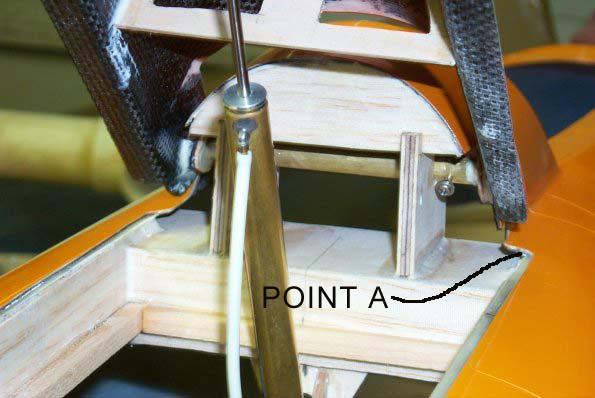
17 Next, I built a box around the opening from 3/32 balsa and a hinge support and bloc from 3/32 ply. The hinge blocks were a bit of fiddley work, I had made three or fou tack gluing them in place to check for correct operation before finding the correct location of the hinge line. Hinge is simply two brass tubes, one inside the other wit small screw to lock side to side movement. Ply rings were made to support the hing on the SB tabs. I also made two formers to strengthen the SB door itself. ~NEW~ I built a Eurosport for a friend and made templates this time for the speed brake assembly. The following will assist you in building the hinge assembly and the corr location... The hinge base is 3/16" ply 6" long and 2" deep (taper ends to match fuse contour). T location of this plate should be 7/8" rear of point A (pic 1) (IE: rear edge of base is 7 back from point A). Hinge block is 2" wide x 1 1/2" deep x 3/16". Rear edge of the hi blocks should be even with rear edge of base. Center of hinge hole is 35mm from re of hinge block and 16mm from top. Location of hinge block on base should be aroun 1/4" from center of hinge base.
18

19

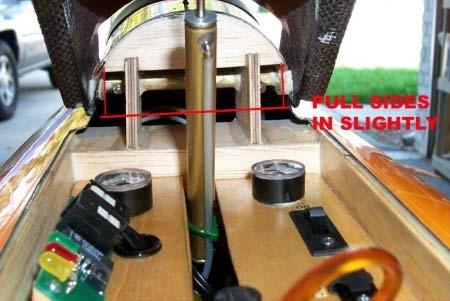
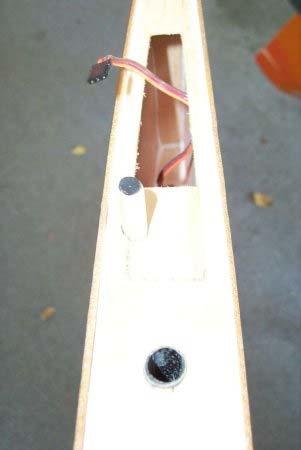
20 When making the top former, you must pull the sides in very slightly so the SB will clear the fuse as it opens. Making the hinge blocks long enough to slot lock into the top former will make the entire assembly rigid. More head scratching when trying to find a good location for the UAT. I like to have a clear view of the header and I wanted a spot that would not require long fuel lines or removing the canopy. Then came this brain storm...rough up the bottle with 80 grit, clean with denatured alcohol and glued in place with a bit of Aeropoxy...

21 Final Shot of the Speed Brake with the floor installed. As you can see, I have access to all the my air fills, fueling, engine lights / data bus, switches and charge jack. I also installed air pressure gauges to monitor the gear and brake systems.


22 Easy-Air BVM Easy-Air system was added to the wings and fuse. This was the first time I have used this system and they work great! Slide the wing on and all my air lines are plugged in... PIC 1

23 PIC 2 Landing Gear Supports I am adding this section by request...although there was some considerable modifications made to the landing gear mounts on my ES, Composite-ARF has since made changes to these mounts in their newer kit to strengthen them. If you have the laminations shown in the picture below, you do not need to perform this step but you should still laminate the root rib with 1/32 ply as shown in pic 2 above. On the older kit (first half of 2003 and earlier) the main landing gear flex plate in the wings was not supported adequately. Upon a slightly harder than normal landing, the ribs that support the flex plate would split, allowing the flex plate and gear to impact the top wing skin usually ending with severe damage to the wing. To fix for this problem is to laminate the root rib and the secondary rib (next rib out towards the tip) with 1/8 or 3/32 ply. The red box in the picture outlines the root area you want to support with the ply stand-off, do the same support to inner support rib as well. I feel it is important to point out here that the landing gear mount is a flex plate and it is designed to flex, absorbing impact loads and is very effective. DO NOT attempt to support the flex plate from the LG mount area to the top skin, you will buckle the top skin on the first landing! Once you have the support
 It is also important to inspect all the glue joints on the wings and add some Aeropoxy to any joints that appear thin on glue.")
24 plates installed, laminate the root rib from wing tube to wing tube with 1/32 ply. This will strenghten the root rib adequatly. (See pic 2 above) It is also important to inspect all the glue joints on the wings and add some Aeropoxy to any joints that appear thin on glue. I also suggest you make it a routine to inspect the glue joints on the entire airframe periodically as we have found a few that were begining to fail.

25 The new version of the Composite-ARF Eurosport has some changes to the flex plate and ribs to help strengthen them. As you can see above, they have added ply laminations to the flex plate and support ribs at the factory. I will be helping a friend build a new version of the EuroSport and I will post here if we find any further modifications are still necessary. There has been multiple reports of Eurosports disintegrating in midair when they lost the large engine hatch in flight. It appears that when the hatch comes off, air gets into the openings in the wing roots, the added pressure explodes the wings. This happens very quickly, no time to reduce throttle! I believe both airplanes that lost the hatch did not have gear doors which allows for added pressure buildup in the engine bay. Since there are only two small tabs to secure the hatch, I suggest everyone make the following modification to ensure the engine hatch does not depart in flight.
26
 at the opening just")

27 Make a 1/4" ply plate to fit in the wing root (skin to skin) at the opening just behind the rear spar. Drill a hole as seen in the picture and insert and glue a dowel.

28 Make a 1/4 ply 1.5"x 1.5" plate to fit in the hatch and glue at the appropriate location for the dowel to slide into. Take a bottle of testors paint, shake the bottle and then press the cap against the dowel end. Slide the wing on and press the dowel against the hatch to mark the pin location. Drill the hole 1 size larger than the dowel. As the wing slides on the spars, the pin will engage the hatch making it impossible for the hatch to depart in flight. I also suggest you cut some vent slots in the rear former inside the fake nozzles to allow excess air to escape the fuselage. Control Throws for Initial Flights The CG is located at 540mm behind the leading edge of the air intake, no need to shift.
29 Elevons: 45mm up & 30mm down, measured at the trailing edge root. Ailerons: 25mm both ways, measured at trailing edge root. Canard center position: Trailing edge parallel to panel lines on fuse. Initial throw is 15mm up & 10mm down measured at trailing edge root. Don't forget, trailing edge down is up elevator & up is down elevator. Rudder: 35mm measured at the bottom trailing edge % Expo on all control surfaces. Separate nose gear from rudder and keep nose gear on ch 4, low rate should only control nose gear steering as well as trim. You do not need a low rate rudder but you can mix it if you wish.
Table of Contents. Tail Wheel Assembly Installation.. page 01. Stabilizer Installation.. page 02. Fin Installation.. page 03
 Table of Contents Tail Wheel Assembly Installation.. page 01 Stabilizer Installation.. page 02 Fin Installation.. page 03 Elevator and Rudder Hinge Installation.. page 04 Rudder Controls.. page 05 Elevator
Turbinator-2 Build Manual
 Turbinator-2 Build Manual Thank you for your purchase of the Turbinator-2 sport jet by Boomerang RC Jets. This RC Jet IS NOT A TOY and should only be flown and operated by experienced RC Turbine Pilots.
STORCH. Parts. Additional items needed to complete the Storch
 STORCH Parts Fuse with Greenhouse- (Attached) Left and right wing panel Horizontal and vertical stab 2 Wing center blocks 2 Carbon spares for wing 1 Undercarriage with wheels 2 Undercarriage shocks 2 Carbon
RECOMMENDED MOTOR AND BATTERY SET UP
 SPECIFICATION - Wingspan: 1404mm (55.3in) - Length: 1134mm (44. 6 in) - Flying weight: 3.2-3.4 kg - Covering type: Genuine ORACOVER - Spinner size: scale type (not included) - Radio: 4 channel minimum
MARACANA ASSEMBLY INSTRUCTION .40 ARF LOW WING TRAINER RADIO CONTROL MODEL. Every body can fly
 RADIO CONTROL MODEL ASSEMBLY INSTRUCTION MARACANA.40 ARF LOW WING TRAINER Every body can fly VQA085 EP GP You can use both Gas or Electric power Wingspan: 59in.(1520mm) Fuselage length: 48in.(1220mm) Engine:
Instruction Manual. SkyRacer. IMAA Legal Sport Aircraft For 35cc - 62cc size engines 84 Wingspan
 Instruction Manual SkyRacer IMAA Legal Sport Aircraft For 35cc - 62cc size engines 84 Wingspan Eureka Aircraft Warranty Eureka Aircraft guarantees this kit to be free from defects in both material and
Parts not supplied. Power Train Twin 48/50mm fans GAD 18A Esc`s 3-4s Lipos
 F/A-18 Hornet Instruction Manual (Beta1.1 Manual) We would like to thank you for purchasing our Green Air Designs F/A-18 Hornet and hope you have as much fun building and flying yours as we have ours.
Instruction Manual BULLDOG. Wingspan : 1410 mm (55.5in) : 1450 mm (57.1in) : 4900gr gr. Weight. : 6-9 Channel/ 7 servo high torque, 1standard
 : 1450 mm (57.1in) : 4900gr gr. Weight. : 6-9 Channel/ 7 servo high torque, 1standard") Wingspan : 1410 mm (55.5in) Length Weight Radio Engine : 1450 mm (57.1in) : 4900gr - 5600gr : 6-9 Channel/ 7 servo high torque, 1standard : 1.20/ 2 stroke 1.80/ 4 stroke KIT CONTENTS: We have organized
Wingspan : 1410 mm (55.5in) Length Weight Radio Engine : 1450 mm (57.1in) : 4900gr - 5600gr : 6-9 Channel/ 7 servo high torque, 1standard : 1.20/ 2 stroke 1.80/ 4 stroke KIT CONTENTS: We have organized
I n s t r u c t i o n M a n u a l. Instruction Manual SPECIFICATION
 I n s t r u c t i o n M a n u a l Instruction Manual SPECIFICATION - Wingspan: 3200mm (125,9 in) - Length: 1650mm (64,9 in) - Flying weight: 3000gr 3200gr - Wing area: 64.5 dm2 - Wing loading: 46g/dm2
Instruction Manual EXTRA 260-EP. 1075mm (42.32 in) 1000mm (39.37 in) 1100gr gr. 4 channel - 4 mini servo. Axi motor 2820
 1000mm (39.37 in) 1100gr gr. 4 channel - 4 mini servo. Axi motor 2820") 1075mm (42.32 in) 1000mm (39.37 in) 1100gr - 1400gr 4 channel - 4 mini servo Axi motor 2820 KIT CONTENTS: We have organized the parts as they come out of the box for better identification during assembly.
1075mm (42.32 in) 1000mm (39.37 in) 1100gr - 1400gr 4 channel - 4 mini servo Axi motor 2820 KIT CONTENTS: We have organized the parts as they come out of the box for better identification during assembly.
Supplemental Instructions for Walkera F-16
 Supplemental Instructions for Walkera F-16 Step 1 the instructions show a brushed motor setup and indicate you should solder 3 capacitors to the motor terminals. The kit actually contains a brushless motor,
Dassault Aviation FALCON 7 X. for Jet CAT P160. Assembly Manual. AVIATION Design
 Dassault Aviation FALCON 7 X for Jet CAT P160 Assembly Manual AVIATION Design ZI le chenet, 91490 Milly La Foret, FRANCE Tel : 33 1 64 98 93 93 Fax : 33 1 64 98 93 88 E-mail : aviation.design@wanadoo.fr
ALMOST READY TO FLY. Wing Span in cm. 2
 ASSEMBLY MANUAL ALMOST READY TO FLY MS:X9 Specifications Wing Span --------------------------61.4 in ---------------------------156cm. 2 Wing Area --------------------------606.1 sq.in ------------------
YAK-54 EXP. 48 inch Electric ARF
 YAK-54 EXP 48 inch Electric ARF 1 Greetings and congratulations on your purchase of the Extreme Flight RC Yak-54 EXP ARF! Like all of the EXP series, the YAK-54 excels at both 3D and precision maneuvers.
Cleveland Quickie Piper Cub
 Cleveland Quickie Piper Cub This plan package is not a 100% copy of the original kit. As you make your way through the instructions you will see the differences. Here s just a few of them: The one thing
MiG-15 ARF Assembly & Operation Manual
 INLET PREP The MiG-15 inlet system has been accurately assembled at BVM. The following steps are required by the modeler prior to installation in the model. The inlet duct system is not glued into the
RECOMMENDED MOTOR AND BATTERY SET UP
 SPECIFICATION - Wingspan: 1410mm (55.5 in) - Length: 1278mm (50.3 in) - Flying weight: 3.2-3.4 kg - Wing area: 41.3 dm2 - Wing loading: 75g/dm2 - Wing type: Naca airfoils - Covering type: Genuine ORACOVER
29% KATANA ARF ASSEMBLY MANUAL
 29% KATANA ARF ASSEMBLY MANUAL Required but not included Aircraft Specifications: 4 channel radio and supporting equipment Wing Span 84 Engine 3.2-4.2 c.i. (50-60 c.c.) Wing Area 1270 Sq. in. Fuel Tank
Build Manual. Vector & Xtra Slick
 Build Manual Vector & Xtra Slick Warning information this is not a toy! Read and understand entire manual before assembling model Do not overlook the warnings and instructions enclosed or those provide
Lanier R/C F-4 Phantom
 Lanier R/C.40-.46 F-4 Phantom Almost Ready to Fly WARNING! THIS IS NOT A TOY! THIS IS NOT A BEGINNERS AIRPLANE This R/C kit and the model you will build from it is not a toy! It is capable of serious bodily
RADIO CONTROL MODEL HURRICANE
 RADIO CONTROL MODEL VQAA040G VQAA040B HURRINE Almost ready to fly SPECIFITIONS Wingspan...63 in. / 161cm Length...50 in. / 129cm Engine...50~60 2T / 70~90 4T Or Electric equivalent. RC Functions: Motor
MS:124 ASSEMBLY MANUAL. Graphics and specifications may change without notice.
 ASSEMBLY MANUAL MS:124 Graphics and specifications may change without notice. Specifications: Wing span ------------------------------65in (165cm). Wing area -----------------658.8sq.in (42.5sq dm). Weight
SIZE.120 OR 30CC SCALE 1:5 ARF
 PC21 PILATUS MK2 SIZE.120 OR 30CC SCALE 1:5 ARF SPECIFICATION - Wingspan: 1772mm (69.72in) - Length: 2019mm (79.5 in) - Flying weight: 6.4-7.2 kg - Wing area: 57.6 dm2 - Wing loading: 113g/dm2 - Wing type:
RECOMMENDED MOTOR AND BATTERY SET UP
 SPECIFICATION - Wingspan: 6000mm (236.2 in) - Length: 2873mm (113.1 in) - Flying weight: 14-18 kg - Wing area: 219.4 dm2 - Wing loading: 64g/dm2 - Wing type: HQ airfoils - Covering type: Genuine ORACOVER
Instruction Manual. Wingspan : 1400 mm (55.12 inch) : 1480 mm (58.27 inch) : 5500gr gr. : 6-9 channel/ 8 servo high torque,1 standard
 : 1480 mm (58.27 inch) : 5500gr gr. : 6-9 channel/ 8 servo high torque,1 standard") Wingspan : 1400 mm (55.12 inch) g Length : 1480 mm (58.27 inch) Weight : 5500gr - 6000gr Radio : 6-9 channel/ 8 servo high torque,1 standard Engine : GT 22 OS KIT CONTENTS: We have organized the parts
Wingspan : 1400 mm (55.12 inch) g Length : 1480 mm (58.27 inch) Weight : 5500gr - 6000gr Radio : 6-9 channel/ 8 servo high torque,1 standard Engine : GT 22 OS KIT CONTENTS: We have organized the parts
ESPA3D Photo Essay One page ESPA3D Plans are HERE Back to Spad Plans Index
 1 of 8 8/29/2012 12:28 PM ESPA3D Photo Essay One page ESPA3D Plans are HERE Back to Spad Plans Index This little airplane has turned out to be one of the most fun Spad projects we've ever done! It is built
MS:176 ASSEMBLY MANUAL. Graphics and specifications may change without notice.
 ASSEMBLY MANUAL MS:176 Graphics and specifications may change without notice. Specifications: Wing span ------------------------------98.4in (250cm). Wing area ----------------1576.4sq.in (101.7sq dm).
1660mm (65.4 in) 1200mm (47.2 in) 2700gr gr 6 channel - 7 servo standard 46/ 2 stroke or 52/ 4 stroke
 1200mm (47.2 in) 2700gr gr 6 channel - 7 servo standard 46/ 2 stroke or 52/ 4 stroke") Instruction Manual CESSNA-46 1660mm (65.4 in) 1200mm (47.2 in) 2700gr - 3000gr 6 channel - 7 servo standard 46/ 2 stroke or 52/ 4 stroke KIT CONTENTS: We have organized the parts as they come out of the
Instruction Manual CESSNA-46 1660mm (65.4 in) 1200mm (47.2 in) 2700gr - 3000gr 6 channel - 7 servo standard 46/ 2 stroke or 52/ 4 stroke KIT CONTENTS: We have organized the parts as they come out of the
Allure Check and Assembly by Earl Haury
 Allure Check and Assembly by Earl Haury The purpose of this article is to offer my evaluation of the Allure and describe my assembly methods and choices. There are various ways of accomplishing the same
Instruction Manual MUSTANG P51 - EP. Wingspan : 1377mm (54.21in) : 1180mm (46.46 in) : 2200gr gr. : AXI motor 2826 or 4120
 : 1180mm (46.46 in) : 2200gr gr. : AXI motor 2826 or 4120") Instruction Manual MUSTANG P51 - EP Wingspan : 1377mm (54.21in) g Length : 1180mm (46.46 in) Weight : 2200gr - 2600gr Engine : AXI motor 2826 or 4120 Radio : 4 channel / 4 servos standard KIT CONTENTS:
Instruction Manual MUSTANG P51 - EP Wingspan : 1377mm (54.21in) g Length : 1180mm (46.46 in) Weight : 2200gr - 2600gr Engine : AXI motor 2826 or 4120 Radio : 4 channel / 4 servos standard KIT CONTENTS:
(Glider) ASSEMBLY MANUAL
 ASSEMBLY MANUAL") (Glider) MS:132 ASSEMBLY MANUAL Graphics and specifications may change without notice. Specifications: Wing span ------------------------------118.1in (300cm). Wing area ---------------------902.1sq.in
(Glider) MS:132 ASSEMBLY MANUAL Graphics and specifications may change without notice. Specifications: Wing span ------------------------------118.1in (300cm). Wing area ---------------------902.1sq.in
MS:159 ASSEMBLY MANUAL. Graphics and specifications may change without notice.
 ASSEMBLY MANUAL MS:159 Graphics and specifications may change without notice. Specifications: Wing span ----------------------------61.8in (157cm). Wing area -----------------1100.5sq.in (71.0sq dm). Weight
Instruction Manual. Specification:
 Instruction Manual L O W Specification: Wingspan: 133 cm (52.3 inches) Length : 104 cm (40.9 inches) Weight : 1790gr Engine : 25-32 two stroke Radio : 4 channel - 4 servo W I N G KIT CONTENTS: We have
This manual covers all color schemes Although it only shows one color scheme, the aircraft are the same This manual is for reference to the actual
 This manual covers all color schemes Although it only shows one color scheme, the aircraft are the same This manual is for reference to the actual product at the time it was written. We can't speak for
RECOMMENDED MOTOR AND BATTERY SET UP
 SPECIFICATION - Wingspan: 2000mm (78.7in) - Length: 1544mm (60.7 in) - Flying weight: 3600-3800 gr - Wing area: 66 dm2 - Wing loading: 55g/dm2 - Wing type: Naca airfoils - Covering type: Genuine ORACOVER
I/C FLIGHT GUIDELINES
 SPECIFICATION - Wingspan: 3500mm (137.8 in) - Length: 1650mm (64.96 in) - Flying weight: 3700-4000 gr - Wing area: 75 dm2 - Wing loading: 49g/dm2 - Wing type: HQ profile - Covering type: Genuine ORACOVER
Pitts Challenger m (100cc) MANUAL
 MANUAL") Pitts Challenger 87 2.20m (100cc) MANUAL 1- Introduction: WELCOME TO THE PILOT-RC TEAM! Thank you for choosing a Pilot-Rc plane as your next model. We hope that you enjoy many successful and exhilarating
Pitts Challenger 87 2.20m (100cc) MANUAL 1- Introduction: WELCOME TO THE PILOT-RC TEAM! Thank you for choosing a Pilot-Rc plane as your next model. We hope that you enjoy many successful and exhilarating
SU-31 PROFILE ELECTRIC ARF ASSEMBLY MANUAL
 SU-31 PROFILE ELECTRIC ARF ASSEMBLY MANUAL 1 TABLE OF CONTENTS Page Aeroworks Contact Information... 3 Introduction.. 4 Kit Contents... 5 Items needed to complete 6 Wing Assembly. 7 Stab Assembly. 10 Flight
FUN-50 ARF ASSEMBLY MANUAL
 FUN-50 ARF ASSEMBLY MANUAL This Manuel is the sole property of Kangke Industrial USA, Inc. Reproducing any part without the consent of Kangke Industrial USA, Inc. is a lawful violation. Kangke Industrial
Instruction Manual book
 book SPECIFICATION Wingspan : 1,450 mm 57.09 in. Length : 1,200mm 47.24in. Weight : 3.1 kg 6.82 Lbs. Radio : 05 channels. Servo : 07 servos. Engine : 61-75 2 stroke. 91 4 stroke. Made in Vietnam. This
ARF TRAINER KIT ASSEMBLY MANUAL BOOMERANG EP. ALMOST READY TO FLY
 WWW.SEAGULLMODELS.COM ASSEMBLY MANUAL BOOMERANG EP ARF TRAINER KIT Graphics and specifications may change without notice. MS: 211 ALMOST READY TO FLY Specifications: Wingspan---------------56.0 in (142.2
... BY: Scott Barnhart
 Wi! ;ql ;~,... TEe ONEYAII54...................................................................................... BY: Scott Barnhart I TALK UP TmSYAK Techone Hobby is a company schemes. The computer numeric
F-84G ThunderJet Construction Manual. Introduction
 Introduction Thank you for purchasing the PST Jets F-84G ThunderJet kit. The PST F-84G is designed for use with 20 to 30 lb turbine engines. The PST F-84G is based on an accurate scale outline of the Republic
Instruction Manual book
 Instruction Manual book SPECIFICATION Wingspan : 1,800mm. 70.87 in. Length : 1,350 mm. 53.15in. Weight : 3.6kg. 7.92lbs. Parts Listing required (not included). Glow Engine : 55-61 2 stroke. 91 4 stroke.
RECOMMENDED MOTOR AND BATTERY SET UP
 SPECIFICATION - Wingspan: 1800mm (70.8 in) - Length: 1355mm (53.3 in) - Flying weight: 4100-4300 g - Wing area: 51 dm2 - Wing loading: 80g/dm2 - Wing type: Naca airfoils - Covering type: Genuine ORACOVER
Instruction Manual. Wingspan : 2270mm (89.37 inches) : 1870mm (73.62 inches) : 7400gr gr. : 4 channel - 6 standard servo.
 : 1870mm (73.62 inches) : 7400gr gr. : 4 channel - 6 standard servo.") Wingspan : 2270mm (89.37 inches) g Length : 1870mm (73.62 inches) Weight : 7400gr - 7600gr Radio : 4 channel - 6 standard servo Engine : 25cc-35cc KIT CONTENTS: We have organized the parts as they come
Wingspan : 2270mm (89.37 inches) g Length : 1870mm (73.62 inches) Weight : 7400gr - 7600gr Radio : 4 channel - 6 standard servo Engine : 25cc-35cc KIT CONTENTS: We have organized the parts as they come
ASSEMBLY MANUAL SIZE
 SIZE.75 -.91 ASSEMBLY MANUAL MS:123 Graphics and specifications may change without notice. Specifications: Wing span ----------------------------66.9in (170cm). Wing area -----------------761.1sq.in (49.1sq
SBD DAUNTLESS GP/EP SIZE ARF SCALE 1:8. Instruction Manual
 GP/EP SIZE.46-.55 ARF SCALE 1:8 SPECIFICATION - Wingspan: 1440mm (56.7in) - Length: 1140mm (44.9 in) - Flying weight: 3000-3300 g - Wing area: 42 dm2 - Wing loading: 78g/dm2 - Wing type: Naca airfoils
Instruction Manual book
 Instruction Manual book Item code:bh133 SPECIFICATION Wingspan : 1,400 mm 55.12 in. Length : 1,350 mm 53.15 in. Weight : 3.7 kg 8.14 Lbs. Radio : 08-09 channels. Servo : 08-09 servos. EDF : Turingy SK3
93 AJ Laser 230z Assembly Instructions
 93 AJ Laser 230z Assembly Instructions Congratulations AJ Aircraft thanks you for the purchase of this airplane. Top grade materials and precision assembly has gone into this to make this a top quality
ASSEMBLY MANUAL. Graphics and specifications may change without notice.
 NEMESISMS: SEA 111 ASSEMBLY MANUAL Graphics and specifications may change without notice. Specifications Wing span------------------------------------- 55.9in ------------------------------- 142cm. Wing
Instruction Manual. Wingspan : 1884 mm (74.17 in) Length. Weight. Engine. : 4 channels / 5 servo standard. : 1450 mm (57.
 Length. Weight. Engine. : 4 channels / 5 servo standard. : 1450 mm (57.") Wingspan : 1884 mm (74.17 in) Length : 1450 mm (57.09 in) Weight : 4000 gr Engine : 60 two strokes Radio : 4 channels / 5 servo standard KIT CONTENTS: We have organized the parts as they come out of the
Wingspan : 1884 mm (74.17 in) Length : 1450 mm (57.09 in) Weight : 4000 gr Engine : 60 two strokes Radio : 4 channels / 5 servo standard KIT CONTENTS: We have organized the parts as they come out of the
: 7 channel - 9 servo, Hi-Torque ( Minimum 6 kg ).
.") g Wingspan : 1820mm (71.65 inches) Length : 1625mm (63.98 inches) Weight : 6900gr Engine : 25cc - 35cc Radio : 7 channel - 9 servo, Hi-Torque ( Minimum 6 kg ). KIT CONTENTS: We have organized the parts
g Wingspan : 1820mm (71.65 inches) Length : 1625mm (63.98 inches) Weight : 6900gr Engine : 25cc - 35cc Radio : 7 channel - 9 servo, Hi-Torque ( Minimum 6 kg ). KIT CONTENTS: We have organized the parts
Instruction Manual. Wingspan : 1670mm. : 3400gr gr. : 61/75 two stroke. : 5 servo + 1 servo retract / 6 channel
 Wingspan : 1670mm g Length Weight Engine Radio : 1350mm : 3400gr - 4000gr : 61/75 two stroke : 5 servo + 1 servo retract / 6 channel KIT CONTENTS: We have organized the parts as they come out of the box
Instruction Manual. Wingspan : 1694mm (66.69 in) : 1470mm (57.87 in) : 3200gr gr. : 61 two stroke/ 71 four stroke. : 6 channel / 7 servo
 : 1470mm (57.87 in) : 3200gr gr. : 61 two stroke/ 71 four stroke. : 6 channel / 7 servo") Wingspan : 1694mm (66.69 in) g Length : 1470mm (57.87 in) Weight : 3200gr - 3800gr Engine : 61 two stroke/ 71 four stroke Radio : 6 channel / 7 servo KIT CONTENTS: We have organized the parts as they
Wingspan : 1694mm (66.69 in) g Length : 1470mm (57.87 in) Weight : 3200gr - 3800gr Engine : 61 two stroke/ 71 four stroke Radio : 6 channel / 7 servo KIT CONTENTS: We have organized the parts as they
96in Super Decathlon ARF
 96in Super Decathlon ARF Instruction Manual Specifications Wingspan: 96in (2438mm) Length: 63.5 in (1614mm) Weight: Approx. 13lbs (6.5kg) 1 Dear Customer, Congratulations on your purchase of Super Decathlon
INSTRUCTION MANUAL BOOK
 INSTRUCTION MANUAL BOOK ITEM CODE BH57. SPECIFICATION Wingspan: 1,470 mm. 57.87 in. Length : 1,180 mm. 46.46 in. Weight : 2.7 Kg. 5.94 Lbs. Engine : 46 cu.in 2 stroke. 52 cu.in 4 stroke. Radio : 4 channels.
: 6 channel - 9 servo
 g Wingspan : 2005mm (78.94 inches) Length : 1640mm (64.57 inches) Weight : 6400g - 6600g Engine : 25cc - 35cc Radio : 6 channel - 9 servo KIT CONTENTS: We have organized the parts as they come out of
RECOMMENDED MOTOR AND BATTERY SET UP
 SPECIFICATION - Wingspan: 1420mm (55.91 in) - Length: 1370mm (53.94 in) - Flying weight: 2600-2800 gr - Wing area: 41.6 dm2 - Wing loading: 65g/dm2 - Wing type: Naca airfoils - Covering type: Genuine ORACOVER
51in Aerobatic Series Sukhoi SU-26M Almost-Ready-to-Fly. Instruction Manual. Specifications
 51in Aerobatic Series Sukhoi SU-26M Almost-Ready-to-Fly Instruction Manual Specifications Wingspan: 51.2 in (1300mm) Length: 51.2 in (1300mm) Wing Area: 581 sq in (37.5sq dm) Flying Weight: 3.5 lb (1600g)
Instruction Manual book
 Instruction Manual book ITEM CODE: BH39. SPECIFICATION Wingspan : 181 cm 71.26 inches. Length : 155 cm 61.024 inches. Weight : 04 kg 8.8 lbs. Servo : 9 servos. Radio : 6 channels. Engine : 91 cu.in - 2
ASSEMBLY MANUAL. Kit features. MS:76
 ASSEMBLY MANUAL MS:76 Graphics and specfications may change without notice. Specifications: Wingspan---------------------------------------------------- 82.8 in------------------------------------- 210.3cm.
EXTRA 330LX. Specifications: Code: SEA274. Graphics and specifications may change without notice. ASSEMBLY MANUAL
 ASSEMBLY MANUAL EXTRA 330LX Code: SEA274 Graphics and specifications may change without notice. Specifications: Wingspan---------------82.0 in (208.2 cm). Wing area---------------1349.4 sq.in ( 87.1 sq.dm).
Curtiss Canuck. R/C Scale Model Instructions. CONTACT INFORMATION The Curtiss Canuck was designed by M.K. Bengtson Prototype By Dave Walker
 Curtiss Canuck 41 1/2 Curtiss Canuck R/C Scale Model Instructions CONTACT INFORMATION The Curtiss Canuck was designed by M.K. Bengtson Prototype By Dave Walker Manufactured and Distributed by: Bengtson
Strix Goblin Instruction Manual. Rev
 Strix Goblin Instruction Manual Rev 3-4.24.2017 1 Introduction Thank you for purchasing the Strix Goblin! This is a high performance plank style aircraft and it was designed using aerodynamic principles
Instruction Manual book
 Instruction Manual book SPECIFICATION Wingspan : 1,780 mm 70.08 in. Length : 1,520 mm 59.84 in. Weight : 4.8 kg 10.56 Lbs. Radio : 06 channels. Servo : 09 servos. Engine : 120 4stroke Made in Vietnam.
CAP 232 ASSEMBLY MANUAL
 CAP 232 MS: ASSEMBLY MANUAL SEA 91 Graphics and specfications may change without notice. Specifications Wingspan------------------------------------ 65 in --------------------------------- 165cm. Wing
MS:183 ASSEMBLY MANUAL. Graphics and specifications may change without notice.
 MS:183 ASSEMBLY MANUAL Graphics and specifications may change without notice. Specifications: Wing span ------------------------------79.9in (203cm). Wing area -----------------1165.6sq.in (75.2sq dm).
ARF. Specifications: ASSEMBLY MANUAL MS: 193. Graphics and specifications may change without notice.
 ASSEMBLY MANUAL Graphics and specifications may change without notice. MS: 193 ARF Specifications: Wingspan---------------62.0 in (157.5 cm). Wing area----------------620 sq.in (40.0 sq.dm). Weight-------------------3.3-3.9
Instruction Manual book
 Instruction Manual book ITEM CODE: BH56. SPECIFICATION Wingspan : 1,660 mm 65.35 in. Length : 1,420 mm 55.91 in. Weight : 3.8 kg 8.36 Lbs. Radio : 06 channels. Servo : 08 servos. Engine : 75 Cu.in 2 Stroke.
SunFlower Helicopter Rocket LUNAR Build Session: 9/25/08 By Tom Desmarais
 SunFlower Helicopter Rocket LUNAR Build Session: 9/25/08 By Tom Desmarais Contents of Kit: A. 3 1/16 x1 x11 basswood rotors B. 3 1/16 x2 x2 basswood fins C. 3 1/16 x5/16 x1/2 basswood hold spacer D. 3
RECOMMENDED EDF AND BATTERY SET UP
 SPECIFICATION - Wingspan: 1150mm (45.3 in) - Length: 1587mm (62.5 in) - Flying weight: 5.0-5.3 kg - Wing area: 40dm2 - Wing loading: 125g/dm2 - Wing type: Naca airfoils - Covering type: Genuine ORACOVER
to fly. Most hardware included and all replacement parts are available.
 Instruction Manual The Thunderbolt P47 was perhaps the greatest of world war II in terms of all round performance and capability Phoenix Model has recreated a 2C - 60 class engine (or 4c 91 class) It was
PANTERA Electric Prop Jet ARF
 PANTERA Electric Prop Jet ARF Copyright 2017 Extreme Flight 1 Greetings and congratulations on your purchase of the SPEED FREAK PANTERA! The PANTERA is the second release from SPEED FREAK and is built
Radio control model INSTRUCTION MANUAL PYLON RACING. Wingspan: 1148mm (45.2 ) Radio : 4 channels Engine : two-stroke
 Radio : 4 channels Engine : two-stroke") VQA038 VQA039 Radio control model INSTRUCTION MANUAL MAGIC PYLON RACING Wingspan: 1148mm (45.2 ) Radio : 4 channels Engine :.25 -.32 two-stroke WARNING! This radio control model is not a toy. If modified
VQA038 VQA039 Radio control model INSTRUCTION MANUAL MAGIC PYLON RACING Wingspan: 1148mm (45.2 ) Radio : 4 channels Engine :.25 -.32 two-stroke WARNING! This radio control model is not a toy. If modified
Falcon mkiii. Christian Perry Pleasant Grove, Utah November 2009
 Falcon mkiii Christian Perry Pleasant Grove, Utah November 2009 This is my third build of the Falcon 120 from Nitro Planes. I have really enjoyed this jet and wanted to do the best I could with this build
STICK F Class 60 Class INSTRUCTION MANUAL. Or Electric equivalent. (2T engine) (4T engine) Radio control model SPECIFICATIONS
 (4T engine) Radio control model SPECIFICATIONS") Radio control model 45 Class 60 Class (2T engine) (4T engine) Or Electric equivalent INSTRUCTION MANUAL STICK F - 1500 SPECIFICATIONS Wingspan 60 in. Length 38.5 in. Electric Motor 650 Watt Glow Engine.45
Radio control model 45 Class 60 Class (2T engine) (4T engine) Or Electric equivalent INSTRUCTION MANUAL STICK F - 1500 SPECIFICATIONS Wingspan 60 in. Length 38.5 in. Electric Motor 650 Watt Glow Engine.45
AVIATOR 25 ARF Almost Ready-to-Fly
 AVIATOR 25 ARF Almost Ready-to-Fly Instruction Manual Specifications Wingspan: 54.3 in (1380mm) Length: 45.2 in (1150mm) Wing Area: 438 sq in (34sq dm) Flying Weight: 3.8 b (1700g) Dear Customer, Congratulations
Building a Mick Reeves 1/4.5 Scale Hawker Hurricane...Instalment 9 Retracts, Door Covers, Radiator and Wing Centre Section
 Building a Mick Reeves 1/4.5 Scale Hawker Hurricane...Instalment 9 Retracts, Door Covers, Radiator and Wing Centre Section Finishing the Wing Set: Now that I ve got the tedious wing skinning behind me
Instruction Manual. We wish you many enjoyable flights with your plane and once again thank you for your choosing a Phoenix Model product
 Instruction Manual Wing span: 1590mm (626 in) Length: 1100mm (433 in) Weight: 1500gr - 1700gr Motor: AXI 2814/10 or Motor: 500-600 w/ gear box Radio: 4 Channel / 4 servos standar Propeller: 12 x 47 We
WE GET PEOPLE FLYING T-34
 TM WE GET PEOPLE FLYING T-34 Mentor ASSEMBLY MANUAL Specifications Wingspan:... 57.25 in (1454 mm) Length:... 45 in (1146 mm) Wing Area:... 555 sq in (35.8 sq dm) Weight:... 6 7 lb (2.7 kg 3.2 kg) Radio:...
Instruction Manual book
 book SPECIFICATION Wingspan : 1,920 mm 75.59 in. Length : 1,560 mm 61.42 in. Weight : 5 kg 11.00Lbs. Radio : 06 channels. Servo : 09 servos. Engine : 120 4 stroke. Made in Vietnam. This instruction manual
第 4 页. 3. Fix the fiber horns to the slots in the aileron with epoxy glue. Accessory list for the installation of aileron.
 TopRCModel-USA.com TopRCModel-USA.com 第 3 页 Accessory list for the installation of aileron. 3. Fix the fiber horns to the slots in the aileron with epoxy glue. 1. Sanding the fiber horns. 4. Fix the fiber
ALMOST READY TO FLY. Wing Span in cm. 2
 ASSEMBLY MANUAL ALMOST READY TO FLY MS: X12 A - B Graphics and specfications may change without notice. Kit features. Specifications Wing Span ------------------------------- 42.7 in ---------------------
SBACH SCALE 1:4 ½ ARF
 SPECIFICATION - Wingspan: 1663mm (65.5 in) - Length: 1638mm (64.5 in) - Flying weight: 4700-5200 gr - Wing area: 56 dm2 - Wing loading: 85g/dm2 - Wing type: Naca airfoils - Covering type: Genuine ORACOVER
HIGH WING MK2 GP/EP ARF SCALE
 SONIC HIGH WING MK2 GP/EP.25-.32 ARF SCALE 1:10 SPECIFICATION - Wingspan: 1340mm (52.7in) - Length: 1040mm (40.9 in) - Flying weight: 1800-2000 gr - Wing area: 27 dm2 - Wing loading: 79g/dm2 - Wing type:
Instruction Manual book
 book ITEM CODE:BH 115. SPECIFICATION Wingspan : 6,000 mm 236,22 in. Length : 2,740 mm 107,87 in. Weight : 17.5kg 38.5Lbs. Radio : 08 channels. Servo : 07-08 HS-5685MH(HITEC) Battery : 2 Cells-Li-Po 7.4V
MS:136 ASSEMBLY MANUAL. Graphics and specifications may change without notice.
 ASSEMBLY MANUAL MS:136 Graphics and specifications may change without notice. Specifications: Wing span ----------------------------79.5in (202cm). Wing area -----------------965.7sq.in (62.3sq dm). Weight
RECOMMENDED MOTOR AND BATTERY SET UP
 SPECIFICATION - Wingspan: 2190mm (86.2 in) - Length: 1907mm (75 in) - Flying weight: 9000-12000 gr - Wing area: 92 dm2 - Wing loading: 98g/dm2 - Wing type: Naca airfoils - Retract gear type: Air-retract
RECOMMENDED MOTOR AND BATTERY SET UP
 SPECIFICATION - Wingspan: 1669mm (65.7in) - Length: 1229mm (48.43 in) - Flying weight: 3300-3400 gr - Wing area: 44.2 dm2 - Wing loading: 67g/dm2 - Wing type: Naca airfoils - Covering type: Genuine ORACOVER
Trainer Assembly Manual
 Trainer Assembly Manual www.pilot-rc.com -Pilot Trainer- 1 -Pilot Trainer- 2 -Pilot Trainer- 3 -Preliminary i wing & stab assembly- 1-) Locate both Plywood wing joiners (Large and small one) 2-) Insert
Instruction Manual book
 book SPECIFICATION Wingspan : 1.750mm 68.90 in. Length : 1.280 mm 50.39 in. Weight : 3.2-3.5 kg 7.04-7.7 Lbs. Radio : 06 channels. Servo : 07-09 mini servos +3 servos retracts (FUTABA,S3170G) Parts listing
Instruction Manual book
 book ITEM CODE:BH 139 SPECIFICATION Wingspan : 1,450mm 57.09 in. Length : 1,140 mm 44.88 in. Weight : 3.3kg 7.26 Lbs. Radio : 05 channels. Servo : 07 mini servos+ 3servos Retracts (FUTABA S3170G) EDF:
F3P Instruction Manual
 Before use, please read the explanations carefully! F3P Instruction Manual Specifications Fuselage length: 884mm ( 34. Bin ) Wingspan : 845mm ( 33. 2in) Flying Weight : 135-160g (with battery) Additional
11 - Fairings. Fairings. February XLF Page 11-1
 11 - Fairings Fairings February 2003 11-XLF Page 11-1 11 - Fairings This Page Intentionally Left Blank Page 11-2 11-XLF February 2003 11 - Fairings Contents 11.0 - Chapter Preface... 11-4 11.0.1 - Parts
SK-50 ARF ASSEMBLY MANUAL
 SK-50 ARF ASSEMBLY MANUAL Kangke Industrial USA, Inc. 65 East Jefryn Blvd. Deer Park NY 11729 http://www.kangkeusa.com E-mail: info@kangkeusa.com Tel: 1-877-203-2377 Fax: 1-631-274-3296 Congratulations!
ASSEMBLY MANUAL. Kit features. MS:110
 MS:110 ASSEMBLY MANUAL Graphics and specifications may change without notice. Specifications: Wing span-------------------------------------------------- 62.9 in---------------------------------------
Instruction Manual book
 Instruction Manual book Item code:bh117 SPECIFICATION Wingspan : 2,100 mm 82.68 in. Length : 1,875 mm 73.82 in. Weight : 7.5 kg 16.5 Lbs. Radio : 08 channels. Servo : 09 servos. Engine : 33-45cc gas. Made
F3D-30 ARF ASSEMBLY MANUAL
 F3D-30 ARF ASSEMBLY MANUAL This Manuel is the sole property of Kangke Industrial USA, Inc. Reproducing any part without the consent of Kangke Industrial USA, Inc. is a lawful violation. Kangke Industrial
Instruction Manual book
 Instruction Manual book Item code:bh117 SPECIFICATION Wingspan : 2,100 mm 82.68 in. Length : 1,875 mm 73.82 in. Weight : 7.5 kg 16.5 Lbs. Parts listing required (not included) Radio : 08 channels. Servo