EG / DC2 Conversion Harness
|
|
|
- Alaina Lawson
- 6 years ago
- Views:
Transcription


1 EG / DC2 Conversion Harness Part # KTH-EG-DC2 Applications: EG Civic / DC2 Integra Important NOTE: Please read all instructions very carefully as K-Tuned are not responsible for any damage to the ecu, sensors or wiring. To start off, there are a few common wires that need to be wired up the same way on all K-swap vehicles. COMMON K-SWAP WIRING Engine grounds - We recommend that a minimum of 2 grounds are used on a K-Series engine swap. Hook up one from the timing chain case to the chassis, and a second ground from the transmission case to the chassis. Fan switch - If you are using KPro, hooking up a fan switch is optional. The KPro software (Protection section) can be set up to control the cooling fan through the oem ECT sensor already wired into the factory K-series engine harness. NOTE: For installs without KPro the fan switch must be wired up to control the cooling fan. To do this, you will need to reuse the fan switch from your B/D series engine or purchase a new one from K-Tuned or your local Honda dealer. You will also need to cut off the 2 pin connector plug from your old B/D series harness. There are 2 wires on the plug for this sensor, signal (solid green) and ground (black). To wire up the fan, connect the signal (green) wire from the fan switch plug to the solid green wire found on the K- Tuned harness. To complete the circuit run a new ground (black) wire somewhere to the chassis. For a clean look you may want to route this into the cabin and ground to the chassis there.


2 Coolant Temp sensor for the gauge cluster - You need to reuse the sensor and plug from your B/D series engine or purchase a new one from your local Honda dealer. This is a yellow/green wire needs to be run into the bay and hooked up to the coolant temp sensor so the gauge on the cluster will operate. This is a simple single wire connection yellow/green on the used plug to yellow/green on the K-Tuned harness. We recommend that this sensor be placed in the upper coolant housing for an accurate reading. We sell an adapter that makes this install very easy. Charging Light - To operate the charging light, the white/blue wire on the K-Tuned conversion harness needs to be tapped into position B10 on your K-series engine harness. Do not cut the wire simply tap into it. The wire on the K-series engine harness will also be white/blue.
3 CAR SPECIFIC CONNECTIONS The next 3 connections are car specific and they need to be connected properly to the oem ecu plugs based on the year and make of your vehicle. Please select the correct factory ecu pin location diagram that is specific to your vehicle and make the appropriate connections. Fuel pump relay - This yellow/green wire, located on the ecu side of K-Tuned harness needs to be connected to fuel pump relay wiring on your chassis. See the diagrams below to make the correct year specific connections. NOTE: If you are using a JDM ecu simply ground these wires to operate the fuel pump. MIL (Check engine light) - This green/orange wire needs to connected to the original check engine light wire and will alert you if there are any engine codes. Again choose the year specific diagram and make the correct connection. ELD (Electronic load detector) - This green/red wire on the K-Tuned conversion harness will not be needed on all chassis. If the vehicle you are working on is equipped with an ELD sensor, hook up this wire according to the year specific diagram. NOTE: If your car does not have this wire, do not worry. You do not need to make this connection. ECU plug wire locations & colors: Civic EG and Integra DC2 Fuel pump relay - A7 and A8 (green/yellow) NOTE: If you are using a JDM ecu simply ground these wires to operate the fuel pump. MIL - A13 (green/orange) ELD - D10 (green/red) STOCK ECU - Connector A STOCK ECU - Connector D Integra DC2 Fuel pump relay - A16 (green/blue) NOTE: If you are using a JDM ecu simply ground these wires to operate the fuel pump. MIL - A18 (green/orange) ELD - D16 (green/red) STOCK ECU - Connector A x x x STOCK ECU - Connector D
 ELD - A30 (green/red) STOCK ECU - Connector A x x 3 4 5 6 7 8 9 10 x x 14 15 16 17 18 19 20 21 22 23 24 x 26 27 28 29 30 31 STEP BY STEP (EK shown, EG is similar) 1) Locate")

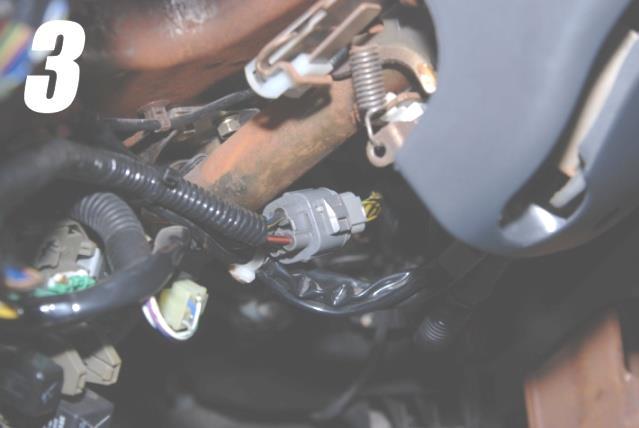
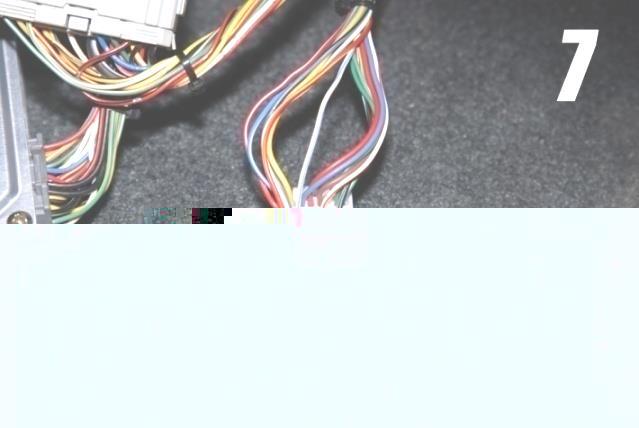
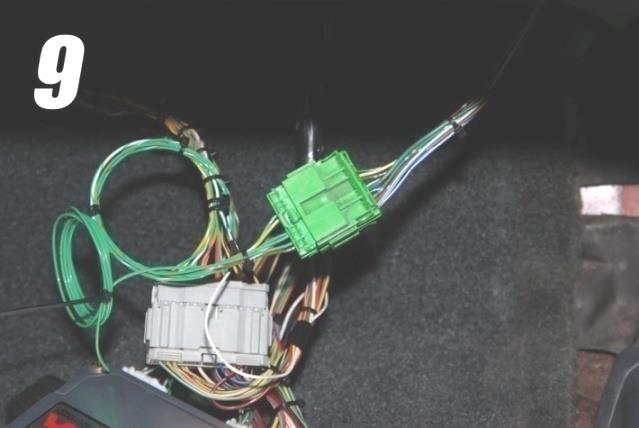
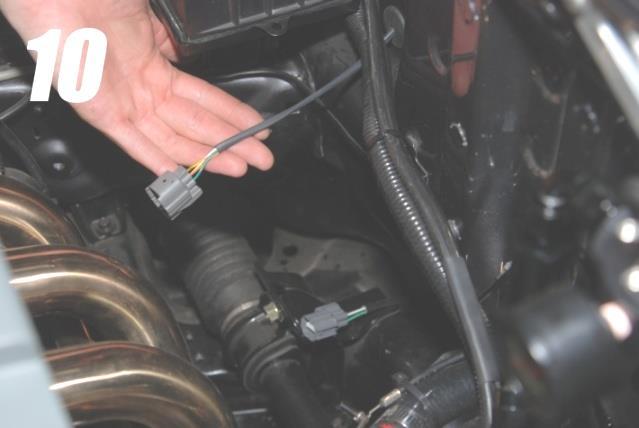
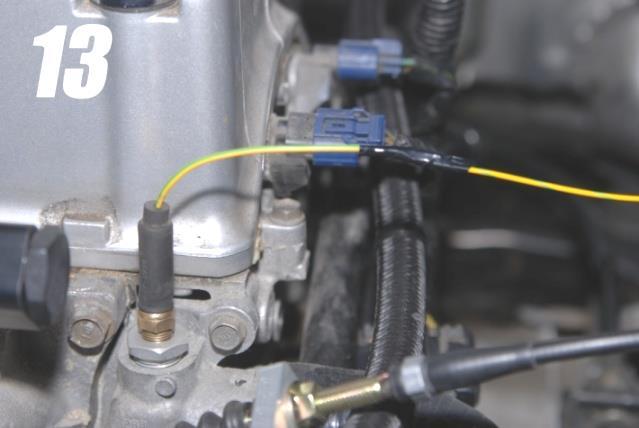
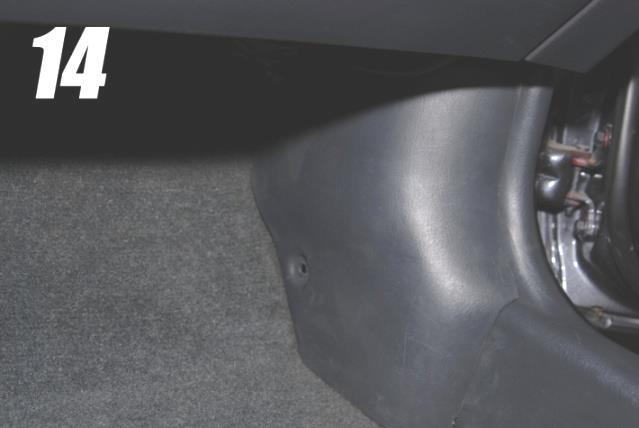
4 Integra DC2 Fuel pump relay - A15 (green/yellow) NOTE: If you are using a JDM ecu simply ground these wires to operate the fuel pump. MIL - A18 (green/orange) ELD - A30 (green/red) STOCK ECU - Connector A x x x x x STEP BY STEP (EK shown, EG is similar) 1) Locate the plug found at the driver side shock tower. This is where the conversion harness will plug in. 2) Push the shock tower plug back through the firewall. Use zipties to hold the conversion harness below the dash making sure to keep it away from the pedals. 3) When the harness is secure, connect the original shock tower plug to your K-Tuned conversion harness. 4) Here is the K-series RSX-S engine harness passed through the AC grommet into the passenger side cabin. Right beside the harness, we are using a Hondata KPro ecu. 5) A and B plugs can now be plugged into the ecu. 6) The remainder of K-Tuned conversion harness is now located on the passenger side cabin. The large grey connector can be plugged in. 7) Remove the ecu B plug and locate pin B10 on the engine harness. This is a white/blue wire. 8) Now simply tap the white/blue wire on the K-T harnes into the white/blue wire on B10. Do not cut this wire just tap into it. 9) Here we connect the green plug found only on EK s. Skip this step for EG/DC2 installs. 10) Now find a suitable grommet to pass the O2 sensor wiring through. The AC grommet or the smaller one below it should work fine. If you are running both O2 s you can pass them both through the same hole 11) Next, the primary O2 is passed up above the subframe and plugged in. 12) Here is the B/D coolant temp sensor installed on the engine. We have used our K-Tuned temp sensor adapter. 13) The yellow/green wire from the K-Tuned harness is connected to the temp sensor. 14) When all the car specific connections have been made and everything is working properly, the K-Tuned harness and ecu can be tucked behind the dash or carpeting out of view.


5
6
99-00 Civic EK K-Series Swap Conversion Wiring Harness V 4.0 Installation Manual
 99-00 Civic EK K-Series Swap Conversion Wiring Harness V 4.0 Installation Manual This guide walks you through the steps to install your Hybrid Racing K-Series swap conversion harness for 99-00 Civic. Written
Please read all instructions before proceeding with the installation DA1K1 & DA2K1
 Installation Instructions For: Part Number DA1K1 and DA2K1 for K-series engines used with the RSX or Civic Si Transmission into 1990-1993 Acura Integra Hasport Performance mounts and mount kit accessories
Hybrid Racing Racing Performance Air Intake System Acura RSX Type S
 Hybrid Racing Racing Performance Air Intake System 02-06 Acura RSX Type S This is a step by step guide on how to install the Hybrid Racing Performance Air Intake System on the 02-06 Acura RSX Type S. Written
Install Guide A Throttle Position Sensor
 1879-A Throttle Position Sensor Install Guide Applications: 2002-2006 Acura RSX Type S 2002-2005 Honda Civic Si 2002-2006 JDM Honda Integra Type R Rev 1.0 www.acuityinstruments.com INSTALLATION NOTES:
HASPORT PERFORMANCE EGH3
 HASPORT PERFORMANCE Installation Instructions For: Part Number EGH3 for H22, H23 and F22 engines with Prelude Transmissions into 1992-1995 Honda Civic, 1994-1997 Del Sol And 1994-2001 Acura Integra Hasport
LSx Harness Installation. lsxeverything.com #BecauseYouShould
 LSx Harness Installation lsxeverything.com #BecauseYouShould Table of Contents Slide 1 Introduction Page Slide 2 Table of Contents Slide 3 Starting Instructions Slide 4 Power Connections Slide 5 Ground
Installation Instructions For: Part Number EKK Honda Civic
 HASPORT PERFORMANCE Installation Instructions For: Part Number EKK1 1996-2000 Honda Civic HASPORT PERFORMANCE Inc. 4046 East Winslow Ave. Phoenix, AZ 85040 Phone: (602) 470-0065 Fax: (602) 470-0516 www.hasport.com
Installation Instructions For: Part Number EFK1 K-series Mount Kit for Civic and CR-X
 HASPORT PERFORMANCE Installation Instructions For: Part Number EFK1 K-series Mount Kit for 1988 1991 Civic and CR-X HASPORT PERFORMANCE Inc. 2849 S. 44 th St. Phoenix, AZ 85040 Phone: (602) 470-0065 Fax:
Installation Instructions For: Part Number EGK Honda Civic, Del Sol & Integra
 HASPORT PERFORMANCE Installation Instructions For: Part Number EGK1 1992-1995 Honda Civic, 1993-1997 Del Sol & 1994-2001 Integra HASPORT PERFORMANCE Inc. 4046 East Winslow Ave. Phoenix, AZ 85040 Phone:
Installation Instructions For: Part Number GDK20 for K20 engines and GDK24 for K24 engines into 2007 Honda Fit
 Installation Instructions For: Part Number GDK20 for K20 engines and GDK24 for K24 engines into 2007 Honda Fit Hasport Performance mounts are the result of extensive research and engineering. All mounts
HASPORT PERFORMANCE EFJ1
 HASPORT PERFORMANCE Installation Instructions For: Part Number EFJ1 for J-series V6 engines into 1988-1991 Honda Civic and CR-X Hasport Performance mounts are the result of extensive research and engineering.
Installation Instructions For: Part Number CDK1 for Some K20 and K24 engines into Honda Accord
 Installation Instructions For: Part Number CDK1 for Some K20 and K24 engines into 1994-1997 Honda Accord Hasport Performance mounts are the result of extensive research and engineering. All mounts are
Installation Instructions For: Part Number EGJ1 for J-series V6 engines into Honda Civic, Del Sol And Acura Integra
 Installation Instructions For: Part Number EGJ1 for J-series V6 engines into 1992-1995 Honda Civic, 1994-1997 Del Sol And 1994-2001 Acura Integra Hasport Performance mounts are the result of extensive
Lethal Performance Dual FPDM Harness Kit Installation
 Lethal Performance Dual FPDM Harness Kit Installation The Lethal Performance Dual FPDM Harness Kit is a plug-and-play modification. Depending on whether you are using the Lethal Performance wire upgrade
HASPORT PERFORMANCE BBK1
 HASPORT PERFORMANCE Installation Instructions For: Part Number BBK1 for some K20 and K24 engines into 1992-1996 Honda Prelude Hasport Performance mounts are the result of extensive research and engineering.
RS4-7/PS4-7 + (2) + SPDT T3015, T3053
 + SPDT T3015, T3053") TIP SHEET Installation Tips for your RS4-7/PS4-7 + Honda-SL3 (2) + SPDT T3015, T3053 v1.3 4/25/14 Honda: ( 98-02 Accord), ( 98-01 CRV), ( 98-04 Odyssey), ( 03-04 Pilot) Acura: ( 98-99 EL), ( 98-03 CL),
TIP SHEET Installation Tips for your RS4-7/PS4-7 + Honda-SL3 (2) + SPDT T3015, T3053 v1.3 4/25/14 Honda: ( 98-02 Accord), ( 98-01 CRV), ( 98-04 Odyssey), ( 03-04 Pilot) Acura: ( 98-99 EL), ( 98-03 CL),
How to install a K Swap Radiator
 How to install a K Swap Radiator Written By: Hybrid Racing 2017 guides.hybrid-racing.com/ Page 1 of 9 INTRODUCTION Important!! Please read the entire install guide twice before starting your installation.
HASPORT PERFORMANCE EFH1
 HASPORT PERFORMANCE Installation Instructions For: Part Number EFH1 1988-1991 Honda Civic/CRX Hasport Performance mounts are the result of extensive research and engineering. All mounts are designed with
Honda CBR600RR
 Parts List 2007-2012 Honda CBR600RR Installation Instructions 1 Power Commander 1 USB Cable 1 CD-ROM 1 Installation Guide 2 Power Commander Decals 2 Dynojet Decals 2 Velcro Strip 1 Alcohol Swab The ignition
Installation Tips for your Remote Start w/ Keyless Entry (Toyota Vehicles) v3.2 Updated 3/14/13
 v3.2 Updated 3/14/13") Installation Tips for your Remote Start w/ Keyless Entry (Toyota Vehicles) v3.2 Updated 3/14/13 Thank you for purchasing your remote start from MyPushcart.com an industry leader in providing remote starts
Installation Tips for your Remote Start w/ Keyless Entry (Toyota Vehicles) v3.2 Updated 3/14/13 Thank you for purchasing your remote start from MyPushcart.com an industry leader in providing remote starts
MALLORY FIRESTORM CD MULTI COIL HARDWARE INSTALLATION - PN 69050S / 69050R
 FORM 69050S/R MALLORY FIRESTORM CD MULTI COIL HARDWARE INSTALLATION - PN 69050S / 69050R To ensure you are using the most current instruction sheet, please visit www.malloryfirestorm.com. CAUTION! The
HASPORT PERFORMANCE FG4STK
 HASPORT PERFORMANCE Installation Instructions For: Part Number FG4STK stock replacement mounts for 2012 up Honda Civic Si Hasport Performance mounts and mount kit accessories are designed in house using
RS4/RS7 + + SPDT T0776,T0731
 TIP SHEET Installation Tips for your RS4/RS7 + Honda-SL3 (1.a) + SPDT T0776,T0731 Honda: ( 03-07 Accord),( 01-05 Civic),( 02-06 CRV),( 03-10 Element),( 05-10 Odyssey) Acura: ( 01-03 EL),( 02-06 RSX),(
Ford Racing 4.6L 3V Crate Engine Control Pack
 Ford Racing 4.6L 3V Crate Engine Control Pack Installation Time: 3-6 hours on a Foxbody Mustang Tools Required: Basic English and Metric Socket and Wrench Set Flat and Phillips Screwdrivers Torx bits Hammer
Adjustable Fan Controller for the Mazda6
 Adjustable Fan Controller for the Mazda6 Scott Burton January 2008 With technical advice provided by ShaDrag and DJQuick of Mazda6Club The Mazda6 engine management computer is tuned to optimize the operation
INSTALLATION INSTRUCTIONS COOLANT TANK KIT
 INSTALLATION INSTRUCTIONS COOLANT TANK KIT 2017+ Honda Civic Type-R Document: 19-0197 Support: info@radiumauto.com NOTES: Installation to be performed on engines that are completely cooled down. Do NOT
INSTALLATION INSTRUCTIONS UNLEASH. THE SMARTEST PERFORMANCE TUNING TECHNOLOGY
 INSTALLATION INSTRUCTIONS R UNLEASH. THE SMARTEST PERFORMANCE TUNING TECHNOLOGY FUEL MANAGEMENT FUEL + QS + TRACTION CONTROL HONDA GROM 2014-2017 F393 T393 1>READ WARNINGS > INSTALLING We strongly suggest
Step 1 Wiring your remote start. Installation Tips for your Remote Start system (for GM vehicles) V3.3 revised 9/12/2013
 V3.3 revised 9/12/2013") Installation Tips for your Remote Start system (for GM vehicles) V3.3 revised 9/12/2013 Thank you for purchasing your remote start from MyPushcart.com - an industry leader in providing remote starts to
Installation Tips for your Remote Start system (for GM vehicles) V3.3 revised 9/12/2013 Thank you for purchasing your remote start from MyPushcart.com - an industry leader in providing remote starts to
AMS F1-I INTAKE MANIFOLD
 AMS F1-I INTAKE MANIFOLD The goal of AMS is to provide the highest quality, best performing products available. By utilizing research and development, and rigorous testing programs AMS will never compromise
R53 BOOST GAUGE INSTALL
 R53 BOOST GAUGE INSTALL 052009 Thank you for purchasing the ALTA Performance gauge pod. Installation should only be performed by persons experienced in the proper operation of Mini electrical and body
Contents. TCS/ Driver Mod Installation Manual
 Contents Introduction... 1 TCS Packing List... 3 Tools Needed for Installation... 4 How to Properly Solder... 5 Soldering Standard Butt Connection... 5 Soldering T Connection... 6 How to Properly Crimp...
Installation Instructions for the Plug & Play Remote Start Package (EVOCHR4)
") T6002 v1.1 02/2013 Installation Instructions for the Plug & Play Remote Start Package (EVOCHR4) For CHRYSLER Town & Country 2008-2012 Review the remote start installation manual for safety instructions!
T6002 v1.1 02/2013 Installation Instructions for the Plug & Play Remote Start Package (EVOCHR4) For CHRYSLER Town & Country 2008-2012 Review the remote start installation manual for safety instructions!
PLEASE READ ALL DIRECTIONS BEFORE STARTING INSTALLATION
 PARTS LIST 2013 Honda CBR600RR Installation Instructions 1 Power Commander 1 USB Cable 1 CD-ROM 1 Installation Guide 2 Power Commander Decals 2 Dynojet Decals 2 Velcro 1 Alcohol swab 1 O2 Optimizer THE
MALLORY FIRESTORM CD MULTI COIL HARDWARE INSTALLATION - PN 69150C / 69150R
 FORM 69150C/R MALLORY FIRESTORM CD MULTI COIL HARDWARE INSTALLATION - PN 69150C / 69150R To ensure you are using the most current instruction sheet, please visit www.malloryfirestorm.com. CAUTION! The
Installation Instructions for the Plug & Play Chrysler/Dodge/Jeep Remote Start Package w/mux T5
 v1.01 12/14/2102 Installation Instructions for the Plug & Play Chrysler/Dodge/Jeep Remote Start Package w/mux T5 Review the remote start installation manual for safety instructions! Overview Your kit consists
Installation Instructions for: EMS P/N Acura Integra Acura 2.3CL Honda Accord Honda Civic
 Installation Instructions for: EMS P/N 30-6050 00-01 Acura Integra 98-99 Acura 2.3CL 98-02 Honda Accord 99-00 Honda Civic Thank you for purchasing an AEM Engine Management System. The AEM Engine Management
V1 Truck Manifold Turbo Kit for F-body
 V1 Truck Manifold Turbo Kit for 98-02 F-body Prep: -Remove all A/C Components, Alternator and brackets, tensioner, front bumper, front bumper foam, and front bumper support. Remove radiator and cooling
Tools you will need: Screwdrivers, Metric Sockets, Hook and Loop Tape or Zip Ties, Shop Light, Wire cutters, Wire crimping tool
 Overview: This guide provides instruction for installing Adventure Wagon s Auxiliary Battery Tray and the charging bundle. Package Contents: Adventure Wagon Battery Tray includes the tray plus mounting
INSTALLATION MANUAL
 315000 INSTALLATION MANUAL EGR & Cooler Race Kit for 2015+ 6.7L Ford Powerstroke WARNING ONLY install this kit if you are using a tuner that disables the EGR sensors & circuit system. Any product that
Honda ST1300 Z-Fi Installation Instructions P/N F351
 2002-2012 Honda ST1300 Z-Fi Installation Instructions P/N F351 WARNING! USE ONLY IN RACE OR OTHER CLOSED COURSE APPLICATIONS AND NEVER ON PUBLIC ROADS Z-Fi products do not meet California CARB highway
JB N20/N26 Stage 1 & JB4 Install Guide Last Updated: 10/31/2017
 JB N20/N26 Stage 1 & JB4 Install Guide Last Updated: 10/31/2017 Use subject to terms and conditions posted at http://www.burgertuning.com/terms.html THIS PART IS LEGAL FOR USE ONLY IN COMPETITION RACING
Honda VFR 1200F Z-Fi Installation Instructions P/N F350
 2010-2012 Honda VFR 1200F Z-Fi Installation Instructions P/N F350 WARNING! USE ONLY IN RACE OR OTHER CLOSED COURSE APPLICATIONS AND NEVER ON PUBLIC ROADS Z-Fi products do not meet California CARB highway
Jeep JK 6 Switch Panel
 921709590 2007-17 Jeep JK 6 Switch Panel Thank you for choosing Rough Country for all your lighting needs. Please read instructions before beginning installation. Check the kit hardware against the kit
2014 YFZ450R Z-Fi MX INSTALLATION INSTRUCTIONS P/N F716
 2014 YFZ450R Z-Fi MX INSTALLATION INSTRUCTIONS P/N F716 WARNING! USE ONLY IN RACE OR OTHER CLOSED COURSE APPLICATIONS AND NEVER ON PUBLIC ROADS PARTS LIST: Z-Fi MX Control Unit Fuel Harness DOWNLOAD Z-Fi
Installation Items: Cruise Module
 Installation Items: Rostra 250-1223, Electronic Cruise Control System (ECCS) includes the cruise module, harness, cruise cable, cruise module mounting bracket, cruise cable mounting bracket and hardware
INSTALLATION INSTRUCTIONS UNLEASH. THE SMARTEST PERFORMANCE TUNING TECHNOLOGY
 INSTALLATION INSTRUCTIONS R UNLEASH. THE SMARTEST PERFORMANCE TUNING TECHNOLOGY HONDA GOLD WING 1800 2001-2013 HONDA GOLD WING FB6 2013 F353 FUEL CONTROL 1>READ WARNINGS > INSTALLING We strongly suggest
TIP SHEET. Installation Tips for your RS IB-MUX / PKUMUX (D) + SPDT T1205 v1.2 4/3/14. 1 P a g e
 + SPDT T1205 v1.2 4/3/14. 1 P a g e") Installation Tips for your RS-150 + IB-MUX / PKUMUX (D) + SPDT T1205 v1.2 4/3/14 TIP SHEET Thank you for purchasing your remote start from MyPushcart.com - an industry leader in providing remote starts
Installation Tips for your RS-150 + IB-MUX / PKUMUX (D) + SPDT T1205 v1.2 4/3/14 TIP SHEET Thank you for purchasing your remote start from MyPushcart.com - an industry leader in providing remote starts
PART No: PRODUCT: BRAKE CONTROLER HARNESS MAKE & MODEL: FORD RANGER - MAZDA BT-50 INSTALLATION INSTRUCTIONS
 Page 1 1. In the engine bay, locate the vehicle battery jumper (1). 2. Route the power input harness (2) from the battery (1) towards the LHS of the firewall. Note: Do not connect the power input harness
Kawasaki Ninja 250R / 2013 Kawasaki Ninja 300 Z-Fi QS / TC Installation Instructions P/N T442S, T442R
 2011-2013 Kawasaki Ninja 250R / 2013 Kawasaki Ninja 300 Z-Fi QS / TC Installation Instructions P/N T442S, T442R WARNING! USE ONLY IN RACE OR OTHER CLOSED COURSE APPLICATIONS AND NEVER ON PUBLIC ROADS Z-Fi
2009 CRF450R Z-Fi MX INSTALLATION INSTRUCTIONS P/N F331
 2009 CRF450R MX INSTALLATION INSTRUCTIONS P/N F331 WARNING! USE ONLY IN RACE OR OTHER CLOSED COURSE APPLICATIONS AND NEVER ON PUBLIC ROADS PARTS LIST: MX Control Unit Fuel Harness DOWNLOAD Z-FI MAPPER
Installation Tips for your Excalibur Remote Start (for Honda and Acura Vehicles) rev 11/28/2012
 rev 11/28/2012") Installation Tips for your Excalibur Remote Start (for Honda and Acura Vehicles) rev 11/28/2012 Thank you for purchasing your remote start from MyPushcart.com - an industry leader in providing remote starts
Installation Tips for your Excalibur Remote Start (for Honda and Acura Vehicles) rev 11/28/2012 Thank you for purchasing your remote start from MyPushcart.com - an industry leader in providing remote starts
Nissan GTR Alpha Fuel System
 Nissan GTR Alpha Fuel System Instructions V5 The goal of AMS is to provide the highest quality, best performing products available. By utilizing research and development, and rigorous testing programs
PART No: 04997, & PRODUCT: Body Harness MAKE & MODEL: T5 VOLKSWAGEN TRANSPORTER INSTALLATION INSTRUCTIONS
 1. In the engine bay, locate the vehicle battery (1). 2. From the battery, route the power input harness (2) behind the battery shield and along the firewall. Note: Do not connect the power input harness
V-Force USER GUIDE #67001/# JET Performance Products Apex Circle Huntington Beach, CA (714) Fax: (714) VF001 1/06
 Fax: (714) VF001 1/06") V-Force ACURA/HONDA USER GUIDE #67001/#67002 www.jetchip.com JET Performance Products 17491 Apex Circle Huntington Beach, CA 92647 (714) 848-5515 Fax: (714) 847-6290 VF001 1/06 2006 JET Performance Products
V-Force ACURA/HONDA USER GUIDE #67001/#67002 www.jetchip.com JET Performance Products 17491 Apex Circle Huntington Beach, CA 92647 (714) 848-5515 Fax: (714) 847-6290 VF001 1/06 2006 JET Performance Products
KAWASAKI CONCOURS
 KAWASAKI CONCOURS 2010-2013 Z-Fi Installation Instructions Part # F450 Parts List: Z-Fi Control Unit Fuel Harness Scotchlok (2) Cable Ties Velcro USB Cable Swingarm Stickers Download Z-Fi Mapper Software
Part # Product Description Notes K-Tuned Swap Packages
 K-Tuned Swap Packages KSP-01 Swap Package Level One (The Basics) $1,499.99 30 lbs KSP-02 Swap Package Level Two (Fuel System Add On) $1,999.99 35 lbs KSP-03 Swap Package Level Three (Almost Done) $2,499.99
Kawasaki Ninja 250R / 2013 Kawasaki Ninja 300 Z-Fi Installation Instructions P/N F442
 2011-2013 Kawasaki Ninja 250R / 2013 Kawasaki Ninja 300 Z-Fi Installation Instructions P/N F442 WARNING! USE ONLY IN RACE OR OTHER CLOSED COURSE APPLICATIONS AND NEVER ON PUBLIC ROADS Z-Fi products do
INSTALLATION INSTRUCTIONS UNLEASH. THE SMARTEST PERFORMANCE TUNING TECHNOLOGY
 INSTALLATION INSTRUCTIONS R UNLEASH. THE SMARTEST PERFORMANCE TUNING TECHNOLOGY FUEL + QUICKSHIFT + TRACTION CONTROL HONDA CB500F CB500X CBR500R 2013 T392S, T392R 1>READ WARNINGS > INSTALLING We strongly
Required Power Inputs and Grounds for Ford Modular V8 EEC-V engines (99-04) Last Modified: Revision: 1.0
 Last Modified: Revision: 1.0") This document has been created to point out main power inputs and grounds for the Ford EEC-V harness for swapping a modular V8 engine into another vehicle. This document may not be fully exhaustive of
This document has been created to point out main power inputs and grounds for the Ford EEC-V harness for swapping a modular V8 engine into another vehicle. This document may not be fully exhaustive of
INSTALLATION INSTRUCTIONS
 INSTALLATION INSTRUCTIONS Accessory Application Publications No. P/N 08E49-S2A-100 2004 S2000 AII 26325 Issue Date OCT 2003 PARTS LIST Hood switch harness TOOLS AND SUPPLIES REQUIRED #2 Phillips screwdriver
VT Commodore LPG installation utilising an LPG Memcal and Apexus Quick-kit.
 VT Commodore LPG installation utilising an LPG Memcal and Apexus Quick-kit. Description of components and operation LPG/Petrol Changeover switch The LPG change-over switch is mounted in the instrument
IT S ELECTRIC SWITCHING TO HOLLEY EFI YIELDS BETTER DRIVABILITY AND MORE POWER FOR A BOOSTED 68 FIREBIRD
 WORDS: Scott Parker PICTURES: By Redline Motorsports IT S ELECTRIC SWITCHING TO HOLLEY EFI YIELDS BETTER DRIVABILITY AND MORE POWER FOR A BOOSTED 68 FIREBIRD I t s been said many times, and often it has
PLEASE READ ALL INSTRUCTIONS BEFORE INSTALLATION
 U 14 May 2013 Allison Transmission TapShifter 1031360-361 1 Allison Transmission Tap Shifter 1031360 Allison Transmission 2001-02 1031361 Allison Transmission 2003-05 PLEASE READ ALL INSTRUCTIONS BEFORE
Addictive Desert Designs
 Preparation: Disconnect the negative battery terminal. Park the vehicle on level ground and set the emergency brake. We recommend reading through the installation instructions in whole before performing
M7 R52S & R53 Cold Air Intake Installation Guide 53-3M7301
 M7 R52S & R53 Cold Air Intake Installation Guide 53-3M7301 M7 Speed engineers and manufactures the highest quality MINI COOPER accessories and performance parts available anywhere on Planet Earth! Please
VW JB1 to JB4 Beta Upgrade
 VW JB1 to JB4 Beta Upgrade Last updated: 3/2/2017 Use subject to terms and conditions posted at http://www.burgertuning.com/terms.html THIS PART IS LEGAL FOR USE ONLY IN COMPETITION RACING VEHICLES AS
Ford Coyote Non-VVT Main Harness PN
 Ford Coyote Non-VVT Main Harness PN 558-114 This wiring harness interfaces a Holley EFI ECU to a Ford Coyote engine that has had the cam VVT hardware locked out. It is meant to be used in conjunction with
Dodge Ram 09-Current CS-DTR SERIES BACKUP CAMERA INSTALLATION
 Dodge Ram 09-Current CS-DTR SERIES BACKUP CAMERA INSTALLATION Thank you for your purchase! These instructions cannot possibly cover every option group for every model year of RAM trucks so you may find
WOT Box Installation Instructions VW / Audi
 Connector Pinout Pin Color AWG Name WOT Box Installation Instructions VW / Audi Description 1 Yellow 18 RPM Connect to Fuel Injector Drive Signal or Ignition Control Signal (varies by car model) 2 Black
Installation Instructions for the Plug & Play Remote Start Package (EVOCHR5)
") T6018 v1.1 02/2013 Installation Instructions for the Plug & Play Remote Start Package (EVOCHR5) For DODGE Nitro 2007-2011 Review the remote start installation manual for safety instructions! Overview Your
T6018 v1.1 02/2013 Installation Instructions for the Plug & Play Remote Start Package (EVOCHR5) For DODGE Nitro 2007-2011 Review the remote start installation manual for safety instructions! Overview Your
Installation Instructions for Chevrolet Colorado, GMC Canyon, LT, Z71, With Factory Fog Lights
 Installation Instructions for 2015-2018 Chevrolet Colorado, GMC Canyon, LT, Z71, With Factory Fog Lights This kit is designed to allow use of your factory fog light operation along with an addition auxiliary
Installation Instructions for: EMS P/N Acura Integra Acura 2.3CL Honda Accord Honda Civic
 ! Installation Instructions for: EMS P/N 30-1010 00-01 Acura Integra 98-99 Acura 2.3CL 98-02 Honda Accord 99-00 Honda Civic WARNING: This installation is not for the tuning novice nor the PC illiterate!
Installation Tips for your Crimestopper/ProStart Remote Start system (add-on for GM vehicles) v1.02 updated 1/16/2013
 v1.02 updated 1/16/2013") Installation Tips for your Crimestopper/ProStart Remote Start system (add-on for GM vehicles) v1.02 updated 1/16/2013 Thank you for purchasing your remote start from MyPushcart.com - an industry leader
Installation Tips for your Crimestopper/ProStart Remote Start system (add-on for GM vehicles) v1.02 updated 1/16/2013 Thank you for purchasing your remote start from MyPushcart.com - an industry leader
Ford Coyote Main Harness and Harness Kit PN , , and
 Ford Coyote Main Harness and Harness Kit PN 558-110, 550-619, and 550-625 This wiring harness interfaces a Holley EFI ECU to a Ford Coyote engine that has either had the cam VVT hardware locked out or
INSTALLATION INSTRUCTIONS
 INSTALLATION INSTRUCTIONS Accessory Application Publications No. All 29191 CIVIC AM/FM CD TUNER 2 and 4 DOOR (DX) Issue Date SEP 2005 PARTS LIST Pocket Attachment Kit P/N 08B60-SCV-100 AM/FM CD Tuner P/N
Nistune Z32 ECU Modifications for R33 RB25DET Skyline Installation
 Nistune Z32 ECU Modifications for R33 RB25DET Skyline Installation Revision 6 14Sep10 Thanks to Eric at DTA Motorsports, Skyline Stu and Andrew H for their help. Overview The Z32 ECU is a functional and
Installation Manual v1.6: Dodge 68RFE Automatic Transmission. Please read all instructions before the installation of the ATS Co-Pilot
 Installation Manual v1.6: 2007.5-09 Dodge 68RFE Automatic Transmission Please read all instructions before the installation of the ATS Co-Pilot Thank you for purchasing the ATS Co-Pilot transmission management
Installation. Instructions ES416. VW MKIV Golf/Jetta/GLI 337/20AE. to activate integral fog lights in Jetta GLX, E-Code, and HID Lighting Systems
 Installation Instructions to activate integral fog lights in Jetta GLX, E-Code, and HID Lighting Systems This tutorial is provided as a courtesy by ECS Tuning. VW MKIV Golf/Jetta/GLI 337/20AE best viewed
PLEASE READ ALL DIRECTIONS BEFORE STARTING INSTALLATION
 PARTS LIST FUEL and IGNITION 2016-2018 Honda Pioneer 1000 Installation Instructions 1 Power Commander 1 USB Cable 1 Installation Guide 2 Power Commander Decals 2 Dynojet Decals 2 Velcro strips 1 Alcohol
Adding a factory trip computer Page 1
 Adding a factory trip computer Page 1 This is what's required to add a factory trip computer to a 1993-1995 Audi 90 quattro. (This procedure might work for FWD 90s as well as '88-'92 80/90s as well, I
KX450F Z-Fi MX INSTALLATION INSTRUCTIONS P/N F431
 2009-2012 KX450F MX INSTALLATION INSTRUCTIONS P/N F431 WARNING! USE ONLY IN RACE OR OTHER CLOSED COURSE APPLICATIONS AND NEVER ON PUBLIC ROADS PARTS LIST: MX Control Unit Fuel Harness DOWNLOAD Z-FI MAPPER
WARNING! USE ONLY IN RACE OR OTHER CLOSED COURSE APPLICATIONS AND NEVER ON PUBLIC ROADS
 2010-2013 Ducati Multistrada 1200 Z-Fi INSTALLATION INSTRUCTIONS P/N F182 WARNING! USE ONLY IN RACE OR OTHER CLOSED COURSE APPLICATIONS AND NEVER ON PUBLIC ROADS Z-Fi products do not meet California CARB
Lethal Performance GT500/GT Return Style Fuel System Installation Instructions
 Lethal Performance 07-12 GT500/GT Return Style Fuel System Installation Instructions The Lethal Performance Return Style System is a fairly easy install. By taking your time and following the steps below
WARNING! USE ONLY IN RACE OR OTHER CLOSED COURSE APPLICATIONS AND NEVER ON PUBLIC ROADS
 2010-2012 Ducati Hypermotard 1100 EVO / EVO SP 2010-2013 Ducati Hypermotard 796 Z-Fi INSTALLATION INSTRUCTIONS PN F183, F184 WARNING! USE ONLY IN RACE OR OTHER CLOSED COURSE APPLICATIONS AND NEVER ON PUBLIC
PRAMCQ13. Designed for Dodge Ram vehicles with base audio Not Compatible with 2018 and newer Dodge Ram vehicles
 PRAMCQ13 Designed for 2013 2017 Dodge Ram vehicles with base audio Not Compatible with 2018 and newer Dodge Ram vehicles Subwoofer Alternate Amplifier Bracket Amplifier Subwoofer Harness Subwoofer Amplifier
INSTRUCTION MANUAL PLUG AND PLAY EMS KIT
 INSTRUCTION MANUAL PLUG AND PLAY EMS KIT LOTUS ELISE/EXIGE/2-ELEVEN 2004+ with 2ZZ-GE ENGINE DOCUMENT 19-0046 Radium Engineering LLC 2012, All right reserved 1. Introduction 2. Warnings and Cautions 3.
Jeep JK S8/Onx6 Mount Kit
 Jeep JK S8/Onx6 Mount Kit PN: 45-7500, 45-7503 Installation Manual Baja Designs 185 Bosstick Blvd. San Marcos CA 92069 Phone 760.560.2252 Fax 760.560.0383 info@bajadesigns.com www.bajadesigns.com Bracket
PLEASE READ ALL DIRECTIONS BEFORE STARTING INSTALLATION
 PARTS LIST 2009-2011 Triumph Rocket III I n s t a l l a t i o n I n s t r u c t i o n s 1 Power Commander 1 USB Cable 1 CD-ROM 1 Installation Guide 2 Power Commander Decals 2 Dynojet Decals 2 Velcro 1
IAG Competition Series Air / Oil Separator (AOS) For WRX
 For WRX") P IAG Competition Series Air / Oil Separator (AOS) For 2015-16 WRX Part# IAG-ENG-7252 Tools Required: Ratchet, torque wrench, extensions, needle nose pliers, hose cutter, snips/scissors, flat head screw
P IAG Competition Series Air / Oil Separator (AOS) For 2015-16 WRX Part# IAG-ENG-7252 Tools Required: Ratchet, torque wrench, extensions, needle nose pliers, hose cutter, snips/scissors, flat head screw
INSTALLATION INSTRUCTIONS UNLEASH. THE SMARTEST PERFORMANCE TUNING TECHNOLOGY
 INSTALLATION INSTRUCTIONS R UNLEASH. THE SMARTEST PERFORMANCE TUNING TECHNOLOGY / KAWASAKI VN1700 2013-2014 F422 / T422 1>READ WARNINGS > INSTALLING We strongly suggest that an experienced technician install
All cores due 30 days after invoice date - no credit after 60 days.
 NO WARRANTY STATEMENT High performance parts & products no warranty policy: The purchaser understands and recognizes that high performance diesel products and services sold by INDUSTRIAL INJECTION SERVICE.
2010 Honda VFR 1200F Z-Fi QS / Z-Fi TC Installation Instructions P/N S350S, S350R, T350S, T350R
 R 2010 Honda VFR 1200F Z-Fi QS / Z-Fi TC Installation Instructions P/N S350S, S350R, T350S, T350R WARNING! USE ONLY IN RACE OR OTHER CLOSED COURSE APPLICATIONS AND NEVER ON PUBLIC ROADS Z-Fi products do
VORTEC Drive by Wire Electronic Fuel Injection Wiring Harness HAR-1085
 2001 2002 VORTEC Drive by Wire Electronic Fuel Injection Wiring Harness HAR-1085 PERFORMANCE SYSTEMS INTEGRATION 170 Oberlin Ave N Suite 13 Lakewood NJ 08701-4548 Ph: 732-444-3277 Email: INFO@PSIConversion.com
15-16 Power Stroke Digital Switch
 www..com page 1 This instruction manual covers installation of the gauge pod mount DSP/SOTF switch for 2015-2016 Ford Power Stroke trucks only. DISCLAIMER: Tuning, LLC will not be held responsible for
Alfa Romeo Giulia BMS JB4 Beta Install Guide Last updated 10/9/2018
 Alfa Romeo Giulia 2017+ BMS JB4 Beta Install Guide Last updated 10/9/2018 Use subject to terms and conditions posted at http://www.burgertuning.com/terms.html THIS PART IS LEGAL FOR USE ONLY IN COMPETITION
In This DIY We Will Show You How To Install Recon Backup Lamps (part # To Run On A Separate Switch & In Reverse.
 In This DIY We Will Show You How To Install Recon Backup Lamps (part # 264150 To Run On A Separate Switch & In Reverse. Please Note, There Are Many Ways of Installing These Lights, Including Wiring Methods,
Wiring Harness 1. Remove left hand footwell trim panel from driver s footwell. Typically secured by several Philips head screws.
 Installation There are four segments to the installation; wiring harness, EDIS and Megajolt, coil pack, and Timing wheel and VR sensor. If the car needs to be driven, install everything except the coil
HONDA VTX 1800C HONDA VTX 1800R INSTALLATION INSTRUCTIONS
 2002-2004 HONDA VTX 1800C 2002-2003 HONDA VTX 1800R INSTALLATION INSTRUCTIONS PARTS LIST quantity description 1 power commander EX 1 USB cable 1 cd-rom 1 installation guide 1 power adapter 2 1 power wire
Installation Tips for your Remote Start/Keyless Entry (for Ford Vehicles) v3.3 Updated 1/13/2013
 v3.3 Updated 1/13/2013") Installation Tips for your Remote Start/Keyless Entry (for Ford Vehicles) v3.3 Updated 1/13/2013 Thank you for purchasing your remote start from MyPushcart.com - an industry leader in providing remote
Installation Tips for your Remote Start/Keyless Entry (for Ford Vehicles) v3.3 Updated 1/13/2013 Thank you for purchasing your remote start from MyPushcart.com - an industry leader in providing remote
½ DODGE CUMMINS
 15 June 2016 #1050305D 2003-2004½ Dodge Cummins FlowMAX Lift Pump Kit (I-00169) - 1-2003-04½ DODGE CUMMINS BD FLOWMAX LIFT PUMP KIT Installation Instructions P/N# 1050305D PLEASE READ ALL INSTRUCTIONS