How To: Convert Headlight DRLs Into Marker DRLs A CFans Members Mod Project by burn
|
|
|
- Clifton Clarke
- 5 years ago
- Views:
Transcription

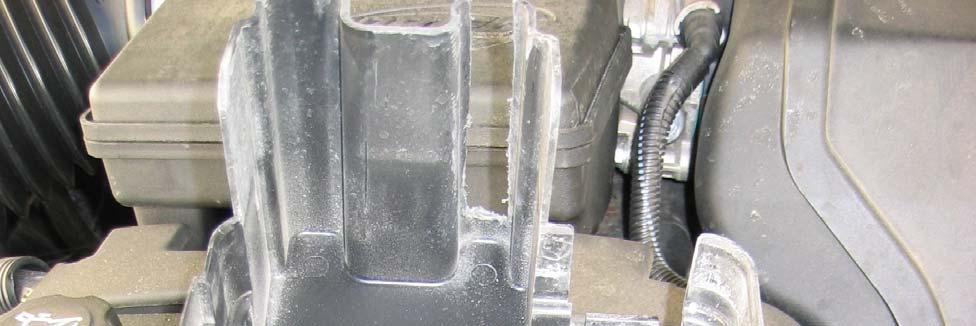
1 How To: Convert Headlight DRLs Into Marker DRLs A CFans Members Mod Project by burn Skill Level: Easy Disclaimer: Please use caution and seek professional assistance when necessary. ColoradoFans.com, the author, and all associated members are not responsible for any damages, injuries or other harm which may occur with this modification. This post does not reflect the views of ColoradoFans.com and its ownership. Before attempting this modification, it is advised to verify this will work on your Colorado or Canyon, as not all GMT 355's are same! PURPOSE: In this write-up, I will demonstrate how I converted my 06+ headlight DRLs into marker light DRLs (similar to the models). This will also illuminate both markers, not just the outside marker as stock with the models. For reference to what we are doing here; here is a before picture. Notice the headlights are lit, however the markers are not. (In order to get the DRLs to light I had to have someone hold the brake while in gear. When you are in park they turn off automatically). REQUIRED PARTS: Mini add-a-fuse circuit Rosin core solder Spare mini fuse 5 wire relay with harness

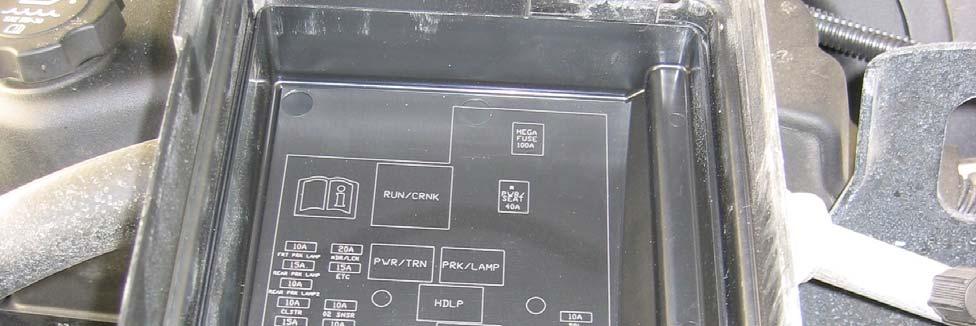
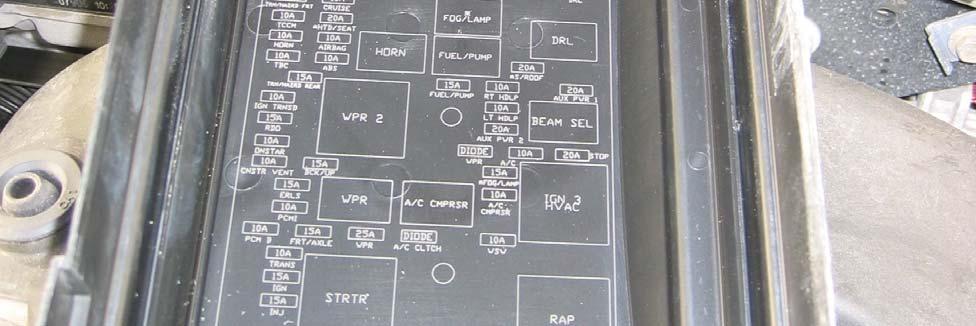
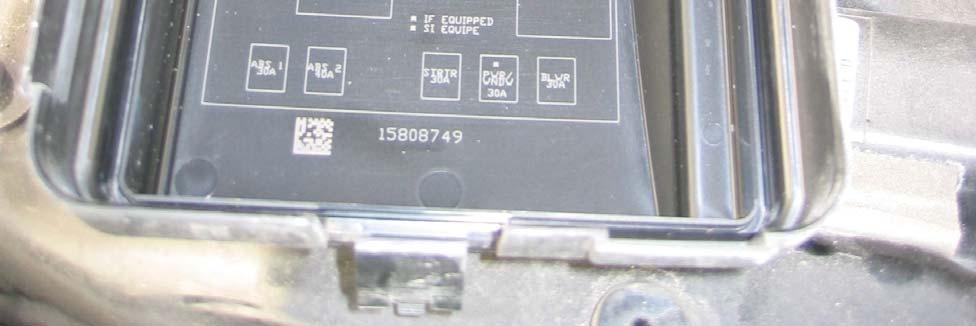
2 REQUIRED TOOLS: Small flat tip screwdriver Diagonal cutting pliers Wire stripper Electric soldering iron Sockets INSTRUCTIONS: 1. Here is an inside view of the fuse box cover. Please confirm yours is the same before proceeding. 2. I will be modifying the Front Park Lamp fuse and the DRL relay.
3

4 3. I will start with the mini add-a-fuse circuit. 4. You will need to modify the way the wire exits the add-a-fuse so that it comes out the opposite direction.


5 5. The reason is so that the cover can close. The add-a-fuse must be installed in this direction - if you just turn it around so that the wire exits towards the middle of the fuse box, this mod wont work.


6 6. You will use the 5-wire relay & harness; remove the wire for pin 87 from the harness, and cut the wire for pin 85 to be about 1" long. 7. Tin the backside of the terminal for pin Solder the wire for pin 85 to the backside of the terminal for pin 87.


7 9. Then reinsert it back into the harness. 10. Next we are going to need to remove the cover to the DRL relay. You also need to cut-off pin 87 on this relay.


8 11. Solder the wire from pin 87 in the new relay harness to the remainder of the pin 87 on the inside of the OEM relay: 12. Now we are going to need to make a notch in the cover of the OEM relay to allow the wire to exit.


9 13. Then reinstall. 14. Now we are going to need to cut a spare mini-fuse in half and strip away the plastic. You are going to need one of the blades. Solder the blade at a 90 degree angle to the wire from pin 87a.


10 15. Then solder the wire from pin 30 to the terminal on the mini add-a-fuse circuit. 16. Then plug the blade you soldered to wire from pin 87a into the socket in the add-a-fuse on the terminal side of the socket.


11 17. Then install it into your fuse box as shown.


12 18. Note the blue wire that is tied to the black wire is a ground. I was hoping to find a ground in the fuse box but was not successful. So I had to add an extension and just hooked it to the battery ground for the sake of testing. 19. Here is the finished result. Notice the headlights are no longer lit - but both inner & outer markers are lit.


13 20. Now after I got everything working I found that I couldn't close the cover. DOH! So I ended up going back and eliminating the relay harness and just using blade terminals to cut down on space. Here is the relay tucked away inside the fuse box. 21. Also make sure to cover all of your exposed wires; I use liquid-electrical tape.
How To: Lift the Truck Using Shackles and Torsion Bars A CFans Members Mod Project by gawillet
 How To: Lift the Truck Using Shackles and Torsion Bars A CFans Members Mod Project by gawillet Skill Level: Moderate Disclaimer: Please use caution and seek professional assistance when necessary. ColoradoFans.com,
How To: Fix That Ugly Hanging E-Brake Cable A CFans Members Mod Project by dirtydawg
 How To: Fix That Ugly Hanging E-Brake Cable A CFans Members Mod Project by dirtydawg Skill Level: Easy Disclaimer: Please use caution and seek professional assistance when necessary. ColoradoFans.com,
* * Inside Toyota Avalon. Tools Required IMPORTANT
 Revision 08/02/16 2013- Toyota Avalon IMPORTANT Before starting, compare items on your invoice with items received. Carefully check through packaging material. If any item is missing, please call Crutchfield
CVO - with ipod Amp & Speaker Upgrade Install Instructions for Batwing Fairing
 CVO - with ipod Amp & Speaker Upgrade Install Instructions for Batwing Fairing Tools Needed: 1/2 inch Socket Wire Cutters 7/16 inch Socket Wire Strippers 5/16 inch Socket Phillips Screwdriver 1/2 inch
Kato P42 Tsunami Digital Sound Decoder Installation Notes
 Kato P42 Tsunami Digital Sound Decoder Installation Notes Overview This application note describes the procedure for installing a TSU-KT1000 Digital Sound Decoder into a Kato HO P42 locomotive. Skill Level
Installation Instructions for Chevrolet Colorado, GMC Canyon, LT, Z71, With Factory Fog Lights
 Installation Instructions for 2015-2018 Chevrolet Colorado, GMC Canyon, LT, Z71, With Factory Fog Lights This kit is designed to allow use of your factory fog light operation along with an addition auxiliary
20 Rigid Industries LED Light Bar Installation into a 2002 Ford Super Duty
 20 Rigid Industries LED Light Bar Installation into a 2002 Ford Super Duty This write-up is how I installed the Rigid Industries 20" E-Series LED Light Bar into the grill area behind the license plate
REPAIR for: Sidelamp Bulb(s) Faulty, Left Tail Lamp Faulty, Right Tail Lamp Faulty, Directional Indicator Faulty, Left Hand Stop Bulb Faulty
 Faulty, Left Tail Lamp Faulty, Right Tail Lamp Faulty, Directional Indicator Faulty, Left Hand Stop Bulb Faulty") REPAIR for: Sidelamp Bulb(s) Faulty, Left Tail Lamp Faulty, Right Tail Lamp Faulty, Directional Indicator Faulty, Left Hand Stop Bulb Faulty DIFFICULTY LEVEL: ***** Drilling, Wire Crimping, Tight Spaces,
REPAIR for: Sidelamp Bulb(s) Faulty, Left Tail Lamp Faulty, Right Tail Lamp Faulty, Directional Indicator Faulty, Left Hand Stop Bulb Faulty DIFFICULTY LEVEL: ***** Drilling, Wire Crimping, Tight Spaces,
8436, 8437, 8438, 8439, 8442, 27480, 27780, 28028, & ISOLATION MODULE ELECTRICAL SYSTEM
 September 11, 2003 Lit. No. 27808 8436, 8437, 8438, 8439, 8442, 27480, 27780, 28028, & 28400 ISOLATION MODULE ELECTRICAL SYSTEM Installation Instructions Read this document before installing the snowplow.
HARNESS KIT 3 PORT ISOLATION MODULE LIGHT SYSTEM. Parts List and Installation Instructions CAUTION
 May 1, 2018 Lit. No. 92991, Rev. 00 HARNESS KIT 3 PORT ISOLATION MODULE LIGHT SYSTEM Parts List and Installation Instructions Read this document before installing the snowplow. See your sales outlet/website
SHELBY GT500
 2007-2009 SHELBY GT500 Removal of Factory Unit WARNING: 1. Radiator fluid must be handled properly. Please observe local ordinances with regards to handling and disposal. 2. Allow vehicle and components
LEXUS RC 350/RC-F ILLUMINATED DOOR SILLS Preparation
 Preparation Part Number: PT944-24150 Kit Contents Item # Quantity Reqd. Description 1 2 Inner LED Scuff 2 2 Outer Scuff 3 1 Hardware Bag Hardware Bag Contents Item # Quantity Reqd. Description 1 15 20
PONTIAC FIREBIRD
 1974-78 PONTIAC FIREBIRD Two Panel Sequential LED Tail Light Kit Installation Guide Kit Contents: 2 LED panels 2 LED panel mount kits 6 rubber grommets 1 power wire 1 pigtail harness Kit 1 crimp terminal
M7 R52S & R53 Cold Air Intake Installation Guide 53-3M7301
 M7 R52S & R53 Cold Air Intake Installation Guide 53-3M7301 M7 Speed engineers and manufactures the highest quality MINI COOPER accessories and performance parts available anywhere on Planet Earth! Please
Rear Vision System Liftgate Emblem Camera for Aftermarket Display Ford Flex (Kit part number )
") Rear Vision System Liftgate Emblem Camera for Aftermarket Display 2009-2012 Ford Flex (Kit part number 1008-6509) Kit Contents: Liftgate Emblem Mount with Camera Chassis Harness with RCA (Note: In some
Rear Vision System Liftgate Emblem Camera for Aftermarket Display 2009-2012 Ford Flex (Kit part number 1008-6509) Kit Contents: Liftgate Emblem Mount with Camera Chassis Harness with RCA (Note: In some
Illuminated Cup Holders Hyundai Elantra (GLS, Limited, Coupe)
") Illuminated Cup Holders 2011-2015 Hyundai Elantra (GLS, Limited, Coupe) Thanks for purchasing this Cup Holder Illumination Install Kit! If you have any questions or feedback please email me direct at info@accentglowled.com
Illuminated Cup Holders 2011-2015 Hyundai Elantra (GLS, Limited, Coupe) Thanks for purchasing this Cup Holder Illumination Install Kit! If you have any questions or feedback please email me direct at info@accentglowled.com
Broadway Limited (and Blueline) SD40-2 Tsunami Digital Sound Decoder Installation Notes
 SD40-2 Tsunami Digital Sound Decoder Installation Notes") Broadway Limited (and Blueline) SD40-2 Tsunami Digital Sound Decoder Installation Notes Overview This application note describes how to install a TSU-AT1000 digital sound decoder into a HO Broadway Limited
Broadway Limited (and Blueline) SD40-2 Tsunami Digital Sound Decoder Installation Notes Overview This application note describes how to install a TSU-AT1000 digital sound decoder into a HO Broadway Limited
INSTALLATION INSTRUCTIONS
 AUTOMOTIVE PRODUCTS, INC. INSTALLATION INSTRUCTIONS ULTIMATE BULL BAR APPLICATION: 2017 Ford F-250/350 PART NUMBER: 32-3900, 32-3905, 32-3900L, 32-3905L ITEM QUANTITY DESCRIPTION TOOLS NEEDED 1 1 ULTIMATE
Ford Escape. Installation Manual: Ford Escape. Power Lift Gate System. Page 1 of 12
 Ford Escape Installation Manual: Ford Escape Power Lift Gate System Page 1 of 12 NOTE: Installation Precaution 1. It is recommended to have this product installed by a professional to avoid damage caused
MUSTANG PROJECT. INSTALLING THE Mustang Project LED SEQUENTIAL TAILLIGHT KIT P/N MP-2004-LED AND MP-2004-LED-QK. Price:$9.
 WWW.MUSTANGPROJECT.COM VOLUME 6 Price:$9.95 A SafeCode Inc. Publication INSTALLING THE Mustang Project 1996-2004 LED SEQUENTIAL TAILLIGHT KIT P/N MP-2004-LED AND MP-2004-LED-QK Page 2 Read these instructions
SCION xb 2004 SECURITY (V5) Section I Installation Preparation. Part Number:
 Section I Installation Preparation. Part Number:") Section I Installation Preparation Part Number: 08586 52960 Section I Installation Preparation Kit Contents Item # Quantity Reqd. Description 1 1 Wire Harness 2 1 Mounting Bracket 3 1 GBS ECU 4 1 Security
Section I Installation Preparation Part Number: 08586 52960 Section I Installation Preparation Kit Contents Item # Quantity Reqd. Description 1 1 Wire Harness 2 1 Mounting Bracket 3 1 GBS ECU 4 1 Security
Connecting the rear fog light on the A4 Jetta, while keeping the 5 Light Mod
 Connecting the rear fog light on the A4 Jetta, while keeping the 5 Light Mod DISCLAIMER: I'm human and make mistakes. If you spot one in this how to, tell me and I'll fix it This was done on my 99.5 Jetta.
Fog Light setup for a 2003 XL F250 Super Duty using the OEM kit.
 Fog Light setup for a 2003 XL F250 Super Duty using the 2005-2007 OEM kit. Since the kit (1C3Z15200BB) for the 2001-2004 series truck was not available anymore, I explored options to put a set of OEM fog
Instructions on installing the R/R to the front battery cover.
 April, 2008 Instructions on installing the R/R to the front battery cover. Please read all of the steps so you will be familiar with the complete relocation installation first. The purpose of this relocation
CHEVY NOVA w/reverse Four Panel Sequential LED Taillight Kit Installation Guide
 1970-72 CHEVY NOVA w/reverse Four Panel Sequential LED Taillight Kit Installation Guide Kit Contents: 4 LED panels 4 rubber grommets 1 power wire with t-tap 1 driver side LED harness, 24 (5 pin) 1 passenger
It is strongly recommended that this product be installed by a professional.
 Lower bumper Ford raptor Lower Bumper 20" E-Series or SR-Series or 4" E-Series set mounting instructions For Part # s 40133 & 40134 Thank you for purchasing Rigid Industries products for your Ford. Installation
Backside License Plate Mount for Jeep JK Wrangler
 REQUIRED TOOLS 10mm SOCKET 13mm SOCKET 4mm HEX KEY WIRE CRIMPS WIRE STRIPPERS ELECTICAL TAPE SCREW DRIVER KIT CONTAINS BACKSIDE MOUNT LICENSE PLATE BRACKET WITH LEDS PLASTIC PASS-THROUGH GROMMET STAINLESS
dually & d2 Ford raptor fog light bracket dually & d2 mounting instructions
 dually & d2 Ford raptor dually & d2 fog light bracket mounting instructions Passenger Driver Thank you for purchasing Rigid Industries products for your Ford. Installation is fairly simple with the right
INSTALLATION INSTRUCTIONS
 INSTALLATION INSTRUCTIONS Accessory P/N 08E10-TA0-100 Application 2008 ACCORD 2-AND 4-DOOR Publications No. AII 35358 Issue Date AUG 2007 PARTS LIST Ambient Light Kit 2 Ambient lights Fuse label Washer
JK BFH II Front Bumpers
 INSTALLATION INSTRUCTIONS INST-17-16-021_A JK BFH II Front Bumpers IMPORTANT: Thank you for purchasing this Poison Spyder product. Please read through this entire document before proceeding with installation.
INSTALLATION INSTRUCTIONS FUEL SURGE TANK KIT
 INSTALLATION INSTRUCTIONS FUEL SURGE TANK KIT BMW E46 3-Series, Excl Convertible Document: 19-0056 Support: info@radiumauto.com Relieve fuel pressure in vehicle before beginingthe installation. Disconnect
CHEVY CAMARO Four panel Sequential LED Taillight kit installation guide
 1978-81 CHEVY CAMARO Four panel Sequential LED Taillight kit installation guide Kit Contents: 4 LED panels 1 power wire with t-tap 2 driver side LED harnesses, 24 2 passenger side LED harnesses, 48 4 LED
INSTALLATION INSTRUCTIONS
 Rear Vision System Liftgate Emblem Camera Mirror Display 2009-2012 Ford Flex (Kit part number 1008-9527) Kit Contents: Mirror Liftgate Emblem Mount with Camera Interior (shorter) Harness Chassis (longer)
MUSTANG GT
 MAXFLOW FUEL PUMP BOOSTER Installation Instructions 2011-2012 MUSTANG GT P/N: 5A102-029 ENGINEERING, INC. 1650 Pacific Avenue, Channel Islands, CA 93033-9901 Phone 805 247-0226 Fax: 805 247-0669 www.vortechsuperchargers.com
80703 & Backside License Plate Mount for Jeep JK Wrangler (80707) & 10+ (80703)
 & 10+ (80703)") 80703 Backside Mount 80707 Backside Mount REQUIRED TOOLS 10mm SOCKET 13mm SOCKET 4mm HEX KEY WIRE CRIMPS WIRE STRIPPERS ELECTICAL TAPE SCREW DRIVER KIT CONTAINS BACKSIDE MOUNT LICENSE PLATE BRACKET WITH
80703 Backside Mount 80707 Backside Mount REQUIRED TOOLS 10mm SOCKET 13mm SOCKET 4mm HEX KEY WIRE CRIMPS WIRE STRIPPERS ELECTICAL TAPE SCREW DRIVER KIT CONTAINS BACKSIDE MOUNT LICENSE PLATE BRACKET WITH
SAFETY SENSORS FIELD OF VIEW WILL BE ALTERED WITH USE OF THE REPLACEMENT BUMPER. Injury hazard
 SAFETY Your safety and the safety of others is very important. In order to help you make informed decisions about safety, we have provided installation instructions and other information. These instructions
29048, 29049, 29050, 29051, 29052, 20953, 29054,
 May 1, 2008 Lit. No. 29206, Rev. 05 29048, 29049, 29050, 29051, 29052, 20953, 29054, 29400-2 HARNESS KIT 3-PORT ISOLATION MODULE LIGHT SYSTEM w/3-plug SYSTEM HARNESSES Installation Instructions Read this
INSTALLATION INSTRUCTIONS For 2007 and newer Jeep Wrangler JK
 7 LED sealed beam headlamp with switchback Halos and DRL INSTALLATION INSTRUCTIONS For 2007 and newer Jeep Wrangler JK SB7250XX-BLK, SB7250XX-CHR, SB7050BA-BLK, SB7060XX-BLK, SB7060XX-CHR, SB7160XX-CHR,
 Page 1 of 14 This install requires work on your supplemental restraint system and could cause injury or damage to your car. If you are not comfortable performing the steps detailed here then do not attempt
Kia Sedona. Installation Manual: Kia Sedona. Power Lift Gate System. Page 1 of 13
 Kia Sedona Installation Manual: Kia Sedona Power Lift Gate System Page 1 of 13 NOTE: Installation Precaution 1. It is recommended to have this product installed by a professional to avoid damage caused
Mustang HID Headlight Installation Guide (9007)
") Mustang HID Headlight Installation Guide 1994-2004 (9007) The below installation instructions work for the following products: 9007 Bulb HID Headlight Coversion Kit 1994-2004 The following are a set of
Mustang HID Headlight Installation Guide 1994-2004 (9007) The below installation instructions work for the following products: 9007 Bulb HID Headlight Coversion Kit 1994-2004 The following are a set of
Application Note. KATO SD40-2 Mid Tsunami Digital Sound Decoder Installation Notes
 Application Note Overview This application note describes how to install a Tsunami TSU-KT1000 Digital Sound Decoder into the HO Kato SD40-2 (Mid-production). Skill Level 2: The entire installation can
HARNESS KIT 3 PORT ISOLATION MODULE LIGHT SYSTEM
 January 1, 2016 Lit. No. 92935, Rev. 01 52101 HARNESS KIT 3 PORT ISOLATION MODULE LIGHT SYSTEM Parts List and Installation Instructions Read this document before installing the snowplow. See your sales
Page 1. File: Motolight caliper one-piece Harley Date: 8/15/2006
 Page 1 Harley-Davidson FL Caliper Mount Installation One-piece mounting brackets You should allow about two to three hours for installation. We suggest you use a well-lighted space for installation. PLEASE
Aopec Dual Battery Kit Fitting Instructions
 AOPEC USA LLC. 1911 US Hwy 301 Suite 460 Tampa, FL 33619 Tel: 813-450-2156 Fax: 813-450-2638 www.aopec.com Aopec Dual Battery Kit Fitting Instructions Aopec Dual Battery Kit Fitting Instructions Fitment
TESLA MODEL S REAR UNDER SPOILER & DIFFUSER SYSTEM
 TESLA MODEL S Thank you for purchasing your Unplugged Performance Rear Under Spoiler & Diffuser System for the Tesla Model S! Please read this manual carefully prior to installation. REAR UNDER SPOILER
WOC & WOC Top & Back Installation Instructions
 Shown with optional Sun Roof WOC-900500-2 & WOC-900501-2 Top & Back Installation Instructions Install Order! Heater Door System Wiper on to Windshield Windshield Rear Panel Top Panel Tools needed: 5/16
29048, 29049, 29050, 29051, 29052, 29053, 29054,
 May 1, 2018 Lit. No. 29206, Rev. 13 29048, 29049, 29050, 29051, 29052, 29053, 29054, 29400 7 HARNESS KIT 3 PORT ISOLATION MODULE LIGHT SYSTEM w/3 PLUG SYSTEM HARNESSES Installation Instructions Read this
Projector39/Umnitza BMW Headlight & Re-Installation for E39s Predator Angel Eyes, and Lamin-X Installation
 Projector39/Umnitza BMW Headlight & Re-Installation for E39s Predator Angel Eyes, and Lamin-X Installation Now it is time to remove the headlights! Obviously you have to open the hood to do this. 100_3630.jpg
B29048, B29049, B29050, B29051, B29053, B
 May 1, 2011 Lit. No. 48266, Rev. 05 B29048, B29049, B29050, B29051, B29053, B29400-5 HARNESS KIT 3-PORT ISOLATION MODULE LIGHT SYSTEM w/2-plug SYSTEM HARNESSES Installation Instructions Read this document
INSTALLATION INSTRUCTIONS
 Rear Vision System Tailgate Emblem Camera Mirror Display 2009-Current Ford F-150 and 2010-Current Super Duty (Kit part number 1008-9527) Kit Contents: Mirror Tailgate Emblem Mount with Camera Interior
Instructions (V ) Type 3 - Hi/Low kit HID Low beam and H3, halogen, for High beam
 Type 3 - Hi/Low kit HID Low beam and H3, halogen, for High beam") Instructions (V5 04.23.2012) Type 3 - Hi/Low kit HID Low beam and H3, halogen, for High beam H4 (9003), H13 (9008), 9004, 9007 These bulbs have a HID Low beam and Halogen Bulb for High beam. Items included
Instructions (V5 04.23.2012) Type 3 - Hi/Low kit HID Low beam and H3, halogen, for High beam H4 (9003), H13 (9008), 9004, 9007 These bulbs have a HID Low beam and Halogen Bulb for High beam. Items included
2005 and 09 Mustang install instructions Sequential / Chase Unit Partial Plug-N-Play Kit Meter4it Eng. Updated: 3/28/09
 Updated: 3/28/09 Verify content of kit: 1- Unit with wiring harness 1- Red power wire with 15 amp fuse 1- Color instruction 2- Velcro for mounting 1-Driver taillight harness 1- Passenger taillight harness
This harness kit includes: Installing the Hybrid ReVolt Universal grid charger in an Insight
 Installing the Hybrid ReVolt Universal grid charger in an Insight This harness kit includes: Insight harness (2000 to 2006) (a) 4 #6 mounting screws for bulkhead (c) 2 sheet metal screws for fan board
Fog Lamp Instructions
 Fog Lamp Instructions 2011+ Ford Super Duty Congratulations on your purchase of a high quality PUTCO product. Should you need any application or technical assistance feel free to call us at: 1-800-247-3974
SE400-M3-MMO-100/(U)SLQ-32A(V)3 WARNING. b. Engage swingbolts 3A11H9 with SRU front panel support hooks H1 and tighten nuts on swingbolts.
SLQ-32A(V)3 WARNING. b. Engage swingbolts 3A11H9 with SRU front panel support hooks H1 and tighten nuts on swingbolts.") j. Ensure the air valve 3A11H15 located in rear of equipment rack has closed and shows no signs of excessive wear or damage. 6-44.3 Installation Procedure. WARNING Two men are required to safely lift SRU
j. Ensure the air valve 3A11H15 located in rear of equipment rack has closed and shows no signs of excessive wear or damage. 6-44.3 Installation Procedure. WARNING Two men are required to safely lift SRU
Page 1. File: Motolight caliper one-piece Date: 8/14/2006
 Page 1 Caliper Mount Installation One-piece mounting brackets You should allow about two to three hours for installation. We suggest you use a well-lighted space for installation. PLEASE READ ALL THE INSTRUCTIONS.
INSTALLATION INSTRUCTIONS
 INSTALLATION INSTRUCTIONS FUEL SURGE TANK INSTALLATION KIT 1999-2006 BMW E46 COUPE Document# 19-0056 Support: info@radiumauto.com Note: This kit was designed for a standard single pump Radium Engineering
Ford Mustang V6 OEM-Style Fog Light Kit Parts List: Quantity: Tool List:
 2015-2017 Ford Mustang V6 OEM-Style Fog Light Kit Parts List: Quantity: Tool List: LED Foglights/ Bezels 2 Flat head & Phillips screwdriver (if you ordered part#3600) Ratchet & Socket set OR Wiring harness
FOG-LAMPS INSTALL KIT
 FOG-LAMPS INSTALL KIT DODGE RAM (BR, BE) Installation Instructions Read entire instructions thoroughly before starting. For proper removal and installation, follow procedures in the service manual. NOTES:
PONTIAC FIREBIRD. Four Panel Sequential LED Tail Light Kit Installation Guide
 1967-68 PONTIAC FIREBIRD Four Panel Sequential LED Tail Light Kit Installation Guide Kit Contents: 4 LED panels 4 rubber grommets 1 power wire 2 pigtail harness kits 2 crimp terminal kits PN 1100567 Please
29048, 29049, 29050, 29051, 29052, 29053, 29054,
 April 15, 2014 Lit. No. 29206, Rev. 11 29048, 29049, 29050, 29051, 29052, 29053, 29054, 29400 5 HARNESS KIT 3 PORT ISOLATION MODULE LIGHT SYSTEM w/3 PLUG SYSTEM HARNESSES Installation Instructions Read
TOYOTA VENZA 2009 TRAILER WIRE HARNESS Procedure
 Part Number: PT791-0T099 Kit Contents Item # Quantity Reqd. Description 1 1 Trailer Wire Harness Module 2 1 4-Flat Harness 3 1 Battery Power Wire Harness 4 1 Mounting Bracket, 4-Flat 5 2 Screw #10-24 6
Athearn Genesis GP38-2 Tsunami Digital Sound Decoder Installation Notes
 Athearn Genesis GP38-2 Tsunami Digital Sound Decoder Installation Notes Overview This application note describes how to install a TSU-GN1000 digital sound decoder into an Athearn Genesis HO GP38-2. Skill
INSTALLATION INSTRUCTIONS
 INSTALLATION INSTRUCTIONS --1075 North Ave. Sanger, CA 93657-3539 local: 559-875-0222 fax: 559-876-2259 toll free: 800-445-3767-- 2505 Lowering Spindle Assembly Installation Instructions ½ TON SILVERADO
TOYOTA TACOMA Part Number: TTA-BGB16-DRL TTA-BGP16-DRL
 TOYOTA TACOMA 2016-17 Date: 10.29.2016 Billet Grille w/led DRL Part Number: TTA-BGB16-DRL TTA-BGP16-DRL Kit Contents Item # Quantity Reqd. Description 1 2 LED DRL 2 1 Driver Box 3 1 Switch 4 1 User Card
In This DIY We Will Show You How To Install Recon Backup Lamps (part # To Run On A Separate Switch & In Reverse.
 In This DIY We Will Show You How To Install Recon Backup Lamps (part # 264150 To Run On A Separate Switch & In Reverse. Please Note, There Are Many Ways of Installing These Lights, Including Wiring Methods,
TOYOTA PRIUS 2004 TVIP V2 (GBS ADD ON) Section I Installation Preparation
 Section I Installation Preparation") Section I Installation Preparation Part Number: 08586 47840 Section I Installation Preparation Kit Contents Item # Quantity Reqd. Description 1 1 Wire Harness 2 1 3 1 ECU Mounting Bracket Hardware Bag
Section I Installation Preparation Part Number: 08586 47840 Section I Installation Preparation Kit Contents Item # Quantity Reqd. Description 1 1 Wire Harness 2 1 3 1 ECU Mounting Bracket Hardware Bag
INSTALLATION INSTRUCTIONS
 INSTALLATION INSTRUCTIONS Accessory Application Publications No. SECURITY SYSTEM P/N 08E49-SDA-100 ACCORD 2- AND 4-DOOR AII 30666 Issue Date AUG 2005 PARTS LIST Hood switch harness Illustration of the
Accessory Fuse Block. Please read this entire manual before proceeding with installation.
 Accessory Fuse Block Please read this entire manual before proceeding with installation. Kit Components: (1) Fuse Block Assembly (1) Harness (1) Positive power cable (1) Negative power cable (5) Pigtails
INSTALLATION MANUAL. For: ACURA NSX
 INSTALLATION MANUAL For: ACURA NSX Package contents cable loom Electronics Bridge plug Installation manual Requested Tools Diagonal pliers small screwdriver T30 Torx Bit 1/4 or 3/8 ratchet 10mm Socket
Installation Instructions
 Installation Instructions For PTI STEZA C (2x2 Burner Configuration) & PTI STEZB C (3x1 Burner Configuration) Revision E Safe-T-Element Installation Instructions Table of Contents 1. PREPARATION..3 1.1
Gentex Homelink Installation Instructions
 Gentex Homelink Installation Instructions Kit Contents: Item Qty Part Description 1 Number GENK-41 NVS Homelink Mirror GENK-42 NVS Homelink w/mood lights 1 of the GENK-45 NVS Homelink w/compass following
Amp & Speaker Upgrade Install Instructions for Road Glide
 Amp & Speaker Upgrade Install Instructions for Road Glide Tools Needed: 1/2 inch Socket Wire Cutters 7/16 inch Socket Wire Strippers 10 mm Socket Phillips Screwdriver 1/2 inch Ratchet Wrench T25 Torx driver
Amp & Speaker Upgrade Install Instructions for Victory Cross Country
 Amp & Speaker Upgrade Install Instructions for Victory Cross Country Tools Needed: 13mm Socket 4mm Ball Head Allen Socket 5mm Allen Wrench 10mm Wrench Wire Cutters Wire Strippers Phillips Screwdriver Pocket
INSTALLATION INSTRUCTIONS
 Rear Vision System Tailgate Emblem Camera Aftermarket Display 2009-Current Ford F-150 and 2010-Current Super Duty (Kit part number 1008-6509) Kit Contents: Tailgate Emblem Mount with Camera Chassis Harness
INSTALLATION INSTRUCTIONS
 INSTALLATION INSTRUCTIONS Accessory ENGINE BLOCK P/N 08T44-SWA-1A0 Application 2012 CIVIC 4-DOOR Si Publications No. AII 45627 Issue Date APRIL 2011 PARTS LIST Engine block heater Aluminum washer Heater
INSTALLATION INSTRUCTIONS
 OEM Tailgate Camera/Bezel Assembly with Chassis Harness 2014-current Chevrolet Silverado and GMC Sierra (Kit part number 9002-1005) Kit Contents: Chassis Harness 1 bubble bag containing: Tailgate Handle
Fitting Instructions
 Dual Battery Kit Fitting Instructions Fitting Instructions We recommend that the is installed by a licensed auto-electrician. WARNING: Like any addition to your 12v set-up, ensure you ve installed a fuse
29048, 29049, 29050, 29051, 29052, 29053, 29054,
 April 15, 2014 Lit. No. 29225, Rev. 11 29048, 29049, 29050, 29051, 29052, 29053, 29054, 29400 5 HARNESS KIT 3 PORT ISOLATION MODULE LIGHT SYSTEM w/2 PLUG SYSTEM HARNESSES Installation Instructions Read
Application Note. Atlas RS-3 Tsunami Digital Sound Decoder Installation Notes
 Application Note Atlas RS-3 Tsunami Digital Sound Decoder Installation Notes Overview This application note describes how to install a TSU-AT1000 digital sound decoder into an HO Atlas RS-3. Skill Level
Installation Manual: Jeep Cherokee Power Lift Gate System
 Installation Manual: Jeep Cherokee Power Lift Gate System Page 1 of 11 NOTE: Installation Precaution Kit Details Power Cable 4120353 1. It is recommended to have this product installed by a professional
Instructions (V ) Type 2-Hi/Low, Motorized HID kit H4-M2 (9003), H13-M2 (9008), 9004-M2, 9007-M2
 Type 2-Hi/Low, Motorized HID kit H4-M2 (9003), H13-M2 (9008), 9004-M2, 9007-M2") Instructions (V5 04.23.2012) Type 2-Hi/Low, Motorized HID kit H4-M2 (9003), H13-M2 (9008), 9004-M2, 9007-M2 Items included; 2x Hi/Low, Motorized bulbs 2x 35-45W CAN BUS Digital Ballasts, 1x Hi/Low, Motorized
Instructions (V5 04.23.2012) Type 2-Hi/Low, Motorized HID kit H4-M2 (9003), H13-M2 (9008), 9004-M2, 9007-M2 Items included; 2x Hi/Low, Motorized bulbs 2x 35-45W CAN BUS Digital Ballasts, 1x Hi/Low, Motorized
TOYOTA VENZA 2009 TRAILER WIRE HARNESS Procedure
 Part Number: PT791-0T099 Kit Contents Item # Quantity Reqd. Description 1 1 Trailer Wire Harness Module 2 1 4-Flat Harness 3 1 Battery Power Wire Harness 4 1 Mounting Bracket, 4-Flat 5 2 Screw #10-24 6
Disconnect the negative battery cable!
 Understanding Mod-3 on a C90 With Wiring Diagrams By DrJones18LC I do not have a C90 at my disposal (or audio/video equipment for that matter) so I can't make a live step by step how-to on doing Mod-3.
2015 Ford F150 Rear Bumper w/ LED
 2015 Ford F150 Bumper w/ LED T527990 T527991 PARTS LIST: 1 Bumper Assembly 4 12mm Lock Washers 2 Mounting Brackets 6 12 mm Nylon Lock Nuts 4 Sensor Hole Plugs 8 4mm x 10mm Button Head Bolts 2 Plastic Plugs
Your Legal Fuel Tank Source.
 February 23, 2015 IS# 808 Page 1 of 13 THANK YOU FOR PURCHASING A TRANSFER FLOW 40 GALLON TOOLBOX REFUELING SYSTEM. PLEASE READ THE FOLLOWING PROCEDURES CAREFULLY BEFORE STARTING THE INSTALLATION. CAUTION:
GENUINE PARTS INSTALLATION INSTRUCTIONS
 GENUINE PARTS INSTALLATION INSTRUCTIONS 1. 2. 3. 4. DESCRIPTION: Security Light Kit APPLICATION: Altima Coupe and Sedan (2011+) PART NUMBER: 999F4 AX008 - Universal Security Lighting Kit. KIT CONTENTS:
Amp & Speaker Upgrade Install Instructions for Batwing Fairing
 Amp & Speaker Upgrade Install Instructions for Batwing Fairing Tools Needed: 1/2 inch Socket Wire Cutters 7/16 inch Socket Wire Strippers 10 mm Socket Phillips Screwdriver 1/2 inch Ratchet Wrench T25 Torx
2016 HONDA 1000 Pioneer PN 3102 Turn signal / horn kit rev nc
 2016 Honda 1000 Pioneer STOP - THIS KIT IS DESIGNED SPECIFICALLY FOR 2016 HONDA 1000 PIONEER IF YOUR MACHINE IS NOT THIS MODEL DO NOT PROCEED. THIS KIT DOES NOT WORK ON THE PIONEER 500 nor 700 S. Contact
Safe-T-element Installation Instructions
 Safe-T-element Installation Instructions For: PTI STEZA (2x2 Burner Configuration) & PTI STEZB (3x1 Burner Configuration) Revision K (May. 3 2012) TABLE OF CONTENTS 1. PREPARATION... 3 1.1 General Safety
2012+ Tacoma APEX Front Bumper Instructions
 Important notices: 2012+ Tacoma APEX Front Bumper Instructions These instructions are intended only as a general guide for installing All-Pro products. For some items, specialized mechanical skills, metal
IMPORTANT WARRANTY & INSTALLATION INSTRUCTIONS ATTACHED
 IMPORTANT WARRANTY & INSTALLATION INSTRUCTIONS ATTACHED Please Forward All Attached Information to Consumer Warranty Not Valid Unless Returned to CORSA Exhaust We ask that you take a few moments to compete
INSTALLATION INSTRUCTIONS
 INSTALLATION INSTRUCTIONS Accessory Application Publications No. 2003 ELEMENT AII 24318 Issue Date DEC 2002 PARTS LIST Trailer Hitch Kit P/N 08L92-SCV-100 4 Bolts, 12 x 35 mm Trailer hitch U-bolt 2 Nuts,
INSTALLATION INSTRUCTIONS
 INSTALLATION INSTRUCTIONS Accessory Application Publications No. P/N 08E49-S2A-100 2004 S2000 AII 26325 Issue Date OCT 2003 PARTS LIST Hood switch harness TOOLS AND SUPPLIES REQUIRED #2 Phillips screwdriver
INSTALLATION INSTRUCTIONS
 INSTALLATION INSTRUCTIONS Accessory S P/N 08E10-TP6-100 Application 2010 ACCORD CROSSTOUR Publications No. AII 41935 Issue Date NOV 2009 PARTS LIST TOOLS AND SUPPLIES REQUIRED Ambient Light Kit Ambient
Installation Manual: Honda CRV Power Lift Gate System
 Installation Manual: Honda CRV Power Lift Gate System Page 1 of 18 NOTE: Installation Precaution 1. It is recommended to have this product installed by a professional to avoid damage caused by improper
LiteDOT Installation Document
 LiteDOT Installation Document This document designed to aid in installation of LiteDOT s on Jeep TJ models, other models are similar. NOTE: Installing LiteDOT s on a Jeep where the 2 necessary mounting
SAFETY THIS PRODUCT IS FOR OFFROAD USE ONLY. ALL LIABILITY FOR INSTALLATION AND USE RESTS WITH THE OWNER.
 SAFETY Your safety and the safety of others is very important. In order to help you make informed decisions about safety, we have provided installation instructions and other information. These instructions
Lethal Performance Dual FPDM Harness Kit Installation
 Lethal Performance Dual FPDM Harness Kit Installation The Lethal Performance Dual FPDM Harness Kit is a plug-and-play modification. Depending on whether you are using the Lethal Performance wire upgrade