GWM GROSS WEIGH BAGGING SCALE
|
|
|
- Marcus Charles
- 5 years ago
- Views:
Transcription
1
2 GWM GROSS WEIGH BAGGING SCALE The GWM Gross Weigh Mechanical Bagging Scale is designed for handling 20 lb. (10 kg.) through 110 lb. (50 kg.) weighments at a rate of 5-6 bags per minute and with an accuracy of +/- 4 oz. (100 grams) on all free flowing products such as corn, soybeans, salt, pellets, prilled fertilizers, sugar, etc. The GWM bagging scale can be supplied with a cam grip for non-dusty products, or a dust tight spout for dusty, free flowing products. GWM Bagging Scale Specifications Actual Weight lbs. (80 kg.) Overall Height 24.5 inches (61 cm.) Inlet Spout Circumferences Available Cam Grip - 22 inch (56 cm.) 29 inch (73 cm.) - 9 inches x 7 inches (22.5 cm. x 17.5 cm) Dust Tight* - 21 inch (53 cm) 25 inch (63 cm) 31 inch (79 cm.) Please note: Electricity and air are not required for the Cam Grip spout. 60 P.S.I. air at 2-3 cubic feet per minute is required for the Dust Tight Spout. PLANNING YOUR HOPPER BEFORE INSTALLATION OF SCALE The flange on your hopper will need to support the scale plus the weight of your heaviest bag plus any product inside the bag. Most installations utilize ¼ flange material or heavier for supporting the scale. The inlet size is 9 X 7. The drawing on page 11 should give a good reference for constructing the hopper.
3 When constructing the hopper, remember that vibration can affect accuracy; the hopper should be isolated from as much plant vibration as possible. When designing hoppers, it is best to have no less than 60 slope. Some products flow better with one straight wall and three 60 slope walls. Other products will flow with four 60 slope walls. The normal height for operating the scale is 48 (1.2 meters) from the bottom of the spout to the floor. The top of the scale will be 74 from the floor. The 48 (1.2m) from the bottom of the scale is normally set at 3 ft. (90 cm) for the bag + 12 for minimum conveyor height. If bags are taller than 36, then this height will need to be increased. If shorter, then conveyor height would need to be increased. These dimensions can vary due to each customer s needs. INSTALLATION 1. Place the bagging scale on the flange of the hopper. Once on the flanges, tighten the 6 bolts (3 on each side) on the top of the scale, so that the scale is firmly connected to the flange. Make sure that the scale is mounted straight and level. 2. Loosen the two bolts on the spout that hold the shipping clip in place on both sides of the scale. First, loosen the right side bolts and push the shipping clip to its lowest position and then re-tighten the two bolts. Second, repeat the previous step on the left side of the scale. At this point, the spout and the scale should be free. 3. Hang the weight rod on the main beam clevis hook at the back of the scale, making sure that the open part of the hook faces away from the scale. 4. Add dashpot oil to your dashpot located on the right rear of the scale. Oil is added into the oiler cup on the side of the dashpot. Two ounces of dashpot oil has been provided with the scale and the dashpot will take 90% of the oil provided. ADJUSTMENTS The GWM Bagging Scale has been calibrated at the factory prior to shipment. Only the following adjustments should be made by the customer. If you experience any problems not covered by these adjustments, please contact us by telephone before making any additional adjustments.
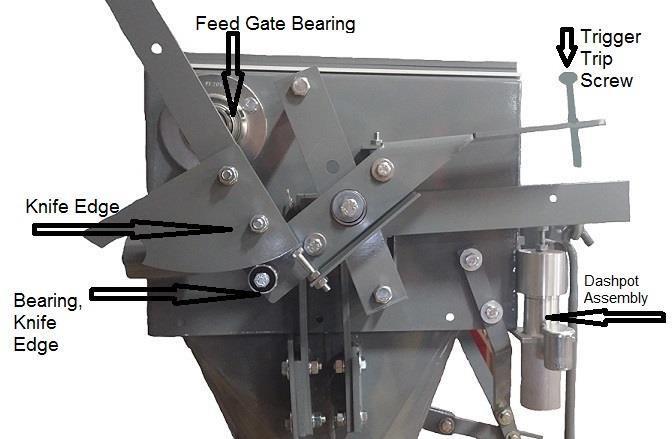
4 Bag Balance Weight (Right front of scale) When your scale is mounted to the hopper and has the weight rod assembly attached (without weights), the weight indicator should point to zero. If not, adjust the indicator to zero by pushing the bag balance weight away from the operator. The bag balance weight is also used to compensate for the weight of the bag. Attach an empty bag. Now adjust the bag balance weight so that the weight indicator again points to zero. Trigger Trip Screw (Right rear of scale) This is you adjustment for material weight in the bag. It accounts for the materials in suspension between the shut-off gate and the bag (similar to the water in a hose between the valve and the end of the hose). If your bags are consistently light, the trigger trip screw is too sensitive and trips early. Adjust the screw upward. This will allow additional weight in the next bag. Do not attempt to adjust the trigger trip screw during the filling process. Regulating Slide (Left front of scale) Some materials are heavier and some flow more freely than others. When weighing a heavy, fast flowing material, the opening should be smaller so that materials flow slower. Excessive flow causes inaccurate weighing. When shipped from the factory, the regulating slide is set for a small opening. To increase the opening, simply loosen the wing nut, pull the handle down and then re-tighten the wing nut. NOTE: A change in the adjustment of the regulating slide will require adjustment of the trigger trip screw. Never make 2 adjustments at the same time. Make 1 adjustment at a time to determine if/where further adjustment will be needed. Dashpot (Right rear of scale) The dashpot is the buffer between the scale and the pointer. Without a dampening device the pointer would never settle down. The dampening effect is accomplished by a metal plate about the size of a quarter riding up and down in an oil bath. The oil is non-temperature sensitive 200 weight silicone. The dampening effect is adjusted by turning the dashpot lid. The oil should completely fill the oiler to the top, approximately 2 oz. total. Change the oil when dirty or approximately every 6 months.
5 Main Beams, Pivots & Bearings (Both sides of scale) The bearings and pivots on both sides of the scale have bolts approximately ⅛ (3 mm) from them to prevent them from jumping during operation. Please be sure that these bolts do not touch the bearings or pivots and that the gap spacing is correct. Compensation Spring The compensation spring is used to help place the beam in motion. The beam should contact the spring before it reaches the beam stop bracket on the downward or empty position. The beam should be free or clear of the spring before the final cutoff. The compensation spring can be easily bent up or down to adjust. OPERATION Place an empty bag on the spout of the scale, slide the balance weight (right front side) until the pointer (left front side) of scale returns to zero. Pull down on empty bag several times watching the pointer each time to ensure that it returns to zero. If not, check for possible binds in the scale. Possible Binds 1. Dashpot is not lined up squarely and possibly rubbing. 2. Check sway control link to make sure it is not pushing or pulling on spout. 3. Check to see that the weight rod has been installed correctly with the open part of the hook facing away from the scale. 4. Compensation spring should not contact beam when the main beam is balanced. Pull feed gate handle (upper right side of scale) locking trigger assembly on the roller bearing. This should be a gentle, soft motion. The internal gate of the scale will be opened, thus allowing product to fall through the scale into the bag. When the beam comes toward balance, it will trip the trigger trip screw (right rear of scale), thus allowing gate to close. At this point, balance indicator (left front of scale) will display actual weight in the bag as an over/under from target weight. If weight is over target
6 weight, the trigger trip screw will need to be lowered. If weight is less than the target weight, then the trigger trip screw will need to be raised. Flow Control The flow control adjust (left front of scale) is used to control speed at which product falls into the bag. Speed should not be faster than 10 lbs. (5 kg.) per second; in order to maintain a repeatable weight. If the speed is too fast, then raise the regulating slide handle. Subsequently, if the speed is too slow, then lower the regulating slide handle. The scale is a 5 to 1 calibrated beam scale. The weights have been marked according to the amount of product in the bag they will counterbalance. One 5 lb. weight actually counterbalances 25 lbs. of weight in the bag. Place the desired amount of weights on the weight rod to counterbalance target weight of the bag. For example: A 50 lb. bag would require two 5 lb. weights or a 50 kg. bag would require four 12.5 kg. weights. Weight sets are shipped to the customer with the scale. The weights come in either lb. or kg, per customer request. The lb. weight set comes with (1)1#, (1) 2# and (2) 5# weights. The kg. weight set comes with (1) 500 gram, (1) 1 kg and (2) 2 kg. The 12.5 kg. weights are labeled their counter balance weight and come as a separate kit. The others weights are labeled their actual weight. Weight = Counterbalance Weight 1 lb. 5 lb. 2 lb. 10 lb. -) Kit (2) 5 lb. 25 lb. 500 grams 2.5 kg 1 kg 5 kg -) Kit 2 kg 10 kg (4) 12.5 kg* 12.5 kg* TIPS TO REMEMBER
7 1. The GWM Bagging Scale is designed for handling free flowing products if a feeder has not been provided. 2. Accuracy is normal at +/- 4 oz. (100 grams). 3. Normal speed is 5-6 bags per minute maximum. 4. The fill time should never exceed 10 lbs. (5 kg) per second. 5. The feed gate handle is to be gently pulled and positioned, locking on the roller bearing. 6. Be sure that no adjustments are made to the bolt behind the roller bearing. This adjustment has already been made at the factory and does not need to be readjusted. Spare parts are available through your distributor who supplied you with the equipment. CALIBRATION The scale has been pre-calibrated at the factory. These calibration steps are used only in the event new bearings and pivots are being replaced. GWM Bagging Scale Calibration Steps Torque torsion rod at both ends and make sure it does not rub. 1. Level the main beam with the housing, which should be level. 2. With the main beam level, set the turnbuckle until indicator reads zero. 3. Check compensation spring and make sure it is set at (-) 1, and free of the beam. 4. Set main beam stop bolt at (+) 2, and with the locknut down. 5. Check dashpot and make sure it is straight and center. (Make sure it does not rub) 6. Check that shipping clips are down and not touching the housing. 7. Calibration a. Set bag balance weight flush with end of rod b. Add shot to weight cup until indicator reads zero.
8 c. Hang empty bag and use bag balance weight to make indicator read zero. d. Add weights to weight rod and then add weight to the bag. This is a 5 to 1 beam and the weights provided are marked with their actual weight. Multiply by 5 for the counterweight. e. With equal ratio weight, indicator should read zero. (If not at zero perform steps f. to i.) f. Move the left pivot to zero and move the right pivot to the other side of zero than it was previously reading. (If it reads (+)1, move the left pivot to zero, then move the right pivot to (-)1 ). g. Remove all the weight and re-hang the bag. h. Check zero; add or remove shot. i. Re-hang the weights and check scale weight reading. If not at zero, repeat steps f. to i. If, after several tries you cannot bring the bagging scale into calibration, please call us for assistance. CALIBRATION PROCEDEURES for Gross Weigh and Net Weigh Bagging Scales 1. Calibrating Brackets/ Strap have been supplied to support the calibration weights. It is important to remember that the weights must be used to counter balance themselves. We cannot have two weights on one side of the unit and no weights on the opposite side. It is extremely important to remember the manner in which the scale is used; all weight will be centered on the scale. 2. The calibration brackets/ straps have their actual weight marked on them and the weights are also clearly marked.
9 3. Gross Weigh Scale Hang calibration strap centered on front and rear of the spout with the hooks hanging on the center grip or dust tight ¾ rod. For a gross weigh scale without a center grip or dust tight spout a different calibration set is provided. 4. Net Weigh Scale Hang two brackets on the weigh hopper halo, or mount to brackets from load cells. 5. Once the brackets/ straps have been hung on the scale, you will add two known weight to the calibration bracket/ straps. We recommend using certified calibration weights for this process. You can calibrate now to the final weight being the weight of the two known weights plus the weight of the brackets or strap. Another option is to zero out the weight of the brackets or straps and simply calibrate to the weight of the known certified calibration weights. For example: If you have two 30 pound weights and two brackets weighing 2 pounds each, you have 64 pounds of known weight that can be calibrated. Once this calibration is complete, you have certified that your scale is correct to either 60 or 64 pounds of weight. 6. You can add a bag onto the spout or add product into the weigh hopper that will weigh less than this amount. Since you have calibrated to 60 or 64 pounds with known weights, then the scale is accurate up to this point with an unknown weight. For example: If you add 50 pounds to the weigh hopper or to the bag, you are now reading 50 pounds on the digital controller and this is a weight that has been certified. At this point, you can now add two 30 pound weights and the final weight should be 60 pounds more than the weight you put into the weigh hopper or into the bag. If you added exactly 50 pounds of product into the weigh hopper or into the bag, you should read 110 pounds when you add the 60 pounds of known weights. This is a buildup test and now the scale has been certified up to 110 pounds. 7. Store the weights and the brackets in an area where they will not fall and chip or be damaged in any way.


10

11

12

13 TRIGGER ARM ASSEMBLY TRIG GER ARM ASSY

14


15 MAIN BEAM ASSY PWV

16

17

18

19 WEIGHT BOX COVER WEIGHT ROD WEIGHT BOX LID WEIGHT BOX
20 GWM HOUS AS LB GROSS WEIGH MECH HOUSING AS LB Page 1 of 2 Part Part Total Number Revision Description Quantity Unit Weight Weight HANDLE GATE GWM SS PGB BRK MIDDLE BRG GWM SS PGB BRK BEAM STOP GWM SS PGB BRK SWAY CONTROL GWM SS EAC PGB WEIGHT SET 65 LB - 5" DIA GWM SHAFT COLLAR, 1" ID, SS EAC P BRG FEED GATE PLASTIC GW SS EAC BOTTLE 2 OZ. DASHPOT OIL GWM DASHPOT OIL GWM OZ DECAL LB GWM DECAL INCREASE FLOW GWM COMPENSATION SPRING GWM Total: 0.00
21 Page 2 of 2 A-22-MS-GWM SPOUT CAM GRIP 22'' GWM MS Part Part Total Number Revision Description Quantity Unit Weight Weight SHIPPING CLIP G MS EAC SWAY LINK GJ MS BRK BAGHOLDER FRONT GB BRK BAGHOLDER REAR GB PIN FULCRUM GC EAC BAG SHOE WITH PAD/HOLE EAC H BRK, GWM, MS EAC HANDLE RELEASE GWM-22 MS PSP5008 SPOUT, GROSS WEIGH 22" CAM GRI J DECAL SHIPPING CLIP Total: 0.00
22 Bill of Materials Recap Part No: Description: POINTER ASSY GWM MS Quantity: 1 Part Number Revision Description Quantity Unit TORSION ROD GWM SPRING STEEL PGB BOLT, TORSION ADJUST GWM ZINC PLATE PGB029 BOLT, SPRING RETAINER GWM ZP PGB038 POINTER GWM MS PGB030 BRACKET SUPPORT GWM MS PGB037 ANGLE SUPPORT GWM MS PGB036 BEARING BAR GWM MS PGB031
23 Bill of Materials Recap Part No: Description: TRIGGER ARM ASSY GWM MS Quantity: 1 Part Number Revision Description Quantity Unit WING NUT GJ 1/4-20 ZP SCREW TRIGGER TRIP GWM TRIGGER ARM GWM MS PGB044 BRK TRIGGER ARM BRG GWM MS PGB BRG TRIGGER ARM GWM BRG KNIFE EDGE GWM
24 Bill of Materials Recap Part No: Description: WEIGHT ROD ASSY GWM MS Quantity: 1 Part Number Revision Description Quantity Unit WEIGHT BOX LID 5" GWM MS PGW WEIGHT ROD GWM MS PGB COVER WEIGHT BOX 5" DIA WEIGHT BOX 5" DIA
25 Bill of Materials Recap Part No: Description: MAIN BEAM ASSY GWM MS Quantity: 1 Part Number Revision Description Quantity Unit CLEVIS GWM PIVOT GWM EAC WEIGHT BAG BALANCE TARE GWM PGB THUMB SCREW BAG TARE WEIGHT GWM Rev_ MAIN BEAM GWM MS PGB023 PIVOT REAR MAIN BEAM GWM MS PGW005
INSTRUCTION MANUAL FOR ESP GROSS BAGGING SCALE MODEL GB-17, GB-25, GB-32, GBAO-21, GBAO-25, GBAO-31 & GBAO-37
 INSTRUCTION MANUAL FOR ESP GROSS BAGGING SCALE MODEL GB-17, GB-25, GB-32, GBAO-21, GBAO-25, GBAO-31 & GBAO-37 The Don Marshall Company, Inc. PO Box 124, 235 Maple St., Plain City, OH 43064 614-873-8520,
HOTSHOT HD COMMERCIAL BROADCAST SPREADER MODEL OWNER S MANUAL
 HOTSHOT HD COMMERCIAL BROADCAST SPREADER MODEL 3 OWNER S MANUAL ASSEMBLY INSTRUCTIONS 1. Remove the spreader and components from carton and place hopper up-side down on a padded surface as shown. Slide
RS75/RS75s COMMERCIAL BROADCAST SPREADER
 SHINDAIWA OWNER S/ OPERATOR S MANUAL RS75/RS75s COMMERCIAL BROADCAST SPREADER Shindaiwa Inc. 975 S.W. Herman Road Tualatin, Oregon 97062 Telephone 50 692-070 FAX 50 692-6696 www.shindaiwa.com 2002 Shindaiwa
CBR lv. Prizelawn COMMERCIAL BROADCAST SPREADER MODEL CBR IV MODEL CBR IVSS. Part# OWNER S MANUAL
 Prizelawn CBR lv COMMERCIAL BROADCAST SPREADER MODEL CBR IV MODEL CBR IVSS Part# 12 OWNER S MANUAL ASSEMBLY INSTRUCTIONS 1. Remove the spreader and components from carton and place hopper up-side down
OWNERS MANUAL. Model No LB. PUSH BROADCAST SPREADER. Assembly Operation Maintenance Repair Parts
 OWNERS MANUAL Model No. 45-02102-101 SHIELD UP - 8 TO 18 FT. SPREAD WIDTH SHIELD DOWN - 3 TO 4 FT. SPREAD WIDTH 125 LB. PUSH BROADCAST SPREADER CAUTION: Read Rules for Safe Operation and Instructions Carefully
PFadvantage MF 6850/6855; Ideal 9080/9090
 MF 6850/6855; Ideal 9080/9090 Note: Indented items indicate parts included in an Quantity by Model assembly listed above MF Ideal Part Name/Description Part Number 6850 6855 9080 9090 Instruction Kit MF
QuickTrick Alignment Tools
 QuickTrick Alignment Tools QuickTrick Alignment Kits are Professional quality tools designed for a lifetime of reliable service. QuickTrick Kits can be used on any vehicle for measurement of the alignment
COMMERCIAL BROADCAST SPREADER
 COMMERCIAL BROADCAST SPREADER Model RS7 Model RS7S WARNING Cancer and Reproductive Harm www.pwarnings.ca.gov Owner s Manual 04-09-1 P12-1 ASSEMBLY INSTRUCTIONS 1. Remove the spreader and components from
RolsplicerTM. Maintenance Manual And Illustrated Parts List
 RolsplicerTM Maintenance Manual And Illustrated Parts List List of Illustrations Figure Page. Rolsplicer 3 2. Roller Adjustment 4 3. Rolsplicer 6 4. Lid Hold Down Assembly 8 5. Automatic Lid Speed Adjustment
Connected To Control Box Series. Closer. Set Screw. Arm Screw. Right Hand Shown. 1/8" I.D. Air Inlet Tubing Connected To Control Box
 *19963* 19963 Auto-Equalizer Low Energy Door Operator 1/8" I.D. Air Inlet Tubing Connected To Control Box Closer 2610 Series Set Screw Arm Screw Track Roller Track Installation Instructions Top Of Door
Belt-Way Integrator Features
 Conveyor Design Requirements Principles of In-Motion Weighing Mechanical Installation Belt-Way Integrator Features Networking / Data Collection Options The first Choice of the American Aggregate Producer
Operation and Assembly Manual for the M30 12-volt ATV Broadcast Spreader
 Operation and Assembly Manual for the M30 12-volt ATV Broadcast Spreader 5-YEAR LIMITED WARRANTY Earthway Products, Inc. warrants this product free of defects in original workmanship and materials for
Hollister-Whitney Elevator Corporation
 3/16/16 A 1 of 10 1171 Hollister-Whitney Elevator Corporation Governor Testing Instructions For Use with All 201, 202, 207, 207RS, 208, & 210 Governor Models Table of Contents I. Instructions for Testing
Installation and Operation Manual. Manufacturers of Innovative Materials Handling Equipment since 1957.
 SWINGSET DISTRIBUTOR Installation and Operation Manual Manufacturers of Innovative Materials Handling Equipment since 1957. 491 North Emerson Street * Cambridge MN 55008-1316 U.S.A. Toll Free (800) 328-8002
Part Name/Description Part Number Quantity Instruction Kit Metalfor Flow Sensor
 NOTE: Indented items indicate parts included in an assembly listed above Part Name/Description Part Number Quantity Instruction Kit Metalfor 4101091 1 Flow Sensor 4001356 1 Deflector plate 2000612-1 1
HOTSHOT COMMERCIAL BROADCAST SPREADER MODEL OWNER S MANUAL
 HOTSHOT COMMERCIAL BROADCAST SPREADER MODEL 380 OWNER S MANUAL ASSEMBLY RH. Handle Brace 1/4-20 x 2 1/4 Hex Bolt 1. Remove components from carton and place spreader upside down on a padded surface. Install
HOTSHOT COMMERCIAL BROADCAST SPREADER MODEL OWNER S MANUAL
 HOTSHOT COMMERCIAL BROADCAST SPREADER MODEL 38170 OWNER S MANUAL ASSEMBLY 1. Remove components from carton and place spreader upside down on a padded surface. For easier assembly, remove the defector shield
ILE - 37 Sensing Head Instruction Manual PL-374 July 1998
 ILE - 37 Sensing Head Instruction Manual PL-374 July 1998 33455040 Rev. 1.3 T hank you for purchasing Milltronics products. We endeavour to design equipment that is simple to use and reliable in its operation,
Assembly, Use and Care
 SSD 36 Inch Professional Drop Spreader Assembly, Use and Care Thank You! You have purchased the highest quality professional drop spreader available on the market today. The SSD is the accumulation of
Operation and Assembly Manual for the M30 12-volt ATV Broadcast Spreader
 Operation and Assembly Manual for the M30 12-volt ATV Broadcast Spreader 5-YEAR LIMITED WARRANTY Earthway Products, Inc. warrants this product free of defects in original workmanship and materials for
2013 RT / 2014RT / 2015 RT - Shock Spring Adjuster Installation Instructions
 2013 RT / 2014RT / 2015 RT - Shock Spring Adjuster Installation Instructions Billet Aluminum Adjusters (2) Shock Spring Compressors (Optional) Spanner Wrench (1) BajaRon Decals Not Shown (4) Adjuster Scuff
Stowe Cargo Management System
 Installation Guide Stowe Cargo Management System Table of Contents 1. Pre-Installation (Page 2) a. Notes, Installation Kit contents & Tools needed 2. How to Install the Stowe Cargo Management System (Pages
TS1251 PRESSURE DISPENSER USER'S MANUAL
 TS1251 PRESSURE DISPENSER USER'S MANUAL TABLE OF CONTENTS SECTION DESCRIPTION PAGE NUMBER 1.0 CAUTIONS AND WARNINGS... 3 2.0 INTRODUCTION... 4 3.0 DESCRIPTION... 4 & 5 4.0 SET UP AND INSTALLATION... 6
Page 1 of 19. Part# /10/2006
 Part# 1002733-01 10/10/2006 This manual contains important information concerning the installation and operation of the gun washers listed above. Read manual thoroughly and keep for future reference INSTRUCTIONS
PENDULUM TM DAIRY GATES
 PENDULUM TM DAIRY GATES FITTING INSTRUCTIONS NZ PATENT NO. 335310 Phone +64 7 889 7769 Main Road, Tatuanui Fax +64 7 8897797 R.D.4 Morrinsville 3374 Email david@leask.co.nz PART LIST PART No. 1 3 4 DESCRIPTION
Agri-Fab OWNERS MANUAL. Model No LB. PUSH BROADCAST SPREADER. Assembly Operation Maintenance Repair Parts
 Agri-Fab OWNERS MANUAL Model No. 45-02103-101 SHIELD UP - 8 TO 18 FT. SPREAD WIDTH SHIELD DOWN - 3 TO 4 FT. SPREAD WIDTH 125 LB. PUSH BROADCAST SPREADER CAUTION: Read Rules for Safe Operation and Instructions
TRANSFER PUMP INSTRUCTIONS P/N 14251NOS
 TRANSFER PUMP INSTRUCTIONS P/N 14251NOS A5048-SNOS SAFETY TIPS Never directly inhale nitrous oxide. When inhaled in large quantities, nitrous oxide can cause respiratory ailments or in extreme cases, death
DeZURIK MODELS P41, P41D AND P42 PMV POSITIONERS
 MODELS P41, P41D AND P42 PMV POSITIONERS Instruction D10112 August 2012 Instructions These instructions provide information about. They are for use by personnel who are responsible for installation, operation
The H-MAC Heavy Metal Articulating Chassis Construction Guide
 The H-MAC Heavy Metal Articulating Chassis Construction Guide The Heavy Metal Chassis is constructed with two identical drive modules built using 10 mechanical sub-assemblies. The drive modules are integrated
Vibrator Kit. Stainless Steel & Poly Hopper Spreaders with FLEET FLEX Electrical System
 October 1, 2016 Lit. No. 95098, Rev. 01 PARTS LIST Vibrator Kit Stainless Steel & Poly Hopper Spreaders with FLEET FLEX Electrical System 5 7 6 9 8 4 1 10 2 3 99504 1 Vibrator Kit Item Part Qty Description
Start-up and Operation
 Start-up and Operation NEVER FORGET THAT ANY MACHINE CAN BE VERY DANGEROUS WHEN NOT OPERATED CORRECTLY AND SAFELY. ALWAYS VISUALLY CHECK TO MAKE SURE THAT ALL PERSONS ARE CLEAR BEFORE TURNING ON ANY CONTROLS.
DODGE SuperRail Mounting Kit #0848
 DODGE SuperRail Mounting Kit #0848 #1200 Super 5 th (16K) #0800 Super 5 th (20.5K) Gross Trailer Weight (Maximum) Vertical Load Weight (Max. Pin Weight) 16,000 lbs. 4,000 lbs. Gross Trailer Weight (Maximum)
CRD610 Automatic Fitting Inserter
 CRD610 Automatic Fitting Inserter OPERATIONS MANUAL VERSION 1.2 LAST EDITED 12.12.2018 cleanroomdevices.com 1 Table of Contents Title Page. 1 Table of Contents...2 1.0 General Product & Safety Information....3
Taylor Products Model OM2 Manual Bagging Scale. Operation and Maintenance Manual
 Taylor Products Model OM2 Operation and Maintenance Manual Taylor Products a division of Magnum Systems 2205 Jothi Avenue Parsons, Kansas 67357-8460 Toll Free: 888-882-9567 Phone: 620-421-5550 Fax: 620-421-5531
OWNER'S MANUAL FOR 135LB STAINLESS STEEL SPREADER SNOWRATOR
 2017 OWNER'S MANUAL FOR 135LB STAINLESS STEEL SPREADER SNOWRATOR AES L. T. RICH PRODUCTS 11/16/2017 TABLE OF CONTENTS 1.0 SHIPPING CONTENTS... 2 2.0 IMPORTANT INFORMATION... 3 2.1 ABOUT THIS MANUAL...
Mitre Band Saw. Installation and Operating Instructions Note: Not all saw parts are shown in this booklet. Replaceable Aluminum Saw Table
 P ARTS C ATALOG 2G PARTS CATALOG Drive Wheel End Pulley Box Speed Reducer M FG. COMPANY, INC. Mitre Band Saw Installation and Operating Instructions Note: Not all saw parts are shown in this booklet Motor
2100P Estate. ASSEMBLY and OPERATING INSTRUCTIONS. Warning Remove agitator when using Rock Salt to prevent gearbox damage
 2100P Estate Broadcast Spreader ASSEMBLY and OPERATING INSTRUCTIONS PLEASE CALL IF YOU ARE MISSING ANY PARTS, HAVE ANY DIFFICULTY IN ASSEMBLY, OR HAVE ANY QUESTIONS REGARDING THE SAFE OPERATION OF THIS
B4A Instruction Manual
 Page 1 TABLE OF CONTENTS Vehicle Preparation 2 Floor Slope Calibration 2 Headlamp Aiming 4 Assembly Instructions / Large and Small Universal Adaptors 6 Aiming Instructions 8 Quick Headlamp Aim Check 15
ILE - 61 SENSING HEAD
 ILE - 61 SENSING HEAD Instruction Manual PL-376 June 1993 33453760 PRR 1.1 Siemens Hardware T hank you for purchasing Milltronics products. We are committed to satisfying our customers needs with innovative
Be Strong. NS 200X. Assembly Manual. Model: NS 200X. P/N: Rev A (10/04/2006)
") Be Strong. Assembly Manual NS 00X Model: NS 00X P/N: 00-700 Rev A (0/0/00) TABLE OF CONTENTS Before You Assemble... 3 Product Specifications... Product Features... Parts List / Box Contents... 5 Exploded
Be Strong. Assembly Manual NS 00X Model: NS 00X P/N: 00-700 Rev A (0/0/00) TABLE OF CONTENTS Before You Assemble... 3 Product Specifications... Product Features... Parts List / Box Contents... 5 Exploded
GLACIER PRO PLOW FRAME KIT
 GLACIER PRO PLOW FRAME KIT P/N 2883255 APPLICATION All 2009 and newer RANGER XP Full installation of the Glacier Pro plow system requires a winch with an auto-stop fairlead and a synthetic winch rope or
Safety Instructions, Installation & Operator s Manual For
 Safety Instructions, Installation & Operator s Manual For #6-3173 TWIN BAG GRASS CATCHER KIT FOR 38 YARD CRUISERS SERIES 2 MODEL YZ145382BVE IMPORTANT! THIS KIT NOT INTENDED FOR USE ON ANY SERIES OF HZ/HZS
HR-520 HOIST. Installation & Operation Manual. To Be Filled In By Installer. Pump Installation And Operation Manual#: In Service Date: Dealer:
 Website: www.tbei.com E-mail: sales@tbei.com Phone: 1-800-869-9162 Rugby 1-800-255-4345 DuraClass 1-800-533-0494 Crysteel HR-520 HOIST Installation & Operation Manual To Be Filled In By Installer Hoist
ProPass-200 Top Dresser
 Setup Manual Form No. 3365-184 Rev A ProPass-200 Top Dresser Model No. 44700-Serial No. 310000001 and Up Model No. 44701-Serial No. 310000001 and Up Model No. 44704 Model No. 44705 Model No. 44706 Model
SPINKS SCALES ROOSTER SCALES MODELS: 250 # 350 # 600 # INSTRUCTIONS/OPERATOR S MANUAL For. JANUARY, 2000 Manual No (Rev.
 SPINKS SCALES INSTRUCTIONS/OPERATOR S MANUAL For ROOSTER SCALES MODELS: 250 # 350 # 600 # JANUARY, 2000 Manual No. 003123 (Rev. 1) TABLE OF CONTENTS HANGING SCALES...Pages 3-4 CONTROL BOX INSTALLATION...
Operator s Manual 09PDMS (100 Lb.) & P45PDMS (45 Lb.) Poly Stainless MP +3 (Positive Displacement Metering System)
 & P45PDMS (45 Lb.) Poly Stainless MP +3 (Positive Displacement Metering System)") Operator s Manual 09PDMS (100 Lb.) & P45PDMS (45 Lb.) Poly Stainless MP +3 (Positive Displacement Metering System) Anertec & Gandy Company 815 Rice Lake Street Owatonna, MN 55060 Telephone: 507-451-5430
Operator s Manual 09PDMS (100 Lb.) & P45PDMS (45 Lb.) Poly Stainless MP +3 (Positive Displacement Metering System) Anertec & Gandy Company 815 Rice Lake Street Owatonna, MN 55060 Telephone: 507-451-5430
OREGON PIONEER 15 OWNER S MANUAL
 OREGON PIONEER 15 OWNER S MANUAL SURVEYORS EXCHANGE COMPANY GEOLASER 3323 DeArmoun Road Anchorage, AK 99516 Phone: 1-507-629-3758 Cell: 1-507-828-0503 www.gold-rus.com INTRODUCTION This manual covers the
Illustrated Parts & Packing List 815 Rice Lake Street, Owatonna, MN For a complete distributor & dealer list go to
 Illustrated Parts & Packing List 815 Rice Lake Street, Owatonna, MN 55060 For a complete distributor & dealer list go to www.gandy.net 36H13 36-inch Variable Rate Spreader Package Push Model w/13-inch
The RCS-6V kit. Page of Contents. 1. This Book 1.1. Warning & safety What can I do with the RCS-kit? Tips 3
 The RCS-6V kit Page of Contents Page 1. This Book 1.1. Warning & safety 3 1.2. What can I do with the RCS-kit? 3 1.3. Tips 3 2. The principle of the system 2.1. How the load measurement system works 5
Prizelawn. BF l COMMERCIAL BROADCAST SPREADER. MODEL BF l MODEL BF l SS OWNER S MANUAL
 Prizelawn BF l COMMERCIAL BROADCAST SPREADER MODEL BF l MODEL BF l SS OWNER S MANUAL ASSEMBLY 3/16 Dia. x 2 COTTER PIN /32 Dia. x 1 1/4 COTTER PIN FREE WHEEL SCREEN Insert into hopper UPPER HANDLE ASSEMBLY
Commercial Bins/Silos
 Commercial Bins/Silos Strongest & Heaviest Gauge Tanks in the Industry. A world leader in steel corrugated storage bin manufacturing, Grain Systems offers the strongest and heaviest gauge storage tanks
Items # and #
 D I S P E N S E R T E C H N I C A L M A N U A L Items #91160-00 and #91161-00 1. System Description... 1 2. Equipment Included with the Green Earth II XL System... 2 3. Components Included with Green Earth
MACHINE SENSORS CONTROL PANEL CONVEYOR SYSTEM SYSTEM SENSORS...
 TABLE OF CONTENTS TABLE OF CONTENTS... 1 CONTROL PANEL...... 4 MACHINE SENSORS... 5 CONVEYOR SYSTEM... 6 SYSTEM SENSORS... 6 INFEED BACKUP... 6 OUTFEED BACKUP... 6 CHANGEOVERS... 6 CONVEYOR GUIDES ADJUSTMENTS...
Hub Stands -- VERSION 5.0
 Hub Stands -- VERSION 5.0 Thanks for choosing our Alignment Hub Stands for your chassis setup needs. We hope you'll find them as handy, accurate, and easy to use as we do! Each stand has a max capacity
APCO SLANTING DISC CHECK VALVES
 BULLETIN 800 JULY 2011 APCO SLANTING DISC CHECK VALVES Series 800, 800B, 800T APCO Slanting Disc Check Valve With decades of experience to guarantee reliability and outstanding performance, our Slanting
Operator s Manual. Fairbanks FH Series by Fairbanks Scales, Inc. All rights reserved. . Revision 1 06/2017
 Operator s Manual Fairbanks FH Series 2017 by Fairbanks Scales, Inc. All rights reserved 51393. Revision 1 06/2017 Amendment Record Fairbanks FH Series Operator s Manual Operator s Manual Document 51393
HR-540/HR-550 HOIST Installation & Operation Manual
 Website: www.tbei.com E-mail: sales@tbei.com Phone: 1-800-869-9162 Rugby 1-800-255-4345 DuraClass 1-800-533-0494 Crysteel HR-540/HR-550 HOIST Installation & Operation Manual To Be Filled In By Installer
Flow Sensor
 NOTE: Indented items indicate parts included in an assembly listed above Part Name/Description Part Number Quantity Instruction Kit Metalfor 4101091 1 Quick reference sheet 2002831-36 1 Installation instructions
Agri-Fab OWNERS MANUAL. Model No LB. PUSH BROADCAST SPREADER. Assembly Operation Maintenance Repair Parts
 Agri-Fab OWNERS MANUAL Model No. 45-02142 100 LB. PUSH BROADCAST SPREADER CAUTION: Read Rules for Safe Operation and Instructions Carefully Assembly Operation Maintenance Repair Parts the fastest way to
Flow Sensor Gleaner N5-R Flow Sensor Gleaner R40, R
 Parts List for Combine Note: Indented items indicate parts included Quantity by Model in an assembly listed above Early Late N N N N N N R R R R R R R Part Name/Description Part No. 5 6 7 5 6 7 5 6 7 40
American Weigh Scales, Inc. DigiPEN-500 D i g i t a l H a n g i n g S c a l e. User Manual
 American Weigh Scales, Inc. DigiPEN-500 D i g i t a l H a n g i n g S c a l e User Manual DigiPen-500 Manual Thank you for purchasing the American Weigh DigiPen-500 digital hanging scale. Please read all
2150 Commercial Broadcast Spreader ASSEMBLY and OPERATING INSTRUCTIONS
 vvvvvvvv vvvvvvvv 2150 Commercial Broadcast Spreader ASSEMBLY and OPERATING INSTRUCTIONS PLEASE CALL IF YOU ARE MISSING ANY PARTS, HAVE ANY DIFFICULTY IN ASSEMBLY, OR HAVE ANY QUESTIONS REGARDING THE SAFE
SmartBob AO. BinMaster: Division of Garner Industries 7201 N. 98th St., Lincoln, NE
 BinMaster: Division of Garner Industries 7201 N. 98th St., Lincoln, NE 68507 402-434-9102 email: info@binmaster.com www.binmaster.com OPERATING INSTRUCTIONS PLEASE READ CAREFULLY 925-0312 Rev B TABLE OF
X.L. BAND W/ SPRING ASSIST INSTRUCTION MANUAL
 PARTS LIST X.L. BAND W/ SPRING ASSIST INSTRUCTION MANUAL (2) Bands (1) Handle assembly (2) Side hinge assemblies (1) Left rear hinge assembly (1) Right rear hinge assembly (2) front spring s (2) rear spring
Please read and understand all instructions before attempting installation. Please pay attention to all Cautions and Notes within these instructions.
 Mustang Cluster Kit - INSTALLATION INSTRUCTIONS - For use with Ford Mustang (2005-2009) and Simco Kit Part # s 2046-7XX Revised: Sept. 29, 2008 Rev. B Please read and understand all instructions before
INSTALLATION, MAINTENANCE, & SAFETY INSTRUCTIONS
 Tarpaulin Systems Flip -N- Go / Quick Mount Flip -N- Go System INSTALLATION, MAINTENANCE, & SAFETY INSTRUCTIONS (800) CRAMARO (800) 272-6276 Plants In: Delaware, Florida, Massachusetts, Nevada, Ohio Install
BILLY GOAT LB VACUUM Owner's Manual LB351, LB61
 BILLY GOAT LB VACUUM Owner's Manual LB351, LB61 Optional Accessories HOSE KIT HOSE CONNECTOR KIT BAG SUPPORT KIT STANDARD FELT DEBRIS BAGS OPTIONAL TURF DEBRIS BAGS 4"(102mm) x 7' (3.05m) For vacuuming
Installation Instructions
 Installation Instructions Version 1.0 Tools Needed: 7/16 Wrench or Adjustable Wrench 3/16 Allen Wrench (included with Trip Mechanism) 1/8 Allen Wrench (included with Trip Mechanism) Materials Recommended:
Bag 1. Bag 1. Center Pivot. Center Pivot
 8 00734 01901 5 Center Pivot Bag 1 3374 - Center Pivot Socket 4019 - Alum Pivot ball 3254-2-56 Button Head *Note - Sometimes it is helpful to slightly over-tighten the top clamp screws, then work the ball
Installation Guide. Stowe Cargo Management System. Table of Contents
 Installation Guide Stowe Cargo Management System Table of Contents 1. Pre-Installation (Page 2) a. Notes, Installation Kit contents & Tools needed 2. How to Install the Stowe Cargo Management System (Pages
Syntron EB-00 Vibratory Parts Feeder GENERAL MANUAL
 Syntron EB-00 Vibratory Parts Feeder GENERAL MANUAL INSTALLATION OPERATION MAINTENANCE Thank you for buying your equipment from Homer City Automation Inc. This manual will help you to understand how your
Rotary Brush Cutter (Standard Flow)
") Rotary Brush Cutter (Standard Flow) Model Number RBV. Serial Number. Serial Number 6795-0050 Maximum Flow Rate gpm. For and 5 GPM Max Models Phone: 0-9-700 0/5/0 Revised // RBV Features of Virnig Mfg.
Rotary Brush Cutter (Standard Flow) Model Number RBV. Serial Number. Serial Number 6795-0050 Maximum Flow Rate gpm. For and 5 GPM Max Models Phone: 0-9-700 0/5/0 Revised // RBV Features of Virnig Mfg.
Additional options. Standard features. Power. Capacities
 The SSEC PSU is a U shaped platform scales, The open front allows loading using hand pallet truck, and is fitted with wheels for complete mobility. Heavy duty mild steel construction Adjustable levelling
OWNERS MANUAL. Model No LB. PUSH BROADCAST SPREADER. Assembly Operation Maintenance Repair Parts
 OWNERS MANUAL Model No. 45-02104 125 LB. PUSH BROADCAST SPREADER CAUTION: Read Rules for Safe Operation and Instructions Carefully Assembly Operation Maintenance Repair Parts the fastest way to purchase
ATLAS 2000 SINGLE LINE HYDRAULIC HOIST
 ATLAS 2000 SINGLE LINE HYDRAULIC HOIST OPERATORS INSTRUCTION MANUAL Keep this Manual with the Atlas 2000 Hoist at all times. This will allow new users to read it before operating the Hoist. It is the Atlas
FIELD ADJUSTMENTS THREE POINT 1510HDF, 2010HDF, & 2510HDF DRILL MAINTENANCE
 FIELD ADJUSTMENTS THREE POINT 1510HDF, 2010HDF, & 2510HDF DRILL MAINTENANCE Proper servicing and adjustment is the key to the long life of any farm implement. With careful and systematic inspection of
USER S OPERATION MANUAL
 USER S OPERATION MANUAL CUSTOMER: ------------ S/O#: ------------ SERIAL #: ----------- MODEL: CM-780-GG-2S (SIMPLEX) CONTROLLER: 665 LCD CMGG 2_51.TXT w/multi-dump ELECTRICAL (CONTROL): ------------------
Explorer Version 3 Instructions
 Explorer Version 3 Instructions Unpacking the system. The Explorer is now easier to assemble than its previous version, but packing it up is a little tricky, so note how things are configured as you take
STOP. Broadcast Spreader. Operator's Manual. Model No Safety Assembly Operation Maintenance Parts
 Operator's Manual STOP Broadcast Spreader Model No. 486.2400 DO NOT RETURN TO STORE For Missing Parts or Assembly Questions Call 1-866-56-8388 CAUTION: Before using this product, read this manual and follow
MORRISON MS-40C MATERIAL SPREADER
 INSTRUCTION MANUAL & PARTS BOOK MORRISON MS-40C MATERIAL SPREADER POWERFUL - EFFICIENT - DEPENDABLE 25 INDUSTRIAL DRIVE, KEYPORT, NEW JERSEY, USA, 07735, 732-566-5400 FAX 732-5444 Doc. # OI M09203 PB M09203
,000 psi Minimum Yield Strength. 70,000 psi Minimum Tensile Strength
 Commercial Bins/Silos Total Value. Total Systems. Strongest & Heaviest Gauge Tanks in the Industry. A world leader in steel corrugated storage bin manufacturing, GSI offers the strongest and heaviest gauge
Operation and Assembly Manual for the EarthWay M40ECM 12-volt Broadcast Spreader
 Operation and Assembly Manual for the EarthWay M40ECM 12-volt Broadcast Spreader 5-Year LIMITED WARRANTY EarthWay Products, Inc. warrants this product free of defects in original workmanship and materials
Operation and Assembly Manual for the EarthWay M80ECM 12-volt Broadcast Spreader
 Operation and Assembly Manual for the EarthWay M80ECM 12-volt Broadcast Spreader 5-Year LIMITED WARRANTY EarthWay Products, Inc. warrants this product free of defects in original workmanship and materials
2020 Dual Tabber Operation Manual
 2020 Dual Tabber Operation Manual Revision 1.2 10 Clipper Road 10/24/2006 West Conshohocken, PA 19428-2721 Tel : 800-523-0320 / 610-825-6205 Fax: 610-825-1397 www.secap.com Index SECTION 1 Introduction
ON DEMAND INSTALLATION GUIDE
 ON DEMAND INSTALLATION GUIDE PICTOGRAMS Each Signifier displayed here is specific to this User Manual. Menu Previous Advance Note Tip Example Barcode Scanner Rotary Heads Drum & Frame Pump Stations Control
3.1 DISPENSER BLACK SHADOW SERIES. Tools Needed for Mounting SCS Dispenser Hammer
 SCS 2 BLACK SHADOW SERIES 3.1 DISPENSER ALWAYS OBSERVE PRODUCT SAFETY AND HANDLING INSTRUCTIONS. ALWAYS DIRECT DISCHARGE AWAY FROM YOU or other persons. ALWAYS DISPENSE CLEANERS AND CHEMICALS AS DIRECTED
Page: REV 3: Add drill and tap information to Figure 4 DRILL #3, TAP 1/4-28 BOTH ENDS.
 REVISION DESCRIPTION: 1) Page: 32-03 MEMO: Step 4 should not be bold. Fix WD-1213 callout in Figure 3. Page: 32-04 REV 3: Add drill and tap information to Figure 4 DRILL #3, TAP 1/4-28 BOTH ENDS. Add make
Contents. Section 5: Adjustments Ball Detect Adjustment Transport Band Tension Adjustment
 Contents Section 5: Adjustments... 5-3 1. Ball Detect Adjustment... 5-3 2. Transport Band Tension Adjustment... 5-5 3. Transport Band Drive Belt Tension Adjustment... 5-7 4. Ball Cushion Adjustment...
CRD600 Automatic Fitting Inserter
 CRD600 Automatic Fitting Inserter OPERATIONS MANUAL VERSION 2.3 LAST EDITED 12.07.2018 cleanroomdevices.com 1 Table of Contents Title Page.. 1 Table of Contents. 2 1.0 General Product & Safety Information...3
PFadvantage Metalfor Araus 1360
 Metalfor Araus 1360 Note: Indented items indicate parts included in an assembly listed above Part Name/Description Part Number Quantity Instruction Kit Metalfor Araus 2005300-14 1 Display Bracket 4000134
INSTALLATION INSTRUCTIONS FOR DSP9600/9100 WHEEL BALANCER
 Form 5063T, 06-05 Supersedes Form 5063T, 02-04 INSTALLATION INSTRUCTIONS FOR DSP9600/9100 WHEEL BALANCER This document provides the information needed to install the DSP9600/9100 Wheel Balancer. NOTE:
ELECTRONIC STAPLER EH-70F SERVICE MANUAL
 ELECTRONIC STAPLER EH-70F SERVICE MANUAL 1 1. CLINCHER ASSY. Tightening Torque: 0.78N m ±10% (8kgf cm) CLINCHER HOLDER BASE CF (EH17398) CLINCHER HOLDER CF (EH16437) CLINCHER (EH12731) CLINCHER SUB-HOLDER
Cylinder Installation Compression/Stripper, for Models, 22HF, 16HF, 1600 machines
 Knowledge Base Article Type: Instructions Cylinder Installation Compression/Stripper, for Models, 22HF, 16HF, 1600 machines Description: Instructions on How to properly install stripper beam and compression
WBS15800 BROADCAST SPREADER OWNERS MANUAL
 S N W P L W A Division of Northern Star Industries, Inc. P.. Box 77 Iron Mountain, MI 901-077 IS 9001:200 REGISTERED bossplow.com WBS0 BRADCAST SPREADER WNERS MANUAL MDEL WBS0 ASSEMBLY PERATIN PATTERN
DeZURIK SPRING RETURN CYLINDER OPERATOR FOR G-SERIES ACTUATORS USED ON PEF 100% PORT ECCENTRIC VALVES
 SPRING RETURN CYLINDER OPERATOR FOR G-SERIES ACTUATORS USED ON PEF 100% PORT ECCENTRIC VALVES Instruction D10466 December 2012 Instructions These instructions provide information about s. They are for
Hopper and Drive Components STEEL-CASTER Hopper Spreader
 Fisher Engineering 99004, 99008, 99012 99015, 990 50 Gordon Drive, Rockland, Maine 04841 2139 www.fisherplows.com December 15, 20 Lit. No. 99, Rev. 0 Hopper and Drive Components STEEL-CASTER Hopper Spreader
USER'S MANUAL and INSTALLATION GUIDE
 AM Inlet Series 8" and 2" baffle AM0896GS AM296GS USER'S MANUAL and INSTALLATION GUIDE TABLE OF CONTENTS Section Page...Requirements for Installation...2 2...Unpacking the AirManager... 3-5...Exploded
Rotary Brush Cutter. Model Number RBV. Serial Number. Serial Number and Greater. Maximum Flow Rate gpm. Phone: RBV
 Rotary Brush Cutter Model Number RBV. Serial Number. Serial Number 75 and Greater Maximum Flow Rate gpm. Phone: 0--700 0/5/0 Revised // RBV Features of Virnig Mfg. Inc. Rotary Brush Cutter include: diameter
Trimline Car and Sling
 Trimline Car and Sling Every attempt has been made to ensure that this documentation is as accurate and up-to-date as possible. However, Vertical Express assumes no liability for consequences, directly
Auto Sentry-eXP Maintenance. Revised 12/21/07
 Auto Sentry-eXP Maintenance Revised 12/21/07 Maintenance Procedures for Auto Sentry exp Bill Dispenser Credit Card Reader Bill Acceptor Bill Dispenser Maintenance Bill Dispenser Problem / Cause Bill Dispenser