Place these instructions in vehicle s glove box after installation is complete. Clean Tonneau Cover with a mild detergent and water solution.
|
|
|
- Irene Norton
- 5 years ago
- Views:
Transcription
1 Place these instructions in vehicle s glove box after installation is complete Installation Time: Approx. 60 Minutes Care Instructions: Clean Tonneau Cover with a mild detergent and water solution. Do not use abrasive cleaners or solvents. WARNING! When in the closed position, Aluminium Tonneau Cover must be latched and tailgate must be closed.failure to do so could result in unexpected opening of the Tonneau Cover from sudden wind gusts or driving conditions, which could cause damage to the vehicle and/or your Aluminium Tonneau Cover. Secure any items tall enough to strike the Tonneau Cover lock mechanism. DO NOT close the Tailgate when the Aluminium Tonneau is in the closed position, as damage may occur to the vehicle and/or your Tonneau Cover. Do not operate vehicle while cover is open. MAINTENANCE: - Avoid the use of chemicals to clean painted surfaces, wash regularly with car wash detergent, hose off and chamois dry. Aluminium top sheet finish can be maintained with briteshine polish or similar. Un-maintained product i.e. surface finish degradations not covered by warranty. - The gas struts are self lubricating and should only be cleaned occasionally with a damp cloth. Premature seal failure will result if solvents or lubricants are used to clean struts. - Gas struts must be connected with the cylinder (wide) end to the Aluminium Tonneau Cover or Warranty is Void. - The locking mechanisms and latches only require occasional lubrication with Graphite Powder. - DO NOT use any other lubricants or oils. Using alternative products will VOID Warranty. - All installation hardware and fasteners must be checked every so often for tightness. TONNEAU COVER - IMPORTANT: - Read instructions carefully before installation. It is strongly recommended that installation is conducted by a qualified mechanic. - This product must be installed exactly as specified in these instructions. Failure to do so may result in improper fit and/or retention. - Do not stand/sit or rest heavy objects on Tonneau Cover. - Humans or animals are not to be under the closed Tonneau Cover at any time. - Securely latch Tonneau Cover before operating vehicle. - Do not carry open volatile chemicals with Tonneau Cover installed. - If contact with volatile chemicals occurs clean Tonneau Cover with mild detergent and water solution. - Recommend installation by 2 people. Fitting Instructions must be given to the end customer to understand correct removal and replacement process onto the vehicle. Page 1 of 12
2 Tonneau Cover Assembly x1 Hinge Bracket x2 Striker Bracket x2 Striker x2 M10 Nut x8 M10 Washer x8 Gas Strut x2 Ball Stud x4 M8 Lock Nut x4 M8 Washer x2 Gas Strut Bracket x2 M6 Button Head Cap Screw x4 M6 Washer x4 M6 Nut Plate x2 4.8x10 Rivets x16 Tailgate Lock Bracket x2 Foam Pad x1 REQUIRED TOOLS EQUIPMENT 13mm and 17mm Socket 4mm Allen Key ½ Drive Ratchet + Extension Bar Rivet Gun 8mm, 13mm and 17mm Spanner Tape Measure Power Drill Centre Punch 5mm Drill Bit Hammer 8 mm Drill Bit Pencil / Marker Page 2 of 12 Cleaning Materials Masking Tape Right Angle Rust Inhibitor Personal Protective Equipment: Safety Glasses, Ear Plugs, Gloves (Scissors, Silicone)* Optional


.")


3 Step 1 507mm 507mm Required tools: Masking Tape, Marker Pen and Tape Measure. 1. Clean the top surface of the tub. 2. Apply masking tape on front rail top surface and mark a centre line accurately. Mark lines 507mm from the centre line to both sides. NOTE: This instruction is for plain tub installation only. If tub liner is fitted, the liner will need to be trimmed to allow correct installation of the tonneau cover brackets and hinges. No spacers or additional media allowed between hinges/brackets and the vehicle tub. NOTE: If fitted, cabin guard must be removed. Step 2 86mm Required tools: Marker pen, tape measure, right angle. 1. Mark another line 86mm outboard from this line, and a line 16mm from front rail inner surface, crossing both lines (use right angle and tape measure). Repeat for both sides. 2. Align Hinge Bracket to marked lines and check alignment. Repeat both sides 16mm Step 3 Required tools: Power drill, 8mm drill bit, centre punch, hammer. 1. Centre punch hole locations (4x) 2. Drill through using 8.0mm drill bit and remove drill burr from the holes. 3. Apply rust inhibitor to the drilled holes. Page 3 of 12


.")


4 Step 4 Required tools: 4mm Allen Key. 1. Position hinge bracket and secure with supplied M6 bolts, washers and nutplate. Finger tighten only. Repeat both sides. 2. Align both Hinge Brackets equal from the front rail inner surface and tighten the bolts to 10Nm. Repeat both sides. Step 5 Vehicle FOR RNGR Double Cab FOR RNGR Super Cab MAZ BT50 Dual Cab MAZ BT50 Freestyle Cab 11mm DIM A 37mm DIM A 885mm 1005mm 885mm 1005mm Required tools: Tape Measure, Marker Pen and Masking Tape. 1. Apply masking tap to the side rail inner 2. Select the relevant DIM A for your vehicle from the table (left). Starting at the front rail inner surface, use the relevant DIM A to make a mark on the inner side rail as shown. 3. Mark another line 37.0mm from this line, and a line 11.0mm from the side rail bottom edge, crossing both lines. 4. Repeat for both sides. Step 6 Required tools: Centre Punch, Marker Pen, 5mm Drill Bit and Power Drill. 1. Align Gas Strut Bracket with marked lines to confirm hole locations. 2. Mark and centre punch hole locations. 3. Drill holes through using 5.0mm drill bit, and remove any drill burr from holes. 4. Repeat for both sides. 5. Apply rust inhibitor to the drilled holes. Page 4 of 12


 2.")


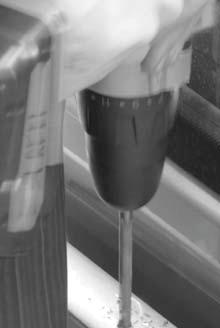
5 Step 7 Required tools: Rivet gun, 13mm spanner and 13mm socket and driver. 1. Install the gas strut bracket with supplied rivets. 2. Install the pivot end ball to the bracket and tighten it to 20.0 Nm outside Wide end Mounts to Tonneau Cover Thin end Mounts to Vehicle Tub Step 8 Required tools: 13mm spanner, 13mm socket and driver 1. Install the ball stud with supplied nut and washer in the middle hole of the Tonneau. (Ball Stud to outside) 2. Repeat for other side. 3. Connect both gas struts by pressing it's end into the ball studs. NOTE: Note, the opening height of the tonneau cover can be adjusted by fixing the ball studs in either holes illustrated. NOTE: Ensure the gas strut is installed in the correct orientation as shown. The wide end connects to the Tonneau cover. Step 9 1. Install the cover by letting the hinge tongue to rest on front of the hinge groove while holding the cover in a 60 angle. 2. Move the cover toward the vehicle cabin to slide the tongue to the groove, ensure hinge parts fully engage. DO NOT LOWER THE COVER YET. NOTE: When lowering the cover, ensure the front seal is not crushed between the front rail and the cover. Page 5 of 12


6 Step While holding the cover up, insert the gas strut ends the brackets, by firmly pushing them in. Step Close the cover by pulling from the handle and slowly close it while checking that the cover is correctly lined up to the tub and the latch mechanisms are not touching the tub s side rails. 2. Once confirmed the cover is lined up correctly, leave it fully open. NOTE: If the cover does not line up correctly, move hinge parts mounted to the front rail forward or backward, one at the time. Step 12 Required tools: 8mm Spanner. 1. While the cover is open and tailgate is open. Press the latch rotor to closed position, both sides. 2. Rotate the handle slowly to clock-wise, ensure both latches disengage at the same time. Adjustment may be required. NOTE: Mechanism can be adjusted by tightening or loosening the latch rod M5 nuts from underneath the cover.. Page 6 of 12


7 Step While the cover is open, check the front seal s lip is not trapped between the cover and the front rails by bending it up. Step 14 DIM B 35mm Vehicle FOR RNGR Double Cab FOR RNGR Super Cab MAZ BT50 Dual Cab MAZ BT50 Freestyle Cab 15mm DIM B 1277mm 1572mm 1277mm 1572mm Required tools: Masking Tape, Marker Pen, and Tape Measure. 1. Apply masking tape to the rear section of the side rails and side wall below. 2. Select the relevant DIM B for your vehicle from the table below. Starting at the front rail inner surface, use the relevant DIM B to make a mark on the inner side rail as shown. 3. Mark another line 35.0 mm, towards the tailgate. 4. Mark one more line 15.0 mm from the side rail bottom edge, crossing two previously marked lines. Step 15 Required tools: Marker Pen 1. Lower the tonneau cover. Mark the centre of the tonneau cover latch on the masking tape on the top surface of the side rail. Page 7 of 12


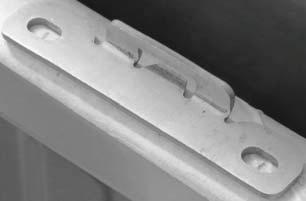
8 Step 16 Required tools: Marker pen. 1. Take the striker bracket and line up the top holes with marked location in the side rail. 2. Mark up the bottom hole location, using the bracket as template. 3. Repeat for other side. 4. Ensure bracket top surface is horizontal and that the line marked in step 14 lines up with the centre of the bracket. Step 17 Required tools: Power drill, 5mm drill bit and drill bit stopper, centre punch, hammer. 1. Remove the bracket, take centre punch and centre punch the hole locations, 4x per side. 2. Using 5.0 mm drill bit, drill the holes, only through the first layer of steel. Remove any drill burr from the holes. 3. Repeat for other side. 4. Apply rust inhibitor to the drilled holes. NOTE: Use drill stopper to avoid drilling too deep. Step 18 Required tools: Rivet gun. 1. Install the bracket using supplied rivets. Page 8 of 12


 NOTE: Tailgate locking")
9 Step 19 Required tools: 17mm spanner, 17mm socket and driver. 1. Install the striker to the striker bracket using supplied hardware. 2. The striker should line up with the top surface of the side rails, fine adjustment required. Step 20 NOTE: Do Not Close the tailgate. 1. Slowly close the cover and move the striker sideways to line it up with the latches. Ensure both sides are lined correctly Adjust the striker height correct by first closing the cover and measuring the gap between the cover and side rails top surface. The gap should be 9.0 mm at the rear, adjust strikers accordingly. Tighten the striker nuts to 30.0Nm. Step 21 (Optional) NOTE: Tailgate locking brackets are included for added security, if you do already have tailgate lock installed or do not require this feature, please go to step 26. Page 9 of 12


 Required tools: Marker Pen.")


 2.")
10 Step 22 (Optional) 20mm 580mm 580mm 20mm Required tools: Masking tape, marker pen, and tape measure. 1. Apply masking tape on both corner of the tailgate top surface and first 30 mm of inner surface. 2. Mark a centre line accurately. Mark lines 580.0mm from the centre line to both sides. 3. Mark another line 20.0 mm outboard from this line. Step 23 (Optional) Required tools: Marker Pen. 1. Align tailgate lock bracket with marked lines to confirm hole location. 2. Use the other bracket to create a gap between the tailgate top surface and tailgate lock bracket. as shown. Mark the centre of the two holes. 3. Repeat for the other side. Step 24 (Optional) Required tools: Centre punch, hammer, drill, 5mm drill bit, drill bit stopper. 1. Centre punch the hole locations (4x) 2. Drill holes using a 5.0 mm drill bit and drill stopper. 3. Remove drill burr from the holes. 4. Apply rust inhibitor to the drilled holes. Page 10 of 12


11 Step 25 (Optional) Required tools: Rivet gun. 1. Install the tailgate lock brackets with supplied rivets. Step Ensure all the parts are correctly installed. 2. Open the tailgate. 3. Close the cover slowly and ensure locking mechanism functions correctly. 4. Repeat step 3 ten times. 5. Fully open the cover. 6. Close the tailgate. 7. Close the cover again slowly ensuring the tailgate lock brackets are lined up correctly (if installed) and the cover closes fully. NOTE: Ensure the keys do not get locked inside the tub. Wide end Mounts to Tonneau Cover Step 27 Wide end 1. Ensure the gas strut is installed in the correct orientation as shown. The wide end connects to the Tonneau cover. NOTE: Incorrect installation of gas strut will void Tonneau Cover warranty. Thin end Thin end Mounts to Vehicle Tub Page 11 of 12


12 Step 28 Required tools: scissors. 1. Use supplied foam seal to improve weather resistance of the tub when required. Silicone may be applied to seal smaller gaps. NOTE: Common area of water ingress is the seam between the side and front panels. Page 12 of 12
NIS NAV AM (MY15 >) - Aluminium Tonneau Cover ATC0051 (silver) ATC0052 (Black) Installation Time: Approx. 60 Minutes WARNING!
 - Aluminium Tonneau Cover ATC0051 (silver) ATC0052 (Black) Installation Time: Approx. 60 Minutes WARNING!") Installation Time: Approx. 60 Minutes WARNING! When in the closed position, Aluminium Tonneau Cover must be latched and tailgate must be closed. Failure to do so could result in unexpected opening of the
Installation Time: Approx. 60 Minutes WARNING! When in the closed position, Aluminium Tonneau Cover must be latched and tailgate must be closed. Failure to do so could result in unexpected opening of the
VOLKSWAGEN AMAROK 3 PIECE HARD TONNEAU COVER INSTALLATION INSTRUCTIONS
 VOLKSWAGEN AMAROK 3 PIECE HARD TONNEAU COVER INSTALLATION INSTRUCTIONS Care Instructions: Clean Tonneau Cover with a mild detergent and water solution. Do not use abrasive cleaners or solvents. Place these
1PC TONNEAU COVER INSTALLATION INSTRUCTIONS. Ford Ranger (with bedliner)
") PC TONNEAU COVER INSTALLATION INSTRUCTIONS Ford Ranger (with bedliner) Care Instructions: Clean Tonneau Cover with a mild detergent and water solution. Do not use abrasive cleaners or solvents. Place these
PC TONNEAU COVER INSTALLATION INSTRUCTIONS Ford Ranger (with bedliner) Care Instructions: Clean Tonneau Cover with a mild detergent and water solution. Do not use abrasive cleaners or solvents. Place these
D40C HINGE # x Support Plate x M8 Bolt 8 x M8 Washer 6 x M6 20mm Bolts 6 x M6 Washers 19 x Screws
 HINGE # 1017 2 x Support Plate 1018 8 x M8 Bolt 8 x M8 Washer 6 x M6 20mm Bolts 6 x M6 Washers 19 x Screws 2 x Lid mount gas strut bracket 1041 2 x Self tap strut mount 1040 1 x Central Lock bracket 1510
H15P. Toyota Hilux A-DECK Dual Cab
 Toyota Hilux A-DECK Dual Cab Page 1 of 14 Fitting Instructions Part Number H15 Toyota Hilux A-DECK Dual Cab 2015+ To suit Sports Bars Check contents of kit before commencing fitment and report any discrepancies
3 PIECE HARD TONNEAU COVER INSTALLATION INSTRUCTIONS
 3 PIECE HARD TONNEAU COVER INSTALLATION INSTRUCTIONS VEHICLE DESCRIPTION: NISSAN NAVARA D0 DUAL CAB 3 Pce Tonneau Cover with OEM Sports Bar 3 Pce Tonneau Cover with EGR Sports Bar PLACE THESE INSTRUCTIONS
1PC TONNEAU COVER INSTALLATION INSTRUCTIONS IMPORTANT
 For use in cleaning painted metal, glass and other vehicle surfaces. For external use only. Dispose of properly after use. IMPREGNATED WITH 70% ISOPROPLY ALCOHOL TC0d PC TONNEAU COVER INSTALLATION INSTRUCTIONS
Q15P. Mitsubishi MQ Triton Dual Cab
 Mitsubishi MQ Triton Dual Cab Page 1 of 12 Fitting Instructions Part Number Mitsubishi MQ Triton Dual Cab 2015+ To suit Sports Bars Check contents of kit before commencing fitment and report any discrepancies
3PC TONNEAU COVER INSTALLATION INSTRUCTIONS. Ford Ranger/Mazda BT-50 (without bedliner)
") 3PC TONNEAU COVER INSTALLATION INSTRUCTIONS Ford Ranger/Mazda BT-50 (without bedliner) Care Instructions: Clean Tonneau Cover with a mild detergent and water solution. Do not use abrasive cleaners or solvents.
3PC TONNEAU COVER INSTALLATION INSTRUCTIONS Ford Ranger/Mazda BT-50 (without bedliner) Care Instructions: Clean Tonneau Cover with a mild detergent and water solution. Do not use abrasive cleaners or solvents.
TONNEAU COVER INSTALLATION INSTRUCTION. Toyota Hilux 407L
 TONNEAU COVER INSTALLATION INSTRUCTION Toyota Hilux 407L Piece Tonneau Cover Place these instructions in vehicle s glove box after installation is complete Care Instructions: Clean Tonneau Cover with a
3PC TONNEAU COVER WITH SPORTS BAR INSTALLATION INSTRUCTIONS
 3PC TONNEAU COVER WITH SPORTS BAR INSTALLATION INSTRUCTIONS TC00d / Vehicle Description: NISSAN NAVARA D0 DUAL CAB 3-PIECE TONNEAU COVER PARTS LIST NO. PART NAME QTY. NO. PART NAME QTY. NO. PART NAME QTY.
C15C C15C. Page 1 of 20
 2 x Lid Front Hinge 1135 8 x M8 Bolt 8 x M8 Washer (3mm Thick) 4 x M6 Large washers 4 x M6 Spring washers 4 x M6 x 40mm Bolts 6 x M6 20mm Bolts 6 x M6 Washers 20 x Screws 2 x Lid mount gas strut bracket
PART A - SPORTS BAR WITH INTEGRATED STOP LAMP INSTALLATION INSTRUCTIONS
 PART A - SPORTS BAR WITH INTEGRATED STOP LAMP INSTALLATION INSTRUCTIONS SB000 Vehicle Description: FORD RANGER 0 Part Number: SBAR007 LIST OF PARTS PLEASE KEEP INSTRUCTIONS IN GLOVE BOX FOR FURTHER USE
MAZDA BT-50 (October 2011 Production Onwards) 1 & 3 PIECE HARD TONNEAU REMOTE LOCKING KIT INSTALLATION INSTRUCTIONS
 1 & 3 PIECE HARD TONNEAU REMOTE LOCKING KIT INSTALLATION INSTRUCTIONS") MAZDA BT-50 (October 0 Production Onwards) & 3 PIECE HARD TONNEAU REMOTE LOCKING KIT INSTALLATION INSTRUCTIONS Installation Time: Approx. 0 Minutes Care Instructions: Clean Tonneau Cover with a mild detergent
MAZDA BT-50 (October 0 Production Onwards) & 3 PIECE HARD TONNEAU REMOTE LOCKING KIT INSTALLATION INSTRUCTIONS Installation Time: Approx. 0 Minutes Care Instructions: Clean Tonneau Cover with a mild detergent
VOLKSWAGEN AMAROK 1 & 3 PIECE HARD TONNEAU REMOTE LOCKING KIT INSTALLATION INSTRUCTIONS
 VOLKSWAGEN AMAROK & PIECE HARD REMOTE LOCKING KIT INSTALLATION INSTRUCTIONS Care Instructions: Clean Tonneau Cover with a mild detergent and water solution. Do not use abrasive cleaners or solvents. Place
VOLKSWAGEN AMAROK MY17> 1 & 3 PIECE HARD TONNEAU REMOTE LOCKING KIT INSTALLATION INSTRUCTIONS
 VOLKSWAGEN AMAROK MY7> & PIECE HARD TONNEAU REMOTE LOCKING KIT INSTALLATION INSTRUCTIONS Care Instructions: Clean Tonneau Cover with a mild detergent and water solution. Do not use abrasive cleaners or
CANOPY INSTALLATION INSTRUCTIONS CURVED REAR DOOR Isuzu D-Max 2012 / Holden Colorado RG
 CANOPY INSTALLATION INSTRUCTIONS CURVED REAR DOOR Isuzu D-Max 2012 / Holden Colorado RG IF FITTING THIS CANOPY TO RG COLORADO A SEPARATE WIRING PATCH HARNESS IS REQUIRED. ORDER EGR PART NUMBER: RGCOL-PATCH-HARN
SUBARU FORESTER - SIDE STEP DIESEL VERSION INSTALLATION INSTRUCTIONS
 SUU FORESTER - SIDE STEP DIESEL VERSION INSTALLATION INSTRUCTIONS SS00 VEHICLE DESCRIPTION: PART NUMBER: SUU FORESTER SACC00 R 9 L 0 Care Instructions: Clean Side Steps with a mild detergent and water
(2012 Production Onwards) INTEGRATED SIDE STEP INSTALLATION INSTRUCTION. 60 Minutes
 INTEGRATED SIDE STEP INSTALLATION INSTRUCTION. 60 Minutes") NISSAN DUALIS (2012 Production Onwards) INTEGRATED SIDE STEP INSTALLATION INSTRUCTION Accessory Part No. STEP0004 60 Minutes Approx Product Weight: 15kg/33 lb IMPORTANT - PLEASE READ INSTRUCTIONS BEFORE
NISSAN DUALIS (2012 Production Onwards) INTEGRATED SIDE STEP INSTALLATION INSTRUCTION Accessory Part No. STEP0004 60 Minutes Approx Product Weight: 15kg/33 lb IMPORTANT - PLEASE READ INSTRUCTIONS BEFORE
TOYOTA HILUX 2015 ~ CANOPY INSTALLATION INSTRUCTIONS. Important
 CP080 CANOPY INSTALLATION INSTRUCTIONS TOYOTA HILUX 05 ~ Installation Time: Approx. 90 Minutes Installation Time: Approx. 00 Minutes (with ute liner) Do not tighten any bolts, screws and nuts that are
CANOPY INSTALLATION INSTRUCTIONS. Holden Colorado LX and LT-R
 CANOPY INSTALLATION INSTRUCTIONS Holden Colorado LX and LT-R (007 Production Onwards) Installation Time: Hour (Approximately) Without Bed Liner Hour 45 Minutes (Approximately) With Bed Liner Care Instructions:
CANOPY INSTALLATION INSTRUCTIONS. TOYOTA HILUX Double Cab - SR / SR5 (with & without Toyota Genuine Bed Liner)
") CANOPY INSTALLATION INSTRUCTIONS TOYOTA HILUX Double Cab - SR / SR5 (with & without Toyota Genuine Bed Liner) (February 005 Production Onwards) Installation Time: Hour (Approximately) Without Bed Liner
CANOPY INSTALLATION INSTRUCTIONS TOYOTA HILUX Double Cab - SR / SR5 (with & without Toyota Genuine Bed Liner) (February 005 Production Onwards) Installation Time: Hour (Approximately) Without Bed Liner
LAND ROVER DISCOVERY 3/ SPARE WHEEL CARRIER
 LAND ROVER DISCOVERY 3/ 4 SPARE WHEEL CARRIER RBLD007 INSTALL TIME: 4.5 Hours NOTE: Park Distance Control will be affected by this fitment and the customer should be informed. IMPORTANT WARNING! IT IS
CANOPY INSTALLATION INSTRUCTIONS. Mitsubishi Triton MN - Long Bed (MY09 Production Onwards)
") CANOPY INSTALLATION INSTRUCTIONS Mitsubishi Triton MN - Long Bed (MY09 Production Onwards) Installation Time: Hour (Approximately) Care Instructions: Clean Canopy with a mild detergent and water solution.
CANOPY INSTALLATION INSTRUCTIONS Mitsubishi Triton MN - Long Bed (MY09 Production Onwards) Installation Time: Hour (Approximately) Care Instructions: Clean Canopy with a mild detergent and water solution.
CANOPY INSTALLATION INSTRUCTIONS NISSAN NAVARA D40 Double Cab - RX / ST / ST-X (with & without Nissan Genuine Bed Liner)
") INSTALLATION INSTRUCTIONS NISSAN NAVARA D40 Double Cab - RX / ST / ST-X (with & without Nissan Genuine Bed Liner) (For Australia: 005 Production Onwards for ST & ST-X) (January 009 Production Onwards for
INSTALLATION INSTRUCTIONS NISSAN NAVARA D40 Double Cab - RX / ST / ST-X (with & without Nissan Genuine Bed Liner) (For Australia: 005 Production Onwards for ST & ST-X) (January 009 Production Onwards for
Tonneau Cover Fitting Instructions Ford PX Ranger XL Dual Cab With HeadBoard June Current
 Tonneau Cover Fitting Instructions Ford PX Ranger XL Dual Cab With HeadBoard June 2013 - Current Part Number: 10129 Package includes 1 x Tonneau Cover 1 x Warranty Card 2 x Bar Bracket (300474) 23 x 4
HARD FOLDING TONNEAU COVER INSTALLATION GUIDE
 HARD FOLDING TONNEAU COVER INSTALLATION GUIDE GUIDE FOR FOLD-A-COVER FD3701, FD3702 TRUCK MODEL(S): 1998-2007 FORD F-150 NOTES TO INSTALLER: 70 F when installing. surface. Some trimming of bed liner may
CANOPY INSTALLATION INSTRUCTIONS Ford Ranger XL and XLT
 CANOPY INSTALLATION INSTRUCTIONS Ford Ranger XL and XLT (006 Production Onwards) Installation Time: Hour (Approximately) Care Instructions: Clean Canopy with a mild detergent and water solution. Do not
CANOPY INSTALLATION INSTRUCTIONS. VW AMAROK Double Cab
 CANOPY INSTALLATION INSTRUCTIONS CP00a VW AMAROK Double Cab Installation Time: Hour (Approximately) Care Instructions: Clean Canopy with a mild detergent and water solution. Do not use abrasive cleaners
LOCKN LOAD FIRST TIME INSTALLATION
 LOCKN LOAD TM TRACK MOUNTING KIT FORD RANGER PX / MAZDA BT-50 DUAL CAB 2011 + 2 BAR TRACK HEAVY DUTY ROOF RACK SYSTEM MAX VEHICLE ROOF LOAD RATING: 100KG TOTAL LOAD EQUALS WEIGHT OF ROOF RACKS + ACCESSORIES
Section 13. Tail Rotor Drive. RotorWay International A600 TALON Construction Manual. Section 13. Page A
 RotorWay International Page A Tail Rotor Drive Procedures covered in this section: Install driveshafts and gearboxes; install drive belt and tensioner; fabricate and install tail rotor pitch actuator arms;
GENUINE PARTS INSTALLATION INSTRUCTIONS
 GENUINE PARTS INSTALLATION INSTRUCTIONS DESCRIPTION: APPLICATION: PART NUMBER: KIT-CARBON FIBER REAR SPOILER INFINITI Q50 T99J1 J5000 KIT CONTENTS: Item A B C D Qty. 1 4 1 1 Part Description Spoiler Assembly
Stowe Cargo Management System
 Installation Guide Stowe Cargo Management System Table of Contents 1. Pre-Installation (Page 2) a. Notes, Installation Kit contents & Tools needed 2. How to Install the Stowe Cargo Management System (Pages
INSTALLATION & OWNER S MANUAL
 Rev. B, p. 1 of 25 INSTALLATION & OWNER S MANUAL POLARIS RANGER RCS (for models XP or HD) (for model years 2009-) cab without doors kit (p/n 1POLRCWD) cab with doors kit (p/n 1POLRC) doors only kit (p/n
Installation Guide. Stowe Cargo Management System. Table of Contents
 Installation Guide Stowe Cargo Management System Table of Contents 1. Pre-Installation (Page 2) a. Notes, Installation Kit contents & Tools needed 2. How to Install the Stowe Cargo Management System (Pages
WORK INSTRUCTION READ FIRST. IF IN DOUBT
 WORK INSTRUCTION PAGE 1 OF 9 FIELD CHANGE INSTRUCTION : TO CHANGE A BACK DOOR AND SIDE LIFT PROCEDURE: Step 1. How to remove and replace the rear door of a canopy. Step 2. How to remove the side lift up
SS77HFZ Toyota Land Cruiser 70 series (Wide Nose) Suits: 4.2L 6cyl Diesel (1HZ engine) Replaces Factory Toyota Raised Air Intake (Genuine Snorkel)
 Suits: 4.2L 6cyl Diesel (1HZ engine) Replaces Factory Toyota Raised Air Intake (Genuine Snorkel)") SS77HFZ Toyota Land Cruiser 70 series (Wide Nose) Suits: 4.2L 6cyl Diesel (1HZ engine) Replaces Factory Toyota Raised Air Intake (Genuine Snorkel) Parts List 15/02/2011 ITEM PART NO DESCRIPTION QTY 1 330-133-700
SS77HFZ Toyota Land Cruiser 70 series (Wide Nose) Suits: 4.2L 6cyl Diesel (1HZ engine) Replaces Factory Toyota Raised Air Intake (Genuine Snorkel) Parts List 15/02/2011 ITEM PART NO DESCRIPTION QTY 1 330-133-700
TOYOTA KLUGER / HIGHLANDER. (2010 Production Onwards) INTEGRATED SIDE STEPS INSTALLATION INSTRUCTION. 60 Minutes
 INTEGRATED SIDE STEPS INSTALLATION INSTRUCTION. 60 Minutes") TOYOTA KLUGER / HIGHLANDER (2010 Production Onwards) INTEGRATED SIDE STEPS INSTALLATION INSTRUCTION Accessory Part No. STEP0003 60 Minutes Approx Product Weight: 33 lbs 15KG IMPORTANT - PLEASE READ INSTRUCTIONS
TOYOTA KLUGER / HIGHLANDER (2010 Production Onwards) INTEGRATED SIDE STEPS INSTALLATION INSTRUCTION Accessory Part No. STEP0003 60 Minutes Approx Product Weight: 33 lbs 15KG IMPORTANT - PLEASE READ INSTRUCTIONS
INSTALLATION INSTRUCTIONS
 INSTALLATION INSTRUCTIONS Accessory Application Publications No. SPOILER (LOW) CIVIC 4-DOOR All 30833 Issue Date SEP 2005 PARTS LIST Trunk spoiler Right trunk spring (marked red) Left trunk spring (marked
INSTALLATION & OWNER S MANUAL
 INSTALLATION & OWNER S MANUAL INSTALLATION INSTRUCTIONS KAWASAKI MULE 4000 CAB KIT (p/n: KAF40-005WA and KAF40-005BA) NOTE: Hard sided doors are sold separately. This manual is the property of the owner.
INSTALLATION INSTRUCTIONS
 INSTALLATION INSTRUCTIONS Accessory Application Publications No. SPOILER (LOW) 2011 CIVIC 4-DOOR All 44416 Issue Date AUG 2010 PARTS LIST Trunk spoiler Right trunk spring (marked red) Left trunk spring
ISNORKEL034XLT FORD PX RANGER XLT 9/2011-7/ & 3.2L DIESEL FORD PX RANGER Mk II XLT 7/ & 3.2L DIESEL
 INSTALLATION GUIDE ISNORKEL034XLT FORD PX RANGER XLT 9/2011-7/2015 2.2 & 3.2L DIESEL FORD PX RANGER Mk II XLT 7/2015+ 2.2 & 3.2L DIESEL Ironman 4x4 Snorkel fits to the right hand side of the Ford PX Ranger
ISNORKEL037 VOLKSWAGEN AMAROK
 INSTALLATION GUIDE ISNORKEL037 VOLKSWAGEN AMAROK Ironman 4x4 Snorkel fits to the right hand side of the Volkswagen Amarok, both flared and non-flared models. It will take about 4 hours to install. Below
INSTALLATION & OWNER S MANUAL
 p. 1 of 13 INSTALLATION & OWNER S MANUAL Polaris Ranger 400-EV PathPro SS Cab (fits 2010 - current) (p/n: 1PRG400FS) The contents of this envelope are the property of the owner. Be sure to leave with the
K327W. Fitting Kit. Fitting Instructions for Basic Carrier. x 4 x 4 x 4 x 4. Revision No: 5E 1
 Fitting Kit Fitting Instructions for Basic Carrier x 4 x 4 x 4 x 4 Revision No: 5E 1 Items you will require: Attention: First Time Installation Tape measure Pen Cordless drill Depth stop Vacuum cleaner
RTS518 - Rhino Heavy Duty 2 & 3 Crossbar System Hyundai iload, imax, i800, H-1.
 RTS518 - Rhino Heavy Duty 2 & 3 Crossbar System Hyundai iload, imax, i800, H-1. NOTE: Please read these instructions carefully prior to installation. Check the contents of kit before commencing fi tment
2011 Honda Accord Coupe Fine Mesh Grille
 IMPORTANT: PLEASE KEEP THIS INSTRUCTION MANUAL FOR FUTURE REFERENCE! TOOLS REQUIRED 2011 Honda Accord Coupe Fine Mesh Grille Replacement Upper / Lower Overlay Part #: Complete #1124-0102-11 / Black Ice
INSTALLATION & OWNER S MANUAL
 Rev. C, p. of 2 INSTALLATION & OWNER S MANUAL KUBOTA B2650/3350 Hard Sided Cab p/n KB33AS Soft Sided Cab p/n KB33SS Installation Instructions The contents of this envelope are the property of the owner.
GENUINE PARTS INSTALLATION INSTRUCTIONS
 GENUINE PARTS INSTALLATION INSTRUCTIONS DESCRIPTION: APPLICATION: PART NUMBER: Hood Bug Deflector Pathfinder T99D5 9PJ0A KIT CONTENTS: Item Qty. A 2 Inner Clip A B 2 Outer Clip B C 2 Wing Clip C D 1 Hood
INSTALLATION & OWNER S MANUAL
 p. 1 of 15 INSTALLATION & OWNER S MANUAL Polaris Ranger 500-800 PathPro SS Cab (fits 2010 - current) (p/n: 1POLRFS1) The contents of this envelope are the property of the owner. Be sure to leave with the
Assembly Instructions
 Assembly Instructions Part Number Description Model Approx. Assembly Time 99994-049 Cab Enclosure MULE SX 3-4 Hours WARNING Improper installation of this accessory could result in an accident causing serious
INSTALLATION & OWNER S MANUAL
 Rev. A, p. of 0 INSTALLATION & OWNER S MANUAL MASSEY FERGUSON GC2400 cab kit p/n MFGC2400 Installation Instructions The contents of this envelope are the property of the owner. Be sure to leave with the
ISNORKEL019 NISSAN D40 NAVARA / R51 PATHFINDER (Except Single Cab) 4.0L Petrol & Diesel YD25DDTi Engines
 4.0L Petrol & Diesel YD25DDTi Engines") INSTALLATION GUIDE ISNORKEL019 NISSAN D40 NAVARA / R51 PATHFINDER (Except Single Cab) 4.0L Petrol & Diesel YD25DDTi Engines Ironman 4x4 Snorkel fits to the left hand side of the Nissan Navara & Pathfinder.
INSTALLATION GUIDE ISNORKEL019 NISSAN D40 NAVARA / R51 PATHFINDER (Except Single Cab) 4.0L Petrol & Diesel YD25DDTi Engines Ironman 4x4 Snorkel fits to the left hand side of the Nissan Navara & Pathfinder.
INSTALLATION INSTRUCTIONS
 INSTALLATION INSTRUCTIONS Accessory Application Publications No. Bll 27035-29095 2005 RL Issue Date MAY 2005 PARTS LIST Trunk spoiler Right support strut Left support strut 4 Washer-bolts 4 Adhesive seals
INSTALLATION INSTRUCTIONS
 INSTALLATION INSTRUCTIONS Accessory Application Publications No. Bll 33590 2007 RL Issue Date AUG 2006 PARTS LIST Trunk spoiler Right support strut Left support strut 4 Washer-bolts 4 Adhesive seals TOOLS
Supertop Installation Instructions
 Supertop Installation Instructions For: CJ7 1980-1986 and Wrangler (All) Part Number: 51603 Rotary Latch Paddle Handle WARNING This product is designed primarily to enhance the appearance of the vehicle
Ground Effects, P/N: (V6), (V8)
, (V8)") , P/N: 92248596 (V6), 92248560 (V8) 3. Open trunk and remove 3 scrivets per side. Retain. Remove LH and RH tail lamp access cover. Retain. Refer to Figure 1. NOTE: Installation is made easier with the
, P/N: 92248596 (V6), 92248560 (V8) 3. Open trunk and remove 3 scrivets per side. Retain. Remove LH and RH tail lamp access cover. Retain. Refer to Figure 1. NOTE: Installation is made easier with the
INSTALLATION INSTRUCTIONS
 INSTALLATION INSTRUCTIONS Accessory Application Publications No. SPOILER (LOW) 2005 ACCORD 4-DOOR AII 27503 Issue Date AUG 2004 PARTS LIST Trunk spoiler Right trunk spring (marked green) Left trunk spring
Factory Five Racing, Inc. 818 Kit Assembly manual revision 1J update
 Factory Five Racing, Inc. 818 Kit Assembly manual revision 1J update Turbo coolant overflow tank...1 Shifter handle...4 Install...4 Door skin...7 Door Liner... 10 Side mirrors... 14 Door handles and pulls...
SCION xd INTERIOR LIGHTING UPGRADE Preparation
 Preparation Part Number: PTS21-52085 Light Guide Kit Contents Item # Quantity Reqd. Description 1 1 Controller Board, 4 color programmed w/ Bracket 2 1 RGB, LED Engine wire harness 3 2 14mm Light Rod,
INSTALLATION INSTRUCTIONS
 INSTALLATION INSTRUCTIONS Accessory Application Publications No. Bll 37371 SPOILER 2008 TL Issue Date JUN 2007 PARTS LIST Trunk spoiler Left trunk spring (marked yellow) Template A TOOLS AND SUPPLIES REQUIRED
<THESE INSTRUCTIONS MUST BE GIVEN TO THE END USER> B&W
 B&W Trailer Hitches 1216 Hawaii Rd / PO Box 186 Humboldt, KS 66748 P:620.473.3664 F:620.869.9031 Turnoverball Gooseneck Hitch Installation Instructions
INSTALLATION INSTRUCTIONS
 INSTALLATION INSTRUCTIONS Accessory Application Publications No. SPOILER (DECK LID) ACCORD 4-DOOR AII 24063 Issue Date AUG 2002 PARTS LIST Trunk spoiler Right trunk spring (marked green) Left trunk spring
SS188HF Toyota Land Cruiser Prado 150 Series KDJ150R 3.0L 4 Cyl. D-4D Diesel (1KD-FTV Engine)
") SS188HF Toyota Land Cruiser Prado 150 Series KDJ150R 3.0L 4 Cyl. D-4D Diesel (1KD-FTV Engine) Parts List 8/7/2010 ITEM PART NO. DESCRIPTION QTY 1 365-133-000 BODY - SNORKEL (SS188HF) 1 2 000-135-800 3
SS188HF Toyota Land Cruiser Prado 150 Series KDJ150R 3.0L 4 Cyl. D-4D Diesel (1KD-FTV Engine) Parts List 8/7/2010 ITEM PART NO. DESCRIPTION QTY 1 365-133-000 BODY - SNORKEL (SS188HF) 1 2 000-135-800 3
INSTALLATION & OWNER S MANUAL
 Rev. R p. 1 of 16 INSTALLATION & OWNER S MANUAL V4211 HARD SIDED CAB KIT and/or V4275 CAMO HARD SIDED CAB KIT INSTALLATION & OWNER S MANUAL The contents of this envelope are the property of the owner.
DF Ford F Short Bed 2009-Current
 921019 DF921019 Ford F150 5.5 Short Bed 2009-Current Hardware (Box 1 of 2) 1. Tango front rail assembly 2. Tango left rail assembly 3. Tango right rail assembly 4. Rhino Rack cross bars (2) 5. Clamps (8)
FIRST TIME INSTALLATION
 LOCKN LOAD TM PLATFORM MAX PLATFORM LOAD RATING: 100 KG (sizes A, B, F, G, I, K, & L) 150 KG (sizes C, D, E, H, J, N, P & U) PLEASE REFER TO VEHICLE MANUFACTURER SPECIFICATIONS FOR MAX ROOF LOAD RATING
Genesis Roll Up Tonneau Cover
 Installation Instructions Genesis Roll Up Tonneau Cover or proper installation and best possible fit, please read all instructions EORE you begin. Contents Cover ssembly river Side Rail C Passenger Side
SS1066HF Jeep JK Wrangler Left Hand Drive CRDI4 2.8Litre-I4 Diesel Engine and EGHV6 3.8Litre V6 Gasoline Engine
 SS1066HF Jeep JK Wrangler Left Hand Drive CRDI4 2.8Litre-I4 Diesel Engine and EGHV6 3.8Litre V6 Gasoline Engine Installation Guide Safari SS1066HF Page - 1 of 12 6/10/2009 ITEM PART NO DESCRIPTION QTY
ITEM PART NO. DESCRIPTION QTY BODY - SNORKEL (SS1410HP) " AIR RAM ASSEMBLY BRACKET - UPPER MOUNTING 1
 AIR RAM ASSEMBLY BRACKET - UPPER MOUNTING 1") L; SS1410HP SAFARI ARMAX SNORKEL VOLKSWAGEN AMAROK V6 TDI550 3.0L TDI V6 Engine Parts List 10/04/2018 ITEM PART NO. DESCRIPTION QTY 1 910-133-600 BODY - SNORKEL (SS1410HP) 1 2 000-135-960 4" AIR RAM ASSEMBLY
L; SS1410HP SAFARI ARMAX SNORKEL VOLKSWAGEN AMAROK V6 TDI550 3.0L TDI V6 Engine Parts List 10/04/2018 ITEM PART NO. DESCRIPTION QTY 1 910-133-600 BODY - SNORKEL (SS1410HP) 1 2 000-135-960 4" AIR RAM ASSEMBLY
SS1135HF Jeep KJ Cherokee CRDI4 2.8Litre-I4 Diesel Engine
 SS1135HF Jeep KJ Cherokee CRDI4 2.8Litre-I4 Diesel Engine Parts List 23/2/2010 ITEM PART NO DESCRIPTION QTY 1 965-133-000 BODY - SNORKEL (SS1130HF) 1 2 000-135-800 3 ½" AIR RAM ASSEMBLY 1 3 965-032-000
HAYMAN REESE PART No: 03099RW BMW X4 F26 Series May 2014 Onwards INSTALLATION INSTRUCTIONS
 PART No: 03099RW BMW X4 F26 Series May 2014 Onwards PLEASE ENSURE THAT ALL INSTRUCTIONS ARE UNDERSTOOD PRIOR TO FITMENT PLACE THESE INSTRUCTIONS IN THE VEHICLE S GLOVEBOX AFTER INSTALLATION IS COMPLETED
J&M CASTER/CAMBER PLATE INSTALLATION INSTRUCTIONS (#24213) Hardware:
 Hardware:") J&M CASTER/CAMBER PLATE INSTALLATION INSTRUCTIONS (#24213) Thank you for purchasing J&M Product s Caster/Camber Plates (#24213) for 1994-2004 Ford Mustang. The J&M Caster/Camber plates are the highest
J&M CASTER/CAMBER PLATE INSTALLATION INSTRUCTIONS (#24213) Thank you for purchasing J&M Product s Caster/Camber Plates (#24213) for 1994-2004 Ford Mustang. The J&M Caster/Camber plates are the highest
INSTALLATION INSTRUCTIONS AND OWNER S MANUAL
 INSTALLATION INSTRUCTIONS AND OWNER S MANUAL Thank you for purchasing the AlloyCover from WeatherTech. Manufactured with pride using superior quality materials and workmanship. With proper care, your cover
Supertop Installation Instructions
 www.bestop.com Inc. Supertop Installation Instructions For: CJ7 ʻ76 -ʼ86 and ʻ86-ʼ95 Wrangler Part Number: 51598 DO NOT INSTALL THIS PRODUCT ON ANY VEHICLE OTHER THAN THOSE LISTED ABOVE. This product is
Installation Instructions EZ Roll Tonneau
 Installation Instructions EZ Roll Tonneau Vehicle Application: Dodge Ram 6.4' bed 06-08 1500 & 06-09 2500/3500 W/TAILGATE SPOILER : 19239 www.bestop.com - We re here to help! Visit our web site and click
INSTALLATION INSTRUCTIONS
 INSTALLATION INSTRUCTIONS Accessory Application Publications No. All 30482 S 2006 PILOT Issue Date P/N 08F23-S9V-100A SEP 2005 PARTS LIST Left front trim piece Right front trim piece Left rear trim piece
PRELIMINARY INSTALLATION INSTRUCTIONS. PARTS LIST Left front trim piece
 INSTALLATION INSTRUCTIONS Accessory Application Publications No. All 30482 S 2006 PILOT Issue Date P/N 08F23-S9V-100A SEP 2005 PARTS LIST Left front trim piece Right front trim piece Left rear trim piece
INSTALLATION & OWNER S MANUAL
 INSTALLATION & OWNER S MANUAL CAB INSTALLATION INSTRUCTIONS FOR E-Z-GO MPT BALL CAGE (p/n 72685-G01) The contents of this envelope are the property of the owner. Be sure to leave with the owner when installation
Preparation Part Number: PT Kit Contents Item # Quantity Reqd. Description 1 1 Rear Spoiler 2 1 Hardware Kit. Hardware Bag Contents
 Preparation Part Number: PT478-11170-09 Kit Contents 1 1 Rear Spoiler 2 1 Hardware Kit Hardware Bag Contents 1 4 M5 Nut 2 4 Clip 3 4 Hole Plug Additional Items Required For Installation 1 1 Outer Drill
INSTALLATION & OWNER S MANUAL
 Rev. E p. of 3 INSTALLATION & OWNER S MANUAL V446 Front Cab Kit and V446 Rear Cab Kit for RTV 40 INSTALLATION & OWNER S MANUAL The contents of this envelope are the property of the owner. Be sure to leave
TONNEAU INSTALLATION GUIDE
 TONNEAU INSTALLATION GUIDE Warranty, Care & Maintenance Model 4056 Toyota Tacoma Double Cab 5' Short Bed 2005-Current (With Multi-Track System) EASY AS 1-2-3! NORMAL INSTALLATION TIME 30 MINUTES For Warranty
Bag 1. Bag 1. Center Pivot. Center Pivot
 8 00734 01901 5 Center Pivot Bag 1 3374 - Center Pivot Socket 4019 - Alum Pivot ball 3254-2-56 Button Head *Note - Sometimes it is helpful to slightly over-tighten the top clamp screws, then work the ball
CIRRUS AIRPLANE MAINTENANCE MANUAL
 MODEL SR PASSENGER AND CREW DOORS. DESCRIPTION AND OPERATION Serials 000 thru 00: The two crew/passenger doors incorporate a flush-mount outside door handle, key-operated door lock, and a conventional
INSTALLATION INSTRUCTIONS
 INSTALLATION INSTRUCTIONS Accessory REAR SPOILER Application 2011 CR-Z MUGEN Publications No. AII 45919 Issue Date APRIL 2011 PARTS LIST Right wing bracket Rear wing Left wing bracket Right wing base Right
<THESE INSTRUCTIONS MUST BE GIVEN TO THE END USER> B&W
 B&W Trailer Hitches 1216 Hawaii Rd / PO Box 186 Humboldt, KS 66748 P:620.473664 F:620.869.9031 Turnoverball Gooseneck Hitch Installation Instructions
FEATURES OF THE EXPEDITION LUGGAGE - ADVENTURE PANNIER MOUNT SET:
 E XPEDITION LUGGAGE ADVENTURE PANNIER MOUNT SET INCLUDES EVERYTHING YOU NEED TO ADD MOUNTS TO YOUR MOTORCYCLE 350-0898 [Triumph Tiger Explorer 200 202-204] FEATURES OF THE EXPEDITION LUGGAGE - ADVENTURE
Care Instruction: Wash vehicle roof prior to installing Rhino Tracks.
 Important: Please read these instructions carefully prior to installation. Please refer to your fitting instruction to ensure that the roof racks are installed in the correct locations. Check the contents
2015+ Mustang S550 AlumaLift System Installation instructions for FR3Z-16796/7-BL
 2015+ ustang S550 Alumaift System nstallation instructions for FR3Z-16796/7-B Thank you for choosing this Drake uscle Cars product for your vehicle. Please read these instructions carefully. ake sure you
Premium Dry Freight (Plywood) Door Installation REFERENCE FIGURE 1
 Door Installation REFERENCE FIGURE 1") Premium Dry Freight (Plywood) Door Installation A Premium door can be identified as usually having a two-spring balancer, 2 diameter (nominal) rollers, and end hinges with removable covers. If your Whiting
Premium Dry Freight (Plywood) Door Installation A Premium door can be identified as usually having a two-spring balancer, 2 diameter (nominal) rollers, and end hinges with removable covers. If your Whiting
Installation Instructions EZ Roll Tonneau
 Installation Instructions EZ Roll Tonneau Vehicle Application: Chevrolet Silverado / Sierra 6.5' Bed 07-13 1500 & 2014 HD : 19211 www.bestop.com - We re here to help! Visit our web site and click on Ask
<THESE INSTRUCTIONS MUST BE GIVEN TO THE END USER> B&W
 B&W Trailer Hitches 1216 Hawaii Rd / PO Box 186 Humboldt, KS 66748 Turnoverball Gooseneck Hitch Installation Instructions MODEL 1314 2013 2014 RAM 3500
INSTALLATION & OWNER S MANUAL
 Page 1 of 16 INSTALLATION & OWNER S MANUAL YAMAHA VIKING CAB KIT WITH HARD DOORS p/n: 1YAMVK fits model years 2014- (fits Yanmar Bull model years 2017-) NOTE: By design, the doors are made to not be removable!
LPE C5 Battery Relocation Kit
 LPE C5 Battery Relocation Kit The LPE C5 Corvette battery relocation kit improves vehicle weight distribution by moving weight to the rear of the vehicle. The improved weight distribution increases traction
Cabinet Free Universal Assist Lifter Instructions
 PART LIST 1 @ Left Undermount Bracket 1 @ Right Undermount Bracket 2 @ 1-5/16 Pivot Arm 2 @ 1-1/8 Bent Arms w/ Foams 2 @ M8 Bolt 1 @ 1-5/16 Coupler 2 @ Gas Shocks w/ Sliding Cylinder Mount 2 @ 3-1/4 x
Installation Instructions EZ Roll Tonneau
 Installation Instructions EZ Roll Tonneau Vehicle Application: Chevy S10/GMC S-15 6' bed 94-2003 : 19019 www.bestop.com - We re here to help! Visit our web site and click on Ask a Question. Click here
SS820R SAFARI R-SPEC SNORKEL SUZUKI JIMNY 1.3L 4 Cylinder Petrol (G13B & M13A Engines)
") SS820R SAFARI R-SPEC SNORKEL SUZUKI JIMNY 1.3L 4 Cylinder Petrol (G13B & M13A Engines) Parts List 01/04/2015 ITEM PART NO DESCRIPTION QTY 1 930-133-000R BODY - SNORKEL 1 2 000-135-400 3 " AIR RAM ASSEMBLY
SS820R SAFARI R-SPEC SNORKEL SUZUKI JIMNY 1.3L 4 Cylinder Petrol (G13B & M13A Engines) Parts List 01/04/2015 ITEM PART NO DESCRIPTION QTY 1 930-133-000R BODY - SNORKEL 1 2 000-135-400 3 " AIR RAM ASSEMBLY
NISSAN #2744. Gross Trailer Weight (Maximum)...16,000 lbs. Vertical Load Weight (Max. Pin Weight)...4,000 lbs. SYSTEM TOW CAPACITY
...16,000 lbs. Vertical Load Weight (Max. Pin Weight)...4,000 lbs. SYSTEM TOW CAPACITY") NISSAN 16K Industry Standard Rail Custom Mounting Kit #2744 Gross Trailer Weight (Maximum)...16,000 lbs. Vertical Load Weight (Max. Pin Weight)...4,000 lbs. SYSTEM TOW CAPACITY Please note, in order to
NISSAN 16K Industry Standard Rail Custom Mounting Kit #2744 Gross Trailer Weight (Maximum)...16,000 lbs. Vertical Load Weight (Max. Pin Weight)...4,000 lbs. SYSTEM TOW CAPACITY Please note, in order to
SS41HF Mitsubishi Pajero NS & NT V8/V9 Series 3.2 Litre Turbo Diesel (4M41 Engine) 3.8 Litre V6 Petrol (6G76 Engine)
 3.8 Litre V6 Petrol (6G76 Engine)") SS41HF Mitsubishi Pajero NS & NT V8/V9 Series 3.2 Litre Turbo Diesel (4M41 Engine) 3.8 Litre V6 Petrol (6G76 Engine) 21/7/2010 Parts List ITEM PART NO DESCRIPTION QTY 1 570-133-200 BODY - SNORKEL (SS41HF)
SS41HF Mitsubishi Pajero NS & NT V8/V9 Series 3.2 Litre Turbo Diesel (4M41 Engine) 3.8 Litre V6 Petrol (6G76 Engine) 21/7/2010 Parts List ITEM PART NO DESCRIPTION QTY 1 570-133-200 BODY - SNORKEL (SS41HF)
SS89HP SAFARI ARMAX SNORKEL Toyota Land Cruiser 200 Series (MY16 Face Lift) 1VD-FTV 4.5Litre-V8 Intercooled Twin Turbo Diesel (Does not suit GX model)
 1VD-FTV 4.5Litre-V8 Intercooled Twin Turbo Diesel (Does not suit GX model)") SS89HP SAFARI ARMAX SNORKEL Toyota Land Cruiser 200 Series (MY16 Face Lift) 1VD-FTV 4.5Litre-V8 Intercooled Twin Turbo Diesel (Does not suit GX model) Parts List 01/12/2016 ITEM PART NO. DESCRIPTION QTY
SS89HP SAFARI ARMAX SNORKEL Toyota Land Cruiser 200 Series (MY16 Face Lift) 1VD-FTV 4.5Litre-V8 Intercooled Twin Turbo Diesel (Does not suit GX model) Parts List 01/12/2016 ITEM PART NO. DESCRIPTION QTY