Copyright 2015 by Paul Olesen
|
|
|
- Asher Parsons
- 5 years ago
- Views:
Transcription
1


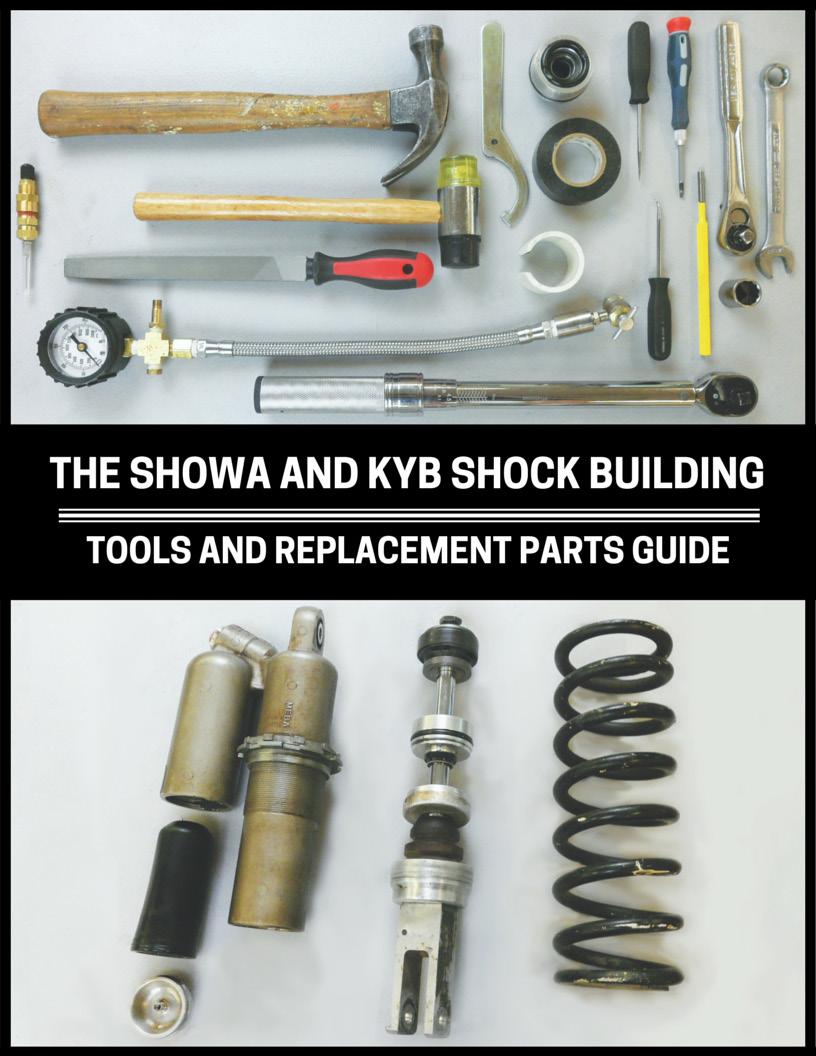
2 Copyright 2015 by Paul Olesen All rights reserved. No part of this publication may be reproduced, distributed, or transmitted in any form or by any means, including photocopying, recording, or other electronic or mechanical methods, without the prior written permission of DIY Moto Fix LLC, except in the case of brief quotations embodied in critical reviews and certain other noncommercial uses permitted by copyright law. For permission requests, the company, addressed Attention: Permissions Coordinator, at the address NOTICE: Tampering with, altering, modifying or removing any emissions-control device is a violation of federal law. The Author and DIY Moto Fix, LLC. disclaim all liability incurred in connection with the use of this information. The information in this work is true and complete to the best of our knowledge. However, all information is presented without any guarantee on part of the Author or DIY Moto Fix, LLC., who also disclaims any liability incurred in connection with the use of the information and any implied warranties of merchantability or fitness for a particular purpose. Readers are responsible for taking suitable and appropriate safety measures when performing any of the operations or activities described in this book. All trademarks, trade names, model names and numbers, and other product designation referred to herein are the property of their respective owners and are used solely for identification purposes. This work is a publication of DIY Moto Fix, LLC., and has not been licensed, approved, sponsored, or endorsed by any other person or entity. THE SHOWA AND KYB SHOCK BUILDING TOOLS AND REPLACEMENT PARTS GUIDE


3 REPLACEMENT PARTS In order to properly service a shock absorber, all the worn or problematic parts must be replaced. I understand knowing what to replace may be challenging if you have never serviced a shock before or don t work on them regularly. To help you get familiarized with what is housed inside a shock, I have created this guide, which will guide you through what the replacement parts are, along with replacment options. Japanese motorcycle suspension parts are primarily sourced from suspension companies, Showa and KYB. Showa and KYB designs are very similar so there aren t any major variations between the parts. For this reason, it is very easy to quickly get familiarized with the parts which comprise these types of shocks and gain an understanding of what will need to be serviced. In its most basic form a shock consists of a spring and a damper, but as you can see in the picture below, a modern motorcycle shock has evolved into quite an assortment of parts. Fortunately, when performing a rebuild the bulk of these parts are reused. THE SHOWA AND KYB SHOCK BUILDING TOOLS AND REPLACEMENT PARTS GUIDE 1


4 The important parts, which attention must be paid to are as follows: Shock Body - The shock body houses the internals of the shock and rarely requires replacement. If a shock is well cared for the shock body will seldom wear out. Problems arise when the shock seals begin to leak, oil is lost, and the shock continues to be used. Using a shock with little to no oil will cause the piston to abnormally wear against the shock body as the piston reciprocates. When this happens, the shock body will require replacement. Reservoir Bladder - The reservoir bladder is responsible for containing the nitrogen in the shock. The bladder mates with the reservoir cap to create a gas tight seal and is under around 150psi of pressure. Over time, due to normal use, the reservoir bladder can deteriorate causing it to crack or puncture. Depending on the age and condition of the shock the reservoir bladder may require replacement. Bladders are often sold with shock rebuild kits or they can be purchased separately. Shock Shaft Nut - When removing the shock shaft nut there are a couple of opportunities for the nut to get damaged. First, since the shock shaft threads are normally peened, the nut can become damaged when the peened threads are filed away. This damage is usually more cosmetic than functional. Second, the nut can become damaged when it is removed from the shaft if the peened threads have been inadequately dressed. To ensure the project goes smoothly it is never a bad idea to have a new nut on hand. Most shock rebuild kits now come with a new nut. Rebound and Compression Valving - The rebound and compression valving within the shock consists of a series of thin shims. These are often referred to as valve stacks. As oil passes through the piston, the shims bend and valve stacks open. The valve stacks are inspection dependent parts which rarely require replacement. While uncommon, shims can bend, cup, or warp. Piston - The piston consists of a bushing which fits around the outside of the piston and a pair of o-rings that are situated behind the bushing. The piston itself seldom seldom suffers wear or damage, however, the bushing and o-rings should be replaced if they have become worn. Shock Shaft - The shock shaft houses the bulk of the internals which reciprocate inside the shock body. Replacement of the shock shaft is inspection dependent. Shock shafts can become bent when the bike and rider suffer a big crash. The shaft can also chip and pit from stones being thrown up from the rear tire and other riders. Normally, a bent or chipped shaft will be apparent without having to disassemble the shock. The shock will either not operate smoothly or chips and pits will be visible on the exposed part of the shaft. Oil may also leak, as a result of pitted or chipped shafts, because the seals have failed. THE SHOWA AND KYB SHOCK BUILDING TOOLS AND REPLACEMENT PARTS GUIDE 2


5 Seal Head - The seal head s primary responsibility is to keep oil inside the shock and external contaminants out. The seal head accomplishes this by using a dust seal and shaft seal. This seal arrangement is very similar to that of a front fork. A bushing allows the shock shaft to reciprocate up and down through the seal head. An o-ring is used to seal the seal head to the shock body. The aforementioned parts are normally all replaced when servicing a shock and can either be bought separately or a whole new seal head can be purchased. Bottom Out Bumper - The bottom out bumper absorbs compression loads which fully compress the shock. The bumper is susceptible to repeated impacts, dirt, and debris. Due to the environment and the duties of the bottom out bumper, it is a frequently replaced part. The bumper can become brittle, crack, and wear out. Bumpers are readily available individually and often come in rebuild kits. In summary, the parts that regularly require servicing are the reservoir bladder, shock shaft nut, piston bushing/o-rings, seal head assembly, and bottom out bumper. As you prepare for your rebuild, be sure to find sources for these parts or purchase a complete rebuild kit which has everything you need. THE SHOWA AND KYB SHOCK BUILDING TOOLS AND REPLACEMENT PARTS GUIDE 3


6 SHOCK BUILDING TOOLS How many different types of tools does it take to disassemble a shock? Surprisingly, very few. The majority of the work can be completed with basic hand tools and a few DIY specialty tools. A bench vice is handy for holding the shock while work is being performed on it and a torque wrench will be necessary when performing full disassemblies and reassemblies. Check out the image below to get an idea of what the rest of the tools needed are. A nitrogen source is required to pressurize the shock at the end of the build, however this task can be farmed out to a shop with a nitrogen tank, if investment in the tank and fittings isn t justifiable. For work up to this point, in terms of air tools, having an air source capable of producing 30psi of pressure and the necessary adapter to temporarily pressurize the reservoir is all that is needed. These are both important tools to have when it comes time for the removal and installation of the reservoir and seal head in the shock body. THE SHOWA AND KYB SHOCK BUILDING TOOLS AND REPLACEMENT PARTS GUIDE 4


7 By looking at the table below, you can get a more detailed idea of what tools are required to successfully rebuild a shock absorber. The tools highlighted in green are all that is required to perform a basic oil change, the tools in yellow are required to perform a full rebuild, and the tools in red are required if you d like to be able to pressurize the shock yourself. SCOPE OF WORK TOOLS REQUIRED BASIC OIL CHANGE - SHOP FULL REBUILD - FULL REBUILD - PRESSURIZES SHOCK SHOP PRESSURIZES SHOCK YOU PRESSURIZE SHOCK BENCH VISE HOLD SHOCK WHILE PERFORMING WORK FLAT BLADE SCREWDRIVER LOW SPEED COMPRESSION/REBOUND ADJUSTERS, CIRCLIP REMOVAL 14MM WRENCH HIGH SPEED COMPRESSION/REBOUND ADJUSTERS - IF APPLICABLE PUNCH SHOCK COLLARS, SEATING CIRCLIPS HAMMER SHOCK COLLARS SHOCK COLLAR SPANNER (OPTIONAL) - LOOSENING SHOCK COLLARS STRAIGHT PICK, 90 DEGREE PICK CIRCLIP REMOVAL AIR SOURCE CAPABLE OF AT LEAST 30PSI AIR CHUCK SHOCK RESERVOIRS WITH SHRADER VALVES NITROGEN NEEDLE ADAPTER REQUIRE FOR ANY SHOCK WITH A NITROGEN NEEDLE FILL PORT PARTS CLEANER CLEAN SHOCK PARTS OIL CATCH PAN DISPOSE OF OLD OIL SEAL HEAD TOOL SEAL HEAD INSTALLATION/REMOVAL FLAT FILE REMOVE SHOCK SHAFT THREAD PEENING 17MM SOCKET SHOCK SHAFT NUT 0-60NM TORQUE WRENCH TIGHTEN SHOCK SHAFT NUT SHOCK SHAFT BULLET TOOL (OPTIONAL) - FOR INSTALLATION OF SEAL HEADS ONTO SHOCK SHAFTS WITH SHARP EDGES PISTON BUSHING INSTALLATION TOOL INSTALLATION OF SHOCK PISTON BUSHING ELECTRICAL TAPE COMPRESS PISTON BUSHING NITROGEN FILL STATION PRESSURIZATION OF SHOCK NITROGEN PRESSURE BLEED TOOL SETTING SHOCK PRESSURE As far as specialty tools go, very few are required. For the ones that are, there are a few different options available for obtaining them. Most specialty tools can either be made from readily available materials or they can be sourced through a suspension parts company. Below you will find a descriptions of the tools, where they are used, and your options for getting them. Seal Head Tool - The seal head tool is used to drive the seal head down into the shock body so that the circlip can be removed or installed. The tool can be constructed from an appropriately sized piece of PVC pipe. The pipe is simply cut to length and slotted so that it fits around the shock shaft. Alternatively, similar tools constructed from metal can be purchased through the aftermarket. Nitrogen Needle Tool - Many shocks now incorporate a nitrogen needle port instead of a standard Schrader valve for pressurizing or depressurizing the reservoir. Nitrogen needles and adapters are readily available from the aftermarket for around $20. THE SHOWA AND KYB SHOCK BUILDING TOOLS AND REPLACEMENT PARTS GUIDE 5


8 Shock Shaft Bullet Tool - Shock shaft bullet tools are optional tools used to aid in the installation of seal heads onto shock shafts which feature sharp edges. The bullet tool fits over the shock shaft and creates a nice smooth transition for the seal head to slide over. Bullet tools come in different sizes depending on the diameter of the shock shaft so they are not entirely universal. I believe a bullet tool would be a good investment when working on a lot of shocks, however, if care and patience are used when installing the seal head, the tool isn t all that necessary. Piston Bushing Installation Tool - In order to install a new shock piston bushing, the bushing must be carefully stretched over the edge of the piston. There are a few different methods ranging in complexity which can be used to do this. For some, carefully and methodically prying the bushing over the piston by hand without any specialty tools can be effective. Personally, I prefer to repurpose the old seal head that has been removed from the shock. A taper can be sanded or filed into the top edge of the seal head. The seal head can then be partially stretched over the taper, removed, and more easily slid over the edge of the piston. Specialty tools are also available, albeit hard to source, from the shock manufacuturers and aftermarket companies. A tapered tool which butts directly against the lip of the piston, paired with a plunger tool is available to assist in installation of the bushing. Piston Bushing Compression Tool - Once the piston bushing has been fit onto the piston it will need to be compressed, which will help bring it back down to its original size. One way to do this, which doesn t require any tools, is to tightly wrap electrical tape around the bushing. In my experiences this has proven an effective method, but for completeness of the discussion on tools available, I want to touch on a specialty tool designed to the same thing. A tapered sleeve tool is available from shock manufacturers and the aftermarket. The piston and bushing are set in the sleeve and a plunger is used to force the piston down into the sleeve. As the taper decreases the bushing compresses, helping bring the bushing back to its original size. THE SHOWA AND KYB SHOCK BUILDING TOOLS AND REPLACEMENT PARTS GUIDE 6


9 That wraps up all the relevant specialty tools you may need to use when performing a shock rebuild. By now you should have a good idea of the tools you ll need, know what is required if you want to make your own specialty tools, and have determined if you will be pressurizing the shock yourself or taking it to a shop. At this time I want to invite you to check out two great tools which have been created to help you fully service your shock. First, a 46 minute HD Video Manual is available for those who enjoy dynamic instruction and want to visually see each step of the process. Second, a 32 page highly illustrated ebook is available for anyone that would prefer to read and follow along. Both are excellent options for learning about servicing reservoir style shocks. Order today, by using the discount code shockmaster and you will get 25% off any of our shock rebuild products! Be sure to take advantage of this offer now because the discount code will expire within the week. Click on the image of the product you want to order or visit us at DIYMotoFix.com! Retail - $25.00 Discount - $18.75 Retail - $20.00 Discount - $15.00 Retail - $10.00 Discount - $7.50 THE SHOWA AND KYB SHOCK BUILDING TOOLS AND REPLACEMENT PARTS GUIDE 7
Instructions for 4616 KYB shock rebuild and valve installation:
 The goals of any suspension builder should be the same. That is to precisely build suspension in a repeatable, and efficient manner. All components must be modified so as to not threaten long-term component
SHOCK GOLD VALVE INSTALLATION STREET/RR 46mm LD (40/36)
") SK code SHOCK GOLD VALVE INSTALLATION STREET/RR 46mm LD (40/36) P Thede 4.22.10 5 pgs TOOLS REQUIRED: Metric Micrometer, Calipers or a Metric Ruler, Torque Wrench, High Pressure
SK code SHOCK GOLD VALVE INSTALLATION STREET/RR 46mm LD (40/36) P Thede 4.22.10 5 pgs TOOLS REQUIRED: Metric Micrometer, Calipers or a Metric Ruler, Torque Wrench, High Pressure
Shock Absorber Rebuild Manual
 Shock Absorber Rebuild Manual Model PODIUM RC3 FOX RACING SHOX 130 Hangar Way, Watsonville, CA 95076 PHONE 800.369.7469 FAX 831.768.7026 Email: psservicemw@ridefox.com Website: www.ridefox.com Disclaimer
TOPAZ Service Guide. Full Service
 TOPAZ Service Guide Full Service SERVICE OVERVIEW This manual will guide you step by step performing an air service to your Topaz. Please follow each instruction carefully to achieve the best and safest
Sachs shock manual. ( ) 2 & 4 Stroke RR Enduro. ( ) RS Dual Sport
 2 & 4 Stroke RR Enduro. ( ) RS Dual Sport") Sachs shock manual (2013 2015) 2 & 4 Stroke RR Enduro (2014-2015) RS Dual Sport 1 Introduction The procedures in this manual must take place in a clean environment using professional tools and some specific,
Sachs shock manual (2013 2015) 2 & 4 Stroke RR Enduro (2014-2015) RS Dual Sport 1 Introduction The procedures in this manual must take place in a clean environment using professional tools and some specific,
Maverick American 3085 Bluff Street Boulder, CO Tel: Fax: ML7.0 SHOCK SERVICE MANUAL
 Maverick American 3085 Bluff Street Boulder, CO 80301 Tel: 303-415-0370 Fax: 303-415-0676 www.maverickamerican.com ML7.0 SHOCK SERVICE MANUAL 1. OVERVIEW 1.1. The Maverick ML7.0 rear shock is an oil damped
SPECIFICATIONS UNIT. mm (in)
") XL200 12. REAR WHEEL/ SUSPENSION SERVICE INFORMATION 12 1 TROUBLESHOOTING 12 2 REAR WHEEL 12 3 REAR BRAKE 12 7 REAR BRAKE PEDAL 12 10 SHOCK ABSORBERS 12 11 SHOCK LINKAGE 12 13 SWINGARM 12 15 SERVICE INFORMATION
XL200 12. REAR WHEEL/ SUSPENSION SERVICE INFORMATION 12 1 TROUBLESHOOTING 12 2 REAR WHEEL 12 3 REAR BRAKE 12 7 REAR BRAKE PEDAL 12 10 SHOCK ABSORBERS 12 11 SHOCK LINKAGE 12 13 SWINGARM 12 15 SERVICE INFORMATION
Shock Absorber for Formula Student and Formula SAE TTX 25. Workshop Manual
 Shock Absorber for Formula Student and Formula SAE TTX 5 Workshop Manual SAFETY PRECAUTIONS General Warnings Note! The shock absorber is an important part of the vehicle and will affect the stability.
This is a guide to tearing down and rebuilding a Fox Racing Shox DHX 3/4/5 Coil shock. It shows the user how to:
 Fox DHX Coil Rebuild Introduction: This is a guide to tearing down and rebuilding a Fox Racing Shox DHX 3/4/5 Coil shock. It shows the user how to: Dismantle the shock Clean internal parts Replace internal
PIKE DUAL AIR PICTORIAL INSTRUCTIONS. INSTRUCTIONS FOR INSTALLING ENDURO FORK SEALS AND CHANGING SEMI-BATH OIL in RockShox PIKE Dual Air Forks
 INSTRUCTIONS FOR INSTALLING ENDURO FORK SEALS AND CHANGING SEMI-BATH OIL in RockShox PIKE Dual Air Forks RECOMMENDED PARTS AND TOOLS -Bicycle work stand -Plastic bucket/drain pan -5mm Allen wrench -DH
FOX Racing Shox Bypass Technical Manual.
 FOX Racing Shox Bypass Technical Manual. The following technical manual will be using a 2.5 dia. shock with three tubes for descriptions and illustrations. Your shock may differ in the number of tubes,
SERVICE INFORMATION 11-1 FRONT WHEEL/SUSPENSION/ STEERING XL FRONT WHEEL 11 7 FORK STEERING STEM 11 18
 XL200 11. FRONT WHEEL/SUSPENSION/ STEERING SERVICE INFORMATION 11 1 TROUBLESHOOTING 11 2 HANDLEBAR 11 3 FRONT WHEEL 11 7 FORK 11 11 STEERING STEM 11 18 SERVICE INFORMATION GENERAL A contaminated brake
Double Barrel Service Instructions Cane Creek R&D. January 2009 V2.0 1
 Double Barrel Service Instructions Cane Creek R&D January 2009 V2.0 1 Table of Contents 3. Diagnosis for Parts Needed 4. Work Flow 5. Initial Disassembly 6. Initial Disassembly Pictures 8. Reservoir Rebuild
Slave Cylinder Weep Hole Drilling Procedure
 Slave Cylinder Weep Hole Drilling Procedure Tools Required: T20 Torx Driver T25 Torx Driver T25 Torx Bit with ¼ Ratchet Wrench 4mm Hex Key (Allen wrench) 5mm Hex Key 6mm Hex Key 8mm Hex Key 12mm Hex Key
Shock absorber for Automotive TTX36 P/ IL. Workshop Manual
 TTX6P TTX6IL Shock absorber for Automotive TTX6 P/ IL Workshop Manual Safety precautions General Warnings Note! The shock absorber/front fork/steering damper is an important part of the vehicle and will
X-Trainer 43mm fork service manual. Beta USA, Inc This work should be performed by a trained motorcycle technician.
 X-Trainer 43mm fork service manual Beta USA, Inc. 2016 This work should be performed by a trained motorcycle technician. Table of contents Page Introduction/special tools... 2 Fork exploded view... 3 Legend.
FORK G2-R COMPRESSION GOLD VALVE INSTALLATION - DIRT 37
 1501 Pomona Rd, Corona, CA 92880 951.279.6655 fax 951.279.7171 racetech.com FORK G2-R COMPRESSION GOLD VALVE INSTALLATION - DIRT 37 FK code FMGV 3720G P Thede 12.3.15 TOOLS REQUIRED:
INSTALLATION MANUAL. TORQ Locker TL GM 14 Bolt Installation Instructions. Made in USA By: Page 1 of 8
 INSTALLATION MANUAL TORQ Locker TL-19035 GM 14 Bolt Installation Instructions Made in USA By: Page 1 of 8 Page 2 of 8 INSTALLATION MANUAL TORQ Locker TL-19035 GM 14 Bolt Installation Instructions By: INTRODUCTION
E31 Repair Procedure Replace Front Wheel Hub/Bearing Assembly
 E31 Repair Procedure 31-21 Replace Front Wheel Hub/Bearing Assembly Disclaimer This repair procedure is provided as is and is not authoritative with respect to any BMW repair operation. Mark F. Fling is
WARRANTY INFORMATION AMERICAN MADE MANITOU SUSPENSION
 AMERICAN MADE MANITOU SUSPENSION CONGRATULATIONS ON CHOOSING THE LATEST IN SUSPENSION TECHNOLOGY AVAILABLE, A 2003 MANITOU DORADO FORK BUILT IN THE USA. This DORADO fork is fully assembled and is ready
55-64 Full Size Chevy Installation Instructions Standard Disc Conversion
 55-64 Full Size Chevy Installation Instructions Standard Disc Conversion DBMC09, PV71 & PVB71 Pictured (Booster, master cylinder & valve setups may vary by upgrades selected) Your new disc brake conversion
Spring manual V3.1 ENGLISH
 Spring manual V3.1 ENGLISH HYPERPRO TOOLS, used in this manual: Tool Description Part no. A, B, C Cartridge fork spring removal tool kit HP-T01 D Big Piston Fork end cap socket 45mm HP-T102 E Big Piston
Commander SUSPENSION SYSTEM INSTALLATION INSTRUCTIONS
 PARTS INCLUDED: 2 - FRONT UPPER A-ARMS 2 - FRONT LOWER A-ARMS 4 - COTTER PINS 2-12MM JAM NUTS 2 - TIE ROD EXTENDERS 8- FLANGED DELRON BUSHINGS 4- DELRON CASTER SPACERS 6 - GREASE FITTINGS 3 - BEARING REMOVAL
TK08 TUNING KIT TECHNICAL MANUAL FOR 16/26/27/28 SERIES SHOCKS Revised 6/17/14
 Tech Line: (952) 985-5675 Fax (952) 985-5679 21730 Hanover Ave. Lakeville, MN 55044 www.qa1.net www.facebook.com/qa1motorsports TK08 TUNING KIT TECHNICAL MANUAL CONTENTS UNDER PRESSURE! USE EXTREME CAUTION
Shock Absorber Rebuild Manual
 Shock Absorber Rebuild Manual Model PODIUM X FOX RACING SHOX 130 Hangar Way, Watsonville, CA 95076 PHONE 800.369.7469 ext. 7647 FAX 831.768.7026 Email: info@foxracingshox.com Website: www.foxracingshox.com
Owners manual. Öhlins Superbike front fork FG 170
 Owners manual Öhlins Superbike front fork FG 0 Including: Setting up your fork Changing springs and seals Service the fork Trouble shooting Technical info Spare parts & tools Öhlins super bike front fork
TK08 TUNING KIT TECHNICAL MANUAL FOR 16/26/27/28 SERIES SHOCKS Revised 6/25/14 Tech Line: (952) Fax (952)
 Fax (952)") Tech Line: (952) 985-5675 Fax (952) 985-5679 21730 Hanover Ave. Lakeville, MN 55044 www.qa1.net www.facebook.com/qa1motorsports TK08 TUNING KIT TECHNICAL MANUAL CONTENTS UNDER PRESSURE! USE EXTREME CAUTION
Tech Line: (952) 985-5675 Fax (952) 985-5679 21730 Hanover Ave. Lakeville, MN 55044 www.qa1.net www.facebook.com/qa1motorsports TK08 TUNING KIT TECHNICAL MANUAL CONTENTS UNDER PRESSURE! USE EXTREME CAUTION
Maintenance Information
 Form 16575334 Edition 1 April 2005 Electric Screwdrivers EL, EP and ET 34V DC Series Maintenance Information Save These Instructions WARNING Maintenance procedures have the potential for severe shock hazard
Suzuki Samurai to Toyota Front Spring Swap Kit, with Missing Link Shackles (SKU#SSP-TSFM) Installation Instructions
 Installation Instructions") Suzuki Samurai to Toyota Front Spring Swap Kit, with Missing Link Shackles (SKU#SSP-TSFM) Installation Instructions CAUTION: Safety glasses should be worn at all times when working with vehicles and related
Suzuki Samurai to Toyota Front Spring Swap Kit, with Missing Link Shackles (SKU#SSP-TSFM) Installation Instructions CAUTION: Safety glasses should be worn at all times when working with vehicles and related
Fluid-O-Tech ROTOFLOW ROTARY VANE PUMP REBUILD MANUAL
 Fluid-O-Tech PUMP TECHNOLOGY AT ITS BEST WWW.FLUID-O-TECH.COM Office: 161 Atwater St., Plantsville, CT 06479 Phone: (860) 276-9270 Fax: (860) 620-0193 ROTOFLOW ROTARY VANE PUMP REBUILD MANUAL 08/09 Ed.,
Installation Manual TWM Performance Short Shifter 2008 Mitsubishi Lancer
 Page 1 Installation Manual TWM Performance Short Shifter 2008 Mitsubishi Lancer Please Note: It is preferable to park on a flat surface, as you will have to engage and disengage the hand brake and shift
For all Ram x4 Trucks, and all Ram x4 trucks.
 Dodge Off Road, LLC Specializing in Dodge Ram Solid-Axle 4x4 Suspension and Steering for Off Road Applications 855.9009.DOR sales@dodgeoffroad.com dodgeoffroad.com DODGE OFF ROAD 5 th GEN STEERING KIT
How to Change Front Brake Pads on a Toyota Corolla
 How to Change Front Brake Pads on a Toyota Corolla Link to this article on (All other links in this document are disabled) Follow this picture guide to change the front brake pads on a 2003-2008 Toyota
Motorcycle Suspension, How They Work, Install and Set Up
 Motorcycle Suspension, How They Work, Install and Set Up Presenters: Klaus Huenecke and Duane Kerzic of Wilbers USA Time: Place: Audience: Beginner to Advanced Street Riders who want to know more about
Instructions for Front Midrange / Tweeter Installation in BMW 3 Series/M3 (E36)
") Disclaimer: Bavarian Soundwerks highly recommends professional installation of the products we sell. We provide these installation instructions free of charge as a guide to assist those customers who choose
Disclaimer: Bavarian Soundwerks highly recommends professional installation of the products we sell. We provide these installation instructions free of charge as a guide to assist those customers who choose
Suzuki GS1000G fork seal replacement
 Suzuki GS1000G fork seal replacement Before you start you require: 1) To read workshop service manual for your model 2) Socket allen key M8 3) Torque wrench 4) Special tool to hold inner, make your own,
Installation Manual TWM Performance Kia Forte Short Shifter
 Installation Manual TWM Performance Kia Forte 2009+ Short Shifter Begin the installation by parking on a flat surface, as you will have to engage and disengage the hand brake and shift from gears to neutral.
2013 IMPCO Technologies, Inc. Page 1 of 20 EPR Repair Kit Instructions (PPI-122, Rev-B)
") EPR Repair Kit Instructions PPI-122 (Rev-B) A. Introduction: This document covers the repair of the Electronic Pressure Regulator (EPR) used on Spectrum III series fuel systems. These instructions will
EPR Repair Kit Instructions PPI-122 (Rev-B) A. Introduction: This document covers the repair of the Electronic Pressure Regulator (EPR) used on Spectrum III series fuel systems. These instructions will
AFTERMARKET SHOCK FLOAT 3 EVOL R FACTORY SERIES OWNER S MANUAL
 2.5 PODIUM-X AFTERMARKET SHOCK FLOAT 3, MANUAL OWNER S FLOAT 3 EVOL R FACTORY SERIES OWNER S MANUAL CONTENTS CONGRATULATIONS... 3 CONSUMER SAFTEY... 3 UNDERSTAND THE FLOAT 3, EVOL R... 4 FOX PUMP... 5
Cane Creek Double Barrel Instructions
 Cane Creek Double Barrel Instructions Congratulations on your purchase of the Cane Creek Double Barrel rear shock. Developed in partnership with Öhlins Racing, the Double Barrel brings revolutionary suspension
Jeep JK Dana 44 and 30 Front Axle Truss Axle Truss Installation Instructions
 THE INFORMATION CONTAINED IN THIS DRAWING IS THE SOLE PROPERTY OF SYNERGY MFG. ANY REPRODUCTION IN PART OR WHOLE WITHOUT THE WRITTEN PERMISSION OF SYNERGY MFG IS PROHIBITIED. Revisions Rev. Description
Installation Instructions
 Preparing your vehicle to install your brake system upgrade 1. Rack the vehicle. 2. If you don t have a rack, then you must take extra safety precautions. 3. Choose a firmly packed and level ground to
FRONT FORK 2.16 GENERAL REMOVAL HOME. 4. See Figure Loosen upper and lower fork clamp pinch fasteners (1, 4).
.") FRONT FORK.6 GENERAL The XRScg model utilizes a mm fork assembly while all other models have changed to the mm fork assembly. The front fork consists of two telescoping outer tube/inner slider assemblies.
FRONT FORK.6 GENERAL The XRScg model utilizes a mm fork assembly while all other models have changed to the mm fork assembly. The front fork consists of two telescoping outer tube/inner slider assemblies.
REBUILD MANUAL FOR PRODIGY SHOCKS
 REBUILD MANUAL FOR 2.625 PRODIGY SHOCKS JUNE 2016 EDITION TOOLS NEEDED - 11/16 th wrench - FT LBS torque wrench - 3/8 ratchet with ¾ socket - ¼ ratchet with 9mm socket - 90 degree small pick - blue lok
Kodak 750H Carousel Projector Repair
 Kodak 750H Carousel Projector Repair An AT YOUR OWN RISK PROJECT by Klaus Wolter, Rev B, 3-26-2016 Here I documen the repair of my 750H carousel. A common problem with this projector, and all of the projectors
Maintenance Information
 45530136 Edition 1 July 2008 Electric Screwdrivers EL 24V DC Series Maintenance Information Save These Instructions WARNING Always wear eye protection when operating or performing maintenance on this tool.
FRONT WHEEL AND BRAKE DISCS. Order Job/Part Q ty Remarks Removing the front wheel and brake discs NOTE:
 FRONT WHEEL AND BRAKE DISCS EAS00514 SIS FRONT WHEEL AND BRAKE DISCS 1 2 3 4 Order Job/Part Q ty Remarks Removing the front wheel and brake discs Remove the parts in the order listed. Place the motorcycle
Welker Adjustable Probe with Check Valve and Welker Automatic Insertion Probe with Check Valve
 a Installation, Operation, & Maintenance Manual Welker Adjustable Probe with Check Valve and Welker Automatic Insertion Probe with Check Valve Models AP-3MI & AIP-3MI The information in this manual has
Mercedes Benz ABC Hydraulic Valve Block Solenoid Oil Seal Repair Fix Rebuild Kit Seals O-Rings Overhaul Install Instructions
 instructables Mercedes Benz ABC Hydraulic Valve Block Solenoid Oil Seal Repair Fix Rebuild Kit Seals O-Rings Overhaul Install Instructions by x8rltd The Problem Vehicle sags on one or more corner after
H31 BOOSTER REBUILD & MASTER CYLINDER
 2010 1991 BMW 750iL George Fontes gajfontes@yahoo.com H31 BOOSTER REBUILD & MASTER CYLINDER Rebuild hydraulic booster and replace Master Cylinder. Page 1 of 16 Master Cylinder Removal & Brake Booster Rebuild
Hayes Performance Systems 5800 W. Donges Bay Rd. Mequon, WI Tel: Web:
 Hayes Performance Systems 5800 W. Donges Bay Rd. Mequon, WI 53092 Tel: 888.686.3472 Email: techsupport@hayesbicycle.com Web: www.hayescomponents.com Hayes Components Europe Dirnismaning 20 a 85748 Garching
Jeep Wrangler Heavy Duty Drag Link Installation Instructions
 THE INFORMATION CONTAINED IN THIS DRAWING IS THE SOLE PROPERTY OF SYNERGY MFG. ANY REPRODUCTION IN PART OR WHOLE WITHOUT THE WRITTEN PERMISSION OF SYNERGY MFG IS PROHIBITED. Revisions Rev. Description
TOO TECH RACING SET-UP INSTRUCTIONS (For Non Twin Chamber Showa & KYB)
") TOO TECH RACING SET-UP INSTRUCTIONS (For Non Twin Chamber Showa & KYB) STEP 1: Measure suspension "Race Sag". (Most important adjustment there is) First: Put the bike on a center stand and release the
TOO TECH RACING SET-UP INSTRUCTIONS (For Non Twin Chamber Showa & KYB) STEP 1: Measure suspension "Race Sag". (Most important adjustment there is) First: Put the bike on a center stand and release the
Welker Automatic Insertion Diffusing Probe Model AIP-3DP
 Installation, Operation, and Maintenance Manual Welker Automatic Insertion Diffusing Probe Model AIP-3DP The information in this manual has been carefully checked for accuracy and is intended to be used
Volvo 850 Radiator Replacement Jason Reed 29 March 2013
 This write up covers removing and replacing the radiator on a 97 855 GLT wagon with light pressure turbo and automatic transmission. This car has 162K miles. The radiator, which was original, developed
Ford Racing BOSS 302 Engine Oil Cooler (11-14 GT)
") Tools needed: 14mm hex socket 7mm socket/wrench 8mm socket/wrench Ford Racing BOSS 302 Engine Oil Cooler (11-14 GT) 10mm socket (for airbox removal) ¾ inch or 19mm wrench Torque wrench Appropriate ratchets
Tools needed: 14mm hex socket 7mm socket/wrench 8mm socket/wrench Ford Racing BOSS 302 Engine Oil Cooler (11-14 GT) 10mm socket (for airbox removal) ¾ inch or 19mm wrench Torque wrench Appropriate ratchets
XJ CHEROKEE LIFT KIT
 921633XN200 Thank you for choosing Rough Country for your suspension needs. 84-01 4.5 XJ CHEROKEE LIFT KIT Rough Country recommends a certified technician installs this system. In addition to these instructions,
Air Brake Adjustment. What You ll Learn After reading this chapter you will be able to:
 8 Air Brake Adjustment Fast Fact Your company may have a maintenance crew to keep vehicles safely running. But one person alone is ultimately responsible to ensure that the brakes are operating properly
Operating Instructions 20 Ton Air/Hydraulic Service Jack
 MODEL: 3225 Operating Instructions 20 Ton Air/Hydraulic Service Jack WARNING: Important: Read these instructions and all warnings prior to using this equipment. Understand all operating procedures, safety
 This document provides instructions for removing and installing a rear shock absorber on a Ducati Superbike with a single-sided swingarm. The torque values used are for the 748/916/996 from 1994 to 2001
INSTALLATION INSTRUCTIONS
 INSTALLATION INSTRUCTIONS FUEL SURGE TANK INSTALLATION KIT 1999-2006 BMW E46 COUPE Document# 19-0056 Support: info@radiumauto.com Note: This kit was designed for a standard single pump Radium Engineering
FORK COMPRESSION AND REBOUND GOLD VALVE INSTALLATION - DIRT 35C/30R SFF
 1501 Pomona Rd, Corona, CA 92880 951.279.6655 racetech.com FORK COMPRESSION AND REBOUND GOLD VALVE INSTALLATION - DIRT 35C/30R SFF FK code 2 part LS FMGV 3521C P Thede 12.3.15 7 pgs
1. Get fork mounted in stand. You can leave it in the bike, but you must remove the wheel and front brake.
 Tools Needed: Bike stand Lint free shop Towels 1.5mm Allen Key Pick Set Grease (We recommend Slick Honey) Oil Measuring Cup (with cc Scale) Small Metal Drift Shop Vise Oil Bucket 13mm Deep Socket (6 point)
JK HD Skid Plate for Rear Falcon Shocks
 1 JK HD Skid Plate for Rear Falcon Shocks Kit # 36-07-01-300 Important Notes: Prior to beginning this or any installation read these instructions to familiarize yourself with the required steps and evaluate
Quadratec Dual Steering Stabilizer Kit
 Quadratec Dual Steering Stabilizer Kit Installation Manual: for 97-06 (TJ) Wrangler # 16116.0202 PARTS LIST: Steering Damper - Qty 2 Black Boot & Boot Tie - Qty 2 (each) Decal - Qty 2 Hourglass Bushing
A/F/X Body GM Installation Instructions Manual Disc Conversion
 A/F/X Body GM Installation Instructions Manual Disc Conversion 64-72 A Body / 67-69 F Body / 62-74 X Body DBMC09 & PVK71 pictured above (Booster, master & valve setups may vary by upgrades selected) Your
Assembly Manual. 1/10th Formula 1 Car
 Assembly Manual 1/10th Formula 1 Car Center Pivot Bag 1 3374 - Center Pivot Socket 40194 - Hard Anodized Alum Pivot ball 3254-2-56 *Note - Sometimes it is helpful to slightly over-tighten the top clamp
Installation Manual TWM Performance Short Shifter Nissan 350Z, 370Z Infiniti G35, G37
 Installation Manual TWM Performance Short Shifter Nissan 350Z, 370Z Infiniti G35, G37 It is preferable to park on a flat surface, as you will have to engage and disengage the hand brake and shift from
Work shop manual. Öhlins Steering damper Road & Track
 Work shop manual Öhlins Steering damper Road & Track Including: Introduction Safety instructions Dismantling the steering damper Assembling the steering damper Filling oil Introduction All of Öhlins advanced
Installation Instructions
 86-95 Suzuki Samurai Rear Wheel Bearing Kit (SKU# SAX-RWB) Instructions also include:! Rear Hub Bolt Kit!!!! (SKU# SAX-AS)!! SJ410 Backing Plate!!!! (SKU# SAX-410)! SJ413 Rear Drum Brake Hardware Kit!
Hayes Performance Systems 5800 W. Donges Bay Rd. Mequon, WI Tel: Web:
 Hayes Performance Systems 5800 W. Donges Bay Rd. Mequon, WI 53092 Tel: 888.686.3472 Email: techsupport@hayesbicycle.com Web: www.hayescomponents.com Hayes Components Europe Dirnismaning 20 a 85748 Garching
GM C10 Street Grip
 Part # 11365010/11365110-1973-1987 GM C10 StreetGrip Front Components 11369590 Delrin Control Arm Bushings 11369300 Drop Spindles 11362350/11362351 Front CoilSpring Kit 11369515 Front HQ Series Shocks
SAP Simulator Installation
 SAP Simulator Installation Disclaimer The SAP Simulator is for off-road use only, not intended for highway vehicles. This modification is not a factory approved modification, and engine damage may occur.
Falcon Type 2 Upgrade Kit
 1 Falcon Type 2 Upgrade Kit Kit # 00-10-32-400-160 Universal, Modular Cartridge System, Series 3 / Type 2, All 4, 1.60" Bore Kit # 00-10-32-100-160 Universal, Modular Cartridge System, Series 3 / Type
Replacement Steering Stabilizer Kit
 Replacement Steering Stabilizer Kit Installation Manual: for 87-95 (YJ) and 97-06 (TJ) Wrangler # 16116.0200 PARTS LIST: Steering Damper Black Boot & Boot Tie Decal Hourglass Bushing - Qty 2 Sleeve - Qty
FORK FREE PISTON MODIFICATION 2011 HONDA CRF250R
 217 Lorain Place Los Gatos, California 95032 408.406.2089 www.smartperformanceinc.com www.spi-racing.com FORK FREE PISTON MODIFICATION 2011 HONDA CRF250R WHAT? All production versions of the 2011 HONDA
Torqueflite Manual/Automatic Valve Body
 TCI 122400 Torqueflite Manual/Automatic Valve Body This valve body can be installed in a few hours by carefully following directions. Read all instructions first to familiarize yourself with the parts
DODGE OFF ROAD T-STYLE STEERING KIT INSTALLATION INSTRUCTIONS
 Dodge Off Road, LLC Specializing in Dodge Ram Solid-Axle 4x4 Suspension and Steering for Off Road Applications 855.9009.DOR sales@dodgeoffroad.com dodgeoffroad.com DODGE OFF ROAD T-STYLE STEERING KIT INSTALLATION
PT 709 firing pin and extractor removal. Disclaimer: My Taurus manual says not to take this apart (just flush it with cleaner).
.") PT 709 firing pin and extractor removal. Disclaimer: My Taurus manual says not to take this apart (just flush it with cleaner). But several list members have done this without ill effect. So here goes:
PT 709 firing pin and extractor removal. Disclaimer: My Taurus manual says not to take this apart (just flush it with cleaner). But several list members have done this without ill effect. So here goes:
Installation & Maintenance Manual
 Installation & Maintenance Manual SMX System & Parts Take a minute to familiarize yourself with the parts and system included: 1 Frozen MOTO SMX Snow Bike System 1 Frozen MOTO Bike Specific fit system
TeraFlex Premium TJ/YJ/XJ/ZJ Dana 30/44 Ball Joints Install Instructions
 #1355100 #1355300 (Knurled) TeraFlex Premium TJ/YJ/XJ/ZJ Dana 30/44 Ball Joints Install Instructions 1 www.teraflex.com Important Notes: Prior to beginning this or any installation read these instructions
SECTION 7 - SUSPENSION
 For Arctic Cat Discount Parts Call 606-678-9623 or 606-561-4983 SECTION 7 - SUSPENSION 7 TABLE OF CONTENTS Front and Rear Suspension Assembly Schematics... 7-2 Shock Absorbers... 7-2 Swing Arm... 7-5 Front
INSTALLATION INSTRUCTIONS
 INSTALLATION INSTRUCTIONS FUEL SURGE TANK INSTALLATION KIT 1999-2006 BMW E46 COUPE Document# 19-0056 Support: info@radiumauto.com Note: This kit wasn t designed for a FST-R, but can be accomplished. 1.
Installation Guide 2016 Kawasaki ZX10-R Exhaust Kit
 Installation Guide 2016 Kawasaki ZX10-R Exhaust Kit!! THIS PRODUCT IS DESIGNED FOR USE IN CLOSED COURSE RACING AND IS NOT INTENDED FOR HIGHWAY USE!! Congratulations on the purchase of your new TaylorMade
INSTALLATION GUIDE DIRECT-REPLACEMENT
 DIRECT-REPLACEMENT INSTALLATION GUIDE TITAN (04+) 883-06-120-2.5 Factory Series Coil-Over Reservoir - Adjustable 883-02-120-2.5 Factory Series Coil-Over Reservoir 983-02-053-2.0 Performance Series Coil-Over
Owners Manual Öhlins road & track front fork FG 43 Including:
 Owners Manual Öhlins road & track front fork FG 43 Including: Safety Adjusters Setting up your fork Changing springs Oil level adjustment Technical information Inspection & maintenance Service Tools 1
FORD FAIRLANE Booster Conversion Kit ( TORINO, RANCHERO )
") 1966-1971 FORD FAIRLANE Booster Conversion Kit ( TORINO, RANCHERO ) F R Unboxing your kit: 1. Remove new booster, bracket assembly and master cylinder from their boxes and inspect the parts. 2. New boosters
1966-1971 FORD FAIRLANE Booster Conversion Kit ( TORINO, RANCHERO ) F R Unboxing your kit: 1. Remove new booster, bracket assembly and master cylinder from their boxes and inspect the parts. 2. New boosters
This is a guide to assist you adjust the valve clearance on a 2l V6 MIVEC engine found in a Mitsubishi FTO GPX
 Adjusting the valve clearance on a 2L V6 FTO engine This is a guide to assist you adjust the valve clearance on a 2l V6 MIVEC engine found in a Mitsubishi FTO GPX Disclaimer: This guide is to assist you
 This document provides instructions for removing and installing a Front Wheel / Rotor on a Ducati Superbike. The torque values used are for the 748/916/996 from 1994 to 2001 and may be applicable for later
SPECIFICATIONS CONTENTS: Specifications Warning Information. Operating Instructions Preventative Maintenance and Troubleshooting
 Model 3322 22 Ton Air/Hydraulic Truck Axle Jack OWNER'S MANUAL CONTENTS: Page 1 Page 2 Page 3-4 Page 4-5 Page 5 Page 6 Page 7 Page 8 Specifications Warning Information Assembly Operating Instructions Preventative
Intake Kit Supplement for CRV and Pathfinder
 Intake Kit Supplement for CRV and Pathfinder This guide will briefly outline how to install the intake kits for the Honda CRV and Nissan Pathfinder. This is a pretty basic job, but for the average person
Sachs 48mm Closed Cartridge fork Service Manual
 Sachs 48mm Closed Cartridge fork Service Manual 1 Fork seal driver 2 Special soft jaws 3 Fork cap wrench 4 Rebound rod holding tool 5 Compression assembly holding tool 6 Retaining clip tool Special Tools
Hayes Performance Systems 5800 W. Donges Bay Rd. Mequon, WI Tel: Web:
 Hayes Performance Systems 5800 W. Donges Bay Rd. Mequon, WI 53092 Tel: 888.686.3472 Email: techsupport@hayesbicycle.com Web: www.hayescomponents.com Hayes Components Europe Dirnismaning 20 a 85748 Garching
TeraFlex Premium JK Dana 30/44 Ball Joints Install Instructions
 #3442002 #3442022 (Knurled) TeraFlex Premium JK Dana 30/44 Ball Joints Install Instructions 1 www.teraflex.com Important Notes: Prior to beginning this or any installation read these instructions to familiarize
Installation Time One / Two Hours
 Front Caliper (With Bracket) Install Guide 1999-2002 Mustang GT or V6 NOTE: These instructions are for the front driver side caliper, but can also be applied to the passenger side front caliper as well.
PORSCHE V r Valve Timing Instructions. Copyright 2009 Written by Mike Frye Edited my Adam G.
 PORSCHE 928 32V r Valve Timing Instructions Copyright 2009 Written by Mike Frye Edited my Adam G. Sections: Overview.3 Disclaimer/warnings/things to watch for 4 Terms and naming conventions used in this
AEROMOTIVE Part # and F-Body Fuel System Kit INSTALLATION INSTRUCTIONS
 AEROMOTIVE Part # 17101 and 17102 93-97 F-Body Fuel System Kit INSTALLATION INSTRUCTIONS CAUTION: Installation of this product requires detailed knowledge of automotive systems and repair procedures. We
Öhlins Front Fork Superbike FGR 900. Owner s Manual
 Öhlins Front Fork Superbike FGR 900 Owner s Manual Introduction Öhlins Racing AB - The Story It was the 1970 s, a young man named Kenth Öhlin spent most of his spare time pursuing his favourite sport:
DIY: Repairing/Replacing the Timing Chain Tensioner
 DIY: Repairing/Replacing the Timing Chain Tensioner By Saki GT - February 8, 2012 [youtube=http://www.youtube.com/watch?v=24cil5_9yvq] The above video is an example of how a bad Timing Chain Tensioner
Installation Manual TWM Performance Short Shifter Cobalt SS/SC, SS/TC, HHR SS, Ion Redline and Saab 9-3
 Page 1 Installation Manual TWM Performance Short Shifter Cobalt SS/SC, SS/TC, HHR SS, Ion Redline and Saab 9-3 Please Note: It is preferable to park on a flat surface, as you will have to engage and disengage