MM Brake Line Kit for Fox-IRS Swap (MMBAK-21)
|
|
|
- Sophia Theresa Andrews
- 5 years ago
- Views:
Transcription
 Supplemental Installation Notes Fits 1986-1995 V8 Mustangs originally equipped with 8.8 solid axle.")
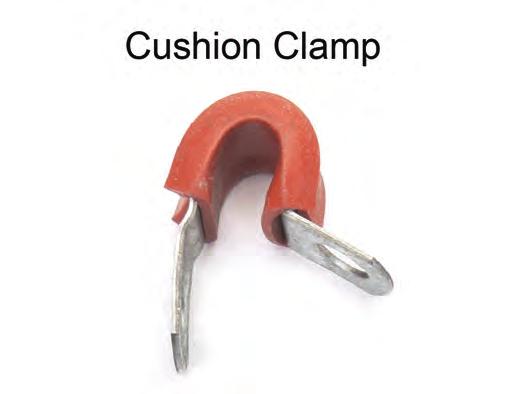
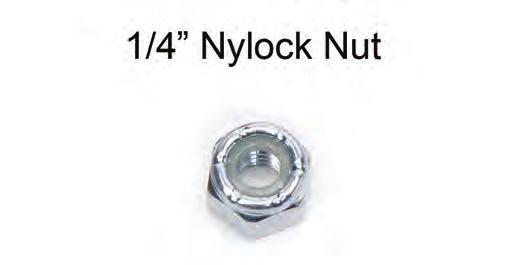
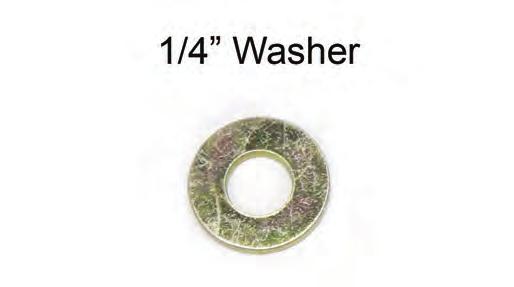
1 3430 Sacramento Dr., Unit D San Luis Obispo, CA Telephone: 805/ Fax: 805/ MM Brake Line Kit for Fox-IRS Swap (MMBAK-21) Supplemental Installation Notes Fits V8 Mustangs originally equipped with 8.8 solid axle. Non-V Mustangs and all Mustangs will require minor brake line re-routing and an additional short hard line extension because the original stock rear brake hose was not center-mounted. Thank you for purchasing the MMBAK-21 Brake Line Kit for a Fox-IRS Swap. This kit will make your life much easier when you re swapping a Mustang Cobra IRS into a Fox Mustang. It has the new brake hard lines to connect the stock solid-axle rear brake hard line to Cobra IRS brake hoses. MM s direct-fit kit means no cutting or flaring of any brake lines! Read all instructions before beginning work. Following instructions in the proper sequence will ensure the best and easiest installation. Required Tools Drill with 1/8, 3/16, and 1/4 bits Basic Hand Tools Required Supplemental Items Requires IRS brake hose assemblies, either MMBK9R or stock Mustang Cobra. Requires two (2) OEM IRS brake hose assembly mounting screws or similar sized thread-forming sheet metal screws (these attach the bracket to the frame rail). Installation Time Shop: 0.5 Hours Home Mechanic: 1 Hour Rear axle assembly and center rear brake hose must be removed before proceeding. Before doing so drain the master cylinder, then drain the rear brake lines to avoid spilling brake fluid while installing this kit. IRS rear brake hoses should be installed at the same time as this kit to ensure all parts are positioned correctly, relative to each other. IRS brake hoses require either removal of the Fox Mustang bumpstop brackets that are spotwelded to the rear frame rails, or modification to the IRS hose assembly mounting brackets to clear the bumpstop brackets. This Kit Contains Description Qty Brake Line, Driver 1 Brake Line, Passenger 1 SAE-Metric Adapter 1 M10x1.0 ISO Tee Fitting 1 Brake Line Bracket 1 1/4 Rivet 2 Sheet Metal Screw 4 1/4-20 G5 Bolt 1 1/4-20 Washer 1 1/4-20 Nylock Nut 1 Cushion Clamp 2 Installation Instructions 1 MMBAK-21.indd 1
2 Component Identification 2 MMBAK-21.indd

3 MMBAK-21.indd 3


. 4. Align the two larger holes in the T-fitting bracket with the holes in the chassis.")
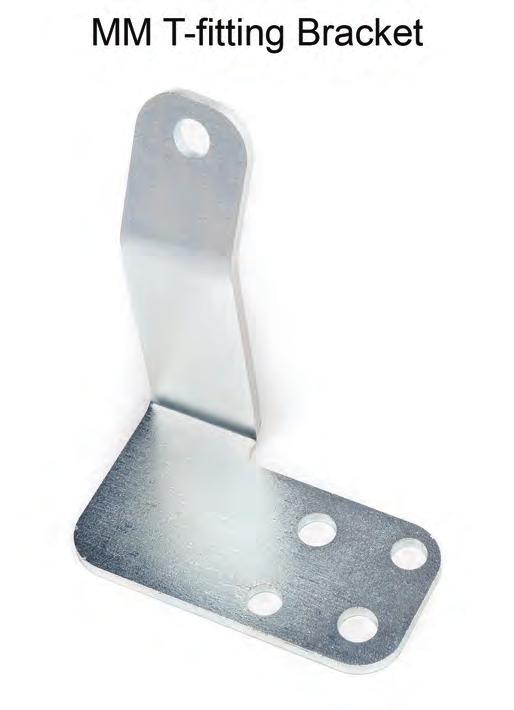
4 Installation Rear Brake Hose Bracket Removal 1. Disconnect the rear brake hard line on the chassis from the coupler fitting on the bracket. NOTE: It usually helps to soak the fitting threads with a good penetrating oil before attempting to loosen the fitting. Installing the MM T-fitting Bracket NOTE: The four holes in the MM T-fitting bracket are of two different sizes. The two larger diameter holes fit the pop rivet shanks left behind when the stock coupler fitting bracket was removed. These locate the bracket on the chassis. The two smaller holes are used to attach the MM T-fitting bracket to the chassis with either sheet metal screws or pop rivets (both supplied in this kit). 3. Locate the two holes in the chassis (Most cars have these holes). 4. Align the two larger holes in the T-fitting bracket with the holes in the chassis. NOTE: If your Mustang doesn t have the holes you ll need to position the bracket yourself. The following photos show how to position the T-fitting bracket. It is mounted just inboard of the driver side upper control arm mount. The hole near the end of the bracket, for securing the T-fitting, must be offset slightly toward the driver side from the rear seat belt bolt. The offset position prevents the end of the ¼ bolt from hitting the end of the seat belt retaining bolt. NOTE: To avoid damaging the tube nut hex, use a flare nut wrench. 2. Remove the stock bracket by drilling the heads off the two pop rivets holding the bracket to the chassis. NOTE: There is no need to remove the pop rivet shank, just the head. The two pop rivet shanks are used to locate the MM T-fitting bracket. 4 MMBAK-21.indd


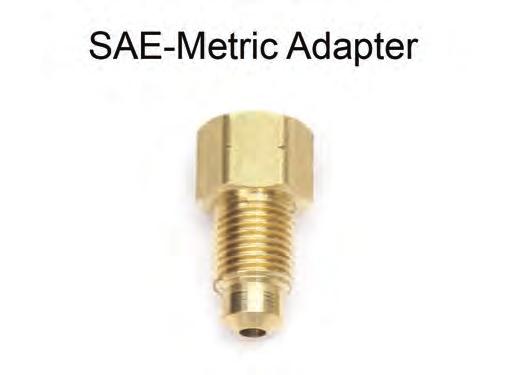
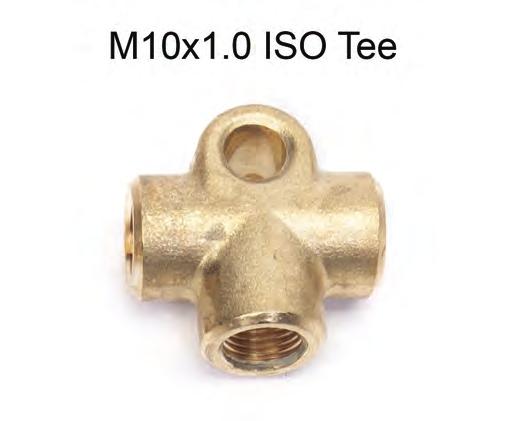
5 7. Attach the MM T-fitting bracket to the chassis using either the rivets or screws. NOTE: Use either the two supplied sheet metal screws or the two supplied pop rivets. The pop rivets are a more secure attachment, but not everyone has a rivet gun. NOTE: If using the sheet metal screws, drill the holes out to 3/16 of an inch. NOTE: If using the pop rivets, drill the holes out to 1/4 of an inch. 5. Once the bracket is in position, mark the location of the two smaller holes on the chassis. 6. Pre-drill the two holes using a 1/8 drill bit. 8. Thread the supplied SAE-metric adapter fitting into the middle port of the T-fitting, and tighten securely. Use two wrenches, or place the T-fitting in a vise while tightening the adapter fitting. NOTE: Clean the tube nut on the Mustang s rear brake line. Make sure to remove any remaining penetrating oil with Brakleen. Inspect the threads and repair with a thread file if damaged. 9. Thread the SAE-metric adapter and T-fitting onto the factory line tube nut. Do not fully tighten the tube nut yet. MMBAK-21.indd 5


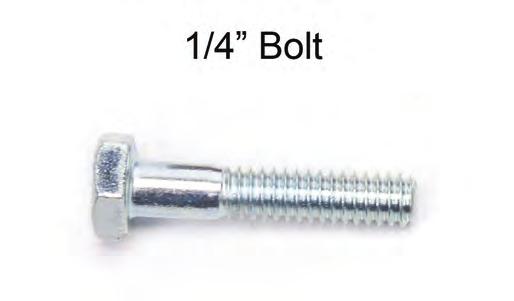
6 10. Attach the T-fitting to the T-fitting bracket with the supplied 1/4 hardware. Place the flat washer under the head of the bolt, then insert the bolt through the hole in the T-fitting, and on through the hole in the T-fitting bracket. Orient the fitting assembly vertically with the bracket, as shown. Secure with the supplied 1/4 lock nut. Do not over-tighten. The torque spec is only 8 lb-ft (96 lb-in). NOTE: The end of the 1/4 bolt will be close to the chassis. Installing the Brake Hard Lines 12. Attach the rear IRS brake hose brackets to each frame rail. NOTE: It s easier to install the new MM hard lines if the hose is not attached to the bracket. It s possible with the MMBK9R kit, but not with stock IRS brake hoses. NOTE: In the following photos, the bump stop brackets that are spot welded to the frame rails have been completely removed with a spot weld drill bit. This is highly recommended to simplify installation of the brake lines. NOTE: To ensure the IRS brake hose brackets are located properly and clear the upper control arms, temporarily install the IRS subframe and upper control arms. Only the upper control arms need to be attached to the IRS subframe; no other parts are necessary for this step. The bend in the bracket aligns with the bottom edge of the frame rail. The bracket is located slightly in front of the upper control am. The bracket is not so far forward that the hose will contact a spring in the stock location. 11. Finish tightening the tube nut of the Mustang s rear brake line to the SAE-metric adapter fitting. Keep the SAE-metric adapter fitting from moving with one wrench while tightening the tube nut with another wrench. Do not overtighten. 6 MMBAK-21.indd


7 18. Secure the hose to the bracket with the U-clip. Do not fully tighten the tube nut yet. 19. While both tube nuts are still slightly loose, position the middle part of the MM hard line up close to the bottom of the sheet metal upper torque box. 20. Tighten the outer tube nut to the hose fitting. 13. Mark the location of the holes needed for the attachment screw and the locating tab, then drill the holes and attach the brackets securely on each side of the car. 14. Install the driver side rear MM hard line as shown. 21. Tighten the inner tube nut to the T-fitting. While doing so hold the T-fitting in place with pliers to prevent the T-fitting bracket from bending or twisting. 15. Thread the inboard tube nut into the T-fitting, but do not fully tighten yet. 16. Position the outboard tube nut inside the hole of the brake hose bracket. NOTE: It may be necessary to adjust the outer tube nut position by gently bending the hard line. Hard lines can be bent or straightened easily by hand; just take care to not kink the line. NOTE: If using a stock IRS brake hose thread the outboard tube nut of the MM hard line into the fitting on the end of the stock hose at this time. Do not fully tighten it. 17. Install the MM brake hose; insert the hose end into the mounting bracket while carefully threading the MM hard line tube nut into the end of the hose. MMBAK-21.indd 7


8 22. Install the passenger side rear MM hard line as shown. NOTE: Notice the inner end of the brake line is rearward of the stock brake line, forward of the two fuel system lines, and rearward of the outboard vent hose. 25. Drill a 3/16 hole in the bottom of the upper control arm torque box to secure the cushion clamp. 26. Attach the cushion clamp with a supplied sheet metal screw. 23. Repeat Steps 15 through 21 on the passenger side. 24. Place a cushion clamp on the passenger side MM hardline. 27. Repeat Steps 24 through 26 on the driver side. 8 MMBAK-21.indd

9 Completed Installation MMBAK-21.indd 9
MM Brake Line Kit (MMBK14R)
") 3430 Sacramento Dr., Unit D San Luis Obispo, CA 93401 Telephone: 805/544-8748 Fax: 805/544-8645 www.maximummotorsports.com MM Brake Line Kit (MMBK14R) Read all instructions before beginning work. Following
3430 Sacramento Dr., Unit D San Luis Obispo, CA 93401 Telephone: 805/544-8748 Fax: 805/544-8645 www.maximummotorsports.com MM Brake Line Kit (MMBK14R) Read all instructions before beginning work. Following
MM Brake Hose Kit (MMBK13R)
") 3430 Sacramento Dr., Unit D San Luis Obispo, CA 93401 Telephone: 805/544-8748 Fax: 805/544-8645 www.maximummotorsports.com MM Brake Hose Kit (MMBK13R) Read all instructions before beginning work. Following
3430 Sacramento Dr., Unit D San Luis Obispo, CA 93401 Telephone: 805/544-8748 Fax: 805/544-8645 www.maximummotorsports.com MM Brake Hose Kit (MMBK13R) Read all instructions before beginning work. Following
MM Caster/Camber Plates, (Mm5CC-7)
") 3430 Sacramento Dr., Unit D San Luis Obispo, CA 93401 Telephone: 805/544-8748 Fax: 805/544-8645 www.maximummotorsports.com MM Caster/Camber Plates, 2005-14 (Mm5CC-7) Supplemental Installation Notes This
3430 Sacramento Dr., Unit D San Luis Obispo, CA 93401 Telephone: 805/544-8748 Fax: 805/544-8645 www.maximummotorsports.com MM Caster/Camber Plates, 2005-14 (Mm5CC-7) Supplemental Installation Notes This
MM Caster Camber Plates, (Mm6CC-10)
") 3430 Sacramento Dr., Unit D San Luis Obispo, CA 93401 Telephone: 805/544-8748 Fax: 805/544-8645 www.maximummotorsports.com MM Caster Camber Plates, 2015+ (Mm6CC-10) Read all instructions before beginning
3430 Sacramento Dr., Unit D San Luis Obispo, CA 93401 Telephone: 805/544-8748 Fax: 805/544-8645 www.maximummotorsports.com MM Caster Camber Plates, 2015+ (Mm6CC-10) Read all instructions before beginning
IRS Racing Brake Kit (MMBAK-15, -16)
") 3430 Sacramento Dr., Unit D San Luis Obispo, CA 93401 Telephone: 805/544-8748 Fax: 805/544-8645 www.maximummotorsports.com IRS Racing Brake Kit (MMBAK-15, -16) Floating rotors (MMBAK-16 ONLY) can move
3430 Sacramento Dr., Unit D San Luis Obispo, CA 93401 Telephone: 805/544-8748 Fax: 805/544-8645 www.maximummotorsports.com IRS Racing Brake Kit (MMBAK-15, -16) Floating rotors (MMBAK-16 ONLY) can move
Coil-Over Kit, MMD-RC1xxxx Shock (MMCO-22)
") 3430 Sacramento Dr., Unit D San Luis Obispo, CA 93401 Telephone: 805/544-8748 Fax: 805/544-8645 www.maximummotorsports.com Coil-Over Kit, MMD-RC1xxxx Shock (MMCO-22) Supplemental Installation Notes This
3430 Sacramento Dr., Unit D San Luis Obispo, CA 93401 Telephone: 805/544-8748 Fax: 805/544-8645 www.maximummotorsports.com Coil-Over Kit, MMD-RC1xxxx Shock (MMCO-22) Supplemental Installation Notes This
Coil-Over Kit, MMD-RC1xxxx Shock (MMCO-23)
") 3430 Sacramento Dr., Unit D San Luis Obispo, CA 93401 Telephone: 805/544-8748 Fax: 805/544-8645 www.maximummotorsports.com Coil-Over Kit, MMD-RC1xxxx Shock (MMCO-23) Supplemental Installation Notes This
3430 Sacramento Dr., Unit D San Luis Obispo, CA 93401 Telephone: 805/544-8748 Fax: 805/544-8645 www.maximummotorsports.com Coil-Over Kit, MMD-RC1xxxx Shock (MMCO-23) Supplemental Installation Notes This
MM Caster/Camber Plates, (MMCC7989)
") 3430 Sacramento Dr., Unit D San Luis Obispo, CA 93401 Telephone: 805/544-8748 Fax: 805/544-8645 www.maximummotorsports.com MM Caster/Camber Plates, 1979-89 (MMCC7989) IMPORTANT: The bearing used in our
3430 Sacramento Dr., Unit D San Luis Obispo, CA 93401 Telephone: 805/544-8748 Fax: 805/544-8645 www.maximummotorsports.com MM Caster/Camber Plates, 1979-89 (MMCC7989) IMPORTANT: The bearing used in our
Manual Brake Conversion Kit, (MMBAK-13)
") 3430 Sacramento Dr., Unit D San Luis Obispo, CA 93401 Telephone: 805/544-8748 Fax: 805/544-8645 www.maximummotorsports.com Manual Brake Conversion Kit, 1994-95 (MMBAK-13) The MM kit includes a CNC machined
3430 Sacramento Dr., Unit D San Luis Obispo, CA 93401 Telephone: 805/544-8748 Fax: 805/544-8645 www.maximummotorsports.com Manual Brake Conversion Kit, 1994-95 (MMBAK-13) The MM kit includes a CNC machined
Coil-Over Kit, MMD-RC0xxxx Shock (MMCO-20)
") 3430 Sacramento Dr., Unit D San Luis Obispo, CA 93401 Telephone: 805/544-8748 Fax: 805/544-8645 www.maximummotorsports.com Coil-Over Kit, MMD-RC0xxxx Shock (MMCO-20) Supplemental Installation Notes OEM
3430 Sacramento Dr., Unit D San Luis Obispo, CA 93401 Telephone: 805/544-8748 Fax: 805/544-8645 www.maximummotorsports.com Coil-Over Kit, MMD-RC0xxxx Shock (MMCO-20) Supplemental Installation Notes OEM
US Patent You will find many features that set our Caster/Camber Plates apart from the rest.
 3430 Sacramento Dr., Unit D San Luis Obispo, CA 93401 Telephone: 805/544-8748 Fax: 805/544-8645 www.maximummotorsports.com US Patent 6485223 Read all instructions before beginning work. Following instructions
MM Tubular K-Member, (Mm5KM-7)
") 3430 Sacramento Dr., Unit D San Luis Obispo, CA 93401 Telephone: 805/544-8748 Fax: 805/544-8645 www.maximummotorsports.com MM Tubular K-Member, 2005-14 (Mm5KM-7) This Kit Contains Congratulations on purchasing
3430 Sacramento Dr., Unit D San Luis Obispo, CA 93401 Telephone: 805/544-8748 Fax: 805/544-8645 www.maximummotorsports.com MM Tubular K-Member, 2005-14 (Mm5KM-7) This Kit Contains Congratulations on purchasing
2011+ Adjustable Tie-rod Ends (Mm5TR-2)
") 3430 Sacramento Dr., Unit D San Luis Obispo, CA 93401 Telephone: 805/544-8748 Fax: 805/544-8645 www.maximummotorsports.com 2011+ Adjustable Tie-rod Ends (Mm5TR-2) Instructions 1. Set the parking brake
3430 Sacramento Dr., Unit D San Luis Obispo, CA 93401 Telephone: 805/544-8748 Fax: 805/544-8645 www.maximummotorsports.com 2011+ Adjustable Tie-rod Ends (Mm5TR-2) Instructions 1. Set the parking brake
MM Panhard Bar, Mustang (MMPBA)
") 3430 Sacramento Dr., Unit D San Luis Obispo, CA 93401 Telephone: 805/544-8748 Fax: 805/544-8645 www.maximummotorsports.com MM Panhard Bar, 1979-98 Mustang (MMPBA) Important Note for Customers with Baer
3430 Sacramento Dr., Unit D San Luis Obispo, CA 93401 Telephone: 805/544-8748 Fax: 805/544-8645 www.maximummotorsports.com MM Panhard Bar, 1979-98 Mustang (MMPBA) Important Note for Customers with Baer
MM Adjustable IRS Tie-Rod (MMIRSTR-2)
") 3430 Sacramento Dr., Unit D San Luis Obispo, CA 93401 Telephone: 805/544-8748 Fax: 805/544-8645 www.maximummotorsports.com MM Adjustable IRS Tie-Rod (MMIRSTR-2) Sample Bumpsteer Curve: Read all instructions
3430 Sacramento Dr., Unit D San Luis Obispo, CA 93401 Telephone: 805/544-8748 Fax: 805/544-8645 www.maximummotorsports.com MM Adjustable IRS Tie-Rod (MMIRSTR-2) Sample Bumpsteer Curve: Read all instructions
2. Remove front wheels.
 Read all instructions before beginning work. Following instructions in the proper sequence will ensure the best and easiest installation. Thank you for purchasing Maximum Motorsports Caster/Camber Plates.
MM Rear Coil-Over Kit - Koni Single and Double Adjustable Shocks (MMCO-5)
") 3430 Sacramento Dr., Unit D San Luis Obispo, CA 93401 Telephone: 805/544-8748 Fax: 805/544-8645 www.maximummotorsports.com MM Rear Coil-Over Kit - Koni Single and Double Adjustable Shocks (MMCO-5) Read
3430 Sacramento Dr., Unit D San Luis Obispo, CA 93401 Telephone: 805/544-8748 Fax: 805/544-8645 www.maximummotorsports.com MM Rear Coil-Over Kit - Koni Single and Double Adjustable Shocks (MMCO-5) Read
2005+ Roll Bar (Mm5RB-20.1 to -20.6) Recommended Center punch 1/8" pilot drill 1-3/4" Hole saw 2" Hole saw
 Recommended Center punch 1/8 pilot drill 1-3/4 Hole saw 2 Hole saw") 3430 Sacramento Dr., Unit D San Luis Obispo, CA 93401 Telephone: 805/544-8748 Fax: 805/544-8645 www.maximummotorsports.com 2005+ Roll Bar (Mm5RB-20.1 to -20.6) Recommended Center punch 1/8" pilot drill
3430 Sacramento Dr., Unit D San Luis Obispo, CA 93401 Telephone: 805/544-8748 Fax: 805/544-8645 www.maximummotorsports.com 2005+ Roll Bar (Mm5RB-20.1 to -20.6) Recommended Center punch 1/8" pilot drill
Cobra IRS Aluminum Differential Bushings (MMIRSB-40.2)
") 3430 Sacramento Dr., Unit D San Luis Obispo, CA 93401 Telephone: 805/544-8748 Fax: 805/544-8645 www.maximummotorsports.com Cobra IRS Aluminum Differential Bushings (MMIRSB-40.2) The MM front differential
3430 Sacramento Dr., Unit D San Luis Obispo, CA 93401 Telephone: 805/544-8748 Fax: 805/544-8645 www.maximummotorsports.com Cobra IRS Aluminum Differential Bushings (MMIRSB-40.2) The MM front differential
MM IRS Coil-Over Kit - Bilstein/MM Shocks (MMCO-4)
") 3430 Sacramento Dr., Unit D San Luis Obispo, CA 93401 Telephone: 805/544-8748 Fax: 805/544-8645 www.maximummotorsports.com MM IRS Coil-Over Kit - Bilstein/MM Shocks (MMCO-4) The lower spring perch is drilled
3430 Sacramento Dr., Unit D San Luis Obispo, CA 93401 Telephone: 805/544-8748 Fax: 805/544-8645 www.maximummotorsports.com MM IRS Coil-Over Kit - Bilstein/MM Shocks (MMCO-4) The lower spring perch is drilled
Drag Race Roll Bar (MMRB-6, -7)
") 3430 Sacramento Dr., Unit D San Luis Obispo, CA 93401 Telephone: 805/544-8748 Fax: 805/544-8645 www.maximummotorsports.com 1994-04 Drag Race Roll Bar (MMRB-6, -7) The Maximum Motorsports 6-point Drag Race
3430 Sacramento Dr., Unit D San Luis Obispo, CA 93401 Telephone: 805/544-8748 Fax: 805/544-8645 www.maximummotorsports.com 1994-04 Drag Race Roll Bar (MMRB-6, -7) The Maximum Motorsports 6-point Drag Race
PARTS LIST: 8581 DODGE LONG ARM BRACKETS 03-13
 SYNERGY MFG. 870 INDUSTRIAL WAY, SAN LUIS OBISPO, CA (805) 242-0397 8580 03-12 DODGE 2500/3500 4X4, 06-08 1500 MEGACAB 4X4 LONG ARM SUSPENSION KIT V3.0 GENERAL NOTES: These instructions are also available
Hybrid Steering Shaft, SN95 Rack in Fox Chassis (MMST-13)
") 3430 Sacramento Dr., Unit D San Luis Obispo, CA 93401 Telephone: 805/544-8748 Fax: 805/544-8645 www.maximummotorsports.com Hybrid Steering Shaft, SN95 Rack in Fox Chassis (MMST-13) Improving Performance
3430 Sacramento Dr., Unit D San Luis Obispo, CA 93401 Telephone: 805/544-8748 Fax: 805/544-8645 www.maximummotorsports.com Hybrid Steering Shaft, SN95 Rack in Fox Chassis (MMST-13) Improving Performance
INSTALLATION GUIDE F10 g-connector Bolt-in Camaro/Firebird with OEM Rear Frame
 READ ALL INSTRUCTIONS COMPLETELY AND THOROUGHLY UNDERSTAND THEM BEFORE DOING ANYTHING. CALL CHASSISWORKS TECH SUPPORT (916) 388-0288 IF YOU NEED ASSISTANCE. INSTALLATION GUIDE 5903-F10 g-connector Bolt-in
Standard Duty Oil Filter Relocation Kit (OC-3)
") 3430 Sacramento Dr., Unit D San Luis Obispo, CA 93401 Telephone: 805/544-8748 Fax: 805/544-8645 www.maximummotorsports.com Standard Duty Oil Filter Relocation Kit (OC-3) Read all of the instructions before
3430 Sacramento Dr., Unit D San Luis Obispo, CA 93401 Telephone: 805/544-8748 Fax: 805/544-8645 www.maximummotorsports.com Standard Duty Oil Filter Relocation Kit (OC-3) Read all of the instructions before
MM Rear Coil-Over Kit - Bilstein Shocks (MMCO-3)
") 3430 Sacramento Dr., Unit D San Luis Obispo, CA 93401 Telephone: 805/544-8748 Fax: 805/544-8645 www.maximummotorsports.com MM Rear Coil-Over Kit - Bilstein Shocks (MMCO-3) Read all instructions before
3430 Sacramento Dr., Unit D San Luis Obispo, CA 93401 Telephone: 805/544-8748 Fax: 805/544-8645 www.maximummotorsports.com MM Rear Coil-Over Kit - Bilstein Shocks (MMCO-3) Read all instructions before
Front Coil-Over Kit, MMD-FCxxxxx Series (MMCO-24)
") 3430 Sacramento Dr., Unit D San Luis Obispo, CA 93401 Telephone: 805/544-8748 Fax: 805/544-8645 www.maximummotorsports.com Front Coil-Over Kit, MMD-FCxxxxx Series (MMCO-24) Overlooked by other companies,
3430 Sacramento Dr., Unit D San Luis Obispo, CA 93401 Telephone: 805/544-8748 Fax: 805/544-8645 www.maximummotorsports.com Front Coil-Over Kit, MMD-FCxxxxx Series (MMCO-24) Overlooked by other companies,
Standard Duty Oil Filter Relocation Kit (OC-8)
") 3430 Sacramento Dr., Unit D San Luis Obispo, CA 93401 Telephone: 805/544-8748 Fax: 805/544-8645 www.maximummotorsports.com Standard Duty Oil Filter Relocation Kit (OC-8) Filter Mount Installation 4. Remove
3430 Sacramento Dr., Unit D San Luis Obispo, CA 93401 Telephone: 805/544-8748 Fax: 805/544-8645 www.maximummotorsports.com Standard Duty Oil Filter Relocation Kit (OC-8) Filter Mount Installation 4. Remove
3430 Sacramento Dr., Unit D San Luis Obispo, CA Telephone: 805/ Fax: 805/
 3430 Sacramento Dr., Unit D San Luis Obispo, CA 93401 Telephone: 805/544-8748 Fax: 805/544-8645 www.maximummotorsports.com MM Caster/Camber Plates, 2005-10 (Mm5CC-1) Read all instructions before beginning
Severe Duty Oil Filter Relocation Kit (OC-9)
") 3430 Sacramento Dr., Unit D San Luis Obispo, CA 93401 Telephone: 805/544-8748 Fax: 805/544-8645 www.maximummotorsports.com Severe Duty Oil Filter Relocation Kit (OC-9) Filter Mount Installation 4. Remove
3430 Sacramento Dr., Unit D San Luis Obispo, CA 93401 Telephone: 805/544-8748 Fax: 805/544-8645 www.maximummotorsports.com Severe Duty Oil Filter Relocation Kit (OC-9) Filter Mount Installation 4. Remove
Roll Bar (MMRB-6.1 to -6.7)
") 3430 Sacramento Dr., Unit D San Luis Obispo, CA 93401 Telephone: 805/544-8748 Fax: 805/544-8645 www.maximummotorsports.com 1994-04 Roll Bar (MMRB-6.1 to -6.7) NOTE: These instructions cover Roll Bars with
3430 Sacramento Dr., Unit D San Luis Obispo, CA 93401 Telephone: 805/544-8748 Fax: 805/544-8645 www.maximummotorsports.com 1994-04 Roll Bar (MMRB-6.1 to -6.7) NOTE: These instructions cover Roll Bars with
Adjustable Tie-rod Ends (Mm5TR-1)
") 3430 Sacramento Dr., Unit D San Luis Obispo, CA 93401 Telephone: 805/544-8748 Fax: 805/544-8645 www.maximummotorsports.com 2005-10 Adjustable Tie-rod Ends (Mm5TR-1) 3. Remove the front wheels. 4. Loosen
3430 Sacramento Dr., Unit D San Luis Obispo, CA 93401 Telephone: 805/544-8748 Fax: 805/544-8645 www.maximummotorsports.com 2005-10 Adjustable Tie-rod Ends (Mm5TR-1) 3. Remove the front wheels. 4. Loosen
PPM-8007 JK STEERING STABILIZER RELOCATION BRACKET Version 1
 POLY PERFORMANCE MFG. 870 INDUSTRIAL WAY, SAN LUIS OBISPO, CA (805) 242-0397 PPM-8007 JK STEERING STABILIZER RELOCATION BRACKET Version 1 GENERAL NOTES: These instructions are also available on our website;
Roll Bar (MMRB-1.1 to 1.7)
") 3430 Sacramento Dr., Unit D San Luis Obispo, CA 93401 Telephone: 805/544-8748 Fax: 805/544-8645 www.maximummotorsports.com 1979-93 Roll Bar (MMRB-1.1 to 1.7) The Maximum Motorsports RB-1.1 to -1.7 Roll
3430 Sacramento Dr., Unit D San Luis Obispo, CA 93401 Telephone: 805/544-8748 Fax: 805/544-8645 www.maximummotorsports.com 1979-93 Roll Bar (MMRB-1.1 to 1.7) The Maximum Motorsports RB-1.1 to -1.7 Roll
Convertible MM Roll Bar (MMRB-10.1 to -10.7)
") 3430 Sacramento Dr., Unit D San Luis Obispo, CA 93401 Telephone: 805/544-8748 Fax: 805/544-8645 www.maximummotorsports.com 1983-93 Convertible MM Roll Bar (MMRB-10.1 to -10.7) The Maximum Motorsports RB-10.1
3430 Sacramento Dr., Unit D San Luis Obispo, CA 93401 Telephone: 805/544-8748 Fax: 805/544-8645 www.maximummotorsports.com 1983-93 Convertible MM Roll Bar (MMRB-10.1 to -10.7) The Maximum Motorsports RB-10.1
TIP-OUT GLASS WINDSHIELD KIT
 TIP-OUT GLASS WINDSHIELD KIT P/N 2881108 APPLICATION Verify accessory fitment at Polaris.com. BEFORE YOU BEGIN Read these instructions and check to be sure all parts and tools are accounted for. Please
PPM-8022 / PPM-8042 JEEP JK STAGE 2 SYNERGY SUSPENSION SYSTEM Version 1
 POLY PERFORMANCE MFG. 870 INDUSTRIAL WAY, SAN LUIS OBISPO, CA (805) 242-0397 PPM-8022 / PPM-8042 JEEP JK STAGE 2 SYNERGY SUSPENSION SYSTEM Version 1 GENERAL NOTES: These instructions are also available
Global West Suspension 655 South Lincoln Ave San Bernardino Ca Phone Fax Web address globalwest.
 Global West Suspension 655 South Lincoln Ave San Bernardino Ca. 92408 Phone 877-470-2975 Fax 909-890-0703 Web address globalwest.net Mustang coilover instruction sheets for 64-66 Kit includes the following
PPM-8023 / PPM-8043 JEEP JK SYNERGY STAGE 3 SUSPENSION SYSTEM Version 1
 SYNERGY MFG. 870 INDUSTRIAL WAY, SAN LUIS OBISPO, CA (805) 242-0397 PPM-8023 / PPM-8043 JEEP JK SYNERGY STAGE 3 SUSPENSION SYSTEM Version 1 GENERAL NOTES: These instructions are also available on our website;
MM Heavy Duty Torque-arm (MMTA-3 & -4) Engine Torque Table 4.56: : :
 Engine Torque Table 4.56: : :") 3430 Sacramento Dr., Unit D San Luis Obispo, CA 93401 Telephone: 805/544-8748 Orders Only: 800/839-0928 Fax: 805/544-8645 The ultimate rear suspension for your Mustang is now available from Maximum Motorsports.
3430 Sacramento Dr., Unit D San Luis Obispo, CA 93401 Telephone: 805/544-8748 Orders Only: 800/839-0928 Fax: 805/544-8645 The ultimate rear suspension for your Mustang is now available from Maximum Motorsports.
05+ Toyota Tacoma Rear Shock Hoop Install Notes Part# 86460
 159 North Maple St. Unit J, CORONA CA 92880 P. 951-737-9682 F. 951-737-9006 WWW.CHAOSFAB.COM 05+ Toyota Tacoma Rear Shock Hoop Install Notes Part# 86460 Note: This kit is designed to work with the Total
4.6L Oil Filter Relocation Kit, (OC-7)
") 3430 Sacramento Dr., Unit D San Luis Obispo, CA 93401 Telephone: 805/544-8748 Fax: 805/544-8645 www.maximummotorsports.com 4.6L Oil Filter Relocation Kit, 2003-04 (OC-7) Filter Mount Installation 4. Remove
3430 Sacramento Dr., Unit D San Luis Obispo, CA 93401 Telephone: 805/544-8748 Fax: 805/544-8645 www.maximummotorsports.com 4.6L Oil Filter Relocation Kit, 2003-04 (OC-7) Filter Mount Installation 4. Remove
2005+ Drag Race Roll Bar (Mm5RB-20)
") 3430 Sacramento Dr., Unit D San Luis Obispo, CA 93401 Telephone: 805/544-8748 Fax: 805/544-8645 www.maximummotorsports.com 2005+ Drag Race Roll Bar (Mm5RB-20) Note that the NHRA DOES allow the door bars
3430 Sacramento Dr., Unit D San Luis Obispo, CA 93401 Telephone: 805/544-8748 Fax: 805/544-8645 www.maximummotorsports.com 2005+ Drag Race Roll Bar (Mm5RB-20) Note that the NHRA DOES allow the door bars
Maximum Motorsports Caster/Camber Plates (03-04 Cobra) - Installation Instructions
 - Installation Instructions") Maximum Motorsports Caster/Camber Plates (03-04 Cobra) - Installation Instructions The below installation instructions work for the following products: Maximum Motorsports Caster/Camber Plates (03-04 Cobra)
Maximum Motorsports Caster/Camber Plates (03-04 Cobra) - Installation Instructions The below installation instructions work for the following products: Maximum Motorsports Caster/Camber Plates (03-04 Cobra)
FRONT STABILIZER BAR KIT
 FRONT STABILIZER BAR KIT P/N 2881205 APPLICATION RZR XP 1000 MY16 and Newer, RZR XP 4 1000 MY16 and Newer BEFORE YOU BEGIN Read these instructions and check to be sure all parts and tools are accounted
1501 Industrial Way N., Toms River, NJ Fax: PACKING LIST INSTALLATION INSTRUCTIONS
 1/6/04 1501 Industrial Way N., Toms River, NJ 08755 732-349-2109 Fax:732-244-0867 MODERATE - Installation requires metric tools and possibly cutting and drilling. The ability to closely follow instructions
Installation Guide for the JK Wrangler 4-Inch Suspension System with FlexArms
 INSTALLATION GUIDE Tera Manufacturing, Inc. 5251 South Commerce Dr. Murray, Utah 84107 Phone/801.288.2585 Fax/801.713.2313 www.teraflex.biz Installation Guide for the JK Wrangler 4-Inch Suspension System
5713 / 5714 JK HEAVY DUTY GAS TANK SKID PLATE Version 1.1
 SYNERGY MFG. 870 INDUSTRIAL WAY, SAN LUIS OBISPO, CA (805) 242-0397 5713 / 5714 JK HEAVY DUTY GAS TANK SKID PLATE Version 1.1 GENERAL NOTES: These instructions are also available on our website; www.synergymfg.com.
Installation Instructions
 Installation Instructions 6 Suspension System FTS25005BK / FTS25006BK 2006-2012 Nissan Frontier 2wd/4wd SHORT BED ONLY Tool List: (not included) Floor Jack & Jack Stands Assorted Metric & S.A.E Sockets
CHECK ALL PARTS INCLUDED IN THIS KIT TO THE PARTS LIST BEFORE INSTALLATION. IF ANY PIECES ARE MISSING, PLEASE CONTACT: TOTAL COST INVOLVED
 1949-1954 TCI Engineering Chevy Rear 4-Link Coil-Over & Air Bag Kit Installation Instructions 1-866-925-1101 www.totalcostinvolved.com Read and understand these instructions before starting any work! CHECK
Installation Instructions
 Installation Instructions Jeep TJ Long Arm Suspension System 1997-2002 JEEP TJ 4WD 6 1997-2002 JEEP TJ 4WD FTS24002 & BK / FTS24003 & BK / FTS44002 & BK PARTS LIST FTS24002BK Jeep TJ 6' Box Kit 1 FTS24003BK
INSTALLATION INSTRUCTIONS RATTLER STEEL RUNNING BOARDS FORD TRANSIT VAN (FULL SIZE)
") INSTALLATION INSTRUCTIONS PARTS LIST: 1 32-inch Steel Running Board 1 8-1.25mm x 35mm Hex Bolt 1 96-inch Steel Running Board 13 8-1.25mm x 25mm Hex Bolt 5 Passenger Side/Driver Side Mounting Brackets 20
INSTALLATION INSTRUCTIONS PARTS LIST: 1 32-inch Steel Running Board 1 8-1.25mm x 35mm Hex Bolt 1 96-inch Steel Running Board 13 8-1.25mm x 25mm Hex Bolt 5 Passenger Side/Driver Side Mounting Brackets 20
RHINO SUSPENSION SYSTEM INSTALLATION INSTRUCTIONS
 PARTS INCLUDED: 2 FRONT UPPER A-ARMS 2 FRONT LOWER A-ARMS 2 UNI-BALL JOINTS 2 UNI-BALL JOINT STUDS 2 UNI-BALL JOINT CAPS 2 RETAINING RINGS 1 FRONT SHOCK ASSEM. 2 DELRON STEERING STOPS 2 SHOCK MOUNT SPACERS
AEV JK Standard Suspensions Installation Instructions
 AEV JK Standard Suspensions Installation Instructions 3.0 and 4.0 suspension systems designed for: 2007-current Jeep JK Wrangler and Unlimited models including Rubicon packages Kit Part Numbers Vehicle
I. Before starting installation
 5. Park the vehicle on a clean, dry, flat, level surface and block the tires so the vehicle cannot roll in either direction. A. Disconnect battery cables 1. Disconnect the negative cable first, then the
Mustang CDC Lightbar (94-04) - Installation Instructions
 - Installation Instructions") Mustang CDC Lightbar (94-04) - Installation Instructions The below installation instructions work for the following products: Classic Design Concepts Mustang Convertible Lightbar (94-04 Carbon Fiber) Classic
Mustang CDC Lightbar (94-04) - Installation Instructions The below installation instructions work for the following products: Classic Design Concepts Mustang Convertible Lightbar (94-04 Carbon Fiber) Classic
FTS & 8 RADIUS ARM BOX KIT
 FTS22139 6 & 8 RADIUS ARM BOX KIT 2008-2015 FORD F-250/350 SUPER DUTY 4WD 2008 2015 FORD F-250/350 SUPER DUTY 4WD FTS22139 6 & 8 RADIUS ARM KIT FTS22139 6"&8" Radius Arm Box Kit FT30287 Hardware Kit Qty
<THESE INSTRUCTIONS MUST BE GIVEN TO THE END USER> B&W
 B&W Trailer Hitches 6 Hawaii Rd / PO Box 86 Humboldt, KS 66748 P:60.473664 F:60.869.903 Turnoverball Gooseneck Hitch Installation Instructions MODEL 08
Detroit Speed, Inc. Second Generation Camaro/Firebird Mini-Tub Kit Camaro/Firebird P/N: ,
 Detroit Speed, Inc. Second Generation Camaro/Firebird Mini-Tub Kit 1970-1981 Camaro/Firebird P/N: 041222, 041223 The Detroit Speed Second Generation Camaro/Firebird Rear Mini-Tub Kit is designed to accommodate
82-01 Chevy S-10/ GMC Sonoma Front Kit Part No B
 www.airliftcompany.com 82-01 Chevy S-10/ GMC Sonoma Front Kit Part No. 75512B MN-481 (02105) ECN 3549 Please read these instructions completely before proceeding with installation Left Side Upper Shock
NOTE: LIFETIME PRODUCT WARRANTY
 Carli Suspension: 422 Jenks Circle, Corona, CA 92880 Tech Support: (714) 532-2798 CS-F45-D30-05 2005-07 Ford Dominator - 4.5 Lift System CS-F45-D30-08 2008-10 Ford Dominator - 4.5 Lift System CS-F45-D30-11
2.5, 3.5 & 5 Rear Air Ride Lift Systems. Dodge 2500 Pickup Part#: , ,
 Part#: 012257, 012359, 012529 2.5, 3.5 & 5 Rear Air Ride Lift Systems Dodge 2500 Pickup 2014-16 Rev. 101016 491 W. Garfield Ave., Coldwater, MI 49036. Phone: 517-279-2135 Web/live chat: www.bds-suspension.com.
PPM JK F911 Hardware Kit Installation Version 2
 SYNERGY MFG. 870 INDUSTRIAL WAY, SAN LUIS OBISPO, CA (805) 242-0397 PPM-8050-02 JK F911 Hardware Kit Installation Version 2 GENERAL NOTES: These instructions are also available on our website; www.synergymfg.com.
Multistrada (MTS) Tank Installation Notes. Tools Required. Phase 1: Remove Fairings. Phase 2: Remove Fuel Tank
 Tank Installation Notes. Tools Required. Phase 1: Remove Fairings. Phase 2: Remove Fuel Tank") The California Cycleworks MTS tank provides an aftermarket alternative to the OEM nylon fuel tanks as used on aircooled Desmodue Ducati Multistrada 1100, 1000, and 620 models. This fuel tank is NOT for
The California Cycleworks MTS tank provides an aftermarket alternative to the OEM nylon fuel tanks as used on aircooled Desmodue Ducati Multistrada 1100, 1000, and 620 models. This fuel tank is NOT for
INSTALLATION INSTRUCTIONS Toyota FJ Cruiser DEMELLO-OFFROAD.
 INSTALLATION INSTRUCTIONS Item Description Vehicle 3 piece Rear Bumper 2007-2014 Toyota FJ Cruiser DEMELLO-OFFROAD www.demello-offroad.com 12785 magnolia ave Riverside ca 92503 Suite 1 phone: 1-951-735-4417
STOP---READ THIS FIRST!
 STOP---READ THIS FIRST! **Read These Entire Instructions Before Starting Anything** 2011-13 FORD F-250 & F350 6 & 8 LIFT KITS 5680 W. Barstow, Fresno, CA 93722 PH: (559) 226-8196 (559) 277-0457 FAX www.mcgaughys.com
»Product» Safety Warning
 #J9320, J9321 Installation Instructions 1986-1995 Jeep YJ 3" Body Lift Kit Read and understand all instructions and warnings prior to installation of product and operation of vehicle. Zone Offroad Products
INSTALLATION INSTRUCTIONS
 INSTALLATION INSTRUCTIONS --1075 North Ave. Sanger, CA 93657-3539 local: 559-875-0222 fax: 559-876-2259 toll free: 800-445-3767-- 2505 Lowering Spindle Assembly Installation Instructions ½ TON SILVERADO
05 12 TOYOTA TACOMA 2WD
 MAXTRAC SUSPENSION 4030 E LEAVERTON CT ANAHEIM, CA 92807 714 630 0363 WWW.MAXTRACSUSPENSION.COM SALES@MAXTRACSUSPENSION.COM PRODUCT: PARTS LIST K756864 6" LIFT KIT 05 12 TOYOTA TACOMA 2WD QTY SPINDLE,
37-39 TCI Chevy Rear 4-Link Kit Installation Instructions
 37-39 TCI Chevy Rear 4-Link Kit Installation Instructions 1-800-984-6259 www.totalcostinvolved.com Read and understand these instructions before starting any work! SUPPORT VEHICLE WITH JACK STANDS BEFORE
POLY TIP-DOWN WINDSHIELD KIT
 POLY TIP-DOWN WINDSHIELD KIT P/N 2881919 APPLICATION Verify accessory fitment at Polaris.com. BEFORE YOU BEGIN Read these instructions and check to be sure all parts and tools are accounted for. Please
HASPORT PERFORMANCE EFJ1
 HASPORT PERFORMANCE Installation Instructions For: Part Number EFJ1 for J-series V6 engines into 1988-1991 Honda Civic and CR-X Hasport Performance mounts are the result of extensive research and engineering.
INSTALLATION INSTRUCTIONS
 INSTALLATION INSTRUCTIONS 2005-2012 Nissan Xterra/Frontier / Pathfinder PART NUMBERS: NP17500, NP17525, NP17550 FRONTIER PARTS & CORRESPONDING HARDWARE LIST XTERRA PATHFINDER ABOVE LISTED 1/2 Metal Lock
Kit No Please read these instructions completely before proceeding with installation. Air Spring Kit Parts List. Bracket Attaching Hardware
 Kit No. 59532 MN-572 (021108) ECR 7136 Please read these instructions completely before proceeding with installation Air Spring Kit Parts List A Item Description Quantity A Air Sleeves 2 B Upper Brackets
VW SCIROCCO TWINTERCOOLER INSTALLATION INSTRUCTIONS
 VW SCIROCCO TWINTERCOOLER INSTALLATION INSTRUCTIONS Tools needed: T25 torx driver Small flat head screwdriver 12mm & 13mm socket, with ratchet Dremel or similar with cut off disc Large Phillips screwdriver
EVO EVO Enforcer PRO Stage 1
 EVO-201-1 EVO Enforcer PRO Stage 1 QTY PART # DESCRIPTION 1 EVO-11022B EVO Front Lower Control Arm, Driver 1 EVO-11023B EVO Front Lower Control Arm, Pass 1 EVO-11042B REARWARD BRACKET JK FRONT TRACKBAR
INSTALLATION INSTRUCTIONS
 INSTALLATION INSTRUCTIONS 6612/6616 & 6614/6618 REAR AXLE FLIP-KIT 1999-UP CHEVROLET SILVERADO/GMC SIERRA 1500 Congratulations! You were selective enough to choose a BELLTECH PRODUCT. We have spent many
JK REAR BUMPER AND TIRE CARRIER
 JK REAR BUMPER AND TIRE CARRIER Installation Guide AEV30105AA (Updated 5/10/10) Page 1 of 20 Page 2 of 20 EXPLODED VIEW PLEASE READ BEFORE YOU START IN ORDER TO INSTALL THIS PART PROPERLY YOU OR YOUR INSTALLER
SR Performance Sway Bars (2010 Mustang GT)
") Total Installation time: Approximately 2 hours SR Performance Sway Bars (2010 Mustang GT) Tools Required: 15mm deep socket 18mm deep socket 19mm deep socket Ratchet with ½ drive Pliers Torque wrench 15mm
Total Installation time: Approximately 2 hours SR Performance Sway Bars (2010 Mustang GT) Tools Required: 15mm deep socket 18mm deep socket 19mm deep socket Ratchet with ½ drive Pliers Torque wrench 15mm
EVO-1085 JK DoubleD Long Arm Upgrade. EVO /37 JK DoubleD LongArm Kit
 EVO-1085 JK DoubleD Long Arm Upgrade EVO-1084-35/37 JK DoubleD LongArm Kit (EVO-1084 pictured above with Bilstein 5100 Shocks and optional EVO HD Swaybar Endlinks) NOTES: Cutting and grinding is required
INSTALLATION INSTRUCTIONS C DMM Nissan Frontier SWING OUT DASH MONITOR MOUNT
 INSTALLATION INSTRUCTIONS C DMM 134 2011 2018 Nissan Frontier SWING OUT DASH MONITOR MOUNT The Dash Monitor Mount bracket system may require two or three main parts that are Sold Separately. See web site
Installation Instructions for BMR Lowering Springs Performance ( Mustang GT)
") Installation Instructions for BMR Lowering Springs Performance (2015-2017 Mustang GT) Time Required: 3+ hours Notes: This install was done with the performance springs from BMR, but install should be the
Installation Instructions for BMR Lowering Springs Performance (2015-2017 Mustang GT) Time Required: 3+ hours Notes: This install was done with the performance springs from BMR, but install should be the
PPM-8055/8089 JK FRONT TRACK BAR RELOCATION BRACKET Version 1.2
 POLY PERFORMANCE MFG. 870 INDUSTRIAL WAY, SAN LUIS OBISPO, CA (805) 242-0397 PPM-8055/8089 JK FRONT TRACK BAR RELOCATION BRACKET Version 1.2 GENERAL NOTES: These instructions are also available on our
2216 (STOCK) / 2224 (3 LOWER) 2WD SPORT SWAY BAR SET 97-UP DODGE DAKOTA INSTALLATION OF HOTCHKIS PERFORMANCE FRONT SWAY BAR
 / 2224 (3 LOWER) 2WD SPORT SWAY BAR SET 97-UP DODGE DAKOTA INSTALLATION OF HOTCHKIS PERFORMANCE FRONT SWAY BAR") 2216 (STOCK) / 2224 (3 LOWER) 2WD SPORT SWAY BAR SET 97-UP DODGE DAKOTA Thank you for your purchase from our line of Dodge Dakota & Durango suspension parts. Please call us at (877) 4NO-ROLL if you have
2216 (STOCK) / 2224 (3 LOWER) 2WD SPORT SWAY BAR SET 97-UP DODGE DAKOTA Thank you for your purchase from our line of Dodge Dakota & Durango suspension parts. Please call us at (877) 4NO-ROLL if you have
FRONT FENDERS WITH FACTORY INNER FENDERS JEEP WRANGLER TJ/LJ/YJ/CJ7 INSTALLATION INSTRUCTIONS
 FRONT FENDERS WITH FACTORY INNER FENDERS JEEP WRANGLER TJ/LJ/YJ/CJ7 INSTALLATION INSTRUCTIONS TOOLS NEEDED 13mm socket 5/32 Allen head 5/16 wrench or socket 7/16 wrench or socket 7/32 Allen head 5/8 wrench
IAG Air / Oil Separator (AOS) For STi
 For STi") IAG Air / Oil Separator (AOS) For 2008-14 STi Part# IAG-ENG-7000 Tools Required: Ratchet, torque wrench, extensions, needle nose pliers, hose cutter, snips/scissors Sockets: 10mm, 12mm 13mm Wrenches: 10mm,
IAG Air / Oil Separator (AOS) For 2008-14 STi Part# IAG-ENG-7000 Tools Required: Ratchet, torque wrench, extensions, needle nose pliers, hose cutter, snips/scissors Sockets: 10mm, 12mm 13mm Wrenches: 10mm,
TEL:1-866-XANATOS INSTALLATION INSTRUCTIONS PART#: SR-FOR SPARTAN RUNNING BOARD FORD ECONOLINE 99-14
 TEL:1-866-XANATOS INSTALLATION INSTRUCTIONS PART#: SR-FOR203796 SPARTAN RUNNING BOARD FORD ECONOLINE 99-14 PARTS LIST: 1 Driver/Left Side Spartan Running Board 2 10mm Lock Washers 1 Passenger/Right Side
INSTALLATION INSTRUCTIONS CHEVY C-10 4-Link Rear End
 INSTALLATION INSTRUCTIONS 73-87 CHEVY C-10 4-Link Rear End Please read these instructions completely before starting your installation. Assemble suspension on vehicle before powder-coating to ensure proper
FAX
 INSTALLATION INSTRUCTIONS 6090 Air Suspension Kit (pat. pending) 1999-2006 Tahoe, Suburban, Avalanche, Yukon Thank you for purchasing a quality Hellwig Product. PLEASE READ THIS INSTRUCTION SHEET COMPLETELY
DODGE OFF ROAD T-STYLE STEERING KIT INSTALLATION INSTRUCTIONS
 Dodge Off Road, LLC Specializing in Dodge Ram Solid-Axle 4x4 Suspension and Steering for Off Road Applications 855.9009.DOR sales@dodgeoffroad.com dodgeoffroad.com DODGE OFF ROAD T-STYLE STEERING KIT INSTALLATION
Extended Capacity Replacement Tanks for RAM Cummins Diesel Trucks
 TITAN pt. no.: 03 0000 0135 Important: Please read these instructions carefully and completely before starting the installation. TITAN Fuel Tanks INSTALLATION INSTRUCTIONS G e n e r a t i o n V Extended
5.5 Gas & 6 Diesel Radius Arm Suspension System. Dodge Ram WD Pickup Dodge Ram WD Pickup
 Part#: 012610 5.5 Gas & 6 Diesel Radius Arm Suspension System Dodge Ram 3500 4WD Pickup 2013-17 Dodge Ram 2500 4WD Pickup 2014-17 491 W. Garfield Ave., Coldwater, MI 49036. Phone: 517-279-2135 Web: www.bds-suspension.com.
Z1 Motorsports 350Z / G35 Oil Cooler Kit Installation Manual
 Z1 Motorsports 2877 Carrollton Villa Rica Hwy Carrollton GA 30116 770.838.7777 Z1 Motorsports 350Z / G35 Oil Cooler Kit Installation Manual For 19, 25 and 34 Row Oil Cooler Kits Parts Included: 1 Aluminum
Evo X Walbro 450 Pump System
 Evo X Walbro 450 Pump System Installation Guide Please contact us at sales@wtftuned.com with any additional questions Tools required: 8 mm socket and wrench, needle-nose pliers, razor, drill w/ 5/64 bit,
WJ AUTO TRANS. ATLAS SHIFTER
 KIT CONSISTS OF: No. Qty Part No. Description 4320 Aerotech Center Way, Page 1 of 8 1 1 302051 BASE- ATLAS TWIN STICK MOUNT 2 1 302080 STUD BOLT 1/2-13 X 7 B7 3 1 303120 Serrated-Flange Hex Locknut 1/2-13
SCION tc BIG BRAKE KIT Section I - Installation Preparation
 SCION tc 2005- BIG BRAKE KIT Section I - Installation Preparation Part Number: PTR09-21080 Kit Contents Item # Quantity Reqd. Description 1 1 Brake Rotor, LH Front 2 1 Brake Rotor, RH Front 3 1 Brake Caliper
RMK HANDLEBAR KIT P/N ; ; APPLICATION BEFORE YOU BEGIN KIT CONTENTS. Verify accessory fitment at Polaris.com.
 RMK HANDLEBAR KIT P/N 2883835; 2883836; 2883837 APPLICATION Verify accessory fitment at Polaris.com. BEFORE YOU BEGIN Read these instructions and check to be sure all parts and tools are accounted for.
INSTALLATION GUIDE. JK Rear bumper & tire carrier. AEV30105AC Last Updated: 10/11/16 US PATENT: D642,502 ; D
 AEV30105AC Last Updated: 10/11/16 JK Rear bumper & tire carrier US PATENT: D642,502 ; D633.024 INSTALLATION GUIDE PLEASE READ BEFORE YOU START TO GUARANTEE A QUALITY INSTALLATION, WE RECOMMEND READING
Installation Instructions. 6 Basic System FTS21060BK / FTS21061BK / FTS21042BK GM 2WD C1500 P/U ONLY
 Installation Instructions 6 Basic System FTS21060BK / FTS21061BK / FTS21042BK 2007-13 GM 2WD C1500 P/U ONLY 2007-13 GM 1500 Truck Basic System FTS21060BK / FTS21061BK / FTS21042BK 2007-13 GM 2WD C1500
INSTALLATION INSTRUCTIONS
 INSTALLATION INSTRUCTIONS --300 W PONTIAC WAY CLOVIS, CA 93612 local: 559-875-0222 fax: 559-876-2249 toll free: 800-445-3767-- 6446 5.5 REAR AXLE FLIP-KIT 2015+ FORD F-150 2WD SHORT BED Thank you for being