P o o L e n c L o s u r e s nova & classic Assembly manual
|
|
|
- Donna Rich
- 5 years ago
- Views:
Transcription
1 P o o L e n c l o s u r e s Nova & Classic Assembly manual

2 Box disassembly Model Outside dimensions weight Model Width Height Depth kg M PC M M M SAN M M PC SAN Model Outside dimensions weight Model Width Height Depth kg A A A4/ A A A A4/ A
 L - R Receiver profile cap L - R c a b d 11 Receiver profile cap 12 Keys 13 Latch sleeve 14 Rail joiner / rail buffer (on rubber side) L - R a b")
3 part list 1 4,8 x 50 pen head torx screw 2 4,8 x 30 pen head 3 Pop rivet 4 torx screw (gray or white) 12mm 4,8 x 60 flat head torx screw 5 6x60 pen head 6 Anchor 7 torx screw Interior handle a b c d 8 Handle 9 Receiver profile cap 10 (including arrest) L - R Receiver profile cap L - R c a b d 11 Receiver profile cap 12 Keys 13 Latch sleeve 14 Rail joiner / rail buffer (on rubber side) L - R a b a b 15 Sliding door lock + plug 16 Front wall fixing nut 17 Plastic plug 18 (Gray or white) Sliding door buffer / screw a b a b a b 19 A5 Sliding door frame rubber seal 20 Rubber seal between 21 Sliding door bottom rubber 22 segments A5 M5 Outside rubber (double)* or or A3 A4 A4/5 A3 A4 A4/5 *With SAN plates T1 T2 T3 T4 T5 4.1 mm 7 mm TRX 3
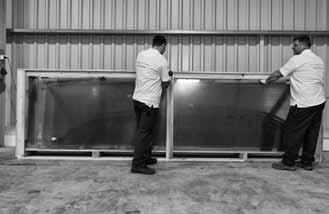
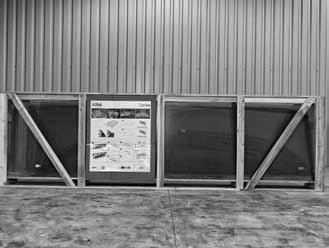
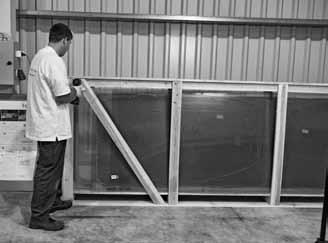
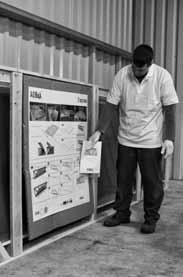
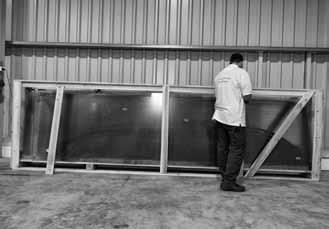

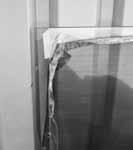


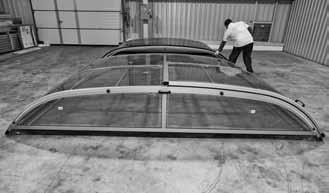
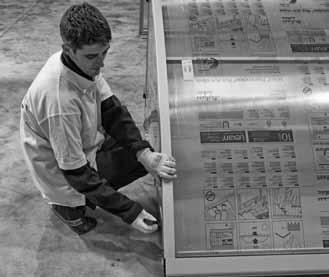
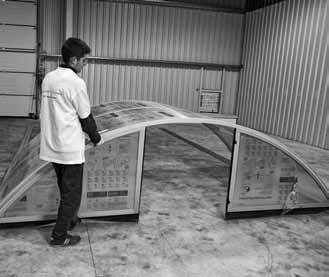
4 1 Box disassembly


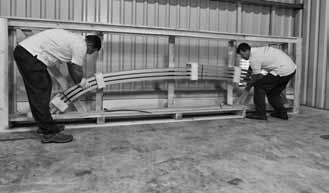
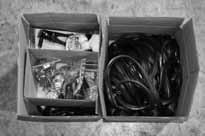
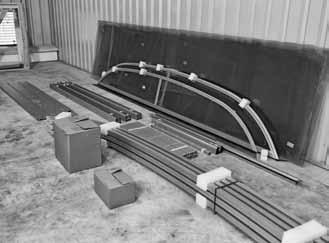


5 1 Box disassembly Recommended tools (not included) 5
6 part list BY enclosure types Nr. List of items for M3 enclosures Item Item name Pcs number Chapter 1a Rail S2/ b Rail S3/ a Front wall 1 8 2b Front wall 1 8 2a 1a 2c Front wall End wall 1 8 2b 2c 1b 4 1. segment segment segment 1 4 List of items for M4 enclosures Nr. Item name Item number Pcs Chapter 1a Rail S1/ b Rail S2/ c Rail S1/ d Rail S3/ a+1c 2a Front wall 1 8 2a 2b 2c 1b+1d 2b Front wall 1 8 2c Front wall End wall segment segment segment segment Nr. List of items for M5 enclosures Item Item name Pcs number Chapter 1a Rail S1/ b Rail S4/ c Rail S1/ d Rail S4/ a 2b 2c 1a+1c 1b+1d 2a Front wall 1 8 2b Front wall 1 8 2c Front wall End wall segment segment segment segment segment 1 4 6
7 part list BY enclosure types Nr. List of items for A3 enclosures Item Item name Pcs number Chapter 1a Rail S2/ b Rail S3/ Front wall End wall 1 8 1a + 1c 4 1. segment segment b + 1d 6 3. segment Side mounted sliding door 1 5 List of items for A4 enclosures Nr. Item name Item number Pcs Chapter 1a Rail S1/ b Rail S2/ c Rail S1/ d Rail S3/ a + 1c 2 Front wall b + 1d 3 End wall segment segment segment segment Side mounted sliding door Nr. List of items for a4/5, A5 enclosures Item Item name Pcs Chapter number 1a Rail S1/ b Rail S4/ c Rail S1/ a + 1c 1d Rail S4/ Front wall b + 1d 3 End wall segment segment segment segment segment Side mounted sliding door 1 5 7
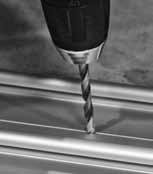
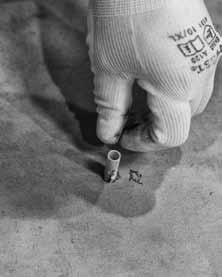
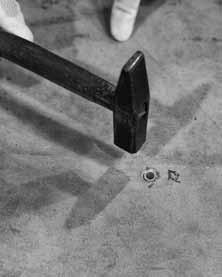
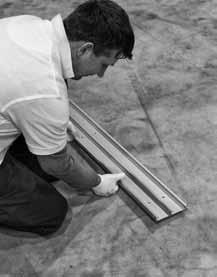
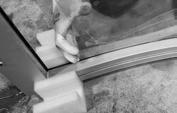
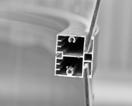
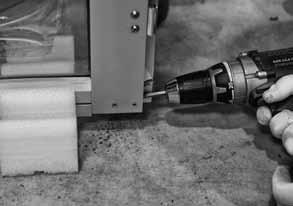
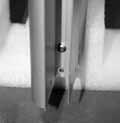
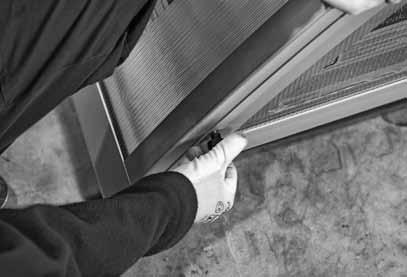
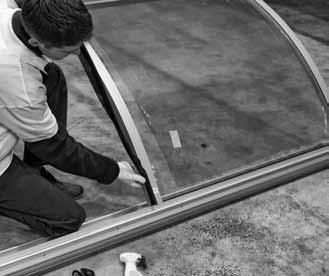
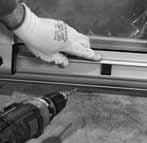
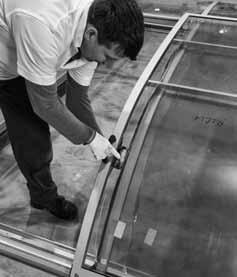
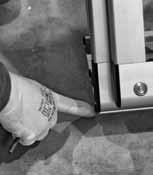
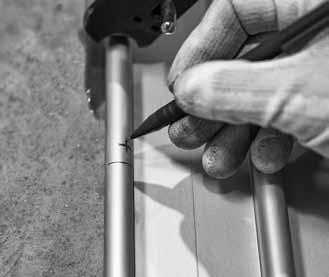
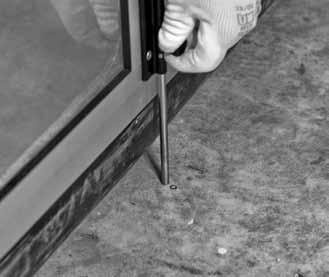
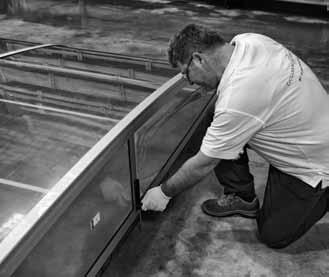
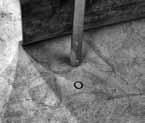
8 2 rail assembly rail placement 1 S2/3 Item Nr. Item name Pcs Notes S2/3 Rail mm S3/3 Rail mm 5 Flat head Screw 60 6x60 6 Anchor 60 14a Rail joiner b S3/ Suggested spots for holes on the rail (depending on the ground surface) S/3 S/3 8
9 2 rail assembly rail placement 1 S1/3 S1/ Item Nr. Item name Pcs Notes S1/3 Rail mm S1/1 Rail mm S2/3 Rail mm S2/1 Rail mm 5 Flat head Screw 108 6x60 6 Anchor a Rail joiner S2/3 1b S2/ Suggested spots for holes on the rail (depending on the ground surface) S/3 S/1 S/1 S/3 9
10 2 rail assembly rail placement 1 S1/3 S1/1 Item Nr. Item name Pcs Notes S1/3 Rail mm S1/1 Rail mm S4/3 Rail mm S4/1 Rail mm 5 Flat head Screw 184 6x60 6 Anchor a Rail joiner S4/3 1b S4/ Suggested spots for holes on the rail (depending on the ground surface) 302 S/3 S/1 S/1 S/1 S/1 S/3 10
11 2 rail assembly rail placement 1 S1/3 S1/ b S4/3 S4/ Item Nr. Item name Pcs Notes S1/3 Rail mm S1/1 Rail mm S4/3 Rail mm S4/1 Rail mm 5 Flat head Screw 184 6x60 6 Anchor a Rail joiner Suggested spots for holes on the rail (depending on the ground surface) S/1 S/1 S/ S/3 S/1 S/1 11
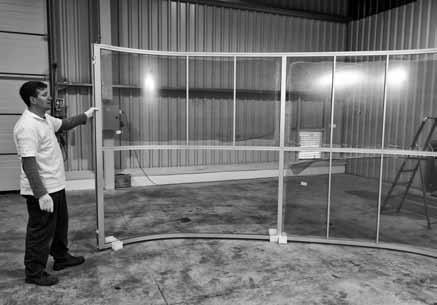
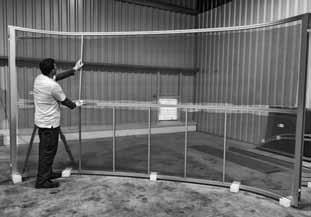
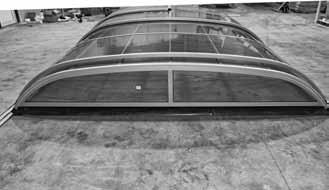
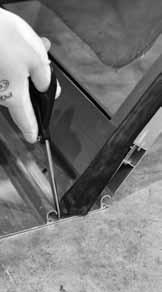
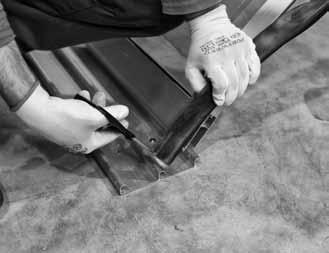
12 installation process 2 rail assembly first segment assembly intermediate segment assembly sliding door assembly sliding door rubber seal installation (next to the SAN plate) segment rubber seal installation mounting segments onto rails / end wall installation Sliding door installation Final assembly


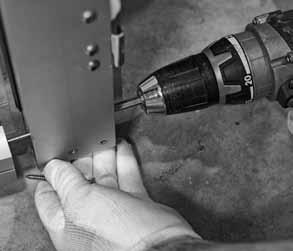
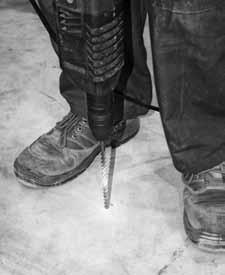
13 2 rail assembly a Hammer drill Hammer Measuring tape Cordless screw driver Cordless drill 13


14 2 rail assembly mm 7 mm 6 mm 10 mm 14


15 2 rail assembly mm 10 mm mm


16 2 rail assembly TRX TRX TRX 16
17 3 first segment assembly B3 1-U GS GS 1 1-B1 2 1-B2 Z 6 4a 1-H1 G 4b 1-HS Item nr. Item name Pcs Pcs Pcs Pcs Notes 1-B1 1. arch B2 2. arch B3 3. arch H Receiver profile HS Receiver profile with rail U SAN plate / PC plate Z Linking hollow section G Linking profile GS Linking profile with rail Flat head torx screw ,8 x 60 1 Pen head torx screw ,8 x 50 2 Pen head torx screw ,8 x 30 3 Rivet Receiver profile cap (including arrest) (L -R) right + 1 left 10 Receiver profile cap (L -R) right + 1 left 22 Outside rubber (double)* Cordless drill Window spray Cordless screw driver Rivet gun Rubber hammer Scissors 17
18 3 first segment assembly 1-B2 1-B3 G G 1-U U 1-B1 Z 1-H1 Gy1 Gy2 1-H2 Item nr. Item name Pcs Pcs Pcs Notes 1-B1 1. arch B2 2. arch B3 3. arch H1 Receiver profile - right H2 Receiver profile - left U SAN plate / PC plate Z Linking hollow section G Linking profile Flat head torx screw ,8 x 60 1 Pen head torx screw ,8 x 50 2 Pen head torx screw ,8 x 30 3 Rivet Receiver profile cap (including arrest) (L -R) right + 1 left 10 Receiver profile cap (L -R) right + 1 left 22 Outside rubber (double)* Cordless drill Window spray Cordless screw driver Rivet gun Rubber hammer Scissors 18


19 3 first segment assembly B3 1-B TRX * 1-HS = at the sliding door 1-H1 / 1-HS* U 19


20 3 first segment assembly *M5 ** a3, A4, a4/5, a G* / GS** Outside view B2 1-U TRX


21 3 first segment assembly U G* *A3, A4, A4/5, A5, M B


22 3 first segment assembly H1/1-HS*/1-H2** 3.22 * A3, A4, A4/5, A5 at the sliding door **M3, m4, m TRX TRX TRX 22


23 3 first segment assembly T2 4.1 mm TRX 4.1 mm TRX 2 TRX TRX


24 3 first segment assembly Z
25 4 intermediate segment assembly B2 B2 B3 B3 G** G U**/U1 U1 B1 B1 U2 U**/U2 H1 Gy1 ** = A5, M5 Z Z H2 Gy2 Item nr. Item name Pcs Pcs Pcs Pcs Notes x*-b1 1. arch x*-b2 2. arch x*-b3 3. arch H1 Receiver profile - right left H2 Receiver profile - left right x*-u SAN plate / PC plate x*-u1 SAN plate / PC plate x*-u2 SAN plate / PC plate Z Linking hollow section G Linking profile Flat head torx screw ,8 x 60 1 Pen head torx screw ,8 x 50 2 Pen head torx screw ,8 x 30 3 Rivet Receiver profile cap (including arrest) left + 1 right 11 Receiver profile cap (on rubber side) left + 1 right 22 Outside rubber (double)*** *x = number of segment (eg.: 2-B1 the first arch of the second segment) *** with SAN plates Cordless drill Window spray Cordless screw driver Rivet gun Rubber hammer Scissors 25


26 4 intermediate segment assembly 4.1 mm 4.2 x-b h1 1 4 TRX x-u**/x-u1 ** = A5, M5 26


27 4 intermediate segment assembly 4.7 x-b TRX 4.9 x-u**/x-u2 4.1 mm x-b1 **A5, m TRX 1 27


28 4 intermediate segment assembly 4.13 x-h TRX 1 TRX z 28

29 4 intermediate segment assembly 4.19 Repeat steps (see at page 21-22) 29
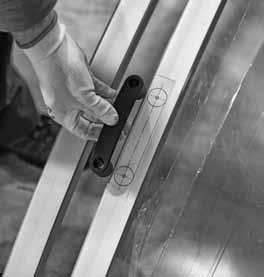
30 5 sliding door assembly 4 A-Z Z 1a H A-H 5 A-U B1 2 A-B 3 A-B B2 A-HM 1b Item nr. Item name Pcs Pcs Pcs Pcs Notes A-B 1. arch A-B 2. arch A-H Receiver profile A-HM Receiver profile marked A-U SAN plate / PC plate A-Z Linking hollow section Pen head torx screw Pop Rivet a Sliding door lock b Sliding door plug Plastic plug Sliding door bottom rubber Outside rubber (double)* *With SAN plates Cordless drill Window spray Cordless screw driver Rivet gun Rubber hammer Scissors 30


31 5 sliding door assembly a-hm 1 1 TRX A-U A-b * 1 A-H 21 TRX *A3, A4, A4/5 31


32 5 sliding door assembly 5.7* 5.8 *A3, A4, A4/5 TRX TRX A-Z a 32


33 5 sliding door assembly Outside view b


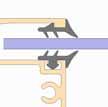
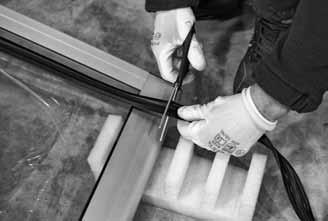


34 6 sliding door rubber seal installation (next to the SAN plate)


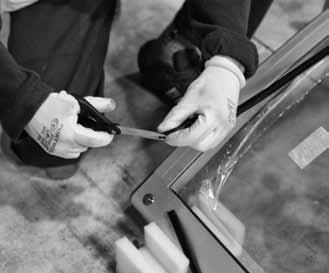
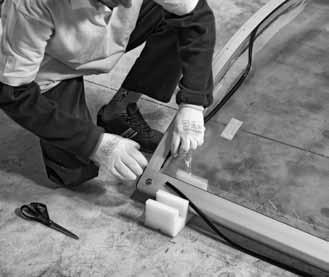
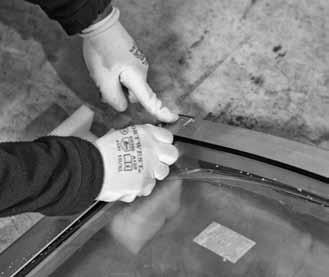

35 6 sliding door rubber seal installation (next to the SAN plate)


 6.")
36 6 sliding door rubber seal installation (next to the SAN plate)


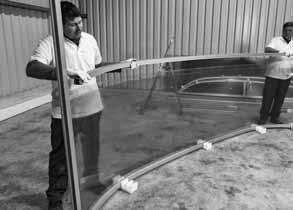
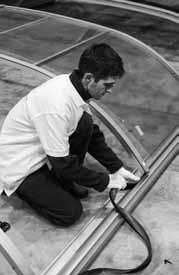
37 7 segment rubber seal installation

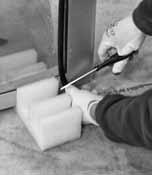
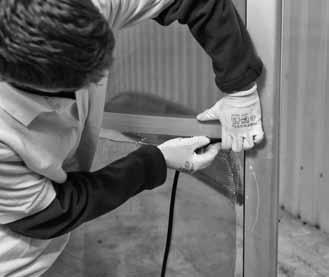

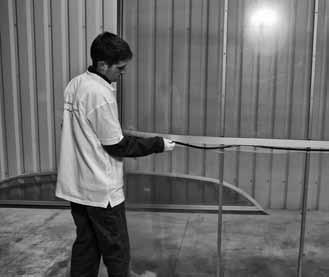
38 7 segment rubber seal installation


39 7 segment rubber seal installation


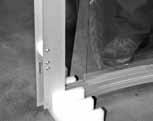
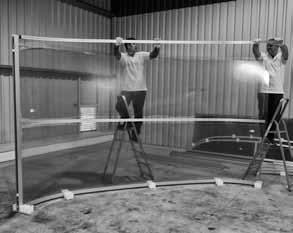
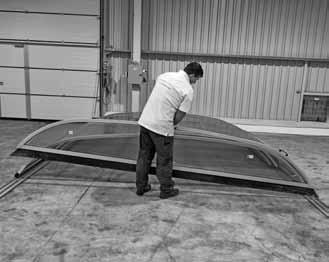
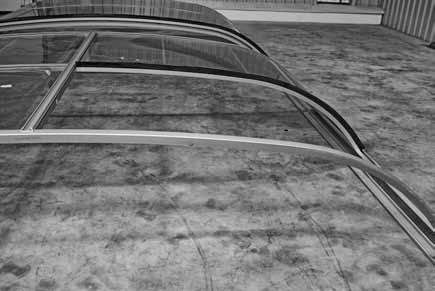
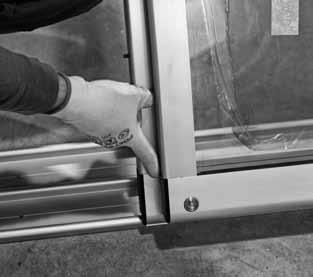
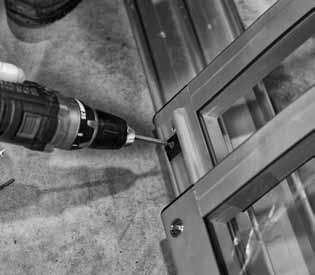
40 8 mounting segments onto rails


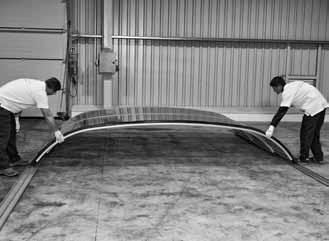

41 8 mounting segments onto rails end wall installation - last segment


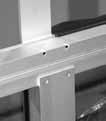
42 8 end wall installation - last segment end wall installation - FIRST segment a 16b 42


43 8 end wall installation - FIRST segment


44 9 Sliding door installation with A3 - A4 - A4/5 models 44


45 9 Sliding door installation with A5 models 45


46 9 Sliding door installation a 4.1 mm d TRX 8b 8c 46


47 9 Sliding door installation min 300 mm 18a b 7b 7c 7d TRX TRX 47


48 9 Sliding door installation a min 500 mm mm TRX 18b 12b 48 rail assembly
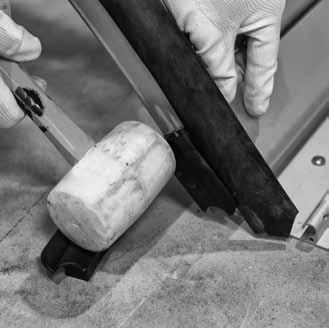
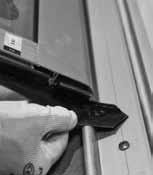
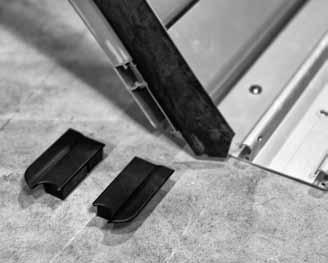
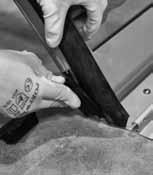
49 10 11 Final assembly Item nr. Item name Pcs Pcs Pcs Notes 20 Rubber seal Receiver profile end cap - rubber side b Rail buffer Latch sleeve Item nr. Item name Pcs Pcs Pcs Pcs Notes 20 Rubber seal 9, Receiver profile end cap - rubber side b Rail buffer a Rail joiner Latch sleeve Cordless drill Hammer drill Rivet gun Rubber hammer Scissors Spirit level 49


50 10 inter-segment rubber seal installation mm 10 mm


51 10 inter-segment rubber seal installation


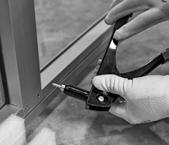
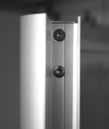
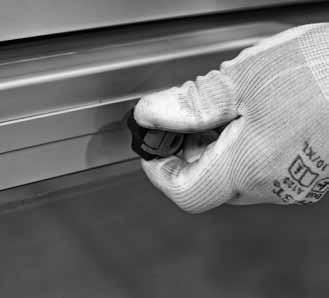
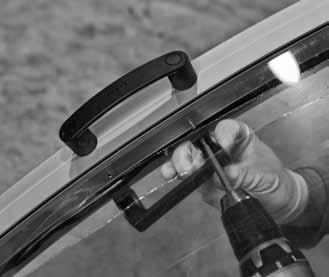
52 11 final assembly arrest system installation latch adjustment b mm


53 11 final assembly arrest system installation latch adjustment mm mm mm 7 mm 4.1 mm 53


54 11 final assembly arrest system installation latch adjustment


55 11 final assembly arrest system installation latch adjustment * 11.20* 11.21* 11.22* 13 6 mm 14 mm *a4, A4/5, a5, a6, M3, m4, m5 55


56 11 final assembly arrest system installation latch adjustment mm 14 mm


57 11 final assembly arrest system installation latch adjustment b 57
58 Notes 58
59 Notes 59
60
P o o L e n c L o s u r e s nova & classic Assembly manual
 P o o L e n c l o s u r e s Nova & Classic Assembly manual Box disassembly Model Outside dimensions weight Model Width Height Depth kg M3 4900 1350 410 240 PC M4 6300 1600 420 415 M5 6500 2000 530 685
NOVA COMFORT & STELLA COMFORT. Assembly manual. Rev
 P O O L E N C L O S U R E S NOVA COMFORT & STELLA COMFORT Assembly manual Rev. 2016.1 BOX DISASSEMBLY Model Outside dimensions Weight Name Type Glazing Width Height Depth kg Nova Comfort 3x6 A3 4750 1350
FRONT DOOR LOCK ACTUATOR (G531598)
") PUBLISHED: 11-MAY-2011 2006.50 XK RANGE (X150), 501-14 HANDLES, LOCKS, LATCHES AND ENTRY SYSTEMS FRONT DOOR LOCK ACTUATOR (G531598) REMOVAL AND INSTALLATION REMOVAL 1. Remove the window regulator. For
PUBLISHED: 11-MAY-2011 2006.50 XK RANGE (X150), 501-14 HANDLES, LOCKS, LATCHES AND ENTRY SYSTEMS FRONT DOOR LOCK ACTUATOR (G531598) REMOVAL AND INSTALLATION REMOVAL 1. Remove the window regulator. For
DV8 Tire Carrier Manufacturer Part Number TCSTTB-01 Model Number J104640
 DV8 Tire Carrier Manufacturer Part Number TCSTTB-01 Model Number J104640 Installation Time: 30 Minutes Tools Required: 19mm Socket 13mm Socket Ratchet T15 Torx Driver T50 Torx Driver Painters Tape Dremel
FREEDOM3 Portable Restroom Assembly Instructions
 FREEDOM3 Portable Restroom Assembly Instructions PN 21337 REV M - 1-1-19-17 FREEDOM 3 ASSEMBLY INSTRUCTIONS PN 21337 REV M -2-1-19-17 PARTS LIST: PN 21337 REV M - 3-1-19-17 INTRODUCTION Satellite portable
Tonneau Cover Fitting Instructions Ford PX Ranger XL Dual Cab With HeadBoard June Current
 Tonneau Cover Fitting Instructions Ford PX Ranger XL Dual Cab With HeadBoard June 2013 - Current Part Number: 10129 Package includes 1 x Tonneau Cover 1 x Warranty Card 2 x Bar Bracket (300474) 23 x 4
INSTALL/REMOVAL INSTRUCTIONS: WINDOW REGULATOR
 REMOVAL/INSTALL OF WINDOW REGULATOR (665-2542) Ford F-Series Pickup & Bronco 1980 96 General Tech Tips: Use painter s tape rather than duct tape to secure window. It will not damage paint or leave sticky
GENUINE PARTS INSTALLATION INSTRUCTIONS
 GENUINE PARTS INSTALLATION INSTRUCTIONS DESCRIPTION: APPLICATION: PART NUMBER: Fixed Bracket Bed Extender Titan (2016-) Bed Extender (999T7 W4100) Installation of this accessory requires installation of
Front bumper (Audi RS6)
") 63-1 Front bumper (Audi RS6) Assembly overview 1 - Air inlet grille To remove pull grille forward 2 - Air inlet grille To remove pull grille forward 3 - Screw 2.5 Nm 3x 4 - Bumper cover Together with impact
63-1 Front bumper (Audi RS6) Assembly overview 1 - Air inlet grille To remove pull grille forward 2 - Air inlet grille To remove pull grille forward 3 - Screw 2.5 Nm 3x 4 - Bumper cover Together with impact
RTS510 Rhino Heavy Duty Track Mount System - MITSUBISHI TRITON MK
 RTS510 Rhino Heavy Duty Track Mount System - MITSUBISHI TRITON MK Important: Please read these instructions carefully prior to installation. Please refer to your fi tting instruction to ensure that the
WK2 SNORKEL. Installation Instructions PLEASE READ AND UNDERSTAND ALL INSTRUCTIONS BEFORE YOU START
 WK2 SNORKEL Installation Instructions PLEASE READ AND UNDERSTAND ALL INSTRUCTIONS BEFORE YOU START Please note: This kit is specifically for diesel models only. WK2 Snorkel Installation Instructions Rev.
Convertible MM Roll Bar (MMRB-10.1 to -10.7)
") 3430 Sacramento Dr., Unit D San Luis Obispo, CA 93401 Telephone: 805/544-8748 Fax: 805/544-8645 www.maximummotorsports.com 1983-93 Convertible MM Roll Bar (MMRB-10.1 to -10.7) The Maximum Motorsports RB-10.1
3430 Sacramento Dr., Unit D San Luis Obispo, CA 93401 Telephone: 805/544-8748 Fax: 805/544-8645 www.maximummotorsports.com 1983-93 Convertible MM Roll Bar (MMRB-10.1 to -10.7) The Maximum Motorsports RB-10.1
K327W. Fitting Kit. Fitting Instructions for Basic Carrier. x 4 x 4 x 4 x 4. Revision No: 5E 1
 Fitting Kit Fitting Instructions for Basic Carrier x 4 x 4 x 4 x 4 Revision No: 5E 1 Items you will require: Attention: First Time Installation Tape measure Pen Cordless drill Depth stop Vacuum cleaner
insulated sectional 2180mm (h) x 2550mm (w) Opening Size: 2140mm (h) x 2500mm (w) suits single car garage
 x 2550mm (w) Opening Size: 2140mm (h) x 2500mm (w) suits single car garage") insulated sectional Garage Door 2180mm (h) x 2550mm (w) Opening Size: 2140mm (h) x 2500mm (w) suits single car garage Disclaimer This product should be installed by a competent person or suitably qualified
insulated sectional Garage Door 2180mm (h) x 2550mm (w) Opening Size: 2140mm (h) x 2500mm (w) suits single car garage Disclaimer This product should be installed by a competent person or suitably qualified
INSTALL/REMOVAL INSTRUCTIONS: WINDOW REGULATOR
 REMOVAL/INSTALL OF WINDOW REGULATOR (740-754) Ford F-Series Pickup & Bronco 1980 96 General Tech Tips: Use painter s tape rather than duct tape to secure window. It will not damage paint or leave sticky
Self tapping fasteners for timber batten to concrete and brickwork
 Self tapping fasteners for timber batten to and brickwork Self tapping fasteners for and brickwork Technical information TI Material: S = Austenitic stainless steel, grade 304 (European Standard 1.4301)
wiring instructions NEW FORD WIRE MOD 60 INCH BLADE INCH BLADE
 wiring instructions 2018-2019 + NEW FORD WIRE MOD New technologically advanced logic box solves and eliminates all codes from trailering, backup assist, BLIS (Blind Spot Information System) and all currently
Tavlesystemdele Tav T l av es l y es s y t s em em e d l e e Indholdsfortegnelse Indho ndho d l s d f s or f t or e t g e ne g l ne s l e T
 Catalogue 2014 Tabula Catalog 2014 Table of Contents Table of Contents Switchboard System Parts Article umber Index 2014 - Tabula Switchboard System Parts Section: Group: Section: Group: Section: Group:
Factory Five Racing, Inc. 818 Kit Assembly manual revision 1J update
 Factory Five Racing, Inc. 818 Kit Assembly manual revision 1J update Turbo coolant overflow tank...1 Shifter handle...4 Install...4 Door skin...7 Door Liner... 10 Side mirrors... 14 Door handles and pulls...
INSTALLATION INSTRUCTIONS
 INSTALLATION INSTRUCTIONS Accessory Application Publications No. 3RD ROW P/N 08R12-SHJ-100 2006 ODYSSEY AII 30563-31117 Issue Date OCT 2005 PARTS LIST Left side rear sunshade Driver s Side 1. Remove the
Water Wizard Arch. Service Manual W 34th St, Houston, TX
 Water Wizard Arch Service Manual 5842 W 34th St, Houston, TX 77092 1.800.999.9878 1.713.683.9878 www.colemanhanna.com Find us on Facebook: /ColemanHannaCarwash 1.0 Installation The following information
SS77HFZ Toyota Land Cruiser 70 series (Wide Nose) Suits: 4.2L 6cyl Diesel (1HZ engine) Replaces Factory Toyota Raised Air Intake (Genuine Snorkel)
 Suits: 4.2L 6cyl Diesel (1HZ engine) Replaces Factory Toyota Raised Air Intake (Genuine Snorkel)") SS77HFZ Toyota Land Cruiser 70 series (Wide Nose) Suits: 4.2L 6cyl Diesel (1HZ engine) Replaces Factory Toyota Raised Air Intake (Genuine Snorkel) Parts List 15/02/2011 ITEM PART NO DESCRIPTION QTY 1 330-133-700
SS77HFZ Toyota Land Cruiser 70 series (Wide Nose) Suits: 4.2L 6cyl Diesel (1HZ engine) Replaces Factory Toyota Raised Air Intake (Genuine Snorkel) Parts List 15/02/2011 ITEM PART NO DESCRIPTION QTY 1 330-133-700
ST Soft Enclosure Assembly Instructions
 ST Soft Enclosure Assembly Instructions Treker 4220ST & 4420ST Series Manual No. 701-192M 25678 25679 Before You Start! When you see this symbol, the subsequent instructions and warnings are serious -
Here I Will Explain How To Install Recon Cab Lights In A 3rd Gen Dodge Ram.
 1 P age Here I Will Explain How To Install Recon Cab Lights In A 3rd Gen Dodge Ram. *Now, There Are Many Ways of Installing Them, Including Wiring Methods, Wiring Connectors, And Other Variables - In This
Mustang Classic LightBar Instructions
 1994-2004 Mustang Classic LightBar Instructions Note: Read installation instructions before starting. Component List: 1 LightBar 4 Poly Plugs 4 LightBar Bolts 4 LightBar Washers 2 LightBar Rivets 2 Light
LOCKN LOAD FIRST TIME INSTALLATION
 LOCKN LOAD TM TRACK MOUNTING KIT FORD RANGER PX / MAZDA BT-50 DUAL CAB 2011 + 2 BAR TRACK HEAVY DUTY ROOF RACK SYSTEM MAX VEHICLE ROOF LOAD RATING: 100KG TOTAL LOAD EQUALS WEIGHT OF ROOF RACKS + ACCESSORIES
INSTALLATION INSTRUCTIONS
 INSTALLATION INSTRUCTIONS Accessory Application Publications No. THIRD-ROW P/N 08R12-SHJ-100 2008 ODYSSEY AII 38141 Issue Date OCT 2007 PARTS LIST Left rear sunshade Driver s Side 1. Remove the spare tire
INSTALL/REMOVAL INSTRUCTIONS: WINDOW LIFT MOTOR
 REMOVAL/INSTALL OF WINDOW REGULATOR (742-269) Ford Mustang 1996 2004 General Tech Tips: Use painter s tape rather than duct tape to secure window. It will not damage paint or leave sticky residue. A plastic
Deuce/Ace Installation Instructions
 HARDWARE KIT: Upper Mounting Plate: 2-7/16" (11mm) X 3.5" bolts 2-7/16" flange nuts 2-2" spacers 2-7/16" trim cap mounting washers 2 - plastic trim caps TOOLS NEEDED: safety glasses wrenches 16mm or 5/8"
ISNORKEL037 VOLKSWAGEN AMAROK
 INSTALLATION GUIDE ISNORKEL037 VOLKSWAGEN AMAROK Ironman 4x4 Snorkel fits to the right hand side of the Volkswagen Amarok, both flared and non-flared models. It will take about 4 hours to install. Below
Mustang CDC Lightbar (94-04) - Installation Instructions
 - Installation Instructions") Mustang CDC Lightbar (94-04) - Installation Instructions The below installation instructions work for the following products: Classic Design Concepts Mustang Convertible Lightbar (94-04 Carbon Fiber) Classic
Mustang CDC Lightbar (94-04) - Installation Instructions The below installation instructions work for the following products: Classic Design Concepts Mustang Convertible Lightbar (94-04 Carbon Fiber) Classic
NB7FI05SY / NBFI05SY FIAT DUCATO 76mm SERIES 2 NUDGE BAR and 76mm NUDGE BAR
 NB7FI05SY / NBFI05SY FIAT DUCATO 76mm SERIES 2 NUDGE BAR and 76mm NUDGE BAR REPLACES: 24.07.10 REVISED: 22.01.15 To the Fitter, This instruction covers two models of this vehicle. The difference between
Installation, Operating Instructions and Replacement Parts Installation video available at
 Installation, Operating Instructions and Replacement Parts Installation video available at www.kool-shield.com/support/ Made in the USA By Humboldt Specialty Manufacturing Co. www.kool-shield.com Revision
Sliding Door Fittings, Roller Shutters Pivot Sliding Door Fittings
 Ultra 20 Swing Door fitting, door weight up to 20 kg Area of application: Door swings out to the front and to the side when being opened, allowing unlimited access to the cabinet interior, can be used
RTS518 - Rhino Heavy Duty 2 & 3 Crossbar System Hyundai iload, imax, i800, H-1.
 RTS518 - Rhino Heavy Duty 2 & 3 Crossbar System Hyundai iload, imax, i800, H-1. NOTE: Please read these instructions carefully prior to installation. Check the contents of kit before commencing fi tment
5 x 1.8mm ASSEMBLY GUIDE
 5 x.8 7 ASSEMBLY GUIDE B E T A E D I T I O N. 0 DISCLAIMER B E T A E D I T I O N. 0 ASSEMBLY GUIDE FOR EVALUATION PURPOSES ONLY Whilst every effort has been made to ensure the information in the following
AUDIO KIT P/N APPLICATION BEFORE YOU BEGIN KIT CONTENTS. Verify accessory fitment at Polaris.com.
 AUDIO KIT P/N 2882696 APPLICATION Verify accessory fitment at Polaris.com. BEFORE YOU BEGIN Read these instructions and check to be sure all parts and tools are accounted for. Please retain these installation
INSTALLATION INSTRUCTIONS
 INSTALLATION INSTRUCTIONS Accessory Application Publications No. 3RD ROW AII 27366 ODYSSEY Issue Date P/N 08R12-SHJ-100 SEP 2004 PARTS LIST Left side rear sunshade Driver s Side 1. Remove the left speaker
LAND ROVER DISCOVERY 3/ SPARE WHEEL CARRIER
 LAND ROVER DISCOVERY 3/ 4 SPARE WHEEL CARRIER RBLD007 INSTALL TIME: 4.5 Hours NOTE: Park Distance Control will be affected by this fitment and the customer should be informed. IMPORTANT WARNING! IT IS
PRP Seats 570/800/900 RZR 4 Doors
 Install Instructions PRP Seats 570/800/900 RZR 4 Doors Remove all parts from the box and unwrap completely using the packaging to lay out the pieces. Tools Needed: (not included) 7/16 Open end wrench and
Place these instructions in vehicle s glove box after installation is complete. Clean Tonneau Cover with a mild detergent and water solution.
 Place these instructions in vehicle s glove box after installation is complete Installation Time: Approx. 60 Minutes Care Instructions: Clean Tonneau Cover with a mild detergent and water solution. Do
Master Your Terrain (307) Rear Swing-out Tire Carrier Jeep CJ. Installation Instructions
 Rear Swing-out Tire Carrier Jeep CJ. Installation Instructions") Master Your Terrain (307) 775 9565 www.tntcustoms.com Rear Swing-out Tire Carrier Jeep CJ Installation Instructions Congratulations for purchasing a TNT, Inc. Rear Swing-out Tire Carrier for your Jeep
Master Your Terrain (307) 775 9565 www.tntcustoms.com Rear Swing-out Tire Carrier Jeep CJ Installation Instructions Congratulations for purchasing a TNT, Inc. Rear Swing-out Tire Carrier for your Jeep
3PC TONNEAU COVER WITH SPORTS BAR INSTALLATION INSTRUCTIONS
 3PC TONNEAU COVER WITH SPORTS BAR INSTALLATION INSTRUCTIONS TC00d / Vehicle Description: NISSAN NAVARA D0 DUAL CAB 3-PIECE TONNEAU COVER PARTS LIST NO. PART NAME QTY. NO. PART NAME QTY. NO. PART NAME QTY.
INSTRUMENT PANEL WARPAGE REPAIR
 PAGE 1 OF 15 AFFECTED VEHICLES: INSTRUMENT PANEL WARPAGE REPAIR ALL 1999-2000 MODEL YEAR CONTOUR AND MYSTIQUE OVERVIEW NOTE! Revisions to the technical instructions are indicated in RED text. This document
Installation of Splash Guards with Pony Logo without Drilling Into the Rear Fender Well: (2008 and Similar Models)
") Installation of Splash Guards with Pony Logo without Drilling Into the Rear Fender Well: (2008 and Similar Models) NOTE: This installation does not require drilling into your wheel well or using the included
Installation of Splash Guards with Pony Logo without Drilling Into the Rear Fender Well: (2008 and Similar Models) NOTE: This installation does not require drilling into your wheel well or using the included
INSTALLATION INSTRUCTIONS
 INSTALLATION INSTRUCTIONS Accessory P/N 08L96-SZA-100A Application 2011 PILOT Publications No. AII 43295 Issue Date MARCH 2010 PARTS LIST Advanced cargo net 2 Anchors A (Large) TOOLS AND SUPPLIES REQUIRED
 INSTALLATION INSTRUCTIONS Accessory P/N 08L96-SZA-100A Application 2015 PILOT Publications No. AII 51544 Issue Date MAY 2014 PARTS LIST Advanced cargo net 2 Anchors A (Large) 4 Anchors B 6 Self-tapping
INSTALLATION INSTRUCTIONS
 INSTALLATION INSTRUCTIONS Accessory D P/N 08L96-SZA-100A Application 2010 PILOT Publications No. AII 41635 Issue Date MAY 2009 PARTS LIST Advanced cargo net 2 Anchors A (Large) TOOLS AND SUPPLIES REQUIRED
Made for Life GF-04W1. Air Tire Buffer. Air Angle Die Grinders 0.5HP (115 ) (18,000 rpm) Mini Air Die Grinders 0.3HP (25,000 rpm)
 (18,000 rpm) Mini Air Die Grinders 0.3HP (25,000 rpm)") Air Tire Buffer Spindle Thread 502653 3/8" Mini Air Die Grinders 0.3HP (25,000 rpm) Spindle Thread 125036 6mm 125032 1/4" Mini Air Angle Die Grinders 0.3HP (90 ) (20,000 rpm) 120036 6mm 120032 1/4" Air
Air Tire Buffer Spindle Thread 502653 3/8" Mini Air Die Grinders 0.3HP (25,000 rpm) Spindle Thread 125036 6mm 125032 1/4" Mini Air Angle Die Grinders 0.3HP (90 ) (20,000 rpm) 120036 6mm 120032 1/4" Air
Trident Universal. Installation Manual
 Trident Universal Installation Manual Revision 1.1; Updated: July 6, 2017 Table of Contents Tool List 03 Installation Tool List Pre-Install Preparation 04 Lateral Panel Modifications 07 Top Panel Modifications
IN-TANK TECHNOLOGY REPAIR GUIDANCE: BX1200 & BX650 IMPELLER REPLACEMENT
 Page 1 REPAIR GUIDANCE: BX1200 & BX650 IMPELLER REPLACEMENT Referring to the Exploded Views of the BX1200 or BX650 (Pages 5 & 6) and to the photo pages that follow, use the procedure shown below. Important:
NM-NP Pajero Rhino Heavy Duty - Two Bar Trackmount System
 NM-NP Pajero Rhino Heavy Duty - Two Bar Trackmount System Parts List Important: Please read these instructions carefully prior to installation. Please refer to your fitting instruction to ensure that the
1464. Interior Installation. Cover Rear Seat Support Cut the vinyl to approximately the size of the rear seat support.
 Chapter 37 (Video Clip 37) - Interior Installation 1464. Interior Installation Cover Rear Seat Support 1465. Cut the vinyl to approximately the size of the rear seat support. 1466. Make a dry fit of the
Copyright Birkin Cars (Pty) Ltd
 Ltd") GROUP EIGHT 1st Edition UPHOLSTERY AND INTERIOR Assemblies included In this group: - 8.1 8.2 8.3 K3601 164AB K3601 161AB K3601 166AB CARPETS BACK REST PANEL SEATS Tools required for assembly of this group:
GROUP EIGHT 1st Edition UPHOLSTERY AND INTERIOR Assemblies included In this group: - 8.1 8.2 8.3 K3601 164AB K3601 161AB K3601 166AB CARPETS BACK REST PANEL SEATS Tools required for assembly of this group:
Accessories. Chapter 16
 Accessories Chapter 01 01 Accessories Rods for espagnolette locks Rod ø6 article-no. execution L pack. stock.0 steel nickel plated 00 1 pcs a.0 with plastic covered, brown 00 1 pcs a.5 with plastic covered,
The Teconnex V Clamp
 The Teconnex V Clamp Description V Clamps (also known as V Band Clamps) consist of a series of profiled segments welded within an outer strap and are of fabricated construction. Teconnex V Clamps are used
BMW E46 Convertible Hydraulic Line #23 Replacement Guide Created by taylor192 of E46Fanatics.com
 BMW E46 Convertible Hydraulic Line #23 Replacement Guide Created by taylor192 of E46Fanatics.com BMW E46 Line #23 Replacment Guide, page 1 of 23 Background: Line #23 runs from the valve block on the driver's
RTS507 NISSAN Navara Dual Cab Track Mount System
 Place these instructions in the vehicle s glove box after installation is complete. Parts List Important: Please read these instructions carefully prior to installation. Please refer to your fi tting instruction
SCION FR-S CENTER ARMREST Preparation
 Preparation Part Number: PT478 18130 Kit Contents Item # Quantity Reqd. Description 1 1 LH Bracket 2 1 RH Bracket 3 1 LH Extrusion 4 1 RH Extrusion 5 1 Slide Assembly 6 4 4.0mm PT (Torx) Screws 7 1 Armrest
The specialist for fastening technology. Post holders NEW. to our product range
 Post holders H post anchors H post anchors Fork width Dimensions a) Drill holes b) Art. no. (mm) Overall/Post support (mm) Post support (mm) PU 904722 91 600 x 60 / 300 4 x 11 904723 101 600 x 60 / 300
TITAN V3: assembly and calibration manual
 TITAN V3: assembly and calibration manual Please read quickstart guide included in the kit before starting installation process. Please note that this is beta version of manual. The full version of manual
NM-NP Pajero Rhino Heavy Duty - Two Bar Trackmount System
 NM-NP Pajero Rhino Heavy Duty - Two Bar Trackmount System Parts List Important: Care Instruction: Clean vehicle roof prior to fi tting Rhino Heavy Duty roof racks. Tools Required: Pneumatic or concertina
INSTALLATION INSTRUCTIONS
 INSTALLATION INSTRUCTIONS Accessory Application Publications No. 2007 CIVIC SI AII 33461 SIDE Issue Date AUG 2006 PARTS LIST Left side under spoiler PARTS LIST Left side sticker (Sold separately) Right
FS3 Fleet Series Non-Flushing Model Assembly Manual U.S. PATENTS: 5,500,960-5,500,962-5,560,050-6,199,222 D 360,471
 FS3 Fleet Series Non-Flushing Model Assembly Manual U.S. PATENTS: 5,500,960-5,500,962-5,560,050-6,199,222 D 360,471 SPECIFICATIONS DIMENSION IMPERIAL METRIC Exterior Height 91 in 231 cm Interior Height
Orders or questions? Call (800)
") Necessary Tools Tool Supplier Part # Air-Powered Rivet Gun McMaster-Carr 66705A51 Cordless Drill w 3/8 Chuck Dewalt DCD710S2 20 Volt Impact Driver w 1/2 drive Dewalt DC822KL 13/64 drill bit, 2-1/4 long
Necessary Tools Tool Supplier Part # Air-Powered Rivet Gun McMaster-Carr 66705A51 Cordless Drill w 3/8 Chuck Dewalt DCD710S2 20 Volt Impact Driver w 1/2 drive Dewalt DC822KL 13/64 drill bit, 2-1/4 long
Rutgerson 32mm Self-tacking Jib System manual - English
 Rutgerson 32mm Self-tacking Jib System manual - English Follow these instructions to obtain maximum performance from the Rutgerson self-tacking jib system. The track has a given optimal placement that
NIS NAV AM (MY15 >) - Aluminium Tonneau Cover ATC0051 (silver) ATC0052 (Black) Installation Time: Approx. 60 Minutes WARNING!
 - Aluminium Tonneau Cover ATC0051 (silver) ATC0052 (Black) Installation Time: Approx. 60 Minutes WARNING!") Installation Time: Approx. 60 Minutes WARNING! When in the closed position, Aluminium Tonneau Cover must be latched and tailgate must be closed. Failure to do so could result in unexpected opening of the
Installation Time: Approx. 60 Minutes WARNING! When in the closed position, Aluminium Tonneau Cover must be latched and tailgate must be closed. Failure to do so could result in unexpected opening of the
PC45 Air PumP replacement kit- For replacing A denver-gardner PumP with A hiblow PumP.
 PC45 Air PumP replacement kit- For replacing A denver-gardner PumP with A hiblow PumP. Air pump # 3-20-02679 (Sold separately) Please read the entire instructions prior to beginning the project. kit Contents
Instruction No Version Part. No , , , , , , , ,
 Instruction No Version Part. No. 30744180 1.2 30794160, 30794013, 30794026, 30794039, 31213192, 30794102, 30794138, 30794151, 30794075 Body kit IMG-256183 Page 1 / 13 Equipment A0000162 A0000163 IMG-239940
RVDRT & RVVRT Model 404 to 408
 All-Star 00% Oil Free Rotary Vane Pump & Compressor RVDRT & RVVRT Model 0 to 08 0 0 0 ( version RVDRT* pcs ) 30 3 3 33 3 35 0 (version RVVRT ) 3 ( version RVDRT ) 50 60 ( version RVDRT ) 70 ( version RVVRT
Air Filter Element, Replacing and Cleaning Housing
 Air Filter Element, Replacing and Cleaning Housing Note Only use silicone-free lubricant for assembling the intake hoses. Secure all hose connections with hose clamps that match current standard production.
THE SERIES-E POWR Slider
 C.R. LAURENCE CO., INC. PATENT NO. 4,920,698 THE SERIES-E POWR Slider MODEL: EPC814S 2014+ CHEVY/GMC SILVERADO/SIERRA 1500 NAGS: DY90122PK5 ELECTRIC SLIDING REAR WINDOW 2014 + CHEVY/GMC SILVERADO/SIERRA
INSTALLATION INSTRUCTIONS
 INSTALLATION INSTRUCTIONS Accessory P/N 08P48-T3L-100 Application 2013 ACCORD 2-DOOR Publications No. AII 13018 Issue Date OCT 2012 PARTS LIST Rear bumper applique Illustration of the Rear Bumper Applique
MAXIMA WITH BOSE AUDIO; REAR PARCEL SHELF RATTLE/BUZZ NOISE
 Classification: Reference: Date: BT01-030A NTB01-051A October 18, 2001 2000-2001 MAXIMA WITH BOSE AUDIO; REAR PARCEL SHELF RATTLE/BUZZ NOISE ATTENTION: This bulletin Amends the Service Information and
SHELF STAXX ACCESSORY INSTALLATION INSTRUCTIONS
 The Narrow Depth Long Component Tray (Depth 3) is compatible with 100-grid Staxx kits. The Component Tray kits include mounting brackets, screws and nuts. One section of the component tray will have a
Performance requires quality.
 131 - With straight shank and square - Left-hand spiral 7-8 - First cut 1/4 of the cutting length (l 2 ) - Accuracy Hand Reamers DIN 26. Not suitable for blind holes. d 1 l 2 l 1 d 2 131 2, 25 5 1,6 21
Installation Instructions
 Instructions Created by an: Samurai Rear Diamond Plate Corners (Pre-bent) (SKU# SEB-RDP) Installation Instructions CAUTION: Safety glasses should be worn at all times when working with vehicles and related
JEEP XJ CHEROKEE REAR LOWER QUARTER PANEL ARMOR INSTALL INSTRUCTIONS
 JEEP XJ CHEROKEE REAR LOWER QUARTER PANEL ARMOR INSTALL INSTRUCTIONS Please read the mounting instructions below carefully before attempting to install. Thank you for purchasing your new armor from JcrOffroad!
A S S E M B L Y & I N S T A L L A T I O N G U I D E
 A S S E M B L Y & I N S T A L L A T I O N G U I D E APPLICATION 2015-2016 2015-2016 PART # 7416-00A Silver 7416-01A Black INSTALLATION TIME 1 Hour 1 SKILL LEVEL 2 3 4 1= Easy TOOLS REQUIRED Phillips screw
LK Shunt Cabinet VS2, Shunt Cabinet VS2 Prefab
 LK Shunt Cabinet VS2, Shunt Cabinet VS2 Prefab Design LK Shunt Cabinet VS2 The LK Shunt Cabinet VS2 is designed to be used when you wish to hide the LK Manifold RF and LK Manifold Shunt VS2. The cabinet
One Piece Products. Series XI Ford F SERIES TRUCKS One Piece Door Glass Conversion Manual.
 *Registered Trademark One Piece Products *Patent Pending Series XI 1980-1996 Ford F SERIES TRUCKS One Piece Door Glass Conversion Manual www.onepieceproducts.com (888)One Products (888)663-7763 1 Installation
INSTALLATION INSTRUCTIONS
 INSTALLATION INSTRUCTIONS Accessory P/N 08L96-SZA-100A Application 2009 PILOT Publications No. AII 39403 Issue Date MAY 2008 PARTS LIST Advance cargo net 2 Anchors A (Large) TOOLS AND SUPPLIES REQUIRED
Service manual Be-Ge 3000
 008-11-14 1(11) 30-/31 series 34- series This service manual is a complement to your user manual and guidance for daily inspection and easier repairs, note that some technical knowledge will be necessary
HVAC YOUR YOUR FALL INTO WINTER SAVINGS CHOICE CHOICE. Low-Profile Backpack ( ) M18 ROVER LED Flood Light ( )
 M18 ROVER LED Flood Light ( )") HVAC FALL INTO WINTER SAVINGS YOUR CHOICE M18 Compact Blower (0884-20) Low-Profile Backpack (48-22-8202) M12 Metal Flashlight (2355-20) M18 ROVER LED Flood Light (2361-20) M12 Four Bay Sequential Charger
HVAC FALL INTO WINTER SAVINGS YOUR CHOICE M18 Compact Blower (0884-20) Low-Profile Backpack (48-22-8202) M12 Metal Flashlight (2355-20) M18 ROVER LED Flood Light (2361-20) M12 Four Bay Sequential Charger
CANOPY INSTALLATION INSTRUCTIONS. Holden Colorado LX and LT-R
 CANOPY INSTALLATION INSTRUCTIONS Holden Colorado LX and LT-R (007 Production Onwards) Installation Time: Hour (Approximately) Without Bed Liner Hour 45 Minutes (Approximately) With Bed Liner Care Instructions:
COLD AIR INTAKE INSTALLATION INSTRUCTIONS. # D Fits: E92 328i & xdrive PARTS LIST
 COLD AIR INTAKE INSTALLATION INSTRUCTIONS # D760-9001 Fits: 2007-13 E92 328i & xdrive PARTS LIST (1) Intake Snorkel (1) Flex Tube (1) Brake Scoop Assy (1) Front Grill (1) Filter (1) Hardware Kit (2) Edge
Automatic Roof Hatch Opener
 Automatic Roof Hatch Opener Installation Guide REQUIRED TOOLS (These tools are required to complete the installation) Cordless Drill 1/8 1/4 Drill Bits 1/8 Pin Punch #2 Philips Bit Rachet Sharpie Hammer
SS41HF Mitsubishi Pajero NS & NT V8/V9 Series 3.2 Litre Turbo Diesel (4M41 Engine) 3.8 Litre V6 Petrol (6G76 Engine)
 3.8 Litre V6 Petrol (6G76 Engine)") SS41HF Mitsubishi Pajero NS & NT V8/V9 Series 3.2 Litre Turbo Diesel (4M41 Engine) 3.8 Litre V6 Petrol (6G76 Engine) 21/7/2010 Parts List ITEM PART NO DESCRIPTION QTY 1 570-133-200 BODY - SNORKEL (SS41HF)
SS41HF Mitsubishi Pajero NS & NT V8/V9 Series 3.2 Litre Turbo Diesel (4M41 Engine) 3.8 Litre V6 Petrol (6G76 Engine) 21/7/2010 Parts List ITEM PART NO DESCRIPTION QTY 1 570-133-200 BODY - SNORKEL (SS41HF)
Copyright Qimarox B.V.
 Assembly instructions PRORUNNER mk5 Version 2.0 / 01-JUN-2013 Copyright Qimarox B.V. All rights reserved. No part of this document may be copied, stored in a database and/or published by means of printing,
Installation Instructions
 Installation Instructions Page 1 of 15 December 2006 Equipment Parts, Trailer Hitch Ver 1.0 Accessory Development SUBJECT MODEL TRAILER HITCH KIT (US Only) - P/N 71 60 0 413 359 X5 (E70): Select Vehicle
D.I.Y SUSPENDED GLASS BALUSTRADING POWDER COATED (Black / White / Bronze)
") SUSPENDED GLASS BALUSTRADING POWDER COATED (Black / White / Bronze) A LANDING: WELDED BASE START / END (2 clamps) R 362.00 B LANDING: WELDED BASE INTERMEDIATE (4 clamps) R 524.00 C LANDING :NO BASE START
SUSPENDED GLASS BALUSTRADING POWDER COATED (Black / White / Bronze) A LANDING: WELDED BASE START / END (2 clamps) R 362.00 B LANDING: WELDED BASE INTERMEDIATE (4 clamps) R 524.00 C LANDING :NO BASE START
Tools Needed for Mounting Cleá Filling Station
 ALWAYS OBSERVE PRODUCT SAFETY AND HANDLING INSTRUCTIONS. ALWAYS DIRECT DISCHARGE AWAY FROM YOU or other persons. ALWAYS DISPENSE CLEANERS AND CHEMICALS AS DIRECTED ON THE LABEL. ALWAYS DISPENSE INTO APPROVED
SS1066HF Jeep JK Wrangler Left Hand Drive CRDI4 2.8Litre-I4 Diesel Engine and EGHV6 3.8Litre V6 Gasoline Engine
 SS1066HF Jeep JK Wrangler Left Hand Drive CRDI4 2.8Litre-I4 Diesel Engine and EGHV6 3.8Litre V6 Gasoline Engine Installation Guide Safari SS1066HF Page - 1 of 12 6/10/2009 ITEM PART NO DESCRIPTION QTY
COYOTE 28" GLC (Ground Level Closure) Complete Assembly Installation
 Complete Assembly Installation") NOVEMBER 2016 COYOTE 28" GLC (Ground Level Closure) Complete Assembly Installation Be sure to read and completely understand this procedure before applying product. Be sure to select the proper PREFORMED
NOVEMBER 2016 COYOTE 28" GLC (Ground Level Closure) Complete Assembly Installation Be sure to read and completely understand this procedure before applying product. Be sure to select the proper PREFORMED
MDS Dead-front Padmount Switchgear Style Guide 1VAM SG May 2010 Revision D
 MDS Dead-front Padmount Switchgear Style Guide 1VAM224804-SG May 2010 Revision D The MDS style guide aids in the proper selection of your style number. When ordering the MDS, the style number must be given
PD15-UL-M KIT INSTRUCTIONS
 PD5-UL-M KIT INSTRUCTIONS The Command Access PD5-UL-M-KIT is a field-installable motorized latchpullback kit for the Jackson 85/95 & AHT 8/9 series devices. A. B. C. D. E. F. G. H. I. KIT INCLUDES TOOLS
3.1 DISPENSER BLACK SHADOW SERIES. Tools Needed for Mounting SCS Dispenser Hammer
 SCS 2 BLACK SHADOW SERIES 3.1 DISPENSER ALWAYS OBSERVE PRODUCT SAFETY AND HANDLING INSTRUCTIONS. ALWAYS DIRECT DISCHARGE AWAY FROM YOU or other persons. ALWAYS DISPENSE CLEANERS AND CHEMICALS AS DIRECTED
INSTALLATION INSTRUCTIONS
 INSTALLATION INSTRUCTIONS Accessory Application Publications No. 2006 CIVIC AII 30895 SIDE 2-DOOR Issue Date SEP 2005 PARTS LIST PARTS LIST Left side sticker Left side under spoiler Right side sticker
Installation Instructions
 Contents Page General Information and Installer Tips.......... 2 Panels & Posts............................. 3 Enclosure Description..................... 4 Hinge Door Hardware................... 4-5 Step-by-Step
M R Ford Racing Mustang Cobra R Air Dam INSTALLATION INSTRUCTIONS
 Please contact the Tech Hot Line for the most current instruction information (586) 468-1356!!! PLEASE READ THE FOLLOWING INSTRUCTIONS CAREFULLY PRIOR TO INSTALLATION!!! INTRODUCTION: Ford Racing has developed