NOVA COMFORT & STELLA COMFORT. Assembly manual. Rev
|
|
|
- Abraham Spencer
- 5 years ago
- Views:
Transcription

1 P O O L E N C L O S U R E S NOVA COMFORT & STELLA COMFORT Assembly manual Rev
2 BOX DISASSEMBLY Model Outside dimensions Weight Name Type Glazing Width Height Depth kg Nova Comfort 3x6 A Nova Comfort 3x7,5 A3/ Nova Comfort 3,5x7 A4S Nova Comfort 3,5x8,5 A4L TH* Nova Comfort 4x8 A Nova Comfort 4x10 A4/ Nova Comfort 5x10 A Nova Comfort 3x6 A Nova Comfort 3x7,5 A3/ Nova Comfort 3,5x7 A4S Nova Comfort 3,5x8,5 A4L CL** Nova Comfort 4x8 A Nova Comfort 4x10 A4/ Nova Comfort 5x10 A Model Outside dimensions Weight Name Type Glazing Width Height Depth kg Stella Comfort 3x6 M Stella Comfort 4x8 M TH* Stella Comfort 4x10 M4/ Stella Comfort 5x10 M Stella Comfort 3x6 M Stella Comfort 4x8 M CL** Stella Comfort 4x10 M4/ Stella Comfort 5x10 M *TH: PC Thermo = double walled polycarbonate sheet **CL: PC Clear = solid, transparent polycarbonate sheet 2

3 BOX DISASSEMBLY
4 PART LIST Part list No. Name Type 1 4,8x50 pen head TRX screw a Wedge + 4,2x10 pen head TRX screw b TRX screw Pop rivet 12 mm a Square lock b flat nut c plug x60 pen head TRX screw Anchor a Interior handle b 4,8x25 pen head TRX screw c Washer d Screw cap a Handle b Washer c 4,8x50 pen head TRX screw d Screw cap Receiver profile cap L/R 71340/41 10a Hidden arrest L/R 71376/77 10b M6 nut c Washer d M6x8 pen head screw e M6x35 pen head screw f Lock pin Receiver profile cap (on rubber side) L/R 71338/39 12a Rocker Lever b M6x35 pen head screw c M6 nut d Sleeve Latch Sleeve a Rail join comfort b Rail buffer comfort L/R 71347/48 14 c Buffer comfort d 6x60 pen head TRX screw e Anchor 6x Sliding door lock b Sliding door key Front wall fixing nut b Front wall fixing nut lock Sliding door buffer b Screw c Plug anodized Buffer plate L/R 71358/ b Screw Sliding door frame rubber seal L/R 71322/62 20 Rubber seal between segments L/R 71322/34 21 Sliding door bottom rubber Outside rubber (double)* 71323


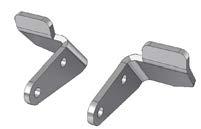


5 PART LIST 1 4,8x50 pen head TRX screw 2 Wedge + 4,2x10 pen head 3 Pop rivet TRX screw 12 mm 4 a Square lock + flat nut + plug a b c b 5 6x60 pen head 6 Anchor 7 TRX screw 4,8x25 pen head TRX screw Interior handle Washer Screw cap a b c d 8 Handle 9 Receiver profile cap 10 L-R b c 4,8x50 pen head TRX screw 11 Receiver profile cap 12 Rocker lever 13 Latch sleeve 14 Rail joiner + rail end cap L-R + buffer (on rubber side) L-R 15 a b Washer Sliding door lock + key a b 16 d Screw cap M6 nut M6x35 pen head screw c d Front wall fixing nut Sleeve d e M6 nut 17 Sliding door buffer + plastic plug + screw 18 a c Washer M6x8 pen head screw M6x35 pen head screw b a Hidden arrest L-R c a a Lock pin f 6x60 pen head TRX screw Anchor Buffer plate L-R + screw a c a b c 4,8x22 flat head b b M6x20 pen head 19 A5 Sliding door frame rubber seal 20 Rubber seal between 21 Sliding door bottom rubber 22 segments A5 M5 Outside rubber (double)* or or A3 A3/4 A4S A4L A4 A4/5 A3 A3/4 A4S A4L A4 A4/5 A3 A3/4 A4S A4L A4 A4/5 *With PC Clear plates T1 T2 T3 T4 T5 T6 T7 T8 T9 4.1 mm 3.5 mm 7 mm TRX 25 TRX 20 5


6 1 BOX DISASSEMBLY


7 1 BOX DISASSEMBLY Recommended tools (not included) 7
8 PART LIST BY ENCLOSURE TYPES Nr. LIST OF ITEMS FOR M3 ENCLOSURES Item Item name Pcs number Chapter 1a Rail S3/ b Rail S4/ a Front wall 1 8 2b Front wall 1 8 2a 1a 2c Front wall End wall 1 8 2b 2c 1b 4 1. segment segment segment 1 4 2a 2b 4 2c a+1c 1b+1d LIST OF ITEMS FOR M4 ENCLOSURES Nr. Item name Item nr. Pcs Chapter 1a Rail S1/ b Rail S3/ c Rail S1/2s 2 2 1d Rail S3/2s 2 2 2a Front wall 1 8 2b Front wall 1 8 2c Front wall End wall segment segment segment segment Nr. LIST OF ITEMS FOR M4/5, M5 ENCLOSURES Item Item name Pcs Chapter number 1a Rail S1/ b Rail S7/ c Rail S1/2s 4 2 1d Rail S7/2s 4 2 2a 2b 2c 1a+1c 1b+1d 2a Front wall 1 8 2b Front wall 1 8 2c Front wall End wall segment segment segment segment segment 1 4 8
9 PART LIST BY ENCLOSURE TYPES Nr. LIST OF ITEMS FOR A3 ENCLOSURES Item Item name Pcs number Chapter 1a Rail S3/ b Rail S4/ Front wall End wall 1 8 1a + 1c 4 1. segment segment b + 1d 6 3. segment Side mounted sliding door 1 6 LIST OF ITEMS FOR A3/4, A4S, A4L, A4 ENCLOSURES Nr. Item name Item number A3/4 Item number A4S Item number A4L Item number A4 1a Rail S1/2 S1/2 S1/2 S1/ b Rail S5/2 S6/2 S2/2 S3/2 4 2 Pcs Chp. 1c Rail S1/2s S1/2s S1/2s S1/2s 2 2 1a + 1c 1d Rail S5/2s S6/2s S2/2s S3/2s Front wall b + 1d 3 End wall segment segment segment segment Sliding door Nr. LIST OF ITEMS FOR A4/5, A5 ENCLOSURES Item Item name Pcs Chapter number 1a Rail S1/ b Rail S7/ c Rail S1/2s 4 2 1a + 1c 1d Rail S7/2s Front wall b + 1d 3 End wall segment segment segment segment segment Side mounted sliding door 1 6 9
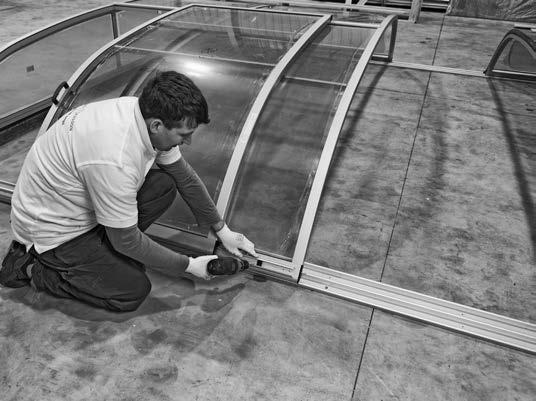
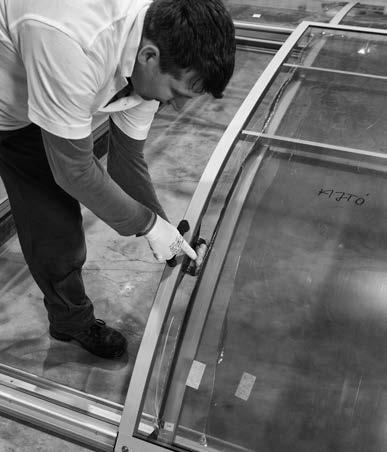
10 2 RAIL ASSEMBLY A3 M3 Rail placement S3/ Item Nr. Item name Pcs Notes S3/3 Rail mm S4/3 Rail mm 5 Pen head screw 36 6x60 6 Anchor 36 14a Rail joiner S4/ Suggested spots for holes on the rail (depending on the ground surface) S/3 S/3 10
11 2 RAIL ASSEMBLY A3/4 S1/2 S1/2s Item Nr. Item name Pcs Notes S1/2 Rail mm S1/2s Rail mm S5/2 Rail mm S5/2s Rail mm 5 Pen head Screw 60 6x60 6 Anchor 60 14a Rail joiner S5/2 S5/2s Suggested spots for holes on the rail (depending on the ground surface) S/2 256 S/2s S/2s S/
12 2 RAIL ASSEMBLY A4S rail placement S1/2 S1/2s Item Nr. Item name Pcs Notes S1/2 Rail mm S1/2s Rail mm S6/2 Rail mm S6/2s Rail mm 5 Pen head Screw 60 6x60 6 Anchor 60 14a Rail joiner S6/2 S6/2s Suggested spots for holes on the rail (depending on the ground surface) S/2s S/ S/2 S/2s 12
13 2 RAIL ASSEMBLY A4L rail placement S1/2 S1/2s Item Nr. Item name Pcs Notes S1/2 Rail mm S1/2s Rail mm S2/2 Rail mm S2/2s Rail mm 5 Pen head Screw 72 6x60 6 Anchor 72 14a Rail joiner S2/2 S2/2s Suggested spots for holes on the rail (depending on the ground surface) S/2s S/ S/2 S/2s 13
14 2 RAIL ASSEMBLY A4 M4 Rail placement S1/2 S1/2s Item Nr. Item name Pcs Notes S1/2 Rail mm S1/2s Rail mm S3/2 Rail mm S3/2s Rail mm 5 Pen head screw 66 6x60 6 Anchor 66 14a Rail joiner S3/2 S3/2s Suggested spots for holes on the rail (depending on the ground surface) S/2 S/2s S/2s S/2 14
15 2 RAIL ASSEMBLY A4/5 M4/5 Rail placement S1/3 S1/2s Item Nr. Item name Pcs Notes S1/3 Rail mm S1/2s Rail mm S7/3 Rail mm S7/2s Rail mm 5 Pen head screw 104 6x60 6 Anchor a Rail joiner S7/3 S7/2s Suggested spots for holes on the rail (depending on the ground surface) S/3 325 S/2s S/2s S/
16 2 RAIL ASSEMBLY A5 M5 Rail placement S1/3 S1/2s Item Nr. Item name Pcs Notes S1/3 Rail mm S1/2s Rail mm S7/3 Rail mm S7/2s Rail mm 5 Pen head screw 104 6x60 6 Anchor a Rail joiner S7/3 S7/2s Suggested spots for holes on the rail (depending on the ground surface) S/3 325 S/2s S/2s S/3 16


17 2 RAIL ASSEMBLY a Hammer drill Hammer Measuring tape Cordless screw driver Cordless drill 17


18 2 RAIL ASSEMBLY mm 7 mm 6 mm 10 mm 18


19 2 RAIL ASSEMBLY mm 6 mm mm


20 2 RAIL ASSEMBLY TRX TRX TRX 20
21 3 FIRST SEGMENT ASSEMBLY B3 1-U GS GS 1 1-B1 2 1-B2 Z 6 4a 1-H1 G 4b 1-HS Item nr. Item name Pcs Pcs Notes 1-B1 1. arch B2 2. arch B3 3. arch H Receiver profile HS Receiver profile with rail U PC Clear plate / PC Thermo plate 3 3 Z Linking hollow section 6 9 G Linking profile 1 1 GS Linking profile with rail Pen head torx screw ,8 x 50 4 Square lock Receiver profile cap (L -R) right + 1 left 10 Hidden arrest right + 1 left 18 Buffer plate right + 1 left 22 Outside rubber (double)* * with PC Clear plate Cordless drill Window spray Cordless screw driver Rivet gun A3/4 A3 A4L A4S Rubber hammer A4/5 A4 Scissors A5 21
22 3 FIRST SEGMENT ASSEMBLY M3 M4 M4/5 M5 1-B2 1-B3 G G 1-U U 1-B1 Z 1-H1 Gy1 Gy2 1-H2 M3 M4 M4/5 M5 Item nr. Item name Pcs Pcs Pcs Notes 1-B1 1. arch B2 2. arch B3 3. arch H1 Receiver profile - right H2 Receiver profile - left U PC Clear plate / PC Thermo plate Z Linking hollow section G Linking profile Pen head torx screw ,8 x 50 4 Square lock Hidden arrest right + 1 left 9 Receiver profile cap (L -R) right + 1 left 18 Buffer plate right + 1 left 22 Outside rubber (double)* *with PC Clear plate Cordless drill Window spray Cordless screw driver Rivet gun Rubber hammer Scissors 22


23 3 FIRST SEGMENT ASSEMBLY B3 1-B TRX * 1-HS = at the sliding door 1-H1 / 1-HS* U 23


24 3 FIRST SEGMENT ASSEMBLY *M5 ** A3, A3/4, A4S, A4L, A4, A4/5, A G* / GS** Outside view B2 1-U TRX


25 3 FIRST SEGMENT ASSEMBLY U G* *A3, A3/4, A4S, A4L, A4, A4/5, A5, M B


26 3 FIRST SEGMENT ASSEMBLY H1/1-HS*/1-H2** 3.22 * A3, A3/4, A4S, A4L, A4, A4/5, A5 at the sliding door **M3, M4, M4/5 M TRX TRX TRX 26


27 3 FIRST SEGMENT ASSEMBLY Optional: By removing the screw and the spring on the key lock side, the pin will arrest automatically at the right position when closing the segment. The opposite side should be arrested manually when closing the segment B H1/*1-H2** e/10c 27


28 3 FIRST SEGMENT ASSEMBLY b d


29 3 FIRST SEGMENT ASSEMBLY B3 1-H1/1-HS*/1-H2** 10 4a b T9 * A3, A3/4, A4S, A4L, A4, A4/5, A5 at the sliding door **M3, M4, M4/5 M5 29


30 3 FIRST SEGMENT ASSEMBLY f d c 30
31 4 INTERMEDIATE SEGMENT ASSEMBLY B2 B2 B3 B3 G** G X*-U2 U1 X*-U1 U2 B1 B1 H2 Gy1 ** = A5, M5 Z Z H1 Gy2 A4L A4 A3/4 A4S A4/5 A5 M3 A3 M4 M4/5 M5 Item nr. Item name Pcs Pcs Pcs Notes x*-b1 1. arch x*-b2 2. arch x*-b3 3. arch H1 Receiver profile - right left H2 Receiver profile - left right X*-U1 PC Clear plate / PC Thermo plate X*-U2 PC Clear plate / PC Thermo plate Z Linking hollow section G Linking profile Pen head torx screw ,8 x Rocker lever Buffer plate left + 1 right 9 Receiver profile cap left + 1 right 11 Receiver profile cap left + 1 right 22 Outside rubber (double)*** *** with PC Clear plate Cordless drill Window spray Cordless screw driver Rivet gun Rubber hammer Scissors 31


32 4 INTERMEDIATE SEGMENT ASSEMBLY X**-B H2 1 1 TRX X**-U2 **X = number of segment 32


33 4 INTERMEDIATE SEGMENT ASSEMBLY 4.7 X**-B TRX 4.9 X**-U X**-B1 **X = number of segment TRX 1 33


34 4 INTERMEDIATE SEGMENT ASSEMBLY 4.13 X**-H TRX 1 TRX Z 34

35 4 INTERMEDIATE SEGMENT ASSEMBLY


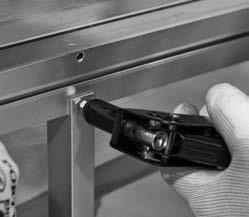
36 4 INTERMEDIATE SEGMENT ASSEMBLY d 12a b 12c 36


37 4 INTERMEDIATE SEGMENT ASSEMBLY


38 4 INTERMEDIATE SEGMENT ASSEMBLY Repeat steps (see at page 30-36) 9 38


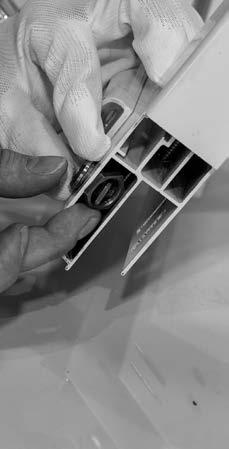
39 5 SEGMENT RUBBER SEAL INSTALLATION


40 5 SEGMENT RUBBER SEAL INSTALLATION


41 5 SEGMENT RUBBER SEAL INSTALLATION
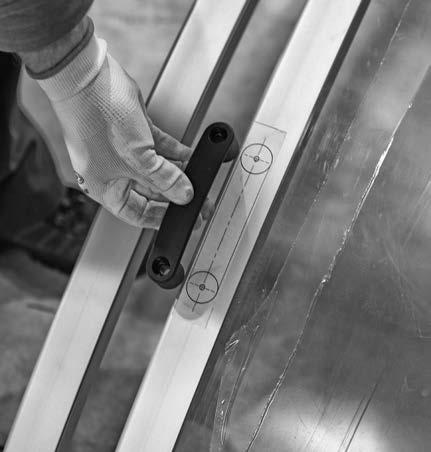
42 6 SLIDING DOOR ASSEMBLY 4 ZZ 1a H A-H 5 1-U B1 2 A-B 3 A-B B2 A-HM 1b A3/4 A4L A4/5 A3 A4S A4 A5 Item nr. Item name Pcs Pcs Notes A-B 1. arch 1 1 A-B 2. arch 1 1 A-H Receiver profile 1 1 A-HM Receiver profile marked U PC Clear plate / PC Thermo plate 1 1 Z Linking hollow section Pen head torx screw a Sliding door lock Plastic plug Sliding door bottom rubber 1-22 Outside rubber (double)* *With PC Clear plate Cordless drill Window spray Cordless screw driver Rivet gun Rubber hammer Scissors 42


43 6 SLIDING DOOR ASSEMBLY A-HM A-B 1 1 TRX U A-B * 1 A-H 21 TRX *A3, A4, A4/5 43


44 6 SLIDING DOOR ASSEMBLY 6.7* 6.8 *A3, A4, A4/5 TRX TRX Z a TRX 44


45 6 SLIDING DOOR ASSEMBLY Outside view


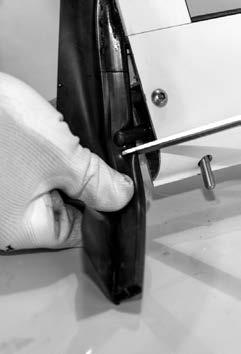
46 6 SLIDING DOOR RUBBER SEAL INSTALLATION (NEXT TO THE PC CLEAR PLATE)


47 6 SLIDING DOOR RUBBER SEAL INSTALLATION (NEXT TO THE PC CLEAR PLATE)


 6.31 6.")
48 6 SLIDING DOOR RUBBER SEAL INSTALLATION (NEXT TO THE PC CLEAR PLATE)


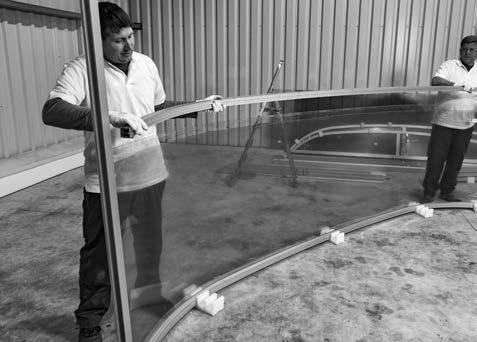
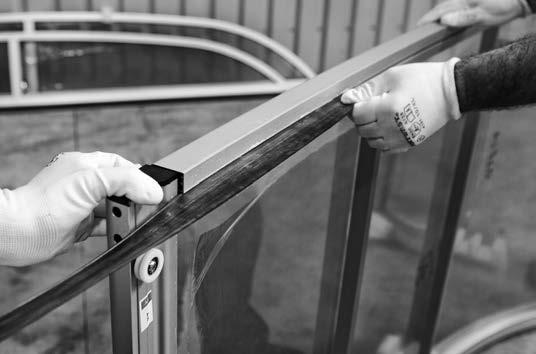
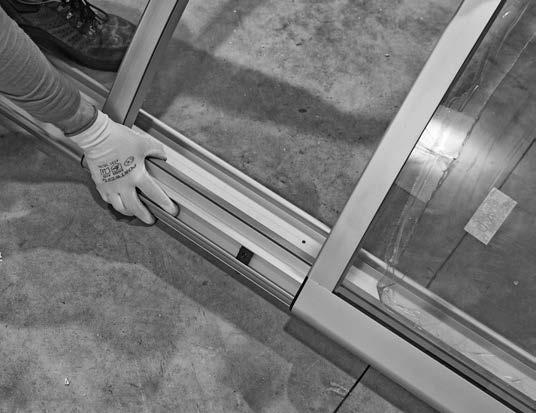
49 7 MOUNTING SEGMENTS ONTO RAILS


50 8 END WALL INSTALLATION - LAST SEGMENT A END WALL INSTALLATION - FIRST SEGMENT a 16b 50


51 8 END WALL INSTALLATION - FIRST SEGMENT M


52 9 SLIDING DOOR INSTALLATION A3 A3/4 A4S A4L A4 A4/ with A3 - A3/4 - A4S - A4L - A4 - A4/5 models 52


53 9 SLIDING DOOR INSTALLATION A with A5 models 53


54 9 SLIDING DOOR INSTALLATION a 4.1 mm d TRX 8b 8c 54


55 9 SLIDING DOOR INSTALLATION min 300 mm 17a b 7b 7c 7d TRX 25 TRX 25 55


56 9 SLIDING DOOR INSTALLATION a min 500 mm mm TRX 25 17b 15c 56 RAIL ASSEMBLY
57 10 FINAL ASSEMBLY M3 M4 M4/5 M5 Item nr. Item name Pcs Pcs Pcs Pcs Notes 14c Buffer a Rail joiner b End cap left + 1 right 13 Latch sleeve A4 A3 A3/4 A4S A4L A4/5 A5 Item nr. Item name Pcs Pcs Pcs Pcs Pcs Pcs Notes 14c Buffer a Rail joiner b End cap left + 1 right 13 Latch sleeve Cordless drill Hammer drill Rivet gun Rubber hammer Scissors Spirit level 57


58 10 FINAL ASSEMBLY c c a 18b 58


59 10 FINAL ASSEMBLY b Ábra szegmens beállítás 2a 2b


60 10 FINAL ASSEMBLY


61 10 FINAL ASSEMBLY * 10.25* * NOT FOR A3, A3/4. 61


62 10 FINAL ASSEMBLY 10.26* 10.27* 13 6 mm 14 mm 10.28** 10.29** 10.30** 10.31** 6 mm 14 mm * FLAT MODELS (A) = FRONT AND BACK WALL STANDARD MODELS (M) = ONLY BACK WALL **STANDARD MODELS (M) = ONLY FRONT WALL 62


63 10 FINAL ASSEMBLY 10.32** 10.33** ** 10.37** 10.38** 15c **STANDARD MODELS (M) = ONLY FRONT WALL 63
64 NOTES 64
65 NOTES 65
66 66
67 67
68
P o o L e n c L o s u r e s nova & classic Assembly manual
 P o o L e n c l o s u r e s Nova & Classic Assembly manual Box disassembly Model Outside dimensions weight Model Width Height Depth kg M3 4900 1350 410 300 PC M4 6300 1600 420 520 M5 6500 2000 530 740
P o o L e n c L o s u r e s nova & classic Assembly manual
 P o o L e n c l o s u r e s Nova & Classic Assembly manual Box disassembly Model Outside dimensions weight Model Width Height Depth kg M3 4900 1350 410 240 PC M4 6300 1600 420 415 M5 6500 2000 530 685
GENUINE PARTS INSTALLATION INSTRUCTIONS
 GENUINE PARTS INSTALLATION INSTRUCTIONS DESCRIPTION: APPLICATION: PART NUMBER: Fixed Bracket Bed Extender Titan (2016-) Bed Extender (999T7 W4100) Installation of this accessory requires installation of
WK2 SNORKEL. Installation Instructions PLEASE READ AND UNDERSTAND ALL INSTRUCTIONS BEFORE YOU START
 WK2 SNORKEL Installation Instructions PLEASE READ AND UNDERSTAND ALL INSTRUCTIONS BEFORE YOU START Please note: This kit is specifically for diesel models only. WK2 Snorkel Installation Instructions Rev.
INSTALL/REMOVAL INSTRUCTIONS: WINDOW REGULATOR
 REMOVAL/INSTALL OF WINDOW REGULATOR (665-2542) Ford F-Series Pickup & Bronco 1980 96 General Tech Tips: Use painter s tape rather than duct tape to secure window. It will not damage paint or leave sticky
FREEDOM3 Portable Restroom Assembly Instructions
 FREEDOM3 Portable Restroom Assembly Instructions PN 21337 REV M - 1-1-19-17 FREEDOM 3 ASSEMBLY INSTRUCTIONS PN 21337 REV M -2-1-19-17 PARTS LIST: PN 21337 REV M - 3-1-19-17 INTRODUCTION Satellite portable
Tonneau Cover Fitting Instructions Ford PX Ranger XL Dual Cab With HeadBoard June Current
 Tonneau Cover Fitting Instructions Ford PX Ranger XL Dual Cab With HeadBoard June 2013 - Current Part Number: 10129 Package includes 1 x Tonneau Cover 1 x Warranty Card 2 x Bar Bracket (300474) 23 x 4
Self-Deploying Rail Kit OEM INSTALLATION MANUAL
 Self-Deploying Rail Kit OEM INSTLLTION MNUL TLE OF ONTENTS Introduction 2 Safety Information 2 Resources Required 3 Prior to Installation 3 Installation 3 Doorjamb 3 Setting the Doorjamb 3 inch Latch 4
INSTALL/REMOVAL INSTRUCTIONS: WINDOW REGULATOR
 REMOVAL/INSTALL OF WINDOW REGULATOR (740-754) Ford F-Series Pickup & Bronco 1980 96 General Tech Tips: Use painter s tape rather than duct tape to secure window. It will not damage paint or leave sticky
Volkswagen New Beetle Body - Exterior 50 Body - Front (Page GR-50)
") 50 Body - Front (Page GR-50) Body, front Front end, Assembly overview Front fender, assembly overview Lock carrier, removing and installing Lock carrier, service position Noise insulation, assembly overview
50 Body - Front (Page GR-50) Body, front Front end, Assembly overview Front fender, assembly overview Lock carrier, removing and installing Lock carrier, service position Noise insulation, assembly overview
Manual UB20 / UB40 / UB50 / 2 EL WiMo Antennen und Elektronik GmbH
 Manual UB20 / UB40 / UB50 / 2 EL. 6-40 Rev. 1.10 1 Introduction Some UltraBeam models work in 30 and 40 meters band with folded elements, this allows you to work on 30 and 40 meters with full-size elements
FRONT DOOR LOCK ACTUATOR (G531598)
") PUBLISHED: 11-MAY-2011 2006.50 XK RANGE (X150), 501-14 HANDLES, LOCKS, LATCHES AND ENTRY SYSTEMS FRONT DOOR LOCK ACTUATOR (G531598) REMOVAL AND INSTALLATION REMOVAL 1. Remove the window regulator. For
PUBLISHED: 11-MAY-2011 2006.50 XK RANGE (X150), 501-14 HANDLES, LOCKS, LATCHES AND ENTRY SYSTEMS FRONT DOOR LOCK ACTUATOR (G531598) REMOVAL AND INSTALLATION REMOVAL 1. Remove the window regulator. For
DV8 Tire Carrier Manufacturer Part Number TCSTTB-01 Model Number J104640
 DV8 Tire Carrier Manufacturer Part Number TCSTTB-01 Model Number J104640 Installation Time: 30 Minutes Tools Required: 19mm Socket 13mm Socket Ratchet T15 Torx Driver T50 Torx Driver Painters Tape Dremel
AUDIO KIT P/N APPLICATION BEFORE YOU BEGIN KIT CONTENTS. Verify accessory fitment at Polaris.com.
 AUDIO KIT P/N 2882696 APPLICATION Verify accessory fitment at Polaris.com. BEFORE YOU BEGIN Read these instructions and check to be sure all parts and tools are accounted for. Please retain these installation
Sliding Door Fittings, Roller Shutters Pivot Sliding Door Fittings
 Ultra 20 Swing Door fitting, door weight up to 20 kg Area of application: Door swings out to the front and to the side when being opened, allowing unlimited access to the cabinet interior, can be used
Front bumper (Audi RS6)
") 63-1 Front bumper (Audi RS6) Assembly overview 1 - Air inlet grille To remove pull grille forward 2 - Air inlet grille To remove pull grille forward 3 - Screw 2.5 Nm 3x 4 - Bumper cover Together with impact
63-1 Front bumper (Audi RS6) Assembly overview 1 - Air inlet grille To remove pull grille forward 2 - Air inlet grille To remove pull grille forward 3 - Screw 2.5 Nm 3x 4 - Bumper cover Together with impact
C13.10 CHRONO LOCKCASE AND PERIMETER LOCKING SET C13 SIDE HUNG WINDOWS
 C13 SIDE HUNG WINDOWS CHRONO LOCKCASE AND PERIMETER LOCKING SET 01.12.2018 Waregemstraat 5-9870 Zulte - Belgium - T. +32 9 388 88 81 - F. +32 9 388 88 21 - commercial@sobinco.com - www.sobinco.com CONTENTS
ZICO* 3096PM1 QUIC-LADDER SWING OUT & DOWN VEHICLE LADDER. Stores ladder parallel to the body.
 QUIC-LADDER SWING OUT & DOWN VEHICLE LADDER ZICO* 309PM REV. --0 Stores ladder parallel to the body. Release the locking handle and pull the ladder out to a comfortable climbing angle. The ladder automatically
ALU ROUND Ø24mm DESCRIPTION
 48 30 31 LU ROUND Ø24mm DESCRIPTION LU ROUND; Ø 24 121,2o FUTURES: Ø24 14,2 12,2 1,2 High quality round shape polycarbonate diffuser Diffuser is placed/removed from the top on click High quality anodized
Convertible MM Roll Bar (MMRB-10.1 to -10.7)
") 3430 Sacramento Dr., Unit D San Luis Obispo, CA 93401 Telephone: 805/544-8748 Fax: 805/544-8645 www.maximummotorsports.com 1983-93 Convertible MM Roll Bar (MMRB-10.1 to -10.7) The Maximum Motorsports RB-10.1
3430 Sacramento Dr., Unit D San Luis Obispo, CA 93401 Telephone: 805/544-8748 Fax: 805/544-8645 www.maximummotorsports.com 1983-93 Convertible MM Roll Bar (MMRB-10.1 to -10.7) The Maximum Motorsports RB-10.1
insulated sectional 2180mm (h) x 2550mm (w) Opening Size: 2140mm (h) x 2500mm (w) suits single car garage
 x 2550mm (w) Opening Size: 2140mm (h) x 2500mm (w) suits single car garage") insulated sectional Garage Door 2180mm (h) x 2550mm (w) Opening Size: 2140mm (h) x 2500mm (w) suits single car garage Disclaimer This product should be installed by a competent person or suitably qualified
insulated sectional Garage Door 2180mm (h) x 2550mm (w) Opening Size: 2140mm (h) x 2500mm (w) suits single car garage Disclaimer This product should be installed by a competent person or suitably qualified
Tavlesystemdele Tav T l av es l y es s y t s em em e d l e e Indholdsfortegnelse Indho ndho d l s d f s or f t or e t g e ne g l ne s l e T
 Catalogue 2014 Tabula Catalog 2014 Table of Contents Table of Contents Switchboard System Parts Article umber Index 2014 - Tabula Switchboard System Parts Section: Group: Section: Group: Section: Group:
POLY TIP-DOWN WINDSHIELD KIT
 POLY TIP-DOWN WINDSHIELD KIT P/N 2883261 APPLICATION Verify accessory fitment at Polaris.com. BEFORE YOU BEGIN Read these instructions and check to be sure all parts and tools are accounted for. Please
Detroit Speed, Inc. 4-Point Roll Cage Camaro/Firebird P/N:
 Detroit Speed, Inc. 4-Point Roll Cage 1970-1981 Camaro/Firebird P/N: 011303 Thank you for your purchase of the Detroit Speed 4-Point Roll Cage. The exclusive DSE design follows the interior lines of the
Page 1 of 17. Part# M0200 Rev.11 7/29/2016
 Part# M0200 Rev.11 7/29/2016 This manual contains important information concerning the installation and operation of the product listed above. Read manual thoroughly and keep for future reference INSTRUCTIONS
TECHNOLOGY IN MOTION MACO MULTI-MATIC TILT AND TURN FITTINGS. Installation instructions PVC WINDOWS
 TECHNOLOGY IN MOTION TILT AND TURN FITTINGS Installation instructions PVC WINDOWS Note on the surfacefinish fittings are electrogalvanised, passivated and sealed with wax. We guarantee that the surfacefinish
MPE 750 Turbo Marine - Closed Loop
 - This spare parts catalogue is valid for the following engine variants: Document No: 00 ETK Revision: 00_I MAR TC- DS V 00.. Date of Issue:.0.00 Table of Contents 00 Crankcase 0 Case 0 Front Cover 00
SS77HFZ Toyota Land Cruiser 70 series (Wide Nose) Suits: 4.2L 6cyl Diesel (1HZ engine) Replaces Factory Toyota Raised Air Intake (Genuine Snorkel)
 Suits: 4.2L 6cyl Diesel (1HZ engine) Replaces Factory Toyota Raised Air Intake (Genuine Snorkel)") SS77HFZ Toyota Land Cruiser 70 series (Wide Nose) Suits: 4.2L 6cyl Diesel (1HZ engine) Replaces Factory Toyota Raised Air Intake (Genuine Snorkel) Parts List 15/02/2011 ITEM PART NO DESCRIPTION QTY 1 330-133-700
SS77HFZ Toyota Land Cruiser 70 series (Wide Nose) Suits: 4.2L 6cyl Diesel (1HZ engine) Replaces Factory Toyota Raised Air Intake (Genuine Snorkel) Parts List 15/02/2011 ITEM PART NO DESCRIPTION QTY 1 330-133-700
INSTALL/REMOVAL INSTRUCTIONS: WINDOW LIFT MOTOR
 REMOVAL/INSTALL OF WINDOW REGULATOR (742-269) Ford Mustang 1996 2004 General Tech Tips: Use painter s tape rather than duct tape to secure window. It will not damage paint or leave sticky residue. A plastic
WARNING. ARB 4x4 ACCESSORIES. Corporate Head Office Garden St Tel: +61 (3) Kilsyth, Victoria Fax: +61 (3) AUSTRALIA 3137
 Kilsyth, Victoria Fax: +61 (3) AUSTRALIA 3137") Part Number: 3440400 Product Description: Suited to vehicle/s: Winch Install Kit: DELUXE WINCH BULL BAR FORD RANGER PX 2011ON 3540050 WARNING REGARDING VEHICLES EQUIPPED WITH SRS AIRBAG; When installed
Part Number: 3440400 Product Description: Suited to vehicle/s: Winch Install Kit: DELUXE WINCH BULL BAR FORD RANGER PX 2011ON 3540050 WARNING REGARDING VEHICLES EQUIPPED WITH SRS AIRBAG; When installed
Copyright Birkin Cars (Pty) Ltd
 Ltd") GROUP EIGHT 1st Edition UPHOLSTERY AND INTERIOR Assemblies included In this group: - 8.1 8.2 8.3 K3601 164AB K3601 161AB K3601 166AB CARPETS BACK REST PANEL SEATS Tools required for assembly of this group:
GROUP EIGHT 1st Edition UPHOLSTERY AND INTERIOR Assemblies included In this group: - 8.1 8.2 8.3 K3601 164AB K3601 161AB K3601 166AB CARPETS BACK REST PANEL SEATS Tools required for assembly of this group:
ISNORKEL037 VOLKSWAGEN AMAROK
 INSTALLATION GUIDE ISNORKEL037 VOLKSWAGEN AMAROK Ironman 4x4 Snorkel fits to the right hand side of the Volkswagen Amarok, both flared and non-flared models. It will take about 4 hours to install. Below
SHELF STAXX ACCESSORY INSTALLATION INSTRUCTIONS
 The Narrow Depth Long Component Tray (Depth 3) is compatible with 100-grid Staxx kits. The Component Tray kits include mounting brackets, screws and nuts. One section of the component tray will have a
Applications Profitronic 19 / Profitronic 19U
 Applications Profitronic 19 / Profitronic 19U 54 Enclosure in variable length version using profile technology Standard construction or version with connection compartment Optional Polycarbonate transparent
3PC TONNEAU COVER WITH SPORTS BAR INSTALLATION INSTRUCTIONS
 3PC TONNEAU COVER WITH SPORTS BAR INSTALLATION INSTRUCTIONS TC00d / Vehicle Description: NISSAN NAVARA D0 DUAL CAB 3-PIECE TONNEAU COVER PARTS LIST NO. PART NAME QTY. NO. PART NAME QTY. NO. PART NAME QTY.
Water Wizard Arch. Service Manual W 34th St, Houston, TX
 Water Wizard Arch Service Manual 5842 W 34th St, Houston, TX 77092 1.800.999.9878 1.713.683.9878 www.colemanhanna.com Find us on Facebook: /ColemanHannaCarwash 1.0 Installation The following information
TECHNICAL INFORMATION
 TECHNICAL INFORMATION Models No. Description BHR202 Cordless Combination Hammer CONCEPT AND MAIN APPLICATIONS The subject model features 18V Li-ion Battery and 3 mode selection for ensuring an operator
RTS510 Rhino Heavy Duty Track Mount System - MITSUBISHI TRITON MK
 RTS510 Rhino Heavy Duty Track Mount System - MITSUBISHI TRITON MK Important: Please read these instructions carefully prior to installation. Please refer to your fi tting instruction to ensure that the
SS71R SAFARI R-SPEC SNORKEL Toyota Land Cruiser LJ70 Bundera 2.4L 4cyl Turbo Diesel (2L-T engine)
") SS71R SAFARI R-SPEC SNORKEL Toyota Land Cruiser LJ70 Bundera 2.4L 4cyl Turbo Diesel (2L-T engine) 01/04/2015 Parts List ITEM PART NO DESCRIPTION QTY 1 330-133-000R BODY - SNORKEL 1 2 000-135-050 3" AIR
SS71R SAFARI R-SPEC SNORKEL Toyota Land Cruiser LJ70 Bundera 2.4L 4cyl Turbo Diesel (2L-T engine) 01/04/2015 Parts List ITEM PART NO DESCRIPTION QTY 1 330-133-000R BODY - SNORKEL 1 2 000-135-050 3" AIR
LOCKN LOAD FIRST TIME INSTALLATION
 LOCKN LOAD TM TRACK MOUNTING KIT FORD RANGER PX / MAZDA BT-50 DUAL CAB 2011 + 2 BAR TRACK HEAVY DUTY ROOF RACK SYSTEM MAX VEHICLE ROOF LOAD RATING: 100KG TOTAL LOAD EQUALS WEIGHT OF ROOF RACKS + ACCESSORIES
PARTS TOOLS. Set Screw. Washer (2) Blue Bushing (2) Black Bushing (2) B&M Short Throw Shifter. Jam Nut Grease. Retaining Ring (2) Insert (2)
 Blue Bushing (2) Black Bushing (2) B&M Short Throw Shifter. Jam Nut Grease. Retaining Ring (2) Insert (2)") Installation Instructions SHORT THROW SHIFTER Fits: Porsche Boxter, Boxter S, 911, 996 Cayman & Cayman S models See Application Guide for specific year ranges and engine sizes Catalog # 45135 WORK SAFELY!
Installation Instructions SHORT THROW SHIFTER Fits: Porsche Boxter, Boxter S, 911, 996 Cayman & Cayman S models See Application Guide for specific year ranges and engine sizes Catalog # 45135 WORK SAFELY!
Installation of Splash Guards with Pony Logo without Drilling Into the Rear Fender Well: (2008 and Similar Models)
") Installation of Splash Guards with Pony Logo without Drilling Into the Rear Fender Well: (2008 and Similar Models) NOTE: This installation does not require drilling into your wheel well or using the included
Installation of Splash Guards with Pony Logo without Drilling Into the Rear Fender Well: (2008 and Similar Models) NOTE: This installation does not require drilling into your wheel well or using the included
CZ-USA SHOTGUN INSTRUCTION MANUAL CZ-USA
 CZ-USA SHOTGUN INSTRUCTION MANUAL CZ-USA SAFETY INSTRUCTIONS Over & Under Shotguns ASSEMBLY Over & Under Shotguns USAGE - Detach the forearm from the barrel. CHOKE TUBES 3 Over & Under Shotguns USAGE ASSEMBLY
HS-501-A... LC4 HS-503-A... LC4 HS-504-A... LC4 HS-505-A... LC5 HS-506-A... LC5 HS-507-A... LC5 HS-508-A... LC5 HS-509-A... LC6 HS-510-B...
 HS-501-A... LC4 HS-503-A... LC4 HS-504-A... LC4 HS-505-A... LC5 HS-506-A... LC5 HS-507-A... LC5 HS-508-A... LC5 HS-509-A... LC6 HS-510-B... LC6 HS-511-A... LC6 HS-512-A... LC7 HS-520-A... LC7 HS-521-A...
TECHNICAL INFORMATION
 TECHNICAL INFORMATION Model No. Description DP4010, DP4011 2-Speed Drill 13mm (1/2") L PRODUCT P 1/ 8 CONCEPT AND MAIN APPLICATIONS Models DP4010 and DP4011 have been developed as 13mm (1/2") Drill for
Rocker Lever Assembly
 003-009 Rocker Lever Assembly Preparatory Steps Remove the air piping from the intake manifold. Remove the rocker lever cover. Refer to Procedure 003-011 in Section 3. Remove the engine brakes, if equipped.
FREEDOM4. Portable Restroom Assembly Instructions
 FREEDOM4 Portable Restroom Assembly Instructions 2530 Xenium Lane North, Minneapolis, MN 55441 Telephone: 763-553-1900 Fax: 763-553-1905 800-328-3332 / www.satelliteindustries.com 9/18 REVD 22541 INSTRUCTION,
K327W. Fitting Kit. Fitting Instructions for Basic Carrier. x 4 x 4 x 4 x 4. Revision No: 5E 1
 Fitting Kit Fitting Instructions for Basic Carrier x 4 x 4 x 4 x 4 Revision No: 5E 1 Items you will require: Attention: First Time Installation Tape measure Pen Cordless drill Depth stop Vacuum cleaner
Sliding Door Fittings, Roller Shutters Folding Sliding Door Fittings
 Silent Fold 20/A, door weight up to 20 kg Area of application: For folding doors mounted to the carcase on one side, without running and guide track, for opening and closing the folding doors without blocking
2: Ecokit Ecokit 11 Overview A 2_ Ecokit 11 Sub Rack Configuration A 2_ Width A 2_ Height / Depth A 2_6
 2: Ecokit 11 2.1 Ecokit 11 Overview 2_3 2.2 Ecokit 11 Sub Rack Configuration 2_5 2.2.1 Width 2_5 2.2.2 Height / Depth 2_6 2.2.3 Handles 2_6 2.2.4 Line Drawing 2_7 2.3 daptation Kits 2_8 2.3.1 daptation
Universal Mounting Kit #0520
 Universal Mounting Kit #0520 #0503 SuperGlide (25.5K) #0515 SuperGlide Low Profile (25.5K) Gross Trailer Weight (Maximum) Vertical Load Weight (Max. Pin Weight) 25,500 lbs. 6,375 lbs. Gross Trailer Weight
Progressive Central Lubrication Systems
 Table of contents 4 Technical basics System description... 04-0-0-0 Construction, applications, advantages, function System design... 04-0-0-02 Design and installation of progressive systems Calculation
RTS518 - Rhino Heavy Duty 2 & 3 Crossbar System Hyundai iload, imax, i800, H-1.
 RTS518 - Rhino Heavy Duty 2 & 3 Crossbar System Hyundai iload, imax, i800, H-1. NOTE: Please read these instructions carefully prior to installation. Check the contents of kit before commencing fi tment
INSTALLATION & OWNER S MANUAL
 Rev. C, p. of 2 INSTALLATION & OWNER S MANUAL KUBOTA B2650/3350 Hard Sided Cab p/n KB33AS Soft Sided Cab p/n KB33SS Installation Instructions The contents of this envelope are the property of the owner.
REAR ROOF SPEAKER KIT
 REAR ROOF SPEAKER KIT P/N 2882876 APPLICATION Verify accessory fitment at Polaris.com. BEFORE YOU BEGIN Read these instructions and check to be sure all parts and tools are accounted for. Please retain
Automatic Roof Hatch Opener
 Automatic Roof Hatch Opener Installation Guide REQUIRED TOOLS (These tools are required to complete the installation) Cordless Drill 1/8 1/4 Drill Bits 1/8 Pin Punch #2 Philips Bit Rachet Sharpie Hammer
Accessories. Chapter 16
 Accessories Chapter 01 01 Accessories Rods for espagnolette locks Rod ø6 article-no. execution L pack. stock.0 steel nickel plated 00 1 pcs a.0 with plastic covered, brown 00 1 pcs a.5 with plastic covered,
Rutgerson 32mm Self-tacking Jib System manual - English
 Rutgerson 32mm Self-tacking Jib System manual - English Follow these instructions to obtain maximum performance from the Rutgerson self-tacking jib system. The track has a given optimal placement that
2" (50MM) ROTARY HAMMER
 ROTARY HAMMER") " (50MM) ROTARY HAMMER MODEL HR5000 05-03 75 7 70 80 39 3 4 5 6 7 8 63 58 59 60 6 57 56 55 54 3 53 5 5 4 5 6 7 8 9 0 3 4 4 4 43 44 45 46 47 48 49 50 38 37 40 5 6 7 36 35 34 33 3 3 8 9 30 99 84 85 83 8
" (50MM) ROTARY HAMMER MODEL HR5000 05-03 75 7 70 80 39 3 4 5 6 7 8 63 58 59 60 6 57 56 55 54 3 53 5 5 4 5 6 7 8 9 0 3 4 4 4 43 44 45 46 47 48 49 50 38 37 40 5 6 7 36 35 34 33 3 3 8 9 30 99 84 85 83 8
INSTALLATION & OWNER S MANUAL
 Rev. E p. of 3 INSTALLATION & OWNER S MANUAL V446 Front Cab Kit and V446 Rear Cab Kit for RTV 40 INSTALLATION & OWNER S MANUAL The contents of this envelope are the property of the owner. Be sure to leave
TITAN V3: assembly and calibration manual
 TITAN V3: assembly and calibration manual Please read quickstart guide included in the kit before starting installation process. Please note that this is beta version of manual. The full version of manual
THE SERIES-E POWR Slider
 C.R. LAURENCE CO., INC. PATENT NO. 4,920,698 THE SERIES-E POWR Slider MODEL: EPC814S 2014+ CHEVY/GMC SILVERADO/SIERRA 1500 NAGS: DY90122PK5 ELECTRIC SLIDING REAR WINDOW 2014 + CHEVY/GMC SILVERADO/SIERRA
Installation, Operating Instructions and Replacement Parts Installation video available at
 Installation, Operating Instructions and Replacement Parts Installation video available at www.kool-shield.com/support/ Made in the USA By Humboldt Specialty Manufacturing Co. www.kool-shield.com Revision
Mustang CDC Lightbar (94-04) - Installation Instructions
 - Installation Instructions") Mustang CDC Lightbar (94-04) - Installation Instructions The below installation instructions work for the following products: Classic Design Concepts Mustang Convertible Lightbar (94-04 Carbon Fiber) Classic
Mustang CDC Lightbar (94-04) - Installation Instructions The below installation instructions work for the following products: Classic Design Concepts Mustang Convertible Lightbar (94-04 Carbon Fiber) Classic
Lingenfelter Signature Series Camaro SS Rear Valance
 Lingenfelter Signature Series 2010-2012 Camaro SS Rear Valance PN: L850161410 Lingenfelter Performance Engineering 1557 Winchester Road Decatur, IN 46733 (260) 724-2552 (260) 724-0422 fax www.lingenfelter.com
Content. Door closer. Overview General information door closer 81 Allocation of sash width to dimension of door closer 82 Adjustment options 82
 Content Overview General information door closer 81 Allocation of sash width to dimension of door closer 82 Adjustment options 82 Slide rail door closer for single-sash doors 83 Slide rail door closer
Pneumatic tools and accessories. For trades and businesses.
 Competence from passion. Pneumatic tools and accessories. For trades and businesses. Pneumatic tools Lightweight, stable construction and proven durability: effective tools for maximum productivity. Impact
Installation Instructions LamboStyleDoors (The instruction are to be used as a reference. Please repeat for both doors)
") Installation Instructions LamboStyleDoors (The instruction are to be used as a reference. Please repeat for both doors) Pre installation check list: - Double check vehicles data with TUV certificate -
Installation Instructions LamboStyleDoors (The instruction are to be used as a reference. Please repeat for both doors) Pre installation check list: - Double check vehicles data with TUV certificate -
Self tapping fasteners for timber batten to concrete and brickwork
 Self tapping fasteners for timber batten to and brickwork Self tapping fasteners for and brickwork Technical information TI Material: S = Austenitic stainless steel, grade 304 (European Standard 1.4301)
5830 Skylight, Solar Smart Retrofit Installation
 Introduction The Solar Smart has a mounting bracket that allows the operator to rotate slightly to reduce wear and tear on the chain drive system for greater performance and reliability. Because of this
COLD AIR INTAKE INSTALLATION INSTRUCTIONS. # D Fits: F10 M5 # D Fits: F06/F12/F13 M6 PARTS LIST
 COLD AIR INTAKE INSTALLATION INSTRUCTIONS # D760-0035 Fits: 2013-15 F10 M5 # D760-0037 Fits: 2012-15 F06/F12/F13 M6 PARTS LIST (1) Left Carbon Airbox Lid (1) Right Carbon Airbox Lid (1) Left Carbon Snorkel
INSTALLATION & OWNER S MANUAL
 1 of 22 INSTALLATION & OWNER S MANUAL Kawasaki Mule PRO-FXT p/n s: 1KAPFXTCA & 1KAPFXTCAS1 fits all Mule Pro 6-Passenger Models Cab Shown with Optional Front Wiper, Lights, and Side View Mirrors Available
LAND ROVER DISCOVERY 3/ SPARE WHEEL CARRIER
 LAND ROVER DISCOVERY 3/ 4 SPARE WHEEL CARRIER RBLD007 INSTALL TIME: 4.5 Hours NOTE: Park Distance Control will be affected by this fitment and the customer should be informed. IMPORTANT WARNING! IT IS
MAINTENANCE AND PARTS MANUAL
 B U T C H E R MAINTENANCE AND PARTS MANUAL SA16 STAINLESS STEEL BAND SAW B O Y ORDER PARTS AND SERVICE FROM: Last printed 4/18/2003 8:51 AM Adjusting screw WARNING NEVER TIGHTEN BLADE BEYOND RED INDICATOR
71685 Landing Light Kit Installation Instructions
 71685 Landing Light Kit Installation Instructions Overview The 71685 Whelen landing light kit is designed to install into the wingtip lens area of an RV. Its important to note that the tip installation
INSTALLATION INSTRUCTIONS
 INSTALLATION INSTRUCTIONS Accessory Application Publications No. 3RD ROW P/N 08R12-SHJ-100 2006 ODYSSEY AII 30563-31117 Issue Date OCT 2005 PARTS LIST Left side rear sunshade Driver s Side 1. Remove the
SIMPLE SLEEK & ELEGANT
 SIMPLE SLEEK & ELEGANT 69 OZ-SL-44-A1 OZ-SL-44-A1-W Roller Assembly Four fiber reinforced plastic rollers of 30mm diameter glass holding point Height adjustable glass holding points (10mm) Secure grip
ALU-ROUND. for the led lighting. Patented. Features:
 ALU-ROUND Patented Features: High quality round shape polycarbonate diffuser Diffuser is placed/removed from the top on click High quality anodized aluminum base Heavy duty heat sink for high power LEDs
INSTRUMENT PANEL WARPAGE REPAIR
 PAGE 1 OF 15 AFFECTED VEHICLES: INSTRUMENT PANEL WARPAGE REPAIR ALL 1999-2000 MODEL YEAR CONTOUR AND MYSTIQUE OVERVIEW NOTE! Revisions to the technical instructions are indicated in RED text. This document
5 x 1.8mm ASSEMBLY GUIDE
 5 x.8 7 ASSEMBLY GUIDE B E T A E D I T I O N. 0 DISCLAIMER B E T A E D I T I O N. 0 ASSEMBLY GUIDE FOR EVALUATION PURPOSES ONLY Whilst every effort has been made to ensure the information in the following
versatile 4C mailbox suites
 INSTALLATION MANUAL versatile 4C mailbox suites (ALL TYPES - FRONT LOADING, REAR LOADING, PARCEL ONLY AND TRASH / RECYCLING BIN) TABLE OF CONTENTS DESCRIPTION PAGE GENERAL INFORMATION AND ADVISORIES 2
1464. Interior Installation. Cover Rear Seat Support Cut the vinyl to approximately the size of the rear seat support.
 Chapter 37 (Video Clip 37) - Interior Installation 1464. Interior Installation Cover Rear Seat Support 1465. Cut the vinyl to approximately the size of the rear seat support. 1466. Make a dry fit of the
Factory Five Racing, Inc. 818 Kit Assembly manual revision 1J update
 Factory Five Racing, Inc. 818 Kit Assembly manual revision 1J update Turbo coolant overflow tank...1 Shifter handle...4 Install...4 Door skin...7 Door Liner... 10 Side mirrors... 14 Door handles and pulls...
The Teconnex V Clamp
 The Teconnex V Clamp Description V Clamps (also known as V Band Clamps) consist of a series of profiled segments welded within an outer strap and are of fabricated construction. Teconnex V Clamps are used
CANVAS DOOR KIT P/N , APPLICATION BEFORE YOU BEGIN KIT CONTENTS. Verify accessory fitment at Polaris.com.
 CANVAS DOOR KIT P/N 2882902, 2882903 APPLICATION Verify accessory fitment at Polaris.com. BEFORE YOU BEGIN Read these instructions and check to be sure all parts and tools are accounted for. Please retain
PC45 Air PumP replacement kit- For replacing A denver-gardner PumP with A hiblow PumP.
 PC45 Air PumP replacement kit- For replacing A denver-gardner PumP with A hiblow PumP. Air pump # 3-20-02679 (Sold separately) Please read the entire instructions prior to beginning the project. kit Contents
Issues. 1. CONCERNING TO: All SportStar airplanes with wing integral fuel tanks, having standard parking brake installed.
 INFORMATIVE BULLETIN No. Issues SPORTSTAR 010 b 1. CONCERNING TO: All SportStar airplanes with wing integral fuel tanks, having standard parking brake installed. 2. REASON: More difficult bleeding of current
ITEM PART NO. DESCRIPTION QTY BODY - SNORKEL (SS662HF) ½" AIR RAM ASSEMBLY BRACKET - UPPER MOUNTING 1
 ½ AIR RAM ASSEMBLY BRACKET - UPPER MOUNTING 1") SS662HF SAFARI V-SPEC SNORKEL MITSUBISHI MQ TRITON (Jan 2015 onwards) 2.4L Turbo Diesel (4N15 Engine) Parts List 05/02/2016 ITEM PART NO. DESCRIPTION QTY 1 530-133-000 BODY - SNORKEL (SS662HF) 1 2 000-135-800
SS662HF SAFARI V-SPEC SNORKEL MITSUBISHI MQ TRITON (Jan 2015 onwards) 2.4L Turbo Diesel (4N15 Engine) Parts List 05/02/2016 ITEM PART NO. DESCRIPTION QTY 1 530-133-000 BODY - SNORKEL (SS662HF) 1 2 000-135-800
OPR Replacement Foxbody Floor Pans Pair (79-93 All)
") OPR Replacement Foxbody Floor Pans Pair (79-93 All) Time Necessary: Approximately 40-hours Tools Required: Spot Weld Cutter Tool Corded Drill Center Punch MIG Welder (minimum recommended: 110VAC/135A)
OPR Replacement Foxbody Floor Pans Pair (79-93 All) Time Necessary: Approximately 40-hours Tools Required: Spot Weld Cutter Tool Corded Drill Center Punch MIG Welder (minimum recommended: 110VAC/135A)
CANOPY INSTALLATION INSTRUCTIONS. Holden Colorado LX and LT-R
 CANOPY INSTALLATION INSTRUCTIONS Holden Colorado LX and LT-R (007 Production Onwards) Installation Time: Hour (Approximately) Without Bed Liner Hour 45 Minutes (Approximately) With Bed Liner Care Instructions:
Spare part list AutoCUT 500. Pos. No. Article no. Description pc Feed unit complete 1
 AutoCUT 500 Article no. Description pc 1 8020901 Feed unit complete 1 2 8020911 Mill unit 1 3 8020921 Steering mechnism complete 1 4 8020861 Coasting rail complete 1 5 8020871 Intake rail complete 1 6
H15P. Toyota Hilux A-DECK Dual Cab
 Toyota Hilux A-DECK Dual Cab Page 1 of 14 Fitting Instructions Part Number H15 Toyota Hilux A-DECK Dual Cab 2015+ To suit Sports Bars Check contents of kit before commencing fitment and report any discrepancies
MPE 750 Turbo Marine - Open Loop
 - This spare parts catalogue is valid for the following engine variants: Document No: 00 ETK Revision: 00_MPE 0 Marine SO.. Date of Issue: 0.0.00 00_ETK_Rev._000 Table of Contents 00 Crankcase 0 Case 0
SCION FR-S CENTER ARMREST Preparation
 Preparation Part Number: PT478 18130 Kit Contents Item # Quantity Reqd. Description 1 1 LH Bracket 2 1 RH Bracket 3 1 LH Extrusion 4 1 RH Extrusion 5 1 Slide Assembly 6 4 4.0mm PT (Torx) Screws 7 1 Armrest
Eclipse C3 Aluminum Folding Door System. Dealer Brochure Exterior folding door systems
 Exterior folding door systems www.eclipsearchitectural.com Eclipse C3 Aluminum Folding Door System Dealer Brochure 2012 Eclipse C3 Aluminum Folding Door System, C3 Fabricator to Dealer Brochure Revision
AL-KO SIDE LIFT JACK HANDBOOK FOR THE 800KG SIDE LIFT JACK FOR CARAVANS WITH A MAXIMUM GROSS WEIGHT OF 1600KG
 AL-KO SIDE LIFT JACK HANDBOOK FOR THE 800KG SIDE LIFT JACK FOR CARAVANS WITH A MAXIMUM GROSS WEIGHT OF 1600KG CONTENTS 3 WARNINGS & TECHNICAL INFORMATION 4 FITMENT OF JACK BRACKETS 7 OPERATING INSTRUCTIONS
INSTALLATION INSTRUCTIONS Toyota FJ Cruiser DEMELLO-OFFROAD.
 INSTALLATION INSTRUCTIONS Item Description Vehicle 3 piece Rear Bumper 2007-2014 Toyota FJ Cruiser DEMELLO-OFFROAD www.demello-offroad.com 12785 magnolia ave Riverside ca 92503 Suite 1 phone: 1-951-735-4417
ISNORKEL011 NISSAN PATROL / FORD MAVERICK TD-42 Diesel (4.2L) , TB-42 Petrol (4.2L), All RB-30 Petrol (3.0L)
 , TB-42 Petrol (4.2L), All RB-30 Petrol (3.0L)") INSTALLATION GUIDE ISNORKEL011 NISSAN PATROL / FORD MAVERICK TD-42 Diesel (4.2L) 1990-94, TB-42 Petrol (4.2L), All RB-30 Petrol (3.0L) Ironman 4x4 Snorkel fits to the left hand side of the Nissan Patrol
INSTALLATION GUIDE ISNORKEL011 NISSAN PATROL / FORD MAVERICK TD-42 Diesel (4.2L) 1990-94, TB-42 Petrol (4.2L), All RB-30 Petrol (3.0L) Ironman 4x4 Snorkel fits to the left hand side of the Nissan Patrol
MPE 750 Turbo Marine - Open Loop
 - This spare parts catalogue is valid for the following engine variants: Document No: 00 ETK Revision: 00_MPE 0 Marine SO.. Date of Issue: 0.0.00 00_ETK_Rev._000 Table of Contents 00 Crankcase 0 Case 0
Pressure-Measuring Tool SMO Nr.: VR
 Pressure-Measuring Tool SMO Nr.: VR00136-0 Part List: Pressure Gauge -1/+9 Bar Pressure Gauge 2.5 Bar Pressure Gauge 250 mbar Adapter Connecting Hose/Gauge Measuring Adapter M18x1.5 Measuring Adapter M12x1.5