Installation Instructions
|
|
|
- Harold Maxwell
- 5 years ago
- Views:
Transcription

1 Installation Instructions Dual Wiper System Part #
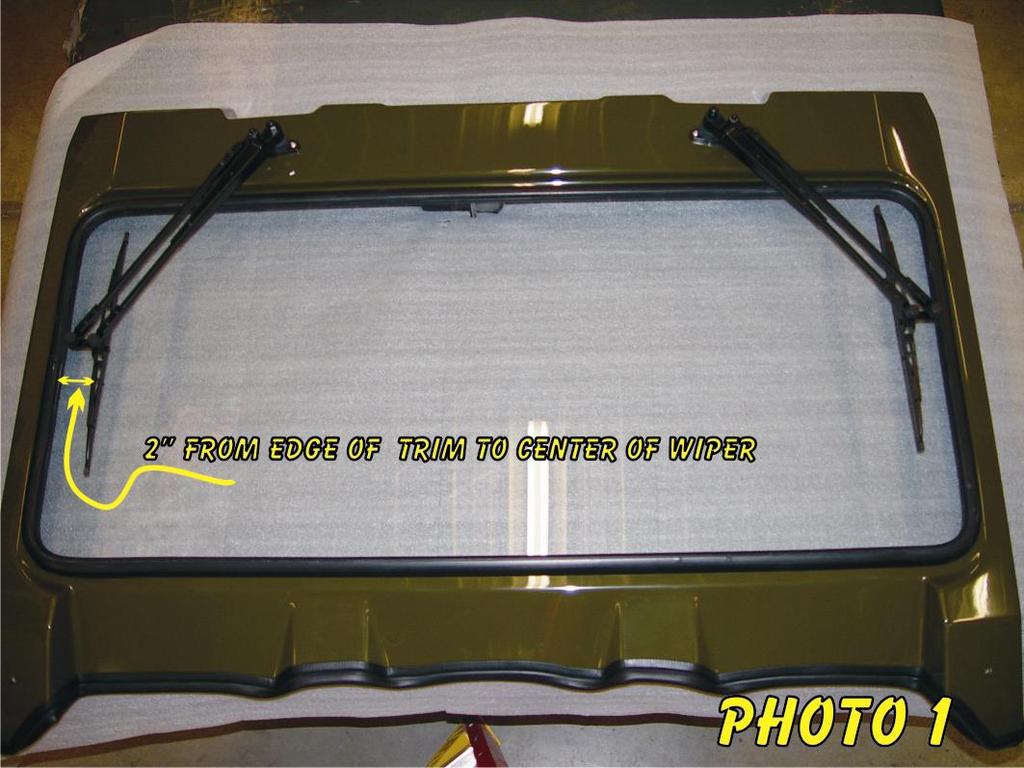
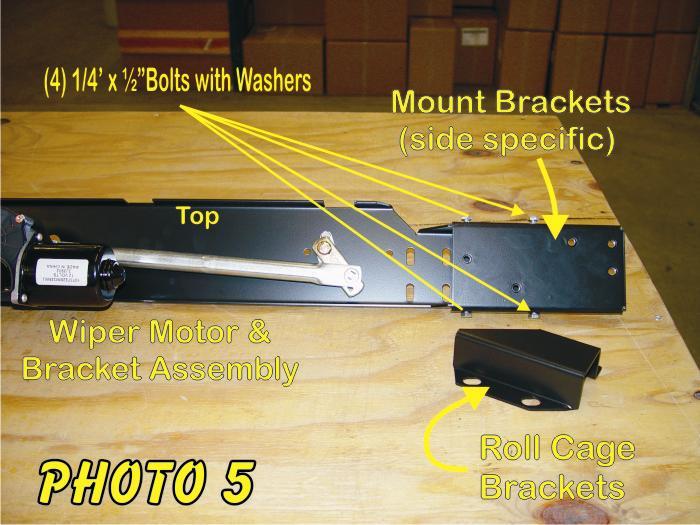
2 For Tip Out Windshield go to page 4 You Will need the Windshield off of Vehicle for the Installation process. Order of installation for Rangerware products Heater Wiper Windshield Top & back Doors 1. If installed on vehicle remove the entire windshield assembly also remove the plastic plugs. 2. Assemble the mount brackets on each end of the motor bracket assembly using (4) ¼ x ½ bolts with washers. NOTE: Brackets are side specific see Photo 5 for proper assembly. 3. Position the motor bracket assembly in to the windshield frame with the pivot shafts extending thru the frame. 4. Mount the pantograph arm adaptors (item 3) to the outside of the fiberglass frame. ((Illustrations 1 & 2)) 5. Install the washer, nuts and boots on the pivot shaft as shown in illustration Install the wiper blades to the arm. (15 blades on the Fixed) Illustration 1 7. Install the wiper arms on the pivot shafts in the position shown in Photo 1, install washers and acorn nuts (snug but do not tighten). Wiper arms will lock at 90 degrees as shown in Photo 2 for easier installation and removal and then tighten acorn nuts. 2
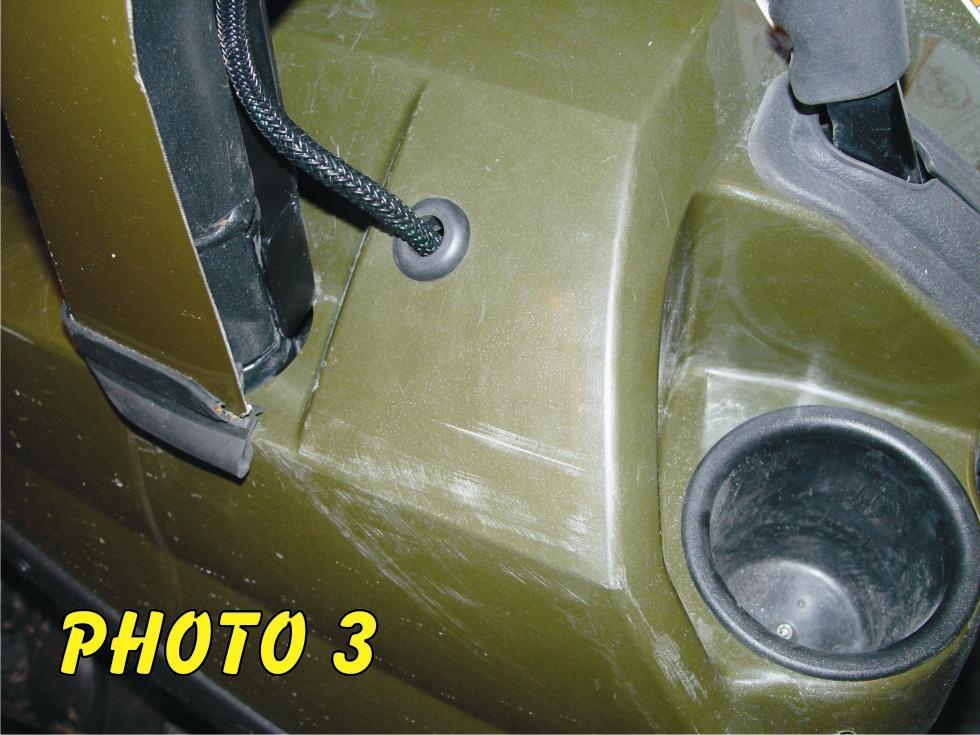
3 8. Plug in the wire harness and connect to an appropriate 12 volt source and test the wiper operation and park position. Adjust the arms on splined shaft as needed. 9. Install the windshield assembly on the vehicle. Omit the (2) center roll cage clamps. Position the roll cage brackets over the angle braces on the upper roll cage and align with the mount brackets on each side of the motor bracket assembly. Secure the windshield assembly using 5/16 x 5/8 bolts and washers. See Photo Drill a ¾ hole as shown in Photo 3 and install the grommet. (Driver Side). Route the wire harness following the roll cage and thru the grommet down under the dash. 11. Drill a 7/16 hole and mount the switch in the dash. Check for proper clearance on the backside before drilling. Connect the harness to an appropriate power source and connect the switch. (see wiring diagram) Wire harness 1134 that comes with the RangerWare WPS series top has both positive and negative accessory wires. You can also use the terminal block located under the dash shown in Photo 4. 3
4 You Will need the Windshield off of Vehicle for the Installation process. Order of installation for Rangerware products Heater Wiper Windshield Top & back Doors 1. If installed on vehicle remove the entire windshield assembly. 2. Open the windshield and remove the gas shocks 3. Remove the Tip Out windshield from the main frame by unbolting the hinges from the main frame (8 Bolts) 4. Remove the bare (top) windshield wiper bracket from the inside of the main frame by removing the 2 bolts on each side which connects it to the side supports. 5. Remove the mount brackets from each side of the motor brackets (4 bolts each side). Note: Brackets are side specific keep separate for correct re-assembly. 6. Assemble the mount on each side of the new wiper motor bracket assembly (complete with motor) and tighten securely. 7. Remove the plugs from the wiper holes in the fiberglass frame. 4
5 8. Position the motor bracket assembly into the main frame with the pivot shafts extending thru the frame and loosely fasten to the side supports. 9. Fasten the Tip Out windshield to the main frame bolting the hinges in place. 10. Tighten the bolts securing the motor bracket assembly to the side supports. 11. Mount the pantograph arm adaptors (item 3) to the outside of the fiberglass frame. ((Illustrations 1 & 2)) 12. Install the washer, nuts and boots on the pivot shaft as shown in illustration Install the wiper blades to the arm. (Use 13 Blades on Tip out) Illustration Install the wiper arms on the pivot shafts in the position shown in Photo 1, install washers and acorn nuts (snug but do not tighten). Wiper arms will lock at 90 degrees as shown in Photo 2 for easier installation and removal and then tighten acorn nuts. 15. Plug in the wire harness and connect to an appropriate 12 volt source and test the wiper operation and park position. Adjust the arms on splined shaft as needed. 16. Install the windshield assembly on the vehicle 17. Drill a ¾ hole as shown in Photo 3 and install the grommet. (Driver Side). Route the wire harness following the roll cage and thru the grommet down under the dash. 18. Drill a 7/16 hole and mount the switch in the dash. Check for proper clearance on the backside before drilling. Connect the harness to an appropriate power and connect the switch. (see wiring diagram) Wire harness1134 which comes with the RangerWare WPS series top has both positive and negative accessory wires, or you can use the terminal block located under the dash as shown in Photo 4. 5

6 \ 6

7 7
8 8
9 9
10 10
11 11
RangerWare RZR Fiberglass Top and Rear Installation Instructions. Page 1 of 10
 Page 1 of 10 RangerWare RZR Fiberglass Top and Rear Installation Instructions FIBERGLASS ROOF & REAR PANELS KIT P/N: 2878051, 2878056 Application: Polaris RZR MY 2010 Before you begin, read these instructions
Rzr Heater System Part #
 Rzr Heater System Part # 2878135 NOTE: This heater unit installs below the center of the dash. If you have a radio mount kit (Polaris Part # 2876897) you may need to cut the top front corner off the mount
3. Cover the hood with padding and fold the stock windshield frame down onto the hood.
 640 North El Dorado Street Stockton, CA 95202 Phone (209)943-0991 Fax (209)943-7923 www.wildhorses4x4.com Stainless steel windshield frame #5722 Date 10/30/07 Parts list: 1-10 ¾ long 1/4 NF threaded rod.
RAINGEAR 1953/ 54 Chevrolet
 RAINGEAR 1953/ 54 Chevrolet GETTING STARTED: SOME RECOMMENDATIONS PLEASE TRY OUR WAY FIRST! Note: This system is designed with built in adjustments to fit in your car. If, as you are installing it, you
WOC-364 Installation Instructions Ranger XP Heater System
 WOC-364 Installation Instructions Ranger 2011-12 XP Heater System Order of installation for a Complete Enclosure Always install the Heater System first if possible NOTE: If installing the Heater System
RH INSTALL INSTRUCTIONS 2008 MODEL
 RH-800-2 INSTALL INSTRUCTIONS 2008 MODEL 1 Tips for Installing Rhinogear Products The recommended sequence for installing our Rhinogear line of products on your Rhino. This sequence will help with ease
Installation Instructions for TJ Jeep s Fiberglass Replacement Bodies and Parts
 Installation Instructions for 1997-2006 TJ Jeep s Fiberglass Replacement Bodies and Parts Getting started: We recommend that you take pictures as you dismantle your Jeep. These pictures will help you when
Installation instructions for Camaro/Firebird and Nova* Windshield Wiper Systems
 Installation instructions for 1967-69 Camaro/Firebird and 1968-74 Nova* Windshield Wiper Systems The Raingear 1967-69 Camaro/Firebird and 1964-74 Nova wiper system is designed for ease of installation
GETTING STARTED: SOME RECOMMENDATIONS PLEASE TRY OUR WAY FIRST!
 RAINGEAR 1953/ 54 Chevrolet GETTING STARTED: SOME RECOMMENDATIONS PLEASE TRY OUR WAY FIRST! Note: This system is designed with built in adjustments to fit in your car. If, as you are installing it, you
RH INSTALL INSTRUCTIONS
 Tips for Installing Rhinogear Products The recommended sequence for installing our Rhinogear line of products on your Rhino. This sequence will help with ease of installation and help save time by eliminating
WOC & WOC Top & Back Installation Instructions
 Shown with optional Sun Roof WOC-900500-2 & WOC-900501-2 Top & Back Installation Instructions Install Order! Heater Door System Wiper on to Windshield Windshield Rear Panel Top Panel Tools needed: 5/16
Installation Instructions and Suggestions For Jeep YJ Fiberglass Replacement Bodies
 Installation Instructions and Suggestions For Jeep YJ Fiberglass Replacement Bodies Getting started with the removal of your existing Jeep body. Trust nothing to memory; take photos of everything at different
Installation Instructions Camaro/Firebird Raingear Windshield Wiper System
 Installation Instructions 1970-78 Camaro/Firebird Raingear Windshield Wiper System A-2 A A-1 A-5 A-3 A-4 B Photo O The Raingear 1970-78 Camaro/Firebird wiper system is designed for ease of installation
WPS-104 Heater Installation Instructions For 500EFI, 700 XP, & Crew Applications
 WPS-104 Heater Installation Instructions For 500EFI, 700 XP, & Crew Applications ORDER OF INSTALLATION FOR A COMPLETE ENCLOSURE OF A RANGERWARE WPS (Weather Protection System) IS AS FOLLOWS: 1. Heater
Assembly Instructions
 Assembly Instructions Part Number Description Model Approx. Assembly Time 99994-0903 Windshield Wiper Kit Mule SX 1 Hour WARNING Improper installation of this accessory could result in an accident causing
RH INSTALLATION INSTRUCTIONS 2
 Tips for Installing Rhinogear Products The recommended sequence for installing our Rhinogear line of products on your Rhino. This sequence will help with ease of installation and help save time by eliminating
Installation Guide for Rough Country 30 in. Chrome Series LED Light Bar w/ Hood Mounting Brackets
 Installation Guide for Rough Country 30 in. Chrome Series LED Light Bar w/ Hood Mounting Brackets Installation Time: 1 Hour Tools Required Trim removal tool (plastic or wood to prevent scratches on the
STREET SCENE EQUIPMENT,INC.
 STREET SCENE EQUIPMENT,INC. 950-76570 BLACK CHROME 365 McCormick Avenue 950-77570 SATIN FINISH Costa Mesa, Ca. 92626 950-78570 CHROME FINISH Phone (714) 426-0590 Fax (714) 426-0591 2007-2008 TOYOTA TUNDRA
Detroit Speed, Inc. Selecta-Speed Wiper Kit Corvette P/N:
 Detroit Speed, Inc. Selecta-Speed Wiper Kit 1968-72 Corvette P/N: 121621 A downpour of rain will no longer hinder your ability to clearly see the road. The Detroit Speed Selecta-Speed Wiper Kit provides
LED Driving Light Set For 2014 & Newer Can-Am Spyder RT # CA006-RT
 LED Driving Light Set For 2014 & Newer Can-Am Spyder RT # CA006-RT 1. Lay-out and familiarize yourself with the components supplied with this set. 2. Remove the left mirror by pulling firmly outward on
CHALLENGER TWIN TURBO SYSTEM INSTALLATION INSTRUCTIONS
 CHALLENGER TWIN TURBO SYSTEM INSTALLATION INSTRUCTIONS 1 Verify contents of kits with supplied packing list 1) Unhook the battery. 2) Remove wheel wells & front fascia of vehicle. 3) Remove the catalytic
WOC Mid Size Door Installation
 WOC-10112 Mid Size Door Installation NOTE: If the Mid Size Ranger that you are installing this door system on is a 2010 or newer you will need to remove the sill plates and side nets. If the doors are
Raingear Mustang Windshield Wiper System Installation Instructions E F A
 Raingear 1965-1966 Mustang Windshield Wiper System Installation Instructions J I H J G E F A D K 2 speed switch B C L Intermittent switch Please try our way first. This system is designed to fit in your
INSTALLATION OF THE ENCLOSURE FOR THE MULE 3010 TRANS INSTALLATION GUIDE FOR THE MULE 3000 TRANS ENCLOSURE P. 1. Sept 07
 INSTALLATION GUIDE FOR THE MULE 3000 TRANS ENCLOSURE P. 1 INSTALLATION OF THE ENCLOSURE FOR THE MULE 3010 TRANS Sept 07 www.essexmfg.com PO Box 92864 Southlake, TX 76092 Ph:888-643-7739 INSTALLATION GUIDE
MOTOALLIANCE WINCH MOUNT
 , / 1-866-527-7637 www.motoalliance.com MOTOALLIANCE WINCH MOUNT Polaris RZR Thank you for purchasing our MotoAlliance winch mount(s). You now own a premium custom winch mount to allow you to use your
Air Conditioner for M915 A0/A1 Truck
 RD-2-4530-0 Air Conditioner for M915 A0/A1 Truck INSTALLATION INSTRUCTIONS Install refrigerant compressor per instructions provided with compressor mount kit. CAUTION: Edges of sheet metal can be sharp!
General Front Windshield
 General Front Windshield **WATCH OUR INSTALL VIDEO ALONG WITH INSTALL SHEET. 8-5/16-18x1 Black Carriage Bolts 8-5/16 Black Nylock Nuts 2-5/16x1-1/4 Stainless Steel Socket Head Screws 2-Rubber Grommets
JEEP TJ/LJ REAR BUMPER INSTALLATION INSTRUCTIONS
 JEEP TJ/LJ REAR BUMPER INSTALLATION INSTRUCTIONS JRR4002-P JRR4102-P JRR-TL INCLUDED PARTS LIST- JRR-TL 2-12MM X 45MM BOLT 2-1/2 FLAT WASHER 2-1/2 SAE FLAT WASHER 4-7/16 NYLOCK NUT 8-7/16 X 1.25 BOLT 12-7/16
Please try our way first.
 1958-1962 Corvette Raingear installation instructions Designer s Note: The 1958-1962 Corvette RainGear wiper system that you have purchased is complex and will require patient fitting. Complete Instructions
1.5 WIPER MOTOR INSTALLATION INSTRUCTIONS (ITEM # S: 71081, 71011, 71082, 71012, 71182, 71112)
") 1.5 WIPER MOTOR INSTALLATION INSTRUCTIONS (ITEM # S: 71081, 71011, 71082, 71012, 71182, 71112) The Marinco 1.5 Wiper Motor features: Fully sealed base and housing which allows installation in wet locations.
1.5 WIPER MOTOR INSTALLATION INSTRUCTIONS (ITEM # S: 71081, 71011, 71082, 71012, 71182, 71112) The Marinco 1.5 Wiper Motor features: Fully sealed base and housing which allows installation in wet locations.
WINDSHIELD WIPER KIT P/N APPLICATION BEFORE YOU BEGIN KIT CONTENTS NOTE. Instr Rev 02 06/15 Page 1 of 7
 WINDSHIELD WIPER KIT P/N 2879968 APPLICATION RANGER 570, RANGER ETX AND RANGER EV Polaris does not recommend use of this kit with Tip-Out Windshield PN 2880442. BEFORE YOU BEGIN Read these instructions
Detroit Speed, Inc. Selecta-Speed Wiper Kit Corvette P/N:
 Detroit Speed, Inc. Selecta-Speed Wiper Kit 1963-67 Corvette P/N: 121620 A downpour of rain will no longer hinder your ability to clearly see the road. The Detroit Speed Selecta-Speed Wiper Kit provides
Installation Instructions
 Installation Instructions Automatic Retracting Running Board Vehicle Application Ford F150 Supercrew 2001-2003 (2004 Heritage) Part Number: 75111-01 www.bestop.com - We re here to help! Visit our web site
M GT 2005 up Mustang ENGINE START Push-Button INSTRUCTION SHEET
 Please contact the Ford Racing Techline for the most current instruction information @ (800) FORD-788!!! PLEASE READ THE FOLLOWING INSTRUCTIONS CAREFULLY PRIOR TO INSTALLATION!!! OVERVIEW: The following
UNIVERSAL POWER WIPER KIT AUTWIPER
 TEH SUPPORT: 503.693.1918 WWW.AUTOO.OM UNIVERSA POWER WIPER KIT AUTWIPER INTRODUTION Measure Distances And ut Aluminum Tubing These instructions are meant as a guide and pertain to general installation.
ECS Tuning 3095 Cleveland-Massillon Rd. Norton, Ohio Phone Fax Web
 B7 A4 Gauge Pod Installation Instructions Safety first:. When working with your vehicles electrical system; always disconnect the battery! Avoid shorting any circuits, or probing around wires. Failure
\ \ ~, en ~ \ \\ en I- ( \\\ b3~(i 5/27/93. æ Lr PECULIAR HYDRAULICS W LL BELT DRIVE, SLC,
 DODGE V8-38\360 W-W/O AC W/SERPENTINE 99-9 PECULIAR HYDRAULICS BELT DRIVE, SLC, UNDERHOOD VALVE 7505 ~., ( \\\ \ \\ ~,/./ LL a: :: z en ~ en I- W LL æ Lr ~,. \ \ \ "',: e /' ~ '\ '- -- - /' "-.. -- - -..
CLASSIC UPDATE WIRING KIT
 by Randy Irwin 1955-57 CLASSIC UPDATE WIRING KIT Randy Irwin - Technical Writer Randy has been involved in the Chevy parts business for over 25 years. He is a wizard at creating, making and modifying custom
Detroit Speed, Inc. Selecta-Speed Wiper Kit C10 Trucks P/N:
 Detroit Speed, Inc. Selecta-Speed Wiper Kit 1964-66 C10 Trucks P/N: 121631 A downpour of rain will no longer hinder your ability to clearly see the road. The Detroit Speed Selecta-Speed Wiper Kit provides
Wildcat System Instructions
 Wildcat System Instructions NOTE: Most steps contained in these instructions will need to be repeated on the other side of the vehicle. Prior to assembly of windshield it is necessary to establish what
Part # Description Qty Inspected By Rack & Pinion Pump Kit Remote Reservoir Line Kit Shaft Kit
 58-62 Corvette Power Rack & Pinion Kit Instructions # 8011530 Unisteer offers a limited warranty against all manufacturer defects of their kits and supplied parts. Unisteer will not honor any warranty
Detroit Speed, Inc. Selecta-Speed Wiper Kit Camaro Non Recessed Park 1978 Camaro Non Recessed Park P/N: ,
 Detroit Speed, Inc. Selecta-Speed Wiper Kit 1975-1977 Camaro Non Recessed Park 1978 Camaro Non Recessed Park P/N: 121406, 121408 A downpour of rain will no longer hinder your ability to clearly see the
INSTALLATION INSTRUCTIONS
 INSTALLATION INSTRUCTIONS Contents Description: Auto-Dimming Rearview Mirror with Compass Part Number: 990B0-35007 Applications: SX4 Hatchback, 2007- SX4 Sedan, 2008- Installation Time:.5 HRS Ref. Part
Camaro Camaro
 Important facts about this kit. 1. The dash panel used in this picture is used by permission of Covan's Classic. We Make Wiring Easy! 2. This kit requires some modification to your original under dash
*1609BAG8* 1609BAG8 JEEP JK 3 1/2 SUSPENSION KIT A
 JEEP JK 3 1/2 SUSPENSION KIT 92160900A *1609BAG8* 1609BAG8 Thank you for choosing Rough Country for your suspension needs. Please read instructions before beginning installation. Check the kit hardware
MODEL NO & UP
 FORM NO. 97 50xi GARDEN TRACTOR MODEL NO. 7570 990000 & UP SET UP INSTRUCTIONS Loose Parts Use the chart below to identify parts for assembly. DESCRIPTION QTY. USE Rear Wheel Wheel Bolt R.H. Wheel Spindle
COLD AIR INTAKE INSTALLATION INSTRUCTIONS
 COLD AIR INTAKE INSTALLATION INSTRUCTIONS # D760-0030 Fits: 2007-10 135i (E82, E88; with N54 engine) 2007-08 335i/xi (E90) 2007-10 335i (E92, E93; with N54 engine) Congratulations for being selective enough
Detroit Speed, Inc. Electric Headlight Door Kit Corvette P/N: &
 Detroit Speed, Inc. Electric Headlight Door Kit 1968-82 Corvette P/N: 122006 & 122007 The Detroit Speed Inc. Electric Headlight Door Kit replaces the stock vacuum actuated system on all 1968-82 Corvettes.
RIM Hood For Aeromaster Bodies
 RIM Hood For Aeromaster Bodies Service Guide WARNING: Hood should be opened by releasing the hold-down straps, lifting the hood, and engaging the prop rod. Be sure prop rod is properly engaged before working
QUALITY INTEGRITY INNOVATION SERVICE
 30630 Lift Kit Warrior recommends this system be installed by a certified technician. In addition to these instructions, professional knowledge of disassembly and reassembly procedures as well as post
2013 Mustang Workshop Manual
 32. Attach the wiring harness retainers to the LH side of the oil pan and the front oil pan stud bolts and install the 2 nuts. Tighten to 8 Nm (71 lb-in). 33. Position the underbody shield and install
Please reference the attached document for information regarding the installation of Utility Side Skirts (USS-160) on Dry Freight Trailers.
 on Dry Freight Trailers.") SERVICE BULLETIN NO. SB-19-004 Issue date: March 9, 2011 SUBJECT: Installing Dry Freight Side Skirts Please reference the attached document for information regarding the installation of Utility Side Skirts
SERVICE BULLETIN NO. SB-19-004 Issue date: March 9, 2011 SUBJECT: Installing Dry Freight Side Skirts Please reference the attached document for information regarding the installation of Utility Side Skirts
ITEM QTY CHECK PART NUMBER DESCRIPTION
 PART #21128 2010 Camaro Cold Air Induction Stage II PACKING LIST Before installation, use this check list to make sure all necessary parts have been included. ITEM QTY CHECK PART NUMBER DESCRIPTION 1.
99-04 Ford F250 Super Duty 4-6 Suspension Kit
 92758200 99-04 Ford F250 Super Duty 4-6 Suspension Kit Thank you for choosing Rough Country for your suspension needs. Rough Country recommends a certified technician installs this system. In addition
INSTALLATION INSTRUCTIONS C-VS-2000-DUR-1 20 VEHICLE SPECIFIC CONSOLE for 2018 Dodge Durango with Standard Shifter
 INSTALLATION INSTRUCTIONS C-VS-2000-DUR-1 20 VEHICLE SPECIFIC CONSOLE for 2018 Dodge Durango with Standard Shifter TOOLS REQUIRED: Phillips Screw Driver T-20 Torx bit Standard Socket set 9/64 Allen wrench
Installation Instructions
 Equipment Required: Fastener Kit: F Wrenches: ¾, 7/8, 15/16 Drill Bits: 1/8, 9/16, 5/8 1-1/8 HOLE SAW Other Tools: Center Punch, Measuring Tape Installation Instructions 5 WARNING: Under no circumstances
ALLDATA Online Toyota Truck Tacoma 4WD V6-4.0L (1GR-FE) - Service and... Service and Repair 1. DISCONNECT CABLE FROM NEGATIVE BATTERY TERMINAL
 - Service and... Service and Repair 1. DISCONNECT CABLE FROM NEGATIVE BATTERY TERMINAL") Page 1 of 9 Service and Repair FRONT WIPER MOTOR REMOVAL 1. DISCONNECT CABLE FROM NEGATIVE BATTERY TERMINAL 2. REMOVE FRONT WIPER ARM HEAD CAP a. Using a screwdriver wrapped with protective tape, remove
Page 1 of 9 Service and Repair FRONT WIPER MOTOR REMOVAL 1. DISCONNECT CABLE FROM NEGATIVE BATTERY TERMINAL 2. REMOVE FRONT WIPER ARM HEAD CAP a. Using a screwdriver wrapped with protective tape, remove
Wiper Motor Windshield Frame Mount Marinco-500. Installation Instructions
 Wiper Motor Windshield Frame Mount Marinco-500 Installation Instructions Wiper Motor Windshield Frame Mount Marinco-500 Tools (Not Included): Phillips head screwdriver 17 mm or small adjustable wrench
99-04 Ford F250 Super Duty 4-6 Suspension Kit
 92758200 99-04 Ford F250 Super Duty 4-6 Suspension Kit Thank you for choosing Rough Country for your suspension needs. Rough Country recommends a certified technician installs this system. In addition
58-62 Corvette Manual Rack & Pinion Kit Instructions #
 58-62 Corvette Manual Rack & Pinion Kit Instructions # 8001550 Unisteer offers a limited warranty against all manufacturer defects of their kits and supplied parts. Unisteer will not honor any warranty
Raxiom Factory GPS Rear Back-up Camera Kit (07-17 Wrangler)
") Raxiom Factory GPS Rear Back-up Camera Kit (07-17 Wrangler) Installation Time: 2.5-3Hrs Tools Required: 7mm Socket & Driver 10mm Socket 10mm Open end wrench Knife / Razor blade Zip-ties Wire Cutters Needle
Raxiom Factory GPS Rear Back-up Camera Kit (07-17 Wrangler) Installation Time: 2.5-3Hrs Tools Required: 7mm Socket & Driver 10mm Socket 10mm Open end wrench Knife / Razor blade Zip-ties Wire Cutters Needle
Installing Reefer Side Skirts USS120A
 SB-19-003 Issue date: March 08, 2011 Revised: January 03, 2013 Installing Reefer Side Skirts USS120A Please reference the attachment for information regarding the aftermarket installation of the Utility
Instructions for Yamaha G14/G16/G19/G22 Models
 Instructions for Yamaha G14/G16/G19/G22 Models The Light Kit includes: (31483) Brakelight Connector Turn Signal Connector (1) Main Wire Harness with Positive & Negative In-line Fuses. (1) Head Light Switch.
INSTALLATION INSTRUCTIONS FORD F-150 2WD & 4WD RETAINS FACTORY TOW HOOKS PART #P3063
 INSTALLATION INSTRUCTIONS FORD F-150 2WD & 4WD RETAINS FACTORY TOW HOOKS PART #P3063 PARTS LIST: 1 Grille Guard 2 10-1.5mm Nylon Lock Nuts 1 Driver/Left Frame Mounting Bracket 4 12mm Plastic Washers 1
Installation instructions, accessories. Electric engine block heater, connector outlet, 4-cyl
 Installation instructions, accessories Instruction No 31359444 Version 1.2 5 Part. No. 31359438 Electric engine block heater, connector outlet, 4-cyl IMG-247665 Volvo Car Corporation Electric engine block
Ranger Product Catalog
 RangerWare Product Catalog We are a composite fiberglass reinforced product (FRP) manufacturing company with 25 years experience in high tech composites, and have the capabilities of design, prototype,
Installing Your 220v J-POD Kit
 Installing Your 220v J-POD Kit NOTE: There are two J-POD versions depending on your pump voltage - 110 volt and 220 volt. MAKE SURE YOU HAVE THE RIGHT VOLTAGE J-POD FOR YOUR. Using software and hardware
JEEP JK 4 SUSPENSION KIT
 92168100 Thank you for choosing Rough Country for your suspension needs. JEEP JK 4 SUSPENSION KIT Rough Country recommends a certified technician install this system. In addition to these instructions,
Factory Five Racing, Inc. Roadster Complete Kit Assembly manual revision 3p update
 Factory Five Racing, Inc. Roadster Complete Kit Assembly manual revision 3p update Kit Parts Prep...3 Body Removal...3 Aluminum Removal...5 Front upper control arm...7 Adjusting the upper control Arm...10
Detroit Speed, Inc. Selecta-Speed Wiper Kit 1967 Camaro/Firebird P/N:
 Detroit Speed, Inc. Selecta-Speed Wiper Kit 1967 Camaro/Firebird P/N: 121001 A downpour of rain will no longer hinder your ability to clearly see the road. This kit provides you with the performance and
PRICING & SPECIFICATIONS ARE SUBJECT TO CHANGE WITHOUT NOTICE.
 We are a composite fiberglass reinforced product (FRP) manufacturing company with 25 years experience in high tech composites, and have the capabilities of design, prototype, tooling, manufacturing, and
Wiper System. W-Series
 Service Guide Wiper System W-Series Contents Overview...2 Troubleshooting Procedure...3 Wiper Blades...5 Washer zzle Spray djustment...5 Wiper rms...6 Wiper ssembly...7 Motor...9 Pivot ssembly...11 Link
05 09 Mustang Squirter Nozzle Relocation Kit CDC #112050
 05 09 Mustang Squirter Nozzle Relocation Kit CDC #112050 Note: Read installation instructions before starting. Component Check List: Quantity/Description Part# CDC Installer 2 - Squirter Nozzles 115063
MOUNT BRACKET PARTS and HARDWARE: Installation parts with * come loose in hardware kit bag. Other parts are preassembled
 INSTALL INSTRUCTIONS C-DMM-2006 Dash Monitor Mount 2017-2019 F-250, 350, 450 Pickup, F-450 and 550 Cab Chassis, 2015-2019 Ford F-150 and 2018-2019 Expedition Notes: 1. The C-DMM-2000 series Dash Monitor
INSTALLATION INSTRUCTIONS
 INSTALLATION INSTRUCTIONS PARTS LIST Accessory Application Publications No. MII 13038 GL1800 P/N 08E75-MCA-100K Issue Date November 2009 Honda Dealer: Please give a copy of these instructions to your customer.
INSTALLATION INSTRUCTION
 1551 S. Vineyard Avenue Ontario, CA 91761 (909) 923-1973 INSTALLATION INSTRUCTION Club Car Precedent Installation Notes CURTIS 1234, 1236 OR 1238 AC INDUCTION MOTOR/ CONTROLLER REVISION: B This kit is
JEEP JK WRANGLER UNLIMITED 4-DOOR Pro-Series Front Replacement Fenders
 PSFF001 2007-2016 JEEP JK WRANGLER UNLIMITED 4-DOOR Pro-Series Front Replacement Fenders HARDWARE INCLUDED 4 6mm x 25mm Hex Bolts 16 10mm x 20mm Button Head Bolts 8 6mm x 12mm x 1.6mm Flat Washers 16 10mm
INSTALLATION & OWNER S MANUAL
 INSTALLATION & OWNER S MANUAL CAB INSTALLATION INSTRUCTIONS JOHN DEERE 3000 SERIES (4200/4300/4400) (4210/4310/4410) & (3120/3320/3520/3720) HARD SIDED CAB ENCLOSURE (p/n 1JD3520AS) SOFT SIDED CAB ENCLOSURE
MOUNTING INSTRUCTIONS JOHN DEERE GATOR NON-ROPS CAB
 MOUNTING INSTRUCTIONS JOHN DEERE GATOR NON-ROPS CAB FITS 4X2 & 6X4 GATORS A-11112, A-11224, A-11225, A-11226 MANUFACTURED BY: BOX 70 LITCHFIELD, MINNESOTA 55355-0070 (320) 693-3221 Fax: (320) 693-7252
Tusk UTV Horn & Signal Kit Installation Instructions
 Tusk UTV Horn & Signal Kit Installation Instructions The Tusk UTV signal kit is designed to be a simple way to provide front and rear turn signals, license plate mount with light, horn, and rearview mirrors
Z1 Motorsports 350Z / G35 Oil Cooler Kit Installation Manual
 Z1 Motorsports 2877 Carrollton Villa Rica Hwy Carrollton GA 30116 770.838.7777 Z1 Motorsports 350Z / G35 Oil Cooler Kit Installation Manual For 19, 25 and 34 Row Oil Cooler Kits Parts Included: 1 Aluminum
Wolverine Turn Signal / Horn Kit 2102
 All years Yamaha Wolverine STOP - THIS KIT IS DESIGNED SPECIFICALLY FOR ALL YEAR AND MODELS YAMAHA WOLVERINE. IF YOUR MACHINE IS NOT ONE OF THESE MODELS DO NOT PROCEED. Contact Ryco Motorsports or your
CUMMINS 6.7L EXHAUST BRAKE PRXB EXHAUST BRAKE KIT FOR 2007½-2015 TRUCKS EQUIPPED WITH 6.7L CUMMINS ISB DIESEL ENGINES. C Kit C Kit
 CUMMINS 6.7L EXHAUST BRAKE PRXB EXHAUST BRAKE KIT FOR 2007½-2015 TRUCKS EQUIPPED WITH 6.7L CUMMINS ISB DIESEL ENGINES C44038 4 Kit C44039 5 Kit BEFORE STARTING THE INSTALLATION please read the entire installation
COLD AIR INTAKE INSTALLATION INSTRUCTIONS. # D Fits: i (4.8L)
") COLD AIR INTAKE INSTALLATION INSTRUCTIONS # D760-0013 Fits: 2006-10 650i (4.8L) PARTS LIST Air Box Assembly Left tube Center tube Right tube Support bracket AFM housing AFM/TB tube Hardware Kit Congratulations
COLD AIR INTAKE INSTALLATION INSTRUCTIONS # D760-0013 Fits: 2006-10 650i (4.8L) PARTS LIST Air Box Assembly Left tube Center tube Right tube Support bracket AFM housing AFM/TB tube Hardware Kit Congratulations
C40008 & C40009 EXHAUST BRAKES
 EXHAUST BRAKES C40008 & C40009 1995 2003 Ford F250 / F350 7.3 L Powerstroke Diesel with manual transmissions 1995 1998 Ford F250 / F350 7.3 L Powerstroke Diesel with automatic transmission* *Requires the
INSTALLATION & OWNER S MANUAL
 INSTALLATION & OWNER S MANUAL This Curtis Cab is designed and manufactured for use only as reasonable weather protection. This cab is not applicable, Nor should the cab be considered as protection against
Luggage System Fitting Instructions - Sprint ST
 WARNING: Always have Triumph approved parts, accessories and conversions fitted by a trained technician of an authorised Triumph dealer. The fitting of parts, accessories and conversions by a technician
GL1800 TRAILER HITCH - INSTALLATION INSTRUCTIONS #GL
 GL1800 TRAILER HITCH - INSTALLATION INSTRUCTIONS #GL18007-20 Read through these instructions completely before attempting installation, lay out all pieces including the numbered hardware bags to familiarize
Detroit Speed, Inc. Selecta-Speed Wiper Kit Mustang P/N:
 Detroit Speed, Inc. Selecta-Speed Wiper Kit 1967-68 Mustang P/N: 121651 A downpour of rain will no longer hinder your ability to clearly see the road. The Detroit Speed Inc. Selecta-Speed Wiper Kit provides
INSTRUCTIONS, (FORD) SUPER DUTY INSTALLATION KIT (C2 PICKUP LIFTGATES)
 SUPER DUTY INSTALLATION KIT (C2 PICKUP LIFTGATES)") LIFT CORPORATION Sht. 1 of 20 DSG# M-14-32 Rev. B Date: 05/31/2017 INSTRUCTIONS, (FORD) SUPER DUTY INSTALLATION KIT (C2 PICKUP LIFTGATES) FORD SUPER DUTY F-250 PICKUP TRUCKS, 1999-2016 FORD SUPER DUTY
LIFT CORPORATION Sht. 1 of 20 DSG# M-14-32 Rev. B Date: 05/31/2017 INSTRUCTIONS, (FORD) SUPER DUTY INSTALLATION KIT (C2 PICKUP LIFTGATES) FORD SUPER DUTY F-250 PICKUP TRUCKS, 1999-2016 FORD SUPER DUTY
Jeep JK 6 Switch Panel
 921709590 2007-17 Jeep JK 6 Switch Panel Thank you for choosing Rough Country for all your lighting needs. Please read instructions before beginning installation. Check the kit hardware against the kit
RAINGEAR 1955/ 1956 Chevrolet
 RAINGEAR 1955/ 1956 Chevrolet GETTING STARTED: SOME RECOMMENDATIONS PLEASE TRY OUR WAY FIRST! Note: This system is designed with built in adjustments to fit in your car. If, as you are installing it, you
HOW - TO WIRING & LIGHTING
 HOW - TO WIRING & LIGHTING Tool And Material Checklist Test Light Service Manual Penetrating Oil Long-Nose Pliers T-Square or Right Angle Screwdriver Black Electrical Tape Fuses Fuse Puller Cloth or Paper
C FORD F250 / F L POWERSTROKE DIESEL WITH AUTOMATIC TRANSMISSIONS ONLY
 EXHAUST BRAKES C40019 1999-2003 FORD F250 / F350 7.3L POWERSTROKE DIESEL WITH AUTOMATIC TRANSMISSIONS ONLY Getting Started Thank you and congratulations on your purchase of a Pacbrake exhaust retarder.
Factory Five Racing, Inc. 818 Kit Assembly manual revision 1J update
 Factory Five Racing, Inc. 818 Kit Assembly manual revision 1J update Turbo coolant overflow tank...1 Shifter handle...4 Install...4 Door skin...7 Door Liner... 10 Side mirrors... 14 Door handles and pulls...
RANGER MIDSIZE WINCH KIT
 RANGER MIDSIZE WINCH KIT P/N 2881669 APPLICATION ALL MY RANGER 400; MY11 AND NEWER RANGER 500 EXCEPT CREW BEFORE YOU BEGIN Read these instructions thoroughly and make sure all parts and tools are accounted
Z1 Motorsports 370Z/G37 Oil Cooler Kit Installation Manual
 Z1 Motorsports 2877 Carrollton Villa Rica Hwy Carrollton GA 30116 770.838.7777 Z1 Motorsports 370Z/G37 Oil Cooler Kit Installation Manual For 19, 25 and 34 Row Oil Cooler Kits Parts Included: 1 SETRAB
PHASE 3 POWERSPORTS AUDIO KIT RZR POLARIS. pg 2 Disassembly, Wire and Amplifier Plate Installation. pg 9 Glovebox Subwoofer Installation
 POLARIS RZR PHASE 3 POWERSPORTS AUDIO KIT pg 2 Disassembly, Wire and Amplifier Plate Installation pg 9 Glovebox Subwoofer Installation pg 13 Kick Panel Speakers Installation pg 25 MRB3 and Dash Kit Installation
05 09 Mustang Squirter Nozzle Relocation Kit CDC #112050
 CD4II3BC 05 09 Mustang Squirter Nozzle Relocation Kit CDC #112050 Note: Read installation instructions before starting. Component Check List: Quantity/Description Part# CDC Installer 2 - Squirter Nozzles
CANADA POST DELIVERY TRUCK. Labor Time Guide
 CANADA POST DELIVERY TRUCK Labor Time Guide 1801 S. Nottawa Street Sturgis, MI 49091 Phone 800-233-4823 Fax (616-659-0499) www.morganolson.com www.morganolsonparts.com Page Table of Contents 3 Hood &