GETTING STARTED: SOME RECOMMENDATIONS PLEASE TRY OUR WAY FIRST!
|
|
|
- Derrick Garrett
- 6 years ago
- Views:
Transcription
1 RAINGEAR 1953/ 54 Chevrolet GETTING STARTED: SOME RECOMMENDATIONS PLEASE TRY OUR WAY FIRST! Note: This system is designed with built in adjustments to fit in your car. If, as you are installing it, you think that you need to modify the parts supplied (except as noted), you are doing something wrong. Please reread the instructions or call us ( ) before proceeding. For technical questions, etc., please contact us directly! Your dealer does not stock spare parts and is unlikely to be able to troubleshoot problems. NOTE: Pacific Western Design 53/54 Chevrolet Wiper System is designed to install in cars which are modified to use a 12- volt negative ground electrical system only and is not available for 6-volt(original)cars. NOTE: You must have the stock original chrome pivot shaft escutcheons. (outside chrome piece) If you do not, try the National Chevy Association in Minnesota.(651) or Please familiarize yourself with the drawings and instructions that are included. First: DISCONNECT YOUR BATTERY (You will be working under the dash in an area of your vehicle, which contains its greatest concentration of electrical wiring.) Remove the radio and the stock radio support bracket from the firewall. Remove the stock radio speaker and the chrome speaker grill-ashtray casting which is held to the dash with the same four studs that hold the speaker. (The two hex nuts above the ashtray shield do not hold the speaker grill to the dash and do not need to be removed.) Installation is easier if the glove box is removed. Remove the wiper control knob and cable from the dash. SAVE THE KNOB FOR USE WITH THE NEW SYSTEM. Remove your wiper arms and blades. Dismantle original wiper system: Remove both the right and left slotted escutcheon nuts that hold the stock pivot shafts (the parts that the wiper arms attach to). Push the pivot shafts into the interior of the vehicle. Remove the vacuum motor control cable from the vacuum motor and push it into the interior of the car. Remove the wiper motor. Remove the spool assembly from the firewall. Remove the wiper motor control cable from the dash. Those of you who wish to retain the original appearance of the car may want to return the motor to the original location on the firewall after the Pacific Western Design system is installed and operational. A block-off plate is included if you would like to cover the hole in the firewall.
2 INSTALLATION of MOTOR and LEFT HAND PIVOT SHAFT ASSEMBLY It is advisable at this point to be certain the new wiper motor and switch are wired together. (see wiring diagrams) It can be very difficult to install the harness once the new wiper assembly is in place. Attach the shorter of the two cross-link halves to pivot pin D on the left-hand drive unit. Be careful to index the key on the bushing into the key slot in the link and install with the shoulder bushing oriented toward the pivot pin as shown. (See Figures 1, 2 & 5). These are made to be a very tight fit. You can use a ¼ open ended wrench to push the j-clip into position. If you have or are installing a windshield washer pump and reservoir, it is advisable to route and install the rubber hoses to the brass tubes on the interior side of the wiper escutcheon plates at this time. Place the u shaped body contour adapter onto the pivot shaft of the left-hand drive assembly (see figure 2). To install the left-hand drive unit assembly, feed the cross-link half and drive unit from the left of the steering column and above the two steel steering column brace rods. Lift the left-hand drive assembly pivot shaft up and through the (interior side of) the chrome escutcheon. This step will be easier if you have assistance holding the left hand drive unit in place while the escutcheon nut is threaded on the exposed pivot shaft from the outside of the car. Snug but do not tighten the nut at this time. BODY BRACE To the left of the drive assembly on the body of the vehicle you will notice the three fasteners that secure the hood hinges to the cowl. Two are 5/16-18 hex bolts. Use a 1/2 wrench and remove the lowest of these two bolts (only). The Pacific Western Design left hand drive assembly uses this hood hinge bolt location as the attachment location of the lower body brace (see figure 1). Use the carriage bolt, nut and washer to secure the body brace to the drive unit and the 5/16-1 hex cap screw to secure the wiper assembly to the car body. Align the left -hand drive unit and body brace as necessary and tighten all bolts including the escutcheon nut. RIGHT HAND PIVOT SHAFT The right hand pivot shaft is installed in the same manner as the left- hand drive assembly. Using a thin washer and j-clip, attach the longer half of the cross-link to the right hand pivot shaft (see figures 2 & 5). Make certain the bushing will ride freely on the drive pins. You can use a ¼ open ended wrench to push down and slide the clip in place. Add the u shaped contour adapter to the right hand pivot shaft assembly and install the pivot shaft to the cowl of the vehicle as you did to the left side. Tighten the escutcheon nut at this time. Be absolutely certain that the lever on the right hand pivot shaft is in the 10 o clock to 2 o clock position. (If the link is connected with the right hand pivot shaft lever in the 8 o clock to 4 o clock position the system will run backwards and you will scrape a lot of paint off your hood!) Use the two X 1/2 machine screws nuts and washers to join the two cross link halves in its shortest configuration and tighten securely.
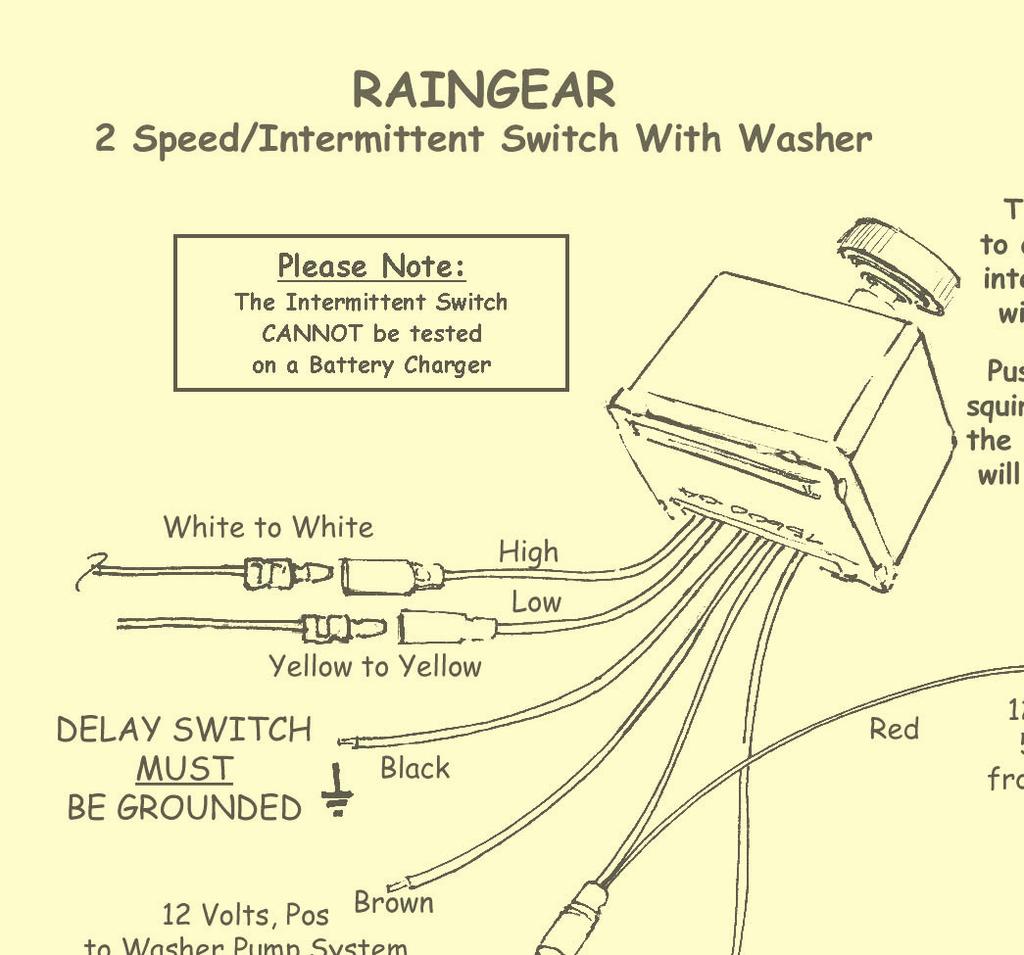
3 SWITCH The intermittent wiper switch is a tight fit in the dash but it does go in. Install wiper switch in the dash panel and tighten the chrome bezel nut supplied. The black ground lead from the intermittent wiper switch (only) must be attached to a good ground on the body of the car. See wiring diagram. Connect the red power lead to a 5 amp fused source controlled by the ignition switch. Note that the intermittent switch must have the black wire grounded to function. This unit will not function if the car body is not grounded and you CANNOT use a battery charger to test the system. Test electrical operation Check park operation as indicated. Do not install arms and blades yet. PARK POSITION CONFIRMATION AND ADJUSTMENT (adjustment is usually not needed) We make every effort to adjust the drive arm on the motor so that the unit will park correctly at the end of the stroke. If the wipers park either early (before the end of the travel) or late, review figure 3. Turn the motor on and then off to park the motor and make a flag from masking tape or wire ties on the pivot shafts so you can see the operation of the system. If it is necessary to adjust the park position, use an adjustable wrench to hold the motor drive arm while you loosen point A jam nut. Pry the drive arm loose from the motor shaft taper and rotate it to line up points A B and C as noted in figure 3. Make sure you keep the drive arm from rotating as you re-tighten the jam nut or the adjustment will be worse than when you started! Put the dashboard back together Install wiper arms and blades. 1953/34 RAINGEAR revised 5/2006
4
5
6
7
8


9

10
RAINGEAR 1953/ 54 Chevrolet
 RAINGEAR 1953/ 54 Chevrolet GETTING STARTED: SOME RECOMMENDATIONS PLEASE TRY OUR WAY FIRST! Note: This system is designed with built in adjustments to fit in your car. If, as you are installing it, you
RAINGEAR 1955/ 1956 Chevrolet
 RAINGEAR 1955/ 1956 Chevrolet GETTING STARTED: SOME RECOMMENDATIONS PLEASE TRY OUR WAY FIRST! Note: This system is designed with built in adjustments to fit in your car. If, as you are installing it, you
Please try our way first.
 1958-1962 Corvette Raingear installation instructions Designer s Note: The 1958-1962 Corvette RainGear wiper system that you have purchased is complex and will require patient fitting. Complete Instructions
Installation instructions for 1948 to 1952 Ford F-1 pick-up trucks. Getting started: Some recommendations : PLEASE TRY OUR WAY FIRST
 Installation instructions for 1948 to 1952 Ford F-1 pick-up trucks The Raingear s modern lever and link electric windshield wiper system for 1948 to 1952 Ford F-1 pickups provides a direct mechanical link
Raingear Mustang Windshield Wiper System Installation Instructions E F A
 Raingear 1965-1966 Mustang Windshield Wiper System Installation Instructions J I H J G E F A D K 2 speed switch B C L Intermittent switch Please try our way first. This system is designed to fit in your
Installation instructions for Camaro/Firebird and Nova* Windshield Wiper Systems
 Installation instructions for 1967-69 Camaro/Firebird and 1968-74 Nova* Windshield Wiper Systems The Raingear 1967-69 Camaro/Firebird and 1964-74 Nova wiper system is designed for ease of installation
Installation Instructions Camaro/Firebird Raingear Windshield Wiper System
 Installation Instructions 1970-78 Camaro/Firebird Raingear Windshield Wiper System A-2 A A-1 A-5 A-3 A-4 B Photo O The Raingear 1970-78 Camaro/Firebird wiper system is designed for ease of installation
Windshield Wiper System Installation Instructions For GM A-Body (All including Chevelle, Tempest, Cutlass, Skylark)
") Windshield Wiper System Installation Instructions For 1964-1967 GM A-Body (All including Chevelle, Tempest, Cutlass, Skylark) Photo ABO-1a: This is the assembled unit. Also shown is the optional 2-speed/
Windshield Wiper System Installation Instructions For 1964-1967 GM A-Body (All including Chevelle, Tempest, Cutlass, Skylark) Photo ABO-1a: This is the assembled unit. Also shown is the optional 2-speed/
Detroit Speed, Inc. Selecta-Speed Wiper Kit Corvette P/N:
 Detroit Speed, Inc. Selecta-Speed Wiper Kit 1963-67 Corvette P/N: 121620 A downpour of rain will no longer hinder your ability to clearly see the road. The Detroit Speed Selecta-Speed Wiper Kit provides
Detroit Speed, Inc. Electric Headlight Door Kit Corvette P/N: &
 Detroit Speed, Inc. Electric Headlight Door Kit 1968-82 Corvette P/N: 122006 & 122007 The Detroit Speed Inc. Electric Headlight Door Kit replaces the stock vacuum actuated system on all 1968-82 Corvettes.
Detroit Speed, Inc. Electric Headlight Door Kit Corvette P/N: &
 Detroit Speed, Inc. Electric Headlight Door Kit 1968-82 Corvette P/N: 122006 & 122007 The Detroit Speed Inc. Electric Headlight Door Kit replaces the stock vacuum actuated system on all 1968-82 Corvettes.
Detroit Speed, Inc. Selecta-Speed Wiper Kit Corvette P/N:
 Detroit Speed, Inc. Selecta-Speed Wiper Kit 1968-72 Corvette P/N: 121621 A downpour of rain will no longer hinder your ability to clearly see the road. The Detroit Speed Selecta-Speed Wiper Kit provides
1963 GEN IV SUREFIT VINTAGE AIR CONDITIONING INSTALLATION
 by Randy Irwin 1963 GEN IV SUREFIT VINTAGE AIR CONDITIONING INSTALLATION Randy Irwin - Technical Writer Randy has been involved in the Chevy parts business for over 30 years. He is a wizard at creating,
Detroit Speed, Inc. Selecta-Speed Wiper Kit Mustang P/N:
 Detroit Speed, Inc. Selecta-Speed Wiper Kit 1967-68 Mustang P/N: 121651 A downpour of rain will no longer hinder your ability to clearly see the road. The Detroit Speed Inc. Selecta-Speed Wiper Kit provides
Assembly Instructions
 Assembly Instructions Part Number Description Model Approx. Assembly Time 99994-0903 Windshield Wiper Kit Mule SX 1 Hour WARNING Improper installation of this accessory could result in an accident causing
INSTALLATION INSTRUCTIONS FORD F-150 2WD & 4WD RETAINS FACTORY TOW HOOKS PART #P3063
 INSTALLATION INSTRUCTIONS FORD F-150 2WD & 4WD RETAINS FACTORY TOW HOOKS PART #P3063 PARTS LIST: 1 Grille Guard 2 10-1.5mm Nylon Lock Nuts 1 Driver/Left Frame Mounting Bracket 4 12mm Plastic Washers 1
Installation Instructions
 Installation Instructions Dual Wiper System Part # 2878138 For Tip Out Windshield go to page 4 You Will need the Windshield off of Vehicle for the Installation process. Order of installation for Rangerware
Detroit Speed, Inc. Selecta-Speed Wiper Kit C10 Trucks P/N:
 Detroit Speed, Inc. Selecta-Speed Wiper Kit 1964-66 C10 Trucks P/N: 121631 A downpour of rain will no longer hinder your ability to clearly see the road. The Detroit Speed Selecta-Speed Wiper Kit provides
RANGER 900 POWER STEERING KIT
 RANGER 900 POWER STEERING KIT P/N 2880083 APPLICATION MY14 AND NEWER RANGER XP 900 MODELS IMPORTANT It is strongly recommended that this kit be installed by an authorized Polaris dealer. NOTE Use of this
Chevy Nova Pro-Touring Front Suspension Installation Instructions
 1962-1967 Chevy Nova Pro-Touring Front Suspension Installation Instructions 1-800-984-6259 www.totalcostinvolved.com 1 Pro-Touring Clip A-Arm Assembly Sway Bar Assembly Fender Panel Kit 8 7/16-20 * 1 ¼
CLASSIC UPDATE WIRING KIT
 by Randy Irwin 1955-57 CLASSIC UPDATE WIRING KIT Randy Irwin - Technical Writer Randy has been involved in the Chevy parts business for over 25 years. He is a wizard at creating, making and modifying custom
3. Cover the hood with padding and fold the stock windshield frame down onto the hood.
 640 North El Dorado Street Stockton, CA 95202 Phone (209)943-0991 Fax (209)943-7923 www.wildhorses4x4.com Stainless steel windshield frame #5722 Date 10/30/07 Parts list: 1-10 ¾ long 1/4 NF threaded rod.
Your Steering Column Specialist
 Cable Shift Installation Instructions for: ididit Column to GM Trans www.ididitinc.com ididit Column to 350 Trans...PG1-4 ididit Column to 400 Trans...PG5-8 ididit Column to 700R4 & 4L60 Series Trans...PG9-12
OWNER S MANUAL MUDRZRDK POLARIS RZR DASH KIT [FOR USE WITH MTX WET-MC3 HEAD UNIT] MTX.COM
![OWNER S MANUAL MUDRZRDK POLARIS RZR DASH KIT [FOR USE WITH MTX WET-MC3 HEAD UNIT] MTX.COM](/thumbs/95/124868028.jpg "OWNER S MANUAL MUDRZRDK POLARIS RZR DASH KIT [FOR USE WITH MTX WET-MC3 HEAD UNIT] MTX.COM") OWNER S MANUAL MUDRZRDK POLARIS RZR DASH KIT [FOR USE WITH MTX WET-MC3 HEAD UNIT] IMPORTANT NOTICE If you have any questions regarding wire routing in a vehicle, please contact MTX Technical Support at
OWNER S MANUAL MUDRZRDK POLARIS RZR DASH KIT [FOR USE WITH MTX WET-MC3 HEAD UNIT] IMPORTANT NOTICE If you have any questions regarding wire routing in a vehicle, please contact MTX Technical Support at
OEM Cruise Control Installation in GMC/Chevy NBS trucks
 OEM Cruise Control Installation in 99-02 GMC/Chevy NBS trucks May 2008 ~ Rampage_Rick Having just installed factory cruise control in my 00 Sierra, I thought I d share the fun. I followed the steps outlined
PART NUMBER: H630SSJ000. Kit Contents: A. Amplifier with Bracket (1) D. Badge (2) with push nuts (4)
 D. Badge (2) with push nuts (4)") Kit Contents: A. Amplifier with Bracket (1) D. Badge (2) with push nuts (4) E. Clip B. Harness (1) C. Cable tie (8) F. Mounting Hardware (2) G. Replacement Speaker (2) H. HVAC Duct extension (2) IMPORTANT:
Kit Contents: A. Amplifier with Bracket (1) D. Badge (2) with push nuts (4) E. Clip B. Harness (1) C. Cable tie (8) F. Mounting Hardware (2) G. Replacement Speaker (2) H. HVAC Duct extension (2) IMPORTANT:
Installation Guide for Rough Country 30 in. Chrome Series LED Light Bar w/ Hood Mounting Brackets
 Installation Guide for Rough Country 30 in. Chrome Series LED Light Bar w/ Hood Mounting Brackets Installation Time: 1 Hour Tools Required Trim removal tool (plastic or wood to prevent scratches on the
1967 (Late) and 1968 CORVETTE TELESCOPING STEERING COLUMN DISASSEMBLY & REPAIR INSTRUCTIONS - PAPER #1
 and 1968 CORVETTE TELESCOPING STEERING COLUMN DISASSEMBLY & REPAIR INSTRUCTIONS - PAPER #1") Last Revision: 03SE2012 1967 (Late) and 1968 CORVETTE TELESCOPING STEERING COLUMN DISASSEMBLY & REPAIR INSTRUCTIONS - PAPER #1 Disassembly and Repair Instructions Addressed in this Paper Difficulty Page
Last Revision: 03SE2012 1967 (Late) and 1968 CORVETTE TELESCOPING STEERING COLUMN DISASSEMBLY & REPAIR INSTRUCTIONS - PAPER #1 Disassembly and Repair Instructions Addressed in this Paper Difficulty Page
Thank you for purchasing the Craven Speed FlexPod Complete Gauge Pod Kit For R56, R58, R59, R60 with Refresh Engines (2011+)
") Thank you for purchasing the Craven Speed FlexPod Complete Gauge Pod Kit For R56, R58, R59, R60 with Refresh Engines (2011+) Before You Start Please read instructions completely before installing. These
Thank you for purchasing the Craven Speed FlexPod Complete Gauge Pod Kit For R56, R58, R59, R60 with Refresh Engines (2011+) Before You Start Please read instructions completely before installing. These
Installation Instructions for the EVO3 Height-Adjustable Ultimate Short Shifter. for F80 M3 and F82 M4
 Installation Instructions for the EVO3 Height-Adjustable Ultimate Short Shifter for 2013+ F80 M3 and F82 M4 part number USSF80 Thank you for purchasing the Ultimate Shift Kit. Please read these directions
1967 (Late) CORVETTE STANDARD (NON-ADJUSTABLE) STEERING COLUMN DISASSEMBLY & REPAIR INSTRUCTIONS PAPER #2
 CORVETTE STANDARD (NON-ADJUSTABLE) STEERING COLUMN DISASSEMBLY & REPAIR INSTRUCTIONS PAPER #2") Last Revision: 03SE2012 1967 (Late) - 1968 CORVETTE STANDARD (NON-ADJUSTABLE) STEERING COLUMN DISASSEMBLY & REPAIR INSTRUCTIONS PAPER #2 Disassembly and Repair Instructions Addressed in this Paper Degree
Last Revision: 03SE2012 1967 (Late) - 1968 CORVETTE STANDARD (NON-ADJUSTABLE) STEERING COLUMN DISASSEMBLY & REPAIR INSTRUCTIONS PAPER #2 Disassembly and Repair Instructions Addressed in this Paper Degree
INSTALLATION INSTRUCTIONS
 INSTALLATION INSTRUCTIONS Accessory Application Publications No. All 12035 SYSTEM 2012 RIDGELINE Issue Date NOV 2011 PARTS LIST Security System Attachment Kit: P/N 08E55-SJC-101 Flange bolt Unit bracket
TOOLS REQUIRED: Panel Removal Tool Phillips Screwdriver 10mm Nut Driver Ratchet 10mm Socket 7mm Wrench 7mm Nut Driver Straight Screwdriver
 CONTENTS: 1EA. FIVE CHANNEL AMPLIFIER/BRACKET ASSEMBLY P/N MPDSP039AA 1EA. OVERLAY HARNESS P/N RH41LX10 3EA. 7MM SCREWS P/N RF7MM 6EA. WIRE TIE P/N RFZIP6 1EA. 30 AMP FUSE P/N RFUSE30 1EA. INSTRUCTIONS
Installation Instructions Jeep CJ-7
 Retrofit Steering Column Installation Instructions 1976-86 Jeep CJ-7 For Part # s 1520800010, 152800020, 1520800051 www.ididitinc.com 610 S. Maumee St., Tecumseh, MI 49286 (517) 424-0577 (517) 424-7293
It is strongly recommended that this kit be installed by an authorized Polaris dealer.
 EPS STEERING KIT P/N 2879970 APPLICATION RANGER 570 AND RANGER ETX IMPORTANT It is strongly recommended that this kit be installed by an authorized Polaris dealer. BEFORE YOU BEGIN Read these instructions
MOTOALLIANCE WINCH MOUNT
 , / 1-866-527-7637 www.motoalliance.com MOTOALLIANCE WINCH MOUNT Polaris RZR Thank you for purchasing our MotoAlliance winch mount(s). You now own a premium custom winch mount to allow you to use your
Accessory Fuse Block. Please read this entire manual before proceeding with installation.
 Accessory Fuse Block Please read this entire manual before proceeding with installation. Kit Components: (1) Fuse Block Assembly (1) Harness (1) Positive power cable (1) Negative power cable (5) Pigtails
TOYOTA TUNDRA TVIP V4 REMOTE ENGINE STARTER (RES)
") Preparation Part Number: 08586-OC910 Conflicts Do not install into vehicles without RKE systems. Recommended Sequence of Application Item # Accessory 1 TVIP/RES Any TVIP or RES system 2 XM Radio NOTE:
Preparation Part Number: 08586-OC910 Conflicts Do not install into vehicles without RKE systems. Recommended Sequence of Application Item # Accessory 1 TVIP/RES Any TVIP or RES system 2 XM Radio NOTE:
Your Steering Column Specialist
 Cable Shift Installation Instructions for: GM Column to GM Transmission GM Steering Column to: 350 Trans...Pg1 400 Trans...Pg5 700R4 & 4L60 Series Trans...Pg9 www.ididitinc.com ididit is... Your Steering
Detroit Speed, Inc. Selecta-Speed Wiper Kit Camaro, 1968 Firebird, Nova P/N: &
 Detroit Speed, Inc. Selecta-Speed Wiper Kit 1968-1969 Camaro, 1968 Firebird, 1968-1972 Nova P/N: 121301 & 121401 A downpour of rain will no longer hinder your ability to clearly see the road. The Detroit
Tools Needed: 7mm Socket socket wrench socket extension interior removal tool wire cutter electical tape Wrangler Raxiom Navigation
 2007-2010 Wrangler Raxiom Navigation Contents: (1) - Raxiom Head Unit (1) - Headphone Jack With Wire (A) (1) - GPS Antennae With Wire (B) (1) - Amplifier Pre-Outs Wire Harness (C) (1) - External Microphone
Detroit Speed, Inc. Selecta-Speed Wiper Kit 1967 Camaro/Firebird P/N:
 Detroit Speed, Inc. Selecta-Speed Wiper Kit 1967 Camaro/Firebird P/N: 121001 A downpour of rain will no longer hinder your ability to clearly see the road. This kit provides you with the performance and
Ford Super Duty F-250, F and up
 Ford Super Duty F-250, F-350 2005 and up Installing Upfitter Switches by Richard L. Ray If you want to add a few aftermarket options to your new Ford Super Duty, Ford Motor Company makes things easy for
Installation Instructions for TJ Jeep s Fiberglass Replacement Bodies and Parts
 Installation Instructions for 1997-2006 TJ Jeep s Fiberglass Replacement Bodies and Parts Getting started: We recommend that you take pictures as you dismantle your Jeep. These pictures will help you when
PERFECT FIT SERIES IN-DASH HEAT/ COOL/ DEFROST MUSTANG
 specializing in AIR CONDITIONING, PARTS AND SYSTEMS for your classic vehicle PERFECT FIT SERIES IN-DASH HEAT/ COOL/ DEFROST 1969-70 MUSTANG CONTROL & OPERATING INSTRUCTIONS The controls on your new Perfect
Installation Instructions for the EVO3 Height-Adjustable Ultimate Short Shifter
 Installation Instructions for the EVO3 Height-Adjustable Ultimate Short Shifter for 1992-2005 325, 323, 318 and 1986-1994 525, 528, 535, 540 5-speed models only. (part number USSE3 and USSE5) Thank you
INSTALLING A 1977 THRU 1982 C3 STEERING COLUMN INTO A EARLIER 1969 THRU 1976 MODEL CORVETTE
 Last Revised: 23FE2011 INSTALLING A 1977 THRU 1982 C3 STEERING COLUMN INTO A EARLIER 1969 THRU 1976 MODEL CORVETTE Why Make This Installation Starting in 1977 and carrying thru 1982, the C3 Corvette steering
TOYOTA COROLLA LOWERING SPRINGS Preparation
 Preparation Part Number: PTR07-02140 Kit Contents Item # Quantity Reqd. Description 1 2 Front Spring 2 2 Rear Spring 3 1 Hardware 4 1 Instruction Form Hardware Bag Contents Item # Quantity Reqd. Description
USE THE PARTS LIST BELOW TO MAKE SURE YOUR KIT IS COMPLETE BEFORE INSTALLATION. IF ANY PIECES ARE MISSING, PLEASE CONTACT:
 1962-1967 Chevy Nova Pro-Touring Front Suspension Installation Instructions Tech line: 1-855-693-1259 www.totalcostinvolved.com Read and understand these instructions before starting any work! USE THE
Detroit Speed, Inc. Selecta-Speed Wiper Kit Camaro Non Recessed Park 1978 Camaro Non Recessed Park P/N: ,
 Detroit Speed, Inc. Selecta-Speed Wiper Kit 1975-1977 Camaro Non Recessed Park 1978 Camaro Non Recessed Park P/N: 121406, 121408 A downpour of rain will no longer hinder your ability to clearly see the
Code 0 Description Pic Link # Used Diameter Thread Pitch Length Washer 1 Washer2 Nut size Class Notes F Alternator bracket mounting bolts
 Code 0 Description Pic Link # Used Diameter Thread Pitch Length Washer 1 Washer2 Nut size Class Notes 1 15 1 2F Alternator bracket mounting bolts (Engine Lift Hook) 3 10 1.25 30 split washer flat 4 14mm
Jeep Wrangler TJ 4.0 LITER Installation instructions
 www.jeepair.com 2002-2004 Jeep Wrangler TJ 4.0 LITER Installation instructions Kit Information These directions are for 2002-2006 model Jeep Wranglers. After 1994 every vehicle was designed for R134a refrigerant.
Jeep Wrangler TJ. Complete Air Conditioning System. Slide Control Head. Installation instructions
 WWW.JEEPAIR.COM 1996-1998 Jeep Wrangler TJ Complete Air Conditioning System Slide Control Head Installation instructions Kit Information After 1994 every vehicle was designed for R134a refrigerant. The
GENUINE PARTS INSTALLATION INSTRUCTIONS
 GENUINE PARTS INSTALLATION INSTRUCTIONS 1. DESCRIPTION: 2. APPLICATION: 3. PART NUMBER(S) REQUIRED FOR INSTALLATION: 4. KIT CONTENTS: Item Qty. Fog Lamp Kit Titan MY16 999F1 W4000 Fog Lamp Kit Part Description
Cable Shift Linkage Kit
 Cable Shift Linkage Kit INSTALLATION INSTRUCTIONS ididit column to GM Trans FOR PART NUMBER S: 2801000010, 2802000010 ididit Column to 350 Trans...Pg 1-4 ididit Column to 400 Trans...Pg 5-8 ididit Column
INSTALLATION INSTRUCTIONS
 INSTALLATION INSTRUCTIONS Accessory ENGINE BLOCK P/N 08T44-SWA-1A0 Application 2012 CIVIC 4-DOOR Si Publications No. AII 45627 Issue Date APRIL 2011 PARTS LIST Engine block heater Aluminum washer Heater
PRAMCQ13. Designed for Dodge Ram vehicles with base audio Not Compatible with 2018 and newer Dodge Ram vehicles
 PRAMCQ13 Designed for 2013 2017 Dodge Ram vehicles with base audio Not Compatible with 2018 and newer Dodge Ram vehicles Subwoofer Alternate Amplifier Bracket Amplifier Subwoofer Harness Subwoofer Amplifier
INSTALLATION INSTRUCTIONS
 28 INSTALLATION INSTRUCTIONS SECTION - AIR SPRING SECTION 2 - AIR ACCESSORY 2-5 ! IMPORTANT PLEASE DON T HURT YOURSELF, YOUR KIT OR YOUR VEHICLE. TAKE A MINUTE TO READ THIS IMPORTANT INFORMATION. This
Last Revision: 07SE2009
 Last Revision: 07SE2009 1967 (Late) and 1968 CORVETTE STANDARD (NON-ADJUSTABLE) STEERING COLUMN DISASSEMBLY & REPAIR INSTRUCTIONS PAPER #1 Disassembly and Repair Instructions Addressed in this Paper Difficulty
INSTALLATION INSTRUCTIONS
 INSTALLATION INSTRUCTIONS Accessory Application Publications No. SYSTEM P/N 08E60-SLN-100 2007 FIT AII 31719 Issue Date MAR 2006 PARTS LIST Fuse label B Keyless entry harness User s information Fuse label
file://c:\program Files\tsocache\OFFICE_5164\SYA~us~en~file=SYA1C003.htm~gen~re...
 Page 1 of 26 SECTION 501-12: Instrument Panel and Console 2000 Crown Victoria/Grand Marquis Workshop Manual REMOVAL AND INSTALLATION Procedure revision date: 06/21/1999 Instrument Panel Removal CAUTION:
1464. Interior Installation. Cover Rear Seat Support Cut the vinyl to approximately the size of the rear seat support.
 Chapter 37 (Video Clip 37) - Interior Installation 1464. Interior Installation Cover Rear Seat Support 1465. Cut the vinyl to approximately the size of the rear seat support. 1466. Make a dry fit of the
PRELIMINARY INSTALLATION INSTRUCTIONS. Remote Engine Starter Attachment Kit P/N 08E92-SNA-100B
 INSTALLATION INSTRUCTIONS Accessory Application Publications No. REMOTE ENGINE STARTER SYSTEM 2008 CIVIC 2-DOOR AII 38215 Issue Date OCT 2007 PARTS LIST Remote Engine Starter Unit Kit P/N 08E91-E22-100B
TOYOTA TACOMA LED DRL. Part Number: TTA-712
 Part Number: TTA-712 Kit Contents Item # Quantity Reqd. Description 1 2 DRL s bezels w/led DRL 2 1 Driver Box 3 1 Harness bag 4 1 User s card 5 1 Switch Hardware Bag Contents Item # Quantity Reqd. Description
Thank you for purchasing the Craven Speed FlexPod Complete Gauge Pod Kit
 Thank you for purchasing the Craven Speed FlexPod Complete Gauge Pod Kit Before You Start Please read instructions completely before installing. These instructions contain the information required to install
Slide the billet aluminum cap over the bushing and secure with the 3/8-16 x 2 1/2 socket head allen and locknuts provided.
 Slide the billet aluminum cap over the bushing and secure with the 3/8-16 x 2 1/2 socket head allen and locknuts provided. Put the urethane bushings into the upper antiroll-bar-link eyebolt. Coat the bushings
INSTALLATION INSTRUCTIONS
 INSTALLATION INSTRUCTIONS Accessory Application Publications No. in- ENTERTAINMENT SYSTEM 2004 TSX BII 24811 Issue Date APRIL 2003 PARTS LIST Attachment Kit P/N 08B23-SDA-101A Monitor bracket harness FM
TOYOTA TACOMA EC REARVIEW MIRROR Preparation
 Preparation Part Number: PT374-35052 Kit Contents Item # Quantity Reqd. Description 1 1 AD Mirror Assembly 2 1 Hardware bag Hardware Bag Contents Item # Quantity Reqd. Description 1 1 T-tap Connectors,
Mustang Clear Lens Instrument Cover (90-93) - Installation Instructions
 - Installation Instructions") Mustang Clear Lens Instrument Cover (90-93) - Installation Instructions The below installation instructions work for the following products: Mustang Clear Lens Instrument Cover (90-93) Please read through
Mustang Clear Lens Instrument Cover (90-93) - Installation Instructions The below installation instructions work for the following products: Mustang Clear Lens Instrument Cover (90-93) Please read through
INSTALLATION INSTRUCTIONS
 INSTALLATION INSTRUCTIONS Accessory P/N 08E50-TK6-100 Application 2010 FIT (BASE MODEL) Publications No. AII 42212 Issue Date AUG 2009 The security system will only work if the vehicle is equipped with
Conflicts - Fog Lights
 TOYOTA CAMRY 2013 - BLACKOUT LED DRL Part Number: 00016-32270 Accessory Code: LDBO10 Conflicts - Fog Lights Kit Contents Item # Quantity Reqd. Description 1 2 DRL Housing 2 2 DRL s bezels 3 1 Driver Box
INSTALLATION INSTRUCTIONS FORD F-150 2WD & 4WD RETAINS FACTORY TOW HOOKS PART #P3063
 INSTALLATION INSTRUCTIONS FORD F-150 2WD & 4WD RETAINS FACTORY TOW HOOKS PART #P3063 PARTS LIST: 1 Grille Guard 2 10-1.5mm Nylon Lock Nuts 1 Driver/Left Frame Mounting Bracket 4 12mm Plastic Washers 1
Last Revision: 30JN THRU 1979 C3 CORVETTE STANDARD (NON-ADJUSTABLE) STEERING COLUMN DISASSEMBLY & REPAIR INSTRUCTIONS PAPER #2
 STEERING COLUMN DISASSEMBLY & REPAIR INSTRUCTIONS PAPER #2") Last Revision: 30JN2007 1969 THRU 1979 C3 CORVETTE STANDARD (NON-ADJUSTABLE) STEERING COLUMN DISASSEMBLY & REPAIR INSTRUCTIONS PAPER #2 Disassembly and Repair Instructions Addressed in this Paper Degree
Last Revision: 30JN2007 1969 THRU 1979 C3 CORVETTE STANDARD (NON-ADJUSTABLE) STEERING COLUMN DISASSEMBLY & REPAIR INSTRUCTIONS PAPER #2 Disassembly and Repair Instructions Addressed in this Paper Degree
Instrument Panel Assembly Replacement. Fig. 14 Battery Negative Cable Removal/Installation
 Page 1 of 11 Home Account Contact ALLDATA Log Out Help BILL SEIDLES MITSUBISHI Select Vehicle New TSBs Technician's Reference Component Search: OK 2003 Chrysler Truck PT Cruiser L4-2.4L VIN B Conversion
1. Disconnect the battery. This is important! This will prevent air bag deployment.
 PARTS PACKING LIST Evaporator assembly Drain tube Plastic air plug Hardware package 11040 3601 W. Clarendon Phoenix, Arizona 85019 (602) 233-0090 800-648-4475 www.ackits.com 2003-4 Jeep Wrangler EVAPORATOR
INSTALLATION INSTRUCTIONS
 INSTALLATION INSTRUCTIONS Accessory Application Publications No. CIVIC All 30175-31616 2 AND 4-DOOR P/N 08E10-SNA-100 Issue Date DEC 2005 NOTE: The interior illumination lights cannot be installed on 2-door
Retro it Steering Column
 Retro it Steering Column INSTALLATION INSTRUCTIONS for 1976-86 CJ5 & CJ7 FOR PART NUMBER S: 1520800010, 1520800020, 1520800051, 1526800010, 1526800020, 1526800051 S I NCE 1986 Instruction # 8000000010
INSTALLATION INSTRUCTIONS
 INSTALLATION INSTRUCTIONS Accessory Application Publications No. AII 32664 TRUNK MOUNT 2007 ACCORD 4-DOOR Issue Date JULY 2006 PARTS LIST 17 Wire ties Attachment Kit (sold separately): P/N 08B26-SDA-100
 INSTALLATION INSTRUCTIONS Accessory Application Publications No. 2010 CIVIC All 42479 2- AND 4-DOOR P/N 08E10-SNA-110 Issue Date AUG 2009 NOTE: The interior illumination lights cannot be installed on 2-door
INSTALLATION INSTRUCTIONS FOR THE MOTOR TRIKE CROSS COUNTRY / CROSS ROADS / HARD BALL RAKE KIT
 INSTALLATION INSTRUCTIONS FOR THE MOTOR TRIKE CROSS COUNTRY / CROSS ROADS / HARD BALL RAKE KIT Thank you for choosing the Motor Trike Cross Country / Cross Roads / Hard Ball rake kit. We ask that you read
STREET SCENE EQUIPMENT,INC.
 STREET SCENE EQUIPMENT,INC. 950-76570 BLACK CHROME 365 McCormick Avenue 950-77570 SATIN FINISH Costa Mesa, Ca. 92626 950-78570 CHROME FINISH Phone (714) 426-0590 Fax (714) 426-0591 2007-2008 TOYOTA TUNDRA
TOYOTA CAMRY HANDS FREE BLU LOGIC Preparation
 TOYOTA CAMRY 2008- HANDS FREE BLU LOGIC Preparation Part #: PT923-00111 Conflicts: JBL Audio, Factory Navigation NOTE: Part number of this accessory may not be the same as the part number shown. Kit Contents:
INSTALLATION INSTRUCTIONS
 INSTALLATION INSTRUCTIONS Accessory REMOTE ENGINE STARTER SYSTEM Application 2010 CIVIC 4-DOOR Publications No. AII 42460 Issue Date AUG 2009 PARTS LIST Remote Engine Starter Unit Kit P/N 08E91-E22-100B
MKVI Jetta Fog Light Kit
 MKVI Jetta Fog Light Kit Part Number VW Jetta Fog Light Installation This tutorial is provided as a courtesy by ECS Tuning. Proper service and repair procedures are vital to the safe, reliable operation
TOYOTA FJ CRUISER TVIP V5 Preparation
 Preparation Part Number: 08586-36822 Conflicts Do not be installed in vehicles with factory Anti-theft alarm, or Vehicle without Factory Keyless Entry Systems. Recommended Sequence of Application Item
Installation Instructions for Chevrolet Colorado, GMC Canyon, LT, Z71, With Factory Fog Lights
 Installation Instructions for 2015-2018 Chevrolet Colorado, GMC Canyon, LT, Z71, With Factory Fog Lights This kit is designed to allow use of your factory fog light operation along with an addition auxiliary
All cores due 30 days after invoice date - no credit after 60 days.
 NO WARRANTY STATEMENT High performance parts & products no warranty policy: The purchaser understands and recognizes that high performance diesel products and services sold by INDUSTRIAL INJECTION SERVICE.
TOYOTA im INTERIOR LIGHT KIT Preparation
 Preparation Part Number: PT922-12170 Kit Contents Item # Quantity Reqd. Description 1 1 Main Wire Harness 2 1 Switch 3 1 Switch Header 4 1 ECU 5 1 ECU Bracket 6 1 Hardware Kit 7 1 Instruction Card 8 1
Chevy Colorado / GMC Canyon INSTALL GUIDE
 Chevy Colorado / GMC Canyon INSTALL GUIDE S-TECH Switch Systems DEVELOPED, DESIGNED, MANUFACTURED and Assembled in the Rocky Mountains of Colorado, known to many as JEEP COUNTRY. Trail riding at 10,000
INSTALLATION INSTRUCTIONS
 INSTALLATION INSTRUCTIONS Accessory HARNESS P/N 08L91-SJC-100C Application 2009 RIDGELINE Publications No. AII 40322 Issue Date AUG 2008 PARTS LIST 3 Riv nuts, 6 mm Trailer socket harness Subharness kit
INSTALLATION INSTRUCTIONS
 INSTALLATION INSTRUCTIONS Accessory REMOTE CONTROL Application 2012 ODYSSEY (EXCEPT LX) Publications No. AII 46745 Issue Date SEP 2011 PARTS LIST Remote Control Engine Starter Unit Kit P/N 08E91-E22-101A
& 76 CHEVROLET NOVA HEATER ONLY
 specializing in AIR CONDITIONING, PARTS AND SYSTEMS for your classic hi l PERFECT FIT IN-DASH HEAT/ COOL/ DEFROST 1969-74 & 76 CHEVROLET NOVA HEATER ONLY CONTROL & OPERATING INSTRUCTIONS The controls on
RANGER MIDSIZE WINCH KIT
 RANGER MIDSIZE WINCH KIT P/N 2881669 APPLICATION ALL MY RANGER 400; MY11 AND NEWER RANGER 500 EXCEPT CREW BEFORE YOU BEGIN Read these instructions thoroughly and make sure all parts and tools are accounted
INSTALLATION INSTRUCTIONS
 Accessory Application Publication No. INSTALLATION INSTRUCTIONS WINCH MOUNT KIT P/N 08L77-HL3-A00 SXS700M4/M2 Honda Dealer: Please give a copy of these instructions to your customer. MII 14607 Issue Date
INSTALLATION INSTRUCTIONS
 INSTALLATION INSTRUCTIONS Accessory Application Publications No. P/N 08V31-SNA-100 2008 CIVIC 4-DOOR AII 37730 Issue Date AUG 2007 PARTS LIST Fog light harness Right fog light Left fog light Sub harness
TOYOTA TACOMA Part Number: TTA-BGB16-DRL TTA-BGP16-DRL
 TOYOTA TACOMA 2016-17 Date: 10.29.2016 Billet Grille w/led DRL Part Number: TTA-BGB16-DRL TTA-BGP16-DRL Kit Contents Item # Quantity Reqd. Description 1 2 LED DRL 2 1 Driver Box 3 1 Switch 4 1 User Card
TOYOTA FJ CRUISER AIR DAM/LIGHT BAR Preparation
 Preparation Part Number: PT278-35071 Kit Contents Item # Quantity Reqd. Description 1 1 Air Dam / Light Bar Hardware Bag 1 Contents Item # Quantity Reqd. Description 1 2 Screw, M6x33mm, Wafer Head 2 2
PERFECT FIT IN-DASH HEAT/ COOL/ DEFROST FORD FAIRLANE & CROWN VICTORIA
 PERFECT FIT IN-DASH HEAT/ COOL/ DEFROST 1955-56 FORD FAIRLANE & CROWN VICTORIA CONTROL & OPERATING INSTRUCTIONS The controls on your new Perfect Fit system, offer complete comfort capabilities in virtually
PCAMA13MY. Designed for Chevrolet Camaro vehicles with MyLink. Subwoofer Assembly. Subwoofer Bracket Wire Ties x6 Rubber Bumper
 PCAMA13MY Designed for 2013-2015 Chevrolet Camaro vehicles with MyLink Subwoofer Assembly Subwoofer Harness Adapter Harness Subwoofer Bracket Wire Ties x6 Rubber Bumper 2012 Stillwater Designs PCAMA13MY-A3-20151028