V6 Spring Belt Tensioner
|
|
|
- Conrad Elliott
- 6 years ago
- Views:
Transcription


1 Dodgerunner s V6 Spring Belt Tensioner Installation Guide Dodgerunner 2007


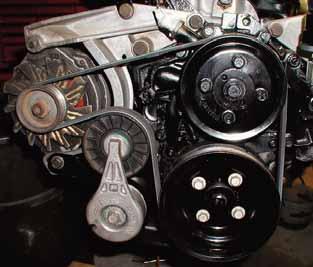
2 The bracket consists of two pieces of 1/8" steel bolted together. The main piece is flat plate with welded-on alternator mounting arm and L shaped mounting leg. The second piece is a larger L leg that bolts to a mounting flange on the bottom of the main piece. Both pieces bolt to the front of the engine at the mount.

3 Tools Required: 3/8" Ratchet 4" (or longer) 3/8" extension 13mm Socket 14mm Socket 15mm Socket 18mm Socket
4 Work safely while installing the bracket. Park the car on a firm level surface. Chock the wheels so the car will not roll. Jack according to instructions. Make sure your tools are clean and servicable. Clean and prep the work area. Keep this guide handy.
5 Installation: Raise the right rear corner of the car. Remove the right rear wheel. Remove the inner splash shield. (WD40 or PB-blaster on the plastic fasteners and a needle nose to lever the center of the plug out works well.) For added safety place a jack under the engine oil pan (using a block of wood as a cushion) and gently support the engine to prevent shifting. Clean the areas around the two motor mount bolts and the front of the alternator bracket. Remove any grease, oil and dirt. The surfaces must be clean so the bracket will seat flat and tight.

6
7 Remove the large L leg and bolt of the tensioner bracket and set aside. Remove and retain the lower alternator bolt currently used to adjust the belt tension (13mm). Verify the BOTTOM motor mount bolt (18mm) is tight to prevent any movement of motor when the top bolt is removed. Remove and retain the TOP motor mount bolt that also goes through the alternator bracket (18mm). Note: DO NOT REMOVE BOTH MOTOR MOUNT BOLTS AT THE SAME TIME. They will be removed and replaced one at a time. This will retain the alignment of the holes in the mount and the block and simplify installation. Gently supporting the engine with a floor jack as mentioned above helps greatly.
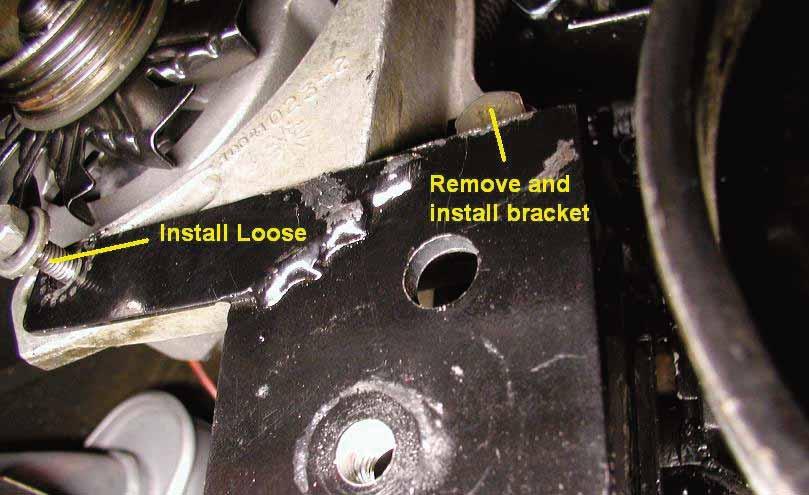
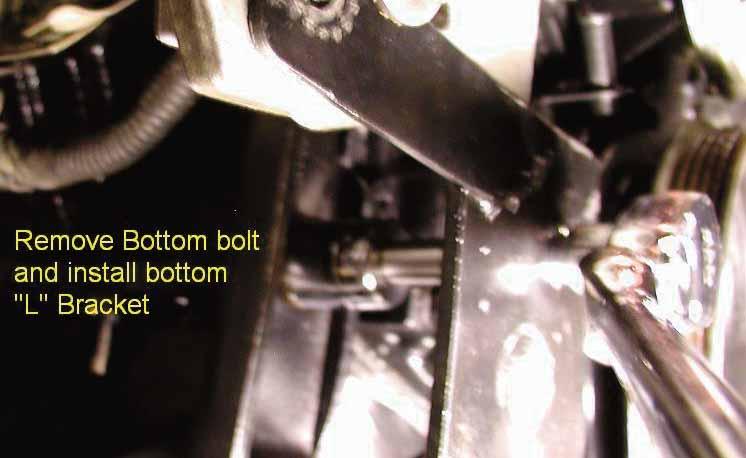
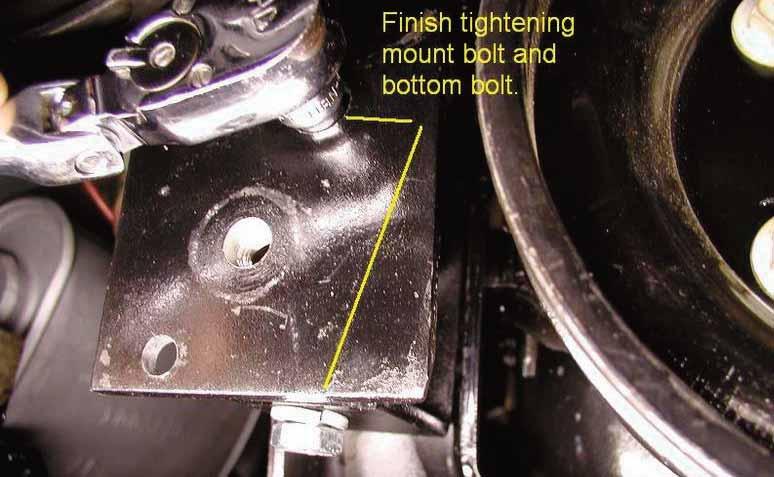
8 Install the large part of the bracket using the long top motor mount bolt. Do not tighten completely. Move the alternator as needed and install the lower alternator bolt through the hole in the bracket arm. Tighten finger tight. Torque the top motor mount bolt (18mm) to ft/lbs. Remove the lower motor mount bolt by holding the (18mm) socket behind the bracket and inserting a 4" (or longer) socket extension through the large hole in the bracket. Install the remaining large L leg behind the bracket with the lower motor mount bolt. Do not tighten completely.
9
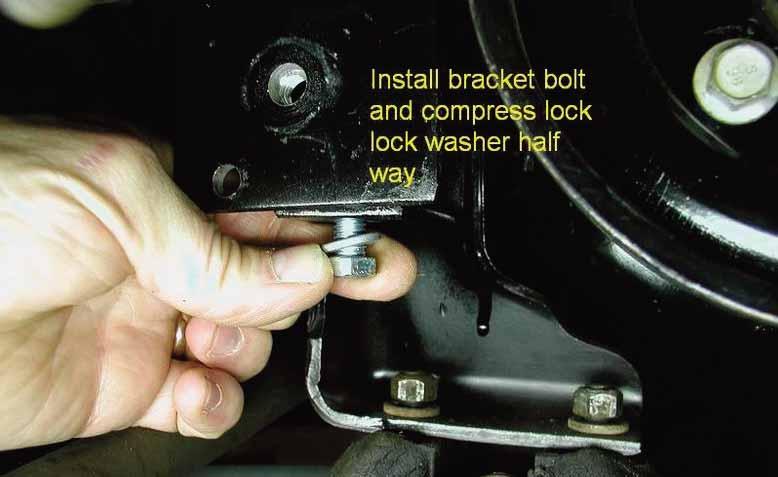
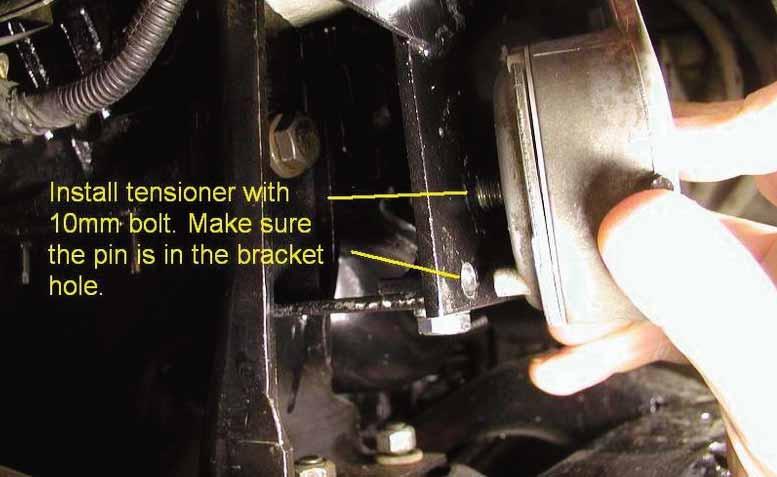
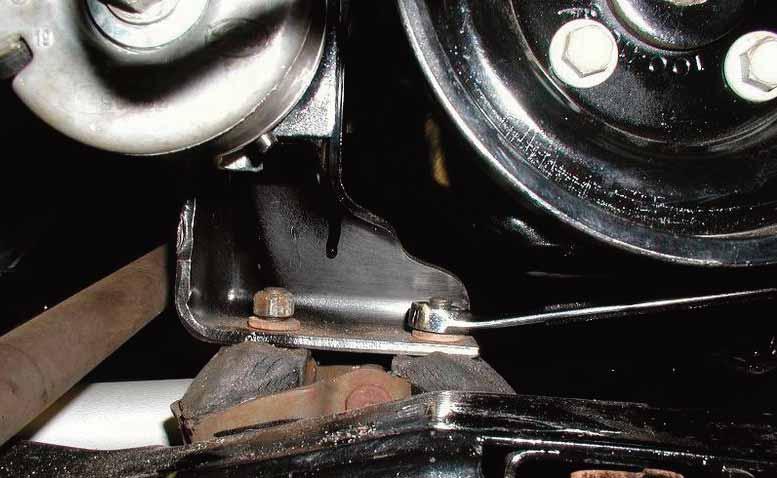
10 Fasten the large L leg to the bracket with the supplied small bolt (through the hole in the L leg and into the threaded mounting flange on the bracket). Tighten until the lock washer is about half compressed. Torque the lower motor mount bolt to ft/lbs. Tighten the bolt securing the large L leg to the bracket (14mm). Tighten the lower alternator bolt (13mm). Mount the spring tensioner to the middle threaded hole on the bracket using the supplied bolt (15mm). Make sure the small stud on the back of the tensioner is inserted into the bottom hole of the bracket (located near the left edge).
11
12
13
14
15 Insert 3/8" drive ratchet into the square hole of the tensioner and move the tensioner to the left. Install Gates K belt or equivalent 45" belt. Note: If you are running non-standard pulleys you will have to size your belt accordingly. Re-install the splash guard and wheel. NOTE: If you have trouble getting either motor mount bolt threaded back into the block the motor may have shifted causing misalignment. To correct this, loosen the two rubber motor mount nuts a couple of turns. Using your support jack and block of wood (under the oil pan) raise the motor until you see the mount move on the rubber mount studs. You should now be able to realign the mount hole(s) to the block hole(s) while starting the bolt. Tapping the motor mount left or right with a hammer may help. Use caution that the motor does not shift causing injury. Don t forget to re-tighten the rubber mount nuts loosened above.
16
Replacement Front Outer Tie Rod End (85-93 All)
") Replacement Front Outer Tie Rod End (85-93 All) Materials in the box: One outer tie rod end, castle nut, cotter pin, nut, and grease fitting. Tools Needed: Jack and Jack Stands Pry bar (you may or may
Replacement Front Outer Tie Rod End (85-93 All) Materials in the box: One outer tie rod end, castle nut, cotter pin, nut, and grease fitting. Tools Needed: Jack and Jack Stands Pry bar (you may or may
WARNING: Only perform this installation if you are experienced, fully equipped mechanic.
 DYNATRAC V3.2 2005-Present Ford Super Duty 250/350-4x4, Front Axle, Free Spin Conversion Kit Some of the less common tools, which will be required: 6 point Spanner socket (OTC #7090-A or equivalent). These
Eibach Pro-Damper Shocks & Struts (05-09 All):
:") Eibach Pro-Damper Shocks & Struts (05-09 All): Required tools: 3/8 and 1/2 drive ratchets 7, 8, 10, 15, 16, 17, 18, 21 & 22 mm open ended wrenches 8 & 10 mm box end wrenches 10mm socket 13, 15 & 18 mm
Eibach Pro-Damper Shocks & Struts (05-09 All): Required tools: 3/8 and 1/2 drive ratchets 7, 8, 10, 15, 16, 17, 18, 21 & 22 mm open ended wrenches 8 & 10 mm box end wrenches 10mm socket 13, 15 & 18 mm
Lowering Spring Installation on a Mustang GT
 Lowering Spring Installation on a 99-04 Mustang GT This installation is very the same installation that many of the 79-04 Mustangs excluding Cobra require. Time to install: 2-3 hours to do alone with a
Front Hub and Disc (4WD Model)
") 4C 8 DRIVE SHAFT SYSTEM Disassembled View Front Hub and Disc (4WD Model) 411RW001 Legend (1) Bolt (2) Cap (3) Snap Ring and Shim (4) Hub Flange (5) Lock Washer and Lock Screw (6) Hub Nut (7) Outer Bearing
4C 8 DRIVE SHAFT SYSTEM Disassembled View Front Hub and Disc (4WD Model) 411RW001 Legend (1) Bolt (2) Cap (3) Snap Ring and Shim (4) Hub Flange (5) Lock Washer and Lock Screw (6) Hub Nut (7) Outer Bearing
ALLOY USA AXLE INSTALLATION (99-04 GT, Mach 1)
") ALLOY USA AXLE INSTALLATION (99-04 GT, Mach 1) Time Necessary: Approximately 4 hours Tools Required: Wrenches: 8mm, 13mm, 15mm, 5.5 mm allen, 6mm allen Sockets: 5/8, 3/4 Ratchet Floor Jack Jack Stands
ALLOY USA AXLE INSTALLATION (99-04 GT, Mach 1) Time Necessary: Approximately 4 hours Tools Required: Wrenches: 8mm, 13mm, 15mm, 5.5 mm allen, 6mm allen Sockets: 5/8, 3/4 Ratchet Floor Jack Jack Stands
M7 R56 Strut Tower Brace (J-Brace Model) 56-5M7104 Installation Guide. THIS PRODUCT DOES NOT FIT ON THE BASE MODEL COOPER (Non S, Non-Turbo)
 56-5M7104 Installation Guide. THIS PRODUCT DOES NOT FIT ON THE BASE MODEL COOPER (Non S, Non-Turbo)") M7 R56 Strut Tower Brace (J-Brace Model) 56-5M7104 Installation Guide THIS PRODUCT DOES NOT FIT ON THE BASE MODEL COOPER (Non S, Non-Turbo) Tools (not included): 13 mm Socket 15 mm Socket or wrench Socket
M7 R56 Strut Tower Brace (J-Brace Model) 56-5M7104 Installation Guide THIS PRODUCT DOES NOT FIT ON THE BASE MODEL COOPER (Non S, Non-Turbo) Tools (not included): 13 mm Socket 15 mm Socket or wrench Socket
Installation Manual TWM Performance Short Shift Kit Estimated Installation Time: Tools required:
 Page 1 Installation Manual TWM Performance Short Shift Kit 1993-2001 Nissan Altima 1991-2001 Infiniti G20 1991-2001 Nissan Sentra- 200SX 1991-1993 Nissan NX 1986-1989 Nissan Stanza 1995-2001 Nissan Maxima
Steeda Lower Control Arms ( )
") Steeda Lower Control Arms (2005-2012) NOTE: The following installation was performed on a 2007 Mustang GT/California Special. The control arms were previously sold in a blue color, but now they are sold
Steeda Lower Control Arms (2005-2012) NOTE: The following installation was performed on a 2007 Mustang GT/California Special. The control arms were previously sold in a blue color, but now they are sold
Ford Racing GT500 Style Strut Mount Upgrade (05-12 All):
:") Ford Racing GT500 Style Strut Mount Upgrade (05-12 All): Required tools: (2) Jack stands Floor jack (1 is required but 2 is preferred) Torque wrench Spring compressor tool (can be rented at your local
Ford Racing GT500 Style Strut Mount Upgrade (05-12 All): Required tools: (2) Jack stands Floor jack (1 is required but 2 is preferred) Torque wrench Spring compressor tool (can be rented at your local
Slave Cylinder Weep Hole Drilling Procedure
 Slave Cylinder Weep Hole Drilling Procedure Tools Required: T20 Torx Driver T25 Torx Driver T25 Torx Bit with ¼ Ratchet Wrench 4mm Hex Key (Allen wrench) 5mm Hex Key 6mm Hex Key 8mm Hex Key 12mm Hex Key
Max IV Rear Axle Replacement For models after Serial Number and all rear splined axle replacements.
 Max IV Rear Axle Replacement For models after Serial Number 19089 and all rear splined axle replacements. 10/8/03 Max IV Snap Ring Rear Axle replacement.doc Tools required: 9/16 Wrench 6 Extension Steel
DYNATRAC PRODUCTS V5.3
 DYNATRAC PRODUCTS V5.3 2000-2008 Dodge Hub Kit Stage 1 4x4, Front Axle Free Spin Conversion Kit Note: This Kit is not Approved for 2007 & up 3500 Cab and Chassis Trucks Due to a Larger U-Joint (If U-Joint
IN-VEHICLE REPAIR. Engine Front Cover
 303-01B-1 IN-VEHICLE REPAIR Engine Front Cover Material Item Specification 303-01B-1 Special Tool(s) Motorcraft SAE 5W-20 WSS-M2C930-A Premium Synthetic Blend 3-Jaw Puller Motor Oil 303-D121 XO-5W20-QSP
DYNATRAC V6.0. WARNING: Only perform this installation if you are experienced, fully equipped mechanic.
 DYNATRAC V6.0 1999-2004 Ford Super Duty 250/550-4x4, Front Axle, Free Spin Conversion Kit Some of the less common tools, which will be required: 6 point Spanner socket (OTC #7090-A or equivalent) OR 4
Suspension System RS6582B
 Suspension System RS6582B Tahoe/Yukon READ ALL INSTRUCTIONS THOROUGHLY FROM START TO FINISH BEFORE BEGINNING INSTALLATION IMPORTANT NOTES! WARNING: This suspension system will enhance the off-road performance
Transmission Diesel Engines
 Page 1 of 17 SECTION 307-01B: Automatic Transaxle/Transmission TorqShift 6 2011 F-250, 350, 450, 550 Super Duty Workshop Manual REMOVAL AND INSTALLATION Procedure revision date: 11/12/2010 Transmission
Running Board Bracket Kit Ram 1500/2500/3500
 Installation Instructions I - Sheet Number LUNDRB58 Rev.A Running Board Bracket Kit 2015-16 Ram 1500/2500/3500 For proper installation and best possible fit, please read all instructions BEFORE you begin.
2003 CR-V - A/T Shift Cable Replacement-Print Preview
 Page 1 of 7 2003 CR-V - A/T Shift Cable Replacement 1. Raise the front of the vehicle, or lift the vehicle up, and make sure it is securely supported. 2. Remove the driver's dashboard lower cover, and
INSTALLATION INSTRUCTIONS
 INSTALLATION INSTRUCTIONS 2500 DROPPED FRONT SPINDLE CHEVROLET C / K and G.M.C. SIERRA 1500 / 2500 / 3500 Pick-Ups Congratulations! You were selective enough to choose a BELLTECH PRODUCT. We have spent
INSTALLATION INSTRUCTION 89450
 INSTALLATION INSTRUCTION 89450 Rancho Suspension System RS66450R7: Fits 2003 2013 4WD Dodge Ram 2500 / 3500 DIESEL MODELS ONLY. READ ALL INSTRUCTIONS THOROUGHLY FROM START TO FINISH BEFORE BEGINNING INSTALLATION
EGR Performance Brakes Assembly Instructions DODGE DANA 70 '87 - '93 (Will not fit stock sized dual rear wheels)
") EGR Performance Brakes Assembly Instructions DODGE DANA 70 '87 - '93 (Will not fit stock sized dual rear wheels) Got Brakes? Parts List (2) Vented Rotors (2) Multi hole Cable Mount & L Brkt (2) Axle Tube
EGR Performance Brakes Assembly Instructions DODGE DANA 70 '87 - '93 (Will not fit stock sized dual rear wheels) Got Brakes? Parts List (2) Vented Rotors (2) Multi hole Cable Mount & L Brkt (2) Axle Tube
Instructions for changing bearings on all B&C Technologies SP and HP models
 Instructions for changing bearings on all B&C Technologies SP and HP models Tools and material required: 30 mm socket Socket handle with extension or air impact wrench Regular Screwdriver Phillips head
Installation Instructions COMPETITION/PLUS SHIFTER Ford Mustang MT82 6-Speed Manual Transmission Catalog#
 Installation Instructions COMPETITION/PLUS SHIFTER 2015-2017 Ford Mustang MT82 6-Speed Manual Transmission Catalog# 3916037 Rev. 00 WORK SAFELY! For maximum safety, perform this installation on a clean,
97-02 JEEP TJ BODY LIFT KIT INSTRUCTIONS
 92RC60500 97-02 JEEP TJ BODY LIFT KIT INSTRUCTIONS Congratulations on your purchase of a new Rough Country 2 /3 Body Lift. We are committed to providing you with the best product available for the best
Changing the Struts on a WK Jeep CRD
 Changing the Struts on a WK Jeep CRD Step by Step By Chirpz Disclaimer: I do not claim that this procedure is the right way or even the best way to change your struts. This is what I did after reading
Installation Instructions
 Installation Instructions Rear Disc Brake Conversion Kit Item # RC1001, RC1001X Applications: 64-72 A-body, 67 F-Body, 63-67 X-body with Non Staggered Shocks Thank you for choosing GPS Auto for your automotive
Wood Grain Warrior Line Incognito hidden winch bumper installation instructions Lexus GX470
 Wood Grain Warrior Line Incognito hidden winch bumper installation instructions 2003-2009 Lexus GX470 Version 1.0-2016 Thank you for purchasing the Southern Style OffRoad Wood Grain Warrior Line Lexus
KG09100BK / KG09101BK GM WD.
 KG09100BK / KG09101BK GM. 1988-2006 2 WD. KG09101BK KG09100BK Instruction Sheet: P10476-05 2013 Daystar Products International Inc. Tools Needed Quantity Description 1 Floor Jack 2 Jack Stands 2 Wheel
2003 Saturn Vue. SATURN 3.0L V6 DOHC - L-Series After VIN & Vue
 TIMING BELT Removal 1. Disconnect negative battery cable. Remove air cleaner assembly. 2. Raise and support vehicle. Remove right front wheel. Remove lower front splash shield. 3. Lower vehicle. Loosen,
62 Deck Idler Kit High Speed
 Part No. 00 FORM NO. -899 6 Deck Idler Kit High Speed For Model 70 Serial No. 99000 to 99000 For Model 7 Serial No. 9900 to 99000 INSTALLATION INSTRUCTIONS Loose Parts Note: Use the chart below to identify
Installation Instructions for: TOYOTA 3.4L SUPERCHARGER SYSTEM
 Installation Instructions for: TOYOTA 3.4L SUPERCHARGER SYSTEM 1996-2002 4Runner 1997-1998 T100 1997-2004 Tacoma 2000-2003 Tundra * PREMIUM FUEL REQUIRED * Magnuson Products LLC 1990 Knoll Drive, Bldg
BX7322 Adventurer Tow Bar Operator Manual & Installation Instructions. (5,000 lb) 2 Inch Coupler
 2 Inch Coupler") Operator Manual & Installation Instructions (5,000 lb) 2 Inch Coupler General Information DO NOT INSTALL, OPERATE OR USE THIS EQUIPMENT UNTIL THE FOLLOWING OPERATING AND SAFETY INSTRUCTIONS HAVE BEEN READ
Operator Manual & Installation Instructions (5,000 lb) 2 Inch Coupler General Information DO NOT INSTALL, OPERATE OR USE THIS EQUIPMENT UNTIL THE FOLLOWING OPERATING AND SAFETY INSTRUCTIONS HAVE BEEN READ
Installation Instructions
 Installation Instructions Rear Disc Brake Conversion Kit Item # RC4001, RC4001X Applications: Mopar 7.25, 8.25, 9.25 Axles Thank you for choosing Leed Brakes for your automotive product needs. Before you
CALIFORNIA TRIMMER MOWER MAINTENANCE MANUAL
 CALIFORNIA TRIMMER MOWER MAINTENANCE MANUAL 2 Table of Contents Section 1: General Information Page Handle Assembly Instructions 4 Maintenance All Models 6 Oil Change Procedures All Models 9 Height Adjustment
* PLEASE READ INSTRUCTIONS PRIOR TO INSTALLATION *
 XDP Duramax LBZ EGR Race Track Kit Item Number: XD165 PACKING LIST: 1 LBZ EGR Plate for Up Pipe 5 M8x1.25-20mm Bolt 2 M10x1.5 Flange Hex Nut 1 LBZ EGR Plate for Intake 1 M8x1.25-45mm Bolt 1 M8x1.25 Flange
INSTALLATION INSTRUCTION 88094
 INSTALLATION INSTRUCTION 88094 FOR RANCHO SUSPENSION SYSTEM RS6594B 4WD & 2WD NISSAN TITAN READ ALL INSTRUCTIONS THOROUGHLY FROM START TO FINISH BEFORE BEGINNING INSTALLATION Rev D IMPORTANT NOTES! WARNING:
1988 Chevrolet Pickup V SUSPENSION - FRONT (4WD)' 'Front Suspension - "V" Series 1988 SUSPENSION - FRONT (4WD) Front Suspension - "V" Series
' 'Front Suspension - V Series 1988 SUSPENSION - FRONT (4WD) Front Suspension - V Series") 1988 SUSPENSION - FRONT (4WD) Front Suspension - "V" Series DESCRIPTION NOTE: Vehicle serial numbers used in this article has been abbreviated for common reference to Chevrolet and GMC models. Chevrolet
1988 SUSPENSION - FRONT (4WD) Front Suspension - "V" Series DESCRIPTION NOTE: Vehicle serial numbers used in this article has been abbreviated for common reference to Chevrolet and GMC models. Chevrolet
Steeda Bumpsteer Kit (94-04) - Installation Instructions
 - Installation Instructions") Steeda Bumpsteer Kit (94-04) - Installation Instructions The below installation instructions work for the following products: Steeda Bumpsteer Kit (94-04) Please read through the instructions carefully
Steeda Bumpsteer Kit (94-04) - Installation Instructions The below installation instructions work for the following products: Steeda Bumpsteer Kit (94-04) Please read through the instructions carefully
SR Performance Billet Aluminum Adjustable Motor Mounts (05-14 GT)
") SR Performance Billet Aluminum Adjustable Motor Mounts (05-14 GT) Tools Needed 1. Engine hoist and chains (only for Hoist method) 2. jack with a 2x4 piece of wood (only for jack method) 3. Wrench 4. Extensions
SR Performance Billet Aluminum Adjustable Motor Mounts (05-14 GT) Tools Needed 1. Engine hoist and chains (only for Hoist method) 2. jack with a 2x4 piece of wood (only for jack method) 3. Wrench 4. Extensions
2005 Hyundai Tucson LX. On some models, engine is equipped with a timing belt and timing chain. Inspect timing chain when replacing timing belt.
 TIMING BELT NOTE: On some models, engine is equipped with a timing belt and timing chain. Inspect timing chain when replacing timing belt. Removal 1. Remove the engine cover. See Fig. 1. 2. Remove right
Cold Air Intake Installation Instructions
 Page 1/5 3.04 INS262 BAVARIAN AUTOSPORT Cold Air Intake Installation Instructions NOTE: Throughout the instructions the term AFM is used. It refers to the Air Flow Meter which is located between the engine
INSTALLATION INSTRUCTIONS
 INSTALLATION INSTRUCTIONS REAR DISC CONVERSION KIT A126-2 1988-98 C1500 2WD 10" REAR DRUM Thank you for choosing STAINLESS STEEL BRAKES CORPORATION for your braking needs. Pleases take the time to read
JL SHIELD TIRE CARRIER INSTALLATION INSTRUCTIONS
 JL SHIELD TIRE CARRIER INSTALLATION INSTRUCTIONS TOOLS NEEDED 3/4 Wrench 3/4 Socket 9/16 Wrench or Socket 1 1/2 Socket 1 1/8 Wrench 13mm Socket Torque Wrench for 1 1/2 Socket HARDWARE 2-1/2 X 2 Hex Bolt
BBK Ceramic Long Tube Headers (99-04 Cobra and Mach 1) - Installation Instructions
 - Installation Instructions") BBK Ceramic Long Tube Headers (99-04 Cobra and 03-04 Mach 1) - Installation Instructions The below installation instructions work for the following products: BBK Ceramic Long Tube Headers (99-04 Cobra
BBK Ceramic Long Tube Headers (99-04 Cobra and 03-04 Mach 1) - Installation Instructions The below installation instructions work for the following products: BBK Ceramic Long Tube Headers (99-04 Cobra
Chrysler 2.0L DOHC timing belt procedure REMOVAL
 Chrysler 2.0L DOHC timing belt procedure REMOVAL CAUTION: Camshaft or crankshaft should not be rotated after timing belt is removed. Damage to valve components may occur. Always align timing marks before
MK-5000G exploded VieW
 Frame accessories 38 cutting head Pump Assembly 39 connecting linkage foot pedal linkage 40 curtain blade guard 41 ENGINE Assembly 42 PARTS LIST A Frames - - A1 Frame, MK-5000 Main 1 155541 B Pivot Bracket
INSTALLATION INSTRUCTIONS
 INSTALLATION INSTRUCTIONS REAR DISC BRAKE CONVERSION KIT A126-3 1988-98 CHEVY K1500 4WD 10" DRUMS Thank you for choosing STAINLESS STEEL BRAKES CORPORATION for your braking needs. Pleases take the time
Oil Pan Replacement Buick Regal
 2000 Buick Regal Oil Pan Replacement Removal Procedure Tools Required J 28467-90A Engine Support Adapters J 28467-B Universal Engine Support Fixture J 36462-A Engine Support Adapter Leg Set 1. Disconnect
Next, set the bar level and tighten it down. Do this on both the driver and passenger sides.
 Next, set the bar level and tighten it down. Do this on both the driver and passenger sides. Using two tape measures, measure the outside width at the front and the rear of the tubes. The front dimension
ProPass-200 Top Dresser
 Setup Manual Form No. 3365-184 Rev A ProPass-200 Top Dresser Model No. 44700-Serial No. 310000001 and Up Model No. 44701-Serial No. 310000001 and Up Model No. 44704 Model No. 44705 Model No. 44706 Model
FORD COBRA JET SPRING INSTALLATION
 FORD COBRA JET SPRING INSTALLATION Tools Needed: 1. Floor jack with rubber padding on lift point or vehicle lift 2. Jack stands (2) 3. Socket sizes 13/16, 3/4, 15mm, 8mm 4. Pliers 5. Breaker bar, ratchet
IMPORTANT WARRANTY & INSTALLATION INSTRUCTIONS ATTACHED
 IMPORTANT WARRANTY & INSTALLATION INSTRUCTIONS ATTACHED Please Forward All Attached Information to Consumer Warranty Not Valid Unless Returned to CORSA Performance We ask that you take a few moments to
Mobtown Offroad Toyota Tacoma Bolt On Rock Slider Installation Instructions
 Mobtown Offroad 2005+ Toyota Tacoma Bolt On Rock Slider Installation Instructions Tools Needed: 9/16 Box Wrench 9/16 Standard and Deep Well Socket, 3/8 Drive Ratchet, 3/8 Drive 3/4 Standard Socket 3/4
Toyota Truck Pickup 2WD L4-2.4L SOHC (22R) 1987
 1987") Timing Chain: Service and Repair Toyota Truck Pickup 2WD L4-2.4L SOHC (22R) 1987 PREPARATION FOR REMOVAL OF TIMING CHAIN 1. REMOVE CYLINDER HEAD 2. REMOVE RADIATOR 3. REMOVE OIL PAN (a) Remove the engine
Timing Chain: Service and Repair Toyota Truck Pickup 2WD L4-2.4L SOHC (22R) 1987 PREPARATION FOR REMOVAL OF TIMING CHAIN 1. REMOVE CYLINDER HEAD 2. REMOVE RADIATOR 3. REMOVE OIL PAN (a) Remove the engine
SERVICE INSTRUCTIONS D TON
 1120 SOUTH CRYSTAL AVE * BENTON HARBOR MI PH: 269-925-7777 FAX: 269-925-6656 SERVICE INSTRUCTIONS D-51223 4 TON TO ASSEMBLE: 1. Check the handle set screw for tightness. CUSTOMER PRE-USE INSTRUCTIONS THE
Installing Rear Brake Pads on a WK Jeep
 Installing Rear Brake Pads on a WK Jeep Step by Step By Chirpz Disclaimer: I do not claim that this procedure is the right way or even the best way to change your rear brake pads. This is what I did after
<THESE INSTRUCTIONS MUST BE GIVEN TO THE END USER> B&W
 B&W Trailer Hitches 1216 Hawaii Rd / PO Box 186 Humboldt, KS 66748 P:620.473.3664 F:620.869.9031 Turnoverball Gooseneck Hitch Installation Instructions
Slide the billet aluminum cap over the bushing and secure with the 3/8-16 x 2 1/2 socket head allen and locknuts provided.
 Slide the billet aluminum cap over the bushing and secure with the 3/8-16 x 2 1/2 socket head allen and locknuts provided. Put the urethane bushings into the upper antiroll-bar-link eyebolt. Coat the bushings
INSTALLATION INSTRUCTION 88148
 INSTALLATION INSTRUCTION 88148 Rev C For Rancho Suspension Systems RS6548, RS6549 & RS6550: GM 2500HD, 2500, and 1500HD Trucks READ ALL INSTRUCTIONS THOROUGHLY FROM START TO FINISH BEFORE BEGINNING INSTALLATION
Self-propelled Chipper Shredder Vacuum
 2.11. Confirm that the drive gears are installed on the correct side. See Figure 2.11. 3. TRANSMISSION REMOVAL 3.1. Disconnect the H.T. lead from the spark plug. 3.2. Remove collection bag or blower chute.
Pypes 409 Stainless Steel Violator Cat-back with Polished 304 Tips Installation Guide (98-04 GT/Mach 1)
") Pypes 409 Stainless Steel Violator Cat-back with Polished 304 Tips Installation Guide (98-04 GT/Mach 1) The below installation instructions work for the following products: Pypes 409 Stainless Steel Violator
Pypes 409 Stainless Steel Violator Cat-back with Polished 304 Tips Installation Guide (98-04 GT/Mach 1) The below installation instructions work for the following products: Pypes 409 Stainless Steel Violator
SECTION C Engine 5.4L (3V)
") 303-01C-i Engine 5.4L (3V) 303-01C-i SECTION 303-01C Engine 5.4L (3V) CONTENTS PAGE IN-VEHICLE REPAIR Engine Front Cover... 303-01C-2 303-01C-2 Engine 5.4L (3V) 303-01C-2 IN-VEHICLE REPAIR Engine Front
303-01C-i Engine 5.4L (3V) 303-01C-i SECTION 303-01C Engine 5.4L (3V) CONTENTS PAGE IN-VEHICLE REPAIR Engine Front Cover... 303-01C-2 303-01C-2 Engine 5.4L (3V) 303-01C-2 IN-VEHICLE REPAIR Engine Front
INSTALLATION INSTRUCTIONS
 Accessory Application Publication No. INSTALLATION INSTRUCTIONS P/N 08M70-MJM-D00 VFR800F/D MII 14983 Issue Date June 2014 PARTS LIST (6) (7) (2) (15) (12) (8) TOOLS AND SUPPLIES REQUIRED Socket (12 and
'99-03 CHEVROLET/GMC IFS 4WD 6" SUSPENSION SYSTEM P/N INSTALLATION INSTRUCTIONS
 1/16/04 '99-03 CHEVROLET/GMC IFS 4WD 6" SUSPENSION SYSTEM P/N. 10-41099 INSTALLATION INSTRUCTIONS NOTE: Each Lift Kit and options to Lift Kits are packaged separately. Therefore, installation procedures
INSTALLATION INSTRUCTIONS
 INSTALLATION INSTRUCTIONS REAR DISC BRAKE CONVERSION KIT A126-1 1973-87 CHEVROLET 1/2 TON 2WD Thank you for choosing STAINLESS STEEL BRAKES CORPORATION for your braking needs. Pleases take the time to
Installation Manual TWM Performance Short Shifter Cobalt SS/SC, SS/TC, HHR SS, Ion Redline and Saab 9-3
 Page 1 Installation Manual TWM Performance Short Shifter Cobalt SS/SC, SS/TC, HHR SS, Ion Redline and Saab 9-3 Please Note: It is preferable to park on a flat surface, as you will have to engage and disengage
INSTALLATION INSTRUCTION 88578
 INSTALLATION INSTRUCTION 88578 For Rancho Suspension System RS6579B: 4WD Dodge 1500 & 2500 READ ALL INSTRUCTIONS THOROUGHLY FROM START TO FINISH BEFORE BEGINNING INSTALLATION Rev E IMPORTANT NOTES! WARNING:
INSTALLATION INSTRUCTIONS Progress Technology Rear Anti-Sway Bar Honda Civic Part # No Revision (7/20/16)
") INSTALLATION INSTRUCTIONS Progress Technology Rear Anti-Sway Bar Honda Civic 96-00 Part # 62.1042 No Revision (7/20/16) WHO SHOULD INSTALL THIS PRODUCT? Progress Technology products should only be installed
INSTALLATION INSTRUCTIONS Progress Technology Rear Anti-Sway Bar Honda Civic 96-00 Part # 62.1042 No Revision (7/20/16) WHO SHOULD INSTALL THIS PRODUCT? Progress Technology products should only be installed
HYUNDAI VELOSTER SHORT RAM 1.6T INTAKE INSTALLATION INSTRUCTIONS
 Installation: HYUNDAI VELOSTER SHORT RAM 1.6T INTAKE INSTALLATION INSTRUCTIONS Tools needed: 1/4 or 3/8 drive ratchet 12 extension (shorter ones work, but will be difficult to reach some bolts) 10mm socket
INSTALLATION INSTRUCTIONS Unitronic 3 Turbo-Back Exhaust System for Golf R UH021-EXA
 Unitronic recommends that you read through the entire installation instructions prior to beginning the installation to familiarize yourself with the included components, tools required, and procedures
Part number RD1306. Maintaining your Cold air intake system: Tools required:
 Part number RD1306 06-07 Honda S2000 4 cyl. 2.2L 1-2 piece cold air intake 1-3 Injen filter (#1014) 1-2 3/4 x 3 silicone step hose (#3040) 1-3 straight hose (#3044) 4- Power-bands.362.048 (#4004) 1-1525
Timing Belt: Service and Repair
 1996 Honda Accord Sedan L4-2.2L SOHC (16 Valve) Copyright 2009, ALLDATA 9.90 Page 1 Timing Belt: Service and Repair TIMING BELT AND TIMING BALANCER BELT REMOVAL Timing Components NOTE: - Turn the crankshaft
First, check and record the camber and caster readings, they will be adjusted later.
 First, check and record the camber and caster readings, they will be adjusted later. The caliper-mounting bosses are machined perpendicular to the spindle so they are an excellent place for the level.
81-87, 22r/re 4wd, 50 state smog legal header ( k) r 4wd ca only 50 state smog legal header ( k) 1 ct.
 r 4wd ca only 50 state smog legal header ( k) 1 ct.") InstalLation Instructions rock ripper toy header tm 81-87, 22r/re 4wd, 50 state smog legal header (180302-1-k) 81-84 22r 4wd ca only 50 state smog legal header (180303-1-k) kit contents Header Tube Intermediate
InstalLation Instructions rock ripper toy header tm 81-87, 22r/re 4wd, 50 state smog legal header (180302-1-k) 81-84 22r 4wd ca only 50 state smog legal header (180303-1-k) kit contents Header Tube Intermediate
Torqueflite Manual/Automatic Valve Body
 TCI 122400 Torqueflite Manual/Automatic Valve Body This valve body can be installed in a few hours by carefully following directions. Read all instructions first to familiarize yourself with the parts
Do not have any open flame or heat sources close to the installation
 March 6, 2017 IS# 791 Page 1 of 16 Thank you for purchasing a Transfer Flow, Inc. 50-gallon replacement fuel system for your 2011-16 Ford diesel short bed pickup. This system will fit any 2x4 or 4x4 crew
 Special Tools Needed: DrVanos.com Stage I Installation Instructions Camshaft locking tool TDC Crank pin Sprocket turning tool Tool rental is available with the purchase of a vanos kit *See website for
LOW RANGE OFF-ROAD Suzuki Samurai Venturi Vent Tube Nozzle (SKU# SER-VENT) Installation Instructions
 Installation Instructions") 86-88 Suzuki Samurai Venturi Vent Tube Nozzle (SKU# SER-VENT) Installation Instructions For a video of this procedure click HERE, or go to our web site. Suggested Tools: CAUTION: Safety glasses should
86-88 Suzuki Samurai Venturi Vent Tube Nozzle (SKU# SER-VENT) Installation Instructions For a video of this procedure click HERE, or go to our web site. Suggested Tools: CAUTION: Safety glasses should
1. General Description
 1. General Description A: SPECIFICATIONS 1. Type Transmission gear ratio Front reduction gear Rear reduction gear 2. TRANSMISSION GEAR OIL Recommended oil Final Transfer 5-forward speeds with synchromesh
2005 Toyota Truck RAV4 2WD L4 2.4L (2AZ FE)
") 2005 Toyota Truck RAV4 2WD L4 2.4L (2AZ FE) Vehicle» Engine, Cooling and Exhaust» Engine» Timing Chain» Service and Repair TIMING CHAIN TIMING CHAIN http://alldatapro.com/alldata/pro~v440713400~c39519~r0~od~n/0/108596970/110859775/110859788/110859790/34853741/100411974/34853743/56492475
2005 Toyota Truck RAV4 2WD L4 2.4L (2AZ FE) Vehicle» Engine, Cooling and Exhaust» Engine» Timing Chain» Service and Repair TIMING CHAIN TIMING CHAIN http://alldatapro.com/alldata/pro~v440713400~c39519~r0~od~n/0/108596970/110859775/110859788/110859790/34853741/100411974/34853743/56492475
Industrial Injections Compound Turbo Installation For 6.7L Scorpion
 Industrial Injections Compound Turbo Installation For 6.7L Scorpion Step 1: Whenever you are doing an installation the first thing you should do is unhook the batteries to avoid arcing. You will need an
TCI Trans-Scat
 Page 1 of 5 Return to Instruction Sheet index TCI 400000 Trans-Scat Turbo Hydramatic 400-1965-Up This kit will allow you to re-program your transmission valve body. This kit will give you firm positive
Installation Instructions for BMR Lowering Springs Performance ( Mustang GT)
") Installation Instructions for BMR Lowering Springs Performance (2015-2017 Mustang GT) Time Required: 3+ hours Notes: This install was done with the performance springs from BMR, but install should be the
Installation Instructions for BMR Lowering Springs Performance (2015-2017 Mustang GT) Time Required: 3+ hours Notes: This install was done with the performance springs from BMR, but install should be the
Remove Air Cleaner Cover and. Filter
 Remove Air Cleaner Cover and Inspect paper filter for tears Foam pre-cleaner is washable if equipped Replace if necessary Filter Remove Trim Panel Pull throttle lever knob off Remove 3, 8mm screws Remove
Trailer Axle Beam Replacement SERVICE MANUAL
 Trailer Axle Beam Replacement SERVICE MANUAL September 20, 2017 Trailer Axle Beam Service Manual TABLE OF CONTENTS System Information 2 Safety Information 2 Required Resources 2 Hub Removal 3 Axle Beam
HURST COMP/PLUS SHIFTER 2015 Ford Mustang (Getrag MT82 six-speed manual transmission) Catalog # by Hurst Performance
 Catalog # by Hurst Performance") FORM 159 0205 07/15 HURST COMP/PLUS SHIFTER 2015 Ford Mustang (Getrag MT82 six-speed manual transmission) Catalog #391 0205 2015 by Hurst Performance Thank you for purchasing the Hurst Comp/Plus Shifter.
FORM 159 0205 07/15 HURST COMP/PLUS SHIFTER 2015 Ford Mustang (Getrag MT82 six-speed manual transmission) Catalog #391 0205 2015 by Hurst Performance Thank you for purchasing the Hurst Comp/Plus Shifter.
FORD RACING DIFFERENTIAL COVER 8.8 IRS
 FORD RACING DIFFERENTIAL COVER 8.8 IRS Tools Needed: Socket set, metric and standard Sledge hammer Puller device, pitman puller Jack Jack stands Flat head screw drivers Torque wrench, capable of 8 ft/lbs
Sisu S-Cam Drum Brakes
 Sisu S-Cam Drum Brakes (For hub reduction rear axles since 1992) Maintenance Manual Sisu Axles, Inc. Autotehtaantie 1 P.O. Box 189 FIN-13101 Hämeenlinna Finland Phone int + 358 204 55 2999 Fax int + 358
REMOVAL & INSTALLATION
 REMOVAL & INSTALLATION TIMING BELT Removal (Esteem) 1. Disconnect negative battery cable. Remove right side engine under cover. Remove power steering and A/C compressor drive belts. 2. Remove A/C compressor
Engine Front Cover. Special Tool(s) 3-Jaw Puller 303-D121 or equivalent. Installer, Front Cover Oil Seal (T88T-6701-A)
 3-Jaw Puller 303-D121 or equivalent. Installer, Front Cover Oil Seal (T88T-6701-A)") SECTION 303-01B: Engine 4.6L (3V) 2009 Mustang Workshop Manual IN-VEHICLE REPAIR Procedure revision date: 05/23/2008 Engine Front Cover Special Tool(s) 3-Jaw Puller 303-D121 or equivalent Installer, Front
SECTION 303-01B: Engine 4.6L (3V) 2009 Mustang Workshop Manual IN-VEHICLE REPAIR Procedure revision date: 05/23/2008 Engine Front Cover Special Tool(s) 3-Jaw Puller 303-D121 or equivalent Installer, Front
Exhaust System and Catalytic Converter Dis-Assembly
 Installation Guidelines For Audi-VW ZF 5-Speed Automatic Transmission Output Flange Seal! CAUTION! Performing work on your automobile without having proper knowledge, mechanical ability or the proper tools
626F Exit Device Trim Installation Instructions
 626F Exit Device Trim Installation Instructions For use with all Yale 7000, 2100, 1800 and 1500 Series Exit Devices (Wood and Metal Doors) Attention Installer Any retrofit or other field modification to
Installation Instructions
 2007/2010 Chevy/GMC 1500 TRUCK (4.8, 5.3, 6.0 & 6.2 liter) 2WD and 4WD 07-08 Part # 715-14110, 715-14120 & 715-14130 09-Up Part # 715-14110, 715-14420 & 715-14430 11-12 6.2L Part # 715-14110, 715-14620
RSA FJ CRUISER LONG RANGE TANK GET ORGANIZED. INSTALL TIME: 1.5 hours
 FJ CRUISER LONG RANGE TANK RSA FTTJ001 INSTALL TIME: 1.5 hours 1 GET ORGANIZED you will need: a 1 and 15 wrench a 10, 1, 15 and 7 socket, and ratchet with an extension a craft/stanley knife a hack saw
Cybex Arc Trainer Owner s & Service Manual. 7 - Service
 7 - Service Table of Contents......... iii Warnings/Cautions All warnings and cautions listed in this chapter are as follows:! WARNING: All maintenance activities shall be performed by qualified personnel.
REMOVAL & INSTALLATION
 REMOVAL & INSTALLATION NOTE: For reassembly reference, label all electrical connectors, vacuum hoses and fuel lines before removal. Also place mating marks on engine hood and other major assemblies before
INSTALLATION INSTRUCTIONS Unitronic 3 Turbo-Back Exhaust System for MK5 Jetta /GLI UH020-EXA
 Unitronic recommends that you read through the entire installation instructions prior to beginning the installation to familiarize yourself with the included components, tools required, and procedures
Timing Chain: Service and Repair
 2005 Nissan-Datsun Altima L4-2.5L (QR25DE) Copyright 2013, ALLDATA 10.52SS Page 1 Timing Chain: Service and Repair TIMING CHAIN Removal and Installation Apply new engine oil to parts marked in illustration
Ford Racing Front Lower Control Arms (05-12 GT & GT500):
:") Ford Racing Front Lower Control Arms (05-12 GT & GT500): Tools needed: Floor jack Jack stands 18mm & 21mm box end wrench 18mm & 21mm socket 13/16 socket (2) Ratchets Breaker bar Torque wrench (0-150 ft/lbs)
Ford Racing Front Lower Control Arms (05-12 GT & GT500): Tools needed: Floor jack Jack stands 18mm & 21mm box end wrench 18mm & 21mm socket 13/16 socket (2) Ratchets Breaker bar Torque wrench (0-150 ft/lbs)