Toothed belt, removing and installing
|
|
|
- Jasmin Wheeler
- 5 years ago
- Views:
Transcription
1 Toothed belt, removing and installing Special Tools and Equipment ^ 3212 spanner wrench ^ 3387 pin wrench ^ T40011 pin ^ T40026 locking pin ^ T40028 socket ^ T40030 camshaft adjuster gauge Removing Lock carrier in service position, Refer to Body and Frame. Ribbed belt removed, Refer to Drive Belt, Service and Repair. 1/17
 using 3212 spanner wrench as")
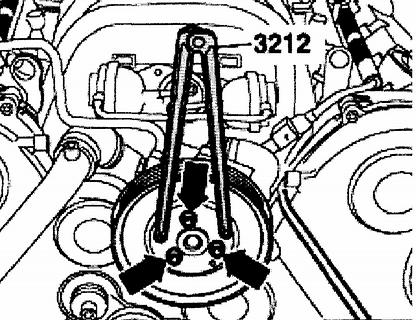
2 Unscrew bolts (arrows) and remove ribbed belt tensioner. Remove ribbed belt gear of vane pump (arrows) using 3212 spanner wrench as retainer. 2/17

3 Remove 8 bolts 1. Remove harmonic balancer 2 and thrust washer 3. Note: Thrust washer 3 is only installed on toothed belt gear with part number 06C No thrust washer must be installed for toothed belt gear with part number 06C B. 3/17
. http://repair.alldata.")
4 Unscrew bolts 1 to 12 and remove toothed belt guards. Remove rear engine cover (arrows). 4/17

sensor. Remove air guide hose 3 together with Mass Air Flow (MAF)sensor.")
5 Remove coolant reservoir (arrows). Disconnect electrical wiring to Engine Coolant Level (ECL) Warning Switch F66 at bottom of expansion tank. Tie coolant expansion tank with connected coolant hoses 1 to 3 to side. Detach Evaporative Emission (EVAP) Canister Purge Regulator Valve N80 1 at air filter housing. Disconnect electrical harness connector 2 at Mass Air Flow (MAP)sensor. Remove air guide hose 3 together with Mass Air Flow (MAF)sensor. Remove air filter housing (arrows). 5/17
 toward top and swing it forward for removal.")
. http://repair.alldata.com/alldata/article/display.action?")
6 Remove bolts 1 and 3. Disconnect hose 4 from line of secondary air injection. Pull out guide tube for oil dipstick 2 from the oil pan (upper part) toward top and swing it forward for removal. Remove bolts 5 and 6 at right cylinder head cover. Disconnect electrical harness connectors 1 to 4. Remove ignition coils (arrows). 6/17

. http://repair.alldata.com/alldata/article/display.action?")
7 Remove hose of crankshaft housing ventilation (arrow). Unscrew bolts for right cylinder head cover in the sequence 12 to 1. Remove cylinder head cover. Unscrew bolts 4 and 5 at left cylinder head cover. Disconnect electrical harness connectors 1 to 3 and 6. Remove ignition coils (arrows). 7/17

 point upward uniformly. Note: Turn engine at crankshaft central bolt.")
8 Remove hose of crankshaft housing ventilation (arrow). Unscrew bolts for left cylinder head cover in the sequence 12 to 1. Remove cylinder head cover. WARNING: Turning of the engine must only occur in direction of engine rotation (clockwise) at the crankshaft Turn engine until the cams (arrows) at intake and exhaust camshaft of cylinder 3 (right cylinder bank) point upward uniformly. Note: Turn engine at crankshaft central bolt. 8/17


9 Insert T40030 camshaft adjuster gauge at camshafts of right cylinder head. Note: Slightly turn crankshaft back and forth so that the claw of T40030 camshaft adjuster gauge can properly grab the camshafts. Spread T40030 camshaft adjuster gauge with threaded shaft (tightening torque 10 Nm) until it is seated without axial play. Insert T40030 camshaft adjuster gauge at left cylinder head in the same manner. If installed, disconnect electrical harness connector at after run coolant pump. Unscrew sealing plug of TDC mark at cylinder block. 9/17


10 Thread T40026 locking pin into the hole of the removed sealing plug and tighten. Note: Slightly turn crankshaft back and forth to do so. Note: Catch escaping oil using a rag. Pry off securing rings 1 for caps 2 at all camshaft gears. 10/17


11 Remove bolts 1 to 4 for crankshaft gears. Note: The bolts remain loosely threaded in. Using an 8 mm hex socket wrench, turn toothed belt tensioner in direction of arrow until the tensioning lever pushes the tensioner together far enough so that the T40011 pin can be inserted into the bore of the pistons and housing. Notes: ^ The toothed belt tensioner is oil dampened. Compress it by slowly applying constant pressure. ^ Mark rotational direction of toothed belt. Reversing the direction in which it runs can ruin it. 11/17
 Camshafts aligned using T40030 camshaft adjuster gauge Crankshaft aligned using T40026 locking pin Camshaft gears loosened.")

12 Loosen bolt (arrow) of eccentric pulley. Remove toothed belt. Installing (adjusting valve timing) Camshafts aligned using T40030 camshaft adjuster gauge Crankshaft aligned using T40026 locking pin Camshaft gears loosened. Notes: ^ Replace gaskets, O rings and self locking bolts. ^ When fuming camshaft, crankshaft must not be at TDC for any cylinder. Valves and/or pistons may be damaged. Bolt in camshaft gears 1 to 4 far enough so they can still just be turned without canting. Install toothed belt as depicted in illustration. ^ For exact valve timing adjustment, the toothed belt must make exact contact with front edge of all toothed belt gears. 12/17


13 Using 3387 pin wrench, turn eccentric pulley 1 in clockwise direction until the handle of the pin wrench is exactly above the center axle of coolant pump gear 2. Hold pin wrench in this position and tighten bolt 3 to 45 Nm. Place torque wrench horizontally on socket head of tensioning lever. Turn with 45 Nm in direction of arrow to pretension toothed belt. 13/17


14 Using 8 mm socket head wrench, turn toothed belt tensioning roller in direction of arrow until T40011 pin can pulled out. Place torque wrench horizontally on socket head of tensioning lever. Turn with 25 Nm in direction of arrow to tension toothed belt. 14/17
.")

15 Insert T40028 socket at camshaft adjuster of exhaust camshaft on left cylinder bank. Turn rotor of camshaft adjuster clockwise to 10 Nm up to stop (arrow). Turn rotor of camshaft adjuster at right cylinder bank clockwise to 10 Nm up to stop (arrow). Tighten camshaft adjuster to 100 Nm. 15/17

16 Insert caps 2 with new O rings 1 at camshaft gears and secure them with the securing ring. Remove T40030 camshaft adjuster gauge. Remove T10026 alignment bolt and thread sealing plug of TDC marking with new O ring into cylinder block. Installation is reverse of removal, noting the following: Install cylinder head covers, Refer to Valve Cover, Service and Repair.. Install toothed belt guards, Refer to Timing Belt, Service and Repair. Install harmonic balancer, Refer to Harmonic Balancer Crankshaft Pulley, Service and Repair. Install ribbed belt, Refer to Drive Belt, Service and Repair. 16/17
17 Component Tightening Torques (Part 12 Of 17) Tightening torques 2018 ALLDATA, LLC. All Rights Reserved. (Version ) 17/17
Engine, disassembling and
 Page 1 of 38 13-1 Engine, disassembling and assembling Lock carrier, moving into service position Special tools and equipment 3369 support tool 1 - Bolts 2 - Bolts 3 - Bolts 4 - Bolts 5 - Bore 45 Nm (33
Valve gear, servicing
 Page 1 of 62 15-1 Valve gear, servicing WARNING! Do not re-use any fasteners that are worn or deformed in normal use. Some fasteners are designed to be used only once, and are unreliable and may fail if
Engine, disassembly and
 Page 1 of 13 13-1 Engine, disassembly and assembly Ribbed belt, removing and installing Removing - Remove noise insulation -arrows-. - Remove bumper Repair Manual, Body Exterior, Repair Group 63 - Move
TOOTHED DRIVE BELT, REMOVING, INSTALLING AND TENSIONING
 2005 Audi A4 Sedan (8E2) L4-1.8L Turbo (AMB) Vehicle > Engine, Cooling and Exhaust > Engine > Timing Components > Timing Belt > Service and Repair > Removal and Replacement TOOTHED DRIVE BELT, REMOVING,
Cylinder head, removing and
 Page 1 of 35 15-2 Cylinder head, removing and installing Note: Replace cylinder head bolts. Always replace self-locking nuts, bolts as well as gaskets and O-rings. After installing a replacement cylinder
ALLDATA Online Ford Focus L4-2.0L DOHC VIN 5 - Service and Repair. Service and Repair
 Page 1 of 22 Service and Repair NOTE: Ford does not provide camshaft gear timing marks, or information to perform timing belt service without the special tools shown in this procedure. Timing Belt Special
Removing and installing toothed belt
 Page 1 of 10 Special tools and workshop equipment required Diesel injection pump locking pin -3359- (2x) Pin wrench -T10020- Crankshaft stop -T10050- for engines with circular crankshaft sprocket Locking
9/24/2017 Camshaft Timing Chain Removal and Installation Engine Mechanical 2002 Audi A6/S6/Quattro/Allroad MotoLogic
 2002 A6/S6/Quattro/Allroad The information in this article comes from a service manual containing information that applies to the following engine code: BAS. Section Info: Report a problem with this article
GM 6-Cylinder Cam Tool Set 3.0L and 3.2L Operating Instructions
 GM 6-Cylinder Cam Tool Set 3.0L and 3.2L Operating Instructions Set Includes: Locking Tool... 536594 Locking Tool... 536595 Crankshaft Holding Tool... 536596 Alignment Gauge... 536608 Belt Installation
1983 BMW 320i. 1.8L 4-CYL 1983 Engines - 1.8L 4-Cylinder Engines - 1.8L 4-Cylinder
 ENGINE IDENTIFICATION 1.8L 4-CYL 1983 Engines - 1.8L 4-Cylinder For engine repair procedures not covered in this article, see ENGINE OVERHAUL PROCEDURES - GENERAL INFORMATION article in the GENERAL INFORMATION
8/14/2016 8:12 PM. Bolt: Part No for Type B
 1 of 21 2 of 21 REMOVAL 1. DISCONNECT PS RESERVOIR AND REMOVE RESERVOIR BRACKET 2. DISCONNECT WIRE HARNESS BRACKET FOR DLC1 3. REMOVE GENERATOR 4. REMOVE GENERATOR BRACKET 5. w/ ABS: REMOVE NO.3 ABS ACTUATOR
REMOVAL & INSTALLATION
 REMOVAL & INSTALLATION CAUTION: This application is an interference engine. Do not rotate camshaft or crankshaft when timing belt is removed, or engine damage may occur. TIMING BELT Removal (Standard Tensioner
Timing Belt: Service and Repair 2002 Acura Truck MDX V6-3.5L
 Timing Belt: Service and Repair 2002 Acura Truck MDX V6-3.5L Timing Belt Removal Special Tools Required - Holder handle 07JAB-001020A - Holder attachment, 50 mm, offset 07MAB-PY3010A - Socket, 19 mm 07JAA-001020A
Fig. 195: Positioning Timing Chain On Exhaust Camshaft Courtesy of BMW OF NORTH AMERICA, INC.
 Fig. 195: Positioning Timing Chain On Exhaust Camshaft Install camshafts so that cam tips on inlet and exhaust valves on 1st cylinder face one another. Refer to 11 31 001 REPLACING CAMSHAFT (M52TU / M54
 Page 1 of 44 REPLACEMENT 1. 2. 3. 4. REMOVE ENGINE UNDER COVER RH DRAIN COOLANT (See REPLACEMENT ) REMOVE FRONT WHEEL RH REMOVE CYLINDER HEAD COVER NO. 2 a. Remove the 2 nuts, 2 clips and cylinder head
3/6/2017 Timing Chain Service and Repair, Removal and Replacement: Valve Timing, Installing and Adjusting
 Valve timing, adjusting Special tools and equipment - T10068 Camshaft bar - T10069 Counter support - VAG 1331 Torque wrench (5-50 Nm) - VAG 1332 Torque wrench (40-200 Nm) - AMV 174 004 01 Sealing compound
REMOVAL & INSTALLATION
 REMOVAL & INSTALLATION CAUTION: This application is an interference engine. Do not rotate camshaft or crankshaft when timing belt is removed, or engine damage may occur. TIMING BELT CAUTION: DO NOT turn
Crankshaft, Remove and Install (Engine Removed) (Z 22 SE)
 (Z 22 SE)") Page 1 of 36 Crankshaft, Remove and Install (Engine Removed) (Z 22 SE) Remove 1. Remove the engine Note: See operation "Engine, Remove and Install". 2. Separate the manual transmission from the engine.
Page 1 of 36 Crankshaft, Remove and Install (Engine Removed) (Z 22 SE) Remove 1. Remove the engine Note: See operation "Engine, Remove and Install". 2. Separate the manual transmission from the engine.
REMOVAL & INSTALLATION
 REMOVAL & INSTALLATION TIMING BELT Removal 1. Noting position for installation reference, disconnect secondary wires from spark plugs. Remove spark plugs. 2. Disconnect negative battery cable. Remove air
Volkswagen New Beetle 2.0 Liter 4-cyl General, Engine (Engine Code AEG) 13 Engine-Crankshaft, Cylinder block (Page GR-13)
 13 Engine-Crankshaft, Cylinder block (Page GR-13)") 13 Engine-Crankshaft, Cylinder block (Page GR-13) Engine, disassembly and assembly 10-222 A/21 guide from 10-222 A support tool, modifying Ribbed belt, removing and installing Semi-automatic toothed belt
13 Engine-Crankshaft, Cylinder block (Page GR-13) Engine, disassembly and assembly 10-222 A/21 guide from 10-222 A support tool, modifying Ribbed belt, removing and installing Semi-automatic toothed belt
2005 Chrysler 300 C ENGINE Mechanical - 3.5L - Service Information & Magnum
 1. Install camshaft sprockets onto the camshafts. Install NEW sprocket attaching bolts into place. The 255 mm (10 in.) bolt is to be installed in the left camshaft and the 213 mm (8 3/8 in.) bolt is to
Service and Repair. a. Remove the 2 nuts and 2 upper radiator support. b. Lift out the radiator and cooling fan assembly.
 Service and Repair REPLACEMENT 1. SEPARATE BATTERY NEGATIVE TERMINAL 2. REMOVE AIR CLEANER INLET NO.1 3. DRAIN ENGINE COOLANT 4. REMOVE V-BANK COVER 5. REMOVE INTAKE AIR CONNECTOR PIPE 6. REMOVE ENGINE
VALVE CLEARANCE (K3-VE)
") ENGINE MECHANICAL VALVE CLEARANCE (K3-VE) 25 ENGINE MECHANICAL VALVE CLEARANCE (K3-VE) INSPECTION 1. DISCONNECT NEGATIVE BATTERY TERMINAL (See page RS-164.) 2. ROVE ENGINE UNDER COVER 3. DRAIN ENGINE COOLANT
ENGINE MECHANICAL VALVE CLEARANCE (K3-VE) 25 ENGINE MECHANICAL VALVE CLEARANCE (K3-VE) INSPECTION 1. DISCONNECT NEGATIVE BATTERY TERMINAL (See page RS-164.) 2. ROVE ENGINE UNDER COVER 3. DRAIN ENGINE COOLANT
1 of 12 11/20/2016 9:32 PM
 1 of 12 11/20/2016 9:32 PM Caution: After removing timing chain, do not turn crankshaft and camshaft separately, or valves will strike piston heads. Apply new engine oil to the sliding surfaces when Installing
ARTICLE BEGINNING INTRODUCTION IGNITION SYSTEM CAMSHAFT POSITION (CMP) SENSOR DISTRIBUTOR
 SENSOR DISTRIBUTOR") Article Text Thursday, August 19, 1999 11:40PM ARTICLE BEGINNING 1996 ENGINE PERFORMANCE Volkswagen Removal, Overhaul & Installation - Gasoline Cabrio, Golf III, GTI, Jetta III, Passat CAUTION: When battery
Article Text Thursday, August 19, 1999 11:40PM ARTICLE BEGINNING 1996 ENGINE PERFORMANCE Volkswagen Removal, Overhaul & Installation - Gasoline Cabrio, Golf III, GTI, Jetta III, Passat CAUTION: When battery
1998 Volkswagen Golf GL
 Removal (Thermo Tensioner Roller - 1997 & Up) CAUTION: To prevent valves from contacting piston, DO NOT rotate camshaft or crankshaft with timing belt removed. Valve damage may result. 1. Remove air cleaner
ENGINE ASSEMBLY. COMPONENTS (Part 1)
") 1 of 32 ENGINE ASSEMBLY COMPONENTS (Part 1) 2 of 32 COMPONENTS (Part 2) 3 of 32 COMPONENTS (Part 3) 4 of 32 COMPONENTS (Part 4) 5 of 32 COMPONENTS (Part 5) 6 of 32 COMPONENTS (Part 6) 7 of 32 COMPONENTS
1 of 32 ENGINE ASSEMBLY COMPONENTS (Part 1) 2 of 32 COMPONENTS (Part 2) 3 of 32 COMPONENTS (Part 3) 4 of 32 COMPONENTS (Part 4) 5 of 32 COMPONENTS (Part 5) 6 of 32 COMPONENTS (Part 6) 7 of 32 COMPONENTS
2003 Saturn Vue. SATURN 3.0L V6 DOHC - L-Series After VIN & Vue
 TIMING BELT Removal 1. Disconnect negative battery cable. Remove air cleaner assembly. 2. Raise and support vehicle. Remove right front wheel. Remove lower front splash shield. 3. Lower vehicle. Loosen,
1 of 15 1/26/2017 8:57 AM
 1 of 15 1/26/2017 8:57 AM Timing Belt and Balancer Belt Removal Special Tools Required ^ Holder Handle 07JAB-001020A ^ Holder Attachment, 50 mm, Offset 07MAB-PY3010A ^ Socket, 19 mm 07JAA-001020A or a
Valve Timing, Adjust (Z 22 SE)
") Page 1 of 15 Valve Timing, Adjust (Z 22 SE) Remove 1. Open the bonnet. 2. Disconnect the battery. 3. Open the engine cover (1). 4. Detach the engine cover. 6 bolts (2) and (3) 5. Release the fuel pressure.
Page 1 of 15 Valve Timing, Adjust (Z 22 SE) Remove 1. Open the bonnet. 2. Disconnect the battery. 3. Open the engine cover (1). 4. Detach the engine cover. 6 bolts (2) and (3) 5. Release the fuel pressure.
COMPONENT LOCATOR > DISASSEMBLED VIEWS
 Page 1 of 45 2006 Pontiac Grand Prix 3.8L Eng Base Service Manual: ENGINE MECHANICAL - 3.8L COMPONENT LOCATOR > DISASSEMBLED VIEWS Fig 1: Engine Block Component Views Callout Component Name 100 Engine
Timing Chain, Balancer Shaft, Replace (Z 22 SE)
") Page 1 of 34 Timing Chain, Balancer Shaft, Replace (Z 22 SE) Remove 1. Open the bonnet. 2. Disconnect the battery. 3. Open the engine cover (1). 4. Detach the engine cover. 6 bolts (2) and (3) 5. Release
Page 1 of 34 Timing Chain, Balancer Shaft, Replace (Z 22 SE) Remove 1. Open the bonnet. 2. Disconnect the battery. 3. Open the engine cover (1). 4. Detach the engine cover. 6 bolts (2) and (3) 5. Release
Removing and installing cylinder head Removing, installing and tensioning toothed belt
 Page 1 of 10 Removing and installing cylinder head Removing, installing and tensioning toothed belt Special tools, workshop equipment, test and measuring appliances and auxiliary items required 3359 Locking
2004 Nissan/Datsun Truck Quest Mini Van 3.5L SFI DOHC 6cyl Repair Guides Engin...
 Page 1 of 10 SAVE 20% ON ONLINE SHIP-TO-HOME ORDERS OF $100 OR MORE. Use Code: MOM20 See Details Nissan Quest 2001-02 and 2004-06 REMOVAL & INSTALLATION Timing Chain Cover Removal & Installation 3.5L Engine
Service and Repair SERVICE POINTS OF REMOVAL. Select Vehicle New TSBs Technician's Reference Mitsubishi 3000GT V6-2972cc 3.
 1 of 12 5/4/2008 10:31 PM Home Account Contact ALLDATA Log Out Help METRO TOYOTA Select Vehicle New TSBs Technician's Reference 1992 Mitsubishi 3000GT V6-2972cc 3.0L DOHC Vehicle Level Engine, Cooling
1GR-FE ENGINE MECHANICAL: TIMING CHAIN: INSTALLATION (2007 4Runner) Model Year: 2007 Model: 4Runner Doc ID: RM WS002X
 Model Year: 2007 Model: 4Runner Doc ID: RM WS002X") Last Modified: 4-26-2007 Service Category: Engine/Hybrid System 1.6 A Section: Engine Mechanical Model Year: 2007 Model: 4Runner Doc ID: RM0000029WS002X Title: 1GR-FE ENGINE MECHANICAL: TIMING CHAIN: INSTALLATION
Last Modified: 4-26-2007 Service Category: Engine/Hybrid System 1.6 A Section: Engine Mechanical Model Year: 2007 Model: 4Runner Doc ID: RM0000029WS002X Title: 1GR-FE ENGINE MECHANICAL: TIMING CHAIN: INSTALLATION
TECHNICAL BULLETIN Engine Vibration/Noise Above 1000 RPM Oil Pump Resonance Install Revised Oil Pump SERVICE DATE MODEL 2002 MY.
 SERVICE V8 XJ Series DATE 12/02 TECHNICAL BULLETIN Engine Vibration/Noise Above 1000 RPM Oil Pump Resonance Install Revised Oil Pump 100-21 MODEL 2002 MY V8 XJ Series VIN F44114 - F55936 Issue: Some 2002
https://quickserve.cummins.com/qs2/pubsys2/xml/en/procedures/40/ tr.html
 Page 1 of 7 NOTE: The timing pin is used to accurately locate TDC for setting the overhead. The timing pin is typically located below the fuel pump. for front gear train engines, in the front gear housing
1992 Mitsubishi 3000GT VR-4
 TIMING BELT Removal (Diamante SOHC) 1. Remove left front and left side splash shields. Using engine hoist, lift engine just enough to remove weight from engine mounts. Remove drive belts. Remove A/C tensioner
2001 Dodge Dakota ENGINES 4.7L V8
 FRONT COVER Removal & Installation 1. Disconnect negative battery cable. Remove drive belt. Remove A/C compressor mounting bolts, and position compressor aside. Drain cooling system. Remove radiator hoses.
2001 Ford FOCUS. Submodel: ZTS Engine Type: L4 Liters: 2.0 Fuel Delivery: FI Fuel: GAS. Timing Belt
 2001 Ford FOCUS Submodel: ZTS Engine Type: L4 Liters: 2.0 Fuel Delivery: FI Fuel: GAS SECTION 303-01A: Engine??? 2.0L Zetec-E (Zetec) 2001 Focus Workshop Manual IN-VEHICLE REPAIR Procedure revision date:
REMOVAL 1. DRAIN ENGINE COOLANT 2. REMOVE THROTTLE BODY COVER 3. DISCONNECT TIMING BELT FROM CAMSHAFT TIM- ING PULLEYS (See page EM 14)
") EM34 ENGINE MECHANICAL (2UZFE) EM11U02 REMOVAL 1. DRAIN ENGINE COOLANT 2. REMOVE THROTTLE BODY COVER 3. DISCONNECT TIMING BELT FROM CAMSHAFT TIM- ING PULLEYS (See page EM14) A02844 Be careful not to drop
EM34 ENGINE MECHANICAL (2UZFE) EM11U02 REMOVAL 1. DRAIN ENGINE COOLANT 2. REMOVE THROTTLE BODY COVER 3. DISCONNECT TIMING BELT FROM CAMSHAFT TIM- ING PULLEYS (See page EM14) A02844 Be careful not to drop
Timing Belt: Service and Repair Removal and Installation Removal
 2004 Acura Truck MDX V6-3471cc 3.5L Copyright 2009, ALLDATA 10.10 Page 1 Timing Belt: Service and Repair Removal and Installation Removal 1. Turn the crankshaft so its white mark (A) lines up with the
Removing and installing cylinder head
 31 30 29 28 27 26 25 24 23 22 1 2 3 11 12 10 4 9 5 6 7 8 Removing and installing cylinder head Checking compression pressure page 15-24. Notes: When installing a replacement cylinder head with a mounted
1 of 10 2/10/2017 5:20 PM
 1 of 10 2/10/2017 5:20 PM Crankshaft Pulley Removal NOTICE: Do not loosen or remove the crankshaft pulley bolt without first installing the special tools as instructed in this procedure. The crankshaft
Lower Intake Manifold Replacement
 Lower Intake Manifold Replacement Removal Procedure 1. Turn OFF all the lamps and the accessories. 2. Ensure the ignition switch is in the OFF position. 3. Disconnect the negative battery cable from the
2004 Volvo C70 L5-2.4L Turbo VIN 63 B5244T7 Cylinder Head Assembly Service and Repair, Removal and Replacement: Cylinder Head/Gasket, Replacing
 1 of 25 8/18/2011 6:10 PM 2004 Volvo C70 L5-2.4L Turbo VIN 63 B5244T7 Cylinder Head Assembly Service and Repair, Removal and Replacement: Cylinder Head/Gasket, Replacing Cylinder head/gasket, replacement
10. SEPARATE COMPRESSOR (a) Remove the nut, 3 bolts compressor stay and compressor. HINT: Hang up the hoses instead of detaching.
 Remove the nut, 3 bolts compressor stay and compressor. HINT: Hang up the hoses instead of detaching.") 14108 ENGINE MECHANICAL REPLACEMENT 1. DRAIN ENGINE COOLANT(See page165 ) 2. SEPARATE BATTERY NEGATIVE TERMINAL 3. REMOVE VBANK COVER SUBASSY (a) Remove the 2 cap nuts and Vbank cover subassy. 4. REMOVE
14108 ENGINE MECHANICAL REPLACEMENT 1. DRAIN ENGINE COOLANT(See page165 ) 2. SEPARATE BATTERY NEGATIVE TERMINAL 3. REMOVE VBANK COVER SUBASSY (a) Remove the 2 cap nuts and Vbank cover subassy. 4. REMOVE
11. REMOVE OIL PAN SUB ASSY NO.2 (a) Remove the 18 bolts and 2 nuts.
 Remove the 18 bolts and 2 nuts.") 1444 ENGINE MECHANICAL REPLACEMENT 1. REMOVE ENGINE ASSEMBLY (SEE PAGE 1419) 2. REMOVE DRIVE PLATE & RING GEAR SUBASSY (AUTOMATIC TRANSMISSION) (SEE PAGE 1419) SST 0921354015 (9165160855), 0933000021 3.
1444 ENGINE MECHANICAL REPLACEMENT 1. REMOVE ENGINE ASSEMBLY (SEE PAGE 1419) 2. REMOVE DRIVE PLATE & RING GEAR SUBASSY (AUTOMATIC TRANSMISSION) (SEE PAGE 1419) SST 0921354015 (9165160855), 0933000021 3.
CBEA/CJAA Timing belt procedure. Written by: greengeeker Photos by: DanG144, Kriesel, coalminer16. Required tools:
 CBEA/CJAA Timing belt procedure Written by: greengeeker Photos by: DanG144, Kriesel, coalminer16 Required tools: 1. Securing pin 3359 (you need two of them!) 2. Crankshaft stop T10050 3. Counter-hold tool
CBEA/CJAA Timing belt procedure. Written by: greengeeker Photos by: DanG144, Kriesel, coalminer16. Required tools:
 CBEA/CJAA Timing belt procedure Written by: greengeeker Photos by: DanG144, Kriesel, coalminer16 Required tools: Securing pin 3359 (need two of them!) Crankshaft stop T10050 Counter-hold tool T10172 Special
Valvetrain, servicing
 Page 1 of 51 15-32 Valvetrain, servicing Note: Cylinder heads with small cracks between the valve seats that are less than 0.3 mm (0.012 in.) wide and/or between one valve seat and only the first 4 threads
M162 ENGINE MECHANICAL
 SECTION 1B1 M162 ENGINE MECHANICAL CAUTION: Disconnect the negative battery cable before removing or installing any electrical unit or when a tool or equipment could easily come in contact with exposed
Page 1 of 25. Service and Repair REMOVAL SIZED FOR PRINT. Related Components
 Page 1 of 25 Service and Repair REMOVAL Related Components Page 2 of 25 1ZZ-FE Page 3 of 25 2ZZ-GE 1. REMOVE UPPER FRONT FENDER APRON SEAL AND UPPER RADIATOR SUPPORT SEAL 2. DRAIN ENGINE COOLANT 3. REMOVE
REMOVAL 1. DISCONNECT CABLE FROM NEGATIVE BATTERY TERMINAL 2. REMOVE FRONT WHEEL RH. 3. REMOVE REAR WHEEL (for 4WD) (a) Move the select lever to N.
 (a) Move the select lever to N.") REMOVAL 1. DISCONNECT CABLE FROM NEGATIVE BATTERY TERMINAL 2. REMOVE FRONT WHEEL RH 3. REMOVE REAR WHEEL (for 4WD) (a) Move the select lever to N. (b) Check that the parking brake is released. (c) Remove
REMOVAL 1. DISCONNECT CABLE FROM NEGATIVE BATTERY TERMINAL 2. REMOVE FRONT WHEEL RH 3. REMOVE REAR WHEEL (for 4WD) (a) Move the select lever to N. (b) Check that the parking brake is released. (c) Remove
2007 Ford Freestyle SEL
 Fig. 279: Exploded View Of Engine Heads, Intake & Exhaust Components Item Part Number Description 1 9D475 Exhaust gas recirculation (EGR) system module 2 9D477 EGR module tube 3 9F485 RH exhaust manifold
Sized for Print. Timing belt, replacing. Special tools: COUNTERHOLD See: Tools and Equipment\ Counterhold
 Timing belt, replacing Special tools: 999 5433 COUNTERHOLD See: Tools and Equipment\999 5433 Counterhold Note! Since the illustrations in this service information are used for different model years and/or
Replacing the camshaft seals / variable valve timing (VVT) unit
 unit") "VCC097794 EN 20110521" 1(10) Replacing the camshaft seals / variable valve timing (VVT) unit Special tools: 951 2050, 999 5450, 999 5451, 999 5452, 999 5651, 999 5718, 999 5719, 999 5919 Note! As the
"VCC097794 EN 20110521" 1(10) Replacing the camshaft seals / variable valve timing (VVT) unit Special tools: 951 2050, 999 5450, 999 5451, 999 5452, 999 5651, 999 5718, 999 5719, 999 5919 Note! As the
Testing and Inspection. Diagnostic Procedure Step 1-2
 1 of 4 5/22/2008 7:54 AM Home Account Contact ALLDATA Log Out Help Select Vehicle New TSBs Technician's Reference Component Search: METRO TOYOTA OK 2002 Nissan-Datsun Altima 2.5 S L4-2.5L (QR25DE) Vehicle
2012 Kia Soul L4 2.0L
 2012 Kia Soul L4 2.0L Vehicle» Engine, Cooling and Exhaust» Engine» Timing Chain» Service and Repair» Repair Procedures» Part 1 Removal Engine removal is not required for this procedure. CAUTION: Use fender
REMOVAL & INSTALLATION
 REMOVAL & INSTALLATION CAUTION: This application is an interference engine. Do not rotate camshaft or crankshaft when timing belt is removed, or engine damage may occur. TIMING BELT & BALANCE SHAFT BELT
3/13/ :32 AM. NOTICE: Do not disconnect the hose.
 1 of 25 REPLACEMENT 1. REMOVE HOOD SUB-ASSEMBLY 2. REMOVE FRONT WHEEL RH 3. REMOVE ENGINE UNDER COVER LH 4. REMOVE ENGINE UNDER COVER RH 5. REMOVE FRONT FENDER APRON SEAL RH 6. DRAIN ENGINE OIL a. Install
2003 Nissan-Datsun Truck Frontier 4WD V6-3.3L (VG33E)
") 1 of 15 8/7/2016 2:34 PM 2003 Nissan-Datsun Truck Frontier 4WD V6-3.3L (VG33E) Vehicle» Engine, Cooling and Exhaust» Engine» Cylinder Head Assembly» Service and Repair» Removal and Installation 2 of 15
1 of 15 8/7/2016 2:34 PM 2003 Nissan-Datsun Truck Frontier 4WD V6-3.3L (VG33E) Vehicle» Engine, Cooling and Exhaust» Engine» Cylinder Head Assembly» Service and Repair» Removal and Installation 2 of 15
WARNING: ALWAYS relieve fuel pressure before disconnecting any fuel related component. DO NOT allow fuel to contact engine or electrical components.
 4.0L V8 - VINS [K,U] Selected Block 1990 Lexus LS 400 For Lextreme Powertrain 2020 S. Hacienda Blvd. # D Hacienda Heights California 91745 Copyright 1998 Mitchell Repair Information Company, LLC Friday,
ContiTech: Expert Tips for Changing Timing Belts
 ContiTech: Expert Tips for Changing Timing Belts Detailed instructions for a CT1015 WP1 and CT1018K1 in an Audi A4 (B6) 2.5-liter V6 TDI with engine code AKE MY 2001 ContiTech shows how to avoid errors
2005 Toyota Truck RAV4 2WD L4 2.4L (2AZ FE)
") 2005 Toyota Truck RAV4 2WD L4 2.4L (2AZ FE) Vehicle» Engine, Cooling and Exhaust» Engine» Timing Chain» Service and Repair TIMING CHAIN TIMING CHAIN http://alldatapro.com/alldata/pro~v440713400~c39519~r0~od~n/0/108596970/110859775/110859788/110859790/34853741/100411974/34853743/56492475
2005 Toyota Truck RAV4 2WD L4 2.4L (2AZ FE) Vehicle» Engine, Cooling and Exhaust» Engine» Timing Chain» Service and Repair TIMING CHAIN TIMING CHAIN http://alldatapro.com/alldata/pro~v440713400~c39519~r0~od~n/0/108596970/110859775/110859788/110859790/34853741/100411974/34853743/56492475
Removing and installing timing case cover. A. Engine
 01-2100 Removing and installing timing case cover Operation no. of operation texts and work units or standard texts and flat rates 01-0080, 8009 A. Engine 119.960 Viscous fan clutch remove, install (20-3120).
Cylinder Head, Remove and Install (Z 22 SE)
") Page 1 of 29 Cylinder Head, Remove and Install (Z 22 SE) Remove 1. Open the bonnet. 2. Disconnect the battery. 3. Open the engine cover (1). 4. Detach the engine cover. 6 bolts (2) and (3) 5. Release the
Page 1 of 29 Cylinder Head, Remove and Install (Z 22 SE) Remove 1. Open the bonnet. 2. Disconnect the battery. 3. Open the engine cover (1). 4. Detach the engine cover. 6 bolts (2) and (3) 5. Release the
1.6L 4-CYL - VIN [E]
![1.6L 4-CYL - VIN [E]](/thumbs/81/84172348.jpg "1.6L 4-CYL - VIN [E]") 1.6L 4-CYL - VIN [E] 1993 Nissan Sentra 1993 NISSAN ENGINES 1.6L 4-Cylinder NX, Sentra * PLEASE READ THIS FIRST * NOTE: For engine repair procedures not covered in this article, see ENGINE OVERHAUL PROCEDURES
1.6L 4-CYL - VIN [E] 1993 Nissan Sentra 1993 NISSAN ENGINES 1.6L 4-Cylinder NX, Sentra * PLEASE READ THIS FIRST * NOTE: For engine repair procedures not covered in this article, see ENGINE OVERHAUL PROCEDURES
2001 Chevrolet Metro LSi ENGINES 1.3L 4-Cylinder - Metro & Firefly (Canadian) Fig. 3: Exploded View Of Timing Belt & Components (Typical)
 Fig. 3: Exploded View Of Timing Belt & Components (Typical)") Fig. 3: Exploded View Of Timing Belt & Components (Typical) Fig. 4: Aligning Timing Marks 6. Loosen the timing belt tensioner bolt and the stud. 7. After pushing up the tensioner plate completely with
Fig. 3: Exploded View Of Timing Belt & Components (Typical) Fig. 4: Aligning Timing Marks 6. Loosen the timing belt tensioner bolt and the stud. 7. After pushing up the tensioner plate completely with
Pistons and Connecting Rods, Remove and Install
 Page 1 of 46 Pistons and Connecting Rods, Remove and Install Remove 1. Open the bonnet. 2. Disconnect the battery. 3. Open the engine cover (1). 4. Detach the engine cover. 6 bolts (2) and (3) 5. Release
15.Timing Chain Assembly
 15. A: REMOVAL 1. TIMING CHAIN RH When replacing a single part, perform the work with the engine assembly installed to body. 1) Remove the chain cover. 2) Using
Fig. 6: Assembling Piston & Rod. NOTE: Notch must face forward Toyota Starlet CRANKSHAFT MAIN BEARINGS
 connecting rods are marked for reassembly. 3. Thoroughly clean and inspect all components. Coat pin with engine oil and heat piston to 158-176 F (70-80 C). Pin should push fit with thumb pressure through
DISASSEMBLY. Engine. CAUTION: Remove the cylinder heads before removing the crankshaft. Failure to do so can result in engine damage.
 303-01A-1 DISASSEMBLY Engine Special Tool(s) Remover, Crankshaft Vibration Damper 303-101 (T74P-3616-A) Special Tool(s) Crankshaft Socket 303-674 303-01A-1 Remover, Crankshaft Vibration Damper 303-773
 Page 1 of 5 Section 03-01C: Engine, 4.0L V-6 IN-VEHICLE SERVICE Workshop Manual Camshaft SPECIAL SERVICE TOOL(S) REQUIRED Description Tool Number Sensor Adjusting Wrench T94T-12270-A Removal NOTE: It is
Generator, removing and
 Page 1 of 14 27-26 Generator, removing and installing CAUTION! Disconnect the battery Ground (GND) strap before working on the electrical system. Notes: Before disconnecting the battery, determine the
Replacing the camshaft seals / variable valve timing (VVT) unit
 unit") "VCC097794 EN 20100918" 1(10) Replacing the camshaft seals / variable valve timing (VVT) unit Special tools: 951 2050, 999 5450, 999 5451, 999 5452, 999 5651, 999 5718, 999 5719, 999 5919 Note! As the
"VCC097794 EN 20100918" 1(10) Replacing the camshaft seals / variable valve timing (VVT) unit Special tools: 951 2050, 999 5450, 999 5451, 999 5452, 999 5651, 999 5718, 999 5719, 999 5919 Note! As the
1 of 8 1/17/2017 8:18 AM
 Timing Belt Service and Repair, Removal and Replacement: Replacing... http://repair.alldata.com/alldata/article/display.action?componentid=64&... 1 of 8 1/17/2017 8:18 AM Replacing the timing belt Special
REPLACEMENT. 1. REMOVE CYLINDER HEAD COVER NO.2 (a) Remove the 4 nuts and cylinder head cover No. 2.
 Remove the 4 nuts and cylinder head cover No. 2.") ENGINE MECHANICAL 1475 REPLACEMENT 141FV01 1. REMOVE CYLINDER HEAD COVER NO.2 (a) Remove the 4 nuts and cylinder head cover No. 2. A66316 2. REMOVE IGNITION COIL NO.1 (a) Remove the 4 bolts and pull out
ENGINE MECHANICAL 1475 REPLACEMENT 141FV01 1. REMOVE CYLINDER HEAD COVER NO.2 (a) Remove the 4 nuts and cylinder head cover No. 2. A66316 2. REMOVE IGNITION COIL NO.1 (a) Remove the 4 bolts and pull out
Chrysler 2.0L DOHC timing belt procedure REMOVAL
 Chrysler 2.0L DOHC timing belt procedure REMOVAL CAUTION: Camshaft or crankshaft should not be rotated after timing belt is removed. Damage to valve components may occur. Always align timing marks before
DISASSEMBLED VIEWS. Disassembled Views. Engine Covers and Component Assemblies (1 of 2) (LF1, LFW or LFX)
 (LF1, LFW or LFX)") 2012 Cadillac CTS Wagon AWD V6-3.0L Vehicle > Engine, Cooling and Exhaust > Engine > Locations > Components DISASSEMBLED VIEWS Disassembled Views Engine Covers and Component Assemblies (1 of 2) (LF1, LFW
2012 Cadillac CTS Wagon AWD V6-3.0L Vehicle > Engine, Cooling and Exhaust > Engine > Locations > Components DISASSEMBLED VIEWS Disassembled Views Engine Covers and Component Assemblies (1 of 2) (LF1, LFW
REMOVAL & INSTALLATION
 REMOVAL & INSTALLATION NOTE: For reassembly reference, label all electrical connectors, vacuum hoses and fuel lines before removal. Also place mating marks on engine hood and other major assemblies before
1999 Honda Accord DX
 Installation 1. Clean tensioner pulleys. Ensure cylinder No. 1 is at TDC by aligning dimple on timing belt drive pulley with pointer on oil pump housing. See Fig. 4. Ensure camshaft pulley TDC marks are
REMOVAL EM SEPARATE COMPRESSOR AND MAGNETIC CLUTCH (w/ Air Conditioning System) (a) Remove the bolt shown in the illustration.
 (a) Remove the bolt shown in the illustration.") 21 ROVAL 1. ROVE HOOD SUB-ASSBLY 2. DISCHARGE FUEL SYST PRESSURE (See page FU-1) 3. ROVE NO. 1 ENGINE UNDER COVER SUB- ASSBLY (for 4WD and Pre-Runner) (a) Remove the 4 bolts, then remove the No. 1 engine
21 ROVAL 1. ROVE HOOD SUB-ASSBLY 2. DISCHARGE FUEL SYST PRESSURE (See page FU-1) 3. ROVE NO. 1 ENGINE UNDER COVER SUB- ASSBLY (for 4WD and Pre-Runner) (a) Remove the 4 bolts, then remove the No. 1 engine
Technical Service BULLETIN
 Technical Service BULLETIN May 19, 2003 Title: Models: 00 02 Celica GTS EG010-03 ENGINE Introduction In some cases, owners of 2000 2002 model year Celica GTS vehicles equipped with the 2ZZ GE engine may
Replacing the oil pump / front crankshaft seal
 "VCC097797 EN 20100518" 1(5) Replacing the oil pump / front crankshaft seal Special tools: 998 6187, 999 5433, 999 5455, 999 5919, 999 5747, 951 2050 Note! As the illustrations in the information are used
Audi > B4 > Liter V6 2V Engine Mechanical, Engine Code(s): AAH, AFC 10 Engine Assembly
: AAH, AFC 10 Engine Assembly") Audi > B4 > 1993 1995 2.8 Liter V6 2V Engine Mechanical, Engine Code(s): AAH, AFC 10 Engine Assembly Removing The engine is removed from above, after being separated from the transmission. Note: All tie
Audi > B4 > 1993 1995 2.8 Liter V6 2V Engine Mechanical, Engine Code(s): AAH, AFC 10 Engine Assembly Removing The engine is removed from above, after being separated from the transmission. Note: All tie
Engine Cylinder Head Installation
 Engine Cylinder Head Installation Important: Install the cylinder head without the camshafts. 1. Install the engine cylinder head to the engine block. 2. Install the AIR pump bolt and fir tree fastener
Cooling system components, removing and installing
 Page 1 of 40 19-1 Cooling system components, removing and installing WARNING! The cooling system is pressurized when the engine is warm. When opening the expansion tank, wear gloves and other appropriate
1995 Mitsubishi Montero LS. Ensure timing marks are aligned. Mark timing belt direction of rotation.
 TIMING BELT NOTE: Ensure timing marks are aligned. Mark timing belt direction of rotation. Removal 1. Disconnect negative battery cable. Drain engine coolant. Remove engine coolant reservoir tank, fan
2/18/2017 Cylinder Head Assembly Service and Repair, Removal and Replacement: Cylinder Head
 Cylinder Head http://repair.alldata.com/alldata/article/display.action?componentid=65&itypeid=401&nonstandardid=2762152&vehicleid=47645&miles=&printfriendl 1/17 RH Splash Shield Accessory Drive Belt, Thermostat
DISASSEMBLY Procedure revision date: 11/22/2001
 Page 1 of 31 Evan Groenke From: Daniel Lelovic [dlelovic@rogers.com] Sent: May 8, 2005 12:06 PM To: 'Evan Groenke' Subject: 2.5 L Engine Disassembly SECTION 303-01B: Engine 2.5L 2000 Contour/Mystique Workshop
Timing Belt: Service and Repair Timing Belt Replacement
 2003 Saturn Truck VUE V6-3.0L VIN B Copyright 2007, ALLDATA 9.50 Page 1 Timing Belt: Service and Repair Timing Belt Replacement Removal Procedure 1. Remove the front timing belt cover. 2. Rotate the crankshaft
 Page 1 of 8 2005 Volvo S40 2.4L Eng Base TIMING BELT REPLACEMENT - 2.4L & 2.5L TURBO, 5-CYLINDER REMOVAL & INSTALLATION CAUTION: This application is an interference engine. Do not rotate camshaft or crankshaft
Motronic ignition system, servicing
 Page 1 of 25 28-2 Motronic ignition system, servicing Note: Motronic Engine Control Module (ECM) J220* with connector page 24-9, item 16. 1 - Highvoltage ignition cable Ignition secondary circuit Check
The following tools will be required to perform this new service procedure outlined in this bulletin:
 The following new service information outlined in this bulletin will aid technicians in removal and installation of the cylinder head without the removal of the front engine cover. The new service procedure
REMOVAL & INSTALLATION
 REMOVAL & INSTALLATION TIMING BELT Removal 1. Disconnect negative battery cable. On Millenia, raise and support vehicle. Remove right front wheel. Remove lower engine covers. 2. On all models, remove accessory
Repair Manual 11/99 PS-34. Page 1
 Repair Manual /99 PS-4 Page Table of contents Index Technical Data page Special tools 4 Repair instructions, general 0 Chain brake 6 0 Centrifugal clutch 8 0 Oil pump 9-04 Ignition system - 0 Starting
Service and Repair REPLACING TIMING BELT/IDLER PULLEY/BELT TENSIONER. Special Tools:
 1 of 9 6/18/2008 8:48 AM Home Account Contact ALLDATA Log Out Help Select Vehicle New TSBs Technician's Reference Component Search: METRO TOYOTA OK 1999 Volvo V70 XC AWD L5-2.4L Turbo VIN 56 B5254T Vehicle
DrVanos.com Stage II Installation Instructions. Tool rental is available with the purchase of a vanos kit *See website for more info*
 DrVanos.com Stage II Installation Instructions Special Tools Needed: Camshaft locking tool TDC Crank pin Sprocket turning tool Tool rental is available with the purchase of a vanos kit *See website for