Open Loads. Brian Pickering
|
|
|
- Charles Sanders
- 5 years ago
- Views:
Transcription
1 Open Loads Brian Pickering
2 What/Why
3 First, why cover up loads? Can be damaged: Weather Graffiti Can be stolen: High value, like automobiles Convenience Palletized cargo Bulk cargo
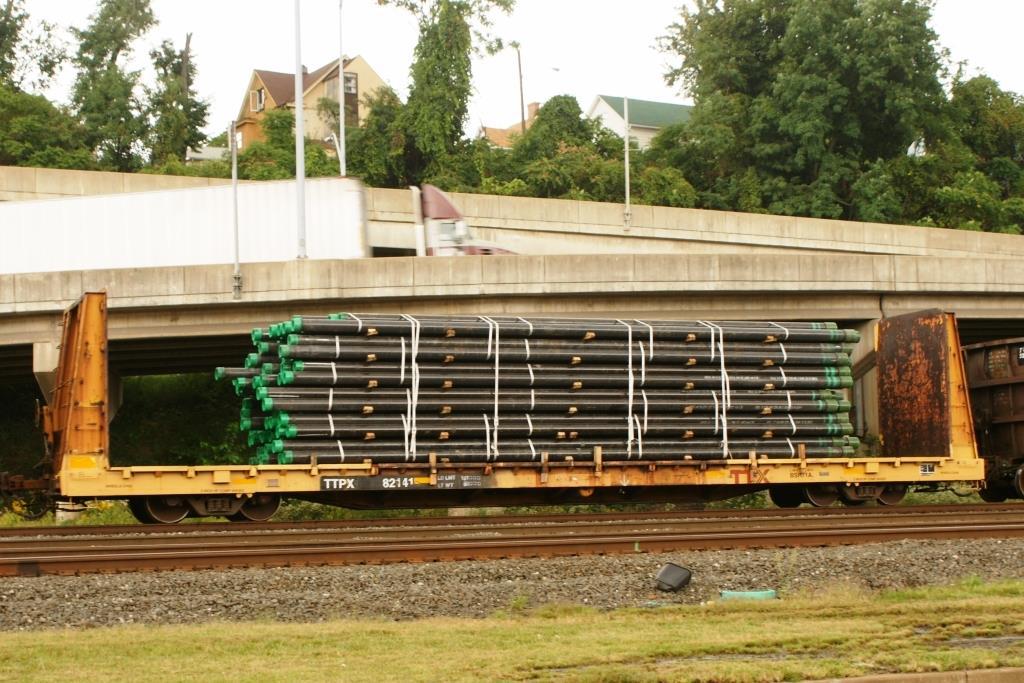
4 So, conversely, what kinds of loads shipped in the open? Minerals/Raw materials Ore Coal Scrap metals Wood (logs, pulpwood, or chips) Components Wrapped wood products Structural components I-Beams, Girders, Pipes, Plate metal Manufactured Goods Vehicles (somewhat era-dependent*) Industrial equipment
5 Exceptions to every rule Susceptible to weather can be overruled Too big or awkward Generators or transformers Machinery Weather-proofing Wrap the whole thing in tarps Seal critical areas, often in industrial shrink-wrap BNSF will likely end up spraying a sealant on coal loads travelling through the Columbia River Basin to prevent coal dust pollution
6 Types

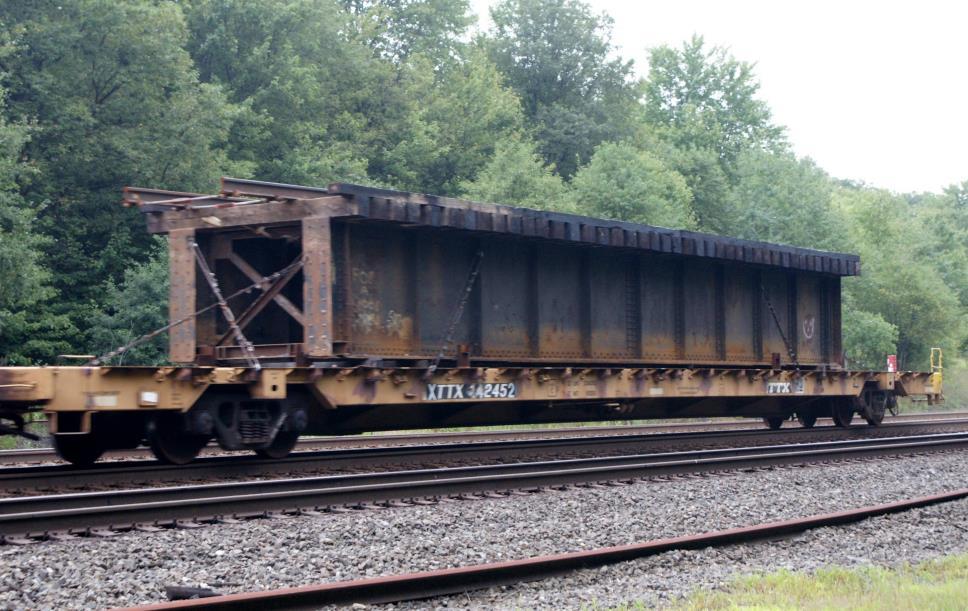

7 Flatcar Stereotypical Open Loads


8 Bulkhead and Center-Beam Flatcars

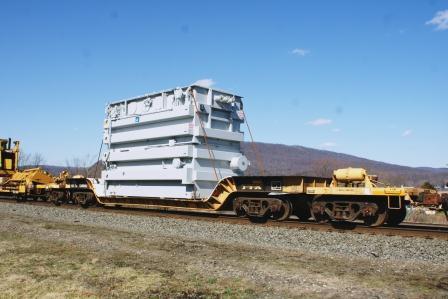

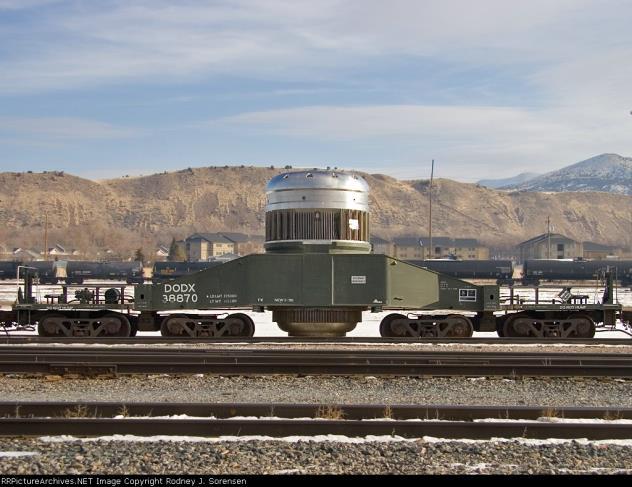
9 Unusual Flat Cars Depressed-Center Open-Center
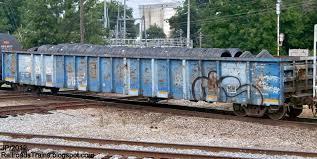


10 Gondolas

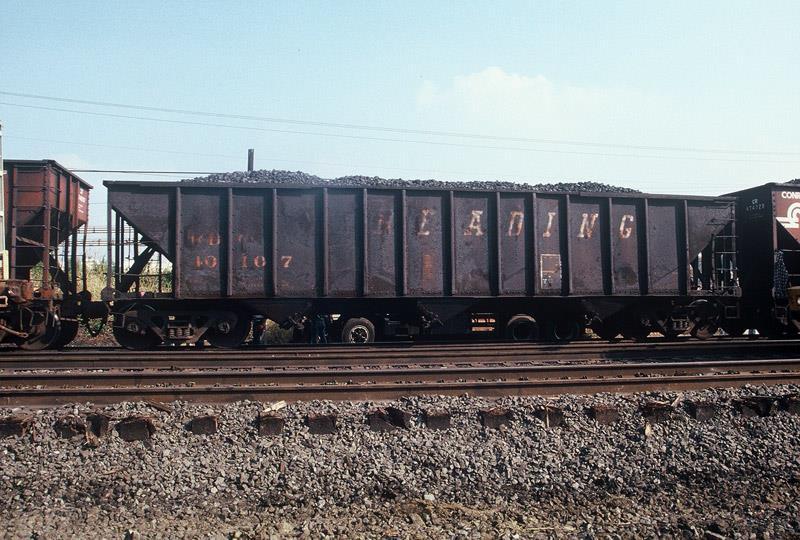

11 Hoppers
12 Implementation
13 Details to remember Dunnage: Blocking Prevents movement (such as, ahead/behind wheels) Allows for mechanization (forklift blades) Tie-downs Chains Ropes Built-in strapping Weather-proofing Disassembly Some items may be partially disassembled to improve clearances
14 Show & Tell Me first. Three cars were supplied with loads for this presentation: 1. Coal gondola 2. Center beam flatcar 3. Ordinary flatcar


15 Coal Gondola ExactRail s FMC 4000 Gondola, in UP Prototype D&RGW shown note that unlike older coal hoppers, modern flood loaders load a relatively even pattern the full length of the car, only angling down at either end (this car appears to have a partial load, for some reason ) Weathered base car with Bragdon Soot weathering powder, followed by flat acrylic spray to seal. Painted faces of wheels Model Master Earth Red acrylic.

16 Coal Gondola 1. The wheels of the car had their faces painted with Model Master Earth Red acrylic, using a small, stiff brush. 2. The car was weathered using Bragdon s weathering powders, then sealed with a flat acrylic coat. 3. Using a serrated kitchen knife, cut a piece of high-density foam insulation to dimensions: 25mm (h) x 31mm (w) x 163mm (l), dimensions measured to fit the gondola. 4. Vacuum up the foam 5. Using a Stanley Surform, round the ends and sides to the characteristic pattern 6. Vacuum up the foam.

17 Coal Gondola 7. Paint surfaces black, at least top and sides. Exact color doesn t matter (this is Badger ModelFlex Engine Black), so long as it is foam compatible. The point is to color this something vaguely coal-like instead of pink foam. 8. Paint on a layer of white glue, then hold over a box to catch extra, and sprinkle on coal. 9. If the load will sit too low in the gondola (pictures seem to show the top of the mound just peeking over the edge), use small scrap pieces of foam or wood to shim to the correct height. 10. To remove, a thin wire, bent 90 o at the end, can be slid down the side to pull up. 11. Attach weights to the bottom, to bring car to proper NMRA-recommended weight.

18 Center-Beam Flatcar One thing I wanted was multiple lengths on one flat, unlike manufactured loads Found an image of a centerbeam flatcar with a relativelylegible name on the load; could this be Riverside Lumber of Snohomish, WA? This is from their website: looks ok!
19 Center-Beam Flatcar I used a procedure based heavily upon the site: Two of the things that attracted me to this technique: It allowed me to consider modeling the irregular load shown in the previous image, where the car isn t completely full. The typical loads you find premade don t allow this. It also gives noticeable gaps between layers of the loads; again, the typical single-piece loads don t allow this.
20 Center-Beam Flatcar The Exact-Rail car is a 63 car, as opposed to the Walthers and Atlas models 72 I chose to have my loads as rows of 2x4 8, 12 and 16. This leaves a little room at ends and between loads. To fit in the space, I used different size/number of bundles. Note that the sides should be at least close to identical in weight I ve seen when even two or three more bundles were removed from one side of the car than the other, and the workers were worried that the car could tip over (to the point of running a forklift to the opposite side to push the car back while another unloaded bundles to re-balance).

21 Center-Beam Flatcar I created wraps in Paint.NET. They were printed by a color printer on ordinary printer paper, then carefully cut out. Blocks were cut to scale 4 width and 2 height on the table saw, then to length with a miter box and razor saw:

22 Center Beam Flatcar 1. The blocks were wrapped and glued with white glue. 2. After dry, 1/32 chart tape was wrapped around, and secured with a drop of superglue. Note: I m not entirely satisfied with either this solution, or the previouslymentioned website: the drops were sometimes huge, while the tape the website suggests would seem likely to fall off after time. 3. Finally, scale 4 long 2x4s, cut on a NWSL Chopper, were glued in place with white glue. Note that I deliberately made spacings somewhat variable. This was my observation from my uncle s lumber company- nothing was exactly centered.


23 Center Beam Flatcar 1. The car was weathered using Weathered Brown Bragdon s weathering powder and a stiff brush to scrub the dust in. This was followed by Aleene s matte-finish acrylic sealer from a can. 2. #74 holes were drilled in the top of the car. There are indentations in each rib to guide this pieces of black thread were inserted into each hole, and a drop of thin superglue applied to hold them in place. 4. The bundles were glued in place using thick superglue. The first layer does not have 2x4 dunnage underneath, as the car has this built in. 5. The threads were led across the bundles, passed through the winch details, and a drop of thin superglue was applied to hold them. 6. The wheelsets outer faces were painted with a Model Master Earth Red acrylic paint using a small, stiff brush.
24 Flatcar This diagram, along with the description of blocking, was taken from US Army Technical Manual , 31 May 1978 Available from Amazon.com for the Kindle At right is Location 3766 in TM , which discusses the blocking and tiedowns for a six-wheel motor grader. The car chosen is an old Roundhouse flatcar. The load is a Norscot Cat 160H motor grader. The prototype weighs in a 34,560 pounds, so falls into the category described.
25 Flatcar The car was molded in a single piece of yellow plastic, including the wood floor. 1. The floor was brush-painted with Model Master Neutral Gray. I deliberately didn t try for full coverage to allow a little yellow to show through, I felt this gave a little bit of a wood tone. 2. This was followed by an alcohol/india ink wash. 3. This was then followed by Bragdon weathering powders, and sealed with the flat acrylic spray. 4. I ll detail blocking on the next page; the blocking was glued to the flatcar with gap-filling superglue. 5. A pencil was used to mark nail-heads 6. Eventually, A-Line chain will be used to hold the grader in place. (Ran out of time! See model in morning clinic!)
26 Flatcar The various blocking pieces were cut from Kappler wood: Block B, 4x10, cut 10" long (straight cut) using Chopper. Dimensions approximatescan not very good in book. Held in a tweezers, and sanded angle. 6 cut Block C, main piece: 8x10, cut to 26" first (straight cut), then in half on 45o cut, both using a NWSL Chopper. 16 cut Block C, face: 4x8, cut 14" long using Chopper. 16 cut Block D calls for 1x6 (which I didn t have), instead I used Kappler 2x8, cut 24" long using Chopper. 2 cut The two pieces of Block C were glued together with white glue, then set aside to dry. At right is Location 4670 in TM , showing assorted forms of blocking.
Scratchbuilding an F25 Well Flat Car
 Scratchbuilding an F25 Well Flat Car By David J. Vinci (Flat Figure 1) Well flats are a pretty rare car type generally, but the Pennsy seems to have had the lion s share of variety. Most of these cars
Revision Date: Building a dual pump system for an open boat. Description:
 Disclaimer: The information is provided as-is. The author(s) accepts no liability for the accuracy, availability, suitability, reliability and usability. The following information is in the public domain
Unusual Prototypes and Core Kits. How to build that model that just isn t available in Plastic!
 Unusual Prototypes and Core Kits How to build that model that just isn t available in Plastic! BP1 Why do manufacturers choose their prototypes? Popularity numerous The Standard Railroad of The World UP
SunFlower Helicopter Rocket LUNAR Build Session: 9/25/08 By Tom Desmarais
 SunFlower Helicopter Rocket LUNAR Build Session: 9/25/08 By Tom Desmarais Contents of Kit: A. 3 1/16 x1 x11 basswood rotors B. 3 1/16 x2 x2 basswood fins C. 3 1/16 x5/16 x1/2 basswood hold spacer D. 3
This is a hobby website dedicated to the Kawasaki KLR650 motorcycle. I make no claim concerning the
 KLR650 Homepage Contact Me You must remove the "REMOVE-THIS" in my email address for it to work. This is a hobby website dedicated to the Kawasaki KLR650 motorcycle. I make no claim concerning the accuracy
Dry Creek Models Historic Designs for California Railroads
 Dry Creek Models Historic Designs for California Railroads SP W-50-3 Hart Convertible Gondola Modified, 1926 and later Model 102: Open hopper doors. Model 103: Closed hopper doors. Contents: freight car
Scratchbuilding a Class Fk Flat Car
 Scratchbuilding a Class Fk Flat Car The Class Fk flat car is apparently the last all wood flat car design adopted by the Pennsylvania. The design dates to 1898 and it appears to be the last all wooden
Stirling Engine. What to Learn: A Stirling engine shows us how energy is converted and used to do work for us. Materials
 Stirling Engine Overview: The Stirling heat engine is very different from the engine in your car. When Robert Stirling invented the first Stirling engine in 1816, he thought it would be much more efficient
instructions 1:48 O-SCALE THROUGH PLATE GIRDER BRIDGE IN DURANGO CO 2017 John Palecki Structures rev 1.1
 instructions 1:48 O-SCALE THROUGH PLATE GIRDER BRIDGE IN DURANGO CO 2017 John Palecki Structures rev 1.1 CONGRATULATIONS ON YOUR BRIDGE PURCHASE! YOU ARE about to assemble a 1:48 O scale model kit of a
The 234/5 (?) Is this the missing link of German armored cars? Model by Tom Kondziolka Photos by Bill Tanguay & Tom Kondziolka
 Is this the missing link of German armored cars? Model by Tom Kondziolka Photos by Bill Tanguay & Tom Kondziolka") The 234/5 (?) Is this the missing link of German armored cars? Model by Tom Kondziolka Photos by Bill Tanguay & Tom Kondziolka THE HISTORY I have always been fascinated by unusual vehicles designed by
The 234/5 (?) Is this the missing link of German armored cars? Model by Tom Kondziolka Photos by Bill Tanguay & Tom Kondziolka THE HISTORY I have always been fascinated by unusual vehicles designed by
The Body Slinger
 http://www.scaryguys.com/slinger.htm The Body Slinger The body slinger is a nifty animation that looks like a benign corpse in a coffin until its triggered, then leaps almost straight up over your head!
TONY S TECH REPORT. Basic Training
 TONY S TECH REPORT (Great Articles! Collect Them All! Trade them with your friends!) Basic Training OK YOU MAGGOTS!! Line up, shut up, and listen good. I don t want any of you gettin killed because you
Subaru SVX 1/43 Scale Model Assembly Instructions
 Subaru SVX 1/43 Scale Model Assembly Instructions Congratulations on your purchase of an unassembled 1/43 scale Subaru SVX! You now own a model that is even more rare than the car it represents. Currently
The September, 1997 issue of Railroad Model Craftsman has an excellent article on these cars.
 TTX 60 flat cars The prototypes Pre-Size Model Specialties TTX is best known for it s fleets of intermodal and auto rack cars. The company started building a fleet of 60 flat cars in 1964. They purchased
 Solid State Ignition Replacement May 15, 2005 Introduction: There are two Tecumseh Solid State Ignitions ( SSI ) configurations we are concerned with here: The one on the left I call SSI Under for short
Smart Opener Retrofit by Richard Bevan (bimmerfest riku2)
") Smart Opener Retrofit by Richard Bevan (bimmerfest riku2) Document history V 1.0 02.04.2015 Document created. Introduction This document tells how to retrofit the smart opener to a 2011 BMW 5 series (F10).
Smart Opener Retrofit by Richard Bevan (bimmerfest riku2) Document history V 1.0 02.04.2015 Document created. Introduction This document tells how to retrofit the smart opener to a 2011 BMW 5 series (F10).
These instructions show how to build the Remote Controlled Fart machine Sound Kit.
 Remote Controlled Fart Machine Assembly Instructions These instructions show how to build the Remote Controlled Fart machine Sound Kit. Tools Required Drill with 7/64, 3/16, and ¼ drill bits. Holt melt
Rostra Electronic Cruise Control Install On a Stratoliner or Roadliner
 Rostra Electronic Cruise Control Install On a Stratoliner or Roadliner MATERIALS LIST: 1 - Rostra Part # 250-1223 (www.brandondist.com/products/cruise1223.htm) 1 - Signal Splitter part # 250-4369 1 - Engagement
Train Time: Sight and Sounds Around Me
 Train Time: Sight and Sounds Around Me The train is coming. The wheels are red and white. The engine is releasing steam. The coupler is a metal piece that hooks the cars together. The air hose is beside
SkyHawk M1620 Satellite Modem. Installation and Setup Guide READ ME FIRST
 SkyHawk M1620 Satellite Modem Installation and Setup Guide READ ME FIRST 2 Location, Location, Location Installing a SkyHawk M1620 Satellite Modem is not the same as installing a satellite dish for television.
The Life of a Lifter, Part 2
 Basics Series: The Life of a Lifter, Part 2 -Greg McConiga Last time we looked at some complicated dynamics and compared flats to rollers. Now for the hands-on. 6 FEATURE This off-the-shelf hydraulic lifter
How to Make Realistic Roads & Parking Lots
 How to Make Realistic Roads & Parking Lots Presented by Jeffrey Jarr Using Lightweight Spackling! Tools & Materials: Roads & Highways Red Devil Onetime Lightweight Spackling 3M All Purpose Sanding Sponge
Renault A442A Conversion By Evan Jones Table of Contents. Introduction:... 2 Frame/Bodywork:... 2.
 Renault A442A Conversion By Evan Jones www.eajonesgue.com/scalemodels Table of Contents Introduction:... 2 Frame/Bodywork:... 2 Page 1 of 10 Introduction: I wanted to do a collection theme in 2008 of a
Installing AMP-wiring in a New Beetle
 Installing AMP-wiring in a New Beetle Vehicle used: New Beetle 2.0i Type 9C (1999) Used set of cables: Dietz 35mm² power cable, double shielded Dietz chinch cable ( 35mm² Professional Line ) First of all:
Dry Creek Models Historic Designs for California Railroads
 Dry Creek Models Historic Designs for California Railroads SP W-50-3 Hart Convertible Gondola As-Built, 1910-1926 and later Model 100: Open center doors. Model 101: Closed center doors. Contents: freight
Building a 3-D Printed Coach by Al Mueller
 Gerry Dykstra has created an antebellum/civil War era coach on the Shapeways web site. Gerry used Inventor software to design the car. His finished product, in my opinion, is a much more accurate rendition
Prerequisites: Shop Manual (recommended) pages 3-9 through 3-13.
 pages 3-9 through 3-13.") Prerequisites: Order your gaskets average about $25.00 bucks X 2 so $50.00 4NK-11193-00-00 Obtain a shim kit (Should have several 265 and 270s) (Some dealers will exchange) Obtain a Valve Bucket Tool YM-33961
Prerequisites: Order your gaskets average about $25.00 bucks X 2 so $50.00 4NK-11193-00-00 Obtain a shim kit (Should have several 265 and 270s) (Some dealers will exchange) Obtain a Valve Bucket Tool YM-33961
Hasegawa F-86 Sabre in 1/48 Scale by Mike Hanlon
 Hasegawa F-86 Sabre in 1/48 Scale by Mike Hanlon Introduced in 1996, the Hasegawa F-86 was released in two versions, the F-86F-30 and 40. Priced at $40 when released, subsequent releases have ranged from
Connecting the rear fog light on the A4 Jetta, while keeping the 5 Light Mod
 Connecting the rear fog light on the A4 Jetta, while keeping the 5 Light Mod DISCLAIMER: I'm human and make mistakes. If you spot one in this how to, tell me and I'll fix it This was done on my 99.5 Jetta.
Dexter Never-Adjust Brake Install
 Dexter Never-Adjust Brake Install Arctic Fox 2007 29-5T Warning: This involves lifting your trailer, working under and around it. If you do not have the correct equipment and knowledge for this, please
Simple Free-Energy Devices
 Simple Free-Energy Devices There is nothing magic about free-energy and by free-energy I mean something which produces output energy without the need for using a fuel which you have to buy. Chapter 5:
Installation Directions for FINGER STICK and Blocker Plate
 Installation Directions for FINGER STICK and Blocker Plate What is a Finger Stick? A Finger Stick is a simple circuit that modifies the MAF signal on LLY and LBZ engines (not LB7 engines) to expected levels
Kevin O Neill. Kevin O Neill 2008
 By Kevin O Neill Kevin O Neill 2008 Rules:...2 Inspection Checklist:... 3 Simple Steps:... 4 Who Am I... 8 Design Templates:... 9 The pinewood derby is the pinnacle of most scouts year however the derby
WARNING These following pages are instruction for C5 CE stripes; however, it is the same method applying vinyl. Please spend time to read thru these
 WARNING These following pages are instruction for C5 CE stripes; however, it is the same method applying vinyl. Please spend time to read thru these pages. At the end, it is your C5/C6 ME stripes' instruction.
Now we re ready to install our new mounts. The picture on the right shows our old and new for comparison.
 Well I didn t have a chance to write last week so we have a little catching up to do. Last Sunday I started out with setting up a jig to weld in the mounts. The jig is made out of a old fork tube that
S1 Sequential. T56 Magnum. Sequential shifter. Contents and assembly instructions
 S1 Sequential Sequential shifter T56 Magnum Contents and assembly instructions Parts List Sequential shifter x1 Base plate x1 Base spacer x1 Drill Square x1 Shaft fitting x1 Square washer x1 8mm Aluminium
Disco 3 Clock Spring / Rotary Coupler replacement
 Disco 3 Clock Spring / Rotary Coupler replacement I recently had to change my Clock spring and thought some folks may find it helpful to see what it entailed. I did lots of reading around but couldn t
Ignition Timing - Honda 180-Degree Twins
 Ignition Timing - Honda 180-Degree Twins First thing to do is make a quick test light - I used a 12 volt indicator bulb from a speedo. Test leads with alligator clips make hookup easy... The point plate
2001 V70 T5 ETM Removal and Cleaning Directions
 2001 V70 T5 ETM Removal and Cleaning Directions Howard Cheng howardc64@gmail.com 10/24/05 Version 1.4 Read this before you start I performed this ETM cleaning because I had gotten 2 reduced performance
Your Guide to Shipping Flatbed A STRIVE TRANSPORTATION BRIEF
 Your Guide to Shipping Flatbed A STRIVE TRANSPORTATION BRIEF IT S ALL IN THE DETAILS A lot of planning and thought goes into flatbed shipping - from load requirements like tarping and dunnage to the specific
Kodak 750H Carousel Projector Repair
 Kodak 750H Carousel Projector Repair An AT YOUR OWN RISK PROJECT by Klaus Wolter, Rev B, 3-26-2016 Here I documen the repair of my 750H carousel. A common problem with this projector, and all of the projectors
DCX2496 Linear Power Supply mod by
 DCX2496 Linear Power Supply mod by Construction Guide Linear Power Supply for the DCX2496 Introduction. One of my more rewarding modifications to the DCX2496 was the replacement of the stock I/O board
Scratchbuilding PRR Class FL Flat Cars By David J. Vinci
 Scratchbuilding PRR Class FL Flat Cars By David J. Vinci If you have been following the scratchbuilding freight car series I have been doing, you probably have noticed that most of the time
My project: A prototyping test bed complete with 3.3, 5, and 12 volt power supplied, measuring tools, and breadboard.
 If you are like me and most other hobbyist, you have a huge box of goodies, those little things that are just too cool looking to through away and fully intend to someday use them. Well I finally decided
Modeling Ideas and techniques, by Bob Rohwer What is the right DCC Decoder for my Locomotive?
 Modeling Ideas and techniques, by Bob Rohwer What is the right DCC Decoder for my Locomotive? I hear this question a lot. Fortunately there are a lot of resources to answer the question. The best I have
Installation Instructions
 Installation Instructions Jeep JK Unlimited (2007 Present) Mounting Bracket and Air Line System Kit for ARB On-Board Twin Air Compressor (CKMTA12) Made in the USA Kit Contents: 1 Bracket for ARB Compressor
Hasse Mods for the Ampeg J20 Guitar Amp
 Hasse Mods for the Ampeg J20 Guitar Amp The following is adapted from a post I put up on The Gear Page, in the Amp Techincal forum. It shows the mods I did to my Ampeg J20. Okay, here s my mods for this
Triumph Street Triple VSM Grip Heater Install
 Triumph Street Triple VSM Grip Heater Install Introduction: With winter fast approaching and with painful memories of last winter riding with the club it was time to do something about getting some grip
Gearbox Assembly 101. Introduction. Before Beginning. By Mark Schutzer 4/13/06
 Gearbox Assembly 101 By Mark Schutzer 4/13/06 Introduction If you are planning to re-motor an old brass locomotive you may want to upgrade to a new gearbox at the same time. The early 60 s and 70 s gearboxes
Improving the gearshift feel in an SW20.
 Improving the gearshift feel in an SW20. Part one In 3 parts. The SW20 gearshift can be often be greatly improved by eliminating play in the shift linkages, and this article covers three areas that need
Replacing stock Ducati relays with solid state type
 Replacing stock Ducati 748-916-996 relays with solid state type Ducati stock relays are basically just the ordinary automotive type in a waterproof housing. They suffer from wear & tear as they contain
Bottom Mount Seat Mount Installation & Wiring Instructions
 E81/E87/E90/E91/E92/F22/F30/F31/F32/F80/F82/F87 (and other cars with the same sliders) Bottom Mount Seat Mount Installation & Wiring Instructions These instructions assume a basic comfort with crimping
Marlon Xplore II / Xplore Pro II Deck Installation & Assembly Instructions
 Marlon Xplore II / Xplore Pro II Deck Installation & Assembly Instructions Marlon Recreational Products www.marlonproducts.com 1-800-663-7367 INSTALLATION INSTRUCTIONS: 1. Remove the ramp from underneath
Stephenson's Valve Gear: 7mm cast white-metal kit 19 th Century swing-link version - non-working, cosmetic only. Instructions
 SER-Kits Stephenson's Valve Gear: 7mm cast white-metal kit 19 th Century swing-link version - non-working, cosmetic only Page 1 of 5 Instructions HEALTH & SAFETY: The castings contain some lead. Dispose
Bachmann Digital Sound Decoder Installation Notes
 New Dimensions in Digital Sound Technology TM APPLICATION NOTE Bachmann 2-6-6-2 Digital Sound Decoder Installation Notes Overview This application note describes the installation of a DSD-090LC Digital
Trouble Shooting Guide for Hubbell Systems
 Trouble Shooting Guide for Hubbell Systems NOTE: Hubbell Special Products discontinued operations in 2008, so there is a very limited number of repair parts available for motor repair. In some ways, this
MGB V8 Roadster restoration project Report 138
 24th May 2017. FITTING THE CARPETS - continued I have included quite a lot of detail and photographs on the carpet and trim fitting, as it may help those who decide to do this job on their own car. The
Turbinator-2 Build Manual
 Turbinator-2 Build Manual Thank you for your purchase of the Turbinator-2 sport jet by Boomerang RC Jets. This RC Jet IS NOT A TOY and should only be flown and operated by experienced RC Turbine Pilots.
Side Mount Installation & Wiring Instructions
 E81/E87/E90/E91/E92/F22/F30/F31/F32/F80/F82/F87 (and other cars with the same sliders) Side Mount Installation & Wiring Instructions These instructions assume a basic comfort with crimping and/or soldering.
Lesson Plan: Electricity and Magnetism (~100 minutes)
") Lesson Plan: Electricity and Magnetism (~100 minutes) Concepts 1. Electricity and magnetism are fundamentally related. 2. Just as electric charge produced an electric field, electric current produces a
Lesson Plan: Electricity and Magnetism (~100 minutes) Concepts 1. Electricity and magnetism are fundamentally related. 2. Just as electric charge produced an electric field, electric current produces a
Additional Instructions for 6" Drop
 Serving the Truck & Trailer Industry Since 1944 Additional Instructions for 6" Drop Attention Dealers: Please give this manual to the customer when product is delivered. Call 800-535-9545 www.aeroindustries.com
I64 I65. Indian 741B. suitable rod, pen, pencil with flat end or so. PE wiring. Front wheel
 Indian 741B Indian motorcycles were manufactured from 1901 to 1953 by a company in Springfield, Massachusetts, USA. Indian's most popular models were the Scout, made from 1920 to 1946, and the Chief, made
How to Repair an Apple AC Adapter Broken
 How to Repair an Apple AC Adapter Broken Cable Learn how to repair a damaged AC Adapter cable. Written By: Angela Penaherrera ifixit CC BY-NC-SA www.ifixit.com Page 1 of 11 INTRODUCTION Sometimes the cable
Walthers/Life-Like USRA Steam Locomotive
 North Raleigh Model Railroad Club Installing Decoders in N Scale Locomotives Detailed Instructions Walthers/Life-Like USRA 2-8-8-2 Steam Locomotive by David Derway May 17, 2010 Table of Contents Introduction...
76 Tips to Help You Build a Fast Pinewood Derby Car From
 76 Tips to Help You Build a Fast Pinewood Derby Car From www.abc-pinewood-derby.com Weights Weights should be added to the back of the car for the most speed so keep this in mind when designing your car's
RAMPAGE POWER LIFT RAMP
 RAMPAGE POWER LIFT RAMP INSTALLATION AND OPERATING INSTRUCTIONS (3/10/07) The Rampage Power Lift Ramp is the fast, easy, and safe way to load a motorcycle into a truck. One person can load or unload a
RoR Step-by-Step Review Tijuana Taxi Revell 1:24 Kit Review
 RoR Step-by-Step Review 20100424 Tijuana Taxi Revell 1:24 Kit 85-4261 Review A Tom Daniel classic, the Tijuana Taxi, has been reissued by Revell in kit #85-4261 under the Monogram label. This 1/24 scale
Restoring the Strategic Air & Space Museum s E-4B Model
 Restoring the Strategic Air & Space Museum s E-4B Model By Don Joy IPMS Fort Crook I received a request from the SASM (Strategic Air and Space Museum) to do a restoration of the model. They had a member
Installation Instructions for the Plug & Play Chrysler/Dodge/Jeep Remote Start Package w/mux T5
 v1.01 12/14/2102 Installation Instructions for the Plug & Play Chrysler/Dodge/Jeep Remote Start Package w/mux T5 Review the remote start installation manual for safety instructions! Overview Your kit consists
June 23, 2014 Page 1
 My engine looks pretty clean but this fuel pump and fuel control assembly looked really nasty. I decided to partially tear them down and clean them up. This is what the asssembly looked like to begin with.
Gun Port Patterns (Part 1 of 2)
") Gun Port Patterns (Part 1 of 2) IMPORTANT: - For modeller's who have had no previous experience with the building of this type of vessel, please read the authors observations on 'Page 26' Authors Note:
Gun Port Patterns (Part 1 of 2) IMPORTANT: - For modeller's who have had no previous experience with the building of this type of vessel, please read the authors observations on 'Page 26' Authors Note:
Imagine not being able to use anything that plugs into an electrical socket.
 Physics 1003 Electromagnetism (Read objectives on screen.) (boy thinking on screen) Imagine your everyday life without talking on the telephone or watching TV. or listening to a radio or playing a CD.
Hood stripes Tools needed from AutoZone or any auto parts store: bottle spray, squeegee, a towel that you re using to clean you car up after washing,
 WARNING These following pages are instruction for C5 CE stripes; however, it is the same method applying vinyl. Please spend time to read thru these pages. At the end, it is your C5 GS1 stripes instruction.
CONCEPT MODELS WESTINGHOUSE SCHNABEL CAR 102/ Sheep Ranch Rd. Mountain Ranch, CA 95246
 CONCEPT MODELS http://www.con-sys.com//index.htm email:concept_models@con-sys.com 8331 Sheep Ranch Rd. Mountain Ranch, CA 95246 WESTINGHOUSE SCHNABEL CAR 102/301 2 CONCEPT MODELS Foreword As our name implies
Chapter 7: DC Motors and Transmissions. 7.1: Basic Definitions and Concepts
 Chapter 7: DC Motors and Transmissions Electric motors are one of the most common types of actuators found in robotics. Using them effectively will allow your robot to take action based on the direction
Converting an A to 12v and Adding Turn Signals Bill Lee
 Converting an A to 12v and Adding Turn Signals Bill Lee Bill@WRLee.com When I bought my 1929 Tudor, it had been restored about 20 years earlier. It had halogens and had been converted to 12v negative ground,
Chopper Couplings. Assembly. Fitting
 Chopper Couplings Unlike most model chopper couplings, these will work with two opposing hooks, which looks so much better and allows you to turn stock at will. They are still compatible with most other
Setting The Sag. We ve gathered up a few tutorials on setting the sag. Read them over and decide which one makes the most sense to you.
 Setting The Sag Setting the sag on your bike is the first step in correctly adjusting your suspension. We here at MotorPsycle.com want you to have a safe, great-handling bike. A suspension set up too hard
 www.odometergears.com Mercedes-Benz Mechanical Odometer Repair This how to can be used for all mechanical repairs as the only difference will be the removal of the instrument cluster. http://www.dieselgiant.com/repairyourodometer.htm
Install: Part A. First things first: Running the wiring for the Neo-Pod
 Install: Part A First things first: Running the wiring for the Neo-Pod These instructions follow installation of #31649KL Neo-Pod (the fully loaded version with amp, sub, etc.) in a factory Wrangler sound
10 Critical Paint Meter Mistakes That Cost Unsuspecting Car Dealers A Fortune
 10 Critical Paint Meter Mistakes That Cost Unsuspecting Car Dealers A Fortune What You Learn In This Report Can Add $1,000's Of Additional Profit To Your Bottom Line...Every Month And Help You Avoid Disastrous
2010 Toyota Prius model II Head Unit Upgrade
 2010 Toyota Prius model II Head Unit Upgrade Monday, December 21, 2009 Disclaimer: Use this document and its contents at your own risk. Forward: Huge thanks to those members on Priuschat.com that forged
13 October, 2014 Page 1
 13 October, 2014 In my second and last Helicycle I want to make everything better than the first one. That includes not only a transmission chip detector, but one for the tail rotor as well. The transmission
How I installed new brake pads on my i with Sport Package (should be fine for other E39 s) By Robert B.
 By Robert B.") How I installed new brake pads on my 1999 528i with Sport Package (should be fine for other E39 s) How I installed new brake pads on my 1999 528i with Sport Package (should be fine for other E39 s) By
How I installed new brake pads on my 1999 528i with Sport Package (should be fine for other E39 s) How I installed new brake pads on my 1999 528i with Sport Package (should be fine for other E39 s) By
Fast Master Products, Inc. P.O. Box 654, Katy Texas Tel: (281) Fax: (281)
 Fax: (281)") Fast Master Products, Inc. P.O. Box 654, Katy Texas 77492-0654 Tel: (281) 391-6750 Fax: (281) 391-6760 Email: info@cruiserlift.com Easy installation and removal from the pick-up bed. Compatible with all
Fast Master Products, Inc. P.O. Box 654, Katy Texas 77492-0654 Tel: (281) 391-6750 Fax: (281) 391-6760 Email: info@cruiserlift.com Easy installation and removal from the pick-up bed. Compatible with all
LEGO Ferrari F40 (10248) Lighting Kit Installation Instructions
 Lighting Kit Installation Instructions") LEGO Ferrari F40 (10248) Lighting Kit Installation Instructions This guide walks you through the steps to install the Brickstuff lighting kit for the LEGO Ferrari F40 (LEGO set #10248). Written By: Rob
LEGO Ferrari F40 (10248) Lighting Kit Installation Instructions This guide walks you through the steps to install the Brickstuff lighting kit for the LEGO Ferrari F40 (LEGO set #10248). Written By: Rob
TRIUMPH ST ROSTRA ELECTORNIC CRUISE CONTROL
 TRIUMPH ST 1050 - ROSTRA ELECTORNIC CRUISE CONTROL There have been a number of threads discussing the pros and cons of electronic vs throttle lock cruise controls. Living in Texas can require some long
Raxiom Factory GPS Rear Back-up Camera Kit (07-17 Wrangler)
") Raxiom Factory GPS Rear Back-up Camera Kit (07-17 Wrangler) Installation Time: 2.5-3Hrs Tools Required: 7mm Socket & Driver 10mm Socket 10mm Open end wrench Knife / Razor blade Zip-ties Wire Cutters Needle
Raxiom Factory GPS Rear Back-up Camera Kit (07-17 Wrangler) Installation Time: 2.5-3Hrs Tools Required: 7mm Socket & Driver 10mm Socket 10mm Open end wrench Knife / Razor blade Zip-ties Wire Cutters Needle
INSTALLATION INSTRUCTIONS
 Rear Vision System Tailgate Emblem Camera Aftermarket Display 2009-Current Ford F-150 and 2010-Current Super Duty (Kit part number 1008-6509) Kit Contents: Tailgate Emblem Mount with Camera Chassis Harness
Scratchbuilding PRR Class Gd, Gn and Gg Wooden Hoppers By David J. Vinci
 Scratchbuilding PRR Class Gd, Gn and Gg Wooden Hoppers By David J. Vinci During the first 25 years of the 20 th century, the rolling stock mixture on the Pennsy was really interesting to
2015 Cubmobile Derby Leaders Guide
 2015 Cubmobile Derby Leaders Guide If you've been to a Cubmobile race, you already know how much fun it is. If you haven't, ask someone who's been to one! Gravity-powered cars begin on a ramp and race
Fitting the Bell Auto Services (B-A-S) TDV6 EGR Blanking Kit to a 2006 model Discovery 3 TDV6 HSE
 TDV6 EGR Blanking Kit to a 2006 model Discovery 3 TDV6 HSE") Fitting the Bell Auto Services (B-A-S) TDV6 EGR Blanking Kit to a 2006 model Discovery 3 TDV6 HSE Before I describe how I did this, I must first thank other members of the Disco3.co.uk forum (namely J,moore
Fitting the Bell Auto Services (B-A-S) TDV6 EGR Blanking Kit to a 2006 model Discovery 3 TDV6 HSE Before I describe how I did this, I must first thank other members of the Disco3.co.uk forum (namely J,moore
Harley Davidson Ultra Fairing Install on a 2003 RoadStar by Bennie Scarbrough (Basshawk84)
") Harley Davidson Ultra Fairing Install on a 2003 RoadStar by Bennie Scarbrough (Basshawk84) There is probably a dozen different ways to go about mounting this fairing on the bike. This is just the way that
Harley Davidson Ultra Fairing Install on a 2003 RoadStar by Bennie Scarbrough (Basshawk84) There is probably a dozen different ways to go about mounting this fairing on the bike. This is just the way that
GM C10 Street Grip
 Part # 11365010/11365110-1973-1987 GM C10 StreetGrip Front Components 11369590 Delrin Control Arm Bushings 11369300 Drop Spindles 11362350/11362351 Front CoilSpring Kit 11369515 Front HQ Series Shocks
Door Panel Removal & Window Stop Adjustment
 Door Panel Removal & Window Stop Adjustment By: Jeff Wolford Disclaimer: This is simply an article of how I fixed my car. I m not responsible if you break, scratch, or mess up anything following my example.
Z1 Motorsports 370Z/G37 Oil Cooler Kit Installation Manual
 Z1 Motorsports 2877 Carrollton Villa Rica Hwy Carrollton GA 30116 770.838.7777 Z1 Motorsports 370Z/G37 Oil Cooler Kit Installation Manual For 19, 25 and 34 Row Oil Cooler Kits Parts Included: 1 SETRAB
ADDICTIVE DESERT DESIGNS
 Preparation: Disconnect the negative battery terminal. Park the vehicle on level ground and set the emergency brake. We recommend reading through the installation instructions in whole before performing
X-Type w/ non-premium sound amplifier installation instructions
 X-Type w/ non-premium sound amplifier installation instructions 1. Pull radio from dash (see Radio Removal Instructions ) 2. Disconnect wiring harness from back of radio by pushing in tab on plug and pulling
Charles Flynn s Permanent Magnet Motor.
 Charles Flynn s Permanent Magnet Motor. Patent US 5,455,474 dated 3rd October 1995 and shown in full in the Appendix, gives details of this interesting design. It says: This invention relates to a method
THE BATTERY CHARGER OF RON PUGH
 THE BATTERY CHARGER OF RON PUGH THANKS IS DUE TO RON PUGH WHO HAS KINDLY SHARED THE CONSTRUCTION DETAILS OF HIS VERY SUCCESSFUL BATTERY CHARGER WHICH IS COP=13 WHEN OPERATING AT 24 VOLTS. IF YOU DECIDE