Table top-mobile-power lift INSTRUCTIONS AND SPARE PARTS
|
|
|
- Toby Stephens
- 5 years ago
- Views:
Transcription


1 COMPACT DEPOSITOR Table top-mobile-power lift INSTRUCTIONS AND SPARE PARTS Translation from the Original Instructions Manual Part # CT-Ins-UK 12/08/2010 From serial number 8989
2 Table of Contents SAFETY INSTRUCTIONS AND WARNINGS...4 INTRODUCTION...5 CONTACTING UNIFILLER...5 MACHINE DESCRIPTION...6 COMPACT POWER LIFT...6 COMPACT MOBILE...7 COMPACT TABLE TOP...7 SERIAL NUMBER LOCATION...8 POWER REQUIREMENTS...9 AIR REQUIREMENTS...9 ASSEMBLY AND OPERATION...10 HOPPER SAFETY PLUG...10 DEPOSITING ACCESSORIES SET UP...11 PRIMING / PREPARING TO DEPOSIT...11 DEPOSIT SPEED CONTROL...12 VOLUME ADJUSTMENT...12 WORKING WITH THE DEPOSITOR...13 DISASSEMBLY FOR SANITIZING...14 GENERAL...14 CLEANING AND SANITIZING...16 CLEANING...16 SANITIZING...17 RE ASSEMBLY...17 MAINTENANCE...18 O RING CARE...19 DAILY...19 WEEKLY MONTHS...19 O RING AND GASKET PART NUMBERS...19 SPARE PARTS...20 PRODUCT CYLINDER SIZES...20 PARTS IDENTIFICATION...21 UNI BLOCK...21 RH SIDE CONNECTIONS...22 BASE COMPONENTS LH...22 BASE COMPONENTS RH...23 POWER LIFT LOWER FRAME...26 POWER LIFT UPPER FRAME...27 POWER LIFT UPPER FRAME (BOTTOM SECTION)...28 TABLE TOP FRAME...28 MOBILE FRAME...30 DEPOSITING WITH HOT PRODUCT...31 PNEUMATIC SCHEMATICS...32 TROUBLESHOOTING
3 PISTON RETURN SPEED CONTROL...35 CE MARK...36 SOUND LEVEL MEASUREMENT
4 Safety Instructions and Warnings These safety instructions must be read prior to operating, sanitizing or servicing the equipment. All machines have a risk of personal injury wherever moving parts are involved in their operation. UNIFILLER has taken all possible precautions to reduce and wherever possible eliminate the dangers associated with moving parts. Having all operators of this equipment read and abide by the instructions in this manual will further reduce the risk of personal injury. Turn air off and remove supply line from machine before attempting to clean, dismantle, or service the machine. Keep fingers and hands away from all mechanical moving parts including the hopper inlet and deposit nozzle outlet. Do not try to service the Air regulator / Water filter with the air supply line connected. For servicing or technical support please contact UNIFILLER directly or one of its authorized suppliers or dealers. Do not run product or water, with temperatures exceeding 140 deg F (60 Deg C), through the machine. For Product Temperatures that exceed 140 deg F (60 Deg C) up to 180 deg F (82 Deg C), please use HOT changeover parts on the machine. Operating Air pressure should not be adjusted to exceed 80 P.S.I. (551 kpa /5.52 Bar) on the Air regulator / Water filter pressure gauge. Always wash out the machine after use, dismantle and lubricate all the seals (As per cleaning instructions in this manual). Follow the enclosed instructions carefully before operating the machine for the first time, or maintenance. Before use ensure that the locks on the wheels are engaged. Unifiller Systems recommends the use of personal protection equipment approved by the safety regulators in the country of use. IMPORTANT: All stainless steel parts are coated with a protective coating at the factory and therefore any stainless steel parts that may come into contact with product must first be washed in hot water and detergent. 4
5 Introduction Thank you for purchasing Unifiller Equipment. We are sure you will get years of trouble free use and excellent productivity from your new investment. Please take a few minutes to read this manual and familiarize yourself with the layout of the controls, and the set up and operating procedure. If you have any questions regarding the setting up, or operation of your equipment please contact us. Contacting Unifiller Manufacturer Unifiller Systems Incorporated, 7621 Macdonald Road Delta, B.C. V4G 1N3 Telephone Main: Toll Free: Fax : parts@unifiller.com OR Contact your local authorized Unifiller dealer. Please see our website for dealer contact Please remember to supply your company name, telephone number, and a contact name when ordering parts. EU Contact Barclay Phelps, Atlantic House, High Road Wood Green London N22 8HH 5

6 Machine Description The Compact is an air operated positive displacement depositor. Intended uses Batter for cakes, muffins, etc Fruit fillings Icings, frostings and toppings Jams and jellies Creams, custards and mousse Anything that can be squeezed through a pastry bag Non intended uses Dry goods Large chunks Liquids Stiff non settling products Compact Power Lift # Description 1 Up / Down Control Valve 2 Air Connection 3 Volume Adjustment 4 Deposit Speed Control 5 Air Regulator / Filter 6 On / Off Adjust Switch 7 Product Cylinder 8 Table Lock 9 Work Table 10 Hopper Safety 11 UNI Block Air Cylinder 12 UNI Block Gallon / 52 Lt Hopper 6


7 Compact Mobile # Description 1 Air Regulator / Filter 2 Air Connection 3 Deposit Speed Control 4 On / Off Adjust switch 5 Table Lock 6 Hopper Safety 7 Product Cylinder 8 Work Table 9 UNI Block Air Cylinder 10 UNI Block Gallon / 52 Lt Hopper 12 Volume Adjustment 13 Depositor Height Adjustment Clamp (not shown) Compact Table Top # Description 1 Air Regulator / Filter 2 Air connection 3 Deposit Speed Control 4 Volume Adjustment 5 On / Off Adjust Switch 6 Hopper Safety 7 Table Lock 8 Work Table 9 UNI Block Air Cylinder 10 UNI Block Gallon / 52 Lt Hopper 12 Product Cylinder 7

8 Serial Number location Quote this number when ordering spare parts. It is located as shown, stamped into the side of the base.. 8
 Set the air pressure gauge on the machine to 80 P.S.I. (6 Bar).")

9 l Power Requirements Air Requirements Important: It is recommended that the compressed air supplied to the depositor be run through an air dryer before connecting to the machine. Please contact Unifiller for details. Use an airline with a minimum inside diameter of 3/8 (10mm) Set the air pressure gauge on the machine to 80 P.S.I. (6 Bar). Connect your supply air hose that comes from your compressor (not supplied) to the quick connector (1) which is located as follows: Power lift - On the main upright of the frame on. Mobile - On the Air pressure regulator for the. Table top - At the end of the air line from the Air regulator. Set the air pressure gauge on the machine to 80 P.S.I. (6 Bar) by pulling up the knob (1), adjusting the air pressure, and then pushing the knob down to lock it. 9

.")
10 Assembly and operation NOTE: Before filling the hopper, ensure the machine is assembled correctly with seals in place, and that the correct depositing outlet attachment is fitted and all clamps are tightened. Hopper Safety Plug Some versions of the Compact may not have the hopper safety plug feature. If installed the machine will not operate until the Hopper Safety plug (1) is connected to the quick disconnect on the side of the base. Warning: Compact Power Lift only. To avoid possible tipping of the machine, keep the area under the work table clear. To raise the machine, move and hold the Black lever in the up position(1). The machine will stop if the lever is released. To lower the machine, move and hold the lever in the down position (2). The machine will stop if the lever is released. 10
 if fitted.")
, fill the hopper.")
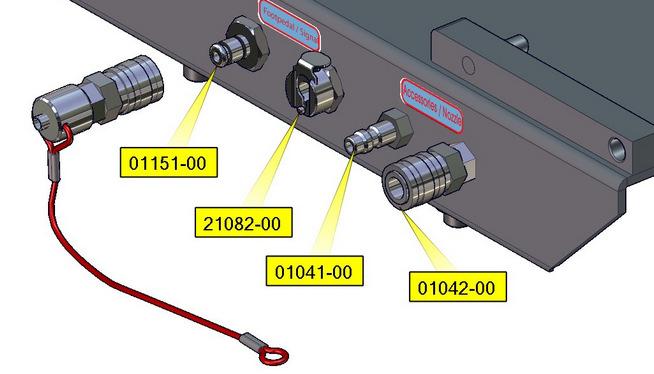
11 Depositing Accessories set up The Depositing Nozzle and the foot pedal airlines are connected to the ports located on the side of the base If using a Hand held nozzle, the four lines will connect to the foot pedal port and accessories port. Remove the cap (5) if fitted. # Description 1 and 2 Foot pedal or external signal connection 3 and 4 Nozzle / Accessory connection 5 Cap If the foot pedal is being used with an attachment that does not have an Air cylinder i.e. (injection needles) connect the cap (5) on to the male fitting (3) of the accessories quick disconnects to prevent air loss. Priming / Preparing to Deposit After sanitizing (See sanitizing section), fill the hopper. Connect the depositing attachment and or foot pedal to the machine using the appropriate clamps and quick disconnects. Connect the air supply. Depress foot pedal or hand held nozzle trigger until product flows from outlet. 11


12 Deposit Speed Control The deposit speed (1) controls the speed at which the product is placed into the target area. Turn clockwise = decrease deposit speed Turn counter clockwise = increase deposit speed Important: If a deposit speed adjustment is made after the volume has been set, the volume may change slightly, so be sure to re-adjust the deposit volume if required. Volume Adjustment Press the pedal or trigger on the hand held nozzle once and 1 measured amount will be deposited. For continuous deposits press and hold. Run the machine 2 or 3 cycles, check the weight of the last deposit. Adjust size of deposit by turning the switch on the side to OFF / ADJUST position. Unlock the handle on the side of the machine by turning it counter clockwise and slide the handle to the desired setting. Re lock the handle, then turn the switch back to ON. Make 2 or 3 deposits into a container and check the weight, adjust the volume again if required. # Description 1 Volume % scale. 2 Control switch set to OFF/ADJUST. 3 Volume locking handle. Shown in the Lock position. 12


13 Working with the Depositor If you experience splashing of the product when depositing, slow down the deposit speed as described previously. If the product is deposited too slowly increase the deposit speed. Keep the hopper more than ½ full to avoid air pockets and inconsistent deposits / portions. 13

14 Disassembly for Sanitizing General Sanitizing requires that the machine must be disassembled. Turn air off and remove supply line from machine. Scrape down the inside of the hopper. Reconnect supply line and turn Air on. Keep depositing until nothing more comes out of the outlet nozzle. Turn air off and remove supply line from machine. Pour warm water (maximum 140 deg, F 60 deg C) into the hopper and wipe the inside of the hopper clean. Reconnect supply line and turn Air on. Reduce deposit speed. Cycle the rest of the water out of the machine. Repeat the above procedure. Turn air off and remove supply line from machine. Disconnect attachment airlines from machine. Connect the red and black quick connects together. This will stop water from entering the air cylinders during cleaning. DO NOT SUBMERGE THE AIR CYLINDERS IN WATER. 14


. 2.")
15 Remove Hopper and place top downwards on a sanitary surface. Unclamp depositing attachment. Remove the UNI-block insert, by removing the clamp and pulling the assembly out. Slide Air cylinder out of slot. Pull the Red safety pin out from the side. Remove the UNI-block by: 1. Tilt up the UNI block (1). 2. Slide UNI block forward (2),over tab (3) Remove the product cylinder by sliding forward. 15


16 Remove the product piston. NOTE: Use O-Ring tool to remove all O-Rings Cleaning and Sanitizing Cleaning Clean and sanitize the parts shown, and any attachment parts. Item Description 1 Clamp 2 Product Cylinder 3 Product piston O Ring 4 Product Piston 5 Safety Pin 6 Hopper Gasket 7 Product Cylinder O Ring 8 Uni Block 9 Uni Valve O Rings 10 Uni Valve Mix 1 to 4 ounces (30-120ml) of Zep F.S. PROCESS CLEANER (green) per gallon (4ltr) of water. Immerse the parts in the solution. Clean all food residues with a cloth or a nonmetallic scrubbing pad/brush. Rinse thoroughly with potable water. For the hopper, spray the same solution on to the Hopper surface. 16

17 Sanitizing Mix 1 ¼ oz s (120ml) of Zep F.S. SUPERMARKET SANITIZER (red) per gallon (4ltr) of water. Immerse all parts that were previously in the cleaner in the new solution for 1-2 minutes. Rinse thoroughly with potable water. Re Assembly Inspect all O rings and seals for damage or wear; replace if required. Re-lubricate all O rings with food quality grease (as supplied with your machine). Re-assemble in the reverse order taking care to center the stainless steel pin of the Air cylinder with the cutout in the UNI valve assembly, Re-connect all the airlines The rest of the machine can be wiped down or washed with a mild detergent. 17


18 Maintenance Turn air off, and remove air supply line from machine before any maintenance is performed. IMPORTANT SAFETY NOTES: Any maintenance to the pneumatics system will require the top cover to be opened and removed. Turn air off and remove air supply line from machine before opening the cover. If top cover is removed beware of pinch points Maintenance personnel will require a Phillips screwdriver to open the cover. The top cover is held in place with 2 screws (1 and 2) as shown in the pictures. Remove both screws and lift cover off. 18

19 O Ring Care The most important components of the machine are the O rings. These must be inspected and maintained daily. All O rings should be high quality Viton as supplied by Unifiller, or your authorized Unifiller dealer. Signs of wear include: Flatness, Abrasions, Cracks, and Cuts Daily After parts have been cleaned, lubricate all O rings, seals and moving parts with food grade grease. Weekly With the air disconnected. Check the air filter/regulator bowl and if necessary clean the bowl and empty any accumulated water. 3 Months With the air disconnected. Check the condition of the White filter in the Air regulator / Water filter, and replace if contaminated. O Ring and Gasket Part numbers Description Part Number Quantity Required Hopper Gasket /2 Clamp Gasket Uni Valve O ring V Product Cylinder O Ring V per Cylinder 1 (25.4 mm) Product Piston O Ring V per Piston 1 ½ (38.1 mm) Product Piston O Ring V per Piston 2 (50 mm) Product Piston O Ring V per Piston 2 ½ (63.5 mm) Product Piston O Ring V per Piston 3 (76.2 mm)product Piston O Ring V per Piston The following parts are available from Unifiller or one of its authorized representatives. Part Number Description Item O ring lubricant. 4 oz tube Lubri-film plus O-ring pick tool. 19

20 Spare Parts Product Cylinder Sizes To obtain the most accurate deposit volume, 5 different sizes of product cylinder and product piston are available. See chart following. To maintain portion accuracy, it is recommended that the % volume setting for the machine be set between 12 to 80% of the scale, this will ensure optimum machine performance. Size Piston and Cylinder Kits Part Numbers Volume (Oz) Volume (ml) 1 (25.4 mm) oz ml 1.5 (38.1 mm) oz ml 2 (50 mm) oz ml 2.5 (63.5 mm) oz ml 3 (76.2 mm) oz ml 20

21 Parts Identification It is highly recommended to carry a complete spare set of O rings and seals, as these are vital to the accuracy of the machine. See O ring care section for a full list. UNI Block 21

22 RH Side Connections Base Components LH 22

23 Base Components RH 23

24 Underside Pneumatic Components 24

25 Adjustable Table (Power lift and Mobile) 25

26 Power Lift Lower Frame 26

27 Power Lift Upper Frame 27

 Table")
28 Power Lift Upper Frame (bottom section) Table Top Frame 28

29 Adjustable Table-Table Top 29

30 Mobile Frame 30
31 Depositing with Hot Product The depositor is supplied with standard product piston and Uni valve, used for products up to 60 C/140 F. For products above 60 C/140 F and up to 82 C /180 F, a hot product piston and Uni valve should be used. Contact Unifiller customer service for details. Hot UNI valve part number: For hot product piston part numbers see page 16. The HOT versions of both parts are identified by the word HOT stamped into the end of each one. 31
32 Pneumatic Schematics Mobile Table Top Power Lift 32

33 Troubleshooting IMPORTANT SAFETY NOTE: The machine will not operate until the Red handled block pin is fully inserted. Problem Cause Remedy Machine will not cycle. Low air pressure. Air on/off rotary switch is in the Off/Adjust position. Rear pilot valve has loosened from its mount bracket or is damaged. Incomplete piston stroke caused by solid object in product cylinder Volume adjustment set too low. Deposit speed set too low. Kinked air lines. Check air supply for correct operation. Also check pressure regulator setting (80 psi/5.5bar). Turn rotary switch to the On position. Check rear pilot valves that they are secure. Replace if necessary. Remove product cylinder and check for obstruction. Increase volume setting. Adjust deposit speed. Check air lines to make sure they are not kinked. Product being deposited is too hot. Ensure product temperature does not exceed 140 deg F (60 deg C) unless HOT valves are in place. Inconsistent deposits Red Uni block pin is not inserted Air leakage past product piston seal, possibly worn or damaged. Hopper almost empty and sucking air. Large air pocket in product mix. Product inconsistent. Insert pin fully. Replace O ring. Use O ring template at the back of this manual. Fill hopper or scrape down. Use product mix as soon as it comes off the mixer. Supply smooth product mix and inspect seals and O-Rings for wear. Deposit return speed too fast. Turn air off and remove supply line from machine before opening the cover. 33
34 Air leakage past loose clamps. Deposit speed set too high. Adjust piston return speed control to slow down back stroke. See page 35 Check all clamps and ensure all flat seals are in place and in good condition. Replace seals or tighten clamps as required. Reduce deposit speed Fluctuating air supply pressure. Check setting of air regulator / water filter. Machine cycles but will not deposit Water build up in air lines and valves. Thick product mix. Hopper is loose or beveled seal is missing. Air quick connects are not secure. Product valve piston jammed. (Positive cut off nozzle only). Product piston O Ring worn or missing. Drain air compressor regularly to remove build up of water. Reduce deposit piston speed. Check that the beveled seal is in place and is not damaged. Re tighten hopper nut. Check all air connections are securely attached. If the product you are depositing is over 150 Deg F (60 Deg C), change the product valve to the high temperature version). Replace O Ring. Product leakage Clamps not tight. Check all clamps for tightness. Flat seal missing or damaged. Product piston O Rings worn or damaged. Product tails Deposit speed set too low. from nozzle. (Positive cut off nozzle). Product splashes Deposit speed set too fast. Check that the flat seals are in place and are not damaged. Replace O Rings. Increase deposit speed adjust deposit setting using adjuster located on the top cover Decrease deposit speed adjust deposit setting using adjuster located on the top cover 34
.")
35 Piston Return Speed Control This is a factory setting and should not normally need to be adjusted. (See trouble shooting section under inconsistent deposits). 35


36 CE Mark 36
37 Sound Level Measurement All sound level readings taken at 1m from the front of the machine and 1.6m from the floor level. All readings are A weighted emission sound pressure level. Machine Sound level db Compact Depositor 79.4 Uni1000i 72.9 Pro 1000i 72.9 Pro Spot 87.5 XL2 81 COM Servo 72.9 Deco Mate 78.0 Hopper Topper 72.0 Hopper Topper Max 82.5 Multi 87 37
Backpack Sprayer. Use and Care Manual
 Backpack Sprayer Use and Care Manual BACKPACK SPRAYER CAUTION: Read and follow all instructions Do Not Return This Backpack To The Store For Help, Information or Parts, Call : 1-800-311-9903 The Fountainhead
OPERATION AND PARTS MANUAL
 OPERATION AND PARTS MANUAL MODEL NUMBER : PART NUMBER : GTL 1110 1900-0510 SERIAL NUMBER : BAYNE MACHINE WORKS, INC. PHONE: (864) 288-3877 910 FORK SHOALS ROAD TOLL FREE: (800) 535-2671 GREENVILLE S.C.,
1 CONDIMENT DISPENSING SYSTEMS MODELS MCD-1 & MCD-2
 1 CONDIMENT DISPENSING SYSTEMS MODELS MCD-1 & MCD-2 THIS EQUIPMENT CHAPTER SHOULD BE INSERTED IN THE EQUIPMENT MANUAL MANUFACTURED FOR McDONALD S BY PERFECTION EQUIPMENT, INC. 4259 LEE AVENUE GURNEE, ILLINOIS
COLDFUSION. Operator s Manual
 COLDFUSION Operator s Manual Publication Number: 621057625OPR Revision Date: April 24, 2014 Revision: D Visit the Cornelius web site at www.cornelius.com for all your Literature needs. The products, technical
3.1 DISPENSER BLACK SHADOW SERIES. Tools Needed for Mounting SCS Dispenser Hammer
 SCS 2 BLACK SHADOW SERIES 3.1 DISPENSER ALWAYS OBSERVE PRODUCT SAFETY AND HANDLING INSTRUCTIONS. ALWAYS DIRECT DISCHARGE AWAY FROM YOU or other persons. ALWAYS DISPENSE CLEANERS AND CHEMICALS AS DIRECTED
OPERATION AND PARTS MANUAL
 OPERATION AND PARTS MANUAL MODEL NUMBER : PART NUMBER : GRL 1110 1900-0540 SERIAL NUMBER : BAYNE MACHINE WORKS, INC. PHONE: 864.288.3877 910 FORK SHOALS ROAD TOLL FREE: 800.535.2671 GREENVILLE SC, 29605
FILLING MACHINES SINGLE HEAD
 USER MANUAL FILLING MACHINES SINGLE HEAD 60, 125, 1000, 5000 ml 1 Table of Contents I. General Machine Information & Applications 3 II. Machine Features 4-6 III. Parts List 7-11 IV. Technical Data 12 V.
OWNER S MANUAL. Model: FS-ATV-15 ( ) (15 Gallon Lawn & Garden/ATV Sprayer) Technical Specifications. Assembly Instructions. General Information
 (15 Gallon Lawn & Garden/ATV Sprayer) Technical Specifications. Assembly Instructions. General Information") OWNER S MANUAL Model: FS-ATV-15 (5301169) (15 Gallon Lawn & Garden/ATV Sprayer) Technical Specifications 15 Gal. Corrosion-Resistant Polyethylene Tank 12 Volt Diaphragm Pump, 1.8 g.p.m. 60 psi Spot Sprayer
OWNER S MANUAL Model: FS-ATV-15 (5301169) (15 Gallon Lawn & Garden/ATV Sprayer) Technical Specifications 15 Gal. Corrosion-Resistant Polyethylene Tank 12 Volt Diaphragm Pump, 1.8 g.p.m. 60 psi Spot Sprayer
Philapack, LLC. Filler Machine Division
 Philapack, LLC Filler Machine Division 1840 County Line Rd. #203, Huntingdon Valley, PA 19006 Telephone (215) 322-2122: Fax (215) 355-1509 Web site: www.philapack.com Parts Email: parts@philapack.com Machine
OPERATION & MAINTENANCE INSTRUCTIONS
 10 TONNE HEAVY DUTY LONG CHASSIS TROLLEY JACK MODEL NO: CTJ10GLS PART NO: 7623095 OPERATION & MAINTENANCE INSTRUCTIONS LS0915 INTRODUCTION Thank you for purchasing this CLARKE 10 Tonne Heavy Duty Long
MicroCoat System Operating Manual MC4000 Series MC785M, MC785M-WF Spray Valves
 MicroCoat System Operating Manual MC Series MC785M, MC785M-WF Spray Valves A NORDSON COMPANY Introduction The MicroCoat System provides precise lubrication control for metal stamping operations. The MC
OWNER S MANUAL. Model: UTL-60-12V ( ) (60 Gallon Lawn & Garden Utility Sprayer w/5-nozzle Boom)
 (60 Gallon Lawn & Garden Utility Sprayer w/5-nozzle Boom)") OWNER S MANUAL Model: UTL-60-12V (5301347) (60 Gallon Lawn & Garden Utility Sprayer w/5-nozzle Boom) Technical Specifications 60 Gal. Corrosion-Resistant Polyethylene Tank Deluxe Pistol-Grip Handgun w/25
OWNER S MANUAL Model: UTL-60-12V (5301347) (60 Gallon Lawn & Garden Utility Sprayer w/5-nozzle Boom) Technical Specifications 60 Gal. Corrosion-Resistant Polyethylene Tank Deluxe Pistol-Grip Handgun w/25
MicroCoat. System Operating Manual MC2000 Series. MC785, MC785-WF Spray Valves. US: UK: Mexico:
 MicroCoat System Operating Manual MC2 Series MC785, MC785-WF Spray Valves A NORDSON COMPANY US: 8-498-8865 UK: 8 585733 Mexico: 1-8-556-3484 Introduction The MicroCoat System provides precise lubrication
ENGINE TUNE-UP INSPECTION OF ENGINE COOLANT INSPECTION OF ENGINE OIL INSPECTION OF BATTERY. INSPECTION OF AIR FILTER (Paper Filter Type)
") ENGINE MECHANICAL - Engine Tune-Up EM-17 ENGINE TUNE-UP INSPECTION OF ENGINE COOLANT (See steps 1 and 2 on page CO-4) INSPECTION OF ENGINE OIL (See steps 1 and 2 on page LU-5) INSPECTION OF BATTERY (See
ENGINE MECHANICAL - Engine Tune-Up EM-17 ENGINE TUNE-UP INSPECTION OF ENGINE COOLANT (See steps 1 and 2 on page CO-4) INSPECTION OF ENGINE OIL (See steps 1 and 2 on page LU-5) INSPECTION OF BATTERY (See
Hydronic Corporation
 Hydronic Corporation Air Driven Hydraulic Pumps and Intensifiers P825 Installation, Use and Maintenance Manual Contents Introduction, Guarantee and Identification Plate Description, Start Up Procedures
Razor Oil Sac Cutter 2007
 Davis Poultry Equipment Razor Oil Sac Cutter 2007 TABLE OF CONTENTS Table of Contents...1 Objective...2 General Description...3 Serial Number Description...4 Thank You...5 General Safety Precautions...6
TYPE F-YRD. Operator s Manual
 TYPE F-YRD Operator s Manual Belshaw Bros., Inc. 814 44 th Street NW, Suite 103 Auburn, WA 98001 USA Phone: (206) 322-5474 Fax: (206) 322-5425 E-mail: service@belshaw.com http://www.belshaw.com EQUIPMENT
1600 PSI ELECTRIC PRESSURE WASHER
 MODEL NO.: XE03 SKU: 39-8508-6 1600 PSI ELECTRIC PRESSURE WASHER Owner s Manual QUESTIONS, PROBLEMS, MISSING PARTS? Before returning to your retailer, visit our web site or call our customer service at
Tools Needed for Mounting Cleá Filling Station
 ALWAYS OBSERVE PRODUCT SAFETY AND HANDLING INSTRUCTIONS. ALWAYS DIRECT DISCHARGE AWAY FROM YOU or other persons. ALWAYS DISPENSE CLEANERS AND CHEMICALS AS DIRECTED ON THE LABEL. ALWAYS DISPENSE INTO APPROVED
FPC815 Pneumatic Rivet Tool
 WARRANTY If you have any problems with this tool, please call FPC Corporation toll-free at 1-800-860-3838 before returning it to the place of purchase. FPC815 Pneumatic Rivet Tool FPC Corporation warrants
INSTRUCTION MANUAL. Stephenson Road Speedwell Industrial Estate Staveley Chesterfield S43 3JN
 INSTRUCTION MANUAL Stephenson Road Speedwell Industrial Estate Staveley Chesterfield S43 3JN Telephone: 0800 1300 402 Fax: 01246 471 277 Website: www.morclean.com Email: information@morclean.com Contents
STAINLESS STEEL DETERGENT INJECTOR AW
 STAINLESS STEEL DETERGENT INJECTOR AW-8000-0001 OPERATING INSTRUCTIONS & PARTS LIST CAUTION RISK OF INJURY! READ ENTIRE MANUAL BEFORE OPERATING! THIS MANUAL IS AN IMPORTANT PART OF THE INJECTOR AND MUST
OWNER S MANUAL GUZZLER MODEL 620 READ THESE INSTRUCTIONS BEFORE USING
 OWNER S MANUAL GUZZLER MODEL 620 OPERATION MAINTENANCE TROUBLE SHOOTING REPAIR PARTS WARRANTY READ THESE INSTRUCTIONS BEFORE USING 201 COMMERCE DRIVE MONTGOMERYVILLE, PA 18936 215-393-4700 800-331-1423
GRSM17 Pneumatic Center Punch Tool Owner s Manual and Operating Instructions
 Owner s Manual and Operating Instructions Table of Contents Page Information 2 Safety Guidelines and Warranty 3 Overview and Installation 4 Air System Requirements 5 Setting Controls 6 Installing Clamps
BOVIBOOSTER WDone & WDtwo
 BOVIBOOSTER WDone & WDtwo User Guide BBWDone BBWDtwo PowerDos15 D2NBAx D2NBDL Always wear suitable protective equipment when working on the BOVIBOOSTER Always disconnect the electrical supply when working
Handheld Tank Sprayer
 Handheld Tank Sprayer Operator's Manual MODELS MS - 20 MS - 35 WARNING DANGER Read rules for safe operation and all instructions carefully. ECHO provides this Operator's Manual which must be read and understood
Maintenance Information
 80234313 Edition 1 June 2006 Air Grinder, Die Grinder, Sander and Belt Sander Series G1 (Angle) Maintenance Information Save These Instructions WARNING Always wear eye protection when operating or performing
OWNER S MANUAL D.E. CARTRIDGE. Installation Operation Parts. Models PCDE-30 PCDE-40
 D.E. CARTRIDGE OWNER S MANUAL Installation Operation Parts Models PCDE-30 PCDE-40 2200 East Sturgis Road, Oxnard, CA 93030 Ph. (805) 981-0262 Fax (805) 981-9403 www.waterwayplastics.com waterway@waterwayplastics.com
OPERATION & MAINTENANCE INSTRUCTIONS
 WARNING Read the instructions before using the machine PETROL DRIVEN POWER WASHER MODEL NO: TIGER1700 PART NO: 7320054 OPERATION & MAINTENANCE INSTRUCTIONS LS0511 2 INTRODUCTION Thank you for purchasing
PRODUCT OPERATING MANUAL
 PRODUCT OPERATING MANUAL PANBLAST TM CS37 SUCTION BLAST CABINET Manual Number: ZVP PC 0069 00 SECTION 1. GENERAL INFORMATION 2. ASSEMBLY & INSTALLATION INSTRUCTIONS 3. OPERATING INSTRUCTIONS 4. MAINTENANCE
Mudhen Portable Slurry System Owners Manual
 Mudhen Portable Slurry System Owners Manual Industrial Contractors Supplies, Inc. 412. 824. 6933 www.icscompany.net Mudhen Manual Page 1 MUDHEN MANUAL 1 Disclaimer & Safety Notice 2 2 Safety Notice 3 3
PENTECH, INC. BD Spray Gun. Operating Manual Parts Manual May, 2008 Issue 1. Plural Component, Impingement Mixing, Mechanical Purge Spray Gun
 PENTECH, INC. Operating Manual Parts Manual May, 2008 Issue 1 Plural Component, Impingement Mixing, Mechanical Purge Spray Gun BD Spray Gun PENTECH, INC. 7256 21 st Street East Sarasota, FL 34243 Phone:
MODEL 872D MODEL 873N MODEL 872B POST-MIX BEVERAGE DISPENSER FOR USE WITH BAG-IN-BOX
 Part No. 803171 Issued 3-28-13 Rev 011515 1 MODEL 872D MODEL 873N MODEL 872B POST-MIX BEVERAGE DISPENSER FOR USE WITH BAG-IN-BOX The Post-Mix Beverage Series utilizes a venturi valve to mix the tea syrup
AVANTI P180. Ground Handling
 AVANTI P180 Ground Handling Towing The airplane should be moved on the ground with the aid of the nosewheel towing bar provided with the airplane. The tow bar is designed to attach to the nose wheel axle.
Service Manual Air Plus Second Stage
 Service Manual Air Plus Second Stage Includes XS Series Second Stage Copyright 2002, Cressi-sub Revised 3/2002 2 Air Plus Second Stage Service Manual Contents BEFORE STARTING... 3 DISASSEMBLY... 3 PARTS
OWNER S MANUAL. Model: LG-30-TRL ( ) (30 Gallon Lawn & Garden Trailer Sprayer)
 (30 Gallon Lawn & Garden Trailer Sprayer)") OWNER S MANUAL Model: LG-30-TRL (5302317) (30 Gallon Lawn & Garden Trailer Sprayer) Technical Specifications 30 Gal. Corrosion-Resistant Polyethylene Tank 12 Volt Diaphragm Pump, 2.1 g.p.m. 60 psi 15 Ft.
OWNER S MANUAL Model: LG-30-TRL (5302317) (30 Gallon Lawn & Garden Trailer Sprayer) Technical Specifications 30 Gal. Corrosion-Resistant Polyethylene Tank 12 Volt Diaphragm Pump, 2.1 g.p.m. 60 psi 15 Ft.
1100W PORTABLE GENERATOR
 1100W PORTABLE GENERATOR MODEL NO: G1200 PART NO: 8010110 OPERATION & MAINTENANCE INSTRUCTIONS LS0312 INTRODUCTION Thank you for purchasing this CLARKE 1100W Portable Generator. Before attempting to use
FRP SystemOne GELCOATER OPERATION MANUAL. MAGNUM VENUS PRODUCTS Operation Manual. Part No. M Revision
 1300-1-1 GELCOATER OPERATION MANUAL MAGNUM VENUS PRODUCTS Operation Manual Part No. M1300-1-1 Revision 04.26.01 Operation Manual Unit Information Unit # Type Of: Power Cylinder Metering Pump Gun Fluid
WARNING Carefully Read These Instructions Before Use
 DO NOT RETURN THIS SPRAYER TO STORE Call: 1-800-950-4458 Backpack Sprayer Use and Care Manual Manufactured for Northern Tool + Equipment Co., Inc. WARNING Carefully Read These Instructions Before Use Model
FULL OPERATING AND MAINTENANCE MANUAL
 Enter Serial No. here. In the event of an enquiry please quote this serial number. www.monoequip.com FULL OPERATING AND MAINTENANCE MANUAL FOR THE STAND ALONE DIVIDER FG398 Stand alone divider REV.A17
Polypropylene Piston Drum Pumps
 Please read and save this Repair Parts Manual. Read this manual and the General Operating Instructions carefully before attempting to assemble, install, operate or maintain the product described. Protect
MICHIGAN FLUID POWER
 MICHIGAN FLUID POWER Air Driven Hydraulic Pumps, Power Units and Intensifiers P901 Installation, Use and Maintenance Manual Contents Introduction, Guarantee and Identification Plate Description, Start
OPERATION INSTRUCTIONS GFA-W-150\300\500\1000
 OPERATION INSTRUCTIONS HORIZONTAL SELF-SUCTION FILLER SERIES GFA-W-10\300\00\1000 Please operate in accordance with the instructions strictly. CONTENTS Overview Maintenance and Service Application Replacement
CUSTOM CAN Custom Can Pneumatic Filling Machine Instructions for Operation and Maintenance
 CUSTOM CAN Custom Can Pneumatic Filling Machine Instructions for Operation and Maintenance U-POL US, Inc., 630 Selvaggio Dr, Suite 300, Nazareth, PA 18064 Tel: (800) 340 7824; Fax: (800) 787 5150 Email:
AQUATEC R / AQUATEC F / AQUATEC XL. Bathlift Operating instructions
 AQUATEC R / AQUATEC F / AQUATEC XL Bathlift Operating instructions 1 2 3 4 5 6 7 8 9 10 11 Contents 1 General instructions................. 3 1.1 Introduction......................... 3 1.2 Proper use.........................
CARTRIDGE FILTER SYSTEMS OWNER S MANUAL
 CARTRIDGE FILTER SYSTEMS OWNER S MANUAL Installation Operation Parts Designed, Engineered & Manufactured in the USA. 2017 Waterway Plastics 2200 East Sturgis Road, Oxnard CA 93030 Phone 805.981.0262 Fax
OWNER S MANUAL. Model: UTV-65-BL ( ) (65 Gallon Lawn & Garden UTV Sprayer w/boomless Boom)
 (65 Gallon Lawn & Garden UTV Sprayer w/boomless Boom)") OWNER S MANUAL Model: UTV-65-BL (5302843) (65 Gallon Lawn & Garden UTV Sprayer w/boomless Boom) Technical Specifications 65 Gal. Corrosion-Resistant Polyethylene Tank Deluxe Pistol-Grip Handgun 25 Ft.
OWNER S MANUAL Model: UTV-65-BL (5302843) (65 Gallon Lawn & Garden UTV Sprayer w/boomless Boom) Technical Specifications 65 Gal. Corrosion-Resistant Polyethylene Tank Deluxe Pistol-Grip Handgun 25 Ft.
Purging Air From Divider Block Lubrication Systems
 FROST ENGINEERING SERVICE Purging Air From Lubrication Systems A D I V I S I O N O F G E C S E Y S A L E S & S E R V I C E DESCRIPTION Divider block lubrication systems operate correctly only when all
OWNER S MANUAL Model: TR-40-EX ( ) (40 Gallon Lawn & Garden Trailer Sprayer w/5-nozzle Boom Assembly)
 (40 Gallon Lawn & Garden Trailer Sprayer w/5-nozzle Boom Assembly)") OWNER S MANUAL Model: TR-40-EX (5301338) (40 Gallon Lawn & Garden Trailer Sprayer w/5-nozzle Boom Assembly) Technical Specifications 40 Gal. Corrosion-Resistant Polyethylene Tank 12 Volt Diaphragm Pump,
OWNER S MANUAL Model: TR-40-EX (5301338) (40 Gallon Lawn & Garden Trailer Sprayer w/5-nozzle Boom Assembly) Technical Specifications 40 Gal. Corrosion-Resistant Polyethylene Tank 12 Volt Diaphragm Pump,
Maintenance Information
 80234313 Edition 2 May 2014 Air Grinder, Die Grinder, Sander and Belt Sander Series G1 (Angle) Maintenance Information Save These Instructions Product Safety Information WARNING Failure to observe the
ASSEMBLY & OPERATION INSTRUCTION MANUAL
 Sliding Bridge Jack 3,500 lbs. Capacity ASSEMBLY & OPERATION INSTRUCTION MANUAL TABLE OF CONTENTS Specifications... 2 Description & Features... 3 Installation Instructions... 4 Safety Instructions... 4
Hydraulic Long Jacks
 Operating Instructions & Parts Manual Hydraulic Long Jacks Model 44915 44930 44940 44980 44981C (Air option) Capacity 1-1/2 Ton 3 Ton 4 Ton 8 Ton 8 Ton Models 44915, 44930, 44940 & 44980 Model 44981C U.S.
SP0 & SP1 Knapsack Sprayer
 SP0 & SP1 Knapsack Sprayer We would like to congratulate you on the purchase of your new SP0. The sprayer that allows you the easiest, most comfortable way of carrying out your farm, garden, etc. projects
Owners Manual POWER PLUS MOBILITY OUR PRODUCTS WILL MOVE YOU
 Owners Manual POWER PLUS MOBILITY OUR PRODUCTS WILL MOVE YOU At Power Plus Mobility, we care! Thank you for choosing a wheelchair from Power Plus Mobility Inc. We are always improving in our ways to serve
k. Components not properly adjusted. Refer to machine technical manual for proper adjustment of components.
 General Troubleshooting Charts General Troubleshooting Charts Use the charts on the following pages to help in listing all the possible causes of trouble when you begin diagnosing and testing of a machine.
AUTOMATIC AIRSPRAY GUN
 INSTRUCTION MANUAL AUTOMATIC AIRSPRAY GUN Manual : 0407 573.011.212 Date : 19/07/04 Supersede : KREMLIN REXSON - Site de Stains : 150, avenue de Stalingrad 93 245 - STAINS CEDEX - FRANCE Téléphone : 33
Tooling Assistance Center
 Safeguards are designed into this application equipment to protect operators and maintenance personnel from most hazards during equipment operation. However, certain safety precautions must be taken by
Operating Manual for. Dispenser. Read this manual thoroughly before operating the Labmax Bottle Top Dispenser!
 Operating Manual for Dispenser Read this manual thoroughly before operating the Labmax Bottle Top Dispenser! General Safety Precautions When using the Labmax please observe the following safety precautions
MICRO WELD MODEL AUF-8 HEAVY DUTY FERROUS BUTT WELDERS MICRO PRODUCTS COMPANY SERVICE MANUAL
 MICRO WELD MODEL AUF-8 HEAVY DUTY FERROUS BUTT WELDERS MICRO PRODUCTS COMPANY SERVICE MANUAL 1 TABLE OF CONTENTS 1.0 SPECIFICATIONS 2.0 GENERAL OPERATING INSTRUCTIONS 3.0 BASIC OPERATING PARTS 4.0 BASIC
Troubleshooting 3Z8 038 Rev B
 Troubleshooting 3Z8 038 Rev B INSTRUCTIONS WARNING INJECTION HAZARD This form is only a quick reference for troubleshooting Graco sprayers. To reduce the risk of serious injury, including fluid injection,
M-5000TG/5700TG Steam and Cold Water Mixing Unit
 M-5000TG/5700TG Steam and Cold Water Mixing Unit Installation, Operating and Maintenance Instructions Last Updated: October, 2012 Strahman Valves, Inc. USA Headquarters 2801 Baglyos Circle Bethlehem, PA
Operation Manual BOTTLE TOP DISPENSER
 Operation Manual BOTTLE TOP DISPENSER TABLE OF CONTENTS Page No. Intended Use Of The Instrument 1 Safety Instructions 1 Functions and Limitations of Use 2 Operating Exclusions 3 Storage Conditions 3 Chemical
OWNER S MANUAL. Model: FSUTV-45-12V ( ) (45 Gallon Lawn & Garden UTV Sprayer, Boom Ready) Technical Specifications. Assembly Instructions
 (45 Gallon Lawn & Garden UTV Sprayer, Boom Ready) Technical Specifications. Assembly Instructions") OWNER S MANUAL Model: FSUTV-45-12V (5302903) (45 Gallon Lawn & Garden UTV Sprayer, Boom Ready) Technical Specifications 45 Gal. Corrosion-Resistant Polyethylene Tank Deluxe Pistol-Grip Handgun 25 Ft. Handgun
OWNER S MANUAL Model: FSUTV-45-12V (5302903) (45 Gallon Lawn & Garden UTV Sprayer, Boom Ready) Technical Specifications 45 Gal. Corrosion-Resistant Polyethylene Tank Deluxe Pistol-Grip Handgun 25 Ft. Handgun
DP556 Pump. 55:1, Air-operated, Grease. General. Operation. Technical Data. Installation. Mounting with Reinforced Cover (Recommended)
") DP556 Pump 55:1, Air-operated, Grease General The DP556 Pump is a compressed air-operated reciprocating piston pump. This high capacity demand pump is compatible with mineral and synthetic grease and suitable
DP556 Pump 55:1, Air-operated, Grease General The DP556 Pump is a compressed air-operated reciprocating piston pump. This high capacity demand pump is compatible with mineral and synthetic grease and suitable
WALKIE HIGH LIFT HYDRAULIC SYSTEM
 WALKIE HIGH LIFT HYDRAULIC SYSTEM W30-40ZA [B453]; W20-30ZR [B455]; W25-30-40ZC [B454] PART NO. 1524251 2000 SRM 1025 SAFETY PRECAUTIONS MAINTENANCE AND REPAIR When lifting parts or assemblies, make sure
CENTURY EXTERNAL MIX GEL COAT SYSTEMS Models: CX2017HC-A and CX2017HC-B000000
 CENTURY EXTERNAL MIX GEL COAT SYSTEMS Models: CX2017HC-A000000 and CX2017HC-B000000 SPECIFICATIONS Maximum air inlet pressure: Maximum recommended continuous cycle rate: Air consumption @ 20 cycles/min
SECTION 4 - FUEL/LUBRICATION/COOLING
 For Arctic Cat Discount Parts Call 606-678-9623 or 606-561-4983 SECTION 4 - FUEL/LUBRICATION/COOLING 4 TABLE OF CONTENTS Carburetor Specifications... 4-2 Carburetor Schematic... 4-2 Carburetor... 4-3 Cleaning
USE and MAINTENANCE INSTRUCTION MANUAL AZ3 HTE2 AZ3 HTE2 HVLP GRAVITY. SPRAY GUN Series. en it fr es pt de se
 USE and MAINTENANCE INSTRUCTION MANUAL AZ3 HTE2 AZ3 HTE2 HVLP GRAVITY SPRAY GUN Series en it fr es pt de se TECHNICAL DATA Technical AZ3 HTE2 AZ3 HTE2 HVLP 1.0 80 180 1.3 10-15HTE 140 200 240 1.5 2.0 160
SERIES OPERATION AND MAINTENANCE MANUAL
 SERIES OPERATION AND MAINTENANCE MANUAL This manual CONTAINS IMPORTANT WARNINGS, S and OTHER INSTRUCTIONS. Read and understand the instruction manual Carefully, before use and retain it for reference.
Owner s Manual MODEL NO: S400A SERIAL NUMBER 5000
 Owner s Manual For ZEP SHURFILL Automated Filling System - For use with ZEP MODEL B SPRAYERS This Manual Contains Important Safety and Operation Information. MODEL NO: S400A 1 SERIAL NUMBER 5000 This Zep
M-5000TG/5700TG Steam and Cold Water Mixing Unit
 M-5000TG/5700TG Steam and Cold Water Mixing Unit Installation, Operating and Maintenance Instructions Last Updated: August, 2014 Strahman Valves, Inc. USA Headquarters 2801 Baglyos Circle Bethlehem, PA
BE 20 IMI Cornelius Orange Juice Dispenser Model Quest Elite QLT 2000
 BEVERAGE EQUIPMENT BE 20 IMI Cornelius Orange Juice Dispenser Model Quest Elite QLT 2000 Daily maintenance tasks BE 20 D1 Flush orange juice system Weekly maintenance tasks BE 20 W1 Sanitize orange juice
Low Profile Wrenches Operation and Maintenance Manual
 Low Profile Wrenches Operation and Maintenance Manual http://www.torquetoolsinc.com Use the HEXPRO Series Low Profile Wrenches Model 2HP 4HP 8HP 14HP 30HP to install and remove large bolts that have minimal
Index. 1. Important safety instructions Overview of the lift Installation instructions Operation instructions 8-9
 2 Index 1. Important safety instructions 4-5 1.1 Safety Warnings 1.2 Qualified personnel 1.3 Safety 1.4 Warning signs 2. Overview of the lift 6 2.1 General descriptions 2.2 Technical data 2.3 Construction
PowerFlo 20 Parts List/Assembly Instructions/Users Guide ***PLEASE READ ALL INSTRUCTIONS CAREFULLY AND THOROUGHLY***
 PowerFlo 20 Parts List/Assembly Instructions/Users Guide ***PLEASE READ ALL INSTRUCTIONS CAREFULLY AND THOROUGHLY*** Owners Manual (Please check to make sure to locate all parts before assembly.) 11/12/2008
MODEL T26746 FOOT-OPERATED GREASE PUMP INSTRUCTIONS
 MODEL T26746 FOOT-OPERATED GREASE PUMP INSTRUCTIONS For questions or help with this product contact Tech Support at (570) 546-9663 or techsupport@grizzly.com Introduction The Model T26746 Foot-Operated
Vision Ped Plus. Operators Guide. Studio Pedestal. Vinten Camera Control Solutions
 Operators Guide Vision Ped Plus Studio Pedestal Vinten Camera Control Solutions Vision Ped Plus Studio Pedestal Publication Part No. 3951-8 Issue 1 Copyright Vinten Broadcast Limited 2002 All rights reserved
MODEL 660 AUTOMATIC FASTENING CENTER OPERATOR S MANUAL
 MODEL 660 AUTOMATIC FASTENING CENTER OPERATOR S MANUAL Copyright: January 13, 2003 Revised: 080612 Serial No. 0506113. 1 TABLE OF CONTENTS INTRODUCTION..3 OPERATOR SAFETY... 3 SYSTEM REQUIREMENTS..4 INSTALLATION
AIR/HYDRAULIC INJECTION GUN MODEL INSTRUCTIONS
 I. OPERATION & DESCRIPTION The Air / Hydraulic Injection Gun is a high-pressure tool that should be used with caution and according to these instructions. IMPORTANT: The Gun is 0,000 psi rated. Do not
Product Identification
 Operation Manual Ketchup Dispenser Product Identification Tether Lever Narrow Lid Narrow Container with Handle Note: This dispenser uses the same lever and pump parts as the standard ketchup-only dispenser.
180 Lake Ave North Paynesville, MN Phone: MASTER MANUFACTURING MASTER GARDNER
 180 Lake Ave North Paynesville, MN 56362 Phone: 1-800-864-1649 www.master-mfg.com MASTER MANUFACTURING MASTER GARDNER Part Number PCD-E3-009B-MM Rev 2 Dec. 2012 Note: Do not return product to the distributor/dealer
Dispenser & Warmer RIC-1909 RIC-1909EXP
 Dispenser & Warmer RIC-1909 RIC-1909EXP Safety Precautions CAUTION This equipment is designed and sold for commercial use only. This equipment is not to be used by the consumer in home use. Do not allow
Backhoe for Dingo Compact Utility Loaders
 Form No. 50-5 Backhoe for Dingo Compact Utility Loaders Model No. 60 000000 & Up Operator s Manual Original Instructions (EN/GB) Contents Page Introduction................................. Safety......................................
180 Lake Ave North Paynesville, MN Phone: (320) MASTER MANUFACTURING MASTER GARDNER
 MASTER MANUFACTURING MASTER GARDNER") 180 Lake Ave North Paynesville, MN 56362 Phone: (320) 340-6464 www.master-mfg.com MASTER MANUFACTURING MASTER GARDNER Part Number PCD-E3-009B-MM July 2017 Note: Do not return product to the distributor/dealer
180 Lake Ave North Paynesville, MN 56362 Phone: (320) 340-6464 www.master-mfg.com MASTER MANUFACTURING MASTER GARDNER Part Number PCD-E3-009B-MM July 2017 Note: Do not return product to the distributor/dealer
SAFETY AND OPERATING MANUAL
 SAFETY AND OPERATING MANUAL COLD WATER PETROL WATER BLASTERS Read Safety & Operating Instructions Before Commencing Operation THESE INSTRUCTIONS MUST BE READ AND ADHERED TO BEFORE OPERATING THIS MACHINE.
I Button Chemical Dispenser. Overview. Installation Instructions
 4 Button Chemical Dispenser Overview The 4 Button Chemical Dispenser makes users more efficient, filling bottles and buckets with ease and quickness. Package Contains: Mounting Template Mounting hardware
 INSTRUCTIONS Your Ampco centrifugal pump is a rugged unit designed to provide years of low cost pumping service. There is a small amount of necessary care required to ensure you of this expected long service.
Single shot MODEL EGA700 OWNERS MANUAL
 Single shot AIR OPERATED GREASE GUN MODEL EGA700 OWNERS MANUAL www.eaglecompressor.com 1-800-551-2406 READ THE ENTIRE MANUAL BEFORE PUTTING THIS TOOL IN SERVICE Limited Air Tool Warranty Eagle warrants
RUFNEX Series Low Profile Wrenches Operation and Maintenance Manual
 RUFNEX Series Low Profile Wrenches Operation and Maintenance Manual http://www.torsionx.com Use the RUFNEX Series Ultra-Low Profile Wrenches to install and remove large bolts that have minimal wrench clearance.
SD Bendix E-10PR Retarder Control Brake Valve DESCRIPTION. OPERATION - Refer to Figure 2
 SD-03-832 Bendix E-10PR Retarder Control Brake Valve MOUNTING PLATE SUPPLY 4 PORTS ELECTRICAL AUXILIARY DESCRIPTION TREADLE RETARDER CONTROL SECTION EXHAUST DELIVERY 4 PORTS FIGURE 1 - E-10PR RETARDER
SB ISS.04. Operation Manual AGMDPRO Automatic Spray Gun
 EN SB-2-991 ISS.04 Operation Manual AGMDPRO Automatic Spray Gun Table of Contents Topic Page Specification and Materials of Construction 3 EC Declaration of Conformity 3 Safety Precautions 4 Model Part
OWNER S MANUAL. Model: TR-40-GAS ( ) (40 Gallon Lawn & Garden Trailer Sprayer w/5-nozzle Boom Assembly) Technical Specifications
 (40 Gallon Lawn & Garden Trailer Sprayer w/5-nozzle Boom Assembly) Technical Specifications") OWNER S MANUAL Model: TR-40-GAS (5301339) (40 Gallon Lawn & Garden Trailer Sprayer w/5-nozzle Boom Assembly) Technical Specifications 40 Gal. Corrosion-Resistant Polyethylene Tank 5.5 HP Briggs & Stratton
OWNER S MANUAL Model: TR-40-GAS (5301339) (40 Gallon Lawn & Garden Trailer Sprayer w/5-nozzle Boom Assembly) Technical Specifications 40 Gal. Corrosion-Resistant Polyethylene Tank 5.5 HP Briggs & Stratton
Removal and Installation of Fuel Injection Pumps
 Page 16 of 126 worn considerably. Fig. C shows how the flat end of a new plunger makes poor contact with a worn lifter, resulting in rapid wear to both parts. An injection pump can have a good fuel flow
PNEUMATIC PUMP Series
 PNEUMATIC PUMP Series 3103... User and Maintenance Manual Original text translation TABLE OF CONTENTS 1. INTRODUCTION 2. GENERAL DESCRIPTION 3. PRODUCT-MACHINE IDENTIFICATION 4. TECHNICAL CHARACTERISTICS
JARVIS. Model Buster V (CE) Beef Splitting Band Saw
 Beef Splitting Band Saw") Model Buster V (CE) Beef Splitting Band Saw EQUIPMENT SELECTION............. Ordering No. TABLE OF CONTENTS......................... Page Buster V Band Saw Shower Head.......... 4006049 Shower Head and
Model Buster V (CE) Beef Splitting Band Saw EQUIPMENT SELECTION............. Ordering No. TABLE OF CONTENTS......................... Page Buster V Band Saw Shower Head.......... 4006049 Shower Head and
CHEM-TEX POWER MAX 25 GOLD EDITION TRUCK MOUNT MANUAL
 CHEM-TEX POWER MAX 25 GOLD EDITION TRUCK MOUNT MANUAL Congratulations On your purchase of a Power Max 25 Gold Edition Truck mount. The Power Max 25 Gold Edition are designed for the professional cleaning
CRD600 Automatic Fitting Inserter
 CRD600 Automatic Fitting Inserter OPERATIONS MANUAL VERSION 2.3 LAST EDITED 12.07.2018 cleanroomdevices.com 1 Table of Contents Title Page.. 1 Table of Contents. 2 1.0 General Product & Safety Information...3
Stowe Cargo Management System
 Installation Guide Stowe Cargo Management System Table of Contents 1. Pre-Installation (Page 2) a. Notes, Installation Kit contents & Tools needed 2. How to Install the Stowe Cargo Management System (Pages
MODELS 9917, , 9946P and 9989 High Pressure Lubrigun Series A
 MODELS 9917, 9917-57, 9946P and 9989 Series A NOTE: Pails and Drums shown for illustration only. not included with models. MAR - 2007 Section - A5 Page - 84 DESCRIPTION Models 9917, 9917-57, 9946P, and
HOT WASHER MODEL NO: KING 125 OPERATION & MAINTENANCE INSTRUCTIONS PART NO: LS1009
 HOT WASHER MODEL NO: KING 125 PART NO: 7320170 OPERATION & MAINTENANCE INSTRUCTIONS LS1009 INTRODUCTION Thank you for purchasing this Hot Washer. This machine is a portable, high pressure power washer,