FRP SystemOne GELCOATER OPERATION MANUAL. MAGNUM VENUS PRODUCTS Operation Manual. Part No. M Revision
|
|
|
- Bridget Newton
- 5 years ago
- Views:
Transcription

1 GELCOATER OPERATION MANUAL MAGNUM VENUS PRODUCTS Operation Manual Part No. M Revision
2 Operation Manual Unit Information Unit # Type Of: Power Cylinder Metering Pump Gun Fluid Section
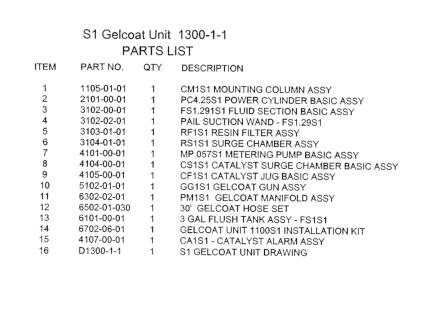
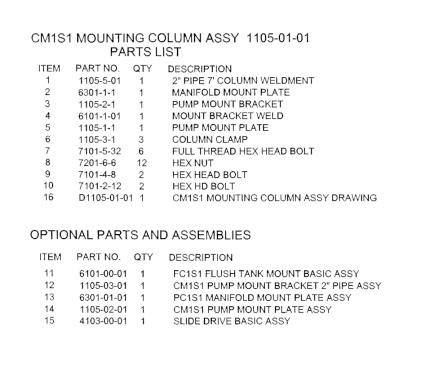
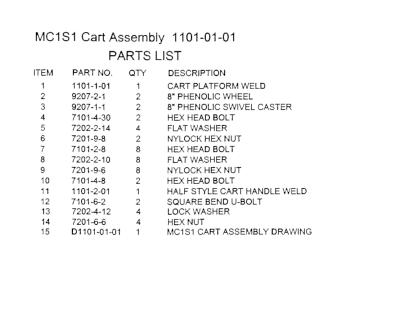
3 Table of Contents Operation Manual CHAPTER Start Up Installation & Setup 1 - QUICK LIST CHAPTER 2 - GETTING STARTED Installation & Setup Pre-Operation Checklist CHAPTER 3 - OPERATION Wetting Unit Proper Operating Pressures Gun Set-Up CHAPTER 4 - MAINTENANCE CHAPTER 5 - PARTS DRAWINGS Unit Assembly Mounting Column Assembly Cart Assembly Pneumatic Manifold Assembly 3-Gallon Flush Tank Assembly Catalyst Jug Assembly Power Cylinder (4.25 ) Assembly Resin Filter Assembly Drum Suction Wand Assembly Surge Chamber Assembly
4 Chapter 1 Quick List Instructions Start-Up Sheet 1. Check & fill solvent system 2. Check & fill resin & catalyst supply 3. Place suction wand in resin supply 4. Prime resin pump 5. Prime catalyst pump and set catalyst percentage 6. Check system for fluid leaks 7. Set air pressure to gun 8. Install turbulent mixer in mix chamber 9. Select & install nozzle 10. Adjust fan pattern NOTE: These instructions include resin and catalyst pressurization procedures. To avoid equipment malfunction or possible injury, please follow these instructions. If you have any questions, please contact our Technical Service Department at
5 Quick List Instructions Installation & Setup 1. Unpack unit & components 2. Place unit & stand pipe in base plate or portable cart (or mount to wall with wall brackets) Tighten bolts to secure 3. Install catalyst jug 4. Install resin surge chamber & filter assembly 5. Install manifold air hose to power cylinder 6. Attach hose fittings to resin pump, catalyst pump, air & flush tank 7. Install boom to mast (if applicable) 8. Hang hose on boom (if applicable) 9. Attach pickup hose 10. Place flush tank in holder and attach air hose from manifold 11. Double check all hose fittings 2
6 Chapter 2 Getting Started Installation 1. Remove unit from crate. With the crate lying flat, open the top panel and remove the components: a. Floor mount assembly b. Gelcoat pump and pump column c. Gun and hose set d. Resin filter and surge chamber assembly e. Suction wand assembly f. Catalyst jug g. Solvent tank h. Catalyst pump i. Air manifold 2. Assemble pump and column to floor mount assembly. a. Slide pump column into floor mount and tighten the two hex bolts in floor mount. 3. Assemble resin filter/surge chamber assembly to pump. a. Check to make sure all Filter/Surge chamber connections are tight. b. Attach the filter/surge chamber assembly to the swivel fitting located at the outlet of the resin pump. c. With the filter/surge chamber assembly vertical. Tighten the fitting with a wrench until it is tight. 3
7 4. Mount catalyst jug bracket. a. Attach the Catalyst jug bracket to the base of the catalyst pump slide drive support. b. Mount the bracket so it extends to the left side of the slide drive support as you stand facing the end of the slide drive. 5. Mount solvent tank retainer bracket. a. Attach the tank bracket to the column approximately 2 to 3 inches from the top of the floor mount frame round tube. b. The bracket should be on the left side of the column as you face the unit. Position the bracket so the tank will sit on the floor mount square tubing. Tighten the flush tank bracket bolts to the column. c. Remove the solvent tank from the carton and place into bracket. 6. Attach catalyst pump. NOTE If SystemOne unit is configured with a catalyst alarm, please refer to the catalyst alarm manual when you reach this stage of set-up. a. Mount the Catalyst pump to the slide drive bracket using the clevis pins and keepers provided. b. The bottom of the catalyst pump is pinned to the lower leg of the slide drive bracket. c. The upper clevis, (piston rod), is pinned to the slide drive using the forward of the long slot in the slide drive. d. Hold the clevis pins in place with the wire keepers by placing them in the holes in the clevis pins. 7. Mount air supply manifold. a. Clamp manifold assembly to the pump column above the power cylinder of the resin pump. b. Regulators and gauges should face to the pump side of the column. c. Clamp yoke tight enough so the assembly does not move around the column. 8. Attach suction wand to gelcoat pump. a. Check all fittings on the wand assembly to make sure they are airtight. b. Attach the wand assembly to the foot valve swivel fitting and tighten. 4
8 9. Make hose connections. a. Connect the black resin hose from the gun to the outlet fitting on the resin filter. b. Connect the catalyst hose from the gun to the outlet of the catalyst pump assembly. c. Attach the red air hose from the gun to the fitting on the regulator labeled gun. d. Attach the yellow poly flush hose from the gun to the outlet fitting of the solvent tank. e. Attach the small red air supply hose from the flush regulator to the input fitting on the flush tank. f. Attach the red air hose from the pump regulator to the power cylinder or the gelcoat pump. g. Attach the ground wire from the gun to the electrical grounding lug on the pump power head. h. Remove the catalyst poly tubes from the component box. Cut the ½ inch diameter poly line with the clamps to 26 inches long. Clamp one end to the outlet of the catalyst jug and the other end to the inlet of the catalyst pump. Make sure the clamps are airtight. i. Connect the 3/8-inch poly line to the relief valve on the catalyst relief valve and insert the other end into the hole in the top of the catalyst jug. j. Connect the green hose from side of the gun handle to the blue valve on air manifold. 10. Mount exhaust muffler to the power head of the gelcoat pump. a. Remove the exhaust deflector from the power head of the gelcoat pump, (4 screws). Screw silencer into the pipe threads of the exhaust port. 5
9 Operation Wetting Out Unit Air supply: 1. Use minimum ½ air hose supply to the system. Air requirements, 9 to 10 CFM 2. Open incoming air supply ball valve. 3. Set regulator labeled gun at 90 to 100 psi. Tighten packing nuts on the gun and trigger the gun 15 to 20 times. Snug packing nuts again and repeat gun triggering. Priming Solvent: 1. Open solvent tank lid and fill ¾ full. Install lid on tank and close the relief valve located on the top of the lid. Set flush tank pressure at 50 to 60 psi. 2. Push the flush valve on the side of the gun block to test solvent flush. Priming Catalyst to Gun: 1. Tighten the catalyst packing nut ¼ turn. Chapter 3 2. Fill the two gallon catalyst jug ¾ full, purge the air out of the catalyst feed line by slightly tilting the catalyst jug. 6
10 3. Lock the gun in the open position. Remove the pivot pin from the catalyst slide arm linkage. Use the slide arm to hand prime catalyst out to the gun until a steady stream is achieved. Do not reinstall pivot pin at this time. Priming Resin to Gun: NOTE The resin pump was tested using oil. It may require up to 1/2 gallon of gelcoat to be run through the unit to purge any remaining oil from the system. 1. Insert the gelcoat suction wand into container of gelcoat. 2. Tighten the gelcoat pump packing nut until snug only. Fill packing nut cavity ¾ full with suitable oil. 3. With the gun locked in the open position, slowly increase pump regulator pressure until pump is running at a slow but steady rate. Allow pump to run until a fairly steady stream of gelcoat is being dispensed. Close the gun and flush the gun head. 4. Increase gelcoat pump pressure to 100 psi. Allow the unit to set under static load for 15 to 30 minutes to seat the resin packing set. 5. Clamp or tape the resin return hose coming from the bottom of the in-line resin filter to the resin pickup wand and into the drum. Turn the resin pump regulator to zero. Slowly open the ball valve at the bottom of the resin filter to drain the fluid pressure. Charging the Resin Surge Chamber: 1. Open the ball valve below inline resin filter. 2. To charge the resin surge chamber, use the air hose with the female quick disconnect (charging hose) and insert over the male quick disconnect at the top of the resin surge chamber. Push down on female quick disconnect for 5 to 10 seconds and disengage. 3. Close ball valve below in-line filter. 7
11 Pressurizing Fluids: NOTE On the air manifold, the blue valve is the safety override. The small brass button next to the valve is the priming button. The SystemOne Unit is standard with a safety override valve. This valve opens and closes the air supply to the resin pump air motor. The valve will be opened when the gun trigger is opened or when the priming button is pushed down. NOTE Remove catalyst quick pin before pressurizing gelcoat pump. 1. Push down on the priming button and slowly increase gelcoat pump regulator, 40 to 50 psi would be a starting point. 2. Using the slide drive arm, use slow up and down motion to pressurize the catalyst pump. There should be a uniform gain in resistance between up and down strokes. 3. Pin the pivot pin into the slide arm. Set catalyst percentage. Gun Set-Up: 1. Install turbulent mixer into mix chamber. Insert static mixer and spray tip onto the air assist housing. Screw air-assist unto the gun mix housing. For longer turbulent mixer life, do not over tighten the air assist nozzle housing. Attach short air assist house from needle valve on side of gun handle to air-assist head. 2. Test spray pattern, make gelcoat pump pressure adjustment until a fairly uniform pattern is achieved. Slowly open the air-assist needle valve located on the side of the gun handle until a soft uniform pattern is achieved. 8
12 Chapter 4 Maintenance Schedule Daily Maintenance 1. Drain water trap. 2. Daily shutdown should include, remove air-assist tip and static mixers from housing and clean. Remove turbulent mixer and mix chamber from gun and clean. Lightly dampen a rag with solvent and wipe down gun head, handle and actuator. Do not soak gun in solvent. Weekly Maintenance Gelcoat Pump Packing Set Check gelcoat pump piston rod oil reservoir, inspect for gelcoat bypassing packing set. 1. Turn pump regulator to zero. Open ball valve at gelcoat filter to release gelcoat pressure. 2. Insert a rod or Philips screwdriver into one of the holes in the gelcoat-packing nut. Snug the packing nut. Do not over tighten. Power Cylinder Turn pump regulator to zero. Loosen the air hose fitting and add 10 to 15 drops of 90-weight non-detergent gear oil. 9
13 Gun Gun maintenance: Turn the pump regulator pressure to zero. Open up the ball valve at filter to relieve gelcoat fluid pressure. Open gun to relieve catalyst fluid pressure. Snug Pro gun packing nuts (light snug on catalyst packing nut) and trigger the gun on and off to seat the resin and catalyst seals. Repeat a second time. Filter & Accumulator 1. Turn gelcoat pump regulator to zero. Open ball valve at the gelcoat filter to relieve gelcoat fluid pressure. To bleed the charge in the accumulator, insert the small diameter rod in the charging valve on the top of the resin accumulator (check valve) and depress to bleed the charge off. Be sure to cover the rod with a rag. 2. To remove the gelcoat filter, remove the return hose from the ball valve. Un-screw the resin filter, clean the filter screen and core. Use Venus-Gusmer white grease on the filter housing threads. 3. Un-screw the gelcoat accumulator. Clean the accumulator, poly ball and thread on the nipple. Coat nipple, o-ring and poly ball with white grease. Inspect o-ring, replace as needed. Catalyst Pump 1. Inspect catalyst pump packing nut for leaking coming up through the packing set. Tighten the packing nut no more than one eighth of a turn at a time as needed. Wipe catalyst pump piston rod off with a clean dry towel. Six Month Maintenance Flush Tank 1. Release fluid pressure from flush tank and drain out solvent. Use a clean towel to wipe the inside of the tank clean. Wipe out any solid debris. Inspect flush tank o-ring, replace as needed. Hose Set 1. Inspect hose set for any kinks or wear, replace hoses as needed. The flush should be replaced once a year. Catalyst Jug & Feed Hose 1. Drain catalyst from jug, wash the jug out with distilled water and drain. Repeat a second time. Replace feed and return hose as needed. 10
14 IT IS ADVISED THAT THE FOLLOWING COMPONENTS BE REBUILT AFTER 6-MONTHS OF USE IN A 8-HOUR, 5-DAY A WEEK SHOP. Catalyst Pump 1. Minimum rebuild should include all o-rings, balls, piston seal and packing set. Gelcoat Pump 1. Minimum rebuild should include, packing set, piston cups and cylinder o-rings, Gun 1. Minimum rebuild should include all seals and o-rings. 11
15 Chapter 5 Parts Drawings 12
16 MAGNUM VENUS PRODUCTS 13
17 14
18 MAGNUM VENUS PRODUCTS 15
19 16
20 MAGNUM VENUS PRODUCTS 17
21 18
22 MAGNUM VENUS PRODUCTS 19
23 20
24 MAGNUM VENUS PRODUCTS 21
25 22
26 MAGNUM VENUS PRODUCTS 23
27 24
28 MAGNUM VENUS PRODUCTS 25
29 26
30 MAGNUM VENUS PRODUCTS 27
31 28
32 MAGNUM VENUS PRODUCTS 29
33 30
34 MAGNUM VENUS PRODUCTS 31
35 32
36
37
38
39
 854-2660 (800) 448-6035 Fax: (253) 854-1666 Email: info@venusmagnum.")
40 MVP Magnum Phone: (727) Fax: (727) Web: MVP Venus Phone: (253) (800) Fax: (253) Web: Magnum Venus Proeducts Manual Part No: M
Gelcoat Fluid Section
 3102-00-01 Fluid Section MAGNUM VENUS PRODUCTS Maintenance & Repair Manual Part No. M3102-00-01 Revision 05.30.01 Maintenance & Repair Manual Fluid Section Module MVP Venus Phone: (253) 854-2660 (800)
Putty 2000 Chop Check Start-Up Instructions
 Putty 2000 Chop Check Start-Up Instructions MAGNUM VENUS PRODUCTS Putty 2000 Chop Check Start-Up Instructions START-UP INSTRUCTIONS NOTE: The regulators marked pump, air lift and ram extraction should
FRP System Gelcoat Metering Pump MAGNUM VENUS PRODUCTS FRP System Gelcoat
 4101-00-01 Metering Pump MAGNUM VENUS PRODUCTS Maintenance & Repair Manual Part No. M6704-4-1 Revision 04.09.01 Maintenance & Repair Manual Metering Pump Module MVP Manufacturing/Sales Phone: (253) 854-2660
CENTURY EXTERNAL MIX GEL COAT SYSTEMS Models: CX2017HC-A and CX2017HC-B000000
 CENTURY EXTERNAL MIX GEL COAT SYSTEMS Models: CX2017HC-A000000 and CX2017HC-B000000 SPECIFICATIONS Maximum air inlet pressure: Maximum recommended continuous cycle rate: Air consumption @ 20 cycles/min
ULTRABOND Methacrylate Adhesive Dispensing unit IMP-DUO Start-Up Instructions
 ULTRABOND Methacrylate Adhesive Dispensing unit IMP-DUO-54646 Start-Up Instructions MAGNUM VENUS PLASTECH UltraBond Start-Up Instructions Rev. 5/07 START-UP INSTRUCTIONS 1. Attach main air supply to the
H.I.S. SYSTEMS INSTRUCTION MANUAL
 H.I.S. SYSTEMS INSTRUCTION MANUAL MAGNUM VENUS PRODUCTS H.I.S. INSTRUCTIONS MANUAL - 1 - H.I.S. Instruction Manual TABLE OF CONTENTS Preface Flow Diagram Safety Installation Portable Chopper Installation
11:1 PRO PUMP ASSEMBLY MAINTENANCE AND REPAIR MANUAL VPRO-45110
 11:1 PRO PUMP ASSEMBLY MAINTENANCE AND REPAIR MANUAL VPRO-45110 MAGNUM VENUS PRODUCTS MAINTENANCE & REPAIR MANUAL - VPRO-45110 Rev. 8/2006 2 PRO PUMP MAINTENANCE & REPAIR MANUAL Warranty Information DANGER
Service Handbook. High-Pressure Washer Pump
 Pump 629 9/28/01 3:22 PM Page 1 Service Handbook High-Pressure Washer Pump 3.532-629.0 10.00 Pump 629 9/28/01 3:22 PM Page 2 Pump 629 9/28/01 3:22 PM Page 3 TROUBLESHOOTING OVERVIEW How to Use This Manual
H.I.S. TM Troubleshooting Manual
 Magnum Venus Products H.I.S. TM Troubleshooting Manual The ABC s of the most economical method of applying material for the fiberglass industry TABLE OF CONTENTS Chapter 1: Materials Page 1 Chapter 2:
PENTECH, INC. BD Spray Gun. Operating Manual Parts Manual May, 2008 Issue 1. Plural Component, Impingement Mixing, Mechanical Purge Spray Gun
 PENTECH, INC. Operating Manual Parts Manual May, 2008 Issue 1 Plural Component, Impingement Mixing, Mechanical Purge Spray Gun BD Spray Gun PENTECH, INC. 7256 21 st Street East Sarasota, FL 34243 Phone:
Airless Spray Gun INSTRUCTIONS DP psi (345 bar) Maximum Working Pressure
 Maximum Working Pressure") INSTRUCTIONS DP-6376 Airless Spray Gun 5000 psi (345 bar) Maximum Working Pressure INSTRUCTIONS This manual contains important warnings and information. READ AND KEEP FOR REFERENCE. Table of Contents Warnings......................................
INSTRUCTIONS DP-6376 Airless Spray Gun 5000 psi (345 bar) Maximum Working Pressure INSTRUCTIONS This manual contains important warnings and information. READ AND KEEP FOR REFERENCE. Table of Contents Warnings......................................
Reactor Startup Checklist
 Reactor Startup Checklist This checklist is for supplemental training of Graco distributors on Fusion and Reactor products. It is not a replacement for reading and understanding the manuals or other training
Electric Airless Sprayers Operating Instructions
 Electric Airless Sprayers Operating Instructions 309365 Rev. A 3000 psi (210 bar, 21 MPa) Maximum Working Pressure How To Perform: Component Identification....... 3 Setup........................... 4 Startup..........................
MVP Patriot Systems Operations Manual
 MVP Patriot Systems Operations Manual Models: - FIT-C-HVPAT - FIT-C-PAT - FIT-W-HVPAT - FIT-W-PAT - IMC-HVPAT - IMC-PAT - IMG-PAT - IMW-HVPAT - IMW-PAT - MCS-PAT - MGS-PAT - MWS-PAT - SF-FIT-C-PAT - SF-FIT-G-PAT
Page 1 of 19. Part# /10/2006
 Part# 1002733-01 10/10/2006 This manual contains important information concerning the installation and operation of the gun washers listed above. Read manual thoroughly and keep for future reference INSTRUCTIONS
EXTERNAL MIX GEL COAT GUN Repair Manual EMG-1000 & EMG-1500
 EXTERNAL MIX GEL COAT GUN Repair Manual EMG-1000 & EMG-1500 MAGNUM VENUS PLASTECH GEL COAT GUN REPAIR MANUAL Rev. 04/04/2007 EMG-1000 & EMG-1500 Gel Coat Gun Manual TABLE OF CONTAINS: WARNING AND SAFETY
HYDRAULICS. TX420 & & lower. Hydraulic Tandem Pump Removal. 4. Remove the LH side panel (Fig. 0388).
.") TX420 & 425 240000299 & lower 4. Remove the LH side panel (Fig. 0388). Hydraulic Tandem Pump Removal Note: Cleanliness is a key factor in a successful repair of any hydraulic system. Thoroughly clean all
TX420 & 425 240000299 & lower 4. Remove the LH side panel (Fig. 0388). Hydraulic Tandem Pump Removal Note: Cleanliness is a key factor in a successful repair of any hydraulic system. Thoroughly clean all
Warning and Safety Precautions
 EXPRESS WARRANTY AND DISCLAIMER OF IMPLIED WARRANTIES Lily Corporation unconditionally guarantees its products to be free of defects in material or workmanship and further warrants that, for a period of
DISPLACEMENT PUMP INSTRUCTIONS-PARTS LIST Rev. K. Model , Series A Model , Series B Model , Series A
 INSTRUCTIONS-PARTS LIST INSTRUCTIONS This manual contains important warnings and information. READ AND KEEP FOR REFERENCE. DISPLACEMENT PUMP 308190 Rev. K 3000 psi (210 bar) MAXIMUM WORKING PRESSURE Model
User Manual for the ProFlow 1K Release: User Manual for the ProFlow 1K_Rev_A PVA Support Hub. User Manual for the ProFlow 1K
 PVA Support Hub User Manual for the ProFlow 1K Collection of guides and pages for the operation and maintenance of the ProFlow 1K. Written By: Technical Writing 2017 support.pva.net Page 1 of 18 INTRODUCTION
B14 AAA FINE FINISH SERIES PUMP OUTFIT
 PRODUCT INFORMATION B14 AAA FINE FINISH SERIES PUMP OUTFIT The B14 AAA pump system is an air assisted airless unit which combines airless and conventional or HVLP air atomization technologies to produce
B14 AAA FINE FINISH SERIES PUMP OUTFIT
 PRODUCT INFORMATION B14 AAA FINE FINISH SERIES PUMP OUTFIT The B14 AAA pump system is an air assisted airless unit which combines airless and conventional or HVLP air atomization technologies to produce
Service Handbook High-Pressure Washer Pump
 Service Handbook High-Pressure Washer Pump 9.120-014.0 2 A. Water Inlet Filter C. Nozzle Insert 1. Remove filter with a screwdriver. 2. Clean filter with warm water and mild soap. 3. Reinstall filter.
Paint/Solvent/Dump Valve and Flow-Through Valve
 Instruction Sheet P/N 08573D Paint/Solvent/Dump Valve and Flow-Through Valve. Description See Figure. The paint/solvent/dump valve is a normally-closed valve that opens to trigger and/or dump coating material.
DO NOT INSTALL, OPERATE, OR MAINTAIN AN ATI PRODUCT UNLESS TRAINED AND QUALIFIED IN PRODUCT AND ACCESSORY INSTALLATION, OPERATION AND MAINTENANCE.
 IOM Supplement IOMS003 ATI HO1/HO2 HYDRAULIC OVERRIDE Scope of Supplement This supplement is intended to assist those who are involved with the installation, operation and maintenance of ATI Linear Actuators
D Instructions/Parts. Siphon Feed Detail Spray Gun D
 Instructions/Parts D-5-55 Siphon Feed Detail Spray Gun FOR PRODUCT INFORMATION CALL: 1-800-742-7731 309991D Important Safety Instructions Read all warnings and instructions in this manual. Save these instructions.
GX-7A, GX-7 DI, and GX Spray Guns
 Operation, Parts, Service, Repair GX-7A, GX-7 DI, and GX-7 400 Spray Guns 311321M EN For use with non-flammable polyurethane foams, two-component coating systems (polyureas), and some two-component epoxy
MGFHVLP. Instructions/Parts. Mini Gravity Feed System E. Part No Includes MGFHVLP Mini Gravity Feed Spray Gun and MGC 125 Gravity Cup.
 Instructions/Parts MGFHVLP Mini Gravity Feed System FOR PRODUCT INFORMATION CALL: 1-800-742-7731 309989E For gravity feed spraying of automotive colors and clears. Ideal for touch-up and detail work. Important
Instruction Book DeLaval Barrier Teat Dip Spray Extension Kit
 Instruction Book DeLaval Barrier Teat Dip Spray Extension Kit - 0910 - Safety precautions DeLaval Barrier Teat Spray Exstention Kit Safety precautions Read carefully before using the product! For best
New & Improved VariFlo Plural Component Equipment. Low Pressure Polymer Dispensing Equipment
 New & Improved VariFlo Plural Component Equipment Low Pressure Polymer Dispensing Equipment Table of Contents Page One Page Two Page Three Page Four Page Five Page Six Page Seven Page Eight Page Nine Page
APS FIT Chop System. FIT-C-APS-3 Maintenance & Repair. MAGNUM VENUS PRODUCTS Maintenance & Repair Manual. Part No. FIT-C-APS-3 Revision
 APS FIT Chop System FIT-C-APS-3 Maintenance & Repair MAGNUM VENUS PRODUCTS Maintenance & Repair Manual Part No. FIT-C-APS-3 Revision 05.14.04 APS FIT Chop System Maintenance & Repair Manual Corporate HQ
MicroCoat System Operating Manual MC4000 Series MC785M, MC785M-WF Spray Valves
 MicroCoat System Operating Manual MC Series MC785M, MC785M-WF Spray Valves A NORDSON COMPANY Introduction The MicroCoat System provides precise lubrication control for metal stamping operations. The MC
INSTALLATION INSTRUCTIONS
 INSTALLATION INSTRUCTIONS REAR DISC BRAKE CONVERSION KIT A126-3 1988-98 CHEVY K1500 4WD 10" DRUMS Thank you for choosing STAINLESS STEEL BRAKES CORPORATION for your braking needs. Pleases take the time
H2O-C14 AAA FINE FINISH SERIES PUMP OUTFIT
 PRODUCT INFORMATION H2O-C14 AAA FINE FINISH SERIES PUMP OUTFIT The H2O-C14 AAA pump system is an air assisted airless unit which combines airless and conventional or HVLP air atomization technologies to
MODELS 9917, , 9946P and 9989 High Pressure Lubrigun Series A
 MODELS 9917, 9917-57, 9946P and 9989 Series A NOTE: Pails and Drums shown for illustration only. not included with models. MAR - 2007 Section - A5 Page - 84 DESCRIPTION Models 9917, 9917-57, 9946P, and
Heavy Duty Sprayer Owners Manual Model MS-O
 Heavy Duty Sprayer Owners Manual Model MS-O Table of Contents Warranty 4 Warning 5 Assembly and Preparation 6 Operation 7 Cleaning and Storage 7 Standard Spray Gun & Parts List 8 Trigger Style Spray Gun
MODEL T26746 FOOT-OPERATED GREASE PUMP INSTRUCTIONS
 MODEL T26746 FOOT-OPERATED GREASE PUMP INSTRUCTIONS For questions or help with this product contact Tech Support at (570) 546-9663 or techsupport@grizzly.com Introduction The Model T26746 Foot-Operated
MicroCoat. System Operating Manual MC2000 Series. MC785, MC785-WF Spray Valves. US: UK: Mexico:
 MicroCoat System Operating Manual MC2 Series MC785, MC785-WF Spray Valves A NORDSON COMPANY US: 8-498-8865 UK: 8 585733 Mexico: 1-8-556-3484 Introduction The MicroCoat System provides precise lubrication
Proportioning Pumps INSTRUCTIONS PARTS LIST HYDRA-CAT FIXED RATIO. Available as Bare Pumps,* Wall-Mounted* or Free-Standing* Models CODE NUMBER
 INSTRUCTIONS PARTS LIST INSTRUCTIONS This manual contains important warnings and information. READ AND KEEP IT FOR REFERENCE. First choice when quality counts. 308986 Rev. B HYDRA-CAT FIXED RATIO Proportioning
Fast-Flo Pump INSTRUCTIONS-PARTS LIST. Table of Contents 1:1 RATIO
 INSTRUCTIONS-PARTS LIST INSTRUCTIONS This manual contains important warnings and information. READ AND KEEP FOR REFERENCE. First choice when quality counts. 07 7 Rev. Z Supersedes W Includes Rev. Y changes
OWNER S MANUAL. Model: LG-25-BL-QR ( ) (25 Gallon ATV Dual Nozzle Sprayer) ***IMPORTANT REMINDER*** Technical Specifications
 (25 Gallon ATV Dual Nozzle Sprayer) ***IMPORTANT REMINDER*** Technical Specifications") OWNER S MANUAL Model: LG-25-BL-QR (5302323) (25 Gallon ATV Dual Nozzle Sprayer) Technical Specifications 25 Gal. Corrosion-Resistant Polyethylene Tank 12 Volt Diaphragm Pump, 3.8 g.p.m. 45 psi Deluxe Pistol
OWNER S MANUAL Model: LG-25-BL-QR (5302323) (25 Gallon ATV Dual Nozzle Sprayer) Technical Specifications 25 Gal. Corrosion-Resistant Polyethylene Tank 12 Volt Diaphragm Pump, 3.8 g.p.m. 45 psi Deluxe Pistol
Athletic Field Painting Pointers Line Star Drawing Line Star Parts List 3-4. Spray Boom Drawing Stainless Steel Tank 6
 TABLE OF CONTENTS TITLE PAGE Athletic Field Painting Pointers 1 44-508 Line Star Drawing 2 44-508 Line Star Parts List 3-4 Spray Boom Drawing 5 40-127 Stainless Steel Tank 6 4085 Spray Gun 7 40-153 Gun
OWNER S MANUAL Model: LG ( ) (25 Gallon Lawn & Garden Trailer Sprayer)
 (25 Gallon Lawn & Garden Trailer Sprayer)") OWNER S MANUAL Model: LG-2500-304 (5301440) (25 Gallon Lawn & Garden Trailer Sprayer) Technical Specifications 25 Gallon Corrosion-Resistant Polyethylene Tank 12 Volt Diaphragm Pump, 2.1 g.p.m. 60 psi
OWNER S MANUAL Model: LG-2500-304 (5301440) (25 Gallon Lawn & Garden Trailer Sprayer) Technical Specifications 25 Gallon Corrosion-Resistant Polyethylene Tank 12 Volt Diaphragm Pump, 2.1 g.p.m. 60 psi
INSTRUCTION MANUAL. Portable Greasing System S1180, REV C GS
 INSTRUCTION MANUAL S1180, REV C Portable Greasing System GS-5 Fully Portable & single person operation manual greasing system designed for volume greasing in workshop environments, site applications, on
JARVIS. Model 30CL-1 and 30CL-3 Hock Cutter and Dehorner
 Model 30CL-1 and 30CL-3 Hock Cutter and Dehorner 30CL--1 Hock Cutter 30CL--1 Pistol Grip 30CL--3 Dehorner EQUIPMENT SELECTION... Ordering No. 30CL--1 Hock Cutter... 4025013 30CL--1 Hock Cutter with Grabber
Impregnator Roll Goods Wet Out Unit
 Impregnator Roll Goods Wet Out Unit MAGNUM VENUS PLASTECH Part No. 90037- Operations Manual Table of Contents Impregnator Roll Goods Wet Out Unit Operations Manual IMPREGNATOR CONCEPT TYPES OF REINFORCEMENTS
AIRMIX PUMP and LOW-PRESSURE PUMP air motor with reversing block
 INSTRUCTION MANUAL AIRMIX PUMP and LOW-PRESSURE PUMP air motor with reversing block Manual : 0306 573.002.212 Date : 12/06/03 Supersedes : 17/06/02 Modif. 1 + 4 added KREMLIN REXSON Site de Stains : 150,
Alpha Tech Pet, Inc. HydroMAID - "Mobile Automated Integrated Diluter" Rechargeable Battery
 Alpha Tech Pet, Inc. HydroMAID - "Mobile Automated Integrated Diluter" Rechargeable Battery WEAR ALWAYS THANK YOU FOR CHOOSING OUR PRODUCTS Please use this equipment carefully and observe all warnings
JARVIS. Model 30CL-1 AND 30CL-3 Hock Cutter and Dehorner. 30CL-1 Hock Cutter
 Model 30CL-1 AND 30CL-3 Hock Cutter and Dehorner 30CL-1 Hock Cutter with Leg Grabber 30CL-1 Hock Cutter 30CL-3 Dehorner Equipment Selection 30CL-1 Sheep Head Dropper Order Number 30CL-1 Hock Cutter 30CL-1
INSTRUCTIONS. Fc. -1,<" SERIES ST-261 REGULATING UNLOADER VALVE
 INSTRUCTIONS Fc. -1,
WA 2719 ( 604 ) ( 604 ) , H.E.R.O.
 ( 604 ) , H.E.R.O.") a division of Middlefield Bancorp Limited 2719 Lake City Way, Burnaby, B.C., Canada Phone: ( 604 ) 420-6543 Fax: ( 604 ) 420-8725 Toll Free: 1-800-494-4376 E-mail: sales@hero.ca Website: www.hero.ca U.S.
a division of Middlefield Bancorp Limited 2719 Lake City Way, Burnaby, B.C., Canada Phone: ( 604 ) 420-6543 Fax: ( 604 ) 420-8725 Toll Free: 1-800-494-4376 E-mail: sales@hero.ca Website: www.hero.ca U.S.
Brake System H TX, H2.0TXS [B475]; H TX [B466] Safety Precautions Maintenance and Repair
![Brake System H TX, H2.0TXS [B475]; H TX [B466] Safety Precautions Maintenance and Repair](/thumbs/86/93834005.jpg "Brake System H TX, H2.0TXS [B475]; H TX [B466] Safety Precautions Maintenance and Repair") HMM180001 Brake System H1.5-1.8TX, H2.0TXS [B475]; H2.5-3.5TX [B466] Safety Precautions Maintenance and Repair When lifting parts or assemblies, make sure all slings, chains, or cables are correctly fastened,
HMM180001 Brake System H1.5-1.8TX, H2.0TXS [B475]; H2.5-3.5TX [B466] Safety Precautions Maintenance and Repair When lifting parts or assemblies, make sure all slings, chains, or cables are correctly fastened,
Welker Sampler. Installation, Operation, & Maintenance Manual. Model GSS-4HP
 Installation, Operation, & Maintenance Manual Welker Sampler Model GSS-4HP The information in this manual has been carefully checked for accuracy and is intended to be used as a guide to operations. Correct
INSTALLATION INSTRUCTIONS FOR THE TRUCK MOUNTED VIPER ADDITIVE INJECTION SYSTEM GTP-8776C
 INSTALLATION INSTRUCTIONS FOR THE TRUCK MOUNTED VIPER ADDITIVE INJECTION SYSTEM GTP-8776C This additive injection system was designed to be used with five gallon jug of additive. The system is supplied
TOLL FREE
 Title: GOSS METRO-LINER UNIT Table of Contents 1-888-434-0888 AIR SYSTEM Main Air Line & Unit Air Line 3 Pneumatic Switches & Indicators 4 Pneumatic Safety System 5 10 & 13 Side Legs - Operator Side 6
Operating Manual High Viscosity Dispense Valve Item #
 Operating Manual High Viscosity Dispense Valve Item # 984594 CLOSE OPEN Item # 984594 Label # 8901197 Warnings INJECTION HAZARD Spray from the valve, hose leaks, or ruptured components can inject fluid
Table of Contents WARRANTY
 a division of Middlefield Bancorp Limited 2719 Lake City Way, Burnaby, B.C., Canada Phone: ( 604 ) 420-6543 Fax: ( 604 ) 420-8725 Toll Free: 1-800-494-4376 E-mail: sales@hero.ca Website: //www.hero.ca
THANK YOU FOR CHOOSING BATHERBOX GETTING STARTED WHAT S IN THE BOX? N. Northview Ave Sioux Falls, SD 57107
 INSTRUCTION MANUAL THANK YOU FOR CHOOSING BATHERBOX You are on your way to creating an unmatched bathing experience both for you and the lucky animal. The BatherBox is designed to save you hours of time
MID RISE. INSTALLATION and OPERATION MANUAL MODEL 6000A // 6000E 6,000 LB. CAPACITY. READ and SAVE THIS INSTRUCTION MANUAL
 INSTALLATION and OPERATION MANUAL MID RISE MODEL 6000A // 6000E 6,000 LB. CAPACITY READ and SAVE THIS INSTRUCTION MANUAL AUGUST 2005 6-0944 6500 Millcreek Drive Mississauga, Ontario Canada L5N 2W6 1-800-268-7959
*Please Note* All Instructions, Manuals, Extra Orifices, Adjustment Tools, Setting Charts, Etc. MUST BE GIVEN TO END USER!
 *Please Note* All Instructions, Manuals, Extra Orifices, Adjustment Tools, Setting Charts, Etc. MUST BE GIVEN TO END USER! JD1775 Exact Emerge 12 Row Starter Fertilizer Installation Instructions L&D Ag
OWNER S MANUAL. Model: ATV ( ) ***IMPORTANT REMINDER*** Technical Specifications. Assembly Instructions. General Information
 ***IMPORTANT REMINDER*** Technical Specifications. Assembly Instructions. General Information") OWNER S MANUAL Technical Specifications 25 Gal. Corrosion-Resistant Polyethylene Tank 12 Volt Diaphragm Pump, 2.1 g.p.m. 60 psi 15 Ft. Handgun Hose (3/8 I.D.) 15 Ft. Vertical throw, 30 Ft. Horizontal Throw
OWNER S MANUAL Technical Specifications 25 Gal. Corrosion-Resistant Polyethylene Tank 12 Volt Diaphragm Pump, 2.1 g.p.m. 60 psi 15 Ft. Handgun Hose (3/8 I.D.) 15 Ft. Vertical throw, 30 Ft. Horizontal Throw
OWNER S MANUAL Model: LG ( ) (15 Gallon Lawn & Garden Trailer Sprayer)
 (15 Gallon Lawn & Garden Trailer Sprayer)") OWNER S MANUAL Model: LG-1500-304 (5301439) (15 Gallon Lawn & Garden Trailer Sprayer) Technical Specifications 15 Gallon Corrosion-Resistant Polyethylene Tank 12 Volt Diaphragm Pump, 2.1 g.p.m. 60 psi
OWNER S MANUAL Model: LG-1500-304 (5301439) (15 Gallon Lawn & Garden Trailer Sprayer) Technical Specifications 15 Gallon Corrosion-Resistant Polyethylene Tank 12 Volt Diaphragm Pump, 2.1 g.p.m. 60 psi
WARNING Carefully Read These Instructions Before Use
 DO NOT RETURN THIS SPRAYER TO STORE Call: 1-800-950-4458 Backpack Sprayer Use and Care Manual Manufactured for Northern Tool + Equipment Co., Inc. WARNING Carefully Read These Instructions Before Use Model
Instructions Parts List
 Instructions Parts List : RATIO Fast Flo Pump Air operated piston transfer pump for low viscosity fluids. For professional use only. Only models that are EX certified are approved for use in European explosive
INSTRUCTIONS. US Patent Pending HVLP Turbine Guns
 INSTRUCTIONS 309317 INSTRUCTIONS This manual contains important warnings and information. READ AND KEEP FOR REFERENCE. Rev. A US Patent Pending HVLP Turbine Guns 10 psi (0.07 MPa,.7 bar) Maximum Inlet
JARVIS. Model 30CL-ABC Beef Aitch Bone Cutter
 Model 30CL-ABC Beef Aitch Bone Cutter EQUIPMENT SELECTION... Ordering No. TABLE OF CONTENTS... Page 30CL--ABC Aitch Bone Cutter Front Entry... 4025102 Rear Entry... 4025111 Hydraulic Power Unit... 4027266
Table of Contents WARRANTY
 H.E.R.O. Industries a division of Middlefield Bancorp Limited 2719 Lake City Way, Burnaby, B.C., Canada Phone: ( 604 ) 420-6543 Fax: ( 604 ) 420-8725 Toll Free: 1-800-494-4376 E-mail: sales@hero.ca Website:
GRAVITY FEED SPRAY GUN & CUP SPECIFICATIONS. Operating Instructions Warning Information Parts Breakdown. Fluid Orifice mm. Air Inlet:...
 Operating Instructions Warning Information Parts Breakdown SPECIFICATIONS Fluid Orifice... 1.4mm Air Inlet:...1/4 NPT Rec. Max. Inlet Pressure:...50 PSI CFM:... 3.1 at 50 PSI Nozzle Pressure... 10 PSI
Paint Pumps INST Manual
 OP Series Air Motor Paint Pumps INST Manual OPERATING MANUAL WITH PARTS IDENTIFICATION IPM INC. Manufactured by International Pump Manufacturing, Inc. Covers models: IP22, IP23 and IP24. Manual Number:
Air-Assist Service Jack Max. Capacity: 10 Tons
 Form No. 565786 Parts List & Operating Instructions for: 1511B Air-Assist Service Jack Max. Capacity: 10 Tons 109 67 66 68 77 69 70 78 95 94 107 106 108 26 71 72 72 93 X L 65 75 92 91 90 89 88 87 86 85
Module. Table of Contents. Section 9. Module NOTE: This section applies to applicators with bead or slot modules.
 9-1 Section 9 NOTE: This section applies to applicators with bead or slot modules. Table of Contents... 9-1 Introduction... 9-3 Overview... 9-7 Service... 9-9 Adjusting a ClassicBlue Zero-Cavity... 9-9
Solvent Purge Plural Component Gun
 Instructions-Parts 30648C Solvent Purge Plural Component Gun 248597, Series A Solvent Purge Manual Spray Gun 248647, Series A Machine Mount Spray Valve with Manual Solvent Purge 248603, Series A Standard
BEFORE BEGINNING INSTALLATION
 COMPLETE CHASSIS FUEL LINE KITS For 1996-2000 Honda Civic Equipped with B-Series Engine INSTALLATION INSTRUCTIONS PLEASE study these instructions carefully before beginning this installation. Most installations
INSTALLATION INSTRUCTIONS
 INSTALLATION INSTRUCTIONS REAR DISC BRAKE CONVERSION KITS A112, A112-1 & A112-93 1979-93 FORD MUSTANG with 7.5" & 8.8" AXLES Thank you for choosing STAINLESS STEEL BRAKES CORPORATION for your braking needs.
Remove utility bag from plastic and install onto pivot arm with attached straps. Install utility bag with zippers facing away from machine.
 Owner s Manual Packing List: C3XP Unit Spray gun w/ 2 settings 12-volt battery Telescoping handle Removable Cleaning Caddy Pivot arm Utility Bag 10 Gallon water reservoir (integral) 17 ft. discharge hose
ULTIMATE Plus+ 600 Airless Paint Sprayer
 OWNER S MANUAL 820 204 Rev. K Supercedes Rev. G, H & J This manual contains important warnings and information. READ AND RETAIN FOR REFERENCE ELECTRIC, 120 VAC ULTIMATE Plus+ 600 Airless Paint Sprayer
HYDROSTATIC TEST SYSTEM MANUAL
 PDQC HYDROSTATIC TEST SYSTEM MANUAL Technical Specification Operating Instructions Part List Revised 12-2016 Manual # PDQC- 6,000 And PDQC-10,000 1 PDQC PERFORMANCE DATA Model Number Maximum Pressure Volume
T1-Titanium Non-HVLP Spray Gun
 T1-Titanium Non-HVLP Spray Gun THE SPRAY GUN PEOPLE FOR PRODUCT INFORMATION CALL: 1-800-742-7731 Important Safety Instructions Read all warnings and instructions in this manual. Save these instructions.
F 167/94 07/ GM-
 5.956 172 F 167/94 07/95 1750 GM- 1750 GM 3 4 2 5 1 16 7 6 8 9 10 15 11 14 12 13 9 1. Unit Start-Up 1750 GM 1 Spray lance with pressure control 2 Spray lance extension 3 Hand gun 4 Safety catch 5 Handle
STALLION SOFT WASH SYSTEM Operations Manual
 STALLION SOFT WASH SYSTEM Operations Manual INTRODUCTION Congratulations on your choice of a Delux Stallion Soft Wash System. We are certain you will be pleased with your purchase. This manual was created
OWNER S MANUAL. Model: LG-30-TRL ( ) (30 Gallon Lawn & Garden Trailer Sprayer)
 (30 Gallon Lawn & Garden Trailer Sprayer)") OWNER S MANUAL Model: LG-30-TRL (5302317) (30 Gallon Lawn & Garden Trailer Sprayer) Technical Specifications 30 Gal. Corrosion-Resistant Polyethylene Tank 12 Volt Diaphragm Pump, 2.1 g.p.m. 60 psi 15 Ft.
OWNER S MANUAL Model: LG-30-TRL (5302317) (30 Gallon Lawn & Garden Trailer Sprayer) Technical Specifications 30 Gal. Corrosion-Resistant Polyethylene Tank 12 Volt Diaphragm Pump, 2.1 g.p.m. 60 psi 15 Ft.
OPERATION MANUAL NT50 NOMAD TRANS-FLO AIR-OPERATED DOUBLE DIAPHRAGM PUMPS. A JDA Global Company. 7/11 rev. 1
 OPERATION MANUAL NT50 NOMAD TRANS-FLO AIR-OPERATED DOUBLE DIAPHRAGM PUMPS A JDA Global Company 7/11 rev. 1 CAUTION SAFETY POINTS TEMPERATURE LIMITS: Neoprene -17.8 C to 93.3 C 0 F to 200 F Buna-N -12.2
SINGLE ACTION FLUID PUMP
 SINGLE ACTION FLUID PUMP MODELS 4490, 4491, 4492 S SERIES A Model 4492 (Stub Pump) Model 4491 (250-275 Gal) Model 4490 (16-55 Gal) Model A52347R-248 (250-275 Gal NOV - 2006 Section -A6 Page -63A Table
ICS Integrated Cleaning System. Rechargeable Battery
 ICS 8900 Integrated Cleaning System Rechargeable Battery THANK YOU FOR CHOOSING OUR PRODUCTS Hydro Systems manufactures quality chemical proportioners. Please use this equipment carefully and observe all
AUTOMATIC AIRSPRAY GUN
 INSTRUCTION MANUAL AUTOMATIC AIRSPRAY GUN Manual : 0407 573.011.212 Date : 19/07/04 Supersede : KREMLIN REXSON - Site de Stains : 150, avenue de Stalingrad 93 245 - STAINS CEDEX - FRANCE Téléphone : 33
BE 20 IMI Cornelius Orange Juice Dispenser Model Quest Elite QLT 2000
 BEVERAGE EQUIPMENT BE 20 IMI Cornelius Orange Juice Dispenser Model Quest Elite QLT 2000 Daily maintenance tasks BE 20 D1 Flush orange juice system Weekly maintenance tasks BE 20 W1 Sanitize orange juice
Lifting height 5.5" - 72" with adapters " Height overall 165" Width between columns 122" Drive through 109" Width overall 151.
 Model Number TP12KC-D Capacity 12,000 lbs. Lifting height 5.5" - 72" with adapters 79.625" Height overall 165" Width between columns 122" Drive through 109" Width overall 151.125" Arm extension 37.5" -
WORKHORSE. Assembly / Operation Instructions / Parts 15 GALLON TRAILER SPRAYER
 WORKHORSE S P R A Y E R S Assembly / Operation Instructions / Parts GALLON TRAILER SPRAYER by, a Division of Green Leaf, Inc MODELS #LGSTS & LGDTS GALLON TRAILER SPRAYER Compact Trailer and Tank Polyethylene
A-4000 Series Oil Removal and Pressure Reducing Stations & Air Compressor Accessories
 Pneumatic Air Supply Manual 718 Filter Stations Section Product Bulletin Issue Date 0907 A-4000 Series Oil Removal and Pressure Reducing Stations & Air Compressor Accessories Oil Removal and Pressure Reducing
PSR-HP-3000 MANUAL HAND PUMP INTERNAL LIQUID CAPICITY MAXIMUM OUTPUT PRESSURE PsiG (BarG) GALLONS (LITERS) 3000 (207) 5 (19)
 GALLONS (LITERS) 3000 (207) 5 (19)") PAGE 1 OF 6 P-SERIES HAND PUMP OPERATING INSTRUCTIONS WARNING: PRESSURE TESTING IS INHERENTLY DANGEROUS. STRICT ADHERENCE TO THESE OPERATING INSTRUCTIONS AND INDUSTRY SAFETY PRACTICES COULD PREVENT INJURY
PAGE 1 OF 6 P-SERIES HAND PUMP OPERATING INSTRUCTIONS WARNING: PRESSURE TESTING IS INHERENTLY DANGEROUS. STRICT ADHERENCE TO THESE OPERATING INSTRUCTIONS AND INDUSTRY SAFETY PRACTICES COULD PREVENT INJURY
SB-1821-E. Instructions for Models: What You Need To Know: Tools: Required: Need Help? For additional assistance or service call: Helpful:
 Instructions for Models: SB-8 SB-8-E What You Need To Know: Tools: Required: *Adjustable Wrench *Groove Joint Pliers *Philips Screwdriver Important Notes: Be sure to read instructions thoroughly before
Oregon Fuel Injection
 Cummins PT Fuel Pump Diagnostic No Start, with no smoke 1. This could be caused by the fuel pump not turning or a seized gear pump. Remove the fuel supply hose and the fuel inlet fitting from the gear
OWNER S MANUAL. Model: ATV-20-2 ( ) ***IMPORTANT REMINDER*** Technical Specifications. Assembly Instructions. General Information
 ***IMPORTANT REMINDER*** Technical Specifications. Assembly Instructions. General Information") OWNER S MANUAL Model: ATV-20-2 (5301551) (20 Gallon Lawn & Garden/ATV Sprayer) Technical Specifications 20 Gal. Corrosion-Resistant Polyethylene Tank 12 Volt Diaphragm Pump, 2.1 g.p.m. 60 psi 15 Ft. Handgun
OWNER S MANUAL Model: ATV-20-2 (5301551) (20 Gallon Lawn & Garden/ATV Sprayer) Technical Specifications 20 Gal. Corrosion-Resistant Polyethylene Tank 12 Volt Diaphragm Pump, 2.1 g.p.m. 60 psi 15 Ft. Handgun
Module. Section 9. NOTE: This section applies to applicators with CC200 modules B Issued 6/01. Manual 42-CF200-CM-01
 Section 9 NOTE: This section applies to applicators with CC200 modules. 9-0 Table of Contents i Table of Contents Section 9 1. Introduction............................................... 9-1 2. Specifications.............................................
INSTALLATION INSTRUCTIONS
 INSTALLATION INSTRUCTIONS REAR DISC CONVERSION KIT A126-2 1988-98 C1500 2WD 10" REAR DRUM Thank you for choosing STAINLESS STEEL BRAKES CORPORATION for your braking needs. Pleases take the time to read
JARVIS. Model Hydraulic Cutter EQUIPMENT... TABLE OF
 Model 425-16 Hydraulic Cutter Standard Handles Pistol Grip and D Handle EQUIPMENT SELECTION... Ordering No. TABLE OF CONTENTS... Page Model 425--16 Cutter Standard Handles... 4025072 Pistol Grip and D
Mudhen Portable Slurry System Owners Manual
 Mudhen Portable Slurry System Owners Manual Industrial Contractors Supplies, Inc. 412. 824. 6933 www.icscompany.net Mudhen Manual Page 1 MUDHEN MANUAL 1 Disclaimer & Safety Notice 2 2 Safety Notice 3 3
180 Lake Ave North Paynesville, MN Phone: MASTER MANUFACTURING MASTER GARDNER
 180 Lake Ave North Paynesville, MN 56362 Phone: 1-800-864-1649 www.master-mfg.com MASTER MANUFACTURING MASTER GARDNER Part Number PCD-E3-009B-MM Rev 2 Dec. 2012 Note: Do not return product to the distributor/dealer
TECHNICAL DATA CAUTION
 Page 1 of 6 1. DESCRIPTION The Viking Model D-2 Accelerator is a quick-opening device, with an integral anti-flood assembly, used to increase the operating speed of a differential type dry pipe valve.
Hydraulics. Part B, Section 1. This section covers the following unit configurations. 3700V 3800V 3900V
 Part B, Section 1 Model Voltage Pump Manifold Control This section covers the following unit configurations. 3500V 3700V 3800V 3900V All Piston (F) 4-Port (A) 6-Port (B or C) -Port (S or T) Vista Standard