The Bloody Battle for Tilly-sur-Seulles: The Pompadours Revenge The 2nd Essex Regiment s Final Assault on Tilly-sur-Seulles 18th/19th June 1944
|
|
|
- Jordan Stone
- 6 years ago
- Views:
Transcription

![At the same time a German tank, possibly a Panther, came out of the road across our front. Captain Davies told us to fire a Dustbin [290mm Petard round] at it, only 50 yards away.](/docs-images/72/67083486/images/1-1.jpg "I traversed our turret slightly to the right, took aim and fired at its turret ring. The round hit a telegraph pole about three feet from the enemy tank.")
1 The Bloody Battle for Tilly-sur-Seulles: The Pompadours Revenge The 2nd Essex Regiment s Final Assault on Tilly-sur-Seulles 18th/19th June 1944 A Scenario for Battlefront: WWII By R Mark Davies As we came near the crossroads, there was an explosion near the front of our AVRE. I immediately sprayed MG rounds at some bushes, where we thought they had fired at us. At the same time a German tank, possibly a Panther, came out of the road across our front. Captain Davies told us to fire a Dustbin [290mm Petard round] at it, only 50 yards away. I traversed our turret slightly to the right, took aim and fired at its turret ring. The round hit a telegraph pole about three feet from the enemy tank. When the smoke and dust cleared the tank had stopped and did not move again. We agreed that the blast had put it out of action. Sapper Sydney Blaskett, No.1 Troop, 81 Assault Squadron, Royal Engineers. When we eventually got into Tilly it was devastated. The civilians were living in trenches dug in their gardens. We didn t realise then that it had taken so many operations to take this town. - Sergeant Charles Benford, Carrier Platoon, S Company, 2nd Battalion, The Essex Regiment Historical Background to the Battle of Tilly-sur-Seulles On D-Day, 6th June 1944, the British XXX Corps, spearheaded by 50th (Northumbrian) Infantry Division, 56th Independent Infantry Brigade and 8th Armoured Brigade, stormed ashore on Gold Beach, just to the northeast of the ancient Norman city of Bayeux. Having got ashore relatively safely and having almost reached it s D-Day objectives, XXX Corps objective was now to drive south for a further 13 miles, to seize its D+1 objective: the high ground and road hub of Villers-Bocage. The famed 7th Armoured Division, the Desert Rats, had begun landing on Gold Beach late on D-Day, and would provide the armoured punch for the drive to Villers-Bocage. However, having shaken off their lethargy of 6th June, the panzers were on the move; 12. SS- Panzer-Division Hitlerjügend had moved into positions along the N13 highway, west of Caen, during the night of 6/7th June. The Panzer-Lehr-Division was also on the march and was aiming to arrive on the left of the 12th SS on 8th June. The 12th SS, Panzer-Lehr and 21. Panzer-Division (which was already fighting north of Caen). The three divisions were brought under the command of I. SS-Panzer-Korps, with the intention of launching a corps-sized assault north to crush the British & Canadian landings. However, the plan very quickly started to unravel: 12th SS had encountered the 3rd Canadian Division advancing in force to cut the N13 Caen-Bayeux highway. The SS had beaten back the first Canadian advance, but had themselves been beaten off when they attempted to resume their attack toward the beaches. As more Canadian brigades came south, the 12th SS had been forced to switch from an offensive to a defensive posture along the line of the N13.
2 Panzer-Lehr was now ordered to mount a single-division attack down the Villers-Bocage to Bayeux axis, thereby outflanking the British and Canadian formations that had so far been detected along the N13. On the morning of 9th June, despite considerable harassment by Allied fighter-bombers during their march, a sizeable battlegroup from Panzer-Lehr was finally in position at Juaye-Mondaye, only a few kilometres south of Bayeux and ready to strike at the city. However, other elements of the division had been engaged between Tilly-sur-Seulles and Fontenay-le-Pesnel by the forward elements of 50th (Northumbrian) Division and 8th Armoured Brigade, who had side-stepped the 12th SS Recce Battalion at Audrieu to take the high ground at Point 103 and the village of St Pierre. The attack on Bayeux was soon called off and the division s offensive efforts were redirected to defending Tilly-sur-Seulles, while re-taking St Pierre and Point 103. The attack on Bayeux had in any case, run into 56th Independent Infantry Brigade and 22nd Armoured Brigade (7th Armoured Division), which was marching through Bayeux with the intention of driving through Tilly-sur-Seulles and driving on to Villers-Bocage. By the morning of 10th June, 22nd Armoured Brigade had gathered its entire strength south of Bayeux and, preceded by heavy artillery bombardment on all likely German positions between Bayeux and Tilly-sur-Seulles, began its drive south. However, the desert veterans found the going tough in such close terrain as Panthers, Pzkpfw IVs and panzerfausts took a constant toll on the British tanks. As the terrain became even thicker further south, the advance slowly ground to a halt as the armoured brigade s single Motor Battalion was insufficient to clear the hedgerows, orchards, farms and villages along the brigade s route south. More infantry were clearly needed, though the division s own infantry element, 131 (Queen s) Brigade, were still not available. However, 56th Independent Brigade (known as the Sphinx Brigade due to all three regiments of the brigade having the Napoleonic Egypt battle honour and associated Sphinx device on their cap-badges) was nearby and Brigadier Cotton soon found his brigade placed under the command of 7th Armoured Division. The reinforced 7th Armoured Division soon resumed its advance to Tilly-sur-Seulles on 11th June; the 2nd Gloucesters advanced down the main axis, toward Bucéels, with the tanks of 4th County of London Yeomanry (4 CLY). The 2nd Essex meanwhile, with the 5th Royal Tank Regiment (5 RTR) hooked right through Bernières-Bocage, with the intention of cutting the Tilly-Lingèvres road. 2nd South Wales Borderers (2 SWB) remained in reserve with 1 RTR at the Jerusalem crossroads. The spearhead battlegroups skirmished their way southwards throughout the morning, steadily pushing back the outpost lines of the Panzer-Lehr battlegroups until the main defence lines started to crystalise just north of Tilly-sur-Seulles and Lingèvres. However, the Desert Rats armour and indeed, most of the supporting elements, were unable to keep up with the infantry in the thick Bocage country and the attacks failed. 2nd Essex in particular, was cut to pieces while advancing unsupported against enemy armour. At the end of the battle of Essex Wood the 2nd Essex had suffered over 200 casualties, including the Commanding Officer and two company commanders, while A, B & D Companies had been reduced to a single composite company. The fresh 131st (Queen s) Brigade from 7th Armoured Division also had a crack at Tilly-sur- Seulles on the 12th but had no more success than 56th Brigade. 69th Brigade meanwhile was finally forced out of St Pierre by Panzer-Lehr. All attempts to take Tilly-sur-Seulles frontally had been blunted. However, an opportunity had now arisen: the US 1st Infantry Division, operating to the west of Bayeux and faced only with the shattered remnants of 352. Infanterie-Division, had been able to push the enemy all the way back to Caumont. As a consequence, a huge gap had now opened up between I. SS-Panzer-Korps and XLVII. Korps on their left. Panzer-Lehr s left flank was now left hanging in the air Fire and Fury Games and R. Mark Davies. See for permissions and restrictions.

3 7th Armoured Division s Drive to Villers-Bocage 12th/13th June 1944 Montgomery was quick to seize the initiative. 7th Armoured Division was quickly withdrawn from the Tilly-sur-Seulles front on 12th June. The Desert Rats were then sent in a long right hook, circumventing I. SS-Panzer-Korps extreme left-flank, in an attempt to reach Villers-Bocage and the high ground at Point th Armoured Division succeeded in reaching Villers-Bocage without incident on the 13th. However, upon pushing through the town and up to Point 213, on the Caen road, they had the misfortune to run straight into the newly-arrived Tiger I heavy tanks of Schwere-SS-Panzer- Abteilung 101 and a certain SS-Obersturmführer Michael Wittmann. Within a few minutes, 4 CLY had lost its A Squadron, RHQ and the supporting A Company of 1 Rifle Brigade. The leading elements of the division then became embroiled in a rapidly-escalating battle within the town as more Tigers, as well as tanks from Panzer-Lehr, arrived to reinforce Wittmann s tiny force. The last straw came when the approach of the fresh 2. Panzer-Division from the south was detected. The Desert Rats were forced to disengage and withdraw the way they had come. 22nd Armoured Brigade was forced to fight one last defensive battle against 2. Panzer-Division on the 14th before safety was reached. In the meantime, operations against Tilly-sur-Seulles continued. A fresh division, the 49th (West Riding) Infantry Division had now arrived in Normandy and had begun taking over the 50th Division s sector at Brouay, Cristot, Audrieu and Point 103. This allowed 50th Division to contract its frontage to the west. 151st Brigade was quickly shifted west of Tilly and succeeded in taking Lingèvres against still resistance on the 14th. 231st Brigade had also managed to turn Panzer- Lehr s left flank and was pushing toward Hottot. Having had nearly a week to recover, 56th Brigade was now back under 50th Division s command and was once again tasked with assaulting Tilly. The battalion selected for the task was 2nd Essex ( The Pompadours ), now partly refilled with replacements, following its mauling at Verrières Wood on the 11th. 2nd Essex would follow in the footsteps of the Glosters and the Queens, attacking straight down the Bayeux Road. However, unlike those earlier attacks, there would be supporting attacks on the flanks: on the right provided by 6th DLI (151st Brigade, 50th Division) and on the left provided by 10th DLI (70th Brigade, 49th Division). In addition, armoured engineer
 against")
4 support would this time be provided by 79th Armoured Division to breach the hedgerows and smash the fortified houses. Scenario Overview The Situation in the Caen-Bayeux Sector, 18th June 1944 This scenario is a Medium-sized, two-part scenario, covering the final assault by the 2nd Essex ( The Pompadours ) against Tilly-sur- Seulles on 18/19th June. The first part of the scenario covers the initial attack against the village during the morning of the 18th, while the second part covers the renewed assault in the afternoon of the 18th. The final reduction of resistance in the village on the 19th can also be played as a third game if it is necessary. 4/7 DG 6 DLI 81 Assault 2 Essex 24L SRY 10 DLI The 2nd Gloucesters attack of the 11th June can be found in the scenario Sphinx Rampant : II 901 I Fkl I./6 Proff Pender s excellent scenario A Hard Day s Fighting covers the capture of Lingèvres on 14th June: II
5 Briefing for Major G G Elliott, Acting Officer Commanding 2nd Battalion, The Essex Regiment, 56th (Independent) Infantry Brigade Situation, Sunday 18th June 1944 You have been in acting command of the regiment for a week now, since Bloody Sunday and the Battle of Verrières Wood (which people are now calling Essex Wood), when the CO, Lieutenant Colonel Higson, was wounded. In that awful battle the battalion was forced to attack over open ground while the supporting tanks and heavy weapons were still struggling through dense Bocage to reach the start-line. With little in the way of support, the battalion was first pinned down and was then attacked by tanks and pioneers with flame-throwing halftracks. The battalion suffered over 200 casualties at Essex Wood, including two company commanders as well as the CO. While Pat Barras C Company got away relatively unscathed, A, B & D Companies were reduced to a single composite company under Major Holme. Over the last week the battalion has received a draft of replacements and A, B & D Companies have been reformed. However, there has been precious little time to absorb and train these new men. Nevertheless, the battalion has been ordered into action once again. 56 Brigade is again mounting a direct attack on the village, down the Bayeux road, and 2nd Essex is the spearhead. On this occasion there is tank support from 8th Armoured Brigade, as well as heavy assault engineering support from 79th Armoured Division. There will also be simultaneous attacks on the flanks 10 DLI (70 Brigade, 49 Division) is attacking St Pierre, while 6 DLI (151 Brigade, 50 Division) is attacking on your immediate right. You managed to establish a bridgehead over the Pont-Esprit stream yesterday evening without too much fuss and today you are ready to assault the village. Mission You are to assault Tilly-sur-Seulles, with the intention of denying the vital crossroads and Seulles bridges to the enemy. Execution General Outline Having established a establish a bridgehead over the Pont-Esprit stream at Pont de La Guillette, you will directly attack the enemy positions at Tilly-sur-Seulles without delay. 6 DLI will hook right to outflank the town from the west. 10 DLI, will assault St Pierre, across the River Seulles on your left, in order to prevent enemy reinforcement of Tilly from that direction. Deployment All elements of the 2nd Essex battlegroup start the game deployed north of the line A-B. No.2 Troop from A Squadron, 4/7 DGs is deployed with 2nd Essex on-table at the start. Note that one of these tanks may be a Firefly at the player s discretion. Additional elements from 4/7 DGs will arrive later as reinforcements.

6 A single D7 armoured bulldozer from 79th Armoured Division is attached to HQ 2nd Essex at the start of the scenario. The purpose of this vehicle is to create breaches in hedgerows for the tanks and the vehicles of the battalion Support Company to pass through. When attempting to create a breach, roll on the Bog-Down table, but with an additional -2 modifier. If the roll succeeds, the hedge is breached. Additional elements from 81 Assault Squadron RE will arrive later.
7 Fire Support The preparatory barrage must be plotted on map before any German units or hidden unit markers are placed on the table. The preparatory barrage fires for the first three turns. The barrage comprises two of the division s three Field Regiment (6x Batteries, each with 4x 25pdr Field Guns: Large Template with -1 vv & +0 vtgsv), a single Medium Regiment (2x Batteries, each with 4x 5.5-inch Guns: Large Template with +1 vv & +2 vtgsv) and a single Heavy Battery of 2x Guns: +2 vv & +3 v TGsV). The artillery may be concentrated and may thicken each other s fire up to a maximum of +3 vv & +4 vtgsv. The 25pdrs and 5.5s may not be split into fire missions smaller than Troop-sized (i.e. two templates, which may be concentrated). The Heavy Battery may not be split. From the Allied Turn 4, the Field Battery from 86th Field Regiment will be available in Direct Support. The two FOs may either call for their own Troop (half-battery) or for the whole battery. The entire regiment is available in General Support for Mike Targets. Note that a FO may not call for fire if the other FO is attempting to call for a battery or Mike target. No smoke is available in the initial barrage, but the attached Field Battery may fire smoke afterwards. The battery has up to three rounds of smoke available (note that a single troop may for example, therefore fire six rounds of smoke if the other troop fires none). Air Support The weather has turned absolutely diabolical and all tactical air support is grounded until the weather improves (historical note: this was the start of the Great Storm that destroyed the Mulberry Harbour at Omaha Beach and severely damaged the Arromanches Mulberry). Engineering: Clearing Minefields with Engineers or Assault Pioneers: Engineers/Assault Pioneers may clear up to 1 inch of minefield per movement action. Rapid Advance (i.e. two actions per turn) is not permitted. For each inch of the minefield, roll on the Improve Position Table with a +3 modifier. If the Engineer/Assault Pioneer section succeeds on the Improve Position table, the Assault Pioneer section moves forward 1 inch and clears a safe path wide enough for one unit of any type to pass through. Mark the safe path on the table using thread or wire. Ordinary (i.e. non Pioneer-trained) Troop elements may also attempt to clear mines using this method, but do so without applying the +3 modifier. However, Veteran and Elite troops may apply a +1 modifier. Engineers/Assault Pioneers may conduct Defensive Fire as normal while attempting to clear mines (we ve all seen Kelly s Heroes!).
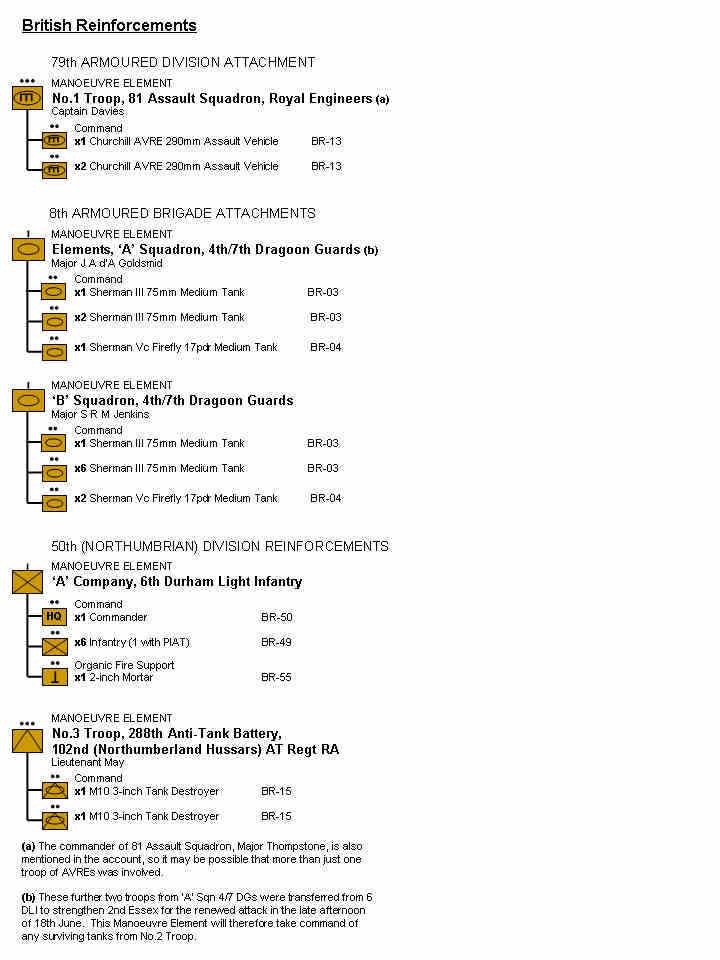
8 If the minefield is in terrain that requires a bog-down test, conduct the bog-down test before attempting to clear the minefield. A Bog or Displace result will prevent the unit from clearing mines for that action. Once a safe path has been cleared through a minefield, units may only pass through in single file and may not perform a Rapid Advance through the breach. Engineers and Assault Pioneers may always attempt to rapidly cross the minefield as normal, rolling on the Minefield Passage Table for every inch of mines crossed. As they are equipped and trained to detect mines, they will apply a +1 modifier on the Minefield Passage Table. Any Troop units following the same route may also then gain the +1 Minefield Passage bonus, but the route will not be safe for anything larger. Note that this method is a lot quicker, but it s risky and it will not create a safe route for vehicles. Friendly Forces Your order of battle is detailed at Annex A below. All elements of the 2nd Essex are rated as Trained, except for C Company, which is rated as Experienced. 4/7 DGs, 86 Field Regiment, 102 Anti-Tank Regiment and 6 DLI are also rated as Experienced. 79th Armoured Division are rated as Veteran. Your flanks are secured by 151st Brigade on your right and by 70th Brigade on your left, beyond the Seulles. Enemy Forces Your opposition have been identified as the 2nd Battalion, 901st Panzer-Grenadier- Regiment, Panzer-Lehr Division. Although originally very well-equipped and supported, this battalion has been defending Tilly for more than a week now and is known to be low in strength and equipment. Game Sequence The British have the first turn. The first part of the game lasts 12 turns or until one side concedes. Victory Conditions Very simply, victory is awarded to the side which has the only un-disordered unit within 10 inches of Tilly-sur-Seulles crossroads at the end of Turn 12. If the British fail to achieve victory by the end of the German Turn 12, proceed to Part 2 of the scenario. If no British units are able to be engaged by direct fire weapons, the British player may opt to break contact and proceed directly to Part 2. Scenario Part 2: The Renewed Assault The initial assault on the morning of the 18th was beaten off by the dug-in Panzer-Grenadiers, due in no small part to the fact that insufficient armour had once again been provided to support the 2nd Essex. The Pompadours broke contact and waited for the armour (particularly the AVREs of 81 Assault Squadron) to move up and the Royal Artillery to prepare their barrage.
9 All British and German units must redeploy within their deployment areas, regardless of how far they have advanced. German units may deploy once again as Hidden Unit markers, but this time may not deploy Dummy Unit markers. No minefields, entrenchments, road-blocks, barbed wire or booby-traps may be redeployed and newly-occupied buildings may not be fortified. All MEs take their strength at the end of Part 1 as the starting strength for Part 2. However, no ME that fought in Part 1 may claim the No Losses Manoeuvre modifier, even if they survived unscathed. This is to reflect the fatigue of fighting all day. The British are reinforced by No.1 Troop, 81 Assault Squadron RE, plus A & B Squadrons, 4/7th Dragoon Guards. If any tanks survive from Part 1, they are now added to A Squadron, 4/7 DGs. The British player must plot another preparatory barrage before the German player deploys (as per Part 1), though this time with the advantage of being able to target entrenchments and fortified buildings spotted in Part 1. Torrential rain will result in a -1 Spotting modifier throughout Part 2 of this scenario. Game Sequence for Part 2 The British have the first turn. The first part of the game lasts 20 turns or until one side concedes. Additional Reinforcements for Part 2 From Turn 11, roll a D10 at the start of each British turn. On a roll of 1, A Company, 6 DLI plus a troop of M10 tank destroyers will arrive on the western table edge between Points C & D. The die number required to get these reinforcements will increase by 1 in each turn (i.e. on Turn 12 a 1 or 2 is required, on Turn 13 a 1, 2 or 3 is required, and so on). Victory Conditions for Part 2 Very simply, victory is awarded to the side which has the only un-disordered unit within 10 inches of Tilly-sur-Seulles crossroads at the end of Turn 20.

10
11
12 Briefing for Oberstleutnant Schöne, Officer Commanding II. Bataillon, Panzer-Grenadier-Lehr-Regiment 901 Situation, Sunday 18th June 1944 Your battalion has now been holding Tilly-sur-Seulles for a week. You have finally managed to unify your entire force in the village, but the two companies who held the village against the first British attacks have suffered horribly; Mahr s 7. Kompanie was reduced to the strength of a platoon on the 11th and is now a company in name only. Following that terrible battle on the 11th, the British made another half-hearted attempt to take the village on the 12th, but were again beaten off by your men. Since then the Tommies have made no more direct attempts to take Tilly, but the your positions have been shelled sporadically and the crossroads has been bombed on a number of occasions. The village has been reduced to rubble, yet still the French civilians remain, living where they can. While no more direct attempts have been made on Tilly, the British have not been idle: on the 13th they drove a whole division around I. Panzer-Korps left flank and briefly succeeded in taking Villers-Bocage. However, this assault was blunted by the newly-arrived SS Tigers, before 2. Panzer-Division finally stabilised the situation. However, the British succeeded in taking Lingèvres on the 14th and have been making repeated attempts to re-take St Pierre on your right, though our II. Bataillon is holding firm there. Thing are now warming up again in your sector. The British successfully established a bridgehead south of the Pont-Esprit stream yesterday evening and seem determined to make another frontal assault on your positions today. General Bayerlein has once again ordered you directly to hold firm. Mission You are to hold the line at Tilly-sur-Seulles, with the intention of keeping the vital crossroads and Seulles bridges open. Execution General Outline The retention of Tilly-sur-Seulles is essential to the divisional plan, as the loss of the crossroads and bridges would effectively cut the division in half. As discussed, your battalion is sorely under-strength and you only have a handful of StuGs and flak guns with which to defend the village and crossroads. The crossroads and village itself is an absolute magnet for Allied artillery and aircraft. It was bombed for the first time on 7th June and the Allies have periodically pounded the place every day since. You have therefore ordered the bulk of your forces to dig in north of the village, where they should hopefully avoid the worst of the speculative bombardment and should be able to mount numerous ambushes in the dense hedgerows and orchards there. Should the Allies break into the town, General Bayerlein has promised to mount a counter-attack, but he has precious little left to send.

13 Deployment Your forces may be deployed as hidden unit markers, anywhere south of line Y-Z, as shown on the map. Historically, the main defence line was in the small valley to the north of the village. You may also deploy 15 dummy unit markers.
14 All Troops and Guns may be dug into foxholes and weapon pits and may have connecting trenches within company positions. Alternatively Troops (but not guns) may be dug into BUAs. All SP guns may be deployed in hull-down positions. Note that the SP guns of 9. (sig) Kompanie are deployed on table. You may deploy 24 inches of barbed wire and 12 inches of mixed minefields, plus 12 inches of dummy minefields. 1 inch-worth of minefield may be used to booby-trap a BUA. Troops entering a boobytrapped BUA must test as if they were crossing a minefield. Fire Support The regiment s 9. (sig) Kompanie is available in Direct Support and an associated FO has been attached to your battlegroup. 5. Batterie, II./Panzer-Artillerie-Lehr-Regiment 130 is available in Direct Support and an associated FO has been attached to your battlegroup. A FO from 4. Batterie, II./Panzer-Artillerie-Lehr-Regiment 130 is positioned in the church tower at St Pierre. Although he is attached to I./901, he has good lines of sight across Tilly and down the Seulles valley. He may therefore call for his battery as General Fire Support, in support of your kampfgruppe. Note that this FO is not under your command and you may not therefore move him. He always classes as being under command for Manoeuvre purposes. If he is KOd, the church tower will also be assumed to be destroyed. No fire missions larger than individual batteries are available an batteries may not thicken the concentrations of other batteries. Air Support The Allies have near-complete air supremacy and have been attacking Panzer-Lehr persistently for days now. Unbelievably, on the sole occasion that the useless Luftwaffe made an appearance over the battlefield, they bombed our own troops in Fontenay-le- Pesnel! However, the weather today is extremely poor and is deteriorating, with high winds and heavy rain. It is highly unlikely that you will see any aircraft today. Friendly Forces Your troops are detailed in the order of battle at Annex A below. Your forces are mainly classed as Experienced. However, Panzers, StuGs, Panzerjägers and Pioneers are classed as Veteran. Your left flank is thinly screened by Panzer-Grenadier-Lehr-Regiment 902. However, they are presently hard-pressed and are being driven steadily back to Hottot, leaving your left flank increasingly exposed. Your right flank is screened by the river Seulles and the regiment s I. Bataillon, who are fighting in St Pierre, plus some tanks of I./Panzer-Lehr-Regiment 130.
15 Note that due to the lack of serviceable tanks, the StuG III G radio-control vehicles of the Panzer-Kompanie (Funklenk) 316 have been co-opted to provide you with armour support. Enemy Forces The enemy is attacking in approximately brigade strength, with large numbers of tanks and considerable amounts of artillery and air support. However, approximately half of this force is presently being directed toward 902 on your left. Reports are coming in from Regiment, indicating that I. Bataillon is also coming under renewed enemy pressure in St Pierre. Game Sequence The British have the first turn. The first part of the game lasts 12 turns or until one side concedes. Victory Conditions Very simply, victory is awarded to the side which has the only un-disordered unit within 10 inches of Tilly-sur-Seulles crossroads at the end of Turn 12. If the British fail to achieve victory by the end of the German Turn 12, proceed to Part 2 of the scenario. If no British units are able to be engaged by direct fire weapons, the British player may opt to break contact and proceed directly to Part 2. Scenario Part 2: The Renewed Assault The initial assault on the morning of the 18th was beaten off by the dug-in Panzer-Grenadiers, due in no small part to the fact that insufficient armour had once again been provided to support the 2nd Essex. The Pompadours broke contact and waited for the armour (particularly the AVREs of 81 Assault Squadron) to move up and the Royal Artillery to prepare their barrage. All British and German units must redeploy within their deployment areas, regardless of how far they have advanced. German units may deploy once again as Hidden Unit markers, but this time may not deploy Dummy Unit markers. No minefields, entrenchments, road-blocks, barbed wire or booby-traps may be redeployed and newly-occupied buildings may not be fortified. All MEs take their strength at the end of Part 1 as the starting strength for Part 2. However, no ME that fought in Part 1 may claim the No Losses Manoeuvre modifier, even if they survived unscathed. This is to reflect the fatigue of fighting all day. The British are reinforced by No.1 Troop, 81 Assault Squadron RE, plus A & B Squadrons, 4/7th Dragoon Guards. If any tanks survive from Part 1, they are now added to A Squadron, 4/7 DGs. The British player must plot another preparatory barrage before the German player deploys (as per Part 1), though this time with the advantage of being able to target entrenchments and fortified buildings spotted in Part 1.
16 Torrential rain will result in a -1 Spotting modifier throughout Part 2 of this scenario. Game Sequence for Part 2 The British have the first turn. The first part of the game lasts 20 turns or until one side concedes. Additional Reinforcements for Part 2 From Turn 12, roll a D10 at the start of each German turn. On a roll of 1, Major Markowski s Kampfgruppe will abandon its defence of St Pierre and will launch a counterattack from St Pierre and into Tilly-sur-Seulles. The die number required to get these reinforcements will increase by 1 in each turn (i.e. on Turn 13 a 1 or 2 is required, on Turn 14 a 1, 2 or 3 is required, and so on). Note that once Markowski s battlegroup appears on table, 4. Batterie becomes Direct Fire Support and the FO must be directly attached to Markowski s HQ or one of his MEs. Victory Conditions for Part 2 Very simply, victory is awarded to the side which has the only un-disordered unit within 10 inches of Tilly-sur-Seulles crossroads at the end of Turn 20.

17

18
19
20 Terrain Effects Mobility Terrain Concealment Cover Troops Open Woods Orchards Streets Built-Up Area Nil Dense Area Sparse Area Dense Area Dense Edge Nil Soft Soft Soft Hard Full Speed Full Speed Full Speed Full Speed Full Speed Tracked or HalfTracked Vehicle Full Speed Half Speed & Bog Half Speed Half Speed Impassable River Seulles Pont-Esprit Stream Bocage Hedgerow Low Hedgerow Paved Road Unpaved Road Nil Nil Dense Edge Sparse Edge Nil Nil Nil Nil Hard Soft Nil Nil Breach & Bog Breach Breach Half Speed Double Speed Full Speed Impassable Breach & Bog Breach & Bog Breach Double Speed Full Speed Wheeled Vehicle or Gun Full Speed Half Speed & Bog Half Speed Half Speed Gun: Half Speed Veh: Impassable Impassable Breach & Bog Breach & Bog Breach & Bog Double Speed Full Speed Note that all hedgerows are considered to be Bocage Hedges unless they border a paved road; in which case they are Low Hedges. Note that there are two crest-lines on spurs that cross the main road to the north of Tillysur-Seulles. Optional Rules Used In This Scenario MG Grazing Fire (see website) British Forward Observer Replacement Rule (see website) Scenario-Balancing Options Favouring the British Increase troop quality of all the Essex companies to Experienced. Allow the AVRE Troop to be included in Part 1. Add a second troop of AVREs in Part 2, plus an AVRE carrying the squadron commander, Major Thompstone. Favouring the Germans Add x1 Tiger 1E to Panzer-Kompanie (Fkl) 316. The unit had a platoon of Tiger 1E control vehicles on paper, but precious little information is available regarding their whereabouts during the Normandy Campaign. Some authors provide quite compelling evidence that they remained in Germany, while others have pointed to the presence of a mysterious Tiger in photos of the German retreat and suggest that it was one of Fkl 316 s Tigers. I leave it up to the player to decide. Allow a proportion of the reinforcements to be on-table at the outset. Deploy 12 inches of mixed minefields and a further 12 inches of barbed wire. Further Scenario Options.
21 If desired, the evening attack across the Pont-Esprit stream may also be played out on table: o This scenario lasts only six turns, starting with the British turn. o The Germans may deploy up to x20 Troop units as hidden unit markers, north of their deployment line, as far north as the stream. These troops will be dug-in, but not connected by trenches. o No Guns or Vehicles may be deployed north of the German deployment line. o An additional six inches of mixed minefields may be deployed north of the German deployment line. o The German player may choose to deploy some of his dummy units north of the deployment line. However, these dummy units will count toward the 20-unit total. o A single British Field Regiment (3x batteries) may one turn s worth of preparatory barrage, followed by one round of smoke. o Regardless of the outcome, at the end of Turn 6 the Germans will withdraw to their main defence line during the night. Go to Part 1 of the main scenario, but deduct any losses incurred from the ME starting strengths.
The Bloody Battle for Tilly-sur-Seulles: The Sphinx Rampant The 2nd Gloucesters Assault on Tilly-sur-Seulles 11th June 1944
 The Bloody Battle for Tilly-sur-Seulles: The Sphinx Rampant The 2nd Gloucesters Assault on Tilly-sur-Seulles 11th June 1944 A Scenario for Battlefront: WWII By R Mark Davies The Gloucesters capture the
VILLERS BOCAGE CAMPAIGN
 VILLERS BOCAGE CAMPAIGN HISTORY The Battle of Villers Bocage took place during the Second World War on 13 June 1944, one week after the Normandy Landings by the Western Allies to begin the conquest of
DEFEAT IN THE CORNFIELDS
 DEFEAT IN THE CORNFIELDS BRAS, NORMANDY, JULY 19, 1944: On the second day of Operation Goodwood, several small towns still had to be taken before the main objective, the ridges beyond could effectively
The Cauldron / Gazala, 1942 A Flames of War Mega-Game Scenario
 The Cauldron / Gazala, 1942 A Flames of War Mega-Game Scenario After the British success in Operation Crusader at the end of 1941, Rommel had been pushed all the way back to Cyrenaica and the key fortress
D-DAY THE CANADIAN PUSH ON CARPIQUET AIRFIELD
 D-DAY + 1 - THE CANADIAN PUSH ON CARPIQUET AIRFIELD HISTORICAL EVENTS At 0745 hours on 7th June 1944 the Canadian 9th Infantry Brigade resumed their push inland from Juno Beach. The Stuart tanks of the
Battle of Villers Bocage - by Mark Piper 13th June, 1944 (Normandy)
") Battle of Villers Bocage - by Mark Piper 13th June, 1944 (Normandy) Background After the D-Day landings, General Montgomery wanted to extend the Allied toehold on the Normandy coastline in preparation
Battle of Villers Bocage - by Mark Piper 13th June, 1944 (Normandy) Background After the D-Day landings, General Montgomery wanted to extend the Allied toehold on the Normandy coastline in preparation
British Motor Company
 British Motor Company The first Motor Battalions formed part of the experimental pre-war Mobile Division, which would go on to become the British Army s first Armoured Division. Unlike its Infantry Battalion
THE BATTLE OF CELLENO By JC von Winterbach
 THE BATTLE OF CELLENO By JC von Winterbach CELLENO, ITALY, JUNE 10 th, 1944: On June 10 th, 1944, the 6 th South African Armoured Division deployed their entire 11 th South African Armoured Brigade in
KAMPFGRUPPE KERSCHER
 By Casey Davies Updated on 2 June 201 1 KAMPFGRUPPE KERSCHER Battlegroup Kerscher Tank Company HEADQUARTERS HEADQUARTERS Kampfgruppe Kerscher HQ 3 You must field one platoon from each box shaded black
IV IL-2
 The Western Front... 3 The Eastern Front... 5 Who Are the Americans?...10 US Special Rules... 14 US Force Diagram...15 M4 Sherman Tank Company...16 M4 Sherman Tank Company HQ... 17 M4 Sherman (late) Tank
Churchills in the Italian Campaign
 Churchills in the Italian Campaign Through mud and blood to the green fields beyond. 1 January 1944 31 October 1944 As a result of the relative success of the six Churchill IIIs that saw action during
THE PIMPLE YOUR ORDERS PREPARING FOR BATTLE
 THE PIMPLE BEDA FOMM, LIBYA, 6 th FEBRUARY 1941: After their crushing defeats at their camps near the Egyptian border and at Bardia and Tobruk the Italian 10 th Army was in full retreat. But, units of
THE FALL GELB CAMPAIGN
 THE FALL GELB CAMPAIGN This Chain of Command campaign shall focus on infantry fighting at the very beginning of the Fall of France, May 10-15, 1940. The campaign will last for a maximum of 9 Campaign Turns
RUles summary. The TURN TURN SEQUENCE ORDERS MOVEMENT FUBAR CHART. Appendix II TROOP QUALITY AND MORALE OFFICER MORALE MODIFERS
 RUles summary The TURN TURN SEQUENCE 1. Orders phase 1. Draw an order die from the dice cup and hand it to the appropriate player. 2. The player chooses one of his units and gives it an order. Place the
Battlefront: First Echelon Tables v1.1 PLAYER TURN SEQUENCE
 Battlefront: First Echelon Tables v1.1 PLAYER TURN SEQUENCE Phase 1: Chemical Agent Dispersion Check Friendly player rolls on the NonPersistent Chemical Agent Dispersion Table for ALL areas contaminated
1st Armoured Regiment
 1st Armoured Regiment The 1st Armoured Regiment was raised on 7 July 1949, as part of the new Australian Regular Army. The regiment s nucleus consisted of personnel from the 1st Australian Armoured Car
Hungarian Setup. Bridge
 Hungarian Setup Bridge Wooded hill (woods with underbrush) with clear hilltop. Units on the hilltop can see over the woods Rough Terrain Ford* - somewhere on the river line. Unfordable River with Bridge
Introductory Scenario: Pushing in a German Outpost
 Introductory Scenario: Pushing in a German Outpost Background for players The date is some time during the summer of 1944 in Normandy. You are the commander of a British motorized battalion, part of an
WARGAME RULES 20mm Scale Russo-German War c. 1943
 WARGAME RULES 20mm Scale Russo-German War c. 1943 Mike Adams December 2001 Ver 3 Based on Battle! by Charles Grant Setup The setup is determined by the scenario being played. Troops in cover may begin
TANK BATTLE AT JUVELIZE 22 nd September 1944 (Lorraine, France) A Rapid Fire scenario V 1.3 By Brad Smith and Mark Piper
 A Rapid Fire scenario V 1.3 By Brad Smith and Mark Piper") TANK BATTLE AT JUVELIZE 22 nd September 1944 (Lorraine, France) Background A Rapid Fire scenario V 1.3 By Brad Smith and Mark Piper In September 1944, Patton s US Third Army fought a series of armoured
TANK BATTLE AT JUVELIZE 22 nd September 1944 (Lorraine, France) Background A Rapid Fire scenario V 1.3 By Brad Smith and Mark Piper In September 1944, Patton s US Third Army fought a series of armoured
OPERATION HANNIBAL THE SEIZURE OF CORINTH CANAL BRIDGE 27 TH APRIL 1941 (GREECE)
") OPERATION HANNIBAL THE SEIZURE OF CORINTH CANAL BRIDGE 27 TH APRIL 1941 (GREECE) BASED ON THE ORIGINAL SCENARIO BY COLIN RUMFORD UPDATED BY MARK PIPER. GRAPHICS BY COLIN. Background As the British and
OPERATION HANNIBAL THE SEIZURE OF CORINTH CANAL BRIDGE 27 TH APRIL 1941 (GREECE) BASED ON THE ORIGINAL SCENARIO BY COLIN RUMFORD UPDATED BY MARK PIPER. GRAPHICS BY COLIN. Background As the British and
Panzer Grenadiers 255 MP (45) Munitions Halftrack 200 MP 15 Fuel. Vampire Halftrack 220 MP. Mortar Halftrack 240 MP 40 Fuel
 Munitions Halftrack 200 MP 15 Fuel. Vampire Halftrack 220 MP. Mortar Halftrack 240 MP 40 Fuel") Headquarters Kettenrad 165 MP Panzer Grenadiers 255 MP (45) 2 Panthers 1000 MP Panther Battle Group 120 MP 20 Fuel Panzer Elite Tech Tree Relic Patch v 2.300 Logistik 220 MP 20 Fuel Scout Car 220 MP Munitions
Headquarters Kettenrad 165 MP Panzer Grenadiers 255 MP (45) 2 Panthers 1000 MP Panther Battle Group 120 MP 20 Fuel Panzer Elite Tech Tree Relic Patch v 2.300 Logistik 220 MP 20 Fuel Scout Car 220 MP Munitions
BATTLE OF THE CARATARRA FRANZIA FROM COLDWARS 2010
 BATTLE OF THE CARATARRA FRANZIA FROM COLDWARS 2010 The battle in question occurred on the 18 th of March 1937 between the C.T.V. (Italian Fascist) Littorio Motor Division under General Annabale Bergonzoli
Zeppelin The German Airship For use in Axis & Allies 1914 Board Game Historical Board Gaming v1.0
 1 2 Zeppelin The German Airship For use in Axis & Allies 1914 Board Game Historical Board Gaming v1.0 Overview The German airships were operated by the Army and Navy as two entirely separate organizations.
Blood & Honour Hitlerjugend in Normandy. Finding the Front Line
 Blood & Honour Hitlerjugend in Normandy Historical Overview Finding the Front Line Wednesday June 7 th 1944 Scenario written by Richard de Ferrars and Paddy Green During the battles for north-west Europe,
Pagoda Hill Mandalay March 10, 1945
 Central Burma As the British XIVth Army burst onto the central plains of Burma, General William Slim assigned the 19th Indian Division the job of seizing the ancient capital of Mandalay. Looming 700 feet
Ticket to Don Gamemaster s notes
 Ticket to Don Map Ticket to Don Gamemaster s notes Date: Jun 28th, 1942 Time: 0800 Location: East of Harkov, Ukraine Background: Summer of 1942 in the East Front began with huge Russian losses. In two
HARPER S WAR STORIES WEST FRONT SCENARIO 45-1 Advance on Aalen April 1945
 HARPER S WAR STORIES WEST FRONT SCENARIO 45-1 Advance on Aalen April 1945 SITUATION The American Army is over the Rhine. Your Armored Division is through the Schwartzwald and speeding across Swabia enroute
Through mud and blood to the green fields beyond Motto of Royal Tank Corps
 3 rd Royal Tank Regiment at Goodwood Through mud and blood to the green fields beyond Motto of Royal Tank Corps Scenario Overview Operation Goodwood was an attempt by the British, Canadian and Polish forces
PART II. Designed to play Company to Brigade sized WWII wargames. Simultaneous turns ensuring the players are always involved.
 PART II SUPPORT MATERIAL FOR BLAZE AWAY WWII Designed to play Company to Brigade sized WWII wargames. Game time 1-4 hours. Simultaneous turns ensuring the players are always involved. Basic unit is a stand
TOBRUK AAR of Strategy & Tactics #278 Tobruk 1941
 Tobruk, with the German 15 th and 21 st Panzer Divisions deployed to the east and other Italian formations covering the coastal positions. The Axis can win a sudden death victory if they manage to capture
Bloody Buron. A Final Combat Scenario
 Bloody Buron A Final Combat Scenario Bloody Buron History For "Charnwood," Montgomery deployed the three divisions of the 1 British Corps, supported by artillery and naval guns offshore. A front of some
(3rd Special Base Force) 1943 FORTIFIED COMPANY (TARAWA)
 1943 FORTIFIED COMPANY (TARAWA)") HEADQUARTERS HEADQUARTERS (2) Regimental HQ COMBAT PLATOONS 1943 FORTIFIED COMPANY (TARAWA) You must field the HQ and two Infantry Platoons. You may choose aditional Tanks, Artillery Support and Reserve.
HEADQUARTERS HEADQUARTERS (2) Regimental HQ COMBAT PLATOONS 1943 FORTIFIED COMPANY (TARAWA) You must field the HQ and two Infantry Platoons. You may choose aditional Tanks, Artillery Support and Reserve.
British Commando (1934/45)
") British Commando (1943/45) While originally formed as a raiding force to maintain a British presence on the Continent, the Commandos were employed as light infantry for the later part of the war. Each
British Commando (1943/45) While originally formed as a raiding force to maintain a British presence on the Continent, the Commandos were employed as light infantry for the later part of the war. Each
To hit Range Hit # Pen. Unit. Armor HE SA Speed Morale PV
 PzKw 38(t) A 15/45 5/3 4/2 4/2 4 3 15 PzKw 38(t) E 15/45 5/3 4/2 4/3 4 3 15 PzKw II A 12/36 6/3 2/1 2/2 0 3 12 PzKw II F 12/36 6/3 2/1 3/2 0 3 12 PzKw II L 12/36 6/3 2/1 3/2 0 3 15 PzKw II (F1) 12 -/-
Desert Pass Blitzkrieg Commander battle report
 Desert Pass Blitzkrieg Commander battle report 26th November 2007: Nik & Dean, Taunton, Somerset Desert Pass: Tunisia, January 1943 Afrika Korps v British & American allies DAK 1500 points v Allies 3000
A SUPPLEMENT FOR BOLT ACTION CANADIANS. Second World War
 Second World War 1939 1945 A SUPPLEMENT FOR BOLT ACTION ARMY SPECIAL RULES The following special rule can be seen as an additional National Characteristic for the ones already mentioned in the Armies of
DESERT RATS. Command & Control. Sand & Steel in the Western Desert 1941/42
 DESERT RATS Sand & Steel in the Western Desert 1941/42 Introduction These rules are intended to provide a framework for tank battle games set in the Deserts of north Africa in World War 2. The basic groups
ARRAS May 21, The History
 ARRAS May 21, 1940 The History On May 21, 1940 Lord Gort, commander of the BEF (British Expeditionary Force), orders a counterattack versus the 7th Panzer Division, commanded by General Rommel, supported
First Gulf War US vs Iraq
 First Gulf War vs Iraq by Jimbo 6000pts attacking strategic town v 3000pts dug in Iraqis I'm on defence and think I ve got the tactics to defeat the invading imperialists!! Here s my army (Iraq) 1 CO (CV8)
The Capture of Hubert-Folie
 The Capture of Hubert-Folie Now that Bras is taken, the 8 th Motor Battalion heads for Hubert-Folie, while the 3 Mon comes up to take its place in Bras. Unfortunately, German mortar fire pins them down
The Guys : Same place in 2004:
 Context: Few days after D-day operations, we are located on the West side of Caen. In the area of N13 road and Paris Cherbourg railway line, Canadians and Germans are facing each other On June 08th 1944
Imphal: The Turning Point The First Battle of Bishenpur: The 1/4th Gurkhas at Ningthoukong 25th April 1944
 Imphal: The Turning Point The First Battle of Bishenpur: The 1/4th Gurkhas at Ningthoukong 25th April 1944 A Scenario for Battlefront: WWII By R Mark Davies Historical Background An Indian recce patrol
Brückenkopf Broekhuizen
 Brückenkopf Broekhuizen The Battle of the Broekhuizen Bridgehead The Netherlands, 30th November 1944 The 3rd Monmouthshires Pyrrhic Victory A Battlefront: WWII Scenario By R Mark Davies Broekhuizen Kasteel
LATE WAR FORCES FOR IRON CROSS
 LATE WAR FORCES FOR IRON CROSS The Orders of Battle in the Iron Cross rule book represent typical ( vanilla ) formations for the Western and Eastern fronts in 1944 and 45. This pdf supplements those forces
Image 1. Wirbelwind based on Pz IV chassis.
 During the later years of World War II, the German air force had lost control of the air. This was particularly true on the western front. British and American planes roamed almost at will seeking ground
What you will find inside Nachtjäger
 Nachtjäger means Night Hunter. What you will find inside Nachtjäger THE BRITISH With the war almost over and the Germans on the run, the British are rated Confident Veteran. Armoured Squadron Comet: The
Part C: World War I Trench Warfare
 Part C: World War I Trench Warfare Trench Warfare is a type of fighting where both sides build deep trenches as a defense against the enemy. These trenches can stretch for many miles and make it nearly
Ginkel Heath DZ Y. 18th September 1944 Scenario written by Andy Parkes
 Ginkel Heath DZ Y 18th September 1944 Scenario written by Andy Parkes Overall Situation:- British View 1st Airborne Divison 13:00h, 17th Sept 1944 Holland. The 1st Airborne Division consisted of two parachute
Contents. Sample file
 Introduction This document details German panzer unit organisations on the Eastern Front in 1941 and 1942, covering the period from Operation Barbarossa to the Stalingrad campaign. Many units have been
More than 7,600 Canadian troops died fighting in the Netherlands. The last months of the Second World War, The Canadian military was given the
 Liberation of the Netherlands Notes More than 7,600 Canadian troops died fighting in the Netherlands. The last months of the Second World War, The Canadian military was given the dangerous job of liberating
Operation Dauntless. Unit Preview: Self-Propelled Artillery
 Operation Dauntless Unit Preview: Self-Propelled Artillery Both the British and German players have a small number of self-propelled artillery units available in Operation Dauntless. This unit preview
World War I Joseph Jackson Downs Douglas, Wesley Wright, and Samantha
 World War I 1917-1918 Joseph Jackson Downs Douglas, Wesley Wright, and Samantha World War I in 1917 Jan 19- Zimmerman Note Feb 1- Germans resume unrestricted submarine war fare. By February 28-8 American
Errata BRITISH POLISH. Road To Rome. Page 40 Company Diagram. Page 61 Assault Gun Platoon. Page 88 Company Instruction Box. Page 82 Combat Platoons
 Road To Rome Errata BRITISH Page 40 Company Diagram Support s, first column, Anti-tank Box, US Tank Destroyer is on page 200. Page 61 Assault Gun Staghound II should read Staghound II CS. Page 68 Company
Landships of Mogdonazia by John Bell
 Landships of Mogdonazia by John Bell These rules are made to interact with Larry Brom s The Sword and The Flame rules set. Anything not explained here might be found in TSATF. It should be noted that the
On Active Service- WW2 Home and BEF The Daimler Fighting Vehicles Project Part Ba
 The British Expeditionary Force Sept 1939 - June 1940 (& Home Service) The British Expeditionary force assigned to defend the Franco-Belgian border were the first to use the Dingo operationally during
Tiger Leader Update Kit August 26, Beta 1.2
 Tiger Leader Update Kit August, 0 - Beta. I have been working with Christopher Dean and Rick Martin to assemble this Tiger Leader Update Kit. We are distributing this kit in PDF format for now to get it
Conceived in Sin and Born in Iniquity 1 The Battle of Le Mesnil Patry Sunday June 11 th 1944
 Conceived in Sin and Born in niquity 1 The Battle of Le Mesnil Patry Sunday June 11 th 1944 Scenario written by Paddy Green and Richard de Ferrars and play tested with Mark Middleton. Situation Canadian
Operation Dauntless. Unit Preview: AFVs with Special Combat Characteristics + AFV Fire Control Classes
 Operation Dauntless Unit Preview: AFVs with Special Combat Characteristics + AFV Fire Control Classes The playtest counters are always changing. Here are some of the latest, current as of June 2011. The
6th Airborne Armoured Recce Regiment
 6th Airborne Armoured Recce Regiment On inspection we had a bit of paint missing and bullet holes in the tool boxes. Once again we had been lucky. Sergeant Sheffield, 6th Airborne Armoured Recce Regiment
The Diary of 9 Platoon of 3 Company, 27 (Machine Gun) Battalion at Sidi Rezegh
 Battalion at Sidi Rezegh") The Diary of 9 Platoon of 3 Company, 27 (Machine Gun) Battalion at Sidi Rezegh From 23 November until 1 December 1941, while under the command of New Zealand s 6 Brigade, 9 Platoon was in action on the
The Diary of 9 Platoon of 3 Company, 27 (Machine Gun) Battalion at Sidi Rezegh From 23 November until 1 December 1941, while under the command of New Zealand s 6 Brigade, 9 Platoon was in action on the
Warfare at Reading 2014:- Juniville June 10 th 1940.
 Warfare at Reading 2014:- Juniville June 10 th 1940. My first outing as Umpire and hosting the annual Big Game. The German offensive is prepared for the 9 th June morning. During this battle, 5 French
By Phil Yates and Wayne Turner
 By Phil Yates and Wayne Turner Updated on 19 Dec 2012 Führer PanzerGrenadiierkompanie Leader s Motorised Grenadier Company Infantry Company Motivation and Skill The Panzergrenadier battalions were newly-raised,
Operation Crusader Nov. 18-Dec
 Operation Crusader Nov. 18-Dec. 30 1941 Location: Egypt and Lybia Objective: Relieve Tobruk Historical Background Events before the battle Following the successful 'Operation Compass', which drove the
Contents. armoured assault AXIS ALLIED. British and Commonwealth Armour Soviet Armour German Armour
 Contents Overview Armoured Assault Scenario Tank Battle Scenario Special Rules ALLIED 3 4 5 6 British and Commonwealth Armour Soviet Armour German Armour AXIS GERMAN 28 29 30 BRITISH AND COMMONWEALTH Armoured
US 2nd MARINE DIVISION
 HEADQUARTERS HEADQUARTERS (2) Regimental HQ COMBAT PLATOONS You must field the HQ and two Marine Platoons and one Transport Platoon. You may choose additional Tanks, Artillery Support and Reserve. INFANTRY(2)
Turnbull: A Micro Melee Scenario. Turnbull
 Turnbull Historical Background Amid the chaos that characterized the airborne operations on the morning of 6 June 1944, Lieutenant Turner B. Turnbull and 41 men of 3 rd Rifle Platoon Company D were dispatched
Roncey Pocket. Roncey Pocket - Scenario
 Roncey Pocket 26 July 1944 Liebste Elise, The American advance began yesterday. Bomb after bomb, shell after shell dropped on the poor Kameraden of the Panzer Lehr Division. I can only imagine that they
COMPANY COMMANDER SUPPORT WEAPONS TACTICAL BRIEFING ON SUPPORT WEAPONS
 COMPANY COMMANDER SUPPORT WEAPONS TACTICAL BRIEFING ON SUPPORT WEAPONS Although towed artillery weapons are by nature cumbersome and hard to handle, their destructive power is substantial. The quantity
QUNEITRA 7 th October, 1973
 QUNEITRA 7 th October, 1973 Recently a group of us played a Cold War Commander game at our local Wargames club (the League of Ancients in Melbourne, Australia). The game was based on an Arab-Israeli Wars
Table of Contents. Preface... x. Section 1. Assuming the Duties of Game Master Section 2. Generating Characters... 3
 Table of Contents Preface... x Introduction...x Intended Audience...x Equipment Needed...x Author s Notes and Acknowledgements... xi Section 1. Assuming the Duties of Game Master... 1 The Spreadsheet...1
Operation Compass. Jdrommel.
 Operation Compass September 1940, according the orders of Benito Mussolini, the Italian forces in Libya, under the command of marshal Graziani attacked the British troops in Egypt and advanced as far as
TRIER, GERMANY. The Capture of Trier (March 1, 1945) Trier, the oldest
 Trier, the oldest") 37 TRIER, GERMANY d a y 1 4 T rier, Germany, was a mere 60 miles or so due east. It was half a day s journey. By the time the tank column was readied with fuel, ammunition, and water, and had been checked
37 TRIER, GERMANY d a y 1 4 T rier, Germany, was a mere 60 miles or so due east. It was half a day s journey. By the time the tank column was readied with fuel, ammunition, and water, and had been checked
716. Infanterie-Division in Normandy 6th June 1944
 716. Infanterie-Division in Normandy 6th June 1944 716. Infanterie-Division (a) Generalmajor Wilhelm Richter 716. Division-Stab (b) Grenadier-Regiment 726 (c) Oberst Walter Korfes Attached: Ost-Bataillon
BG-BRB01, Panzer Division Battlegroups (1)
") BG-BRB01,02 1941 Panzer Division Battlegroups (1) Battlegroup-GEBRB01 Panzer Regiment x1 PzBefWg III GE-20 Battlegroup-GEBRB02 Panzer Battalion x1 PzBefWg III GE-20 x2 PzKpfw II GE-72 BATTLE GROUPS x2-3
BG-BRB01,02 1941 Panzer Division Battlegroups (1) Battlegroup-GEBRB01 Panzer Regiment x1 PzBefWg III GE-20 Battlegroup-GEBRB02 Panzer Battalion x1 PzBefWg III GE-20 x2 PzKpfw II GE-72 BATTLE GROUPS x2-3
The Daimler Fighting Vehicles Project Part Bm On Active Service 1947 to 1957 Suez and Egypt
 Egypt and the Suez Crisis ADD DETAILS AS THEY CAN BE FOUND The post war strain on Anglo-Egyptian relations came to a head on 26th July 1956 when President Nassar announced the nationalization of the Anglo-French
GOAL To examine the realities of trench warfare.
 GOAL To examine the realities of trench warfare. What is Trench Warfare? Cross-section of a front-line trench Type of fighting during World War I in which both sides dug trenches protected by mines and
Airborne Armoured Recce Squadron
 Airborne Armoured recce squadron COMBAT PLATOONS HEADQUARTERS Airborne Armoured Recce SquadroN (Mechanised COMPANY) HEADQUARTERS ARMOUR RECONNAISSANCE RECONNAISSANCE 3 3 3 You must field one platoon from
NATO COMMUNICATION Urgent Transmission
 NATO COMMUNICATION Urgent Transmission To: NATO CinC NORTHAG Date: 0530hrs - Sunday 4 th August 1985 Warsaw Pact forces have crossed the East German border checkpoint at Helmstedt Marienborn (Checkpoint
Frost s Perimeter. By Mike Haught
 Frost s Perimeter By Mike Haught The primary objective of the 1 st Airborne Division in Operation Market Garden was to capture the Arnhem Road Bridge over the Rhine intact. Brigadier Gerald Lathbury s
KEY WEAPONS OF WWI. Gas Tanks Machine Guns Rifles and bayonets Grenades Artillery Submarines Flame Throwers Airplanes and zeppelins
 World War I Weapons KEY WEAPONS OF WWI Gas Tanks Machine Guns Rifles and bayonets Grenades Artillery Submarines Flame Throwers Airplanes and zeppelins GAS As World War I went on, poison gas was used more
Gazala 1942 Avalanche Press After-Action Report Dav Vandenbroucke February 16, 2014
 Gazala 1942 Avalanche Press After-Action Report Dav Vandenbroucke February 16, 2014 This is an after-action report of a solitaire game of Avalanche Press Gazala 1942. I played it on a vertical gaming wall,
Organization of British Armored Divisions Structure and Divisional Elemental Assignments By Division
 Organization of British Armored Divisions Structure and Divisional Elemental Assignments By Division 1939-1945 Part One: The following section provides the internal structure of the British armored division
Stolberg Campaign German Forces v1.3 (1 hex = 1200 yards map) Command Decision Test of Battle By Jeff Glasco
 Command Decision Test of Battle By Jeff Glasco") LXXXI Corps Transport: (Trained/6) (Langerwehe L4) 8 medium trucks 9th Panzer Division: (Experienced/9) Division (Walheim J18) (Major General Gerhard Mueller) Division Headquarters Company: (Walheim J18)
LXXXI Corps Transport: (Trained/6) (Langerwehe L4) 8 medium trucks 9th Panzer Division: (Experienced/9) Division (Walheim J18) (Major General Gerhard Mueller) Division Headquarters Company: (Walheim J18)
234 Brigade Nov LBBG-01 Infantry Brigade (Experienced) HEADQUARTERS ELEMENT. LBBG-02 Infantry Battalion BATTLE GROUPS
 HEADQUARTERS ELEMENT. LBBG-02 Infantry Battalion BATTLE GROUPS") 234 Brigade Nov 1943 LBBG-01 Infantry Brigade (Experienced) HEADQUARTERS ELEMENT x1 er x1 Morris MWD 15cwt Truck LBBG-02 Infantry Battalion HEADQUARTERS ELEMENT x1 er LBME-01 x4 Infantry Company BATTLE
234 Brigade Nov 1943 LBBG-01 Infantry Brigade (Experienced) HEADQUARTERS ELEMENT x1 er x1 Morris MWD 15cwt Truck LBBG-02 Infantry Battalion HEADQUARTERS ELEMENT x1 er LBME-01 x4 Infantry Company BATTLE
Fallschirmjäger (1940/43)
") Fallschirmjäger (190/3) Fallschirmjäger in German means parachute rifleman. The Luftwaffe (German Airforce)expanded from its initial regiment of airborne troops at the beginning of the war to a Fallschirmjäger
Fallschirmjäger (190/3) Fallschirmjäger in German means parachute rifleman. The Luftwaffe (German Airforce)expanded from its initial regiment of airborne troops at the beginning of the war to a Fallschirmjäger
Service Battery: 1 medium ammo truck with AAMG and trailer
 3rd Armored Division [Experienced/8] Division Troops: Division (MG Maurice Rose) Division Headquarters Company: 1 M5 light tank 1 recon jeep with MG 1 57L52 AT gun and crew (integral bazooka) 1 M3 halftrack
Advance of the Reich Scenario List
 Advance of the Reich Scenario List 1. 000000-Started.scn This is the Getting Started scenario for Advance of the Reich. It is normally played while viewing the Getting Started instructions. This scenario
Silence The Gun. A scenario for General Glen s Combat Rules For Toy Soldiers
 A scenario for General Glen s Combat Rules For Toy Soldiers Silence The Gun One of a dozen gliders sent to carry British airborne troops to Caen took off from a remote airfield in Southern England during
Ten Rounds Rapid - White Heat of Change
 1 of 20 Ten Rounds Rapid - White Heat of Change Fast play Rules for 20 mm World War One. Introduction. The third set of rules in this series covers the unfashionable period of the early 20th century with
The Battle for Ypres
 The Battle for Ypres Menin Road Polygon Wood - Passchendaele 1 st to 3 rd Battles of Ypres Matt Walsh Table of content Topic Page Introduction 1 3 rd Battle of Ypres The Battle of the Menin Road The objectives
Div Tac. World War II Divisional Level North West Europe 1944 to By Ian Shaw.
 1 of 11 Div Tac World War II Divisional Level North West Europe 1944 to 1945. By Ian Shaw. This article is intended to provide a simple set of rules to cover combat at divisional level in Europe in 1944
ny A omp C Airlanding ndinga irl A Company
 Airlanding Company COMBAT PLATOONS HEADQUARTERS (Infantry COMPANY) HEADQUARTERS INFANTRY INFANTRY 3 3 You must field one platoon from each box shaded black and may field one platoon from each box shaded
Building German Tank Companies for Your Battles
 Building German Tank Companies for Your Battles Welcome to the third Ostfront Commander s Bulletin, Colonel. We re going to tackle the German armed forces this time. You re still going to need the Wehrmacht
Armies of CHINA. Written by: Paul Beccarelli. Production: Mark Owen. Artwork from Men-At-Arms 424: The Chinese Army Osprey Publishing, Ltd.
 Armies of CHINA Written by: Paul Beccarelli Production: Mark Owen Artwork from Men-At-Arms 424: The Chinese Army 1937-49 Osprey Publishing, Ltd. ospreypublishing.com warlordgames.com This get-you-by Bolt
British Forces Battle of El Alamein 23 October 1942
 British Forces Battle of El Alamein 23 October 1942 8th Army: Lieutenant General Sir Bernard L. Montgomery Army Troops Directly Under Command 1st Army Tank Brigade: 1 Brigadier G.N.Todd 42nd Royal Tanks
1/25/2017. Operation Sea Lion German Invasion of England & The Battle of Britain The Luftwaffe s Attempt to Gain Air Superiority & Beyond!
 Operation Sea Lion German Invasion of England & The Battle of Britain The Luftwaffe s Attempt to Gain Air Superiority & Beyond! 1 Led by Herman Goering WWI fighter ace / Hitler s deputy Condor Legion Experiences
Desert Duel Blitzkrieg Commander battle report
 Desert Duel Blitzkrieg Commander battle report 5th June 2007: Nik & Dean, Taunton, Somerset Desert Duel: October 1942 Italian & German army v British 8th Army Battle of Attrition: Axis 2000 points v Allies
THE PUSAN PERIMETER. ~_-,dj.~~~!~; Reworked M4A3 of A Company, 89th Tank Battalion, with units of the 29th Infantry Regiment, August, 1950.
 Mines were an ever present danger to tanks. This Marine M-26 lost its right tread to a mine while leading an advance against North Korean troops near Myong-ni. Extra gear is being carried over the entire
Artillery Factors in the Dunnigan System
 Artillery Factors in the Dunnigan System By Alan R. Arvold Way back when Panzer- Blitz was first being developed, Dunnigan and crew created a rather complex system of determining the counter values for