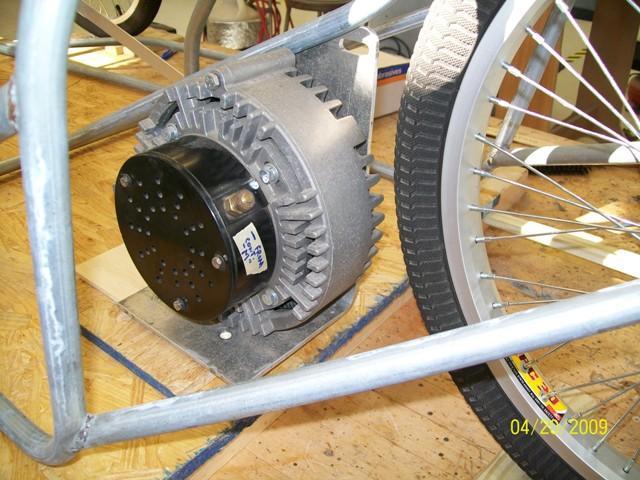
Well, it's finally on its own 3 wheels. Next up... motor mounts! Attached Images
|
|
|
- Herbert Perry
- 5 years ago
- Views:
Transcription
. After situating the motor where I wanted, I added two crossmembers in the frame to support it.")
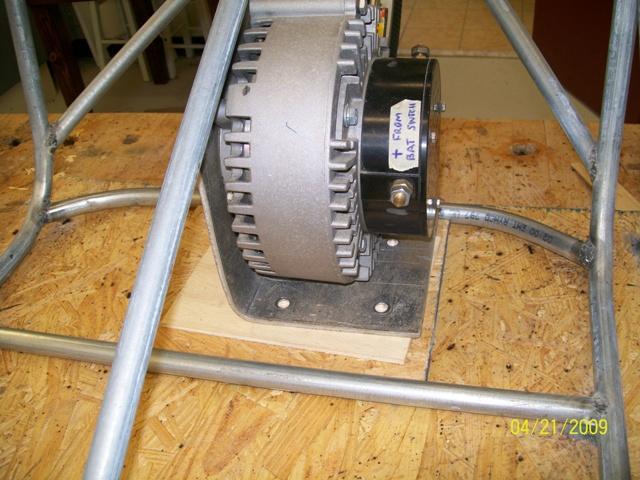
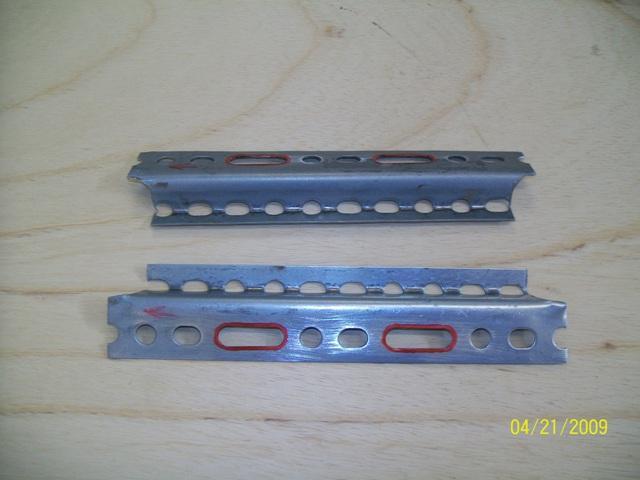
1 Well, it's finally on its own 3 wheels. Next up... motor mounts! OK, first step to mounting the motor is to mock it up in position. I am using a Briggs & Stratton Etek motor here (Yes, Briggs & Stratton makes electric motors! ). After situating the motor where I wanted, I added two crossmembers in the frame to support it. The rear one had to be contoured slightly on the ends to get it back far enough. After the crossmembers were welded in place, I next fabricated the bottom mounts from 18 gauge perforated angle. Yes, this lightweight stuff supports the motor just fine; electric motors don't vibrate like gasoline engines, so metal fatigue is not a problem. I cut these pieces so they are mirror images of each other, notched them to fit the crossmembers, and then folded the bottom edges upward at a 90 degree angle. The fold adds strength and also keeps the bottom edge from hanging below the frame. I mocked up the motor in place again with the mounts underneath to assure the fit and mark which holes would be used. While the motor was in place I fabricated a tab for the top mounting hole; it's a piece of 16 gauge steel, drilled, and a 5/16-18 nut welded to it. Then I elongated 4 pairs of holes where the motor bolts down to allow for chain adjustment (I put a red outline around the elongated holes so they would show for the picture). I mocked everything up again, this time with bolts in place. I squared everything up with a try-square and measuring tape, and tack-welded the mounts in place. Then I removed the motor and welded everything solid. Finally, I reinstalled the motor and bolted it down.
2


3 In order to use an electric motor, an electronic motor controller is necessary. Without some type of controller, the motor would either be full-on or off; there could be no intermediate speed, no smooth acceleration, no real control. A mechanical potentiometer big enough to handle the amperage of two Optima batteries in series would be HUGE and heavy. Electronic controllers do the same job, but are substantially smaller and lighter than a mechanical potentiometer. They use a very low power electronic circuit to control the main power circuit. Although controllers can get expensive, the one I am using here is a remanufactured Scott controller that I bought a few years ago for $160. Sometimes, used controllers can be had very inexpensively through golf cart service places. When they get touchy at low speeds they are removed and replaced (Little old ladies who play golf don t like golf carts that have sudden or jerky starts.), but they may be fine for Electrathon. I located the controller near the motor, but far enough away so if I ever throw a chain it won't be likely to whip the controller. Mounting it was simple; I just fabricated a couple of tabs that match the bolt holes on the controller and welded them to the rear crossmembers.


4 On the silver car and orange car pictured previously, I used 18 gauge perforated angle to make the battery trays. For this car I decided to try something different (and lighter?)...
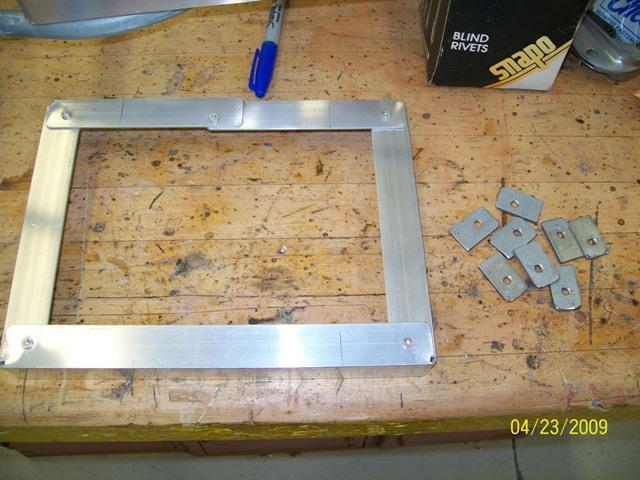
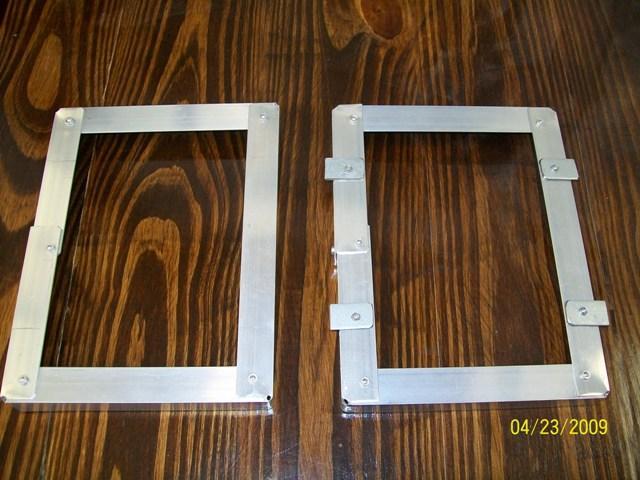
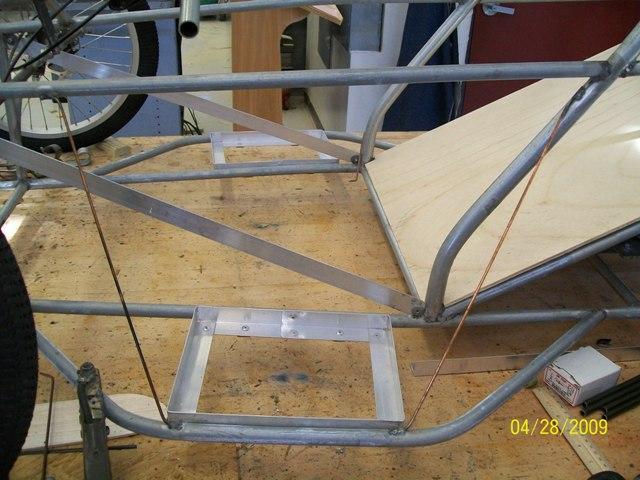
5 I bought some 1/16" wall, 1" aluminum angle at the local ACE Hardware. I don't have access to a TIG welder, so I used 3/16" pop-rivets. I cut a piece of angle long enough to go around the perimeter of the battery bottom, allowing 1/4" clearance both directions, plus an extra inch for overlapping the ends. I drilled a 3/16" hole through the fillet of the angle where the bends would be and then made a cut from the edge of what would be the bottom to the hole (see pic). Then I made the bends in a vise with the bottoms of the corners overlapping, overlapped the ends, and riveted them. After checking and adjusting for square, I also riveted the bottom of all four corners. I made eight mounting tabs (four for each tray) from 1/8" x 3/4" flat steel. I drilled and riveted the tabs to the battery trays and then welded the assemblies in place from the bottom of the chassis.
6
 to make a pair of diagonal struts for each battery pod.")

7 Because of the weight of the batteries, the bottoms of the side pods need additional support along the outside. In this case I used 1/8" steel round stock (welding rod) to make a pair of diagonal struts for each battery pod. The forward ones are welded to the outer bottom rail in front of the battery tray and to the top rail near the steering wheel crossmember. The rear ones are welded to the outer bottom rail behind the battery tray and to the main roll cage hoop.
8
7333 INSTRUCTIONS FOR MILD STEEL A-ARM AVENGER CHASSIS MUSTANG
 #917333 Page 1 of 5 7333 INSTRUCTIONS FOR MILD STEEL A-ARM AVENGER CHASSIS 1994-2004 MUSTANG ITEM QTY PART NO/SIZE TUBE CODE DESCRIPTION 1 1 4080 Main hoop 2 1 pr 4180 Cage side (driver & passenger side)
LPE C5 Battery Relocation Kit
 LPE C5 Battery Relocation Kit The LPE C5 Corvette battery relocation kit improves vehicle weight distribution by moving weight to the rear of the vehicle. The improved weight distribution increases traction
7256 INSTRUCTIONS FOR ELIMINATOR II A-ARM FRONT, 4-LINK REAR, MILD STEEL, INTERMEDIATE, SERIES CHASSIS
 #917256 Page 1 of 7 7256 INSTRUCTIONS FOR ELIMINATOR II A-ARM FRONT, 4-LINK REAR, MILD STEEL, INTERMEDIATE, SERIES CHASSIS ITEM QTY SIZE/PART NO. TUBE CODE DESCRIPTION 1 2 4138 Cage Side 2 2 4208 Forward
Detroit Speed, Inc. Mini Tubs Camaro/Firebird P/N:
 Detroit Speed, Inc. Mini Tubs 1967-1969 Camaro/Firebird P/N: 040401 The Detroit Speed Mini-Tubs are inner wheel housings designed to accommodate a wider wheel and tire package. They are engineered for
INSTALLATION GUIDE Canted Billet 4-Bar, 4x2 Rear Frame
 INSTALLATION GUIDE 7154 Canted Billet 4-Bar, 4x2 Rear Frame Description: Non-application specific, weld-in, 4 x 2 rear frame for use with Chassisworks 6241 billet aluminum suspension links. IMPORTANT:
7311 INSTRUCTIONS FOR 4130 STRUT AVENGER CHASSIS CAMARO/FIREBIRD
 #917311 Page 1 of 5 7311 INSTRUCTIONS FOR 4130 STRUT AVENGER CHASSIS 1993-1995 CAMARO/FIREBIRD ITEM QTY PART NO/SIZE TUBE CODE DESCRIPTION 1 1 4382 Main hoop 2 1 pr 4383 Cage side (driver & passenger side)
INSTRUCTIONS FOR MILD STEEL STRUT AVENGER CHASSIS 1937 CHEVY, SCALED DOWN BODY
 #917325 Page 1 of 5 7325 INSTRUCTIONS FOR MILD STEEL STRUT AVENGER CHASSIS 1937 CHEVY, SCALED DOWN BODY Item Qty Part No/Tube Size Tube Code Description 1 1 4069 Main hoop 2 1 pr 4169 Cage side (driver&passenger
05+ Toyota Tacoma Rear Shock Hoop Install Notes Part# 86460
 159 North Maple St. Unit J, CORONA CA 92880 P. 951-737-9682 F. 951-737-9006 WWW.CHAOSFAB.COM 05+ Toyota Tacoma Rear Shock Hoop Install Notes Part# 86460 Note: This kit is designed to work with the Total
Detroit Speed, Inc. 4-Point Roll Cage Camaro/Firebird P/N:
 Detroit Speed, Inc. 4-Point Roll Cage 1970-1981 Camaro/Firebird P/N: 011303 Thank you for your purchase of the Detroit Speed 4-Point Roll Cage. The exclusive DSE design follows the interior lines of the
Mustang CDC Lightbar (94-04) - Installation Instructions
 - Installation Instructions") Mustang CDC Lightbar (94-04) - Installation Instructions The below installation instructions work for the following products: Classic Design Concepts Mustang Convertible Lightbar (94-04 Carbon Fiber) Classic
Mustang CDC Lightbar (94-04) - Installation Instructions The below installation instructions work for the following products: Classic Design Concepts Mustang Convertible Lightbar (94-04 Carbon Fiber) Classic
7260 INSTRUCTIONS FOR ELIMINATOR II STRUT FRONT, 4-LINK REAR, MILD STEEL, FULL SIZE, SERIES CHASSIS
 #917260 Page 1 of 6 7260 INSTRUCTIONS FOR ELIMINATOR II STRUT FRONT, 4-LINK REAR, MILD STEEL, FULL SIZE, SERIES CHASSIS ITEM QTY SIZE/PART NO. TUBE CODE DESCRIPTION 1 2 4139 Cage Side 2 2 4250 Forward
Convertible MM Roll Bar (MMRB-10.1 to -10.7)
") 3430 Sacramento Dr., Unit D San Luis Obispo, CA 93401 Telephone: 805/544-8748 Fax: 805/544-8645 www.maximummotorsports.com 1983-93 Convertible MM Roll Bar (MMRB-10.1 to -10.7) The Maximum Motorsports RB-10.1
3430 Sacramento Dr., Unit D San Luis Obispo, CA 93401 Telephone: 805/544-8748 Fax: 805/544-8645 www.maximummotorsports.com 1983-93 Convertible MM Roll Bar (MMRB-10.1 to -10.7) The Maximum Motorsports RB-10.1
Detroit Speed, Inc. Mini Tubs Camaro/Firebird P/N:
 Detroit Speed, Inc. Mini Tubs 1967-1969 Camaro/Firebird P/N: 040401 The Detroit Speed Mini-Tubs are inner wheel housings designed to accommodate a wider wheel and tire package. They are engineered for
7316 INSTRUCTIONS FOR MILD STEEL STRUT AVENGER CHASSIS CHEVY FULL SIZE WITH 3" TOP CHOP
 #917316 Page 1 of 5 7316 INSTRUCTIONS FOR MILD STEEL STRUT AVENGER CHASSIS 1955-1957 CHEVY FULL SIZE WITH 3" TOP CHOP ITEM QTY PART NO/SIZE TUBE CODE DESCRIPTION 1 1 4054 Main hoop 2 1 pr 4154 Cage side
INSTALLATION INSTRUCTIONS CHEVY C-10 4-Link Rear End
 INSTALLATION INSTRUCTIONS 73-87 CHEVY C-10 4-Link Rear End Please read these instructions completely before starting your installation. Assemble suspension on vehicle before powder-coating to ensure proper
'03 and up Dodge tube frame Chev HD (wide frame) 2011 (up) GM Trucks UP/Down Cylinder Boom
 2011 (up) GM Trucks UP/Down Cylinder Boom") Installation Manual 3 Series 5 Series Z Series Typical Installation Place truck on lift or suitable jack stands with rear wheels off the surface. Remove rear wheels, hitch & rear bumper. Remove spare tire
Installation Manual 3 Series 5 Series Z Series Typical Installation Place truck on lift or suitable jack stands with rear wheels off the surface. Remove rear wheels, hitch & rear bumper. Remove spare tire
INSTALLATION INSTRUCTIONS
 COLD AIR INTAKE INSTALLATION INSTRUCTIONS PART NUMBER D760-0390C APPLICATION: 1999-2003 E39 M5 PARTS LIST 1 Left Aluminum Intake Tube 1 Air Pump Bracket (A) 1 Right Aluminum Intake Tube 1 Air Pump Bracket
7211 A-ARM FRONT, 4-LINK, 3 X 2 FRAME, INTERMEDIATE, ELIMINATOR CHASSIS ITEM QTY SIZE/PART NO. TUBE CODE DESCRIPTION
 #917211 Page 1 of 6 7211 A-ARM FRONT, 4-LINK, 3 X 2 FRAME, INTERMEDIATE, ELIMINATOR CHASSIS ITEM QTY SIZE/PART NO. TUBE CODE DESCRIPTION 1 2 4138 Cage Side 2 2 4208 Forward strut 3 1 4038 Main Hoop 4 1
Hard Bar Sport, M1/M2 Hard Core Hardtop, M2 Sport, and Xtreme Installation Instructions
 HARDWARE KIT: Hard Bar Sport, M1/M2 Hard Core Shoulder Harness Guide Relocation Assemblies: 2-3/8" X 1" grade 8 bolts 4-3/8" flat washers 2-3/8" lock nuts 2 - brass bushings 2 - plastic trim caps 2-3/8"
PLEASE READ THROUGH THE WHOLE WRITE UP BEFORE ACTUALLY USING IT!!!!
 JDM power folding mirror switch install into stock USDM harness. By: Greg L., Zeke21 on twinturbo.net PLEASE READ THROUGH THE WHOLE WRITE UP BEFORE ACTUALLY USING IT!!!! This is how I was able to get the
RedlineGoods Tacoma Installation Manual
 RedlineGoods 2016+ Tacoma Installation Manual AUTOMATIC SHIFT BOOT AND EBRAKE BOOT Press down on the factory shift boot collar to disconnect it from the shift knob. Unscrew shift knob Pull up on the rear
Ford Passenger Cars Mustang II Independent Front Suspension Installation Instructions
 1935-1948 Ford Passenger Cars Mustang II Independent Front Suspension Installation Instructions 1-866-925-1101 www.totalcostinvolved.com The installation of the Total Cost Involved's Mustang Independent
Factory Five Racing, Inc. 818 Kit Assembly manual revision 1i update
 Factory Five Racing, Inc. 818 Kit Assembly manual revision 1i update Pedal box...1 Cable Accelerator Pedal (2002-2005)...2 OEM seats...7 Windshield... 13 Center console... 19 Pedal box Attach the pedal
INSTALLATION GUIDE x2 Eliminator II Rear Frame
 READ ALL INSTRUCTIONS COMPLETELY AND THOROUGHLY UNDERSTAND THEM BEFORE DOING ANYTHING. CALL CHASSISWORKS TECH SUPPORT (916) 388-0288 IF YOU NEED ASSISTANCE. INSTALLATION GUIDE 7136 3x2 Eliminator II Rear
Detroit Speed, Inc. Second Generation Camaro/Firebird Mini-Tub Kit Camaro/Firebird P/N: ,
 Detroit Speed, Inc. Second Generation Camaro/Firebird Mini-Tub Kit 1970-1981 Camaro/Firebird P/N: 041222, 041223 The Detroit Speed Second Generation Camaro/Firebird Rear Mini-Tub Kit is designed to accommodate
INSTALLATION INSTRUCTIONS Toyota FJ Cruiser DEMELLO-OFFROAD.
 INSTALLATION INSTRUCTIONS Item Description Vehicle 3 piece Rear Bumper 2007-2014 Toyota FJ Cruiser DEMELLO-OFFROAD www.demello-offroad.com 12785 magnolia ave Riverside ca 92503 Suite 1 phone: 1-951-735-4417
GM F-Body Convertible 1404 Center X-Brace Installation Instructions
 1967-1969 GM F Body 1967-1969 GM F-Body Convertible 1404 Center X-Brace Installation Instructions Thank you for your purchase of this Hotchkis Performance product. Your X-Brace was designed with the performance
HASPORT PERFORMANCE EFJ1
 HASPORT PERFORMANCE Installation Instructions For: Part Number EFJ1 for J-series V6 engines into 1988-1991 Honda Civic and CR-X Hasport Performance mounts are the result of extensive research and engineering.
Now we re ready to install our new mounts. The picture on the right shows our old and new for comparison.
 Well I didn t have a chance to write last week so we have a little catching up to do. Last Sunday I started out with setting up a jig to weld in the mounts. The jig is made out of a old fork tube that
INSTRUCTIONS FOR STRUT FRONT, 4-LINK REAR, 1 5/8 FRAME, FULL SIZE, 4130 ELIMINATOR CHASSIS
 #917230 Page 1 of 6 7230 INSTRUCTIONS FOR STRUT FRONT, 4-LINK REAR, 1 5/8 FRAME, FULL SIZE, 4130 ELIMINATOR CHASSIS ITEM QTY SIZE/PART NO. TUBE CODE DESCRIPTION 1 2 4350 Cage Side 2 2 4351 Forward strut
CSS-C SUSPENSION LIFT KIT
 115 W. La Cadena Dr. Ste 100 Riverside, CA 92501 (951) 328-9902 phone (951) 328-9908 fax 2000-2006 CHEVROLET SILVERADO 1500 4WD CSS-C3-2 6-8 SUSPENSION LIFT KIT WARNING: CALIFORNIA SUPERTRUCKS RECOMMENDS
The kit includes everything seen here, and there are only a few upgrades or mods available.
 The kit includes everything seen here, and there are only a few upgrades or mods available. Complete Kit $1,445.00 1 pair trailing arms LH/RH, with poly lined Monster balls. Pinion angle corrected 1 pair
Pro/Series 2000 Tubular A-Arm Front Suspension
 11 Mennonite Church Road Spring City, PA 19475 (610) 948-7303 Installation Instructions Pro/Series 2000 Tubular A-Arm Front Suspension (Pinto-Style) CAUTION!!! The most important requirement for a successful
Installation Instructions
 Instructions Created by an: Samurai Rear Diamond Plate Corners (Pre-bent) (SKU# SEB-RDP) Installation Instructions CAUTION: Safety glasses should be worn at all times when working with vehicles and related
General Front Windshield
 General Front Windshield **WATCH OUR INSTALL VIDEO ALONG WITH INSTALL SHEET. 8-5/16-18x1 Black Carriage Bolts 8-5/16 Black Nylock Nuts 2-5/16x1-1/4 Stainless Steel Socket Head Screws 2-Rubber Grommets
Make sure all tubes are installed to your satisfaction BEFORE finish welding!!
 INTRODUCTION: This S&W Roll Bar or Roll Cage performs both a safety and performance function. As a safety device, the main hoop of the cage protects the driver from impact. The rear braces and side bars
INSTALLATION INSTRUCTIONS PART # 9B048803SS/9B048803A SIDE BAR FOR FORD ESCAPE 2013
 INSTALLATION INSTRUCTIONS PART # 9B048803SS/9B048803A SIDE BAR FOR FORD ESCAPE 2013 PARTS LIST: - Qty Description Qty Description 1 Driver / Left Sidebar 2 12mm Plastic Retainers 1 Passenger / Right Sidebar
Detroit Speed, Inc. QUADRA Link Rear Suspension Nova P/N:
 Detroit Speed, Inc. QUADRA Link Rear Suspension 1968-1974 Nova P/N: 041704 The Detroit Speed Inc., QUADRA Link rear suspension system is a great way to upgrade from an original leaf spring rear suspension.
COLD AIR INTAKE INSTALLATION INSTRUCTIONS. # D Fits: E92 328i & xdrive PARTS LIST
 COLD AIR INTAKE INSTALLATION INSTRUCTIONS # D760-9001 Fits: 2007-13 E92 328i & xdrive PARTS LIST (1) Intake Snorkel (1) Flex Tube (1) Brake Scoop Assy (1) Front Grill (1) Filter (1) Hardware Kit (2) Edge
INSTRUCTIONS FOR STRUT FRONT, 4-LINK REAR, ROADSTER CHASSIS
 #917406 Page 1 of 5 7406 INSTRUCTIONS FOR STRUT FRONT, 4-LINK REAR, ROADSTER CHASSIS ITEM QTY SIZE/PART NO. TUBE CODE DESCRIPTION 1 1 4215 Front frame rail strut 1 5/8 (pair) 2 1 4236 Roadster firewall
PPM-5203 TJ/LJ FRONT CAGE KIT Version 1.1
 POLY PERFORMANCE MFG. 870 INDUSTRIAL WAY, SAN LUIS OBISPO, CA (805) 242-0397 PPM-5203 TJ/LJ FRONT CAGE KIT Version 1.1 GENERAL NOTES: These instructions are also available on our website; www.synergysuspension.com.
Replacing MK4 Golf/Jetta radiator mounts in-car
 Replacing MK4 Golf/Jetta radiator mounts in-car This is a guide to replacing the radiator mounts in a MK4 Golf/Jetta. This involves moving the core support to the service position which allows you to do
1501 Industrial Way N., Toms River, NJ Fax: PACKING LIST MUSTANG LONG TUBE HEADERS (M30000)
") 2/18/04 1501 Industrial Way N., Toms River, NJ 08755 732-349-2109 Fax:732-244-0867 ADVANCED - Installation requires professional-type tools and advanced automotive-service skills. If you lack experience
2/18/04 1501 Industrial Way N., Toms River, NJ 08755 732-349-2109 Fax:732-244-0867 ADVANCED - Installation requires professional-type tools and advanced automotive-service skills. If you lack experience
1996+ Yamaha G16 / G22 Yamaha G29/YDRA Drive
 Vegas Carts & Performance 2995 Coleman St North Las Vegas, NV 89032 702-530-7753 VegasCarts.com 625cc Big Block Installation Instructions 1996+ Yamaha G16 / G22 Yamaha G29/YDRA Drive Revised 8/6/2018 1
60-65 Falcon, Comet & Ranchero Coil Spring IFS
 60-65 Falcon, 62-65 Comet & 62-65 Ranchero Coil Spring IFS All engine installations with this front end will require a rear sump oil pan. 289-302 Small Block Ford Motors Milodon rear sump pan holds 7 quarts
Part# C3132/C Up Ford Mustang 8-Point Roll Bar
 Part# C3132/C3156 2005-Up Ford Mustang 8-Point Roll Bar Installation Instructions Please read the instructions completely BEFORE starting this project. Competition Engineering 8-Point Roll Bars are not
GrilleGuy.com, LLC. Installation Instructions and Care guide : Scion tc : Honda S2000 : Honda Civic
 Installation Instructions and Care guide : 2005 2009 Scion tc : 2000 2003 Honda S2000 : 2004 2005 Honda Civic Thanks again for purchasing your custom grille insert from the GrilleGuy. The following are
FITTING OIL TEMP AND PRESSURE GUAGES
 FITTING OIL TEMP AND PRESSURE GUAGES this guide is of reference to fitting an oil temp and pressure sender/ sensor into a sandwich plate- not the sump plug temp sensor (although it wouldn't be much different
PBFAB DROPMEMBER V GM INSTALLATION GUIDE
 PBFAB DROPMEMBER V.7 55-59 GM INSTALLATION GUIDE STEP 1: INSTALLATION OF FRAME RAIL ASSEMBLIES -REMOVE ALL FACTORY FRONT SUSPENSION AND STEERING COMPONENTS STEP 1.1: INSTALLATION OF FRAME RAIL ASSEMBLIES
Hood Lift Kit Installation Instructions For Mazda Miata PART # , ,
 Tools required: Rivet gun, masking tape, small flat screw driver, 10mm combination wrench, two13mm combination wrenches, two 17mm combination wrenches. Read and understand these instructions before attempting
EVO-1050 JK Long Arm Upgrade w/ EVOlever
 EVO-1050 JK Long Arm Upgrade w/ EVOlever Recommended: All Vehicles that spend time on salted roads. It is recommended that removal of both threaded collar and joint on all arms. Apply a small amount of
INSTRUCTIONS. 4-Link Parallel With Adjustable Panhard Bar Rear Suspension System FOR MOPAR MUSCLE CARS: A-BODY (RS-5435)
") MOPAR A-BODY 4-LINK PARALLEL COIL OVER SYSTEM INSTRUCTIONS 4-Link Parallel With Adjustable Panhard Bar Rear Suspension System FOR MOPAR MUSCLE CARS: 1967-1976 A-BODY (RS-5435) Revised: 6-1-2011 Page 2
MOPAR A-BODY 4-LINK PARALLEL COIL OVER SYSTEM INSTRUCTIONS 4-Link Parallel With Adjustable Panhard Bar Rear Suspension System FOR MOPAR MUSCLE CARS: 1967-1976 A-BODY (RS-5435) Revised: 6-1-2011 Page 2
Tuned Length Headers. Special Tools Required: Install Time: Difficulty: Follow these instructions carefully to ensure correct fitment and operation.
 Special Tools Required: welder / saws all Install Time: Approximately 4 Hours Difficulty: 4 out of 5 Follow these instructions carefully to ensure correct fitment and operation. STEP 1 Disconnect the negative
HEIDTS RF-110. INSTALLATION INSTRUCTIONS Fairlane Comet Rear 4-Link
 HEIDTS RF-110 INSTALLATION INSTRUCTIONS 66-67 Fairlane 66-67 Comet Rear 4-Link Please read these instructions completely before starting your installation. Remember the basic rule for a successful installation:
Subaru Front Mount Intercooler Kit STI Subaru Front Mount Intercooler Kit STI
 Subaru Front Mount Intercooler Kit STI 2008-2014 715500 Subaru Front Mount Intercooler Kit STI 2008-2014 Congratulations on your purchase of the Subaru Front Mount Intercooler Kit STI 2008-2014. The following
USE THE PARTS LIST BELOW TO MAKE SURE YOUR KIT IS COMPLETE BEFORE INSTALLATION. IF ANY PIECES ARE MISSING, PLEASE CONTACT:
 60-65 Ford Falcon Triangulated 4-Link Suspension Installation Instructions Tech Line: 1-855-693-1259 www.totalcostinvolved.com Read and understand these instructions before starting any work! USE THE PARTS
Detroit Speed, Inc. Mini-Tub Kit Chevy Nova, Oldsmobile Omega, Pontiac Ventura P/N: &
 Detroit Speed, Inc. Mini-Tub Kit 1968-74 Chevy Nova, Oldsmobile Omega, Pontiac Ventura P/N: 041207 & 041208 Item Component Quantity 1 DSE Mini Tubs 1968-74 X-Body 2 2 Rear Upper Shock Crossmember 1 3 Upper
CHEVY SILVERADO CREW CAB RX3 Includes models equipped with DEF tank
 2007-2017 CHEVY SILVERADO 1500-3500 CREW CAB RX3 Includes models equipped with DEF tank HARDWARE INCLUDED RECOMMENDED TOOLS 1 Passenger Side Front Support Plate 13mm Wrench 1 8-1.25 x 40mm Hex Bolt 13mm
Installation Instructions Tubular A-Arm Front Suspension
 11 Mennonite Church Road Spring City, PA 19475 (610) 948-7303 Installation Instructions Tubular A-Arm Front Suspension (Mustang II -Style) CAUTION!!! The most important requirement for a successful installation
DO NOT GRIND ANY WELDS! DO NOT QUENCH WELDS WITH WATER OR OIL. ALLOW TO AIR COOL.
 1 READ FIRST! PLEASE READ THROUGH ALL OF THE INSTRUCTIONS AND ENSURE THAT YOU UNDERSTAND THEM. BE SURE THAT YOU HAVE ALL THE REQUIRED GSI COMPONENTS, BASIC TOOLS, AND SKILLS. CUTTING THIS KIT REQUIRES
Please read all instructions before proceeding with the installation DA1K1 & DA2K1
 Installation Instructions For: Part Number DA1K1 and DA2K1 for K-series engines used with the RSX or Civic Si Transmission into 1990-1993 Acura Integra Hasport Performance mounts and mount kit accessories
Detroit Speed, Inc Chevy II Mini-Tubs P/N:
 Detroit Speed, Inc. 1962-67 Chevy II Mini-Tubs P/N: 040404 The Detroit Speed, Inc. Mini-Tubs are inner wheel housings designed to accommodate wider tire and wheel packages, including tires as wide as 295mm
Detroit Speed, Inc. QUADRA Link Rear Suspension Chevy II P/N:
 Detroit Speed, Inc. QUADRA Link Rear Suspension 1962-1967 Chevy II P/N: 041707 Detroit Speed, Inc. QUADRAlink is a great way to upgrade from original leaf spring suspension. Unlike our competitors, Detroit
Full Size GM Installation Instructions
 Full Size GM Installation Instructions Rear Disc Conversion 55 64 Full Size GM (Impala, Bel Air, etc.) This kit is for axle with a 3 3/8 spread center to center on the top two bolt holes (pictured left).
Mustang Radiator Conversion DIY. By GearHeadPeter. January 27, 2011
 1964-1966 Mustang Radiator Conversion DIY By GearHeadPeter January 27, 2011 We all know that the radiators in our cars are not the best, especially if you have done any customization to the engine, which
FLOODLIGHT unit IMPORTANT WARNING! RRAC055/RRAC059. INSTALL TIME: 30 mins
 LED 4" FLOODLIGHT unit RRAC055/RRAC059 INSTALL TIME: 30 mins Depending on the type of installation chosen, not all components supplied will be used. Refer to Page 13 Section 7 on how to set the angle of
Deuce/Ace Installation Instructions
 HARDWARE KIT: Upper Mounting Plate: 2-7/16" (11mm) X 3.5" bolts 2-7/16" flange nuts 2-2" spacers 2-7/16" trim cap mounting washers 2 - plastic trim caps TOOLS NEEDED: safety glasses wrenches 16mm or 5/8"
HASPORT PERFORMANCE BBK1
 HASPORT PERFORMANCE Installation Instructions For: Part Number BBK1 for some K20 and K24 engines into 1992-1996 Honda Prelude Hasport Performance mounts are the result of extensive research and engineering.
This is what we are trying to create in the steps below
 You will need: (1) Some 3/4 aluminium or steel flat bar (+/- 1 foot) (2) About 12 of 3 Aluminium or steel tubing. (2) Piece of 3X3 silicone hose and 2 hose clamps (3) 1 K&N (or similar) high flow filter
Factory Five Racing, Inc. 818 Kit Assembly manual revision 1J update
 Factory Five Racing, Inc. 818 Kit Assembly manual revision 1J update Turbo coolant overflow tank...1 Shifter handle...4 Install...4 Door skin...7 Door Liner... 10 Side mirrors... 14 Door handles and pulls...
Installation Instructions For: Part Number GDK20 for K20 engines and GDK24 for K24 engines into 2007 Honda Fit
 Installation Instructions For: Part Number GDK20 for K20 engines and GDK24 for K24 engines into 2007 Honda Fit Hasport Performance mounts are the result of extensive research and engineering. All mounts
STEPS FOR REMOVING REAR ASHTRAY & CUP HOLDER, CENTER ARMREST, E- BRAKE CONSOLE, FRONT ASHTRAY, LOWER CENTER CONSOLE AND GLOVE BOX
 Please give credit where credit is due! This DIY was completed ENTIRELY by the hardest working VW Vortex moderator on the site!! Gary Thompson, Ph.D. - vortex ID VGRT6, email address vgrt6@yahoo.com. Please
We will be upgrading from the factory, paper-cone disgrace to an Infinity Kappa 62.9i:
 In order to fully round out your stereo upgrade, the factory rear speakers must go. This is another easy job to tackle, but the fitment of the package tray and being hunched over in the rear glass area
Installing LED lights in a Hypercharger By Keith Edwards Joker s Wild! (Wildjokr)
") Installing LED lights in a Hypercharger By Keith Edwards Joker s Wild! (Wildjokr) THINGS YOU WILL NEED: A Hypercharger (duh!) LEDs (The ones I got were from Benny Bryant at Fantasies on Wheels in Sylacauga,
Installing LED lights in a Hypercharger By Keith Edwards Joker s Wild! (Wildjokr) THINGS YOU WILL NEED: A Hypercharger (duh!) LEDs (The ones I got were from Benny Bryant at Fantasies on Wheels in Sylacauga,
Installation Instructions and Suggestions For Jeep YJ Fiberglass Replacement Bodies
 Installation Instructions and Suggestions For Jeep YJ Fiberglass Replacement Bodies Getting started with the removal of your existing Jeep body. Trust nothing to memory; take photos of everything at different
Roll Bar (MMRB-6.1 to -6.7)
") 3430 Sacramento Dr., Unit D San Luis Obispo, CA 93401 Telephone: 805/544-8748 Fax: 805/544-8645 www.maximummotorsports.com 1994-04 Roll Bar (MMRB-6.1 to -6.7) NOTE: These instructions cover Roll Bars with
3430 Sacramento Dr., Unit D San Luis Obispo, CA 93401 Telephone: 805/544-8748 Fax: 805/544-8645 www.maximummotorsports.com 1994-04 Roll Bar (MMRB-6.1 to -6.7) NOTE: These instructions cover Roll Bars with
Mounting Body CHAPTER 9
 CHAPTER 9 Mounting Body During the build of your car, you will need to trial fit the body numerous times. It is possible to construct a simple moveable rack that can lift the body and then move the body
Polaris Axys Sidekick Installation Instructions
 2016-2017 Polaris Axys Sidekick Installation Instructions 1. Remove hood and side panels. 2. Remove fasteners and slide console back. 3. Remove belt and driven clutch. 4. Remove clutch cover/ oil-tank
Trouble Shooting Guide for Hubbell Systems
 Trouble Shooting Guide for Hubbell Systems NOTE: Hubbell Special Products discontinued operations in 2008, so there is a very limited number of repair parts available for motor repair. In some ways, this
Safety - Installation and Operation:
 4x4 or 4x2 Instructions EZGO Electric Cars Thank you for purchasing your 4x4 or 4x2 conversion kit. Safety at all times whether during installation or operation is utmost importance. Before After!!!!!!!!!!!!!!
CSS-C CHEVROLET SUBURBAN & TAHOE WD AND 2WD CHEVROLET AVALANCHE WD AND 2WD 6-8 SUSPENSION LIFT KIT
 14385 Veterans Way Moreno Valley, CA 92553 Phone: (951) 571-0212 Fax: (951) 571-0215 WWW.CSTSUSPENSION.COM CSS-C3-3 2000-2006 CHEVROLET SUBURBAN & TAHOE 1500 4WD AND 2WD 2002-2006 CHEVROLET AVALANCHE 1500
Detroit Speed, Inc. QUADRA Link Rear Suspension Mustang P/N:
 Detroit Speed, Inc. QUADRA Link Rear Suspension 1964.5-1970 Mustang P/N: 041731 The Detroit Speed QUADRAlink is a great way to upgrade from an original leaf spring rear suspension. Detroit Speed's exclusive
Drag Race Roll Bar (MMRB-6, -7)
") 3430 Sacramento Dr., Unit D San Luis Obispo, CA 93401 Telephone: 805/544-8748 Fax: 805/544-8645 www.maximummotorsports.com 1994-04 Drag Race Roll Bar (MMRB-6, -7) The Maximum Motorsports 6-point Drag Race
3430 Sacramento Dr., Unit D San Luis Obispo, CA 93401 Telephone: 805/544-8748 Fax: 805/544-8645 www.maximummotorsports.com 1994-04 Drag Race Roll Bar (MMRB-6, -7) The Maximum Motorsports 6-point Drag Race
MM Standard Torque-arm (MMTA-1 & -2) Engine Torque Table. Differential Ratio. Standard TA Max. Engine Torque (lb-ft)
 Engine Torque Table. Differential Ratio. Standard TA Max. Engine Torque (lb-ft)") 3430 Sacramento Dr., Unit D San Luis Obispo, CA 93401 Telephone: 805/544-8748 Orders Only: 800/839-0928 Fax: 805/544-8645 The ultimate rear suspension for your Mustang is now available from Maximum Motorsports.
3430 Sacramento Dr., Unit D San Luis Obispo, CA 93401 Telephone: 805/544-8748 Orders Only: 800/839-0928 Fax: 805/544-8645 The ultimate rear suspension for your Mustang is now available from Maximum Motorsports.
Installation Instructions For: Part Number CDK1 for Some K20 and K24 engines into Honda Accord
 Installation Instructions For: Part Number CDK1 for Some K20 and K24 engines into 1994-1997 Honda Accord Hasport Performance mounts are the result of extensive research and engineering. All mounts are
PARTS LIST. (1) Main Hoop (1) Cage Leg (Left) (1) Main Hoop Crossbar (1) Cage Leg (Right) (1) Windshield Crossbar (2) 39 Hoop Diagonals
 Main Hoop (1) Cage Leg (Left) (1) Main Hoop Crossbar (1) Cage Leg (Right) (1) Windshield Crossbar (2) 39 Hoop Diagonals") 10-POINT ROLL CAGE, CHROME MOLY 1994-98 MUSTANG HDTP P/N C3279 NOTE: This style cage kit is designed for use with the factory dash to remain in place and the front cage supports to pass through the dash.
10-POINT ROLL CAGE, CHROME MOLY 1994-98 MUSTANG HDTP P/N C3279 NOTE: This style cage kit is designed for use with the factory dash to remain in place and the front cage supports to pass through the dash.
GM G-Body Manifold Back System Instruc ons
 GM G-Body Manifold Back System Instruc ons Page 1 of 5 Buick 400, 430, 455 xxxxxxxxxxxxxxxxxxxx Pontiac Ram Air / HO x xxxxxxxxxxxxxxxxxxxx Olds 442 w/w & Z x xxxxxxxxxxxxxxxxxxxxxx Chevy Big & Small Block
Chevrolet Bar Kit
 1947-53 Chevrolet 3100 4-Bar Kit Congratulations on your purchase on what we believe is the finest rear suspension 4-bar kit available for 1947-53 Chevrolet pickups with stock frames. We have invested
Connecting the rear fog light on the A4 Jetta, while keeping the 5 Light Mod
 Connecting the rear fog light on the A4 Jetta, while keeping the 5 Light Mod DISCLAIMER: I'm human and make mistakes. If you spot one in this how to, tell me and I'll fix it This was done on my 99.5 Jetta.
Main Fuel Tank #9662 Date 3/17/23 rev. 0. Pic #1 Pic #2. Pic #4. Pic #3. Pic #5 Pic #6
 1045 S. Cherokee Lane Lodi CA 95240 Phone (209)400-7200 Fax (209)943-7923 www.wildhorses4x4.com Note: To assure a completely clean tank, use the large hole to inspect tank for any debris. It is highly
RS-2 SINGLE ACTION REAR BUMPER WITH TIRE CARRIER INSTALL MANUAL FOR JEEP WRANGLER ALL MODELS.
 RS-2 SINGLE ACTION REAR BUMPER WITH TIRE CARRIER INSTALL MANUAL FOR 2007-2016 JEEP WRANGLER ALL MODELS. Rear Bumper Installation Instructions 1) Remove factory rear bumper, (this includes all tow hitch
V1 Truck Manifold Turbo Kit for F-body
 V1 Truck Manifold Turbo Kit for 98-02 F-body Prep: -Remove all A/C Components, Alternator and brackets, tensioner, front bumper, front bumper foam, and front bumper support. Remove radiator and cooling
Mopar 8 3/4 & 9 3/4 (Dana) Installation Instructions Rear Disc Conversion
 Installation Instructions Rear Disc Conversion") Mopar 8 3/4 & 9 3/4 (Dana) Installation Instructions Rear Disc Conversion This kit is for either Mopar 8 ¾ or Mopar 9 ¾ (Dana). This kit is designed to work with axles with either GM 5 x 4.75 Bolt Pattern
Mopar 8 3/4 & 9 3/4 (Dana) Installation Instructions Rear Disc Conversion This kit is for either Mopar 8 ¾ or Mopar 9 ¾ (Dana). This kit is designed to work with axles with either GM 5 x 4.75 Bolt Pattern
Ford F-150 Speaker Replacement Instructions
 Ford F-150 Speaker Replacement Instructions This article was downloaded from http://www.fordf150.net Be sure to go there to view and download the other how-to articles. Thanks to John Meyer for contributing
Raxiom Factory GPS Rear Back-up Camera Kit (07-17 Wrangler)
") Raxiom Factory GPS Rear Back-up Camera Kit (07-17 Wrangler) Installation Time: 2.5-3Hrs Tools Required: 7mm Socket & Driver 10mm Socket 10mm Open end wrench Knife / Razor blade Zip-ties Wire Cutters Needle
Raxiom Factory GPS Rear Back-up Camera Kit (07-17 Wrangler) Installation Time: 2.5-3Hrs Tools Required: 7mm Socket & Driver 10mm Socket 10mm Open end wrench Knife / Razor blade Zip-ties Wire Cutters Needle
LoD Offroad. Jeep JK Rear Bumper with Tire Carrier Installation Instructions
 LoD Offroad Jeep JK Rear Bumper with Tire Carrier Installation Instructions Please read through the instructions before beginning any part of the installation process. Packaging List: 1-Rear Bumper 1-Tire
Installation Instructions For: Part Number EFK1 K-series Mount Kit for Civic and CR-X
 HASPORT PERFORMANCE Installation Instructions For: Part Number EFK1 K-series Mount Kit for 1988 1991 Civic and CR-X HASPORT PERFORMANCE Inc. 2849 S. 44 th St. Phoenix, AZ 85040 Phone: (602) 470-0065 Fax:
Step 5 Install the frame rail insert into the frame.
 COR-6372S, COR-6372D 63-72 C-10 Rear Coil-over KIT Tool s for the job Car Lift Floor Jack Chalks Jack Stands Standard Wrench set Standard Socket set Spring Compressor Phneumatic/ Electric Grinder Phneumatic/
How To Build A Mini Chopper!
 How To Build A Mini Chopper! by Custom-Choppers-Guide.com Copyright All Rights Reserved. If you are new to such projects, it is strongly recommended that you do an assembly job, purchasing pre-constructed
S&W Race Cars and Components, Inc.
 S&W Race Cars and Components, Inc. 11 Mennonite Church Road Spring City, PA 19475 TECH & INFORMATION: 610-948-7303 ORDERS: 1-800-523-3353 FAX: 610-948-7342 CAUTION!!! - The most important requirement for