Homemade Creeper with Backrest and Locking Casters
|
|
|
- Karin Armstrong
- 6 years ago
- Views:
Transcription
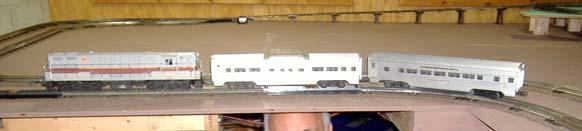
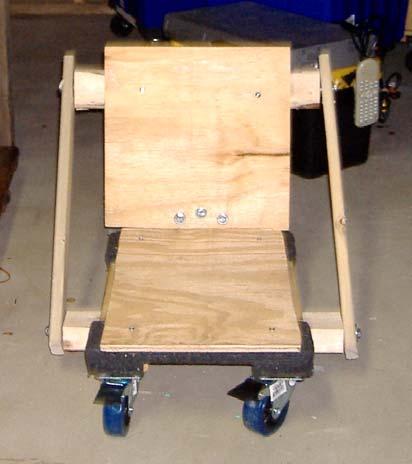
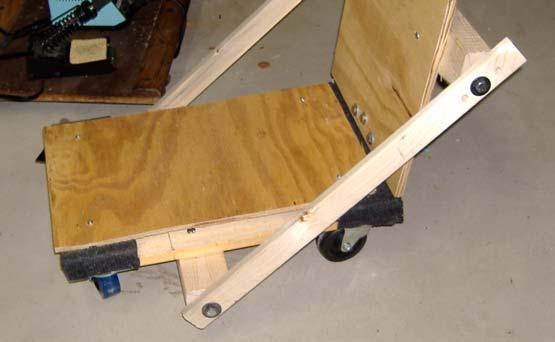
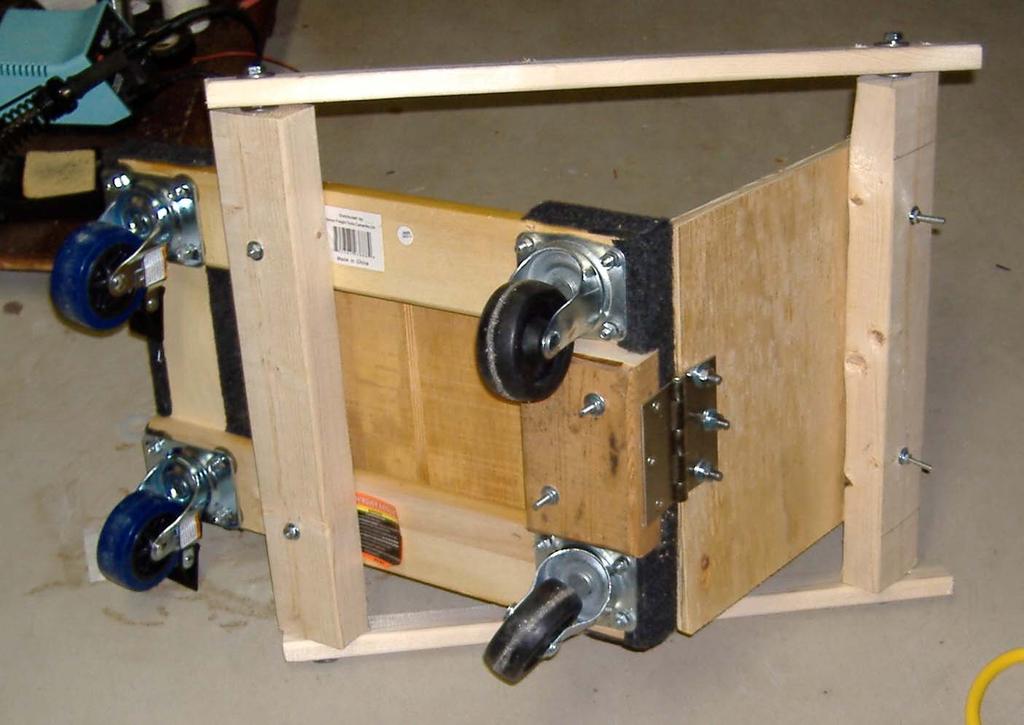
1 October 11, 2016 Homemade Creeper with Backrest and Locking Casters Motivation: It became difficult to work under the train layout without back support that could be positioned where needed. It was difficult to solder wires up under the platform and still maintain my back in an upright position. This creeper provides back support and can be position where needed with the casters locked to prevent movement. Description of Design: The creeper was built using inexpensive materials that are available from Harbor Freight and Home Depot. It is built on a small mover's dolly that is modified by substituting 2 locking casters for 2 of the 4 non-locking casters. An adjustable plywood backrest is attached to the dolly by a hinge. Wooden side arms with adjustment holes are attached to 2x3's using 5/16 lag screws and the 2x3's are secured to the dolly and the backrest. Construction Steps: (numbers in parenthesis refers to items in the list of materials) 1. Remove 2 of the 4 casters along the short dimension of the dolly (1). 2. Install the 2 locking casters (2) in their place. These casters need to be modified by elongating the mounting slots in the direction closer to the caster wheels. The elongation is best done with a Dremel tool using a rotary file attachment. 3. Install 3 each 1/4 inch washers (3) over each caster mounting stud before attaching the caster to the dolly. This is to provide clearance between the stud and the wheel to allow complete circular swiveling. 4. Cut a 2x3 to 5.5 inches (4) and mount it within the dolly frame between the 2 non-locking casters. Use two bolts (8) that are 3 inches long complete with washers (9), lock washers (11), and nuts (10). This provides the mounting surface for the backrest-hinge that is screwed to the 2x3. 5. Cut two 2x3's to 16 or 17 inches long (4). These provide the attachment points for the adjustable side arms. The length of these depends on the clearance needed to sit on the dolly. 6. Use two bolts that are 3 inches long (8) to mount one 16 inch 2x3 (4) under the dolly approximately 6 inches back from the front of the dolly (end of dolly with locking casters). It is important to center the 2x3 so that there is equal overhang on each side of the dolly. 7. Use two bolts that are 3 inches long (8) to mount the other 16 inch 2x3 (4) approximately 1 1/2 inches down from the top of the backrest. It is important to center the 2x3 so that there is equal overhang on each side of the backrest. 8. Mount the hinge (7) to the center of the 5 1/2 inch 2x3 (4) on the back of the dolly using 3 wood screws (7) from the hinge package. 9. Attach the other section of the hinge to the 12 x12 plywood (5) backrest using the three 1.25 inch 1/4-20 bolts (12). Center the backrest so the edges line up with the edges of the dolly. The hinge should be on the backside of the backrest with the head of the bolt and a washer on the side of the backrest facing the seat. Place a 1/4 inch washer (14), lock washer (15), and nut (13) on the hinge side of the backrest. 10. Drill 5/16 inch clearance holes in each of the two 1 x 2 backrest adjustment arms (6) as follows: 1
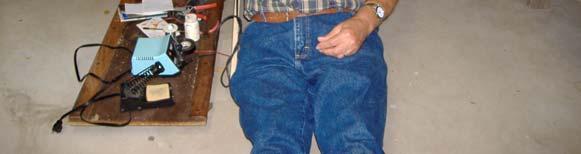
2 A. Drill a hole in the center of the wide dimension at a distance of 1 1/2 inches from the end. B. Drill a hole in the center of the wide dimension at a distance of 3 1/4 inches from the opposite end. C. Drill a hole in the center of the wide dimension at a distance of 2 1/4 inches from that same end. D. Drill a hole in the center of the wide dimension at a distance of 1 1/4 inches from that same end. 11. Drill 7/32 inch pilot holes for the 5/16 lag screws (16) in the centers on all 4 protruding ends of the 2x3's. Mark a "X" diagonally across the ends of 2x3 to locate the center. 12. Mount the two 1x2 arms to the dolly with the lag screw placed in the hole that is 1 1/2 inches from the end. Place a 5/16 washer (17) on each side of the 1x Mount the other end of the 1x2 arms to the backrest with the lag screw placed in the hole that is 2 1/4 inches from the end. Place a 5/16 washer on each side of the 1x Experiment with adjustment of the backrest by selecting one of the 3 holes near the backrest in the adjustment arm that provides the most comfort. 15. Mount the 12x18 plywood (5) to the dolly to serve as a seat using wood screws. Line up the plywood with the edges of the dolly. Make sure you leave clearance for free movement of the hinge at the end of the dolly near the backrest. Using the Creeper: It is important to note that this creeper may raise the person's head so high that their head may not clear the bottom of the platform. The dolly raises the person's body up by about 4 inches. My platform is 35 inches off the floor and my head just clears the bottom of the platform by about an inch or 2. More head clearance can be obtained by increasing the slope of the backrest. A person can sit in the creeper and move to the desired location. The casters can be locked while sitting in the creeper. The 2 front casters could also be locked and the front of the creeper can be picked up and moved into the position where you plan to work. I have also found it very helpful to use a regular automotive creeper along with the homemade creeper to serve as a movable tray for the materials that I am using like cordless drill, soldering iron, solder, wire, wire strippers, electrical tape, screwdrivers, diagonals, etc. Preferences: There are some areas where personal preference may lead to modifications. I used some less than optimum materials because I had them on hand. Some people may prefer a higher backrest. Some may prefer widening the seat and the backrest out to the backrest adjusting arms. Relative sizes and locations of items may require changes to items like the backrest adjusting arms. Pictures: Pictures are located at the end of the document after the list of materials. Carl Kellenbenz Baltimore Area American Flyer Club 2
3 List of Materials Item # Description Part # Qty Supplier Comments 1 Mover's Dolly 18 x Harbor Freight Regular price 19.99, sale price 11.99, coupon price in swivel caster with brake Harbor Freight Regular price 5.99, sale price 4.49, coupon price /4 inch flat washers 24 Home Depot Use 3 each 1 inch diameter washers on each locking caster mounting stud before installing caster. This raises caster so caster wheels will swivel without hitting mounting studs. 4 2 x 3 Studing Home Depot Cut 2 lengths to 16 inches for backrest adjustment. Cut 1 length to 5.5 inches to mount hinge to dolly. 5 1/2 inch plywood Home Depot Cut one piece 12 x 18 for seat. Cut one piece 12 x 12 for backrest. 6 1 x 2 furring strip Home Depot Cut 2 lengths 21 inches long for backrest support arms /2 in Square Hinge Home Depot Used to mount backrest to dolly bolts 3 in long 6 Home Depot Used to mount 2 x 3's to dolly and to backrest. 9 # 10 flat washers 12 Home Depot Use 1 inch washers under head of # 10 bolts and under lock washer & nut nuts 6 Home Depot Use to secure 2 x 3's with # 10 bolts 11 # 10 lock washers 6 Home Depot Use between flat washers (item 9) and nuts (item 10) /4 inch 1/4-20 bolts 3 Home Depot Use to secure hinge to backrest. 13 1/4-20 nuts 3 Home Depot Use to secure hinge to backrest. 14 1/4 inch flat washers 6 Home Depot Use 1inch washer under head and nut of 1/4-20 bolts. 15 1/4 inch lock washers 3 Home Depot Use under item /16 hex head Lag screws 2 1/2 in. 4 Home Depot Use to secure backrest adjustment arms to the 2 x 3's 17 5/16 flat washers 8 Home Depot Use 1 1/2 inch washers on either side of backrest adjustment arms when mounting with 5/16 lag screws.


4
5
2015 Cubmobile Derby Leaders Guide
 2015 Cubmobile Derby Leaders Guide If you've been to a Cubmobile race, you already know how much fun it is. If you haven't, ask someone who's been to one! Gravity-powered cars begin on a ramp and race
Detailed Explanation of Function of AF 695 Reverse Loop Relay
 June 24, 2017 Detailed Explanation of Function of AF 695 Reverse Loop Relay The American Flyer (AF) Reverse Loop Relay sold for $ 2.95 and $ 3.95 respectively when manufactured in 1955 and 1956. The Reverse
Gauge Wiring Instructions
 Thank you for purchasing the Track Dog Racing Gauges. These instructions are for wiring the Westach brand gauges with the TDR gauge panel for all model years of the Miata. Refer to the installation instructions
Guide to Installing Y o u r H a r m a r S t a i r L i f t
 Guide to Installing Y o u r H a r m a r S t a i r L i f t 2 W E L C O M E T O T H E H A R M A R F A M I L Y Congratulations on your purchase of a Harmar Access Stairway Lift. These instructions will assist
Design of a Station for Pump Testing
 Design of a Station for Pump Testing The system below was developed for use in the First Year Engineering Program at Louisiana Tech University. Using water around electrical devices can be hazardous. Louisiana
How To: Convert Headlight DRLs Into Marker DRLs A CFans Members Mod Project by burn
 How To: Convert Headlight DRLs Into Marker DRLs A CFans Members Mod Project by burn Skill Level: Easy Disclaimer: Please use caution and seek professional assistance when necessary. ColoradoFans.com, the
STAY ON TRACK WITH THIS LINE FOLLOW BUGGY WITH :MOVE LINE FOLLOW BOARD FOR BBC MICRO:BIT
 STAY ON TRACK WITH THIS LINE FOLLOW BUGGY WITH :MOVE LINE FOLLOW BOARD FOR BBC MICRO:BIT BUILD INSTRUCTIONS LIST OF FIXINGS M3 BOLTS M3 NUTS STANDOFFS 6mm x12 x4 x4 10mm x4 x12 12mm x2 30mm x2 20mm M-F
Guide to Installing Your Summit Stairway Lift
 Guide to Installing Your Summit Stairway Lift 2 3 W E L C O M E O H E S U M M I F A M I L Y B E F O R E Y O U S A R Congratulations on your purchase of a Summit Stairway Lift. hese instructions will assist
Installation Instructions Studio Makeup Station
 Installation Instructions Studio Makeup Station 30" and 36" Models 5-light 30" Studio Makeup Station 8-light 30" Studio Makeup Station 6-light 36" Studio Makeup Station 9-light 36" Studio Makeup Station
Congratulations on your purchase of a Mobile Ramps and Lifts lift.
 2 W E L C O M E T O T H E M O B I L E R A M P S A N D L I F T S Congratulations on your purchase of a Mobile Ramps and Lifts lift. These instructions will assist you in making sure your installation is
INSTALLATION AND OWNER S MANUAL Wing Deflectors, Fairing Mount N5107 and N5109 for HONDA GL1800
 INSTALLATION AND OWNER S MANUAL Wing Deflectors, Fairing Mount N5107 and N5109 for HONDA GL1800 Thank you for purchasing a National Cycle product. Please read these instructions carefully and thoroughly
Introduction Date: October 2007 Pt No INSTRUCTION KIT JOINER RF 1 KIT COMPONENTS
 KIT COMPONENTS Part Illustration Rear Bracket Description Front Lower Bracket KIT APPLICATION This kit is designed for use on 1595mm / 62 & 1695mm / 66 high cabinet models, incorporating the B, C, D &
Illuminated Cup Holders Hyundai Elantra (GLS, Limited, Coupe)
") Illuminated Cup Holders 2011-2015 Hyundai Elantra (GLS, Limited, Coupe) Thanks for purchasing this Cup Holder Illumination Install Kit! If you have any questions or feedback please email me direct at info@accentglowled.com
Illuminated Cup Holders 2011-2015 Hyundai Elantra (GLS, Limited, Coupe) Thanks for purchasing this Cup Holder Illumination Install Kit! If you have any questions or feedback please email me direct at info@accentglowled.com
Bruce s Science workbench
 Baby Vandegraff Generator by Bruce Yeany 2001 https://www.youtube.com/watch?v=parq01q DKe4 http://www.instructables.com/id/van-de- Graaff-Electrostatic-High-Voltage- Generator/ https://www.youtube.com/watch?v=esz
Installation Instructions
 Equipment Required: Installation Instructions Fastener Kit: F Wrenches: 8mm, 13mm, 3/4, 15/16 Drill Bits: 1/4 Other Tools: Drill, Reciprocating Saw, File WARNING: Under no circumstances do we recommend
ZODIAC 601 XL. Trim the outboard corner of the front flange of the center spar 6W4-1. Corner should not touch the side of the cabin floor skin 6B10-1.
 Trim the outboard corner of the front flange of the center spar 6W4-1. Corner should not touch the side of the cabin floor skin 6B10-1. Tape the side skins to the cabin floor skin (area in front of the
DV8 Tire Carrier Manufacturer Part Number TCSTTB-01 Model Number J104640
 DV8 Tire Carrier Manufacturer Part Number TCSTTB-01 Model Number J104640 Installation Time: 30 Minutes Tools Required: 19mm Socket 13mm Socket Ratchet T15 Torx Driver T50 Torx Driver Painters Tape Dremel
(2) 10mm Quick Release Bolts with Pivot Washers (4) 10mm Flat Washers (2) 10mm Nylon Lock Nuts. (4) 10mm Plastic Washers
 10mm Quick Release Bolts with Pivot Washers (4) 10mm Flat Washers (2) 10mm Nylon Lock Nuts. (4) 10mm Plastic Washers") PARTS LIST: EXTREME GRILLE GUARD 1 Extreme Heavy Duty Grille Guard 2 10mm Cam Lever Quick Release Bolts with Special Pivot Washer 1 Driver/left Frame Mounting Bracket 4 10mm x 24mm OD x 2.2mm Flat Washers
PARTS LIST: EXTREME GRILLE GUARD 1 Extreme Heavy Duty Grille Guard 2 10mm Cam Lever Quick Release Bolts with Special Pivot Washer 1 Driver/left Frame Mounting Bracket 4 10mm x 24mm OD x 2.2mm Flat Washers
3.5-4 GENERIC POSITIVE AIR SHUTOFF
 3 October 2016 1036732 1036733 Generic Positive Air Shutoff (I-00189) 1 DOWNLOAD ENHANCED INSTALL MANUALS AT dieselperformance.com 3.5-4 GENERIC POSITIVE AIR SHUTOFF P/N# 1036732 P/N# 1036732-M P/N# 1036733
UMS Storage Rack ASSEMBLY INSTRUCTIONS Chief Automotive Systems, Inc.
 UMS Storage Rack ASSEMBLY INSTRUCTIONS R 2000 Chief Automotive Systems, Inc. Chief s Limited One-Year Warranty & Liability CHIEF'S LIMITED ONE-YEAR WARRANTY & LIABILITY Chief Automotive Technologies,
Instructions on installing the R/R to the front battery cover.
 April, 2008 Instructions on installing the R/R to the front battery cover. Please read all of the steps so you will be familiar with the complete relocation installation first. The purpose of this relocation
Char-Griller Smokin Pro Modifications
 Char-Griller Smokin Pro Modifications By Phil Lee aka HawgHeaven Right out of the box, the Char-Griller Smokin Pro has a few design deficiencies that need to be addressed, and are fairly easy to remedy.
Inteli-Lift GEN II DUMBWAITER
 1 877-345-4387 530-295-4900 www.eilifts.com Inteli-Lift GEN II DUMBWAITER The Easiest Dumbwaiter system on the Market Fully UL Certified Dumbwaiter Systems UL File # SA32120 This manual will cover the
Troop 22 Soapbox Derby
 Event Information Overview: The Soapbox Derby is a colorful, thrilling activity that is fun for the whole family. Scouts and adults will create and drive their own cars. There is no engine; the Soapbox
HEAVY DUTY STAIR LIFT SYSTEM Installation and Service Manual
 HEAVY DUTY STAIR LIFT SYSTEM Installation and Service Manual WARNING! STRICT ADHERENCE TO THESE INSTALLATION INSTRUCTIONS is required and will promote the safety of installers, as well as those who will
LPE C5 Battery Relocation Kit
 LPE C5 Battery Relocation Kit The LPE C5 Corvette battery relocation kit improves vehicle weight distribution by moving weight to the rear of the vehicle. The improved weight distribution increases traction
MOUNT BRACKET PARTS and HARDWARE: Installation parts with * come loose in hardware kit bag. Other parts are preassembled
 INSTALL INSTRUCTIONS C-DMM-2006 Dash Monitor Mount 2017-2019 F-250, 350, 450 Pickup, F-450 and 550 Cab Chassis, 2015-2019 Ford F-150 and 2018-2019 Expedition Notes: 1. The C-DMM-2000 series Dash Monitor
Application Note. Atlas RS-3 Tsunami Digital Sound Decoder Installation Notes
 Application Note Atlas RS-3 Tsunami Digital Sound Decoder Installation Notes Overview This application note describes how to install a TSU-AT1000 digital sound decoder into an HO Atlas RS-3. Skill Level
INSTALLATION INSTRUCTIONS 3063 / FORD F-150
 INSTALLATION INSTRUCTIONS 3063 / 3063-2 2009-10 FORD F-150 PARTS LIST: Qty Description Qty Description 1 Grill Guard 4 12mm x 44mm OD Flat Washers 1 Driver/Left Lower Mounting 4 12mm Hex Nut 1 Passenger/Right
Memories of a Power Brakes conversion on a 1971 Corvette
 Memories of a Power Brakes conversion on a 1971 Corvette I did the job all by myself, except for the brake bleeding. Looks like an easy job but its not, you definitely need some experience to avoid screw
Q15P. Mitsubishi MQ Triton Dual Cab
 Mitsubishi MQ Triton Dual Cab Page 1 of 12 Fitting Instructions Part Number Mitsubishi MQ Triton Dual Cab 2015+ To suit Sports Bars Check contents of kit before commencing fitment and report any discrepancies
INSTALLATION INSTRUCTIONS GRILLE GUARD TOYOTA TUNDRA TOYOTA SEQUOIA PART # 2067/2067-2
 INSTALLATION INSTRUCTIONS 07-15 TOYOTA TUNDRA 08-15 TOYOTA SEQUOIA PART # 2067/2067-2 PARTS LIST: 1 Grille Guard 2 10mm Cam Lever Quick Release Bolts with Special Pivot Washer 1 Driver/left Frame Mounting
How to Convert a Universal Starter Box for Revo 3.3/Platinum
 How to Convert a Universal Starter Box for Revo 3.3/Platinum These are instructions for converting a common universal electric starter box for starting the Revo 3.3 or Platinum without an on-board starting
IL500 Sierra Inclined Platform Lift
 IL500 Sierra Inclined Platform Lift Installation & Service Manual www.harmar.com 800-833-0478 IMPORTANT: Read and understand this manual thoroughly before attempting to install or operate the lift. If
AMERICAN CART & RACK CARTS, HAND TRUCKS, DOLLIES & RACKING AMERICANCARTANDRACK.COM GRANITEIND.COM
 AMERICAN CART & RACK CARTS, HAND TRUCKS, DOLLIES & RACKING AMERICANCARTANDRACK.COM GRANITEIND.COM 877-447-2648 JAN 2018 AMERICAN CART & RACK TABLE OF CONTENTS / ALUMINUM HAND TRUCKS Table of Contents Aluminum
Trident Universal. Installation Manual
 Trident Universal Installation Manual Revision 1.1; Updated: July 6, 2017 Table of Contents Tool List 03 Installation Tool List Pre-Install Preparation 04 Lateral Panel Modifications 07 Top Panel Modifications
Marlon Xplore / Xplore Pro Deck Installation & Assembly Instructions
 Marlon Xplore / Xplore Pro Deck Installation & Assembly Instructions Marlon Recreational Products www.marlonproducts.com 1-800-663-7367 INSTALLATION INSTRUCTIONS: 1. Remove the ramp from underneath the
Guide to Installing Your AMERIGLIDE Stairway Lift
 Guide to Installing Your AMERIGLIDE Stairway Lift 2 3 W E L C O M E O H E S U M M I F A M I L Y B E F O R E Y O U S A R Congratulations on your stair lift. hese instructions will assist you in making sure
Ford E350/E450 Super Duty (2004-present) Part #SSR ~ SSR ~ SSR Installation Instructions
 Part #SSR ~ SSR ~ SSR Installation Instructions") Ford E350/E450 Super Duty (2004-present) Part #SSR-106-40-1 ~ SSR-106-47-1 ~ SSR-106-54-1 Installation Instructions Drivers side (Passenger s side similar) Parts List Item Part # Description Qty. A 512067/8
Ford E350/E450 Super Duty (2004-present) Part #SSR-106-40-1 ~ SSR-106-47-1 ~ SSR-106-54-1 Installation Instructions Drivers side (Passenger s side similar) Parts List Item Part # Description Qty. A 512067/8
Installation Instructions
 Equipment Required: Fastener Kit: F Wrenches: 3/4, 15/16 Drill Bits: 1/4 Other Tools: Drill WARNING: Under no circumstances do we recommend exceeding the towing vehicle manufacturers recommended vehicle
Installation and Service Manual
 RAVE Stair Lift Installation and Service Manual WARNING! STRICT ADHERENCE TO THESE INSTALLATIONS INSTRUCTIONS IS REQUIRED to promote the safety of those installing this product, as well as that of those
** DO NOT EXCEED THE RECOMMENDED VEHICLE TOWING WEIGHT RATING ** DODGE RAM 1500
 10/3/2017 DODGE RAM 1500 WARNING!! BRAKE, FUEL, AND ELECTRICAL LINES MAY NEED TO BE LOOSENED OR REPOSITIONED TO PROVIDE CLEARANCE FOR NEW HARDWARE. ON SHORT BED MODELS, CHECK FOR ADEQUATE TURNING CLEARANCE
H15P. Toyota Hilux A-DECK Dual Cab
 Toyota Hilux A-DECK Dual Cab Page 1 of 14 Fitting Instructions Part Number H15 Toyota Hilux A-DECK Dual Cab 2015+ To suit Sports Bars Check contents of kit before commencing fitment and report any discrepancies
Higher Level. Junior Certificate Technology. Design Folio. Year. Design Task. Examination Number. School Roll Number 68261G
 Junior Certificate Technology Higher Level Design Folio Year Design Task 2009 A Examination Number School Roll Number 148416 68261G Note: The content layout in this exemplar design folio follow the headings
Installation Instructions Table of Contents
 Installation Instructions Table of Contents Pre- Installation of Garage Storage Lift 2 Layout the Garage Storage Lift 3 Installing the strut Channels 3 Install the Drive Assembly 5 Install the Drive Shaft
(W) INSTALLATION INSTRUCTIONS GRILLE GUARD 2014 GMC SIERRA 1500 EXCLUDES DENALI PART # /
 INSTALLATION INSTRUCTIONS GRILLE GUARD 2014 GMC SIERRA 1500 EXCLUDES DENALI PART # /") (W) INSTALLATION INSTRUCTIONS GRILLE GUARD PART # 508514/ 508515 PARTS LIST: GRILLE GUARD Qty Description Qty Description 1 Grille Guard Assembly 6 12-1.75mm Hex Nuts 2 Frame Brackets 4 10-1.50mm x 30mm
(W) INSTALLATION INSTRUCTIONS GRILLE GUARD PART # 508514/ 508515 PARTS LIST: GRILLE GUARD Qty Description Qty Description 1 Grille Guard Assembly 6 12-1.75mm Hex Nuts 2 Frame Brackets 4 10-1.50mm x 30mm
Electric Power Steering Installation in the Pantera. by Gerry Romack & Alan Cameron
 Electric Power Steering Installation in the Pantera by Gerry Romack & Alan Cameron 1. Harness with controller 2. Power Wire battery 3. Steering assembly 4. Hall Effect Speed Sensor Fused Ignition relay
This harness kit includes: Installing the Hybrid ReVolt Universal grid charger in an Insight
 Installing the Hybrid ReVolt Universal grid charger in an Insight This harness kit includes: Insight harness (2000 to 2006) (a) 4 #6 mounting screws for bulkhead (c) 2 sheet metal screws for fan board
Part List ASSEMBLY INSTRUCTIONS. Backrest. Seat. Armrests. Star Base. Caster. Arm Bolts (M8 X 22mm) Back Bolts (M8 X 15mm) Allen Wrench
 Back Bolts (M8 X 15mm) Allen Wrench") IOO-BLK/IOO-WHT ASSEMBLY INSTRUCTIONS IOO-BLK/IOO-WHT Part List Key Description Part Qty. Spare A Backrest B Seat C Armrests ( left & right armrest) 2 D Seat Post(Cylinder) E Star Base F Caster r 5 G H
IOO-BLK/IOO-WHT ASSEMBLY INSTRUCTIONS IOO-BLK/IOO-WHT Part List Key Description Part Qty. Spare A Backrest B Seat C Armrests ( left & right armrest) 2 D Seat Post(Cylinder) E Star Base F Caster r 5 G H
INSTALLATION INSTRUCTIONS GRILLE GUARD SILVERADO 1500 PART #
 INSTALLATION INSTRUCTIONS PART # 3-5863 4-0863 PARTS LIST: Qty Description Qty Description 1 Grille Guard Assembly 6 12-1.75mm Hex Nuts 2 Frame Brackets 4 10-1.50mm x 30mm Hex Bolts 1 Driver/Left Mounting
8mm Bolt Plate. (15) 8mm U-Clip Nuts. Passenger/right front Upper Bracket
 8mm U-Clip Nuts. Passenger/right front Upper Bracket") PARTS LIST: 2 T-6 Side Bars 8 8mm Double Bolt Plates 1 Passenger/right Upper Bracket (all incl. DEF) 17 8-1.25mm x 25mm Hex Bolts 1 Passenger/right Lower Bracket (all incl. DEF) 33 8mm x 24mm x 2mm Flat
PARTS LIST: 2 T-6 Side Bars 8 8mm Double Bolt Plates 1 Passenger/right Upper Bracket (all incl. DEF) 17 8-1.25mm x 25mm Hex Bolts 1 Passenger/right Lower Bracket (all incl. DEF) 33 8mm x 24mm x 2mm Flat
Stair Lift SR601X INSTALLATION MANUAL
 Stair Lift SR601X INSTALLATION MANUAL ATTENTION! STRICT ADHERENCE TO THESE INSTALLATION INSTRUCTIONS is required and will promote the safety of those installing this product, as well as those who will
Installation Instructions
 Equipment Required: Fastener Kit: F Wrenches: 3/4, 15/16 Drill Bits: 1/4 Other Tools: Drill Installation Instructions Short & Long Bed All Megacabs 9464/9474 HIDE-A-GOOSE HITCH INSTALLATION WARNING: Under
Guide to adding a current selection switch to the DIY Portable EVSE from ZCW
 Guide to adding a current selection switch to the DIY Portable EVSE from ZCW Introduction This guide is intended for those who have built the Zero Carbon World DIY Charging Station kit as depicted in the
Dodge Cummins Positive Air Shutoff
 21 October 2011 1998-2002 24V 5.9 Dodge Cummins Positive Air Shutoff 1 1998.5-2002 5.9 Dodge Cummins Positive Air Shutoff P/N# 1036719 P/N# 1036719-M UPLEASE READ ALL INSTRUCTIONS BEFORE INSTALLATION 21
2002 Convertible Cloth Sleeve Convertible Cloth Attachment
 2002 Glass Convertible Top on 2000-2001 Frame Submitted by Clovis, North Texas S2000 Owners Club So what s the difference? Honestly, not much. The 2000 soft top cloth has attachment points for each of
ASAP Jr. A Strap and Pole. Magic Christmas. Walter Monkhouse. Alexandria, La.
 ASAP Jr A Strap and Pole Walter Monkhouse Walter@MagicChristmas.org Magic Christmas Alexandria, La. Description The ASAP is a telescoping pole that mounts on a Portable Hole and can extend up to 19 feet
GAS CYLINDER LIFTS BEFORE YOU BEGIN
 I N S T R U C T I O N M A N U A L GAS CYLINDER LIFTS The LM Series gas cylinder lifts are smooth, quiet reliable lift mechanisms for your valuable equipment in a mobile application. The LM Series can be
Rollstar Shade Installation Instructions
 Rollstar Shade Installation Instructions All Lifting Systems Inside or Outside Mount Thank you for purchasing your new Rollstar shade. It has been custom-made from the highest quality materials to the
SECTION 11 INTERMODAL EQUIPMENT
 SECTION 11 INTERMODAL EQUIPMENT ROA MANUAL SCHEDULE OF AMENDMENTS SECTION 11 AMENDMENT NUMBER PAGES AMENDED AMENDMENT SUMMARY DATE ISSUED TABLE OF CONTENTS Section Description Page No. 11.1 SCOPE... 11-1
Installing a genuine HoodLift on a Jeep JK with an AEV hood
 Installing a genuine HoodLift on a Jeep JK with an AEV hood (to print a full-color version of these instructions go to www.hoodlift.com/products.html. Scroll down to the JK HoodLift and click on the AEV
FREEDOM3 Portable Restroom Assembly Instructions
 FREEDOM3 Portable Restroom Assembly Instructions PN 21337 REV M - 1-1-19-17 FREEDOM 3 ASSEMBLY INSTRUCTIONS PN 21337 REV M -2-1-19-17 PARTS LIST: PN 21337 REV M - 3-1-19-17 INTRODUCTION Satellite portable
Installation Instructions
 Equipment Required: Installation Instructions Fastener Kit: F Wrenches: 8mm, 13mm, 3/4, 15/16 Drill Bits: 1/4 Other Tools: Drill, Reciprocating Saw, File WARNING: Under no circumstances do we recommend
Donut Glazers HG18EZ HG18C SUPPORT TECHNICAL SUPPLEMENT OPERATOR S MANUAL SUPPLÉMENT TECHNIQUE OPERATOR S TECHNICAL SUPPLEMENT
 The #1 Source for Donut and Bakery Equipment www.belshaw.com OPERATOR S MANUAL TECHNICAL SUPPLEMENT OPERATOR S TECHNICAL SUPPLEMENT MANUAL SUPPLÉMENT TECHNIQUE PARTS AND ELECTRICAL DIAGRAMS PARTS AND ELECTRICAL
DC disconnect. #4 AWG Negative wire
 90 ASSEMBLING A SOLAR GENERATOR Figure 11-3: Inverter Input Circuit DC disconnect #4 AWG Positive wire 75 amp fuse 12-volt deep cycle battery, 120 Ah 400 watt Inverter #4 AWG Negative wire So we should
Installation and Service Manual
 RAVE Star Lift Installation and Service Manual WARNING! STRICT ADHERENCE TO THESE INSTALLATION INSTRUCTIONS is required and will promote the safety of those installing this product, as well as those who
Model SL-12K-A SCISSOR LIFT. wheel alignment model. (11000 LBS / 5000Kg Capacity) INSTALLATION & OPERATION INSTRUCTION (SECOND EDITION)
 INSTALLATION & OPERATION INSTRUCTION (SECOND EDITION)") Model SL-12K-A SCISSOR LIFT wheel alignment model (11000 LBS / 5000Kg Capacity) INSTALLATION & OPERATION INSTRUCTION (SECOND EDITION) 2007. 6. CONTENTS Chapter 1 Introduction & Specifications ---------------------------------------
Model SL-12K-A SCISSOR LIFT wheel alignment model (11000 LBS / 5000Kg Capacity) INSTALLATION & OPERATION INSTRUCTION (SECOND EDITION) 2007. 6. CONTENTS Chapter 1 Introduction & Specifications ---------------------------------------
Roller Shades CORD LOOP. Head Rail, Fascia and No Head Rail. Installation & Care Instructions
 Roller Shades CORD LOOP Head Rail, Fascia and No Head Rail Installation & Care Instructions 152038 H 5/30/2017 GETTING STARTED A few simple tools are required: - Measuring tape - Power drill, drill bits
INSTALLATION INSTRUCTIONS GRILLE GUARD TOYOTA TUNDRA TOYOTA SEQUOIA PART # P2067
 INSTALLATION INSTRUCTIONS GRILLE GUARD 07-14 TOYOTA TUNDRA 08-14 TOYOTA SEQUOIA PART # P2067 PARTS LIST: GRILLE GUARD 1 Grille Guard 2 10mm Cam Lever Quick Release Bolts with Special Pivot Washer 1 Driver/left
Times-2 Speed Files INSTALLATION INSTRUCTIONS
 Times-2 Speed Files INSTALLATION INSTRUCTIONS AURORA from RICHARDS-WILCOX, INC. 600 South Lake Street Aurora, Illinois 60506 Phone: 630-897-6951 Fax: 630-897-6994 Toll Free: 800-277-1699 TIMES-2 SPEED
Build an electric Scoot-car
 513 Build an electric Scoot-car Designed by ROBERT W O O L S O N Here's a sidewalk special for young hot rodders that safely takes the corner on two wheels, has two forward speed and brakes that stop on
IMPORTANT OWNER-OPERATOR INSTALLATION INSTRUCTIONS A7728 HIDDEN POWER APPLICATION: FORD F250/F350/F450 with Battery Box
 IMPORTANT OWNER-OPERATOR INSTALLATION INSTRUCTIONS A7728 HIDDEN POWER APPLICATION: 2008-2012 FORD F250/F350/F450 with Battery Box A7728 INVENTORY LIST 1- Frame Plate 1- Side Gusset 1- Bent Hook Bracket
INSTALLATION PROCEDURE Step 1. Unpack and verify shipment. Double-check site specifics. Step 2. - Page 3 -
 Vesta INSTALL GUIDE TOOLS AND MATERIALS REQUIRED Portable circular saw with edge guide to cut the rail squarely Allen keys (Imperial for splice bars) Screwdrivers (specifically Robertson #2 and #3, as
Irunning Board Installation Instruction
 PARTS LIST: Item QTY Description Item QTY Description #1 2 Running Board(use for left or right) #8 13 8-1.25mm x 25mm Hex Bolt #2 1 Passenger/right Upper Bracket #9 13 8mm x 24mm x 2mm Flat Washer #3 1
Bachmann Spectrum Peter Witt in HO
 Bachmann Spectrum Peter Witt in HO By Bob Dietrich This is my impression of an unpainted Peter Witt from Bachmann Spectrum. The packaging of the car was impressive a large red box with a clear cover showing
Triumph Street Triple VSM Grip Heater Install
 Triumph Street Triple VSM Grip Heater Install Introduction: With winter fast approaching and with painful memories of last winter riding with the club it was time to do something about getting some grip
Tip: and Orient Express LED Light Upgrade Date: Correction
 Hi All, I have since inherited my friend Rudolf s 42755 Orient Express with the extra 42760 car set and wanted to complete the LED light upgrade as we had planned. Side view of the Restaurant car with
INSTALLATION INSTRUCTIONS GRILLE GUARD GMC SIERRA 1500 EXCLUDES DENALI PART # 4084/
 INSTALLATION INSTRUCTIONS GRILLE GUARD 14-15 GMC SIERRA 1500 PART # 4084/ 4084-2 PARTS LIST: GRILLE GUARD Qty Description Qty Description 1 Grille Guard Assembly 6 12-1.75mm Hex Nuts 2 Frame Brackets 4
Instruction Manual book
 Instruction Manual book ITEM CODE:BH135 SPECIFICATION Wingspan : 4,200mm. 163.35 in. Length : 2,100 mm. 82.68 in. Weight : 7,6 kg. 16.72lbs Radio : 07 channels. Servo : 05 06 standard high torque servos,
INSTALLATION INSTRUCTIONS CRL JACKSON P PANIC EXIT DEVICE
 INSTALLATION INSTRUCTIONS CRL JACKSON 1095-1095P PANIC EXIT DEVICE crlaurence.com Phone: (800) 421-6144 Fax: (866) 921-0531 crlaurence.com usalum.com crl-arch.com 11M0246 ORDER OF AND INSTALLATION Tools
Assembly, Installation, Operation and Maintenance Instructions. Base Rail Bracket Kit. For updates see PRODUCT SUPPORT tab at
 Assembly, Installation, Operation and Maintenance Instructions P/N: 31408 Base Rail Bracket Kit For updates see PRODUCT SUPPORT tab at www.huskytow.com Provide a copy of these Instructions to the end user
Installation of Auto Meter Cobalt Boost/Vacuum Gauge:
 Installation of Auto Meter Cobalt Boost/Vacuum Gauge: Fitment: All 79-14 models. This installation was completed on a 2004 Mustang GT, and should be identical for all 1999-2004 model Mustangs. Time needed:
Mid West Model Railroaders Rules and Standards
 Mid West Model Railroaders Rules and Standards Last updated 21 st January 2007 Electrical Specifications And Standards Per NMRA recommendations, each piece of rail is to be wired with appropriate colour
Mustang Classic LightBar Instructions
 1994-2004 Mustang Classic LightBar Instructions Note: Read installation instructions before starting. Component List: 1 LightBar 4 Poly Plugs 4 LightBar Bolts 4 LightBar Washers 2 LightBar Rivets 2 Light
Top Down Rollstar Shade Installation Instructions
 Top Down Rollstar Shade Installation Instructions Thank you for purchasing your new Rollstar shade. It has been custom-made from the highest quality materials to the dimensions you specified. With proper
Legacy Installation Manual
 Staying Home Corporation 1503 Vine Street P.O. Box 37 Harrisonville, MO 64701 816.380.2427 www.stayinghome.com A. INSTALLATION SITE REQUIREMENTS Legacy Installation Manual I. PRELIMINARY CHECKS 115 VAC,
Dodge Cummins Positive Air Shutoff
 21 October 2011 2003-2007 5.9 Dodge Cummins Positive Air Shutoff 1 2003-2007 5.9 Dodge Cummins Positive Air Shutoff P/N# 1036720 P/N# 1036720-M UPLEASE READ ALL INSTRUCTIONS BEFORE INSTALLATION 21 October
Ford 7.3L Powerstroke Positive Air Shutoff
 24 October 2012 Ford 7.3L 1999.5-2003 Positive Air Shutoff 1 1999.5-2003 Ford 7.3L Powerstroke Positive Air Shutoff P/N# 1036700 P/N# 1036700-M UPLEASE READ ALL INSTRUCTIONS BEFORE INSTALLATION 24 October
INFINITY MULTA SERIES
 ASSEMBLY ASSEMBLY INSTRUCTIONS INSTRUCTIONS ASSEMBLY INSTRUCTIONS INFINITY MULTA SERIES Workstations, WORKSTATIONS, desks, DESKS, and AND tables TABLES with WITH powered POWERED ADJUSTMENT adjustment PARTS
NorSap 1500 March 16, :03 PM
 Users Manual NorSap 500 March 6, 202 2:03 PM This user manual contains the following models: 6400 - NorSap 500 Standard H=88cm 6405 - NorSap 500 Standard no foot rest H=4cm 6500 - NorSap 500 Comfort 72-92cm
B, are made of %-in. strap iron. Armature
 # 6-32 HACK SCREWS operating on low-voltage a.c. from a bell transformer is shown in Figs. 1 and 3. The field coils A and B are two magnets from a buzzer or doorbell placed so that the windings run in
Type 2 Push-Through 37 Ton Log Splitter. Assembly Manual
 Type 2 Push-Through 37 Ton Log Splitter Assembly Manual Refer to this manual for the following models: RS37PT-LF09PC-16-1 RS37PT-LF09EC-16-1 RS37PT-LF09EC-16-2 RS37PT-LF13EC-22-1 RS37PT-LF13EC-22-2 RS37PT-LF15EC-22-1
G1 MOBILE WORKSTATION CART ASSEMBLY INSTRUCTIONS
 G1 MOBILE WORKSTATION CART ASSEMBLY INSTRUCTIONS GOLIATH G1 CART SAFETY INSTRUCTIONS Please read completely before using the Cart. Follow the information warnings written on the sticker affixed to the
Tiller Drive Installation Guide. Document number: Date: Oct 2006
 Tiller Drive Installation Guide Document number: 87061-2 Date: Oct 2006 Tiller Drive 3 System layout Tiller drive Course computer Boat's electrical distribution panel Fluxgate compass Control unit NMEA
INSTALLATION INSTRUCTIONS DRAWERS #240
 INSTALLATION INSTRUCTIONS DRAWERS #240 Please read and fill out the enclosed warranty registration card to activate your warranty. SHIPMENT CONTENTS #1 Lid #2 Rear #3 Left side panel #4 Right side panel
FLOODLIGHT unit IMPORTANT WARNING! RRAC055/RRAC059. INSTALL TIME: 30 mins
 LED 4" FLOODLIGHT unit RRAC055/RRAC059 INSTALL TIME: 30 mins Depending on the type of installation chosen, not all components supplied will be used. Refer to Page 13 Section 7 on how to set the angle of
AL LACKI'S ENGINE CART ASSEMBLY NOTES
 AL LACKI'S ENGINE CART ASSEMBLY NOTES BEFORE STARTING. Please refer to the drawings and photos at the end of this document. FOR MORE PHOTOS, LOG ON TO FACEBOOK USING THIS ADDRESS. https://www.facebook.com/media/set/?set=oa.10152545415424017&type=1
Mini EV Prize Solar Car Kit
 Mini EV Prize Solar Car Kit Each Kit includes 2 x Solar Panels 8 x Wheels 4 x 50mm, 4 x 40mm 2 x Axels (short & long) & 4 x Axel Collars 1 x Motor - F18 & 3D printed mount 2 x Large Spur Gear 60T & 48T
Instruction Manual book
 book ITEM CODE:BH 139 SPECIFICATION Wingspan : 1,450mm 57.09 in. Length : 1,140 mm 44.88 in. Weight : 3.3kg 7.26 Lbs. Radio : 05 channels. Servo : 07 mini servos+ 3servos Retracts (FUTABA S3170G) EDF:
lkm7001 key override module Installation Instructions Converting The LKM7000 to The LKM7003
 lkm7001 Instructions Converting The LKM7000 to The LKM7003 key override module In A Single Motion, We ll Change The Way You Think About Security Read Instructions thoroughly prior to installation Base