CSL Map Sensor Modification Instructions for E46 M3 Coupe, Convertible
|
|
|
- Paula Wade
- 6 years ago
- Views:
Transcription
 Source the parts as indicated below: Rock Auto and other online vendors will sell the Part number cross")

1 CSL Map Sensor Modification Instructions for E46 M3 Coupe, Convertible Sources for map sensor: 1) Frank Smith, included with the DME modifications and sent as part of the kit 2) Source the parts as indicated below: Rock Auto and other online vendors will sell the Part number cross references to: , , and to assist with searching. Wiring for the map sensor requires both a harness for the map sensor with associated wiring, along with a pin and wire to connect to the ECU follows: E46 M3 DME Overview Modifications will relate to Performance Controls are of the DME


2 Plug x60003 on the BMW DME side Preparation Step 1 Remove Power Disconnect the battery ground connector (BLACK) at the battery (Rear truck) Step 2 Remove DME Cover Remove DME compartment cover Step 3 Remove DME Connectors Remove DME connections in the following order depressing lock clips as needed: X60005

3 X60004 X60003


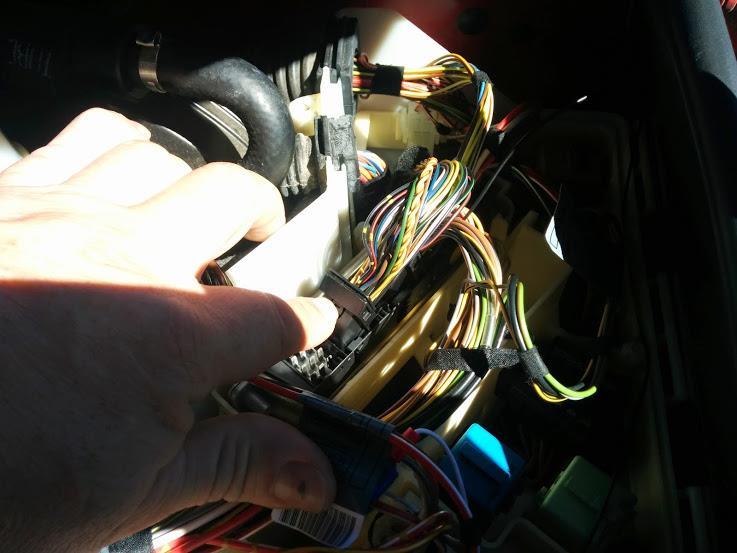
4 Step 4 Gain access to connector X60003 terminations Working with connector x60003, turn or twist as needed to gain access to the retaining clip on the connector. Using a pick or other tool, raise the retaining clip while keeping force on the wiring/gray connector so that when the clip is released the connector slides out.


5 All of the work will now relate to this gray connector. We will be adding one receptacle pin and 2 other wires we will trace down, making note of the wire coloring for our taps later on. Step 5 Add Map Sensor Signal Wire Pin 18 - Signal Turn over the gray connector and insert the wiring pin into pin location 18. This wire will go to Signal to pin B of the map sensor (requires pin and short lead as this spot is empty on the ECU plug) Reference to FIG A in appendix


6 Slide back into the connector retainer NOTE: Be sure to have referenced and located PIN # 17 and 7 and made note of the color coding. YOU WILL NEED THIS FOR THE NEXT FEW STEPS THAT FOLLOW Ready to re-seat: Reseated: Go ahead and reconnect all of the DME connectors back into their appropriate locations. Start with X60003 then X60004 and finally X60005 Make sure to go slowly as you do not want to force or bend any pins or connectors. If you have trouble seating a connector, examine the locking tab or mechanism. This is what usually prevents the connector from seating again into the DME module. You should just have a black wire now ready to connect.

 (This was wiring from a 2004 model so there color coding was a")
7 Step 6 Tap Voltage for Map Sensor Pin 7 Voltage RED on HARNESS Voltage to pin C on harness (tap into this wire) (In this installation, I ran the wires from the MAP sensor through the forward rear grommet So that there would be a clean intersection between the sensor and the DME compartment) Step 7 Tap Ground for Map Sensor Pin 17 - Ground BLACK on HARNESS Goes to pin A on harness (tap into this wire) (This was wiring from a 2004 model so there color coding was a little different)
 Step 8 Install Vacuum Signal Hose Connections Hose taps into the brake booster hose with a Tee. Easier and cleaner this way as this will not get engine heat this way.")

8 (Customers that have purchased the TTFS CSL Vacuum rail, Step 8 and Step 9 do not apply. The sensor and hose is already attached to the vacuum rail.) Step 8 Install Vacuum Signal Hose Connections Hose taps into the brake booster hose with a Tee. Easier and cleaner this way as this will not get engine heat this way. I have absolutely no idea why BMW decided to locate an electronic sensor on the top of a motor to be exposed to high heat. The only requirement is for the sensor to face a certain way. That is really the only reason I can see for that location. It is not necessary to copy the BMW installation. If you want, Frank does sell a very nice economical part that looks very much the part with his very special branding if you want to be all CSL like.

9 Step 9 Mount/Locate Map Sensor Sensor resides with the vacuum nipple facing down. This is the only way to mount this type of sensor as any other orientation will result in sporadic operation. Appendix Map Sensor Side Wiring FIG A & B Letter A- GROUND / Black wire on Green Harness Letter B-Sensor SIGNAL / White wire on Green Harness Letter C- 5 Volt POWER supply / Red wire on Green Harness


10 Parts needed: Wire taps: At least 2, but best to have several on hand as they can get messed up before getting them seated correctly. These can be purchased from Lowes, Amazon etc.


11 If unable to acquire the above connectors, soldering would be the best option. Please make sure when soldering to use heat shrink to cover the wiring. Vacuum Tee 3/8 x 3/8 x ¼ 2 Hose Clamps SIZE: 5/8 ¾ Electrical tape or zip ties to re-band DME wiring harness.
Shotgun Double Barrel HPFP install guide
 Shotgun Double Barrel HPFP install guide Thank you for your purchase of the VTT Shotgun Double Barrel HPFP upgrade! First thing to do when you open your box is to make sure all parts are in their respective
Fabricating and Installing Headlight Relays. Mike Graham
 Fabricating and Installing Headlight Relays Mike Graham For some time I had been reading about the benefits of installing headlight relays. As I understand it, there are two principal benefits: the load
INSTALLATION INSTRUCTIONS
 COLD AIR INTAKE INSTALLATION INSTRUCTIONS PART NUMBER D760-0390C APPLICATION: 1999-2003 E39 M5 PARTS LIST 1 Left Aluminum Intake Tube 1 Air Pump Bracket (A) 1 Right Aluminum Intake Tube 1 Air Pump Bracket
INSTALLATION INSTRUCTIONS. Revision 3.1.1
 INSTALLATION INSTRUCTIONS Revision 3.1.1 Table of Contents INTRODUCTION... 4 INSTALLATION OVERVIEW... 5 Included Parts... 6 DEVICE WIRING... 7 Required Parts... 7 Guidelines... 7 Wiring Diagram... 8 Compatible
SAISBM V36W Installation Instructions
 The Original Secondary Air Injection System Bypass Kit SAISBM V36W Installation Instructions All Applicable Toyota/Lexus Vehicles Introduction: The Secondary Air Injection System (SAIS) bypass module is
2014+ Ram 3.0 EcoDiesel EGR Delete
 2014+ Ram 3.0 EcoDiesel EGR Delete Installation Guide WARNING: This product is for competition use only in a sanctioned racing event. NOT FOR USE ON VEHICLES USED OR REGISTERED FOR USE ON A PUBLIC ROAD
Nissan GTR Alpha Fuel System
 Nissan GTR Alpha Fuel System Instructions V5 The goal of AMS is to provide the highest quality, best performing products available. By utilizing research and development, and rigorous testing programs
Installation Tips for RS1 + EVO-RIDE + SPDT. *(reglar key, automatic transmission vehicles ONLY)*
*") Installation Tips for RS1 + EVO-RIDE + SPDT TIP SHEET T1235 *(reglar key, automatic transmission vehicles ONLY)* Thank you for purchasing your remote start from MyPushcart.com - an industry leader in providing
Installation Tips for RS1 + EVO-RIDE + SPDT TIP SHEET T1235 *(reglar key, automatic transmission vehicles ONLY)* Thank you for purchasing your remote start from MyPushcart.com - an industry leader in providing
Rostra Electronic Cruise Control Install On a Stratoliner or Roadliner
 Rostra Electronic Cruise Control Install On a Stratoliner or Roadliner MATERIALS LIST: 1 - Rostra Part # 250-1223 (www.brandondist.com/products/cruise1223.htm) 1 - Signal Splitter part # 250-4369 1 - Engagement
WOT Box Installation Instructions VW / Audi
 Connector Pinout Pin Color AWG Name WOT Box Installation Instructions VW / Audi Description 1 Yellow 18 RPM Connect to Fuel Injector Drive Signal or Ignition Control Signal (varies by car model) 2 Black
Designed for the Street Proven on the Track
 TDR Fuel and Timing Card Wiring Thank you for using our TDR Fuel and or Timing Cards (F/T). There are two options on how to wire the F/T cards. Our preferred method is to use our TDR Patch Harness as shown
Installation Instructions
 Installation Instructions Jeep JK Unlimited (2007 Present) Mounting Bracket and Air Line System Kit for ARB On-Board Twin Air Compressor (CKMTA12) Made in the USA Kit Contents: 1 Bracket for ARB Compressor
Total installation time for the cruise control was approximately 8 hours.
 The following summary highlights the start-to-finish install of an Audiovox cruise control on stellarpod s (Steve) ST1300. Fred D (Fred) and ChucksKLRST (Chuck) primarily performed the install (Steve did
Installation Tips for your Remote Start system (for RS4LX>GMBP for GM vehicles)
") Installation Tips for your Remote Start system (for RS4LX>GMBP for GM vehicles) Thank you for purchasing your remote start from MyPushcart.com - an industry leader in providing remote starts to doit-yourself
Installation Tips for your Remote Start system (for RS4LX>GMBP for GM vehicles) Thank you for purchasing your remote start from MyPushcart.com - an industry leader in providing remote starts to doit-yourself
Installation Tips for your Remote Start/Keyless Entry (for Honda/Acura Vehicles) [EVO-ALL] v1.02 updated 9/13/2013
![Installation Tips for your Remote Start/Keyless Entry (for Honda/Acura Vehicles) [EVO-ALL] v1.02 updated 9/13/2013](/thumbs/87/96035180.jpg "Installation Tips for your Remote Start/Keyless Entry (for Honda/Acura Vehicles) [EVO-ALL] v1.02 updated 9/13/2013") Installation Tips for your Remote Start/Keyless Entry (for Honda/Acura Vehicles) [EVO-ALL] v1.02 updated 9/13/2013 Thank you for purchasing your remote start from MyPushcart.com - an industry leader in
Installation Tips for your Remote Start/Keyless Entry (for Honda/Acura Vehicles) [EVO-ALL] v1.02 updated 9/13/2013 Thank you for purchasing your remote start from MyPushcart.com - an industry leader in
Installation Instructions
 Installation Instructions Jeep JK 2-Door (2011 Present) Mounting Bracket and Air Line System Kit for ARB On-Board Twin Air Compressor (CKMTA12) Made in the USA Kit Contents: 1 Flat Bracket 1 Formed Bracket
A. Preparing the charge harness. Start by removing the plastic covers by the battery terminal.
 twist battery relocate kit and harness. Step 1 A. Remove battery. Start by removing the negative battery cable and then the positive. After removing the battery cables remove the battery hold down bracket.
Installation Instructions
 Instructions Created by an: DIY Underhood LED Lighting Kit (SKU# DIY-E-UHLK) Installation Instructions NOTICE: This Under Hood Light Kit was installed on a 2002 Toyota Tacoma. However, these instructions
#TL T EA888 GEN 3 FUELING SYSTEM/ INSTALLATION INSTRUCTIONS
 #TL100069 2.0T EA888 GEN 3 FUELING SYSTEM/ INSTALLATION INSTRUCTIONS Notes: These instructions were written for a North American specification MkVII GTI. Other models, like the Golf R, are similar. When
*(reglar key vehicles ONLY)* Read the entire installation manual. There are several safety tips in there to know before you start
* Read the entire installation manual. There are several safety tips in there to know before you start") Installation Tips for RS4 + EVO-RIDE + SPDT TIP SHEET T2519 2009-2011 Ford Crown Victoria 2009-2012 Ford E-150 2009 Ford E-150 Econoline Club Wagon 2008-2010 Ford E-250 2010 Ford E-250 Econoline 2010 Ford
Installation Tips for RS4 + EVO-RIDE + SPDT TIP SHEET T2519 2009-2011 Ford Crown Victoria 2009-2012 Ford E-150 2009 Ford E-150 Econoline Club Wagon 2008-2010 Ford E-250 2010 Ford E-250 Econoline 2010 Ford
Remove the 3-11mm nuts holding mirror on. Don t drop the nuts!
 2005-2012 Ford Mustang Puddle Lamp Kit Parts List: Quantity: Tool List: LED Lamps 2 Flat head screwdriver Seals 2 Ratchet & Socket set OR Nuts 2 Adjustable Wrench Wiring harness 1 Drill & 11/16 th bit
7B1210 COBB BMW N54 Charge Pipe
 7B1210 COBB BMW N54 Charge Pipe Installation Instructions Congratulations on your purchase of the COBB BMW N54 Charge Pipe for your BMW. The following instructions will assist you through your installation
Connecting the rear fog light on the A4 Jetta, while keeping the 5 Light Mod
 Connecting the rear fog light on the A4 Jetta, while keeping the 5 Light Mod DISCLAIMER: I'm human and make mistakes. If you spot one in this how to, tell me and I'll fix it This was done on my 99.5 Jetta.
Dodge Ram 09-Current CS-DTR SERIES BACKUP CAMERA INSTALLATION
 Dodge Ram 09-Current CS-DTR SERIES BACKUP CAMERA INSTALLATION Thank you for your purchase! These instructions cannot possibly cover every option group for every model year of RAM trucks so you may find
Networkfleet 3500 Product Line Installation Guide
 Networkfleet 3500 Product Line Installation Guide Light/Medium Duty (L3500) Heavy Duty (H3500) Universal (U3500) www.networkcar.com/fleet Customer Care: (866) 227-7323 customercare@networkcar.com Table
Bucket Harness. Installation Instructions. for Electric Club Car Precedent
 Bucket Harness for Electric Club Car Precedent Installation Instructions Electric Club Car Precedents manufactured after January 1, 2008 require an additional harness to allow the installation of light
Depress each tab as you pull the bezel off. The bezels are tight. L.H. shown.
 2013-2014 Ford Mustang V6 & Boss 302 Lower Valance Fog Light Kit Parts List: Quantity: Tool List: Fog light & bulb with bracket 2 Flat head & Phillips screwdriver Black bezels 2 Ratchet & Socket set OR
Installation Tips for your Crimestopper/ProStart Remote Start system (add-on for GM vehicles) v1.02 updated 1/16/2013
 v1.02 updated 1/16/2013") Installation Tips for your Crimestopper/ProStart Remote Start system (add-on for GM vehicles) v1.02 updated 1/16/2013 Thank you for purchasing your remote start from MyPushcart.com - an industry leader
Installation Tips for your Crimestopper/ProStart Remote Start system (add-on for GM vehicles) v1.02 updated 1/16/2013 Thank you for purchasing your remote start from MyPushcart.com - an industry leader
N63TU Upgrade Intercooler Installation Instructions
 N63TU Upgrade Intercooler Installation Instructions Part Number: D330-0017 Applications: 2014 F10 550i & xdrive 2013-14 F12/F13 650i & xdrive 2013-14 F06 650i & xdrive Gran Coupe 2013-14 F01/F02 750i/Li
Installation Manual v1.6: Dodge 68RFE Automatic Transmission. Please read all instructions before the installation of the ATS Co-Pilot
 Installation Manual v1.6: 2007.5-09 Dodge 68RFE Automatic Transmission Please read all instructions before the installation of the ATS Co-Pilot Thank you for purchasing the ATS Co-Pilot transmission management
COBB 3-Port Electronic Boost Control Solenoid
 COBB 3-Port Electronic Boost Control Solenoid MazdaSpeed3/Mazdaspeed6 Congratulations on your purchase of the COBB Tuning 3-Port Electronic Boost Control Solenoid. The following instructions will assist
COMPONENT WORK SAMPLE 15 Electrical Circuitry & Print Reading MAINTENANCE MANUAL
 COMPONENT WORK SAMPLE 15 Electrical Circuitry & Print Reading MAINTENANCE MANUAL TABLE OF CONTENTS SECTION TITLE PAGE 1A CHECKING THE BATTERIES, METER AND PROBES... 1 1B SECTION A: CHECKING THE COUNTER...
TIP SHEET T2352, T3396. Installation Tips for RS1 + EVO-ALL 1-BUTTON REMOTE STARTER FOR: Acura RDX PUSH-TO-START / AUTOMATIC
 Installation Tips for RS1 + EVO-ALL 1-BUTTON REMOTE STARTER FOR: Acura RDX 2013-2015 PUSH-TO-START / AUTOMATIC TIP SHEET T2352, T3396 Thank you for purchasing your remote start from MyPushcart.com - an
2010 Toyota Prius model II Head Unit Upgrade
 2010 Toyota Prius model II Head Unit Upgrade Monday, December 21, 2009 Disclaimer: Use this document and its contents at your own risk. Forward: Huge thanks to those members on Priuschat.com that forged
Factory safe air/fuel ratio s for Optimum performance Patent# 7,359,795 Now equipped with Air Fusion Patent pending
 Part number SP1997 2007-08 Infiniti G35 3.5L V6 Sedan 2008-09 Infiniti G37 3.7 V6 Coupe 2009 Infiniti G37 3.7 V6 Sedan cold air intake equipped with MR Tech and Air Fusion 1- primary air intake 1- primary
Installation Instructions: Epson 1400 CFS
 Installation Instructions: Epson 1400 CFS Epson 1400 with MIS CFS Installed *A perfect print with OEM cartridges is a must* Prerequisite - Before starting this installation, you MUST test your printer
PN R CHEVY CAMARO w/reverse Two panel Sequential LED Taillight kit installation guide. Kit Contents:
 Two panel Sequential LED Taillight kit installation guide Kit Contents: 2 LED panels 4 rubber grommets 1 power wire with t-tap 1 driver side LED harness, 24 1 passenger side LED harness, 48 2 LED extension
Ford Mustang V6 OEM-Style Fog Light Kit Parts List: Quantity: Tool List:
 2015-2017 Ford Mustang V6 OEM-Style Fog Light Kit Parts List: Quantity: Tool List: LED Foglights/ Bezels 2 Flat head & Phillips screwdriver (if you ordered part#3600) Ratchet & Socket set OR Wiring harness
FUEL INJECTION SYSTEM - MULTI-POINT
 FUEL INJECTION SYSTEM - MULTI-POINT 1988 Jeep Cherokee 1988 Electronic Fuel Injection JEEP MULTI-POINT 4.0L Cherokee, Comanche, Wagoneer DESCRIPTION The Multi-Point Electronic Fuel Injection (EFI) system
ECS Tuning 3095 Cleveland-Massillon Rd. Norton, Ohio Phone Fax Web
 B7 A4 Gauge Pod Installation Instructions Safety first:. When working with your vehicles electrical system; always disconnect the battery! Avoid shorting any circuits, or probing around wires. Failure
Installation Instructions - ECS Tuning Vent Pod Vacuum/Boost Gauge Kit
 Installation Instructions - ECS Tuning Vent Pod Vacuum/Boost Gauge Kit This tutorial is provided as a courtesy by ECS Tuning. Part Number for (2005-2008) Proper service and repair procedures are vital
Chevy Sonic 1.4L Intake Manifold
 Chevy Sonic 1.4L Intake Manifold Install Time: 3 hours In the Box: (1) Racer X Intake manifold (6) M8x1.25 bolts (4) M6x1 bolts (2) 1/8 NPT plugs (1) 3/8 NPT plug (1) 1/4 NPT 90 degree barb (4) Small O-rings
BX88175 Installation Instructions ToadStop II Vacuum Brake System
 BX88175 Installation Instructions ToadStop II Vacuum Brake System Serial No. Customer supplied tools & supplies Utility knife, 12VDC tester, drill & bits: (1/8", 1/4", 5/8 ), ¼ socket drive bit, punch,
Stand Alone Kit Installation Instructions
 Before installation: Stand Alone Kit Installation Instructions Read all information in this manual carefully Check the product for all components before starting the installation Remove the negative battery
2010 Toyota Prius Fog Light Retrofit
 2010 Toyota Prius Fog Light Retrofit A DIY prospective Last updated: Friday, December 25, 2009 *** Disclaimer Use this document and its contents at your own risk! *** Forward: This document was compiled
Shotgun Single Barrel HPFP install guide
 Shotgun Single Barrel HPFP install guide Thank you for your purchase of the VTT Shotgun Single Barrel HPFP upgrade! First thing to do when you open your box is to make sure all parts are in their respective
Performance Inlet Manifold
 Performance Inlet Manifold Tools needed (some tools not required on some models): 13mm Combination Wrench Flat Blade Screwdriver T30 Torx Driver T25 Torx Driver 10mm Combination Wrench and/or Socket with
M-9424-M50CJ INTAKE MANIFOLD INSTALLATION INSTRUCTIONS
 Please visit www.fordracingparts.com for the most current instruction information!!! PLEASE READ ALL OF THE FOLLOWING INSTRUCTIONS CAREFULLY PRIOR TO INSTALLATION. AT ANY TIME YOU DO NOT UNDERSTAND THE
Mustang One-Touch Convertible Top Module (2005+) - Installation Instructions
 - Installation Instructions") Mustang One-Touch Convertible Top Module (2005+) - Installation Instructions The below installation instructions work for the following products: Mustang One-Touch Convertible Top Module (2005+) Please
Mustang One-Touch Convertible Top Module (2005+) - Installation Instructions The below installation instructions work for the following products: Mustang One-Touch Convertible Top Module (2005+) Please
INSTALLATION INSTRUCTIONS
 HIGH FLOW AIRFLOW METER INSTALLATION INSTRUCTIONS PART NUMBER D763-1600A APPLICATION: 2001-06 E46 M3 Parts List: Hose clamp 64Z (7) Plastic Rivets Air Filter Temp Sensor & Harness (2) Button Head Screws
OVERVIEW. PART NUMBER D440-16xx-xxx. APPLICATION: Various -- see chart below
 OVERVIEW PART NUMBER D440-16xx-xxx APPLICATION: Various -- see chart below Congratulations for being selective enough to use a DINANTRONICS Performance Tuner. We have spent many hours developing this system
TOYOTA VENZA 2009 TRAILER WIRE HARNESS Procedure
 Part Number: PT791-0T099 Kit Contents Item # Quantity Reqd. Description 1 1 Trailer Wire Harness Module 2 1 4-Flat Harness 3 1 Battery Power Wire Harness 4 1 Mounting Bracket, 4-Flat 5 2 Screw #10-24 6
CustomerServicesDivision Toyota Motor Sales, U.S.A., Inc South Western Avenue P.O. Box 2991 Torrance, CA
 CustomerServicesDivision Toyota Motor Sales, U.S.A., Inc. 19001 South Western Avenue P.O. Box 2991 Torrance, CA 90509 2991 TO: ALL TOYOTA DEALER PRINCIPALS, SERVICE MANAGERS, PARTS MANAGERS SUBJECT: SPECIAL
Tailgate Light Bar Installation by Flopster Feb 2015
 Tailgate Light Bar Installation by Flopster843 23 Feb 2015 If you ever looked at the rear of a 3rd generation Dodge Ram dually pickup truck, you'll notice that there is a light bar with 3 red marker lights
INSTALLATION MANUAL AP60B INSTALLATION MANUAL
 INSTALLATION MANUAL 2. TOOLS REQUIRED The following is a list of tools required to properly install the cruise control. While this unit may be installed without some of the tools listed, it is recommended
PN CHEVY TRI-FIVE. Kit Contents: Four panel Sequential LED Taillight kit installation guide
 Four panel Sequential LED Taillight kit installation guide Kit Contents: 2 tail light LED panels 2 tail light turn signal LED panels 1 rubber boot/sleeve kit 1 power wire with t-tap 1 driver side LED harness,
Single Barrel Shotgun HPFP Install Guide
 Single Barrel Shotgun HPFP Install Guide Thank you for purchasing the VTT Single Barrel Shotgun HPFP upgrade kit! PLEASE READ THE ENTIRE GUIDE BEFORE BEGINNING INSTALLATION! The first thing you should
Stay-IN-Play with Panic Stop Braking
 INSTALLATION INSTRUCTIONS TOWED VEHICLE BRAKING SYSTEM Stay-IN-Play with Panic Stop Braking SMI Manufacturing, Inc. P.O. Box 14040 Evansville, IN 47728 1-800-893-3763 www.smibrake.com SIP0906 Model SIP0603
INSTALLATION INSTRUCTIONS
 INSTALLATION INSTRUCTIONS FUEL SURGE TANK INSTALLATION KIT 1999-2006 BMW E46 COUPE Document# 19-0056 Support: info@radiumauto.com Note: This kit was designed for a standard single pump Radium Engineering
LEXUS CT 200h ILLUMINATED DOOR SILLS Preparation
 Preparation Part Number: PT922-89100 Kit Contents Item # Quantity Req'd. Description 1 1 Door Sill, Front Right Hand 2 1 Door Sill, Front Left Hand 3 1 Door Sill, Rear Right Hand 4 1 Door Sill, Rear Left
Thank you for purchasing the Craven Speed FlexPod Complete Gauge Pod Kit For R56, R58, R59, R60 with Refresh Engines (2011+)
") Thank you for purchasing the Craven Speed FlexPod Complete Gauge Pod Kit For R56, R58, R59, R60 with Refresh Engines (2011+) Before You Start Please read instructions completely before installing. These
Thank you for purchasing the Craven Speed FlexPod Complete Gauge Pod Kit For R56, R58, R59, R60 with Refresh Engines (2011+) Before You Start Please read instructions completely before installing. These
Backside License Plate Mount for Jeep JK Wrangler
 REQUIRED TOOLS 10mm SOCKET 13mm SOCKET 4mm HEX KEY WIRE CRIMPS WIRE STRIPPERS ELECTICAL TAPE SCREW DRIVER KIT CONTAINS BACKSIDE MOUNT LICENSE PLATE BRACKET WITH LEDS PLASTIC PASS-THROUGH GROMMET STAINLESS
Installation Instructions for the Lingenfelter Gen 6 Camaro Boost-A-Pump (BAP) Kit
 Kit") Installation Instructions for the Lingenfelter Gen 6 Camaro Boost-A-Pump (BAP) Kit PN: L460417316 Lingenfelter Performance Engineering 1557 Winchester Road Decatur, IN 46733 (260) 724-2552 (260) 724-0422
Installation Instructions for the Lingenfelter Gen 6 Camaro Boost-A-Pump (BAP) Kit PN: L460417316 Lingenfelter Performance Engineering 1557 Winchester Road Decatur, IN 46733 (260) 724-2552 (260) 724-0422
Toggle Button Kit. Installation Instructions
 Toggle Button Kit Installation Instructions Thank you for choosing the Double Apex Toggle Button kit. If you have any questions about the installation please do not hesitate to email us at support@doubleapex.co.
TIP SHEET T0491. Installation Tips for your Excalibur RS Passlock-sl2(4) + DLRC + SPDT
 + DLRC + SPDT") TIP SHEET T0491 Installation Tips for your Excalibur RS-360 + Passlock-sl2(4) + DLRC + SPDT For Chevrolet: Astro 1998-2005, Avalanche 2002, Blazer 1998-2005, Cavalier 2000-2003, Express Van 1998-2005,
TIP SHEET T0491 Installation Tips for your Excalibur RS-360 + Passlock-sl2(4) + DLRC + SPDT For Chevrolet: Astro 1998-2005, Avalanche 2002, Blazer 1998-2005, Cavalier 2000-2003, Express Van 1998-2005,
Installation Tips for your Remote Start system (for Toyota Camry & Prius C, ) Crimestopper RS0+ EVO-ALL T3468 rev#1.
 Crimestopper RS0+ EVO-ALL T3468 rev#1.") Installation Tips for your Remote Start system (for Toyota Camry & Prius C, 2012-2014) Crimestopper RS0+ EVO-ALL T3468 rev#1.1 1/22/2015 Thank you for purchasing your remote start from MyPushcart.com -
Installation Tips for your Remote Start system (for Toyota Camry & Prius C, 2012-2014) Crimestopper RS0+ EVO-ALL T3468 rev#1.1 1/22/2015 Thank you for purchasing your remote start from MyPushcart.com -
Mustang Headlight w/ CCFL Halo (05-09) - Installation Instructions
 - Installation Instructions") Mustang Headlight w/ CCFL Halo (05-09) - Installation Instructions The below installation instructions work for the following products: Chrome Mustang Headlight w/ CCFL Halo (05-09) Smoked Mustang Headlight
Mustang Headlight w/ CCFL Halo (05-09) - Installation Instructions The below installation instructions work for the following products: Chrome Mustang Headlight w/ CCFL Halo (05-09) Smoked Mustang Headlight
STEALTH BIG AIR KIT - Yamaha Roadliner/Stratoliner and Raider
 Page: 1 If you question your abilities it may be best for an experienced service technician perform this installation. A Yamaha Service Manual would be helpful to have on hand for reference. Revision:
Installation of Auto Meter Cobalt Boost/Vacuum Gauge:
 Installation of Auto Meter Cobalt Boost/Vacuum Gauge: Fitment: All 79-14 models. This installation was completed on a 2004 Mustang GT, and should be identical for all 1999-2004 model Mustangs. Time needed:
Power Seat Side Mount Installation & Wiring Instructions
 F22/F30/F31/F32/F80/F82/F87 (and other cars with the same sliders) Power Seat Side Mount Installation & Wiring Instructions These instructions assume a basic comfort with crimping and/or soldering. That
INSTALLATION INSTRUCTIONS
 1. Note: It is recommended this install be done with a minimal amount of fuel in the tank. This will reduce fuel spills and make installation easier and safer. Draining the tank is recommended. INSTALLATION
Special Note About The JDM High Performance Water Pump:
 Page 1 of 30 JDM Engineering, Inc. home Call Us! 732-780- 0770 back to Installation Instructions Electric Fan Upgrade Kit Electric Fan Wiring Diagram Thank you for your purchase of the JDM Engineering
GXS14 - Civic Natural Gas Fuel Tank Solenoid Valve Replacement
 Objective Remove In-Tank Solenoid Valve Inspect Fuel Tank for Liquid Contamination Evaluate Replacement Valve Condition Install In-Tank Solenoid Valve and Leak Check Align New Solenoid Valve and Connect
Mishimoto Performance Aluminum Mustang Radiator - Manual - (94-95 GT/Cobra/V6) - Installation Instructions
 - Installation Instructions") Mishimoto Performance Aluminum Mustang Radiator - Manual - (94-95 GT/Cobra/V6) - Installation Instructions The below installation instructions work for the following products: Mishimoto Performance Aluminum
Mishimoto Performance Aluminum Mustang Radiator - Manual - (94-95 GT/Cobra/V6) - Installation Instructions The below installation instructions work for the following products: Mishimoto Performance Aluminum
Installation Instructions - ECS Tuning Vent Pod Vacuum/Boost Gauge Kit
 Installation Instructions - ECS Tuning Vent Pod Vacuum/Boost Gauge Kit This tutorial is provided as a courtesy by ECS Tuning. Part Number (also available as steering wheel mounted kit ES2593248) for VW
2010 FORD TRANSIT ELECTRONIC CRUISE KIT Part Number:
 General Applicability Recommended Tools Item # Qty. Description 1. 250-2758 1 Cruise Control Module 2. 250-2760 1 Switch Harness 3. 250-2759 1 Main Wiring Harness 4. 250-2771 1 Pedal Interface Harness
Tools you will need: Screwdrivers, Metric Sockets, Hook and Loop Tape or Zip Ties, Shop Light, Wire cutters, Wire crimping tool
 Overview: This guide provides instruction for installing Adventure Wagon s Auxiliary Battery Tray and the charging bundle. Package Contents: Adventure Wagon Battery Tray includes the tray plus mounting
TIP SHEET. Installation Tips for your RS OL-MDB-CH6 (1) (for Jeep vehicles) T1227 v1.0 3/19/14
 (for Jeep vehicles) T1227 v1.0 3/19/14") TIP SHEET Installation Tips for your RS-360 + OL-MDB-CH6 (1) (for Jeep vehicles) T1227 v1.0 3/19/14 Thank you for purchasing your remote start from MyPushcart.com - an industry leader in providing remote
TIP SHEET Installation Tips for your RS-360 + OL-MDB-CH6 (1) (for Jeep vehicles) T1227 v1.0 3/19/14 Thank you for purchasing your remote start from MyPushcart.com - an industry leader in providing remote
80703 & Backside License Plate Mount for Jeep JK Wrangler (80707) & 10+ (80703)
 & 10+ (80703)") 80703 Backside Mount 80707 Backside Mount REQUIRED TOOLS 10mm SOCKET 13mm SOCKET 4mm HEX KEY WIRE CRIMPS WIRE STRIPPERS ELECTICAL TAPE SCREW DRIVER KIT CONTAINS BACKSIDE MOUNT LICENSE PLATE BRACKET WITH
80703 Backside Mount 80707 Backside Mount REQUIRED TOOLS 10mm SOCKET 13mm SOCKET 4mm HEX KEY WIRE CRIMPS WIRE STRIPPERS ELECTICAL TAPE SCREW DRIVER KIT CONTAINS BACKSIDE MOUNT LICENSE PLATE BRACKET WITH
INSTALLATION INSTRUCTIONS. Revision 4.0.3
 INSTALLATION INSTRUCTIONS Revision 4.0.3 Table of Contents INTRODUCTION... 3 INSTALLATION OVERVIEW... 4 Included Parts... 5 DEVICE WIRING... 6 Required Parts... 6 Guidelines... 6 Wiring Diagram... 7 Engine
Bottom Mount Seat Mount Installation & Wiring Instructions
 E81/E87/E90/E91/E92/F22/F30/F31/F32/F80/F82/F87 (and other cars with the same sliders) Bottom Mount Seat Mount Installation & Wiring Instructions These instructions assume a basic comfort with crimping
Installation Instructions for Chevrolet Colorado, GMC Canyon, LT, Z71, With Factory Fog Lights
 Installation Instructions for 2015-2018 Chevrolet Colorado, GMC Canyon, LT, Z71, With Factory Fog Lights This kit is designed to allow use of your factory fog light operation along with an addition auxiliary
Curt Mfg. Trailer Hitch and Hoppy Wiring Kit Installation Instructions
 Curt Mfg. Trailer Hitch and Hoppy Wiring Kit Installation Instructions The Curt trailer hitch replaces the stock rear cross member in the Touareg. It attaches with 8 bolts just like the factory VW hitch.
TOYOTA VENZA 2009 TRAILER WIRE HARNESS Procedure
 Part Number: PT791-0T099 Kit Contents Item # Quantity Reqd. Description 1 1 Trailer Wire Harness Module 2 1 4-Flat Harness 3 1 Battery Power Wire Harness 4 1 Mounting Bracket, 4-Flat 5 2 Screw #10-24 6
Factory safe air/fuel ratio s for Optimum performance Patent# 7,359,795 Now equipped with Air Fusion Patent pending
 Part number SP1997 2007-08 Infiniti G35 3.5L V6 Sedan 2008-09 Infiniti G37 3.7 V6 Coupe 2009 Infiniti G37 3.7 V6 Sedan cold air intake equipped with MR Tech and Air Fusion 1- primary air intake 1- primary
C TROUBLESHOOTING SIENNA (EWD613U) VOLTAGE CHECK CONTINUITY AND RESISTANCE CHECK
 VOLTAGE CHECK CONTINUITY AND RESISTANCE CHECK") To Ignition SW IG Terminal Fuse SW 1 [A] [B] Voltmeter VOLTAGE CHECK (a) Establish conditions in which voltage is present at the check point. [A] - Ignition SW on [B] - Ignition SW and SW 1 on [C] - Ignition
To Ignition SW IG Terminal Fuse SW 1 [A] [B] Voltmeter VOLTAGE CHECK (a) Establish conditions in which voltage is present at the check point. [A] - Ignition SW on [B] - Ignition SW and SW 1 on [C] - Ignition
INSTALLATION INSTRUCTIONS
 Jeep Wrangler Rear Vision Camera, 2007 Current (Kit # 9002-8838) Items Included in the Kit Camera Chassis Harness Zip lock bag with 15 Wire Ties & 3 Push Nuts These Instructions Required Tools & Supplies
Designed for 2015 Ford F150 Super-Cab and Super-Crew vehicles (Compatible in vehicles with or without Sony System. M6 Bolt X 2
 SF150SC15 Designed for 2015 Ford F150 Super-Cab and Super-Crew vehicles (Compatible in vehicles with or without Sony System Subwoofer Assembly Amplifier Relocation Bracket (not used on non Sony trucks)
Remote Start Kit for GM Installation RS1/3/4/7 + ADS-DL Tip Sheet
 Remote Start Kit for GM Installation RS1/3/4/7 + ADS-DL Tip Sheet rev 1.4 12/16/2013 Thank you for purchasing your remote start from MyPushcart.com - an industry leader in providing remote starts to do-it-yourself
Congratulations on purchasing the Edge Juice/Attitude system for the Dodge Cummins Diesel.
 Getting Started About the Juice Congratulations on purchasing the Edge Juice/Attitude system for the Dodge Cummins Diesel. The Juice/Attitude system features an intelligent module (Juice) that acts as
Note: Injen strongly recommends that this system be installed by a professional mechanic. MR Technology, The World s First Tuned air Intake System!
 Part number SP6080 04-08 Mazda RX8 Rotary 1.3L 1-1 pc. cold air intake equipped with MR Tech and Air Fusion Power-Flow box- contents (PB375C-8) 1-8 inverted top filter (A) (#1022) 1-main body,top screen
Note: Please read through the entire guide before attempting any kind of installation.
 KIT-RSRTD Installation Guide Version 1.5 Auber Instruments, 730 Culworth Manor, Alpharetta, GA 30022 e-mail: info@auberins.com Tel: 770-569-8420 www.auberins.com This is a PID controller kit installation
 Page 1 of 14 This install requires work on your supplemental restraint system and could cause injury or damage to your car. If you are not comfortable performing the steps detailed here then do not attempt
-Magnet (not completely necessary but can come in handy)
") McLeod High Performance Hydraulic Clutch Line Upgrade (05-14 V8) Included in kit: -New clutch line -2 fittings Required Tools: -Floor jack and jack stands (or a lift) -Flashlight -Angled pick tool -13mm
McLeod High Performance Hydraulic Clutch Line Upgrade (05-14 V8) Included in kit: -New clutch line -2 fittings Required Tools: -Floor jack and jack stands (or a lift) -Flashlight -Angled pick tool -13mm
1995 Chrysler Cirrus 2.5L MFI 6cyl Repair Guides Charging System Alternator Auto...
 Page 1 of 9 SAVE 20% + GET A $10 GIFT CARD ON ONLINE SHIP-TO-HOME ORDERS OF $100 OR MORE. Use Code: 20TUNE10 See Details Chrysler Cirrus/Stratus/Sebring/Avenger/Breeze 1995-1998 TESTING REMOVAL & INSTALLATION
Installation Tips for your GMDLBP + Excalibur Remote Start system (for GM vehicles) v1.01 updated 10/09/13
 v1.01 updated 10/09/13") Installation Tips for your GMDLBP + Excalibur Remote Start system (for GM vehicles) v1.01 updated 10/09/13 Thank you for purchasing your remote start from MyPushcart.com - an industry leader in providing
Installation Tips for your GMDLBP + Excalibur Remote Start system (for GM vehicles) v1.01 updated 10/09/13 Thank you for purchasing your remote start from MyPushcart.com - an industry leader in providing
Note: Please read through the entire guide before attempting any kind of installation.
 KIT-RSNSb Installation Guide Version 1.3 Auber Instruments, 730 Culworth Manor, Alpharetta, GA 30022 e-mail: info@auberins.com Tel: 770-569-8420 www.auberins.com This is a PID controller kit installation
ITEM QTY CHECK PART NUMBER DESCRIPTION. NOTE: This package does not include any accessories for gauge installation
 PART #90540A Gauge Pod Only Package, SLP, 2005-2013 Corvette PACKING LIST Before installation, use this check list to make sure all necessary parts have been included. ITEM QTY CHECK PART NUMBER DESCRIPTION
Installation Instructions
 Installation Instructions 2.0T TSI Intake Manifold: Featuring better flow, higher boost capacity, 40% larger plenum volume, and integrated flapper delete; this product will take your 2.0L VW TSI to the
Low Range HD 2 Inch Body Lift Kit (Sidekick, GV, Vitara, Tracker, X90) SKU# KSP-BL2
 SKU# KSP-BL2") Low Range HD 2 Inch Body Lift Kit (Sidekick, GV, Vitara, Tracker, X90) SKU# KSP-BL2 Installation Instructions Background: These instructions are designed for installing the 2 body lift. They can also be
Low Range HD 2 Inch Body Lift Kit (Sidekick, GV, Vitara, Tracker, X90) SKU# KSP-BL2 Installation Instructions Background: These instructions are designed for installing the 2 body lift. They can also be