Dash removal for 1968 Chevelles
|
|
|
- Daniel Park
- 6 years ago
- Views:
Transcription


1 Dash removal for 1968 Chevelles This is the procedure I used when I removed the dash from my car. It s a column shift, automatic trans, A/C car with tach and gauges. 1. Disconnect the battery. 2. Remove the front seat(s) and console. You ll be spending a lot of time on your back, and it s easier if you don t have your legs in the air. 3. Remove the steering wheel shroud and straighten the wheels. Before you pull the steering wheel, mark the shaft and hub. I tie a piece of foam rubber to the end of the shaft so it won t hurt when you bang your head on it. 4. Remove the ashtray and ashtray retainer. Remove the lower steering column cover. Auto trans cars release the gear position indicator cable by sliding it down, then to the front to get it out of the column. Be gentle, these parts are very fragile and brittle.


2 5. Remove the two screws securing the lower air distributor duct and remove it. 6. Pull the intermediate duct down and out. 7. Remove the screw holding the radio and heater control brace to the lower dash brace-don t lose the J nut that s attached to the radio brace. Remove the radio knobs and two nuts, disconnect the wiring, and pull the radio out. 8. Remove the four screws to the heater/a/c control panel, they come up from the bottom. Disconnect the plugs at the fan switch and compressor-actuating switch and remove the light socket from the end of the panel. The cables and vacuum hoses can stay on the control panel, don t take them off. Pull the right side flexible duct off of the upper distributor duct. 9. Light socket removal is a PIA on these cars. The sockets are pressed into the metal of the cluster and that s how they are grounded. If you just pull on the plastic end of the socket, odds are that the metal piece of the socket will pull out of the plastic and the bulb will fall into the cluster. You need to take a small


3 screwdriver or pick and pry the sockets out of the cluster. 10. Reach through the ashtray opening and unplug the cigarette lighter and the ignition switch. The ignition switch has 3 locking tabs on the plug. The easiest way to remove it is to cut the tabs off. 11. Lie down in the floorboard and unplug the wiring to the gauges and clock, pry out the bulb sockets, disconnect the speedometer cable, and the oil pressure pipe. Wait to unhook the tachometer and its bulbs until later. I recommend that you note and label the positions of the instrument lighting bulb sockets, the ones with the single gray wire, especially on the speedometer side. The wires are cut to length, and need to go back into the holes they originally came out of. Unscrew the dash ground wire from the emergency brake bracket. 12. Remove the two screws from the left A/C vent. The upper screw can be accessed easier by rotating the vent ball so the louvers are vertical. There is a Z shaped retainer that holds the upper screw, be careful and don t lose it. 13. Reach up through the vent hole and disconnect the wiring to the headlight switch. Push in the button on the right side of the switch and pull the rod out of the switch, then remove the switch from the dash (big screwdriver). Unplug the wiring from the wiper/washer switch, but you can leave the switch in the dash.


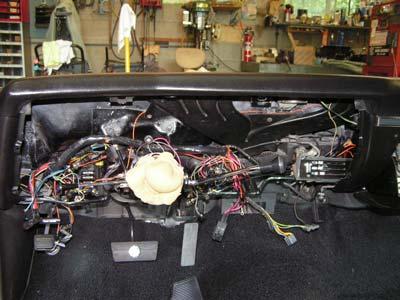
4 14. Shift the transmission into Low (column shift) and loosen the two nuts holding the steering column to its brace. Remove the bolt and wedge from the column; don t lose the wedge. Now remove the two nuts and let the column down. It s a good idea to support the column with a bungee cord or some wire so it won t drop too far. Cover the top of the column with a rag so the paint doesn t get scratched when you drag the dash over it. 15. Remove the Philips screws on the bottom of the dash. The second screw to the right of the steering column goes into the bracket for the flasher. Don t lose the bracket. Now remove the rest of the dash screws while using one hand to support it. I take the top center screw out last, and then ease the dash down on to the column. 16. Remove the left A/C duct from the air distributor and pull it out of the dash. Ease the dash forward a little, then you can reach behind it to disconnect the tach wiring and the two lights for the tach. 17. Pull the dash forward and to the left so the air distributor clears the right side of the dash. BE GENTLE!! Don t yank or jerk on the dash if it doesn t come out. Chances are there s an unconnected wire or part of the harness hanging up somewhere. If it isn t coming out smoothly, then stop and look and determine what the problem is. They aren t reproducing these dashes, so you need to take care of it. This is what you ll see when it s out-
5
Retro it Steering Column
 Retro it Steering Column INSTALLATION INSTRUCTIONS for 1976-86 CJ5 & CJ7 FOR PART NUMBER S: 1520800010, 1520800020, 1520800051, 1526800010, 1526800020, 1526800051 S I NCE 1986 Instruction # 8000000010
Installation Instructions Jeep CJ-7
 Retrofit Steering Column Installation Instructions 1976-86 Jeep CJ-7 For Part # s 1520800010, 152800020, 1520800051 www.ididitinc.com 610 S. Maumee St., Tecumseh, MI 49286 (517) 424-0577 (517) 424-7293
Two screws were also located in the glove box and go up to the dash pad from upper edge of the glove box opening.
 A few months back, we had the opportunity to be involved in a 1972 Chevelle Malibu to a Super Sport conversion. The vehicle had much of the conversion completed already, but needed to have to a floor shifter
Jeep Wrangler TJ 4.0 LITER Installation instructions
 www.jeepair.com 2002-2004 Jeep Wrangler TJ 4.0 LITER Installation instructions Kit Information These directions are for 2002-2006 model Jeep Wranglers. After 1994 every vehicle was designed for R134a refrigerant.
INSTRUCTIONS. 20 Circuit Wiring Kit Instructions October 2009, Speedway Motors, Inc.
 1 MAIN FUSE PANEL The main fuse panel harness s designed to be mounted under the dash a the firewall in an area close to the steering column. The enclosed representation of the main dash harness shows
Jeep Wrangler TJ. Complete Air Conditioning System. Slide Control Head. Installation instructions
 WWW.JEEPAIR.COM 1996-1998 Jeep Wrangler TJ Complete Air Conditioning System Slide Control Head Installation instructions Kit Information After 1994 every vehicle was designed for R134a refrigerant. The
Genuine Corvette Accessories Carbon Fiber Radio Surround Installation Instructions for Corvettes.
 Genuine Corvette Accessories Carbon Fiber Radio Surround Installation Instructions for 2005-2007 Corvettes. Difficulty: 3 out of 5. Time: Plan on about 1 hour. The tools used are: A small flashlight A
72 Mustang Mach 1 tachometer cluster and gauge conversion
 72 Mustang Mach 1 tachometer cluster and gauge conversion Dated: 02-17-2009 (drafted by a Chevy person working on his first Ford -not good-) Revised: 11-05-2010 The following information pertains to how
1. Disconnect the battery. This is important! This will prevent air bag deployment.
 PARTS PACKING LIST Evaporator assembly Drain tube Plastic air plug Hardware package 11040 3601 W. Clarendon Phoenix, Arizona 85019 (602) 233-0090 800-648-4475 www.ackits.com 2003-4 Jeep Wrangler EVAPORATOR
INSTALLATION INSTRUCTIONS
 INSTALLATION INSTRUCTIONS Accessory CIGARETTE Application 2005 CIVIC Publications No. AII 27859 WITH ASHTRAY (EX, GX, LX, VP) 2 AND 4-DOOR Issue Date AUG 2004 The Cigarette Lighter with Ashtray cannot
Detroit Speed, Inc. Selecta-Speed Wiper Kit Corvette P/N:
 Detroit Speed, Inc. Selecta-Speed Wiper Kit 1968-72 Corvette P/N: 121621 A downpour of rain will no longer hinder your ability to clearly see the road. The Detroit Speed Selecta-Speed Wiper Kit provides
Jeep Wrangler TJ 4.0 LITER Installation instructions
 www.jeepair.com 2000-2001 Jeep Wrangler TJ 4.0 LITER Installation instructions Important information about your system, and warranty DO NOT ADD ANY OIL TO ANY PART OF THE SYSTEM. DO NOT USE THE SIGHT GLASS
Jeep Wrangler 4.0 Liter TJ Jeep Wrangler 2.5 Liter TJ Installation instructions
 TM www.jeepair.com 1999 Jeep Wrangler 4.0 Liter TJ 1999-2001 Jeep Wrangler 2.5 Liter TJ Installation instructions Kit Information After 1994 every vehicle was designed for R134a refrigerant. The Jeep kit
Detroit Speed, Inc. Electric Headlight Door Kit Corvette P/N: &
 Detroit Speed, Inc. Electric Headlight Door Kit 1968-82 Corvette P/N: 122006 & 122007 The Detroit Speed Inc. Electric Headlight Door Kit replaces the stock vacuum actuated system on all 1968-82 Corvettes.
TOYOTA CAMRY HANDS FREE BLU LOGIC Preparation
 TOYOTA CAMRY 2008- HANDS FREE BLU LOGIC Preparation Part #: PT923-00111 Conflicts: JBL Audio, Factory Navigation NOTE: Part number of this accessory may not be the same as the part number shown. Kit Contents:
INSTRUMENT PANEL Toyota Celica DESCRIPTION & OPERATION GAUGES SWITCHES TESTING - GAUGES FUEL GAUGE & WARNING LIGHT
 INSTRUMENT PANEL 1994 Toyota Celica 1994 ACCESSORIES & EQUIPMENT Toyota Motor Sales, U.S.A., Inc. - Instrument Panel Celica * PLEASE READ THIS FIRST * WARNING: Vehicles are equipped with a driver-side
Thank you for purchasing the Craven Speed FlexPod Complete Gauge Pod Kit
 Thank you for purchasing the Craven Speed FlexPod Complete Gauge Pod Kit Before You Start Please read instructions completely before installing. These instructions contain the information required to install
Detroit Speed, Inc. Electric Headlight Door Kit Corvette P/N: &
 Detroit Speed, Inc. Electric Headlight Door Kit 1968-82 Corvette P/N: 122006 & 122007 The Detroit Speed Inc. Electric Headlight Door Kit replaces the stock vacuum actuated system on all 1968-82 Corvettes.
INSTALLATION INSTRUCTIONS
 INSTALLATION INSTRUCTIONS Accessory Application Publications No. AIR CONDITIONER CIVIC 2- AND 4-DOOR AII 24158 Issue Date SEP 2002 What s New The installation instructions for the 2003 Civic A/C are the
Volvo 1800 Dash Pad Replacement
 Volvo 1800 Dash Pad Replacement (courtesy of John Garden State Chapter Volvo Club America) Reupholstering the dash Well it has been some time since I have been online in the forum. Winter is a quite time
Heater Core Replacement
 Heater Core Replacement Ok, I just finished replacing the heater core in my dad's '94 840Ci. While this is fresh in my mid I thought I would outline the procedure, I'm going from memory here, so I will
X-Type w/ non-premium sound amplifier installation instructions
 X-Type w/ non-premium sound amplifier installation instructions 1. Pull radio from dash (see Radio Removal Instructions ) 2. Disconnect wiring harness from back of radio by pushing in tab on plug and pulling
BODY-24, Late Model 944 ( and Newer) Dash Replacement
 Dash Replacement") BODY-24, Late Model 944 (1985.5 and Newer) Dash Replacement Introduction Replacing the dash in a late model 944 is not overly difficult. However, it is very tedious and a lot of patience is required. It's
BODY-24, Late Model 944 (1985.5 and Newer) Dash Replacement Introduction Replacing the dash in a late model 944 is not overly difficult. However, it is very tedious and a lot of patience is required. It's
Push Start Ignition (05-10 All) Installation
 Installation") Tools Required: Phillips head screwdriver Flat head screwdriver Ratchet 7mm Socket Torx T20 bit Wire strippers/cutters Hand file Needle nose pliers Installation Instructions: Push Start Ignition (05-10
Tools Required: Phillips head screwdriver Flat head screwdriver Ratchet 7mm Socket Torx T20 bit Wire strippers/cutters Hand file Needle nose pliers Installation Instructions: Push Start Ignition (05-10
2007 Crown Victoria Police Interceptor (P71) Blend Door Actuator Replacement (If I did it, you can too.)
 Blend Door Actuator Replacement (If I did it, you can too.)") 2007 Crown Victoria Police Interceptor (P71) Blend Door Actuator Replacement (If I did it, you can too.) I'm not saying this is the only way, or even the right way, but it worked for me. First time I've
2007 Crown Victoria Police Interceptor (P71) Blend Door Actuator Replacement (If I did it, you can too.) I'm not saying this is the only way, or even the right way, but it worked for me. First time I've
Climate control components in passenger compartment, servicing
 Page 1 of 34 87-120 Climate control components in passenger compartment, servicing Component electrical testing page 01-115. A/C control head -E87-, removing and installing Notes: Always check DTC memory
Dash Procedure (Dash Cluster Corvette) for color upgrade
 for color upgrade") Dash Procedure (Dash Cluster 1984-1989 Corvette) for color upgrade Chapter 1 Please read all instructions before proceeding. 1. Disconnect negative battery cable. 2. Use small flat blade screw driver to
Dash Procedure (Dash Cluster 1984-1989 Corvette) for color upgrade Chapter 1 Please read all instructions before proceeding. 1. Disconnect negative battery cable. 2. Use small flat blade screw driver to
Thank you for purchasing the Craven Speed FlexPod Complete Gauge Pod Kit For R56, R58, R59, R60 with Refresh Engines (2011+)
") Thank you for purchasing the Craven Speed FlexPod Complete Gauge Pod Kit For R56, R58, R59, R60 with Refresh Engines (2011+) Before You Start Please read instructions completely before installing. These
Thank you for purchasing the Craven Speed FlexPod Complete Gauge Pod Kit For R56, R58, R59, R60 with Refresh Engines (2011+) Before You Start Please read instructions completely before installing. These
vacuum/boost vent mounted ES best viewed in Acrobat Reader This tutorial is provided as a courtesy by ECS Tuning.
 vent mounted vacuum/boost ES2713030 This tutorial is provided as a courtesy by ECS Tuning. best viewed in Acrobat Reader Proper service and repair procedures are vital to the safe, reliable operation of
INSTALLATION INSTRUCTIONS
 INSTALLATION INSTRUCTIONS Accessory Application Publications No. AII 27871 CIVIC IN-DASH CD CHANGER 2- AND 4-DOOR Issue Date AUG 2004 PARTS LIST In-Dash CD Changer Attachment: P/N 08B06-S5D-110 CD Changer
Installation: Dashboard. Thank you for your purchase of the replacement dash for your truck.
 www.genosgarage.com INTERIOR Installation: 98-02 Dashboard Replacement Thank you for your purchase of the replacement dash for your truck. To make this project a little easier we ve included TDR Issue
CBR250 Fitment Guide
 CBR250 Fitment Guide 35W Bulbs Before 60W GT150 Power2Night Bulbs The mod is designed to allow the headlights to be upgraded from the 35W bulbs to 60W bulbs. Normally, this would cause flat battery trouble
Depress each tab as you pull the bezel off. The bezels are tight. L.H. shown.
 2013-2014 Ford Mustang V6 & Boss 302 Lower Valance Fog Light Kit Parts List: Quantity: Tool List: Fog light & bulb with bracket 2 Flat head & Phillips screwdriver Black bezels 2 Ratchet & Socket set OR
OIL COOLER KIT INSTALLATION INSTRUCTIONS PART NUMBER D E92 335i/xi (N55 engine) with M-Technic bumper and without stock oil cooler
 with M-Technic bumper and without stock oil cooler") OIL COOLER KIT INSTALLATION INSTRUCTIONS PART NUMBER D570-0925 APPLICATION 2011-12 E92 335i/xi (N55 engine) with M-Technic bumper and without stock oil cooler Congratulations for being selective enough
OIL COOLER KIT INSTALLATION INSTRUCTIONS PART NUMBER D570-0925 APPLICATION 2011-12 E92 335i/xi (N55 engine) with M-Technic bumper and without stock oil cooler Congratulations for being selective enough
C4 Sound Deadening & Insulation Kit Interior Removal & Installation Instructions
 C4 Sound Deadening & Insulation Kit Interior Removal & Installation Instructions Ok, let's start with taking the radio bezel dash area off first. Here is what the OEM radio looks like, and the points you
INSTALLATION INSTRUCTIONS
 INSTALLATION INSTRUCTIONS Accessory Application Publications No. CASSETTE/MP3/ AII 30664 2006 ACCORD IN-DASH CD 2- AND 4-DOOR Issue Date ATTACHMENT AUG 2005 PARTS LIST cable Attachment Kit (sold separately):
xpressstart Mercedes Solution Mercedes Benz S and CL Class
 DIGITAL REMOTE START SYSTEM WWW.XPRESSKIT.COM MADE IN THE USA xpressstart Mercedes Solution 2007-2012 Mercedes Benz S and CL Class Tools you will need -T-25 Torx Driver -Panel Removal tool -3/4 Drill bit
Ford Mustang V6 OEM-Style Fog Light Kit Parts List: Quantity: Tool List:
 2015-2017 Ford Mustang V6 OEM-Style Fog Light Kit Parts List: Quantity: Tool List: LED Foglights/ Bezels 2 Flat head & Phillips screwdriver (if you ordered part#3600) Ratchet & Socket set OR Wiring harness
Slave Cylinder Weep Hole Drilling Procedure
 Slave Cylinder Weep Hole Drilling Procedure Tools Required: T20 Torx Driver T25 Torx Driver T25 Torx Bit with ¼ Ratchet Wrench 4mm Hex Key (Allen wrench) 5mm Hex Key 6mm Hex Key 8mm Hex Key 12mm Hex Key
Part Number DP6003 Chevy Truck Digital Dash YEARS 67-72
 Part Number DP6003 Chevy Truck Digital Dash YEARS 67-72 KIT COMPONENTS: One (1) Digital Circuit Board One (1) Smoked Acrylic See-Through Lens *Peel off protective covering from both sides of lens attached
AW-800PKUV INSTALLATION INSTRUCTIONS
 KIT FEATURES Works with factory brackets or Metra's 99-80 Fills space left after removing double-din unit 88-00-8000 AW-800PKUV INSTALLATION INSTRUCTIONS APPLICATIONS KIT COMPONENTS Pocket TOOLS REQUIRED
INSTALLATION INSTRUCTIONS
 INSTALLATION INSTRUCTIONS Accessory Application Publications No. CHANGER ATTACHMENT (TRUNK MOUNT) 2005 CIVIC 4-DOOR AII 27890 Issue Date AUG 2004 PARTS LIST Changer Attachment (sold separately) P/N 08B26-S5D-100
Replacement Cluster Fascia Replacement
 1 of 12 11/1/2013 9:13 AM SOUL(AM) >2010 > G 2.0 DOHC > Body (Interior and Exterior) Replacement Cluster Fascia Replacement When prying with a flat-tip screwdriver, wrap it with protective tape, and apply
Raxiom Factory GPS Rear Back-up Camera Kit (07-17 Wrangler)
") Raxiom Factory GPS Rear Back-up Camera Kit (07-17 Wrangler) Installation Time: 2.5-3Hrs Tools Required: 7mm Socket & Driver 10mm Socket 10mm Open end wrench Knife / Razor blade Zip-ties Wire Cutters Needle
Raxiom Factory GPS Rear Back-up Camera Kit (07-17 Wrangler) Installation Time: 2.5-3Hrs Tools Required: 7mm Socket & Driver 10mm Socket 10mm Open end wrench Knife / Razor blade Zip-ties Wire Cutters Needle
Retrofit Steering Column
 Retrofit Steering Column INSTALLATION INSTRUCTIONS for 1970-75 Camaro FOR PART NUMBER S: 1620860010, 1620860020, 1620860051, 1626860010, 1626860020, 1626860051 S INCE 1986 www.ididitinc.com 610 S. Maumee
OIL COOLER KIT INSTALLATION INSTRUCTIONS PART NUMBER D
 OIL COOLER KIT INSTALLATION INSTRUCTIONS PART NUMBER D570-0904 APPLICATION: 2011-2012 E90 335i/xi (N55 engine) with BMW standard bumper and with stock oil cooler Congratulations for being selective enough
INSTALLATION INSTRUCTIONS
 INSTALLATION INSTRUCTIONS Accessory Application Publications No. CD/CASSETTE PLAYER 2005 CIVIC 2- AND 4-DOOR AII 27857 Issue Date AUG 2004 PARTS LIST Cassette Player: P/N 08A53-S5A-100 Cassette player
SCION tc SECURITY (V5) Preparation
 Preparation") Preparation Part Number: PT398-21070 Kit Contents Item # Quantity Reqd. Description 1 1 2 1 GBS ECU Hardware Bag Contents Item # Quantity Reqd. Description 1 1 V5 Security ECU 2 1 ECU Mounting Bracket
Preparation Part Number: PT398-21070 Kit Contents Item # Quantity Reqd. Description 1 1 2 1 GBS ECU Hardware Bag Contents Item # Quantity Reqd. Description 1 1 V5 Security ECU 2 1 ECU Mounting Bracket
INSTALLATION INSTRUCTIONS
 INSTALLATION INSTRUCTIONS Accessory Application Publications No. AII 27996 ATTACHMENT KIT 2005 CIVIC HYBRID Issue Date AUG 2004 PARTS LIST Changer Attachment Kit: P/N 08B26-S5B-100 4 Washer-screws, 4 x
Rear Body 40D 156A 24 17A 151 3D. 8A,8B,8C under hood light. Horn Relay 91
 fuse box as viewed from the wire entry side Mating connector is plugged into Power Accessory connector 40D Rear Body 19 18 9B 30 LH Courtesy Light 40A,D 4D, 43 156B,C 16 16A 4C 3D 3C 16A 3G 4B 3G 116 4A&130
OIL COOLER KIT INSTALLATION INSTRUCTIONS PART NUMBER D E92 335is (N54 engine) with BMW M-Technic bumper and with stock oil cooler
 with BMW M-Technic bumper and with stock oil cooler") OIL COOLER KIT INSTALLATION INSTRUCTIONS PART NUMBER D570-0923 APPLICATION: 2011 E92 335is (N54 engine) with BMW M-Technic bumper and with stock oil cooler Congratulations for being selective enough to
OIL COOLER KIT INSTALLATION INSTRUCTIONS PART NUMBER D570-0923 APPLICATION: 2011 E92 335is (N54 engine) with BMW M-Technic bumper and with stock oil cooler Congratulations for being selective enough to
Volvo 850 Radiator Replacement Jason Reed 29 March 2013
 This write up covers removing and replacing the radiator on a 97 855 GLT wagon with light pressure turbo and automatic transmission. This car has 162K miles. The radiator, which was original, developed
The drawings are all available from the author or from the host websight. You will find these pictures and descriptions to be most helpful.
 Last Revision: 10JA2010 1969 THRU 1976 GM A & F-CAR STANDARD (NON-ADJUSTABLE) STEERING COLUMN DISASSEMBLY & REPAIR INSTRUCTIONS PAPER #1 Disassembly and Repair Instructions Addressed in this Paper Degree
Fitting Instructions For The TDV6 EGR Blanking Kit To A 2006 Model Discovery 3 TDV6 GHSE
 Part Number DA1112 Fitting Instructions For The TDV6 EGR Blanking Kit To A 2006 Model Discovery 3 TDV6 GHSE You do this modification at your own risk. Britpart won t be held responsible for what is written
Pantera Electronics LED Taillight Installation Manual
 Pantera Electronics LED Taillight Installation Manual (2nd Gen) This LED signal lamp conversion was designed to replace the incandescent lamp 1157 with a Light Emitting Diode Array designed specifically
Ford Mustang GT-Style Fog Light Kit Parts List: Quantity: Tool List:
 2013-2014 Ford Mustang GT-Style Fog Light Kit Parts List: Quantity: Tool List: Fog light (Left& Right) 2 Flat head & Phillips screwdriver Upper grille with surround 1 Ratchet & Socket set OR Lower grille
1999 Corolla Valve Cover Gasket Replacement
 1999 Corolla Valve Cover Gasket Replacement While checking the spark plugs on my 1999 Corolla, I found the each plug sitting in a pool of oil. Oil on the spark plugs usually is indicative of major engine
OIL COOLER KIT INSTALLATION INSTRUCTIONS PART NUMBER D E92 335i/xi (N55 engine) with BMW Standard bumper and with stock oil cooler
 with BMW Standard bumper and with stock oil cooler") OIL COOLER KIT INSTALLATION INSTRUCTIONS PART NUMBER D570-0924 APPLICATION: 2011-12 E92 335i/xi (N55 engine) with BMW Standard bumper and with stock oil cooler Congratulations for being selective enough
OIL COOLER KIT INSTALLATION INSTRUCTIONS PART NUMBER D570-0924 APPLICATION: 2011-12 E92 335i/xi (N55 engine) with BMW Standard bumper and with stock oil cooler Congratulations for being selective enough
Ford Super Duty Dash Lighting LED Upgrade F250 4x4 XLT Sport Crew Cab
 Page 1 of 32 Ford Super Duty Dash Lighting LED Upgrade 2004 F250 4x4 XLT Sport Crew Cab Back to 2004 F250 Main Page Click Here for a PDF version of this article ** Updated 12/15/09 ** New version of the
Chrysler Multi-kit TABLE OF CONTENTS Dash Disassembly...2 Kit Assembly
 99-650345 INSTALLATION INSTRUCTIONS Chrysler Multi-kit 1998-2010 INTRODUCTION This instruction booklet will cover (3) different kits, yet carry the same applications and dash disassembly. After dash disassembly
SADDLEBAG AUDIO WIRE HARNESS KIT P/N
 SADDLEBAG AUDIO WIRE HARNESS KIT P/N 2880986 APPLICATION ALL INDIAN MOTORCYCLES WITH BOTH TRUNK AND SADDLEBAG AUDIO INSTALLED BEFORE YOU BEGIN Read these instructions and check to be sure all parts and
INSTALLATION INSTRUCTIONS
 INSTALLATION INSTRUCTIONS Accessory Application Publications No. AII 26031 2004 ODYSSEY Issue Date AUG 2003 NOTE: You cannot install the subwoofer in a vehicle equipped with both an under seat Navigation
2010 & Up Mazdaspeed 3 Hood Scoop Vented Insert Installation Instructions
 Page1 2010 & Up Mazdaspeed 3 Hood Scoop Vented Insert Installation Instructions Tooling: Ratchet wrench 10mm Socket Small pick Flat head screwdriver Parts List: Hood scoop insert **Please be sure to read
Prepare the cargo area for storage of under-hood parts, removed as interference. (Put down blankets.)
") PCU Replacement Procedure John Mayer Hawthorne Auto Clinic 1-28-2014 updated 1-20-2016 Overall notes: It is preferable to perform the PCU replacement procedure on a lift, or to have access to under the
PCU Replacement Procedure John Mayer Hawthorne Auto Clinic 1-28-2014 updated 1-20-2016 Overall notes: It is preferable to perform the PCU replacement procedure on a lift, or to have access to under the
TOYOTA YARIS HATCHBACK TVIP V3 (RS3200) Preparation
 Preparation") Preparation Part Number: 08586-53810 Kit Contents Item # Quantity Reqd. Description 1 1 V3 ECU 2 1 Piezo Buzzer 3 1 Wire Harness 4 1 ECU Mounting Bracket 5 2 Remote Control Transmitter 6 1 Butyl Tape 7
Preparation Part Number: 08586-53810 Kit Contents Item # Quantity Reqd. Description 1 1 V3 ECU 2 1 Piezo Buzzer 3 1 Wire Harness 4 1 ECU Mounting Bracket 5 2 Remote Control Transmitter 6 1 Butyl Tape 7
2001 Honda Civic EX ACCESSORIES & EQUIPMENT' 'Cruise Control Systems - Civic & CR-V 2001 ACCESSORIES & EQUIPMENT
 DESCRIPTION 2001 ACCESSORIES & EQUIPMENT Cruise Control Systems - Civic & CR-V Cruise control system uses mechanical and electrically operated devices to maintain vehicle speed settings greater than 25
Wheel Bearing Replacement Passat TDI
 Rear Bearing/hub assembly replacement This is a fairly straight forward process. Pictures are not necessary for most of this procedure for a person with skills to do this repair. Anyone who thinks they
CLASSIC UPDATE WIRING KIT
 by Randy Irwin 1955-57 CLASSIC UPDATE WIRING KIT Randy Irwin - Technical Writer Randy has been involved in the Chevy parts business for over 25 years. He is a wizard at creating, making and modifying custom
Pantera Electronics LED Taillight Conversion Installation Manual
 Pantera Electronics LED Taillight Conversion Installation Manual This LED signal lamp conversion was designed to replace the incandescent lamp 1157 with a Light Emitting Diode Array designed specifically
jegs.com
 Contents Wiring Harness w/ Fuse Panel Installation Instructions Turn Signal Plug w/ Terminals 2 Headlight Plugs 3/4 Grommet 10 ¼ Terminals 4 Ring Terminals 10 Wire Ties Fusible Link 2 Screws & Nuts 2 Plastic
Sunroof Repair. Sunroof Repair TSB. The sunroof repair kit available for the J30 is part number Y20. See images at bottom of document.
 Sunroof Repair This document is the text/images from the TSB (technical service bulletin) issued by Infiniti concerning the repair procedure for sunroof issues. Be advised that this is a LARGE, TIME-CONSUMING
2. NOTE: On vehicles equipped with automatic transmissions, move the shift lever to the 1 position to ease removal.
 Page 1 of 28 Section 501-12: Instrument Panel and Console REMOVAL AND INSTALLATION 1997 F-150, F-250 Workshop Manual Instrument Panel Removal 1. WARNING: TO AVOID ACCIDENTAL DEPLOYMENT AND POSSIBLE INJURY,
Throttle Positioning Sensor & Throttle Body Synchronization Suzuki TL1000s By CJ s Garage march 2016
 Throttle Positioning Sensor & Throttle Body Synchronization Suzuki TL1000s 97 01 By CJ s Garage march 2016 Throttle positioning sensor & Throttle body synchronization Bike condition: Tappet clearance should
5 Lift the selector lever cover and unplug the connector to the switch for the seat heater and cigarette lighter.
 MODIFICATION INSTRUCTION Number: 432-2138 Year: 1999 Month: Market: MARCH US, CA Shift-lock solenoid Customer care modification campaign 10473 Cars in stock should be rectified before delivery. Owners
Installation Instructions COMPETITION/PLUS SHIFTER Ford Mustang MT82 6-Speed Manual Transmission Catalog#
 Installation Instructions COMPETITION/PLUS SHIFTER 2015-2017 Ford Mustang MT82 6-Speed Manual Transmission Catalog# 3916037 Rev. 00 WORK SAFELY! For maximum safety, perform this installation on a clean,
Headlight Switch Connector. Brake Switch. Lead Wires. Main Power Feed from Starter. Fuse Box Connections (viewed from underside)
") www.americanautowire.com 86-933-0801 TH KT DOE NOT UPPORT TOCK (ORGNAL) GENERATOR. THE DEGN OF THE KT DEGNED TO UPPLY MORE POWER THAN THE GENERATOR ALE TO UPPLY. 16 68A 4D 4C 4D 0 0 0 4C 4 43 7 39 3 Dimmer
www.americanautowire.com 86-933-0801 TH KT DOE NOT UPPORT TOCK (ORGNAL) GENERATOR. THE DEGN OF THE KT DEGNED TO UPPLY MORE POWER THAN THE GENERATOR ALE TO UPPLY. 16 68A 4D 4C 4D 0 0 0 4C 4 43 7 39 3 Dimmer
INSTALLATION INSTRUCTIONS
 INSTALLATION INSTRUCTIONS Accessory TRIM Application 2009 ACCORD 4-DOOR Publications No. AII 40008 Issue Date JULY 2008 PARTS LIST Steering Wheel Trim (Without Navigation) P/N 08Z13-TA0-100 Right steering
INSTRUCTIONS Circuit Wiring Kit Instructions _2017. Fuse Box Connections. (viewed from underside) 2018, Speedway Motors, Inc.
 2018, Speedway Motors, Inc.") Fuse Box Connections (viewed from underside) 4D 4C 100 50 300 4D 4C 4B 4A 43 107 39 103 3B 2G 104 93 2F 2E 2D 2C 2B 40 69A 102 101 105 2G 2F 2E 3A A 2A B 40A,B 27 69A 106 201, Speedway Motors, Inc. 1 Fuse
Fuse Box Connections (viewed from underside) 4D 4C 100 50 300 4D 4C 4B 4A 43 107 39 103 3B 2G 104 93 2F 2E 2D 2C 2B 40 69A 102 101 105 2G 2F 2E 3A A 2A B 40A,B 27 69A 106 201, Speedway Motors, Inc. 1 Fuse
Removing Mercedes W123 Instrument Cluster
 Removing Mercedes W123 Instrument Cluster If your odometer stops working, your speedometer cable needs to be replaced, or other issues arise with your instrument cluster you will need to remove it before
Retrofit Steering Column
 Retrofit Steering Column Installation Instructions for 1970-75 Camaro For Part # s: 1620860010, 1620860020, 1620860051, 1620869910, 1620869920, 1620869951, 1625860010, 1625860020, 1625860051, 1625869910,
INSTALLATION INSTRUCTIONS
 5 ALL VEHICLES KIT FEATURES Equalizer provisions Rear support provisions KIT COMPONENTS 99-7890 INSTALLATION INSTRUCTIONS -SHAFT HEAD UNITS: Snap the Shaft Supports into the Radio Housing. Slide the aftermarket
Install: Part A. First things first: Running the wiring for the Neo-Pod
 Install: Part A First things first: Running the wiring for the Neo-Pod These instructions follow installation of #31649KL Neo-Pod (the fully loaded version with amp, sub, etc.) in a factory Wrangler sound
Non-Luster Mid-Year Cluster THE SECOND STEP TO A JEWEL-LIKE MID-YEAR DASH
 Non-Luster Mid-Year Cluster THE SECOND STEP TO A JEWEL-LIKE MID-YEAR DASH B Y J O H N H I N C K L E Y At the end of Part I in the July issue of Corvette Enthusiast, the cluster and clock were on their
HAND THROTTLE KIT For Workman 3000 Series
 FORM NO. 7 6 MODEL NO. 0746 INSTALLATION INSTRUCTIONS HAND THROTTLE KIT For Workman 000 Series. Position vehicle on a clean, level surface, stop engine, engage parking brake and remove key from ignition
Electric Power Steering Installation in the Pantera. by Gerry Romack & Alan Cameron
 Electric Power Steering Installation in the Pantera by Gerry Romack & Alan Cameron 1. Harness with controller 2. Power Wire battery 3. Steering assembly 4. Hall Effect Speed Sensor Fused Ignition relay
Installation MKIV Headlight Housings with Fog Lamps (Procedures apply to both MKIV Jetta and Golf)
") Page 1 This tutorial is provided as a courtesy by ECS Tuning. Service Procedure Installation Proper service and repair procedures are vital to the safe, reliable operation of all motor vehicles as well
Page 1 This tutorial is provided as a courtesy by ECS Tuning. Service Procedure Installation Proper service and repair procedures are vital to the safe, reliable operation of all motor vehicles as well
40A A 40B. Horn Relay Connector. Brake Switch. Third Brake Light. Brake Switch. Brake Switch. Wires. page 3. Rear Body Feed Wires.
 Fuse Box Connections (viewed from underside) 4D 4C 4D 0 50 300 4C 43 7 39 3 6 4 93 A 2G 2F 2E 2D 2C 2B 2G 2F 2E 40 69A 2 1 5 27 69A 3A B 40A,B 11A,B 40A 156 Dimmer Dome Feed page 2 Horn Relay 2D 2 29 40B
INSTALLATION INSTRUCTIONS
 INSTALLATION INSTRUCTIONS Accessory Application Publications No. in- ENTERTAINMENT SYSTEM 2004 TSX BII 24811 Issue Date APRIL 2003 PARTS LIST Attachment Kit P/N 08B23-SDA-101A Monitor bracket harness FM
Fitting the Bell Auto Services (B-A-S) TDV6 EGR Blanking Kit to a 2006 model Discovery 3 TDV6 HSE
 TDV6 EGR Blanking Kit to a 2006 model Discovery 3 TDV6 HSE") Fitting the Bell Auto Services (B-A-S) TDV6 EGR Blanking Kit to a 2006 model Discovery 3 TDV6 HSE Before I describe how I did this, I must first thank other members of the Disco3.co.uk forum (namely J,moore
Fitting the Bell Auto Services (B-A-S) TDV6 EGR Blanking Kit to a 2006 model Discovery 3 TDV6 HSE Before I describe how I did this, I must first thank other members of the Disco3.co.uk forum (namely J,moore
The drawings are all available from the author or from the host websight. You will find these pictures and descriptions to be most helpful.
 Last Revision: 09JA2010 1969 THROUGH 1976 GM A & F-CAR TILT STEERING COLUMN DISASSEMBLY & REPAIR INSTRUCTIONS PAPER #1 Disassembly and Repair Instructions Addressed in this Paper Degree of Difficulty Page
TOYOTA RAV TVIP V3
 Section I Installation Preparation Part Number: 08586-4A872 Section I Installation Preparation Kit Contents Item # Quantity Reqd. Description 1 1 Wire Harness 2 1 Status Monitor 3 1 Piezo Buzzer 4 1 V3
Troubleshooting Guide for Okin Systems
 Troubleshooting Guide for Okin Systems More lift chair manufacturers use the Okin electronics system than any other system today, mainly because they re quiet running and usually very dependable. There
GENUINE PARTS INSTALLATION INSTRUCTIONS
 GENUINE PARTS INSTALLATION INSTRUCTIONS 1. 2. 3. 4. DESCRIPTION: Accent light Kit APPLICATION: R42H (2011) PART NUMBER: 999F3 AW000 - Universal Accent Lighting Kit. KIT CONTENTS: Item QTY Description Service
Retrofit Steering Column
 Retrofit Steering Column INSTALLATION INSTRUCTIONS for 1965-66 Ford Trucks FOR PART NUMBER S: 1170825010, 1170825020, 1170825051 www.ididit.com 610 S. Maumee St., Tecumseh, MI 49286 PH: (517) 424-0577
1963 GEN IV SUREFIT VINTAGE AIR CONDITIONING INSTALLATION
 by Randy Irwin 1963 GEN IV SUREFIT VINTAGE AIR CONDITIONING INSTALLATION Randy Irwin - Technical Writer Randy has been involved in the Chevy parts business for over 30 years. He is a wizard at creating,
INSTALLATION INSTRUCTIONS FOR MK4 VOLKSWAGEN JETTA (BORA) /GOLF 1.8T, 2.0L, VR6, & R32 MODELS ALSO FITS ALL MODELS OF SEAT LEON & TOLEDO
 /GOLF 1.8T, 2.0L, VR6, & R32 MODELS ALSO FITS ALL MODELS OF SEAT LEON & TOLEDO") CI100001 INSTALLATION INSTRUCTIONS FOR 1999.5-2005 MK4 VOLKSWAGEN JETTA (BORA) /GOLF 1.8T, 2.0L, VR6, & R32 MODELS ALSO FITS ALL MODELS OF SEAT LEON & TOLEDO Thank you for choosing to purchase a Carbonio
CI100001 INSTALLATION INSTRUCTIONS FOR 1999.5-2005 MK4 VOLKSWAGEN JETTA (BORA) /GOLF 1.8T, 2.0L, VR6, & R32 MODELS ALSO FITS ALL MODELS OF SEAT LEON & TOLEDO Thank you for choosing to purchase a Carbonio
Convenience Lighting
 Convenience Lighting by Flopster843 19 Dec 2011 In order to cut costs and make a larger profit, many automobile manufacturers decided to cut several minor items from the production line. Chrysler removed
SCION xb 2004 SECURITY (V5) Section I Installation Preparation. Part Number:
 Section I Installation Preparation. Part Number:") Section I Installation Preparation Part Number: 08586 52960 Section I Installation Preparation Kit Contents Item # Quantity Reqd. Description 1 1 Wire Harness 2 1 Mounting Bracket 3 1 GBS ECU 4 1 Security
Section I Installation Preparation Part Number: 08586 52960 Section I Installation Preparation Kit Contents Item # Quantity Reqd. Description 1 1 Wire Harness 2 1 Mounting Bracket 3 1 GBS ECU 4 1 Security
INSTALLATION GUIDE Chevrolet Digital Dash Panel Part Number: DP6003 Year Series:
 INSTALLATION GUIDE Chevrolet Digital Dash Panel Part Number: DP6003 Year Series: 1967-1972 * Disconnect the battery before attempting any electrical work on your vehicle. * KIT COMPONENTS One (1) Digital
We thank you for purchasing a manual petcock conversion kit from Murphs!
 We thank you for purchasing a manual petcock conversion kit from Murphs! The first step is removing the gas tank from the bike. We suggest running the tank down to reserve before removal, both for the