RX Catch Can installation& PCV system
|
|
|
- Lillian Hunter
- 6 years ago
- Views:
Transcription
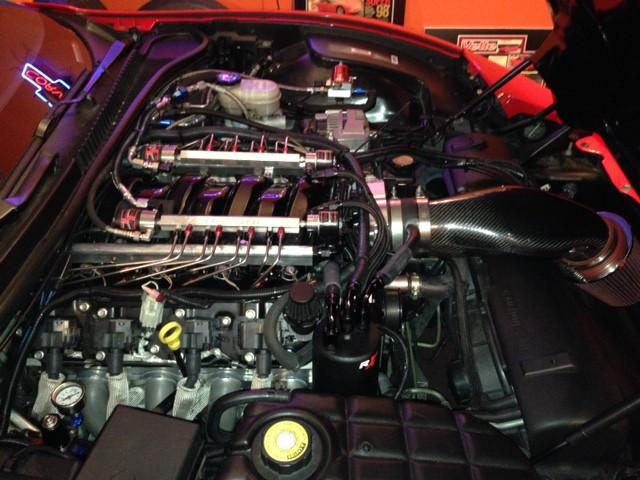
1 RX Catch Can installation& PCV system The LS based motors have a PCV system that at best is pretty ineffective. This allows oil mist to enter the intake manifold causing undue carbon buildup on the piston tops & valve surfaces & detonation from the contaminated air charge. The catch can goes in-line in your OEM system and due to its design & surface area, condenses these vapors & mist to droplets that then fall to the bottom of the can so only the water vapors, unburnt fuel, & combustion blow-by gasses enter as designed. The result? Little or no oil contamination in the intake air charge & more consistent power & fuel economy. Just take off your throttle body sometime & reach a finger into the intake manifold snout and see how much oil is on your finger. Should be zero. What makes the RX catch can work so well? The design. It is nearly one quart capacity (anything less is not as effective due to the surface area cooling needed for the vapors & mist to condense efficiently, and the perforated down tube that evenly disperses the vapors to contact as much surface area as possible) and with it's 4 separate chambers, and 3 steps it is unequaled on the market today. The mounting bracket uses the bottom threaded hole on the passenger cylinder head (very low, near the block) and use the included shoulder bolt and should be mounted angling to the left so the can will be mounted offset to clear. Modding the routing to use a good portion of the OEM plumbing. Above shows the outlet of the can (now an integrated PCV valve) to the intake manifold. Pic above shows retaining the stock PCV valve. Note: There is no problem having both PCV valves intact The stock PCV valve & tubing is used in the complete PCV mod, all that is needed is a 4 1/2" 3/8 tube. You cut the stock plastic tube 2 " behind the PCV valve & slide the 4 1/2" line onto it & to the outlet on the catch can. Then you remove the line from the TB (OEM fresh air source) and the fitting on the front of the valve cover & plug each. You then cut the plastic tube running along the pass side valve cover where the foam covering has a window in it (cut at the front most opening of the window). and you reuse the tube from the TB to go between the inlet in the catch can & the plastic line you cut along the pass side valve cover. Final step is to modify the oil fill cap & bond a mini filter to it. (This is all included in the complete system kit) NOTE: If not doing the full PCV system mod you just do the first section of this mod and leave the OEM fresh air line from the TB intact, and run the catch can inline with the PCV line The full system mod is recommended as it also addresses the cleanside of the PCV system and retains an emissions compliant closed system that retains 100% MAF metered air: Supplement: Replace your oil fill cap w/the cleanside unit pictured below included in the kit. This will be the fresh air source. Nothing should be open & unfiltered. Then you cap off the fitting from the throttle body (should already be on yours if modded before) where the fresh air did draw from before. That covers the fresh air source.
 fitting on the catch can.")
2 If OEM tubing is missing: Then to draw the vapors out you will need to run a hose from the rear of the drivers side valve cover routed around the rear of the engine up to the catch can location at the front of the passenger side cylinder head. This you will attach to the center (inlet) fitting on the catch can. Then from the outer fitting (outlet) you run a short hose (provided) to the PCV valve (fat side towards the catch can). The OEM line that the PCV valve fit in is plastic & should be cut off app. 2" behind the PCV valve & a 3/8" hose will slide right on it. The front (narrow end) of the PCV valve then plugs into a small 2-3" hose that fits onto the vacuum source at the front passenger side of the intake manifold. (On the latest revision a PCV valve is integrated into the catch can to avoid confusion, and having the OEM valve still in place will not negatively affect the operation) Note: On LS6 style valley covers the OEM draw is from the Valley cover & is a metered orifice but a PCV valve is still needed. Just plumb the catch can between the vacuum source & the barb on the valley cover. Last is to cap off the other fittings (only if the breather mod is used) on the pass side valve cover & you are finished. Just remember, the vacuum source pulls from the outer (outlet) fitting on the catch can. App. once every few thousand miles, with engine off and warm, open the petcock drain valve on the bottom of the can to drain any accumulated oil/water/etc. from the can. Do NOT reuse the oil as it will be full of contaminates that have flashed off in the crankcase! This shows the system routing for a LS6/LS2/LS3/LS7 application. The pass side fitting is capped off here since the cleanside mod is used.

3 LS6/LS2/LS3/LS7 style valley cover fitting showing the correct hose routing. Below is an example of a dual can setup for race applications where the throttle body makeup air source is retained for emissions requirements: Note: The clear hose running from the drain should be loosely secured (so it can rotate when opening the drain) with zip ties to the fan shroud or frame where you can easily place a drain pan or bottle to catch the trapped oil when it is time to
4 drain. It is recommended it be drained every oil change if not sooner. This oil will be contaminated and should NOT be reused in the motor. On the next page are some pictures of the LS3 C6 Corvette: Note the fuel rail cover needs to be notched to fit. Note, Light trucks use the bolt on the brake master cylinder for the mount.

5
 of RX separator can.")
6 Note: Dirty side (foul vapors from crankcase) may be from valley cover OR rear of drivers side valve cover. You can T both together and then run to center (inlet) of RX separator can. The RX checkvalves are inline now for silent operation.
RX Catch Can installation & PCV system for Turbo & remote mount supercharger systems
 RX Catch Can installation & PCV system for Turbo & remote mount supercharger systems The LS based motors have a PCV system that at best is pretty ineffective. This allows oil mist to enter the intake manifold
Catch Cans. (For the 5 th Gen Camaro, L99 A6 V8) (For the LS3 M6 V8, see pics at the end)
 (For the LS3 M6 V8, see pics at the end)") R X Catch Cans (For the 5 th Gen Camaro, L99 A6 V8) (For the LS3 M6 V8, see pics at the end) What makes the RX performance the most effective oil separating catchcan on the market? There are several factors
R X Catch Cans (For the 5 th Gen Camaro, L99 A6 V8) (For the LS3 M6 V8, see pics at the end) What makes the RX performance the most effective oil separating catchcan on the market? There are several factors
2014 Corvette Stingray. Install instructions.
 2014 Corvette Stingray Install instructions. GM has made great strides in the much improved baffles in both the valve covers and the valley cover where the crankcase dirty side is evacuated through, but
RX Monster Catch Can installation & PCV system for Turbo & remote mount supercharger systems
 RX Monster Catch Can installation & PCV system for Turbo & remote mount supercharger systems Please note: Depending on the mount location of the head unit, you may need to find an alternate spot to mount
INSTALLATION INSTRUCTIONS Oil Catch Can Kit BMW E46 3-Series/M3 Document# Support:
 INSTALLATION INSTRUCTIONS Oil Catch Can Kit BMW E46 3-Series/M3 Document# 19-0055 Support: info@radiumauto.com Qty Description 1 Radium Engineering Anodized and Etched Catch Can Top 1 Radium Engineering
Oil Module in the Inner V
 Oil Module in the Inner V There are numerous oil supply passages under a cover in the V of the engine. The cover is bolted directly to the cylinder block, with a metal gasket positioned between them. Oil
INSTALLATION INSTRUCTIONS CATCH CAN KIT
 INSTALLATION INSTRUCTIONS CATCH CAN KIT FORD FOCUS Document: 19-0150 Support: info@radiumauto.com STEPS 1-19 COVER THE PCV SIDE CATCH CAN KIT (P/N: 20-0315) STEPS 20-32 COVER THE CRANKCASE CATCH CAN KIT
INSTALLATION INSTRUCTIONS DUAL OIL CATCH CAN KIT
 INSTALLATION INSTRUCTIONS DUAL OIL CATCH CAN KIT SUBARU WRX FA20F ENGINE Document: 19-0135 Support: info@radiumauto.com This dual catch can kit installs in the right-hand side of the engine bay and intercepts
Air Oil Separator for WRX
 Air Oil Separator for 2015+ WRX 2018-06-05 Thank you for purchasing this PERRIN product for your car! Installation of this product should only be performed by persons experienced with installation of aftermarket
2006 Honda Civic SI Supercharger Kit Installation Instruction Kit #
 2006 Honda Civic SI Supercharger Kit Installation Instruction Kit #350-091 3239 MONIER CIRCLE, STE.5 RANCHO CORDOVA, CA 95742 916.635.4550 FAX 916.635.4632 www.ct-engineering.com INS-157 VERSION: 3.25.2009
05-08 GT. Hellion Power Systems Mustang Kit Instructions
 Hellion Power Systems 05-08 Mustang Kit Instructions 1. Disconnect Battery 2. Drain Radiator, keep fluid for re-installation. 3. Remove air box and inlethoses. 6. Next, underneath, punch oil pan for turbo
928 Motorsports Oil Control System for the 16V Porsche 928
 928 Motorsports Oil Control System for the 16V Porsche 928 NOTE: Left and Right are always as seen from the driver s seat-as you sit in the car. The following instructions will help you improve the oil
4. Remove (4) 10mm and (1) 7mm bolt that holds fascia at front corners, on each side
 10mm and (1) 7mm bolt that holds fascia at front corners, on each side") 2010 Camaro LS3 1. Disconnect battery ground 2. Remove front wheels 3. Remove (5) push pins and (5) #20 torx screws on inner front wheel well liners and remove liners on each side 4. Remove (4) 10mm and
2010 Camaro LS3 1. Disconnect battery ground 2. Remove front wheels 3. Remove (5) push pins and (5) #20 torx screws on inner front wheel well liners and remove liners on each side 4. Remove (4) 10mm and
INSTALLATION INSTRUCTIONS CATCH CAN KIT
 INSTALLATION INSTRUCTIONS CATCH CAN KIT FORD FOCUS Document: 19-0150 Support: info@radiumauto.com STEPS 1 TO 19 COVER THE PCV CATCH CAN KIT (P/N: 20-0315) STEPS 20-32 COVER THE CRANKCASE CATCH CAN KIT
ITEM QTY CHECK PART NUMBER DESCRIPTION
 PART #21128 2010 Camaro Cold Air Induction Stage II PACKING LIST Before installation, use this check list to make sure all necessary parts have been included. ITEM QTY CHECK PART NUMBER DESCRIPTION 1.
INSTALLATION INSTRUCTIONS Dual Catch Can Kit Subaru Turbo and STi Document# Support:
 INSTALLATION INSTRUCTIONS Dual Catch Can Kit 02-14 Subaru Turbo and 2015+ STi Document# 19-0099 Support: info@radiumauto.com This document covers the installation of a Radium dual catch can kit for the
Crawford Performance Top Mount Air/Oil Separator Install Instructions Version 1.12
 Crawford Performance Top Mount Air/Oil Separator Install Instructions Version 1.12 Parts List Part Number Quantity Description Sent Received S0774 1 TMIC Air/Oil Separator F0365 1 Crank Case Breather Connector
Instant Chat off the main page of Or simply call our tech team at
 Subaru WRX/STI Air Oil Separator for Front Mounted Intercooler Setups 2013-02- 22 Thank you for purchasing this PERRIN product for your car! Installation of this product should only be performed by persons
Instant Chat off the main page of Or simply call our tech team at
 02-07 WRX/STI Air Oil Separator for Top Mounted Intercooler Setups 2013-02- 27 Thank you for purchasing this PERRIN product for your car! Installation of this product should only be performed by persons
INSTALLATION INSTRUCTIONS CATCH CAN KIT
 INSTALLATION INSTRUCTIONS CATCH CAN KIT FORD FOCUS Document: 19-0150 Support: info@radiumauto.com STEPS 1 TO 19 COVER THE PCV SIDE CATCH CAN KIT (P/N: 20-0315) STEPS 20-32 COVER THE CRANKCASE CATCH CAN
Procharger Stage II Intercooled Supercharger System (11-14 GT)
") Procharger Stage II Intercooled Supercharger System (11-14 GT) Installation Time: Approximately one day. Installed on 2012 Mustang GT 5.0/Manual Required Tools 3/8 Socket Set (Standard and Metric) 1/2
Procharger Stage II Intercooled Supercharger System (11-14 GT) Installation Time: Approximately one day. Installed on 2012 Mustang GT 5.0/Manual Required Tools 3/8 Socket Set (Standard and Metric) 1/2
IAG Street Series Air / Oil Separator (AOS) For WRX
 For WRX") P IAG Street Series Air / Oil Separator (AOS) For 2015-16 WRX Part# IAG-ENG-7152 Tools Required: Ratchet, torque wrench, extensions, needle nose pliers, hose cutter, snips/scissors, flat head screw driver,
P IAG Street Series Air / Oil Separator (AOS) For 2015-16 WRX Part# IAG-ENG-7152 Tools Required: Ratchet, torque wrench, extensions, needle nose pliers, hose cutter, snips/scissors, flat head screw driver,
LChevrolet Camaro Supercharger Kit
 PART #92000A Important Notes: 2010-2013 6.2LChevrolet Camaro Supercharger Kit The use of fuel additives (ie. octane boosters) is not recommended. There is a possibility that these chemicals can damage
Chevy Sonic 1.4L Intake Manifold
 Chevy Sonic 1.4L Intake Manifold Install Time: 3 hours In the Box: (1) Racer X Intake manifold (6) M8x1.25 bolts (4) M6x1 bolts (2) 1/8 NPT plugs (1) 3/8 NPT plug (1) 1/4 NPT 90 degree barb (4) Small O-rings
2015 Corvette Supercharger System Instructions
 2015 Corvette Supercharger System Instructions These instructions are meant to serve as a guide to the installation of the ECS 2015 Corvette Supercharging system. Please be sure to use all safety equipment
Installation Instructions
 Installation Instructions 2.0T TSI Intake Manifold: Featuring better flow, higher boost capacity, 40% larger plenum volume, and integrated flapper delete; this product will take your 2.0L VW TSI to the
IAG Competition Series Air / Oil Separator (AOS) For WRX
 For WRX") P IAG Competition Series Air / Oil Separator (AOS) For 2015-16 WRX Part# IAG-ENG-7252 Tools Required: Ratchet, torque wrench, extensions, needle nose pliers, hose cutter, snips/scissors, flat head screw
P IAG Competition Series Air / Oil Separator (AOS) For 2015-16 WRX Part# IAG-ENG-7252 Tools Required: Ratchet, torque wrench, extensions, needle nose pliers, hose cutter, snips/scissors, flat head screw
MOROSO PERFORMANCE PRODUCTS, INC.
 85487 Air Oil Separator kit is designed for vehicles with automatic and standard transmissions. Determine what application applies and follow either Automatic Transmission or Standard Transmission directions.
8 Zip Tie Zip Tie 1 Union Fitting 1 ½ ½ Union Reducer Fitting Union 1 5/8 ½ (For Plastic Intake Manifold Vehicles)
") P IAG Street Series Air / Oil Separator (AOS) For 2017 STI Part# IAG-ENG-7151 Tools Required: Ratchet, torque wrench, extensions, needle nose pliers, hose cutter, snips/scissors, flat head screw driver,
P IAG Street Series Air / Oil Separator (AOS) For 2017 STI Part# IAG-ENG-7151 Tools Required: Ratchet, torque wrench, extensions, needle nose pliers, hose cutter, snips/scissors, flat head screw driver,
AIR INDUCTION SYSTEM
 Page 1 of 7 PART NUMBER: APPLICATION: 203.60.2505 HONKER C6 2005 07 CORVETTE AIR INDUCTION SYSTEM EXC. Z06 INSTRUCTION SHEET NUMBER: with supercharger 903.60.9852A PACKAGE CONTENTS: Air Box Cover Air Box
IAG Street Series Air / Oil Separator (AOS) For 2017 WRX
 For 2017 WRX") P IAG Street Series Air / Oil Separator (AOS) For 2017 WRX Part# IAG-ENG-7152 Tools Required: Ratchet, torque wrench, extensions, needle nose pliers, hose cutter, snips/scissors, flathead screwdriver,
P IAG Street Series Air / Oil Separator (AOS) For 2017 WRX Part# IAG-ENG-7152 Tools Required: Ratchet, torque wrench, extensions, needle nose pliers, hose cutter, snips/scissors, flathead screwdriver,
IAG Street Series Air / Oil Separator (AOS) For WRX & WRX STI
 For WRX & WRX STI") IAG Street Series Air / Oil Separator (AOS) For 2006-07 WRX & 2004-07 WRX STI Part# IAG-ENG-7150 Tools Required: Ratchet, torque wrench, extensions, needle nose pliers, hose cutter, snips/scissors, flat
IAG Street Series Air / Oil Separator (AOS) For 2006-07 WRX & 2004-07 WRX STI Part# IAG-ENG-7150 Tools Required: Ratchet, torque wrench, extensions, needle nose pliers, hose cutter, snips/scissors, flat
Crawford Performance Top Mount Air/Oil Separator Version 2 (S0714-1)
") Crawford Performance Top Mount Air/Oil Separator 02-07 Version 2 (S0714-1) Parts List Part Number Quantity Description Sent Received S0707-1 1 TMIC Air/Oil Separator V2 F0365 1 Crank Case Breather Connector
Crawford Performance Top Mount Air/Oil Separator 02-07 Version 2 (S0714-1) Parts List Part Number Quantity Description Sent Received S0707-1 1 TMIC Air/Oil Separator V2 F0365 1 Crank Case Breather Connector
Installation Instructions Shifter Improver Kit Fits:1988 and Later TurboHydramatic 400, TH-400/TH-475 (3L80/3L80-HD) Catalog # 20261
 Catalog # 20261") Installation Instructions Shifter Improver Kit Fits:1988 and Later TurboHydramatic 400, TH-400/TH-475 (3L80/3L80-HD) Catalog # 20261 WORK SAFELY! For maximum safety, perform this installation on a clean,
Installation Instructions Shifter Improver Kit Fits:1988 and Later TurboHydramatic 400, TH-400/TH-475 (3L80/3L80-HD) Catalog # 20261 WORK SAFELY! For maximum safety, perform this installation on a clean,
ZX-14 Stage I Turbo Kit
 62910 Peerless Ct. Bend, OR 97701 Phone 541.385.0706 Fax 541.382.9406 ZX-14 Stage I Turbo Kit WARNING: This turbo kit is for OFF-ROAD RACING use ONLY. Advisement: These instructions are written to be comprehensive
Installation Instructions
 Installation Instructions 2.0T FSI Intake Manifold: Featuring better flow, higher boost capacity, 40% larger plenum volume, and integrated flapper delete; this product will take your 2.0L VW TSI and FSI
IAG Competition Series Air / Oil Separator (AOS) For 2017 STI
 For 2017 STI") P IAG Competition Series Air / Oil Separator (AOS) For 2017 STI Part# IAG-ENG-7251 Tools Required: Ratchet, torque wrench, extensions, needle nose pliers, hose cutter, snips/scissors, flat head screw driver,
P IAG Competition Series Air / Oil Separator (AOS) For 2017 STI Part# IAG-ENG-7251 Tools Required: Ratchet, torque wrench, extensions, needle nose pliers, hose cutter, snips/scissors, flat head screw driver,
INSTALLATION INSTRUCTIONS
 Equipped with AEM Dryflow Filter No Oil Required! INSTALLATION INSTRUCTIONS PART NUMBER: 21-507B (Blue Finish) 21-507C (Gun Metal Grey Finish) 21-507R (Red Finish) 2002-2006 ACURA RSX L4-2.0L Auto Trans.
M-9603-CJ 123 mm Cold Air Kit for 5.4L 4V V8 Cobra Jet Mustang INSTALLATION INSTRUCTIONS
 Please contact the Techline for the most current instruction information 1-800-367-3788.!!! PLEASE READ THE FOLLOWING INSTRUCTIONS CAREFULLY PRIOR TO INSTALLATION!!! OVERVIEW: This kit is designed for
EMISSION CONTROL SYSTEMS
 EMISSION CONTROL SYSTEMS (3SFE) EMISSION CONTROL SYSTEMS EC1 EC2 EMISSION CONTROL SYSTEMS (3SFE) System Purpose System SYSTEM PURPOSE Abbreviation Purpose Positive crankcase ventilation Fuel evaporative
INSTALLATION INSTRUCTIONS CATCH CAN KIT MITSUBISHI EVOLUTION X Document# Customer Support:
 The EVOX catch can kit is available in 3 variations. The PCV kit installs between the PCV valve and the intake manifold. The crankcase kit installs between the valve cover vent port and the pre-turbo air
Instant Chat off the main page of Or simply call our tech team at
 FRONT MOUNT INTERCOOLER 2015+ WRX 2017-07-07 Thank you for purchasing this PERRIN product for your car! Installation of this product should only be performed by persons experienced with installation of
INSTALLATION MANUAL
 315000 INSTALLATION MANUAL EGR & Cooler Race Kit for 2015+ 6.7L Ford Powerstroke WARNING ONLY install this kit if you are using a tuner that disables the EGR sensors & circuit system. Any product that
Thermo-Bob 1 Installation Manual: Kawasaki Concours
 Thermo-Bob 1 Installation Manual: 1986-2006 Kawasaki Concours This is a basic guide for installing the Thermo-Bob 1 on a Kawasaki ZG-1000 Concours. The bike used in the following photos was a 1995 year
Wrenches: ⅞, 8mm, 10mm, 13mm, 19mm P. allen, Other: Electrical Tape
 IAG Street Series Air / Oil Separator (AOS) For 2008-14 STI Part# IAG-ENG-7100 Tools Required: Ratchet, torque wrench, extensions, needle nose pliers, hose cutter, snips/scissors, flat head screw driver,
Crawford Performance Top Mount Air/Oil Separator For 08 STi + Version 2 (S0713-1)
") Crawford Performance Top Mount Air/Oil Separator For 08 STi + Version 2 (S0713-1) Parts List Part Number Quantity Description Sent Received S0709-1 1 TMIC Air/Oil Separator 08STI V2 F0365 1 Crank Case
Crawford Performance Top Mount Air/Oil Separator For 08 STi + Version 2 (S0713-1) Parts List Part Number Quantity Description Sent Received S0709-1 1 TMIC Air/Oil Separator 08STI V2 F0365 1 Crank Case
Hybrid Racing Racing Performance Air Intake System Acura RSX Type S
 Hybrid Racing Racing Performance Air Intake System 02-06 Acura RSX Type S This is a step by step guide on how to install the Hybrid Racing Performance Air Intake System on the 02-06 Acura RSX Type S. Written
INSTALLATION INSTRUCTIONS AOS-R (Air Oil Separator-Return) Turbo Subaru and STi
 Turbo Subaru and STi") INSTALLATION INSTRUCTIONS AOS-R (Air Oil Separator-Return) 02-14 Turbo Subaru and 2015+ STi These instructions are based on a vehicle with an OEM turbocharger and top-mount intercooler. If a front-mount
INSTALLATION INSTRUCTIONS AOS-R (Air Oil Separator-Return) 02-14 Turbo Subaru and 2015+ STi These instructions are based on a vehicle with an OEM turbocharger and top-mount intercooler. If a front-mount
Racing Oil Pan Trap-Door Inserts for Chevrolet Corvette (C5)
") Racing Oil Pan Trap-Door Inserts for 1997-2004 Chevrolet Corvette (C5) Part No. EGM-202 Made in USA Important: Read these instructions in their entirety prior to installation. Rev 170104 Applications This
Racing Oil Pan Trap-Door Inserts for 1997-2004 Chevrolet Corvette (C5) Part No. EGM-202 Made in USA Important: Read these instructions in their entirety prior to installation. Rev 170104 Applications This
IAG Street Series Air / Oil Separator (AOS) For WRX & WRX STI
 For WRX & WRX STI") IAG Street Series Air / Oil Separator (AOS) For 2006-07 WRX & 2004-07 WRX STI Part# IAG-ENG-7100 Tools Required: Ratchet, torque wrench, extensions, needle nose pliers, hose cutter, snips/scissors, flat
IAG Street Series Air / Oil Separator (AOS) For 2006-07 WRX & 2004-07 WRX STI Part# IAG-ENG-7100 Tools Required: Ratchet, torque wrench, extensions, needle nose pliers, hose cutter, snips/scissors, flat
LSX Intake Manifold. #54001 LSX (78mm Throttle Body) #54003 LSX (90mm Throttle Body)
 #54003 LSX (90mm Throttle Body)") LSX Intake Manifold #54001 LSX (78mm Throttle Body) #54003 LSX (90mm Throttle Body) Thank you for your purchase of the most innovative and powerful Gen III (LS1 and LS6) manifold ever developed. We are
LSX Intake Manifold #54001 LSX (78mm Throttle Body) #54003 LSX (90mm Throttle Body) Thank you for your purchase of the most innovative and powerful Gen III (LS1 and LS6) manifold ever developed. We are
INSTALLATION INSTRUCTIONS
 Equipped with AEM Dryflow Filter No Oil Required! INSTALLATION INSTRUCTIONS PART NUMBER: 21-448B (Blue Finish) 21-448C (Gun Metal Grey Finish) 21-448P (Vauum Metalized Chrome-VMC) 21-448R (Red Finish)
Ford Racing Performance Improvement Intake Manifold (96-04 GT) Time Necessary: Approximately 4 hours
 Time Necessary: Approximately 4 hours") Ford Racing Performance Improvement Intake Manifold (96-04 GT) Time Necessary: Approximately 4 hours Tools Required: Ratchet and socket set Torque wrench Large adjustable wrench Needle nose pliers A dozen
Ford Racing Performance Improvement Intake Manifold (96-04 GT) Time Necessary: Approximately 4 hours Tools Required: Ratchet and socket set Torque wrench Large adjustable wrench Needle nose pliers A dozen
IAG Street Series Air / Oil Separator (AOS) For WRX
 For WRX") IAG Street Series Air / Oil Separator (AOS) For 2008-14 WRX Part# IAG-ENG-7100 Tools Required: Ratchet, extensions, needle nose pliers, hose cutter, snips/scissors, flat head screw driver, hose clamping
IAG Street Series Air / Oil Separator (AOS) For 2008-14 WRX Part# IAG-ENG-7100 Tools Required: Ratchet, extensions, needle nose pliers, hose cutter, snips/scissors, flat head screw driver, hose clamping
Single Barrel Shotgun HPFP Install Guide
 Single Barrel Shotgun HPFP Install Guide Thank you for purchasing the VTT Single Barrel Shotgun HPFP upgrade kit! PLEASE READ THE ENTIRE GUIDE BEFORE BEGINNING INSTALLATION! The first thing you should
Timing Chain - Renew ( )
") «Scorpio '95 Table of Contents» «Section 21: Engine» «Subsection 21-05: 2,9 V6 24V Cosworth Engine» «REMOVAL AND INSTALLATION» Timing Chain - Renew (21 314 0) Special Tools 21-140-01Adaptor for 21-140
«Scorpio '95 Table of Contents» «Section 21: Engine» «Subsection 21-05: 2,9 V6 24V Cosworth Engine» «REMOVAL AND INSTALLATION» Timing Chain - Renew (21 314 0) Special Tools 21-140-01Adaptor for 21-140
gas passes through baffle plates in cylinder oil separator inlet port. Separated oil returns The first separation will happen when blowby
 2 05 LAYOUT AND OVERVIEW Lubrication System PCV Oil Separator Cylinder head cover (oil + gas) Blow-by gas (air duct hose) Inlet port Oil (oil gauge pipe) The first separation will happen when blowby gas
Air Oil Separator for WRX/STI Top Mounted Intercooler Setups
 Air Oil Separator for 02-07 WRX/STI Top Mounted Intercooler Setups Thank you for purchasing this PERRIN product for your car! Installation of this product should only be performed by persons experienced
Installation Instructions for: TOYOTA 4.5L SUPERCHARGER SYSTEM
 Installation Instructions for: TOYOTA 4.5L SUPERCHARGER SYSTEM 1995-1997 Land Cruiser * PREMIUM FUEL REQUIRED * Magnuson Products LLC 1990 Knoll Drive, Bldg A, Ventura, CA 93003 (805) 642-8833 phone *
Z06 Corvette Lingenfelter High Flow Air Intake
 2006-2007 Z06 Corvette Lingenfelter High Flow Air Intake LN4233 1557 Winchester Road Decatur, Indiana 46733 260 724 2552 phone 260 724 8761 fax www.lingenfelter.com Parts List # Part number Description
REMOVAL & INSTALLATION
 REMOVAL & INSTALLATION NOTE: For reassembly reference, label all electrical connectors, vacuum hoses and fuel lines before removal. Also place mating marks on engine hood and other major assemblies before
Ford 6.7 EGR Delete Kit
 Fits: 2011 12 Powerstroke 6.7L Read instructions thoroughly before proceeding! ***This kit may void factory warranty please check with manufacturer.*** ***This kit is intended for off road use only.***
IAG Street Series Air / Oil Separator (AOS) For WRX & WRX STI
 For WRX & WRX STI") IAG Street Series Air / Oil Separator (AOS) For 2006-07 WRX & 2004-07 WRX STI Part# IAG-ENG-7150 Tools Required: Ratchet, torque wrench, extensions, needle nose pliers, hose cutter, snips/scissors, flat
IAG Street Series Air / Oil Separator (AOS) For 2006-07 WRX & 2004-07 WRX STI Part# IAG-ENG-7150 Tools Required: Ratchet, torque wrench, extensions, needle nose pliers, hose cutter, snips/scissors, flat
Typical Install Instructions
 Typical Install Instructions Read & understand all steps of these instructions before beginning this installation. WEBER Conversion Kit, VW T-1/2, up to 1835cc 32 / 36 DFEV Weber Carburetor These instructions
FRS/BRZ Air Oil Separator (AOS) Installation Manual
 Installation Manual") FRS/BRZ Air Oil Separator (AOS) Installation Manual Eric Hazen Rev. 2 Overview: Detailed instructions on installing the AOS for the FRS/BRZ/GT86. Difficulty: Beginner Time required: 1-3 hours depending
FRS/BRZ Air Oil Separator (AOS) Installation Manual Eric Hazen Rev. 2 Overview: Detailed instructions on installing the AOS for the FRS/BRZ/GT86. Difficulty: Beginner Time required: 1-3 hours depending
SLP Camaro ZL1 STAGE 3 (650 HP)
") SLP - 2012 Camaro ZL1 STAGE 3 (650 HP) PART #26002 PACKING LIST Before installation, use this check list to make sure all necessary parts have been included. ITEM QTY CHECK PART NUMBER DESCRIPTION 1. 1
SLP - 2012 Camaro ZL1 STAGE 3 (650 HP) PART #26002 PACKING LIST Before installation, use this check list to make sure all necessary parts have been included. ITEM QTY CHECK PART NUMBER DESCRIPTION 1. 1
(C6) Chevrolet Corvette Crank Scraper and Oil Pan Baffle Kit
 Chevrolet Corvette Crank Scraper and Oil Pan Baffle Kit") 2005-2013 (C6) Chevrolet Corvette Crank Scraper and Oil Pan Baffle Kit Part No. EGM-21X Made in USA Important: Read these instructions in their entirety prior to installation. Rev 160614 Applications 2005-2013
2005-2013 (C6) Chevrolet Corvette Crank Scraper and Oil Pan Baffle Kit Part No. EGM-21X Made in USA Important: Read these instructions in their entirety prior to installation. Rev 160614 Applications 2005-2013
HOW - TO EMISSION CONTROL BASICS EMISSION CONTROL BASICS
 HOW - TO EMISSION CONTROL BASICS EMISSION CONTROL BASICS Tool And Material Checklist Bore Brush Thermometer Portable Vacuum Pump Screwdriver Combination Wrench Set 3/8 Drive Socket Set Tachometer Rag Service
Section 10 Chapter 17
 Section 10 Chapter 17 24 Valve, 8.3 Liter Engine Air Intake System Note: All coding used in the 8.3 Liter and 9 Liter engine manuals are Cummins engine codes. These engine codes have no meaning to New
ACCUFAB 70mm THROTTLE BODY (96-04 V8)
") ACCUFAB 70mm THROTTLE BODY (96-04 V8) TIME NECESSARY: Less than 2 hours TOOLS REQUIRED: Ratchet Ratchet extension 5/16 or 8mm socket 3/8 or 10mm socket Philips screwdriver 1/8 hex key Hammer Loctite 243
ACCUFAB 70mm THROTTLE BODY (96-04 V8) TIME NECESSARY: Less than 2 hours TOOLS REQUIRED: Ratchet Ratchet extension 5/16 or 8mm socket 3/8 or 10mm socket Philips screwdriver 1/8 hex key Hammer Loctite 243
Timing Chain Renew ( ) Renew. Section Title. Special Tools. Proprietary Tools Scraper Engine support bar
 Renew. Section Title. Special Tools. Proprietary Tools Scraper Engine support bar") Timing Chain Renew ( 34 0) Special Tools 40 400 40 Engine support bar 40 0 Adaptor for -40 40 03 Adaptor for -40 Proprietary Tools Scraper Workshop Equipment Transmission jack Materials Cable ties Sealer
Timing Chain Renew ( 34 0) Special Tools 40 400 40 Engine support bar 40 0 Adaptor for -40 40 03 Adaptor for -40 Proprietary Tools Scraper Workshop Equipment Transmission jack Materials Cable ties Sealer
Sikky Oil Pan Install Guide
 Sikky Oil Pan Install Guide **If you have a double chain timing belt or after market oil pump setup then further modifications may need to be made in order for the pan to fit.** Remove starter Remove plastic
Instant Chat off the main page of Or simply call our tech team at
 08+ Rotated Tuner Kit for Garrett GT Turbos 2016-11-03 Thank you for purchasing this PERRIN product for your car! Installation of this product should only be performed by persons experienced with installation
Included parts: 1 - New Bosch CP3 Pump 1 - HSM Pulley 1 - Serpentine Belt 1 - Pump Bracket/ Hardware STEP 1
 TROUBLESHOOTING: Please read and understand all installation instructions before proceeding with the installation. If you have questions during the installation of this product, please contact H&S Motorsports
INSTALL MANUAL D o d g e 1 2 v 6 B T A PLEASE READ ALL INSTRUCTIONS BEFORE INSTALLATION.
 PN#1045310 12V Dodge Twin Turbo Kit (I-00273) 1 INSTALL MANUAL BD Twin Turbo Kit 1994-1 9 9 8 D o d g e 1 2 v 6 B T A Part# 1045310 PLEASE READ ALL INSTRUCTIONS BEFORE INSTALLATION. * Picture as shown
NOVICE 1, 2 & JUNIOR 1 & 2 DIVISIONS
 NOVICE 1, 2 & JUNIOR 1 & 2 DIVISIONS 708 BRIGGS LOCAL OPTION 206 Briggs & Stratton (B&S) Model 124332 Type 8201 only. The intent of this class is to provide a sealed, simple-to-operate, ultra dependable
1988 Ford F-350 PICKUP
 1988 Ford F-350 PICKUP Submodel: Engine Type: V8 Liters: 7.5 Fuel Delivery: FI Fuel: GAS 1987 93 4.9L Engine The intake and exhaust manifolds on these engines are known as combination manifolds and are
Shotgun Single Barrel HPFP install guide
 Shotgun Single Barrel HPFP install guide Thank you for your purchase of the VTT Shotgun Single Barrel HPFP upgrade! First thing to do when you open your box is to make sure all parts are in their respective
TURBOCHARGER L INSTALLATION GUIDE
 1 TURBOCHARGER INSTALLATION GUIDE TABLE OF CONTENTS Chapter Page 1 Intake and Cooling System Preparation 04 2 Intake Plenum and Manifold 08 3 Turbocharger Lubrication 11 4 Fuel Injectors 13 5 Re-installing
SHORT RAM AIR INTAKE SYSTEM. Installation Instructions for: Part Number Nissan 350Z
 SHORT RAM AIR INTAKE SYSTEM Installation Instructions for: Part Number 22-547 2003-2006 Nissan 350Z ADVANCED ENGINE MANAGEMENT INC. 2205 126 TH Street, Unit A Hawthorne, CA. 90250 Phone: (310) 484-2322
Z1 Motorsports 300zx 2.5 Upgraded piping & BA SMIC Install Guide
 Z1 Motorsports 300zx 2.5 Upgraded piping & BA SMIC Install Guide Congratulations on your new upgraded piping and intercooler kit, this kit has proven to provide the lowest intake air temps to date on our
1997 Volvo 850 GLT. Fig. 2: Removing Drive Shaft, Engine Mount Bolt & Torque Arm (5-Cylinder) Courtesy of VOLVO CARS OF NORTH AMERICA.
 Courtesy of VOLVO CARS OF NORTH AMERICA.") Fig. 2: Removing Drive Shaft, Engine Mount Bolt & Torque Arm (5-Cylinder) 4. Remove front exhaust pipe nuts and springs. Remove front exhaust pipe bolts. Disconnect speedometer. Remove engine mounting
Fig. 2: Removing Drive Shaft, Engine Mount Bolt & Torque Arm (5-Cylinder) 4. Remove front exhaust pipe nuts and springs. Remove front exhaust pipe bolts. Disconnect speedometer. Remove engine mounting
2014+ Ram 3.0 EcoDiesel EGR Delete
 2014+ Ram 3.0 EcoDiesel EGR Delete Installation Guide WARNING: This product is for competition use only in a sanctioned racing event. NOT FOR USE ON VEHICLES USED OR REGISTERED FOR USE ON A PUBLIC ROAD
Cackle cure Kit Installation by Pete Cleveland (aka FTE) for Dino Fuel Alternatives
 for Dino Fuel Alternatives") Cackle cure Kit Installation by Pete Cleveland (aka F250_ @ FTE) for Dino Fuel Alternatives March 26, 2007 Test Vehicle: 2002 Ford F250 XLT, 7.3L PowerStroke TurboDiesel, 2WD, Crew Cab, SWB, SRW, 124,000
Cackle cure Kit Installation by Pete Cleveland (aka F250_ @ FTE) for Dino Fuel Alternatives March 26, 2007 Test Vehicle: 2002 Ford F250 XLT, 7.3L PowerStroke TurboDiesel, 2WD, Crew Cab, SWB, SRW, 124,000
ZZP LNF Cobalt Turbo Upgrade
 ZZP LNF Cobalt Turbo Upgrade Note: These instructions are intended for installers with previous turbo installation experience. Some procedures will not be described in full detail. If you run into any
Intake Manifold Removal
 PLEASE READ ALL OF THE FOLLOWING INSTRUCTIONS CAREFULLY PRIOR TO INSTALLATION. AT ANY TIME YOU DO NOT UNDERSTAND THE INSTRUCTIONS Parts included: -GT350 Intake manifold M-944-M5 -GT350 Air bucket w/filter.
Application & Installation Guide. Crankcase Ventilation Systems LEBW
 Application & Installation Guide Crankcase Ventilation Systems LEBW4958-04 Contents Crankcase Ventilation Systems... 1 Crankcase Emissions... 2 Blow-by... 2 Crankcase Ventilation... 3 Ingestive... 3 Low
Pre-Installed. 1 Seal Kit 10 Silicone O-ring, 3/32 W, Intake Port Seals 1 Throttle Body Seal
 Atomic AirForce Intake Manifold for LS7, 2006-2013 Corvette and 2014 Z28 Camaro - PN 2701 LS2, 2005-2007 Corvette and CTS-V, 2005-2006 GTO and SSR PN 2702 LS1/6*, 1997-2004 Corvette, 1998-2002 Camaro/Firebird,
INSTALLATION INSTRUCTIONS AIR/OIL SEPARATOR KIT
 INSTALLATION INSTRUCTIONS AIR/OIL SEPARATOR KIT 2015+ SUBARU WRX (LHD ONLY) Document: 19-0136 Support: info@radiumauto.com This document covers the installation of the Radium brake master cylinder brace
TOYOTA FJ CRUISER / 4RUNNER COLD AIR INTAKE Section I Installation Preparation. 4.0L V6 (1GR) Roller Rocker Part Number(s): PTR
 Roller Rocker Part Number(s): PTR") Section I Installation Preparation Part Number(s): PTR03-89100 Kit Contents Item # Quantity Reqd. Description 1 1 Air Filter (P/N: PTR43-00083) 2 1 Upper Air Box 3 1 Lower Air Box 4 1 Hump Coupler 5 1
Section I Installation Preparation Part Number(s): PTR03-89100 Kit Contents Item # Quantity Reqd. Description 1 1 Air Filter (P/N: PTR43-00083) 2 1 Upper Air Box 3 1 Lower Air Box 4 1 Hump Coupler 5 1
ACCELERATOR CABLE AND PEDAL
 17 ENGINE & EMISSION CONTROL 1996 Engine Control System ACCELERATOR CABLE AND PEDAL REMOVAL AND INSTALLATION Post-installation Operation (Refer to Adjusting the Accelerator Cable.)
Slingshot Rotrex Supercharger Kit
 Slingshot Rotrex Supercharger Kit This supercharger kit improves on the Slingshot by forcing more dense air into the engine and creating more power. Installation time of the supercharger depends on you
Air Management System Components
 AIR M anagement Sys tem Air Management System Components Air Management System Features Series Sequential The series sequential turbocharger is a low pressure/high pressure design working in series with
Olson Kustom Works th St SE #M, Monroe, WA (949)
") Olson Kustom Works 17404 147 th St SE #M, Monroe, WA 98272 (949)742-0613 Jesse@OKW-Inc.com FOR REVISIONS ALL 2017 BRACKET REVISIONS, revised July 2017 Thank you for your purchase from OKW. If you have
Olson Kustom Works 17404 147 th St SE #M, Monroe, WA 98272 (949)742-0613 Jesse@OKW-Inc.com FOR REVISIONS ALL 2017 BRACKET REVISIONS, revised July 2017 Thank you for your purchase from OKW. If you have
Cut zip ties and remove 2 plastic wiring harness brackets.
 TROUBLESHOOTING: Please read and understand all installation instructions before proceeding with the installation. Included parts: 1 - New Bosch Cp3 Pump 1 - HSM Pulley 1 - Serpentine Belt 1 - Pump Bracket/
Rotated Tuner Kit for Garrett GT Turbos
 Rotated Tuner Kit for Garrett GT Turbos 031411 Thank you for purchasing the PERRIN performance rotated turbo kit. Installation of this turbo should only be performed by persons experienced in the installation
Installation Instructions for: TOYOTA 3.4L SUPERCHARGER SYSTEM
 Installation Instructions for: TOYOTA 3.4L SUPERCHARGER SYSTEM 1996-2002 4Runner 1997-1998 T100 1997-2004 Tacoma 2000-2003 Tundra * PREMIUM FUEL REQUIRED * Magnuson Products LLC 1990 Knoll Drive, Bldg
Phone Fax
 Directions for Installation of ECS Paxton Supercharger Kit Disconnect battery Remove stock serpentine belt Remove stock belt tensioner, save the 2 bolts for later use on supercharger bracket Remove alternator
Induction, Cooling, & Exhaust. Aviation Maintenance Technology 111 B B
 Induction, Cooling, & Exhaust Aviation Maintenance Technology 111 B - 112 B Unliscensed copyrighted material - W. North 1998 Unliscensed copyrighted material - W. North 1998 Induction = those locations
M-9603-GTB 85 mm Cold Air Kit w/premium Cal. for 4.6L 3V V8 Mustang INSTALLATION INSTRUCTIONS
 Please contact the Techline for the most current instruction information 800-367-3788.!!! PLEASE READ THE FOLLOWING INSTRUCTIONS CAREFULLY PRIOR TO INSTALLATION!!! OVERVIEW: This kit is designed for use