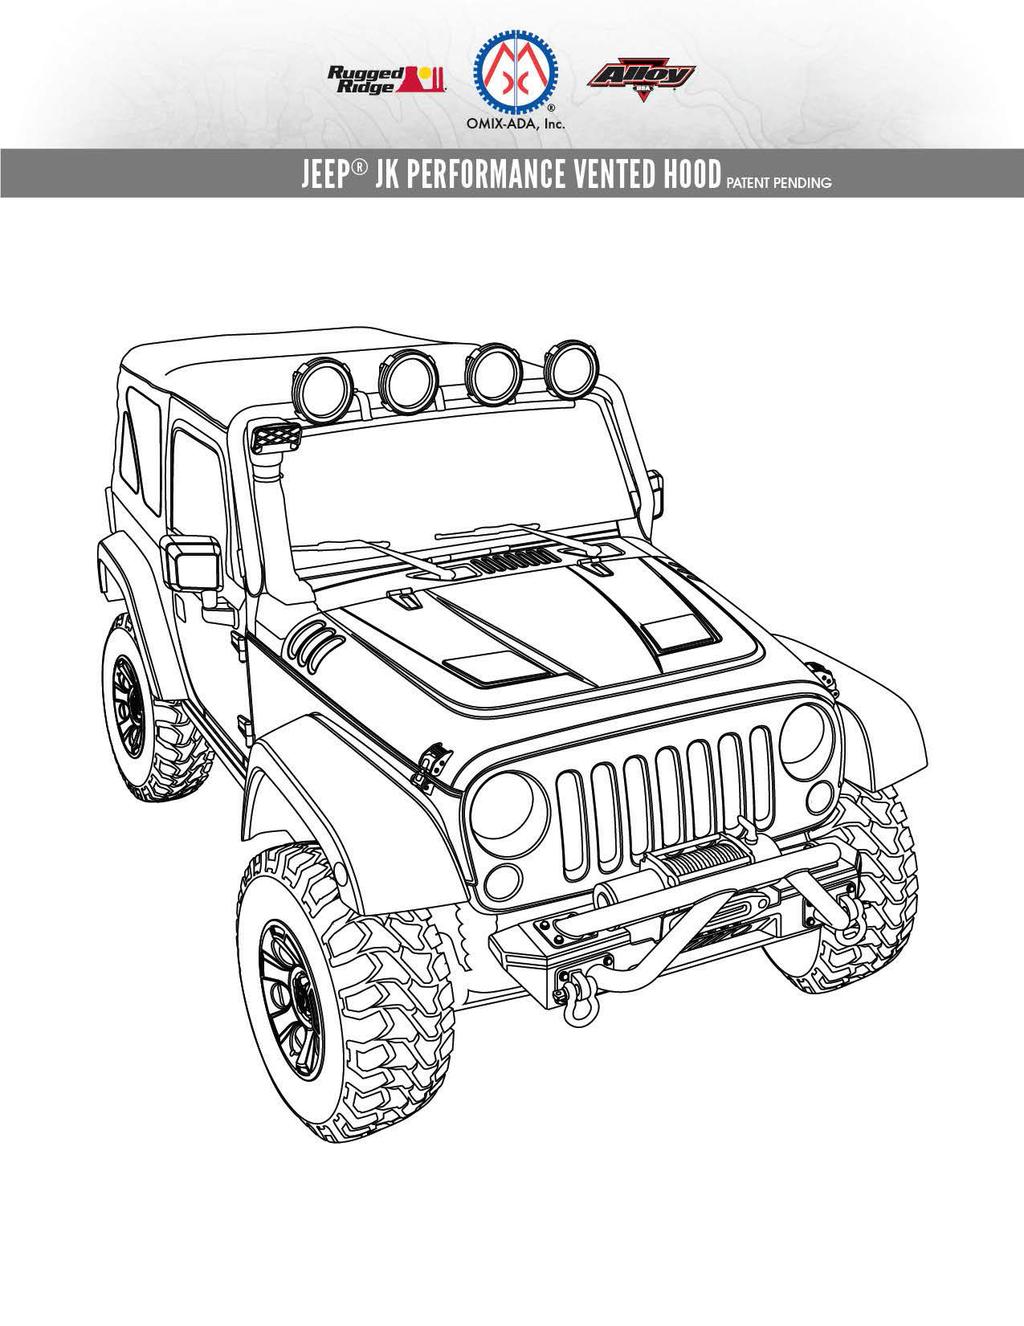
PERFORMANCE HOOD VENTS CONTENTS: Left Side Hood Vent (1) Right Side Hood Vent (1) Mounting Bracket, Inner (2) Mounting Bracket, Outer (2) OE Hood Temp
|
|
|
- Beryl Sullivan
- 5 years ago
- Views:
Transcription
1
2
3
4
5
6
7
8 CONTENTS: Left Side Hood Vent (1) Right Side Hood Vent (1) Mounting Bracket, Inner (2) Mounting Bracket, Outer (2) OE Hood Template (1) HARDWARE: Mounting Bracket, Inner X 2 Phillips Screw X 8 Mounting Bracket, Outer X 2 TOOLS REQUIRED: For use with Rugged Ridge Performance Vented Hood: Phillips Head Screwdriver 3/32 inch Allen Wrench For use with OE Hood: Phillips Head Screwdriver Drill, 1/16 Drill bit, 3/16 Drill Bit Angle Grinder/Metal Nibblers Center Punch Razor or Hobby Knife Deburring tool or hand file Touch-Up Paint Painters Tape Marker Tree Fastener Removal Tool Socket Wrench, 9mm Socket
9 Important Safety Information Your Rugged Ridge Performance Vented Hood Inserts are intended to increase the utility and enjoyment of your Jeep by reducing under-hood temperatures and enhancing the look of your vehicle. Before installation, please take a moment to review the following safety information and installation instructions. Important safety information is generally preceded by one of three signal words indicating the relative risk of injury. The signal words mean:! WARNING A hazardous situation which, if not avoided, could result in serious injury or death. You can be killed or seriously hurt if you do not follow instructions.! CAUTION A hazardous situation which, if not avoided, could result in minor or moderate injury. You can be moderately hurt and may also suffer property damage if you do not follow instructions. NOTICE Careful attention is required to this instruction or operation, but does not generally relate to personal injury. Damage to your product or other property may result if you do not follow instructions. Installation Instructions To reduce risk of personal injury during assembly and use of this product: Wear safety glasses during entire installation. Follow manufacturer s safety guidelines for all power tools. When using an angle grinder or metal nibblers, make sure to wear gloves, eye, and ear protection, and dust mask. Do not wear loose fitting clothing or jewelry. Read entire installation preocedure before beginning.
10 INSTALLATION INSTRUCTIONS FOR USE WITH RUGGED RIDGE PERFORMANCE VENTED HOOD (part # ) NOTICE If installing on OE hood, skip to OE Hood Installation Instructions section beginning on page Using a phillips head screwdriver and suppplied phillips head screws, install inner and outer Hood Vent Mounting Brackets onto each Performance Hood Vent. 2. Open Hood. Uninstall left and right metal hood vents by removing the 8 J-Clip Screws and J-clips (4 per side) using a 3/32 inch allen wrench. NOTICE Save J-Clips and screws for later use.
11 3. Position Performance Hood Vent Insert on top side of hood. Hold vent in place with one hand, and install 2 J-clips, one onto each Hood Vent Mounting Bracket on the user-side of hood. Make sure each J-Clip captures hood flange and Hood Vent Mounting Bracket. 4. With a 3/32 allen wrench, re-install J-Clip screws into the 2 J-Clips and fully tighten. Repeat steps 3 and 4 for Performance Hood Vent Insert on other side.
12 INSTALLATION INSTRUCTIONS FOR USE WITH OE HOOD. 1. Raise Hood and remove hood insulation blanket by removing christmas tree fasteners using tree fastener removal tool. (JK Model Only) 2. Remove Footman using a 9mm socket. For TJ/LJ models, also remove windsheild bumpers. 3. Place hood template on flat surface. With a hobby knife or razor blade, cut out the shaded circles for the Footman Holes. NOTICE There are 2 template patterns printed on the template sheet. Make sure to reference only the pattern meant for your vehicle. Items marked JK are for Wrangler. Items marked TJ/LJ are for Wrangler. 4. Lift hood and place a blanket or! CAUTION other protective barrier over engine bay, fenders, and windshield. Gently lower hood.
13 5. Place template on hood and align footman holes from step 4 with corresponding holes on vehicle hood. 6. Reinstall footman (and bumpers, if applicable) to positively locate template on hood. 7. Carefully inspect template placement to ensure proper alignment. Secure template in place with painters tape along edges of hood template. 8. Use a center punch to mark the centers of mounting fastener holes for Hood Vents. There are 8 total centers to marks; 4 per side. NOTICE Make sure to use the correct template markings for your vehicle model/year. 9. Using a 1/16 drill bit, drill pilot holes at 8 center punched locations for Hood Vents fastener holes. 10. Use a 3/16 drill bit to enlarge 8 holes for fasteners. When drilling holes in hood, be sure to NOTICE support under-side of hood so the metal does not deform. 11. OPTIONAL - Use center punch to mark 4 locations on each side of hood where vent holes will be cut under Hood Vents. 12. OPTIONAL - Drill 1/16 pilot holes at 8 locations marked for vent cutouts. Use a 1 sheet metal hole saw to enlarge these holes. NOTICE Make sure to use the correct template markings for your vehicle model/year. NOTICE When drilling holes in hood, be sure to support under-side of hood so the metal does not deform.
14 13. Remove hood template and painters tape. 14. OPTIONAL - Use painter s tape to connect each 1 hole with a straight line of tape around outside edges of each hole as shown in template. 15. OPTIONAL - Carefully use an angle grinder with a metal cut off wheel or metal nibbler to cut top layer of hood sheet metal along inside edge of painter s tape.! WARNING Always wear gloves, safety glasses, ear protection, and dust mask when cutting metal. 16. Remove painters tape. Use a deburring tool or hand file to remove any burrs or sharp edges created in steps Use touch-up paint to cover any exposed metal resulting from cutting and drilling. Allow paint to dry before proceeding.! WARNING Always wear gloves, safety glasses, ear protection, and dust mask when cutting metal. 18. For JK models, replace hood insulation blanket. If optional hole cutouts from steps were made: do not re-install christmas tree fasteners yet. Use a marker to trace hole cutouts onto hood insulation blanket. Use scissors or razor to cut corresponding holes in hood insulation blanket.

15 19. Place Hood Vent Inserts onto hood surface and align with mounting fastener holes. From underside of hood, insert supplied phillips head screws through holes created in steps 10 & 11 and use screwdriver to fasten Hood Vents in place. 20. Re-install footman on OE hood. For TJ/LJ models, also re-install windshield bumpers. 21. Replace hood insulation blanket and christmas tree fasteners. (JK Only) 22. Raise hood and carefully remove blanket from step 5, making sure not to spill any debris into engine bay. 23. Close Hood. Step back, and marvel at the awesomeness! Learn more about performance custom hoods on our website.
Established in 1977 KJ71050BK JK Hood Cowl
 Established in 1977 KJ71050BK JK Hood Cowl!!COWL AND SIDE SCOOPS MUST BE PAINTED TO PREVENT UV DAMAGE!! Like Us Share Us Watch Us Follow Us www.daystarweb.com Tech Support Contact Info Tech@DaystarWeb.com
460 HORIZON DR. SUITE 400 SUWANEE, GA PHONE: FAX: JK Hood Vent
 460 HORIZON DR. UITE 400 UWANEE, GA 30024 PHONE: 770-614-6101 FAX: 770-614-6069 info@omix-ada.com Components: 1. Hood Vent (1) 2. utton Head olt (16) 3. Nylon Lock Nut (16) 4. Washer (30) 5. utton Head
INSTALLATION GUIDE RAISED AIR INTAKE ½+ ram heavy duty diesel. AEV30240AA Last Updated: 12/11/14
 RAISED AIR INTAKE 2013 ½+ ram heavy duty diesel AEV30240AA Last Updated: 12/11/14 INSTALLATION GUIDE PLEASE READ BEFORE YOU START TO GUARANTEE A QUALITY INSTALLATION, WE RECOMMEND READING THESE INSTRUCTIONS
HD Hinge Casting HARDWARE: CONTENTS:
 Page 1/9 Part #11546.51 CONTENTS: HD Hinge Casting Spacer Plates (2 PCS) HD Hinge Casting HARDWARE: Hex Bolt X 4 Washer X 4 TOOLS REQUIRED: Socket Wrench 10 extension 13mm socket 3/4 deep socket T-20,
2010 Mustang V6 Shaker CDC #
 - - Incomplete 2010 Mustang V6 Shaker CDC # 1011-7002-01 Component Check List: Quantity/Description Part # Engine Cover Assembly 1011-6000-01 1 Engine Cover w/ Upper Air Tube 0511-2100-01 1 Aluminum Shaker
INSTALLATION INSTRUCTIONS
 INSTALLATION INSTRUCTIONS Accessory Application Publications No. All 30482 S 2006 PILOT Issue Date P/N 08F23-S9V-100A SEP 2005 PARTS LIST Left front trim piece Right front trim piece Left rear trim piece
PRELIMINARY INSTALLATION INSTRUCTIONS. PARTS LIST Left front trim piece
 INSTALLATION INSTRUCTIONS Accessory Application Publications No. All 30482 S 2006 PILOT Issue Date P/N 08F23-S9V-100A SEP 2005 PARTS LIST Left front trim piece Right front trim piece Left rear trim piece
GT Mustang Shaker
 CD4II3CU CDC Mustang 5.0 Shaker 2011-2014 2011-2014 5.0 GT Mustang Shaker Part #1111-7000-01 Component Check List: Shaker Assembly: Part # 1 - Aluminum Shaker Scoop 183020 1 Upper Air Box 1111-3301-01
INSTALLATION INSTRUCTIONS
 INSTALLATION INSTRUCTIONS Accessory Application Publications No. BII 33322-36889 UNDER 2007 TL Issue Date MAY 2007 PARTS LIST Front under spoiler Left bracket (Marked L ) Right bracket (Marked R ) 8 Self-tapping
Mustang Shaker
 2005-2009 Mustang Shaker CDC #110050 ( 05/ 06) or 0711-7000-01 ( 07/ 09) Component Check List: Quantity/Description Part # CDC Installer 1 - Engine Cover Assembly 114050 1 - Aluminum Shaker Scoop 183020
INSTALLATION INSTRUCTIONS
 INSTALLATION INSTRUCTIONS Accessory Application Publications No. UNDER 2007 CIVIC SI All 33529 Issue Date AUG 2006 PARTS LIST Rear under spoiler Clip Rubber washer 6 Flange bolts 6 Flange nuts TOOLS REQUIRED
Quadratec Automatic Power Mirror Movers for Jeep Wrangler JK Current
 Quadratec Automatic Power Mirror Movers for Jeep Wrangler JK 2011- Current US PATENT 9573526 Installation and Instruction Manual: Item # 13125.023X 2011-2013 JK 2014-Current JK REQUIRED TOOLS: Safety Glasses
GENUINE PARTS INSTALLATION INSTRUCTIONS
 GENUINE PARTS INSTALLATION INSTRUCTIONS DESCRIPTION: APPLICATION: PART NUMBER: Hood Bug Deflector Pathfinder T99D5 9PJ0A KIT CONTENTS: Item Qty. A 2 Inner Clip A B 2 Outer Clip B C 2 Wing Clip C D 1 Hood
EVO-1148AL/EVO-1149AL EVO Hood Breach
 EVO-1148AL/EVO-1149AL EVO Hood Breach Bill of Materials EVO-1148AL EVO Hood Breach Single Sprayer Part number Description Quantity EVO-12135AL EVO Hood Breach Single Sprayer 1 EVO-12136AL EVO Hood Breach
XX, TOYOTA, TACOMA FRONT BUMPER INSTALLATION INSTRUCTIONS THIS BUMPER SHOULD ONLY BE INSTALLED BY A PROFESSIONAL. SAFETY
 FRONT BUMPER INSTALLATION INSTRUCTIONS THIS BUMPER SHOULD ONLY BE INSTALLED BY A PROFESSIONAL. SAFETY Know safety, no injury. Know injury, no safety. ~Author Unknown If there are any questions, call 1-855-HHTOUGH
99-03 V6 "Shaker" System Instructions. *03 Model requires new hood Contents w/ Kit. Tool List For Appliqué:
 99-03 V6 "Shaker" System Instructions *03 Model requires new hood Contents w/ Kit 1 - Hood Appliqué 1 - Aluminum Shaker Scoop 1 - Lower Air Box w/drain tube fittings (2) 1 - Upper Air Box w/cdc nameplate
INSTALLATION INSTRUCTIONS ELITE FRONT BUMPER Part Number: w/ Grille Guard & w/o Grille Guard Application: Jeep JK 2007+
 INSTALLATION INSTRUCTIONS ELITE FRONT BUMPER Part Number: 87750 w/ Grille Guard & 87775 w/o Grille Guard Application: Jeep JK 2007+ GENERAL SAFETY PRECAUTIONS Your safety, and the safety of others, is
SAFETY THIS PRODUCT IS FOR OFFROAD USE ONLY. ALL LIABILITY FOR INSTALLATION AND USE RESTS WITH THE OWNER.
 SAFETY Your safety and the safety of others is very important. In order to help you make informed decisions about safety, we have provided installation instructions and other information. These instructions
M-9603-FST FOCUS ST COLD AIR INTAKE KIT INSTALLATION INSTRUCTIONS
 M-9603-FST Please visit www.fordracingparts.com for the most current instruction information.!!! PLEASE READ ALL OF THE FOLLOWING INSTRUCTIONS CAREFULLY PRIOR TO INSTALLATION. AT ANY TIME YOU DO NOT UNDERSTAND
5102 JK Hood Louver Panel
 SYNERGY MFG. 870 INDUSTRIAL WAY, SAN LUIS OBISPO, CA (805) 242-0397 5102 JK Hood Louver Panel GENERAL NOTES: These instructions are also available on our website; www.synergymfg.com. Check the website
Lexus NX Fine Mesh and Dynamic Radar Cruise Control Fine Mesh Grilles
 IMPORTANT: PLEASE KEEP THIS INSTRUCTION MANUAL FOR FUTURE REFERENCE! 2015-16 Lexus NX Fine Mesh and Dynamic Radar Cruise Control Fine Mesh Grilles Upper Insert - factory chrome surround and emblem reused
ROUSH Convertible Stylebar Installation Instructions P/N: (1315-STYLEBAR) Convertible Only
 Convertible Only") Installation Instructions P/N: 421911 (1315-STYLEBAR) Convertible Only 39555 Schoolcraft Rd, Plymouth MI, 48170 800.59.ROUSH Installation Instructions P/N: 421911 (1315-STYLEBAR) Convertible Only Application:
Installation Instructions P/N: 421911 (1315-STYLEBAR) Convertible Only 39555 Schoolcraft Rd, Plymouth MI, 48170 800.59.ROUSH Installation Instructions P/N: 421911 (1315-STYLEBAR) Convertible Only Application:
2011 Cadillac CTS Coupe EGX Exhaust Tip & Rear Valance Mesh Accent Kit Part #: Complete E
 BILLET GRILLS IMPORTANT: PLEASE KEEP THIS INSTRUCTION MANUAL FOR FUTURE REFERENCE! 2011 Cadillac CTS Coupe EGX Exhaust Tip & Rear Valance Mesh Accent Kit Part #: Complete 5122-1900-11E TOOLS REQUIRED Automotive
INSTALLATION INSTRUCTIONS
 INSTALLATION INSTRUCTIONS Accessory Application Publications No. All 28593 2006 RIDGELINE P/N 08F23-SJC-100 Issue Date FEB 2005 PARTS LIST Center front bumper trim (Not used if the vehicle is equipped
SAFETY THIS PRODUCT IS FOR OFFROAD USE ONLY. ALL LIABILITY FOR INSTALLATION AND USE RESTS WITH THE OWNER.
 SAFETY Your safety and the safety of others is very important. In order to help you make informed decisions about safety, we have provided installation instructions and other information. These instructions
Front aero bumper Lower grille Right air spoiler. Left air spoiler Bolts (15) Self-tapping screws (8)
 Self-tapping screws (8)") INSTALLATION INSTRUCTIONS Parts List AERO ACCORD FEB. 2008 Front aero bumper Lower grille Right air spoiler Left air spoiler Bolts (15) Self-tapping screws (8) Nuts (10) Tools and Supplies Required Phillips
INSTALLATION INSTRUCTIONS Parts List AERO ACCORD FEB. 2008 Front aero bumper Lower grille Right air spoiler Left air spoiler Bolts (15) Self-tapping screws (8) Nuts (10) Tools and Supplies Required Phillips
SAFETY. Read and understand all safety precautions and instructions before installing this product.
 SAFETY Installation Instructions Application: 2015+ FORD F150 Your safety and the safety of others is very important. In order to help you make informed decisions about safety, we have provided installation
Rev TOOLS & MATERIALS REQUIRED QTY 3D PART NO. DESCRIPTION
 Rev. 04-10 QTY 3D PART NO. DESCRIPTION 1 691609 FRONT BUMPER REPLACEMENT 1 691610 RIGHT SIDE SKIRT 1 691611 LEFT SIDE SKIRT 1 691612 REAR LOWER SKIRT 4 3M 94 3M ADHESION PROMOTER 16 #8 X ¾ SELF DRILLING
INSTALLATION INSTRUCTIONS For 65800, 65801, 66355, 69250, Rear Bumper And Tire Carrier For Jeep XJ Cherokee
 INSTALLATION INSTRUCTIONS For 65800, 65801, 66355, 69250, 69251 Rear Bumper And Tire Carrier For Jeep XJ Cherokee Your safety, and the safety of others, is very important. To help you make informed decisions
INSTALLATION INSTRUCTIONS
 INSTALLATION INSTRUCTIONS Accessory ENGINE BLOCK P/N 08T44-SWA-1A0 Application 2012 CIVIC 4-DOOR Si Publications No. AII 45627 Issue Date APRIL 2011 PARTS LIST Engine block heater Aluminum washer Heater
Preparation Part Number: PT Kit Contents Item # Quantity Reqd. Description 1 1 Rear Spoiler 2 1 Hardware Kit. Hardware Bag Contents
 Preparation Part Number: PT478-11170-09 Kit Contents 1 1 Rear Spoiler 2 1 Hardware Kit Hardware Bag Contents 1 4 M5 Nut 2 4 Clip 3 4 Hole Plug Additional Items Required For Installation 1 1 Outer Drill
SAFETY. Read and understand all safety precautions and instructions before installing this product.
 SAFETY Your safety and the safety of others is very important. In order to help you make informed decisions about safety, we have provided installation instructions and other information. These instructions
LGT-312L E-Z-Go TXT Light Bar Bumper Kit Installation Instructions
 LGT-312L E-Z-Go TXT 2014+ Light Bar Bumper Kit Installation Instructions Caution: Please read through the instructions carefully. Before starting this project, remove the system s positive and negative
INSTALLATION INSTRUCTIONS
 INSTALLATION INSTRUCTIONS Accessory Application Publications No. SPOILER (LOW) 2005 ACCORD 4-DOOR AII 27503 Issue Date AUG 2004 PARTS LIST Trunk spoiler Right trunk spring (marked green) Left trunk spring
Lexus ES Fine Mesh and Adaptive Cruise Control Fine Mesh Grilles Upper and Lower Replacements
 IMPORTANT: PLEASE KEEP THIS INSTRUCTION MANUAL FOR FUTURE REFERENCE! 2013-15 Lexus ES Fine Mesh and Adaptive Cruise Control Fine Mesh Grilles Upper and Lower Replacements Part #1372-0102-13 / Black Ice
INSTALLATION INSTRUCTIONS SEMI Hidden Kit Part Number: Application: 2017 Toyota 4Runner
 INSTALLATION INSTRUCTIONS SEMI Hidden Kit Part Number: 100022 Application: 2017 Toyota 4Runner GENERAL SAFETY PRECAUTIONS Your safety, and the safety of others, is very important. To help you make informed
TOYOTA HIGHLANDER RUNNING BOARD HIGHLANDER HV Preparation
 Preparation Part Number: PT738-48080 Kit Contents Item # Quantity Reqd. Description 1 1 Driver Side Running Board 2 1 Passenger Side Running Board 3 4 /Middle Mount Bracket 4 2 Rear Mount Bracket 5 2 Rear
SAFETY THIS PRODUCT IS FOR OFFROAD USE ONLY. ALL LIABILITY FOR INSTALLATION AND USE RESTS WITH THE OWNER.
 SAFETY Your safety and the safety of others is very important. In order to help you make informed decisions about safety, we have provided installation instructions and other information. These instructions
INSTALLATION INSTRUCTIONS SEMI Hidden Kit Part Number: Application: Toyota Tacoma
 INSTALLATION INSTRUCTIONS SEMI Hidden Kit Part Number: 100044 Application: 2016+ Toyota Tacoma GENERAL SAFETY PRECAUTIONS Your safety, and the safety of others, is very important. To help you make informed
INSTALLATION INSTRUCTIONS
 INSTALLATION INSTRUCTIONS Accessory P/N 08L92-TX4-200 Application 2013 RDX Publications No. BII 13467 Issue Date MAR 2012 PARTS LIST 4 Nuts, Trailer hitch 10 Plain washers, Ball mount 6 Spring washers,
Mustang Hood Scoop
 Installation Instructions P/N: 421858 421859 421860 421861 421862 421863 421864 421865 421866 421867 421868 422055 422056 422057 39555 Schoolcraft Rd, Plymouth MI, 48170 800.59.ROUSH 2015-2017 Mustang
INSTALLATION INSTRUCTIONS
 INSTALLATION INSTRUCTIONS Accessory Application Publications No. Bll 30250 UNDER SPOILER 2006 RSX Issue Date JULY 2005 PARTS LIST Rear under spoiler 5 Stepped bolts 2 Bolts 7 Flange nuts, 6 mm 3 Square
 INSTALLATION INSTRUCTIONS Accessory Application Publications No. AII 33173 UNDER 2007 ODYSSEY Issue Date JULY 2006 PART LIST Front under spoiler 5 Stepped bolts TOOLS AND SUPPLIES REQUIRED Phillips screwdriver
FRONT FENDERS WITH FACTORY INNER FENDERS JEEP WRANGLER TJ/LJ/YJ/CJ7 INSTALLATION INSTRUCTIONS
 FRONT FENDERS WITH FACTORY INNER FENDERS JEEP WRANGLER TJ/LJ/YJ/CJ7 INSTALLATION INSTRUCTIONS TOOLS NEEDED 13mm socket 5/32 Allen head 5/16 wrench or socket 7/16 wrench or socket 7/32 Allen head 5/8 wrench
JEEP JK WRANGLER UNLIMITED 4-DOOR Pro-Series Front Replacement Fenders
 PSFF001 2007-2016 JEEP JK WRANGLER UNLIMITED 4-DOOR Pro-Series Front Replacement Fenders HARDWARE INCLUDED 4 6mm x 25mm Hex Bolts 16 10mm x 20mm Button Head Bolts 8 6mm x 12mm x 1.6mm Flat Washers 16 10mm
Adjustable Light Kits E-Z-Go TXT All Models Installation Instructions
 Adjustable Light Kits E-Z-Go TXT All Models 1996-2013 Installation Instructions Caution: Please read through the instructions carefully. Before starting this project, remove the system s positive and negative
2015+ Mustang Rear Valance Installation Instructions P/N: (R F953) (R F953BS)
 (R F953BS)") 2015+ Mustang Rear Valance Installation Instructions P/N: 421894 (R1315-17F953) 421919 (R1315-17F953BS) 39555 Schoolcraft Rd, Plymouth MI, 48170 800.59.ROUSH 2015+ Mustang Rear Valance Kit Installation
2015+ Mustang Rear Valance Installation Instructions P/N: 421894 (R1315-17F953) 421919 (R1315-17F953BS) 39555 Schoolcraft Rd, Plymouth MI, 48170 800.59.ROUSH 2015+ Mustang Rear Valance Kit Installation
IMPORTANT: PLEASE KEEP THIS INSTRUCTION MANUAL FOR FUTURE REFERENCE! 2015 Nissan Murano. Upper and Lower Overlay Mesh Grilles
 IMPORTANT: PLEASE KEEP THIS INSTRUCTION MANUAL FOR FUTURE REFERENCE! 2015 Nissan Murano Upper and Lower Overlay Mesh Grilles Upper Chrome Mesh Part #1318-010U-15 / Lower Chrome Mesh Part #1318-010L-15
 INSTALLATION INSTRUCTIONS Accessory Application Publications No. 2009 CIVIC HYBRID All 40191 Issue Date AUG 2008 PARTS LIST Rear under spoiler 2 Step bolts 4 Self-tapping screws TOOLS REQUIRED Phillips
SAFETY THIS PRODUCT IS FOR OFFROAD USE ONLY. ALL LIABILITY FOR INSTALLATION AND USE RESTS WITH THE OWNER.
 SAFETY Your safety and the safety of others is very important. In order to help you make informed decisions about safety, we have provided installation instructions and other information. These instructions
INSTALLATION INSTRUCTIONS
 INSTALLATION INSTRUCTIONS Accessory Application Publications No. SPOILER (DECK LID) ACCORD 4-DOOR AII 24063 Issue Date AUG 2002 PARTS LIST Trunk spoiler Right trunk spring (marked green) Left trunk spring
2018+ Mustang Hood Heat Extractors Installation Instructions P/N: (R C920)
") 2018+ Mustang Hood Heat Extractors Installation Instructions P/N: 422083 (R1318-16C920) 39555 Schoolcraft Rd, Plymouth MI, 48170 800.59.ROUSH 2018+ Mustang Hood Heat Extractors Installation Instructions
2018+ Mustang Hood Heat Extractors Installation Instructions P/N: 422083 (R1318-16C920) 39555 Schoolcraft Rd, Plymouth MI, 48170 800.59.ROUSH 2018+ Mustang Hood Heat Extractors Installation Instructions
INSTALLATION INSTRUCTIONS HD BUMPER AND WINCH MOUNTING KIT Part Number: 74777, Application: 08-NEWER FORD SUPER DUTY WARNING
 INSTALLATION INSTRUCTIONS HD BUMPER AND WINCH MOUNTING KIT Part Number: 74777, 76250 Application: 08-NEWER FORD SUPER DUTY Your safety, and the safety of others, is very important. To help you make informed
INSTALLATION INSTRUCTIONS WINCH MOUNTING KIT Part Number: Application: Honda Rubicon/Foreman 500
 INSTALLATION INSTRUCTIONS WINCH MOUNTING KIT Part Number: 70830 Application: Honda Rubicon/Foreman 500 Your safety, and the safety of others, is very important. To help you make informed decisions about
INSTALLATION INSTRUCTIONS WINCH MOUNTING KIT Part Number: Application: Honda Rancher TRX420
 INSTALLATION INSTRUCTIONS WINCH MOUNTING KIT Part Number: 75660 Application: Honda Rancher TRX420 Your safety, and the safety of others, is very important. To help you make informed decisions about safety,
GENUINE PARTS INSTALLATION INSTRUCTIONS
 GENUINE PARTS INSTALLATION INSTRUCTIONS DESCRIPTION: APPLICATION: PART NUMBER: KIT-CARBON FIBER REAR SPOILER INFINITI Q50 T99J1 J5000 KIT CONTENTS: Item A B C D Qty. 1 4 1 1 Part Description Spoiler Assembly
SAFETY THIS PRODUCT IS FOR OFFROAD USE ONLY. ALL LIABILITY FOR INSTALLATION AND USE RESTS WITH THE OWNER.
 SAFETY Your safety and the safety of others is very important. In order to help you make informed decisions about safety, we have provided installation instructions and other information. These instructions
JK BFH II Front Bumpers
 INSTALLATION INSTRUCTIONS INST-17-16-021_A JK BFH II Front Bumpers IMPORTANT: Thank you for purchasing this Poison Spyder product. Please read through this entire document before proceeding with installation.
Installation of Barricade Flat Style Fender Flare Kit (97-06 Wrangler TJ)
") Installation of Barricade Flat Style Fender Flare Kit (97-06 Wrangler TJ) Installation Time: 3-4 Hours Tools Required: 8mm wrench 8mm socket drive #1 Phillips screw driver Pliers Pry bar Electric drill
Installation of Barricade Flat Style Fender Flare Kit (97-06 Wrangler TJ) Installation Time: 3-4 Hours Tools Required: 8mm wrench 8mm socket drive #1 Phillips screw driver Pliers Pry bar Electric drill
INSTALLATION INSTRUCTIONS
 INSTALLATION INSTRUCTIONS Accessory (WITH TEMPLATE) Application 2010 TL Publications No. BII 42533-44799 Issue Date AUG 2010 PARTS LIST Right rear under spoiler 4 Self-tapping screws 10 Seals Left rear
Product Drive Cameron Park, CA PH: PRO LAUNCH INSTALLATION INSTRUCTIONS
 12-228 4130 Product Drive Cameron Park, CA 95682 PH: 1.530.642.9488 VIEW INSTALLATION VIDEO AT www.worksconnection.com/prolaunch/ 12-228 PRO LAUNCH INSTALLATION INSTRUCTIONS We at Works Connection Inc.
PRO LAUNCH INSTALLATION INSTRUCTIONS
 12-339 4130 PRODUCT DRIVE, CAMERON PARK, CA 95682 PH: 1.530.642.9488 VIEW INSTALLATION VIDEO AT www.worksconnection.com/prolaunch/ 12-339 PRO LAUNCH INSTALLATION INSTRUCTIONS We at Works Connection Inc.
CAUTION. INSTALLATION INSTRUCTIONS Part Number Hidden Winch Kit with special XD 9000 Short Drum Winch For Ford F-150 Truck
 INSTALLATION INSTRUCTIONS Part Number 69110 Hidden Winch Kit with special XD 9000 Short Drum Winch For Ford F-150 Truck As you read these instructions, you will see NOTES, CAUTIONS and WARNINGS. Each message
INSTALLATION INSTRUCTIONS
 INSTALLATION INSTRUCTIONS Accessory Application Publications No. SPOILER (LOW) 2011 CIVIC 4-DOOR All 44416 Issue Date AUG 2010 PARTS LIST Trunk spoiler Right trunk spring (marked red) Left trunk spring
INSTALLATION INSTRUCTIONS
 INSTALLATION INSTRUCTIONS Accessory Application Publications No. AII 25876 2004 PILOT (LX only) Issue Date AUG 2003 The subwoofer cannot be installed on a vehicle equipped with a navigation unit. Subwoofer
Mustang V6 Shaker 99-04* Components Check List:
 Mustang V6 Shaker 99-04* Components Check List: *03 Model requires new hood CDC Inspected Installer Check Quantity Descriptions 1- Hood Appliqué 1- Aluminum Shaker Scoop 1- Lower Air Box w/drain tube fittings
INSTALLATION INSTRUCTIONS
 INSTALLATION INSTRUCTIONS Accessory Application Publications No. S 1998 CIVIC 2/3/4-DOOR All 18767 Issue Date SEP 1997 PARTS LIST Fog Light Kit: P/N 08V31-S01-100 Right fog light (marked R ) Fuse label
2018+ Mustang Lower Grill and Chin Spoiler Kits Installation Instructions P/N: (R K945) P/N: (R F775)
 P/N: (R F775)") 2018+ Mustang Lower Grill and Chin Spoiler Kits Installation Instructions P/N: 422081 (R1318-17K945) P/N: 422082 (R1318-17F775) 39555 Schoolcraft Rd, Plymouth MI, 48170 800.59.ROUSH 2018+ Mustang Lower
2018+ Mustang Lower Grill and Chin Spoiler Kits Installation Instructions P/N: 422081 (R1318-17K945) P/N: 422082 (R1318-17F775) 39555 Schoolcraft Rd, Plymouth MI, 48170 800.59.ROUSH 2018+ Mustang Lower
SAFETY THIS PRODUCT IS FOR OFFROAD USE ONLY. ALL LIABILITY FOR INSTALLATION AND USE RESTS WITH THE OWNER.
 SAFETY Your safety and the safety of others is very important. In order to help you make informed decisions about safety, we have provided installation instructions and other information. These instructions
INSTALLATION INSTRUCTIONS
 INSTALLATION INSTRUCTIONS Accessory P/N 08F02-T0A-100 Application 2015 CR-V Publications No. VERSION 1 Issue Date SEP 2014 PARTS LIST 3 Adhesive sealing washers Tailgate spoiler 2 Hook and loop fasteners
SAFETY SENSORS FIELD OF VIEW WILL BE ALTERED WITH USE OF THE REPLACEMENT BUMPER. Injury hazard
 SAFETY Your safety and the safety of others is very important. In order to help you make informed decisions about safety, we have provided installation instructions and other information. These instructions
SAFETY THIS PRODUCT IS FOR OFFROAD USE ONLY. ALL LIABILITY FOR INSTALLATION AND USE RESTS WITH THE OWNER.
 SAFETY Your safety and the safety of others is very important. In order to help you make informed decisions about safety, we have provided installation instructions and other information. These instructions
Performance Oil Cooler Kit for (C6) Chevrolet Corvette
 Chevrolet Corvette") Performance Oil Cooler Kit for 2005-2013 (C6) Chevrolet Corvette Part No. EC6-600 Made in USA Important: Read these instructions in their entirety prior to installation. Copyright 2008-2018 Improved Racing
Performance Oil Cooler Kit for 2005-2013 (C6) Chevrolet Corvette Part No. EC6-600 Made in USA Important: Read these instructions in their entirety prior to installation. Copyright 2008-2018 Improved Racing
Installation Instructions
 Parts Installation Instructions DESCRIPTION PART # QTY A Alignment Tab PN ESB101 1 B Drill Guide PN ESB102 1 C Actuator Cable Assembly PN ESB103 1 C1 72 Actuator Cable 1 C2 5/16 Jam Nut 1 C3 Star Washer
Subaru Front Mount Intercooler Kit STI Subaru Front Mount Intercooler Kit STI
 Subaru Front Mount Intercooler Kit STI 2008-2014 715500 Subaru Front Mount Intercooler Kit STI 2008-2014 Congratulations on your purchase of the Subaru Front Mount Intercooler Kit STI 2008-2014. The following
INSTALLATION INSTRUCTIONS
 INSTALLATION INSTRUCTIONS Accessory S P/N 08V67-SJC-101 Application 2012 RIDGELINE Publications No. AII 12006 Issue Date NOV 2011 PARTS LIST Back-up sensor harness 3 Wire ties with small clips (2 Not used)
SAFETY THIS PRODUCT IS FOR OFFROAD USE ONLY. ALL LIABILITY FOR INSTALLATION AND USE RESTS WITH THE OWNER.
 Installation Instructions SAFETY Your safety and the safety of others is very important. In order to help you make informed decisions about safety, we have provided installation instructions and other
INSTALLATION INSTRUCTIONS
 INSTALLATION INSTRUCTIONS Accessory Application Publications No. SPOILER (LOW) CIVIC 4-DOOR All 30833 Issue Date SEP 2005 PARTS LIST Trunk spoiler Right trunk spring (marked red) Left trunk spring (marked
INSTALLATION INSTRUCTIONS
 INSTALLATION INSTRUCTIONS Accessory S P/N 08V67-SJC-101 Application 2010 RIDGELINE Publications No. AII 42117 Issue Date AUG 2009 PARTS LIST Back-up sensor harness 3 Wire ties with small clip (2 Not used)
INSTALLATION INSTRUCTIONS
 INSTALLATION INSTRUCTIONS Accessory Application Publications No. AII 44415 2011 CIVIC 4-DOOR Issue Date AUG 2010 PARTS LIST Trunk spoiler 2 Cap nuts 2 Screws Left trunk spring (marked yellow) Right trunk
SAFETY THIS PRODUCT IS FOR OFFROAD USE ONLY. ALL LIABILITY FOR INSTALLATION AND USE RESTS WITH THE OWNER.
 SAFETY Your safety and the safety of others is very important. In order to help you make informed decisions about safety, we have provided installation instructions and other information. These instructions
INSTALLATION INSTRUCTIONS BUMPER WINCH MOUNTING KIT Part Number: Application: Polaris Ranger 400, 500, 800 HO 2012+
 INSTALLATION INSTRUCTIONS BUMPER WINCH MOUNTING KIT Part Number: 90794 Application: Polaris Ranger 400, 500, 800 HO 2012+ GENERAL SAFETY PRECAUTIONS Your safety, and the safety of others, is very important.
GMC Yukon
 Torch Series LED Grille TOOLS REQUIRED: Flat Head Screwdriver Long Flat Head Screwdriver Phillips Screwdriver 7mm Socket 10mm Socket Ratchet & Extensions 3/16 Drill Bit Power Drill Cutting Wheel or Saw
SAFETY SENSORS FIELD OF VIEW WILL BE ALTERED WITH USE OF THE REPLACEMENT BUMPER. Injury hazard
 SAFETY Your safety and the safety of others is very important. In order to help you make informed decisions about safety, we have provided installation instructions and other information. These instructions
Lower Radiator Grill Debris Shield
 P/N S297-200-GT & 200-CS 2010-12 Lower Radiator Grill Debris Shield Thank you for your purchase of SilverHorse Racing products. Please read all directions before beginning the installation. A factory shop
2015+ Mustang S550 AlumaLift System Installation instructions for FR3Z-16796/7-BL
 2015+ ustang S550 Alumaift System nstallation instructions for FR3Z-16796/7-B Thank you for choosing this Drake uscle Cars product for your vehicle. Please read these instructions carefully. ake sure you
INSTALLATION INSTRUCTIONS
 INSTALLATION INSTRUCTIONS Accessory Application Publication No. SADDLEBAG SUPPORT BRACKETS P/N 08L73-MGS-A30 2012 Only NC700X/XD Honda Dealer: Please give a copy of these instructions to your customer.
INSTALLATION INSTRUCTIONS SKID PLATE FRONT MOUNTING KIT Part Number: Application: Polaris Ranger 400, 500, 800 HO
 INSTALLATION INSTRUCTIONS SKID PLATE FRONT MOUNTING KIT Part Number: 90812 Application: 2012+ Polaris Ranger 400, 500, 800 HO GENERAL SAFETY PRECAUTIONS Your safety, and the safety of others, is very important.
POLY TIP-DOWN WINDSHIELD KIT
 POLY TIP-DOWN WINDSHIELD KIT P/N 2881919 APPLICATION Verify accessory fitment at Polaris.com. BEFORE YOU BEGIN Read these instructions and check to be sure all parts and tools are accounted for. Please
SAFETY THIS PRODUCT IS FOR OFFROAD USE ONLY. ALL LIABILITY FOR INSTALLATION AND USE RESTS WITH THE OWNER.
 SAFETY Your safety and the safety of others is very important. In order to help you make informed decisions about safety, we have provided installation instructions and other information. These instructions
SAFETY. Your safety and the safety of others is very important.
 SAFETY Your safety and the safety of others is very important. In order to help you make informed decisions about safety, we have provided installation instructions and other information. These instructions
SAFETY THIS PRODUCT IS FOR OFFROAD USE ONLY. ALL LIABILITY FOR INSTALLATION AND USE RESTS WITH THE OWNER.
 SAFETY Your safety and the safety of others is very important. In order to help you make informed decisions about safety, we have provided installation instructions and other information. These instructions
TOYOTA RAV4/HV INTERIOR LIGHT KIT Preparation
 Preparation Part Number: PT413-42130 Kit Contents Item # Quantity Reqd. Description 1 1 Wire Harness 2 3 Hardware Bag Contents Item # Quantity Reqd. Description 1 20 Cable Tie 2 2 Scotchlok 3 2 Foam Pad
INSTALLATION INSTRUCTIONS
 INSTALLATION INSTRUCTIONS Part# 22-7810 Add On Kit for Your ADS System Contents: Complete Install Kit for Your ARB CKMTA12V Compressor For the most up-to-date instructions please visit www.updownair.com
SAFETY. Read and understand all safety precautions and instructions before installing this product.
 SAFETY Your safety and the safety of others is very important. In order to help you make informed decisions about safety, we have provided installation instructions and other information. These instructions
WARNING. BX Saturn Vue and Redline Chevy Captiva (All Models) Installation Instructions
 Installation Instructions") Attachment Tab Height: 21-1/2 Attachment Tab Width: 18-1/2 Please read BOTH these and the General Information sheet prior to installing or operating this equipment. 1. Blue Ox towing products and accessories
Attachment Tab Height: 21-1/2 Attachment Tab Width: 18-1/2 Please read BOTH these and the General Information sheet prior to installing or operating this equipment. 1. Blue Ox towing products and accessories
31065 INSTALLATION INSTRUCTIONS
 106 INSTALLATION INSTRUCTIONS Safety glasses should be worn at all times while installing this product. YEARS: 010-PRESENT MAKE: DODGE MODEL: RAM 00 STYLE: PICKUP WARNING: NEVER EXCEED YOUR VEHICLE MANUFACTURER'S