2018+ Mustang Lower Grill and Chin Spoiler Kits Installation Instructions P/N: (R K945) P/N: (R F775)
|
|
|
- Claribel Garrison
- 5 years ago
- Views:
Transcription


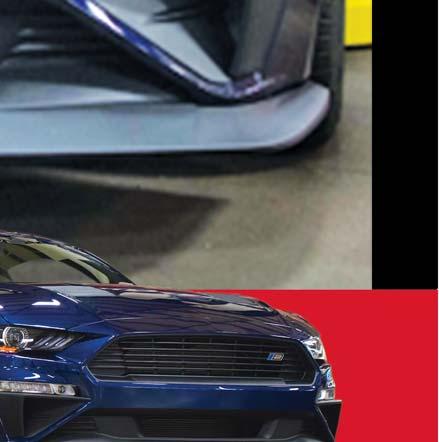

1 2018+ Mustang Lower Grill and Chin Spoiler Kits Installation Instructions P/N: (R K945) P/N: (R F775) Schoolcraft Rd, Plymouth MI, ROUSH
 and Chin Spoiler Kit (422082) must be used in conjunction with each other.")
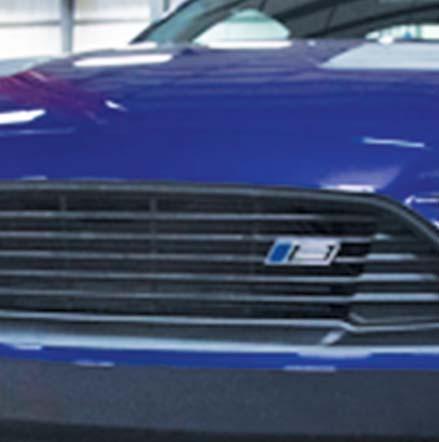
2 2018+ Mustang Lower Grill Kit P/N: (R K945) Mustang Chin Spoiler Kit P/N: (R F775) Installation Instructions Application: 2018 Ford Mustang 5.0L and 2.3L with Automatic/Manual Transmission Note: 2018 Mustang Lower Grill Kit (422081) and Chin Spoiler Kit (422082) must be used in conjunction with each other. Important Note: Before installing the ROUSH Performance Product, please read through the installation procedure and verify that all items are present. If you are missing hardware or have any questions, please contact ROUSH Performance at ROUSH, 9:00 AM to 5:00 PM EST. R K945IM-AA ROUSH
3 TABLE OF CONTENTS Packing List for Mustang Lower Grill Kit...3 Packing List for Mustang Chin Spoiler Kit...3 Equipment and Supplies Required...4 Limit of Liability Statement...4 Safety Precautions...4 Work Safely! Front Fascia Removal...5 ROUSH Performance Lower Grill and Chin Spoiler Installation...9 R K945IM-AA ROUSH
4 PACKING LIST FOR MUSTANG LOWER GRILL KIT Description Part Number Quantity Lower Grill Kit (422081) R K945 Lower Grill K945 1 Two-Sided Tape mm x 204 mm TAPE x204 5 Front End Black Out Graphic F744 1 Website Instruction Sheet 1315-P1INST 1 Sticker - White ROUSH (7" Long x 1.25" Tall) ROUSH-STKR-7x PACKING LIST FOR MUSTANG CHIN SPOILER KIT Description Part Number Quantity Chin Spoiler Kit (422082) R F775 Front Chin Spoiler F775 1 Front LH - Wheel Canard Front RH - Wheel Canard Foam Insert - Chin Spoiler LH Outboard U551 1 Foam Insert - Chin Spoiler LH Inboard U552 1 Foam Insert - Chin Spoiler Center U553 1 Foam Insert - Chin Spoiler RH Inboard U554 1 Foam Insert - Chin Spoiler RH Outboard U555 1 Spanner Bar K241 1 Brkt - Spoiler Support LH F770 1 Brkt - Spoiler Support RH F771 1 Brace - Spoiler Support F774 2 M4.2x1.41 J-Clip W Bolt - M4.2x1.41x19 W Bolt - M6x1.0x24 N J-Clip - M6x1.0 N Bolt - M6x1.0x16 W Bolt - M8x1.25x Bolt - M5x0.8x10 Hex Flange M4.2x16 Self Tapping Screw Brkt - Canard Upr Mnt Template - Spoiler Mntg Holes F775TMPL 1 Template - Air Dam Clearance Hole LH F774TMPLRH 1 Template - Air Dam Clearance Hole RH F774TMPLLH 1 Sticker - White ROUSH (7" Long x 1.25" Tall) ROUSH-STKR-7x Website Instruction Sheet 1315-P1INST 1 R K945IM-AA ROUSH
5 EQUIPMENT AND SUPPLIES REQUIRED 7 mm Socket 8 mm Socket 10 mm Socket 13 mm Socket Plastic Flat-Edge Squeegee Plastic Pry Tool 1-1/8" Hole Saw 1/4" Drill Bit Drill Punch Trim Removal Tool Blue Painter s Tape Spray Bottle with Soapy Water Isopropyl Alcohol If you are missing any items, please call us toll free at ROUSH. LIMIT OF LIABILITY STATEMENT The information contained in this publication was accurate and in effect at the time the publication was approved for printing and is subject to change without notice or liability. ROUSH Performance Products (RPP) reserves the right to revise the information presented herein or to discontinue the production of parts described at any time. SAFETY PRECAUTIONS STOP STOP CAREFULLY READ THE IMPORTANT SAFETY PRECAUTIONS and WARNINGS BEFORE PROCEEDING WITH THE INSTALLATION! Appropriate disassembly, assembly methods and procedures are essential to ensure the personal safety of the individual performing the kit installation. Improper installation due to the failure to correctly follow these instructions could cause personal injury or death. Read each step of the installation manual carefully before starting the installation. Always wear safety glasses for eye protection. Place ignition switch in the OFF position. Always apply the parking brake when working on a vehicle. Block the front and rear tire surface to prevent unexpected vehicle movement. If working with a lift, always consult vehicle manual for correct lifting specifications. Operate the engine only in well-ventilated areas to avoid exposure to carbon monoxide. Do not smoke or use flammable items near or around the fuel system. Use chemicals and cleaners in well-ventilated areas. Batteries produce explosive gases, which can cause personal injury. Therefore, do not allow flames, sparks or flammable substances to come near the battery. Keeps hands and any other objects away from the radiator fan blades. Keep yourself and your clothing away from moving parts when the engine is running. Do not wear loose clothing or jewelry that can get caught in rotating parts or scratch surface finishes. Allow the engine, cooling system, brakes and exhaust to cool before working on a vehicle. WORK SAFELY! Perform this installation on a good clean level surface for maximum safety and with the engine turned off. R K945IM-AA ROUSH
 and Chin Spoiler (422082). 1.")
 push pins from the fender liner on both sides of the vehicle using a trim removal tool")
 push pins and remove the fender liner as shown. Repeat on the other side of the vehicle.")

6 2018+ FRONT FASCIA REMOVAL The following section will guide you through the installation of the ROUSH Lower Grill (422081) and Chin Spoiler (422082). 1. Suspend the front of the vehicle on jack stands and remove the front wheels. 2. Remove the two (2) push pins from the fender liner on both sides of the vehicle using a trim removal tool or a pry tool as shown. Repeat on the other side of the vehicle. 3. Remove the five (5) push pins and remove the fender liner as shown. Repeat on the other side of the vehicle. 4. Remove the two (2) 8 mm screws from the stone deflector (non-performance package) located on the undertray just in front of each tire. NOTE: Stone deflector is not shown but fastener locations are indicated. Repeat on the other side of the vehicle. NOTE: Performance packageequipped vehicle shown. R K945IM-AA ROUSH
![5. Remove the seventeen (17) (nineteen [19] for the performance](/docs-images/81/83196978/images/7-0.jpg "package) 8 mm screws from the undertray.")


7 5. Remove the seventeen (17) (nineteen [19] for the performance package) 8 mm screws from the undertray. Remove the two (2) push pins and remove the undertray from the vehicle. NOTE: Performance package-equipped vehicle shown. 7. Remove the two (2) nuts and one (1) push pin holding the fascia to the fender. Push down on the Christmas tree retaining the bracket to the fender. Repeat on the other side of the vehicle. 6. Disconnect the fog lamp connector. Repeat on the other side of the vehicle. R K945IM-AA ROUSH
![10. Remove the six (6) (three [3] for each light) 7 mm](/docs-images/81/83196978/images/8-0.jpg "screws from the back of the fascia holding the fog")


8 10. Remove the six (6) (three [3] for each light) 7 mm screws from the back of the fascia holding the fog lights. Repeat on the other side of the vehicle. 11. Remove the fascia energy absorber structure by prying back the six (6) tabs with a pry tool or trim removal tool. 8. Open the hood and remove the eight (8) push pins securing the upper radiator shroud. Remove the upper radiator shroud and set aside for re-use. 9. Remove the two (2) 7 mm screws and six (6) 8 mm screws from the upper lip of the fascia. Lift the fascia off the alignment pins and forward off of the vehicle (this step may require the assistance from another person). R K945IM-AA ROUSH

 7 mm screws retaining the OEM chin spoiler")
 push pins restraining the end of the OEM chin")
9 12. Remove the OEM lower grill by prying back on twenty-two (22) tabs with a pry tool and pulling up on the OEM grill. NOTE: Be careful not to damage the tabs on the fascia. 14. Remove the eight (8) 7 mm screws retaining the OEM chin spoiler to the fascia. 13. Remove the six (6) push pins restraining the end of the OEM chin spoiler to the fascia. R K945IM-AA ROUSH
 and the lower lip of")
 strips of double-sided tape (PN: TAPE-5390-25X204) with the red")


10 ROUSH Performance Lower Grill and Chin Spoiler Installation 1. Clean the bottom of the ROUSH lower grill (PN: K945) and the lower lip of the fascia with isopropyl alcohol. Place five (5) strips of double-sided tape (PN: TAPE X204) with the red backing facing out across the lower edge of the lower grill, 5 mm off of the edge. 2. Bend the extra tape backing forward beyond the front of the grill. Insert the lower grill into the fascia through the mouth on the front and tilt into position. Snap the grill into the OEM fascia utilizing eight (8) of the OEM retention tabs. 3. Pull the red backing off of the tape on the lower grill and squeeze the lower grill and lower lip of fascia together to wet out the tape. This ensures the tape adheres properly to both parts. R K945IM-AA ROUSH
 into the backside of the spoiler, aligning them with their")
 clips install into the dog house holes and six (6) clips install into the")
, check scale with a metric ruler and")

11 5. Insert the fourteen (14) M4.2 J-clips (PN: W704823) into the backside of the spoiler, aligning them with their respective holes. Eight (8) clips install into the dog house holes and six (6) clips install into the outboard holes. 4. Cut out the drill template (PN: F775TMPL), check scale with a metric ruler and tape to the underside of the chin spoiler as shown. Be sure to align the template on the UNDERSIDE of the spoiler (the ROUSH logo should be facing down). Align the inner edge of the template to the inner edge of the spoiler. Mark and drill the twelve (12) 1/4" holes in the bottom of the spoiler. Trim out the five (5) rectangular sections. R K945IM-AA ROUSH

 to 2 Nm.")


 M4.")
12 6. Insert the chin spoiler foam inserts (PN: U551, U552, U553, U554, U555) into the cavities in the spoiler. Start on the LH side, insert U551, then move across the chin spoiler, installing the foam inserts in numerical order. NOTE: Insert foam with the arrow on the back of the foam facing up. 8. Torque the M4.2 fasteners (both ROUSH-provided fasteners and factory-reinstalled fasteners) to 2 Nm. Torque the fasteners down evenly by first starting at the center and working your way out, alternating from one side to the other. 9. Reinstall the energy absorber structure and fog lights in reverse of Removal steps 10 and Print out the pencil brace templates (PN: F774TMPLRH and F774TMPLLH) from the back of this manual. IMPORTANT: Print templates to scale. Check scale by measuring reference line with a metric ruler. Tape templates to the lower grill air deflector as shown. 7. Install the chin spoiler onto the OEM fascia by hand-starting the fourteen (14) M4.2 fasteners (eight [8] takeoff fasteners in the center and six [6] [PN: W715060] fasteners at the ends). Note that the tabs on the ROUSH lower grill slide under the upper lip of the chin spoiler. Retain the spoiler by hand. Torque all fasteners to 5 Nm. R K945IM-AA ROUSH

 by hand starting four")


13 11. Drill a 1/4" pilot hole using the template as a guide. Then drill a 1-1/8" hole with a hole saw using the pilot hole as a guide. 13. Hang the spanner bar (PN: K241) by hand starting four (4) M6 bolts (PN: N807309) into the J-clips as shown. Torque to 10 Nm. 14. Remove only the lower 13 mm nut from the backside of the bumper beam. Slide the pencil brace (PN: F774) through the hole in the air deflector and onto the bumper beam bolt and reinstall the 13 mm nut. Repeat on the other side. Do not tighten at this time. NOTE: The circular end faces down. 12. Insert two (2) M6x1 J-clips (PN: N623332) into the OEM frame rails as shown. Repeat on the other frame rail. R K945IM-AA ROUSH

 M6 fastener through the pencil brace and into the spoiler bracket (PN:")
 by pushing the OEM fascia retainer into")

14 16. Hand-start one (1) M8 fastener (PN: ) going through the outer hole of the bracket into the spanner bar as shown. Repeat on the other side of the vehicle. Do not tighten at this time. 15. Hang the spoiler support bracket (PN: F770 for LH and F771 for RH) from the pencil braces by hand-starting one (1) M6 fastener through the pencil brace and into the spoiler bracket (PN: W500013). Repeat on the other side. Do not tighten at this time. 17. Mock install the outer spoiler canard bracket (PN: ) by pushing the OEM fascia retainer into the fender and placing the bracket onto the stud. Drill a 1/4" hole in the fender liner by visually lining the drill bit up with the canard bracket. Repeat on the other side of the vehicle. Do not tighten at this time. R K945IM-AA ROUSH

 on the fastener")


15 18. Reinstall the fascia in the reverse order starting with Removal step 11 and following it back to Removal step 8. Ensure the spoiler support brackets are resting above the tabs on the fascia. 19. Reinstall the OEM plastic fascia retainers with the two (2) fasteners and one (1) push pin. On the rear-most bolt of the plastic piece, install the canard bracket (PN: ) on the fastener on top of the fender sheet metal behind the wheel liner as shown. Reinstall the takeoff nuts. Repeat on the other side of the vehicle. 20. Reconnect the fog lights and torque the fasteners in Installation step 14 to 10 Nm. 21. Torque the fasteners in Installation step 15 to 10 Nm. 22. Torque the fasteners in Installation step 16 to 25 Nm. 23. Torque the fasteners in Installation step 17 to 10 Nm. R K945IM-AA ROUSH
![24. Reinstall the belly pan using the takeoff fasteners (with the exception of the two [2] fasteners](/docs-images/81/83196978/images/16-0.jpg "circled in red) and torque to 5 Nm.")

 M6 J-clips (PN: N623332) onto the inner fascia and belly pan as shown.")
 M4.")
16 24. Reinstall the belly pan using the takeoff fasteners (with the exception of the two [2] fasteners circled in red) and torque to 5 Nm. For these, hand-start two (2) M6 fasteners (PN: W500013), attaching the lower fascia to the chin spoiler support brackets. Torque these fasteners to 10 Nm. Repeat with the two (2) fasteners on the other side of the belly pan. 25. Clip two (2) M6 J-clips (PN: N623332) onto the inner fascia and belly pan as shown. Bolt on the canard using two (2) M6x16 (PN: W500013) fasteners and one (1) M5x10 (PN: ) fastener. 26. Install one (1) M4.2 self-taping screw (PN: 12741) through the bottom of the canard into the bottom of the chin spoiler. Torque to snug. Torque M6 fasteners in previous step to 10 Nm. Repeat on the other side of the vehicle. R K945IM-AA ROUSH
 found in the bottom of the box,")


17 27. Clean the front of the fascia with isopropyl alcohol. Wet the area with soapy water. Remove the backing from the front blackout graphic (PN: F744) found in the bottom of the box, and wet with soapy water. Apply to the front fascia, aligning the top edge of the graphic with the styling line on the fascia. 28. Reinstall the front fender liner push pins from Removal steps 2 and 3, less the three (3) push pins that were replaced by the M6 bolts for the canards. Congratulations! You have now completed the installation of your ROUSH Lower Grill and Chin Spoiler. R K945IM-AA ROUSH
18
2018+ Mustang Hood Heat Extractors Installation Instructions P/N: (R C920)
") 2018+ Mustang Hood Heat Extractors Installation Instructions P/N: 422083 (R1318-16C920) 39555 Schoolcraft Rd, Plymouth MI, 48170 800.59.ROUSH 2018+ Mustang Hood Heat Extractors Installation Instructions
2018+ Mustang Hood Heat Extractors Installation Instructions P/N: 422083 (R1318-16C920) 39555 Schoolcraft Rd, Plymouth MI, 48170 800.59.ROUSH 2018+ Mustang Hood Heat Extractors Installation Instructions
2015 Mustang Heat Extractors Installation Instructions P/N: (R C920)
") Installation Instructions P/N: 421869 (R1315-16C920) 39555 Schoolcraft Rd, Plymouth MI, 48170 800.59.ROUSH 2015 Mustang Heat Extractors Installation Instructions P/N: 421869 (R1315-16C920) Application:
Installation Instructions P/N: 421869 (R1315-16C920) 39555 Schoolcraft Rd, Plymouth MI, 48170 800.59.ROUSH 2015 Mustang Heat Extractors Installation Instructions P/N: 421869 (R1315-16C920) Application:
ROUSH Convertible Stylebar Installation Instructions P/N: (1315-STYLEBAR) Convertible Only
 Convertible Only") Installation Instructions P/N: 421911 (1315-STYLEBAR) Convertible Only 39555 Schoolcraft Rd, Plymouth MI, 48170 800.59.ROUSH Installation Instructions P/N: 421911 (1315-STYLEBAR) Convertible Only Application:
Installation Instructions P/N: 421911 (1315-STYLEBAR) Convertible Only 39555 Schoolcraft Rd, Plymouth MI, 48170 800.59.ROUSH Installation Instructions P/N: 421911 (1315-STYLEBAR) Convertible Only Application:
2015 Mustang Quarter Window Scoop Installation Instructions P/N: (R UA)
") 2015 Mustang Quarter Window Scoop Installation Instructions P/N: 421881 (R1315-011104UA) 39555 Schoolcraft Rd, Plymouth MI, 48170 800.59.ROUSH 2015 Mustang Quarter Window Scoop Installation Instructions
2015 Mustang Quarter Window Scoop Installation Instructions P/N: 421881 (R1315-011104UA) 39555 Schoolcraft Rd, Plymouth MI, 48170 800.59.ROUSH 2015 Mustang Quarter Window Scoop Installation Instructions
2015+ Mustang Trunk Toolkit Installation Instructions P/N: (R1315-TOOLKIT)
") Installation Instructions P/N: 421910 (R1315-TOOLKIT) 39555 Schoolcraft Rd, Plymouth MI, 48170 800.59.ROUSH 2015+ Mustang Trunk Toolkit Installation Instructions P/N: 421910 (R1315-TOOLKIT) Important Note:
Installation Instructions P/N: 421910 (R1315-TOOLKIT) 39555 Schoolcraft Rd, Plymouth MI, 48170 800.59.ROUSH 2015+ Mustang Trunk Toolkit Installation Instructions P/N: 421910 (R1315-TOOLKIT) Important Note:
2015+ Mustang Rear Valance Installation Instructions P/N: (R F953) (R F953BS)
 (R F953BS)") 2015+ Mustang Rear Valance Installation Instructions P/N: 421894 (R1315-17F953) 421919 (R1315-17F953BS) 39555 Schoolcraft Rd, Plymouth MI, 48170 800.59.ROUSH 2015+ Mustang Rear Valance Kit Installation
2015+ Mustang Rear Valance Installation Instructions P/N: 421894 (R1315-17F953) 421919 (R1315-17F953BS) 39555 Schoolcraft Rd, Plymouth MI, 48170 800.59.ROUSH 2015+ Mustang Rear Valance Kit Installation
2015+ Mustang GT V8 X-Pipe Exhaust Kit Installation Instructions P/N: (99-137)
") 2015+ Mustang GT V8 X-Pipe Exhaust Kit Installation Instructions P/N: 422046 (99-137) 39555 Schoolcraft Rd, Plymouth MI, 48170 800.59.ROUSH 2015+ Mustang GT V8 X-Pipe Exhaust Kit Installation Instructions
2015+ Mustang GT V8 X-Pipe Exhaust Kit Installation Instructions P/N: 422046 (99-137) 39555 Schoolcraft Rd, Plymouth MI, 48170 800.59.ROUSH 2015+ Mustang GT V8 X-Pipe Exhaust Kit Installation Instructions
2015+ Mustang I-4 Y-Pipe Exhaust Kit Installation Instructions P/N: (1315-5G206)
") 2015+ Mustang I-4 Y-Pipe Exhaust Kit Installation Instructions P/N: 422091 (1315-5G206) 39555 Schoolcraft Rd, Plymouth MI, 48170 800.59.ROUSH 2015+ Mustang I-4 Y-Pipe Exhaust Kit Installation Instructions
2015+ Mustang I-4 Y-Pipe Exhaust Kit Installation Instructions P/N: 422091 (1315-5G206) 39555 Schoolcraft Rd, Plymouth MI, 48170 800.59.ROUSH 2015+ Mustang I-4 Y-Pipe Exhaust Kit Installation Instructions
2015+ Mustang GT V8 X-Pipe/H-Pipe Exhaust Kit Installation Instructions
 2015+ Mustang GT V8 X-Pipe/H-Pipe Exhaust Kit Installation Instructions P/N: 422046 and 422119 39555 Schoolcraft Rd, Plymouth MI, 48170 800.59.ROUSH 2015+ Mustang GT V8 X-Pipe/H-Pipe Exhaust Kit Installation
2015+ Mustang Windshield Banner Installation Instructions P/N: (R )
") Installation Instructions P/N: 421903 (R1315-03088) 39555 Schoolcraft Rd, Plymouth MI, 48170 800.59.ROUSH 2015+ Mustang Windshield Banner Installation Instructions P/N: 421903 (R1315-03088) Application:
Installation Instructions P/N: 421903 (R1315-03088) 39555 Schoolcraft Rd, Plymouth MI, 48170 800.59.ROUSH 2015+ Mustang Windshield Banner Installation Instructions P/N: 421903 (R1315-03088) Application:
2018 F L Cold Air Intake Installation Instructions P/N: ( )
") Installation Instructions P/N: 422088 (111850-9600) 39555 Schoolcraft Rd, Plymouth MI, 48170 800.59.ROUSH 2018 F-150 5.0L Cold Air Intake Installation Instructions P/N: 422088 (111850-9600) Application:
Installation Instructions P/N: 422088 (111850-9600) 39555 Schoolcraft Rd, Plymouth MI, 48170 800.59.ROUSH 2018 F-150 5.0L Cold Air Intake Installation Instructions P/N: 422088 (111850-9600) Application:
2015+ Ford F-150 Windshield Banner Kit Installation Instructions P/N: (R )
") 2015+ Ford F-150 Windshield Banner Kit Installation Instructions P/N: 422016 (R1115-03088) 39555 Schoolcraft Rd, Plymouth MI, 48170 800.59.ROUSH 2015+ F-150 Windshield Banner Installation Instructions
2015+ Ford F-150 Windshield Banner Kit Installation Instructions P/N: 422016 (R1115-03088) 39555 Schoolcraft Rd, Plymouth MI, 48170 800.59.ROUSH 2015+ F-150 Windshield Banner Installation Instructions
2015+ F-150 Active Exhaust Kit Installation Instructions P/N: (1117-5E292LITE)
") 2015+ F-150 Active Exhaust Kit Installation Instructions P/N: 422104 (1117-5E292LITE) 39555 Schoolcraft Rd, Plymouth MI, 48170 800.59.ROUSH 2015+ Ford F-150 Active Exhaust Kit Installation Instructions
2015+ F-150 Active Exhaust Kit Installation Instructions P/N: 422104 (1117-5E292LITE) 39555 Schoolcraft Rd, Plymouth MI, 48170 800.59.ROUSH 2015+ Ford F-150 Active Exhaust Kit Installation Instructions
2015 Mustang Fastback Rear Spoiler Installation Instructions P/N:
 Installation Instructions P/N: 421883 421884 421885 421886 421887 421888 421889 421890 421891 421892 421893 39555 Schoolcraft Rd, Plymouth MI, 48170 800.59.ROUSH 2015 Mustang Fastback Rear Spoiler Installation
2015+ Mustang LoudMouth I and LoudMouth II Exhaust Kits
 2015+ Mustang LoudMouth I and Installation Instructions P/N: 620054, 620055, 620061, 620062 (S1315-5231LM1, S1315-5231LM2, S1315S1-5231LM1, S1315S1-5231LM2) *LoudMouth II shown. BY 39555 Schoolcraft Rd,
2018 Mustang 5.0L Cold Air Intake Installation Instructions P/N: ( )
") Installation Instructions P/N: 422086 (131850-9600) 39555 Schoolcraft Rd, Plymouth MI, 48170 800.59.ROUSH 2018 Mustang 5.0L Cold Air Intake Installation Instructions P/N: 422086 (131850-9600) Application:
Installation Instructions P/N: 422086 (131850-9600) 39555 Schoolcraft Rd, Plymouth MI, 48170 800.59.ROUSH 2018 Mustang 5.0L Cold Air Intake Installation Instructions P/N: 422086 (131850-9600) Application:
F L NA Cold Air Intake Installation Instructions P/N: ( )
") 2015-2017 F-150 3.5L NA Cold Air Intake Installation Instructions P/N: 421982 (111535-9600) 39555 Schoolcraft Rd, Plymouth MI, 48170 800.59.ROUSH 2015-2017 F-150 3.5L NA Cold Air Intake Installation Instructions
2015-2017 F-150 3.5L NA Cold Air Intake Installation Instructions P/N: 421982 (111535-9600) 39555 Schoolcraft Rd, Plymouth MI, 48170 800.59.ROUSH 2015-2017 F-150 3.5L NA Cold Air Intake Installation Instructions
2015+ Ford F-150 Off-Road Exhaust Kit
 2015+ Ford F-150 Off-Road Exhaust Kit Installation Instructions P/N: 421985 (1115-5E292ORR) Application: 2015+ Ford F-150 OFF-ROAD USE ONLY Important Note: Before installing the ROUSH Performance Product,
Mustang 5.0L Cold Air Intake Installation Instructions P/N:
 2015-2017 Mustang 5.0L Cold Air Intake Installation Instructions P/N: 421826 39555 Schoolcraft Rd, Plymouth MI, 48170 800.59.ROUSH 2015-2017 Mustang 5.0L Cold Air Intake Installation Instructions P/N:
2015+ Mustang Shift Ball Installation Instructions P/N: (R BLK) P/N: (R WHT)
 P/N: (R WHT)") 2015+ Mustang Shift Ball Installation Instructions P/N: 421906 (R1315-7213 BLK) P/N: 421907 (R1315-7213 WHT) 39555 Schoolcraft Rd, Plymouth MI, 48170 800.59.ROUSH 2015+ Mustang Shift Ball Installation
2015+ Mustang Shift Ball Installation Instructions P/N: 421906 (R1315-7213 BLK) P/N: 421907 (R1315-7213 WHT) 39555 Schoolcraft Rd, Plymouth MI, 48170 800.59.ROUSH 2015+ Mustang Shift Ball Installation
2018 Mustang 5.0L Performance PAC1 Installation Instructions P/N: ( PERFPK1)
") 2018 Mustang 5.0L Performance PAC1 Installation Instructions P/N: 422113 (131850-PERFPK1) 39555 Schoolcraft Rd, Plymouth MI, 48170 800.59.ROUSH 2018 Mustang 5.0L Performance PAC1 Installation Instructions
2018 Mustang 5.0L Performance PAC1 Installation Instructions P/N: 422113 (131850-PERFPK1) 39555 Schoolcraft Rd, Plymouth MI, 48170 800.59.ROUSH 2018 Mustang 5.0L Performance PAC1 Installation Instructions
Mustang V-6 Cold Air Intake P/N: ( A600) Application: Ford Mustang 3.7L Manual or Automatic Transmission
 Application: Ford Mustang 3.7L Manual or Automatic Transmission") 2015-2017 Mustang V-6 Cold Air Intake P/N: 421828 (131537-9A600) Application: 2015-2017 Ford Mustang 3.7L Manual or Automatic Transmission Installation Instructions Before installing your ROUSH Performance
2015-2017 Mustang V-6 Cold Air Intake P/N: 421828 (131537-9A600) Application: 2015-2017 Ford Mustang 3.7L Manual or Automatic Transmission Installation Instructions Before installing your ROUSH Performance
Mustang Hood Scoop
 Installation Instructions P/N: 421858 421859 421860 421861 421862 421863 421864 421865 421866 421867 421868 422055 422056 422057 39555 Schoolcraft Rd, Plymouth MI, 48170 800.59.ROUSH 2015-2017 Mustang
Mustang V-6 Level 1 Performance Pack Installation Instructions P/N: ( PWRPK1-AA)
") 2015-2017 Mustang V-6 Level 1 Performance Pack Installation Instructions P/N: 421999 (131537-PWRPK1-AA) 39555 Schoolcraft Rd, Plymouth MI, 48170 800.59.ROUSH 2015-2017 Mustang V-6 Level 1 Performance Pack
2015-2017 Mustang V-6 Level 1 Performance Pack Installation Instructions P/N: 421999 (131537-PWRPK1-AA) 39555 Schoolcraft Rd, Plymouth MI, 48170 800.59.ROUSH 2015-2017 Mustang V-6 Level 1 Performance Pack
ROUSH Quad Tip Exhaust Installation Instructions P/N:
 Installation Instructions P/N: 421920 421921 421922 421923 39555 Schoolcraft Rd, Plymouth MI, 48170 800.59.ROUSH ROUSH Quad Tip Exhaust Installation Instructions P/N: 421920 (R1315-5231PV) Fastback GT
2012+ Focus Focus ST ROUSH Cold Air Induction Kit(s)
") 2012+ Focus 2013+ Focus ST ROUSH Cold Air Induction Kit(s) P/N: 421642 (1213NA-9600) 421609 (1213ST-9600) Installation Instructions Before installing your ROUSH Performance Product(s), read through the
2012+ Focus 2013+ Focus ST ROUSH Cold Air Induction Kit(s) P/N: 421642 (1213NA-9600) 421609 (1213ST-9600) Installation Instructions Before installing your ROUSH Performance Product(s), read through the
F L and 2.7L Ecoboost V6
 2015-2016 F-150 3.5L and 2.7L Ecoboost V6 Installation Instructions P/N: 421981 (1115TT-9600) Application: 2015-2016 Ford F-150 2.7L Ecoboost V6, 2015-2016 Ford F-150 3.5L Ecoboost V6 Important Note: Before
Front Fascia Kit Installation Instructions P/N:
 Installation Instructions P/N: 421843 421844 421845 421846 421847 421848 421849 421850 421851 421852 421853 39555 Schoolcraft Rd, Plymouth MI, 48170 800.59.ROUSH 2015-2017 Front Fascia Kit Installation
F L Ecoboost V F L Ecoboost V6 Performance Pac Level 2 Installation Instructions P/N: (1115TT-PWRPK2)
") 2015-2016 F-150 3.5L Ecoboost V6 2015-2017 F-150 2.7L Ecoboost V6 Performance Pac Level 2 Installation Instructions P/N: 422007 (1115TT-PWRPK2) 39555 Schoolcraft Rd, Plymouth MI, 48170 800.59.ROUSH 2015-2016
2015-2016 F-150 3.5L Ecoboost V6 2015-2017 F-150 2.7L Ecoboost V6 Performance Pac Level 2 Installation Instructions P/N: 422007 (1115TT-PWRPK2) 39555 Schoolcraft Rd, Plymouth MI, 48170 800.59.ROUSH 2015-2016
2018 Mustang Ecoboost Cold Air Intake P/N: ( ) Application: 2018 Ford Mustang 2.3L Manual or Automatic Transmission
 Application: 2018 Ford Mustang 2.3L Manual or Automatic Transmission") 2018 Mustang Ecoboost Cold Air Intake P/N: 422087 (131823-9600) Application: 2018 Ford Mustang 2.3L Manual or Automatic Transmission Installation Instructions Before installing your ROUSH Performance Product(s),
2018 Mustang Ecoboost Cold Air Intake P/N: 422087 (131823-9600) Application: 2018 Ford Mustang 2.3L Manual or Automatic Transmission Installation Instructions Before installing your ROUSH Performance Product(s),
2013 Mustang Chin Splitter
 2013 Mustang Chin Splitter P/N: 421391 (R1313-17F775-AA) Application: 2013 Ford Mustang 2013 Mustang 5.0L with Automatic/Manual Transmission 2013 Mustang 3.7L with Automatic/Manual Transmission Installation
2016+ Camaro V8 or V6/I4 Exhaust Kit
 2016+ Camaro V8 or V6/I4 Exhaust Kit Installation Instructions P/N: 620079 (99-135) P/N: 620078 (99-136) 39555 Schoolcraft Rd, Plymouth MI, 48170 855.SLP.PERF 2016+ Camaro V8 or V6/I4 Exhaust Kit Installation
ROUSH Cat Back Exhaust
 ROUSH Cat Back Exhaust Installation Instructions 2015-2018 2.3L I-4 P/N: 422094 (1315-5G203) 2015-2017 5.0L V8 P/N: 422092 (1315-5G201) 2018 5.0L V8 P/N: 422093 (1318-5G202) 39555 Schoolcraft Rd, Plymouth
2014+ GM Truck Cat Back Exhaust Kit 4.3L/5.3L/6.2L
 2014+ GM Truck Cat Back Exhaust Kit 4.3L/5.3L/6.2L Installation Instructions P/N: 620074 (99-47) 4.3L/5.3L P/N: 620080 (99-139) 6.2L 39555 Schoolcraft Rd, Plymouth MI, 48170 855.SLP.PERF 2014+ GM Truck
2015 Mustang Ecoboost Cold Air Intake
 2015 Mustang Ecoboost Cold Air Intake Installation Instructions P/N: 421827 (131523-9A600) Application: 2015 Ford Mustang 2.3L Manual or Automatic Transmission Important Note: Before installing the ROUSH
ROUSH Active IO Exhaust. Installation Instructions P/N: (R LITE) Fastback GT Convertible GT V8
 Fastback GT Convertible GT V8") Installation Instructions P/N: 422128 (R1318-5231LITE) Fastback GT Convertible GT V8 39555 Schoolcraft Rd, Plymouth MI, 48170 800.59.ROUSH ROUSH Active IO Exhaust Installation Instructions P/N: 422128
Installation Instructions P/N: 422128 (R1318-5231LITE) Fastback GT Convertible GT V8 39555 Schoolcraft Rd, Plymouth MI, 48170 800.59.ROUSH ROUSH Active IO Exhaust Installation Instructions P/N: 422128
Ford F-150 Off Road Exhaust Kit
 2011-14 Ford F-150 Off Road Exhaust Kit P/N: 620092 (SLP1111-5E292) Application: 2011-14 Ford F-150 equipped with the following engine options: 3.5L Eco-Boost Engine with automatic transmission. 5.0L 4V
ROUSH Billet Lower Grille Kit
 ROUSH Billet Lower Grille Kit Kit Part Number 1310R8200B Application: 2010 ROUSH Mustang w/roush Front Fascia Installation Instructions Before installing your ROUSH Performance Product(s), read through
Ford Mustang Rear Decklid Spoiler Kit. Installation Instructions
 Ford Mustang Rear Decklid Spoiler Kit Application: 2005-09 Ford Mustang Installation Instructions Before installing your ROUSH Performance Product(s), read through the entire installation procedure and
ROUSH Billet Upper Grille Kit
 ROUSH Billet Upper Grille Kit Part Number R03010141 Application: 2010-11 Mustang GT Installation Instructions Before installing your ROUSH Performance Product(s), read through the entire installation procedure
Ford Mustang Side Rocker Molding Installation Instructions Application: Ford Mustang
 Ford Mustang Side Rocker Molding Installation Instructions Application: 2005-07 Ford Mustang Before installing your Roush Performance Product(s), read through the entire installation procedure and check
ROUSH Front Splitter Kit
 ROUSH Front Splitter Kit Kit Part Number 1310010803 Application: 2010-11 ROUSH Mustang Note: Splitter only fits onto the 2010-11 ROUSH Front Fascia. Installation Instructions Before installing your ROUSH
ROUSH Active Exhaust. Installation Instructions P/N: (R AVC) Fastback GT V8 - Convertible GT V8
 Fastback GT V8 - Convertible GT V8") Installation Instructions P/N: 422100 (R1318-5231AVC) Fastback GT V8 - Convertible GT V8 39555 Schoolcraft Rd, Plymouth MI, 48170 800.59.ROUSH ROUSH Active Exhaust Installation Instructions P/N: 422100
Installation Instructions P/N: 422100 (R1318-5231AVC) Fastback GT V8 - Convertible GT V8 39555 Schoolcraft Rd, Plymouth MI, 48170 800.59.ROUSH ROUSH Active Exhaust Installation Instructions P/N: 422100
Ford F150 Center and Side Stripe Kit(s) Part # Refer to Tables on pages 2 & 3
 Part # Refer to Tables on pages 2 & 3") Ford F150 Center and Side Stripe Kit(s) Part # Refer to Tables on pages 2 & 3 Installation Instructions Application: 2005-07 Ford F150 SuperCab and SuperCrew with or without the following Roush accessories:
Ford F150 Center and Side Stripe Kit(s) Part # Refer to Tables on pages 2 & 3 Installation Instructions Application: 2005-07 Ford F150 SuperCab and SuperCrew with or without the following Roush accessories:
Before installing your Roush Performance Product(s), read through the entire installation procedure and check to make sure all items are present.
, read through the entire installation procedure and check to make sure all items are present.") 2005-2006 Ford Mustang GT Legal / Stage 3 / Offroad Exhaust Kits for Roush Rear Valence Installation Instructions Application: 2005- Ford Mustang GT Model Must have Roush Rear Valence Kit #R03030061 Before
2005-2006 Ford Mustang GT Legal / Stage 3 / Offroad Exhaust Kits for Roush Rear Valence Installation Instructions Application: 2005- Ford Mustang GT Model Must have Roush Rear Valence Kit #R03030061 Before
Installation Instructions
 2012-2014 Ford F-150 ROUSH Phase 1 Kit 3.5L V6 Eco-Boost P/N: 421735 (1135-P1CAL) Installation Instructions Before installing your ROUSH Cold Air Kit, please read through the entire installation procedure
Before installing your Roush Performance Product(s), read through the entire installation procedure and check to make sure all items are present.
, read through the entire installation procedure and check to make sure all items are present.") Ford Mustang Roush Fog Lamp Wiring Harness Installation Instructions Application: 2005 Ford Mustang GT Model (Designed for use with Roush Fog Lamps SM01-6400-AL) Before installing your Roush Performance
Ford Mustang Roush Fog Lamp Wiring Harness Installation Instructions Application: 2005 Ford Mustang GT Model (Designed for use with Roush Fog Lamps SM01-6400-AL) Before installing your Roush Performance
ROUSH FUEL SYSTEM UPGRADE CURRENT FORD MUSTANG 5.0L
 ROUSH FUEL SYSTEM UPGRADE 2011- CURRENT FORD MUSTANG 5.0L P/N: 421602 (1313-FPVRKIT) Installation Instructions Before installing your ROUSH Performance Product(s), read through the entire installation
ROUSH Performance Air Induction Kit Pt # Installation Instructions
 ROUSH Performance Air Induction Kit Pt #11099600 Application: 2009 Ford F-150 with 4.6L and 5.4L V8 Engines 2008-09 Ford F-250/F-350 Super Duty with 5.4L V8 and 6.8L V10 Engines For Off Road Use Only Installation
2013+ Focus ST Focus ROUSH Exhaust Kit
 2013+ Focus ST 2011 + Focus ROUSH Exhaust Kit P/N: 421610 (1213-5E292) Application: 2013+ Ford Focus ST 2011 + Ford Focus Installation Manual Before installing your ROUSH Performance Product(s), read through
2011+ Ford F-150 ROUSH Cold Air Kit for the V6 Engine Family 3.7L 4V Ti-VCT ( ) Installation Instructions
 Installation Instructions") 2011+ Ford F-150 ROUSH Cold Air Kit for the V6 Engine Family 3.7L 4V Ti-VCT (1135-9600) Installation Instructions Before installing your ROUSH Cold Air Kit, please read through the entire installation
2011+ Ford F-150 ROUSH Cold Air Kit for the V6 Engine Family 3.7L 4V Ti-VCT (1135-9600) Installation Instructions Before installing your ROUSH Cold Air Kit, please read through the entire installation
Mustang Billet Aluminum Pedal Cover Kit P/N R (Manual) and R (Automatic) Installation Instructions
 and R (Automatic) Installation Instructions") 2005-06 Mustang Billet Aluminum Pedal Cover Kit P/N R08050020 (Manual) and R08050021 (Automatic) Installation Instructions 1305-R08050026-AA Page 1 of 7 1-800-59-ROUSH Before installing this Roush Performance
2005-06 Mustang Billet Aluminum Pedal Cover Kit P/N R08050020 (Manual) and R08050021 (Automatic) Installation Instructions 1305-R08050026-AA Page 1 of 7 1-800-59-ROUSH Before installing this Roush Performance
Installation Instructions
 SLP GM/Chevrolet LS3 COIL COVER KIT 2010+ Camaro 5.3L/6.2L 2007+ GMT900 5.3L/6.2L PN: 620038 Installation Instructions Important Notes: Before installing your SLP Coil Cover Kit, please read the installation
ROUSH Short Throw Shifter Kit
 ROUSH Short Throw Shifter Kit Part Number 1310R7400 Application: 2010 Ford Mustang GT Installation Instructions Before installing your ROUSH Performance Product(s), read through the entire installation
ROUSH Mustang Lowering Spring Kit
 ROUSH Mustang Lowering Spring Kit Part Number R06000043 Applications: 2010 ROUSH V8 Mustang 2010 Mustang GT w/ ROUSH Front Struts and Rear Shocks This spring set will lower your 2010 ROUSH Mustang an additional
M-9603-CJ 123 mm Cold Air Kit for 5.4L 4V V8 Cobra Jet Mustang INSTALLATION INSTRUCTIONS
 Please contact the Techline for the most current instruction information 1-800-367-3788.!!! PLEASE READ THE FOLLOWING INSTRUCTIONS CAREFULLY PRIOR TO INSTALLATION!!! OVERVIEW: This kit is designed for
Mustang Billet Rear Lower Control Arm Kit
 Mustang Billet Rear Lower Control Arm Kit Part #R06030037 Application: 2005-2009 Ford Mustang Installation Instructions Before installing your ROUSH Performance Product(s), read through the entire installation
2014 GM Truck Level 1 Performance Pack
 2014 GM Truck Level 1 Performance Pack Installation Instructions P/N: 2414-PRFPC1-AA Application: 2014+ Chevy Silverado and GMC Sierra 5.3L and 6.2L Important Note: Before installing your Blackwing cold
ROUSH Performance Air Induction Kit Pt # R
 ROUSH Performance Air Induction Kit Pt # R07060087 C. A. R. B. EO # D-418-14 See Important EO Note below Included with your ROUSH Intake System Kit is a sticker with a California Air Resources Board (C.
ROUSH Dome Badge Kit
 ROUSH Dome Badge Kit Kit Part Number 13106342508**K Application: 2010-13 Ford Mustang GT Installation Instructions Before installing your ROUSH Performance Product(s), read through the entire installation
ROUSH Front Fascia Kit
 ROUSH Front Fascia Kit Kit Part Number 1310011901 Application: 2010-2012 Ford Mustang GT Installation Instructions Before installing your ROUSH Performance Product(s), read through the entire installation
M MBKIT 2013 MUSTANG GT/V6 FRONT BOSS SPLITTER KIT INSTALLATION INSTRUCTIONS
 Please visit www.fordracingparts.com for the most current instruction information!!! PLEASE READ ALL OF THE FOLLOWING INSTRUCTIONS CAREFULLY PRIOR TO INSTALLATION. AT ANY TIME YOU DO NOT UNDERSTAND THE
M-9603-GTB 85 mm Cold Air Kit w/premium Cal. for 4.6L 3V V8 Mustang INSTALLATION INSTRUCTIONS
 Please contact the Techline for the most current instruction information 800-367-3788.!!! PLEASE READ THE FOLLOWING INSTRUCTIONS CAREFULLY PRIOR TO INSTALLATION!!! OVERVIEW: This kit is designed for use
GENUINE PARTS INSTALLATION INSTRUCTIONS
 GENUINE PARTS INSTALLATION INSTRUCTIONS DESCRIPTION: APPLICATION: PART NUMBER: KIT-CARBON FIBER REAR SPOILER INFINITI Q50 T99J1 J5000 KIT CONTENTS: Item A B C D Qty. 1 4 1 1 Part Description Spoiler Assembly
Ground Effects, P/N: (V6), (V8)
, (V8)") , P/N: 92248596 (V6), 92248560 (V8) 3. Open trunk and remove 3 scrivets per side. Retain. Remove LH and RH tail lamp access cover. Retain. Refer to Figure 1. NOTE: Installation is made easier with the
, P/N: 92248596 (V6), 92248560 (V8) 3. Open trunk and remove 3 scrivets per side. Retain. Remove LH and RH tail lamp access cover. Retain. Refer to Figure 1. NOTE: Installation is made easier with the
INSTALLATION GUIDE PREMIUM FRONT BUMPER FOR RAM AEV30304AA Last Updated: 09/18/17
 AEV30304AA Last Updated: 09/18/17 PREMIUM FRONT BUMPER FOR RAM 1500 INSTALLATION GUIDE PLEASE READ BEFORE YOU START To guarantee a quality installation, we recommend reading these instructions thoroughly
INSTALLATION INSTRUCTIONS
 INSTALLATION INSTRUCTIONS Accessory Application Publications No. All 30482 S 2006 PILOT Issue Date P/N 08F23-S9V-100A SEP 2005 PARTS LIST Left front trim piece Right front trim piece Left rear trim piece
PRELIMINARY INSTALLATION INSTRUCTIONS. PARTS LIST Left front trim piece
 INSTALLATION INSTRUCTIONS Accessory Application Publications No. All 30482 S 2006 PILOT Issue Date P/N 08F23-S9V-100A SEP 2005 PARTS LIST Left front trim piece Right front trim piece Left rear trim piece
INSTALLATION GUIDE VW AMAROK INTERCOOLER KIT P/N PWI63123 INTERCOOLER P/N PWA64398 PIPE KIT
 INSTALLATION GUIDE VW AMAROK INTERCOOLER KIT P/N PWI63123 INTERCOOLER P/N PWA64398 PIPE KIT ENGINEERING THE UNFAIR ADVANTAGE Contents CONDITIONAL MANUFACTURERS WARRANTY... 2 Warranty voids... 2 Warranty
INSTALLATION GUIDE HOLDEN COLORADO (RG) INTERCOOLER KIT P/N PWI66175K INTERCOOLER P/N PWA64553 ( ) PIPE KIT
 INTERCOOLER KIT P/N PWI66175K INTERCOOLER P/N PWA64553 ( ) PIPE KIT") INSTALLATION GUIDE HOLDEN COLORADO (RG) INTERCOOLER KIT P/N PWI66175K INTERCOOLER P/N PWA64553 (2012-13) PIPE KIT ENGINEERING THE UNFAIR ADVANTAGE Contents CONDITIONAL MANUFACTURERS WARRANTY... 2 Warranty
INSTALLATION GUIDE HOLDEN COLORADO (RG) INTERCOOLER KIT P/N PWI66175K INTERCOOLER P/N PWA64553 (2012-13) PIPE KIT ENGINEERING THE UNFAIR ADVANTAGE Contents CONDITIONAL MANUFACTURERS WARRANTY... 2 Warranty
INSTALLATION INSTRUCTIONS
 INSTALLATION INSTRUCTIONS Hidden Winch Mount For 2008 Ford Super Duty Kit 78105 Your safety, and the safety of others, is very important. To help you make informed decisions about safety, we have provided
SAFETY SENSORS FIELD OF VIEW WILL BE ALTERED WITH USE OF THE REPLACEMENT BUMPER. Injury hazard
 SAFETY Your safety and the safety of others is very important. In order to help you make informed decisions about safety, we have provided installation instructions and other information. These instructions
M-9603-SVT mm Cold Air Kit w/premium Calibration INSTALLATION INSTRUCTIONS
 Please visit www.fordracingparts.com for the most current instruction information!!! PLEASE READ ALL OF THE FOLLOWING INSTRUCTIONS CAREFULLY PRIOR TO INSTALLATION. AT ANY TIME YOU DO NOT UNDERSTAND THE
SAFETY THIS PRODUCT IS FOR OFFROAD USE ONLY. ALL LIABILITY FOR INSTALLATION AND USE RESTS WITH THE OWNER.
 SAFETY Your safety and the safety of others is very important. In order to help you make informed decisions about safety, we have provided installation instructions and other information. These instructions
2010 Mustang V6 Shaker CDC #
 - - Incomplete 2010 Mustang V6 Shaker CDC # 1011-7002-01 Component Check List: Quantity/Description Part # Engine Cover Assembly 1011-6000-01 1 Engine Cover w/ Upper Air Tube 0511-2100-01 1 Aluminum Shaker
Preparation Part Number: PT Kit Contents Item # Quantity Reqd. Description 1 1 Rear Spoiler 2 1 Hardware Kit. Hardware Bag Contents
 Preparation Part Number: PT478-11170-09 Kit Contents 1 1 Rear Spoiler 2 1 Hardware Kit Hardware Bag Contents 1 4 M5 Nut 2 4 Clip 3 4 Hole Plug Additional Items Required For Installation 1 1 Outer Drill
QTY 3D PART NO. FORD SERVICE PN DESCRIPTION VAA6Z A FIESTA 5 DOOR (4) PC. KIT
 PC. KIT") Rev. 08-4 - 2010 QTY 3D PART NO. FORD SERVICE PN DESCRIPTION 1 691620 VAA6Z-5820049-A 2011- FIESTA 5 DOOR (4) PC. KIT HARDWARE SUPPLIED 12 #8 X ¾ SELF DRILLING SCREWS 220 / 18.5 3M VHB DOUBLE FACE TAPE
Rev. 08-4 - 2010 QTY 3D PART NO. FORD SERVICE PN DESCRIPTION 1 691620 VAA6Z-5820049-A 2011- FIESTA 5 DOOR (4) PC. KIT HARDWARE SUPPLIED 12 #8 X ¾ SELF DRILLING SCREWS 220 / 18.5 3M VHB DOUBLE FACE TAPE
INSTALLATION INSTRUCTIONS SEMI Hidden Kit Part Number: Application: 2017 Toyota 4Runner
 INSTALLATION INSTRUCTIONS SEMI Hidden Kit Part Number: 100022 Application: 2017 Toyota 4Runner GENERAL SAFETY PRECAUTIONS Your safety, and the safety of others, is very important. To help you make informed
M-9603-SVT mm Cold Air Kit w/premium Calibration INSTALLATION INSTRUCTIONS
 Please contact the Tech Line for the most current instruction information (800) 367-3788.!!! PLEASE READ THE FOLLOWING INSTRUCTIONS CAREFULLY PRIOR TO INSTALLATION!!! OVERVIEW: This kit is designed for
Subaru Front Mount Intercooler Kit STI Subaru Front Mount Intercooler Kit STI
 Subaru Front Mount Intercooler Kit STI 2008-2014 715500 Subaru Front Mount Intercooler Kit STI 2008-2014 Congratulations on your purchase of the Subaru Front Mount Intercooler Kit STI 2008-2014. The following
SAFETY SENSORS FIELD OF VIEW WILL BE ALTERED WITH USE OF THE REPLACEMENT BUMPER. Injury hazard
 SAFETY Your safety and the safety of others is very important. In order to help you make informed decisions about safety, we have provided installation instructions and other information. These instructions
INSTALLATION GUIDE NISSAN NAVARA INTERCOOLER KIT P/N PWI65094K
 INSTALLATION GUIDE NISSAN NAVARA INTERCOOLER KIT P/N PWI65094K ENGINEERING THE UNFAIR ADVANTAGE Contents CONDITIONAL MANUFACTURERS WARRANTY... 2 WARRANTY VOIDS... 2 WARRANTY DOES NOT COVER... 2 LIMIT OF
SAFETY THIS PRODUCT IS FOR OFFROAD USE ONLY. ALL LIABILITY FOR INSTALLATION AND USE RESTS WITH THE OWNER.
 SAFETY Your safety and the safety of others is very important. In order to help you make informed decisions about safety, we have provided installation instructions and other information. These instructions
SAFETY THIS PRODUCT IS FOR OFFROAD USE ONLY. ALL LIABILITY FOR INSTALLATION AND USE RESTS WITH THE OWNER.
 Installation Instructions SAFETY Your safety and the safety of others is very important. In order to help you make informed decisions about safety, we have provided installation instructions and other
Roush Side Rocker Panel Splitters (10-13 All)
") Required tools: Jack stands (2) Floor jack (1 is required but 2 is preferred) Pliers Small Phillips screw driver Drill ¼ Drill bit T15 Torx bit (for some models of vehicle) Hacksaw (for some models of
Required tools: Jack stands (2) Floor jack (1 is required but 2 is preferred) Pliers Small Phillips screw driver Drill ¼ Drill bit T15 Torx bit (for some models of vehicle) Hacksaw (for some models of
RS5mesh style Grille. Audi A5/S5. Installation Instructions. pre-facelift ES best viewed in Acrobat Reader
 Audi A5/S5 pre-facelift RS5mesh style Grille Installation Instructions ES2627648 This tutorial is provided as a courtesy by ECS Tuning. best viewed in Acrobat Reader Proper service and repair procedures
Shelby GT500 Front Fascia Conversion Kit (05-09 All) Item # Installation Time: 1 Day. Required tools:
 Item # Installation Time: 1 Day. Required tools:") Shelby GT500 Front Fascia Conversion Kit (05-09 All) Item #53611 Installation Time: 1 Day Required tools: Phillips Screw driver 10mm Socket + Ratchet/Wrench 8mm Socket + Ratchet/Wrench 5mm Socket + Ratchet/Wrench
Shelby GT500 Front Fascia Conversion Kit (05-09 All) Item #53611 Installation Time: 1 Day Required tools: Phillips Screw driver 10mm Socket + Ratchet/Wrench 8mm Socket + Ratchet/Wrench 5mm Socket + Ratchet/Wrench
WARNING. When installed in accordance with these instructions, the front protection bar does not affect operation of the SRS airbag.
 Part Number: 343870 F/Kit 17557 Product Deluxe Combination Winch and Non Winch Bull Bar Description: Suited to Nissan XTERRA 05ON USA Only vehicle/s: WARNING REGARDING VEHICLES EQUIPPED WITH SRS AIRBAG;
INSTALLATION INSTRUCTIONS
 INSTALLATION INSTRUCTIONS Trans4mer Grille Guard/Winch Mount For 2007 Toyota Tundra Kit 76380 (Black) and 76381 (Stainless) Your safety, and the safety of others, is very important. To help you make informed
SUBARU FORESTER - SIDE STEP DIESEL VERSION INSTALLATION INSTRUCTIONS
 SUU FORESTER - SIDE STEP DIESEL VERSION INSTALLATION INSTRUCTIONS SS00 VEHICLE DESCRIPTION: PART NUMBER: SUU FORESTER SACC00 R 9 L 0 Care Instructions: Clean Side Steps with a mild detergent and water
SAFETY SENSORS FIELD OF VIEW WILL BE ALTERED WITH USE OF THE REPLACEMENT BUMPER. Injury hazard
 SAFETY Your safety and the safety of others is very important. In order to help you make informed decisions about safety, we have provided installation instructions and other information. These instructions
KJ JEEP COMBINATION BULL BAR WARNING
 KJ JEEP COMBINATION BULL BAR PRODUCT NUMBER FITTING KIT NUMBER 3450120 6171962 WARNING FOR VEHICLES EQUIPPED WITH SRS AIRBAG WHEN INSTALLED IN ACCORDANCE WITH THESE INSTRUCTIONS, THE FRONT PROTECTION BAR
Installation Instructions for Lingenfelter GM 2500 Suburban & Yukon XL Auxiliary Fan System (with AC clutch controlled fan output)
") Installation Instructions for Lingenfelter 2007-2013 GM 2500 Suburban & Yukon XL Auxiliary Fan System (with AC clutch controlled fan output) PN L300080607 Revision - 1.1 Lingenfelter Performance Engineering
Installation Instructions for Lingenfelter 2007-2013 GM 2500 Suburban & Yukon XL Auxiliary Fan System (with AC clutch controlled fan output) PN L300080607 Revision - 1.1 Lingenfelter Performance Engineering
SAFETY SENSORS FIELD OF VIEW WILL BE ALTERED WITH USE OF THE REPLACEMENT BUMPER. Injury hazard
 SAFETY Your safety and the safety of others is very important. In order to help you make informed decisions about safety, we have provided installation instructions and other information. These instructions
GENUINE PARTS INSTALLATION INSTRUCTIONS
 GENUINE PARTS INSTALLATION INSTRUCTIONS 1. 2. 3. 4. DESCRIPTION: APPLICATION: PART NUMBER: KIT CONTENTS: Fog Lamp Kit Versa Note (SV Only) 999L1 4Z000 - Fog Lamp Kit Item QTY Description Service Part Number