TyrolSport Solid Rack Bracket Installation Instruction. Kit Contents: 1x Adel Clamp
|
|
|
- Sheryl Robertson
- 5 years ago
- Views:
Transcription
1 TyrolSport Solid Rack Bracket Installation Instruction Tools Needed: 21mm socket 16mm socket 13mm socket 10mm wrench or socket 8mm Allen (Hex Key, Allen Key) socket Torque wrench (1/2 drive) 3/8 drive breaker bar or ratchet Kit Contents: 1x CNC Solid Rack Bracket 2x Stainless M10 Cap Screws 2x M8 Stainless hex nuts 1x Stainless M6 Bolt w/ stainless fender washer 1x Anti seize compound 1x Adel Clamp ½ drive breaker bar or ratchet Drill with 19/64 drill bit (or close)

2 Arrow direction indicates front of car.

3 The first step is to remove the bolts for the sway bar end links using a 13mm socket. With the end links removed, we will remove the bolts that attach the steering rack to the subframe with the same 13mm socket:


4 The two bolts for the lower dogbone mount are removed as well using a 16mm socket: The next step is to lower the subframe. Remove the bolts highlighted in red with a 21mm socket. Proceed by supporting the subframe with a transmission jack, or a floor jack if working on the ground.

5 With the subframe lowered, the steering rack can be accessed.


6 The next step is to remove the heat shield from the top of the steering rack. You will need the 13mm socket to remove the bolts holding the heat shield down.
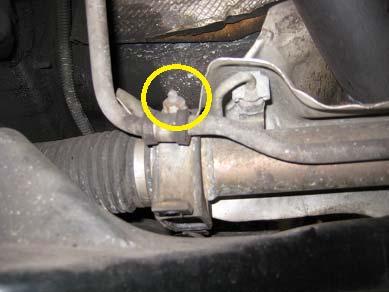

7


8 Heat shield removed: The stock rack bracket is removed in two pieces a metal U and a soft rubber insert.


9 The TyrolSport Solid Rack Bracket can now be installed. It will rest on top of the subframe, with the TyrolSport logo facing the center of the car.

10 The two steering rack bolts can now be threaded into the stainless M8 nuts provided in the kit. The nuts will sit within the recess machined into the TyrolSport Solid Rack Bracket.


11 With the lower half of the rack bracket loosely bolted to the subframe, the steering rack can be reinstalled. Be sure to have the bolts on the driver side of the steering rack started first, followed by the TyrolSport Rack Bracket second. The driver side of the steering rack has two tapered guide pins that allow it to align with the subframe. Be sure to seat the steering rack into the subframe before tightening down the steering rack bolts.


12 With the driver side of the steering rack bolted down, the passenger side of the steering rack will be slightly above the TyrolSport Solid Rack Bracket:

13 With the steering rack in place over the TyrolSport Rack Bracket, the top cap of the Rack Bracket can be installed. The top cap of the Rack Bracket is asymmetrical, with the D recess facing towards the front of the car. The D shape recess is a feature of the TyrolSport Rack Bracket which accommodates the supplied Adel clamp or the OEM power steering line clamp (if drilled for the M10 bolt) seen above and below:


14 The provided anti seize compound will be applied to the stainless bolts for the top of the rack bracket:


15


16 Proceed by lightly tightening down the TyrolSport Rack Bracket. The Rack Bracket should only have a slight, even gap between the top and bottom half when fully seated. Be sure to tighten down both sides evenly:


17 The next step is to trim the steering rack heat shield so the steering rack bolts can be accessible:


18 Before reinstalling the heat shield, there is one more modification to make. We use a 19/64 drill bit to make a hole in the heat shield where it will mount to the Rack Bracket. This will be located approximately 2 from the edge of the heat shield, at the center of the radius. We then trimmed some excess material off to give the heat shield a nice rounded edge. This M6 bolt received anti seize compound as well.
19 Now that the heat shield is in place, the rest of the heat shield will need to be re bolted down. These are only tightened until snug. The Subframe will have to be bolted to the underside of the car before you can fully tighten the steering rack. The torque spec for the subframe bolts is 74 ft/lbs +90 degrees (when using new subframe bolts). The steering rack to subframe is tightened until snug. Be careful on the aluminum threads in the steering rack, as well as the dogbone mount on the transmission. Finally, the front swaybar end links are reinstalled and tightened until snug. For any questions regarding this product or the installation procedure, please do not hesitate to call us at (917) or to contact us via at Thank you for your support!
This procedure is best performed on a vehicle lift, however it is possible to install these coilovers using a floor jack and jack stands.
 Description: FeatherLight Single Adjustable Corvette Coilovers Part Number: 430-401004-N Application: 2014-2015 Chevrolet Corvette (C7) Note: Some models might be equipped with Magnetic Ride electric adjustable
INSTALLATION GUIDE. JK Rear bumper & tire carrier. AEV30105AC Last Updated: 10/11/16 US PATENT: D642,502 ; D
 AEV30105AC Last Updated: 10/11/16 JK Rear bumper & tire carrier US PATENT: D642,502 ; D633.024 INSTALLATION GUIDE PLEASE READ BEFORE YOU START TO GUARANTEE A QUALITY INSTALLATION, WE RECOMMEND READING
Universal Tall HoneyBadger Chase Rack Installation Instructions
 PREPARATION Universal Tall HoneyBadger Chase Rack Installation Instructions 1. Disconnect the negative terminal on the battery. Park the vehicle on level ground and set the emergency brake. 2. We recommend
Make sure your vehicle is on a level surface prior to starting installation.
 Thank you for purchasing the CorkSport Mazdaspeed 3 Front Sway Bar. Our sway bar will help remove the vehicles tendency to overpower the front tires under hard cornering and minimize traction robbing body
Fig A ADDICTIVE DESERT DESIGNS. Preparation: Removal:
 Preparation: Disconnect the negative battery terminal. Park the vehicle on level ground and set the emergency brake. We recommend reading through the installation instructions in whole before performing
Alignment Spec. Power Rack & Pinion: 5 degrees positive Camber 0 degrees Toe-In 1/32
 333-TCIE237 1967-1969 Chevy Camaro Front Suspension 1968-1972 Chevy Nova Front Suspension 1967-1969 Pontiac Firebird Front Suspension 1-800-984-6259 www.totalcostinvolved.com 1967-1969 Chevy Camaro Front
2017 Current Ford SuperDuty Adaptive Cruise Control Relocation Bracket Installation Instructions
 2017 Current Ford SuperDuty Adaptive Cruise Control Relocation Bracket Installation Instructions PREPARATION 1. Disconnect the negative terminal on the battery. Park the vehicle on level ground and set
09-UP FORD F150 6 LIFT KIT
 92159800 09-UP FORD F150 6 LIFT KIT THANK YOU FOR CHOOSING ROUGH COUNTRY FOR YOUR SUSPENSION NEEDS. Rough Country recommends a certified technician install this system. In addition to these instructions,
Fig A. Addictive Desert Designs. Preparation: Removal:
 Preparation: Disconnect the negative battery terminal. Park the vehicle on level ground and set the emergency brake. We recommend reading through the installation instructions in whole before performing
CorkSport Adjustable Front Swaybar ND MX-5
 CorkSport Adjustable Front Swaybar 2016+ ND MX-5 Thank you for purchasing the CorkSport Adjustable Front Swaybar. Track tested and racer approved, the CorkSport Front Swaybar is a great compliment to the
Description: Camber Kit Part Number: A Application: C5, C6 Steel Frame
 Description: Camber Kit Part Number: 450-401009-A Application: 1997-2004 C5, 2005-2013 C6 Steel Frame Tools Needed: 3/8" drive ratchet 24" long 3/8" torque wench 10mm deep socket 13mm socket 13mm deep
Installation Guide 50342/ Kargo Master Safari Rancho Cordova, CA
 Installation Guide 50342/50352 Kargo Master Safari Rancho Cordova, CA 95742 800-343-7486 CustomerService@Safari.com *PLEASE READ ALL INSTRUCTIONS AND WARNINGS PRIOR TO ASSEMBLING, INSTALLING AND USING
Make sure your vehicle is on a level surface prior to starting installation.
 Thank you for purchasing the CorkSport Mazdaspeed 3 Front Sway Bar. Our sway bar will help remove the vehicles tendency to overpower the front tires under hard cornering and minimize traction robbing body
JK REAR BUMPER AND TIRE CARRIER
 JK REAR BUMPER AND TIRE CARRIER Installation Guide AEV30105AA (Updated 5/10/10) Page 1 of 20 Page 2 of 20 EXPLODED VIEW PLEASE READ BEFORE YOU START IN ORDER TO INSTALL THIS PART PROPERLY YOU OR YOUR INSTALLER
ADJUSTABLE ANTI-ROLL BAR INSTALLATION INSTRUCTIONS PART NUMBER D PARTS LIST
 ADJUSTABLE ANTI-ROLL BAR INSTALLATION INSTRUCTIONS PART NUMBER D120-0580 DESCRIPTION: Front 28mm; 3-hole adjustable APPLICATION: 2014-16 F22 228i/M235i 2015-16 F23 228i/M235i Convertible 2013-16 F30 320i
2015 F /5 /6 LIFT KIT
 92155700 2015 F-150 4 /5 /6 LIFT KIT THANK YOU FOR CHOOSING ROUGH COUNTRY FOR YOUR SUSPENSION NEEDS. Rough Country recommends a certified technician install this system. In addition to these instructions,
INSTALLATION GUIDE. High Steer Kit
 AEV30212AE Last Updated: 12/09/16 High Steer Kit Designed for 2007 current Jeep JK Wrangler and Wrangler Unlimited models in all trim levels, including Rubicon, with at least 3.0 of suspension lift. INSTALLATION
2017 Current Ford Raptor Stealth Fighter Rear Bumper Installation Instructions
 2017 Current Ford Raptor Stealth Fighter Rear Bumper Installation Instructions PREPARATION 1. Disconnect the negative terminal on the battery. Park the vehicle on level ground and set the emergency brake.
2014 F /6 LIFT KIT
 92157500 2014 F-150 4 /6 LIFT KIT THANK YOU FOR CHOOSING ROUGH COUNTRY FOR YOUR SUSPENSION NEEDS. Rough Country recommends a certified technician install this system. In addition to these instructions,
Anti-Sway Bars Installation Instructions For Mazda MX-5 PART #
 Anti-Sway Bars Installation Instructions For 2006+ Mazda MX-5 PART # 920-330 Tools required: A jack and jack stands, 5mm Allen wrench, ratchet, 10mm, 12mm and 14mm, combination wrenches and sockets, 21mm
Camaro Camber Kit Installation
 Camaro Camber Kit Installation Part Name: Camaro Camber Kit Part Number: 1410120/1410111 Application: 2010 + Chevrolet Camaro V8 and V6 Level of Difficulty: Moderate Expected Installation Time: 2 Hours
2017 Current Ford Raptor HoneyBadger Rear Bumper Installation Instructions
 2017 Current Ford Raptor HoneyBadger Rear Bumper Installation Instructions PREPARATION 1. Disconnect the negative terminal on the battery. Park the vehicle on level ground and set the emergency brake.
2. Remove the front lower half of the fender liners on both the left and right sides. Remove the center under tray as well.
 1. Raise and support the front of the vehicle with either jack stands or a lift, and remove the front wheels. 2. Remove the front lower half of the fender liners on both the left and right sides. Remove
Ford E350/E450 Super Duty (2004-present) Part #SSR ~ SSR ~ SSR Installation Instructions
 Part #SSR ~ SSR ~ SSR Installation Instructions") Ford E350/E450 Super Duty (2004-present) Part #SSR-106-40-1 ~ SSR-106-47-1 ~ SSR-106-54-1 Installation Instructions Drivers side (Passenger s side similar) Parts List Item Part # Description Qty. A 512067/8
Ford E350/E450 Super Duty (2004-present) Part #SSR-106-40-1 ~ SSR-106-47-1 ~ SSR-106-54-1 Installation Instructions Drivers side (Passenger s side similar) Parts List Item Part # Description Qty. A 512067/8
Product: Camaro Spec Adjustable Heavy Duty Sway Bar Package
 Product: Camaro Spec Adjustable Heavy Duty Sway Bar Package Part Number: 440-402001-G Applications: Chevrolet Camaro SS, and ZL1 2012 - Current Description: These racing sway bars are engineered to be
COIL-OVER SUSPENSION SYSTEM
 Page 1 of 11 PART NUMBER: 220.50.631X, 220.60.631X INSTRUCTION SHEET NUMBER: 920.65.9800A COIL-OVER SUSPENSION SYSTEM APPLICATION: 1997-2013 CORVETTE PACKAGE CONTENTS: Coil-Over Assembly - Front Right
2010 Current Ford Raptor Lower Control Arm Installation Instructions
 PREPARATION 2010 Current Ford Raptor Lower Control Arm Installation Instructions 1. Disconnect the negative terminal on the battery. Park the vehicle on level ground and set the emergency brake. 2. We
Fig A ADDICTIVE DESERT DESIGNS. Preparation: Removal:
 Preparation: Disconnect the negative battery terminal. Park the vehicle on level ground and set the emergency brake. We recommend reading through the installation instructions in whole before performing
INSTALLATION INSTRUCTIONS ELEVATION REAR BUMPER FORD SUPERDUTY F #PW016687
 INSTALLATION INSTRUCTIONS #PW016687 PARTS LIST: 1 Elevation Bumper Assembly 2 Plastic Plugs for license plate mount 2 2-hole Spacer Plates (for tow hitch only) 8 4mm x 10mm Socket Head Screws 4 Sensor
(2) Blank Cover Plates. (2) Light Plates. (2) J Bolts
 Blank Cover Plates. (2) Light Plates. (2) J Bolts") PARTS LIST: 1 Tall-Size/Mid-Size/Short-size HD Headache Rack 16 10mm Lock Washers 1 Driver/Left Side Mounting Bracket 12 10mm Hex Nuts 1 Passenger/Right Side Mounting Bracket 4 10mm Nylon Lock Nuts 1 Rear
PARTS LIST: 1 Tall-Size/Mid-Size/Short-size HD Headache Rack 16 10mm Lock Washers 1 Driver/Left Side Mounting Bracket 12 10mm Hex Nuts 1 Passenger/Right Side Mounting Bracket 4 10mm Nylon Lock Nuts 1 Rear
Ford F150/Raptor & F150 Lower Control Arm Installation Instructions
 2009-2010 Ford F150/Raptor & 2015-2017 F150 Lower Control Arm Installation Instructions PREPARATION 1. Disconnect the negative terminal on the battery. Park the vehicle on level ground and set the emergency
09-13 FORD F150 4 LIFT KIT
 92159900 09-13 FORD F150 4 LIFT KIT THANK YOU FOR CHOOSING ROUGH COUNTRY FOR YOUR SUSPENSION NEEDS. Rough Country recommends a certified technician install this system. In addition to these instructions,
PRE-INSTALLATION Ford F150 4WD 4" Suspension Lift Kit
 2009-2013 Ford F150 4WD 4" Suspension Lift Kit PRE-INSTALLATION 25007 2 - Knuckle (Driv/Pass) 2 - Crossmember (Front/Rear) 2 - Differential Bracket (Driv/Pass) 1 - Diff. Brace Bracket (Pass) 2 - Front
ADDICTIVE DESERT DESIGNS
 Preparation: Disconnect the negative battery terminal. Park the vehicle on level ground and set the emergency brake. We recommend reading through the installation instructions in whole before performing
IE B9 A4/A5 Cold Air Intake Install Guide
 IE B9 A4/A5 Cold Air Intake Install Guide Thank you for purchasing another high quality Integrated Engineering product! This instruction guide is used for installation of IE s Cold Air Intake Kit for Audi
Lexus NX Fine Mesh and Dynamic Radar Cruise Control Fine Mesh Grilles
 IMPORTANT: PLEASE KEEP THIS INSTRUCTION MANUAL FOR FUTURE REFERENCE! 2015-16 Lexus NX Fine Mesh and Dynamic Radar Cruise Control Fine Mesh Grilles Upper Insert - factory chrome surround and emblem reused
TyrolSport UGSMIC Install Instructions for Audi A4.
 TyrolSport UGSMIC Install Instructions for Audi A4. Tools Necessary: Torx T25, T45. 10mm socket and ratchet. 6mm hex wrench. Flat blade screwdriver. Hacksaw blade or die grinder or dremel tool. Drill (not
INSTALLATION INSTRUCTIONS 64 ½ - 70 SUPERRIDE II INDEPENDENT FRONT SUSPENSION BX-350 FOR COYOTE AND MOD ENGINES
 INSTALLATION INSTRUCTIONS 64 ½ - 70 SUPERRIDE II INDEPENDENT FRONT SUSPENSION BX-350 FOR COYOTE AND MOD ENGINES Please read these instructions completely before starting your installation. Assemble suspension
 WWW.RUSHRACINGPRODUCTS.COM 1. Remove the saddlebags, side covers, and seat; place them to the side. 2. Disconnect the battery. EXHAUST SYSTEM REMOVAL 3. Cover the primary housing and transmission covers
RHINO SUSPENSION SYSTEM INSTALLATION INSTRUCTIONS
 PARTS INCLUDED: 2 FRONT UPPER A-ARMS 2 FRONT LOWER A-ARMS 2 UNI-BALL JOINTS 2 UNI-BALL JOINT STUDS 2 UNI-BALL JOINT CAPS 2 RETAINING RINGS 1 FRONT SHOCK ASSEM. 2 DELRON STEERING STOPS 2 SHOCK MOUNT SPACERS
The Driveshaft Shop One Piece Aluminum Driveshaft Install for GT/BOSS
 The Driveshaft Shop One Piece Aluminum Driveshaft Install for 2011-14 GT/BOSS Tools and Equipment needed: Install time: approximately 2-3 hours Ratcheting socket wrench socket extensions 1/2 drive breaker
Part# CE-9800H & CE-9801H Jeep Wrangler TJ / LJ Lift Kit Installation Instructions
 Part# CE-9800H & CE-9801H 1997 2006 Jeep Wrangler TJ / LJ Lift Kit Installation Instructions Please note that modifying the suspension of your Jeep Wrangler will affect the vehicle handling and stability
Installation Instructions
 Installation Instructions 6 Suspension System FTS25005BK / FTS25006BK 2006-2012 Nissan Frontier 2wd/4wd SHORT BED ONLY Tool List: (not included) Floor Jack & Jack Stands Assorted Metric & S.A.E Sockets
ADDICTIVE DESERT DESIGNS
 Preparation: Disconnect the negative battery terminal. Park the vehicle on level ground and set the emergency brake. We recommend reading through the installation instructions in whole before performing
SAFETY THIS PRODUCT IS FOR OFFROAD USE ONLY. ALL LIABILITY FOR INSTALLATION AND USE RESTS WITH THE OWNER.
 SAFETY Your safety and the safety of others is very important. In order to help you make informed decisions about safety, we have provided installation instructions and other information. These instructions
James Barone Racing Aftermarket Parts and Accessories
 Page1 James Barone Racing Aftermarket Parts and Accessories What you will need: Jack and Jack Stands Drill 1/8 and 1/4 drill bits Ratchet wrench 11mm socket Philips head screw driver Flat head screw driver
Ford F-150 Billet Grilles Upper Replacement
 2015-16 Ford F-150 Billet Grilles Upper Replacement Upper Black Billet Part #1045-019U-15B Upper Polished Billet Part #1045-019U-15 TOOLS REQUIRED Automotive grade masking tape, plastic clip removal tool,
Subaru WRX Performance Charge-Pipe System, 2015+
 PARTS LIST AND PARTS LIST 1PC BAR-AND-PLATE INTERCOOLER 1PC INTERCOOLER MOUNTING BRACKET 1PC CHARGE-PIPE ASSEMBLY 1PC AIR DIVERTER WITH ATTACHED RUBBER GASKETS 1PC CHARGE-PIPE-TO-INTERCOOLER HOSE INSTALLATION
1203AA GM A-BODY Double Adjustable Trailing Arms
 1203AA 64-67 GM A-BODY Double Adjustable Trailing Arms Warning: This installation should be performed by a trained professional. Note, pictures in this booklet are from a 77-96 GM B Body. Installation
INSTALLATION MANUAL
 INSTALLATION MANUAL 1500350 Parts List 1 Driver / left inner fender liner 1 Passenger / right inner fender liner 4 Z-hanger brackets 1 Thread-set bolt, M6 1 Thread-set washer 1 Thread-set spacer 22 Hex
Install Guide Billet + Spherical MQB Dogbone Mount
 Billet + Spherical Dogbone Mount, 8S Audi TT RS & Installation Spiciness Rating 8V Audi RS3 (Mild) Installation of your 034Motorsport Billet + Spherical Dogbone Mount is a straightforward process that
MM Tubular K-Member, (Mm5KM-7)
") 3430 Sacramento Dr., Unit D San Luis Obispo, CA 93401 Telephone: 805/544-8748 Fax: 805/544-8645 www.maximummotorsports.com MM Tubular K-Member, 2005-14 (Mm5KM-7) This Kit Contains Congratulations on purchasing
3430 Sacramento Dr., Unit D San Luis Obispo, CA 93401 Telephone: 805/544-8748 Fax: 805/544-8645 www.maximummotorsports.com MM Tubular K-Member, 2005-14 (Mm5KM-7) This Kit Contains Congratulations on purchasing
AEV-Nth JK High Steer Kit Installation Instructions
 AEV-Nth JK High Steer Kit Installation Instructions designed for: 2007-current Jeep JK Wrangler and Unlimited models in all trim levels including Rubicon with at least 3.0 of suspension lift. Vehicle Applications
TOYOTA TUNDRA SKID PLATE Preparation
 Preparation Part Number: PT98-4140 Kit Contents Item # Quantity Reqd. Description 1 1 Skid Plate (Pre-Assembled with Hardware) 2 1 Hardware Bag Hardware Bag Contents Item # Quantity Reqd. Description 1
INSTALLATION INSTRUCTIONS
 INSTALLATION INSTRUCTIONS OUTLAW FRONT BUMPER APPLICATION: 2014-2018 TOYOTA TUNDRA PART NUMBER: 58-61035 CONTENT ITEM QUANTITY DESCRIPTION TOOLS NEEDED 1 1 FRONT BUMPER ASSEMBLY 18MM WRENCH 2,3 2 MESHED
Fig A ADDICTIVE DESERT DESIGNS. Preparation: Removal: Release these clips
 Preparation: Disconnect the negative battery terminal. Park the vehicle on level ground and set the emergency brake. We recommend reading through the installation instructions in whole before performing
2014 F /6 LIFT KIT
 92157500 2014 F-150 4 /6 LIFT KIT THANK YOU FOR CHOOSING ROUGH COUNTRY FOR YOUR SUSPENSION NEEDS. Rough Country recommends a certified technician install this system. In addition to these instructions,
MM Rear Coil-Over Kit - Bilstein Shocks (MMCO-3)
") 3430 Sacramento Dr., Unit D San Luis Obispo, CA 93401 Telephone: 805/544-8748 Fax: 805/544-8645 www.maximummotorsports.com MM Rear Coil-Over Kit - Bilstein Shocks (MMCO-3) Read all instructions before
3430 Sacramento Dr., Unit D San Luis Obispo, CA 93401 Telephone: 805/544-8748 Fax: 805/544-8645 www.maximummotorsports.com MM Rear Coil-Over Kit - Bilstein Shocks (MMCO-3) Read all instructions before
IE MK5 & MK6 Downpipe Install Guide IEEXCC5
 IE MK5 & MK6 Downpipe Install Guide IEEXCC5 Thank you for purchasing another high quality Integrated Engineering product! This instruction guide is used for installation of IE s 3 Downpipe System for VW
Installation of Van Steel Tubular A-Arms & Coilovers
 Installation of Van Steel Tubular A-Arms & Coilovers Tools Needed ¾ Wrench & Socket 3/8 Allen Head Socket/T-handle Pry Bar or Long Screwdriver Torque Wrench Rubber Mallet Once you have the old arms removed
AEV30308AA Last Updated: 05/31/18. 4 DUALSPORT sc SUSPENSION system for RAM 1500 air ride standard and rebel INSTALLATION GUIDE
 AEV30308AA Last Updated: 05/31/18 4 DUALSPORT sc SUSPENSION system for RAM 1500 air ride standard and rebel INSTALLATION GUIDE PLEASE READ BEFORE YOU START TO GUARANTEE A QUALITY INSTALLATION, WE RECOMMEND
Install Guide MQB 1.8T/2.0T Cast Downpipe
 Cast Stainless Steel Performance Downpipe, 8V Audi A3/S3 & MkVII Volkswagen Golf/GTI/R Installation Spiciness Rating (Spicy) Installation of your 034Motorsport Cast Downpipe is a complex process. We recommend
Full Tilt Boogie (FTBR) Subframe Bushing Kit Install (99-04 Cobra)
 Subframe Bushing Kit Install (99-04 Cobra)") Full Tilt Boogie (FTBR) Subframe Bushing Kit Install (99-04 Cobra) Tools Required: Jack and jack stands (Or a lift) Metric sockets 8,12,15,18,21mm and a 12pt 12mm socket for driveshaft bolts T40 torx bit
Full Tilt Boogie (FTBR) Subframe Bushing Kit Install (99-04 Cobra) Tools Required: Jack and jack stands (Or a lift) Metric sockets 8,12,15,18,21mm and a 12pt 12mm socket for driveshaft bolts T40 torx bit
INSTALLATION INSTRUCTIONS
 INSTALLATION INSTRUCTIONS ULTIMATE BULL BAR APPLICATION: 2016-2018 Chevrolet Silverado 1500 2016-2018 GMC Sierra 1500 PART NUMBER: 32-3870, 32-3875, 32-3870L, 32-3875L, 32-3920, 32-3925. ITEM QUANTITY
APIKOL Ur-S4/S6 Gen. II Front Mount Intercooler INSTALLATION INSTRUCTIONS
 APIKOL Ur-S4/S6 Gen. II Front Mount Intercooler INSTALLATION INSTRUCTIONS Only work underneath your vehicle after properly supporting it with adequate jack stands on a flat surface. NEVER work under a
Product: Variable Height Spring. Part Numbers: N. Applications: BMW F8x, M2/M3/M
 Product: Variable Height Spring Part Numbers: 415-503001-N Applications: BMW F8x, M2/M3/M4 2014-17 Contents in the box: Qty Part # Description 1 00P-0A1646-B Front Passenger Sleeve Assembly 1 00P-0A1645-N
VW & Audi TDI CR140 ECO KIT Installation Guide
 VW & Audi TDI CR140 ECO KIT Installation Guide This guide is to help you install your new Rawtek DPF, EGR & Adblue Delete Exhaust ECO Kit on your (2009-2014) VW / Audi with 2.0l CR140 Diesel Engine. Note:
GM C10 Street Grip
 Part # 11365010/11365110-1973-1987 GM C10 StreetGrip Front Components 11369590 Delrin Control Arm Bushings 11369300 Drop Spindles 11362350/11362351 Front CoilSpring Kit 11369515 Front HQ Series Shocks
COBB SPORT SPRINGS
 915760 - COBB SPORT SPRINGS 2008-2013 Subaru WRX/STi Congratulations on your purchase of the COBB Sport Springs for your 2008-2013 Subaru WRX/STi. The following instructions will assist you through your
Toyota Tacoma Winch Mount Bumper Installation Instructions Tools Required: Transmission cooler relocation brackets Torque Wrench
 2016-2017 Toyota Tacoma Winch Mount Bumper Installation Instructions Tools Required: Items Included: Small flat head screw driver Winch Mount Ratchet, 10mm, 12mm, 14mm, 17mm & Skid Plate 19mm sockets Transmission
ZJ 4-Link Rear Long Arm Upgrade Instructions
 Parts Checklist: Instructions Iron Rock Off Road logo decal (Qty: 1) Rock-Link decal 13287 (2) ironrockoffroad.com Decal (1) Crossmember 99118 (1) 3/16 steel brake line tubing (5 feet) Coil spring retainer
PRE-INSTALLATION. INSTALLATION INSTRUCTIONS Front Ford F150 4WD 4" Suspension Lift Kit
 2015 Ford F150 4WD 4" Suspension Lift Kit PRE-INSTALLATION 2 - Knuckle (Driv/Pass) 2 - Crossmember (Front/Rear) 2 - Differential Bracket (Driv/Pass) 1 - Diff. Brace Bracket (Pass) 2 - Front Brake Line
RAM FRONT RADIUS ARM DROP BRACKETS Installation Instructions
 THE INFORMATION CONTAINED IN THIS DRAWING IS THE SOLE PROPERTY OF SYNERGY MFG. ANY REPRODUCTION IN PART OR WHOLE WITHOUT THE WRITTEN PERMISSION OF SYNERGY MFG IS PROHIBITIED. Revisions Rev. Description
Winch Mounting Plate for Wrangler
 Winch Mounting Plate for 87-06 Wrangler Installation Manual # 92122.2900 Winch Plate is designed to accommodate standard winch mounting footprint. Should it become necessary to drill into plate, do so
INSTALLATION INSTRUCTIONS ELEVATION REAR BUMPER FORD F150
 INSTALLATION INSTRUCTIONS PARTS LIST: 1 Elevation Bumper Assembly 2 Plastic Plugs (license plate mount) 6 12-1.75mm x 50mm Hex Bolts 8 4mm x 10mm Socket Head Screws 12 12mm x 37mm OD x 3mm Flat Washers
AEV30213AH Last Updated: 04/28/17. jk wrangler dualsport sc suspension INSTALLATION GUIDE
 AEV30213AH Last Updated: 04/28/17 jk wrangler 3.5 4.5 dualsport sc suspension INSTALLATION GUIDE PLEASE READ BEFORE YOU START TO GUARANTEE A QUALITY INSTALLATION, WE RECOMMEND READING THESE INSTRUCTIONS
SAFETY THIS PRODUCT IS FOR OFFROAD USE ONLY. ALL LIABILITY FOR INSTALLATION AND USE RESTS WITH THE OWNER.
 SAFETY Your safety and the safety of others is very important. In order to help you make informed decisions about safety, we have provided installation instructions and other information. These instructions
Thank you for purchasing your new Carbon Fiber Front Strut Brace, we appreciate your business! Project Overview:
 Skill Level 1 - Easy Audi B8 Carbon Fiber Front Strut Brace Installation Instructions Thank you for purchasing your new Carbon Fiber Front Strut Brace, we appreciate your business! Project Overview: Adding
License Plate Bracket (4) Rubber Plugs. (2) Retaining Rings (2) Foam Spacers
 Rubber Plugs. (2) Retaining Rings (2) Foam Spacers") LDB-NTIT62-FB PARTS LIST: 1 LD1 Bumper Assembly 2 8mm Hex Nuts 1 Driver/left L Bracket (center LED light) 2 6mm x 20mm Button Head Bolts 1 Passenger/right L Bracket (center LED light) 4 6mm x 18mm x 1.6mm
LDB-NTIT62-FB PARTS LIST: 1 LD1 Bumper Assembly 2 8mm Hex Nuts 1 Driver/left L Bracket (center LED light) 2 6mm x 20mm Button Head Bolts 1 Passenger/right L Bracket (center LED light) 4 6mm x 18mm x 1.6mm
09-UP F150 2WD 6 LIFT KIT
 92157300 09-UP F150 2WD 6 LIFT KIT THANK YOU FOR CHOOSING ROUGH COUNTRY FOR YOUR SUSPENSION NEEDS. Rough Country recommends a certified technician install this system. In addition to these instructions,
If you have any difficulties at all, please give us a call. Thank you and enjoy your MetalCloak Products!
 PRODUCT: TJ/LJ 3.5 Dual Rate Lift RockSport Edition READ INSTRUCTIONS IN FULL BEFORE INSTALLATION. QUESTIONS? CALL 916-631-8071 M-F 7:00 AM 5:00 PM PST The MetalCloak experience includes the ease of installation
DL650 Odyssey Luggage Installation Guide
 DL650 Odyssey Luggage Installation Guide Thank you for purchasing Jesse Luggage for your Motorcycle. Our Luggage, handcrafted in the USA, is designed for those with an interest in finding the most durable
2005-Pres. Ford Mustang Camber Plate Installation Instructions:
 2005-Pres. Ford Mustang Camber Plate Installation Instructions: J&M Products once again outdoes our competitors with these fully adjustable PATENT PENDING Camber & Caster plate assemblies for the 2005-2010
ToyTec Front Suspension Install Instructions 2.5" Coilovers Toyota 4Runner / FJ Cruiser ( NON-KDSS)
") ToyTec Front Suspension Install Instructions 2.5" Coilovers 2010+ Toyota 4Runner / FJ Cruiser ( NON-KDSS) Note: ToyTec recommends that all products are installed by trained professionals. List of contents:
ToyTec Front Suspension Install Instructions 2.5" Coilovers 2010+ Toyota 4Runner / FJ Cruiser ( NON-KDSS) Note: ToyTec recommends that all products are installed by trained professionals. List of contents:
INSTALLATION INSTRUCTIONS
 INSTALLATION INSTRUCTIONS OUTLAW FRONT BUMPER APPLICATION: 2016-2018 Chevrolet Silverado 1500 PART NUMBER: 58-61005 CONTENT ITEM QUANTITY DESCRIPTION TOOLS NEEDED 1 1 FRONT BUMPER ASSEMBLY 18MM WRENCH
/3500 Dodge 5 Lift Kit Drop Brackets
 923913000A 2003-07 2500/3500 Dodge 5 Lift Kit Drop Brackets Thank you for choosing Rough Country Suspension for your Off Road needs. Rough Country recommends a certified technician installs this system.
MK5/MK6 Panzer Plate Install Instructions
 MK5/MK6 Panzer Plate Install Instructions This is the install procedure for the dieselgeek.com MK5/MK6 Panzer Plate Skid Plate Kits. These instructions are for the following vehicles, regardless of engine
Savvy Off Road Front Bumper TJ/LJ
 Savvy Off Road Front TJ/LJ 1997-2006 Thank you for the purchase of our Front. Our front bumpers are available in two thicknesses 3/16 and 1/4 to suit your off-road needs. They are made from 6061-T6 aluminum
Installation Manual TWM Performance Short Shifter Subaru STi 2008+
 - 1 - Installation Manual TWM Performance Short Shifter Subaru STi 2008+ Please Note: It is preferable to park on a flat surface, as you will have to engage and disengage the hand brake and shift from
(1) License Plate Light (2) License Plate Plugs
 License Plate Light (2) License Plate Plugs") PARTS LIST: 1 HD Replacement Bumper 4 12mm x 40mm Hex Bolts 1 Driver/Left Bracket 4 12mm Nylon Lock Nuts 1 Passenger/Right Bracket 8 12mm x 37mm x 3mm Oversize Flat Washers 2 Thin Side Spacers 4 Rubber
PARTS LIST: 1 HD Replacement Bumper 4 12mm x 40mm Hex Bolts 1 Driver/Left Bracket 4 12mm Nylon Lock Nuts 1 Passenger/Right Bracket 8 12mm x 37mm x 3mm Oversize Flat Washers 2 Thin Side Spacers 4 Rubber
DODGE OFF ROAD T-STYLE STEERING KIT INSTALLATION INSTRUCTIONS
 Dodge Off Road, LLC Specializing in Dodge Ram Solid-Axle 4x4 Suspension and Steering for Off Road Applications 855.9009.DOR sales@dodgeoffroad.com dodgeoffroad.com DODGE OFF ROAD T-STYLE STEERING KIT INSTALLATION
COBB WRX Sports Springs West 1820 South Salt Lake City, UT USA (801)
") COBB 3362 West 1820 South Salt Lake City, UT 84104 USA (801) 713-0035 2008 WRX Sports Springs Congratulations on your purchase of the COBB Sports Springs. The following instructions should assist you through
COBB 3362 West 1820 South Salt Lake City, UT 84104 USA (801) 713-0035 2008 WRX Sports Springs Congratulations on your purchase of the COBB Sports Springs. The following instructions should assist you through
Max IV Rear Axle Replacement For models after Serial Number and all rear splined axle replacements.
 Max IV Rear Axle Replacement For models after Serial Number 19089 and all rear splined axle replacements. 10/8/03 Max IV Snap Ring Rear Axle replacement.doc Tools required: 9/16 Wrench 6 Extension Steel
4 th Gen 4 Runner Front Bumper - Installation Instructions:
 www.shrockworks.com info@shrockworks.com 877-474-7625 4 th Gen 4 Runner Front Bumper - Installation Instructions: Thank you for purchasing a ShrockWorks product. We are confident you will enjoy it for
SAFETY THIS PRODUCT IS FOR OFFROAD USE ONLY. ALL LIABILITY FOR INSTALLATION AND USE RESTS WITH THE OWNER.
 SAFETY Your safety and the safety of others is very important. In order to help you make informed decisions about safety, we have provided installation instructions and other information. These instructions
INSTALLATION INSTRUCTIONS
 INSTALLATION INSTRUCTIONS OUTLAW FRONT BUMPER APPLICATION: 2013-2018 Dodge Ram 1500 PART NUMBER: 58-61025 ITEM QUANTITY DESCRIPTION TOOLS NEEDED 1 1 OUTLAW FRONT BUMPER 18MM WRENCH 2 1 UPPER SKID PLATE
CHECK ALL PARTS INCLUDED IN THIS KIT TO THE PARTS LIST BEFORE INSTALLATION. IF ANY PIECES ARE MISSING, PLEASE CONTACT: TOTAL COST INVOLVED
 333-TCIE237 1967-1969 Chevy Camaro Front End, 1968-1972 Chevy Nova Front End 1967-1969 Pontiac Firebird Front End Suspension Installation Instructions 1-855-693-1259 www.totalcostinvolved.com CHECK ALL
M7 R56 Strut Tower Brace (J-Brace Model) 56-5M7104 Installation Guide. THIS PRODUCT DOES NOT FIT ON THE BASE MODEL COOPER (Non S, Non-Turbo)
 56-5M7104 Installation Guide. THIS PRODUCT DOES NOT FIT ON THE BASE MODEL COOPER (Non S, Non-Turbo)") M7 R56 Strut Tower Brace (J-Brace Model) 56-5M7104 Installation Guide THIS PRODUCT DOES NOT FIT ON THE BASE MODEL COOPER (Non S, Non-Turbo) Tools (not included): 13 mm Socket 15 mm Socket or wrench Socket
M7 R56 Strut Tower Brace (J-Brace Model) 56-5M7104 Installation Guide THIS PRODUCT DOES NOT FIT ON THE BASE MODEL COOPER (Non S, Non-Turbo) Tools (not included): 13 mm Socket 15 mm Socket or wrench Socket
You will be removing the suspension of your vehicle. If you are not comfortable with this or do not have the proper tools, please do not proceed.
 Thank you for purchasing the CorkSport Mazda 3 and Mazdaspeed 3 Coilover Kit. This suspension system features 15-way adjustable dampening settings and full length adjustment to meet every driver s handling
VRSC-DX Truck-Lite LED Headlight Installation Instructions
 VRSC-DX Truck-Lite LED Headlight Installation Instructions The following Instructions are for installing a 7 Truck-Lite LED headlight into a Harley Davidson VRSC-DX Night Rod Special fairing. Other 7 headlights