EN: CIGARETTE LIGHTER KIT LEGACY / OUTBACK, IMPREZA, ASCENT,FORESTER. Installation Instruction. No. Name Qty Socket ASSY 1 Plug 1 Ring 1 TOOLS NEEDED
|
|
|
- Candice Greer
- 5 years ago
- Views:
Transcription


1 04 EN: CIGARETTE LIGHTER KIT LEGACY / OUTBACK, IMPREZA, ASCENT,FORESTER Installation Instruction PART No. H6710AL010 EN: COMPONENTS No. Name Qty Socket ASSY 1 Plug 1 Ring TOOLS NEEDED PRECAUTIONS Please refer to the precautions below before you begin work, in order to install the product safely and accurately Please also refer to the vehicle Service manual. This manual shows typical installation procedures on LHD vehicle. Installation will be mirror image for RHD vehicles. ATTENTION Please disconnect the battery cable while conducting wiring operations. Failure to do so may result in electrical shock or injury. Please confirm that the electrical components of the vehicle operate normally. Also, please make an note of data in the memory of the electrical components such as the radio. This will help avoid problems that may arise when performing the repair check after the installation. When tightening bolts or screws, use the proper tools and the proper size, and comply for the specified torque specified for the part. Failure to securely tighten the bolt and nut may cause them to loosen and fall off, causing damage. When removing the connector from the vehicle, remember to remove the lock that holds the main body of the connector, instead of pulling the lead line. This protects against a lead wire cuts, etc. 1
2 Please be sure to properly connect the connector and terminal. This helps to avoid a poor connection. When wiring the harness(wiring), clamp the wires together along with the wiring harness of the vehicle. This protects the harness from becoming entangled or causing strange sounds. When connecting or disconnecting parts or installing or removing the finisher, etc, be careful not to let the harness be hooked or pulled from the back. This protects against a cut wire or shorts. Be careful not to forcefully pull the wiring harness of the vehicle. This helps prevent the connector from being disconnected, and the wires from being cut or damaged. After installing the wiring, perform an operations check on the newly installed parts before reassembling. This helps prevent mis-wiring. LEGACY / OUTBACK BEFORE BEGINNING INSTALLATION 1. Apply parking brake firmly and shift the selector lever in N range. 2. Disconnect the battery negative cable. MOUNTING THE CIGERETTE LIGHTER (REPLACING WITH ACCESSORY SOCKET) 1. Removing associated parts - Upon removal, wrap the screwdriver with vinyl tape to avoid scratching the ornament panels. 2
3 1 2 3 (a) Before Action (a), remove 2 phillips screws. (a) (a) 3
4
5 7 8 9 Tightening torque: 6.5 Nm / 4.8 ft-lb 5
6 Install ring set Remove ring Install cigarette lighter as set Re-install the removed parts Remove socket 6

 2-1.")
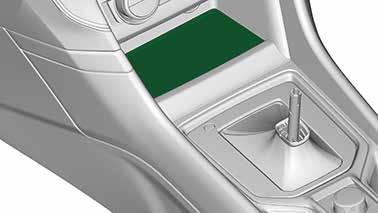
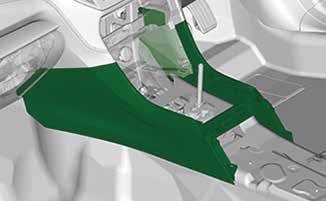
7 IMPREZA 1. BEFORE BEGINNING INSTALLATION Apply parking brake firmly and shift the selector lever in N range. For models with power seats, move the seats to the furthest forward position before disconnecting the battery negative cable. Open the engine hood and disconnect the battery negative cable. WARNING When the battery cable is disconnected, data such as memory stored in the audio system may be lost. Make sure to keep such information before disconnecting the battery cable. Illustration 1 2. INSTALLING THE CIGARETTE LIGHTER (REPLACING WITH ACCESSORY POWER SOCKET) 2-1. Removal of related parts (1) Lift up the cup holder and remove the clips located towards the rear end of the cover ASSY - front (models with hand brake) (Illustration 1). Illustration 2 (2) Remove the boot - hand brake (models with hand brake) (Illustration 2). 7
 or the cover grip AT (for blind type models)")

 Remove the cover ASSY front (models with EPB) (Illustration")
8 Illustration 3 (3) Remove the selector knob (Illustration 3) Pull down the boot ASSY (for boot type models) or the cover grip AT (for blind type models) vertically along the lever in the direction. Remove the pin by pulling it forward in the direction. Remove grip ASSY. (4) Remove the shift knob (MT model). Illustration 4 (5) Remove the cover ASSY front (models with EPB) (Illustration 4). Illustration 5 (6) Remove the cover ASSY front (models with hand brake) (Illustration 5). 8

 Pull out the harness connector (models with hand brake) (Illustration 7). (9) Remove the mat - center tray and tray center LWR.")
 Remove the console box ASSY (models with EPB) (Illustration 8). 9")
9 Illustration 6 (7) Pull out the harness connector (models with EPB) (Illustration 6). WARNING For models with keyless entry and push-button start system, an interior antenna is located in the inner side of the tray - center LWR. Take care not to damage the harness when removing the cover ASSY - front. Illustration 7 (8) Pull out the harness connector (models with hand brake) (Illustration 7). WARNING For models with keyless entry and push-button start system, an interior antenna is located in the inner side of the tray - center LWR. Take care not to damage the harness when removing the cover ASSY - front. (9) Remove the mat - center tray and tray center LWR. WARNING The mat may be damaged if you remove the Mat - center tray first. Make sure to remove mat center tray and tray - center LWR together. Illustration 8 (10) Remove the console box ASSY (models with EPB) (Illustration 8). 9
 Remove the panel center LWR (Illustration 10).")
 (Illustration 11).")

10 Illustration 9 (11) Remove the console box ASSY (models with hand brake) (Illustration 9). Illustration 10 (12) Remove the panel center LWR (Illustration 10). Illustration 11 protective tape (13) Attach a protective tape to the instrument panel (for models with audio or navigation system) (Illustration 11). (14) Remove the grille ASSY - CTR ventilation (for models with audio or navigation system) (Illustration 11). WARNING In order to avoid the grille ASSY - CTR ventilation from being damaged, wrap the remover with protective tape or cloth, and remove it by pressing the remover against the side of the instrument panel. 10
 (Illustration 12).")
 (Illustration 13).")
11 Illustration 12 (15) Remove the panel - center UPR (for models with audio or navigation system) (Illustration 12). Illustration 13 (16) Remove the audio or navigation system (for models with audio or navigation system) (Illustration 13). Illustration 14 (17) Remove the pocket ASSY (manual A/C model) (Illustration 14). 11
 (Illustration 15).")
 (Illustration 16).")
 (Illustration")
12 Illustration 15 (18) Remove the under cover ASSY - passenger (manual A/C model) (Illustration 15). Illustration 16 (19) Remove the cover - instrument panel side RH (manual A/C model) (Illustration 16). Illustration 17 (20) Remove the ornament - panel ASSY passenger (manual A/C model) (Illustration 17). 12
 (Illustration 18).")
 (Illustration 19).")

13 Illustration 18 (21) Remove the back panel - pocket (manual A/ C model) (Illustration 18). Illustration 19 (22) Disconnect the cable - mode and cable - temperature (manual A/C model) (Illustration 19). WARNING Check the dial position before disconnecting the cables. Illustration 20 (23) Push the heater control ASSY from behind and remove it (Illustration 20). 13
 Pull out the 2 polar (white) power connector from the accessory")
 Remove the tray - center UPR (Illustration 22).")
 attached to the tray center UPR and remove the")
14 Illustration 21 (24) Pull out the USB connector (Illustration 21). (25) Pull out the 2 polar (white) power connector from the accessory power socket (Illustration 21). Illustration 22 (26) Remove the tray - center UPR (Illustration 22). Illustration 23 (27) Using a flat tip screwdriver, press the 2 claws of the holder (black) attached to the tray center UPR and remove the accessory power socket (Illustration 23). 14
 and the hole of socket are fitted firmly (Illustration 24). (2) Confirm the fitting of socket, and insert the cigarette lighter into socket.")
 socket cigarette lighter socket terminal power connector 2 polar (white) 2-3. Operation check (1) Connect the battery and shift the selector lever in the P range.")
15 2-2. Installation of related parts (1) Install socket along the groove of the holder (black) attached to the tray center UPR. Make sure that the holder (black) and the hole of socket are fitted firmly (Illustration 24). (2) Confirm the fitting of socket, and insert the cigarette lighter into socket. (3) Firmly connect the power connector (2 polar) to the terminal of the accessory power socket. (4) Connect the USB connector. (5) Install the related parts in the reverse order of removal. Illustration 24 groove holder (black) socket cigarette lighter socket terminal power connector 2 polar (white) 2-3. Operation check (1) Connect the battery and shift the selector lever in the P range. Turn the ignition/starter switch to the ACC position, and check that the cigarette lighter operates normally. (2) Check the operation of the other removed parts. Set the clock and settings for audio system, etc. and complete the procedure by cleaning the vehicle. 15
 1.")
16 ASCENT BEFORE BEGINNING INSTALLATION 1. Apply parking brake firmly and shift the selector lever in N range. 2. Disconnect the battery negative cable MOUNTING THE CIGERETTE LIGHTER (REPLACING WITH ACCESSORY SOCKET) 1. Removing associated parts - Upon removal, wrap the screwdriver with vinyl tape to avoid scratching the ornament panels. 1 16


17 2 C62(W) Carefully remove vent trim on each side of the radio. Use a trim tool to remove, starting at the bottom section as shown. Follow the vehicle service manual for complete removal instruction. 17


18 3 4 C62(W) x4 Tightening torque: 1.8 N m / 1.3 ft-lb 18


19 5 Pawl Pawl 6 Align Re-install the removed parts Reconnect the battery Shift the selector lever into P from N Install cigarette lighter as shown 19


 1.")

20 FORESTER BEFORE BEGINNING INSTALLATION 1. Apply parking brake firmly and shift the selector lever in N range. 2. Disconnect the battery negative cable MOUNTING THE CIGERETTE LIGHTER (REPLACING WITH ACCESSORY SOCKET) 1. Removing associated parts - Upon removal, wrap the screwdriver with vinyl tape to avoid scratching the ornament panels. 1 2 (a) C63(L) 3 (a) 20
 6")

21 4 5 C63(L) 6 C63(L) 21
 8")

22 7 C63(L) C62(W) 8 x2 C63(L) x2 9 C63(L) 22


23 10 11 Align Re-install the removed parts Reconnect the battery Shift the selector lever into P from N Install cigarette lighter as shown 23
24 24 Content of revision Added procedure for Impreza 10/ Added procedure for ASCENT 1/ Added procedure for FORESTER 7/ 2018
EN: CIGARETTE LIGHTER KIT LEGACY / OUTBACK IMPREZA. Installation Instruction. No. Name Qty Socket ASSY 1 Plug 1 Ring 1 TOOLS NEEDED
 02 EN: CIGARETTE LIGHTER KIT LEGACY / OUTBACK IMPREZA PART No. EN: COMPONENTS No. Name Qty Socket ASSY 1 Plug 1 Ring 1 Installation Instruction H6710AL010 1 2 3 TOOLS NEEDED PRECAUTIONS Please refer to
Cargo Socket Kit. Securely connect connectors and terminals. Failure to do so can result in poor connections.
 00 Cargo Socket Kit Fitting Model OUTBACK October 2014 and later Installation Instructions PART No. H6710AL100 J: To those installing this product Important 1. We recommend that you ask the SUBARU dealer
IR 13 INTERIOR ROOF HEADLINING REMOVAL
 INTERIOR ROOF HEADLINING 13 REMOVAL 1. DISCONNECT CABLE FROM NEGATIVE BATTERY TERMINAL 2. REMOVE REAR SEATBACK BOARD CARPET ASSEMBLY RH (See page SE-43) 3. REMOVE REAR SEATBACK ASSEMBLY RH (See page SE-43)
2004 TL - Center Console Panel Removal/Installation
 2004 TL - Center Console Panel Removal/Installation Special Tools Required KTC trim tool set SOJATP2014 NOTE: Use the appropriate tool from the KTC trim tool set to avoid damage when prying components.
INSTALLATION INSTRUCTIONS
 INSTALLATION INSTRUCTIONS Accessory Application Publications No. CD/CASSETTE PLAYER 2005 CIVIC 2- AND 4-DOOR AII 27857 Issue Date AUG 2004 PARTS LIST Cassette Player: P/N 08A53-S5A-100 Cassette player
INSTALLATION INSTRUCTIONS
 INSTALLATION INSTRUCTIONS Accessory Application Publications No. SYSTEM ACCORD 2-DOOR (LX/EX L4, LX V6) AII 25749 Issue Date FEB 2004 PARTS LIST Double-sided adhesive tape XM Radio Attachment Kit : P/N
INSTRUMENT PANEL ASSEMBLY. INSTRUMENT PANEL ASSEMBLY Component Parts Drawing IP-10 PFP:68200 AIS005BC PIIB0009E
 INSTRUMENT PANEL ASSEMBLY Component Parts Drawing PFP:68200 AIS005BC PIIB0009E IP-10 1. Passenger air bag module 2. Front defroster grille (LH) 3. Front defroster grille (RH) 4. Cluster Lid A 5. Instrument
INSTALLATION INSTRUCTIONS
 INSTALLATION INSTRUCTIONS Accessory Application Publications No. AII 32664 TRUNK MOUNT 2007 ACCORD 4-DOOR Issue Date JULY 2006 PARTS LIST 17 Wire ties Attachment Kit (sold separately): P/N 08B26-SDA-100
INSTALLATION INSTRUCTIONS
 INSTALLATION INSTRUCTIONS Accessory Application Publications No. AII 27871 CIVIC IN-DASH CD CHANGER 2- AND 4-DOOR Issue Date AUG 2004 PARTS LIST In-Dash CD Changer Attachment: P/N 08B06-S5D-110 CD Changer
AC 110V POWER OUTLET INSTALLATION INSTRUCTIONS. Part No. Application 1. PRE INSTALLATION / INSTALLATION OVERVIEW 2. KIT CONTENTS H7110AJ100
 Part. Application H70AJ00 LEGACY / OUTBACK 0MY w/ HK audio LEGACY / OUTBACK 0MY w/o HK audio AC 0V POWER OUTLET INSTALLATION INSTRUCTIONS Page. -6,9-5 Page. -4,7-5. PRE INSTALLATION / INSTALLATION OVERVIEW
INSTALLATION INSTRUCTIONS
 INSTALLATION INSTRUCTIONS Accessory Application Publications No. (Trunk Mount) 2009 CIVIC 4-DOOR AII 40184 Issue Date AUG 2008 PARTS LIST 8 Cushion tapes Changer Attachment (Sold Separately) P/N 08B26-SNA-101
1. General Description
 EXERIOR/INERIOR RIM 1. General Description A: COMPONEN 1. FRON GRILLE General Description EI-00627 Front grille Front grille emblem Front grille clip 2. UNDER COVER EI-00681 ightening torque: N m (kgf-m,
REASSEMBLY IR INSTALL ROOF WIRE (a) Apply new double-sided tape to the roof headlining along the markings of the roof headlining.
 Apply new double-sided tape to the roof headlining along the markings of the roof headlining.") 31 REASSEMBLY 1. INSTALL ROOF WE (a) Apply new double-sided tape to the roof headlining along the markings of the roof headlining. Double-sided Tape Marking B130653E01 (b) NOTICE: Apply the tape securely
31 REASSEMBLY 1. INSTALL ROOF WE (a) Apply new double-sided tape to the roof headlining along the markings of the roof headlining. Double-sided Tape Marking B130653E01 (b) NOTICE: Apply the tape securely
AC 120V POWER OUTLET INSTALLATION INSTRUCTIONS. Part Number Description 1. PRE INSTALLATION / INSTALLATION OVERVIEW 2.
 Part Number Description :H70AL00 :Legacy AC 20V Power Outlet. PRE INSTALLATION / INSTALLATION OVERVIEW AC 20V POWER OUTLET INSTALLATION INSTRUCTIONS (In the case of car without RAB) (In the case of car
Replacement Cluster Fascia Replacement
 1 of 12 11/1/2013 9:13 AM SOUL(AM) >2010 > G 2.0 DOHC > Body (Interior and Exterior) Replacement Cluster Fascia Replacement When prying with a flat-tip screwdriver, wrap it with protective tape, and apply
ASX / OUTLANDER SPORT / RVR REAR VIEW CAMERA MZ380552EX INSTALLATION AND HANDLING INSTRUCTIONS
 ASX / OUTLANDER SPORT / RVR REAR VIEW CAMERA MZ380552EX INSTALLATION AND HANDLING INSTRUCTIONS Navigation (MMCS) unit Camera Thank you for purchasing the Mitsubishi Genuine Accessory. To install and use
INSTALLATION INSTRUCTIONS
 INSTALLATION INSTRUCTIONS Accessory Application Publications No. CASSETTE/MP3/ AII 30664 2006 ACCORD IN-DASH CD 2- AND 4-DOOR Issue Date ATTACHMENT AUG 2005 PARTS LIST cable Attachment Kit (sold separately):
INSTALLATION INSTRUCTIONS
 INSTALLATION INSTRUCTIONS Accessory Application Publications No. CHANGER ATTACHMENT (TRUNK MOUNT) 2005 CIVIC 4-DOOR AII 27890 Issue Date AUG 2004 PARTS LIST Changer Attachment (sold separately) P/N 08B26-S5D-100
INSTALLATION INSTRUCTIONS
 INSTALLATION INSTRUCTIONS Accessory Application Publications No. AUTOMATIC AII 27160 2005 CR-V Issue Date ATTACHMENT KIT SEP 2004 PARTS LIST Automatic Day/Night Mirror Attachment Kit (sold separately)
REMOVAL IR 11. Slide the inner rear view mirror.
 11 Slide REMOVAL CAUTION: Some of these service operations affect the SRS airbag system. Read the precautionary notices concerning the SRS airbag system before servicing (See page RS-1). 1. DISCONNECT
INSTALLATION INSTRUCTIONS
 INSTALLATION INSTRUCTIONS Accessory Application Publications No. XM RADIO SYSTEM 2006 CIVIC 4 DOOR (EX) AII 30852 Issue Date JAN 2006 PARTS LIST XM Radio Attachment (sold separately): P/N 08B15-SNA-100A
INSTALLATION INSTRUCTIONS
 INSTALLATION INSTRUCTIONS Accessory Application Publications No. AII 27996 ATTACHMENT KIT 2005 CIVIC HYBRID Issue Date AUG 2004 PARTS LIST Changer Attachment Kit: P/N 08B26-S5B-100 4 Washer-screws, 4 x
GENUINE Interior Lighting Kit
 GENUINE Interior Lighting Kit INSTALLATION INSTRUCTIONS Thank you for purchasing a genuine Mazda accessory. Before removal and installation, be sure to thoroughly read these instructions. Please read the
Plastic Trim Removal Tool Phillips Screwdriver (for vehicles w/ shift boot) Wire Cutter. (FOR VEHICLES w/o A SHIFT BOOT)
 Wire Cutter. (FOR VEHICLES w/o A SHIFT BOOT)") INSTALLATION INSTRUCTIONS C10FL0 DESCRIPTION: STI CVT SHIFT KNOB STI CVT SHIFT KNOB TOOLS REQUIRED: PARTS IDENTIFICATION: Plastic Trim Removal Tool Phillips Screwdriver (for vehicles w/ shift boot) Wire
INSTALLATION INSTRUCTIONS C10FL0 DESCRIPTION: STI CVT SHIFT KNOB STI CVT SHIFT KNOB TOOLS REQUIRED: PARTS IDENTIFICATION: Plastic Trim Removal Tool Phillips Screwdriver (for vehicles w/ shift boot) Wire
INSTALLATION INSTRUCTIONS
 INSTALLATION INSTRUCTIONS Accessory Application Publications No. CD CHANGER ATTACHMENT KIT 2005 CIVIC SI AII 27936 Issue Date AUG 2004 PARTS LIST CD Changer Attachment Kit (sold separately): P/N 08B26-S5T-100
Be sure to carry out the following before starting work
 Be sure to carry out the following before starting work If an older version of the CMU software is being used, the CarPlay/Android Auto-compatible USB hub may not be recognized. If the software version
HARNESS KIT F INSTALLATION INSTRUCTIONS. Vehicle: Mazda RX-8 Parts number F CFZ (ipod integration module) C9F4 V6 029 (Harness Kit F)
 C9F4 V6 029 (Harness Kit F)") GENUINE ipod INTEGRATION MODULE HARNESS KIT F INSTALLATION INSTRUCTIONS Vehicle: Mazda RX-8 Parts numberf197 79 CFZ (ipod integration module) C9F4 V6 029 (Harness Kit F) Thank you for purchasing a genuine
GENUINE ipod INTEGRATION MODULE HARNESS KIT F INSTALLATION INSTRUCTIONS Vehicle: Mazda RX-8 Parts numberf197 79 CFZ (ipod integration module) C9F4 V6 029 (Harness Kit F) Thank you for purchasing a genuine
INSTALLATION INSTRUCTIONS
 INSTALLATION INSTRUCTIONS Accessory Application Publications No. in- ENTERTAINMENT SYSTEM 2004 TSX BII 24811 Issue Date APRIL 2003 PARTS LIST Attachment Kit P/N 08B23-SDA-101A Monitor bracket harness FM
ED 13. ENGINE HOOD / DOOR FRONT DOOR (w/ Power Window) DISASSEMBLY
 DISASSEMBLY") 13 B088092E01 DISASSEMBLY Use the same procedures for both the LH and RH sides. 1. DISCONNECT CABLE FROM NEGATIVE BATTERY TERMINAL 2. REMOVE FRONT DOOR LOWER FRAME BRACKET GARNISH LH (a) Disengage the
13 B088092E01 DISASSEMBLY Use the same procedures for both the LH and RH sides. 1. DISCONNECT CABLE FROM NEGATIVE BATTERY TERMINAL 2. REMOVE FRONT DOOR LOWER FRAME BRACKET GARNISH LH (a) Disengage the
 INSTALLATION INSTRUCTIONS Accessory Application Publications No. XM RADIO SYSTEM 2006-2008 CIVIC 2- AND 4-DOOR (Si) AII 37662 Issue Date AUG 2007 PARTS LIST XM Radio Attachment (sold separately): P/N 08B15-SNA-100B
INSTALLATION INSTRUCTIONS
 INSTALLATION INSTRUCTIONS Accessory XM RADIO SYSTEM Application 2009 CIVIC 2-AND 4-DOOR (Si) Publications No. AII 40186 Issue Date AUG 2008 PARTS LIST XM Radio Attachment (sold separately): P/N 08B15-SNA-100B
TOYOTA TACOMA INTERFACE KIT FOR IPOD Preparation
 Preparation Part Number: PT545-00082 Kit Contents Item # Quantity Reqd. Description 1 1 Unit Assembly Kit 2 1 Mounting Kit 3 1 Hardware Bags 4 1 Unit and Fit Kit List 5 1 Owner s Manual Unit Assembly Kit
 INSTALLATION INSTRUCTIONS Accessory Application 2010 CR-V Publications No. AII 42592 Issue Date AUG 2009 PARTS LIST Bass Works Attachment kit (sold separately) P/N 08B54-SWA-100 Bass system harness 4 Washer-bolts,
TOYOTA im NAVIGATION UPGRADE Preparation
 Preparation Part Number: PT296-00170 PT296-12170 (Extension Module w/ AHA) Kit Contents Item # Quantity Reqd. Description 1 1 Extension Module 2 1 BT cable 3 1 DA/Ext Harness 4 1 GPS Antenna kit 5 6 Bolt
INSTALLATION INSTRUCTIONS
 Accessory Application Publication No. INSTALLATION INSTRUCTIONS HOMELINK P/N 08U77-MKC-A00 GL1800/B/BD/D/DA Honda Dealer: Please give a copy of these instructions to your customer. MII 16426 Issue Date
INTEGRATION MODULE HARNESS KIT A4, F4
 GENUINE INTEGRATION MODULE HARNESS KIT A4, F4 INSTALLATION INSTRUCTIONS Vehicle: Mazda MX-5 Parts numberbbm2 79 CFZ (ipod integration module) C9FA V6 029 (Harness Kit A4) C9FB V6 029 (Harness Kit F4) Thank
A750F AUTOMATIC TRANSMISSION: SHIFT LEVER ASSEMBLY: REMOVAL (2007 4Runner) Model Year: 2007 Model: 4Runner Doc ID: RM000002BHN007X
 Model Year: 2007 Model: 4Runner Doc ID: RM000002BHN007X") A750F AUTOMATIC TRANSMISSION: SHIFT LEVER ASSEMBLY: REMOVAL (2007 4Runner) Last Modified: 4-26-2007 Service Category: Drivetrain 1.6 A Section: Automatic Transmission/Transaxle Model Year: 2007 Model:
A750F AUTOMATIC TRANSMISSION: SHIFT LEVER ASSEMBLY: REMOVAL (2007 4Runner) Last Modified: 4-26-2007 Service Category: Drivetrain 1.6 A Section: Automatic Transmission/Transaxle Model Year: 2007 Model:
BMW E46 Android Touch Screen Radio Installation Instructions
 BMW E46 Android Touch Screen Radio Installation Instructions Enjoy your new Android Radio from Bremmen Parts, we appreciate your business. Vibrant Touch Display This radio features a responsive 9 touch
Removal & Installation
 Page 1 of 11 2011 Nissan Rogue : Body > Interior > Instrument Panel > Removal & Installation Removal & Installation 1. Before servicing the vehicle, refer to the Precautions Section. CAUTION Always work
SCION tc ILLUMINATED DOOR SILLS Preparation
 Preparation Part Number: PTS21-21070 Kit Contents Item # Quantity Reqd. Description 1 2 Hardware Kit w/ power harness 2 1 Front Left Illuminated Door Sill Protector 3 1 Front Right Illuminated Door Sill
TOYOTA CAMRY HANDS FREE BLU LOGIC Preparation
 TOYOTA CAMRY 2008- HANDS FREE BLU LOGIC Preparation Part #: PT923-00111 Conflicts: JBL Audio, Factory Navigation NOTE: Part number of this accessory may not be the same as the part number shown. Kit Contents:
All bolts, screws and nuts relevant to installing and removing the instrument panel are shown along with their alphabet code below.
 Page 1 of 12 Last Modified: 9-21-2007 1.6 A Service Category: Vehicle Interior Section: Interior Panels/Trim Model Year: 2008 Model: Tundra Doc ID: RM000002VHU003X Title: INSTRUMENT PANEL: INSTRUMENT PANEL
Remote engine start INSTALLATION INSTRUCTIONS
 GENUINE Remote engine start INSTALLATION INSTRUCTIONS Thank you for purchasing a genuine Mazda accessory. efore removal and installation, be sure to thoroughly read these instructions. Please read the
SCION tc Navigation System Preparation. Part Number: PT
 Preparation Part Number: PT611-21111 Kit Contents Item # Quantity Reqd. Description 1 1 Navigation System 2 1 GPS Antenna 3 1 Bluetooth Antenna 4 1 Wire Harness (Reverse / Park Brake) 5 1 RCA Relay Cable
INSTALLATION INSTRUCTIONS
 INSTALLATION INSTRUCTIONS Accessory Application 2015 CR-Z Publications No. VERSION 1 Issue Date SEP 2014 PARTS LIST Armrest console Armrest bracket 2 Collars 4 Washer-bolts 2 Caps TOOLS AND SUPPLIES REQUIRED
Removal and Installation
 Page 1 of 14 Removal and Installation Work item table PARTS INSTRUMENT PANEL ASSEMBLY COMBINATION METER DISPLAY UNIT AV control unit CENTER CONSOLE ASSEMBLY Rear console assembly [1] [1] Instrument garnish
Hiace TNS600. LHD installation instructions. Model year: 2006 Vehicle code: KLH**L-**M**W
 Hiace TNS600 LHD installation instructions Model year: 2006 Vehicle code: KLH**L-**M**W Part number: Navigationssystem PZ 445-00331-00 W2DIN Conversion Kit PZ 425-H0211-60 Manual ref. no: AIM 000 759-0
GENUINE PARTS INSTALLATION INSTRUCTIONS
 GENUINE PARTS INSTALLATION INSTRUCTIONS DESCRIPTION: APPLICATION: PART NUMBERS: Sports Horn Murano / Murano Cross Cabriolet (2011) Sports Horn (B5610 1SXOA) KIT CONTENTS: Item QTY. Description Part Number
GENUINE PARTS INSTALLATION INSTRUCTIONS
 GENUINE PARTS INSTALLATION INSTRUCTIONS 1. 2. 3. 4. DESCRIPTION: APPLICATION: PART NUMBER: KIT CONTENTS: LED Daytime Driving Lights CUBE B66M0-1FC00 Item A B C D E F G H I K L QTY 2 2 1 1 1 2 18 6 4 J
(1) Remote Control with (2) AAA Batteries
 Remote Control with (2) AAA Batteries") TOOLS REQUIRED: KIT CONTENTS: E14 Torx (1) Remote Control with (2) AAA Batteries (2) Wireless Headphones with (4) AAA Batteries (2) DVD Headrest Units Owner s Manual (1) Owner s Manual (1) Power / Audio
TOOLS REQUIRED: KIT CONTENTS: E14 Torx (1) Remote Control with (2) AAA Batteries (2) Wireless Headphones with (4) AAA Batteries (2) DVD Headrest Units Owner s Manual (1) Owner s Manual (1) Power / Audio
TOYOTA SOLARA CONVERTIBLE XM SATELLITE RADIO Preparation. Part Number: Mounting Kit PT
 Preparation Part Number: Mounting Kit PT546-06061 Tuner Assy 86180-0W030 Tuner Assy Kit Contents (86180-0W030) 1 1 Tuner Assy, Stereo Component Mounting Kit Contents (PT546-06061) 1 Ground Cable 1 1 Wire,
INSTALLATION INSTRUCTIONS
 INSTALLATION INSTRUCTIONS Accessory CIGARETTE Application 2005 CIVIC Publications No. AII 27859 WITH ASHTRAY (EX, GX, LX, VP) 2 AND 4-DOOR Issue Date AUG 2004 The Cigarette Lighter with Ashtray cannot
2. DISCONNECT BATTERY NEGATIVE TERMINAL (See page 60 1) 3. REMOVE SHIFT LEVER KNOB SUB ASSY 4. REMOVE SHIFT LEVER KNOB SUB ASSY
 3. REMOVE SHIFT LEVER KNOB SUB ASSY 4. REMOVE SHIFT LEVER KNOB SUB ASSY") 7112 INSTRUMENT PANEL/METER 710DV02 REPLACEMENT HINT: COMPONENTS: See page 718 1. TABLE OF BOLT, SCREW AND NUT HINT: The bolts, screws and nuts, which are necessary for installation and removal of the
7112 INSTRUMENT PANEL/METER 710DV02 REPLACEMENT HINT: COMPONENTS: See page 718 1. TABLE OF BOLT, SCREW AND NUT HINT: The bolts, screws and nuts, which are necessary for installation and removal of the
INSTALLATION INSTRUCTIONS
 INSTALLATION INSTRUCTIONS Accessory Application Publications No. AII 37978 XM RADIO SYSTEM 2008 CIVIC HYBRID Issue Date SEP 2007 PARTS LIST XM Radio Attachment (sold separately): P/N 08B15-SNA-100B 7 Wire
LANCER FOG LAMP KIT MZ380479EX (for RHD) INSTALLATION AND HANDLING INSTRUCTIONS
 INSTALLATION AND HANDLING INSTRUCTIONS") LANCER FOG LAMP KIT MZ380479EX (for RHD) INSTALLATION AND HANDLING INSTRUCTIONS Fog lamp Thank you for purchasing the Mitsubishi Genuine Accessory. To install and use the product correctly with proper
LANCER FOG LAMP KIT MZ380479EX (for RHD) INSTALLATION AND HANDLING INSTRUCTIONS Fog lamp Thank you for purchasing the Mitsubishi Genuine Accessory. To install and use the product correctly with proper
TOYOTA PRIUS XM SATELLITE RADIO Preparation
 Preparation Part Number: Mounting Kit PT546-4700 Tuner Assy 8680-0W03 NOTE: Part number of this accessory may not be the same as the part number shown. Tuner Assembly Kit Contents (8680-0W03) Item # Quantity
SCION xb SIRIUS SATELLITE RADIO TUNER Preparation
 Preparation Part Number: PTS3-52050 NOTE: Part number of this accessory may not be the same as the part number shown. Kit Contents Item # Quantity Reqd. Description Antenna, Exterior 2 Wire Harness 3 Bracket,
Corolla TNS600. RHD installation instructions. Model year: 2004 Vehicle code: **E12*R-****W
 Corolla RHD installation instructions Model year: 2004 Vehicle code: **E12*R-****W Part number: Navigation System PZ 445-00331-00 Clusterpanel 55406-02070-B0 Manual ref. no: AIM 000 767-0 PRECAUTIONS PLEASE
INSTALLATION INSTRUCTIONS FOR PART
 INSTALLATION INSTRUCTIONS FOR PART 99-7605 APPLICATIONS INFINITI G5 Coupe 2005-07 INFINITI G5 Sedan 2005-06 Painted And Finished To Match Factory Dash 99-7605 KIT FEATURES ISO Mount Radio Provision KIT
Remote engine start INSTALLATION INSTRUCTIONS
 GENUINE Remote engine start INSTALLATION INSTRUCTIONS Thank you for purchasing a genuine Mazda accessory. Before removal and installation, be sure to thoroughly read these instructions. Please read the
Conflicts. TOYOTA Camry XM Satellite Radio. Part Number: Code: RX30. Vehicle Service Parts (May be required for reassembly)
") TOYOTA 2013 - Part Number:00016-00076 Code: RX30 Conflicts 1. Entune 2. Vehicle s with factory XM radio Kit Contents Item # Qty Description 1 1 XM Module 2 1 XM Tuner Module 3 1 Wiring Harness 4 1 Hardware
TOYOTA 2013 - Part Number:00016-00076 Code: RX30 Conflicts 1. Entune 2. Vehicle s with factory XM radio Kit Contents Item # Qty Description 1 1 XM Module 2 1 XM Tuner Module 3 1 Wiring Harness 4 1 Hardware
SCION iq AUDIO Preparation
 Preparation Part Number: PT546-00140 (Base Radio) Kit Contents Item # Quantity Reqd. Description 1 1 Receiver Assembly, Radio Unit 2 1 Hardware Bag Hardware Bag Contents Item # Quantity Reqd. Description
SCION im PREMIUM AUDIO Preparation
 SCION im 2016 - PREMIUM AU Preparation Part Number: PT296-12160 (Extension Module w/ AHA) Kit Contents Item # Quantity Reqd. Description 1 1 Extension Module 2 1 BT cable 3 1 DA/Ext Harness 4 1 GPS Antenna
GENUINE PARTS INSTALLATION INSTRUCTIONS
 GENUINE PARTS INSTALLATION INSTRUCTIONS 1. DESCRIPTION: 2. APPLICATION: 3. PART NUMBER(S) REQUIRED FOR INSTALLATION: 4. KIT CONTENTS: Item Qty. Fog Lamp Kit Titan MY16 999F1 W4000 Fog Lamp Kit Part Description
General Applicability Note: Recommended Tools. Personal & Vehicle Protection Safety Goggles Seat Covers Floor Covers Special Tools. Installation Tools
 TOYOTA HIGHLANDER/HIGHLANDER HV 2008- Preparation Part #: PT923-00111 Conflicts: JBL Audio, Factory Navigation NOTE: Part number of this accessory may not be the same as the part number shown. Kit Contents:
Acura/Honda/Isuzu AT-807HD, IBR-807HD, CF-807HD, AW-807HD
 Installation instructions for part Acura/Honda/Isuzu 1988-2006 99-7898 AT-807HD, IBR-807HD, CF-807HD, AW-807HD WIRING & ANTENNA CONNECTIONS (sold separately) Wiring Harness: Not Required KIT FEATURES DIN
INSTALLATION INSTRUCTIONS
 INSTALLATION INSTRUCTIONS Accessory Application Publications No. All 26124 CR-V Issue Date SEP 2003 P/N 08V31-S9A-112 PARTS LIST 4 Washer-bolts, 6 x 20 mm Left fog light 2 Small spring nuts Right fog light
TOYOTA Matrix XM SATELLITE RADIO Preparation
 Preparation Part Number: Mounting Kit PT546-12080 Tuner Assembly 86180-0W031 (Music Only) Tuner Assembly PT546-00090 (Music Plus Data) NOTE: Part number of this accessory may not be the same as the part
INSTALLATION INSTRUCTIONS
 INSTALLATION INSTRUCTIONS Accessory Application Publications No. AII 26031 2004 ODYSSEY Issue Date AUG 2003 NOTE: You cannot install the subwoofer in a vehicle equipped with both an under seat Navigation
TOYOTA FJ CRUISER AIR DAM/LIGHT BAR Preparation
 Preparation Part Number: PT278-35071 Kit Contents Item # Quantity Reqd. Description 1 1 Air Dam / Light Bar Hardware Bag 1 Contents Item # Quantity Reqd. Description 1 2 Screw, M6x33mm, Wafer Head 2 2
SCION tc PREMIUM AUDIO Preparation. Part Number: PT (Extension Module w/ AHA)
") Preparation Part Number: PT296-12160 Kit Contents Item # Quantity Reqd. Description 1 1 Extension Module 2 1 BT cable 3 1 DA/Ext Harness 4 1 GPS Antenna kit 5 6 Bolt (M5x8) 6 5 Wire tie (10 ) Hardware
Preparation Part Number: PT296-12160 Kit Contents Item # Quantity Reqd. Description 1 1 Extension Module 2 1 BT cable 3 1 DA/Ext Harness 4 1 GPS Antenna kit 5 6 Bolt (M5x8) 6 5 Wire tie (10 ) Hardware
393: Multimedia system for the rear seat Multimedia system for the rear seat
 393: Multimedia system for the rear seat S80 (07-), 2008, B8444S, TF-80SC AWD, L.H.D, YV1AH852881073834, 073834 4/1/2013 PRINT 393: Multimedia system for the rear seat Multimedia system for the rear seat
INSTALLATION INSTRUCTIONS
 INSTALLATION INSTRUCTIONS Accessory ACCESSORY HANDSFREELINK Application 2010 ACCORD 2 AND 4-DOOR Publications No. AII 42231 Issue Date AUG 2009 PARTS LIST HFL retainer HFL Attachment Kit P/N 08E02-TA0-100
INSTALLATION INSTRUCTIONS
 INSTALLATION INSTRUCTIONS Accessory Application Publications No. AUTOMATIC PILOT AII 23597 Issue Date MAY 2002 PARTS LIST Automatic Day/Night Mirror Attachment Kit P/N 08V03-S9V-100A Day/night mirror Upper
GENUINE PARTS INSTALLATION INSTRUCTIONS
 GENUINE PARTS INSTALLATION INSTRUCTIONS 1 DESCRIPTION: 2 APPLICATION: 3 PART NUMBER(S) REQUIRED FOR INSTALLATION: Fog Lamp Kit Rogue w/ AL 999F1 G2000 (Fog Lamp Kit) 4 KIT CONTENTS: Item Qty. Part Description
Subaru of America, Inc. What s New for 2016
 Subaru of America, Inc. What s New for 2016 BRZ Rear-Vision Camera standard. Center console knee pads with red stitching now standard on Limited trim. Updated door grip, trim panels and floor mats. 6.2
AR68.20-P-2150CW Disassemble/assemble center console
 AR68.20-P-2150CW Disassemble/assemble center console 14.3.11 MODEL 204, 207.3 MODEL 212 except CODE (279) Electronic gear selector Shown on center console on model 204.0 with code (523) Radio MB Audio
INSTALLATION INSTRUCTIONS
 INSTALLATION INSTRUCTIONS Accessory P/N 08E50-TK6-100 Application 2010 FIT (BASE MODEL) Publications No. AII 42212 Issue Date AUG 2009 The security system will only work if the vehicle is equipped with
Code Shape Code Shape. φ = 6 (0.31) (0.24) (A) (B) (C) L = 18 L = 20 (0.71) φ = 5 (0.24) (0.20) (D) (E) (F) L = 16 L = 14 (0.63)
 (0.24) (A) (B) (C) L = 18 L = 20 (0.71) φ = 5 (0.24) (0.20) (D) (E) (F) L = 16 L = 14 (0.63)") 7110 INSTRUMENT PANEL/METER 7108S01 REPLACEMENT HINT: COMPONENTS: See page 717 1. TABLE OF BOLT, SCREW AND NUT HINT: Indicate the bolts, screws and nuts, which are necessary for installation and removal
7110 INSTRUMENT PANEL/METER 7108S01 REPLACEMENT HINT: COMPONENTS: See page 717 1. TABLE OF BOLT, SCREW AND NUT HINT: Indicate the bolts, screws and nuts, which are necessary for installation and removal
INSTALLATION INSTRUCTIONS
 INSTALLATION INSTRUCTIONS Accessory Accessory Hands Free Link Application 2008 ACCORD 2 AND 4-DOOR Publications No. AII 38281 Issue Date NOV 2007 PARTS LIST Attachment Kit P/N 08E02-TA0-100 trim retainer
RAV4 TNS310 (Traffic) Plus
 Plus") TNS310 (Traffic) Plus RHD installation instructions Model year: 005 Vehicle code: **A3***-*****W Part number TNS310 Plus: Sub wire harness No 1: 08673-64801 Sub wire harness No : 08673-64800 Part number
TNS310 (Traffic) Plus RHD installation instructions Model year: 005 Vehicle code: **A3***-*****W Part number TNS310 Plus: Sub wire harness No 1: 08673-64801 Sub wire harness No : 08673-64800 Part number
TOYOTA TACOMA TVIP V3 (RS3200) Section I - Installation Preparation
 Section I - Installation Preparation") Section I - Installation Preparation Part Number: 08586-04810 Section I - Installation Preparation Kit Contents Item # Quantity Reqd. Description 1 1 Wire Harness 2 1 Status Monitor 3 1 Piezo Buzzer 4
Section I - Installation Preparation Part Number: 08586-04810 Section I - Installation Preparation Kit Contents Item # Quantity Reqd. Description 1 1 Wire Harness 2 1 Status Monitor 3 1 Piezo Buzzer 4
Mazda S
 INSTALLATION INSTRUCTIONS FOR PART 99-7523S KIT FEATURES Double DIN radio provision ISO DIN radio provision with pocket Painted silver Pre-wired ASWC-1 harness included (ASWC-1 sold separately) APPLICATIONS
INSTALLATION INSTRUCTIONS
 INSTALLATION INSTRUCTIONS Accessory Accessory Hands Free Link Application 2009 ACCORD 2 AND 4-DOOR Publications No. AII 40055 Issue Date JULY 2008 PARTS LIST HFL Attachment Kit P/N 08E02-TA0-100 HFL trim
BODY-24, Late Model 944 ( and Newer) Dash Replacement
 Dash Replacement") BODY-24, Late Model 944 (1985.5 and Newer) Dash Replacement Introduction Replacing the dash in a late model 944 is not overly difficult. However, it is very tedious and a lot of patience is required. It's
BODY-24, Late Model 944 (1985.5 and Newer) Dash Replacement Introduction Replacing the dash in a late model 944 is not overly difficult. However, it is very tedious and a lot of patience is required. It's
INSTALLATION INSTRUCTIONS
 INSTALLATION INSTRUCTIONS Accessory Application Publications No. All 27176 2005 CR-V Issue Date P/N 08V31-S9A-114 SEP 2004 PARTS LIST 25 Wire ties Left fog light 6 Washer-bolts Right fog light 6 Spring
INSTALLATION INSTRUCTIONS
 INSTALLATION INSTRUCTIONS Accessory Application Publications No. BII 30230 2006 RSX P/N 08U96-S6M-200 Issue Date JULY 2005 PARTS LIST Cigarette lighter 3. Turn the two knobs counterclockwise, and remove
Installation Instructions
 Installation Instructions Page 1 of 8 August 2008 Sound System, CD Changer Version 2.0 Accessory Development These installation instructions supercede all previous versions. SUBJECT CD Changer Retrofit
GENUINE SATELLITE RADIO KIT
 GENUINE STELLITE RDIO KIT INSTLLTION INSTRUCTIONS Thank you for purchasing a genuine Mazda accessory. Before removal and installation, be sure to thoroughly read these instructions. Please read the contents
GENUINE PARTS INSTALLATION INSTRUCTIONS
 GENUINE PARTS INSTALLATION INSTRUCTIONS 1 DESCRIPTION: 2 APPLICATION: 3 PART NUMBER(S) REQUIRED FOR INSTALLATION: Fog Lamp Kit (AL) Rogue (SV) 999F1 G2000 (Fog Lamp Kit) 4 KIT CONTENTS: Item Qty. Part
INSTALLATION INSTRUCTIONS INFINITI CELLPORT UNIVERSAL HANDS FREE SYSTEM
 INSTALLATION INSTRUCTIONS 1. DESCRIPTION: INFINITI CELLPORT UNIVERSAL HANDS FREE SYSTEM 2. APPLICATION: 2002 Q45 3. PART NUMBER: 948T3CELLR95 (VPC) or 999Q2TN000 (PDC) 4. TOOLS REQUIRED: a. Loctite 242
INSTALLATION INSTRUCTIONS
 INSTALLATION INSTRUCTIONS Accessory Application Publications No. AII 26042-26353 XM INTERFACE ODYSSEY EXCEPT EX-L WITH NAVI/RES Issue Date FEB 2004 PARTS LIST 8 Wire ties XM Radio Attachment P/N 08B15-S0X-100
Mercedes Benz SLK Class
 INSTALLATION INSTRUCTIONS FOR PART 99-8713 KIT FEATURES DIN radio provision with pocket ISO radio provision with pocket Double DIN radio provision APPLICATIONS See application list inside Mercedes Benz
SCdefault. 900 Installation instructions
 SCdefault 900 Installation instructions SITdefault Airbag replacement harness MONTERINGSANVISNING INSTALLATION INSTRUCTIONS MONTAGEANLEITUNG INSTRUCTIONS DE MONTAGE Accessories Part No. Group Date Instruction
INSTALLATION INSTRUCTIONS
 Accessory Application Publications No. INSTALLATION INSTRUCTIONS S (DX, HX, VP) 2005 CIVIC 2- AND 4- DOOR AII 27865-30866 Issue Date SEP 2005 NOTE: Fog Lights cannot be installed if the vehicle is equipped
SCION XB SUBWOOFER ENCLOSURE Preparation
 Preparation Part Number: Kit Contents Item # Quantity Reqd. Description 1 1 Subwoofer enclosure 2 1 Wire Harness 3 1 Paper Template 4 1 Plastic Drill Template 5 1 Hardware Bag Hardware Bag Contents 1 Item
TOYOTA TACOMA XM SATELLITE RADIO Preparation
 Preparation Part Number: Mounting Kit PT546-35090 Tuner Assembly 8680-0W03 NOTE: Part number of this accessory may not be the same as the part number shown. Tuner Assembly Kit Contents (8680-0W03) Item
TOYOTA RAV INTERFACE KIT FOR IPOD Preparation Part Number: PT
 Preparation Part Number: PT545-00082 NOTE: Part number of this accessory may not be the same as the part number shown. General Applicability Note: Kit Contents Item # Quantity Reqd. Description 1 1 Unit
TOYOTA tc HANDS FREE BLU LOGIC Preparation
 TOYOTA tc 2011- HANDS FREE BLU LOGIC Preparation Part #: PT923-00111 Conflicts: JBL Audio, Factory Navigation NOTE: Part number of this accessory may not be the same as the part number shown. Kit Contents:
INSTALLATION INSTRUCTIONS
 INSTALLATION INSTRUCTIONS Accessory Application Publications No. AII 22903-22963 ODYSSEY Issue Date MAY 2002 PARTS LIST Subwoofer Kit: P/N 08A39-EP7-100 Subwoofer 2 Cushion tapes 8 Wire ties (1 not used)