ire 4' Extention Module 119.5L x 244.5W x 268.5Hcm / 47 "L x 96.3 "W x "H
|
|
|
- Rodney Skinner
- 5 years ago
- Views:
Transcription


1 i Assembly nstructions GloryTM 8'x8' - Premium Class Greenhouse Approx. Dim. 244L x 244.5W x 268.5Hcm / 96.3"L x 96.3"W x 05.7"H 4' Extention Module 9.5L x 244.5W x 268.5Hcm / 47 "L x 96.3 "W x 05.7 "H Extension Kit Extension Kit Optional: ire After Sale Service USA England France Canada Germany nternational J
.")

2 MPORTANT Please read these instructions carefully before you start to assemble this greenhouse. Keep these instructions in a safe place for future reference.» Customer Service For assistance with assembly or for replacement parts - please log onto our website or call our service line (number is on the title page). Additional information can be found at our website: Safety Advice t is of utmost importance to assemble all of the parts according to the directions. Do not skip any step. We strongly recommend using work gloves during panels' sliding. Always wear shoes and safety goggles when working with extruded aluminium. f using a step ladder or power tools make sure that you follow the manufacturer's safety advice. Do not touch overhead power cables with the aluminium profiles. Do not attempt to assemble the greenhouse in windy or wet conditions. Dispose of all plastic bags. Keep them out of reach of small children. Keep children away from the assembly area. Do not lean against or push the greenhouse during construction. Do not position your greenhouse in an area exposed to excessive winds. Do not attempt to assemble this greenhouse if you are tired, have taken drugs or alcohol or if you are prone to dizzy spells. Hot items such as recently used grills, blowtorches etc. must not be stored in the greenhouse. Make sure there are no hidden pipes or cables in the ground before inserting the pegs. This product is designed to be used as a greenhouse only. Note: You should anchor the greenhouse directly to a solid foundation; Make sure that there are no obstructions between the assembly area and the final position.» Care & Maintenance When your greenhouse needs to be cleaned, use a mild detergent solution and rinse with cold clean water. DO NOT use acetone, abrasive cleaners or other special detergents to clean the clear panels.» Tools & Equipment Work gloves Phillips head screwdriver Adjustable Spanner /Wrench Leveler Tape measure Step ladder» Before Assembly Rt Selecting a site: Scissors Electric screwdriver (0mm, 7mm, Phillips) Lubricant (Optional) T00 - Special tool for Screws 4 and nuts 42 - The greenhouse must be positioned and fixed on a flat level surface. - Choose a sunny position away from overhanging trees. Rt We strongly recommend this greenhouse to be secured directly to a solid concrete foundation. Rt This is a multi -part assembly best achieved by two people. Allow at least half a day for the assembly process. Rt Take all components & parts out of the packages. Sort the parts and check against the content parts list. l Please Please Parts should be laid out close at hand. Keep all small parts (screws etc.) in a bowl so they do not get lost. note multi -sided profiles are used in this greenhouse. As a result some holes in the profiles are not used during assembly. review entire instructions before starting. Carry out the assembly steps in exact order. Rt Prior to fitting the Automatic Vent Opener, the power -tube has to be cooled by placing it in a refrigerator for approximately 30 minutes. Rt The drawings in this manual are designed for 8'x8'greenhouse + 4'Extension Kit. Please note that content list refers only for 8x8 greenhouse. Note: all the extension module steps are marked with a dashed outline integrally in the greenhouse assembly process. -,
 603 cm / 237.4\" 5 >> During Assembly You may use Silicon lubricant spray in order to help you slide the panels into the profiles.")

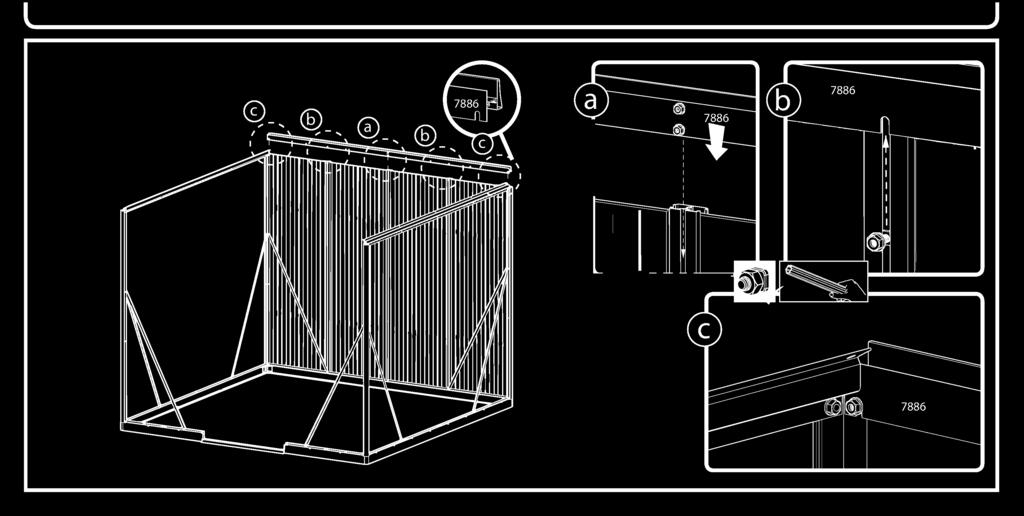
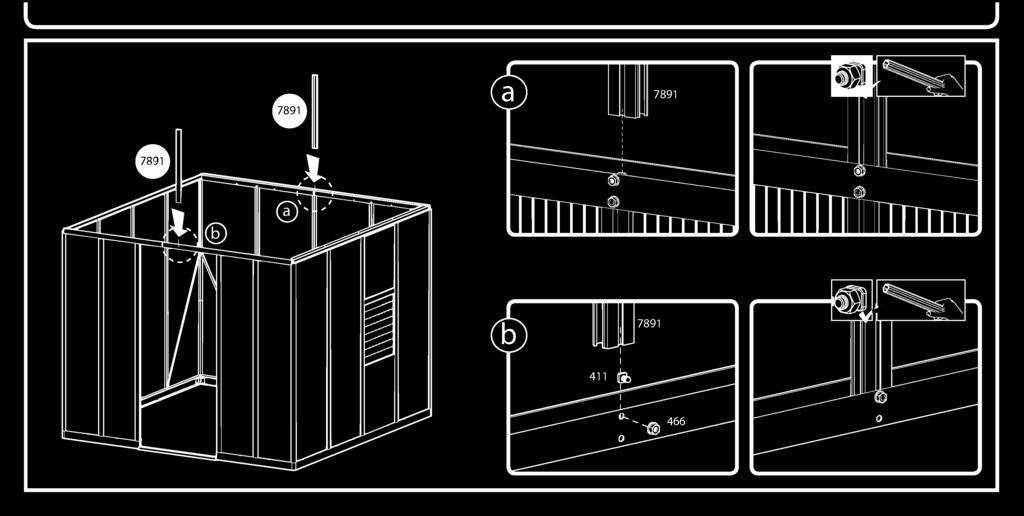
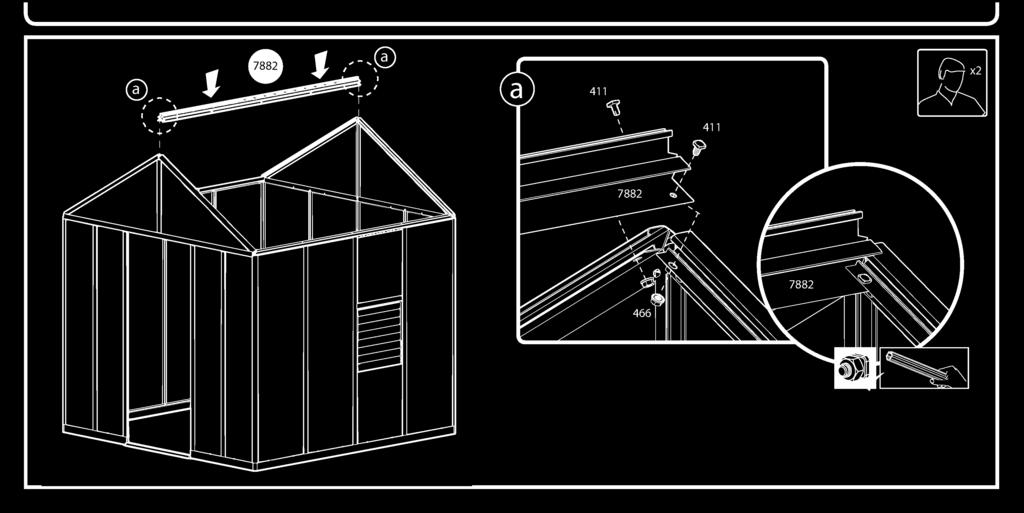
 Step : Please make sure the screw connection is made exactly as illustrated.")


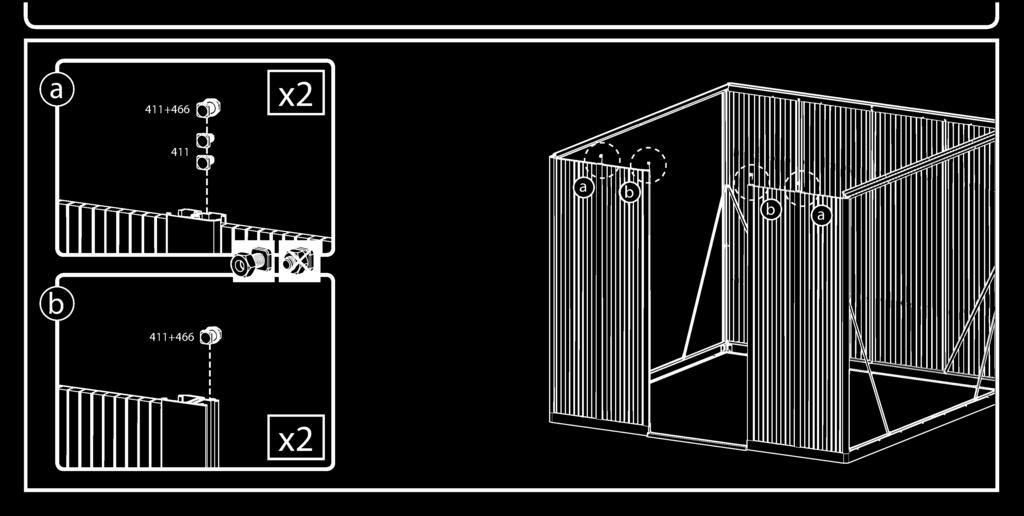
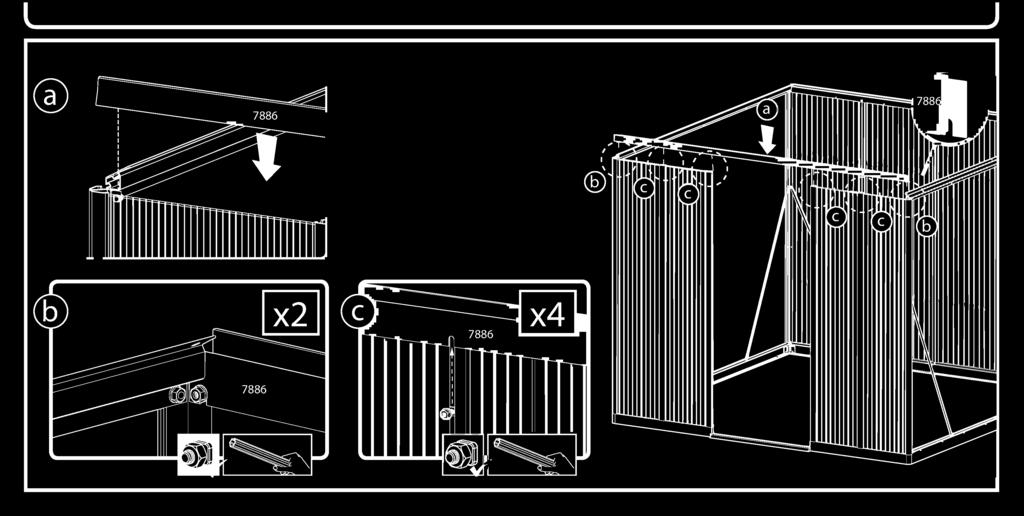
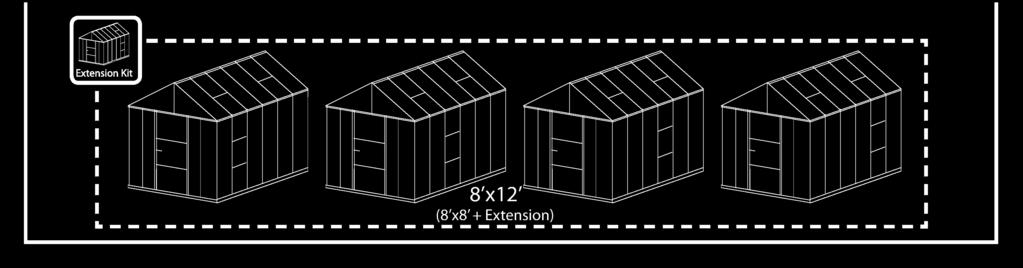
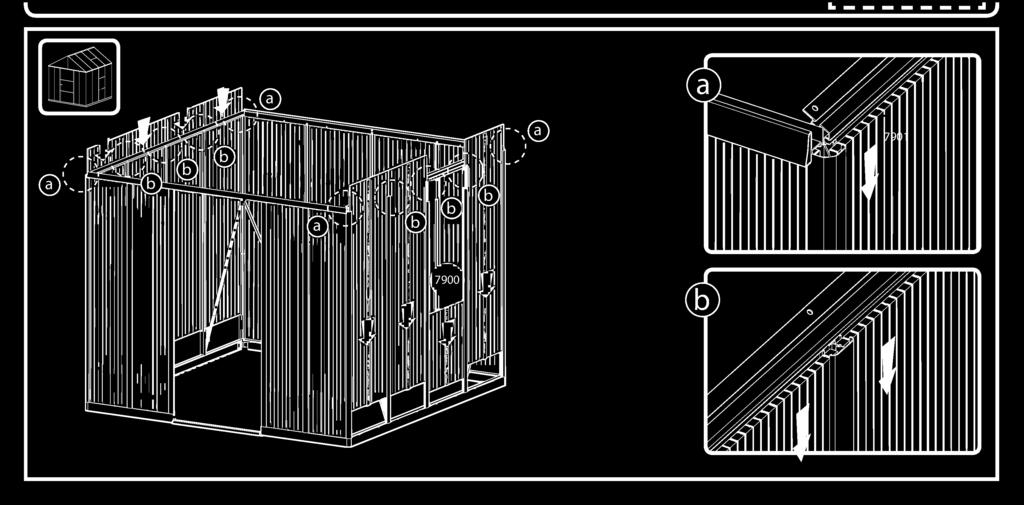
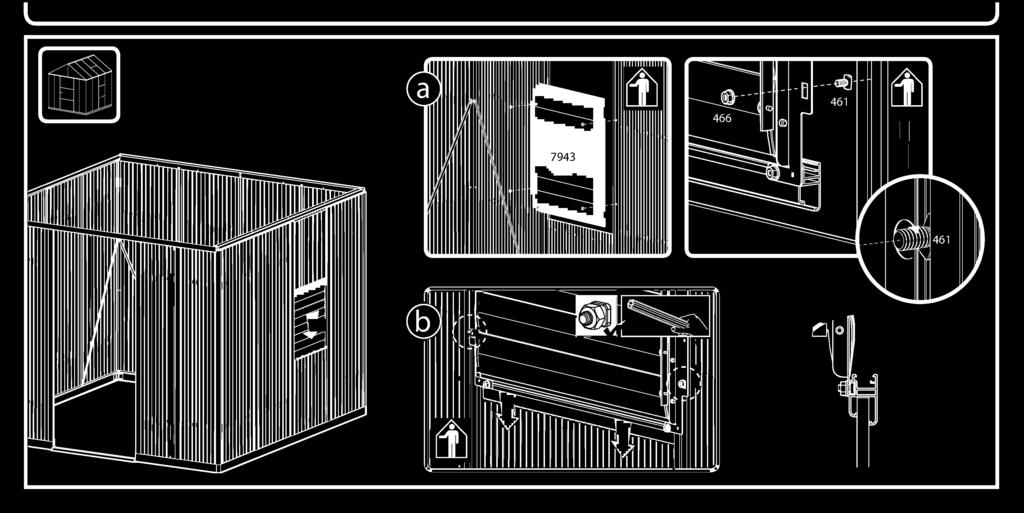
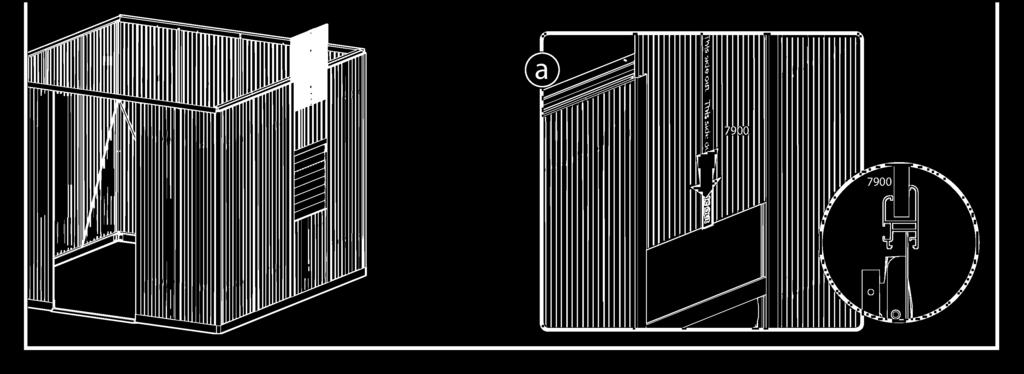
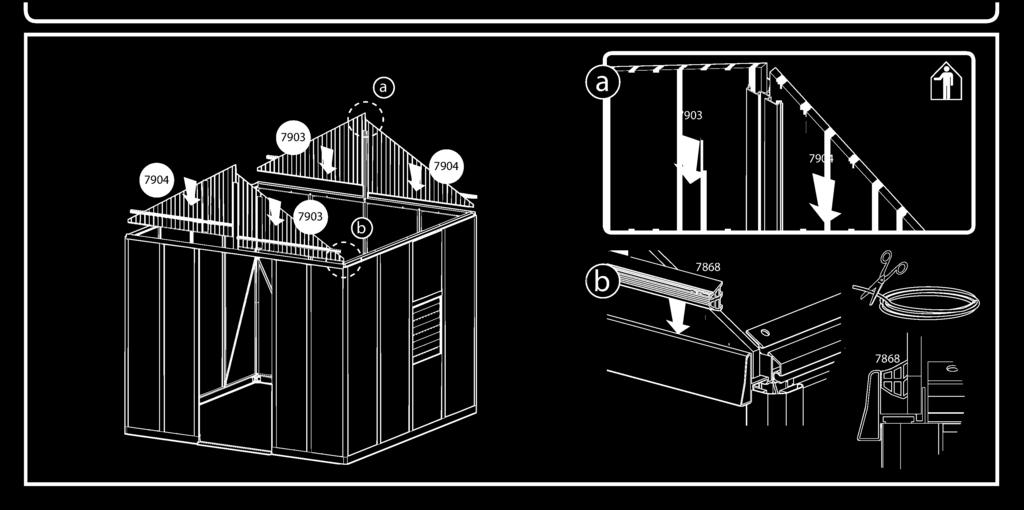
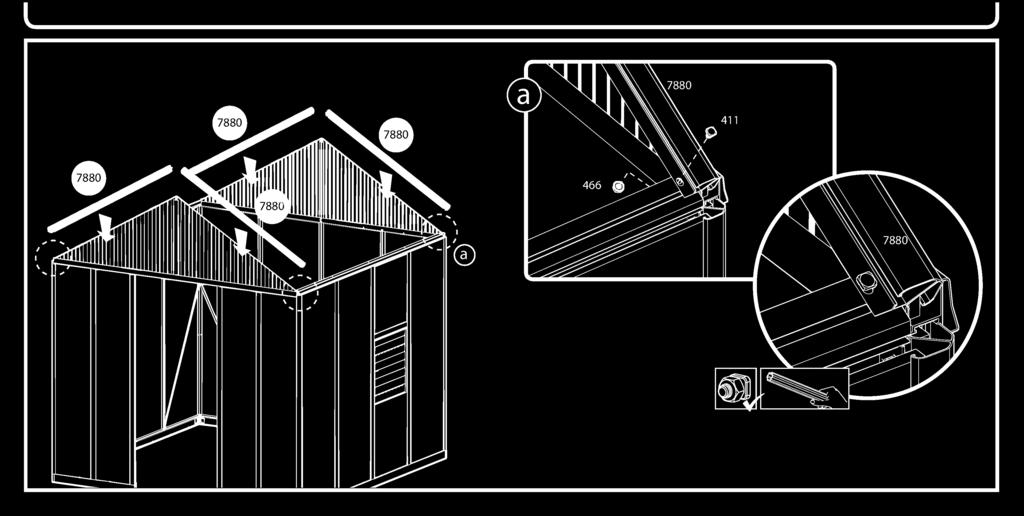
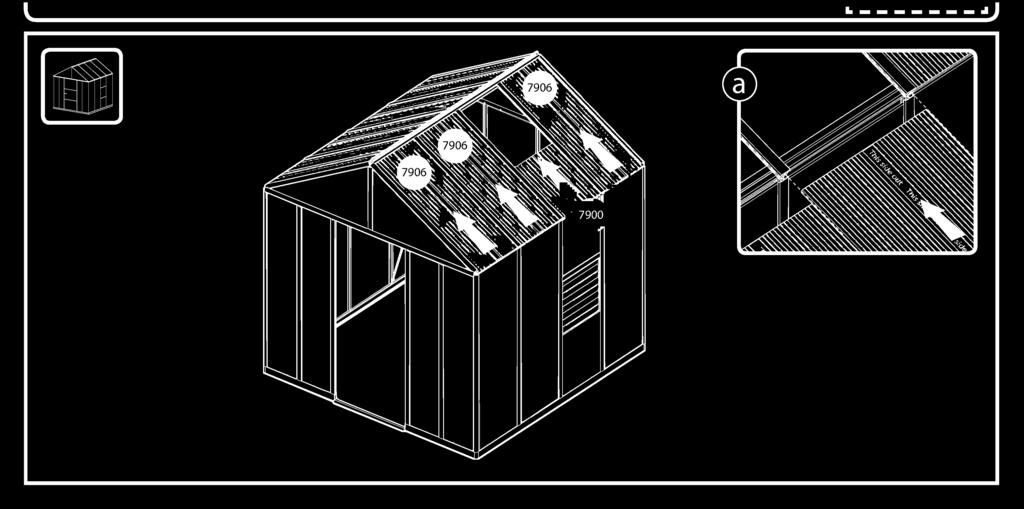
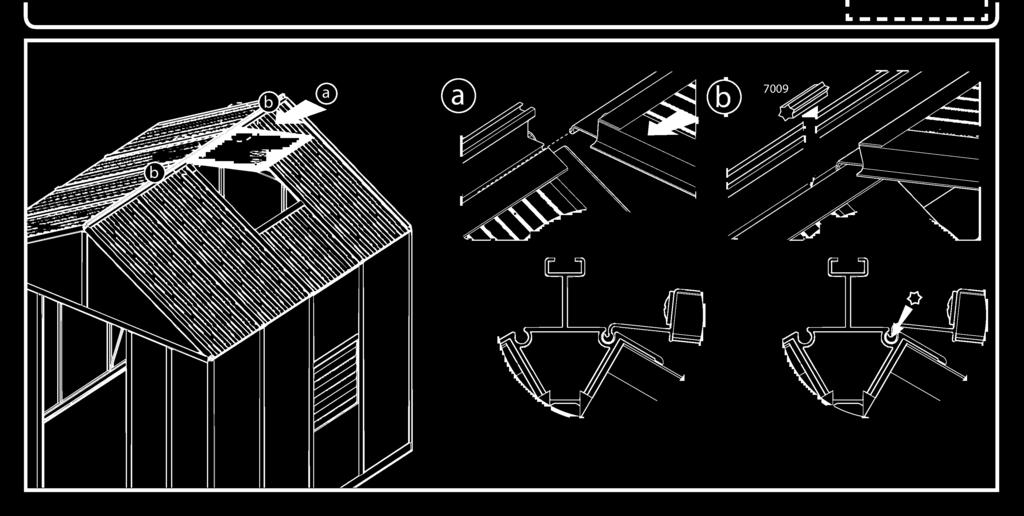
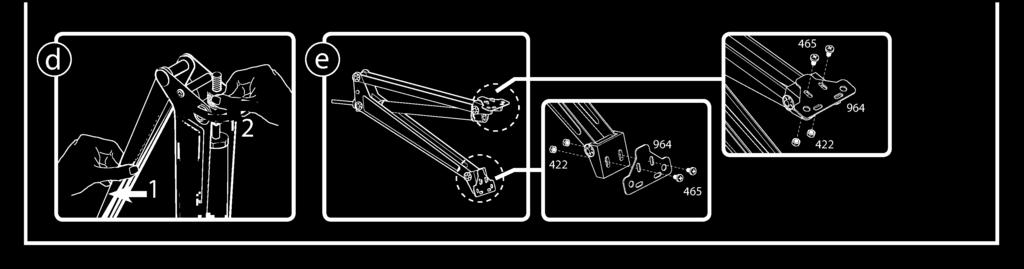
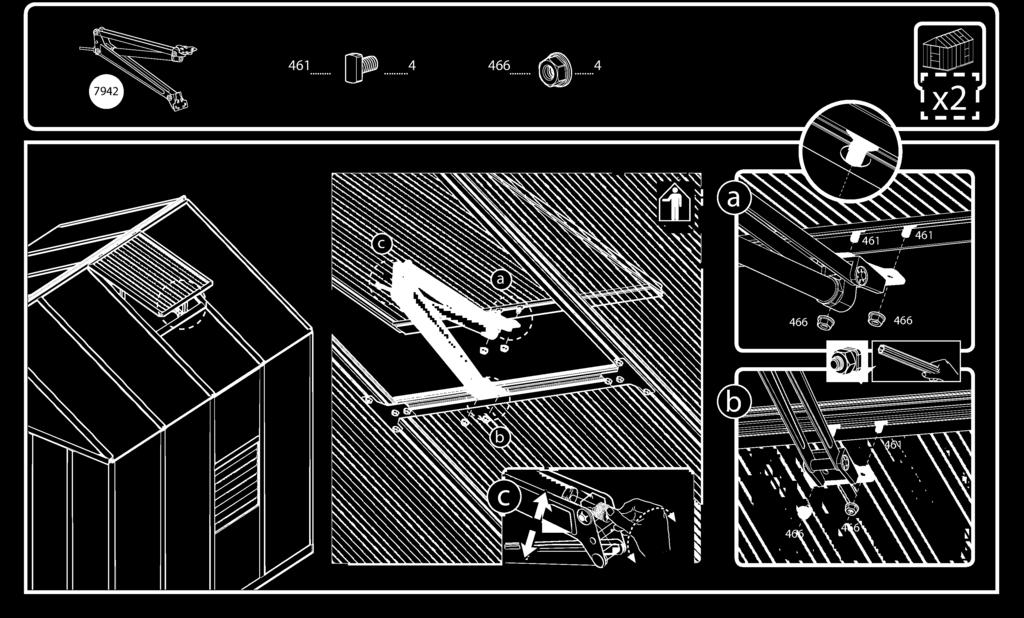
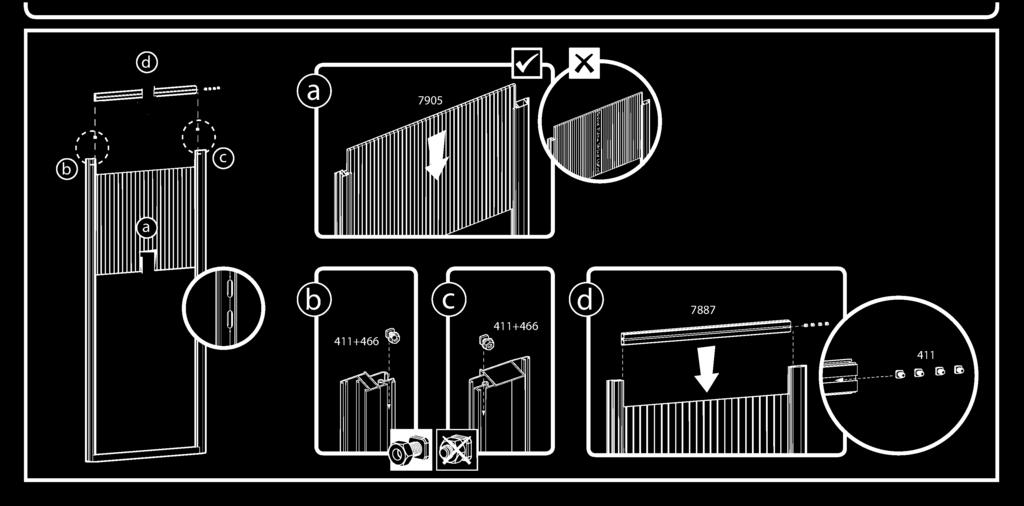
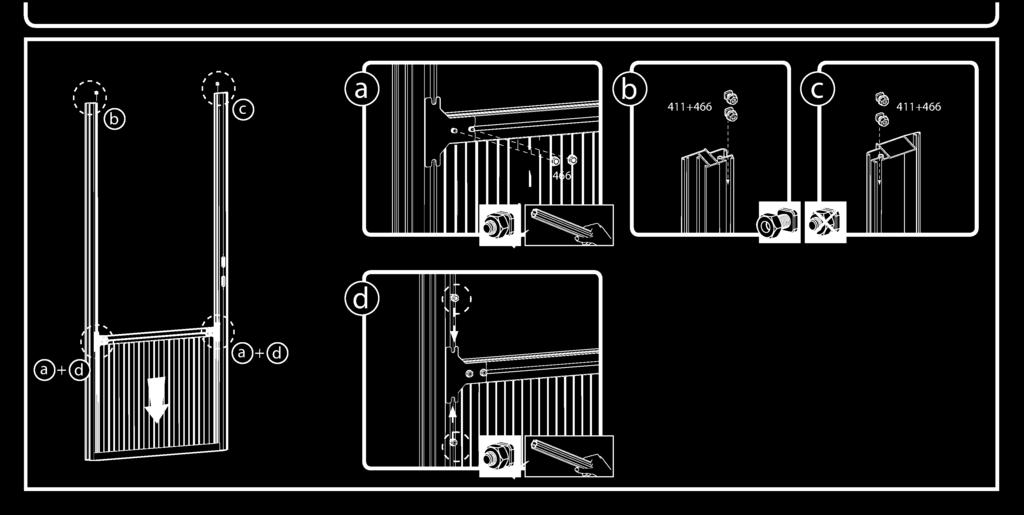
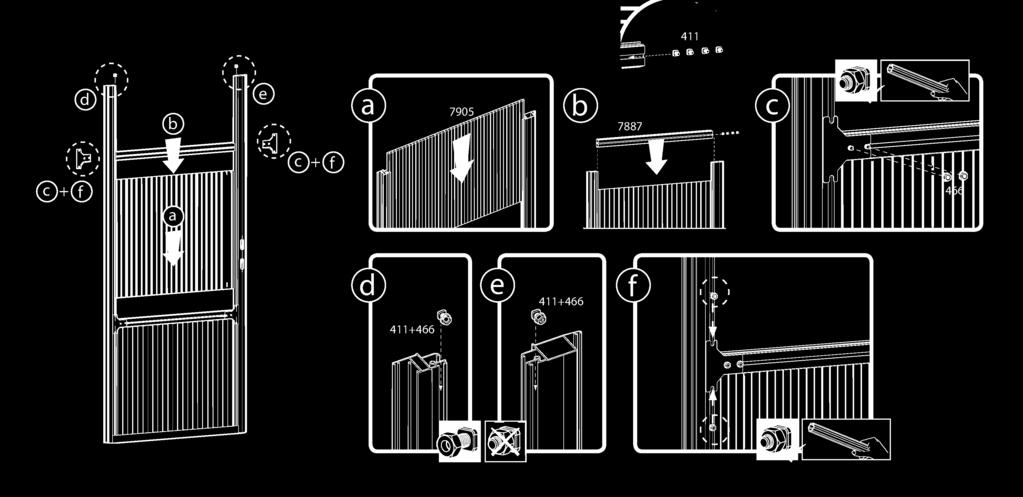
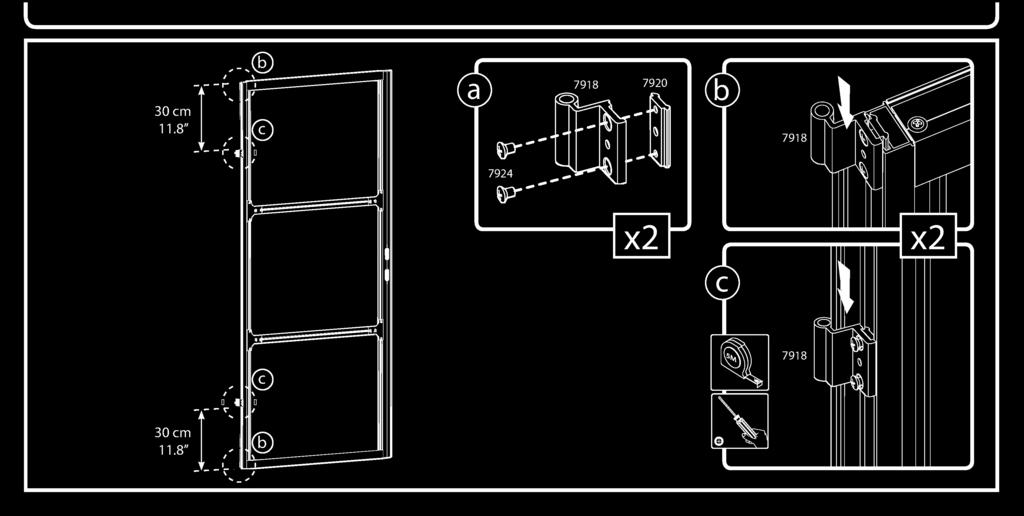
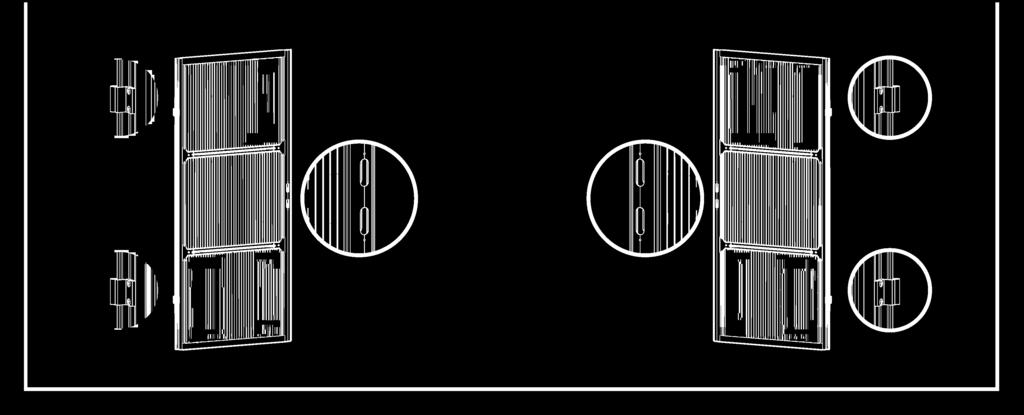
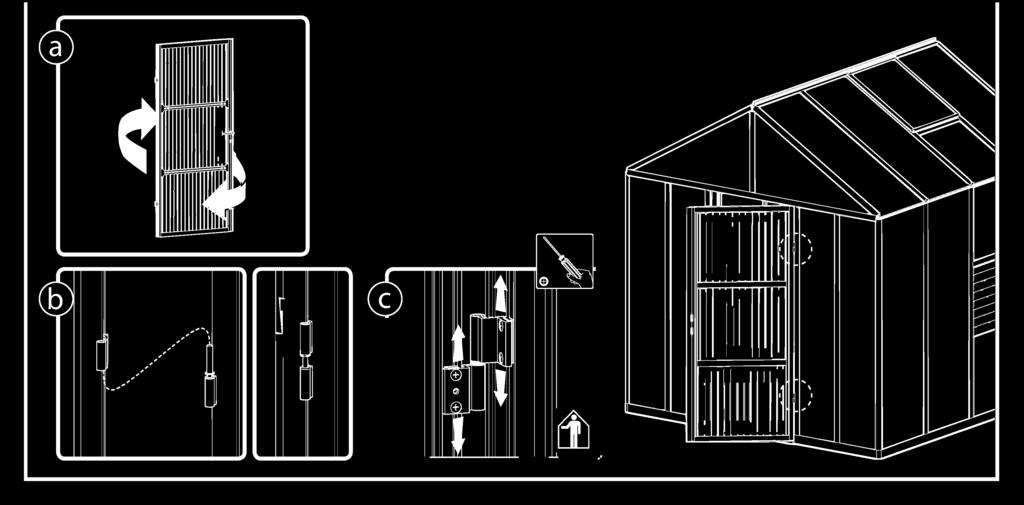
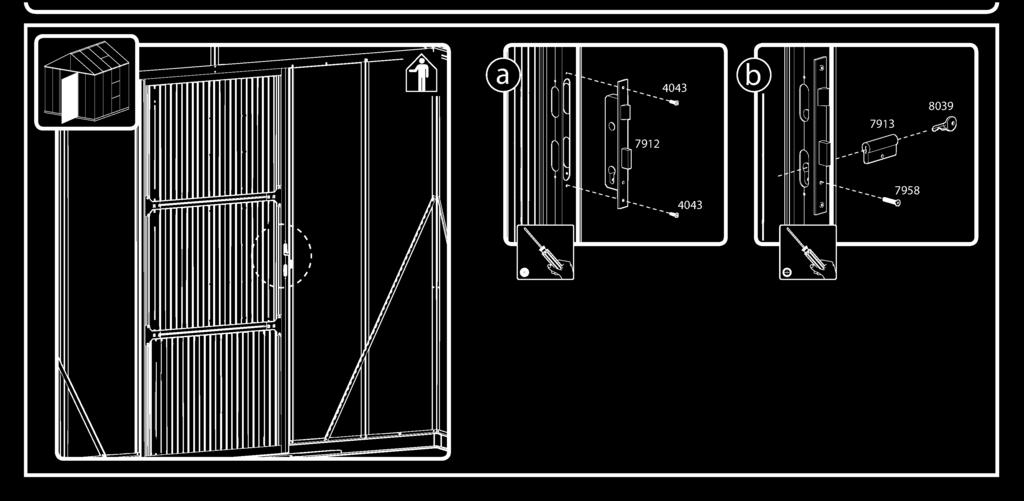
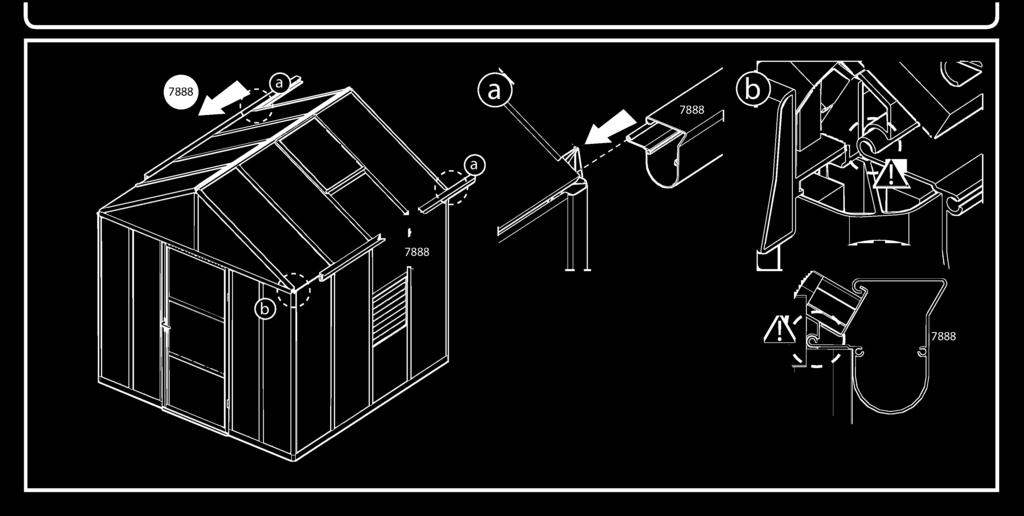
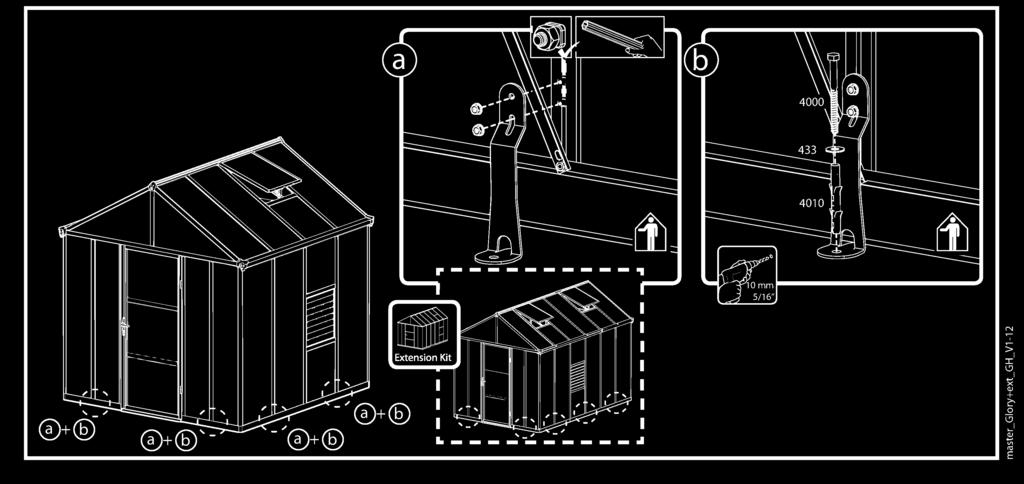
3 /.! 8'x8' 4' Ext. 8'x 2' Model Base Length No. of Packages Glory Standard (8'x 8') cm / 96.3" 2 Glory + 4' Ext. (8'x 2') 364 cm / 43.3" 3 Glory + 4' Ext. x2 (8'x 6') cm / 90.4" 4 Glory + 4' Ext. x3 (8'x 20') 603 cm / 237.4" 5 >> During Assembly You may use Silicon lubricant spray in order to help you slide the panels into the profiles. Do not spray the Polycarbonate panels. Use a rubber mallet if necessary. All panels with the stamped words THS SDE OUT must be facing out to create full UV protection. Remove plastic sticker as panels are locked in place. The Auto Vent Opener has a separate assembly instruction in its own package. During assembly you will encounter the information icon, please refer to the relevant assembly step for additional comments and assistance. 'ii Step : Paste an insulating tape on each open ends of all panels (including panels in the Extension package) Step : Please make sure the screw connection is made exactly as illustrated. A - Connect the screw in the left hole. B - Connect the screw in the right hole. Step 22: Part 7943 (Side Louver Window) can be located only on one of the two central panels. * f you assemble the greenhouse with an extension module, the window can be placed on all panels, except for the last two end panels. * Note: The selected placing will affect the next assembly steps. Step 33: Roof window can be located only on one of the two central roof panels. * f you assemble the greenhouse with an extension module, the roof windows must be placed on panels only as specified in the manual. * Note: The selected placing will affect the next assembly steps. Step 38: Please tighten screws from inside the greenhouse. n addition, please tighten the remaining loose screws. Step 43: As mentioned at the 'Before Assembly' section, prior to fitting the Automatic Vent Opener, the power -tube has to be cooled by placing it in a refrigerator for approximately 30 minutes. Step 52: Door can be installed as a left hand door or right hand door as per your decision. These instructions show a right hand door assembly. Please determine door opening direction. This decision will affect the next assembly steps. Step 54: Please adjust the hinges height in accordance with the upper post and lower ramp of the door aperture, as specified in Level C. Step 58: Threading parts 7888 exactly as specified in Level C, is very important in order to create good drainage. Step 62: Anchor the greenhouse only onto a hard surface (supplied bolts fit only hard surface such as concrete or asphalt). / \ mportant Recommendations Firmly connect the greenhouse to a level surface immediately after completion of the assembly. Tighten all screws once assembly is completed. This icon indicates that the installer should be inside the product. This icon indicates that the installer should be outside the product. Screws 4 and nuts 466 are used throughout the assembly process. Screws 4 are to be assembled from the outside and nuts 466 from the inside of the greenhouse. f not specified otherwise, do not fasten screws and nuts (4 & 466) more than 2-3 turns only. Do not tighten them until completion of the panels'assembly. These 2 icons indicate if screws' tightening is required or not. However, in some steps, temporary tightening of a few screws may be needed to prevent a profile from falling.


4 lb is 8'x2' (8'x8'+ Extension) 244 cm /


5 Contents tem Qty. % tem Qty. 794 tem Qty.. i... 2 i' 2


6 Contents tem Qty. tem Qty. tem Qty. tem Qty x 74 cm 23 "x29" x 62 cm 23"x24" 3 0))))))))))))007% )mn»»»)0»um x 7.5 cm 24"x28" ( +2)


,")
7 Contents tem T C36 Qty er tem Qty c o tem f: a Íc9 o 7), \ Qty
8 Contents Extension Kit r tem i L ,.,..._... Qty. 7 r tem ' i J L _..._,.-. 05' 59 x 74 cm 23 "x29" 59 x 62 cm 23"x24"..., Qty. 7 r tem i ' i' J L tem 9 r 2 46 Qty J L Qty. 7 6 ( +2) 44 (+5) 64 ( +7) 6 ( +2) 2 ( +5) J


9 in Extension Kit L. N f ; i R, i


10 , ,., %.,.,


11 ic


12 R 7523 'r 7958


13 5 For Extension Kit Only r 2'i,,/ Extension Kit 760 í í 8'x 7597 (8'x8'+ Extension) % 7599 x x 'x 6' (8'x8'+ 2 Extensions)


14


15 O / %


16 8 256 o o % A


17 9 For Extension Kit Only lik 7928, Extension Kit 8'x2' (8'x8'+ Extension


18 lo


19 Extension Kit L M. e -


20


21 H


22 U


23 5 did


24 M.


25 V lit ll

26

27


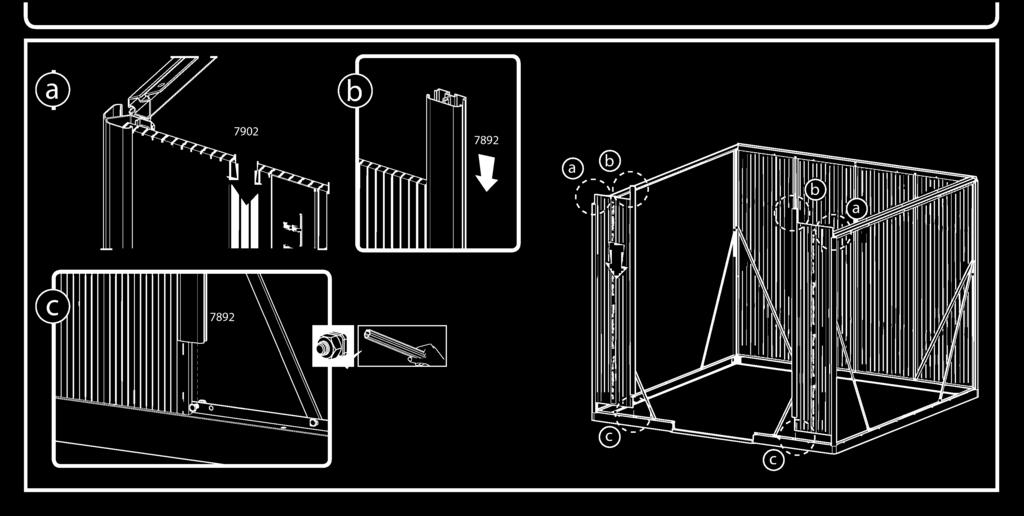
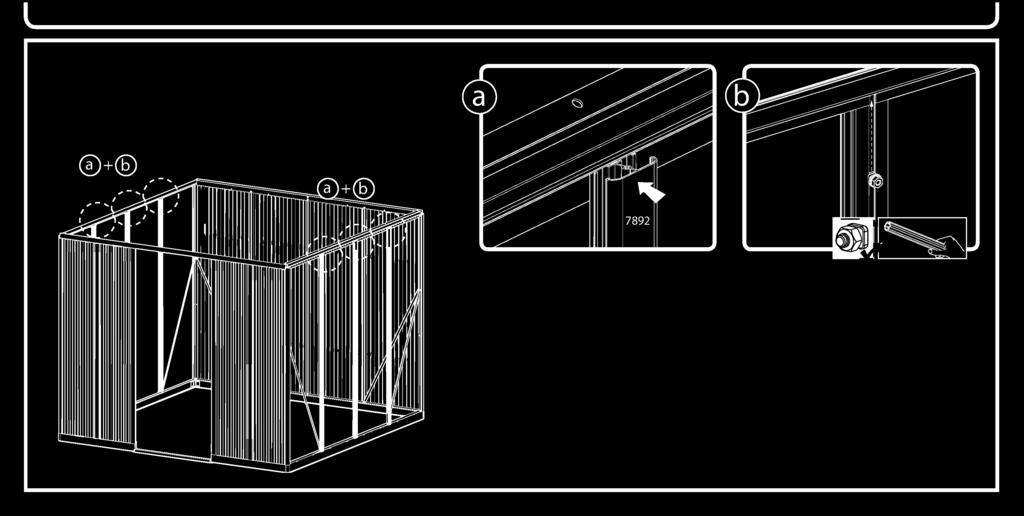
28 Extension Kit j 7892 Extension Kit

29 2

")

30 Extension Kit ` 7 (8'x8'+ Extension) a
")


31 23., ) x 74 cm 23 "x29" Extension Kit. _. _.


32
 59 x 74")


33 r ) 59 x 74 cm 23 "x29" ij 0 ' á Mli! O


34 i i i 789 i o 466


35 27 r / o


36


37


")

38 30 For Extension Kit Only t - Extension Kit (8x8'+ Extension) -'


39


40 Extension Kit L i 4

")

41 33 Extension Kit, 8'xl (8'x8'+ Extension) \_ O, i a


42 34 r , Extension Kit L. l...4


43 35 r Extension Kit


44 , L Extension Kit N , i - JJ - J


45 Extension Kit ra-), 0 - le ;e :-', - Q 0 - % _ o %. ie


46 38 f


47 39 L r 7 ` a Extension Kit '


48 r Extension Kit., J
 7878")


49 4 L ) ,, -, N.. _..-.,


50 ,, 2 ' Extension Kit ,,.


51 o OP i 4 tr Y 7 L--

52


53 % 2 O»»»»»»»»»» , 7893 "O b


54 N


55


56


57 CZ O


58 V 4 J. 30 cm.8" -.-. O b


59 J


60 52


61 53 c c? o ) 7 23, 0 o o v r2 +


62 f l 6 4= i


63 l l j ))


64 a, - m V i 7442 c- e


65 WO

66


 e. - M.")
67 59 /r- For Extension Kit Only , Extension Kit 8'x 2' (8'x8'+ Extension) e. - M. Optional: i -a


68


69 r Extension Kit JJ


70 »»»))) Extension Kit C i aj i
Snap & Grow 8 x8 254 L x 249 W x 260 H cm 100 L x 98 W x /2 H
 Assemly Instrutions Snp & Grow 8 x8 254 L x 249 W x 260 H m 100 L x 98 W x 102 1 /2 H In se of ddition SNAP & GROW 8x4 Extension Kit purhse Plese refer to the ssemly instrution provided in the 4' Extension
Snap & Grow 8 x8 + 4 Extension
 Assemly Instrutions Snp & Grow 8 x8 + 4 Extension 267 L x 249 W x 260 H m 150 L x 98 W x 102 1 /2 H Compny informtion: Plrm Ameris In. 9735 Commere Prkwy Kutztown, PA, USA E-Mil: greenhouseusa.support@plrm.om
Snap & Grow 6 x8 254 L x 190 W x 209 H cm 100 L x 74 3 /4 W x 82 1 /4 H
 Assemly Instrutions Snp & Grow 6 x8 254 L x 190 W x 209 H m 100 L x 74 3 /4 W x 82 1 /4 H Bse Size: 245x186m / 96 1 /4 x73 1 /4 In se of ddition SNAP & GROW 6x4 Extension Kit purhse Plese refer to the
Assembly Instructions
 Assemly Instrutions Snp & Grow 8'x8' 254x249x260m / 100"x98"x102 1/2" In se of ddition SNAP & GROW 8x4 Extension Kit purhse Plese refer to the ssemly instrution provided in the 4 Extension Kit Box Only
Assembly Instructions
 Assemly Instrutions Snp & Grow 8'x8' 254x249x260m / 100"x98"x102 1/2" In se of ddition SNAP & GROW 8x4 Extension Kit purhse Plese refer to the ssemly instrution provided in the 4 Extension Kit Box Only
Assembly Instructions
 Assemly Instrutions Snp & Grow 6'x8'+4 Extension 374x19009m / 1471/4"x743/4"x821/4" Bse Size: 365x18609m / 143 3/4"x73 1/4" 6 x16 : 494x19009m / 1941/2"x743/4"x821/4" 6 0 : 614x19009m / 2413/4"x743/4"x821/4"
Arcadia ssembly Instructions. 501x363x242cm / 16 5"Lx11 103/4"x7 111/4"
 A ssemly Instructions Arcdi 5000 English_71087 501x36342cm / 16 5"Lx11 103/4"x7 111/4" Compny informtion: Plrm Americs Inc. 9735 Commerce Prkwy Kutztown, PA, USA Service Center: Toll Free: (877) 627-8476
Assembly Instructions Montageanleitung Instructions de montage. Arcadia D x 363W x 242H cm / 16 5"D x 11 10¾"W x 7 11¼"H
 Assemly Instructions Montgenleitung Instructions de montge Arcdi 5000 501D x 363W x 242H cm / 16 5"D x 11 10¾"W x 7 11¼"H EN IMPORTANT Plese red these instructions crefully efore you strt to ssemle this
6 3 X X X X X
 Use mm s only! (mm) B (mm) 4 6 3 X 4 3 1298 6 8 10 12 6 3 X 6 4 1918 6 3 X 8 4 1918 2538 6 3 X 10 4 3158 6 3 X 12 5 3778 Thank you for purchasing your new greenhouse. We recommend you familiarise yourself
SCREEN ROOM ITM./ART MODEL#L-GZ938PCO-B/L-GZ938PCO-B2 ASSEMBLY INSTRUCTIONS
 SCREEN ROOM ITM./ART. 470260 MODEL#L-GZ938PCO-B/L-GZ938PCO-B2 ASSEMBLY INSTRUCTIONS IMPORTANT: RETAIN FOR FUTURE REFERENCE. READ CAREFULLY. Please check with your local governing authority / local municipal
M O TO R C YC L E S TA N D OWNER S MANUAL
 M O TO R C YC L E S TA N D OWNER S MANUAL WARNING: Read carefully and understand all INSTRUCTIONS before operating. Failure to follow the safety rules and other basic safety precautions may result in serious
SUBARU FORESTER - SIDE STEP DIESEL VERSION INSTALLATION INSTRUCTIONS
 SUU FORESTER - SIDE STEP DIESEL VERSION INSTALLATION INSTRUCTIONS SS00 VEHICLE DESCRIPTION: PART NUMBER: SUU FORESTER SACC00 R 9 L 0 Care Instructions: Clean Side Steps with a mild detergent and water
Model HE-BOS 8FT DEEP LEAN-TO
 Model HE-BOS 8FT DEEP LEAN-TO C D A B Example 8 X 10 External Frame Dimensions (for base sizes see page 3) Size Range A (mm) B (mm) C (mm) D (mm) 8 5 x 6 8 2036 8 5 x 8 8 2656 2570 8 5 x 10 9 3276 2635
LOCKN LOAD FIRST TIME INSTALLATION
 LOCKN LOAD TM TRACK MOUNTING KIT FORD RANGER PX / MAZDA BT-50 DUAL CAB 2011 + 2 BAR TRACK HEAVY DUTY ROOF RACK SYSTEM MAX VEHICLE ROOF LOAD RATING: 100KG TOTAL LOAD EQUALS WEIGHT OF ROOF RACKS + ACCESSORIES
VOLKSWAGEN AMAROK 3 PIECE HARD TONNEAU COVER INSTALLATION INSTRUCTIONS
 VOLKSWAGEN AMAROK 3 PIECE HARD TONNEAU COVER INSTALLATION INSTRUCTIONS Care Instructions: Clean Tonneau Cover with a mild detergent and water solution. Do not use abrasive cleaners or solvents. Place these
15-GALLON OIL DRAIN DOLLY WITH 12 VOLT PUMP
 15-GALLON OIL DRAIN DOLLY WITH 12 VOLT PUMP OWNER S MANUAL WARNING: Read carefully and understand all ASSEMBLY AND OPERATION INSTRUCTIONS before operating. Failure to follow the safety rules and other
8GAL STEEL OIL DRAIN
 8GAL STEEL OIL DRAIN OWNER S MANUAL WARNING: Read carefully and understand all ASSEMBLY AND OPERATION INSTRUCTIONS before operating. Failure to follow the safety rules and other basic safety precautions
Place these instructions in vehicle s glove box after installation is complete. Clean Tonneau Cover with a mild detergent and water solution.
 Place these instructions in vehicle s glove box after installation is complete Installation Time: Approx. 60 Minutes Care Instructions: Clean Tonneau Cover with a mild detergent and water solution. Do
16 Inch Surface Cleaner
 16 Inch Surface Cleaner Owner s Manual WARNING: Read and understand all instructions, warnings, and cautions before using this product. Failure to follow the instructions, warnings, and cautions may result
9'8" x 9'8" (8,8 m2)
") 9'8" x 9'8" (8,8 m) 007-CH 007 - CH GB May we congratulate you on your new greenhouse US Dear DER Customer! CUSTOMER The Congratulations assembly of on your purchasing new house your new requires greenhouse.
9'8" x 9'8" (8,8 m) 007-CH 007 - CH GB May we congratulate you on your new greenhouse US Dear DER Customer! CUSTOMER The Congratulations assembly of on your purchasing new house your new requires greenhouse.
LOCKN LOAD MOUNTING KIT
 LOCKN LOAD MOUNTING KIT TM VOLKSWAGEN AMAROK 2 BAR FIXED POINT HEAVY DUTY ROOF RACK SYSTEM MAX VEHICLE ROOF LOAD RATING: 100KG TOTAL LOAD EQUALS WEIGHT OF ROOF RACKS + ACCESSORIES + CARGO FIRST TIME INSTALLATION
Helios 200/25. Helios Hobby. Type A (cm) X B(cm) M 2 H1(cm) H2(cm) Mounting difficulty. ALU (no color)
 X B(cm) M 2 H1(cm) H2(cm) Mounting difficulty. ALU (no color)") Helios 200/25 Helios Hobby Color ALU (no color) Mounting difficulty Type A (cm) X B(cm) M 2 H1(cm) H2(cm) cm cm m 2 cm cm cm cm 7,3 m 2 cm cm cm x 73 cm 1,7 m 2 - - - cm cm m 2 cm cm cm cm m 2 cm cm cm
Helios 200/25 Helios Hobby Color ALU (no color) Mounting difficulty Type A (cm) X B(cm) M 2 H1(cm) H2(cm) cm cm m 2 cm cm cm cm 7,3 m 2 cm cm cm x 73 cm 1,7 m 2 - - - cm cm m 2 cm cm cm cm m 2 cm cm cm
DORMA INTERIOR. DORMA PURE FAMELESS SLIDING Glass Wall Systems
 TABLE OF CONTENTS Overview Intended use Structure requirements and fittings Requirements for glass panel Safety instructions Symbols used - safety/ installation Maintenance, care, repair Disposal 3 Overall
PE51 HURLEY 3 STATION METAL SWING SET OWNER'S MANUAL
 PE51 HURLEY 3 STATION METAL SWING SET OWNER'S MANUAL WARNING! The disassembled product may contain small parts which pose a choking hazard to children under 3. IMPORTANT: This product may contain sharp
INSTRUCTION MANUAL. Stephenson Road Speedwell Industrial Estate Staveley Chesterfield S43 3JN
 INSTRUCTION MANUAL Stephenson Road Speedwell Industrial Estate Staveley Chesterfield S43 3JN Telephone: 0800 1300 402 Fax: 01246 471 277 Website: www.morclean.com Email: information@morclean.com Contents
FORD EDGE. (2011 Production Onwards) INTEGRATED SIDE STEP INSTALLATION INSTRUCTION. 60 Minutes
 INTEGRATED SIDE STEP INSTALLATION INSTRUCTION. 60 Minutes") FORD EDGE (2011 Production Onwards) INTEGRATED SIDE STEP INSTALLATION INSTRUCTION Accessory Part No. STEP0010 60 Minutes Approx Product Weight: KG / 35LBS IMPORTANT - PLEASE READ INSTRUCTIONS BEFORE COMMENCING
FORD EDGE (2011 Production Onwards) INTEGRATED SIDE STEP INSTALLATION INSTRUCTION Accessory Part No. STEP0010 60 Minutes Approx Product Weight: KG / 35LBS IMPORTANT - PLEASE READ INSTRUCTIONS BEFORE COMMENCING
RMT1201. ORIGINAL INSTRUCTIONS Cordless Multi-Tool
 RMT1201 ORIGINAL INSTRUCTIONS Cordless Multi-Tool Important! It is essential that you read the instructions in this manual before operating this machine. Subject to technical modifications. Safety GENERAL
FIRST TIME INSTALLATION
 LOCKN LOAD TM PLATFORM MAX PLATFORM LOAD RATING: 100 KG (sizes A, B, F, G, I, K, & L) 150 KG (sizes C, D, E, H, J, N, P & U) PLEASE REFER TO VEHICLE MANUFACTURER SPECIFICATIONS FOR MAX ROOF LOAD RATING
STEEL SIDE PANEL KIT. Model (FOR USE WITH MODEL FOLDABLE UTILITY TRAILER)
") STEEL SIDE PANEL KIT Model 47423 (FOR USE WITH MODEL 42709 FOLDABLE UTILITY TRAILER) Set up and Operating Instructions (MODEL 42709 TRAILER and TARP NOT INCLUDED. TARP SOLD SEPARATELY. Shown for illustration
STEEL SIDE PANEL KIT Model 47423 (FOR USE WITH MODEL 42709 FOLDABLE UTILITY TRAILER) Set up and Operating Instructions (MODEL 42709 TRAILER and TARP NOT INCLUDED. TARP SOLD SEPARATELY. Shown for illustration
ORIGINAL INSTRUCTIONS
 OPERATION & MAINTENANCE INSTRUCTIONS CBB200 Shown here BUFFER/POLISHER MODEL NO: CBB150, CBB200 PART NO: 6500485, 6500490 ORIGINAL INSTRUCTIONS LS0818 - ISS 1 INTRODUCTION Thank you for purchasing this
Offset Solar LED Umbrella
 Item #0178 Offset Solar LED Umbrella The schematics in this manual are for assembly and operation illustration only. They may differ from the umbrella s actual appearance. Owner s Manual Package Contents
3PC TONNEAU COVER INSTALLATION INSTRUCTIONS. Ford Ranger/Mazda BT-50 (without bedliner)
") 3PC TONNEAU COVER INSTALLATION INSTRUCTIONS Ford Ranger/Mazda BT-50 (without bedliner) Care Instructions: Clean Tonneau Cover with a mild detergent and water solution. Do not use abrasive cleaners or solvents.
3PC TONNEAU COVER INSTALLATION INSTRUCTIONS Ford Ranger/Mazda BT-50 (without bedliner) Care Instructions: Clean Tonneau Cover with a mild detergent and water solution. Do not use abrasive cleaners or solvents.
Roof access hatch installation instructions
 Roof access hatch installation instructions 08.09.2017 Contents 1. Introduction 1 2. Safety precautions and warnings 1 3. Types of roof access hatches and product dimensions 2 4. Parts overview 3 5. Preparation
5-FT. DELUXE ALUMINUM CARGO CARRIER WITH 5-FT. RAMP OWNER S MANUAL
 5-FT. DELUXE ALUMINUM CARGO CARRIER WITH 5-FT. RAMP OWNER S MANUAL WARNING: Read carefully and understand all ASSEMBLY AND OPERATION INSTRUCTIONS before operating. Failure to follow the safety rules and
1PC TONNEAU COVER INSTALLATION INSTRUCTIONS. Ford Ranger (with bedliner)
") PC TONNEAU COVER INSTALLATION INSTRUCTIONS Ford Ranger (with bedliner) Care Instructions: Clean Tonneau Cover with a mild detergent and water solution. Do not use abrasive cleaners or solvents. Place these
PC TONNEAU COVER INSTALLATION INSTRUCTIONS Ford Ranger (with bedliner) Care Instructions: Clean Tonneau Cover with a mild detergent and water solution. Do not use abrasive cleaners or solvents. Place these
Heavy-Duty Sawhorse. Owner s Manual
 Heavy-Duty Sawhorse Owner s Manual WARNING: Read carefully and understand all ASSEMBLY AND OPERATION INSTRUCTIONS before operating. Failure to follow the safety rules and other basic safety precautions
TELESCOPIC LADDER MODEL NO: TL-2B / TL-3B
 TELESCOPIC LADDER MODEL NO: TL-2B / TL-3B PART NO: 3500240 / 3500242 OPERATION & MAINTENANCE INSTRUCTIONS ORIGINAL INSTRUCTIONS LS0918 - ISS 1 INTRODUCTION Thank you for purchasing this CLARKE telescopic
48 in. DELUXE ALUMINUM CARGO CARRIER WITH RAMP
 48 in. DELUXE ALUMINUM CARGO CARRIER WITH RAMP OWNER S MANUAL WARNING: Read carefully and understand all ASSEMBLY AND OPERATION INSTRUCTIONS before operating. Failure to follow the safety rules and other
Eos 200/40. Eos. Type A (cm) X B(cm) M 2 H1(cm) H2(cm)
 X B(cm) M 2 H1(cm) H2(cm)") Eos 200/40 Eos Color RAL 9005 RAL 6009 Polycarbon 10mm Security 4mm Mounting difficulty Type A (cm) X B(cm) M 2 H1(cm) H2(cm) ET23 314 cm x 396 cm 11,2 m 2 201 cm 260 cm 38 - - ET2E 236 cm x 73 cm 1,7
Eos 200/40 Eos Color RAL 9005 RAL 6009 Polycarbon 10mm Security 4mm Mounting difficulty Type A (cm) X B(cm) M 2 H1(cm) H2(cm) ET23 314 cm x 396 cm 11,2 m 2 201 cm 260 cm 38 - - ET2E 236 cm x 73 cm 1,7
TOYOTA CAMRY EC REARVIEW MIRROR Preparation
 TOYOTA CAMRY 2010 - EC REARVIEW MIRROR Preparation Part Number: 00016-09101 Code: CM9 Kit Contents Item # Quantity Reqd. Description 1 1 AD Mirror Assembly w/ Compass 2 1 Hardware bag Hardware Bag Contents
Product Maintenance Guide
 Product Maintenance Guide Upvc windows, doors, FSG and conservatories Thank you for investing in our products. They have all been designed and manufactured to the highest possible standards and are relatively
Air-Operated Waste Oil Drainer
 Air-Operated Waste Oil Drainer 20-Gallon Tank Owner s Manual WARNING: Read carefully and understand all ASSEMBLY AND OPERATION INSTRUCTIONS before operating. Failure to follow the safety rules and other
20- G A L L O N O I L D R A I N W I T H C A S T E R S OWNER S MANUAL
 20- G A L L O N O I L D R A I N W I T H C A S T E R S OWNER S MANUAL WARNING: Read carefully and understand all INSTRUCTIONS before operating. Failure to follow the safety rules and other basic safety
SAFETY AND OPERATING MANUAL. Lithium-Ion cordless hammer drill WX372 WX372.1 WX372.9
 SAFETY AND OPERATING MANUAL 2 Original Instructions General Power Tool Safety Warnings WARNING: Read all safety warnings and all instructions. Failure to follow the warnings and instructions may result
NIS NAV AM (MY15 >) - Aluminium Tonneau Cover ATC0051 (silver) ATC0052 (Black) Installation Time: Approx. 60 Minutes WARNING!
 - Aluminium Tonneau Cover ATC0051 (silver) ATC0052 (Black) Installation Time: Approx. 60 Minutes WARNING!") Installation Time: Approx. 60 Minutes WARNING! When in the closed position, Aluminium Tonneau Cover must be latched and tailgate must be closed. Failure to do so could result in unexpected opening of the
Installation Time: Approx. 60 Minutes WARNING! When in the closed position, Aluminium Tonneau Cover must be latched and tailgate must be closed. Failure to do so could result in unexpected opening of the
INSTALLATION INSTRUCTIONS
 AUTOMOTIVE PRODUCTS, INSTALLATION INSTRUCTIONS HDX AND SPORTSMAN GRILLE GUARD APPLICATION: 2015-2017 Chevrolet Silverado 2500/3500 PART NUMBER: 45-3780, 40-3785, 57-3780, 57-3785 ITEM QUANTITY DESCRIPTION
LOCKN LOAD. MAX VEHICLE ROOF LOAD RATING: 100KG (2 Leg Pairs) 150KG (3 Leg Pairs) TOTAL LOAD EQUALS WEIGHT OF ROOF RACKS + ACCESSORIES + CARGO
 150KG (3 Leg Pairs) TOTAL LOAD EQUALS WEIGHT OF ROOF RACKS + ACCESSORIES + CARGO") LOCKN LOAD TM GUTTER MOUNT KIT GUTTER MOUNT HEAVY DUTY ROOF RACK ATTACHMENT SYSTEM MAX VEHICLE ROOF LOAD RATING: 00KG ( Leg Pairs) 50KG (3 Leg Pairs) TOTAL LOAD EQUALS WEIGHT OF ROOF RACKS + ACCESSORIES
LOCKN LOAD TM GUTTER MOUNT KIT GUTTER MOUNT HEAVY DUTY ROOF RACK ATTACHMENT SYSTEM MAX VEHICLE ROOF LOAD RATING: 00KG ( Leg Pairs) 50KG (3 Leg Pairs) TOTAL LOAD EQUALS WEIGHT OF ROOF RACKS + ACCESSORIES
INSTALLATION & OWNER S MANUAL
 Rev. B, p. 1 of 18 INSTALLATION & OWNER S MANUAL KAWASAKI TERYX ClearView Cab p/n: 1KAWT8002CV This cab fits model years: 2014- The contents of this envelope are the property of the owner. Be sure to leave
INSTALLATION INSTRUCTIONS
 GENUINE PARTS INSTALLATION INSTRUCTIONS. DESCRIPTION:. APPLICATION: 3. PART NUMBER: Hood Protector 004 Nissan Armada 004 Nissan Titan 999D X000 4. KIT CONTENTS: Item No. ) ) 3) 4) ) 6) 7) 8) 9) 0) ) Qty
CALF SHELTER 6, 12, 15, 18, & 24 MODELS ASSEMBLY MANUAL
 CALF SHELTER 6, 12, 15, 18, & 24 MODELS ASSEMBLY MANUAL Read this manual before using product. Failure to follow instructions and safety precautions can result in serious injury, death, or property damage.
Please follow the procedure marked with this symbol precisely. Non-compliance may lead to damage of the product.
 Revision L, October 2016 Mounting Kits for Single Band 160mm (6.3 ) Profile Panel Antennas F-074-S4, T-075-S4 & T-095-S4 General This instruction sheet contains all necessary information required to assist
TOYOTA TUNDRA COLD AIR INTAKE Preparation SEQUOIA
 Preparation SEQUOIA 2008 - Part Number: PTR03-34070 (5.7L) PTR03-34072 (4.7L) Kit Contents: 5.7L Item # Quantity Reqd. Description 1 1 Lid: Air Filter 2 1 Inlet Pipe: 5.7L 3 1 Air Filter: TRD Conical 4
Parts List ILLUSTRATION #1
 Installation Instructions BR20 Rear Bumper Replacement Part Number 28171T 2014-2016 Chevrolet Silverado 1500 2/4WD Do not attempt to install this product on any vehicle other than the one listed above!
UPS-ST12xx UPSPro Backup Power System
 UPS-ST12xx UPSPro Backup Power System Wireless Base Stations Surveillance Cameras Lighting Applications Up to 30W loads Congratulations! on your purchase of the UPSPro outdoor backup power system. Please
60 Watt Industrial LED Low Bay Light
 60 Watt Industrial LED Low Bay Light Owner s Manual WARNING: Read carefully and understand all ASSEMBLY AND OPERATION INSTRUCTIONS before operating. Failure to follow the safety rules and other basic safety
Owners Manual POWER PLUS MOBILITY OUR PRODUCTS WILL MOVE YOU
 Owners Manual POWER PLUS MOBILITY OUR PRODUCTS WILL MOVE YOU At Power Plus Mobility, we care! Thank you for choosing a wheelchair from Power Plus Mobility Inc. We are always improving in our ways to serve
H E AV Y- D U T Y G A R D E N W A G O N w i t h R A I L S OWNER S MANUAL
 H E AV Y- D U T Y G A R D E N W A G O N w i t h R A I L S OWNER S MANUAL WARNING: Read carefully and understand all INSTRUCTIONS before operating. Failure to follow the safety rules and other basic safety
Renaissance Swing. Item# L-GZ542PCO
 Renaissance Swing Item# L-GZ542PCO Congratulations on your purchase of our SUNJOY Renaissance Swing. Our clear, easy to follow, step-by-step instructions will guide you through the assembly process from
Manual CPK 7210 N. Flate plate collector. Mounting parallel bench srew mountingsystem x x x x / version
 Manual Mounting parallel bench srew mountingsystem Flate plate collector CPK 7210 N 6 9 0 x x x x / version 2008.03 Contents Safety information...3 Transport note...4 Assembly instructions - Collector...5
GUIDANCE NOTES. Solar Collectors. On-Roof Installation (First Fix) Please leave these instructions with the User. Baxi Heating UK Ltd 2012
 Please leave these instructions with the User. Baxi Heating UK Ltd 2012") GUIDANCE NOTES Solar Collectors On-Roof Installation (First Fix) Baxi Heating UK Ltd 2012 Please leave these instructions with the User Contents 1.0 2.0 3.0 4.0 5.0 6.0 7.0 8.0 9.0 Symbols and tools 4
GUIDANCE NOTES Solar Collectors On-Roof Installation (First Fix) Baxi Heating UK Ltd 2012 Please leave these instructions with the User Contents 1.0 2.0 3.0 4.0 5.0 6.0 7.0 8.0 9.0 Symbols and tools 4
Pioneer Tray, Pioneer Platform & Pioneer Tradie
 CONTROLLED Pioneer Tray, Pioneer Platform & Pioneer Tradie Place these instructions in the vehicle s glove box after installation is complete. Important: Please read these instructions carefully prior
LED-6200T 144 LED VARIABLE COLOR ON-CAMERA LIGHT USER MANUAL
 LED-6200T 144 LED VARIABLE COLOR ON-CAMERA LIGHT USER MANUAL LED-6200T Introduction Thank you for choosing the Genaray LED-6200T On-Camera Light. This product will provide you with powerful, portable and
original instructions 18V Torch RFP1801
 original instructions 18V Torch RFP1801 Important! It is essential that you read the instructions in this manual before operating this machine. Subject to technical modifications. Safety GENERAL POWER
Care Instruction: Wash vehicle roof prior to installing Rhino Tracks.
 Important: Please read these instructions carefully prior to installation. Please refer to your fitting instruction to ensure that the roof racks are installed in the correct locations. Check the contents
1464. Interior Installation. Cover Rear Seat Support Cut the vinyl to approximately the size of the rear seat support.
 Chapter 37 (Video Clip 37) - Interior Installation 1464. Interior Installation Cover Rear Seat Support 1465. Cut the vinyl to approximately the size of the rear seat support. 1466. Make a dry fit of the
Parts List DAKAR PRO Brackets Part # Chevrolet Silverado /4WD
 Installation Instructions BR5 Front Bumper Replacement Part Number 24128T Ram 1500 2/4WD (Not compatible with ParkSense, Sport, Express and Rebel Models) Parts List DAKAR PRO Brackets Part # 524765 2014
Pioneer Tray, Pioneer Platform & Pioneer Tradie
 Place these instructions in the vehicle s glove box after installation is complete. Important: Please read these instructions carefully prior to installation. Check the contents of this kit before commencing
Installation Instructions. Ventvisor Deflector
 Installation Instructions Important Safety Information Ventvisor Deflector For proper installation and best possible fit, please read all instructions BEFORE you begin. CAUTION - Before driving, ensure
INSTALLATION INSTRUCTIONS WINCH MOUNTING KIT Part number: Application: Ford F150 Ecoboost
 INSTALLATION INSTRUCTIONS WINCH MOUNTING KIT Part number: 88070 Application: 2011+ Ford F150 Ecoboost GENERAL SAFETY PRECAUTIONS Your safety, and the safety of others, is very important. To help you make
M-9603-SVT mm Cold Air Kit w/premium Calibration INSTALLATION INSTRUCTIONS
 Please visit www.fordracingparts.com for the most current instruction information!!! PLEASE READ ALL OF THE FOLLOWING INSTRUCTIONS CAREFULLY PRIOR TO INSTALLATION. AT ANY TIME YOU DO NOT UNDERSTAND THE
SSW 18 LTX 600 SSW 18 LTX 400 BL
 SSW 18 LTX 600 SSW 18 LTX 400 BL en Operating Instructions 5 fr Mode d'emploi 9 es Instrucciones de manejo 13 www.metabo.com SSW 18 LTX 400 BL 1 SSW 18 LTX 600 1 2 3 2 3 4 5 7 4 7 6 6 9 8 9 8 10 2 11.
D40C HINGE # x Support Plate x M8 Bolt 8 x M8 Washer 6 x M6 20mm Bolts 6 x M6 Washers 19 x Screws
 HINGE # 1017 2 x Support Plate 1018 8 x M8 Bolt 8 x M8 Washer 6 x M6 20mm Bolts 6 x M6 Washers 19 x Screws 2 x Lid mount gas strut bracket 1041 2 x Self tap strut mount 1040 1 x Central Lock bracket 1510
NM-NP Pajero Rhino Heavy Duty - Two Bar Trackmount System
 NM-NP Pajero Rhino Heavy Duty - Two Bar Trackmount System Parts List Important: Care Instruction: Clean vehicle roof prior to fi tting Rhino Heavy Duty roof racks. Tools Required: Pneumatic or concertina
LIFT N LOAD INSTALLATION, MAINTENANCE, & SAFETY INSTRUCTIONS (800)
") LIFT N LOAD INSTALLATION, MAINTENANCE, & SAFETY INSTRUCTIONS (800) 272-6276 001-321-757-7611 www.cramarotarps.com Plants In: Delaware, Florida, Massachusetts, Nevada, Ohio, and Canada General Information
LIFT N LOAD INSTALLATION, MAINTENANCE, & SAFETY INSTRUCTIONS (800) 272-6276 001-321-757-7611 www.cramarotarps.com Plants In: Delaware, Florida, Massachusetts, Nevada, Ohio, and Canada General Information
RUSH WALL TOP ASSEMBLIES EXT D 15MM PRODUCT CODE: FINISH: RU067 MB MATTE BLACK 3/4 TURN OPERATION PREMIUM FINISHES
 RUSH WALL TOP ASSEMBLIES EXT D 1MM PRODUCT CODE: FINISH: RU067 MB MATTE BLACK 3/4 TURN OPERATION PREMIUM FINISHES CERAMIC DISC CARTRIDGE PHOENIX WARRANTY MATCH WITH... TECHNICAL SPECIFICATIONS CONSUMER
For Honda Big Red. Caution: Before using this product, read this manual and follow all safety instruction. Defender Cab Owner s Manual.
 Defender Cab Owner s Manual Model: Honda Big Red Caution: Before using this product, read this manual and follow all safety instruction For Honda Big Red Safety Instructions Kit Contents Tool Requirement
USER S MANUAL CAUTION. Visit our website at. new products, prizes, fitness tips, and much more!
 Patent Pending Model No. 831.159730 Serial No. The serial number is found in the location shown below. Write the serial number in the space above. USER S MANUAL Serial Number Decal SEARS, ROEBUCK AND CO.
Installation Manual. AutoSteer. Gleaner Combine. AutoGuide 2 Steer Ready. Supported Models A66 A76 R66 R76 S67 S77 PN: A
 Installation Manual AutoSteer Gleaner Combine AutoGuide 2 Steer Ready Supported Models A66 A76 R66 R76 S67 S77 PN: 602-0312-01-A LEGAL DISCLAIMER Note: Read and follow ALL Instructions in this manual carefully
INSTALLATION INSTRUCTIONS
 INSTALLATION INSTRUCTIONS Accessory MOON P/N 08R01-SZA-101 Application 2014 PILOT Publications No. AII 50258 Issue Date AUG 2013 PARTS LIST TOOLS AND SUPPLIES REQUIRED Phillips screwdriver 10 mm Combination
Scion xb EC Rearview Mirror Preparation
 Scion xb 2010 - EC Rearview Mirror Preparation Part Number: 00016-09101 Code: CM9 Kit Contents Item # Quantity Reqd. Description 1 1 AD Mirror Assembly w/ Compass and Homelink 2 1 Hardware bag Hardware
Parts List. Item Qty. Part # Description Item Qty. Description Torque T0AA Bumper Replacement Shell 10 5 Plastic Hole Plug
 Installation Instructions BR20 Rear Bumper Replacement Part Number 28295T Ford F-150 2/4WD (Excludes King Ranch models with appearance package & Platinum models) Parts List Item Qty. Part # Description
VIVID SLIMLINE FLOOR MOUNTED BATH MIXER PRODUCT CODE: FINISH: VS745 CHR CHROME STYLISH PREMIUM FINISH CONTEMPORARY DESIGN PHOENIX WARRANTY
 VIVID SLIMLINE FLOOR MOUNTED BATH MIXER PRODUCT CODE: FINISH: VS745 CHR CHROME STYLISH PREMIUM FINISH CONTEMPORARY DESIGN PHOENIX WARRANTY MATCH WITH... TECHNICAL SPECIFICATIONS CONSUMER INFORMATION RANGE:
RTS528 - Holden Colorado/ Isuzu D-MAX Space Cab Track Mount System
 RTS528 - Holden Colorado/ Isuzu D-MAX Space Cab Track Mount System Important: Please read these instructions carefully prior to installation. Please refer to your fi tting instruction to ensure that the
GENUINE PARTS INSTALLATION INSTRUCTIONS
 GENUINE PARTS INSTALLATION INSTRUCTIONS DESCRIPTION: APPLICATION: Moonroof Wind Deflector Nissan Altima PART NUMBER: 999D UZ000 KIT CONTENTS: Item Qty. Description Service Part Number A B C D E F G H 1
LED-6200T 144 LED VARIABLE COLOR ON-CAMERA LIGHT USER MANUAL
 LED-6200T 144 LED VARIABLE COLOR ON-CAMERA LIGHT USER MANUAL LED-6200T INTRODUCTION Thank you for choosing the Genaray LED-6200T On-Camera Light. This product will provide you with powerful, portable and
M-9603-SVT mm Cold Air Kit w/premium Calibration INSTALLATION INSTRUCTIONS
 Please contact the Tech Line for the most current instruction information (800) 367-3788.!!! PLEASE READ THE FOLLOWING INSTRUCTIONS CAREFULLY PRIOR TO INSTALLATION!!! OVERVIEW: This kit is designed for
Instruction Manual. CORDLESS DRILL 18V Li-ion WITH IMPACT FUNCTION. Model SROM 1172
 Instruction Manual CORDLESS DRILL 18V Li-ion WITH IMPACT FUNCTION Model SROM 1172 Our tool range has you covered for DIY. Whatever the job, make light work of it with MAKO tools. Product Features: 1. Keyless
90CM KA-BAND TYPE 9013 ANTENNA SYSTEM with Factory Assembled Az/El Mount
 MARCH 2017 Revision A ASSEMBLY MANUAL 8001121-01 90CM KA-BAND TYPE 9013 ANTENNA SYSTEM with Factory Assembled Az/El Mount A ORIGINAL RELEASE MAR 2017 R. Thompson REV. DESCRIPTION DATE APPROVED Global Skyware
Custom Modern. Type A (cm) X B(cm) M 2 H1(cm) H2(cm) Mounting difficulty RAL 9005 RAL cm X cm m 2 cm cm. cm X 73 cm 1,7m
 X B(cm) M 2 H1(cm) H2(cm) Mounting difficulty RAL 9005 RAL cm X cm m 2 cm cm. cm X 73 cm 1,7m") Custom Modern Color RAL 9005 RAL 6009 Mounting difficulty Type A (cm) X B(cm) M 2 H1(cm) H2(cm) cm X cm m 2 cm cm cm X 73 cm 1,7m 2 - - - - - - cm X cm m 2 cm 292 cm cm X 73 cm 2,3m 2 - - - - - - Included
Custom Modern Color RAL 9005 RAL 6009 Mounting difficulty Type A (cm) X B(cm) M 2 H1(cm) H2(cm) cm X cm m 2 cm cm cm X 73 cm 1,7m 2 - - - - - - cm X cm m 2 cm 292 cm cm X 73 cm 2,3m 2 - - - - - - Included
ELECTRIC CAR POLISHER
 ELECTRIC CAR POLISHER MODEL NO: CP254 PART NO: 6462108 OPERATION & MAINTENANCE INSTRUCTIONS LS0610 INTRODUCTION Thank you for purchasing this CLARKE electric car polisher. Before attempting to use this
Fastback Top Installation Instructions and Owner s Manual
 Fastback Top Installation Instructions and Owner s Manual MODEL: Suzuki Samurai 1985-1989 PART NUMBER Congratulations on your purchasing decision. Bestop designed the Convertible Top to give you years
PERFORMANCE HOOD VENTS CONTENTS: Left Side Hood Vent (1) Right Side Hood Vent (1) Mounting Bracket, Inner (2) Mounting Bracket, Outer (2) OE Hood Temp
 Right Side Hood Vent (1) Mounting Bracket, Inner (2) Mounting Bracket, Outer (2) OE Hood Temp") CONTENTS: Left Side Hood Vent (1) Right Side Hood Vent (1) Mounting Bracket, Inner (2) Mounting Bracket, Outer (2) OE Hood Template (1) HARDWARE: Mounting Bracket, Inner X 2 Phillips Screw X 8 Mounting
CONTENTS: Left Side Hood Vent (1) Right Side Hood Vent (1) Mounting Bracket, Inner (2) Mounting Bracket, Outer (2) OE Hood Template (1) HARDWARE: Mounting Bracket, Inner X 2 Phillips Screw X 8 Mounting
74CM KU-BAND TYPE 743 ANTENNA SYSTEM with Factory Assembled Az/El Mount
 January 2016 Revision A ASSEMBLY MANUAL 8001107-01 74CM KU-BAND TYPE 743 ANTENNA SYSTEM with Factory Assembled Az/El Mount A ORIGINAL RELEASE EC-02390 JAN 2016 R. Thompson REV. DESCRIPTION DATE APPROVED
INSTALLATION AND OWNER S MANUAL Wing Deflectors, Fairing Mount N5107 and N5109 for HONDA GL1800
 INSTALLATION AND OWNER S MANUAL Wing Deflectors, Fairing Mount N5107 and N5109 for HONDA GL1800 Thank you for purchasing a National Cycle product. Please read these instructions carefully and thoroughly
USER'S MANUAL ORDERING REPLACEMENT PARTS QUESTIONS? CAUTION. Visit our website at.
 ORDERING REPLACEMENT PARTS If you encounter any difficulties or problems with this product, contact the ICON Fitness Lifestyle Ltd. office, or write: ICON Fitness Lifestyle Ltd. Greenwich House North Street
Water Leak in 3rd Row Seat Stow Area
 T-SB-0214-12 November 1, 2012 Service Category Vehicle Exterior Section Exterior Panels/Trim Market USA Applicability YEAR(S) MODEL(S) ADDITIONAL INFORMATION 2011 2012 Sienna Introduction Some 2011 2012
GENUINE MUD FLAP (FRONT)
") GENUINE MUD FLAP (FRONT) INSTALLATION AND USER S INSTRUCTIONS Thank you for purchasing a Genuine Mazda Accessory. Before removal and installation, be sure to thoroughly read these instructions. Please
GENUINE MUD FLAP (FRONT) INSTALLATION AND USER S INSTRUCTIONS Thank you for purchasing a Genuine Mazda Accessory. Before removal and installation, be sure to thoroughly read these instructions. Please
INSTALLATION INSTRUCTIONS
 AUTOMOTIVE PRODUCTS, INSTALLATION INSTRUCTIONS SPORTSMAN WINCH MOUNT GRILLE GUARD / MAX WINCH TRAY HDX WINCH MOUNT GRILLE GUARD APPLICATION: 2017 Ford F250/350 Super Duty PART NUMBER: 40-93905, 45-93900,
Inspiration strikes PP-310 CYCLONE BATTERY PACK. User s Manual
 Inspiration strikes PP-310 CYCLONE BATTERY PACK User s Manual Copyright 2013 Gradus Group Bolt and other names of Bolt products are trademarks of Gradus Group. Other product and corporate names mentioned
VOLKSWAGEN AMAROK 1 & 3 PIECE HARD TONNEAU REMOTE LOCKING KIT INSTALLATION INSTRUCTIONS
 VOLKSWAGEN AMAROK & PIECE HARD REMOTE LOCKING KIT INSTALLATION INSTRUCTIONS Care Instructions: Clean Tonneau Cover with a mild detergent and water solution. Do not use abrasive cleaners or solvents. Place