Model HE-BOS 8FT DEEP LEAN-TO
|
|
|
- Godfrey Bryant
- 5 years ago
- Views:
Transcription
 B (mm) C (mm) D (mm) 8 5 x 6 8 2036 8 5 x 8 8 2656 2570 8 5 x 10 9 3276 2635 1985 8 5 x 12 9")
1 Model HE-BOS 8FT DEEP LEAN-TO C D A B Example 8 X 10 External Frame Dimensions (for base sizes see page 3) Size Range A (mm) B (mm) C (mm) D (mm) 8 5 x x x x

 / CORNER GLAZING BARS (e.g. 915) ALL NEED TO HAVE RUBBER INSERTED INTO THEM BEFORE FRAME CONSTRUCTION CAN COMMENCE.")

2 Thank you for purchasing your new Hercules greenhouse. We recommend you familiarise yourself with the instructions and read all safety information before you commence assembly. This instruction manual is also available online at in our technical help section should you need to reprint it. Should you require any additional advice you can always call us on IMPORTANT: PLEASE BE AWARE THAT THE YOUR GLAZING BARS (e.g. 916) / CORNER GLAZING BARS (e.g. 915) ALL NEED TO HAVE RUBBER INSERTED INTO THEM BEFORE FRAME CONSTRUCTION CAN COMMENCE. Safety Warning Site Preparation Glass and aluminium can potentially cause injury. Please ensure you wear protective goggles, gloves, headgear and suitable footwear when assembling and glazing the building. Please remember that glass is fragile and should be handled with extreme care. Always clear up and dispose of any breakages immediately. Do not assemble the greenhouse in high winds. For safety reasons and ease of assembly, we recommend that this greenhouse is assembled by a minimum of two people. Please clear all lying snow from the greenhouse roof as it can cause the roof to buckle or collapse. When selecting a site for your greenhouse, it is vital that you choose as flat and level an area as possible. A concrete or slabbed base will provide the most solid foundation for your greenhouse. It is the end users responsibility to supply a flat and vertical donor wall and any flashing/sealant between the two structures. Avoid placing your greenhouse under trees or in other vulnerable locations. To minimise the risk of wind damage, try to select as sheltered a site as possible, e.g. beside a hedgerow or garden fence. Additional Considerations Guarantee Please bear in mind that assembling your greenhouse can be time consuming. You may need to spread the construction over two or more days. We recommend that you avoid leaving the building partially glazed. If you ever have to leave your greenhouse half assembled and not anchored down, weigh it down with slabs or bags of sand to stop the wind moving it. You will find it helpful to prepare a large, clean and clear area in which to work in. A garage floor or flat lawn area is ideal. If you have arranged for someone to install your greenhouse for you, please check that all components are included. Most parts are numbered and can be identified by a stamp or removable label. Alternatively, the components can be identified by lengths detailed in the packing list (see diagram below). Once installed your greenhouse requires little maintenance, but to maintain the smooth running of your door(s) WD40 or similar can be applied to the door wheels and lower door guides. Your new Hercules greenhouse is guaranteed for 10 years against faulty manufacture of the framework. This does not include glass, moving parts, accidental damage or wind damage. Look out for part numbers KEY View Orientation Potential Hazard Wear safety goggles Wear gloves 64mm Think/Decision Example Section No. Page No. 512 e.g. Refer to section 4 Keep away from water while fitting Cut/Trim


 OPTION 2 -")


 B (mm) C (mm) D")

3 OPTION 1 - Slab Base Slab Base Sizes (Recommended) Note: The base should always be larger than your building. The measurements given should only be used as a guide. Building Size 8 5 x 6 8 A (mm) B (mm) C (mm) 2600 C 90 o 8 5 x x x A B Recommended 3 X 2 Slab (910mm X 610mm) 2 thickness (50mm) OPTION 2 - Brick Plinth 50mm SOIL 5 : 1 E C A B Brick Plinth (External) (Greenhouse size on front cover) Building A (mm) B (mm) C (mm) D (mm) E (mm) Size C D? 8 5 x x x ? C+D 8 5 x
4 Section Part Size Profile No. (mm) Section Part Size Profile No. (mm) Base Bracket Cantilever Front Cill Gutter Front Purling Glazing Bar Front Roof Brace Roof Brace Roof Purling Roof Glazing Bar Ridge Diagonal Bracing Foam Strip 7m Base Bracket Top/Bottom Purling Purling Gable Cill 915 Glazing Bar Corner Side Side M4 M6 Crop M Wall Plate Glazing Bar Side Glazing Bar Side Glazing Bar Side Glazing Bar Above Door Base Bracket 707 Door Bottom 708 Door Top 373 Door Middle 375 Door Runner Glazing Bar Roof Corner Door Stile With Lock
5 Section Part Profile Size No. (mm) Section Part Profile Size No. (mm) Door Stile Without Lock Vent Bottom Door Stile Male Vent Side Vent Top 384 Door Handle Door Stop Slam Bar Door Track Casement Stay Door Track Support Bracket M6 578 M Door Track Main Support M Door Track 580 Nut Caps Vertical Support M Threshold 557 Glass Jack M Edging Strip M6 Cropped Head Door Stop Bung Draught Excluder M M Nut Caps M M6 15
 12 576 3 588 1 576 3 588 1 588 (M6) 2 16 916 931 936 304 8' Part Number Size (mm) Quantity 304 2038 2 334")

 916 576 3 588 1 932 576 4 576 4 576 3 588 1 937 304 337 10'")
 Quantity 304 2038 2 336 3748 1 916 1797 5 933 3736 1 938 3748 1 576")
6 Front ' Part Number Size (mm) Quantity (M6) (M6) (M6) ' Part Number Size (mm) Quantity (M6) (M6) (M6) 2 16 It is possible to fit either a louvre or a door on the front of the building. If you wish to do this you will need to add extra bolts in the channels of the glazing bars (916). If fitting the door you will need to cut the purling (Page 29) ' Part Number Size (mm) Quantity (M6) (M6) (M6) ' Part Number Size (mm) Quantity (M6) (M6) (M6) 2 16


7
 10 20 579 (M6) - 24 588 (M6) 15 4 The door can also be fitted to the front of the greenhouse.")
8 Left Gable Right Gable Door Option Part Number Size (mm) Quantity (M6) (M6) (M6) 15 4 The door can also be fitted to the front of the greenhouse. See section 8, page 29.


9

10
11 Left Gable Right Gable Part Number Size (mm) Quantity (M6) (M6) (M6) 15 4


12


13

14 Frame Assembly IMPORTANT Do not fix the greenhouse to the base untill the greenhouse is fully glazed.

15
 into the roof glazing bars for the roof purling")
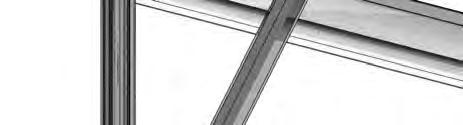
16 Roof Roof Purling Remember to insert extra bolts (588-15mm) into the roof glazing bars for the roof purling (944)


17 External View


18


19 Attach foam strip to the back of the ridge and the wall bars. 572 IMPORTANT Do not fix the greenhouse to the base until the greenhouse is fully glazed
20 Fix the greenhouse to the wall using 2 inch screws and rawl plugs. The table below suggests how many you will need for your size of greenhouse. Ensure the greenhouse is level and the uprights are vertical before fixing. IMPORTANT Do not fix the greenhouse to the base until the greenhouse is fully glazed


21 928 7mm 919 Drill 5mm weep holes every 300mm in the gutter 919 7mm


22 Cut all the bar capping to length. Start with the longest length of bar capping and work your way round the greenhouse until you get to the smallest piece. A hacksaw is the ideal tool for the job. (To make it easier, try grouping capping of the same length when cutting.) Once you have cut all the capping distribute it around the greenhouse. So when you start glazing, the capping you need is always to hand. Part Size (mm) A 610 X B 610 X E 610 X F 610 x L 573 X Q 610 X W 610 X DD 563 X II 610 X 151 X 10 2 JJ 610 X 292 X KK 610 X 436 X LL 610 X 582 X Section View


23 LL F KK A JJ E F II A E F E E E (2 Z Clips per overlap) 557 Q DD DD W Q Q Q Q Q B DD DD IMPORTANT Drill weep holes in the gutter before fitting the roof glass. See page 19. B B II B B JJ L B For Peak models with kick panels: B becomes the aluminium kick panel and a pane 610x290 is used above the kick panel and below the large Q pane. KK B LL IMPORTANT Do NOT glaze above the door untill you have it set up and sliding nicely. Q Q W Q IMPORTANT Do not fix the greenhouse to the base untill the greenhouse is fully glazed. B B B L B II JJ KK LL
24 Louvre B 610 x 457 Louvre Frame


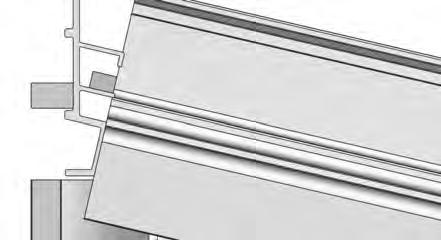
25 W 610 x 1070 L 573 x 100 There are two ways of installing the bar capping. Option 1: Cut the capping above and below the louvre. Option 2: Insert a full length of bar capping. You have to push the bottom edge in first between the louvre and the glazing bar. Once in position, push the top edge under the arrow head of the glazing bar.
 Quantity 375 2508 1 403 2508 1 404-2 406 1232 1 512 64 1 526 1206")
.")
.")
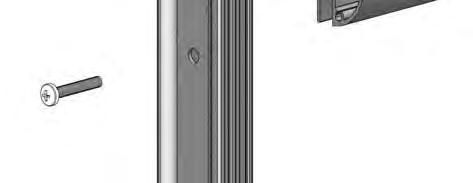
26 Door Track and Runner Remember the door can be fitted on the other end or on the front. Part Number Size (mm) Quantity IMPORTANT Do not fix this support untill you are happy with the final possition of the door track (403). You will need to drill a pilot hole using a 3mm drill bit in the Door Track (403) and in the Wall Bar (918). If you use an M6 nut (579) as a washer you can then hide the screw head with a nut cap


27 External View Section View mm Section View
.")
.")


28 Door Assembly P41 Start by fixing the door middle in place (373). Make sure this is the correct way up (the channel should face down). Slide the edgign strips into place (558), then slide the glass into the edging strips. Then slot the top and bottom into place. Troubleshooting If the top and bottom don t line up with the pre drilled holes in the door stiles: Try checking that the glass has located with the door middle correctly. Check that the edging strip isn t interfering with the door top/bottom. Top DD 563 x 880


29 Internal View External View


30 Section View Door Door Instillation on Gable To locate the door wheels and the door guide you will probably have to adjust the height of the door track, you do this by loosening the bolts that join the door track support bracket to the glazing bars. If you find that the door doesn t run very well at first, try adjusting the bolts on the main door track support. (You can also use WD40 on the door wheels and rails for an even smoother running door). General maintenance: For a smooth running door you should oil the wheels regularly and keep the bottom door runner clear of grit by swilling with water Internal View Remove part 400 to install doors. Once in place this can be reattached


 into the gutter with a 7mm")
 through the")


31 7mm Door Instillation on Front It is possible to fit the door to the front of your building. This will involve slight modifications to some components. The purling will need to be cut (using a hacksaw) where the door is being positioned. It is best to cut a 45 angle on the end of the purling, as supplied. You will need to drill through the door track (402) into the gutter with a 7mm drill. Insert the 15mm bolt (588) through the door track. You now need to insert the M6 washers to space the door track from the gutter. The number of washers used here can effect how well your door runs. Before fixing the nut (586) insert a rubber washer to seal the gutter Door Track Support 586 M6 Rubber Washer M6 Washer 707


32 Vent Part No. Size (mm) Quantity M6 X 10 4 M6 6 M6 X 10 2 M4 X 10 6 M4 6 M3.5 X X 610


33 External View External View


34 XL Autovent Attachment to Hercules Greenhouses CLAMP 944


35 Rotate to adjust the position of your vent. You should take the weight of the vent in one hand while doing this. CLAMP Section View GLASS CLAMP Section View The autovent clamps in place. NO holes are used.


36 Fix the greenhouse to the floor using 2 inch screws and rawl plugs. Ensure the greenhouse is level and the uprights are vertical before fixing. IMPORTANT Do not fix the greenhouse to the base untill the greenhouse is fully glazed. 7mm


 onto the end of the downpipe to direct the flow of water. Part Name Part Length Qty No.")
37 Downpipe Instillation 1. Firstly you need to decide which end you want your downpipe. 2. The gutter outlet and stop end simply push into the gutter. For an even better seal you could run a bead of silicone around the inside edge of the gutter before inserting the outlet and stop end. 3. Now take the downpipe and slide on the bracket. Insert the downpipe into the outlet. 4. When you are happy with its position line up the bracket with the side corner bar, mark through the screw hole and with a 3.2mm drill make a pilot hole. Using the self tapping screw fix the bracket to the corner bar. 5. Finally push the 45 degree pipe (593) onto the end of the downpipe to direct the flow of water. Part Name Part Length Qty No. mm Required Screws, self tapping - 19mm M Gutter outlet Gutter stop end Downpipe degree double collar Downpipe bracket


38 Downpipe Attachment Choose one of the options for attaching your downpipes. It is entirely your preference, either method is as good as the other Option mm Option


39
40 The Greenhouse People Unit 19, Blythe Park Cresswell Stoke-on-Trent Staffordshire ST11 9RD
6 3 X X X X X
 Use mm s only! (mm) B (mm) 4 6 3 X 4 3 1298 6 8 10 12 6 3 X 6 4 1918 6 3 X 8 4 1918 2538 6 3 X 10 4 3158 6 3 X 12 5 3778 Thank you for purchasing your new greenhouse. We recommend you familiarise yourself
Assembly instructions A B. A (mm) B (mm) C (mm) A A A A Walk-in Greenhouse
 B (mm) C (mm) A A A A Walk-in Greenhouse") ssembly instructions C MODEL (mm) (mm) C (mm) 907 34 90 950 689 4 9 3666 94 438 Walk-in Greenhouse Statement Dear Customer! May we congratulate you on your new Greenhouse. We feel sure that by following
ssembly instructions C MODEL (mm) (mm) C (mm) 907 34 90 950 689 4 9 3666 94 438 Walk-in Greenhouse Statement Dear Customer! May we congratulate you on your new Greenhouse. We feel sure that by following
9'8" x 9'8" (8,8 m2)
") 9'8" x 9'8" (8,8 m) 007-CH 007 - CH GB May we congratulate you on your new greenhouse US Dear DER Customer! CUSTOMER The Congratulations assembly of on your purchasing new house your new requires greenhouse.
9'8" x 9'8" (8,8 m) 007-CH 007 - CH GB May we congratulate you on your new greenhouse US Dear DER Customer! CUSTOMER The Congratulations assembly of on your purchasing new house your new requires greenhouse.
Consort, Viscount, Regal, 814
 Consort, Viscount, Regal, 814 09072014 Int Introduction TITLE Foreword Safety tips Notes Components list Exploded view Profiles and fittings PAGE NO. 2 3 4 5 6 7 STAGES OF ASSEMBLY: Stage 1 Stage 2 Stage
CHECKLIST & COMPONENTS
 Eclipse Compact www.rollershuttercompany.com Tel 0800 6444121 55mm Roller Garage Doors CHECKLIST & COMPONENTS EQUIPMENT REQUIRED 2 x Step ladders or hop ups Spirit level Tape measure Power drill 10mm A/F
Installation Guide Rollerdor RD55 Econ Roller Garage Door
 Installation Guide Rollerdor RD55 Econ Roller Garage Door 1 Finished door Rollerdor RD55 Econ Roller Garage Door CHECKLIST & COMPONENTS EQUIPMENT REQUIRED 2 x Step ladders or hop ups Spirit level Tape
Eos 200/40. Eos. Type A (cm) X B(cm) M 2 H1(cm) H2(cm)
 X B(cm) M 2 H1(cm) H2(cm)") Eos 200/40 Eos Color RAL 9005 RAL 6009 Polycarbon 10mm Security 4mm Mounting difficulty Type A (cm) X B(cm) M 2 H1(cm) H2(cm) ET23 314 cm x 396 cm 11,2 m 2 201 cm 260 cm 38 - - ET2E 236 cm x 73 cm 1,7
Eos 200/40 Eos Color RAL 9005 RAL 6009 Polycarbon 10mm Security 4mm Mounting difficulty Type A (cm) X B(cm) M 2 H1(cm) H2(cm) ET23 314 cm x 396 cm 11,2 m 2 201 cm 260 cm 38 - - ET2E 236 cm x 73 cm 1,7
Tools Required. Metric Wrench Set Screwdriver Set Metric Socket Set Pliers Heavy duty hydraulic Jack and Car Stands Box knife or similar Hacksaw WD40
 Subaru 2004+ Legacy GT & Outback XT For JDM 2.0 twinscroll turbo and USDM 2.5 turbo models Front Mount Intercooler Fitting Instructions PN# LEG-1348-000 You are now the proud owner of a highly tested and
Installation Instructions Table of Contents
 Installation Instructions Table of Contents Pre- Installation of Garage Storage Lift 2 Layout the Garage Storage Lift 3 Installing the strut Channels 3 Install the Drive Assembly 5 Install the Drive Shaft
Installation Guide Rollerdor RD77 Econ Roller Garage Door
 Installation Guide Rollerdor RD77 Econ Roller Garage Door 1 Finished door Rollerdor RD77 Econ Roller Garage Door CHECKLIST & COMPONENTS EQUIPMENT REQUIRED 2 x Step ladders or hop ups Spirit level Tape
LAND ROVER DISCOVERY 3/ SPARE WHEEL CARRIER
 LAND ROVER DISCOVERY 3/ 4 SPARE WHEEL CARRIER RBLD007 INSTALL TIME: 4.5 Hours NOTE: Park Distance Control will be affected by this fitment and the customer should be informed. IMPORTANT WARNING! IT IS
Gearbox Assembly 101. Introduction. Before Beginning. By Mark Schutzer 4/13/06
 Gearbox Assembly 101 By Mark Schutzer 4/13/06 Introduction If you are planning to re-motor an old brass locomotive you may want to upgrade to a new gearbox at the same time. The early 60 s and 70 s gearboxes
AMT Motorsport C7 Corvette Camber Kit User s Guide. 8 Upper Control Arm Studs and hardware for rear upper control arm adjustments
 AMT Motorsport C7 Corvette Camber Kit User s Guide Thank you for purchasing the AMT Motorsport Camber Kit for the C7 Corvette. We believe this is the most versatile camber kit available on the market,
6 3 WIDE igro. Available in 3 sizes: 4 5 x x x 6 3. Available in Aluminium or Green
 6 6 3 WIDE igro Available in Aluminium or Green Available in 3 sizes: 4 5 x 6 3 6 5 x 6 3 8 5 x 6 3 igro 6 x6 (Nominal), Alloy, 4mm Twin Wall Polycarbonate The budget stretching 6 wide igro provides an
Detailed Assembly Instructions. ATS Evacuated Tube - Solar Panel Units ATS10 / ATS20 / ATS30
 Detailed Assembly Instructions ATS Evacuated Tube - Solar Panel Units ATS10 / ATS20 / ATS30 Release: 2/2012 1 ATS-10, ATS-20, and ATS-30 tube collectors are all setup using a similar method. Carefully
Eazipole Cordless. Installation & Set Up Instructions. Electric Blinds & Curtains
 Eazipole Cordless Installation & Set Up Instructions Electric Blinds & Curtains Pole Installation - Deciding The Best Position Points to consider when planning the installation of your pole It may be easiest
One Piece Products. Series XI Ford F SERIES TRUCKS One Piece Door Glass Conversion Manual.
 *Registered Trademark One Piece Products *Patent Pending Series XI 1980-1996 Ford F SERIES TRUCKS One Piece Door Glass Conversion Manual www.onepieceproducts.com (888)One Products (888)663-7763 1 Installation
Installation Guide Rollerdor RD55 Econ Roller Garage Door
 Installation Guide Rollerdor RD55 Econ Roller Garage Door 1 Finished door Rollerdor RD55 Econ Roller Garage Door CHECKLIST & COMPONENTS EQUIPMENT REQUIRED 2 x Step ladders or hop ups Spirit level Tape
ire 4' Extention Module 119.5L x 244.5W x 268.5Hcm / 47 "L x 96.3 "W x "H
 i Assembly nstructions GloryTM 8'x8' - Premium Class Greenhouse Approx. Dim. 244L x 244.5W x 268.5Hcm / 96.3"L x 96.3"W x 05.7"H 4' Extention Module 9.5L x 244.5W x 268.5Hcm / 47 "L x 96.3 "W x 05.7 "H
FLOODLIGHT unit IMPORTANT WARNING! RRAC055/RRAC059. INSTALL TIME: 30 mins
 LED 4" FLOODLIGHT unit RRAC055/RRAC059 INSTALL TIME: 30 mins Depending on the type of installation chosen, not all components supplied will be used. Refer to Page 13 Section 7 on how to set the angle of
Installation Instructions Supertop for Truck
 Installation Instructions Supertop for Truck US Patent 6827391 Vehicle Application: Ford F150 1987-1996 (8 ft.) Part Number: 76315 Ford F250 1987-1998 (8 ft.) Part Number: 76315 Ford F350 1987-1998 (8
SERIES B & C ROLLER DOORS INSTALLATION GUIDE
 SERIES B & C ROLLER DOORS INSTALLATION GUIDE THESE INSTRUCTIONS ARE PROVIDED FOR USE BY EXPERIENCED INSTALLERS OF GARAGE DOORS BY UNDERTAKING THE INSTALLATION OF THIS DOOR, THE INSTALLER UNDERSTANDS THE
Custom Modern. Type A (cm) X B(cm) M 2 H1(cm) H2(cm) Mounting difficulty RAL 9005 RAL cm X cm m 2 cm cm. cm X 73 cm 1,7m
 X B(cm) M 2 H1(cm) H2(cm) Mounting difficulty RAL 9005 RAL cm X cm m 2 cm cm. cm X 73 cm 1,7m") Custom Modern Color RAL 9005 RAL 6009 Mounting difficulty Type A (cm) X B(cm) M 2 H1(cm) H2(cm) cm X cm m 2 cm cm cm X 73 cm 1,7m 2 - - - - - - cm X cm m 2 cm 292 cm cm X 73 cm 2,3m 2 - - - - - - Included
Custom Modern Color RAL 9005 RAL 6009 Mounting difficulty Type A (cm) X B(cm) M 2 H1(cm) H2(cm) cm X cm m 2 cm cm cm X 73 cm 1,7m 2 - - - - - - cm X cm m 2 cm 292 cm cm X 73 cm 2,3m 2 - - - - - - Included
Peg-Harness installation instructions
 Peg-Harness installation instructions I know it s not the easiest thing to do, but PLEASE READ THESE INSTRUCTIONS COMPLETELY so you will understand what you are trying to accomplish before you start drilling
What s in the Box? AMT Motorsport C5/C6 Corvette Steel Frame Camber Kit User s Guide
 AMT Motorsport C5/C6 Corvette Steel Frame Camber Kit User s Guide Thank you for purchasing the AMT Motorsport Camber Kit. We believe this is the most versatile camber kit available on the market, but with
Rear Speaker replacement.
 Rear Speaker replacement. First off you need the right rear speakers. The easy bit is 6x9 and better than a 15W paper cone, the difficult bit is getting a mounting depth under 74mm. Or to be more precise,
Installation Instructions Supertop for Truck
 Installation Instructions Supertop for Truck US Patent 6827391 Vehicle Application: Toyota Tacoma Double Cab 2005-2011 (5 ft.) Part Number: 76308 INSTALLATION TIME SKILL LEVEL 1-1/2 Hours 2 - Moderately
Helios Twin 200/25. Helios Twin. Mounting difficulty
 Helios Twin 200/25 Helios Twin Bemating: zie Helios (2 x A) Dimensions: See Helios (2 x A) Dimensions: Voir Helios (2 x A) Abmessungen: Sehe Helios (2 x A) Mounting difficulty 38 Helios Multibay Greenhouses
insulated sectional 2180mm (h) x 2550mm (w) Opening Size: 2140mm (h) x 2500mm (w) suits single car garage
 x 2550mm (w) Opening Size: 2140mm (h) x 2500mm (w) suits single car garage") insulated sectional Garage Door 2180mm (h) x 2550mm (w) Opening Size: 2140mm (h) x 2500mm (w) suits single car garage Disclaimer This product should be installed by a competent person or suitably qualified
insulated sectional Garage Door 2180mm (h) x 2550mm (w) Opening Size: 2140mm (h) x 2500mm (w) suits single car garage Disclaimer This product should be installed by a competent person or suitably qualified
RAMPAGE POWER LIFT RAMP
 RAMPAGE POWER LIFT RAMP INSTALLATION AND OPERATING INSTRUCTIONS (3/10/07) The Rampage Power Lift Ramp is the fast, easy, and safe way to load a motorcycle into a truck. One person can load or unload a
Eazidraw Cordless. Installation & Set Up Instructions. Electric Blinds & Curtains
 Eazidraw Cordless Installation & Set Up Instructions Electric Blinds & Curtains Features Quiet, DC battery motor with low power consumption. Rechargeable battery with up to 500 uses between charges Fully
What s in the Box? AMT Motorsport C5/C6 Corvette Steel Frame Camber Kit User s Guide
 AMT Motorsport C5/C6 Corvette Steel Frame Camber Kit User s Guide Thank you for purchasing the AMT Motorsport Camber Kit. We believe this is the most versatile camber kit available on the market, but with
Contents. Preparing the motor Winding the rotating secondary Winding the primary... 8
 120732-130389 Propeller Clock Construction Notes Revision E, December 2, 2013 Contents Preparing the motor... 2 Winding the rotating secondary... 5 Winding the primary... 8 UltiProp Clock (Elektor Dec.
Mustang CDC Lightbar (94-04) - Installation Instructions
 - Installation Instructions") Mustang CDC Lightbar (94-04) - Installation Instructions The below installation instructions work for the following products: Classic Design Concepts Mustang Convertible Lightbar (94-04 Carbon Fiber) Classic
Mustang CDC Lightbar (94-04) - Installation Instructions The below installation instructions work for the following products: Classic Design Concepts Mustang Convertible Lightbar (94-04 Carbon Fiber) Classic
Ensure staff are trained in use of equipment
 Work at height Can you avoid working at height in the first place? No Yes Plan the task required Risk assess the task required Ensure staff are trained in use of equipment Ensure equipment has been correctly
Product Maintenance Guide
 Product Maintenance Guide Upvc windows, doors, FSG and conservatories Thank you for investing in our products. They have all been designed and manufactured to the highest possible standards and are relatively
Aluminium sliding gate
 Aluminium sliding gate Preparing pillars, brickwork and base Running the sleeves and wires Sliding gate conception Gate components Installing the guiding device on the pillar Installing the guiding post
Steeda Sport Mustang Lowering Springs (2005+) - Installation Instructions
 - Installation Instructions") Steeda Sport Mustang Lowering Springs (2005+) - Installation Instructions The below installation instructions work for the following products: Steeda Sport Mustang Lowering Springs (2005+) Please read
Steeda Sport Mustang Lowering Springs (2005+) - Installation Instructions The below installation instructions work for the following products: Steeda Sport Mustang Lowering Springs (2005+) Please read
CP 130 Sliding Door. CP 130 is a premium insulated sliding system combining high weather performance with enhanced security and great aesthetics.
 CP 130 Sliding Door CP 130 is a premium insulated sliding system combining high weather performance with enhanced security and great aesthetics. Available in slide or lift-and-slide variants, this sliding
Installation of a Tekonsha Prodigy P2 Trailer Brake Controller in a 2016 Tesla Model X
 If you received a copy of this document from any source other than http:// www.adelman.com/model-x-brake-controller.pdf, please go to this URL and download the latest version of this document. Want to
Bag 1. Bag 1. Center Pivot. Center Pivot
 8 00734 01901 5 Center Pivot Bag 1 3374 - Center Pivot Socket 4019 - Alum Pivot ball 3254-2-56 Button Head *Note - Sometimes it is helpful to slightly over-tighten the top clamp screws, then work the ball
5. E-axis assembly. 5. E-axis assembly. Written By: Jakub Dolezal manual.prusa3d.com/ Page 1 of 40
 5. E-axis assembly Written By: Jakub Dolezal 2018 manual.prusa3d.com/ Page 1 of 40 Step 1 Tools necessary for this chapter Needle-nose pliers for zip tie trimming. 2.5mm Allen key for M3 screws 2mm Allen
PHOTON ONE - SOLAR POWERED AWNING MOTOR
 PHOTON ONE - SOLAR POWERED AWNING MOTOR CONTENTS 1 GETTING STARTED 1.1 VERIFY PACKAGE CONTENTS...4 1.2 TOOLS REQUIRED...4 2 PARTS DESCRIPTION 2.1 BATTERY PACK / RECEIVER UNIT...5 2.2 SOLAR PANEL / BRACKETS...5
EZ-Glide Wheels Installation Patent Pending Revised 8/23/2011
 EZ-Glide Wheels Installation Patent Pending Revised 8/23/2011 Questions: Lakeside Quilt Co. Jack Boersma Toll Free (888) 361-4806 www.lovetoquilt.com Cell (406) 270-4715 sales@lovetoquilt.com Toll Free
Rollstar Shade Installation Instructions
 Rollstar Shade Installation Instructions All Lifting Systems Inside or Outside Mount Thank you for purchasing your new Rollstar shade. It has been custom-made from the highest quality materials to the
Perfect Park 7000 Installation & Unloading Instructions Operating Manual
 Perfect Park 7000 Installation & Unloading Instructions Operating Manual 1) Always file a claim with the truck line if the lift has been damaged! (If you don t originally notice the damage, but find some
For our present, For their future. Version 11.03
 For our present, For their future. SFB-AL (SF-B) series Installation Manual All-glass Evacuated Tubular Solar Collector with Heat Pipe Contents http://www.sunflower-solar.com/ 1. SOLAR COLLECTOR SIZE AND
Installation Instructions Supertop for Truck
 Installation Instructions Supertop for Truck Vehicle Application: Ford F-150 5.5 Ft. Styleside 2004 and newer Part Number: 76309 www.bestop.com - We re here to help! Visit our web site and click on Ask
STOP. Broadcast Spreader. Operator's Manual. Model No Safety Assembly Operation Maintenance Parts
 Operator's Manual STOP Broadcast Spreader Model No. 486.2400 DO NOT RETURN TO STORE For Missing Parts or Assembly Questions Call 1-866-56-8388 CAUTION: Before using this product, read this manual and follow
Solar & Roller Shades
 STEP BY STEP INSTALLATION INSTRUCTIONS Solar & Roller Shades 1 2 3 4 5 Motivia Motorization Table of Contents Step 1 - Getting Started....3 Everything You Need A Smooth Set-Up We want you to love your
VW & Audi TDI CR140 ECO KIT Installation Guide
 VW & Audi TDI CR140 ECO KIT Installation Guide This guide is to help you install your new Rawtek DPF, EGR & Adblue Delete Exhaust ECO Kit on your (2009-2014) VW / Audi with 2.0l CR140 Diesel Engine. Note:
Automatic Roof Hatch Opener
 Automatic Roof Hatch Opener Installation Guide REQUIRED TOOLS (These tools are required to complete the installation) Cordless Drill 1/8 1/4 Drill Bits 1/8 Pin Punch #2 Philips Bit Rachet Sharpie Hammer
SERIES A & AA ROLLER DOORS INSTALLATION GUIDE
 SERIES A & AA ROLLER DOORS INSTALLATION GUIDE THESE INSTRUCTIONS ARE PROVIDED FOR USE BY EXPERIENCED INSTALLERS OF GARAGE DOORS BY UNDER-TAKING THE INSTALLATION OF THIS DOOR, THE INSTALLER UNDERSTANDS
HOW TO MODIFY A STOCK DODGE KEGGER INTAKE MANIFOLD
 HOW TO MODIFY A STOCK DODGE KEGGER INTAKE MANIFOLD Even though this 3.9L V6 intake manifold is smaller than the 5.2L and 5.9L V8 intake manifolds, the same instructions apply to all 3 engines. If you are
INSTALLATION INSTRUCTIONS Unitronic 3 Turbo-Back Exhaust System for MK5 Jetta /GLI UH020-EXA
 Unitronic recommends that you read through the entire installation instructions prior to beginning the installation to familiarize yourself with the included components, tools required, and procedures
X.L. BAND W/ SPRING ASSIST INSTRUCTION MANUAL
 PARTS LIST X.L. BAND W/ SPRING ASSIST INSTRUCTION MANUAL (2) Bands (1) Handle assembly (2) Side hinge assemblies (1) Left rear hinge assembly (1) Right rear hinge assembly (2) front spring s (2) rear spring
Safety on Heights. Remember: heights safety isn t just about working safely up high. It s also ensuring the safety of everyone below.
 11/17/14 Safety on Heights Our Policy: Only volunteers over the age of 18 are allowed to work on heights of more than six feet off the ground. This includes all extension ladders. Many tasks involving
Universal Mounting Kit #0820
 Universal Mounting Kit #0820 #1200 Super 5 th (16K) #0800 Super 5 th (20.5K) Gross Trailer Weight (Maximum) Vertical Load Weight (Max. Pin Weight) 16,000 lbs. 4,000 lbs. Gross Trailer Weight (Maximum)
Volvo 1800 Dash Pad Replacement
 Volvo 1800 Dash Pad Replacement (courtesy of John Garden State Chapter Volvo Club America) Reupholstering the dash Well it has been some time since I have been online in the forum. Winter is a quite time
S1 Sequential. T56 Magnum. Sequential shifter. Contents and assembly instructions
 S1 Sequential Sequential shifter T56 Magnum Contents and assembly instructions Parts List Sequential shifter x1 Base plate x1 Base spacer x1 Drill Square x1 Shaft fitting x1 Square washer x1 8mm Aluminium
The H-MAC Heavy Metal Articulating Chassis Construction Guide
 The H-MAC Heavy Metal Articulating Chassis Construction Guide The Heavy Metal Chassis is constructed with two identical drive modules built using 10 mechanical sub-assemblies. The drive modules are integrated
EXPRESS/SAVANNA 155 WHEELBASE. Installation Instructions Van: VNGM96EXSV65 TOOLS REQUIRED 1996-CURRENT. follow us : CHEVROLET & GMC
 Installation Instructions Van: VNGM96EXSV65 CHEVROLET & GMC EXPRESS/SAVANNA 155 WHEELBASE 1996-CURRENT TOOLS REQUIRED Adjustable wrench (that opens to about 1 ), 1/2 open end wrench, Phillips screwdriver,
Drag Race Roll Bar (MMRB-6, -7)
") 3430 Sacramento Dr., Unit D San Luis Obispo, CA 93401 Telephone: 805/544-8748 Fax: 805/544-8645 www.maximummotorsports.com 1994-04 Drag Race Roll Bar (MMRB-6, -7) The Maximum Motorsports 6-point Drag Race
3430 Sacramento Dr., Unit D San Luis Obispo, CA 93401 Telephone: 805/544-8748 Fax: 805/544-8645 www.maximummotorsports.com 1994-04 Drag Race Roll Bar (MMRB-6, -7) The Maximum Motorsports 6-point Drag Race
Remove the 3-11mm nuts holding mirror on. Don t drop the nuts!
 2005-2012 Ford Mustang Puddle Lamp Kit Parts List: Quantity: Tool List: LED Lamps 2 Flat head screwdriver Seals 2 Ratchet & Socket set OR Nuts 2 Adjustable Wrench Wiring harness 1 Drill & 11/16 th bit
Part # Camber Caster Plates Ford Mustang All Ford Mustang GT500
 Part # 24220 Camber Caster Plates 2005-2010 Ford Mustang All 2007-2014 Ford Mustang GT500 J&M Products once again outdoes our competitors with these fully adjustable (Protected under US Patent No. 8,820,759
Installation Guide FOR CONSTRUCTION AND RENTAL EQUIPMENT SOLARTRAK INSTALLATION GUIDE CALL US WITH QUESTIONS:
 Installation Guide TIPS AND HINTS FOR PEAK PERFORMANCE FROM SOLARTRAK TRACKERS FOR CONSTRUCTION AND RENTAL EQUIPMENT SolarTrak is created by SOLARTRAK INSTALLATION GUIDE CALL US WITH QUESTIONS: 484-223-4994
2010 Prius Maintenance
 2010 Prius Maintenance Changing Oil Disclaimer: All the information stated in this document was provided by Prius owners. None were affiliated with Toyota Motor Corporation, except as customers. This document
Affordable Buildings, Exceptional Quality! Product Catalog. Carports Garages Horse Barns Commercial Buildings.
 Affordable Buildings, Exceptional Quality! Product Catalog Carports Garages Horse Barns Commercial Buildings 2200 North Granville Avenue Muncie, Indiana 47303 Toll Free: 800.730.7908 Fax: 765.284.2689
Installation Instructions
 Installation Instructions TrailView Soft Top Important Safety Information For proper installation and best possible fit, please read all instructions BEFORE you begin. Periodically check all components
Installing LED lights in a Hypercharger By Keith Edwards Joker s Wild! (Wildjokr)
") Installing LED lights in a Hypercharger By Keith Edwards Joker s Wild! (Wildjokr) THINGS YOU WILL NEED: A Hypercharger (duh!) LEDs (The ones I got were from Benny Bryant at Fantasies on Wheels in Sylacauga,
Installing LED lights in a Hypercharger By Keith Edwards Joker s Wild! (Wildjokr) THINGS YOU WILL NEED: A Hypercharger (duh!) LEDs (The ones I got were from Benny Bryant at Fantasies on Wheels in Sylacauga,
STEP BY STEP INSTALLATION INSTRUCTIONS. Sheer Shadings. Motivia Motorization Remote Control
 STEP BY STEP INSTALLATION INSTRUCTIONS Sheer Shadings 1 2 3 4 5 Motivia Motorization Remote Control Everything You Need A Smooth Set-Up We want you to love your new window coverings and that includes having
Universal Mounting Kit #0520
 Universal Mounting Kit #0520 #0503 SuperGlide (25.5K) #0515 SuperGlide Low Profile (25.5K) Gross Trailer Weight (Maximum) Vertical Load Weight (Max. Pin Weight) 25,500 lbs. 6,375 lbs. Gross Trailer Weight
IN-GROUND POOL COVER INSTALLATION GUIDE
 IN-GROUND POOL COVER INSTALLATION GUIDE A safety pool cover is secured into the deck via straps, springs and anchors. The brass anchors thread up to install the cover, and thread down flush into the deck
Installation Instructions Supertop for Truck
 Installation Instructions Supertop for Truck Vehicle Application: Toyota Tacoma Double Cab 2005 - Current (5 ft.) Part Number: 76308 US Patent 6827391 www.bestop.com - We re here to help! Visit our web
Kit No Please read these instructions completely before proceeding with installation. Air Spring Kit Parts List. Bracket Attaching Hardware
 Kit No. 59537 MN-461 (021108) ECR 7136 Please read these instructions completely before proceeding with installation Air Spring Kit Parts List Item Description Quantity A Air Sleeves 2 B Upper Brackets
Helios 200/25. Helios Hobby. Type A (cm) X B(cm) M 2 H1(cm) H2(cm) Mounting difficulty. ALU (no color)
 X B(cm) M 2 H1(cm) H2(cm) Mounting difficulty. ALU (no color)") Helios 200/25 Helios Hobby Color ALU (no color) Mounting difficulty Type A (cm) X B(cm) M 2 H1(cm) H2(cm) cm cm m 2 cm cm cm cm 7,3 m 2 cm cm cm x 73 cm 1,7 m 2 - - - cm cm m 2 cm cm cm cm m 2 cm cm cm
Helios 200/25 Helios Hobby Color ALU (no color) Mounting difficulty Type A (cm) X B(cm) M 2 H1(cm) H2(cm) cm cm m 2 cm cm cm cm 7,3 m 2 cm cm cm x 73 cm 1,7 m 2 - - - cm cm m 2 cm cm cm cm m 2 cm cm cm
Tip: LED Lighting for the 4367 SBB Euro City Set, 4366 and 4368 Cars Date: , Corrections Modified , Photos
 Hi All, I have had the 4367 SBB Euro City set with extra cars 4366 and 4368 since 1998, apart from a test run on the layout they have stayed in storage ever since. I decided to change some rolling stock
C O L M A N. Air Distribution LINEAR SLOT DIFFUSERS CD SERIES SERIES
 C O L M A N Air Distribution E N G I N E E R E D A I R P R O D U C T S LINEAR SLOT DIFFUSERS CD SERIES CD SERIES LINEAR SLOT DIFFUSERS QUALITY AND EFFICIENCY WITHOUT COMPROMISE Application Colman Moducel
WIND RATED ROLLER DOORS INSTALLATION GUIDE
 WIND RATED ROLLER DOORS INSTALLATION GUIDE THESE INSTRUCTIONS ARE PROVIDED FOR THE USE BY EXPERIENCED INSTALLERS OF GARAGE DOORS BY UNDERTAKING THE INSTALLATION OF THIS DOOR, THE INSTALLER UNDERSTANDS
2005-Pres. Ford Mustang Camber Plate Installation Instructions:
 2005-Pres. Ford Mustang Camber Plate Installation Instructions: J&M Products once again outdoes our competitors with these fully adjustable PATENT PENDING Camber & Caster plate assemblies for the 2005-2010
OPERATIONAL ADVICE WARNING: TO PREVENT SERIOUS INJURY, PLEASE READ AND UNDERSTAND ALL WARNINGS AND INSTRUCTIONS BEFORE USE.
 OPERATIONAL ADVICE WARNING: TO PREVENT SERIOUS INJURY, PLEASE READ AND UNDERSTAND ALL WARNINGS AND INSTRUCTIONS BEFORE USE. SAVE THIS MANUAL Keep this manual in a safe place for future reference. This
THE SERIES-E POWR Slider
 C.R. LAURENCE CO., INC. PATENT NO. 4,920,698 THE SERIES-E POWR Slider MODEL: EPC814S 2014+ CHEVY/GMC SILVERADO/SIERRA 1500 NAGS: DY90122PK5 ELECTRIC SLIDING REAR WINDOW 2014 + CHEVY/GMC SILVERADO/SIERRA
2014-Current. Adjustable wrench (that opens to about 1 ), 1/2 open end wrench, Phillips screwdriver, 3/8 socket, 7/16 socket, 7/32 Allen wrench
, 1/2 open end wrench, Phillips screwdriver, 3/8 socket, 7/16 socket, 7/32 Allen wrench") Installation Instructions Van: VNFD13TRAN65 FORD TRANSIT 148 WHEELBASE 2014-Current TOOLS REQUIRED Adjustable wrench (that opens to about 1 ), 1/2 open end wrench, Phillips screwdriver, 3/8 socket, 7/16
Installation Instructions Van: VNFD13TRAN65 FORD TRANSIT 148 WHEELBASE 2014-Current TOOLS REQUIRED Adjustable wrench (that opens to about 1 ), 1/2 open end wrench, Phillips screwdriver, 3/8 socket, 7/16
Fitting Instructions For The TDV6 EGR Blanking Kit To A 2006 Model Discovery 3 TDV6 GHSE
 Part Number DA1112 Fitting Instructions For The TDV6 EGR Blanking Kit To A 2006 Model Discovery 3 TDV6 GHSE You do this modification at your own risk. Britpart won t be held responsible for what is written
Installation Instructions I - Sheet Number I-TVR-01 Rev. A
 Installation Instructions I - Sheet Number I-TVR-01 Rev. A TrailView Soft Top For proper installation and best possible fit, please read all instructions BEFORE you begin. For technical assistance or to
SKID MARK GARAGE. Axillary Fuel Supply
 1 SKID MARK GARAGE Axillary Fuel Supply *Disclaimer: Our Axillary Fuel kits are designed to fit most late model GM vehicles with minimum modifications. While not quite a universal kit for all, it has been
Z1 Motorsports 350Z / G35 Oil Cooler Kit Installation Manual
 Z1 Motorsports 2877 Carrollton Villa Rica Hwy Carrollton GA 30116 770.838.7777 Z1 Motorsports 350Z / G35 Oil Cooler Kit Installation Manual For 19, 25 and 34 Row Oil Cooler Kits Parts Included: 1 Aluminum
FRONT MOUNTED INTERCOOLER KIT. Renault 5 GT Turbo 1985* to 1991
 1 FRONT MOUNTED INTERCOOLER KIT Renault 5 GT Turbo 1985* to 1991 Although this has been fitted to a Phase 2 model, there is little reason to believe it will not fit the Phase 1 model as well. It is recommended
Down and Out Motor Mount Assembly & Installation Directions
 Down and Out Motor Mount Assembly & Installation Directions Mounting the Down and Out Motor Mount correctly takes a lot of thought and a lot of planning. Please read the directions thoroughly and plan
Bachmann D11 EM/S4 Finescale Conversion
 Bachmann D11 EM/S4 Finescale Conversion Before you start, it is a good idea to have some small containers or snap top poly bags to put screws and components in for safe keeping...much better than crawling
Hasse Mods for the Ampeg J20 Guitar Amp
 Hasse Mods for the Ampeg J20 Guitar Amp The following is adapted from a post I put up on The Gear Page, in the Amp Techincal forum. It shows the mods I did to my Ampeg J20. Okay, here s my mods for this
Subaru SVX 1/43 Scale Model Assembly Instructions
 Subaru SVX 1/43 Scale Model Assembly Instructions Congratulations on your purchase of an unassembled 1/43 scale Subaru SVX! You now own a model that is even more rare than the car it represents. Currently
POWER ASSISTED BICYCLES LA GRANDE OWNERS MANUAL
 LA GRANDE OWNERS MANUAL Welcome to the World of e.bike cycling. Firstly may we congratulate you on purchasing your new electric power assisted e.bike. Please take time to read your manual. We have tried
Hillside Cultivator Co. LLC Operators Manual. Model NH
 Hillside Cultivator Co. LLC Operators Manual Model NH Table of Contents Page Safety 3 Unpacking a Shipped Cultivator 4 Cultivator Parts and Description 6 Using Rolling Spider Cultivators 7 Adjustments
POWER ASSISTED BICYCLES OWNERS MANUAL
 OWNERS MANUAL Simply explained this is how your e.life bike basically works. Firstly may we congratulate you on purchasing your new electric power assisted e.bike. Please take time to read your manual.
INSTRUCTIONS FOR INSTALLING MIND/MOTION SENSOR/E-PORT ON USI ALPINE FOOD MACHINE
 INSTRUCTIONS FOR INSTALLING MIND/MOTION SENSOR/E-PORT ON USI ALPINE FOOD MACHINE Read these instructions carefully before installing the kit. If you are having problems installing the kit, please call
ADDING A SUBWOOFER TO A BOSE EQUIPTED MK2 AUDI TT COUPE
 ADDING A SUBWOOFER TO A BOSE EQUIPTED MK2 AUDI TT COUPE Mark Davis March 2008 Obligatory Disclaimer This document remains the copyright of Mark Davis. No unauthorised distribution or sale of this document,
INSTALLATION INSTRUCTIONS FOR SOLID VENT KIT PART NUMBER
 INSTALLATION INSTRUCTIONS FOR SOLID VENT KIT PART NUMBER 239-47810-00 WARNING The vent-air intake system must be properly installed. Failure to properly install the vent-air intake system could result
3.3 m LED Free Arm Parasol
 Assembly Instructions 3.3 m LED Free Arm Parasol PL33 IMPORTANT PLEASE KEEP THIS BOOKLET FOR FUTURE REFERENE. THIS IS IMPORTANT INFORMATION REGARDING THE USE AND ARE OF YOUR GARDEN FURNITURE. Oct 2017
Van Rack Installation Manual Ford Transit Connect
 1.888.772.8400 Big to small... We do it all Van Rack Installation Manual Ford Transit Connect Thank you for your purchase of an Unruh Fab Van rack. We have designed and built this rack so that you can