CorkSport Gauges. Oil Pressure, Oil Temperature, Coolant Temperature & Boost Pressure. Part # GEN
|
|
|
- Sophie Young
- 6 years ago
- Views:
Transcription
1 CorkSport Gauges Oil Pressure, Oil Temperature, Coolant Temperature & Boost Pressure This Package should contain: 1. One - Complete Gauge Kit (Oil P, Oil T, Coolant T or Boost) i. One - Electronic Analog Gauge ii. One - Power Wire iii. One - Daisy Chain Wire iv. One - Mount Housing v. One - Mount Housing Hardware vi. One - Double Sided Sticky Tape vii. One - Glare Shield viii. One Sensor ix. One Sensor Wire x. Sensor Accessories


2 CorkSport Gauges Oil Pressure, Oil Temperature, Coolant Temperature, and/or Boost Pressure Pre-Installation Notes: Keep an eye on your engine parameters with the CorkSport Oil Pressure, Oil Temperature, Coolant Temperature, and Boost Pressure gauges. The gauges have a 2% accuracy with Peak Recall, Limit Alarms, and Multi Color Display Features to customize for your specific vehicle. Let us know your thoughts about the CorkSport Gauges by submitting a review at: If installing on a Mazdaspeed use of a Mazdaspeed 3 oil filter housing and oil filter plate is suggested. The housing and gasket can be purchased from you local Mazda dealer. Part #: L A & LF These instructions do not show the housing or oil filter plate installation. Make sure your vehicle is completely cooled down prior to starting installation. If you are going to work on your car within an hour or two of having driven it, use a fan to cool off the car. These instructions were written for reference only and the use of a factory service manual is recommended. How our instructions work: To best cover all of our customers experience levels, we have included a table of contents/order of operations along with step-by-step instructions. These in car installations are intended for general application installation. Vehicle specific images and instructions are not included. Materials and Time: General Info. Part #: GEN Time Est: 2-4 Hours Wrench Rating: 3/5 Suggested Items (not included) : Gen2 Oil Filter Housing P#: L A Oil Filter Housing Gasket P#: LF Add-a-Fuse ATM Mini QTY=4 CorkSport Oil Filter Sandwich Plate Tooling List 12mm Wrench/3/8 Socket 14mm Wrench 22mm Wrench 3/8 Torque Wrench 2mm Allen Wrench 3mm Allen Wrench Wire Strippers Wire Cutters Oil Rags/Paper Towels Oil Resistant Thread Sealant Voltmeter 10-15ft of 18-20awg Coated Wire (having four various colors may be helpful) Electrical Tape Small Zip Ties 18-20awg Butt Crimp Connections 18-20awg Eyelet Crimp Connections Parts List 1. One - Electronic Analog Gauge 2. One - Power Wire 3. One - Daisy Chain Wire 4. One - Mount Housing 5. One - Mount Housing Hardware 6. One - Double Sided Sticky Tape 7. One - Glare Shield 8. One Sensor 9. One Sensor Wire 10. Sensor Accessories
3 Order of Operations & Table of Contents Parts Identification Section 1: General Parts Identification Pg. 2 Section 2: Boost Gauge Specific Parts Identification Pg. 3 Section 3: Oil Temperature Gauge Specific Parts Identification Pg. 4 Section 4: Oil Pressure Gauge Specific Parts Identification Pg. 4 Section 5: Coolant Temperature Gauge Specific Parts Identification Pg. 5 Installation Section 5: General Mounting Pg. 6 Section 6: Gauge Wiring Installation Pg. 7 Section 7: General Wiring Installation Pg. 8 Section 8: Sensor Installation Pg Section 9: Gauge Setup & Control Pg of 11


4 1. General Parts Identification Mounting Plate Glare Shield Mounting Hardware Mount Housing Power Wire One Sided Foam Tape Daisy Chain Wire Double Sided Foam Tape 2 of 11


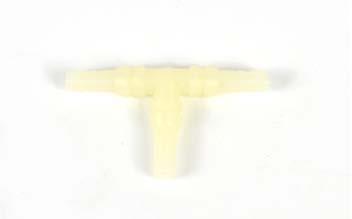

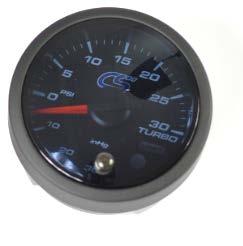
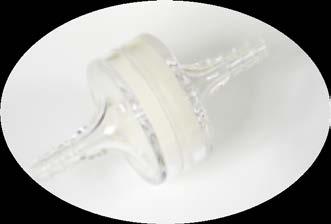
5 2. Boost Gauge Specific Parts Identification Boost Gauge Hose T-Connection Pressure Sensor Hose Sensor Wire In-Line Filter 3 of 11

6 3. Oil Temperature Gauge Specific Parts Identification Sensor Wire Oil T. Gauge Temp Sensor 4. Oil Pressure Gauge Specific Parts Identification Sensor Wire Oil P. Gauge Temp Sensor 4 of 11

7 5. Coolant Temperature Gauge Specific Parts Identification Sensor Wire Coolant T. Gauge Temp Sensor 5 of 11
 If desired, install the glare shield onto the gauge.")
 With or without the glare shield, apply the one sided foam tape to the circumference of the gauge as shown")

8 6. General Mounting a) Assemble the mounting plate and the mount housing with the provided hardware, shown in Figure 6a. Use a 3mm allen wrench to tighten the hardware. b) If desired, install the glare shield onto the gauge. Seen in Figure 5b. Figure 6a c) With or without the glare shield, apply the one sided foam tape to the circumference of the gauge as shown in Figure 6b. Figure 6b d) Install the gauge into the housing as shown in Figure 6c. Be careful to not pull off the foam tape while installing. The foam tape is intended to provide a firm fitment in the housing. e) Determine ideal location for the gauge in the vehicle. The gauge can be removed from the housing for wire installation. Figure 6c 6 of 11
 Once the wiring is routed from power and ground sources, the gauges can be hooked up.")
9 7. Gauge Wiring Installation The following steps show how to connect the wiring to the gauge and how to setup the display color. a) Once the wiring is routed from power and ground sources, the gauges can be hooked up. b) Figure 7a shows how to connect power to the White and Orange wires found in the Power Wire provided with the gauge. Follow this guide to setup the back light color for day and night time driving. c) Figure 7b shows how to connect the provided wiring to the gauge. d) If using only one gauge: The Daisy Cain Wire will not be used. The Power Wire will only be connected as shown in Figure 7b. Gauge Face Lighting Diagram Day Time Night Time Power Wire Setup White Amber White Amber White Amber Amber White White Wire - Connect to Acc. Power Circuit Orange Wire - Do Not Connect White Wire - Do Not Connect Orange Wire - Connect to Acc. Power Circuit White Wire - Connect to Acc. Power Circuit Orange Wire - Connect to Running Light Circuit White Wire - Connect to Running Light Circuit Orange Wire - Connect to Acc. Power Circuit Figure 7a e) If using more than one gauge: Connect the Power Wire to one gauge in the Input location. Use the Daisy Chain Wire to connect the to the next gauge as shown in Figures 6b & 6c. f) With this setup you do not have to run power wires to each gauge separately. Figure 7b: The boost gauge needle may not arrive to you at the correct zero (KOEO) position. Use a 2mm allen wrench to adjust the needle zero (KOEO) position as shown in Figure 7b. Turn the allen wrench CW or CCW to adjust. Power/Daisy Chain Wire Input Daisy Chain Wire Output Daisy Chain to 3 rd Gauge Multiple Gauge Daisy Chain Connection Boost Gauge Zero Offset Control Figure 7b Sensor Wire Input Figure 7c Sensor Wire Input 7 of 11
 Red Lead from Power Wire: Locate a fuse/circuit that has 12v power when the key is in both ON and OFF positions (12v constant power).")
 White/Orange Lead from Power Wire: Locate a fuse/circuit that has 12v power when the night time running lights turn on. Verify with a voltmeter.")
10 8. General Wiring Installation Sourcing Power & Ground Connections: a) Locate the vehicle s fuse panel. This is typically located under the glove box, behind a kick panel, and/or in the engine bay. Using an interior fuse panel is typically easier for wiring. b) Red Lead from Power Wire: Locate a fuse/circuit that has 12v power when the key is in both ON and OFF positions (12v constant power). Verify with a voltmeter. c) White /Orange Lead from Power Wire: Locate a fuse/circuit that has 12v power with the key in the ON position. Verify with a voltmeter. d) White/Orange Lead from Power Wire: Locate a fuse/circuit that has 12v power when the night time running lights turn on. Verify with a voltmeter. e) Locate mounting point in cabin that bolts directly to metal. This can be your ground source. Verify with a voltmeter. f) The method to connect to these circuits can vary, however we do have a recommendation. Shown in Figure 8a, a Low Profile Fuse Adapter can be added to create a secondary circuit. These can be found at any local auto parts store. You will also need to purchase a 5amp fuse for each additional circuit, this is the fuse that protects the gauge itself. If the adapter is not used an in-line fuse must be added to the circuit, example shown in Figure 8b. g) Run 3-4 (depending on display color setup) 18-20awg wires from the gauge mounting location to the fuse panel and ground location. Use wire cutters, wire strippers, and crimp connections to assemble the wires. Be sure to leave 8-10 inches of extra length at the gauge for easy gauge installation. Fuse Removed from Panel A 5amp fuse is required in-line for all power sources. New 5amp Fuse Figure 8a Wire Lead to Gauge Figure 8b 8 of 11

 Torque sensor to 7 in-lbs. d) Verify the wires are fully seated into the sensor/sensor wire leads.")
11 9. Sensor Installation Oil Pressure and Temperature Sensors: a) If not using an oil filter plate: Location of oil pressure source and extra fittings required for oil pressure sensor installation. Drilling and tapping of the oil pan is required to install the oil temperature sensor; this may vary depending on make and model. b) If using an oil filter plate: Install the sensors into any of the NPT port that provides proper clearance when installed in the vehicle, shown in Figure 9a. Check fitment of plate and sensor in the vehicle before next step. c) Torque sensor to 7 in-lbs. d) Verify the wires are fully seated into the sensor/sensor wire leads. e) Route the sensor wires in the engine bay and through the firewall. Choose a location through the firewall that already has a rubber grommet to protect the wires from chaffing. Verify that the wires are not near excessive heat in the engine bay. Boost Pressure Sensor: a) Mount the sensor in a location that is protected from excess heat and water. Verify that this location can be reached by the provided hose and the provided sensor wire. b) Use the provided hose, in-line filter, and T-connection to connect the sensor to the BPV hose as shown in Figure 9b. c) Route the sensor wires in the engine bay and through the firewall. Choose a location through the firewall that already has a rubber grommet to protect the wires from chaffing. Verify that the wires are not near excessive heat in the engine bay. In-Line Filter BPV Intake Manifold Figure 9a Figure 9b T-Connection in BPV Hose 9 of 11
12 9. Sensor Installation (continued) Coolant Temperature Sensor: a) Coolant Temperature pickup location will need to be determined for each individual make and model. Either tie into a hot side coolant line using extra fittings or drill and tap into any hot side coolant passage. Sensor uses 1/8 NPT thread. b) Torque sensor to 7 in-lbs. c) Verify the wires are fully seated into the sensor/sensor wire leads. d) Route the sensor wires in the engine bay and through the firewall. Choose a location through the firewall that already has a rubber grommet to protect the wires from chaffing. Verify that the wires are not near excessive heat in the engine bay. 10 of 11
 Push and hold button to sweep the needle quickly or toggle button to move needle in small increments f) Position needle to desire limit point to sound the alarm light g) Release")
 Release button d) Repeat above steps to Unmute the alarm Figure 10a Button Limit Recall Feature: a) Turn ignition to ON position b) Push button one time to recall peak level c) The blue")
13 10. Gauge Setup & Control Set the Limit/Warning Feature: a) Turn ignition to ON position b) Allow gauge starting process to finish c) Press and hold the button down for approximately 5 seconds d) Release button e) Push and hold button to sweep the needle quickly or toggle button to move needle in small increments f) Position needle to desire limit point to sound the alarm light g) Release button for 5 second or more to set the limit Warning Sound Mute/Unmute: a) With the ignition OFF, press and hold button b) Turn the ignition to ON position and wait for the needle to come to resting position c) Release button d) Repeat above steps to Unmute the alarm Figure 10a Button Limit Recall Feature: a) Turn ignition to ON position b) Push button one time to recall peak level c) The blue limit light will come on while in recall mode d) The needle will sweep to the highest level attained and remain there approximately 5 seconds. e) To reset peak level: while in peak recall mode, press and hold button Figure 10b 11 of 11
These instructions were written for reference only and the use of a factory service manual is recommended.
 Introducing the CorkSport High Pressure Fuel Line designed for the MZR DISI. This fuel line is designed to replace the OEM fuel line which are prone to failure at the brazed connection at the rail. The
Tooling List 10mm Socket 3 Extension Ratchet Large Jaw Pliers Needle Nose Pliers
 Thank you for purchasing! The CorkSport Binary VTA BPV provides features and performance to suit stock cars and on up to big turbo high power setups. The CorkSport Binary VTA BPV holds 50psi, responds
These instructions were written for reference only and the use of a factory service manual is recommended.
 Introducing the CorkSport High Pressure Fuel Line designed for the MZR DISI. This fuel line is designed to replace the OEM fuel line which are prone to failure at the brazed connection at the rail. The
Installation Instructions
 Installation Instructions AMP RESEARCH Power Step by Bestop Automatic Retracting Running Board Vehicle Application Nissan Titan King Cab 2004 and newer (5 ft.) Part Number: 75106-01 Nissan Titan Crew Cab
Parts List See cover Page
 Thank you for purchasing the CorkSport Front Mount Intercooler Kit for the 2010-2013 Mazdaspeed 3. Keep your BAT s under check with the CorkSport FMIC Kit with the small or large intercooler. Please let
CORKSPORT Power Series Cat Back Exhaust I N S T A L L A T I O N I N S T R U C T I O N S Mazda 6 2.5T PART #: ATK
 I N S T A L L A T I O N I N S T R U C T I O N S CORKSPORT Power Series Cat Back Exhaust 2018+ Mazda 6 2.5T PART #: ATK-6-101-12 Need Help With Your Installation? Call (360) 260-CORK PAGE 1 CORKSPORT Power
TOYOTA TACOMA FOG LIGHT
 TOYOTA TACOMA 2012 - FOG LIGHT Part Number: 00016-35220 Accessory Code: LF10 Conflicts - Factory Fog Lights Kit Contents Item # Quantity Reqd. Description 1 2 Fog Lamps 2 1 Hardware bag 3 1 Switch Assembly
R53 BOOST GAUGE INSTALL
 R53 BOOST GAUGE INSTALL 052009 Thank you for purchasing the ALTA Performance gauge pod. Installation should only be performed by persons experienced in the proper operation of Mini electrical and body
Thank you for purchasing the Craven Speed FlexPod Complete Gauge Pod Kit For R56, R58, R59, R60 with Refresh Engines (2011+)
") Thank you for purchasing the Craven Speed FlexPod Complete Gauge Pod Kit For R56, R58, R59, R60 with Refresh Engines (2011+) Before You Start Please read instructions completely before installing. These
Thank you for purchasing the Craven Speed FlexPod Complete Gauge Pod Kit For R56, R58, R59, R60 with Refresh Engines (2011+) Before You Start Please read instructions completely before installing. These
IAG Street Series Air / Oil Separator (AOS) For WRX
 For WRX") P IAG Street Series Air / Oil Separator (AOS) For 2015-16 WRX Part# IAG-ENG-7152 Tools Required: Ratchet, torque wrench, extensions, needle nose pliers, hose cutter, snips/scissors, flat head screw driver,
P IAG Street Series Air / Oil Separator (AOS) For 2015-16 WRX Part# IAG-ENG-7152 Tools Required: Ratchet, torque wrench, extensions, needle nose pliers, hose cutter, snips/scissors, flat head screw driver,
TECHNICAL INSTRUCTIONS FOR SAFETY RECALL ALE VALVE SPRING AND LASH ADJUSTER REPLACEMENT GS 350: IS 350:
 TECHNICAL INSTRUCTIONS FOR SAFETY RECALL ALE VALVE SPRING AND LASH ADJUSTER REPLACEMENT GS 350: 2007 2008 IS 350: 2006 2008 I. OPERATION FLOWCHART Verify Vehicle Eligibility 1. Check the VIN range. 2.
TOYOTA TACOMA FOG LIGHT
 TOYOTA TACOMA 2013 - FOG LIGHT Part Number: 00016-35220 Accessory Code: LF10 Conflicts - Factory Fog Lights Kit Contents Item # Quantity Reqd. Description 1 2 Fog Lamps 2 1 Hardware bag 3 1 Switch Assembly
Important: Please read these instructions carefully and completely before starting the installation. TITAN Fuel Tanks INSTALLATION INSTRUCTIONS
 TITAN pt. no.: 99 0000 0509 Important: Please read these instructions carefully and completely before starting the installation. TITAN Fuel Tanks INSTALLATION INSTRUCTIONS I n B e d F u e l T a n k Shown
CORKSPORT Short Ram Intake
 I N S T A L L A T I O N I N S T R U C T I O N S CORKSPORT Short Ram Intake 2018+ Mazda 6 2.5T & 2016+ CX-9 PART #: ATK-6-117-xxxxx Need Help With Your Installation? Call (360) 260-CORK PAGE 1 CORKSPORT
IAG Competition Series Air / Oil Separator (AOS) For 2017 STI
 For 2017 STI") P IAG Competition Series Air / Oil Separator (AOS) For 2017 STI Part# IAG-ENG-7251 Tools Required: Ratchet, torque wrench, extensions, needle nose pliers, hose cutter, snips/scissors, flat head screw driver,
P IAG Competition Series Air / Oil Separator (AOS) For 2017 STI Part# IAG-ENG-7251 Tools Required: Ratchet, torque wrench, extensions, needle nose pliers, hose cutter, snips/scissors, flat head screw driver,
CorkSport Mazdaspeed 3 ECU Relocation Box Mazdaspeed 3
 CorkSport Mazdaspeed 3 ECU Relocation Box 2007-2013 Mazdaspeed 3 Thank you for purchasing the CorkSport ECU Relocation Battery Box for the Mazdaspeed 3. With the install of this battery box, you now have
SALEEN SPEEDLAB BOOST AND WATER TEMPERATURE GAUGE POD KIT
 = SALEEN SPEEDLAB BOOST AND WATER TEMPERATURE GAUGE POD KIT INSTALLATION MANUAL: 2005-09 Mustang 4.6L 3V P/N: 10-8002-C12000B KIT P/N: 10-2903-B11511* Saleen Performance, Inc. 1225 East Maple Rd. Troy,
CorkSport Mazdaspeed 3 Performance Leather Steering Wheel
 CorkSport Mazdaspeed 3 Performance Leather Steering Wheel 2010-2013 Mazdaspeed 3 & 2010-2013 Mazda 3 Take control with the CorkSport Performance Leather Steering Wheel for 2010-2013 Mazdaspeed 3 and 2010-2013
IAG Street Series Air / Oil Separator (AOS) For 2017 WRX
 For 2017 WRX") P IAG Street Series Air / Oil Separator (AOS) For 2017 WRX Part# IAG-ENG-7152 Tools Required: Ratchet, torque wrench, extensions, needle nose pliers, hose cutter, snips/scissors, flathead screwdriver,
P IAG Street Series Air / Oil Separator (AOS) For 2017 WRX Part# IAG-ENG-7152 Tools Required: Ratchet, torque wrench, extensions, needle nose pliers, hose cutter, snips/scissors, flathead screwdriver,
Installation Instructions
 Installation Instructions Automatic Retracting Running Board Vehicle Application Ford F150 Supercrew 2001-2003 (2004 Heritage) Part Number: 75111-01 www.bestop.com - We re here to help! Visit our web site
PRODUCT INSTRUCTIONS
 PRODUCT INSTRUCTIONS Thank you for purchasing genuine Design Engineering, Inc. products. Be sure to always wear the proper safety equipment when installing any DEI product. Design Engineering Inc. WILL
Thank you for purchasing the Craven Speed FlexPod Complete Gauge Pod Kit
 Thank you for purchasing the Craven Speed FlexPod Complete Gauge Pod Kit Before You Start Please read instructions completely before installing. These instructions contain the information required to install
Part Number: Code: CL7
 Document # 16.01.00 PIO/DIO Rev. A 06/23/08 TOYOTA YARIS 2008- ELECTRONIC CRUISE CONTROL KIT Part Number: 00016-52030 Code: CL7 Section I Installation Preparation Kit Contents Item # Qty. Description 1.
INSTALLATION INSTRUCTIONS
 INSTALLATION INSTRUCTIONS FUEL SURGE TANK INSTALL KIT Honda S2000 Document# 19-0063 Support: info@radiumauto.com WARNING: DO NOT SMOKE WHILE WORKING ON FUEL SYSTEMS. KEEP SPARKS AND OPEN FLAMES AWAY FROM
IAG Competition Series Air / Oil Separator (AOS) For WRX
 For WRX") P IAG Competition Series Air / Oil Separator (AOS) For 2015-16 WRX Part# IAG-ENG-7252 Tools Required: Ratchet, torque wrench, extensions, needle nose pliers, hose cutter, snips/scissors, flat head screw
P IAG Competition Series Air / Oil Separator (AOS) For 2015-16 WRX Part# IAG-ENG-7252 Tools Required: Ratchet, torque wrench, extensions, needle nose pliers, hose cutter, snips/scissors, flat head screw
Powerstroke EGR Delete A B C
 20-203 6.7 Powerstroke EGR Delete A B C D E F G H I J K Part # A B C D E F G H I J K PACKING LIST: QTY. 3 5 2 Description Sensor Bracket Exhaust Blockoff Plate Straights Barbed Brass Fitting 39 5/8 Coolant
---Optional Items---
 1 2 3 4 5 6 ---Optional Items--- 10 9 11 7 8 12 This package should contain: 1. One (1) CorkSport Crashbar Weldment 2. Eight (8) M8x1.25x20 mm Bolts 3. Eight (8) M8x1.25mm Nyloc Nuts 4. Sixteen (16) M8
Part Number: TTA-2N1. Hardware Bag Contents. General Applicability SR5, TRD Sport, TRD Off-Road, Limited
 Date: 2.10.2016 TOYOTA TACOMA 2016-2 in 1 LED UPGRADE KIT Part Number: TTA-2N1 Kit Contents Item # Quantity Reqd. Description 1 2 DRL + Fog Light Housing 2 1 Driver Box 3 1 Harness bag 4 1 User s card
DODGE RAM 24V 5.9L CUMMINS
 DODGE RAM 24V 5.9L CUMMINS DODGE RAM 24V 5.9L CUMMINS TABLE OF CONTENTS SECTION 1 Preparing the Installation 1 SECTION 2 Boost Gauge Installation 2 SECTION Pyrometer/EGT Gauge Installation 4 SECTION 4
TOYOTA PRIUS V LED DRL Black-Out
 TOYOTA PRIUS V 2012 - LED DRL Black-Out Part Number: 00016-47021 Accessory Code:LDBO10 Conflicts Fog Lights Kit Contents Item # Quantity Reqd. Description 1 2 DRL Housing 2 2 DRL s bezels 3 1 Driver Box
Installation Instructions for Chevrolet Colorado, GMC Canyon, LT, Z71, With Factory Fog Lights
 Installation Instructions for 2015-2018 Chevrolet Colorado, GMC Canyon, LT, Z71, With Factory Fog Lights This kit is designed to allow use of your factory fog light operation along with an addition auxiliary
PART No: 04997, & PRODUCT: Body Harness MAKE & MODEL: TOYOTA 400A/125A KLUGER INSTALLATION INSTRUCTIONS
 Issue Date 23-11-10 Page 1 1. In the LHS of the vehicle cabin, locate the main harness grommet nipple (1). 2. Cut off the tip of the main harness grommet nipple (1). 3. In the engine bay, locate the vehicle
ROUSH FUEL SYSTEM UPGRADE CURRENT FORD MUSTANG 5.0L
 ROUSH FUEL SYSTEM UPGRADE 2011- CURRENT FORD MUSTANG 5.0L P/N: 421602 (1313-FPVRKIT) Installation Instructions Before installing your ROUSH Performance Product(s), read through the entire installation
JOHN DEERE GATOR SWITCH PANEL INSTRUCTIONS FITS 1GTRXUV2 AND 1GTRXUV4 CABS (p/n: 1XUVSP)
") P. 1 of 5 JOHN DEERE GATOR SWITCH PANEL INSTRUCTIONS FITS 1GTRXUV2 AND 1GTRXUV4 CABS (p/n: 1XUVSP) Note: Harness Extension Kit Required for 4 Passenger (p/n: 1XUV4WHEK) This manual is the property of the
P. 1 of 5 JOHN DEERE GATOR SWITCH PANEL INSTRUCTIONS FITS 1GTRXUV2 AND 1GTRXUV4 CABS (p/n: 1XUVSP) Note: Harness Extension Kit Required for 4 Passenger (p/n: 1XUV4WHEK) This manual is the property of the
INSTALLATION INSTRUCTIONS
 INSTALLATION INSTRUCTIONS Part# 22-2719 Complete Mounting System for Dual Viair Compressors For the most up-to-date instructions please visit www.updownair.com www.updownair.com 833-226-4863 I M P O R
Tooling List 10mmSocket 12mm Socket 3/8 Drive Ratchet
 Thank you for purchasing the CorkSport Mazdaspeed 3 Short Ram Intake. One of the easiest and most beneficial performance enhancements you can do for your vehicle, the CorkSport Power Series Short Ram Intake
Make sure your vehicle is on a level surface prior to starting installation.
 Thank you for purchasing the CorkSport Mazdaspeed 3 Front Sway Bar. Our sway bar will help remove the vehicles tendency to overpower the front tires under hard cornering and minimize traction robbing body
ELECTRONIC POSITIVE AIR SHUTOFF
 12 January 2015 103675X Electronic positive air shutdown (I-00336) 1 ELECTRONIC POSITIVE AIR SHUTOFF 1036750 2007-2009 Dodge 6.7L 1036751 2010-2015 Dodge 6.7L 1036754 2008-2010 Ford 6.4L 1036755 2011-2014
8 Zip Tie Zip Tie 1 Union Fitting 1 ½ ½ Union Reducer Fitting Union 1 5/8 ½ (For Plastic Intake Manifold Vehicles)
") P IAG Street Series Air / Oil Separator (AOS) For 2017 STI Part# IAG-ENG-7151 Tools Required: Ratchet, torque wrench, extensions, needle nose pliers, hose cutter, snips/scissors, flat head screw driver,
P IAG Street Series Air / Oil Separator (AOS) For 2017 STI Part# IAG-ENG-7151 Tools Required: Ratchet, torque wrench, extensions, needle nose pliers, hose cutter, snips/scissors, flat head screw driver,
MAZDA BT-50 (October 2011 Production Onwards) 1 & 3 PIECE HARD TONNEAU REMOTE LOCKING KIT INSTALLATION INSTRUCTIONS
 1 & 3 PIECE HARD TONNEAU REMOTE LOCKING KIT INSTALLATION INSTRUCTIONS") MAZDA BT-50 (October 0 Production Onwards) & 3 PIECE HARD TONNEAU REMOTE LOCKING KIT INSTALLATION INSTRUCTIONS Installation Time: Approx. 0 Minutes Care Instructions: Clean Tonneau Cover with a mild detergent
MAZDA BT-50 (October 0 Production Onwards) & 3 PIECE HARD TONNEAU REMOTE LOCKING KIT INSTALLATION INSTRUCTIONS Installation Time: Approx. 0 Minutes Care Instructions: Clean Tonneau Cover with a mild detergent
TOYOTA TACOMA LED DRL Black-Out
 TOYOTA TACOMA 2013 - LED DRL Black-Out Part Number: 00016-35021 Accessory Code: LDBO10 Conflicts - Fog Lights Kit Contents Item # Quantity Reqd. Description 1 2 DRL Housing 2 1 Driver Box 3 1 Harness bag
Part Number: T4R-2N1. Hardware Bag Contents. General Applicability Models with factory fog light. Conflicts -
 Date: 07.30.2015 TOYOTA TUNDRA 2014-2016 LED Fog Light & DRL 2 in 1 Part Number: T4R-2N1 Kit Contents Item # Quantity Reqd. Description 1 2 DRL + Fog Light Housing 2 1 Driver Box 3 1 Harness bag 4 1 User
TOYOTA TACOMA FOG LIGHT
 Date: 10.31.2013 TOYOTA TACOMA 2012-15 FOG LIGHT (Halogen or LED) Part Number: TTA-312 Kit Contents Item # Quantity Reqd. Description 1 2 Fog Lamps 2 1 Switch Assembly 3 1 Fog light operation guide 4 1
Part Number: T4R-2IN1
 Date: 12.11.2014 TOYOTA HIGHLANDER 2015 LED Fog Light & DRL 2in1 Part Number: T4R-2IN1 Kit Contents Item # Quantity Reqd. Description 1 2 DRL + Fog Light Housing 2 1 Driver Box 3 1 Harness bag 4 1 User
TOYOTA RAV FOG LIGHT
 TOYOTA RAV4 2011 - FOG LIGHT Part Number: 00016-12013 Accessory Code: LF10 Conflicts - Kit Contents Item # Quantity Reqd. Description 1 2 Fog Lamps 2 2 Fog Lamp s bezels 3 1 Switch Assembly 4 1 Fog light
Part Number: T4R-2N1. Hardware Bag Contents. General Applicability. Conflicts - Limited Models
 Date: 12.11.2014 TOYOTA HIGHLANDER 2014-2016 LED Fog Light & DRL 2 in 1 Part Number: T4R-2N1 Kit Contents Item # Quantity Reqd. Description 1 2 DRL + Fog Light Housing 2 1 Driver Box 3 1 Harness bag 4
Part Number: SFR-713. Hardware Bag Contents. General Applicability All models. Conflicts - Fog Lights. Date: SCION FRS LED DRL
 Date: 01.30.2014 SCION FRS 2013-2015 LED DRL Part Number: SFR-713 Kit Contents Item # Quantity Reqd. Description 1 2 DRL s bezels w/led DRL 2 1 Driver Box 3 1 Harness bag 4 1 User s card 5 1 Switch Hardware
GENUINE PARTS INSTALLATION INSTRUCTIONS
 GENUINE PARTS INSTALLATION INSTRUCTIONS 1. 2. 3. 4. DESCRIPTION: Security Light Kit APPLICATION: Altima Sedan (2013+) PART NUMBER: 999F4 AX010 - Universal Security Lighting Kit. KIT CONTENTS: Item QTY
INSTALLATION INSTRUCTIONS HIGH OUTPUT 2 SPEED RAD FAN ASSEMBLY
 INSTALLATION INSTRUCTIONS HIGH OUTPUT 2 SPD RAD FAN ASSMBLY PART # 66818, 66819, 66820, 66821, 66822, 66823, 66827 & 66828 Please read these instructions completely before beginning installation FAN SHROUD
Allison Lockup Controller
 19 February 2018 1031311/1031312/1031313 Allison Transmission Lockup and Pressure Module (I-00413) 1 Allison Lockup Controller Transmission Lockup and Pressure Controller 1031311 1031312 1031313 2001-2010
PART No: 04997, & PRODUCT: Body Harness MAKE & MODEL: T5 VOLKSWAGEN TRANSPORTER INSTALLATION INSTRUCTIONS
 1. In the engine bay, locate the vehicle battery (1). 2. From the battery, route the power input harness (2) behind the battery shield and along the firewall. Note: Do not connect the power input harness
Conflicts. TOYOTA Prius Foglights. Part Number: Accessory Code: LF1. Factory Fog Lights
 TOYOTA Prius 2011- Foglights Part Number: 00016-47401 Accessory Code: LF1 Conflicts Factory Fog Lights Item # Quantity Reqd. Description 1 2 Fog Lamps 2 2 Fog Lamp s bezels 3 1 Switch Assembly 4 1 Fog
Ford 6.7 EGR Delete Kit
 Fits: 2011 12 Powerstroke 6.7L Read instructions thoroughly before proceeding! ***This kit may void factory warranty please check with manufacturer.*** ***This kit is intended for off road use only.***
Installation Instructions
 Installation Instructions Automatic Retracting Running Board Vehicle Application Dodge Ram Quad Cab Pickup 2002-2005 Part Number: 75101-01 Dodge Ram Mega Cab Pickup 2006 - Current Part Number: 75118-01
SCION FRS FOG LIGHTS. Part Number: SFR-313
 Part Number: SFR-313 Kit Contents Item # Quantity Reqd. Description 1 2 Light Housings 2 2 Fog Light bezels 3 1 Harness bag 4 1 User s card 5 1 Switch 6 1 Fuse jumper Hardware Bag Contents Item # Quantity
Conflicts - Fog Lights
 TOYOTA CAMRY 2013 - BLACKOUT LED DRL Part Number: 00016-32270 Accessory Code: LDBO10 Conflicts - Fog Lights Kit Contents Item # Quantity Reqd. Description 1 2 DRL Housing 2 2 DRL s bezels 3 1 Driver Box
PART # US Patent
 Please read these instructions completely before beginning installation KIT CONTNTS QTY. DSCRIPTION 1 PWM Fan Controller 1 PWM Cover 3 #8 Lock Washers 2 #6 Lock Washers 3 #8 Nuts 2 #6 Nuts 2 Allen Head
Conflicts NOTE: XLE, LE, AND SE MODELS
 TOYOTA SIENNA 2011- REARSIGHT Part Number: 00016-00085 Accessory Code: MC9 Conflicts NOTE: XLE, LE, AND SE MODELS KIT CONTENTS ITEM QTY DESCRIPTION 1 1 MIRROR/MONITOR 2 1 REAR CAMERA ASSEMBLY 3 1 CAMERA
TOYOTA SIENNA LED DRL Black-Out
 TOYOTA SIENNA 2013 - LED DRL Black-Out Part Number: 00016-08021 Accessory Code: LDBO10 Conflicts - Fog Lights Kit Contents Item # Quantity Reqd. Description 1 2 DRL Housing 2 2 DRL s bezels 3 1 Driver
Fitting Instructions
 Tow-Pro Wiring Kit Fitting Instructions Suitable for: Toyota Hilux / Fortuner Accessory Kit Estimated Fitting Time: 90 Minutes FI807 Page 0 of Issue: Date: /08/08 08 General Notes Safety Notes Suitable
Part# JL AIR IT UP 4 Tire On Board Air Delivery System. (Requires External Air Source)
") Part# 18-1819 JL AIR IT UP 4 Tire On Board Air Delivery System (Requires External Air Source) The most up-to-date instructions always visit www.updownair.com www.updownair.com 833-226-4863 I M P O R T
Part# 18-1819 JL AIR IT UP 4 Tire On Board Air Delivery System (Requires External Air Source) The most up-to-date instructions always visit www.updownair.com www.updownair.com 833-226-4863 I M P O R T
TOYOTA TACOMA XSP-X LED DRL. Part Number: Accessory Code: LDRL10
 TOYOTA TACOMA 2013 - XSP-X LED DRL Part Number: 00016-35230 Accessory Code: LDRL10 Conflicts -None Kit Contents Item # Quantity Reqd. Description 1 2 LED DRL 2 1 Driver Box 3 1 Harness bag 4 Hardware Bag
Revised 10/22/2014 Page 2 of?
 1.Remove side panels, hood, seat, fuel tank, and 2.Remove stock air box, remove fuel line muffler. Save exhaust springs and rubber muffler mounts for turbo bracket. Sand back surface flat for mounting.
TOYOTA TACOMA FOG LIGHT (Halogen or LED)
") Part Number: TTA-312 / TTA-812 Kit Contents Item # Quantity Reqd. Description 1 2 Fog Lamps 2 1 Switch Assembly 3 1 Fog light operation guide 4 1 Harness bag Hardware Bag Contents Item # Quantity Reqd.
Part Number: TTA-312 / TTA-812 Kit Contents Item # Quantity Reqd. Description 1 2 Fog Lamps 2 1 Switch Assembly 3 1 Fog light operation guide 4 1 Harness bag Hardware Bag Contents Item # Quantity Reqd.
LED Fog Light. Conflicts Note: 1832, 1852, 1856, 1872, General Applicability Fits Models
 LED Fog Light Year & Model Part Number 2017 Corolla TCO-817 Conflicts Note: 1832, 1852, 1856, 1872, 1874 General Applicability Fits Models 1863 1866 1864 1865 Additional Items Required For Installation
INSTALLATION INSTRUCTIONS
 2007-Current Jeep Wrangler 360º System for Aftermarket display (Kit # AVMS-3700v2) Please read thoroughly before starting installation and check that kit contents are complete. Items Included in the Kit:
PRXB EXHAUST BRAKE MAXIMUM EXHAUST FLOW DESIGN
 MAXIMUM EXHAUST FLOW DESIGN PRXB EXHAUST BRAKE C44072/C44073/C44074/C44075/C44076 APPLICATION: 994-2002 DODGE RAM TRUCKS W/5.9L CUMMINS DIESEL ENGINES WITH MANUAL & AUTOMATIC TRANSMISSIONS STOCK DODGE
CORKSPORT Performance Steering Wheel
 I N S T A L L A T I O N I N S T R U C T I O N S CORKSPORT Performance Steering Wheel 2016+ Mazda MX-5 PART #: NDM-9-342-10 Need Help With Your Installation? Call (360) 260-CORK PAGE 1 CORKSPORT Performance
Part Number: T4R-2N1. Hardware Bag Contents. General Applicability Models with factory fog light
 11/10/16 TOYOTA CAMRY 2012-2014 2 in 1 LED UPGRADE KIT Part Number: T4R-2N1 Kit Contents Item # Quantity Reqd. Description 1 2 DRL + Fog Light Housing 2 1 Driver Box 3 1 Harness bag 4 1 User s card 5 1
INSTALLATION INSTRUCTIONS
 2007-Current Jeep Wrangler 360º System for Factory Display Radios (Kit # AVMS-3701v2) Please read thoroughly before starting installation and check that kit contents are complete. Items Included in the
VOLKSWAGEN AMAROK 1 & 3 PIECE HARD TONNEAU REMOTE LOCKING KIT INSTALLATION INSTRUCTIONS
 VOLKSWAGEN AMAROK & PIECE HARD REMOTE LOCKING KIT INSTALLATION INSTRUCTIONS Care Instructions: Clean Tonneau Cover with a mild detergent and water solution. Do not use abrasive cleaners or solvents. Place
INSTALLATION INSTRUCTIONS
 2007-Current Jeep Wrangler 360º System for Factory Display Radios (Kit # AVMS-3701) Please read thoroughly before starting installation and check that kit contents are complete. Items Included in the Kit:
TOYOTA COROLLA FOG LIGHT
 Doc. 03.69.00 PIO / DIO Rev. C 10/11/12 TOYOTA COROLLA 2012 - FOG LIGHT Part Number: 00016-32118 Accessory Code: LF10 Conflicts - Factory code PM on model 1838 Kit Contents Item # Quantity Reqd. Description
CAMRY STRIP LED DRL TOYOTA Part Number: Accessory Code: LDRS10. PIO / DIO Rev. A 02/26/13. Doc
 Doc. 02.126.00 TOYOTA CAMRY PIO / DIO Rev. A 2013-02/26/13 STRIP LED DRL Part Number: 00016-32280 Accessory Code: LDRS10 Conflicts - Only works on Camry SE Kit Contents Item # Quantity Reqd. Description
Installation Instructions - ECS Tuning Vent Pod Vacuum/Boost Gauge Kit
 Installation Instructions - ECS Tuning Vent Pod Vacuum/Boost Gauge Kit This tutorial is provided as a courtesy by ECS Tuning. Part Number for (2005-2008) Proper service and repair procedures are vital
MSD 6AL Ignition Module w/ Rev Control - Installation Instructions
 MSD 6AL Ignition Module w/ Rev Control - Installation Instructions The below installation instructions work for the following products: MSD 6AL Ignition Module w/ Rev Control Please read through the instructions
Make sure your vehicle is on a level surface prior to starting installation.
 Thank you for purchasing the CorkSport Mazdaspeed 3 Front Sway Bar. Our sway bar will help remove the vehicles tendency to overpower the front tires under hard cornering and minimize traction robbing body
PHASE 3 POWERSPORTS AUDIO KIT RZR POLARIS. pg 2 Disassembly, Wire and Amplifier Plate Installation. pg 9 Glovebox Subwoofer Installation
 POLARIS RZR PHASE 3 POWERSPORTS AUDIO KIT pg 2 Disassembly, Wire and Amplifier Plate Installation pg 9 Glovebox Subwoofer Installation pg 13 Kick Panel Speakers Installation pg 25 MRB3 and Dash Kit Installation
PRODUCT SAFETY NOTICE
 PRODUCT SAFETY NOTICE Congratulations. This vehicle has been equipped with a Firestone air suspension system. This suspension will enhance the vehicle s handling when loaded, however, the vehicle s performance
Ford Racing 4.6L 3V Crate Engine Control Pack
 Ford Racing 4.6L 3V Crate Engine Control Pack Installation Time: 3-6 hours on a Foxbody Mustang Tools Required: Basic English and Metric Socket and Wrench Set Flat and Phillips Screwdrivers Torx bits Hammer
WirelessAIR Advanced Integrated Remote
 Advanced Integrated Remote Gen 3 Kit 72000 Automatic Leveling Digital On-Board Compressor System MN-772 (021112) ECR 7233 INSTALLATION GUIDE For maximum effectiveness and safety, please read these instructions
Lethal Performance Dual FPDM Harness Kit Installation
 Lethal Performance Dual FPDM Harness Kit Installation The Lethal Performance Dual FPDM Harness Kit is a plug-and-play modification. Depending on whether you are using the Lethal Performance wire upgrade
Optional: Wiring a Relay for Gauge Controlled Output
 Wiring Installation Instructions for : PYROMETER 2 1/16 Spek Pro Professional Racing Gauge GAUGE 12-Pin Wiring Harness & Plug Firewall Grommet DIAGRAM 1 Black-Engine Ground 12-Pin Wiring Harness CUP Coil
Weistec M177 WMI System
 Weistec M177 WMI System Installation Guide 2015+ C63(S) Sedan 2016+ C63(S) Coupe This product is legal in California for racing vehicles only and should never be used upon a highway. This product is legal
C FORD F250 / F L POWERSTROKE DIESEL WITH AUTOMATIC TRANSMISSIONS ONLY
 EXHAUST BRAKES C40019 1999-2003 FORD F250 / F350 7.3L POWERSTROKE DIESEL WITH AUTOMATIC TRANSMISSIONS ONLY Getting Started Thank you and congratulations on your purchase of a Pacbrake exhaust retarder.
IR Temp Probe. Toyota Sienna Rear Sight. Part Number: Accessory Code:MC1
 Toyota Sienna 200 - Rear Sight Part Number: 0006-00085 Accessory Code:MC Section I Installation Preparation Kit Contents Item # Quantity Reqd. Description 2 3 4 5 6 7 8 MIRROR/MONITOR REVERSE MINI-CAMERA
FRS/BRZ Air Oil Separator (AOS) Installation Manual
 Installation Manual") FRS/BRZ Air Oil Separator (AOS) Installation Manual Eric Hazen Rev. 2 Overview: Detailed instructions on installing the AOS for the FRS/BRZ/GT86. Difficulty: Beginner Time required: 1-3 hours depending
FRS/BRZ Air Oil Separator (AOS) Installation Manual Eric Hazen Rev. 2 Overview: Detailed instructions on installing the AOS for the FRS/BRZ/GT86. Difficulty: Beginner Time required: 1-3 hours depending
INSTALLATION GUIDE PRISONER TRANSPORT LIGHTING. pro-gard.com STRONG RELIABLE SECURE
 INSTALLATION GUIDE PRISONER TRANSPORT LIGHTING STRONG RELIABLE SECURE pro-gard.com 800.480.6680 THESE COMPONENTS ARE REQUI TO INSTALL THE PRO-GARD PRISONER TRANSPORT LIGHTING 3" Round LED Lighthead QTY=
INSTALLATION INSTRUCTIONS TRAILER HITCH MAIN HARNESS KIT
 PART NUMBER: 0000-89-N30 GENUINE ACCESSORIES INSTALLATION INSTRUCTIONS TRAILER HITCH MAIN HARNESS KIT APPLICABLE MODELS: 2016 > CX-9 PACKAGE CONTENTS: INSTALLATION INSTRUCTIONS QTY 1 CABLE TIE MOUNT QTY
A. Preparing the charge harness. Start by removing the plastic covers by the battery terminal.
 twist battery relocate kit and harness. Step 1 A. Remove battery. Start by removing the negative battery cable and then the positive. After removing the battery cables remove the battery hold down bracket.
ENGINE DEVELOPMENT INC.
 2003 Ford Expedition 4.6L& 5.4L We encourage you to read this manual thoroughly before you begin work, and perform the following: 1. A quick parts check to make certain your kit is complete. If you discover
ACD-PRO Install in 2008 EvoX
 Turning in a counter clockwise direction, unscrew ift knob ACD-PRO Install in 2008 EvoX Slide back and remove the floor console panel assembly Pull up to remove the center console tray Disconnect the plug
Tooling List 10mm Wrench 10mm Socket 3/8 Drive 3/8 Drive Ratchet Flat Head Screwdriver
 Thank you for purchasing the CorkSport Cold Air Box. Protect your short ram intake from excessive engine bay heat with our two piece cold air box. CAD designed and thermoformed this box fits like it was
Installation Instructions - ECS Tuning Vent Pod Vacuum/Boost Gauge Kit
 Installation Instructions - ECS Tuning Vent Pod Vacuum/Boost Gauge Kit This tutorial is provided as a courtesy by ECS Tuning. Part Number for Audi B6 A4 (2002-2004) Proper service and repair procedures
Direct Mount EXHAUST BRAKES
 Direct Mount EXHAUST BRAKES APPLICATIONS: Fixed Orifice & PRXB Exhaust Brakes 2003-2005 Dodge trucks with 3.5 & 4 exhaust and 47RE &48RE Automatic Transmissions only THIS KIT IS NOT FOR USE ON 2006 & 2007
TOYOTA COROLLA LED DRL eyebrow. Part Number: TCO-DRL
 Part Number: TCO-DRL Kit Contents Item # Quantity Reqd. Description 1 2 DRL s bezels w/led DRL 2 1 Driver Box 3 1 Harness bag 4 1 User s card 5 1 Switch Hardware Bag Contents Item # Quantity Reqd. Description
HP10098 BASIC INDEPENDENT AIR SPRING ACTIVATION KIT
 HP10098 BASIC INDEPENDENT AIR SPRING ACTIVATION KIT Thank you and congratulations on the purchase of a Pacbrake basic independent air spring activation kit. Please read the entire installation manual prior
pg 2 Disassembly, Wire and Amplifier Plate Installation pg 9 Glovebox Subwoofer Installation pg 13 Kick Panel Speakers Installation
 RZ3-5KRC RZR XP1000 & 2015+ RZR900 with Ride Command SSV Works 5 Speaker Audio Kit pg 2 Disassembly, Wire and Amplifier Plate Installation pg 9 Glovebox Subwoofer Installation pg 13 Kick Panel Speakers
Fitting Instructions
 Reverse Park Assist Suitable for: Nissan Navara Kit Part No: 5466XX NP00 Tow-Pro Wiring Kit Fitting Instructions Accessory Kit Estimated Fitting Time: 0 Minutes FI98 Page 0 of 5 General Notes Read through
Weistec M157 WMI System
 Weistec M157 WMI System Installation Guide 2012-2013 E63 2014+ E63 4matic(S) 2011-2013 CLS63 2014+ CLS63 4matic(S) 2015+ S63 AMG (Without ABC Suspension) This product is legal in California for racing