IMPORTANT NOTICES 03 ASSEMBLING OF THE PARAMOTOR 05 HARNESS AND DISTANCE BARS 07 ASSEMBLING OF THE PROPELLER 10 ASSEMBLY INSPECTION 11
|
|
|
- Paul Austin
- 6 years ago
- Views:
Transcription


1
2 2 IMPORTANT NOTICES 03 ASSEMBLING OF THE PARAMOTOR 05 HARNESS AND DISTANCE BARS 07 ASSEMBLING OF THE PROPELLER 10 ASSEMBLY INSPECTION 11 TECHNICAL DATA OF THE ENGINE 12 CARBURETOR FUEL AND OIL 14 IGNITION AND ELECTRIC 15 JOYSTICK 17 PRE-FLIGHT CHECK 18 SPARE PARTS LIST 19 DIAGNOSING AND STARTING A FLOODED ENGINE 25 REGULAR CHECKS AND MAINTENANCE 27 TERMS OF GUARANTEE 28 WARRANTY ZERTIFICATE 29
3 3 IMPORTANT NOTICES * * C O N G R A T U L A T I O N S * * Thank you for choosing an excellent paramotor. Please take the time to read this manual carefully, with this manual we will try to give advice on the maintenance and operation that will help you have a reliable paramotor and to preserve your investment. Furthermore, we invite you to give this manual with the paramotor if you sell it, so it can be useful for the next owner as well. The manufacturer and the resellers are ready to answer your questions and, if necessary, to solve problems, because the safety of yourself and the others is the most important thing for us. When you will receive the motor, it will already have overcome a test of 1 hour in the factory, verifying the operation of all the components and the operation to every speed. All the paramotors are tested before the delivery. We reserve the right to change specifications, components, details of the motor, in relationship to the model in production without incurring in some obligation. The reliability, the performances and the duration of your paramotor will also depend on your understanding of the correct maintenance and operation of the engine. This manual describes the paramotor, its installation, use and control. This PPG is not covered by product liability insurance. Do not start it or fly it unless you are willing to assume all risks inherent in the sport of Powered Paragliding and all responsibility for any property damage, injury or death which may result from the use of this product.
4 4 You must be aware that any engine can fail and breakdown at any moment, this could lead a landing in less than ideal areas with the possibility of injury to the pilot or other people. Any powered paramotor must only fly in permitted areas, and never to fly low above a crowd of people. Inhabited zones, water, and areas that are difficult to land should be avoided, always remember that the engine could stop. Some atmospheric conditions can cause the engine to perform differently than normal. Before beginning every flight, you must test the paramotor on the ground. Start the engine on a flat surface that is free from stones, sand or small parts that could be sucked in by the propeller. Be sure any persons nearby are well clear off the thrust from the propeller and not near the propeller at any time the motor is running. A good safety distance is 50 meters for all directions of projection of the propeller and 20 meters for the others directions. Do not use a paramotor that has not been correctly maintained or not been used for some time, or if you know that is not in good condition. The use of not original spare parts can make the paramotor dangerous and immediately voids the warranty. Changes to the reduction or propellers can reduce safety and reliability of the aircraft. Before every use or test, check the condition of the propeller and the torque of bolts of the propeller. If the propeller is damaged do not use it, this can lead to a breakup of the propeller in rotation or to strong vibrations that will transmit to the motor and may cause damage or loosen bolts or components. Never use the motor without propeller or without reduction drive.
 central module - b.) cage - c.) 2x long supports - d.")

5 5 ASSEMBLING OF THE PARAMOTOR FRAME The frame consists of: - a.) central module - b.) cage - c.) 2x long supports - d.) 4x middle supports Top position: Middle position: Bottom position: long supports middle supports middle supports Assemble the complete cage and close all velcro straps


6 6 Insert assembled cage first in top position after that insert middle and bottom position. Close bottom velcro straps on both sides. Close netting with carabineer on both sides.


7 7 ASSEMBLING OF THE HARNESS AND THE DISTANCE BARS Harness has to be connected with the special buckles. Connect harness with both buckles to the frame.


8 8 Fix the distance bars with the nut. Distance bars are moveable vertically and horizontally. Fix the shoulder strap correctly to the harness.
9 9 ADJUSTING OF THE HARNESS The best way to familiarize yourself with the harness and your personal flying position is to use a simulator. Sit in the harness and adjust the shoulder straps correctly. The weight should be constantly shared on the shoulders. Find your seat position and adjust the straps accordingly to sit relaxed. The shoulder straps are adjusted depending on pilot weight. The flight position is optimal when the propeller shaft line is 5 to a maximum of 10 below the horizontal line. horizontal line propeller shaft line


10 10 ASSEMBLING OF THE PROPELLER On the MOSTER paramotor can be mounted a wood or carbon propeller Mount the propeller with the six M6 screw with a torque of 10Nm. Please use only original propellers otherwise you lose your warranty.
11 11 ASSEMBLY INSPECTION It is very important to fully inspect the assembly of your paramotor to find and remedy any potential problem areas before proceeding. The inspection should contain, at a minimum, the following items: Review each assembly step above Examine all nuts, bolts, and fasteners for security Check the harness for correct mounting, that all straps are secure, that there are no twists on any straps Examine prop cage for correct assembly, that it is strong, the netting is tight and on the correct side Check that nothing can get in the prop. The prop should clear the cage by same distance at all points. Check the fuel tank and fuel delivery system. Check for correct mounting of prop, and correct torque of prop bolts.


12 TECHNICAL DATA OF THE ENGINE 12
13 13 TIGHTENING TOURQUE VALUE FOR ENGINE BOLTS AND SREWS M N.m Kgf.m Lbf.ft HEAD NUTS ,4 10,36 CRANKSHAFT NUT CLUTCH SIDE ,4 CRANKSHAFT NUT IGNITION SIDE ,6 Locking compound PROPELLER CENTRAL SCREW ,6 Loctite 243 SPARK PLUS ,8 CRANKCASE SCREWS 6 8 0,8 5,92 CARBURETOR LOCKING SCREWS 6 8 0,8 5,92 INTAKE MANIFOLD LOCKING SCREWS 6 8 0,8 5,92 MUFFLER STUDS NUTS ,4 Loctite 270 SILENCER LOCKING SCREWS ,5 11,1 Loctite 243 MUFFLER LOCKING SCREWS ,5 11,1 Loctite 243 STANDARD TIGHTENING TORQUE VALUES N.m Kgf.m Lbf.ft 5 mm Bolts and nuts 6 0,6 4,44 6 mm Bolts and nuts ,40 8 mm Bolts and nuts 25 2,5 18,50 10 mm Bolts and nuts 45 4,5 33,30 12 mm Bolts and nuts 55 5,5 40,70
14 14 CARBURETOR FUEL AND OIL IMPORTANT INFORMATION We recommend using super gasoline and full synthetic oil (Castrol TTS) at 2,5%. Mix fresh fuel and oil before each flying session. Store your fuel/oil mixture in an approved, sealed container. Dispose of fuel/oil mixture that is older than 1 month. During running in we recommend using 3.0% oil mixture and use only full power during starting. Mixture table: fuel 95/98 octan LITER 0, full synthetic oil Castrol TTS 1:33 (3%)during running in time ml 16 ml 33 ml 66 ml 100 ml 132 ml 165 ml 333 ml full synthetic oil Castrol TTS 1:40 (2,5%) normal use ml 13 ml 25 ml 50 ml 75 ml 100 ml 125 ml 250 ml The fuel oil mixture should not be older than 1 month!
15 15 IGNITION AND ELECTRIC Spark plug : NGK BR9ES

16 16

17 17 JOYSTICK We supply with this paramotor a special build joystick which is a novum in the paramotor market. Since it s important to know how to stop the engine once it s started, let s cover Stopping the Engine first. To stop the engine, simply depress the STOP button and hold it until the engine comes to a complete stop.
18 18 PRE-FLIGHT CHECK THE FOLLOWING POINTS SHOULD BE CARRIED OUT BEFORE EACH START! 01 VISUAL INSPECTION OF CAGE AND FRAME FOR FRACTURES 02 PROPELLER HUB WITHOUT CLEARANCE? 03 REDUCTION GEAR LEAK-PROOF? 04 EXAMINATION OF EXHAUST AND MOTOR RUBBER ELEMENTS! 05 PETROL FILTER UNPOLLUTED? 06 MOTOR, CARBURETOR AND TANK ARE LEAK-PROOF? 07 SUFFICIENT SUPPLY OF FUEL AND OIL IN FUEL (DON T USE MIXTURE OLDER THAN 1 MONTH)? 08 PILOT SUSPENSION UNDAMAGED? 09 CANOPY UNDAMAGED? 10 GAS LEVER POSITION CHECK THE FREE MOVEMENT! 11 VENTILATED TANK LID ON TANK? 12 PROPELLER CLEAR START PARMOTOR NO PERSONS NEAR BY STARTING THE PARAMOTOR 13 CARRY OUT A TEST AT FULL THROTTLE AFTER WARMING UP! 14 TEST THE SWITCH-OFF FUNCTION! 15 PILOT PROPERLY HOOKED IN? 16 WIND DIRECTION AND WIND FORCE? 17 TAKE OFF AREA CLEAR? 18 TEST FOR LEAKS?

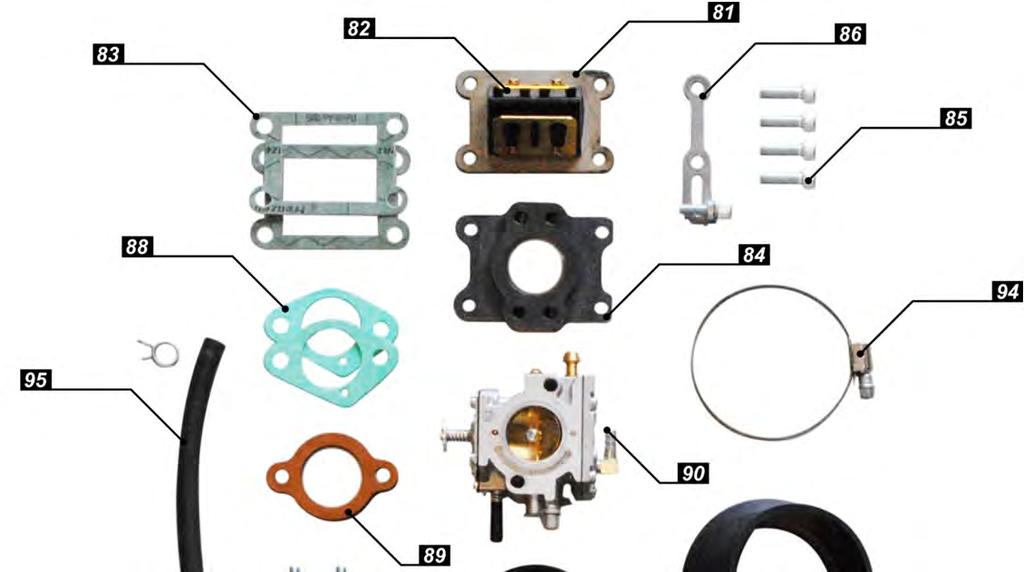
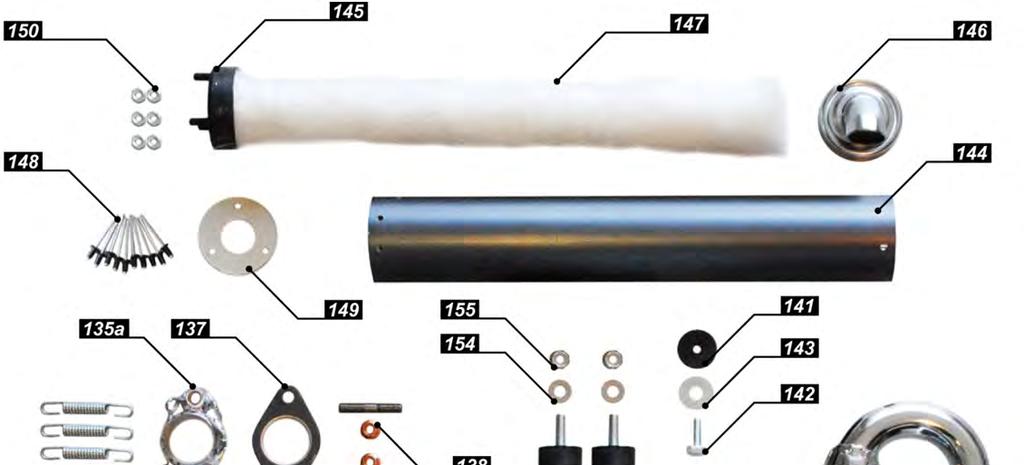
19 SPARE PARTS LIST 19

20 20


21 21
22 22

23 23

24 24
25 25 DIAGNOSING AND STARTING A FLOODED ENGINE A flooded engine can be identified by the smell of unburned gasoline coming from the exhaust pipe, or by periodic weak firing and puffs of black smoke during starting attempts. If you have a flooded engine, follow the procedure below: Remove the spark plug and thoroughly dry it. (Note another indication of a flooded engine is a spark plug that is dripping with gas). With the spark plug removed push the starter button for a few seconds while holding the throttle in the full-open position. This will remove excess fuel from the engine. Install the dry spark plug, and start using the normal procedure. WARNING! Ensure you have placed the spark plug cap away from all fuel sources before pulling the starter cord or a fire could occur! WARNING! Do not use a flooded engine procedure whereby you hold the throttle wide-open and then attempt to start the engine. If the engine starts, the prop would rapidly spin to full RPM and damage or injury would most likely occur! ENGINE PROBLEMS DIAGNOSTIC REASON REMEDY The engine doesn t start Out of petrol Add petrol Petrol doesn t reach the carburetor Check the fuel system circuit Old or wrong petrol Empty the tank and the fuel system circuit and replace the petrol Flooded engine Remove the spark plug, start the engine, dry or replace the spark plug. Defective spark plug Replace it Blockened spark plug or wet Clean and dry the spark plug or replace it Earthened switching off cable Check the wiring Spark plug hood Check it
26 26 Carburetor has problems Clean and check it, eventually replace the diaphragm No spark Check the ignition, coil and wiring The engine doesn t idle Dirty carburetor Calibrate the carburetor Out-of-adjustment screws Clean and check it, eventually replace the diaphragm Defective spark plug Replace it The engine doesn t reach the maximum rpm Engine revved up when idling Wrong carburetion The carburetor has problems The reed valve has problems Dirty air filter Dirty exhaust system Out-of-adjustment screws Air through the gaskets Calibrate the carburetor Clean and check it, eventually replace the diaphragm Replace the reeds or the whole reed valve Clean or replace it Clean or replace the deadening material Calibrate the carburetor Replace the gaskets and seals
27 27 REGULAR CHECKS AND MAINTENANCE At every use After the first 10 hours Check the bolts and screw tightening Check the silent-block conditions Check carburetion Every 25 hours Replace the spark plug Clean the air filter Replace the muffler springs Every 100 hours or every year Every 100 hours Every 200 hours Every 400 hours Replace the air filter Replace the starter rope Replace the diaphragm and clean it Replace the silent-block Replace the fuel system pipes Replace the reed valves Check the piston and piston rings Replace the pin and rollers cage Decarbonise and clean the decompression hole Replace the silencer deadening material Replace reduction gear belt Replace the piston and piston rings Replace the reed valve Replace all the bearings and seals Replace the crankshaft
28 28 TERMS OF GUARANTEE G-Force Paramotors will warrant their product to be free from defects in materials and workmanship for a period of twelve (12) months from the date of purchase. This warranty applies to the product in normal usage situations only. The dealer, from whom you purchased the product or G-Force Paramotors will repair the product free-of-charge. To obtain warranty service please contact your dealer or G-Force Paramotors and then either bring the product in or have it shipped. Shipping charges are the responsibility of the purchaser. This warranty does not apply even during the warranty period, and the purchaser shall pay repair or replacement charges if: The cause of malfunction is due to misuse, neglect, negligence, etc. This includes seize of the engine due by an improper carburetor adjustment or improper fuel/oil mix The malfunction is caused by incorrect pilot operation, i.e. a crash, whack, dork, bang, splat, ding, prong, bend, tweak, trip, fall, bounce or any other piloting eventuality. The malfunction is caused by lack of normal maintenance or modification, i.e. loose parts falling off and breaking the propeller. The malfunction is caused by an Act of God, including but not limited to fire, earthquake, hurricane, flood or other natural calamity. Purchaser has no warranty-certificate

29 29 WARRANTY ZERTIFICATE Name of buyer: Model: Date of purchase: Address: This warranty certificate is valid 1 year after purchase. Please read this manual carefully. For further question please ask your dealer or direct G-Force Paramotors. DEALER G-Force Paramotors G-Force Paramotors Paurach 55, A-8332 Edelsbach Tel.: +43 (0) sales@gforce-paramotor.at
ASSEMBLING OPERATION SERVICE SKY 100 MANUAL
 ASSEMBLING OPERATION SERVICE 2 IMPORTANT NOTICES 03 ASSEMBLING OF THE PARAMOTOR 05 HARNESS AND DISTANCE BARS 07 ASSEMBLING OF THE PROPELLER 10 ASSEMBLY INSPECTION 11 TECHNICAL DATA OF THE ENGINE 12 CARBURETOR
Operation and Maintenance Instructions for the RAPTOR 178
 WWW.SKYTOY.COM Operation and Maintenance Instructions for the RAPTOR 178 See www.skytoy.com for updates and service bulletins. 2/1/2011 1. Parts Schematic:... 3 2. Muffler Assembly Diagram:... 4 3. Muffler
IMPORTANT: Read this manual fully before assembly and use and observe all safety rules and operating instructions
 PETROL ENGINE Model: MLR52 IMPORTANT: Read this manual fully before assembly and use and observe all safety rules and operating instructions Contents Technical Specification 2 Safety 3 Starting 5 Running
DLA56 USER MANUAL TOPLEVEL GASOLINE ENGINE. Manufactured by FeiaoModel
 DLA56 TOPLEVEL GASOLINE ENGINE USER MANUAL Manufactured by FeiaoModel User Manual Thanks for purchasing DLA series engines,pls read all of the instructions below before starting your engine, especially
TRIKE-FLASH OWNER'S MANUAL. Copyright by FLY Products s.r.l.
 TRIKE-FLASH OWNER'S MANUAL Copyright by FLY Products s.r.l. Via Perù n. 30 63013 GROTTAMMARE (AP) - ITALY tel./fax +39.735.632486 www.flyproducts.com - fly@flyproducts.com Page Description 2 INDEX 3 INTRODUCTION
User Manual EOS EOS 100 Booster - EOS 100 Booster ICI
 User Manual EOS 100 - EOS 100 Booster - EOS 100 Booster ICI Introduction Thank you for having purchased an EOS 100 / EOS 100 Booster / ICI engine! It can proudly be said that most probably the EOS engine
Brushcutters. Bent Shaft Brushcutter. Straight Shaft Brushcutter BCS260 BCB260
 Brushcutters BCB260 Bent Shaft Brushcutter BCS260 Straight Shaft Brushcutter Please read this instruction manual carefully before operating your new Sanli Brushcutter. Congratulations on choosing a Sanli
ASSEMBLY MANUAL VERSION /2013
 ASSEMBLY MANUAL VERSION 1.1 01/2013 Copyright by FLY Products s.r.l. Via Perù n. 30 63013 GROTTAMMARE (AP) - ITALY tel./fax +39.735.632486 www.flyproducts.com - fly@flyproducts.com INDEX 1 FRAME ASSEMBLY
alternatives to the NGK BR9HS (the recommended standard spark plug for EOS 150)
") Appendix amendments to manual EOS 150 - EOS 150 ICI mod. 2019 status 12.2018 spark plug - gap to spark plug electrode and moment of torque To grant for a only single and exact spark at the right time due
Appendix amendments to manual EOS 150 - EOS 150 ICI mod. 2019 status 12.2018 spark plug - gap to spark plug electrode and moment of torque To grant for a only single and exact spark at the right time due
DIRECTIONS FOR USING ZDZ ENGINES
 DIRECTIONS FOR USING ZDZ ENGINES (Please READ this carefuly and become FAMILIAR with these instructions before using the engine) ZDZ two-stroke gasoline engines are intended for large models and offer
WORKSHOP MANUAL. 63,4 cm³ chainsaws
 WORKSHOP MANUAL General failures analysis Suggested tools I. Emak tool kit II. Compression tester: to check thermal group III. Electronic tachometer: for 2 and 4 stroke engines, measurement range from
Cover 1 Content 2 Assembling 3 Assembling 4 Fuel and Oil 5 Starter the Engine 6 Pilotsuspension 7 Pilotsuspension and Harness 8 Pilotsuspension and
 Cover 1 Content 2 Assembling 3 Assembling 4 Fuel and Oil 5 Starter the Engine 6 Pilotsuspension 7 Pilotsuspension and Harness 8 Pilotsuspension and Harness 9 Pilotsuspension and Harness 10 Pilotsuspension
TECHNICAL DATA. COMPRESSION RATUI 9,5/1 WEIGHT ready to fly CONSUMPTION at 5400RPM 5,6litres/h POWER at 6200RPM
 VICTOR 1 SUPER This handbook aims to bring to the attention of key technical, functional and maintenance of your motor VICTOR 1. Read carefully the following pages, will be synonymous with safety, reliability
Instruction Model 18537
 Instruction 738-556 Model 18537 LIMITED WARRANTY H. D. Hudson Manufacturing Company warrants to the original purchaser only that this product will continue to function as intended if used in accordance
Version 1.4 Operating instructions Czech Republic
 Version 1.4 Operating instructions Czech Republic Please check updates of operating instructions at www.rotomotor.cz, that your engine has still the best care. (can happen important changes that will lead
Instruction Manual SPE-26CC
 Instruction Manual SPE-26CC 1 Safety Precautions This engine is for experienced flyers only and could cause serious harm if used incorrectly. Always take care when running large gas engines. Read this
EME 60 Gasoline Engine User Manual
 EME 60 Gasoline Engine User Manual Eagle Master Engine EME 60 User Manual 1 SAFETY INSTRUCTIONS Thank you for purchasing EME 60 gasoline Engine. We at EME always strive to product reliable engines that
Operating instructions
 Operating instructions MVVS 50 IRS No: 3005L/3005S Before using the engine, please read these instructions carefully. Congratulations on choosing the MVVS 50 gas engine. The MVVS 50 has been designed and
Ciscomotors C-Max All types of models
 Ciscomotors C-Max All types of models SiMPLIFIED MAINTENANCE MANUAL All information in this publication is based on latest specification s product available at the time of approval for printing. CISCOMOTORS
Tel: , FAX: ,
 DIRECTIONS FOR USING ZDZ ENGINES (Please READ this carefuly and become FAMILIAR with these instructions before using the engine) ZDZ two-stroke gasoline engines are intended for large models and offer
720W PORTABLE GENERATOR
 720W PORTABLE GENERATOR MODEL NO: G720 PART NO: 8857800 OPERATION & MAINTENANCE INSTRUCTIONS LS0214 INTRODUCTION Thank you for purchasing this CLARKE 720W Portable Generator Before attempting to use this
20. TROUBLESHOOTING ENGINE DOES NOT START OR IS HARD TO START XL200
 20. ENGINE DOES NOT START OR IS HARD TO START 20-1 ENGINE LACKS POWER 20-2 POOR PERFORMANCE AT LOW AND IDLE SPEED 20-3 POOR PERFORMANCE AT HIGH SPEED 20-4 POOR HANDLING 20-4 ENGINE DOES NOT START OR IS
OWNERS MANUAL. Two Stroke Dirt Bike. Distributed by SSR Motorsports. Address: Alondra Blvd, Norwalk CA
 OWNERS MANUAL Two Stroke Dirt Bike Distributed by SSR Motorsports Address: 12825 Alondra Blvd, Norwalk CA 90650 www.ssrmotorsports.com Please note that this is a general manual. The model of the vehicle
RM80 & PA125 MOTOR MANUAL
 MOTOR MANUAL RM80 & PA125 Thank you for purchasing a PAP machine and trusting in our experience. This will let you achieve and experience flight in a very simplistic form and let those childhood dreams
Manual. Engine SOLO type 2350
 the Engine SOLO type 2350 Serial - no. Manufactured Aircraft - type... Registration no.... Owner... Log of revisions no. edition date revised page no. date of entry 1 November 16 th, 2005 1 November 16
Owner s Manual Instructions for Installation/Set-up, Operation, Servicing, & Storage
 M781692B.1 Item# 193030 Owner s Manual Instructions for Installation/Set-up, Operation, Servicing, & Storage ENGINE MUFFLER WARNING READ and UNDERSTAND this manual completely before using your muffler!
Operating instructions
 Operating instructions MVVS 116 NP No: 3010NP Before using the engine, please read these instructions carefully. Congratulations on choosing the gas engine MVVS 116cc. MVVS 116cc has been designed and
Operating instructions
 Operating instructions MVVS 80 IRS No: 3007L MVVS 80 IRS SP No: 3007SP MVVS 80 IRS TS No: 3007TS Before using the engine, please read these instructions carefully. Congratulations on choosing the gas engine
GP-123 Owner s Manual
 GP-123 Owner s Manual www.geme.com.tw Please read these instructions carefully before operating the engine Technical Specifications Item Data Item Data Bore 46.5 mm RPM Range 1500-8900 RPM Net Weight 2300
SPECIFICATIONS Horsepower: 1.5 HP Running Maximum PSI: 125 PSI Tank Capacity: 15 Gallons CFM: 6 40 PSI 5 90 PSI
 15 GALLON AIR COMPRESSOR Model: 7678 DO NOT RETURN TO STORE Please call 800-348-5004 for parts and service CALIFORNIA PROPOSITION 65 WARNING: You can create dust when you cut, sand, drill or grind materials
PF-4000, PF-4010, PF-4210 MULTI-PURPOSE ENGINE
 PF-4000, PF-4010, PF-4210 MULTI-PURPOSE ENGINE Date 09-26-01 Supplier To The Outdoor Power Equipment Industry ISM, Inc. 1028 4 th Street SW Auburn, WA 98001 Phone: (253) 333-1200 Fax: (253) 333-1212 WWW.TANAKA-USA.COM
USER S MANUAL for M19Y / BLACK MAGIC
 USER S MANUAL for M19Y / BLACK MAGIC Distributed by: JPX ITALIA Production Plant: Via Falcone 4, 42021 Barco di Bibbiano (RE) Italy Phone:(39)0522-246544 Fax:(39) 0522-246169 www.jpxitalia.com e-mail jpxitalia@jpxitalia.com
WORKSHOP MANUAL. Chainsaw GS35 GS350 MT350 MT3500
 WORKSHOP MANUAL Chainsaw GS35 GS350 MT350 MT3500 General failures analysis Suggested tools I. Emak tool kit II. Compression tester: to check thermal group III. Electronic tachometer: for 2 and 4 stroke
INSTALLATION AND MAINTENANCE MANUAL Rev. 12/2015 Deda Elementi. seat post. seat post
 INSTALLATION AND MAINTENANCE MANUAL Rev. 12/2015 Deda Elementi seat post UK seat post Thank you for choosing a DEDA ELEMENTI and MUD product. We at DEDA ELEMENTI develop, manufacture, and constantly test
INDEX TECHNICAL SPECIFICATIONS 2 SPECIAL TOOLS 3-4 PERIODIC MAINTENANCE 5 LUBRICANTS 6 TROUBLESHOOTING 7-14 TIGHTENING TORQUE TABLE 15
 INDEX TECHNICAL SPECIFICATIONS 2 SPECIAL TOOLS 3-4 PERIODIC MAINTENANCE 5 LUBRICANTS 6 TROUBLESHOOTING 7-14 TIGHTENING TORQUE TABLE 15 ENGINE DISASSEMBLY 16-24 ENGINE REASSEMBLY 25-37 SPECIAL 3-SHOE CLUTCH
WARM ENGINE STARTING PROCEDURE
 saw starting COLD ENGINE STARTING PROCEDURE 1. Pull the choke lever out. 2. Lock the throttle in the start position by depressing and holding the throttle lock button (C) while releasing the trigger (A)
WEBER CARBURETOR TROUBLESHOOTING GUIDE
 This guide is to help pinpoint problems by diagnosing engine symptoms associated with specific vehicle operating conditions. The chart will guide you step by step to help correct these problems. For successful
DA 150 EFI. Electronic Fuel Injected Engines OWNER S MANUAL
 DA 150 EFI Electronic Fuel Injected Engines OWNER S MANUAL Table of Contents Section Page 1. General Safety 3 2. Un-Packing Your Engine 4 3. Getting Started 8 a. Hardware Installation 9 b. Transmitter/Receiver
SAFARI125 MOTOR MANUAL
 SAFARI15 MOTOR MANUAL Thank you for purchasing a PAP machine and trusting in our experience. This will let you achieve and experience flight in a very simplistic form and let those childhood dreams of
DA Engine Info; 50R, 60, 85, 100, 120, 150, 170
 DA Engine Info; 50R, 60, 85, 100, 120, 150, 170 1815 S. Research Loop Tucson, AZ 85710 USA Ph 520 722 0607 Fax 520 722 5622 Email info@desertaircraft.com Web www.desertaircraft.com All DA motors take the
SECTION 3.00 WARNING WARNING ENGINE STARTUP AND SHUTDOWN PRESTART INSPECTION
 SECTION 3.00 ENGINE STARTUP AND SHUTDOWN PRESTART INSPECTION Be sure that the clutch, circuit breaker, or other main power transmission device is disconnected. Generators develop voltage as soon as the
CRRCpro GP26R Gasoline Engine
 CRRCpro GP26R Gasoline Engine Thank you very much for buying this engine. Hope it will bring you a good happy time. In order to get a good operation, please read the instruction in detail as below. I Parameter
WELCOME TO MAVERICK WELCOME TO PARAJET
 MAVERICK WELCOME TO PARAJET WELCOME TO MAVERICK From a small hotbed of innovation in Dorset to the snowy peaks of Everest. From pioneering journeys in far flung corners of the world, to you and your next
Recommended fuel. Recommended engine oil. Gearbox oil. Engine s fuel and oil capacity. Fuel consumption SAE 10W30 SAE 80W90
 TROUBLESHOOT ZONE USEFUL INFORMATION Recommended fuel Lead-free petrol USA: Pump octane number of 86 or higher. Non-USA: Research octane number of 91 or higher Pump octane number of 86 or higher. We recommend
KING CANADA 950W PORTABLE GENERATOR MODEL: KCG-951G INSTRUCTION MANUAL COPYRIGHT 2011 ALL RIGHTS RESERVED BY KING CANADA TOOLS INC.
 KING CANADA 950W PORTABLE GENERATOR MODEL: KCG-951G INSTRUCTION MANUAL COPYRIGHT 2011 ALL RIGHTS RESERVED BY KING CANADA TOOLS INC. WARRANTY & SERVICE INFORMATION 1-YEAR LIMITED WARRANTY FOR THIS 950W
2005 Manufactured exclusively for Horizon Hobby, Inc
 2005 Manufactured exclusively for Horizon Hobby, Inc. www.horizonhobby.com 800-535-5551 7795 Evolution Engines 26GT/35GT USER GUIDE Before using this engine, please read these instructions carefully. Introduction
3. INSPECTION/ADJUSTMENT
 SERVICE INFORMATION...3-0 FINAL REDUCTION GEAR OIL...3-7 MAINTENANCE SCHEDULE...3-2 DRIVE BELT...3-7 FUEL FILTER...3-3 BRAKE SHOE...3-8 THROTTLE OPERATION...3-3 BRAKE ADJUSTING NUT...3-8 AIR CLEANER...3-4
All Credit to Jeff Goin and Scout Paramotoring
 TechDummy Understanding Paramotor Torque & Twist ad how to correct or minimize Mar 18, 2013 Section IV Theory & Understanding See other PPG Bible Additions See also Paramotor Torque Twist and Crash Torque
9.7 Replacement of the compressed air distributor
 9.6.6 9.6.7 screw in the bolt and to increase unscrew the bolt. For a complete rotation of the bolt, the variation is of 1mm. After measuring the pointer position and the compensatory adjustment screw
Sport Coil Springs (19425) Scion tc
 Scion tc") Sport Coil Springs (19425) Scion tc Thank you for your purchase from our new line of Scion tc parts. Please call us at (877) 4NO-ROLL if you have any questions regarding the service or installation of
Sport Coil Springs (19425) Scion tc Thank you for your purchase from our new line of Scion tc parts. Please call us at (877) 4NO-ROLL if you have any questions regarding the service or installation of
GP 123. Great Power Model Engines
 Great Power Model Engines www.gp-engine.com.tw GP 123 Displacement: 123C.C Output: 13hp Bore: 46.5mm Weight: 2300g RPM Range: 1000~7200 Recommend Gasoline Octane Number: 89~92 (R+M)/2) Warranty: 2 years
HI-FLOW FUEL RAIL. Installation Instructions for Scion tc & xb AEM Fuel Rail AN Hose adaptor
 HI-FLOW FUEL RAIL Installation Instructions for 08-10 Scion tc & xb 25-170 AEM Fuel Rail 2-661 -6 AN Hose adaptor AEM Performance Electronics INC. 2205 126 TH Street, Unit A Hawthorne, CA. 90250 Phone:
SKY 110s. User s Manual
 SKY 110s User s Manual INDEX 1.0 INTRODUCTION 1.1 General warnings 1.2 Recommendations for the prevention of accidents 2.0 DIRECTION FOR USE 2.1 Fuel 2.2 Running - in 2.3 Starting the engine 3.0 TECHNICAL
solo KLEINMOTOREN GMBH
 Engine 2 489 the Engine SOLO type 2 489 Serial - no.... Manufactured... Aircraft - type... Registration no.... Owner... Log of revisions no. edition date revised page no. date of entry edition 1 revised
 OWNERS MANUAL www.prodriveoutboards.com PO Box 949 129 S Main St. Loreauville, LA PH#: 337-229-0034 FAX#: 337-229-2302 1 TO THE OWNER Thank you for purchasing a Pro-Drive Shallow Water Outboard. Your unit
Engine Does Not Start or Is Hard to Start Cause of Trouble. 1. Open the drain screw, and check Fuel not supplied (1) Fuel tank empty
 Fuel tank empty") 20. Engine Does Not Start or Is Hard to Start 20-1 Engine Output Insufficient 20-2 Poor Performance at Low Speed and Idling 20-3 Poor Performance at High Speed 20-3 Unsatisfactory Operation 20-4 Fuel Gauge
20. Engine Does Not Start or Is Hard to Start 20-1 Engine Output Insufficient 20-2 Poor Performance at Low Speed and Idling 20-3 Poor Performance at High Speed 20-3 Unsatisfactory Operation 20-4 Fuel Gauge
Typical Install Instructions
 Typical Install Instructions Read & understand all steps of these instructions before beginning this installation. WEBER Conversion Kit, VW T-1/2, up to 1835cc 32 / 36 DFEV Weber Carburetor These instructions
Water pump Owner's Manual
 Water pump Owner's Manual Safety Precautions I. General Safeguards Please read this operation manual to have a thorough understanding of the content there before use the product. Failure to do so may lead
iqpc912 PARTS MANUAL PC912PM v1
 iqpc912 PARTS MANUAL PC912PM v1 See Page 10 See Page 6 & See Page 12 See Page 2 See Page 16 See Page 1 See Page 1 See Page See Page 22 See Page 20 See Page 2 See Page 26 3 16 19 1 17 1 1 11 13 12 10 9
MINI Engine Manual. Introduction. OTK KART GROUP s.r.l. Via dei Soprini Prevalle (Brescia) IT
 IT") Introduction Thank you for purchasing MINI Vortex engines. This manual contains information to help you to get the best results from your new engine. Furthermore, it will explain you how to operate your
Introduction Thank you for purchasing MINI Vortex engines. This manual contains information to help you to get the best results from your new engine. Furthermore, it will explain you how to operate your
Table of Contents. Safety symbols... 3 Assembly 6. Operation Maintenance Troubleshooting 11. Storage. 12. Notes. 13
 Table of Contents Safety symbols... 3 Assembly 6 Operation... 8 Maintenance... 10 Troubleshooting 11 Storage. 12 Notes. 13 2 Safety Information Attention; this machine can be dangerous! All operators should
Operation, Maintenance &Parts Manual. EZ Vibe TM. Model EH035 Hand Held Gas Vibrator
 wycor Operation, Maintenance &Parts Manual EZ Vibe TM Model EH0 Hand Held Gas Vibrator TABLE OF CONTENTS ) Safety... ) Benefits of vibration... ) Operation... a) Starting procedure... b) Vibrator insertion...
Manual for Engine 2350 C M A N U A L. for the. Engine SOLO Type 2350 C. Serial No.:.. Manufactured :..
 M A N U A L the Engine SOLO Type 2350 C Serial No.:.. Manufactured :.. List of changes to the manual No. Issue Page Date of filing 1 13. January 1985 Ha1-1 n/a 2 16. November 2005 Ha 3-1 n/a 3 16. November
DA 35/70 EFI MIL SPEC
 DA 35/70 EFI MIL SPEC Electronic Fuel Injected Engines OWNER S MANUAL Table of Contents Section Page 1. General Safety 3 2. Un-Packing Your Engine 4 3. Getting Started 7 4. Maintenance 9 5. Absolute Ratings
INSTRUCTION MANUAL & PARTS BOOK. Vibratory Screed
 INSTRUCTION MANUAL & PARTS BOOK Vibratory Screed 200 COMMERCE DRIVE, FREEHOLD, NEW JERSEY, USA, 07728, 732-566-5400 FAX 732-5444 Doc. # OI-M09201 Current Rev. 07 Revised: 11/2013 Orig. Rel.: 06/2014 SAFETY
DA 120 EFI. Electronic Fuel Injected Engines OWNER S MANUAL
 DA 120 EFI Electronic Fuel Injected Engines OWNER S MANUAL Table of Contents Section Page 1. General Safety 3 2. Un-Packing Your Engine 4 3. Getting Started 8 a. Hardware Installation 9 b. Transmitter/Receiver
3. INSPECTION/ADJUSTMENT
 3 SERVICE INFORMATION...3-0 FINAL REDUCTION GEAR OIL...3-7 MAINTENANCE SCHEDULE...3-2 DRIVE BELT...3-7 FUEL FILTER...3-3 BRAKE SHOE...3-8 THROTTLE OPERATION...3-3 BRAKE ADJUSTING NUT...3-8 AIR CLEANER...3-4
Quality Stainless Products DB-8000-XL Strut Compressor
 Quality Stainless Products DB-8000-XL Strut Compressor Thank you for choosing Quality Stainless Products DB-8000-XL, Strut Compressor. In order to operate your new Strut Compressor safely, we suggest you
ValveSentry USER S MANUAL REVISED 8/6/16 IMPORTANT! PLEASE READ CAREFULLY AND SAVE
 ValveSentry USER S MANUAL REVISED 8/6/16 IMPORTANT! PLEASE READ CAREFULLY AND SAVE This user s manual contains important information about your ValveSentry device s operation. If you are installing this
18673, INSTALLATION INSTRUCTIONS
 18673, 18674 INSTALLATION INSTRUCTIONS WARNING! The fuel system is under pressure. Do not open the fuel system until the pressure has been relieved. Refer to the appropriate vehicle service manual for
12. CARBURETOR 12-0 CARBURETOR VITALITY 50
 12 12 CARBURETOR SERVICE INFORMATION (2-STROKE)... 12-2 SERVICE INFORMATION (4-STROKE)... 12-3 THROTTLE VALVE (2-STROKE)... 12-5 CARBURETOR (2-STROKE)... 12-7 AIR SCREW ADJUSTMENT (2-STROKE)... 12-13 REED
OWNER S MANUAL G620PU-1 MODEL: G620PU WARNING 848H5693A3 (208)
") 848H5693A3 (208) OWNER S MANUAL MODEL: G620PU G620PU-1 WARNING Do not modify any parts of the engine. This engine is designed to be used to Radio controlled products. In case any modification by customer,
848H5693A3 (208) OWNER S MANUAL MODEL: G620PU G620PU-1 WARNING Do not modify any parts of the engine. This engine is designed to be used to Radio controlled products. In case any modification by customer,
GASOLINE GENERATOR SET USER S MANUAL
 GASOLINE GENERATOR SET USER S MANUAL Foreword Thank you for purchasing our gasoline generator and hope that you will enjoy operating your unit, one of the finest models in the market. This Manual provides
Thompson Performance, LLC - POWERBLAST PLATE
 Thompson Performance, LLC - POWERBLAST PLATE INSTALLATION INSTRUCTIONS FOR PBP EC-56 AND PBP EC-78 IMPORTANT NOTE: Proper installation and safe use of the POWERBLAST PLATE is the responsibility of the
VERT 1 VERTICAL TAKE OFF / LANDING RC PLANE
 VERT 1 VERTICAL TAKE OFF / LANDING RC PLANE THANK YOU. Thank you for your purchase of Protocol s Vert I Vertical Take Off / Landing RC Plane. You are about to experience the best of what remote control
18642, INSTALLATION INSTRUCTIONS
 18642, 18643 INSTALLATION INSTRUCTIONS WARNING! The fuel system is under pressure. Do not open the fuel system until the pressure has been relieved. Refer to the appropriate vehicle service manual for
BRIDGESTONE M 1)RCYCLES TUNING UP
RCYCLES TUNING UP") BRIDGESTONE M 1)RCYCLES TUNING UP BRIDGESTONE MOTORCYCLES TUNING UP FOR COMPETITION CONTENTS Introduction... 4 Tuning up 350 GTR for Road Racing...,... 7 Tuning up 350 GTR for Scrambling... 10 Tuning up
BRIDGESTONE M 1)RCYCLES TUNING UP BRIDGESTONE MOTORCYCLES TUNING UP FOR COMPETITION CONTENTS Introduction... 4 Tuning up 350 GTR for Road Racing...,... 7 Tuning up 350 GTR for Scrambling... 10 Tuning up
Rotrex C-type Superchargers. Setup and maintenance
 Rotrex C-type Superchargers Setup and maintenance Index Welcome 3 Key points 4 Lubrication system 5 Routing of oil lines 6 Connecting the parts 6 Initial start up 9 Oil level check and maintenance 10 Testing
rev 1_09/20/2017 PS-35C EA3500SR
 C 1 Tank, Handle 5 7 6 8 17 9 1 2 10 11 12 13 18 19 20 3 21 4 22 23 14 16 2 1 Tank, Handle 1 1 168507-3 TANK CAP COMPLETE 1 1 INC. 2 1 2 213080-9 O RING 29.5 1 1 1 3 163447-0 GASOLINE FILTER 1 1 1 4 195757-7
HKS 700E. Service Manual June Ver. 2.04
 HKS 700E Service Manual 009 June Ver..04 HKS CO.,LTD 78 KITAYAMA FUJINOMIYA SHIZUOKA JAPAN 48-09 TEL +8(0)544-54-78 FAX +8(0)544-54-40 hks_aviation@hks-power.co.jp http://www.hks-power.co.jp/hks_aviation/
SKY 100 User s Manual
 SKY 100 User s Manual INDEX 1.0 INTRODUCTION 1.1 General warnings 1.2 Recommendations for the prevention of accidents 2.0 DIRECTION FOR USE 2.1 Fuel 2.2 Running - in 2.3 Starting the engine 3.0 TECHNICAL
S&S. Installation Instructions for S&S Sealed Air Cleaner. Instruction IMPORTANT NOTICE:
 Instruction 106-2707 11-20-08 Copyright 2008 by S&S Cycle, Inc. All rights reserved. Printed in the U.S.A. S&S Cycle, Inc. 235 Causeway Blvd. La Crosse, Wisconsin 54603 Phone: 608-627-1497 Fax: 608-627-1488
Owner s/operator s Manual
 Water Pump MP2533E2 Owner s/operator s Manual Completely read and understand this manual before using this product. Foreword This Owner s/ Operator s Manual is designed to familiarize the operator with
AREA 51 - Project Deep Water Foreman!
 AREA 51 - Project Deep Water Foreman! Submitted By: Mike Smith of www.shed-headz.com This year marks a very important mile stone for me, that my 1998 Honda Foreman 450s turns 10 years old. Its important
4. FUEL SYSTEM CK 1 4-0
 4 4 4-0 SERVICE INFORMATION... 4-1 FLOAT LEVEL INSPECTION... 4-5 TROUBLESHOOTING... 4-2 CARBURETOR INSTALLATION... 4-6 THROTTLE VALVE DISASSEMBLY... 4-3 THROTTLE VALVE ASSEMBLY... 4-6 CARBURETOR REMOVAL...
RD St N West Palm Beach, FL (478)
") 14842 93 RD St N West Palm Beach, FL 33412 1-(478) 247 7275 www.ch-ignitions.com Saito 450 R CH Ignition Glow CDI & Gasoline Conversions Kit Install Instructions By converting your engine you may void
14842 93 RD St N West Palm Beach, FL 33412 1-(478) 247 7275 www.ch-ignitions.com Saito 450 R CH Ignition Glow CDI & Gasoline Conversions Kit Install Instructions By converting your engine you may void
FUEL SYSTEM. Table of Contents. Specifications. Section 3A Fuel Delivery System. Models 6/8/9.9/10/15 CARBURETOR SPECIFICATIONS
 FUEL SYSTEM Section 3A Fuel Delivery System Table of Contents Specifications............................. 3A-1 WMC Carburetor Specifications............. 3A-2 WMC Carburetor Specifications.............
INSTALLATION HYPERCHARGER AIR FILTER KIT 9754
 9754 PARTS INCLUDED 1 Chrome Hypercharger Assembly 1 Support Bracket 1 Breather Hardware Kit, including: 2 1-1/4 Breather Bolts 2 Breather Hoses 4 Shim Washers 1 Twin Cam Breather Kit, Including: 1 Breather
solo KLEINMOTOREN GMBH
 Engine 2625 01 the Engine SOLO type 2625 01 Serial - no.... Manufactured... Aircraft - type... Registration no.... Owner... Log of revisions no. edition date revised page no. date of entry 1 Oktober 3
V-Twin Forward Control Installation Instructions
 V-Twin Forward Control Installation Instructions Thank you for a choosing a Supreme Legends USA product. Supreme Legends forward controls are designed to add style and performance to your bike. Our extended
Make/Type/Size/Model Honda Generator EB 3500X & EB5000X Operators Manual Open Well Ventilated Area to Start & Shut Down Machine
 HONDA GENERATORS ARE DESIGNED TO GIVE SAFE AND DEPENDABLE SERVICE IF OPERATED ACCORDING TO INSTRUCTIONS. YOU CAN HELP PREVENT ACCIDENTS BY BEING FAMILIAR WITH YOUR GENERATORS CONTROLS AND BY OBSERVING
INSTRUCTIONS SMOKE BLOWER WITH HONDA ENGINE PART NUMBER
 1 INSTRUCTIONS SMOKE BLOWER WITH HONDA ENGINE PART NUMBER 303-568 CHERNE INDUSTRIES INCORPORATED 1-800-THE PLUG 5700 LINCOLN DRIVE (1-800-843-7584) MINNEAPOLIS, MN 55436-1695 FAX: 1-800-843-7585 www.cherneind.com
Illustration Engine. PTX 2710 (EPA 3) Pole pruner. 3/27/2017 Page Copyright COMET USA, INC.
 Pole pruner. 3/27/2017 Page Copyright COMET USA, INC.") Documents Engine Starter assy and clutch Tank and air filter Adjustable telescopic pole Pruner Carburetor WT-1150 Accessories 3/27/2017 Page 1-16 Illustration Engine 3/27/2017 Page 2-16 Illustration Engine
Documents Engine Starter assy and clutch Tank and air filter Adjustable telescopic pole Pruner Carburetor WT-1150 Accessories 3/27/2017 Page 1-16 Illustration Engine 3/27/2017 Page 2-16 Illustration Engine
Conversion Instructions
 Conversion Instructions from Magneto to Microprocessor Ignition PCI -HV version, for 2s LiPo, 2s LiFePo or 4,5 or 6 cell NiCad These instructions showing the conversion of a ZG 62SL to a ZG 62PCI-HV apply
26cc 4.5 KWA Marine Engine
 26cc 4.5 KWA Marine Engine Thank you for purchasing your new Venom 26cc 4.5 KWA Marine Engine. Not only did you purchase a top of the line R/C Marine Engine but you have also joined the Venom Team and
INSTALLATION HYPERCHARGER AIR FILTER KIT 9992
 9992 PARTS INCLUDED 1 Chrome Hypercharger Assembly with Chrome Blood Groove Trap Door and Chrome Butterflies 1 Support Bracket 1 Breather Hardware Kit, including: 2 1-1/4 Breather Bolts 2 Breather Hoses
OWNER S MANUAL G620PU-1 MODEL: G620PU WARNING 848H4893A3 (704)
") 848H4893A3 (704) OWNER S MANUAL MODEL: G620PU G620PU-1 WARNING Do not modify any parts of the engine. This engine is designed to be used to Radio controlled products. In case any modification by customer,
848H4893A3 (704) OWNER S MANUAL MODEL: G620PU G620PU-1 WARNING Do not modify any parts of the engine. This engine is designed to be used to Radio controlled products. In case any modification by customer,
Feb 22, 2018 '67-69 Camaro & '68-74 Nova Bumpsteer Adjustment Kit
 Feb 22, 2018 '67-69 Camaro & '68-74 Nova Bumpsteer Adjustment Kit 10552 The following instructions are intended for professional installers. Speedtech Performance assumes NO responsibility for the installation
5. FUEL SYSTEM 5-0 FUEL SYSTEM MXU 250R/300R
 5 FUEL SYSTEM 5 SERVICE INFORMATION------------------------------------------------ 5-2 TROUBLESHOOTING----------------------------------------------------- 5-3 FUEL TANK -----------------------------------------------------------------
7. FUEL SYSTEM ('04 - '05)
") 7. FUEL SYSTEM ('04 - '05) SYSTEM COMPONENTS 7-2 CARBURETOR DISASSEMBLY 7-81 SERVICE INFORMATION 7-3 CARBURETOR ASSEMBLY 7-14 TROUBLESHOOTING 7-4 CARBURETOR INSTALLATION 7-21 AIR CLEANER HOUSING 7-5 PILOT
7. FUEL SYSTEM ('04 - '05) SYSTEM COMPONENTS 7-2 CARBURETOR DISASSEMBLY 7-81 SERVICE INFORMATION 7-3 CARBURETOR ASSEMBLY 7-14 TROUBLESHOOTING 7-4 CARBURETOR INSTALLATION 7-21 AIR CLEANER HOUSING 7-5 PILOT