RD St N West Palm Beach, FL (478)
|
|
|
- Dorothy Bryan
- 6 years ago
- Views:
Transcription
1 RD St N West Palm Beach, FL (478) Saito 450 R CH Ignition Glow CDI & Gasoline Conversions Kit Install Instructions By converting your engine you may void the manufacture warranty and cause possible mechanical failures. If you choose to make the conversion you do so at your own risk and assume all liability. CH Ignition will not be liable for any mechanical failures or voided warranty. CH Ignition systems are assembled in the USA with US and worldwide manufactured components to bring you the best quality and value. Now that we have gotten the legal stuff out of the way, let s have some FUN! Glow to CDI Ignition: Your engine should run more reliably with lower, more stable idle. RPMs may increase in many cases top end RPM will increase requiring a larger prop to stay within the manufacturer recommended RPM range. This will depend on altitude and temp where you fly. You can expect to see an increase of fuel economy of up to 25%. Gasoline Conversion: Your engine will run hotter. Proper cooling and airflow inside the cowling must be maintained. The ratio of 3 to 5 times exit area to intake area is usually considered acceptable for proper engine cooling. Again this will depend on engine installation, altitude and the temp where you fly. You can expect a reduction in engine power to be between 10 and 15 percent, 500 to 1000 RPM drop. I suggest high quality synthetic oil with a mixture of 20 to 1. (A mixture of 6.5 oz. per gallon or 50 ml per liter.)you can expect improved fuel economy; in some ground tests fuel consumption was close to 10 ml or 1 oz. per fuel per min. Carburetors are shipped as received from the manufacturer. In some instances you may need to start using the following mixture settings. 1 ¼ turns out for the low speed needle. 1 ½ turns out on the high speed needle.

2 Saito R450 Cylinder Number Match the CDI Leads with the numbers you see on to the picture.
3 CH GASOLINE CDI KIT Installed
4 CH GLOW & GASOLINE CONVERSION KITS DESCRIPTION GLOW & GASOLINE COMMON PARTS: 1. CH CDI Ignition,1/4-32 sparkplug cap 120 degree. 2. Sensor Holder with mounted sensor. 3. Magnet ring 2 x 3mm set screws, use 1.5mm hex wrench. 4. Cap screw bolts; 2 x 12mm to fasten the sensor holder on the front cover. 5. Spark plug (1/4-32 to replace the original Glow Plug, direct replacement) GASOLINE PARTS : 6. Pumped Gasoline carburetor assembly.
5 The next 5 steps are common for both glow conversion and conversion to gasoline. Please refer to the following photographs for part description and location 1 Install sensor holder a. Remove the two front cam cover cap screws

6 2. Install Magnet Ring, This ring has 4 magnets. Black Magnet = Cylinder #1 a. Slip the ring over the prop drive, make sure you loosen off the 2 x 3mm set screws by using the 1.5mm hex wrench
7 3. TIME THE ENGINE 30 BTDC Using the supplied degree wheel, follow the timing instructions that came with your kit. Remove the glow plug. We suggest you use a piston stop for accurate timing. Turn the ring around the prop drive and adjust the spark to 30 degrees BTDC (Before Top Dead Center). Spark should occur just as the BLACK magnet first meet with the sensor. Then tighten the set screws, and do not use excessive force. After you are sure the timing is set at 30 degrees you can use some thin super glue on the edge of the timing ring and prop drive. Take one set screw out at a time and apply thread lock to each screw and reinstall. Black Magnet = CYL #1 This Edge of the Black Magnet to be BTDC Check first that magnet and sensor duty is at list 13 degrees IMPORTANT! When magnet passes under the sensor from one edge to the other edge to be at list 13 Degrees. If less, give a little tap and close the gap between sensor and magnet ring.
8 4. Install ¼-32 spark plug a. In step 3 you removed the glow plug and set the engine timing to 30 degrees BTDC. b. Install the spark plug. You can use the supplied plug or a Rimfire or NGK-M8 plug. Your kit is supplied with a standard Rcxel plug. The Front Glow Plug MUST BE A BURNED PLUG AND NO FILAMENT INSIDE!!!

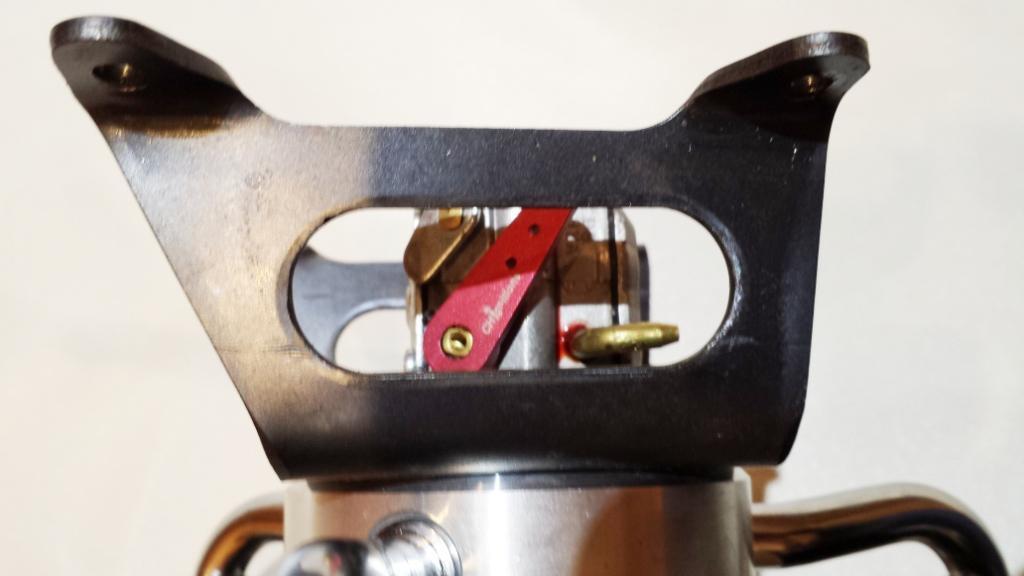
9 5. CH CDI Installation Now it is time to enjoy your new CH CDI Conversion and go fly. CH CDI installation If you got to this point and your installation looks like the picture below, congratulations your engine is almost ready to run. a. Install the ignition lead by pushing down firmly and twisting slightly. You will fell the lead lock into place. b. Mount the CDI unit with some foam rubber to dampen the vibration transferred from your air frame. Check the battery and voltage marked on you CDI unit. Install the proper battery. This is a Saito R 170 GLOW CDI, Also Available for 200R. Did not have a R450 Glow CDI Picture
10 These last steps are for converting you engine to gasoline.


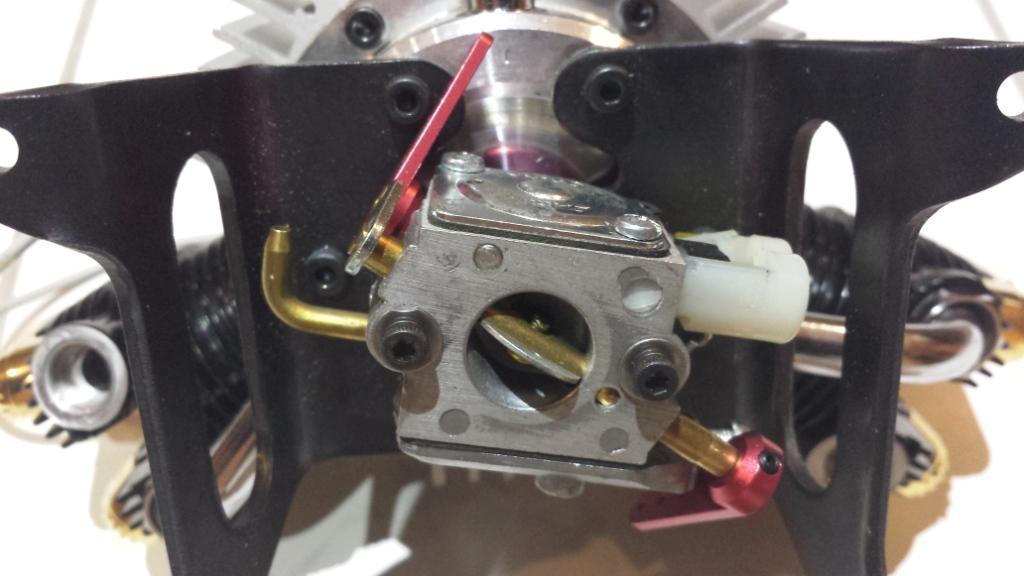
11 6. Install Intake /Carburetor Assembly to the engine. First remove your GLOW carburetor. Shorten the fuel inlet as need, screw the carb assembly in the same place where Glow carb was mounted. Check your desired position and if that will be the best position for your set-up. Recommended is that the metering is on top but you can try a different position as well. Mount the supplied Throttle Levers. If you found the positions and all will be as you want, then now is the time to LOCK everything in place. Clean good the parts, engine threaded flange where Glow carb was mounted. the fuel inlet

12 6. Install Intake /Carburetor Assembly to the engine. Use a good Permanent LOCK THREAD or JB Weld, Apply it on the Threaded tube and screw it in to the carb flange first. Then screw the whole assembly in to the motor flange. Make it as tight as possible and let it to set in to the same position you have it fitted before for the amount of time that your bonding agent require full strenght.

13 Reference Pictures
14 Reference Pictures All conversion hardware is designed by CH Ignitions and Property of CH Ignition, Duplication of any parts and/or unauthorized use granted by Adrian and/or CH Ignition will be subject to the court of justice.
RD St N West Palm Beach, FL (478)
") 14842 93 RD St N West Palm Beach, FL 33412 1-(478) 247 7275 www.ch-ignitions.com Saito 120/150/180 CH Ignition Glow CDI & Gasoline Conversions Kit Install Instructions By converting your engine you may
14842 93 RD St N West Palm Beach, FL 33412 1-(478) 247 7275 www.ch-ignitions.com Saito 120/150/180 CH Ignition Glow CDI & Gasoline Conversions Kit Install Instructions By converting your engine you may
Backwater Performance Systems Large Vanguard Mikuni Twin Carburetor Kit
 Backwater Performance Systems Large Vanguard Mikuni Twin Carburetor Kit 1. Throttle Cable Twin (CKC-41) 2. Carburetor VM30mm (CKC-40) 3. Loctite 242.5mL (A-210) 4. Air Cleaner Filter 6000 (EC-86) 5. Rev
DA Engine Info; 50R, 60, 85, 100, 120, 150, 170
 DA Engine Info; 50R, 60, 85, 100, 120, 150, 170 1815 S. Research Loop Tucson, AZ 85710 USA Ph 520 722 0607 Fax 520 722 5622 Email info@desertaircraft.com Web www.desertaircraft.com All DA motors take the
TECHNICAL DATA. COMPRESSION RATUI 9,5/1 WEIGHT ready to fly CONSUMPTION at 5400RPM 5,6litres/h POWER at 6200RPM
 VICTOR 1 SUPER This handbook aims to bring to the attention of key technical, functional and maintenance of your motor VICTOR 1. Read carefully the following pages, will be synonymous with safety, reliability
CRRCpro GP26R Gasoline Engine
 CRRCpro GP26R Gasoline Engine Thank you very much for buying this engine. Hope it will bring you a good happy time. In order to get a good operation, please read the instruction in detail as below. I Parameter
What is a GLOW engine?
 Micro engines What is a GLOW engine? R/C models get power from various modes. Gliders, for example, do not need a power source other than what nature provides. But they are the exception. Normally all
Prerequisites: Shop Manual (recommended) pages 3-9 through 3-13.
 pages 3-9 through 3-13.") Prerequisites: Order your gaskets average about $25.00 bucks X 2 so $50.00 4NK-11193-00-00 Obtain a shim kit (Should have several 265 and 270s) (Some dealers will exchange) Obtain a Valve Bucket Tool YM-33961
Prerequisites: Order your gaskets average about $25.00 bucks X 2 so $50.00 4NK-11193-00-00 Obtain a shim kit (Should have several 265 and 270s) (Some dealers will exchange) Obtain a Valve Bucket Tool YM-33961
2005 Manufactured exclusively for Horizon Hobby, Inc
 2005 Manufactured exclusively for Horizon Hobby, Inc. www.horizonhobby.com 800-535-5551 7795 Evolution Engines 26GT/35GT USER GUIDE Before using this engine, please read these instructions carefully. Introduction
QUICK FUEL TECHNOLOGY HOT ROD SERIES CARBURETORS SLAYER SERIES CARBURETORS SUPER STREET SERIES CARBURETORS
 QUICK FUEL TECHNOLOGY Installation Instructions HOT ROD SERIES CARBURETORS SLAYER SERIES CARBURETORS SUPER STREET SERIES CARBURETORS HR-580-VS 580 CFM Vac. Secondary!!! SS-680-VS 680 CFM Vac. Secondary
Installation Manual TWM Performance 2010 Mazda 3 short shifter 5 and 6 speed non-mazdaspeed
 Installation Manual TWM Performance 2010 Mazda 3 short shifter 5 and 6 speed non-mazdaspeed Begin the installation by parking on a flat surface, as you will have to engage and disengage the hand brake
Remove Air Cleaner Cover and. Filter
 Remove Air Cleaner Cover and Inspect paper filter for tears Foam pre-cleaner is washable if equipped Replace if necessary Filter Remove Trim Panel Pull throttle lever knob off Remove 3, 8mm screws Remove
Arrow Shark 2015 E-Starter V4 Owner Manual
 Arrow Shark 2015 E-Starter V4 Owner Manual The Arrow Shark E-Starter V3 has successfully been available in the market for over three years now. During that time, we have never stopped seeking ways to improve
7C1550 COBB Tuning R35 GT-R Silicone Hose Kit Install Instructions
 7C1550 COBB Tuning R35 GT-R Silicone Hose Kit Install Instructions Nissan GT-R (R35) Silicone Hose Kit Congratulations on your purchase of the COBB GT-R Silicone Hose Kit for your Nissan GT-R. The following
5-2 FUEL SYSTEM AND THROTTLE BODY FUEL SYSTEM FUEL DELIVERY SYSTEM The fuel delivery system consists of the fuel tank, fuel pump, fuel filters, fuel f
 FUEL SYSTEM AND THROTTLE BODY 5-1 FUEL SYSTEM AND THROTTLE BODY I CONTENTS FUEL SYSTEM 5-2 FUEL DELIVERY SYSTEM 5-2 FUEL PUMP 5-3 FUEL PRESSURE REGULATOR 5-4 FUEL INJECTOR 5-4 FUEL PUMP CONTROL SYSTEM
Arrow Shark 2013 Outboard Dragon Drive Owner Manual. Introduction
 Arrow Shark 2013 Outboard Dragon Drive Owner Manual Introduction Our purpose in designing the Dragon Drive is to offer a high quality, sleek looking and durable outboard drive for the growing RC F1 (Formula
Mopar 8 3/4 & 9 3/4 (Dana) Installation Instructions Rear Disc Conversion
 Installation Instructions Rear Disc Conversion") Mopar 8 3/4 & 9 3/4 (Dana) Installation Instructions Rear Disc Conversion This kit is for either Mopar 8 ¾ or Mopar 9 ¾ (Dana). This kit is designed to work with axles with either GM 5 x 4.75 Bolt Pattern
Mopar 8 3/4 & 9 3/4 (Dana) Installation Instructions Rear Disc Conversion This kit is for either Mopar 8 ¾ or Mopar 9 ¾ (Dana). This kit is designed to work with axles with either GM 5 x 4.75 Bolt Pattern
Simple Carburettor Fuel System for a Piston Engine. And how it works
 Simple Carburettor Fuel System for a Piston Engine And how it works Inlet Exhaust Tank PISTON ENGINE Carburettor Fuel System Filler Cap COCKPIT FUEL GAUGE E FUEL 1/2 F Filler Neck Tank Cavity FUEL LEVEL
Torqueflite Manual/Automatic Valve Body
 TCI 122400 Torqueflite Manual/Automatic Valve Body This valve body can be installed in a few hours by carefully following directions. Read all instructions first to familiarize yourself with the parts
GP 123. Great Power Model Engines
 Great Power Model Engines www.gp-engine.com.tw GP 123 Displacement: 123C.C Output: 13hp Bore: 46.5mm Weight: 2300g RPM Range: 1000~7200 Recommend Gasoline Octane Number: 89~92 (R+M)/2) Warranty: 2 years
SECTION 4 - FUEL SYSTEMS AND CARBURETION
 SECTION - FUEL SYSTEMS AND CARBURETION FUEL SYSTEMS - - - - - - - - - - - - - - - - - - - - - - - - - - - - - - - - - - - - - - - - - - - - - - - - - - - - - - - - - - - - - -62 FUEL PUMP - - - - - - -
Equipped with AEM Dryflow Filter No Oil Required! INSTALLATION INSTRUCTIONS PART NUMBER C (Gun Metal Grey Finish) 2015 Ford Mustang 5.
 2015 Ford Mustang 5.") Equipped with AEM Dryflow Filter No Oil Required! INSTALLATION INSTRUCTIONS PART NUMBER 21-745C (Gun Metal Grey Finish) 2015 Ford Mustang 5.0L 1 2 Read and understand these instructions BEFORE attempting
Equipped with AEM Dryflow Filter No Oil Required! INSTALLATION INSTRUCTIONS PART NUMBER 21-745C (Gun Metal Grey Finish) 2015 Ford Mustang 5.0L 1 2 Read and understand these instructions BEFORE attempting
Tel: , FAX: ,
 DIRECTIONS FOR USING ZDZ ENGINES (Please READ this carefuly and become FAMILIAR with these instructions before using the engine) ZDZ two-stroke gasoline engines are intended for large models and offer
Operation and Maintenance Instructions for the RAPTOR 178
 WWW.SKYTOY.COM Operation and Maintenance Instructions for the RAPTOR 178 See www.skytoy.com for updates and service bulletins. 2/1/2011 1. Parts Schematic:... 3 2. Muffler Assembly Diagram:... 4 3. Muffler
Version 1.4 Operating instructions Czech Republic
 Version 1.4 Operating instructions Czech Republic Please check updates of operating instructions at www.rotomotor.cz, that your engine has still the best care. (can happen important changes that will lead
OWNER S MANUAL G620PU-1 MODEL: G620PU WARNING 848H4893A3 (704)
") 848H4893A3 (704) OWNER S MANUAL MODEL: G620PU G620PU-1 WARNING Do not modify any parts of the engine. This engine is designed to be used to Radio controlled products. In case any modification by customer,
848H4893A3 (704) OWNER S MANUAL MODEL: G620PU G620PU-1 WARNING Do not modify any parts of the engine. This engine is designed to be used to Radio controlled products. In case any modification by customer,
Equipped with AEM Dryflow Filter No Oil Required! INSTALLATION INSTRUCTIONS PART NUMBER: DS (Plastic tube)
") Equipped with AEM Dryflow Filter No Oil Required! INSTALLATION INSTRUCTIONS PART NUMBER: 21-8316DS (Plastic tube) 2012-2016 Jeep Wrangler V6 3.6L C.A.R.B E.O. # D-670-24 Not legal for sale or use on any
Equipped with AEM Dryflow Filter No Oil Required! INSTALLATION INSTRUCTIONS PART NUMBER: 21-8316DS (Plastic tube) 2012-2016 Jeep Wrangler V6 3.6L C.A.R.B E.O. # D-670-24 Not legal for sale or use on any
INSTALLATION INSTRUCTIONS PART NUMBER:
 Equipped with AEM Dryflow Filter No Oil Required! INSTALLATION INSTRUCTIONS PART NUMBER: 21-8205 2003-2004 DODGE RAM 1500 Pickup V8-4.7L C.A.R.B. E.O. # D-392-29 * NOTE: Legal in California only for racing
World Formula TECH MANUAL
 World Formula TECH MANUAL Section 1 General Rules 1. Only stock Briggs & Stratton World Formula Model # 124435-8101 will be used in this class except as provided in this Tech manual. All parts will be
rev 1_09/20/2017 PS-35C EA3500SR
 C 1 Tank, Handle 5 7 6 8 17 9 1 2 10 11 12 13 18 19 20 3 21 4 22 23 14 16 2 1 Tank, Handle 1 1 168507-3 TANK CAP COMPLETE 1 1 INC. 2 1 2 213080-9 O RING 29.5 1 1 1 3 163447-0 GASOLINE FILTER 1 1 1 4 195757-7
Instruction Manual SPE-26CC
 Instruction Manual SPE-26CC 1 Safety Precautions This engine is for experienced flyers only and could cause serious harm if used incorrectly. Always take care when running large gas engines. Read this
Sherco Carb Jetting Instructions
 Sherco Carb Jetting Instructions This manual provides instructions on how to remove and reinstall the stock carburetor, it also shows you how to change the pilot jet and the main jet. It is intended to
Illustrated Parts List Industrial/Commercial to
 FORM MS-9479 6/95 REPLACES FORM MS-9479 10/94 FILE IN SECT. 2 OF SERVICE MANUAL 402700 to 402799 Illustrated Parts List Industrial/Commercial Model Series 402700 to 402799 TYPE NUMBERS 1115 through 1117,
SERVICE DATA GT-220ES SRM-220ES TRIMMER/BRUSHCUTTER. (Serial nember : and after) (Serial nember : and after) INDEX INTRODUCTION
 (Serial nember : and after) INDEX INTRODUCTION") 10-21P-02, 1 1 SERVICE DATA TRIMMER/BRUSHCUTTER INTRODUCTION We are constantly working on technical improvement of our products. For this reason, technical data, equipment and design are subject to change
10-21P-02, 1 1 SERVICE DATA TRIMMER/BRUSHCUTTER INTRODUCTION We are constantly working on technical improvement of our products. For this reason, technical data, equipment and design are subject to change
SAITO FG Stroke Gasoline Single Engine Operating instructions
 SAITO FG- 4-Stroke Gasoline Single Engine Operating instructions Thanks for buying SAITO FG- 4-stroke gas-engine exclusively for model airplanes. In order to avoid misuse, please be sure to read well this
DIRECTIONS FOR USING ZDZ ENGINES
 DIRECTIONS FOR USING ZDZ ENGINES (Please READ this carefuly and become FAMILIAR with these instructions before using the engine) ZDZ two-stroke gasoline engines are intended for large models and offer
B4578BTPA Fender Mounting Instructions for MIN4000, MIN900, MIN1500 & MIN1554 Fenders
 STEP 1 B4578BTPA Fender Mounting Instructions for MIN4000, MIN900, MIN1500 & MIN1554 Fenders A. Unpack all cartons and lay out parts. B. Compare the parts with hardware kit B4578BTPA as shown in Figure
* Caution : Brushes are brittle. Do not brake them. 3UE
 The IVOPROP operates on a COMPLETELY UNIQUE adjustable pitch system that allows for substantially less hardware and rotating mass than any other ground pitch adjustable prop. The unique pitch adjustment
TH400 STREETFIGHTER SERIES VALVE BODY MANUAL/AUTO VALVE BODY INSTALLATION INSTRUCTIONS
 1 INSTRUCTIONS TH400 STREETFIGHTER SERIES VALVE BODY 1965-87 MANUAL/AUTO VALVE BODY INSTALLATION INSTRUCTIONS TCI 222400 TCI 222400 ALLOWS AUTOMATIC SHIFT FEATURES IN THE DRIVE POSITION Thank you for choosing
Illustrated Parts List to
 FORM MS-9491 6/94 REPLACES FORM MS-9491 8/93 FILE IN SECT. 2 OF SERVICE MANUAL 404700 to 404799 Illustrated Parts List Model Series 404700 to 404799 TYPE NUMBERS 1200 through 1207, 1211 through 1214, 1400,
STREET/RACE DISTRIBUTOR
 Installation Instructions for STREET/RACE DISTRIBUTOR CAUTION: READ INSTRUCTIONS CAREFULLY BEFORE STARTING INSTALLATION INTRODUCTION The Crane Cams street/race distributor is a high precision system intended
Operating instructions
 Operating instructions MVVS 116 NP No: 3010NP Before using the engine, please read these instructions carefully. Congratulations on choosing the gas engine MVVS 116cc. MVVS 116cc has been designed and
RCGF 26ccBM Operator s Manual
 RCGF 26ccBM Operator s Manual (note: the spare parts list and dimension of engine are in the end of manual) RCGF 26cc BM Parameter: Type : 2 cycle piston valve type gasoline engine for airplane Piston
HW Prowler Carburetor Installation Instructions
 HW Prowler Carburetor Installation Instructions Page 1 of 6 Carb Kit Contains: HW modified Mikuni 36mm pumper style carb Custom choke cable Fuel Line Clamp Instructions (2) Leaner and (2) richer main jets
MAZDASPEED3 Intercooler Instructions
 MAZDASPEED3 Intercooler Instructions Congratulations on your purchase of the COBB Tuning Front Mount Intercooler System for your 2007-2009 Mazdaspeed3. The following instructions should assist you through
Operating instructions
 Operating instructions MVVS 80 IRS No: 3007L MVVS 80 IRS SP No: 3007SP MVVS 80 IRS TS No: 3007TS Before using the engine, please read these instructions carefully. Congratulations on choosing the gas engine
INTRODUCTION. Reference No S-01 REVISED:
 10-21S-01 GT-225, SRM-225 1 1 INTRODUCTION We are constantly working on technical improvement of our products. For this reason, technical data, equipment and design are subject to change without notice.
10-25J-00 SRM-261T 1 INTRODUCTION. Reference No J-00 ISSUED:
 10-25J-00 SRM-261T 1 1 INTRODUCTION We are constantly working on technical improvement of our products. For this reason, technical data, equipment and design are subject to change without notice. All specifications
Handout Activity: HA170
 Basic diesel engine components Handout Activity: HA170 HA170-2 Basic diesel engine components Diesel engine parts are usually heavier or more rugged than those of similar output gasoline engines. Their
INSTRUCTIONS FOR C. H. IGNITIONS
 INSTRUCTIONS FOR C. H. IGNITIONS Your C. H. Capacitive Discharge Ignition system can be installed on most single or twin cylinder, two or four stroke engine. THESE INSTRUCTIONS ARE IN THREE PARTS - The
INSTALLATION INSTRUCTIONS PART NUMBER: C/P
 Equipped with AEM Dryflow Filter No Oil Required! INSTALLATION INSTRUCTIONS PART NUMBER: 21-725C/P 2011-2016 SCION TC L4-2.5L LEGAL IN CALIFORNIA ONLY FOR RACING VEHICLES WHICH MAY NEVER BE USED, REGISTERED
Ford 8, 9 Small Bearing Installation Instructions Rear Disc Conversion
 Ford 8, 9 Small Bearing Installation Instructions Rear Disc Conversion This kit is for Ford 9 rear axles with the small (2.835 ) style bearing and Ford 8 rear ends. This kit is designed to work with axles
Illustrated Parts List to
 FORM MS-2442-9/93 REPLACES FORM MS-2442-11/92 FILE IN SECT. 2 OF SERVICE MANUAL Illustrated Parts List Industrial/Commercial Model Series TYPE NUMBERS 0101 through 0104, 0116 through 0120, 0122 through
Operating instructions
 Operating instructions MVVS 50 IRS No: 3005L/3005S Before using the engine, please read these instructions carefully. Congratulations on choosing the MVVS 50 gas engine. The MVVS 50 has been designed and
This is what we are trying to create in the steps below
 You will need: (1) Some 3/4 aluminium or steel flat bar (+/- 1 foot) (2) About 12 of 3 Aluminium or steel tubing. (2) Piece of 3X3 silicone hose and 2 hose clamps (3) 1 K&N (or similar) high flow filter
Mfg. No: ,700 Watt Briggs & Stratton Inverter
 Parts Manual Mfg. No: 030651-00 1,700 Watt Briggs & Stratton Inverter Copyright Briggs and Stratton. All Rights reserved 13-Nov-2017 Model Components Table Of Contents Page Alternator & Control Panel
Includes: 1. Silicone Hose 2. EGR Block Off Plates 1. Exhaust Block Off Plate 2. Hose Clamps 1. Spacer/Washer 8. Bolts 2. Nuts
 Includes: 1. Silicone Hose 2. EGR Block Off Plates 1. Exhaust Block Off Plate 2. Hose Clamps 1. Spacer/Washer 8. Bolts 2. Nuts WARNING: This product is not legal for sale or use on pollution controlled
K&T Saw Shop or
 11-400060-02 TITAN 2100 08/92 to 10/92 IPL 211404 Page 1 of 12 Carburetor Assembly www.ktoutdoor.com 11-400060-02 TITAN 2100 08/92 to 10/92 IPL 211404 Page 2 of 12 Carburetor Assembly 1 224142-03 1 Carburetor
Local Option 206 Rules Manual Section 1 General Rules 1. Only stock Briggs & Stratton LO206 # engine will be allowed in this class.
 Local Option 206 Rules Manual Section 1 General Rules 1. Only stock Briggs & Stratton LO206 # 124332-8201engine will be allowed in this class. o All parts will be stock unaltered Briggs & Stratton Animal
VW & Audi TDI CR140 ECO KIT Installation Guide
 VW & Audi TDI CR140 ECO KIT Installation Guide This guide is to help you install your new Rawtek DPF, EGR & Adblue Delete Exhaust ECO Kit on your (2009-2014) VW / Audi with 2.0l CR140 Diesel Engine. Note:
Replacing Valve Guide Oil Seals
 Many thanks to Sonicrete, Bucko and Lucksox who put me onto this whole way of replacing the valve guide oil seals without pulling the head or even taking the motor out of the frame. The key to it all is
Illustrated Parts List Vanguard to Compliance
 Non-Compliance Illustrated Parts List Vanguard Model Series 104700 to 104799 FORM MS-9878 7/93 REPLACES FORM MS-9878 5/92 FILE IN SECT. 2 OF SERVICE MANUAL 104700 to 104799 Compliance TYPE NUMBERS 0101,
TCI Trans-Scat
 Page 1 of 5 Return to Instruction Sheet index TCI 400000 Trans-Scat Turbo Hydramatic 400-1965-Up This kit will allow you to re-program your transmission valve body. This kit will give you firm positive
Instructions for SAITO FA-200R3 (AAC) 4-Stroke Engine
 4-Stroke Engine") Instructions for SAITO FA-200R3 (AAC) 4-Stroke Engine We would like to express our sincere thanks for your purchase of the SAITO FA-200R3 engine. Please read our instructions carefully and treat your engine
Instructions for SAITO FA-200R3 (AAC) 4-Stroke Engine We would like to express our sincere thanks for your purchase of the SAITO FA-200R3 engine. Please read our instructions carefully and treat your engine
Installation Instructions
 2003-Present Toyota 4Runner 2007-2014 FJ Cruiser LRT 3" Lift Kit by Low Range Off-Road (SKU# LR-LRFJ4RU) Installation Instructions Suggested Tools: CAUTION: Safety glasses should be worn at all times when
2006 Honda Civic SI Supercharger Kit Installation Instruction Kit #
 2006 Honda Civic SI Supercharger Kit Installation Instruction Kit #350-091 3239 MONIER CIRCLE, STE.5 RANCHO CORDOVA, CA 95742 916.635.4550 FAX 916.635.4632 www.ct-engineering.com INS-157 VERSION: 3.25.2009
Cold Air Intake Installation Instructions
 Page 1/5 3.04 INS262 BAVARIAN AUTOSPORT Cold Air Intake Installation Instructions NOTE: Throughout the instructions the term AFM is used. It refers to the Air Flow Meter which is located between the engine
SDS Continental O-200 Installation Manual Aug. 4/17
 SDS Continental O-200 Installation Manual Aug. 4/17 This manual covers the steps to install the SDS EM-5 fuel injection and ignition system components on O-200 engines. Hall Sensor and Bracket Install
55-64 Full Size GM (Impala, Bel Air, etc.) This kit is for axles with a 3 3/8 spread center to center on the top two bolt holes (pictured left).
 This kit is for axles with a 3 3/8 spread center to center on the top two bolt holes (pictured left).") SUM-BK1624A Full Size GM Installation Instructions Rear Disc Conversion 55-64 Full Size GM (Impala, Bel Air, etc.) This kit is for axles with a 3 3/8 spread center to center on the top two bolt holes (pictured
SUM-BK1624A Full Size GM Installation Instructions Rear Disc Conversion 55-64 Full Size GM (Impala, Bel Air, etc.) This kit is for axles with a 3 3/8 spread center to center on the top two bolt holes (pictured
K&T Saw Shop or
 11-400200-02 McCULLOCH GAS POWERED DRILL 02/91 to 10/91 IPL 224325 Page 1 of 13 Carburetor Assembly (Part 1) K&T Saw Shop 606-678-9623 or 606-561-4983 11-400200-02 McCULLOCH GAS POWERED DRILL 02/91 to
A /F/X Body Instruction Packet Rear Disc Conversion
 A /F/X Body Instruction Packet Rear Disc Conversion 64-72 A Body / 67-81 F Body / 62-74 X Body This kit is for axles with a 3 1/8 spread center to center on the top two bolt holes (pictured left). Rotor
The Multi-Fuel Timing Conversion Kit Installation & Setup Instructions
 The Multi-Fuel Timing Conversion Kit Installation & Setup Instructions 1. Remove the flywheel shroud from engine, uninstall the recoil pull start unit from the shroud. 2. Remove the valve cover and the
Typical Install Instructions
 Typical Install Instructions Read & understand all steps of these instructions before beginning this installation. WEBER Conversion Kit, VW T-1/2, up to 1835cc 32 / 36 DFEV Weber Carburetor These instructions
DDMWorks Race Intake for Mazda Miata
 DDMWorks Race Intake for 1999-2005 Mazda Miata f This DDMworks Race Intake improves your Mazda Miata by supplying your engine with cold pressurized air for it to breathe in through a free flowing filter
INSTALLATION INSTRUCTION PART NUMBER:
 Equipped with AEM Dryflow Filter No Oil Required! INSTALLATION INSTRUCTION PART NUMBER: 24-6003 1994-2001 ACURA Integra L4-1.8L Manual Trans. C.A.R.B. E.O. # D-670 Non VTEC models ONLY AEM bypass valves
Installation Instructions
 86-89 Suzuki Samurai Pedal Rebuild Kit SKU# SIB-PRB! Instructions also includes clutch adjustment procedures. Installation Instructions W e a l s o s u p p l y replacement peddle pads. Click HERE for more
Installation Manual TWM Performance Short Shifter Subaru STi 2008+
 - 1 - Installation Manual TWM Performance Short Shifter Subaru STi 2008+ Please Note: It is preferable to park on a flat surface, as you will have to engage and disengage the hand brake and shift from
RCGF 60CC-Twin Operator s Manual (note: the spare parts list and dimension of engine are in the end of manual)
") RCGF 60CC-Twin Operator s Manual (note: the spare parts list and dimension of engine are in the end of manual) RCGF 60cc twin Parameter: Type : 2 cycle piston valve type gasoline engine for airplane Piston
RCGF 60CC-Twin Operator s Manual (note: the spare parts list and dimension of engine are in the end of manual) RCGF 60cc twin Parameter: Type : 2 cycle piston valve type gasoline engine for airplane Piston
INTRODUCTION. Reference No L-01 R E V I SED :
 10-25L-01 SRM-265ES 1 1 2 INTRODUCTION We are constantly working on technical improvement of our products. For this reason, technical data, equipment and design are subject to change without notice. All
Sherco Engine Teardown and Assembly Manual
 Sherco Engine Teardown This Manual is provided as a guide for: Removing the engine from the frame Splitting the cases Complete Disassembly of the engine Reassembly of the engine Reinstallation back in
Parts Manual. Reproduction. Not for. Commando Series. String Trimmer. Models. Mfg. No. Description CTB2232-A - Commando Trimmer, 32cc
 Parts Manual Models Commando Series Mfg. No. Description CTB2232-A - Commando Trimmer, 32cc String Trimmer Manual Part No. LR00956A Revision A Rev. Date: 8/29/2011 Table Of Contents PRODUCT COMPONENTS
HIRTH 3203 Carburated - 65 hp
 HIRTH 3203 Carburated - 65 hp 2706-65Hp engine shown with fan cooling HIRTH s most popular engine. The 3203 produces more horsepower and torque per pound than any other engine in its power class. Hirth
Mfg. No: ,700 Watt Briggs & Stratton Inverter
 Parts Manual Mfg. No: 030651-00 1,700 Watt Briggs & Stratton Inverter Copyright Briggs and Stratton. All Rights reserved 08-Aug-2018 Model Components Table Of Contents Page Alternator & Control Panel
Includes: 1. Upgraded Tube Type EGR Cooler 2. Silicone Hoses
 Includes: 1. Upgraded Tube Type EGR Cooler 2. Silicone Hoses CAUTION: Never work on a hot vehicle. The hot exhaust system or hot engine can cause serious injury in the form of burns. If the vehicle has
Includes: 1. High Flow Turbo Up-Pipe 1. J-Hook Block Off / Coolant Reroute 1. Coolant Hose 1. EGR Valve Block Off Plate 2. Hose Clamps 4.
 Includes: 1. High Flow Turbo Up-Pipe 1. J-Hook Block Off / Coolant Reroute 1. Coolant Hose 1. EGR Valve Block Off Plate 2. Hose Clamps 4. Bolts & Nuts WARNING: This product is not legal for sale or use
KEIHIN CARBURATORS FOR 4-CYLINDER HONDA MOTORCYCLES
 KEIHIN CARBURATORS FOR 4-CYLINDER HONDA MOTORCYCLES Set of 4 Keihin carburetors marked 089A and used on 1976 CB550K GENERAL NOTES: All carburetors perform the same function: mixing air and fuel for supply
HYUNDAI VELOSTER SHORT RAM 1.6T INTAKE INSTALLATION INSTRUCTIONS
 Installation: HYUNDAI VELOSTER SHORT RAM 1.6T INTAKE INSTALLATION INSTRUCTIONS Tools needed: 1/4 or 3/8 drive ratchet 12 extension (shorter ones work, but will be difficult to reach some bolts) 10mm socket
PORSCHE V r Valve Timing Instructions. Copyright 2009 Written by Mike Frye Edited my Adam G.
 PORSCHE 928 32V r Valve Timing Instructions Copyright 2009 Written by Mike Frye Edited my Adam G. Sections: Overview.3 Disclaimer/warnings/things to watch for 4 Terms and naming conventions used in this
EME 60 Gasoline Engine User Manual
 EME 60 Gasoline Engine User Manual Eagle Master Engine EME 60 User Manual 1 SAFETY INSTRUCTIONS Thank you for purchasing EME 60 gasoline Engine. We at EME always strive to product reliable engines that
LF2WP (-CA) WATER PUMP EXPLODED VIEWS & PARTS LISTS
 WATER PUMP EXPLODED VIEWS & PARTS LISTS") LFWP (-CA) WATER PUMP EXPLODED VIEWS & PARTS LISTS 0 Industrial Park Road Van Buren, AR 9 (8) - www.lifanpowerusa.com E- CRANKCASE ASSY 8 9 0 /8F /8F GB/T 80/8F 00/8F-E /8F 9/8F /8F GB/T 80/8F GB/T. /8F
LFWP (-CA) WATER PUMP EXPLODED VIEWS & PARTS LISTS 0 Industrial Park Road Van Buren, AR 9 (8) - www.lifanpowerusa.com E- CRANKCASE ASSY 8 9 0 /8F /8F GB/T 80/8F 00/8F-E /8F 9/8F /8F GB/T 80/8F GB/T. /8F
Illustrated Parts List to
 Illustrated Parts List Model Series 124800 to 124899 FORM MS-2436-9/94 REPLACES FORM MS-2436-10/93 FILE IN SECT. 2 OF SERVICE MANUAL 124800 to 124899 TYPE NUMBERS 0106, 0206 through 0284, 0406 through
Cold Air Intake Installation Instructions
 BAVARIAN AUTOSPORT Cold Air Intake Installation Instructions Page 1/5 3.06 INS264 NOTE: The vehicle shown for this installation is equipped with ASC+T. If your vehicle dos not have this feature, installation
13. FUEL SYSTEM/CARBURETOR/
 13 FUEL SYSTEM/CARBURETOR/FUEL PUMP FUEL SYSTEM --------------------------------------------------------- 13-1 SCHEMATIC DRAWING ---------------------------------------------- 13-2 OPERATION OF CARBURETOR
COBB CAMSHAFTS INSTALLATION Impreza RS/TS
 4673 South Cherry St. Salt Lake City, UT 84213 USA +1 801-713-0035 COBB CAMSHAFTS INSTALLATION 99-01 Impreza RS/TS Congratulations on your purchase of Cobb Camshafts. The following instructions should
OEM Cruise Control Installation in GMC/Chevy NBS trucks
 OEM Cruise Control Installation in 99-02 GMC/Chevy NBS trucks May 2008 ~ Rampage_Rick Having just installed factory cruise control in my 00 Sierra, I thought I d share the fun. I followed the steps outlined
CAUTION: READ INSTRUCTIONS CAREFULLY BEFORE STARTING INSTALLATION
 V-Twin MFG. VT No. 32-9500 V-TECH 1 IGNITION KIT, SINGLE FIRE FITS EV SHOVEL, XL THRU 1997 VT No. 32-9503 V-TECH 1 IGNITION KIT, SINGLE FIRE FITS EV, SHOVEL, XL, WITH COIL AND WIRES This is a custom application
HS6 Carburetor Conversion Installation Instructions
 HS6 Carburetor Conversion Installation Instructions For: TR6 PART # 370-847, 370-848, 370-489 440 Rutherford St. Goleta, CA 93117 1-800-667-7872 FAX 805-692-2525 www.mossmotors.com Tools required: Shop
MARACANA ASSEMBLY INSTRUCTION .40 ARF LOW WING TRAINER RADIO CONTROL MODEL. Every body can fly
 RADIO CONTROL MODEL ASSEMBLY INSTRUCTION MARACANA.40 ARF LOW WING TRAINER Every body can fly VQA085 EP GP You can use both Gas or Electric power Wingspan: 59in.(1520mm) Fuselage length: 48in.(1220mm) Engine:
L DURAMAX LBZ EGR DELETE GDP TUNING
 2006-2007.5 6.6L DURAMAX LBZ EGR DELETE GDP TUNING ! WARNING REGARDING EMISSIONS LAWS Not legal for sale or use on pollution-controlled motor vehicles anywhere in the be used on vehicles that are operated
1 of 2 9/4/ :27 AM
 Ford Mustang IAC IAB - Solving your idle problems http://www.muscularmustangs.com/iac.php 1 of 2 9/4/2010 10:27 AM Solving idle problems part 1 - Cleaning your IAC Does your idle rise and fall over and
Note: Please read through the entire guide before attempting any kind of installation.
 KIT-RSRTD Installation Guide Version 1.5 Auber Instruments, 730 Culworth Manor, Alpharetta, GA 30022 e-mail: info@auberins.com Tel: 770-569-8420 www.auberins.com This is a PID controller kit installation