DO NOT LOCK THIS IN YOUR SAFE
|
|
|
- Angel George
- 6 years ago
- Views:
Transcription
1 DO NOT LOCK THIS IN YOUR SAFE IMPORTANT: PLEASE RETAIN FOR YOUR RECORDS SERIAL NUMBER KEY CODE PURCHASED AT DATE Cannon Safe Company 216 South 2nd Ave. Bldg. 932 San Bernardino, CA th Edition 1
2 INDEX Serial Number Information page 1 Index page 2 President s Letter page 3 Warranty page 4-5 Interior Setup page 6 Door Adjustment page 7 Using the Mechanical Lock page 9 Types of Electronic Locks page S & G Electronic page La Gard Basic page Most Common Questions page Certificate of Compliance page 18 Firearms Records page Cannon Safe Accessories page 38 Order Form page 39 Reg. Card/Comb. Card Back cover Please complete and mail Registration To assure warranty. 2
3 We want to thank you for purchasing one of our safes. These units are made in our factories by craftsmen who have years even decades building beautiful pieces for your home. We know that it will be a wonderful addition to your home and bring security to your valued possessions. Cannon Safe strives to build the best quality and functional safe on the market. We believe a home security safe is a very permanent investment, and those who choose to secure personal items, family heirlooms, collectables, money, or firearms should have peace of mind, knowing that these items are in a secure environment. Our Safes are backed by a lifetime warranty at no additional cost to you. We build each safe to strict standards so if the time comes for it to withstand a burglary attack or fire it will be prepared to do it's duty. We are proud to have one of our silent sentinels protecting your valuables. You can be assured that Nothing Protects Like a Cannon The Cannon Safe Family 3
4 CANNON LIFETIME WARRANTY This Cannon Safe carries a lifetime warranty. It is warranteed against defects in workmanship and materials also against damage by attempted break-in or actual break-in, natural flood and fire. In order to obtain service under this Warranty Purchaser must provide Cannon Safe Inc. with proof of purchase and police or fire department report. Cannon Safe Inc. may, at its discretion, repair or replace any defective or damaged part or replace the defective or damaged safe. Whenever possible the safe will be repaired locally. If Cannon Safe Inc. is replacing a safe, we will require the old safe to be returned to the factory. This being the case Cannon Safe Inc. will at its expense have the safe opened and will pay for the freight to the factory and returned. The purchaser must have the safe packaged and palletized and available for a curb side pick up at their expense. The Warranty does not cover labor costs for removal or installation of the safe and contents. Personal property in the safe is not covered. The obligation Cannon Safe Inc. has under this Warranty is contingent upon proper installation and use of the safe, and shall not apply to parts or safes which have been misused, neglected, or put in unusual or extreme environments. Modifying or tampering with the safe, which might affect the product's use, voids the Warranty. Without limit, this Warranty specifically excludes any liability for defects or damage caused by, or aggravated by, the use of unauthorized parts. Upon delivery, Purchaser must promptly notify Cannon Safe Inc. of any defect. Purchaser's remedies are limited solely to repair, or replacing parts and are at the discretion of Cannon Safe Inc. 4
5 Paint is warranted for one year. Mechanical locks carry a lifetime warranty; after three years parts only are covered. The warranty does not cover lost combinations nor improper opening procedure. Electronic locks carry a lifetime warranty; after five years only parts are covered. This warranty does not cover forgotten combinations nor weak or dead batteries. This Warranty only applies to safes located in the continental United States. This Warranty is given in place of all other warranties and assurances, whether expressed or implied, including but not limited to matters of quality, fitness for purpose, or merchantability and Cannon Safe Inc. accepts no liability, under any circumstances whatsoever, for any incidental or consequential damage or loss suffered by anyone as a result of using or being unable to use the safe. 5

6 INTERIOR SETUP Interior subject to change based on size and model 1. Install top shelf, or shelves at desired height 2. The gun rack is already installed. 3. Install side shelves 4. The cover plate fits directly over half of the gun rack, this allows you to use the rack as a shelf. Adjust shelf clips as needed. Side shelves may be installed on either right or left side. Converting your combo interior to an all-rifle interior requires removal of side shelves and cover plate. 6
7 DOOR ADJUSTMENT On rear of left door jam, in alignment with the second locking bolt down from the top, there is a U shaped cutout with a hole in the center. Using a Phillips screwdriver, insert in the hole, gently bend the tab, in small increments to tighten door. 7
8 CHANGING INDEX OPENING INDEX * IGNORE CHANGING INDEX 8
9 USING THE MECHANICAL LOCK DO NOT SPIN THE DIAL TURN SLOWLY USE OPENING INDEX MARK AT TOP OF RING (12:00 POSITION) Turning dial left (counter-clockwise) stop on first number the 4th time you come to it Turning dial right (clockwise) stop on second number the 3rd time you come to it Turning dial to the left stop on third number the 2nd time you come to it Turn dial slowly to the right, you should feel resistance around zero and the lock should stop turning at about Turn handle left or counter-clockwise until safe opens. WARNING NEVER LUBRICATE THE LOCK OR DIAL WITH ANY TYPE OF LUBRICANT. THE KEY LOCKING DIAL The dial has a key feature. This will allow the dial to be locked either in the open mode or locked mode. Locking the dial at 90, after combination has opened the safe, will prevent anyone from shutting the door and locking it. Once you close the door and turn the combination, you can then lock the dial in the "0" position to prevent anyone from tampering with the lock. Never use the key as the sole means of locking the safe. It is not meant as the primary locking feature. 9

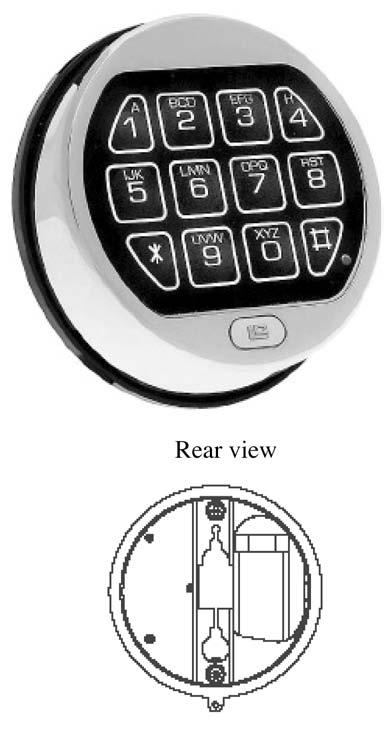
10 TYPES OF ELECTRONIC LOCKS Sargent & Greenleaf 10

11 TYPES OF ELECTRONIC LOCKS LaGard Basic 11
12 S & G ROTARYBOLT OPENING THE LOCK Enter six (6) digit code, # and turn handle counter-clockwise to unlock safe. Enter the combination & # slowly. WRONG TRY PENALTY After 4 (four) wrong entries the lock will go into lock out for 15 minutes. Lock can also go into lock out during re-programming if it interprets an incorrect programming sequence. Do not press any buttons during the lock out period, it will start the 15 minutes again. LOW BATTERY WARNING The lock will beep twenty (20) consecutive times after the last number of the combination is entered. Only use Duracell Alkaline batteries. Try to find ' use date ' 5 years in the future. CHANGING BATTERY On bottom of face plate, there is a trap door; push up slightly and slide forward. Battery tray will drop straight down. Attach new battery, slide into opening, replace trap door by pushing up slightly and sliding back. CHANGING YOUR CODE DOOR SHOULD BE OPEN DOOR MUST BE IN LOCKED MODE Press 7 4 * (existing code) # 1 * (new code) # (new code) # Enter existing six (6) digit code. There will be 5 beeps. Enter NEW six (6) digit code twice. There will be 3 beeps after each entry. Invalid Combination Entry see wrong try penalty On some safe models there is a detent release on the bottom of the door that must be pushed up to put door into locked mode. 12

13 S & G Electronic Lock Battery Trap Door 13
14 LAGARD BASIC OPENING THE LOCK Enter six (6) digit code and turn handle counter-clockwise to unlock safe. WRONG TRY PENALTY Entry of four consecutive invalid codes starts a 5-minute delay period. Key pad will be dead during delay period. LED flashes red at 10 second intervals. At the end of the delay period, two more incorrect codes will restart the delay. LOW BATTERY WARNING Repeated beeping during opening indicates a low battery and should be replaced immediately. Uses one (1) 9-volt Energizer or Duracell Alkaline Battery. CHANGING BATTERY Lift the face plate straight up about 1 /4 and away from safe door. Battery is located in back of face plate. Being careful not to pull on the wires connected to the battery connecter, remove the old battery. Attach new 9-Volt Alkaline Battery to connector and replace face on front of door LaGard recommends the use of Energizer or Duracell. CHANGING YOUR CODE DOOR SHOULD BE OPEN DOOR MUST BE IN LOCKED MODE Enter six (6) zeros. Enter existing six (6) digit code. Enter NEW six (6) digit code twice. Do not use '0' as first number of new combination Invalid Combination Entry Lock signals three times and old code is still valid. On some models there is a detent release on the bottom of door that must be pushed up to put door into locked mode. 14
15 15
16 FREQUENTLY ASKED QUESTIONS Where is the serial number? The serial number is located on the right side of the safe, upper front corner. How do I clean my safe? You can use any mild cleaner without abrasives (like Windex ). Do not use any product containing ammonia. Can I polish my safe? On the gloss models you can use any automotive (abrasive free) wax or glaze. Is my safe water tight? No! In a flood, water will enter the safe, so place your safe in a dry location. Is my safe airtight? No! Some air will get into your safe, but not enough to live on. Never leave unattended children near an open safe! Do I need a dehumidifier? A dehumidifier will help to protect the contents of your safe from a humid environment. Is my safe pre-drilled for a dehumidifier? The body is drilled three (3) inches from the bottom slightly off midline on the back side. You will have to continue the hole through the fireboard. 16
17 Do I need to lubricate my safe? Lubricate hinge if needed. Never lubricate the lock. Should my safe be level? Yes. This can be done with wood shims available at most lumber or hardware stores. If your safe is on carpet you will probably have to shim the front about 3/8 inch to compensate for the tack strip against the wall. Why do I need to bolt my safe down? There are two reasons to bolt your safe down. First, under normal circumstances your safe should never tip over, but earthquakes etc. can surprise us. Second, if your safe is located in the garage, it will stop anyone from backing a truck up and driving away with your safe. How do I bolt it down? The floor of the safe is pre-drilled. Place the safe in position, level it, drill right through the pre-drilled holes into the floor. Use either 3/8 or 1/2 inch sleeved anchors that will extend into the concrete 2-3 inches. Be sure to use four bolts to properly secure your safe. My combination quit working, what do I do? If your dial has been repeatedly spun, the disks in the lock may have shifted. Most of the time if you drop the middle number by one digit the safe will open. This new number will now be your combination. Should I have my lock serviced? Most combo locks need to be serviced once every 3-5 years. This should be done by a qualified locksmith. Electronic locks do not need to be serviced. 17
18 Certificate of Compliance The following Cannon Safe, Inc. security products exceed California Department of Justice Gun Safe Standards as per Title 11, Division 1, Chapter 12.6, ; Traditional Series, all models. Cannon Series, all models. American Eagle Series, all models. DO NOT DISCARD THIS CERTIFICATE. ATTACH TO YOUR RECEIPT OF PURCHASE. ALL CANNON SAFES ARE UL BURGLARY RATED TO THE RESIDENTIAL SECURITY CONTAINER STANDARD 18
19 Firearms Record: Firearms Record:
20 Firearms Record: Firearms Record:
21 Firearms Record: Firearms Record:
22 Firearms Record: Firearms Record:
23 Firearms Record: Firearms Record:
24 Firearms Record: Firearms Record:
25 Firearms Record: Firearms Record:
26 Firearms Record: Firearms Record:
27 Firearms Record: Firearms Record:
28 Firearms Record: Firearms Record:
29 Firearms Record: Firearms Record:
30 Firearms Record: Firearms Record:
31 Firearms Record: Firearms Record:
32 Firearms Record: Firearms Record:
33 Firearms Record: Firearms Record:
34 Firearms Record: Firearms Record:
35 Firearms Record: Firearms Record:
36 Firearms Record: Firearms Record:
37 Firearms Record: Firearms Record:


38 CANNON SAFE ACCESSORIES C) Knight Duck Seat by Cannon $59.95 Designed especially for duck hunters. D) Wall Safe $ The Cannon Wall Safe is the safest and practical answer for concealing important valuables or documents. This unit features a high-security combination lock, thickplate steel door and built-in shelving, and is painted in a durable matte finish. Keep your valuables close by and private! It has many uses. Just 4 lbs! Folds to a super compact 3"x30"x8" Backed by Cannon Safe s Limited 2 Year Warranty 10" height adjustment will accommodate everyone Non-reflective, teal green anodized finish Designed by a physical therapist with your comfort and safety in mind Rugged construction won t let you down in the field Stabilizing flutes ensure secure seating Heavy camouflage pattern canvas seat over high density foam padding Solid hardwood seat base And it floats! E) Door-Panel Pistol Kit $58.00 Accommodates multiple handguns. F) Electric Dehumidifier $58.00 Provides rust protection. Plus S&H A-1) Mini Standard $ A-2) Mini Deluxe $ Outer dimensions: 12"L x 8.1"W x 4.9"H tapering to 3"H Inner Dimensions: 11"L x 3.6"W x 2.8"H Power Supply: 8AA alkaline batteries. (not included) One-year battery life under normal operating conditions. CALIFORNIA DEPARTMENT OF JUSTICE APPROVED B-1) Multi Standard $ B-2) Multi Deluxe Outer dimensions: 14"L x 10.1"W x 7.9"H tapering to 6.3" Inner Dimensions: 12.9"L x 9.5"W x 6.1"H Power Supply: 8AA alkaline batteries. (not included) One-year battery life under normal operating conditions. Gun Rack Top Shelf Side Shelf Cover Plate $69.00 $90.00 $50.00 $25.00 Complete G P Interior $ $200.00
39 Please Fax or Mail Order Form to: Credit Card#: 216 South 2nd Avenue Building 932 San Bernardino, CA Toll Free Fax # Pin (Back of Card): Expiration Date: Billing Address: Name: Address: Qty Item Price Sub-Total Phone: Check#: Credit Card Type: VISA MC Discover AMEX Tax (If App.): cannonsafe.com Total:
40
SAFE OWNER S MANUAL SERIAL NO..
 NOTHING PROTECTS LIKE A CANNON TM EST 1965 SAFE OWNER S MANUAL SERIAL NO DO NOT LOCK THIS IN YOUR SAFE IMPORTANT: FILL OUT THE INFORMATION BELOW AND RETAIN FOR YOUR RECORDS IT WILL BE REQUIRED WHEN CALLING
Index. 2 Warranty Registration. 3 Getting Started & Safe Set-up. 5 NL & Lexam Lock 7 EMP LOCK CONTINUED. 8 Accessories. 8 FAQs
 Index CEO s Letter 1 Limited Lifetime Warranty 2 Warranty Registration 3 Getting Started & Safe Set-up 5 NL & Lexam Lock 6 Identify your Lock 6 Changing the Battery 6 EMP Lock 7 EMP LOCK CONTINUED 8 Accessories
Operating Instructions Lock Instructions Warranty Extended Warranty
 Operating Instructions Lock Instructions Warranty Extended Warranty Granite 4801 Esco Drive Fort Worth, Texas 76140 T 817-561-9095 F 817-478-3056 Operating Instructions Thank you for purchasing a new safe.
Owner Use and Care Manual
 Safe Owner Use and Care Manual Model: WS211404-E Tracker Safe LLC 6317 NE 63rd Street Vancouver, WA 98661 (360) 213-0363 www.trackersafe.com Document # Tracker Safe-Owner Use and Care Manual-WS-Rev1 Table
WARNING ATTENTION. Please read this information carefully before operating your safe.
 WARNING Please use caution when unbolting this safe from its shipping skid. Sports Afield recommends anchoring your safe to the floor. Failure to do so may cause the safe to fall forward. ATTENTION Please
Limited Warranty. Operation & Installation Guide. Read These Instructions Very Carefully! Home and Office Security Safes M ENGLISH
 Limited Warranty LIFETIME AFTER FIRE REPLACEMENT GUARANTEE Operation & Installation Guide M08-0268-000 ENGLISH If your First Alert Firesafe is ever damaged by a fire, BRK will replace it with a comparable
Digital Anti-Theft Wall Safe
 Operation & Installation Guide 2070AF Manual # M08-0271-000 www.firstalert.com Digital Anti-Theft Wall Safe Manual # M08-0271-000 4 7 8 9 DIGITAL ELECTRONIC S AFE Index / Overview of Your Safe Index Overview
Operation & Installation Guide 2074F / 2079F. Manual # M Digital Anti-Theft Drawer Safe. Manual # M
 Operation & Installation Guide 07F / 079F Manual # M08-07-000 www.firstalert.com Digital Anti-Theft Drawer Safe Manual # M08-07-000 Index / Overview of Your Safe Index Overview of Your Safe Package contents
2025F / 2072F / 2073F
 Operation & Installation Guide F / F / F Manual # M-- Digital nti-theft Safe Manual # M-- Index / Overview of Your Safe Index Overview of Your Safe Package contents Overview of Your Safe... Initial Set
Using the power override wire. LED Interior Light System (Optional) Adjusting the shelves: TIPS:
 Adjusting the shelves: TIPS:") Using the power override wire LED Interior Light System (Optional) If your keypad does not respond, don t be alarmed. Most likely the batteries are dead and need replacing. You will be able to open the
Using the power override wire LED Interior Light System (Optional) If your keypad does not respond, don t be alarmed. Most likely the batteries are dead and need replacing. You will be able to open the
2060F / 2062F / 2064F
 Operation & Installation Guide 060F / 06F / 064F DIGITAL ANTI-THEFT SAFE MANUAL # M08-070-000 Index / Overview of Your Safe INDEX Overview of Your Safe...1 Initial Set Up... Programming a Personal Passcode...
2087F-BD / 2092F-BD. COMBINATION WATERPROOF FIRE SAFE with Ready-Seal. Operation & Installation Guide. Manual # M
 Operation & Installation Guide 2087F-BD / 2092F-BD Manual # M08-0274-008 www.firstalert.com COMBINATION WATERPROOF FIRE SAFE with Ready-Seal Manual # M08-0274-008 L-10-XZ Index / Overview of Your Safe
Operation & Installation Guide 2087F / 2092F. Manual # M Manual # M
 https://www.supplychimp.com/ Operation & Installation Guide 2087F / 2092F Manual # M08-0280-006 COMBINATION WATERPROOF FIRE SAFE Manual # M08-0280-006 L-10-XZ https://www.supplychimp.com/ Index / Overview
Intelligent Electronic Safe
 Operation & Installation Guide 1036616 / 1036617 / 1036618 Intelligent Electronic Safe Please do not keep emergency keys in your safe! MANUAL # M08-0566-155041 Index / Proper Use of Your Safe INDEX Proper
2025F / 2072F / 2073F
 Operation & Installation Guide F / F / F Manual # M-- www.firstlert.com Digital nti-theft Safe Manual # M-- Index / Overview of Your Safe Index Overview of Your Safe Package contents Overview of Your Safe...
Operation & Installation Guide 2087DF / 2092DF. Manual # M DIGITAL WATERPROOF. Manual # M
 Operation & Installation Guide DF / DF Manual M-- www.firstalert.com DIGITAL WATERPROOF FIRE Safe Manual M-- L--XZ Index Index Overview of Your Safe... Opening Your Safe for the First Time... Test Locking
2087DF-BD / 2092DF-BD
 Operation & Installation Guide DF-BD / DF-BD Manual M-- www.firstalert.com DIGITAL WATERPROOF FIRE Safe with Ready-Seal Manual M-- L--XZ Index / Overview of Your Safe Overview of Your Safe Index Overview
Important Operating Instructions and Warranty Information On Your New Electronic AMSEC Safe
 Important Operating Instructions and Warranty Information On Your New Electronic AMSEC Safe MODELS: ES914, ES149, ES1814, ES813, ES916, ES1014, ES2014, ES412, WES149, WES2114 Read Contents Carefully For
IMPORTANT SAFETY INFORMATION
 Specifications Outer Dimensions Inner Dimensions Lockbox Inner Dimensions Panel Features Includes 21 W x 15 D x 59 H 20-1/2 W x 12 D x 49-1/2 H 20-1/2 W x 11 D x 7-5/8 H Dual Security System for Keyed
Advanced Netbook Charging Carts for 10 laptops or 20 netbooks
 Advanced Netbook Charging Carts for 10 laptops or 20 netbooks Owners Manual TECHNOLOGY FURNITURE Hello! Thank you for choosing Anthro. This unit has been tested to Underwriters Laboratories U.S. and Canadian
INSTALLATION INSTRUCTIONS
 0711016 Page 1 INSTALLATION INSTRUCTIONS ELECTRONIC DEADBOLT WITH KEYPAD latch 2-3/8 Your latch is now set 2-3/8 (60mm) backset latch 2-3/4 2-3/4" (70mm) 2-3/8" (60mm) Cylindrical cover Extension plate
Installation Instructions Soft Top Replacement Hardware, Wrangler
 Installation Instructions Soft Top Replacement Hardware, 87-95 Wrangler IMPORTANT NOTICE: Carefully read instructions before attempting to install this product. Rampage is in no way responsible for any
Super Titan XL Owner s Manual
 Super Titan XL Owner s Manual Thank you for purchasing a SnapSafe Super Titan XL. The SnapSafe Modular Assembly System offers all the impregnability of a welded safe in an easy-toassemble modular design.
BOLT TORQUE SPECIFICATIONS STANDARD BOLTS:
 10-05 TP2010,Rev. ASSEMBLY OPERATION REPLACEMENT PARTS Hyundai Accent BOLT TORQUE SPECIFICATIONS STANDARD BOLTS: METRIC BOLTS: Size Grade Torque Size Torque 5/16" 5 20 ft/lbs. 8mm 22 ft/lbs. /8" 5 5 ft/lbs.
INSTALLATION INSTRUCTIONS
 INSTALLATION INSTRUCTIONS Universal Short Throw Projector Wall Mount Model: NORTH AMERICA 3130 East Miraloma Avenue Anaheim, CA 92806 USA USA and Canada Phone: 1-800-368-9700 Fax: 1-800-832-4888 Other
Raydot LLC 24 Actuator (115 VOLT)
") Installation, Operation & Parts Manual Read carefully the information provided. Retain manual for future reference. Raydot LLC 24 Actuator (115 VOLT) 145 Jackson Ave. S. Cokato, MN 55321-USA (320) 286-2103
Installation, Operation & Parts Manual Read carefully the information provided. Retain manual for future reference. Raydot LLC 24 Actuator (115 VOLT) 145 Jackson Ave. S. Cokato, MN 55321-USA (320) 286-2103
AC/DC Powered Peak Detection Fast Charger for 4- to 8-Cell Ni-Cd & Ni-MH Batteries
 AC/DC Powered Peak Detection Fast Charger for 4- to 8-Cell Ni-Cd & Ni-MH Batteries 2010 Horizon Hobby, Inc. 4105 Fieldstone Road Champaign, IL 61822 USA Dynamite products are distributed exclusively by
Titan Owner s Manual 1
 Titan Owner s Manual 1 Thank you for purchasing a SnapSafe Titan. Now you have the peace-of-mind knowing your valuables are protected from loss due to fire or theft. Best of all, you can easily locate
Owner Use & Care Manual
 LIBERTY SAFE AND SECURITY PRODUCTS LIMITED LIFETIME WARRANTY Limited Lifetime Warranty: Liberty Safe and Security Products, Inc. (Liberty) is proud of the workmanship of the product you have just purchased.
Owner s Manual. (Actual safe model, size, color and specifications may vary.) OWNER S MANUAL PAGE 1
 OWNER S MANUAL PAGE 1") (Actual safe model, size, color and specifications may vary.) OWNER S MANUAL PAGE 1 NOTES: CUSTOMER SERVICE DEPARTMENT HOURS: 7:00am - 5:00pm Central Time PHONE: 877-948-6723 (877-9GUNSAFE) GRANITE SECURITY
(Actual safe model, size, color and specifications may vary.) OWNER S MANUAL PAGE 1 NOTES: CUSTOMER SERVICE DEPARTMENT HOURS: 7:00am - 5:00pm Central Time PHONE: 877-948-6723 (877-9GUNSAFE) GRANITE SECURITY
Doing Our Best to Provide You the Best. Centers-25-3/4 Pin Height PARTS LIST BOLT TORQUE SPECIFICATIONS TP20076,Rev.
 11-08 TP20076,Rev.5 Ford F-150 Pick-Up (4WD) Ford Expedition (4WD) BOLT TORQUE SPECIFICATIONS STANDARD BOLTS: METRIC BOLTS: Size Grade Torque Size Torque 5/16 5 20 ft/lbs. 8mm 22 ft/lbs. /8 5 5 ft/lbs.
Doing Our Best to Provide You the Best. Honda CR-V Honda Element. BolT ToRQUE specifications
 6-11 TP20135,Rev.9 Honda CR-V Honda Element BolT ToRQUE specifications standard BolTs: METRiC BolTs: size Grade Torque size Torque 5/16 5 20 ft/lbs. 8mm 22 ft/lbs. 3/8 5 35 ft/lbs. 10mm 42 ft/lbs. 7/16
Installation Instructions
 85-3847 rev. 01 09-09 Installation Instructions Thank you for purchasing this anti-sway bar kit. Please read through these instructions before installation. Front Anti-Sway Bar TruTrac Bar Combo Kit for
42 ft/lbs PARTS LIST
 ASSEMBLY OPERATION REPLACEMENT PARTS Chevy Venture 04-06 TP20044,Rev.5 BOLT TORQUE SPECIFICATIONS STANDARD BOLTS: METRIC BOLTS: Size Grade Torque 5/16" 5 20 ft/lbs. 3/8" 5 35 ft/lbs. 7/16" 5 56 ft/lbs.
Installation Instructions
 85-3209 rev. 07 03-11 Installation Instructions Thank you for purchasing this anti-sway bar kit. Please read through these instructions before installation. Front Anti-Sway Bar Kit for Workhorse W22, Holiday
Installation Instructions: Bumper (Part # SB76854) XJ Jeep Cherokee XRC Body Armor 4-Door
 XJ Jeep Cherokee XRC Body Armor 4-Door") NOTE: Carefully read entire instructions thoroughly before attempting to install this part. Parts Included Qty 93-7818 XRC Front Fender Skin: Drvr 1 93-7862 XRC Front Door Skin: Drvr 1 93-7863 XRC Rear
NOTE: Carefully read entire instructions thoroughly before attempting to install this part. Parts Included Qty 93-7818 XRC Front Fender Skin: Drvr 1 93-7862 XRC Front Door Skin: Drvr 1 93-7863 XRC Rear
Doing Our Best to Provide You the Best. Pontiac Transport Pontiac Montana
 Pontiac Transport Pontiac Montana 07-09 TP20043,Rev.5 BolT ToRQue specifications standard BolTs: MeTRic BolTs: size grade Torque size Torque 5/16 5 20 ft/lbs. 8mm 22 ft/lbs. 3/8 5 35 ft/lbs. 10mm 42 ft/lbs.
BOLT TORQUE SPECIFICATIONS STANDARD BOLTS:
 04-06 TP20124,Rev.3 ASSEMBLY OPERATION REPLACEMENT PARTS Mitsubishi Montero Limited Mitsubishi Montero XLS BOLT TORQUE SPECIFICATIONS STANDARD BOLTS: METRIC BOLTS: Size Grade Torque 5/16" 5 20 ft/lbs.
Model AS-FM64 Wall Mount. Full Motion Television Wall Mount
 Model AS-FM64 Wall Mount Full Motion Television Wall Mount Getting Started Introduction Congratulations on the purchase of your new Audio Solutions AS-FM64 Television Wall Mount. For maximum benefit, please
Installation Instructions
 85-3909 rev. 01 09-09 Installation Instructions Thank you for purchasing this anti-sway bar kit. Please read through these instructions before installation. Rear Anti-Sway Bar Kit for Chevrolet G30 part
PROPHET PLUS LCD INSTRUCTION MANUAL Horizon Hobby, Inc Fieldstone Road Champaign, IL USA
 PROPHET PLUS LCD AC/DC Powered Peak Prediction Charger for 4- to7-cell Ni-Cd and Ni-MH Battery packs INSTRUCTION MANUAL 2010 Horizon Hobby, Inc. 4105 Fieldstone Road Champaign, IL 61822 USA Dynamite products
Installation Instructions
 85-4592 rev. 08 02-18 Installation Instructions Thank you for purchasing our sway bar kit. Please read through these instructions before installation. Auxiliary Rear Anti-Sway Bar Kit for Ford F53 part
24 Linear Actuator 115 Volts A.C. (Cat. # C430A)
") Installation, Operation & Parts Manual Read carefully the information provided. Retain manual for future reference. 24 Linear Actuator 115 Volts A.C. (Cat. # C430A) Page 1 of 8 IS10007.doc 11/15/06 IMPORTANT!
Installation, Operation & Parts Manual Read carefully the information provided. Retain manual for future reference. 24 Linear Actuator 115 Volts A.C. (Cat. # C430A) Page 1 of 8 IS10007.doc 11/15/06 IMPORTANT!
CHAIN AND SHACKLE LOCK SECURITY SYSTEMS
 -J05161 REV. 2010-03-24 CHAIN AND SHACKLE LOCK SECURITY SYSTEMS GENERAL Kit Number 94869-10, 94872-10 Models The shackle lock can be used to secure the front or rear slotted brake discs or secure theft
metric BOlTS: 42 ft/lbs.
 Nissan Sentra 04-10 TP20276,Rev.0 Pin height - 12-1/2 Centers - 20-1/2 BOlT TORQuE SPECIfICATIONS STANDARD BOlTS: Size grade Torque 5/16 5 20 ft/lbs. 3/8 5 35 ft/lbs. 7/16 5 56 ft/lbs. 1/2 5 85 ft/lbs.
Installation Instructions
 85-3195 rev. 12 04-18 Installation Instructions Thank you for purchasing this antisway bar kit. Please read through these instructions before installation. Part #1139-117 Rear Anti-Sway Bar Kit 1½ diameter
Remote Vehicle Control System CA-150. Owner's Manual. Vehicle Security System With Remote Keyless Entry
 Remote Vehicle Control System CA-150 Owner's Manual Vehicle Security System With Remote Keyless Entry IMPORTANT NOTE: The operation of the Security and Convenience System as described in this manual is
SAFE QUICK STRONG SMART. Owners Manual. Models: HV3000 HomeVault GV5500 Gun Safe GV5900 Gun Safe
 SAFE QUICK STRONG SMART Owners Manual Models: HV3000 HomeVault GV5500 Gun Safe GV5900 Gun Safe 216 South 2 nd Avenue Building No. 932 San Bernardino, CA 92408 (909) 382-0505 (800) 222-1055 Covered by United
Installation Instructions BULL BAR (Part # 51033&51034) SIERRA 1500 / SILVERADO 1500
 SIERRA 1500 / SILVERADO 1500") PARTS LIST: 1 Bull Bar 2 12-1.75mm x 140mm Hex Head Bolts 1 Driver/Left Mounting Bracket 3 s 1 Passenger/Right Mounting Bracket 5 12m ID x 29mm OD x 3mm Flat Washers 1 12-1.75mm x 35mm Bolt Plate 3 s 4
PARTS LIST: 1 Bull Bar 2 12-1.75mm x 140mm Hex Head Bolts 1 Driver/Left Mounting Bracket 3 s 1 Passenger/Right Mounting Bracket 5 12m ID x 29mm OD x 3mm Flat Washers 1 12-1.75mm x 35mm Bolt Plate 3 s 4
Model AS-RC3260 TV Cart. Rolling Cart for Audio Mount System & Flat Panel TVs
 Model AS-RC3260 TV Cart Rolling Cart for Audio Mount System & Flat Panel TVs GETTING STARTED Introduction Congratulations on the purchase of your new Helios AS-RC3260 Rolling Cart. For maximum benefit,
Installation Instructions
 85-3910 rev. 03 01-18 Installation Instructions Thank you for purchasing the antisway bar kit. Please read through these instructions before installation. Rear Anti-Sway Bar Kit for Ford F-250/F-350 part
MeTRic BolTs: 42 ft/lbs.
 Mazda B-Series Pickup 08-09 TP20067,Rev.3 BolT ToRQue specifications standard BolTs: size grade Torque 5/16 5 20 ft/lbs. 3/8 5 35 ft/lbs. 7/16 5 56 ft/lbs. 1/2 5 85 ft/lbs. MeTRic BolTs: size 8mm 10mm
3/8" 5 35 ft/lbs. 10mm 42 ft/lbs. 1/2" 5 85 ft/lbs. 14mm 95 ft/lbs.
 0-06 TP056,Rev. ASSEMBLY OPERATION REPLACEMENT PARTS Kia Rio BOLT TORQUE SPECIFICATIONS STANDARD BOLTS: METRIC BOLTS: Size Grade Torque Size Torque 5/6" 5 0 ft/lbs. 8mm ft/lbs. /8" 5 5 ft/lbs. 0mm 4 ft/lbs.
Model T2642 Wall Mount. Television Wall Mount with Tilt Option
 Model T2642 Wall Mount Television Wall Mount with Tilt Option Getting Started Introduction Congratulations on the purchase of your new Audio Solutions T2642 Television Wall Mount. For maximum benefit,
PACIFICA Shower Cabin Installation Instructions
 PACIFICA Shower Cabin Installation Instructions IMPORTANT Please read carefully the following instructions before installing your shower cabin. If you have any questions on this shower cabin installation
Hollywood Racks Sport Rider Hitch Rack Instruction Manual
 Hollywood Racks Sport Rider Hitch Rack Instruction Manual Model HR1200 3 Bike, 2 rec. Model HR1210 3 Bike, 1 ¼ rec. Model HR1400-4 Bike, 2 rec. Not to be used on any trailer, fifth wheel or vehicle being
Installation Instructions
 85-3214 rev. 07 03-11 Installation Instructions Thank you for purchasing this anti-sway bar kit. Please read through these instructions before installation. Rear Anti-Sway Bar Kit Freightliner FL Series
3/8" 5 35 ft/lbs. 10mm 42 ft/lbs. 1/2" 5 85 ft/lbs. 14mm 95 ft/lbs PARTS LIST NO. QTY. DESCRIPTION
 ASSEMBLY OPERATION REPLACEMENT PARTS Oldsmobile Alero 03-06 TP20068,Rev.5 BOLT TORQUE SPECIFICATIONS STANDARD BOLTS: METRIC BOLTS: Size Grade Torque Size Torque 5/16" 5 20 ft/lbs. 8mm 22 ft/lbs. 3/8" 5
Doing Our Best to Provide You the Best. Toyota Tacoma. Pin height: 17 Centers: 30-1/2. BOlT TORQuE specifications TP20190,Rev 7
 10-13 TP20190,Rev 7 Toyota Tacoma BOlT TORQuE specifications standard BOlTs: metric BOlTs: size grade Torque size Torque 5/16 5 20 ft/lbs. 8mm 22 ft/lbs. 3/8 5 35 ft/lbs. 10mm 42 ft/lbs. 7/16 5 56 ft/lbs.
metric BOlTs: 42 ft/lbs.
 08-09 TP20059,Rev.5 Dodge Caravan Plymouth Voyager BOlT TORQuE specifications standard BOlTs: size grade Torque 5/6 5 20 ft/lbs. /8 5 5 ft/lbs. 7/6 5 56 ft/lbs. /2 5 85 ft/lbs. metric BOlTs: size 8mm 0mm
CT4880 Collaboration Huddle Table Assembly Instructions
 CT4880 Collaboration Huddle Table Assembly Instructions Monitor, monitor stand and chairs are not included. Thank you for choosing the CT4880 Collaboration Huddle Table from AmpliVox Portable Sound Systems.
Model FM2642 Wall Mount. Full Motion Television Wall Mount
 Model FM2642 Wall Mount Full Motion Television Wall Mount Getting Started Introduction Congratulations on the purchase of your new Audio Solutions FM2642 Television Wall Mount. For maximum benefit, please
Installation Instructions
 85-4209 rev. 05 11-18 Installation Instructions Thank you for purchasing this anti-sway bar kit. Please read through these instructions before installation. Factory Replacement Anti-Sway Bar Kit part #1129-135
Installation Instructions
 85-3414 rev. 02 11-09 Installation Instructions Thank you for purchasing this anti-sway bar kit. Please read through these instructions before installation. Rear Anti-Sway Bar Kit for the Monaco Diplomat
Installation Instructions SRC Over-Size Tire Carrier Jeep Wrangler/Unlimited Part # 2743
 NOTE: Carefully read instructions entirely before assembling/installing this product. Parts Included Qty Parts Included Qty Tire Carrier 1 8 x 70mm Hex Bolt 4 Brake Light Bracket 1 8mm Flat Washer 4 Tire
 CUSTOMER SERVICE: 800-973-8374 Frame Assembly Instructions Headboard Installation E 1. Use the remote control to raise the head of the adjustable foundation in order to gain access to the foundation
Installation & Operation Guide
 Installation & Operation Guide ENGLISH Electronic Entry Lock with Knob Models 8732001, 8732101, 8732301, 8732401 Read this manual carefully before installing and operating! Page 1 Index INSTALLATION INSTRUCTIONS
Installation Instructions
 85-5029 rev. 03 06-17 Installation Instructions Thank you for purchasing our anti-sway bar kit. Please read through these instructions before installation. Rear Anti-Sway Bar Kit for Workhorse W22, Holiday
Anthro Mobile Device Charging Carts and Cabinets Owners Manual
 Anthro Mobile Device Charging Carts and Cabinets Owners Manual TECHNOLOGY FURNITURE Hello! Thank you for choosing Anthro. Anthro's Tablet Charging Carts and Cabinets are designed to automatically charge
OWNER S MANUAL & Assembly Instructions
 OWNER S MANUAL & Assembly Instructions EWT- Olympic Plate Tree L2 X W 2 X H1 EWT-_Rev0 Revision Date -27-12 Table of Contents DANGER, WARNING, & CAUTION LABELS INFORMATION...Page - IMPORTANT SAFETY INSTRUCTIONS...Page
Doing Our Best to Provide You the Best. VW Golf, GTi, Jetta PaRTs list. BOlT TORQuE specifications TP20103,Rev.4
 10-09 TP20103,Rev.4 VW Golf, GTi, Jetta BOlT TORQuE specifications standard BOlTs: metric BOlTs: size Grade Torque size Torque 5/16 5 20 ft/lbs. 8mm 22 ft/lbs. 3/8 5 35 ft/lbs. 10mm 42 ft/lbs. 7/16 5 56
SHOTLOCK OWNER S MANUAL TABLE OF CONTENTS -3-
 SHOTLOCK OWNER S MANUAL Thank you for purchasing a ShotLock Solo Vault. Now, you can enjoy peace-of-mind knowing your personal defense shotgun is always close, secure and ready. When the first-responder
Installation Instructions
 85-4341 rev. 04 10-15 Installation Instructions Thank you for purchasing this antisway bar kit. Please read through these instructions before installation. Rear Anti-Sway Bar Kit for Chevy 2500/3500/4500
metric BOlTS: 42 ft/lbs.
 Subaru Outback 11-13 TP20272,Rev.1 BOlT TORQuE SPECIfICATIONS STANDARD BOlTS: Size grade Torque 5/16 5 20 ft/lbs. 3/8 5 35 ft/lbs. 7/16 5 56 ft/lbs. 1/2 5 85 ft/lbs. metric BOlTS: Size 8mm 10mm 12mm 14mm
Important Information
 Boat Lift Boss Installation Instructions For Metal Craft Lifts (Kit 3005.7204) Important Information Before installation, read and understand all instructions and warnings. All 120 Volt units MUST have
TERMS OF USE TERMS AND CONDITIONS. Plumbing and Heating Products (PL-WR)
") TERMS OF USE 1. Watts pricing and product data is subject to change without notice and such changes supersede all previous versions. 2. Watts data is to be used as provided. Watts is not responsible for
TERMS OF USE 1. Watts pricing and product data is subject to change without notice and such changes supersede all previous versions. 2. Watts data is to be used as provided. Watts is not responsible for
Level One Electric Vehicle Charging Station FREE STANDING Product Guide
 Level One Electric Vehicle Charging Station FREE STANDING Product Guide Model # SC2-120 Shorepower Technologies 2351 NW York St. Portland, OR 98664 503-892-7345 info@shorepower.com www.shorepower.com 2
Super Brain 992 Palm Charger
 Super Brain 992 Palm Charger INSTRUCTION MANUAL Features and Specifications DC charger with separate AC power supply included (DC input of 12V to 18V) Large backlit LCD Adjustable charge rate from 0.2
Installation Instructions
 85-3511 rev. 04 11-15 Installation Instructions Polyurethane Bushing Kit for Ford F-53 (Front) (replaces OE bushings and brackets) part #4139-127 1-5/8 diameter INTRODUCTION Thank you for purchasing this
E-941SA-300RQ. Manual. 300-lb Single-Door Electromagnetic Lock with Reversible Magnet
 E-941SA-300RQ 300-lb Single-Door Electromagnetic Lock with Reversible Magnet Manual Reversible magnet for left or right-swing doors. Perfect for cabinets, small enclosures, or pedestrian gates. Selectable
Installation Instructions
 85-3207 rev. 03 05-06 Installation Instructions Thank you for purchasing this anti-sway bar kit. Please read through these instructions before installation. Rear Anti-Sway Bar Kit for the Freightliner
S&G 6300 Electronic Safe Lock. Installation Instructions. Mounting Considerations:
 S&G 6300 Electronic Safe Lock Multiple Compartment Lock Control Installation Instructions Mounting Considerations: Sargent & Greenleaf 6300 Multiple Compartment Electronic Safe Lock has been designed to
Reach ins, Freeezers & Refrigerators Installation & Operation Manual
 Reach ins, Freeezers & Refrigerators Installation & Operation Manual BSR23 BSF23 BSR49 BSF49 BSR72 BSF72 IMPORTANT SAFETY INSTRUCTIONS (SAVE THESE INSTRUCTIONS) Visit us on the web at www.blueairinc.com
HTR-202 INSTRUCTION MANUAL. Portable Digital Height Rod. Befour, Inc. 102 Progress Drive Saukville, WI 53080
 Befour, Inc. 102 Progress Drive Saukville, WI 53080 Phone: 262-284-5150 Toll Free: 1-800-367-7109 Fax: 262-284-5966 Email: mail@befour.com www.befour.com 2014 Befour, Inc. Rev.1 HTR-202 Portable Digital
Owner s Manual FS-10/FreshSpa
 Owner s Manual FS-10/FreshSpa Table of Contents Product Features................ Page 2 Parts List....................... Page 3 Configuration................... Page 4 Installation.....................
Remote Vehicle Control System. Keyless Entry & Remote Start System
 1 Remote Vehicle Control System PC 7400 TM Owner's Manual Keyless Entry & Remote Start System IMPORTANT NOTE: The operation of the Power Code as described in this manual is applicable to most vehicles.
Installation Instructions
 85-3180 rev. 07 03-14 Installation Instructions Thank you for purchasing this antisway bar kit. Please read through these instructions before installation. Front Anti-Sway Bar Kit for the Ford E350/450
Read this entire manual before operation begins.
 Read this entire manual before operation begins. Record below the following information which is located on the serial number data plate. Serial No. Model No. Date of Installation Contents Specifications.............
Installation Instructions
 85-3700 rev. 08 05-18 Installation Instructions Thank you for purchasing this antisway bar kit. Please read through these instructions before installation. Front Anti-Sway Bar Kit for the F53 Chassis part
(Special designed for Duro Gas Grill BI)
") DURO FAUX STONE BASE MODEL: 780-0644A (Special designed for Duro Gas Grill 740-3003BI) Installation and User Care Guide IMPORTANT: Save for electrical inspector s use. Installer: Leave installation instructions
DURO FAUX STONE BASE MODEL: 780-0644A (Special designed for Duro Gas Grill 740-3003BI) Installation and User Care Guide IMPORTANT: Save for electrical inspector s use. Installer: Leave installation instructions
EZ Carrier 3. Owner s Manual. Keep instructions for future reference
 EZ Carrier vv Owner s Manual Keep instructions for future reference Introduction The EZ Carrier provides all the flexibility you may need to transport your mobility scooter. The features include: The capability
CLEAN ROOM DEVICES, LLC "WHERE TUBING AND FITTINGS COME TOGETHER"
 CLEAN ROOM DEVICES, LLC "WHERE TUBING AND FITTINGS COME TOGETHER" CRD600AF Automatic Fitting Inserter With Auto Feed OPERATIONS MANUAL (Shown with optional alcohol dispenser) 1 VERSION 1.1 LAST EDITED
Cast Iron WARNING CAUTION. CAUTION Some parts may contain sharp edges especially as noted in manual. Wear protective gloves if necessary.
 Outdoor Fireplace 04201101 04501122 Cast Iron For Outdoor Use Only CAUTION THIS UNIT IS HEAVY! DO NOT assemble without a helper. CAUTION Some parts may contain sharp edges especially as noted in manual.
Installation Instructions: (Part # SB76828) Jeep JK 2dr/4dr XRC Modular Front Bumper Full Width End Plate Kit
 Jeep JK 2dr/4dr XRC Modular Front Bumper Full Width End Plate Kit") 2007-2013 Jeep JK 2dr/4dr NOTE: Carefully read entire instructions thoroughly before attempting to install this part. Parts Included Qty 93-7649 Full Width End Plate: Drvr 1 93-7652 Full Width End Plate:
2007-2013 Jeep JK 2dr/4dr NOTE: Carefully read entire instructions thoroughly before attempting to install this part. Parts Included Qty 93-7649 Full Width End Plate: Drvr 1 93-7652 Full Width End Plate:
3700/8700/8800 Rim Exit Device Owner s Manual
 3700/8700/8800 Rim Exit Device Owner s Manual 1 80-0180-256, Rev E Table of Contents Table of Contents... 2 What This Owner s Manual Can Do For You... 3 Owner s Record... 3 Exit Device Operation... 4 Dogging
Installation Instructions
 1 Installation Instructions SharkBite Connection System The SharkBite System The SharkBite connection system uses an advanced push-fit design that works in two stages. When the tube is inserted into the
Breezy EC Transport Wheelchair
 B r e e z y E C Tr a n s p o r t W h e e l c h a i r Breezy EC Transport Wheelchair O w n e r s M a n u a l READ BEFORE USE REVIEW THIS MANUAL Before using this chair you, and each person who may assist
User Manual By Firstech LLC, Version: 1.1
 User Manual By Firstech LLC, Version: 1.1 Applicable to the following remote(s); Pro 2BSHLEDR (2-Way 2 Button LED Remote) This device complies with Part 15 of the FCC rules. Operation is subject to the
Hollywood Racks Assembly & installation instructions for models:
 Hollywood Racks Assembly & installation instructions for models: HR1400Y (4 bike), HR1450Y (2 bike), HR1475Y, 1450Y-E & 1455Y-E (E bikes) For use on 2 hitches only. Do not use a 1 ¼ -2 hitch adapter. Maximum
Installation & Operation Guide
 Installation & Operation Guide ENGLISH Digital Deadbolt Models 8712009, 8712109, 8712309, 8712409 Read this manual carefully before installing and operating! Page 1 Index INSTALLATION INSTRUCTIONS Package