Operation & Installation Guide 2087DF / 2092DF. Manual # M DIGITAL WATERPROOF. Manual # M
|
|
|
- Lindsay Watson
- 5 years ago
- Views:
Transcription


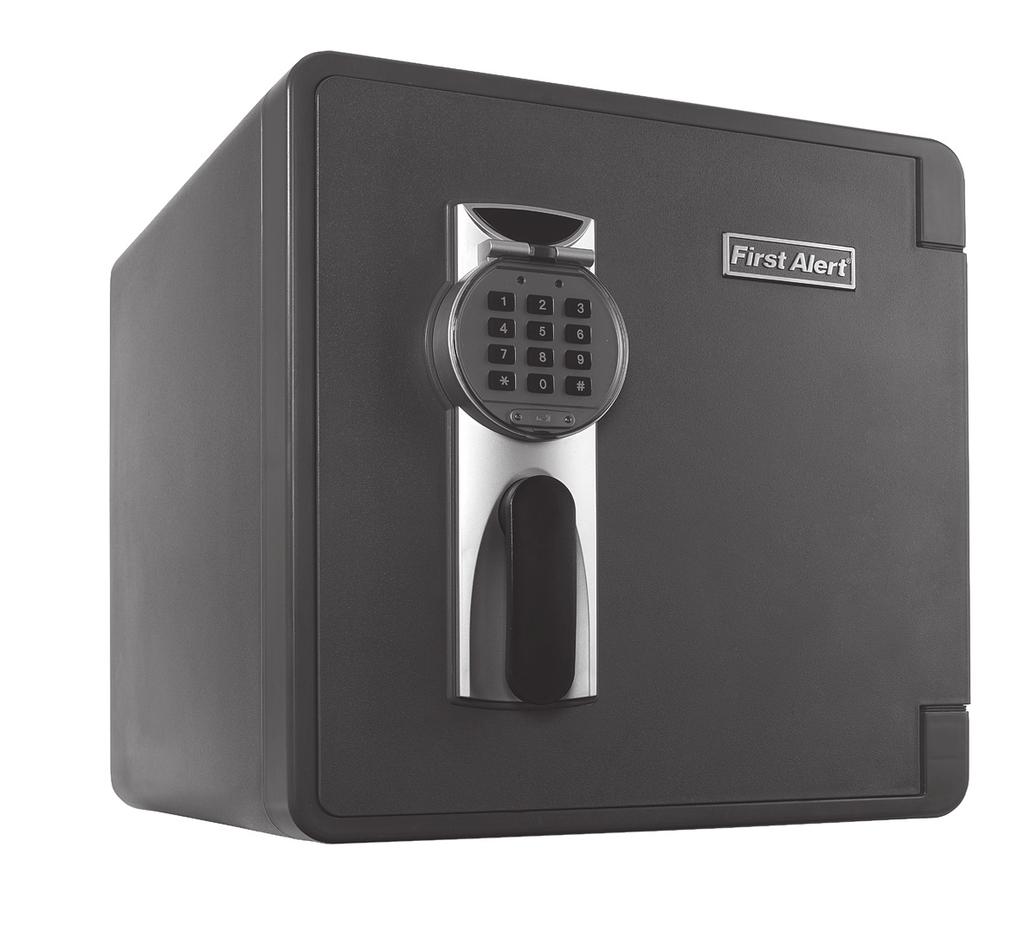
1 Operation & Installation Guide DF / DF Manual M-- DIGITAL WATERPROOF FIRE Safe Manual M--
2 L--XZ Index Index Overview of Your Safe... Opening Your Safe for the First Time... Test Locking System... Programming a Personal Passcode... Emergency Override Key / Battery Replacement... Additional Features... Use, Care and Maintenance... Consumer Affairs... Safe Identification Record... Limited Warranty... OVERVIEW OF YOUR SAFE Congratulations! Overview of Your Safe Your new First Alert Digital Waterproof Fire Safe will provide years of safe and secure protection for your valuables, important documents and other personal items. All First Alert safes are designed and built using the highest manufacturing standards to ensure maximum user satisfaction under a variety of conditions. With proper care, your First Alert safe will provide peace of mind for many years to come. US Patent No. D,,,,. Other patents pending. Package contents L--XZ For Your Protection a Do not remove the serial number tag from the safe. a Store emergency override keys away from safe, NEVER INSIDE. a Record all safe identification numbers on Safe Identification Record on page. a Save this manual and NEVER keep it inside the safe. Emergency Override Keys Adjustable Shelf AA Batteries important: do not return safe to store If you are missing parts, have difficulty programming your safe or have any other questions pertaining to its proper use and care, DO NOT RETURN your safe to the store. Please contact Consumer Affairs at ---, : a.m. p.m. Central Standard Time, Monday through Friday. To assist us in serving you, please have the model number, serial number and date of purchase available when calling.
3 Opening Your Safe For The First Time Test Locking System Opening Your Safe for the First Time Important first time activation Your safe is ready for activation. To open the safe and prevent it from locking before completing the first-time activation, a solenoid deactivation safety device has been installed. Batteries and Emergency Override Keys Remove four () AA batteries and two () Emergency Override Keys. They are located in the protective styrofoam insert at the top of the box. User Activation Install Batteries Turn handle upwards to the right and pull open the safe door. Note: This waterproof safe may require additional force upon initial entry. Slide the battery compartment cover forward and remove. The compartment is located inside the safe at the top of the door. Install the four () AA batteries. Make sure the batteries are installed in the proper direction as indicated in the battery compartment. Slide the cover back into place. After the batteries are correctly installed, the red and green lights located at the top of the keypad on the front of the safe will blink twice, the keypad backlight will flash once and you will hear a single beep. Proceed to Activate Lock. Important Enable/disable sound Once the batteries are installed, if you do not hear a beep when entering the factory pre-set passcode or during the personal passcode re-programming process, enter the following key sequence into the digital keypad: * Battery Configuration + + Green Light Keypad Backlight This will turn the sound on. Repeat the process if you want the sound turned off. Red Light Activate Lock Locate the small plastic Locking Pin on the inside of the safe door. Grip and pull out completely then dispose of properly. Leave the safe door open and proceed to Electronic Locking System Test. test locking system Electronic Locking System Test With the door still open, you can test the Electronic Digital Lock by manually activating the Locking System. To activate the Locking System, locate the locking push button on the inside of the safe door, push it in and turn the handle to the left. This will cause the live door bolts to extend out and into the locked position. Now with the door open and the live door bolts in the locked position, you may proceed to Testing the Passcode. Dead Bolt Dead Bolt Locking Push Button Extended Live Bolts Locking Push Button Extended Live Bolts Important Engaging live bolts Closing the safe door with the Live Bolts in the locked position can damage the safe. The locking push button should only be used when testing or programming the safe with the door remaining open.
4 Test Locking System Testing the Passcode With the safe door open and the Live Bolts engaged, you can now test the Electronic Locking System using the pre-set three digit factory code. Locate the digital keypad on the front of the safe and open up the protective cover to expose the keypad. When the cover is opened, the keypad is activated and the keypad backlight will turn on and remain on for approximately five () seconds. The keypad is still active even when the backlight turns off. It will turn on again when any key is pressed. The pre-set three digit factory passcode is. Enter this passcode as follows: * Note: All entries are accompanied by a beep and the green light will flash. After properly entering the entire sequence, the green light will turn on and the lock will click. You now have five () seconds to open the safe by turning the safe door handle upward to the right. Important If handle will not turn If the handle will not turn to the right after the green light comes on, first turn the handle slightly back to the left until it stops, then turn upwards to the right again to open. Once the handle has been turned to the right, the live bolts will disengage and retract into the door. At this point you have successfully unlocked the safe and the door can be opened. Note: This waterproof safe may require additional force upon initial entry. Leave the safe door open and proceed to Programming a Personal Passcode. Important security lockout periods For added security, the safe will automatically lock out entry for minutes after three () attempts to open with an invalid passcode. MINUTES Programming A Personal Passcode programming a personal passcode For security reasons, it is very important that you program your own personal passcode into the digital lock. The factory code should be changed immediately. To program your own unique three to eight digit (-) passcode, follow these steps: NOTE: After pressing the reset button, the red and green lights on the keypad will flash to indicate the programming is authorized and you have seconds to begin. Open the protective cover on the front of the safe to expose the keypad. With the safe in the open position, press the small reset button located on the inside top edge of the door. Enter your new three to eight digit (-) passcode followed by the key. P A S S C O D E Immediately repeat the sequence, beginning with the new passcode followed by the key. P Minimum Digits A S S C O Reset Button D E The green light will light up solid for seconds, indicating your new passcode has been successfully entered. Your new passcode will now be comprised of the three to eight (-) digit sequence you selected, always followed by the sign. The factory pre-set Passcode will no longer open the safe.! You may change your passcode at any time by repeating the same steps. It is important that you write down your personal passcode and secure it in a safe location away from the safe. NOTE: If you forget your personal Passcode, access to the safe can be made using the Emergency Override key. Important Once your personal passcode is programmed, the factory pre-set code will no longer open the safe.
5 L--XZ Emergency Override Key / Battery Replacement / Additional Features emergency override key/battery replacement Locate and open the protective keypad cover on the front of the safe. Using a small Phillips head screwdriver, remove the two screws securing the small Emergency Override Key lock cover located just below the digital keypad. Pull forward on the cover to remove and set aside with the small screws. Insert the Emergency Override Key into the lock and turn clockwise to the right. Turn the handle upwards to the right to open the safe. L--XZ Low Battery Indicator Every time the keypad is activated, the system automatically checks the power level remaining in the batteries. If the power falls below a certain level, the red light will flash every two seconds to indicate the need for new batteries. Disable / Enable Sound To enable (turn on) the sound during normal operation, press the following key sequence: Repeat the process to turn the sound off. Use, Care and Maintenance * Red Light NOTE: If batteries need replacing, proceed with step. Otherwise, proceed to steps -. Slide the battery compartment cover (located inside the safe at the top of the door) forward and remove. Remove and properly dispose of the four () nonworking batteries. Install four () new AA batteries. Make sure the batteries are installed in the proper direction as indicated in the battery compartment. Slide the cover back into place. Remove the Emergency Override Key, and before replacing the lock cover, enter your personal passcode to make sure the safe will open. Replace the lock cover using the two small screws and return the Emergency Override Key to a secure place away from the safe. Close and lock the safe door by turning handle downward to the left. additional features ShelF To allow for greater flexibility and further accommodate your particular storage needs, this safe includes one () adjustable/ removable shelf. Use, Care and Maintenance Appropriate Use of Your Safe First Alert Waterproof and Fire Resistant Safes protect paper records and many other valuables. Verified fire protection for: This product is NOT INTENDED to protect audio or video cassettes, floppy discs, data cartridges, film and photos or photo negatives from fire. Testing shows that the interior temperature of the safe remains below F for one () hour during a fire up to F when used properly. Your safe must be closed and latched in order to properly protect the contents from fire. USB. MODEL: HD SERIAL:... TB HARD DRIVE CDs & DVDs USB Drives External Hard Drives HOUR Position shelf so that the gripping ridges are on the top and towards the front of the safe. Locate the approximate position in the safe where you would like to place it and, using the guides molded into the walls of the safe, slide the shelf into place. Gripping Ridges
6 Use Care and Maintenance Moisture Warning We recommend that you place delicate items such as pictures or intricate jewelry into an air-tight container before storing them in your safe. Avoid placing your safe in areas of high humidity. For optimum performance, the safe should be opened and aired out for at least minutes every two () weeks. Firearms Warning This safe is not designed to store medication, items with combustible content, guns or other weapons. Pearls Because pearls sustain heat damage at temperatures below F, we advise that you DO NOT store pearls in this fire safe. Safe Care and Maintenance When properly maintained, your safe will continue to operate accurately for many years. In order to ensure optimum performance of your safe, please follow these simple precautions: Battery Maintenance Always purchase and use the batteries as specified by this User s manual. Always replace all batteries at the same time. It is recommended to replace all batteries at least once a year or sooner depending on amount of use. Always clean the battery contacts in the battery compartment and on the batteries before installing new batteries. Always make sure all batteries match the polarity (+ and -) signs in the open battery compartment. If your safe will not be used for an extended period of time, it is recommended that you remove the batteries. Always promptly remove and properly discard of all used batteries. Consumer Affairs Your Safe s Unique Identification Numbers When contacting Consumer Affairs, you should be prepared to supply some important information that specifically identifies your safe. This information is extremely important to assuring prompt and accurate customer assistance. It is strongly recommended that you identify and record the following information in the Safe Identification Record form located on page. Locating Model and Serial Numbers Most First Alert safes include a small metallic silver or gray tag affixed to one of the surfaces. This tag is usually located on the front or right side of the safe. This tag contains the serial number and on selected models a similar tag is attached containing the model number. If a model number tag is not attached to the safe, then it can be located on the front or side panel of the box that the safe was packaged in. Write this number down for future reference. Key Number The key number is located on the key. If you do not have the key, the number is also located on a sticker on the inside of the Emergency Override Key lock cover. Consumer Affairs Model Number Serial Number Key Number L--XZ L L--XZ Clean Hands - Never attempt to operate the digital keypad if your hands have excessive dirt, debris or liquids on them. Clean Safe To clean the surface of your safe, it is recommended that you use a mild cleaner (e.g., window cleaner) to avoid scratching or discoloring the surface. Always wipe dry and NEVER use abrasive cleansers on the safe or digital keypad. Waterproof Your new First Alert Digital Waterproof Fire Safe is designed to help protect your valuables from fire and water. This product is not intended for long term underwater exposure. For future reference, store this manual in a secure area away from the safe. DO NOT DISCARD!. Important do not remove tags In case your safe becomes inoperable or you lose your keys, these identification numbers will be needed to correct the problem. It is recommended that the number tags remain in place on the safe. If removal is necessary, then they should be attached to the inside back cover of this manual. Store in a safe and secure place for future reference.
7 Consumer Affairs How to Obtain Warranty Service If service is required, do not return the product to your retailer. In order to obtain warranty service, contact Consumer Affairs at ---, : a.m. p.m. Central Standard Time, Monday through Friday. To assist us in serving you, please have the model number and date of purchase available when calling. For Warranty Service return to: First Alert, Inc. Attn: Warranty Safe Returns S Banning Blvd Carson, CA Please call us at --- to establish a warranty return set-up Ordering Replacement Keys If you lose the Emergency Override Keys or would like additional keys, you can purchase them from First Alert, Inc. You must supply the following information to assure accurate processing: Safe Identification Record Safe Identification Record Model Number Serial Number Key Number Digital Passcode Record Your passcode must be at least three () digits and no more than eight () digits followed by the sign.!. Name / Address / Telephone Number. Safe Model Number / Serial Number. Key Number (located on the key and on the Emergency Override Key Lock). Notarized statement of ownership (a notary letter form can be printed off at Indicate number of keys requested Please send all the information via fax at -- or mail First Alert, Inc., Liberty Street Road, Aurora, IL -. Checks or Money Orders are required for orders received by mail and should be made payable to First Alert. Contact our Consumer Affairs Department for costing information prior to ordering. Mail To: First Alert, Inc. Attn: Consumer Affairs Liberty Street Road Aurora, IL -
8 Limited Warranty Limited Warranty Limited Warranty LIFETIME AFTER FIRE REPLACEMENT GUARANTEE If your First Alert Digital Waterproof Fire Safe is ever damaged by a fire, BRK will replace it with a comparable model at no charge to the consumer. Freight on the replacement unit is not included in the guarantee and must be paid by the consumer. For claims, submit your name and address, a photo of the damaged safe along with its Model Number, and a copy of the Fire Department report to BRK Consumer Affairs as proof of loss. Once the information is received, Consumer Affairs will contact you with further instructions. LIMITED WARRANTY BRK Brands, Inc., ( BRK ) warrants that for a period of five () years from the date of purchase, this product will be free from defects in material and workmanship. BRK, at its sole option, will repair or replace this product or any component of the product found to be defective during the warranty period. Replacement or repair will be made with a new or remanufactured product or component. If the product is no longer available, replacement may be made with a similar product of equal or greater value. This is your exclusive warranty. This warranty is only valid for the original retail purchaser from the date of initial retail purchase and is not transferable. You must keep the original sales receipt. Proof of purchase is required to obtain warranty performance. BRK dealers, service centers, or retail stores selling this product do not have the right to alter, modify or in any way change the terms and conditions of this warranty. This warranty does not apply to the finish on the product. This warranty does not cover normal wear and tear of parts or damage resulting from any of the following: negligent use or misuse of the product, use contrary to the operating instructions, disassembly, repair or alteration by anyone other than BRK or an authorized service center, improper installation, or exposure to extremes of heat or humidity. Further, the warranty does not cover Acts of God, including natural disasters. BRK shall not be liable for any incidental or consequential damages caused by the breach of any express or implied warranty. BRK is also not responsible for: costs associated with removing or installing the product; damage or loss of the contents of the product; nor for the unauthorized removal of the contents; or damages incurred during shipment. Except to the extent prohibited by applicable law, any implied warranty of merchantability or fitness for a particular purpose is limited in duration to the duration of the above Warranty Period. Some states, provinces or jurisdictions do not allow the exclusion or limitation of incidental or consequential damages or limitations on how long an implied warranty lasts, so the above limitations or exclusion may not apply to you. This warranty gives you specific legal rights, and you may also have other rights that vary from state to state, or province to province, or jurisdiction to jurisdiction. If you have any questions that cannot be answered by reading this manual, call Consumer Affairs at ---. BRK Brands, Inc., a Jarden Corporation company (NYSE: JAH) Liberty Street Road, Aurora, IL - All rights reserved.
2087DF-BD / 2092DF-BD
 Operation & Installation Guide DF-BD / DF-BD Manual M-- www.firstalert.com DIGITAL WATERPROOF FIRE Safe with Ready-Seal Manual M-- L--XZ Index / Overview of Your Safe Overview of Your Safe Index Overview
2087F-BD / 2092F-BD. COMBINATION WATERPROOF FIRE SAFE with Ready-Seal. Operation & Installation Guide. Manual # M
 Operation & Installation Guide 2087F-BD / 2092F-BD Manual # M08-0274-008 www.firstalert.com COMBINATION WATERPROOF FIRE SAFE with Ready-Seal Manual # M08-0274-008 L-10-XZ Index / Overview of Your Safe
Operation & Installation Guide 2087F / 2092F. Manual # M Manual # M
 https://www.supplychimp.com/ Operation & Installation Guide 2087F / 2092F Manual # M08-0280-006 COMBINATION WATERPROOF FIRE SAFE Manual # M08-0280-006 L-10-XZ https://www.supplychimp.com/ Index / Overview
Operation & Installation Guide 2074F / 2079F. Manual # M Digital Anti-Theft Drawer Safe. Manual # M
 Operation & Installation Guide 07F / 079F Manual # M08-07-000 www.firstalert.com Digital Anti-Theft Drawer Safe Manual # M08-07-000 Index / Overview of Your Safe Index Overview of Your Safe Package contents
2060F / 2062F / 2064F
 Operation & Installation Guide 060F / 06F / 064F DIGITAL ANTI-THEFT SAFE MANUAL # M08-070-000 Index / Overview of Your Safe INDEX Overview of Your Safe...1 Initial Set Up... Programming a Personal Passcode...
Limited Warranty. Operation & Installation Guide. Read These Instructions Very Carefully! Home and Office Security Safes M ENGLISH
 Limited Warranty LIFETIME AFTER FIRE REPLACEMENT GUARANTEE Operation & Installation Guide M08-0268-000 ENGLISH If your First Alert Firesafe is ever damaged by a fire, BRK will replace it with a comparable
Digital Anti-Theft Wall Safe
 Operation & Installation Guide 2070AF Manual # M08-0271-000 www.firstalert.com Digital Anti-Theft Wall Safe Manual # M08-0271-000 4 7 8 9 DIGITAL ELECTRONIC S AFE Index / Overview of Your Safe Index Overview
2025F / 2072F / 2073F
 Operation & Installation Guide F / F / F Manual # M-- www.firstlert.com Digital nti-theft Safe Manual # M-- Index / Overview of Your Safe Index Overview of Your Safe Package contents Overview of Your Safe...
Intelligent Electronic Safe
 Operation & Installation Guide 1036616 / 1036617 / 1036618 Intelligent Electronic Safe Please do not keep emergency keys in your safe! MANUAL # M08-0566-155041 Index / Proper Use of Your Safe INDEX Proper
2025F / 2072F / 2073F
 Operation & Installation Guide F / F / F Manual # M-- Digital nti-theft Safe Manual # M-- Index / Overview of Your Safe Index Overview of Your Safe Package contents Overview of Your Safe... Initial Set
ValveSentry USER S MANUAL REVISED 8/6/16 IMPORTANT! PLEASE READ CAREFULLY AND SAVE
 ValveSentry USER S MANUAL REVISED 8/6/16 IMPORTANT! PLEASE READ CAREFULLY AND SAVE This user s manual contains important information about your ValveSentry device s operation. If you are installing this
Owner Use and Care Manual
 Safe Owner Use and Care Manual Model: WS211404-E Tracker Safe LLC 6317 NE 63rd Street Vancouver, WA 98661 (360) 213-0363 www.trackersafe.com Document # Tracker Safe-Owner Use and Care Manual-WS-Rev1 Table
INSTALLATION INSTRUCTIONS
 0711016 Page 1 INSTALLATION INSTRUCTIONS ELECTRONIC DEADBOLT WITH KEYPAD latch 2-3/8 Your latch is now set 2-3/8 (60mm) backset latch 2-3/4 2-3/4" (70mm) 2-3/8" (60mm) Cylindrical cover Extension plate
Operating Instructions Lock Instructions Warranty Extended Warranty
 Operating Instructions Lock Instructions Warranty Extended Warranty Granite 4801 Esco Drive Fort Worth, Texas 76140 T 817-561-9095 F 817-478-3056 Operating Instructions Thank you for purchasing a new safe.
IMPORTANT SAFETY INFORMATION
 Specifications Overall Dimensions Batteries 9" L x 6-3/4" W x 6-3/4" H 4 - AA (sold separately) IMPORTANT SAFETY INFORMATION Installation Precautions 1. Verify that installation surface has no hidden utility
INSTALLATION INSTRUCTIONS SINGLE HORIZONTAL ACCESS DOOR PANTRY INSERT MANUAL
 INSTALLATION INSTRUCTIONS MODEL #88972 SINGLE HORIZONTAL ACCESS DOOR PANTRY INSERT MANUAL TABLE OF CONTENTS PAGE # INSTALLATION INSTRUCTIONS...................2 CABINET LOCATION GUIDELINES...2 REGULAR
Installation & Operation Guide
 Installation & Operation Guide ENGLISH Electronic Entry Lock with Knob Models 8732001, 8732101, 8732301, 8732401 Read this manual carefully before installing and operating! Page 1 Index INSTALLATION INSTRUCTIONS
ELECTRIC WINE OPENER FPSTBW8225. Safety. How to use. Warranty. User Guide/ Guía del Usuario: FPSTBW8220.
 ELECTRIC WINE OPENER SACACORCHOS ELÉCTRICO User Guide/ Guía del Usuario: FPSTBW8220 FPSTBW8225 Safety Seguridad How to use Cómo usar Care & Cleaning Cuidado y Limpieza Warranty Garantía IMPORTANT SAFEGUARDS
Remote Vehicle Control System CA-150. Owner's Manual. Vehicle Security System With Remote Keyless Entry
 Remote Vehicle Control System CA-150 Owner's Manual Vehicle Security System With Remote Keyless Entry IMPORTANT NOTE: The operation of the Security and Convenience System as described in this manual is
Model 2008 I Battery Operated Irrigation Timer with 3/4 in. Anti-Siphon Valve
 i n s t r u c t i o n m a n u a l Model 2008 I Battery Operated Irrigation Timer with 3/4 in. Anti-Siphon Valve Features Weekly or cyclical programming 4 start times per day in weekly program Irrigation
WARNING ATTENTION. Please read this information carefully before operating your safe.
 WARNING Please use caution when unbolting this safe from its shipping skid. Sports Afield recommends anchoring your safe to the floor. Failure to do so may cause the safe to fall forward. ATTENTION Please
ValveSentry USER S MANUAL PLEASE READ CAREFULLY AND SAVE
 ValveSentry USER S MANUAL IMPORTANT! PLEASE READ CAREFULLY AND SAVE This user s manual contains important information about your ValveSentry device s operation. If you are installing this ValveSentry device
SHOTLOCK OWNER S MANUAL TABLE OF CONTENTS -3-
 SHOTLOCK OWNER S MANUAL Thank you for purchasing a ShotLock Solo Vault. Now, you can enjoy peace-of-mind knowing your personal defense shotgun is always close, secure and ready. When the first-responder
Installation & Operation Guide
 Installation & Operation Guide ENGLISH Digital Deadbolt Models 8712009, 8712109, 8712309, 8712409 Read this manual carefully before installing and operating! Page 1 Index INSTALLATION INSTRUCTIONS Package
Owner s Installation Guide
 Owner s Installation Guide Introduction The nophoto is a highly advanced smart detterent device designed to protect your license plate from flash photography. Using patented technology, the nophoto reacts
IMPORTANT SAFETY INFORMATION
 Specifications Outer Dimensions Inner Dimensions Lockbox Inner Dimensions Panel Features Includes 21 W x 15 D x 59 H 20-1/2 W x 12 D x 49-1/2 H 20-1/2 W x 11 D x 7-5/8 H Dual Security System for Keyed
PVI 60KW, PVI 82KW, PVI 95KW
 PVI 60KW PVI 82KW PVI 95KW WARRANTY MANUAL Commercial, Grid-Tied Photovoltaic Inverters 2008, Solectria Renewables LLC Subject to Change DOC-020099 rev 024 1 1 Product Warranty & RMA Policy Warranty Policy
Digital Clock model 75100C
 Instruction Manual Digital Clock model 75100C CONTENTS Unpacking Instructions... 2 Package Contents... 2 Product Registration... 2 Features & Benefits... 3 Clock Setup... 4 Set the Time & Date... 5 Care
Model AS-RC3260 TV Cart. Rolling Cart for Audio Mount System & Flat Panel TVs
 Model AS-RC3260 TV Cart Rolling Cart for Audio Mount System & Flat Panel TVs GETTING STARTED Introduction Congratulations on the purchase of your new Helios AS-RC3260 Rolling Cart. For maximum benefit,
Nature s Generator Power Panel
 Nature s Generator Power Panel Nature s Generator Power Panel Contents Introduction - Unpack Your Nature's Generator Power Panel - Unpack Your Solar Panel Accessory Box - Assemble Your Solar Panel Cart
Index. 2 Warranty Registration. 3 Getting Started & Safe Set-up. 5 NL & Lexam Lock 7 EMP LOCK CONTINUED. 8 Accessories. 8 FAQs
 Index CEO s Letter 1 Limited Lifetime Warranty 2 Warranty Registration 3 Getting Started & Safe Set-up 5 NL & Lexam Lock 6 Identify your Lock 6 Changing the Battery 6 EMP Lock 7 EMP LOCK CONTINUED 8 Accessories
(Special designed for Duro Gas Grill BI)
") DURO FAUX STONE BASE MODEL: 780-0644A (Special designed for Duro Gas Grill 740-3003BI) Installation and User Care Guide IMPORTANT: Save for electrical inspector s use. Installer: Leave installation instructions
DURO FAUX STONE BASE MODEL: 780-0644A (Special designed for Duro Gas Grill 740-3003BI) Installation and User Care Guide IMPORTANT: Save for electrical inspector s use. Installer: Leave installation instructions
Remote Vehicle Control System. Keyless Entry & Remote Start System
 1 Remote Vehicle Control System PC 7400 TM Owner's Manual Keyless Entry & Remote Start System IMPORTANT NOTE: The operation of the Power Code as described in this manual is applicable to most vehicles.
PVI 1800/PVI Residential/Commercial Grid-Tied Photovoltaic Inverter WARRANTY MANUAL. Subject to Change REV , Solectria Renewables
 PVI 1800/PVI 2500 WARRANTY MANUAL Residential/Commercial Grid-Tied Photovoltaic Inverter 2009, Solectria Renewables Subject to Change REV 10.09 1 Product Warranty & RMA Policy 1.1 Warranty Policy The Solectria
WARRANTY POLICY. Grid-Tied Photovoltaic Inverters. Revision D. 2014, Solectria Renewables, LLC DOCIN
 WARRANTY POLICY Revision D 2014, Solectria Renewables, LLC DOCIN-070360 1 Product Warranty & RMA Policy 1. Warranty Policy Warranty Registration: It is important to have updated information about the inverter
SUPERPLUS WATER FILTRATION SYSTEM
 SUPERPLUS WATER FILTRATION SYSTEM For Model #: SP20-1 INSTRUCTIONS/ASSEMBLY USE AND CARE MANUAL (Important: Read this manual thoroughly before install) TABLE OF CONTENTS 2 3 4 6 8 9 10 11 12 General Notes
PLEASE READ BEFORE RETURNING THIS PRODUCT FOR ANY REASON.
 MOBILE COOLER CART INSTRUCTION MANUAL CATALOG NUMBER BCC20W Thank you for choosing BLACK+DECKER! PLEASE READ BEFORE RETURNING THIS PRODUCT FOR ANY REASON. If you have a question or experience a problem
Assembly Instructions
 Assembly Instructions Aluminum Padded Sling Chaise Lounge Questions, problems, or missing parts? Before returning to the store, call Customer Service. -866-988-3300 8 a.m. -5 p.m., PST Monday - Friday
Remote Vehicle Control System. Keyless Entry and Convenience System
 1 Remote Vehicle Control System PC 6100 TM Owner's Manual Keyless Entry and Convenience System IMPORTANT NOTE: The operation of the Power Code as described in this manual is applicable to most vehicles.
Important Operating Instructions and Warranty Information On Your New Electronic AMSEC Safe
 Important Operating Instructions and Warranty Information On Your New Electronic AMSEC Safe MODELS: ES914, ES149, ES1814, ES813, ES916, ES1014, ES2014, ES412, WES149, WES2114 Read Contents Carefully For
CT4880 Collaboration Huddle Table Assembly Instructions
 CT4880 Collaboration Huddle Table Assembly Instructions Monitor, monitor stand and chairs are not included. Thank you for choosing the CT4880 Collaboration Huddle Table from AmpliVox Portable Sound Systems.
Model T2642 Wall Mount. Television Wall Mount with Tilt Option
 Model T2642 Wall Mount Television Wall Mount with Tilt Option Getting Started Introduction Congratulations on the purchase of your new Audio Solutions T2642 Television Wall Mount. For maximum benefit,
i n s t r u c t i o n m a n u a l
 i n s t r u c t i o n m a n u a l Model 7001 Battery Operated Irrigation Controller with Hose or Pipe Thread Features Weekly or cyclical programming 4 start times per day in weekly program Irrigation duration
Model AS-FM64 Wall Mount. Full Motion Television Wall Mount
 Model AS-FM64 Wall Mount Full Motion Television Wall Mount Getting Started Introduction Congratulations on the purchase of your new Audio Solutions AS-FM64 Television Wall Mount. For maximum benefit, please
Power. On Your Terms.
 Power. On Your Terms. 10 YEAR LIMITED WARRANTY PHI 1310 TM 1 SIMPLIPHI POWER, INC. REV102016 10 YEAR LIMITED WARRANTY: PHI 1310 TM LIMITED PRO-RATED WARRANTY COVERAGE The SimpliPhi Power PHI 1310 as supplied
AppCam Solo 2 Rechargeable Battery. Quick Start Guide
 AppCam Solo 2 Rechargeable Battery Quick Start Guide What s in the Box Rechargeabl Battery x1 1 Install the Rechargeable Battery to the Camera Charge the Battery AppCam Solo 2 Power Cable Rechargeable
10 Year Limited Warranty
 Power. On Your Terms. 10 Year Limited Warranty PHI 2.7 TM PHI 3.5 TM 60A SIMPLIPHI POWER, INC. REV020618 10 Year Limited Warranty: PHI 2.7 TM PHI 3.5 TM 60A 24V 48V Limited Pro-Rated Warranty Coverage
2000-LB. ENGINE STAND
 2000-LB. ENGINE STAND WARNING: Read carefully and understand all ASSEMBLY AND OPERATION INSTRUCTIONS before operating. Failure to follow the safety rules and other basic safety precautions may result in
Model Railroad Circuit Breaker (CB-1)
") Model Railroad Circuit Breaker (CB-1) User Manual Ring Engineering Inc. (219) 322-0279 www.ringengineering.com Revision 1.11 Copyright 2018 Ring Engineering Inc. All rights reserved. Introduction Thank
Model Railroad Circuit Breaker (CB-1) User Manual Ring Engineering Inc. (219) 322-0279 www.ringengineering.com Revision 1.11 Copyright 2018 Ring Engineering Inc. All rights reserved. Introduction Thank
Owner s Guide ca4054 ca4554
 PROFESSIONAL SERIES Owner s Guide ca4054 ca4554 Remote Start System IMPORTANT NOTE: The operation of the Security and Convenience System as described in this manual is applicable to most vehicles. However,
Spotlight 1,000,000 Power Series Cordless Rechargeable
 VEC156CFL_Manual_012405 1/24/05 4:29 PM Page iv VEC156 Spotlight 1,000,000 Power Series Cordless Rechargeable OWNER S MANUAL & WARRANTY INFORMATION 53SB E231887 IMPORTANT SAFETY INFORMATION, SAVE THESE
OUTDOOR TABLE TENNIS TABLE ASSEMBLY INSTRUCTIONS
 OUTDOOR TABLE TENNIS TABLE ASSEMBLY INSTRUCTIONS Please Do Not Hesitate to Contact Our Consumer Hotline at 800-759-0977 with Any Questions That May Arise During Assembly or Use of This Product! NG2336P
advanced FLOW engineering Quantum Air Intake Instruction Manual P/N: D / R
 advanced FLOW engineering Quantum Air Intake Instruction Manual P/N: 53-10003D / 53-10003R Make: Ford Model: F-250/F-350/F-450/F-550 Year: 2011-2016 Engine: V8-6.7L (td) Power Stroke Please read the entire
PH550 Parts Cart. Distributed by Torin Jacks, Inc E. Brickell St. Ontario, CA USA
 PH550 Parts Cart This is the safety alert symbol. It is used to alert you to potential personal injury hazards. Obey all safety messages that follow this symbol to avoid possible injury or death. Questions,
NSF MODELS: CTP200, CTP100. This System does not require the services of a plumber. Read and Save these Instructions. Important
 INDEPENDENTLY Installation, Use & Care Guide Countertop Filter Systems MODELS: CTP200, CTP100 This System does not require the services of a plumber. Important Read and Save these Instructions CTP200 shown
Table of Contents. How the Surestart SE 433 Operates Starting the Vehicle with the Remote Starter... 3
 Table of Contents How the Surestart SE 433 Operates... 3 Starting the Vehicle with the Remote Starter... 3 Stopping the Vehicle While It Is Running Via the Remote Starter... 4 Operating Your Vehicle While
Using the power override wire. LED Interior Light System (Optional) Adjusting the shelves: TIPS:
 Adjusting the shelves: TIPS:") Using the power override wire LED Interior Light System (Optional) If your keypad does not respond, don t be alarmed. Most likely the batteries are dead and need replacing. You will be able to open the
Using the power override wire LED Interior Light System (Optional) If your keypad does not respond, don t be alarmed. Most likely the batteries are dead and need replacing. You will be able to open the
WARNING Read these materials prior to assembling and using the trampoline and Trampoline Enclosure
 & Rectangular PowerBounce User s Manual Assembly, Installation, Care, Maintenance, and Use Instructions WARNING Read these materials prior to assembling and using the trampoline and Trampoline Enclosure
Fitting Instruction for EZI-GRIP Bike Rack
 Fitting Instruction for EZI-GRIP Bike Rack Congratulations on purchasing Ezi-Grip to carry your valued bicycles. We are sure you will get many years of enjoyable use from your Ezi-Grip Bike Rack. These
Smart-UPS RT External Battery Pack Stack/Rack-Mount 6U
 Smart-UPS RT External Battery Pack Stack/Rack-Mount 6U SURT192RMXLBP2 SURT192RMXLBP2J English 990-2485B 02/2009 Introduction About this UPS The American Power Conversion (APC ) SURT192RMXLBP2 external
Owner s Guide. ca5354
 PROFESSIONAL SERIES Owner s Guide for models: ca5354 Deluxe Vehicle Remote Start System with 900Mhz 2 Way Confirming LED Remote Control IMPORTANT NOTE: The operation of the Security and Convenience System
2-Pack Indoor/Outdoor Simulated Security Cameras. Owner s Manual
 2-Pack Indoor/Outdoor Simulated Security Cameras Owner s Manual WARNING: Read carefully and understand all ASSEMBLY AND OPERATION INSTRUCTIONS before operating. Failure to follow the safety rules and other
Owner s Guide. ca5154
 PROFESSIONAL SERIES Owner s Guide for models: ca5154 Automatic / Manual Transmission Remote Start and Keyless Entry System IMPORTANT NOTE: The operation of the Security and Convenience System as described
Instant Wine Aerator USER MANUAL SAVE THIS MANUAL FOR FUTURE REFERENCE
 Instant Wine Aerator USER MANUAL SAVE THIS MANUAL FOR FUTURE REFERENCE Table of Contents Section 1. Information 1.1 Introduction 1.2 Safety Warnings Section 2. Product Parts Section 3. Product Information
TXJ0500/RR500 1,000-lbs. Truck Bed Roller Dolly
 OWNER S MANUAL TXJ0500/RR500 1,000-lbs. Truck Bed Roller Dolly WARNING: Questions, problems, missing parts? Before returning to your retailer, call our customer service department at 1-888-448-6746, 8
CA 5054 Owner s Guide
 PROFESSIONAL SERIES CA 5054 Owner s Guide Remote Start and Keyless Entry System IMPORTANT NOTE: The operation of the Security and Convenience System as described in this manual is applicable to most vehicles.
3700/8700/8800 Rim Exit Device Owner s Manual
 3700/8700/8800 Rim Exit Device Owner s Manual 1 80-0180-256, Rev E Table of Contents Table of Contents... 2 What This Owner s Manual Can Do For You... 3 Owner s Record... 3 Exit Device Operation... 4 Dogging
Owner s Guide ca4053 ca4553
 PROFESSIONAL SERIES Owner s Guide ca4053 ca4553 Remote Start System IMPORTANT NOTE: The operation of the Security and Convenience System as described in this manual is applicable to most vehicles. However,
Adjustable Shop Stool with Backrest
 Adjustable Shop Stool with Backrest Owner s Manual WARNING: Read carefully and understand all ASSEMBLY AND OPERATION INSTRUCTIONS before operating. Failure to follow the safety rules and other basic safety
CHAIN AND SHACKLE LOCK SECURITY SYSTEMS
 -J05161 REV. 2010-03-24 CHAIN AND SHACKLE LOCK SECURITY SYSTEMS GENERAL Kit Number 94869-10, 94872-10 Models The shackle lock can be used to secure the front or rear slotted brake discs or secure theft
Installation & Operators Manual
 Installation & Operators Manual Model Serial Number Purchase Date 2007-2008 SegVator, LLC Patent Pending All Rights Reserved Important Safety Information Make sure the vehicle has a properly installed
AC Irrigation and Propagation Controllers I Four Station, 5006-I and 5006-IP Six Station
 AC Irrigation and Propagation Controllers 5004-I Four Station, 5006-I and 5006-IP Six Station I N S T R U C T I O N M A N U A L Table of contents Introduction 1 1. Specifications 1 2. Controller Mounting
SLX300. Register your product. Send us your photos. Warranty COLOR CHANGING HEADLIGHT ACCENT LIGHTING SYSTEM. Installation Manual
 Register your product In order to provide you with prompt warranty service and technical support please register your product on line at www.varad.com. Be sure to have your product serial number ready.
Model FM2642 Wall Mount. Full Motion Television Wall Mount
 Model FM2642 Wall Mount Full Motion Television Wall Mount Getting Started Introduction Congratulations on the purchase of your new Audio Solutions FM2642 Television Wall Mount. For maximum benefit, please
182-LED Solar-Powered Motion Security Light. Owner s Manual
 182-LED Solar-Powered Motion Security Light Owner s Manual WARNING: Read carefully and understand all ASSEMBLY AND OPERATION INSTRUCTIONS before operating. Failure to follow the safety rules and other
Owner s Guide CA 4555
 PROFESSIONAL SERIES Owner s Guide For Model: CA 4555 Vehicle Remote Start System with 2 Way Confirming Remote Control IMPORTANT NOTE: The operation of the Security and Convenience System as described in
Shower System. Dual Head INSTRUCTION GUIDE
 INSTRUCTION GUIDE Step-By-Step Illustrated Installation Instructions Jet Cleaning Instructions Proper Finish Care Limited Warranty Read these instructions carefully before installing your new shower system
Owner s Guide. ca6154
 PROFESSIONAL SERIES Owner s Guide For Models: ca6154 Deluxe Vehicle Security and Remote Start System IMPORTANT NOTE: The operation of the Security and Convenience System as described in this manual is
1000-LB. ENGINE STAND
 1000-LB. ENGINE STAND WARNING: Read carefully and understand all ASSEMBLY AND OPERATION INSTRUCTIONS before operating. Failure to follow the safety rules and other basic safety precautions may result in
1000-LB. MOTORCYCLE LIFT TABLE OWNER S MANUAL
 1000-LB. MOTORCYCLE LIFT TABLE OWNER S MANUAL WARNING: Read carefully and understand all ASSEMBLY AND OPERATION INSTRUCTIONS before operating. Failure to follow the safety rules and other basic safety
SAFE OWNER S MANUAL SERIAL NO..
 NOTHING PROTECTS LIKE A CANNON TM EST 1965 SAFE OWNER S MANUAL SERIAL NO DO NOT LOCK THIS IN YOUR SAFE IMPORTANT: FILL OUT THE INFORMATION BELOW AND RETAIN FOR YOUR RECORDS IT WILL BE REQUIRED WHEN CALLING
USER S MANUAL & WARRANTY INFORMATION
 VEC117BD_Manual_122905 2/20/06 3:31 PM Page 8 VEC117BD TWO YEAR LIMITED WARRANTY PROGRAM This limited warranty program is the only one that applies to this product, and it sets forth all the responsibilities
Pressure Washer Hose Reel
 Pressure Washer Hose Reel Owner s Manual WARNING: Read carefully and understand all ASSEMBLY AND OPERATION INSTRUCTIONS before operating. Failure to follow the safety rules and other basic safety precautions
Humidity Monitor model 00619
 Instruction Manual Humidity Monitor model 00619 CONTENTS Unpacking Instructions...2 Package Contents...2 Product Registration...2 Features & Benefits...3 Setup...3 Measurement Units...4 Placement Guidelines...4
4-LED Solar-Powered Pendant Shed Light
 4-LED Solar-Powered Pendant Shed Light Owner s Manual WARNING: Read carefully and understand all ASSEMBLY AND OPERATION INSTRUCTIONS before operating. Failure to follow the safety rules and other basic
i n s t r u c t i o n m a n u a l
 i n s t r u c t i o n m a n u a l 8006 Six-Station AC Timer Residential/Light Commercial Independent Program Irrigation Controllers Installation, Programming and Operating Instructions Features Operates
Heavy Duty Four Wheeled Walker
 Heavy Duty Four Wheeled Walker Weight Capacity: 500 lbs. ITEM # W1802 Made in China 2011 ESSENTIAL MEDICAL SUPPLY, INC. Manufactured for Orlando, FL 32822 -- SAVE THESE INSTRUCTIONS -- Do not attempt to
Effective June 1, 2013 This guide supersedes all previous versions
 Effective June 1, 2013 This guide supersedes all previous versions 3842 Redman Drive 1-800-797-7974 Fort Collins, CO 80524 www.commandlight.com L-CAS THANK YOU Please allow us to express a simple thank
Window Thermometer models / / 00423
 Instruction Manual Window Thermometer models 00305 / 00306 / 00423 CONTENTS Unpacking Instructions... 2 Package Contents... 2 Product Registration... 2 Features & Benefits... 3 Setup... 3 Placement Guidelines...
The Next Generation. of Intakes. advanced FLOW engineering Momentum Air Intake. Instruction Manual P/N: E
 The Next Generation advanced FLOW engineering Momentum Air Intake Instruction Manual P/N: 51-72005-E Make: RAM Model: 2500/3500 HD Year: 2013-2018 Engine: L6-6.7L (td) of Intakes Please read the entire
CA 5053 Owner s Guide
 PROFESSIONAL SERIES CA 5053 Owner s Guide Remote Start and Keyless Entry System IMPORTANT NOTE: The operation of the Security and Convenience System as described in this manual is applicable to most vehicles.
INSTALLATION GUIDE. Rainier Coil Pull Down Kitchen Faucet PB-K01
 INSTALLATION GUIDE Rainier Coil Pull Down Kitchen Faucet PB-K01 RECOMMENDED TOOLS AND MATERIALS Plumbers Putty Adjustable Wrench Tape Measure Basin Wrench Phillips Screwdriver Pencil Masking Tape BEFORE
INSTALLATION GUIDE. Tenino Retro Pot Filler Hi-Rise Kitchen Faucet PB-K05
 INSTALLATION GUIDE Tenino Retro Pot Filler Hi-Rise Kitchen Faucet PB-K05 RECOMMENDED TOOLS AND MATERIALS Sink Hole Cover (Optional) Allen Wrench Set Plumbers Putty Adjustable Wrench Tape Measure Basin
Harvil 4 Foot Air Hockey Table
 Harvil 4 Foot Air Hockey Table Thank you for your purchase of this Harvil product! We work around the clock and around the globe to ensure that Harvil products maintain the highest possible quality. However,
User Instruction Manual
 RAIL LOCK SPRING COMPRESSOR User Instruction Manual For Spring and Gas Piston Rifles and Pistols V1 03/16 Contents Parts of the Rail Lock compressor...3 Disassembling your rifle or pistol...4-6 Assembling
Owner s Guide CA 5055
 PROFESSIONAL SERIES Owner s Guide For Model: CA 5055 Vehicle Remote Start and Keyless Entry System IMPORTANT NOTE: The operation of the Security and Convenience System as described in this manual is applicable
Instruction Sheet DWRSR-ZL. Zero Clearance Latch
 Instruction Sheet DWRSR-ZL Zero Clearance Latch US Patent 7,188,570 B2 THANK YOU Thank you for purchasing the DWRSR-ZL Zero Clearance Latch. Please read these instructions thoroughly before installing
Thermometer models 02023, 02028, 02029
 Instruction Manual Thermometer models 02023, 02028, 02029 CONTENTS Unpacking Instructions... 2 Package Contents... 2 Product Registration... 2 Features & Benefits... 3 Setup... 4 Set the Time, Date & Units...
CPL 100 Owner's Manual
 BY CPL 100 Owner's Manual Keyless Entry Upgrade Security System IMPORTANT NOTE: The operation of the Security and Convenience System as described in this manual is applicable to most vehicles. However,
Utility Cart. Owner s Manual
 Utility Cart Owner s Manual WARNING: Read carefully and understand all ASSEMBLY AND OPERATION INSTRUCTIONS before operating. Failure to follow the safety rules and other basic safety precautions may result