Titan Owner s Manual 1
|
|
|
- Joshua Williams
- 6 years ago
- Views:
Transcription
1 Titan Owner s Manual 1
2 Thank you for purchasing a SnapSafe Titan. Now you have the peace-of-mind knowing your valuables are protected from loss due to fire or theft. Best of all, you can easily locate or relocate this protection anywhere piece-by-piece to any room in minutes. The SnapSafe Modular Assembly System offers all the impregnability of a welded safe in an easy-to-assemble modular design. CUSTOMER SERVICE For all Customer Service questions call toll free: Or write: SnapSafe Inc. Customer Service 3721 Doubleton Drive, Stuart, FL Or info@snapsafe.com 2


 INTERIOR : 55 1/8\"H x 17\"W x 14 1/2\"D DOOR OPENING : 52\"H x 14 3/4\"W LOCKING BOLTS : 8 CAPACITY : 12 + Long Guns WEIGHT : 388 Lbs.")
3 SNAPSAFE TITAN FEATURES: Delivered right to your door Assembles in minutes Sledgehammer and pry-bar resistant 3/16" solid steel door Thick steel exterior walls 2300 F one-hour Fire Shield protection Heat activated door fire seals Secures 12+ long guns Nine slot full gun rack Option Between UL Security Listed locks: Digital or Mechanical Eight chrome steel live locking bolts Spring-loaded relocker Powder coated finish Lined interior Adjustable lined shelves Includes 1 full shelf and full gun rack and a half gun rack with 2 half shelves Professional grade non breach seal dead bolt door Predrilled for floor mounting Lifetime warranty SNAPSAFE TITAN SPECIFICATIONS: MODEL : Titan EXTERIOR : 59"H x 22"W x 17 1/2"D (Add 3" for handle) INTERIOR : 55 1/8"H x 17"W x 14 1/2"D DOOR OPENING : 52"H x 14 3/4"W LOCKING BOLTS : 8 CAPACITY : 12 + Long Guns WEIGHT : 388 Lbs. - 9 Gauge 3

 onto the hub on DOOR (Part #12). 3.")

 and set aside. 6. Assemble Top, Bottom and Sides (Parts #1 through #4) first.")


4 Top Right Side Left Side Bottom Back Top Interior Panel Door Frame Left Interior Panel Right Interior Panel Bottom Interior Panel Stand Safe Upright And Hang Door Divider Gun Rack Divider Top Shelves ASSEMBLING YOUR SNAPSAFE TITAN 1. Unpack and lay out all parts. 2. Thread DOOR HANDLE SPOKES (Part #11) onto the hub on DOOR (Part #12). 3. Install a fresh high-quality 9V battery in the Entry Keypad (see pages 8 and 9). 4. Important Remove temporary door hinge bolts from door hinges. 5. Enter the factory combination code and open the DOOR, then lift it off the DOOR FRAME (Part #6) and set aside. 6. Assemble Top, Bottom and Sides (Parts #1 through #4) first. Then bolt the entire assembly onto the BACK (Part #5). 7. For additional help watch our Live Action Assembly Video on the Features page at Notes: 1. Each part is marked with an assembly number, orientation and instructions. 2. Each part s orientation: TOP, BOTTOM, FRONT, etc. matches its orientation in the assembled vault. LEFT and RIGHT are as you face the front of the vault. 3. For easier assembly, remove the FIRESHIELD blankets from the TOP, BOTTOM and SIDEWALLS and then stuff them back into place before interior assembly. 4. Screw on nuts loosely at first. Once all Exterior Panels are aligned and seated tighten the nuts. 5. The INTERIOR SIDE PANELS are designed to fit snuggly. Insert them through the door opening bottom-to-top and then slide into final position front-to-back. 6. Insert the INTERIOR BOTTOM PANEL through the door opening between the front and back shelf strips and then drop into position front-to-back. 4

 Part #14 GUN RACK DIVIDER TOP (optional) Part #15 SHELF HARDWARE (not pictured) Part")
 Part #20 FULL GUN RACK (not pictured) #7 #1 #8 #18 #5 #9 #3 #14 #11 #13 #17 #16 #6")
5 TITAN PARTS LIST #2 Part #1 LEFT SIDE Part #2 TOP Part #3 RIGHT SIDE Part #4 BOTTOM Part #5 BACK Part #6 DOOR FRAME Part #7 TOP INTERIOR PANEL Part #8 LEFT INTERIOR PANEL Part #9 RIGHT INTERIOR PANEL Part #10 BOTTOM INTERIOR PANEL Part #11 DOOR HANDLE SPOKES Part #12 DOOR Part #13 DIVIDER (optional) Part #14 GUN RACK DIVIDER TOP (optional) Part #15 SHELF HARDWARE (not pictured) Part #16 LOWER SHELF (optional) Part #17 LOWER SHELF (optional) Part #18 UPPER SHELF Part #19 HARDWARE (not pictured) Part #20 FULL GUN RACK (not pictured) #7 #1 #8 #18 #5 #9 #3 #14 #11 #13 #17 #16 #6 #10 #12 #4 5

 Part")

6 Part #2 TOP Part #5 BACK Part #1 LEFT Part #3 RIGHT Part #6 DOOR FRAME Part #12 DOOR Part #4 BOTTOM Part #7 TOP INTERIOR PANEL Part #14 GUN RACK DIVIDER TOP (optional) Part #18 UPPER SHELF Part #10 BOTTOM INTERIOR PANEL Part #13 DIVIDER (optional) Part #16 LOWER SHELF (optional) Part #17 LOWER SHELF (optional) Part #8 LEFT INTERIOR PANEL Part #9 RIGHT INTERIOR PANEL Part #20 FULL GUN RACK 6
7 YOUR COMBINATION CODE Your factory preset combination code is It is recorded in a small envelope wired to the door handle of your vault. Store this combination in a location other than your vault. OPENING AND CLOSING YOUR VAULT OPENING: 1. Enter the 6-digit combination code. 2. Rotate 3-spoke handle clockwise into the open position and pull door open. 3. The Entry Keypad relocks in 4 seconds after a valid code has been entered. 4. The Entry Keypad will return to standby status with a long beep sound if there is no operation in 10 seconds after the system has been activated. 5. If you enter an incorrect combination 4-times in a row, the lock will shut down for 5-minutes. CLOSING: 1. Close vault door. 2. Rotate 3-spoke handle counterclock wise to the closed position until you hear bolts engage. CHANGING YOUR COMBINATION CODE Write down and store a new 6-digit code. (Do not store in vault).) You cannot set the combination code to six (6) zeros (0). 1. Open vault door and lock it in open position. 2. Enter zero (0) six (6) times. One beep sounds indicating the entry is valid and the system is awaiting a code change. 3. Enter the existing 6-digit code. One beep sounds, indicating the entry is valid. 4. Enter a new 6-digit code. One beep sounds, indicating the entry is valid. 5. Re-enter the new 6-digit code. One beep sounds, indicating that the code in step 4 and 5 are the same and that the code change is successful. 6. If three beeps sound, the code change was unsuccessful, and the existing code is still valid. Repeat steps Enter and check new code 3-times before closing door. Note: Each step in the code change process must be completed in 10 seconds or the system reverts back to standby status. 7

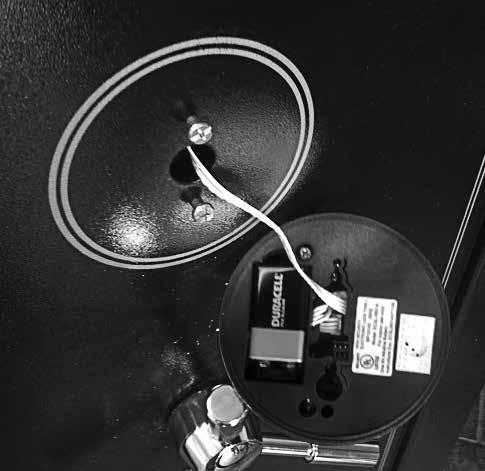
8 DOUBLE SAFEGUARDING VALUABLE PAPERS Your SnapSafe Titan s Fire Shield blankets are rated at 2300ºF for one hour. However, we recommend that if you are going to be putting important papers in the vault, you first put it in a fire resistant document box, and then put it in the vault. BOLTING DOWN YOUR VAULT We recommend bolting your vault to the floor using two ¼" wedge anchor concrete bolts through the predrilled holes in the BOTTOM of the vault. LOW BATTERY ALERT Your lock has a Low Battery Alert. If the Entry Keypad beeps repeatedly during an unlocking, the battery is low and needs immediate replacement. INSTALLING AND REPLACING ENTRY KEYPAD BATTERY Your vault is equipped with an electronic lock made with non-volatile memory, meaning your combination code is retained even if the batteries are no longer powering the lock. If this happens, simply replace the batteries. Install only a high-quality alkaline battery in the compartment in the back of the Entry Keypad following these steps. 1. Remove Entry Keypad. Slide it up and carefully pull it away from the vault door. (Fig.1) Note: Do not pull the Keypad as too much force may damage the cable. 2. Snap new battery into the connector clip, and slide it into the battery compartment top down so that the wires will not be pinched between the battery and the vault door. (Fig.2) 3. Fold the connection cable inside the Keypad (Fig.3) 4. Position the Keypad over the mounting screws, and slide it down into position. Note: Make sure the connection cable is not trapped between the Keypad and the door or rubs or tangles on the mounting screws. (Fig.4) 8
9 9
10 CARE AND MAINTENANCE With a little care and maintenance your SnapSafe Modular Vault will last a lifetime. Keep the door hinge pins lightly greased so that the door opens smoothly. Vacuum the inside from time to time, and wipe down the outside with a soft cloth and mild detergent. Never use harsh solvents or abrasives on any surfaces, as they may damage the exterior finish or interior materials. SNAPSAFE LIFETIME WARRANTY Were going to take care of you. Period. We have built products and a company we are proud of and want you to be as well. If you ever experience a fire or attempted break-in we ll repair or replace your vault at no charge. (All you have to do is to forward the report from the proper investigative agency.) 10
11 NOTES: 11
12 IMPORTANT! Keep for Your Records. Do not store this booklet and information in your vault. Date of receipt of vault Vault serial number (Located on plate on the bottom of door frame) Customer Service: 3721 Doubleton Drive Stuart, FL REV SnapSafe is a Hornady Company.
Super Titan XL Owner s Manual
 Super Titan XL Owner s Manual Thank you for purchasing a SnapSafe Super Titan XL. The SnapSafe Modular Assembly System offers all the impregnability of a welded safe in an easy-toassemble modular design.
Titan Safe Owner s Manual
 Titan Safe Owner s Manual Thank you for purchasing a SnapSafe Titan. Now you have the peace-of-mind knowing your valuables are protected from loss due to fire or theft. Best of all, you can easily locate
WARNING ATTENTION. Please read this information carefully before operating your safe.
 WARNING Please use caution when unbolting this safe from its shipping skid. Sports Afield recommends anchoring your safe to the floor. Failure to do so may cause the safe to fall forward. ATTENTION Please
INSTALLATION INSTRUCTIONS
 0711016 Page 1 INSTALLATION INSTRUCTIONS ELECTRONIC DEADBOLT WITH KEYPAD latch 2-3/8 Your latch is now set 2-3/8 (60mm) backset latch 2-3/4 2-3/4" (70mm) 2-3/8" (60mm) Cylindrical cover Extension plate
Operation & Installation Guide 2074F / 2079F. Manual # M Digital Anti-Theft Drawer Safe. Manual # M
 Operation & Installation Guide 07F / 079F Manual # M08-07-000 www.firstalert.com Digital Anti-Theft Drawer Safe Manual # M08-07-000 Index / Overview of Your Safe Index Overview of Your Safe Package contents
2087DF-BD / 2092DF-BD
 Operation & Installation Guide DF-BD / DF-BD Manual M-- www.firstalert.com DIGITAL WATERPROOF FIRE Safe with Ready-Seal Manual M-- L--XZ Index / Overview of Your Safe Overview of Your Safe Index Overview
Installation & Programming Manual. Quick Reference
 Installation & Programming Manual Getting Started Prepare door, per additional instructions (included) before installing unit. IMPORTANT: Read instructions completely before beginning installation. Refer
Digital Anti-Theft Wall Safe
 Operation & Installation Guide 2070AF Manual # M08-0271-000 www.firstalert.com Digital Anti-Theft Wall Safe Manual # M08-0271-000 4 7 8 9 DIGITAL ELECTRONIC S AFE Index / Overview of Your Safe Index Overview
Owner Use and Care Manual
 Safe Owner Use and Care Manual Model: WS211404-E Tracker Safe LLC 6317 NE 63rd Street Vancouver, WA 98661 (360) 213-0363 www.trackersafe.com Document # Tracker Safe-Owner Use and Care Manual-WS-Rev1 Table
Operation & Installation Guide 2087DF / 2092DF. Manual # M DIGITAL WATERPROOF. Manual # M
 Operation & Installation Guide DF / DF Manual M-- www.firstalert.com DIGITAL WATERPROOF FIRE Safe Manual M-- L--XZ Index Index Overview of Your Safe... Opening Your Safe for the First Time... Test Locking
Limited Warranty. Operation & Installation Guide. Read These Instructions Very Carefully! Home and Office Security Safes M ENGLISH
 Limited Warranty LIFETIME AFTER FIRE REPLACEMENT GUARANTEE Operation & Installation Guide M08-0268-000 ENGLISH If your First Alert Firesafe is ever damaged by a fire, BRK will replace it with a comparable
Operating Instructions Lock Instructions Warranty Extended Warranty
 Operating Instructions Lock Instructions Warranty Extended Warranty Granite 4801 Esco Drive Fort Worth, Texas 76140 T 817-561-9095 F 817-478-3056 Operating Instructions Thank you for purchasing a new safe.
Product card User manual. KP Strong Safe
 Product card User manual KP Strong Safe Grade IV - VI KONSMETAL Export Department export@konsmetal.pl KONSMETAL Service: phone: +48 89 6253799 (Monday Friday: 8-16) e-mail: serwis@konsmetal.pl Contents
Product card User manual. KP Strong Safe
 Product card User manual KP Strong Safe grade II and III with ECB-S certificate KONSMETAL Export Department export@konsmetal.pl KONSMETAL Service: phone: +48 89 6253799 (Monday Friday: 8-16) e-mail: serwis@konsmetal.pl
Product card User manual. Koliber Safes Koliber Deposit Drop Safes KSN Wall Safes Grade S1
 Product card User manual Koliber Safes Koliber Deposit Drop Safes KSN Wall Safes Grade S1 KONSMETAL Service phone: +48 89 6253799 (Monday-Friday 8-16) e-mail: serwis@konsmetal.pl Contents Application...
SAFE OWNER S MANUAL SERIAL NO..
 NOTHING PROTECTS LIKE A CANNON TM EST 1965 SAFE OWNER S MANUAL SERIAL NO DO NOT LOCK THIS IN YOUR SAFE IMPORTANT: FILL OUT THE INFORMATION BELOW AND RETAIN FOR YOUR RECORDS IT WILL BE REQUIRED WHEN CALLING
2060F / 2062F / 2064F
 Operation & Installation Guide 060F / 06F / 064F DIGITAL ANTI-THEFT SAFE MANUAL # M08-070-000 Index / Overview of Your Safe INDEX Overview of Your Safe...1 Initial Set Up... Programming a Personal Passcode...
16" STAND FAN WITH REMOTE
 OWNER S MANUAL 16" STAND FAN WITH REMOTE MODEL:FS40-8JR READ AND SAVE THESE INSTRUCTIONS Attention: Pictures in the IM are for reference only. CAUTION Read rules for safe operation and instrucions carefully.
Troubleshooting: Door Jamming and Door Handing 6. Troubleshooting: Keypad 11. Troubleshooting: Smart Home Systems 12. Troubleshooting: Battery 14
 Programming and Troubleshooting Guide 1 2 3 4 5 6 Mastercode 2 Troubleshooting: Door Jamming and Door Handing 6 Troubleshooting: Keypad 11 Troubleshooting: Smart Home Systems 12 Troubleshooting: Battery
2025F / 2072F / 2073F
 Operation & Installation Guide F / F / F Manual # M-- Digital nti-theft Safe Manual # M-- Index / Overview of Your Safe Index Overview of Your Safe Package contents Overview of Your Safe... Initial Set
OPERATION MANUAL. Manual for GW2 2-port and GW3 3-port Dispensers. Java Creations Iced Coffee & Java Works Creamery Classics machines
 OPERATION MANUAL Manual for GW2 2-port and GW3 3-port Dispensers Java Creations Iced Coffee & Java Works Creamery Classics machines (revised 6.1.2017) 1 TABLE OF CONTENTS Page Unpacking and Inspection
2087F-BD / 2092F-BD. COMBINATION WATERPROOF FIRE SAFE with Ready-Seal. Operation & Installation Guide. Manual # M
 Operation & Installation Guide 2087F-BD / 2092F-BD Manual # M08-0274-008 www.firstalert.com COMBINATION WATERPROOF FIRE SAFE with Ready-Seal Manual # M08-0274-008 L-10-XZ Index / Overview of Your Safe
Here we have the old lock on an exterior door (note more than one door was used for this article- taking the best pictures of the group)
") Alarm lock T2 Part 1 of 4 Installations Eugene Hansen 2004 This is the first part of four, 1st we will install a T2 Trilogy, 2 nd replacing the batteries, 3 rd replacing the solenoid and finally 4 th reprogramming
Alarm lock T2 Part 1 of 4 Installations Eugene Hansen 2004 This is the first part of four, 1st we will install a T2 Trilogy, 2 nd replacing the batteries, 3 rd replacing the solenoid and finally 4 th reprogramming
DF Ford F Short Bed 2009-Current
 921019 DF921019 Ford F150 5.5 Short Bed 2009-Current Hardware (Box 1 of 2) 1. Tango front rail assembly 2. Tango left rail assembly 3. Tango right rail assembly 4. Rhino Rack cross bars (2) 5. Clamps (8)
Using the power override wire. LED Interior Light System (Optional) Adjusting the shelves: TIPS:
 Adjusting the shelves: TIPS:") Using the power override wire LED Interior Light System (Optional) If your keypad does not respond, don t be alarmed. Most likely the batteries are dead and need replacing. You will be able to open the
Using the power override wire LED Interior Light System (Optional) If your keypad does not respond, don t be alarmed. Most likely the batteries are dead and need replacing. You will be able to open the
Index. 2 Warranty Registration. 3 Getting Started & Safe Set-up. 5 NL & Lexam Lock 7 EMP LOCK CONTINUED. 8 Accessories. 8 FAQs
 Index CEO s Letter 1 Limited Lifetime Warranty 2 Warranty Registration 3 Getting Started & Safe Set-up 5 NL & Lexam Lock 6 Identify your Lock 6 Changing the Battery 6 EMP Lock 7 EMP LOCK CONTINUED 8 Accessories
Troubleshooting: Installation 8. Troubleshooting: Door Jamming and Door Handing 9. Troubleshooting: Keypad 13. Troubleshooting: Smart Home Systems 14
 Programming and Troubleshooting Guide 1 2 3 4 5 6 7 Mastercode 2 Troubleshooting: Installation 8 Troubleshooting: Door Jamming and Door Handing 9 Troubleshooting: Keypad 13 Troubleshooting: Smart Home
Operation & Installation Guide 2087F / 2092F. Manual # M Manual # M
 https://www.supplychimp.com/ Operation & Installation Guide 2087F / 2092F Manual # M08-0280-006 COMBINATION WATERPROOF FIRE SAFE Manual # M08-0280-006 L-10-XZ https://www.supplychimp.com/ Index / Overview
2025F / 2072F / 2073F
 Operation & Installation Guide F / F / F Manual # M-- www.firstlert.com Digital nti-theft Safe Manual # M-- Index / Overview of Your Safe Index Overview of Your Safe Package contents Overview of Your Safe...
SafeLogic Xtreme - Electromechanical Redundant Safe Lock System - Instructions
 SafeLogic Xtreme - Electromechanical Redundant Safe Lock System - Instructions Please visit the website below by scanning the QR code with your smartphone or by typing in the address below for video instructions
INSTALLATION & OWNER S MANUAL
 Rev. C, p. 1 of 18 INSTALLATION & OWNER S MANUAL KUBOTA RTV 400 CAB (Not for use on RTV 500) These instructions are for installation of the complete cab as well as the modular components. DESCRIPTION:
Troubleshooting: Installation 10. Troubleshooting: Door Jamming and Door Handing 11. Troubleshooting: Touchscreen 14
 Programming and Troubleshooting Guide 1 2 3 4 5 6 7 Mastercode 2 Troubleshooting: Installation 10 Troubleshooting: Door Jamming and Door Handing 11 Troubleshooting: Touchscreen 14 Troubleshooting: Smart
Operator's Manual. Storage System. Ultrasound Probe Cabinet. Manufactured by:
 Storage System Ultrasound Probe Cabinet Operator's Manual Manufactured by: CIVCO Medical Solutions 102 First Street South Kalona, IA 52247 USA 319.248.6757 / 800.445.6741 WWW.CIVCO.COM Copyright 2018 All
CHUBBSAFES EVOLVE INSTRUCTION MANUAL
 CHUBBSAFES EVOLVE INSTRUCTION MANUAL 1 Ref: BASS-0010-B/21.02.2014 Table of content 1- CHARACTERISTICS... 4 1-1 Models... 4 1-2 Dimensions & Weights... 4 1-3 Interior fittings (standard and optional)...
Intelligent Electronic Safe
 Operation & Installation Guide 1036616 / 1036617 / 1036618 Intelligent Electronic Safe Please do not keep emergency keys in your safe! MANUAL # M08-0566-155041 Index / Proper Use of Your Safe INDEX Proper
TECHNICAL SPECIFICATIONS. CAPACITY per slot width 1ʺ 1.25ʺ 1.5ʺ HKPX2VC/A 2 modules devices HKPY2VC/A 3 modules devices
 USER GUIDE Mobility MiX Cart HKPX2VC/A Mobility MiX Cart 30 HKPY2VC/A Mobility MiX Cart 45 TECHNICAL SPECIFICATIONS CAPACITY per slot width 1ʺ 1.25ʺ 1.5ʺ HKPX2VC/A 2 modules 30 24 20 devices HKPY2VC/A
Installation & Operation Guide
 Installation & Operation Guide ENGLISH Electronic Entry Lock with Knob Models 8732001, 8732101, 8732301, 8732401 Read this manual carefully before installing and operating! Page 1 Index INSTALLATION INSTRUCTIONS
I N ST R UC T I ON HHTC SERIES DELI DISPLAY CASES MODELS ML (8 FT, TWO-TIER, SELF-SERVICE) FORM (July 2003)
 FORM (July 2003)") I N ST R UC MODEL HHTC4 T I ON HHTC SERIES S DELI DISPLAY CASES MODELS HHTC4 HHTC6 HHTC8 ML-132073 (4 FT, TWO-TIER, SELF-SERVICE) ML-132074 (6 FT, TWO-TIER, SELF-SERVICE) ML-132075 (8 FT, TWO-TIER, SELF-SERVICE)
I N ST R UC MODEL HHTC4 T I ON HHTC SERIES S DELI DISPLAY CASES MODELS HHTC4 HHTC6 HHTC8 ML-132073 (4 FT, TWO-TIER, SELF-SERVICE) ML-132074 (6 FT, TWO-TIER, SELF-SERVICE) ML-132075 (8 FT, TWO-TIER, SELF-SERVICE)
CT CLICK HERE. to watch our product demonstration video. Product Description: Primary Area for Product Usage: Dispenses/Stores:
 Product Description: BOWMAN Mobile Protection System Holds laundered or boxed gowns, earloop face masks or face shields, gloves, and has dedicated storage areas for additional isolation supplies Easy roll
USER GUIDE KAS-840-DEN KAS-850-RDEN
 USER GUIDE KAS-840-DEN KAS-850-RDEN 1 Discover the etouch Remote Control Keyless Lock Thank you for purchasing KAS etouch Remote Control Keyless Lock. As you ll soon discover, this stylish electronic touch
INSTALLATION INSTRUCTIONS GRILLE GUARD TOYOTA TUNDRA TOYOTA SEQUOIA PART # P2067
 INSTALLATION INSTRUCTIONS GRILLE GUARD 07-14 TOYOTA TUNDRA 08-14 TOYOTA SEQUOIA PART # P2067 PARTS LIST: GRILLE GUARD 1 Grille Guard 2 10mm Cam Lever Quick Release Bolts with Special Pivot Washer 1 Driver/left
Installation & Operation Guide
 Installation & Operation Guide ENGLISH Digital Deadbolt Models 8712009, 8712109, 8712309, 8712409 Read this manual carefully before installing and operating! Page 1 Index INSTALLATION INSTRUCTIONS Package
USER GUIDE KAS-840-DEN KAS-850-RDEN
 USER GUIDE KAS-840-DEN KAS-850-RDEN 1 Discover the etouch Remote Control Keyless Lock Thank you for choosing KA Security s etouch Remote Control Keyless Lock. As you ll soon discover, this stylish electronic
Automatic Roof Hatch Opener
 Automatic Roof Hatch Opener Installation Guide REQUIRED TOOLS (These tools are required to complete the installation) Cordless Drill 1/8 1/4 Drill Bits 1/8 Pin Punch #2 Philips Bit Rachet Sharpie Hammer
INSTRUCTIONS INSTRUCCIONES CONSIGNES
 AUTOMOTIVE PRODUCTS, INC. INSTRUCTIONS INSTRUCCIONES CONSIGNES APPLICATION: 2013-UP FORD ESCAPE APP PART # 28-21010, 28-21015 STYLIZED RUNNING BOARD ITEM QUANTITY DESCRIPTION TOOLS NEEDED 1 2 RUNNING BOARDS
Owner Use & Care Manual
 LIBERTY SAFE AND SECURITY PRODUCTS LIMITED LIFETIME WARRANTY Limited Lifetime Warranty: Liberty Safe and Security Products, Inc. (Liberty) is proud of the workmanship of the product you have just purchased.
HAPPY TRAILS NO-ZIP PET STROLLER
 For The ON-THE-GO Pet INSTRUCTION MANUAL HAPPY TRAILS NO-ZIP PET STROLLER PG8100NZ Interior Dimensions: 24.5"L x 12"W x 21"H To see our full line of products, visit us online at: www.petgearinc.com CUSTOMER
IMPORTANT SAFETY INFORMATION
 Specifications Outer Dimensions Inner Dimensions Lockbox Inner Dimensions Panel Features Includes 21 W x 15 D x 59 H 20-1/2 W x 12 D x 49-1/2 H 20-1/2 W x 11 D x 7-5/8 H Dual Security System for Keyed
Standard Lockers Series Double Tier Installation Instructions
 Thank you for selecting Salsbury s standard double tier lockers. These instructions are intended to assist you in assembling the lockers. Note that a 6 feet high locker is shown. Hole locations on the
AutoDose Automatic Dispensing System
 AutoDose Automatic Dispensing System The AutoDose TM is a battery or A/C-powered peristaltic pumping dispenser that runs automatically at preset times as programmed with an electronic timer / control.
TOYOTA COROLLA ILLUMINATED DOOR SILLS Preparation
 Preparation Part Number: PT942-02140 Kit Contents Item # Quantity Reqd. Description 1 1 Illuminated Scuff plate, Front Right Hand 2 1 Illuminated Scuff plate, Front Left Hand 3 1 Door Scuff plate, Rear
Rollstar Shade Installation Instructions
 Rollstar Shade Installation Instructions All Lifting Systems Inside or Outside Mount Thank you for purchasing your new Rollstar shade. It has been custom-made from the highest quality materials to the
INSTALLATION INSTRUCTIONS PART NUMBER:
 Equipped with AEM Dryflow Filter No Oil Required! INSTALLATION INSTRUCTIONS PART NUMBER: 21-462B (Blue Finish) 21-462C (Gun Metal Grey Finish) 21-462P (Vacuum Metalized Chrome-VMC) 21-462R (Red Finish)
Fender Mounting Instructions for MIN100, MIN150, MIN1600, MIN161200, MIN1900, MIN2200, MIN221800, MIN2260, MIN2480 & MIN9950 Fenders
 STEP 1 100126 Fender Mounting Instructions for MIN100, MIN150, MIN1600, MIN161200, MIN1900, MIN2200, MIN221800, MIN2260, MIN2480 & MIN9950 Fenders A. Unpack all cartons and lay out parts. B. Compare the
Solar Roller & Classic Roller Shades
 STEP BY STEP INSTALLATION INSTRUCTIONS Solar Roller & Classic Roller Shades 1 2 3 4 5 Motivia Motorization Table of Contents Step 1 - Getting Started....3 Everything You Need A Smooth Set-Up We want you
INSTALLATION & OWNER S MANUAL
 p. 1 of 13 INSTALLATION & OWNER S MANUAL Polaris Ranger 400-EV PathPro SS Cab (fits 2010 - current) (p/n: 1PRG400FS) The contents of this envelope are the property of the owner. Be sure to leave with the
DO NOT LOCK THIS IN YOUR SAFE
 DO NOT LOCK THIS IN YOUR SAFE IMPORTANT: PLEASE RETAIN FOR YOUR RECORDS SERIAL NUMBER KEY CODE PURCHASED AT DATE Cannon Safe Company 216 South 2nd Ave. Bldg. 932 San Bernardino, CA 92408 800-242-1055 www.cannonsafe.com
Part No Part No Product Name: Adventure System
 WARNING: DO NOT DRILL, WELD OR MODIFY TO THIS ASSEMBLY. TOOLS REQUIRED 3/16 Allen Wrench 7/32 Allen Wrench 1/2 Wrench 9/16 Wrench IMPORTANT NOTES USE ONLY THE FASTENERS SUPPLIED OR APPROVED BOLTS, LOCKNUTS,
Toyota Prius Interior Light Upgrade
 Toyota Prius 2012- Interior Light Upgrade Part Number 00016-00095 Accesory Code: IL2 Conflicts Kit Contents Item # Quantity Reqd. Description 1 1 Y Adapter 2 1 Wire harness 3 1 Hardware Kit 4 2 White Light
The MAN SAFE - Luxury Watch Safe Series
 - Luxury Watch Safe Series The Man Safe series of luxury burglary safes are designed and created specifically for the needs of the modern man. This unit is manufactured expressly for the watch enthusiast
C15C C15C. Page 1 of 20
 2 x Lid Front Hinge 1135 8 x M8 Bolt 8 x M8 Washer (3mm Thick) 4 x M6 Large washers 4 x M6 Spring washers 4 x M6 x 40mm Bolts 6 x M6 20mm Bolts 6 x M6 Washers 20 x Screws 2 x Lid mount gas strut bracket
3200ET TIMER. Service Manual. IMPORTANT: Fill in pertinent information on page 2 for future reference.
 3200ET TIMER Service Manual IMPORTANT: Fill in pertinent information on page 2 for future reference. Installation And Start-Up Procedures Timer Programming Water Hardness System Capacity Regeneration Time
NORTHSTAR TRAILERS. Assembly Guide for SPORTSTAR II Trailer
 NORTHSTAR TRAILERS Assembly Guide for SPORTSTAR II Trailer Congratulations! You are the proud owner of a NORTHSTAR trailer. Please follow the instructions and steps in this manual for proper assembly.
ALPHA Tow Bar (6,500 lb) 2 Inch Receiver
 2 Inch Receiver") Operator Manual & Serial Number ALPHA Tow Bar (6,500 lb) 2 Inch Receiver 405-0154 Rev C Page 1 of 7 7/29/13 DO NOT INSTALL, OPERATE OR USE THIS EQUIPMENT UNTIL THE FOLLOWING OPERATING AND SAFETY INSTRUCTIONS
Operator Manual & Serial Number ALPHA Tow Bar (6,500 lb) 2 Inch Receiver 405-0154 Rev C Page 1 of 7 7/29/13 DO NOT INSTALL, OPERATE OR USE THIS EQUIPMENT UNTIL THE FOLLOWING OPERATING AND SAFETY INSTRUCTIONS
SR500 PAPR How to Copyright 2015 by The S.E.A. Group 1
 SR500 PAPR How to Copyright 2015 by The S.E.A. Group 1 BEFORE YOU START: Make sure the respirator and all its parts are clean and intact Make sure you are familiar with the equipment and know how to use
VOLKSWAGEN AMAROK 3 PIECE HARD TONNEAU COVER INSTALLATION INSTRUCTIONS
 VOLKSWAGEN AMAROK 3 PIECE HARD TONNEAU COVER INSTALLATION INSTRUCTIONS Care Instructions: Clean Tonneau Cover with a mild detergent and water solution. Do not use abrasive cleaners or solvents. Place these
I - Sheet Number I-PW Rev. A
 I - Sheet Number I-PW013988 Rev. A Installation Instructions Part # 23948007/24048007 PARTS LIST: 1 Driver/left Sidebar 17 8-1.25mm x 25mm Hex Bolts 1 Passenger/right Sidebar 17 8mm x 24mm x 2mm Flat Washers
Competitor. Ultra Light Plus, Semi Electric Bed. Item # Owner s Assembly And Operating Manual
 Competitor 1 Ultra Light Plus, Semi Electric Bed Item # 15560 Owner s Assembly And Operating Manual 2 Assembly Instructions 1. Remove contents from carton. 2. Place both ends of the sleep surface on their
SLIMRACK SLIDE-OUT MOTOR AND DRIVE BLOCK REPLACEMENT
 SLIMRACK MOTOR AND DRIVE BLOCK Purpose This document provides instructions on replacing the motor and drive block installed on a SlimRack Slideout system. Safety Read all instructions and safety labels
Southwest Windpower Instruction Sheet AIR-X Circuit Replacement Kit
 Southwest Windpower Instruction Sheet AIR-X Circuit Replacement Kit Tools Required 5 / 32 Hex key 5 / 16 Hex key 7 / 64 Hex key Standard screwdriver Pair of external snap ring pliers Rubber mallet Hammer
INSTALLATION GUIDE CRF150R Manual Revision:
 REKLUSE MOTOR SPORTS The z-start Pro Clutch INSTALLATION GUIDE CRF150R 191-810 Manual Revision: 032508 2002 Rekluse Motor Sports Rekluse Motor Sports, Inc. 110 E. 43rd Street Boise, Idaho 83714 208-426-0659
FS3 Fleet Series Non-Flushing Model Assembly Manual U.S. PATENTS: 5,500,960-5,500,962-5,560,050-6,199,222 D 360,471
 FS3 Fleet Series Non-Flushing Model Assembly Manual U.S. PATENTS: 5,500,960-5,500,962-5,560,050-6,199,222 D 360,471 SPECIFICATIONS DIMENSION IMPERIAL METRIC Exterior Height 91 in 231 cm Interior Height
Driver/Left Rear Inner Support Bracket. (2) Front Bracket Arms
 Front Bracket Arms") PARTS LIST: VIEWPOINT RUNNING BOARDS 1 Driver/Left Running Board 2 10mm Lock Washers 1 Passenger/Right Running Board 20 8mm x 25mm Hex Bolts 2 Mounting Bracket Arms 28 8mm x 22mm OD x 2mm Flat Washers
PARTS LIST: VIEWPOINT RUNNING BOARDS 1 Driver/Left Running Board 2 10mm Lock Washers 1 Passenger/Right Running Board 20 8mm x 25mm Hex Bolts 2 Mounting Bracket Arms 28 8mm x 22mm OD x 2mm Flat Washers
DMG100 Digital Micron Gauge Limited Warranty DMG100 DMG100 Digital Micron Gauge USA CANADA COPYRIGHT 2011 UEi
 99 Washington Street Melrose, MA 02176 Phone 781-665-1400 Toll Free 1-800-517-8431 Visit us at www.testequipmentdepot.com DMG100 Digital Micron Gauge Parts Diagram 2 LCD Display Item A B C Main Numeric
IMPORTANT. 1. Key lock 2. Combination buttons 3. Reset button (inside safe) 4. Battery Compartment (inside safe) CONTROL FEATURES
 4. Battery Compartment (inside safe) CONTROL FEATURES") CONTROL FEATURES QAS-1514 Instructions 1. Key lock 2. Combination buttons 3. Reset button (inside safe) 4. Battery Compartment (inside safe) IMPORTANT Record your combination. Record the serial number
CONTROL FEATURES QAS-1514 Instructions 1. Key lock 2. Combination buttons 3. Reset button (inside safe) 4. Battery Compartment (inside safe) IMPORTANT Record your combination. Record the serial number
82V LITHIUM-ION BATTERY CHARGER GC 400
 82V LITHIUM-ION BATTERY CHARGER GC 400 (2907302) Owner s Manual TOLL-FREE HELPLINE: 1-855-470-4267 www.greenworkstools.com/82v-commercial/ Read all safety rules and instructions carefully before operating
GENUINE PARTS INSTALLATION INSTRUCTIONS
 GENUINE PARTS INSTALLATION INSTRUCTIONS DESCRIPTION: APPLICATION: PART NUMBER: Electronic Tailgate Lock Kit Nissan Titan 999M2-W3005 KIT CONTENTS: Item Qty. Part Description Service Part Number A 1 Electronic
Price Computing Scale D Series Operation Manual
 This Document is Hosted by: www.oldwillknottscales.com Price Computing Scale D Series Operation Manual Cardinal Scale Manufacturing Co. 8529-M400-O1 Rev. A PO BOX 151 WEBB CITY, MO 64870 04/13 PH (417)
PRODUCT MANUAL Gecko Wireless One Zone LED Dimmer and Receiver
 Product Description The Gecko Wireless One Zone Wall LED Dimmer has been designed to bring light control easily. No wires or switch box locations are needed, just stick or mount the Gecko to any flat location
D40C HINGE # x Support Plate x M8 Bolt 8 x M8 Washer 6 x M6 20mm Bolts 6 x M6 Washers 19 x Screws
 HINGE # 1017 2 x Support Plate 1018 8 x M8 Bolt 8 x M8 Washer 6 x M6 20mm Bolts 6 x M6 Washers 19 x Screws 2 x Lid mount gas strut bracket 1041 2 x Self tap strut mount 1040 1 x Central Lock bracket 1510
Replacement Top Hardware Installation Instructions
 Replacement Top Hardware Installation Instructions Windshield Channel Installation 1. Position Windshield Channel onto vehicle as shown in Figure 1. 2. Once in position, secure Windshield Channel using
NORTHSTAR TRAILERS. Assembly Guide for SPORTSTAR I Trailer
 NORTHSTAR TRAILERS Assembly Guide for SPORTSTAR I Trailer Congratulations! You are the proud owner of a NORTHSTAR trailer. Please follow the instructions and steps in this manual for proper assembly. We
DKC400Y AC Sliding Gate Installation Manual. Sliding Gate Opener. Model: DKC400Y. Installation Manual WARNING
 Sliding Gate Opener Model: DKC400Y Installation Manual WARNING Read and thoroughly understand all instructions before installing or operating this automatic gate opener. Failure to do so may cause serious
PET UNIT DOSE CABINET
 PET UNIT DOSE CABINET INSTALLATION MANUAL 244-200 244-205 FN: 08-134 Rev A 11/17 Pet Unit Dose Cabinet This manual covers operation procedures for the following products: 244-200 Cabinet, PET, Unit Dose
PSX2 (Power Stabilizing System) OEM INSTALLATION MANUAL
 OEM INSTALLATION MANUAL") PSX2 (Power Stabilizing System) OEM INSTLLTION MNUL Rev: 10.24.2018 PSX2 OEM TLE OF CONTENTS Safety Information 2 System Description 3 Installation 3 Resources Required 3 Determine Stabilizer Locations
PSX2 (Power Stabilizing System) OEM INSTLLTION MNUL Rev: 10.24.2018 PSX2 OEM TLE OF CONTENTS Safety Information 2 System Description 3 Installation 3 Resources Required 3 Determine Stabilizer Locations
FULL HEIGHT ALUMINUM TURNSTILE DOUBLE UNIT AT-FAL SERIES I N STALLATION AND O P E RATING I N STRUCTIONS
 FULL HEIGHT ALUMINUM TURNSTILE DOUBLE UNIT AT-FAL SERIES I N STALLATION AND O P E RATING I N STRUCTIONS CONTENTS 1. SITE PREPARATION 2. EXPLODED VIEW DRAWING 3. UNPACKING 4. SPECIFICATIONS 5. INSTALLATION
Top Down Rollstar Shade Installation Instructions
 Top Down Rollstar Shade Installation Instructions Thank you for purchasing your new Rollstar shade. It has been custom-made from the highest quality materials to the dimensions you specified. With proper
Plasma Dual Swing-Out (PDS Series) Wall Mount
 Wall Mount") INSTALLATION INSTRUCTIONS Plasma Dual Swing-Out ( Series) Wall Mount The wall mount is a rugged, versatile, and installer-friendly solution to unique display mounting requirements. In addition to providing
INSTALLATION INSTRUCTIONS Plasma Dual Swing-Out ( Series) Wall Mount The wall mount is a rugged, versatile, and installer-friendly solution to unique display mounting requirements. In addition to providing
Installation Instructions HURST COMP STICK KIT Dodge Challenger (with AUTO-STICK)
") Installation Instructions HURST COMP STICK KIT 2008-2012 Dodge Challenger (with AUTO-STICK) 1590402 REV01 08/17/15 Catalog# 538 0402 & 538 0403 2009, 2015 Hurst Performance WORK SAFELY! For maximum safety,
Installation Instructions HURST COMP STICK KIT 2008-2012 Dodge Challenger (with AUTO-STICK) 1590402 REV01 08/17/15 Catalog# 538 0402 & 538 0403 2009, 2015 Hurst Performance WORK SAFELY! For maximum safety,
GM G-BODY LSD INSTALLATION
 GM G-BODY 1979-1987 LSD INSTALLATION INSTALLATION INTRODUCTION 1. REMOVING THE FENDER AND DOORS FROM THE A-PILLAR AND DISCONNECTING THE WIRE HARNESS @ THE DOOR JAM 2. REMOVING THE EXISTING DOOR HINGES
OPERATOR, PARTS AND INSTALLATION MANUAL. BX7330 AVENTA TM Tow Bar TOWING PRODUCTS DIVISION
 A V E N T A TM OPERATOR, PARTS AND INSTALLATION MANUAL BX7330 AVENTA TM Tow Bar TOWING PRODUCTS DIVISION SAFETY DO NOT INSTALL, OPERATE OR USE THIS EQUIPMENT UNTIL THE FOLLOWING OPERATING AND SAFETY INSTRUCTIONS
DIGITAL PHYSICIAN Waist-High Scale Models 8430, 8431 & 8437 Operating Instructions
 DIGITAL PHYSICIAN Waist-High Scale Models 8430, 8431 & 8437 Operating Instructions CARDINAL SCALE MFG. CO. 8525-M041-O1 Rev H PO BOX 151 WEBB CITY, MO 64870 Printed in USA 09/04 PH (417) 673-4631 FAX (417)
8mm Bolt Plate. Passenger/right front only Upper Mounting Bracket
 4 SIDE STEPS PARTS LIST: 1 Driver/left Side Step 13 8-1.25mm x 25mm Hex Bolts 1 Passenger/right Side Step 13 8mm x 24mm x 2mm Flat Washers 1 Passenger/right Upper Bracket (all incl. DEF) 13 8mm Lock Washers
RaptorAero. Crossbar-spread requirements: (distance between towers) 1 or 2 bikes min. 38 max.
 1 or 2 bikes min. 38 max.") Spring (1) threaded plug (1) RaptorAero guide plug (1) Crossbar-spread requirements: (distance between towers) 1 or 2 bikes... 16 min. 38 max. more than 2 bikes on round or square bars only: 3+ bikes...
Spring (1) threaded plug (1) RaptorAero guide plug (1) Crossbar-spread requirements: (distance between towers) 1 or 2 bikes... 16 min. 38 max. more than 2 bikes on round or square bars only: 3+ bikes...
NORTHSTAR TRAILERS. Assembly Guide for MULTISTAR Trailer
 NORTHSTAR TRAILERS Assembly Guide for MULTISTAR Trailer Congratulations! You are the proud owner of a NORTHSTAR trailer. Please follow the instructions and steps in this manual for proper assembly. TRAILER
(W) INSTALLATION INSTRUCTIONS GRILLE GUARD TOYOTA TUNDRA / SEQUOIA PART # &
 INSTALLATION INSTRUCTIONS GRILLE GUARD TOYOTA TUNDRA / SEQUOIA PART # &") (W) INSTALLATION INSTRUCTIONS PART # 501894 & 501895 PARTS LIST: 1 Grille Guard 4 3/8" Flat Washers 1 Driver/Left Frame 2 3/8" Nylon Lock Nuts 1 Passenger/Right Frame 4 12mm Plastic Washers 1 Driver/Left
(W) INSTALLATION INSTRUCTIONS PART # 501894 & 501895 PARTS LIST: 1 Grille Guard 4 3/8" Flat Washers 1 Driver/Left Frame 2 3/8" Nylon Lock Nuts 1 Passenger/Right Frame 4 12mm Plastic Washers 1 Driver/Left
XChange Seat Service and Maintenance Guide
 XChange Seat Service and Maintenance Guide Table Of Contents Page General Information... 1 Registration Information... 1 Seat Cushion Latch... 2 Lap Shoulder Belt Replacement... 2 Sliding Buckles Replacement...
1PC TONNEAU COVER INSTALLATION INSTRUCTIONS IMPORTANT
 For use in cleaning painted metal, glass and other vehicle surfaces. For external use only. Dispose of properly after use. IMPREGNATED WITH 70% ISOPROPLY ALCOHOL TC0d PC TONNEAU COVER INSTALLATION INSTRUCTIONS
Turning Point Pin Box. by Trailair OWNER'S MANUAL
 Turning Point Pin Box by Trailair OWNER'S MANUAL TABLE OF CONTENTS Product and Safety Information 2 Preparation 3 Tow Rating Weights Check 3 Cab and Bed Clearance Check 3 Operation 3 Conventional Transport
TOOLS REQUIRED FOR ASSEMBLY. Rubber Mallet or Plastic Tip Hammer PARTS REQUIRED FOR ASSEMBLY OF SINGLE ENTRY STARTER.
 TOOLS REQUIRED FOR ASSEMBLY Rubber Mallet or Plastic Tip Hammer Top Cover Support PARTS REQUIRED FOR ASSEMBLY OF SINGLE ENTRY STARTER Back Stop Divider Closed 'L' Upright Slotted Reinforcement Support