CL5000 Series. User s Manual. Rev
|
|
|
- Kathryn Jefferson
- 6 years ago
- Views:
Transcription
1 CL5000 Series User s Manual Rev
2 Table of Contents. GENERAL PRECAUTIONS INTRODUCTIONS SPECIFICATIONS....4 NAME AND FUNCTIONS SYMBOLS SYMBOLS KEY FUNCTIONS Installation of the Label Roll PROGRAMMING PLU Programming Create By-Weight PLU (Menu code 20) Create By-Count PLU (Menu code 20) Create By-PCS PLU (Menu code 20) Editing PLU (Menu code 20) Sample Printing (Menu code 70) Listing PLU (Menu code 50) Copying PLU (Menu code 4) Deleting PLU (Menu code 42) Moving PLU (Menu code 43) Selecting PLU Items (Menu code 44) PLU Sale Count (Menu code 45) Programming PLU Data Table I Department (Menu code 20) New/Edit Department (Menu code 2) List Department (Menu code 22) Delete Department (Menu code 23) Group (Menu code 220) New/Edit Group (Menu code 22) List Group (Menu code 222) Delete Group (Menu code 223) Tax Rate (Menu code 230) New/Edit Tax Rate (Menu code 23) List Tax Rate (Menu code 232) Delete Tax Rate (Menu code 233) Sales Message (Menu code 240) New/Edit Sales Message (Menu code 24)
3 2.2.5 List Sales Message (Menu code 242) Delete Sales Message (Menu code 243) Origin (Menu code 250) New/Edit Origin (Menu code 25) List Origin (Menu code 252) Delete Origin (Menu code 253) Barcode (Menu code 260) New/Edit Barcode (Menu code 26) List Barcode (Menu code 262) Delete Barcode (Menu code 263) Tare (Menu code 270) New/Edit Tare (Menu code 27) List Tare (Menu code 272) Delete Tare (Menu code 273) Tare Key (Menu code 274) Unit Symbol (Menu code 280) New/Edit Unit Symbol (Menu code 28) List Unit Symbol (Menu code 282) Delete Unit Symbol (Menu code 283) Programming PLU Data Table II Ingredient (Menu code 30) New/Edit Ingredient (Menu code 3) List Ingredient (Menu code 32) Delete Ingredient (Menu code 33) Nutrition Facts (Menu code 320) New/Edit Nutrition Facts (Menu code 32) List Nutrition Facts (Menu code 322 ) Delete Nutrition Facts (Menu code 323) Discount Programming Discount (Menu code 30) New/Edit Discount (Menu code 3) List Discount (Menu code 32) Delete Discount (Menu code 33) Delete by PLU No. (DC) (Menu code 37) Delete by Dept. No. (DC) (Menu code 38) Delete ALL (DC) (Menu code 39) Global Discount Programming Global Discount (Menu code 530) Priority Setting (Menu code 53)
4 2.5.3 Weight/Count/PCS Discount (Menu code 532/533/534) Speed Key Setting Speed Key (Menu code 60) Traceability Traceability (Menu code 330) New/Edit Traceability (Menu code 33) List Traceability (Menu code 332) Delete Traceability (Menu code 333) Country Programming Country (Menu code 340) New/Edit Country (Menu code 34) List Country (Menu code 342) Delete Country (Menu code 343) Programming Slaughter House Slaughter House (Menu code 350) New/Edit Slaughter House (Menu code 35) List Slaughter House (Menu code 352) Delete Slaughter House (Menu code 353) Programming Cutting Hall Cutting Hall (Menu code 360) New/Edit Cutting Hall (Menu code 36) List Cutting Hall (Menu code 362) Delete Cutting Hall (Menu code 363) Programming Store Data Store Data (Menu code 40) New/Edit Store (Menu code 4) List Store (Menu code 42) Delete Store (Menu code 43) Customer (Menu code 420) New/Edit Customer (Menu code 42) List Customer (Menu code 422) Delete Customer (Menu code 423) Scroll Message (Menu code 430) Configuration (Menu Code 43) Edit Scroll Message (Menu Code 432) List Scroll Message (Menu Code 433) Currency (Menu code 440) New/Edit Currency (Menu Code 44) List Currency (Menu Code 442)
5 2..6 Delete Currency (Menu code 443) Programming Global Setting Global Label Format (Menu code 50) Barcode Format (Menu code 520) Printing Programming Printing (Menu code 700) Print label item (Menu code 70) Markdown (Menu code 720) Printer Hardware (Menu code 730) Print Mode (Menu code 73) Label Size/Ticket Size (Menu code 732) Sensor Calibration (Menu code 733) Sensor & Motor (Menu code 734) Print Intensity (Menu code 735) Adjust Feed Length (Menu code 736) Label Preprint (Menu code 737) Serial Number Format (Menu code 740) Add-Up Total (Menu code 750) Ticket (Menu code 760) Select Ticket Item (Menu code 76) Select List Item (Menu code 762) Programming Scale Configuration Scale Configuration (Menu code 800) Sale Mode (Menu code 80) Operation Mode (Menu code 820) Department (Menu code 830) Date & Time (Menu code 840) User/ Security Configuration (Menu code 850) New/Edit User(Menu code 85) Change Password (Menu code 852) List User (Menu code 853) Delete User (Menu code 854) Config Permission (Menu code 855) Clerk Key ( Menu code 856 ) Test (Menu code 860) Display Test (Menu code 86) A/D Test (Menu code 862) Keyboard Test (Menu code 863) Chess Printer Test (Menu code 864)
6 2.4.8 Printer Sensor Test (Menu code 865) Memory Information (Menu code 866) Firmware Version (Menu code 867) Scale Parameter (Menu code 870) Function Key Define (Menu code 880) Report Introduction Report Menu (Menu code 600) X/X2 Report (Menu code 60/630) X/X2 Scale Sales Report (Menu code 6/63) X/X2 PLU Report (Menu code 62/632) X/X2 Miscellaneous PLU Report (Menu code 63/633) X/X2 Group Report (Menu code 64/644) X/X2 Deptment Sales Report (Menu code 65/635) X/X2 Hourly Sales Report (Menu code 66/636) X/X2 Clerk Sales Report (Menu code 67/637) Z/Z2 Report (Menu code 620/640) Clear All Report (Menu code 650) SALES OPERATION Basic Operation Zero Tare Manual Tare Entry Weighed Tare Entry How to Clear Tare Preset Tare Successive Tare Tare Override Calling Up a PLU Using Numeric Key Using Speed Key Override (FOR key) By-Weight PLU By-Count PLU By-PCS PLU Sales Operation Weighed Item Operation By Count Item By PCS Item
7 3.7 Discount Unit Price Discount - By Weight PLU % Unit Price Discount - By Weight PLU Unit Price Discount - By PCS PLU Add-Up Transaction Clerk Operation Standard Clerk Operation Floating Clerk Operations Void Payment & Change Return Prepack Key X Key By-Weight PLU Non-Weighed PLU How to Change Sell By Date/Time How to Change Origin How to Change PLU Type Direct Discount Fixed Price Key % Discount Price Key PLU Connection Referenced PLU Function Coupled PLU Function Linked PLU Function Sales Operation Control Parameters Fixed Weight Prepack Without Report Appendix Label Format Label Format Sample Label Field Item Label Field Total Label Field ASCII Code Table Window Character Set Information

8 . GENERAL. PRECAUTIONS 8
9 9
10 .2 INTRODUCTIONS Thank you for purchasing the CAS CL5000 price computing electronic printing scale. We have designed this equipment with many advanced features, high quality construction, and user-friendly menu driven programming. We are confident that you will find the CAS CL5000 scale will meet all of your most demanding needs. Remember, for proper installation and maintenance please have your Authorized CAS Dealer do the primary installation, programming, and demonstration. Your CAS Authorized Dealer also has a wide variety of supplies, accessories, and expansion options for whatever your new and increasing demands may require. Authorized CAS dealers are trained to help you with every aspect of the CL5000 and should you need servicing, they are expertly trained by CAS to assist you with virtually any problem. 0
11 .3 SPECIFICATIONS Max. Capacity 6/5 kg 5/30 kg 5/30 lb 30/60 lb Interval 2/5 g 5/0 g 0.005/0.0 lb 0.0/0.02 lb Max. Tare kg kg lb lb A/D Conversion Rate Measurement Type Platter Size Approx. 8 times/sec. Load Cell 380 x 244 mm Key Speed Key Display Standard Type (B) 48 PLU key, 72 PLU key, Pole Type(P,R) 36 function key 36 function key Hanging Type(H) 96 PLU 44 PLU 24 digit VFD + Graphic LCD Preset Tare : 4 digit Weight : 5 digit Weight : 5 digit Unit Price : 6 digit Unit Price : 6 digit Total Price : 7 digit Total Price : 6 digit Printer Printing Resolution Label Size Barcode Type Font Printer Type Speed 00 mm/sec. 202 dpi Width: 40mm~60 mm Length: 30mm~20 mm UPC, EAN3, EAN3A5, I2OF5, CODE28, CODE39, CODE93, CODABAR MSI/PLESSEY, IATA2OF5 Small, Middle, Large Size, Free Format, Italic, Bold, Underline, Through Line, Double through line, Reverse, shadow, outline DIRECT THERMAL Operating Temp. -0 C~ 40 C (4 F~ 04 F) Power AC 00~240V 50/60Hz.5A
12 Number Range PLU Ingredient 50 character 999 ~999 User Defined Barcode Format 99 ~99 Department 99 ~99 Tax Type 9 ~9 Group 99 ~99 Clerk 3 ~3 Discount 99 ~99 Origin 499 ~499 Traceability 99 ~99 Slaughter House 99 ~99 Programmable Data Cutting Hall 99 ~99 Traceability Country 99 ~99 Label Format 45 Fixed 20 Free Format Bitmap Image 4 Customer 99 ~99 Quantity Symbol 8 ~8 Scroll Message 9 ~9 X,X2,Z,Z2 Report Pay Type 7 Sales Message 99 ~99 Nutrition fact 99 ~99 Tare Table 99 ~99 Sales Period Sales Report Mode Dual totals for daily/monthly or user selectable reporting period. Read: X/X2 Mode, Read & Reset: Z/Z2 Mode Note: Specifications are subject to change without notice. 2
13 .4 NAME AND FUNCTIONS Standard Type Pole Type P Pole Type R Hanging Type H 3


14 DISPLAY KEYBOARD B-Type (Standard) P Type, R-Type (pole type) 4

 H-type tray NOTE: Push")
15 H-Type (hanging type).5 Basic set-up How to install tray B,P,R type H-type mouting method (3 suggested) H-type tray NOTE: Push down ball connection 5
16 .6 SYMBOLS SYMBOLS ST ( ) 0 NET ( ) AUTO SAVE PREPACK DC ( ) SHIFT ( ) TR DESCRIPTION Stable indicator Zero weight indicator Net weight indicator Auto Print Mode indicator Auto clearing status indicator Prepack Mode indicator Discount status indicator Speed key shift status indicator Data transmission status indicator.7 KEY FUNCTIONS KEYS 0 ~ 9 00 C ZERO TARE OVER RIDE DATE /TIME MENU PG UP FUNCTIONS Numeric keys. Used to enter pricing, qty, count, tare, etc. Double zero key Clear key. Used to clear erroneous entries and error conditions. Re-Zero key. Use to remove small variations in the scale s zero. Tare key. Use to manually enter and remove tare weights. Override key. For temporary price change entry. Date & Time key. Toggles the display between time, date, scale number and department number. MENU key. This key toggles from program menu to sale mode. Page up key: Used to go to previous page in program mode. 6
17 FOR AUTO For key. Use this key for by- count or by pcs pricing: 3 FOR $.00. It toggles between the QTY, PIECE, and PRICE fields. AUTO key. Auto-print mode PRE PACK SAVE VOID PLU ADD PG DOWN X ESC ST TTL FEED PAY TEST RETURN SHIFT DISC% INSERT Pre-Pack key. Used to enter Pre-Packaging mode in which the scale Auto-prints for every transaction and prevents the auto clearing of data. Save key. Save mode prevents the auto clearing of any called-up data like tare weight, PLU pricing, etc. Void key. To remove erroneous sales from ADD-Up When you type a PLU number and press this key, it calls-up that PLU. ADD-Up key. This key when used in conjunction with ST/TTL key allows you print a customer-total label as well as individual transaction labels. Page Down key. Used to go to next page in program mode. Multi-Label key. Use this key to print multiple sales of the same transaction. Escape key. It is used to exit in program mode. Subtotal / Total key. Used with the ADD key in order to print customer-totals. Feed key. Use this key to feed labels or paper through printer Pay key. Use this key to calculate change. Test key. Used to print test pattern Print key. Used to manually print transactions and also serves as an ENTER key. Return key. Used to credit sales for erroneous transactions or returns. Shift Key. Used to SHIFT function in program Mode Discount % key. Used to discount price. Insert key: Insert mode for text typing in program mode. 7
18 WT/CT CAPS MISC. By WEIGHT MISC. BY COUNT MISC. PCS DISC- DEL Special WT/CT key. Toggles between Weight PLU and Count PLU. CAPS Key: Used to type a small letter in program mode. Miscellaneous By-Weight PLU key. Miscellaneous By-Count PLU key. Miscellaneous By-PCS PLU key. Negative Discount DELETE key. Used to delete text data in program mode Special Discount by Special Unit Price NEG To change the price of PLU called-up to negative price. FP Change Fixed Price Called PLU OPEN Open Cash Drawer G.TTL To show total amount added-up. (Greek) REF Call Reference PLU IN WT To continue to use the weight selected by user. L/T To switch label to ticket and vice versa. BL On/Off LCD Backlight SDATE Edit Sell by Date ORIGIN Edit Origin ITEM Edit PLU Item DISC Edit Discount 8
19 SKEY To assign speed key. V ~ V32 Clerk Key V Indirect Clerk Call A ~ Z Alpha keys. Used to type text data. $ Used to type $ Currenc y SPACE For future Backspace key. Used to backspace and delete text data. Space bar. Used to go to next line to enter text / ~ Ü Special symbol keys. CHAR Used to type special symbol. (See ASCII code table on page 92) Note : X key is only used in sale mode and ESC key is only used in program mode. Sale mode : X key Program mode : ESC key X ESC 9
20 .8 Installation of the Label Roll Label Specifications Outer diameter of roll : 00mm Inner diameter of roll : 40mm Width of receipt roll : 40, 50, 60mm Width of label roll : 60mm(MAX) Print Area Width of label : 60mm(MAX) Length of label : 20mm(MAX) 20

 Remove cartridge as fig. 3.")
21 To install the label roll at ANY time you must follow the directions in this section: ) Press the ON/OFF key and make sure that the display is completely off. Open the printer s side-access panel. (See fig.) 2) Lift up TPH lever as fig 2. 3) Remove cartridge as fig. 3. 4) Remove Pick-Up Spool assembly and paper guide from the cartridge as fig. 4. 2
22 4 5) Place the label in the scale as fig ) Press the FEED key. *If label position is not correct, you have to check follows : a, Label size.(label setting menu) b. Feed Adjustment.(Feed adjustment menu) c. Sensor calibration(sensor Calibration menu) 22
23 2. PROGRAMMING Program Mode Menu Tree (Menu code : 000) CODE Menu CODE Sub Menu CODE Sub Menu 00 PLU 200 PLU Data Table I 300 PLU Data Table II 400 Store Data Table 500 Global Setting 0 Change Price 20 New/Edit 30 Discount 40 Management 50 List 60 Speed Key 70 Sample Printing 20 Department 220 Group 230 Tax Rate 240 Sales Message 250 Origin 260 Barcode 270 Tare 280 Unit Symbol 30 Ingredient 320 Nutrition Facts 330 Traceability 340 Country 350 Slaughter House 360 Cutting Hall 40 Store 420 Customer 430 Scroll Message 440 Currency 50 Label Format 520 Barcode 530 Discount 540 Tax 3 New/Edit 32 List 33 Delete 4 Copy 42 Delete 43 Move 44 Select PLU Items 45 PLU Sale Count 43 Configuration 37 Delete by PLU(DC) 38 Delete by Dept(DC) 39 Delete All(DC) 47 Delete by PLU No. 48 Delete by Dept. No. 49 Delete All 432 Edit Scroll Message 433 List Scroll Message 53 Priority Setting 532 Weight Discount 533 Count Discount 534 PCS Discount 54 Set Global Tax 542 Global Tax No. 23
24 600 Report 700 Print 800 Scale Config 60 X Report 620 Z Report 630 X2 Report 640 Z2 Report 650 Clear All 70 Print Label Item 720 Markdown 730 Printer Hardware 740 Serial Number Format 750 Add-Up Total 760 Ticket 80 Sale Mode 820 Operation Mode 830 Department 840 Date/Time 850 User/Security Configuration 860 Test 870 Scale Parameter 880 Function Key Define 6 Scale 62 PLU 63 Misc. PLU 64 Group 65 Department 66 Hourly 67 Clerk 63 Scale 632 PLU 633 Misc. PLU 634 Group 635 Department 636 Hourly 637 Clerk 73 Print Mode 732 Label/Ticket Size 733 Sensor Calibration 734 Sensor & Motor 735 Print Intensity 736 Adjust Feed Length 737 Label Preprint 76 Select Ticket Item 762 Select List Item 85 New/Edit User 852 Change Password 853 List User 854 Delete User 855 Config Permission 856 Clerk Key 86 Display 862 A/D 863 Keyboard 864 Chess Printer 865 Printer Sensor 866 Memory Information 867 Firmware Version 87 Display 872 Printing 873 Sale setup 874 Clerk Logout 24
25 900 Communication 90 Network Setting 920 Application 930 Scale Lock/Unlock 940 Check Scale 950 Backup to Scale 9 Service Type 92 DHCP 93 IP 94 Remote IP 95 RS232C 96 WLAN Setting 97 WLAN Config How to access PROGRAM MODE You can see the Program Menu screen by pressing the MENU key. The 2 numbers at top left (/3) indicate the number of pages or screens. The number to the left of the slash is the current page or screen number and the number to the right of the slash indicates the total number of pages or screens. You can use the PG UP and PG DOWN keys to navigate from page to page, or you can use the Arrow keys to go through each page line at a time. (Screen of 3) 000 PROGRAM MODE (/3). PLU 2. PLU Data Table I. 3. PLU Data Table II. Menu code. Selectable menu. If you want to select PLU, simply press. If you press PG DOWN key, you can see other menu screens as below. PROGRAM MODE (/3). PLU 2. PLU Data Table I. 3. PLU Data Table II. PROGRAM MODE (2/3) 4. Store Data Table 5. Global Setting 6. Report PROGRAM MODE (3/3) 7. Print 8. Scale Config 9. Communication 25
26 2. PLU Programming You can set 45 items for a PLU as below table and if you do not want to use some items, you can prohibit those items in menu code:44. < PLU ITEM> No Item Description Department Department No. 2 PLU No PLU No. 3 PLU Type Select PLU type among By Weight, By Count or By-PCS 4 Name Enter name of item. Maximum 40 characters. 5 Name 2 Enter name 2 of item. Maximum 40 characters. 6 Name 3 Enter name 3 of item. Maximum 40 characters. 7 Group No. Select group number. This value can be from 0 to Label No. (0~99) (0=Do not use Label No.), Label Formats ~2. If Global Setting is YES, it is not shown. 9 Aux. Label No. (0~99) (0=Do not use Label No.), Label Formats ~2. This function prints aux. label as saved number of label number 0 Origin No. (0~500) 0=Do not use origin. Unit Weight Unit weight of Price(No.9) (2:unit price for 00g, :unit price for kg) 2 Fixed Weight The weight is fixed regardless of item 3 Prefix Enter serial code for PLU (Greece version of CL5000 series) 4 Item code Item code 5 Use Fixed Price Type You can set wheter use Fixed Price or not 6 Pieces (0-999) Set the number for By-PCS PLU 7 Quantity Symbol ID (0~8) Set symbol of PCS or Count 8 Fixed price Price is fixed regardless of weight or pcs 9 (Unit) Price This value can be from 0 to Special Price It can be unit price by using Special key. 2 Tax No. Enter tax number. This value can be from 0 to9 22 Tare / Tare No. You can enter tare weight manually or enter No. of tare data. (By-weight PLU) 23 % Tare 0~99.99 You can enter tare weight as percentage of item. If you set it to 20%, 20% of item is tare weight. 24 Tare % Limit 0~99.99 You can enter tare limit. %tare <= % limit -> Gross weight is printed %tare > % limit -> Net weight is printed 26
27 25 Barcode No. This value can be from 0 to 99, If Global Setting is YES, it is not shown. 26 Produced Date (0~999) This is subtracted to the current date in order to be calculated. 27 Packed Date (0~999) This is added to the current date in order to be calculated. 28 Packed Time (0~99) If you set it to 0, it is not printed 29 Sell-by Date (0~9999) This is expirations date that is numbered in days and added to the Packed On date in order to be calculated. If you set it to 0, it is not printed 30 Sell-by Time (0~99) If you set it to 0, it is not printed 3 Cook-by Date (0~9999) This is expirations date that is numbered in days and added to the Packed On date in order to be calculated. 32 Ingredients No. (0~999) Enter ingredients 33 Traceability No. (0~99) Enter traceability No. 34 Bonus For future use. 35 Nutri. Fact No. (0~500) Enter nutrition fact ID 36 Sales Msg No. (0~99) Enter sales message No. 37 Reference PLU Dept. (0~99) Enter reference department No. 38 Reference PLU No. (0~999999) Enter reference PLU No. 39 Coupled PLU Dept. (0~99) Enter coupled PLU department 40 Coupled PLU No. (0~999999) Enter coupled PLU No. 4 # of Link PLU (0~2) Enter the number of linked PLU. 42 Link PLU Dept. (0~99) Enter PLU department No. 43 Link PLU No. (0~999999) Enter PLU No. 44 Link PLU2 Dept. (0~99) Enter PLU2 department No. 45 Link PLU2 No. (0~999999) Enter PLU2 No. These items are shown on the display when you select By- Weight PLU. These items are shown on the display when you select By Count or By PCS PLU. 2.. Create By-Weight PLU (Menu code 20) <New/Edit PLU : MENU ->. PLU -> 2.New/Edit> * You can press the SAVE key at anytime to save the current PLU data and if you want to exit without saving, press the ESC key. 27
28 . Enter Department No. and PLU No. * Department should be set previously EX) Department No. = [ ] Default PLU No. : [ ] NEW/ EDIT Department No. : [ ] Default PLU No. : [ ] No Data or Param 2. Select PLU Type. By Weight -> 2. By Count -> 3. By PCS -> EX) BY-Weight Item By-Weight PLUs are priced as price-perweight; for example, $3.99/lb or $.99/kg. You must weigh these PLUs before you can execute a sales transaction. (#/ may be changed on Menu 44). PLU No. : PLU Type : [ ]. By-Weight (/ ) 3. Enter PLU Name EX) BEEF B E E F PLU No. : (2/ ) Name : [BEEF ] 4. Enter PLU Name 2 EX) Sirloin PLU No. : (3/ ) Name 2: [Sirloin ] S Shift i r l O i n 5. Enter PLU Name 3 EX) STEAK PLU No. : (4/ ) Name 3: [STEAK ] S T E A K 6. Select Group * If there is no group for this PLU, enter 0 EX). Meat PLU No. : Group : [ ]. Meat (5/ ) 28
29 7. Select Label Format * If you enter 0, standard label format (menu code 50) is used. * For details about label format, refer to 8. Setting Global option PLU No. : Label No. : [ ]. IS (60X30) (6/ ) EX). IS (60x30) PLU No. : Aux. Label No. : [ ]. IS (60X30) (7/ ) 8. Select Origin * If you do not want to use origin, enter 0 EX) 49. China 4 9 PLU No. : Origin No. : [ ] 49. China (8/ ) 9. Enter Fixed Weight The weight of an item is fixed. * If you do not want to use, enter 0. EX) Do not use Fixed Weight PLU No. : FixedWeight : [ 0.000] Kg (9/ ) 0 0. Enter Prefix * If you do not want to use, enter 0. EX) Do not use Fixed Weight PLU No. : Prefix : [ ] (0/ ). Item Code EX) Item Code = PLU No. : ItemCode : [ 94] (/ ) 2. Use Fixed Price Type EX) Fixed price type PLU No. : Use Fixed Price Type : [ ] (2/ ) 29
30 3. Price EX) Price = $ PLU No. : Price : [ 0.00] (3/ ) 4. Special Price EX) Price = $ PLU No. : Special Price : [ 20.00] (4/ ) 5. Tax No. * It may be changed by setting Menu code 54. * If you do not want to use, enter 0 PLU No. : Tax No. : [ ] (5/ ) EX) Tax data 6. Tare * You can use Tare Table, depending on the setting of Parameter 584 EX) Tare Value = 00 g 0 0 PLU No. : Tare : [ 0.00] Kg (6/ ) 7. %Tare PLU No. : %Tare : [ 0.00] (7/ ) EX) 0.00% Tare % limit * If you do not want to use, enter 0 PLU No. : Tare %Limit : [ 0.00] (8/ ) EX) Do not use Tare % limit 0 9. Barcode No. * You can use barcode ID depending on the setting of Menu code 520 EX) Barcode Data Table PLU No. : Barcode No. : [ ] EAN-8, DDIIIIIC (9/ ) 30
31 20. Produced Date PLU No. : (20/ ) Produced Date : [ ] 2. Packed Date PLU No. : (2/ ) Packed Date : [ ] 22. Packed Time PLU No. : (22/ ) Packed Time : [ ] 23. Sell By Date * This value can be from 0 to * If you do not want to use, enter 0 PLU No. : Sell By Date : [ 2] (23/ ) EX) Sell By Time * This value can be from 0 to 99. * If you do not want to use, enter 0 EX) 0 0 PLU No. : Sell By Time : [0] (24/ ) 25. Cook By Date * This value can be from 0 to * If you do not want to use, enter 0 PLU No. : Cook By Date : [ 2] (25/ ) EX) Ingredient No. * If you do not want to use, enter 0 EX) Do not use ingredient 0 PLU No. : Ingredient No. : [ 0] (26/ ) 3
32 27. Traceability No. * If you do not want to use, enter 0 PLU No. : Traceability No. : [ ] (27/ ) 28. Bonus * If you do not want to use, enter 5 Bonus : [ 5] PLU No. : (28/ ) Nutri. Fact No. * If you do not want to use, enter 0 PLU No. : Nutri.Fact No. : [ ] (29/ ) 30. Sales Msg No. * If you do not want to use, enter 0 EX) Sales Message PLU No. : Sales Msg No. : [ 0], Thank You (30/ ) 3. Reference PLU Department * If you do not want to use, enter 0 EX) Do not use Reference PLU Department PLU No. : Reference PLU Dept : [ 0] (3/ ) Reference PLU No. * If you do not want to use, enter 0 EX) Do not use reference PLU No. PLU No. : Reference PLU No. : [ 0] (32/ ) Coupled PLU Department * If you do not want to use, enter 0 EX) Do not use Coupled PLU Department PLU No. : Coupled PLU Dept : [ 0] (33/ ) Coupled PLU No. * If you do not want to use, enter 0 EX) Do not use coupled PLU number PLU No. : Coupled PLU No. : [ 0] (34/ ) 0 32
33 35. # of Link PLU * If you do not want to use, enter 0 EX) Do use coupled PLU 2 PLU No. : # of Link PLU : [ 2] (35/ ) Link PLU Dept * If you do not want to use, enter 0 EX) Do not use coupled PLU number PLU No. : Link PLU Dept : [ 0] (36/ ) Link PLU No. * If you do not want to use, enter 0 EX) Do not use coupled PLU number PLU No. : Link PLU No. : [ 0] (37/ ) Link PLU2 Dept * If you do not want to use, enter 0 EX) Do not use coupled PLU number PLU No. : Link PLU2 Dept : [ 0] (38/ ) Link PLU2 No. * If you do not want to use, enter 0 EX) Do not use coupled PLU number PLU No. : Link PLU2 No. : [ 0] (39/ ) 0 33
34 2..2 Create By-Count PLU (Menu code 20) (MENU ->. PLU -> 2.New/Edit) * You can press the SAVE key at anytime to save the current PLU data and if you want to exit without saving, press the ESC key.. Enter Department No. / PLU No. * Department should be set previously EX) Department # =. Default PLU # = 2 NEW/ EDIT Department No. : [ ] Default PLU No. : [ 2] No Data or Param 2 2. Select PLU Type. By Weight -> 2. By Count -> 3. By PCS -> EX) BY-Count Item PLU No. : 2 PLU Type : [ 2] 2. By-Count (/ ) 2 3. Enter PLU Name EX) PEAR P E A R PLU No. : 2 (2/ ) Name : [PEAR ] 4. Enter PLU Name 2 EX) Do not use name 2 PLU No. : 2 (3/ ) Name 2: [ ] 5. Enter PLU Name 3 EX) Do not use name 3 PLU No. : 2 (4/ ) Name 3: [ ] 34
35 6. Group * If there is no group data, enter 0 EX) 2. Fruit 2 PLU No. : 2 Group : [ 2] 2. Fruit (5/ ) 7. Select Label Format * If you enter 0, standard label format (menu code 50) is used. * For details about label format, refer to 8. Setting Global option PLU No. : 2 Label No. : [ ]. IS (60X30) (6/ ) EX). IS (60x30) PLU No. : 2 Aux. Label No. : [ ]. IS (60X30) (7/ ) 8. Origin No. * If you do not want to use origin, enter 0 EX) 9. Korea 9 PLU No. : 2 Origin No. : [ ] 9. Korea (8/ ) 9. Enter Prefix * If you do not want to use, enter 0. Prefix : [ ] PLU No. : 2 (9/ ) EX) Do not use Fixed Weight 0. Item Code PLU No. : 2 ItemCode : [ 273] (0/ ) EX) Item Code = Qty Unit No. EX) Qty Unit No. 6 6 PLU No. : 2 Qty Unit No. : [ 6] (/ ) 35
36 2. Use Fixed Price Type EX) Fixed price type PLU No. : 2 Use Fixed Price Type : [ ] (2/ ) 3. Price PLU No. : 2 Price : [ 0.00] (3/ ) EX) Price = $ Special Price PLU No. : 2 Special Price : [ 20.00] (4/ ) EX) Price = $ Tax No. * It may be changed by setting Menu code 54. * If you do not want to use tax id, enter 0 EX) Tax data PLU No. : 2 Tax No. : [ ] Type=, rate = 0.00 % (5/ ) 6. Barcode No. * It is used depending on the setting of the Menu code 520 EX) Barcode Data Table PLU No. : 2 Barcode No. : [ ] EAN-8, DDIIIIIC (6/ ) 7. Produced Date PLU No. : 2 (7/ ) Produced Date : [ ] 8. Packed Date PLU No. : 2 (8/ ) Packed Date : [ ] 36
37 9. Packed Time PLU No. : 2 Packed Time : [ ] (9/ ) 20. Sell By Date * This value can be from 0 to 9999 PLU No. : 2 Sell By Date : [ 2] (20/ ) EX) 2 days 2 2. Sell By Time * This value can be from 0 to 99 EX) 0 hours 22. Cook By Date * This value can be from 0 to * If you do not want to use, enter 0 0 PLU No. : 2 Sell By Time : [0] PLU No. : 2 Cook By Date : [ 2] (2/ ) (22/ ) EX) Ingredient No. * If you do not want to use ingredient, enter 0 EX) Do not use ingredient 24. Traceability No. * If you do not want to use, enter 0 0 PLU No. : 2 Ingredient No. : [ 0] PLU No. : 2 Traceability No. : [ ] (23/ ) (24/ ) 25. Bonus * If you do not want to use, enter 5 Bonus. : [ 5] PLU No. : 2 (25/ ) Nutri. Fact No. * If you do not want to use, enter 0 PLU No. : 2 Nutri. Fact No : [ ] (26/ ) 37
38 27. Sales Msg No. * If you do not want to use, enter 0 EX) Sales Message PLU No. : 2 Sales Msg No. : [ 0], Thank You (27/ ) 28. Reference PLU Department * If you do not want to use reference department ID, enter 0 EX) Do not use Reference Department PLU No. : 2 Reference PLU Dept : [ 0] (28/ ) Reference PLU No. * If you do not want to use reference PLU, enter 0 EX) Do not use Reference PLU 0 PLU No. : 2 Reference PLU No. : [ 0] (29/ ) 30. Coupled PLU Department * If you do not want to use, enter 0 EX) Do not use Coupled PLU Department PLU No. : 2 Coupled PLU Dept : [ 0] (30/ ) 0 3. Coupled PLU No. * If you do not want to use, enter 0 EX) Do not use coupled PLU number PLU No. : 2 Coupled PLU No. : [ 0] (3/ ) # of Link PLU * If you do not want to use, enter 0 EX) Do not use coupled PLU number PLU No. : 2 # of Link PLU : [ 0] (32/ ) 0 38
39 2..3 Create By-PCS PLU (Menu code 20) (MENU ->. PLU -> 2.New/Edit) By-PCS PLU is used depending on the Para 593. * You can press the SAVE key at anytime to save the current PLU data and if you want to exit without saving, press the ESC key.. Enter Department No. / PLU No. * Department should be set previously EX) Department # =. Default PLU # = 2 NEW/ EDIT Department No. : [ ] Default PLU No. : [ 3] No Data or Param 3 2. Select PLU Type. By Weight -> 2. By Count -> 3. By PCS -> EX) BY-PCS Item PLU No. : 3 PLU Type : [ 3] 3. By-PCS (/ ) 3 3. Enter PLU Name PLU No. : 3 (2/ ) Name : [CAKE ] EX) CAKE C A K E 4. Enter PLU Name2 EX) Do not use name 2 PLU No. : 3 (3/ ) Name 2: [ ] 5. Enter PLU Name3 EX) Do not use Name3 PLU No. : 3 (4/ ) Name 3: [ ] 6. Group * If there is no group data, enter 0 EX) 2. groceries 2 PLU No. : 3 Group : [ 2] 2. Groceries (5/ ) 39
40 7. Select Label Format * If you enter 0, standard label format (menu code 50) is used. * For details about label format, refer to 8. Setting Global option PLU No. : 3 Label No. : [ ]. IS (60X30) (6/ ) EX). IS (60x30) PLU No. : 3 Aux. Label No. : [ ]. IS (60X30) (7/ ) 8. Origin No. * If you do not want to use origin, enter 0 EX) 9. Korea 9 PLU No. : 3 Origin No. : [ ] 9. Korea (8/ ) 9. Enter Prefix * If you do not want to use, enter 0. Prefix : [ ] PLU No. : 3 (9/ ) EX) Do not use Fixed Weight 0. Item Code PLU No. : 3 ItemCode : [ 273] (0/ ) EX) Item Code = Pieces * If you enter 0, it is regarded as. PLU No. : 3 Pieces : [ 0] (/ ) EX) 0 piece 0 2. Qty Unit No. EX) Qty Unit No. 6 6 PLU No. : 3 Qty Unit No. : [ 6] (2/ ) 40
41 3. Use Fixed Price Type EX) Fixed price type PLU No. : 3 Use Fixed Price Type : [ ] (3/ ) 4. Price PLU No. : 3 Price : [ 0.00] (4/ ) EX) Price = $ Special Price PLU No. : 3 Special Price : [ 20.00] (5/ ) EX) Price = $ Tax No. * It may be changed by setting Menu code 540. * If you do not want to use tax ID, enter 0 EX) Tax data PLU No. : 3 Tax No. : [ ] Type=, rate = 0.00 % (6/ ) 7. Barcode No. * It is used depending on the setting of the Menu code 520 EX) Barcode Data Table PLU No. : 3 Barcode ID : [ ] EAN-8, DDIIIIIC (7/ ) 8. Produced Date PLU No. : 3 (8/ ) Produced Date : [ ] 9. Packed Date PLU No. : 3 (9/ ) Packed Date : [ ] 4
42 20. Packed Time PLU No. : 3 Packed Time : [ ] (20/ ) 2. Sell By Date * This value can be from 0 to 9999 PLU No. : 3 Sell By Date : [ 2] (2/ ) EX) 2 days Sell By Time * This value can be from 0 to 99 EX) 0 hours 23. Cook By Date * This value can be from 0 to * If you do not want to use, enter 0 0 PLU No. : 3 Sell By Time : [0] PLU No. : 3 Cook By Date : [ 2] (22/ ) (23/ ) EX) Ingredient No. * If you do not want to use ingredient, enter 0 EX) Do not use ingredient 0 PLU No. : 3 Ingredient No. : [ 0] (24/ ) 25. Traceability No. * If you do not want to use, enter 0 PLU No. : 3 Traceability No. : [ ] (25/ ) 26. Bonus * If you do not want to use, enter 5 Bonus : [ 5] PLU No. : 3 (26/ ) Nutri. Fact No. * If you do not want to use, enter 0 PLU No. : 3 Nutri Fact No. : [ ] (27/ ) 42
43 27. Sales Msg No. * If you do not want to use, enter 0 EX) Sales Message PLU No. : 3 Sales Msg No. : [ 0], Thank You (28/ ) 28. Reference PLU Department * If you do not want to use reference department ID, enter 0 EX) Do not use Reference Department PLU No. : 3 Reference PLU Dept : [ 0] (27/ ) Reference PLU No. * If you do not want to use reference PLU, enter 0 EX) Do not use Reference PLU 0 PLU No. : 3 Reference PLU No. : [ 0] (28/ ) 30. Coupled PLU Department * If you do not want to use, enter 0 EX) Do not use Coupled PLU Department PLU No. : 3 Coupled PLU Dept : [ 0] (29/ ) 0 3. Coupled PLU No. * If you do not want to use, enter 0 EX) Do not use coupled PLU number PLU No. : 3 Coupled PLU No. : [ 0] (30/ ) # of Link PLU * If you do not want to use, enter 0 EX) Do not use coupled PLU number PLU No. : 3 # of Link PLU : [ 0] (3/ ) Editing PLU (Menu code 20) (MENU ->. PLU -> 2.New/Edit) * You can edit PLU as PLU creating and you can press the SAVE key at anytime to save the current PLU data and if you want to exit without saving, press the ESC key. 43
44 2..5 Sample Printing (Menu code 70) (MENU ->. PLU -> 7.Sample Printing) If you press SAVE key during PLU creating or editing, label is printed Listing PLU (Menu code 50) (MENU ->. PLU -> 5.List). Enter Department No. * Enter department number that you wish to see EX) Department No. List (/2) Department No.: [ ] 2. Enter PLU Range EX) PLU ~0 List (2/2) Start PLU No : [ ] End PLU No : [ 0] List All - press "SAVE" key 0 No. Reference(descript) BEEF 2 2 CAKE If you want to print PLU list, press the TEST key. 3 3 PEAR 2..7 Copying PLU (Menu code 4) (MENU ->. PLU -> 4.Management ->.Copy) If there is a similar PLU, you can copy it.. Select Source Enter the Department No. and PLU No. that you wish to copy EX) Source Department # = COPY (/2) Source Dept. No. : [ ] Grocery Source PLU No. : [ ] Potato Source PLU # = 2. Select Destination Enter the Department number where the new PLU(s) will be located COPY (2/2) Dest. Dept. No. : [ 2] vegetable Dest. PLU No. : [ ] No Data Enter the PLU number that you wish to copy the Source PLU into 2 44
45 2..8 Deleting PLU (Menu code 42) (MENU ->. PLU -> 4.Management -> 2.Delete) There are three ways to delete PLU. Simply enter the number that you wish to delete. EX) Press key to select Delete by PLU No. DELETE (/). Delete by PLU No. 2. Delete by Dept. No. 3. Delete All EX) Department No. : PLU No. : DELETE BY PLU NO (2/2) Department No. : [ ] Grocery PLU No. : [ ] 2..9 Moving PLU (Menu code 43) (MENU ->. PLU -> 4.Management -> 3.Move) You can move PLU. If there is discount information, it is also moved.. Select Source Enter the Department No. and PLU No. which you wish to move EX) Source Department # = MOVE (/2) Source Dept. No. : [ ] Grocery Source PLU No. : [ ] Potato Source PLU # = 2. Select Destination Enter the Department number where the PLU(s) will be located MOVE (2/2) Dest. Dept. No. : [ 2] vegetable Dest. PLU No. : [ 6] No Data Enter the PLU number that you wish to move the Source PLU into 2 45
46 2..0 Selecting PLU Items (Menu code 44) (MENU ->. PLU -> 4.Management -> 4.Select PLU Items) If you enter Y, you cannot use that item when you create PLU. To enter Y, press Y key or key. To enter N, press N key or 0 key. SELECT PLU ITEMS Department No. : [ N ] (/0) Name2 : [ N ] Name3 : [ Y ] Note : You can use the PG UP and PG DOWN keys to navigate from page to page, or you can use the Arrow keys to go through each page line at a time. 2.. PLU Sale Count (Menu code 45) (MENU->. PLU-> 4.Management-> 5.PLU Sale Count) You can count each PLU sale and also you can clear this count. This sale count is used for serial number printing of PLU PLU SALE COUNT (/2) Department No. : [ ] Grocery PLU No. : [ ] To clear PLU sale count, press the TEST key. PLU SALE COUNT (2/2) Count:20 [TEST]= clear [ZERO]=clear all 46
47 2.2. Programming PLU Data Table I 2.2. Department (Menu code 20) (MENU -> 2. PLU Data Table I ->.Department) If a scale is assigned to department then all of the PLUs that you select on that scale will be from department. You can assign the department by pressing MENU, 8 and 3 keys. If you want to change the department assignment of the scale, you have to change the setting. You also have to set Speed key for this department New/Edit Department (Menu code 2) (MENU -> 2. PLU Data Table I ->.Department ->. New/Edit ) You can press the SAVE key at anytime to save the current data and if you want to exit without saving, press the ESC key.. Department Number Department number is available to 99. NEW/ EDIT DEPARTMENT (/2) Department No. : [ 2 ] EX) Department No. = Department Description EX) Department Decription = GROCERY NEW/ EDIT DEPARTMENT (2/2) Description : [ GROCERY ] Speed Key Set No: [ ] G R O C E R Y 3. Speed Key Setting Refer to 2.6. Speed Key EX) Speed key set no. = NEW/ EDIT DEPARTMENT (2/2) Description : [ GROCERY ] Speed Key Set No: [ ] 47
48 2.2.3 List Department (Menu code 22) (MENU -> 2. PLU Data Table I ->.Department -> 2. List ). Set the department range that you wish to see. EX) Department to 0 LIST DEPARTMENT (/) - Start Number : [ ] - End Number : [ 0] List All-press [SAVE] key 0 No. Reference(descript) Default 2 GROCERY If you want to print list, press the TEST key Delete Department (Menu code 23) (MENU -> 2. PLU Data Table I ->.Department -> 2. Delete ). Enter Department number DELETE DEPARTMENT (/) Department No. : [ 2] GROCERY EX) Delete department Group (Menu code 220) (MENU -> 2. PLU Data Table I -> 2.Group) This menu is to group any PLU(s) regardless the PLU s department. Any individual PLU must be involved in any department, but not in any group. User may select any PLUs as a group at users needs. Especially, grouping PLU(s) can be used to get total sum for a specific. 48
49 2.2.6 New/Edit Group (Menu code 22) (MENU -> 2. PLU Data Table I ->.Group ->. New/Edit ) You can press the SAVE key at anytime to save the current data and if you want to exit without saving, press the ESC key.. Enter Group Number Group number is available to 99. NEW/EDIT GROUP (/) Group No. : [ ] Description : [ ] EX) Group No = 2. Enter Group Description EX) Group Description = BAGEL NEW/EDIT GROUP (/) GROUP No. : [] Description : [BAGEL ] B A G E L List Group (Menu code 222) (MENU -> 2. PLU Data Table I -> 2.Group -> 2. List ). Set the group range that you wish to see EX) ~0 LIST GROUP (/) - Start Number : [ ] - End Number : [ 0] List All-press [SAVE] key 0 No. Reference(descript) BAGEL If you want to print list, press the TEST key Delete Group (Menu code 223) (MENU -> 2. PLU Data Table I -> 2.Group -> 3. Delete ). Enter group number DELETE GROUP (/) Group No : [ ] BAGEL EX) Delete group. 49
50 2.2.9 Tax Rate (Menu code 230) (MENU -> 2. PLU Data Table I -> 3.TAX Rate) You can use tax number when you create PLU New/Edit Tax Rate (Menu code 23) (MENU -> 2. PLU Data Table I -> 3.TAX Rate ->. New/Edit ) You can press the SAVE key at anytime to save the current data and if you want to exit without saving, press the ESC key.. Enter tax number TAX number is available to 9 NEW/EDIT TAX RATE (/2) TAX No. : [] EX) TAX No. = 2. Set Tax Type See Tax Type table as below. EX) Internal TAX Type Tax Type 0 NEW/EDIT TAX RATE (2/2) TAX TYPE (0=Int/=Ext) : [0] TAX Rate : [ 0.00] % Item Symbol Description Internal TAX 0 Tax is included in total price External TAX Tax is added to total price Refer to menu code 873(T.price = price + Tax) on chapter Enter Tax Rate EX) Tax Rate = 5.00% NEW/EDIT TAX RATE (2/2) TAX TYPE (0=Int/=Ext) : [0] TAX Rate : [ 5.00] % Exit Menu If you want to exit, press ESC key. X ESC 50
51 2.2. List Tax Rate (Menu code 232) (MENU -> 2. PLU Data Table I -> 3.TAX Rate -> 2. List ). Set the range of tax rate EX) ~9 LIST TAX RATE (/) - Start Number : [ ] - End Number : [ 9] List All-press [SAVE] key 9 No. Reference(descript) I 5.00% If you want to print list, press the TEST key Delete Tax Rate (Menu code 233) (MENU -> 2. PLU Data Table I -> 3.TAX Rate -> 3. Delete ). Enter tax number DELETE TAX RATE (/) TAX No. : [ ] EX) Delete tax number Sales Message (Menu code 240) (MENU -> 2. PLU Data Table I -> 4.Sales Message) Sales message can be printed on PLU labels so long as the format that you use contains a Sales Message field. This is a great tool for advertising and cross-marketing products. 5
52 2.2.4 New/Edit Sales Message (Menu code 24) (MENU -> 2. PLU Data Table I -> 4. Sales Message ->. New/Edit ) You can press the SAVE key at anytime to save the current data and if you want to exit without saving, press the ESC key.. Enter Message Number Message number is available to 99 EX) Message No. = NEW/EDIT SALES MESSAGE (/) Message No. : [ ] Message : [ ] 2. Enter Message EX) Message = THANK YOU NEW/EDIT SALES MESSAGE (/) Message No. : [] Message : [THANK YOU ] T H A N K SPACE Y O U 3. Exit Menu If you want to exit, press ESC key. X ESC List Sales Message (Menu code 242) (MENU -> 2. PLU Data Table I -> 4. Sales Message -> 2. List ). Set the List Range Set the range of sales message that you wish to check EX) ~0 LIST SALES MESSAGE (/) - Start Number : [ ] - End Number : [ 0] List All - press [SAVE] key 0 No. Reference(descript) THANK YOU If you want to print list, press the TEST key. 52
53 2.2.6 Delete Sales Message (Menu code 243) (MENU -> 2. PLU Data Table I -> 4. Sales Message -> 3. Delete ). Enter Message No. DELETE SALES MESSAGE (/) Message No : [ ] EX) Delete message Origin (Menu code 250) (MENU -> 2. PLU Data Table I -> 5.Origin) You can use origin number when you create PLU. How to print origin on a label. The format that you use contains Origin field 2. Set MENU-> 8.scale config -> 6.parameter -> 2.printing oper(print origin for comm.line) New/Edit Origin (Menu code 25) (MENU -> 2. PLU Data Table I -> 5.Origin ->. New/Edit ) You can press the SAVE key at anytime to save the current data and if you want to exit without saving, press the ESC key.. Enter Origin No. Origin number is available to 500 EX) Origin No = 0 NEW/EDIT ORIGIN (/) Origin No. [ 0] Origin : [ ] 0 2. Enter Origin EX) Origin = KOREA K O R E A NEW/EDIT ORIGIN (/) Origin No. [ 0] Origin : [ KOREA ] 3. Exit Menu If you want to exit, press ESC key. X ESC 53
54 2.2.9 List Origin (Menu code 252) (MENU -> 2. PLU Data Table I -> 5.Origin -> 2. List ). Set the List Range Set the range of origin that you wish to check EX) ~20 LIST ORIGIN (/) - Start Number : [ ] - End Number : [ 20] List All Press [SAVE] Key 2 0 No. Reference(descript) 0 KOREA If you want to print list, press the TEST key Delete Origin (Menu code 253) (MENU -> 2. PLU Data Table I -> 5.Origin -> 3. Delete ). Enter Origin No. DELETE ORIGIN (/) Origin No. [ 0] EX) Delete Origin Barcode (Menu code 260) (MENU -> 2. PLU Data Table I -> 6.Barcode) You can use barcode when you create PLU. Barcode can be changed depending on the Global setting of barcode. 54
55 New/Edit Barcode (Menu code 26) (MENU -> 2. PLU Data Table I -> 6.Barcode ->. New/Edit ) You can press the SAVE key at anytime to save the current data and if you want to exit without saving, press the ESC key.. Enter Barcode No. This value can be from to 99. EX) Barcode No = NEW/EDIT BARCODE (/2) Barcode No : [ ] Description : [ ] 2. Barcode Description EX) Barcode Description = EAN3- NEW/EDIT BARCODE (/2) Barcode No : [ ] Description : [EAN3- ] E A N 3-3. Barcode Type * See below table. EX) Barcode Type =. EAN-3 NEW/EDIT BARCODE (2/2) Type : [ ] EAN-3 Form (0~4) : [0] User Defined Barcode Type of Barcode No. Type Description EAN-3 3digit 2 EAN3A5 3digit + 5digit 3 EAN-8 8 digit 4 I20F5 2~24 digit 5 UPCA 2 digit 6 UPC-3 3 digit 7 CODE39 8 CODE93 Alphanumeric character, Format T, prints out the name of 9 CODE28 PLU. 0 CODABAR 55
56 4. Enter Barcode Form You can select from a list of Barcode types or you can create your own custom format * Refer to below table. EX) Barcode Form =. Change DDIIIIIPPPPPC to GGIIIIIVPPPPC NEW/EDIT BARCODE (2/2) Type : [ ] EAN-3 Form (0~4) : [] DDIIIIIPPPPPC G G BARCODE NO. : (2/2) Type : [ ] EAN-3 From (0~4) : [] [GGIIIIIPPPPPC ] The following defines the format characters for Barcode Formats : (Example) Form No. Format Description 0 User Defined Barcode I: item code DDIIIIIPPPPPC N: PLU number 2 DDIIIIPPPPPPC P: price 3 DIIIIIPPPPPPC V: price check digit 4 DIIIIIIPPPPPC (It is created automatically) U: unit price W: weight Q: quantity D: department G: group K: country code (For future) A: ticket counter (Only for ticket) B: scale transaction counter C: total barcode check sum (It is created automatically) F: PLU prefix character T: text character R: transaction counter for each PLU L: clerk number %: print next fixed character* 0~9: numbers *%: It is used to enter characters therefore you cannot use this to enter numbers. 4. Exit Menu If you want to exit, press ESC key. X ESC 56
57 List Barcode (Menu code 262) (MENU -> 2. PLU Data Table I -> 6.Barcode -> 2. List ). Set the list range Set the range of barcode that you wish to check EX) ~0 LIST BARCODE (/) - Start Number : [ ] - End Number : [ 0] List All Press [SAVE] Key 0 No. Reference(descript) GGIIIIIPPPPPC EAN3- If you want to print list, press the TEST key Delete Barcode (Menu code 263) (MENU -> 2. PLU Data Table I -> 6.Barcode -> 3. Delete ). Enter barcode number to delete DELETE BARCODE (/) Barcode No : [ ] EX) Delete barcode Tare (Menu code 270) (MENU -> 2. PLU Data Table I -> 7.Tare) If Parameter 584 option (Use Tare No.) is Yes you can use this tare number which is set here when you create PLU, If it is set to No you have to program tare weight again. 57
58 New/Edit Tare (Menu code 27) (MENU -> 2. PLU Data Table I -> 7.Tare ->. New/Edit ) You can press the SAVE key at anytime to save the current data and if you want to exit without saving, press the ESC key.. Enter Tare No. This value can be from to 99. EX) Tare No. = NEW/EDIT TARE (/2) Tare No. : [ ] Description : [ ] 2. Tare Description EX) Tare Description = Container NEW/EDIT TARE (/2) Tare No. : [ ] Description : [CONTAINER ] C O N T A I N E R 3. Tare Type There are 2 types as below table EX) Tare Type =, Numeric Tare NEW/EDIT TARE (2/2) Tare Type : [ ] -> Numeric Tare Tare : [ 0.000]kg If you set Tare Type to 2, put a container on the platter and press the key after 2~3 seconds. Type of Tare Tare No. Type of Tare Description Numeric Tare Enter tare weight by using numeric keys. 2 Weight Tare Put a container on the platter. 4. Enter Tare Value EX) Tare = 0.00 Kg NEW/EDIT TARE (2/2) Tare Type : [ ] -> Numeric Tare Tare : [ 0.00]kg 0 58
59 5. Exit Menu If you want to exit, press ESC key. X ESC * If you set Tare No. to when you create PLU, tare is set to 0.00kg that is programmed here List Tare (Menu code 272) (MENU -> 2. PLU Data Table I -> 7.Tare -> 2. List ). Set the list range Set the range of tare that you wish to check EX) ~0 LIST TARE (/) - Start Number : [ ] - End Number : [ 0] List All Press [SAVE] Key 0 No. Reference(descript) 0.00kg CONTAINER If you want to print list, press the TEST key Delete Tare (Menu code 273) (MENU -> 2. PLU Data Table I -> 7.Tare -> 3. Delete ). Enter tare number to delete DELETE TARE (/) Tare No. : [ ] EX) Delete tare no. 59
60 Tare Key (Menu code 274) (MENU -> 2. PLU Data Table I -> 7.Tare -> 4.Tare Key ) You can assign Tare Key. There are 9 Tare keys and you have to set these keys in menu 880 (Key define). See Chapter Enter tare Key EX) Tare Key = TARE KEY (/) Tare Key : [ ] Tare No. : [ ] 2. Enter tare number EX) Tare No = TARE KEY (/) Tare Key : [ ] Tare No. : [ ] 0.00Kg CONTAINER Unit Symbol (Menu code 280) (MENU -> 2. PLU Data Table I -> 8.Unit Symbol) You can program unit symbol to print label New/Edit Unit Symbol (Menu code 28) (MENU -> 2. PLU Data Table I -> 8. Unit Symbol ->. New/Edit ) You can press the SAVE key at anytime to save the current data and if you want to exit without saving, press the ESC key.. Enter unit number This value can be from to 8. EX) Qty Unit No. = NEW/EDIT UNIT SYMBOL (/) Qty Unit No. [] Symbol : [ ] 2. Enter unit symbol EX) Symbol = TH CHAR 9 9 NEW/EDIT UNIT SYMBOL (/) Qty Unit No. : [] Symbol : [ TH ] 60
61 If you want to enter special symbol, press the CHAR key and enter the code value. (See ASCII code table on chapter 4.4) 3. Exit menu If you want to exit, press ESC key. X ESC List Unit Symbol (Menu code 282) (MENU -> 2. PLU Data Table I -> 8. Unit Symbol -> 2. List ). Set the list range EX) ~8 LIST UNIT SYMBOL (/) - Start Number : [ ] - End Number : [ 8] List All Press [SAVE] Key 8 No. Reference(descript) TH If you want to print list, press the TEST key Delete Unit Symbol (Menu code 283) (MENU -> 2. PLU Data Table I -> 8. Unit Symbol -> 3. Delete ). Enter unit symbol number to delete EX) Delete unit symbol. DELETE UNIT SYMBOL (/) Qty Unit No. [ ] 6
62 2.3 Programming PLU Data Table II 2.3. Ingredient (Menu code 30) (MENU -> 3. PLU Data Table II ->.Ingredient) New/Edit Ingredient (Menu code 3) (MENU -> 3. PLU Data Table II ->.Ingredient ->. New/Edit ) You can press the SAVE key at anytime to save the current data and if you want to exit without saving, press the ESC key.. Enter ingredient number. This value can be from to 999. EX) Ingredient number = NEW/EDIT INGREDIENT (/) Ingredient No. : [ ] Ingredients : [ ] /50 2. Enter ingredient EX) Ingredient Line = SALT Ingredient Line 2 = SUGAR To print SUGAR on next line, enter after SALT. S A L T NEW/EDIT INGREDIENT (/) Ingredient No. : [ ] Ingredients : [SALT SUGAR ] /50 S U G A R * The number of right side of "[ ]" is digit and total number of character. * Pressing "PAGE UP/DN" key turns to next or previous page. 3. Exit menu If you want to exit, press ESC key. X ESC 62
63 2.3.3 List Ingredient (Menu code 32) (MENU -> 3. PLU Data Table II ->.Ingredient -> 2. List ). Set the list range EX) ~0 LIST INGREDIENT (/) - Start Number : [ ] - End Number : [ 0] List All Press [SAVE] Key 0 No. Reference(descript) SALT SUGAR If you want to print list, press the TEST key Delete Ingredient (Menu code 33) (MENU -> 3. PLU Data Table II ->.Ingredient -> 3. Delete ). Enter ingredient number to delete DELETE INGREDIENT (/) Ingredient No. : [ ] EX) Delete ingredient no Nutrition Facts (Menu code 320) (MENU -> 3. PLU Data Table II -> 2.Nutrition Facts) You can program nutrition facts for your needs and you can use this when you create PLU. Nutrition facts is printed small or large size depending on the label format. Nutrition facts table Nutrition Facts Calories Calories From Fat Total Fat Saturated Fat Cholesterol Sodium Total Carbohydrates Dietary Fibers G G mg mg G G Unit 63
64 Sugars G Protein G Vitamin A % Calcium % Vitamin C % Iron % Etc New/Edit Nutrition Facts (Menu code 32) (MENU -> 3. PLU Data Table II -> 2. Nutrition Facts ->. New/Edit ) You can press the SAVE key at anytime to save the current data and if you want to exit without saving, press the ESC key. You can use the PG UP and PG DOWN keys to navigate from page to page, or you can use the Arrow keys to go through each page line at a time.. Nutrition Fact No * This value can be from to 500. EX) Nutrition fact no = NEW/EDIT NUTRIFACT (/0) Nutrition Fact No. : [ ] Description : [ ] 2. Enter description EX) BEEF STEW B E E F S T E W NEW/EDIT NUTRIFACT (/0) Nutrition Fact No : [ ] Description: [BEEFSTEW ] 3. Enter Serving Size EX) Sering size = CUP NEW/EDIT NUTRIFACT (2/0) Serving Size : [CUP ] Serving Per : [ ] C U P 4. Serving Per Container EX) Sering Per Container = 2 NEW/EDIT NUTRIFACT (2/0) Serving Size : [CUP ] Serving Per : [2 ] 2 5. Calories EX) Calories = 230 NEW/EDIT NUTRIFACT (3/0) Calories : [ 230 ] Calories From Fat : [ 0 ]
65 6. Calories from fat EX) Calories From Fat= 20 NEW/EDIT NUTRIFACT (3/0) Calories : [ 230 ] Calories From Fat: [ 20 ] Toral Fat EX) Total fat = 4 g NEW/EDIT NUTRIFACT (4/0) Total Fat : [ 4 ] g Saturated Fat : [ 0 ] g 4 8. Saturated fat EX) Saturated fat = 7 g NEW/EDIT NUTRIFACT (4/0) Total Fat : [ 4 ] g Saturated Fat : [ 7 ] g 7 9. Cholesterol EX) Cholesterol = 40 mg NEW/EDIT NUTRIFACT (5/0) Cholesterol : [ 40 ] mg Sodium : [ 0 ] mg Sodium EX) Sodium = 950 mg NEW/EDIT NUTRIFACT (5/0) Cholesterol : [ 40 ] mg Sodium : [ 950 ] mg Total Carbohydrate EX) Total Carbohydrate = 6 g NEW/EDIT NUTRIFACT (6/0) Total Carbohydrate : [ 6 ] g Dietary Fibers : [ 0 ] g 6 2. Dietary Fibers EX) Dietary Fiber = 2 g NEW/EDIT NUTRIFACT (6/0) Total Carbohydrate : [ 6 ] g Dietary Fibers : [ 2 ] g 2 3. Sugars EX) Sugars = 3 g NEW/EDIT NUTRIFACT (7/0) Sugars : [ 3 ] g Protein : [ 0 ] g 3 65
66 4. Protein EX) Protein = g NEW/EDIT NUTRIFACT (7/0) Sugars : [ 3 ] g Protein : [ ] g 5. Vitamin A EX) Vitamin A = 20% NEW/EDIT NUTRIFACT (8/0) Vitamin A : [ 20 ] % Calcium : [ 0 ] % Calcium EX) Calcium = 2% 2 NEW/EDIT NUTRIFACT (8/0) Vitamin A : [ 20 ] % Calcium : [ 2 ] % 7. Vitamin C EX) Vitamin C = 0 % NEW/EDIT NUTRIFACT (9/0) Vitamin C : [ 0 ] % Iron : [ 0 ] % 0 8. Iron EX) Iron = 6 % NEW/EDIT NUTRIFACT (9/0) Vitamin C : [ 0 ] % Iron : [ 6 ] % 6 9. Etc EX) Etc = 2 NEW/EDIT NUTRIFACT (0/0) Etc : [ 2 ] Exit menu If you want to exit, press ESC key. X ESC 66
67 2.3.7 List Nutrition Facts (Menu code 322 ) (MENU -> 3. PLU Data Table II -> 2.Nutrition Facts -> 2. List ). Set the list range EX) ~0 LIST NUTRIFACT (/) - Start Number : [ ] - End Number : [ 0] List All Press [SAVE] Key 0 No. Reference(descript) BEEFSTEW If you want to print list, press the TEST key Delete Nutrition Facts (Menu code 323) (MENU -> 3. PLU Data Table II -> 2.Nutrition Facts -> 3. Delete ). Enter nutrition fact number to delete. DELETE NUTRIFACT (/) Nutrition Facts No : [ ] EX) Delete nutrition facts no. 67
68 2.4 Discount Programming 2.4. Discount (Menu code 30) (MENU ->. PLU -> 3.Discount) You have to set discount information for each PLU New/Edit Discount (Menu code 3) (MENU ->. PLU -> 3.Discount ->. New/Edit ) You can press the SAVE key at anytime to save the current data and if you want to exit without saving, press the ESC key. You can use the PG UP and PG DOWN keys to navigate from page to page, or you can use the Arrow keys to go through each page line at a time.. Enter department number and PLU number. EX) Department No =, PLU No = NEW/EDIT DISCOUNT (/7) Department No. : [ ] Default PLU No. : [ ] BEEF 2. Enter discount type Refer to Discount Type table as below Discount information can be different depending on the discount type. WEIGHT DISCOUNT (2/7) Discount Type : [ ]. Unit Price Discount EX). Unit Price Discount Discount Type # Type Description Unit Price Discount - By Weight PLU: Set the discount amount on unit price, depending on weight. - By Count/PCS PLU: Set the discount amount on unit price, depending on number of items. 2 % Unit Price Discount - By Weight PLU: set discount % of unit price, depending on weight. - By Count/PCS PLU: set discount % of unit price, depending on number of items. 3 Total Price Discount - Set discount amount for total price. 4 % Total Price Discount - Set discount % of total price. 5 Fixed Price - Set a fixed amount for discount. 68
69 6 Free Item - Set free of charge item. 7 Free Addition - By Weight PLU: Set discount weight. - By Count/PCS PLU: Set discount number 8 Total Price by total price Set a discount amount of total price for current total price. 9 % Total Price by Total - Set a discount % of total price for current total price Price 0 Unit Price by Total Price - Set a discount amount of unit price for current total price Extra by Total Price - Set a discount number of item for current total price Please refer to "para 572" when user wants to also see the unit price discounted on "Unit Price" segment together with total price discounted in display 3. Enter discount value Refer to bleow table. Target unit is different depending on the PLU type. This is By Weight PLU therefore this unit is weight. In case of By count PLU or By PCS PLU, unit is count. EX) st Target : 0.00 Kg st Value :.00 $ NEW/EDIT DISCOUNT (3/7) First Target : [ 0.00] Weight First Value : [.00] Price NEW/EDIT DISCOUNT (4/7) Second Target : [ 0.500] Weight Second Value : [ 2.00] Price 2 nd Target : Kg 2 nd Value : 2.00 $ No Type Description First Target Weight Set the first weight limit for discount and apply discount for more than limit weight. 2 First Value Price Set the discount amount of unit price for the first weight limit. 3 Second Target Weight Set the second weight limit for discount and apply discount for more than limit weight. 4 Second Value Price Set the discount amount of unit price for the second weight limit. 69
70 4. Discount Condition : (Set the day of week ) -> Discount 0-> Do not discount EX) Discount on Thursday, Friday and NEW/EDIT DISCOUNT (5/7) Input or 0 : [SMTWTFS] Day of Week : [0000] Discount Condition 2 : (Set date and time) If you set date and time to 0, it means discount all the time EX) Start Date : End Date : NEW/EDIT DISCOUNT (6/7) Start Date : [04:07:0] YY-MM-DD End Date : [04:07:3] YY-MM-DD Start Time End Time : 8 am : 6:30pm NEW/EDIT DISCOUNT (7/7) Start Time : [08:00:00] (0..23 Hour End Time : [8:30:00] (0..23 Hour Exit menu If you want to exit, press the ESC key. X ESC List Discount (Menu code 32) (MENU ->. PLU -> 3.Discount -> 2.List). Enter department number to check EX) Department No. LIST DISCOUNT (/2) Department No: [ ] 70
71 2. Enter PLU range to check EX) PLU ~0 LIST DISCOUNT (2/2) Start PLU No : [ ] End PLU No : [ 0] List All Press SAVE Key 0 PLU Type Unit price discount If you want to print list, press the TEST key Delete Discount (Menu code 33) (MENU ->. PLU -> 3.Discount -> 3.Delete ) There are three ways to delete Discount. Simply enter the number that you wish to delete Delete by PLU No. (DC) (Menu code 37) (MENU ->. PLU -> 3.Discount -> 3.Delete->.Delete by PLU no.(dc) EX) Press key to select Delete by PLU No.(DC) DELETE (/). Delete by PLU No. (DC) 2. Delete by Dept. No. (DC) 3. Delete All (DC). Enter the department number and PLU number to delete EX) Department number = 2 PLU number = 2 DELETE BY PLU NO(DC) (/) Deptment No. : [ 2] Grocery PLU No. : [ ] Delete by Dept. No. (DC) (Menu code 38) (MENU ->. PLU -> 3.Discount->3.Delete->2.Delete by Dept. No (DC) EX) Press 2 key to select Delete by Dept. No.(DC) DELETE (/). Delete by PLU No. (DC) 2 2. Delete by Dept. No. (DC) 3. Delete All (DC). Enter the department number to delete EX) Department number = 2 DELETE BY DEPT. NO(DC) (/) Deptment No. : [ 2] Grocery 2 7
72 2.4.7 Delete ALL (DC) (Menu code 39) (MENU ->. PLU -> 3.Discount -> 3.Delete->3.Delete ALL(DC) EX) Press 3 key to select Delete all(dc) DELETE (/). Delete by PLU No. (DC) 3 2. Delete by Dept. No. (DC) 3. Delete All (DC). Enter the department number and PLU number to delete EX) Press key to select Delete all (DC) DELETE ALL(DC) (/) Are you sure?(=y/0=n) [ ] 72
73 2.5 Global Discount Programming 2.5. Global Discount (Menu code 530) (MENU -> 5. Global Setting -> 3.Discount) You can apply same discount regardless of PLU Priority Setting (Menu code 53) (MENU -> 5.Global -> 3.Discount ->.Priority) You can set discount type. Refer to Discount Priority Setting Table as below.. You can see discount information on the display by setting of menu 87 and also you can check it on a label. (See chapter 2.4.2) Discount Priority Setting No Type Description 0 No Discount No discount applied PLU Discount PLU discount only applied 2 Global Discount Global discount only applied 3 No Discount in PLU then Global PLU discount is applied. If there is no PLU discount, apply global discount Weight/Count/PCS Discount (Menu code 532/533/534) If you want to apply same discount regardless of PLU, you can set discount information in menu code, 532, 533 and 544. Refer to Discount Programming on chapter Global Discount condition by weight Item (Menu code 532) (MENU -> 5.Global -> 3.Discount -> 2.Weight discount) Global Discount condition by Count Item (Menu code 533) (MENU -> 5.Global -> 3.Discount -> 3.Count discount) Global Discount condition by PCS Item (Menu code 534) (MENU -> 5.Global -> 3.Discount -> 4.PCS discount) 73
74 2.6 Speed Key Setting This menu is to set speed keys, one-touch keys, for most frequently used PLUs to simply call up them. You can program up to 5 speed key set. Remember that there is a SHIFT key that allows you to double-use the Speed Keys. The Speed keys are numbered left-to-right and top-to-bottom. You can use speed key set number when you program menu 2.(See chapter 2.2.2) User can not assign the function key as speed keys Speed Key (Menu code 60) (MENU ->.PLU -> 6.Speed Key). Speed Key Set No. Enter speed key set no. You can use this number when you program menu 2. (See the chapter 2.2.2) EX) Speed key set No. = 2 2 SPEED KEY (/2) Speed Key Set No: [ 2] 2. Speed Key Programming The Speed keys are numbered left-to-right and top-to-bottom. In case of standard type, there are 8 columns and 6 rows for a total of 48 physical keys but if you press the SHIFT key and then one of the 48 Speed keys, then you can access Speed keys 49 through 96. In case of pole type, there are 72 keys but if you press the SHIFT key and then one of the 72 Speed keys, then you can access Speed keys 73 through 44. EX) Speed key no. SPEED KEY (2/2) Speed Key No : [ ] PLU No : [ 0] A EX2) Speed key no. 49 (In case of standard type) SPEED KEY (2/2) Speed Key No : [ 49] PLU No : [ 0] SHIFT A 2. PLU No. Enter PLU no. to assign speed key * PLU should be belong to scale s department. EX) PLU 0 = BEEF 0 SPEED KEY (2/2) Speed Key No : [ ] PLU No : [ 0] BEEF 74
75 2.7 Traceability 2.7. Traceability (Menu code 330) (MENU -> 3. PLU Data Table II -> 3.Traceability) You can use this traceability number when you program PLU New/Edit Traceability (Menu code 33) (MENU -> 3. PLU Data Table II -> 3.Traceability ->. New/Edit ) You can press the SAVE key at anytime to save the current data and if you want to exit without saving, press the ESC key.. Enter traceability number This value can be from to 99. EX) Traceability number = NEW/EDIT TRACEABILITY (/3) Traceability No. : [ ] Description : [ ] 2. Enter description EX) Description = SIRLOIN NEW/EDIT TRACEABILITY (/3) Traceability No. : [ ] Description: [SIRLOIN ] S I R L O I N 3. Born in country number EX) Born in country No. =. SWEDEN Note : To program country, see chapter 2.8 Country programming. NEW/EDIT TRACEABILITY (2/3) Born in Country No. : [ ] Bred in Country No. : [ ] SWEDEN 4. Bred in country number EX) Bred in country No. = 95. KOREA 9 5 NEW/EDIT TRACEABILITY (2/3) Born in Country No. : [ ] Bred in Country No. : [ 95] KOREA 75
76 5. Slaughter house numer EX) Slaughter house No. = 2. BILLY S Note : To program slauter house, see page 76 (2.9 Slauter house programming). 2 NEW/EDIT TRACEABILITY (3/3) Slaughter House No. : [ 2] Cutting Hall No. : [ ] BILLY S 6. Cutting hall number EX) Cutting hall No. = 23. HAN S CUT 2 3 NEW/EDIT TRACEABILITY (3/3) Slaughter House No. : [ 2] Cutting Hall No. : [ 23] HAN S CUT 7. Exit menu If you want to exit, press ESC key. X ESC List Traceability (Menu code 332) (MENU -> 3. PLU Data Table II -> 3.Traceability -> 2. List ). Set the list range Set the list range to check EX) ~0 LIST TRACEABILITY (/) - Start Number : [ ] - End Number : [ 0] List All press [SAVE] key 0 No. Traceability : 99 : 2 : 23 : SIRLOIN If you want to print list, press the TEST key Delete Traceability (Menu code 333) (MENU -> 3. PLU Data Table II -> 3.Traceability -> 3. Delete ). Enter traceability number to delete DELETE TRACEABILITY (/) Traceability No : [ 2] EX) Delete traceability no
77 2.8 Country Programming 2.8. Country (Menu code 340) (MENU -> 3. PLU Data Table II -> 4.Country) You can use country data when you program traceability New/Edit Country (Menu code 34) (MENU -> 3. PLU Data Table II -> 4.Country ->. New/Edit ) You can press the SAVE key at anytime to save the current data and if you want to exit without saving, press the ESC key.. Enter country number This value can be from to 250. EX) Country No. = NEW/EDIT COUNTRY (/) Enter Country No. : [ ] Name : [ ] 2. Enter country name EX) Name = KOREA NEW/EDIT COUNTRY (/) Enter Country No. : [ ] Name : [KOREA ] K O R E A 3. Exit menu If you want to exit, press ESC key. X ESC List Country (Menu code 342) (MENU -> 3. PLU Data Table II -> 4.Country -> 2. List ). Set the list range Set the list range to check EX) ~0 LIST COUNTRY (/) - Start Number : [ ] - End Number : [ 0] List All press [SAVE] key 0 If you want to print list, press the TEST key. 77
78 2.8.4 Delete Country (Menu code 343) (MENU -> 3. PLU Data Table II -> 4.Country -> 3. Delete ). Enter country number to delete DELETE COUNTRY (/) Enter Country No : [ ] EX) Delete country no. 2.9 Programming Slaughter House 2.9. Slaughter House (Menu code 350) (MENU -> 3. PLU Data Table II -> 5.Slaughter House) You can use slaughter house data when you program traceability New/Edit Slaughter House (Menu code 35) (MENU -> 3. PLU Data Table II -> 5.Slaughter House ->. New/Edit ) You can press the SAVE key at anytime to save the current data and if you want to exit without saving, press the ESC key.. Enter slaughter House number This value can be from to 99.. EX) Slaughter house No. = NEW/EDIT SLAUGHTER HOUSE (/) Enter Slaughter House No. : [ ] House : [ ] Country : [ ] 2. Enter Slaughter House Enter slaughter house name or registered number. EX) Slaughter house registered no. = KSH2 K S H 2 NEW/EDIT SLAUGHTER HOUSE (/) Enter Slaughter House No. : [ ] House : [KSH2 ] Country : [ ] 3. Enter slaughter house country number You can use contry number which is programmed at menu 34 EX) Slaughter house Country No. =. KOREA 4. Exit menu If you want to exit, press ESC key. NEW/EDIT SLAUGHTER HOUSE (/) Enter Slaughter House No. : [ ] House : [KSH2 ] Country : [ ] X ESC 78
79 2.9.3 List Slaughter House (Menu code 352) (MENU -> 3. PLU Data Table II -> 5.Slaughter house -> 2. List ). Set the list range Enter list range to check EX) ~0 LIST SLAUGHTER HOUSE (/) - Start Number : [ ] - End Number : [ 0] List All press [SAVE] key 0 If you want to print list, press the TEST key Delete Slaughter House (Menu code 353) (MENU -> 3. PLU Data Table II -> 5.Slaughter House -> 3. Delete ). Enter slaughter house number to delete DELETE SLAUGHTER HOUSE (/) Enter Slaughter House No : [ ] EX) Delete slaughter house no. 2.0 Programming Cutting Hall 2.0. Cutting Hall (Menu code 360) (MENU -> 3. PLU Data Table II -> 6.Cutting Hall) You can use this cutting hall data when you program traceability New/Edit Cutting Hall (Menu code 36) (MENU -> 3. PLU Data Table II -> 6.Cutting Hall ->. New/Edit ) You can press the SAVE key at anytime to save the current data and if you want to exit without saving, press the ESC key.. Enter cuttting hall number This value can be from to 99 EX) Cutting hall no. = NEW/EDIT CUTTING HALL (/) EnterCutting Hall No. : [ ] Hall : [ ] Country : [ 0] 79
80 2. Enter cutting hall information Enter cutting hall name or registered number. EX) Cutting hall registered number = KSH2 K C H 2 NEW/EDIT CUTTING HALL (/) Enter Cutting Hall House No. : [ ] Hall :[KCH2 ] Country : [ 0] 3. Cutting hall Country number You can use contry number which is programmed at menu 34 (See page 74) EX) Cutting Hall Country no. =. KOREA NEW/EDIT CUTTING HALL (/) Enter Cutting Hall House No. : [ ] Hall :[KCH2 ] Country : [ ] 4. Exit menu If you want to exit, press ESC key. X ESC List Cutting Hall (Menu code 362) (MENU -> 3. PLU Data Table II -> 6.Cutting Hall -> 2. List ). Set the list range Set the list range to check EX) ~0 LIST CUTTING HALL (/) - Start Number : [ ] - End Number : [ 0] List All press [SAVE] key 0 No. reference(descript.) : KCH2 If you want to print list, press the TEST key Delete Cutting Hall (Menu code 363) (MENU -> 3. PLU Data Table II -> 6.Cutting Hall -> 3. Delete ). Enter cutting hall number to delete DELETE CUTTING HALL (/) Enter Cutting Hall No. : [ ] EX) Delete cutting hall no. 80
81 2. Programming Store Data This chapter explains how to access, program STORE data table (Price Look Up) in CL5000 series. 2.. Store Data (Menu code 40) (MENU -> 4. Store Data Table ->.Store) data. This section shows how to create, edit, list and delete store, customer, and advertisement message 2..2 New/Edit Store (Menu code 4) (MENU -> 4. Store Data Table ->.Store ->.New/Edit Store ). Enter store number. EX) # NEW/EDIT STORE (/2) Store No. : [ ] Name : [ ] 2. Press key and enter appropriate text in NAME. EX) NAME=YANGJOO NEW/EDIT STORE (/2) Store No. : [ ] Name : [YANGJOO ] Y A N G J O O 3. Press key, then user may enter other store information such as TELEPHONE NUMBER or any text information. NEW/EDIT STORE (2/2) TEL. : [ ] Text : [ HO ] EX) TEL.#= , TEXT= HO 4. Press key and user may go back to STORE main menu by using ESC key. X ESC 8
82 2..3 List Store (Menu code 42) (MENU -> 4. Store Data Table ->.Store -> 2.List Store ) This menu shows the list of STORE saved. Press 2 in STORE menu to get into LIST STORE menu. Press SAVE key to list all of STORE information saved.. Set the list range Set the list range to check EX) ~0 LIST STORE (/) - Start Number : [ ] - End Number : [ 0] List All press [SAVE] key 0 No. reference(descript.) Yangjoo If you want to print list, press the TEST key Delete Store (Menu code 43) (MENU -> 4. Store Data Table ->.Store -> 3.Delete Store ) This menu is to delete the STORE user wish to. Press 3 in STORE menu to get into DELETE STORE menu.. Enter cutting hall number to delete DELETE STORE (/) Store No. : [ ] EX) Delete cutting hall no Customer (Menu code 420) (MENU -> 4. Store Data Table -> 2.Customer ) This section shows how to register customers account and their information. Customer information is to manage the specific customer s account receivable. * Customer registration is used for printing a receipt of credit transactions 82
83 2..6 New/Edit Customer (Menu code 42) (MENU -> 4. Store Data Table -> 2.Customer ->.New/Edit ). Enter Customer number and press key. EX) Customer No.=, NEW/EDIT CUSTOMER (/3) Customer No. : [ ] 2. Enter other informations in [ ], such as Name, Address, and Address2. EX) NAME=BILLY, ADDRESS =GARAEBI. ADDRESS 2=033/80 B I L L Y NEW/EDIT CUSTOMER (2/3) Name :[BILLY ] Address :[GARAEBI ] Address 2 : [ 033/80 ] G A R A E B I / Press key, then user may enter the Address 3, TEL. Number and customer s CREDIT LIMIT AMOUNT. EX) TEL.= CREDIT LIMIT AMOUNT= NEW/EDIT CUSTOMER (3/3) Address 3 :[ ] TEL. : [ ] Credit Limit Amount : [ ] Press key to enter the information. User may go back to main CUSTOMER menu by pressing X/ESC key. X ESC 2..7 List Customer (Menu code 422) (MENU -> 4. Store Data Table -> 2.Customer -> 2.List ) This menu shows the list of CUSTOMER saved. Press 2 in CUSTOMER menu to get into LIST CUSTOMER menu. Press SAVE key to list all of CUSTOMER information saved. 83
84 . Set the list range Set the list range to check EX) ~0 LIST COTOMER (/) Start Number : [ ] End Number : [ 0] 0 No. reference(descript.) BILLY If you want to print list, press the TEST key Delete Customer (Menu code 423) (MENU -> 4. Store Data Table -> 2.Customer -> 3.Delete ) This menu is to delete the CUSTOMER user wish to. Press 3 in CUSTOMER menu to get into DELETE CUSTOMER menu. Enter customer number to delete.. Enter cutting hall number to delete DELETE STORE (/) Store No. : [ ] EX) Delete cutting hall no Scroll Message (Menu code 430) (MENU -> 4. Store Data Table -> 3.Scroll Message) This function is to set the scrolling advertisement on LCD Display Configuration (Menu Code 43) (MENU->4. Store Data Table -> 3.Scroll Message ->. Configuration). Configuration User may set the wait time from to 9999 second. Setting wait time as 0 is not to use Scroll Message function. EX) Wait Time = 5 Speed means the scrolling speed of message. User may set it from to 9. Default speed: 4 (recommended). CONFIGURATION (/) Wait Time (s) : [ 5] Speed : [4]
85 2.. Edit Scroll Message (Menu Code 432) (MENU -> 4. Store Data Table -> 3. Scroll Message ->2. Edit Scroll Message). Input and edit Message User may input up to five messages and select two different scrolling effect. Please input messages No. and message. EDIT SCROLL MESSAGE (/7) Message No. : [] Message : [Scroll Message... ] 2. Set scrolling message effect Effect =0 : No use of scrolling message effect. Effect = : Scroll message left to right Effect =2 : Scroll message right to left EDIT SCROLL MESSAGE (2/7) Effect : [] -> Left to Right 3. Select use or unuse for scrolling message If you set [N] at Use Setting, this scrolling message is not use. If it use this scroll, then set [Y] 4. Set date of scroll message If you set Y [] at Date Setting, you can go to next screen to set day of week. (For example, if you set M to 0, scroll message is not shown on Monday.) EDIT SCROLL MESSAGE (3/7) Use message (Y/N) : [Y] EDIT SCROLL MESSAGE (4/7) Date Setting (Y/N) : [Y] EDIT SCROLL MESSAGE (5/7) Input or 0 : [SMTWTFS] Day of Week : [] You have to enter date. If you set Start Date to , it means that scroll message is shown from now and if you set End Date to , it means that scroll message is shown from now until December 3, 99 You have to enter time. You have to enter hour, minute, and second in regural sequence and start time should be lower than end time. EDIT SCROLL MESSAGE (6/7) Start Date : [ ] DD-MM-YY End Date : [ ] DD-MM-YY EDIT SCROLL MESSAGE (7/7) Start Time : [00:00:00] End Time : [00:00:00] 85
86 2..2 List Scroll Message (Menu Code 433) (MENU -> 4.Store Data Table -> 3.Scroll Message -> 3.List) This function is to set the scrolling advertisement on LCD Display.. Set the list range Set the list range to check EX) ~0 LIST COTOMER (/) - Start Number : [ ] - End Number : [ 0] List All Press [SAVE] key Currency (Menu code 440) (MENU -> 4. Store Data Table -> 4. Currency) User may save rate of currency to default currency and convert to another currency simply by this function. Please refer to Menu 880 Function key definition New/Edit Currency (Menu Code 44) (MENU -> 4. Store Data Table -> 4.Currency ->.New/Edit). Numbering Currency User may save up to 4 different currencies by numbering ~4. EX) Currency No. = NEW/EDIT CURRENCY (/3) Enter Currency No : [] Rate Decimal Point : [4] 2. Rate Decimal Point Enter th Rate Decimal Point (default = 4) EX) Rate Decimal Point = 3 NEW/EDIT CURRENCY (/3) Enter Currency No : [] Rate Decimal Point : [3] 3 86
87 3. Currency Rate. Enter comparative rate of currency to default currency set. NEW/EDIT CURRENCY (2/3) Currency Rate : [ 2.800] Primary Sign : [ ] EX) Default currency = $.00 Comparative currency rate to default currency = Primary Sign Enter the first currency sign to be changed. EX) Primary Sign = $ NEW/EDIT CURRENCY (2/3) Currency Rate : [ 2.800] Primary Sign : [$ ] CHAR Last Symbol Enter the last currency symbol to be changed. EX) No last symbol NEW/EDIT CURRENCY (3/3) Last Sign : [ ] Price Decimal Point : [0] 6. Price Decimal Digit Enter the number of decimal digit EX) Price Decimal point digit = 2 NEW/EDIT CURRENCY (3/3) Last Sign : [ ] Price Decimal Point : [2] 2 Printing formats of currency symbol No Printing Format Remarks , 0.2 $ 00.00, $ $, 0.2 $ 3 $ c, $ 0.2 c 4 $ c, 2 c (Greek) When total amount is less than, only Last currency symbol shows up. 5 $00.00, $ $, 0.2$ 7 $00.00c, $0.2c 8 $00.00c, 2c (Greek) When total amount is less than, only Last currency symbol shows up. 87
88 2..5 List Currency (Menu Code 442) (MENU -> 4. Store Data Table -> 4.Currency -> 2.List). Set the list range Set the list range to check EX) ~4 LIST CURRENCY (/) - Start Number : [ ] - End Number : [ 4] List All press [SAVE] key 4 No. reference(descript.).2800 $ If you want to print list, press the TEST key Delete Currency (Menu code 443) (MENU -> 4. Store Data Table -> 4.Currency -> 3.Delete). Currency number to delete DELETE CURRENCY (/) Enter Currency No : [ 2] EX) Delete Currency no
89 2.2 Programming Global Setting 2.2. Global Label Format (Menu code 50) (MENU -> 5. Global Setting ->.Label Format) Pre-programmed fixed label formats are from # to #0 and these formats cannot be modified. Label format #~#30 are free formats that users may modify at their needs. Users may download one into the scale and set a specific free label format. (Refer to 4.2 Label format on chapter ) You can press the SAVE key at anytime to save the current data and if you want to exit without saving, press the ESC key.. Global Label If you use Global Label, enter. If not, enter 0. *If you set it to, st format number is ignored which is set in PLU programming *2 nd label format is printed if it is set. LABEL FORMAT (/3) Use Global Label (=Y/0=N): [Y] PLU Label No. : [0] EX) Use global label 2. Set PLU label No. Set PLU label number EX) PLU Label No. = 2. IS (60x40) 2 LABEL FORMAT (/3) Use Global Label (=Y/0=N): [Y] PLU Label No. :[2] IS (60x40) 3. Set Miscellaneous label number Set label format for miscellaneous item. EX) Misc. Label ID = 2. IS (60x40) 2 LABEL FORMAT (2/3) Misc. Label No. : [ 2 ] Total Label No. : [ 2 ] IS (60x40) 4. Set total label number Set label format of total label for Add-Up sales. EX) Total label No. = 0, TC (60x60) 0 LABEL FORMAT (2/3) Misc. Label No. : [ 2 ] Total Label No. : [0] TC (60x40) 89
90 5. Set printing direction of total label EX) Reverse Total Label = Y Y LABEL FORMAT (3/3) Reverse Total Label : [ Y ] Reverse Item Label : [ N ] 6. Set printing direction of PLU and Misc. item EX) Reverse Item Label = Y Y LABEL FORMAT (3/3) Reverse Total Label : [ Y ] Reverse Item Label : [ Y ] 7. Exit menu If you want to exit, press ESC key. X ESC Barcode Format (Menu code 520) (MENU -> 5. Global Setting -> 2.Barcode) Global Barcode Setting provides all-in-one barcode setting by selecting nine different barcode options so that user does not need to save data for individual PLUs one by one. All related barcode data are selected and saved from PLU barcode data table user may already register. You can press the SAVE key at anytime to save the current data and if you want to exit without saving, press the ESC key.. Set Global Barcode If you use global barcode, enter. If not, enter 0. *If you set it to, barcode number is ignored which is set in PLU programming EX) Use global barcode BARCODE (/4) Use Global Barcode (=Y/0=N) : [ Y ] PLU Weight Barcode No. : [ 0 ] PLU Count Barcode No. : [ 0 ] 2. Set barcode number for by-weight PLU EX) PLU Weight barcode No. = 2 2 BARCODE (/4) Use Global Barcode (=Y/0=N) : [ Y ] PLU Weight Barcode No. :[ 2 ] PLU Count Barcode No. : [ 0 ] 90
91 3. Set barcode number for by-count PLU EX) PLU Count barcode No. = 2 2 BARCODE (/4) Use Global Barcode (=Y/0=N) : [ Y ] PLU Weight Barcode No. : [ 2 ] PLU Count Barcode No. : [ 2 ] 4. Set barcode number for by-pcs PLU EX) PLU PCS barcode No. = 2 2 BARCODE (2/4) PLU PCS Barcode No. : [ 2 ] PLU Fixed Barcode No. : [ 2 ] Misc. Weight Barcode No. : [ 0 ] 5. Set barcode number for fixed PLU EX) PLU fixed barcode No. = 2 BARCODE (2/4) PLU PCS Barcode No. : [ 2 ] PLU Fixed barcode No. : [ 2 ] Misc. Weight Barcode No. : [ 2 ] 2 6. Set barcode number for Misc. weight item EX) Misc. weight barcode No. = 2 BARCODE (2/4) PLU PCS Barcode No. : [ 2 ] PLU Fixed barcode No. : [ 2 ] Misc. Weight Barcode No. : [ 2 ] 2 7. Set barcode number for Misc. count item EX) Misc. count barcode No. = 2 2 BARCODE (3/4) Misc. Count Barcode No. : [ 2 ] Misc. pcs Barcode No. : [ 2 ] Add-Up TTL Barcode No. : [ 0 ] 8. Set barcode number for Misc. PCS Item EX) Misc. PCS barcode No. = 2 2 BARCODE (3/4) Misc. Count Barcode No. : [ 2 ] Misc. pcs Barcode No. : [ 2 ] Add-Up TTL Barcode No. : [ 0 ] 9. Set barcode number for Add-Up Total EX) Add Up TTL barcode No. = 2 2 BARCODE (3/4) Misc. Count Barcode No. : [ 2 ] Misc. pcs Barcode No. : [ 2 ] Add-Up TTL Barcode No. : [ 0 ] 9
92 0. Set barcode number for floating Total EX) Floating TTL barcode No. = 2 BARCODE (4/4) Floating TTL Barcode No. : [ 0 ] 2. Exit menu If you want to exit, press ESC key. X ESC 92
93 2.3 Printing Programming This chapter explains how to set printing-related environments, such as print label item, markdown, Hardware, serial number format, and ticket Printing (Menu code 700) (MENU -> 7. Print) (/2). Print Label Item 2. Markdown 3.Printer Hardware (2/2) 4. Serial Number Format 5. Add-Up Total 6. Ticket Submenu No. Submenus Description Print Label Item Select item(s) which is(are) not printed on label. 2 Markdown Select Yes or No to print both of original and discount information on the label. 3 Print Hardware Set the label type and sensor of printer 4 Serial Number Format Set the format of serial number to print label or ticket 5 ADD-UP Total Select add-up total label whether is printed or not 6 Ticket Set printing item for ticket Print label item (Menu code 70) (MENU -> 7. Print ->.Print Label Item) If you set any of the items to Y, then they will NOT print on any labels regardless of the label format. You can use the PG UP and PG DOWN keys to navigate from page to page, or you can use the Arrow keys to go through each page line at a time. You can press the SAVE key at anytime to save the current data and if you want to exit without saving, press the ESC key..if you do not want to print, enter 0(N), if you want to print, enter (Y). or 0 LABEL ITEM (/6) Department Name (Y/N) : [N] Department Number (Y/N) : [N] Group Number (Y/N) : [N] 93
94 Print Label Item Page Item Department Name Department Number Group Number 2 PLU Number PLU Name PLU Name 2 3 PLU Name 3 Item Code Unit Weight 4 Tax Rate Tax Price Tare Weight 5 Pieces Unit Symbol Sell By Date 6 Sell By Time Packed On Date Packed On Time 7 Produced Date Cook By Date Bonus Point 8 Origin Ingredient Sales Message 9 Refer. Net Weight Refer. Gross Weight Percent Tare 0 Percent Tare Limit Saved Price Label Serial Store Name Clerk Number Clerk Name 2 Customer Name Customer Number Scale Number 94
95 Day of Week Currency Rate Second Total Price Second Unit Price Traceability Nutrition Fact Label Caption Total Tax Price Second Add Total Barcodes Image Markdown (Menu code 720) (MENU -> 7. Print -> 2.Markdown) Markdown is to select Yes or No to print both of original and discount information on the label. There are 4 selectable sub-menus on label. Markdown Sub-menu No. Sub-menu Description Total Price Markdown Select Yes to display both of original total price and discount total price if any. Otherwise, select No. 2 Unit Price Markdown Select Yes to display both of original unit price and discount unit price if any. Otherwise, select No. 3 Weight Markdown Select Yes to display both of original weight and discount weight if any. Otherwise, select No. 4 Quantity Markdown Select Yes to display both of original quantity and discount quantity if any. Otherwise, select No.. Select Yes or No by using or 0 key and press the key. 0 or MARKDOWN (/2) Total Price Markdown (Y/N) : [ Y ] Unit Price Markdown (Y/N) : [ Y ] Weight Markdown (Y/N) : [ Y ] 2. After setting all of above MARK DOWN submenus use X/ESC key or SAVE key to go back to main menu. X or SAVE ESC MARKDOWN (2/2) Quantity Markdown : [ Y ] 95
96 2.3.4 Printer Hardware (Menu code 730) (MENU -> 7. Print -> 3.Printer Hardware) This section is to explain how to set printing H/W environments in the following table..press 3 to get into H/W setting mode on Print Menu. 3 ER HARDWARE (/3). Print Mode 2. Label/Ticket Size 3. Sensor Calibration Printer Hardware Sub-Menu No. Sub-Menu Description Print Mode Select label, ticket or continuous label mode. 2 Label / Ticket Size If it is Label mode, Width(60), Height(40) and Gap length(2) size is set, If it is Ticket mode, Width(60), Feed(20) and End Margin(5) size is set. If you use Continuous Label Paper in Label mode, Gap length value is applied to End Margin. * The values in ( ) are default. 3 Sensor Calibration Enter the Gap(28) and Peel(28) values for printing sensor calibration. * The values in ( ) are default. * If you press TEST key, Gap and Peel values are adjusted automatically. * In case of Ticket mode, Gap value is not saved. 4 Sensor & Motor Set Peel-off sensor, Rewind Motor and Label Paper type 5 Print Intensity Set the extent of intensity of label (ticket) printed. 6 Adjust Feed Length Set adjusting values of feed length. This value can be from -200 to You can change sign(+,-) by pressing ZERO key. + value will print higher than THP. * Pressing TEST key automatically feeds to adjust the feed length. 7 Label Preprint You can set preprint length Print Mode (Menu code 73) (MENU -> 7. Print -> 3.Printer Hardware ->.Print Mode) Select 0 for Label Mode, for Ticket Mode or 2 for Continuous Label Mode. Press to save. MODE (/) Print Mode (0-2) : [0] Label Mode 96
97 2.3.6 Label Size/Ticket Size (Menu code 732) (MENU -> 7. Print -> 3. Printer Hardware -> 2.Label Size) Enter values for Width, Height, Gap Length. If you press TEST key, height and gap length of current label is measured. * If it is Ticket Mode, TICKET SIZE is displayed, and TEST key is not operated. * If it is Label mode and Continuous Label Paper, TEST key is not operated. And "End Margin" instead of "Gap Length" shows up. LABEL SIZE (/) Width :[60]mm Height:[40]mm Gap Length:[ 2]mm TICKET SIZE (/) Width :[60]mm Feed : [20]mm End Margin :[ 5]mm Sensor Calibration (Menu code 733) (MENU -> 7. Print -> 3. Printer Hardware -> 3.Sensor Calibration) Enter appropriate values for Gap, Peel, Out of Paper. * If you press TEST key, Gap and Peel values are adjusted automatically. * If it is Ticket mode, Gap value is not saved. SENSOR CALIBRATION (/) Gap :[28] Peel:[28] [TEST]=Auto Calibration SENSOR CALIBRATION (/) Gap (Rcpt):[28] Peel:[28] [TEST]=Auto Calibration Sensor & Motor (Menu code 734) (MENU -> 7. Print -> Printer Hardware -> 4. Sensor & Motor) Enter appropriate values or Yes or No for METHOD TYPE, ACTIVE PEEL-OFF, ACTIVE REWIND MOTOR, and LABEL PAPER. * If there is no gap on a label, set Label Paper to 0, if there a gap, set it to. SENSOR&MOTOR (/) Active Peel-off :[ Y ] Active Rewind Motor : [ Y ] Label Paper (0=No Gap, =Gap) : [ ] *When "Ticket Mode" is in "Print Mode", [Rewind Motor] and [Labe Paper] do not work Print Intensity (Menu code 735) (MENU -> 7. Print -> 3. Printer Hardware -> 5.Print Intensity) Enter any value from 0 to 20. Press TEST to test printing a label.. INTENSITY (/) Printer Intensity (0-20) : [0] [TEST] = Test Intensity 97
98 2.3.0 Adjust Feed Length (Menu code 736) (MENU -> 7. Print -> 3. Printer Hardware -> 6.Adjust Feed Length) Enter any value of the feed alignment from -200 to Press ZERO to toggle sign. Press TEST to test feed or ENTER to save current FEED Length value. * pixel = 0.25mm Ex) +80 will print 0mm higher. -40 will print 5mm lower. ADJUST FEED LENGTH (/) Feed Adjustment (-200~+200):[+ 0] [TEST]=Test, [ZERO]=+ or Label Preprint (Menu code 737) (MENU -> 7. Print -> 3. Printer Hardware -> 7.Label Preprint) Enter Y(Yes) or N(No) to select Preprint mode and any value of the preprint length from 0 mm to 0 mm. Press TEST to test preprinting. LABEL PRE (/) Preprint Mode (Y/N) : [ N ] Preprint Length (0-0) : [ 0] After setting all of above H/W setting sub-menus use X/ESC key to go back to main menu X ESC Serial Number Format (Menu code 740) (MENU -> 7. Print -> 4.Serial Number Format) SERIAL NUMBER FORMAT programming is for numbering of label/ticket issued (printed) on label/ticket. User may identify daily total counts of label/ticket used up. Press 4 to go to SERIAL NUMBER FORMAT menu in main menu. 4 SERIAL NUMBER FORMAT (/) Label Serial No. : [BBBBB ] Ticket Serial No. : [%N%O%:AAAAA ] 2 Enter appropriate data in [ ]. EX) #000 on label RCT#00 on ticket % # B B B B SERIAL NUMBER FORMAT (/) Label Serial No. : [%#BBBB ] Ticket Serial No. : [%R%C%TAAA ] % R % C % T A A A 98
99 Meaning I: Item Code N: PLU Number P: Price U: Unit Price W: Weight Q: Quantity D: Department G: group A: Ticket Counter (Ticket Mode) B: Scale Transaction Counter F: PLU Prefix Character T: Text Character R: Transaction Counter of Each PLU L: Clerk Number %: Print Fixed Character in the Next Space. K: Country Code (For Future) Sample Label Serial Number Sample Ticket Serial Number #000 RCT# Add-Up Total (Menu code 750) (MENU -> 7. Print -> 5.Add-up Total) This section shows how to set printing environments of total label and item label when you use ADD-UP sales. Press 5 to get into ADD-UP TOTAL menu in main menu. 5 ADD-UP TOTAL (/) Prt. Total Label: [ Y ] Prt. Item Label : [ Y ] 2 Press 0 for No or for Yes in [ ]. EX) Print Total Label - Yes Print Item Label - No ADD-UP TOTAL (/) Prt. Total Label: [ Y ] Prt. Item Label: [ N ] 0 99
100 3 Press key to save and go back to main menu ADD-UP Setting ADD-UP Setting Print Total Label Description Total label is printed when you press the key during add-up sales. Print Item Label Item label is printed whenever you press the ADD key. * It is applied to Label mode Ticket (Menu code 760) (MENU -> 7. Print -> 6.Ticket ) This section shows how to select item(s) (Contents) printed on ticket. Press 6 to go to TICKET setting. TICKET (/). Select Ticket Item 2. Select List Item Select Ticket Item (Menu code 76) (MENU -> 7. Print -> 6.Ticket ->.Select Ticket Item) 2 Press to go to SELECT TICKET ITEM menu. Select Yes or No for Print List, Print Total Barcode, and Print Total Label. SELECT TICKET ITEM (/) Prt. List : [ Y ] Prt. Total Barcode : [ Y ] Prt. Total Label : [ Y ] 00
101 2.3.6 Select List Item (Menu code 762) (MENU -> 7. Print -> 6.Ticket ->2.Select List Item) * Before setting list item, you have to set Print List to Y in menu 76. Press 2 to get into SELECT LIST ITEM menu. Select Yes or No for Print Store Name, Print Clerk Name, and Print Item Barcode. SELECT LIST ITEM (/3) Prt. Store Name :[ Y ] Prt. Clerk Name :[ Y ] Prt. Item Barcode :[ Y ] 2 2 Select Yes or No for Print Tax Information, and Print Traceability. And, select appropriate ID # for Ticket Head Form and Ticket Tail Form. SELECT LIST ITEM (2/3) Prt. Tax Information : [ Y ] Prt. Traceability : [ Y ] Ticket Head Form No. : [ 2 ] SELECT LIST ITEM (3/3) Ticket Tail Form No. : [ 3 ] 2 3 Ticket Format Setting Ticket Item List Item Ticket Formats Setting Print List (Y/N) Print Total Barcode Print Total Label Print Store Name Print Clerk Name Print Item Barcode Print Tax Information Print Traceability Ticket Head Form No. Ticket Tail Form No. Description Printing the list of each sales item(s). * In case of Yes selected user can go to List Item setting. Printing total barcode on ticket. Printing total amount on ticket. Printing store name on ticket. Printing clerk name on ticket. Printing every item s barcode on ticket. Printing tax information on ticket. Printing traceability information on ticket Printing label format No. for ticket head. Printing label format No. for ticket tail. * You have to download label format for Ticket Head Form No. and Ticket Tail Form No. from PC. 0
102 * Ticket Format SELECT TICKET ITEM (/) Prt. List : [ Y ] Prt. Total Barcode : [ Y ] Prt. Total Label : [ Y ] LIST * List Format Ticket Head Label Form Store Name Clerk Name List Title(Fixed) Item List Item Barcode Item List N SELECT LIST ITEM (/3) Prt. Store Name :[ Y ] Prt. Clerk Name :[ Y ] Prt. Item Barcode :[ Y ] SELECT LIST ITEM (2/3) Prt. Tax Information : [ Y ] Prt. Traceability : [ Y ] Ticket Head Form No. : [ 2 ] SELECT LIST ITEM (3/3) Ticket Tail Form No. : [ 3 ] Item Barcode N Sub Total Fixed format Tax Information Total Ticket Tail Label Form 02
103 2.4 Programming Scale Configuration 2.4. Scale Configuration (Menu code 800) (MENU -> 8. Scale Config) This chapter explains how to configure the scale. The main menu of Scale Configuration is shown as below. SCALE CONFIG (/3).Sale Mode 2.Operation Mode 3. Department SCALE CONFIG (2/3) 4. Date/Time 5.User/Security Configuration 6.Test SCALE CONFIG (3/3) 7.Scale Parameter 8.Function Key Define Sale Mode (Menu code 80) (MENU -> 8. Scale Config ->.Sale Mode) This section is to select sale mode, which have six different modes in the following table. Sale Modes No. Sale Modes Description REG: Ticket & Floating Selecting Ticket and Floating Clerk Mode. 2 REG: Label Selecting label Mode. 3 REG: Prepack Selecting Prepack Mode. 4 REG: Label & Floating Selecting Label and Floating Clerk Mode. 5 Manager Selecting Manager Mode 6 Repack Selecting Repack Mode (In this mode, report is not updated.) 7 Self Service & Label Selecting Self Service Mode (In this mode, you can use speed key and some keys. If you want to finish this mode, while pressing MENU key, enter system password and key) 03
104 Selecting one of following sale modes, user may select an one-stop setting for Clerk, Operation, Print, and Prepack mode. MODE Clerk Mode Operation Mode Print Mode Prepack Mode. REG: Ticket & Floating Floating Clerk Regist Ticket OFF 2. REG: Label No Clerk Regist Label OFF 3. REG: Prepack No Clerk Regist Label ON 4. REG: Label & Floating Floating Clerk Regist Label OFF 5. Manager - Manager - OFF 6. Repack - Repack - OFF 7. Self Service & Label - - Label OFF Usually user has to set each option you wish to for clerk, operation, print or prepack mode. However, user may select simply one-stop sales mode for 7 different modes-clerk, Operation, Print, and Prepack mode. User may also set options for Clerk/Operation mode in MENU 820 and Print/Prepack mode in MENU 73.. Select a sale mode EX) Sale mode = 2.REG: Label SALE MODE (/) Select Sale Mode : [2] REG : Label 2 2. Select Floating & Ticket mode EX) Sale mode =.REG: Ticket & Floating SALE MODE (/) Select Sale Mode : [] REG: Ticket & Floating 04
105 2.4.3 Operation Mode (Menu code 820) (MENU -> 8. Scale Config -> 2.Operation Mode ) This section is to select a clerk and operation mode. There are three different operation modes, REGISTRATION, RE-PACK, MANAGER and three different clerk modes, NO CLERK, STANDARD CLERK, and FLOATING CLERK. Clerk Modes No. Clerk Modes Description No Clerk Sales clerk do not log in and makes sales using key. 2 Standard Clerk Sales clerk can make sales when he/she logs in. 3 Floating Clerk Plural sales clerks can make sales using own clerk ID. Operation Modes No. Operation Modes Description Registration Normal sales mode. 2 Repack Normal sales mode but not included in total sales data(report). Good for clerk training. 3 Manager In this mode user can access all of functions without any permission.. Select appropriate CLERK MODE and OPERATION MODE. EX) Clerk Mode=Standard Clerk OPERATION MODE (/) Select Clerk Sale Mode : [2] Select Oper Mode : [] Registration 2 Operation Mode=Registration Department (Menu code 830) (MENU -> 8. Scale Config -> 3.Department ) This section shows how to select current department where scale is being used. User can use (call up) PLUs only for current department selected in sales mode. For example, if current department selected is GROCERY user can call up items registered only in GROCERY department. If user would like to use PLUs registered in other department than current department he/she should change scale s department setting. Store No. represents Store Name (or branch number) on label/ticket printed. 05
106 . Select DEPARTMENT No. and STORE ID. EX) DEPARTMENT No.= 2 (Grocery) 2 DEPARTMENT (/) Dept No. : [2] Grocery Store No. : [] Branch # STORE No.= (Branch #) Date & Time (Menu code 840) (MENU -> 8. Scale Config -> 4.Date/Time ) This section is to set scale s DATE & TIME appropriately.. Set appropriate DATE, TIME, and MONTH FORMAT. EX) DATE= [ ] TIME= [0:30:00] Month Format= [] DATE / TIME (/3) Date : [ ] DD-MM-YY Time : [0:30:00] Month Format (0=DEC, =2) : [ ] 2. Set YEAR FORMAT, TIME FORMAT and separator for DATE. EX) Year Format (0=200, =0) = [] Time Format(0~3) = [] Date Separator= [-] DATE / TIME (2/3) Year Format (0=200, =0) : [ ] Time Format (0~3) : [ ] Date Separator : [ - ] 3. Set separators for DATE, using ASCII code table on page EX) Time Separator= [:] DATE / TIME (3/3) Time Separator : [ : ] Please refer to ASCII Code Table (chapter 4.4) to input special characters in Date or Time separator. 4. Press key to save it and go out to SCALE CONFIGURATION main menu. SCALE CONFIGURATION (/2). Sale Mode 2. Operation Mode 3. Department 06
107 2.4.6 User/ Security Configuration (Menu code 850) (MENU -> 8. Scale Config -> 5.User/Security Configuration ) This section is to create, edit, change, list, delete clerk s security information and configure security level New/Edit User(Menu code 85) (MENU -> 8. Scale Config -> 5.User/Security Con->. New/Edit ) Enter appropriate USER data for CLERK number, CLERK NAME, NICKNAME, CLERK PASSWORD, CLERK LEVEL, and LABEL MESSAGE NO. EX) CLERK No.=[2], CLERK NAME=[CHRISTOPER], NICKNAME=[CHRIS], CLERK PASSWORD=[05], CLERK LEVEL=[3], Note : If you use floating mode, you have to register all clerks. NEW/EDIT USER (/2) Clerk No. : [ 2] Clerk Name : [CHRISTOPER ] Nickname : [CHRIS] NEW/EDIT USER (2/2) Clerk Password : [ 05 ] Clerk Level : [ 3 ] NEW/EDIT USER in USER S Security Condition No. Operation Mode Description Clerk No. This value can be from to Clerk Name This value is available up to 22 characters. 3 Nickname This value is available up to 7 characters. It can be printed on a label and displayed on the scale. 4 Clerk Password 4 digit (alphanumeric) 5 Clerk Level 0~3 level Password : When you enter the password, you have to type clerk number(2 digit) and password(4 digit). For example, if your clerk number is 20 and password is 234, you have to type Minimum password is 3 digit and maximum password is 6 digit. If there is no level 3 clerk, you can use default value. (Clerk No:, password:, Level:3) Therefore default password is 0. You have to set a level 3 clerk. If there is no level 3 clerk, you can use default password(0) and if any, you cannot use it. 07
108 Clerk level : This value can be from 0 to 3. This level is related to menu 855(Config permission). If clerk 2 is set to level 2, this clerk can use the function which is set to level, 2 in menu 855 and cannot use the function which is set to level 3. No. Level Description 0 It is assigned to employees who is registerd but do not use scale. 2 Lowest level. Normal employees are assigned to level. 3 2 It is proper for chief clerk. 4 3 Highest level. It is proper for store manager Change Password (Menu code 852) (MENU->8.Scale Config->5.User/Security Con->2.Change Password). Enter password. * Clerk No. (2 digit)+ password (4 digit) Input Password : [ ] EX) CLERK No.=, PASSWORD=2 -> 02 CLERK No.=, PASSWORD=22 -> 22 CLERK No.=36, PASSWORD=234 -> New Password * Enter new password CHANGE PASSWORD (/) Clerk No. :[ ] Clerk New Password : [ 22] EX) CLERK ID=, PASSWORD = List User (Menu code 853) (MENU -> 8. SCALE CONFIG ->5.User/Security Con. -> 3. List ). Enter start number and end number to check * To list all, press the SAVE key EX) ~0 0 LIST USER (/) - Start Number : [ ] - End Number : [ 0] List All Press [SAVE] Key No Level Name 3 JOHNATHAN 2 3 CHRISTOPER 3 2 PHILIP 08
109 2.4.0 Delete User (Menu code 854) (MENU -> 8. SCALE CONFIG -> 5.User/Security Con. -> 4. Delete ). Enter clerk number to delete DELETE USER (/) Clerk No. : [ 2] LEE EX) Delete clerk no Config Permission (Menu code 855) (MENU -> 8. SCALE CONFIG -> 5. User / Security Con. -> 5.Config Permission ) Permission level is related to clerk level and if the clerk level is lower than permission level, this clerk cannot access that function. Refer to clerk level on chapter If permission level is 0, all clerks can access this function. EX) If you set permission level to 2 for price change key and clerk is set to level and clerk 2 is set to level 2, clerk can not use this key but clerk 2 can use this key. Setting Configuration Permission No Operating Description Set a permission level for PLU Change Key. (You can Use Item Change Key define this function key in menu 880 on chapter ) Set a permission level for price change key. (You can 2 Use Price Change Key define this function key in menu 880 on chapter ) Set a permission level for department change key. 3 Use Dept. Change Key 4 Use Pay Key (You can define this function key in menu 880 on chapter ) Set a permission level for Pay key (You can define this function key in menu 880 on chapter ) Set permission level for data change key. (You can 5 Use Date Change Key define this function key in menu 880 on chapter ) Set a permission level for PLU type change key.(you 6 Use Type Change Key can define this function key in menu 880 on chapter ) 7 Use PLU Item Key Set a permission level for Selecting PLU item (You can 09
110 define this function key in menu 880 on chapter ) 8 Use In-Weight Key Set a permission level for In-weight key(you can define this function key in menu 880 on chapter ) 9 Use Discount Key Set a permission level for discount (You can define this function key in menu 880 on chapter ) 0 Allow Clerk Sale Set a permission level for password in floating mode Allow Void Set a permission level to void item 2 Allow ADD-UP Set a permission level for add-up sales 3 Allow Return Set a permission level to return item 4 Allow Override Set a permission level to override price 5 Allow Cash Drawer Open Set a permission level to open cash drawer 6 Allow Edit Menu Set a permission level to go to program menu 7 Allow Edit PLU Set a permission level to edit PLU 8 Allow Price Change Set a permission level to change price 9 Allow Global Set Set a permission level for global setting 20 Allow X Report Set a permission level for X report 2 Allow Z Report Set a permission level for Zreport 22 Allow Store Data Edit Set a permission level to edit store data 23 Allow Discount Edit Set a permission level to edit discount 24 Allow Tax Edit Set a permission level to edit tax 25 Allow Tare Edit Set a permission level to edit tare 26 Allow Traceability Edit Set a permission level to edit traceability 27 Allow Customer Edit Set a permission level to edit customer 28 Allow Scale Configuration Set a permission level for scale configuration 29 Allow Communication Meg. Set a permission level for communication message 30 Allow Edit Data Table I. Set a permission level to edit data table I. 3 Allow Edit Data Table II. Set a permission level to edit data table II. 32 Allow Printer Setting Set a permission level for printer setting 33 Allow Change Oper. Mode Set a permission level to change operation mode 34 Allow Change User Param. Set a permission level to change user param. 35 Allow Set Communication Set a permission level for communication setting. You can use the PG UP and PG DOWN keys to navigate from page to page, or you can use the Arrow keys to go through each page line at a time. 0
111 2.4.2 Clerk Key ( Menu code 856 ) (MENU -> 8. SCALE CONFIG -> 5.User/Security Con. -> 6. Clerk Key ) You can assign Clerk key to clerk. There are 3 Clerk keys and you have to set these keys in menu 880 (Key define). See chapter Enter Clerk Key This value can be from to 3. CLERK KEY (/) Clerk Key : [ 2] Clerk No. : [ ] EX) Clerk Key No. = 2 2. Enter Clerk No. EX) Clerk = 2. LEE CLERK KEY (/) Clerk Key : [ 2] Clerk No. : [ 2] LEE For example if you set A key to clerk 2 in menu 880 (Key define), and call up a PLU and press A key in floating sale mode, it is recognized that clerk no. 2 (LEE) sold this item Test (Menu code 860) (MENU -> 8. SCALE CONFIG -> 6.Test ) This programming is to test the scale by itself in the 7 fields, such as DISPLAY, A/D, KEYBOARD, ER, RINTER SENSOR, MEMORY INFORMATION AND FIRMWARE VERSION. Press 6 to get into TEST menu. 6 TEST (/3).Display 2.A/D 3.Keyboard TEST (2/3) 4.Chess Print 5.Printer Sensor 6.Memory Information TEST (3/3) 7.Firmware Version
112 2.4.4 Display Test (Menu code 86) (MENU -> 8. SCALE CONFIG -> 6.Test ->. Display ) To test the display, press on Test menu screen. It automatically tests it. User may exit from testing, using X/ESC key A/D Test (Menu code 862) (MENU -> 8. SCALE CONFIG -> 6.Test -> 2. A/D) To test the A/D, press 2 on Test menu screen AD TEST (/) Normalized A/D To set zero press ZERO ZERO User may exit from this menu, using X/ESC key Keyboard Test (Menu code 863) (MENU -> 8. SCALE CONFIG -> 6.Test -> 3. Keybord) To test keyboard, press 3 on Test menu screen. To exit keyboard test, press ESC two times. KEYBOARD TEST (/) Raw Code:[006C] Chess Printer Test (Menu code 864) (MENU -> 8. SCALE CONFIG -> 6.Test -> 4. Chess Print) Press TEST key to test printing a label. User may exit from this menu, using X/ESC key. CHESS (/) [TEST] = Print Test [ESC] = Escape 2
113 2.4.8 Printer Sensor Test (Menu code 865) (MENU -> 8. SCALE CONFIG -> 6.Test -> 5. Printer Sensor ) To test printer sensor, press 5 on Test menu screen. The scale shows the condition of current printer sensor. ER SENSOR TEST (/2) Peel-off : [UNLOCKED] Head-up : [CLOSED ] ER SENSOR TEST (2/2) Gap :[ 68] Peel :[ 66] Printer Sensor Test Items Test Items Description Peel-off To test that peel-off sensor is properly work. 2 Head-up To test that TPH is opened or not 3 Gap To show real time-sensoring Gap value. 4 Peel To show real time-sensoring peel value Memory Information (Menu code 866) (MENU -> 8. SCALE CONFIG -> 6.Test -> 6. Memory Information ) To see memory information, press 6 on Test menu screen. The display shows current memory size. 0 indicates MB. User may exit from this menu, using X/ESC key. MEMORY INFORMATION (/) Chip Status : [00XXX] Total Flash Size (MB) : Firmware Version (Menu code 867) (MENU -> 8. SCALE CONFIG -> 6.Test -> 7. Firmware Version ) You can check firmware version of the scale. DEV DESCRIPTION VERSION # Scale Main F/W V.03 #2 AD Module F/W V0.97 #3 Ethernet N/A User may exit from this menu, using X/ESC key. 3
114 2.4.2 Scale Parameter (Menu code 870) (MENU -> 8. Scale Config -> 7.Scale Parameter) You can set scale s environment as below. Scale Parameter Menu Sub-menu Setting Value Description. Display (Menu code:87) 2. Printing (Menu code:872) Display Discount Info Y/N The scale shows discount information. Show Clerk Nickname Y/N The scale shows clerk s nickname 0: Left alignment PLU Name Align : Center alignment Set the alignment position of PLU 2: Right alignment Label prt w.o rewind(x Key) Y/N Do not use rewind function when you use X key. 0:Print automatically :Need to confirm to print report and do not confirm any Confirm prt report on label more until power off Set confrim method when you print report in 2:Need to confirm to label mode print report and do not confirm any more until you exit program mode Print origin for comm..line 0: Do not print : Print in Name. 2: Print in Name 2 Print origin in commodity line. 3: Print in Name 3 Print unit symbol in qty area Y/N Print Qty Symbol in qty area. Print pieces in unit price area Y/N Print Pieces in unit price area. Print All report within range Y/N Print all report Save unit price change Y/N Save unit price change. 3. Sale Setup (Menu code:873) Save Type change Y/N Save type Change in PLU Start save mode(start up) Y/N Save mode is active when you turn on the scale. PLU clr Aft sale(wt. On Plu is cleared after printing even though Y/N Tray) there is an item on the platter. Print count w.o misc. key Y/N If you enter count, it is considered that misc. count condition when there is no Misc. Key Print weight w.o misc. key Y/N If there is an item on the platter, it is considered that misc. weight condition when there is no Misc. Key T.price = price + Tax Y/N Tax is included in total price Shift key instead return Key Y/N Use shift key instead of return key. 4. Clerk Logout (Menu code:874) Use double speed key Y/N Use double speed key Log off after transaction Y/N After printing label, automatically Clerk Log off Clerk log out Time(0.s) ~99 Set clerk log out time. You can use the PG UP and PG DOWN keys to navigate from page to page, or you can use the Arrow keys to go through each page line at a time. 4
115 Function Key Define (Menu code 880) (MENU -> 8. Scale Config -> 8.Function Key Define) You can define function keys to Speed keys. It is recommended that you define function key to higher number Speed key because you can not use that PLU key FUNCTION KEY DEFINE (/) Key Code : [ ] Enter Function Key: [ ]. Enter key code Pole type : 72 Speed Keys Standard type : 48 Speed Keys. If you press Speed key, the displays shows the key code of that speed key. EX) Standard Type : Press last speed key. R_B FUNCTION KEY DEFINE (/) Key Code :[ 48] Enter Function Key:[ 0] EX2) Pole Type: Press last speed key R_B FUNCTION KEY DEFINE (/) Key Code :[ 72] Enter Function Key:[ 0] 2. Enter function key EX) Use 2 Function key (LCD Back_light ON/OFF) Refer to below table. 2 FUNCTION KEY DEFINE (/) Key Code :[ 48] Enter Function Key:[ 2] Function Key. Function Key Define [DISC -] - SALE Key Description 2 [DISC%] % SALE Key 3 [SPECIAL SALE] Special sales unit price 4 [NEGATIVE] Negative sale 5 [FIXED PRICE] Fixed Price Key 6 [TYPE CHANGE] WT/CT Key 7 [CASHOPEN] Cash Drawer Open Key 8 [GRAND TOTAL] Grand Total Key 5
116 9 [ PLU REFERENCE] Reference PLU Key 0 [IN WEIGHT] In-Weight Key [LABEL/TICKET] Toggle between the Label and Ticket 2 [LEDON] LCD Backlight On/Off Key 3 [MISC WEIGHT] Misc. Weight Key 4 [MISC COUNT] Misc. Count Key 5 [MISC PCS] Misc. PCS Key 6 [EDIT SELL] Sell By Date Change Key 7 [EDIT ORIGIN] Origin Change Key. 8 [EDIT ITEM] PLU Change Key 9 [EDIT DATETIME] Change Date/Time 20 [EDIT D/C] Set discount for current PLU 2 [EDIT SPEEDKEY] Change PLU Speed key 22 [EDIT PRICE] PLU Price Change Key 23 [CLERK CALL] Clerk key to call indirectly 24 [LAST VOID] Void Last Sale 25~28 [CURRENCY~4] Call Currency Table 3~39 [TARE KEY~9] Call Tare Table 40~42 [UNIT~3] kg : UNIT=kg, UNIT2=00g, UNIT3=N/A lb : UNIT=lb, UNIT2=/2lb, UNIT3=/4lb 43 [kg/lb] Toggle between the kg and lb 5~83 [V~32] Clerk key 0 or 9999 PLU Key 3. To cancel function key. Enter key code to cancel and set Function Key No. to 0 EX) Key Code = 42 Function Key id = 0 FUNCTION KEY KEY Code : [ 42] FUNCTION KEY ID: [ 0] If you cancel function key, you can use it as Speed key. 6
117 2.5 Report 2.5. Introduction X mode is used to read (i.e. print and display) sales data. There are variety of reports that you can generate from X mode. Each of these reports is kept in two separate counters or books called X and X2. The X and X2 reports allow you to print reports at any time for either of the reporting periods. You can use X reports to see current daily totals and X2 reports to see current weekly totals. The time period combination you chose is completely dependent upon how you use Z and Z2. Remember that you can generate as many X reports as you would like because X mode does NOT clear any sales data Report Menu (Menu code 600) (MENU -> 6. Report) REPORT (/2). X Report 2. Z Report 3. X2 Report REPORT (2/2) 4. Z2 Report 5. Clear All No. Submenus Description X Report Print and display sales data of period 2 Z Report Print, display and clear sales data of period 3 X2 Report Print and display sales data of period 2 4 Z2 Report Print, display and clear sales data of period 2 5 Clear All Clear all reports of period and X/X2 Report (Menu code 60/630) (MENU -> 6. Report ->.X Report / 3. X2 Report) There are 7 detailed reports. X REPORT (/3). Scale 2. PLU 3. Misc. PLU 7
118 No. Submenu Description Scale Print and display scale sales report 2 PLU Print and display PLU sales report 3 Misc. PLU Print and display Misc. PLU sales report 4 Group Print and display group sales report 5 Department Print and display department sales report 6 Hourly Print and display hourly sales report 7 Clerk Print and display clerk sales report X/X2 Scale Sales Report (Menu code 6/63) (MENU -> 6. Report ->.X Report/3.X2.Report ->. Scale ) If you press key on X/X2 Report menu screen, scale sales report is shown on the display. X SCALE SALES REPORT (/) No. from [ ]..to [ ] Total:$ [TEST]=print To print this report, press TEST key. TEST X SCALE SALES REPORT (/) Count: Total:$ Waiting.. * If your scale is in label mode, the scale shows Do you want to print on label?. If your label has gap, press. if you want to print report on ticket, press 0 and change the setting to Ticket in menu 73 then change your label to ticket. Do you want to print on label? message is displayed depending on the setting of menu 862 Confirm Prt Report on Label Do you want to print on label? =Yes, 0=No If you print report in label mode, rewind motor does not operated so you remove label and then press the PEED key. To exit this menu, press the ESC key. ESC X REPORT (/3). Scale 2. PLU 3. Misc. PLU 8
119 *Sample Scale Report X SCALE REPORT AUG-23-04(MON) 09:46:36 AM Last Reset AUG-6-04(MON) 03:33:4 PM ======================================================= SCALE # TOTAL COUNT 267 TOTAL PRICE $ VOID COUNT 3 VOID PRICE $ REPACK COUNT 0 REPACK PRICE $ 0.00 OVERRIDE COUNT 0 OVERRIDE PRICE $ 0.00 DISCOUNT COUNT 0 DISCOUNT PRICE $ 0.00 PREPACK COUNT PREPACK PRICE $ 3.05 RETURN COUNT 0 RETURN PRICE $ 0.00 NO SALE OPEN COUNT 0 PAY SUMMARY CASH 26 $ PIN/CHIP 2 $ 2.50 CHECK 2 $ CREDIT CARD 5 $ CREDIT NOTE 2 $ 6.00 COUPON 3 $ 7.00 BONUS POINT 0 $ 0.00 CREDIT SALES 3 $ CHANGE 7 $ TAX SUMMARY :0.00%,Internal $ :0.00%,External $ : 8.00%,Internal $ : 0.00% $ : 0.00% $ : 0.00% $ : 0.00% $ : 0.00% $ : 0.00% $ ======================================================= 9
120 2.5.5 X/X2 PLU Report (Menu code 62/632) (MENU -> 6. Report ->.X Report/3.X2 Report -> 2. PLU Report) Press 2 key on X/X2 Report menu screen. 2 X PLU SALES REPORT (/) Dept[ ] PLU[ ]..to[99999] Enter PLU range to check. EX) dept, plu ~0 0 X PLU SALES REPORT (/) Dept[ ] PLU[ ]..to[ 0] PLU sales report is shown on the display by pressing key. X PLU SALES REPORT (/) Count:26 Total:$ [TEST]=print To print report, press TEST key. TEST X PLU SALES REPORT (/) Count:26 Total:$ Waiting.. * If your scale is in label mode, the scale shows Do you want to print on label?. If your label has gap, press. if you want to print report on ticket, press 0 and change the setting to Ticket in menu 73 then change your label to ticket. Do you want to print on label? message is displayed depending on the setting of menu 862 Confirm Prt Report on Label Do you want to print on label? =Yes, 0=No If you print report in label mode, rewind motor does not operated so you remove label and then press the PEED key. To exit this menu, press ESC key. Note: PLU with no sales is not printed. ESC X REPORT (/3). Scale 2. PLU 3. Misc. PLU 20
121 *Sample PLU Report X P L U R E P O R T AUG-23-04(MON) 09:46:36 AM Last Reset AUG-6-04(MON) 03:33:4 PM Start No:00000, End No:99999 ======================================================= DEPT #0 Default PLU #0000 APPLE TRANSACTION COUNT 84 WEIGHT kg QUANTITY 0 PRICE $ TAX PRICE $ PLU #00002 BANANA TRANSACTION COUNT 96 WEIGHT kg QUANTITY 98 PRICE $ TAX PRICE $ PLU #00003 ORANGE TRANSACTION COUNT 6 WEIGHT kg QUANTITY 62 PRICE $ TAX PRICE $ ======================================================= 2
122 2.5.6 X/X2 Miscellaneous PLU Report (Menu code 63/633) (MENU -> 6. Report ->.X Report/3.X2 Report -> 3. MISC. PLU ) Press 3 key on X/X2 Report menu screen. 3 X MISC. SALES REPORT (/) Misc(0-2)[0]..to[2] Enter the number to check. 0 : Miscellaneous by-weight : Miscellaneous by-count 2 : Miscellaneous by-pcs Ex) Misc. by-weight, Misc. by-count, Misc. by-pcs 0 2 X MISC. SALES REPORT (/) Misc(0-2)[0]..to[2] Sales report is shown on the display by pressing key. X MISC. SALES REPORT (/) Count:4 Total:$ [TEST]=print To print report, press TEST key. TEST X MISC. SALES REPORT (/) Count:4 Total:$ Waiting.. * If your scale is in label mode, the scale shows Do you want to print on label?. If your label has gap, press. if you want to print report on ticket, press 0 and change the setting to Ticket in menu 73 then change your label to ticket. Do you want to print on label? message is displayed depending on the setting of menu 862 Confirm Prt Report on Label Do you want to print on label? =Yes, 0=No If you print report in label mode, rewind motor does not operated so you remove label and then press the PEED key. To exit this menu, press ESC key. ESC Note: Misc. PLU with no sales is not printed. X REPORT (/3). Scale 2. PLU 3. Misc. PLU 22
123 *Sample Miscellaneous Report X MISC. REPORT AUG-23-04(MON) 09:46:36 AM Last Reset AUG-6-04(MON) 03:33:4 PM Start No:0, End No:2 ======================================================= PLU # Misc By Weight TRANSACTION COUNT 84 WEIGHT kg QUANTITY 0 PRICE $ TAX PRICE $ PLU # Misc by Count TRANSACTION COUNT 96 WEIGHT kg QUANTITY 98 PRICE $ TAX PRICE $ PLU # Misc By PCS TRANSACTION COUNT 6 WEIGHT kg QUANTITY 98 PRICE $ TAX PRICE $ ======================================================= 23
124 2.5.7 X/X2 Group Report (Menu code 64/644) (MENU -> 6. Report ->.X Report/X2 Report -> 4. Group) Press 4 key on X/X2 Report menu screen. 4 X GROUP SALES REPORT (/) No. from[ 0]..to[99] Enter group range to check If you do not set group in PLU creating, it is included group 0. 예 ) Group 0 ~ Group 23 X GROUP SALES REPORT (/) No. from[ 0]..to[99] 2 3 You can see group sales data by pressing key. X GROUP SALES REPORT (/) Count:26 Total:$ [TEST]=print To print report, press the TEST key. TEST X GROUP SALES REPORT (/) Count:26 Total:$ Waiting.. * If your scale is in label mode, the scale shows Do you want to print on label?. If your label has gap, press. if you want to print report on ticket, press 0 and change the setting to Ticket in menu 73 then change your label to ticket. Do you want to print on label? =Yes, 0=No To exit this menu, press ESC key. ESC X REPORT (/3). Scale 2. PLU 3. Misc. PLU Note: If the setting of MENU 862, Print All Report within Range is No, the group with no sales is not printed. But if Yes, all group sales data within the range is printed. 24
125 *Sample Group Report X G R O U P R E P O R T AUG-23-04(MON) 09:46:36 AM Last Reset AUG-6-04(MON) 03:33:4 PM Start No:00, End No:99 ======================================================= GROUP #00 NO Assigned PLU Group TOTAL COUNT 276 TOTAL PRICE $ PREPACK COUNT PREPACK PRICE $ GROUP #0 Vegetable TOTAL COUNT 276 TOTAL PRICE $ PREPACK COUNT PREPACK PRICE $ GROUP #02 Fruit TOTAL COUNT 276 TOTAL PRICE $ PREPACK COUNT PREPACK PRICE $ ======================================================= 25
126 2.5.8 X/X2 Deptment Sales Report (Menu code 65/635) (MENU -> 6. Report ->.X Report/3.X2 Report -> 5. Department ) Press 5 key on X/X2 Report menu screen. 5 X DEPT SALES REPORT (/) No. from[ ]..to[99] Enter department range to check. EX) dept ~ dept 0 0 X DEPT SALES REPORT (/) No. from[ ]..to[0] You can see department sales data by pressing key. X DEPT SALES REPORT (/) Count:26 Total:$ [TEST]=print To print report, press TEST key. TEST X DEPT SALES REPORT (/) Count:26 Total:$ Waiting.. * If your scale is in label mode, the scale shows Do you want to print on label?. If your label has gap, press. if you want to print report on ticket, press 0 and change the setting to Ticket in menu 73 then change your label to ticket. Do you want to print on label? =Yes, 0=No To exit this menu, press ESC key. ESC X REPORT (/3). Scale 2. PLU 3. Misc. PLU Note: If the setting of MENU 862, Print All Report within Range is No, the department with no sales is not printed. But if Yes, all group sales data within the range is printed. 26
127 *Sample Department Report X DEPARTMENT REPORT AUG-23-04(MON) 09:46:36 AM Last Reset AUG-6-04(MON) 03:33:4 PM Start No:0, End No:99 ======================================================= DEPT #0 Default TOTAL COUNT 274 TOTAL PRICE $ PREPACK COUNT PREPACK PRICE $ 3.05 RETURN COUNT 0 RETURN PRICE $ DEPT #02 MEET TOTAL COUNT 274 TOTAL PRICE $ PREPACK COUNT PREPACK PRICE $ 3.05 RETURN COUNT 0 RETURN PRICE $ DEPT #03 FISH TOTAL COUNT 274 TOTAL PRICE $ PREPACK COUNT PREPACK PRICE $ 3.05 RETURN COUNT 0 RETURN PRICE $ ======================================================= 27
128 2.5.9 X/X2 Hourly Sales Report (Menu code 66/636) (MENU -> 6. Report ->.X Report/3.X2 REport -> 6. Hourly) Press 6 key on X/X2 Report menu screen. 6 X HOURLY SALES REPORT (/) No. from[ 0]..to[23] Enter time to check. 예 ) AM 9 hour ~ PM 2 hour 9 4 X HOURLY SALES REPORT (/) No. from[ 9]..to[4] You can see hourly sales data by pressing key. X HOURLY SALES REPORT (/) Count:26 Total:$ [TEST]=print To print report, press TEST key. TEST X HOURLY SALES REPORT (/) Count:26 Total:$ Waiting.. * If your scale is in label mode, the scale shows Do you want to print on label?. If your label has gap, press. if you want to print report on ticket, press 0 and change the setting to Ticket in menu 73 then change your label to ticket. Do you want to print on label? =Yes, 0=No To exit this menu, press ESC key. ESC X REPORT (/3). Scale 2. PLU 3. Misc. PLU Note: If the setting of MENU 862, Print All Report within Range is No, the hour with no sales is not printed. But if Yes, all group sales data within the range is printed. 28
129 *Sample Hourly Report X HOURLY REPORT AUG-23-04(MON) 09:46:36 AM Last Reset AUG-6-04(MON) 03:33:4 PM Start No:00, End No:23 ======================================================= HOUR # TOTAL COUNT 274 TOTAL PRICE $ PREPACK COUNT PREPACK PRICE $ HOUR # TOTAL COUNT 274 TOTAL PRICE $ PREPACK COUNT PREPACK PRICE $ HOUR # TOTAL COUNT 274 TOTAL PRICE $ PREPACK COUNT PREPACK PRICE $ ======================================================= 29
130 2.5.0 X/X2 Clerk Sales Report (Menu code 67/637) (MENU -> 6. Report ->.X Report/3.X2 Report -> 7. Clerk) Press 7 key on X/X2 Report menu screen. 7 X CLERK SALES REPORT (/) No. from[ 0]..to[99] Enter clerk range to check. EX) clerk 0 ~ clerk X CLERK SALES REPORT (/) No. from[ 0]..to[99] You can see clerk sales data by pressing key. X CLERK SALES REPORT (/) Count:26 Total:$ [TEST]=print To print report, press the TEST key. TEST X CLERK SALES REPORT (/) Count:26 Total:$ Waiting.. * If your scale is in label mode, the scale shows Do you want to print on label?. If your label has gap, press. if you want to print report on ticket, press 0 and change the setting to Ticket in menu 73 then change your label to ticket. Do you want to print on label? =Yes, 0=No To exit this menu, press ESC key. ESC X REPORT (/3). Scale 2. PLU 3. Misc. PLU Note: If the setting of MENU 862, Print All Report within Range is No, the clerk with no sales is not printed. But if Yes, all group sales data within the range is printed. 30
131 *Sample Clerk Report X CLERK REPORT AUG-23-04(MON) 09:46:36 AM Last Reset AUG-6-04(MON) 03:33:4 PM Start No:00, End No:99 ======================================================= CLERK #00 MANAGER TOTAL COUNT 267 TOTAL PRICE $ VOID COUNT 3 VOID PRICE $ REPACK COUNT 0 REPACK PRICE $ 0.00 OVERRIDE COUNT 0 OVERRIDE PRICE $ 0.00 DISCOUNT COUNT 0 DISCOUNT PRICE $ 0.00 PREPACK COUNT PREPACK PRICE $ 3.05 RETURN COUNT 0 RETURN PRICE $ 0.00 NEGATIVE COUNT 0 NEGATIVE PRICE $ 0.00 NO SALE OPEN COUNT 0 PAY SUMMARY CASH 26 $ PIN/CHIP 2 $ 2.50 CHECK 2 $ CREDIT CARD 5 $ CREDIT NOTE 2 $ 6.00 COUPON 3 $ 7.00 BONUS POINT 0 $ 0.00 CREDIT SALES 3 $ CHANGE 7 $ CLERK #0 CLERK TOTAL COUNT 267 TOTAL PRICE $ CLERK #02 AHN TOTAL COUNT 267 TOTAL PRICE $ ======================================================= 3
132 2.5. Z/Z2 Report (Menu code 620/640) (MENU -> 6. Report -> 2.Z Report / 4. Z2 Report) If you select menu code 620, you will see following screen. Z SCALE SALES REPORT (/) Count:296 Total:$ [TEST]=print & clear If you want to print and clear the data, press TEST key. The scale shows following screen. Are you sure?(=y/0=n) If the print mode(paper type) is different, following message is shown on the display. Are you sure?(=y/0=n) Warning : Paper Type is Label To print and clear, press key. The scale shows following screen. Z SCALE SALES REPORT (/) Count:296 Total:$ Wating.. When printing is done, Z data is cleard and exit this menu. Sales data is same with X report REPORT (/2). X Report 2. Z Report 3. X2 Report Note : If the setting of PARAMETER 598, Print when Z Report clear is No, you cannot print Z Report. Note 2: If the setting of PARAMETER 595 Individual clear(z report) is Yes, you can clear Scale, PLU, Misc. PLU, Group, Department, Hourly, Clerk data is cleared separately. But if you use this function, each report is not same with scale report. 32
133 2.5.2 Clear All Report (Menu code 650) (MENU -> 6. Report -> 5.Clear All) If you select menu code 650, you will see following screen. CLEAR ALL (/) Are you sure?(=y/0=n) To clear all report, press key. If you do not want to clear, press 0 or ESC key. REPORT (2/2) 4. Z2 report 5. Clear All 33
134 3. SALES OPERATION 3. Basic Operation This chapter explains basic operation of scale, such as how to set zero, tare, call up a PLU and override unit price in CL5000 series. In order to make sales transaction user should access REGISTRATION mode. How to access REGISTRATION MODE: Turn ON the scale :29 AM 3.2 Zero You can use the ZERO key to correct for a deviation from zero as long as there are no PLUs or MISC PLUs called-up. The weight can sometimes drift from zero due to debris on the platter, leaving objects on the platter for excessive periods of time, or other environmental factors. To correct this, remove everything from the platter and press the ZERO key when the stable indicator is on. Below is a possible zero drifted state that should be corrected by simply pressing the ZERO key. EX) Initial weight displayed => :29 AM 2 Press ZERO key to set initial zero. ZERO :29 AM 34
135 3.3 Tare You can enter tare weights as long as there are no PLUs or MISC PLUs called-up. If you need to temporarily override a PLU s tare weight, you must enter the tare weight first and then call-up that PLU. There are two ways to enter a tare weight and both ways will only work if there is no PLU or MISC PLU called-up Manual Tare Entry Enter a tare weight manually by pressing the numeric keys EX) 50 g :35 AM 2 Press TARE key. TARE :36 AM Weighed Tare Entry Place the empty container on the platter making sure that the weight is stable EX) 0.5 kg :35 AM 2 Press TARE key. TARE :36 AM 35
136 3.3.3 How to Clear Tare Remove the item from the platter :36 AM 2 Press TARE key again :36 AM Preset Tare Call up a PLU including tare(weight of container). EX) PLU #3 s tare =50 g 3 PLU APPLE :35 AM 2 Clear PLU#3, then tare is also automatically cleared Successive Tare Enter tare (weight of container) using numeric keys. EX) 50 g TARE :35 AM 2 Enter the weight of container using numeric keys. EX) 200 g TARE :36 AM 3 Press TARE key after removing item and container from the platter. 36
137 Note : Parameter 605 Accumulation Tare and parameter 606 Subtraction Tare must be set Tare Override Call up a PLU including tare (weight of container). EX) PLU #4 s tare = 00 g 4 PLU APPLE :35 AM 2 Place the container (Weight of container must be greater than weight data input) for TARE OVERRIDE APPLE :36 AM 3 Pressing TARE key overrides current PLU tare (weight of container) and the weight becomes O. Note : Parameter 603 PLU Tare Override must be set. 3.4 Calling Up a PLU There are two ways to call up a PLU by using numeric key and preset key Using Numeric Key Enter PLU number by using numeric keys and press PLU key. EX) PLU No PLU :35 AM Note Even though you do not press PLU key after entering a PLU number, PLU will be 37
138 displayed depending on the setting time. It takes time to call up a PLU depending on the setting of parameter, 586 Indirect PLU Call Time Using Speed Key To call-up PLU number 79, and you programmed Speed key #5 to be PLU number 79, then you need to press the following key: Speed key #5. Note: - You have to set Speed key in program mode (Menu 60 on chapter 2.6.) Press a speed key (which is save as a PLU). EX) PLU #79=Apple, Speed key # APPLE :35 AM 3.5 Override (FOR key) The OVERRIDE key is used to temporarily change the pricing of priced PLUs. If you set program menu 873(Save unit price change), changed priced is saved after printing a label. If Para 534 : Default UnitWeight is different from unit weight of PLU, Multiple Unit PLU message can be occurred By-Weight PLU - PLU#.MEAT ( PLU Type: By weight, Unit Price :.99$). Press OVERRIDE key. OVER RIDE MEAT R :35 AM 2 Enter new unit price
139 MEAT R :35 AM 3 Press key to print label R :35 AM By-Count PLU - PLU# 2.APPLE ( PLU Type: By count, Unit Price :.00$). Press OVERRIDE key. OVER RIDE APPLE R :35 AM 2 Enter QUANTITY and press FOR key. 3 FOR APPLE :35 AM 3 Enter new unit price APPLE R2 :35 AM 4 Press key to print label. 39
140 :35 AM By-PCS PLU - PLU# 3.Eggs ( PLU Type: By PCS, Pieces : 3, Unit Price : 30.00$). Press OVERRIDE key. OVER RIDE Eggs R :35 AM 2 Enter QUANTITY and press FOR key. 5 FOR Eggs R2 :35 AM 40
141 3 Enter PIECES and press FOR key 2 FOR Eggs R3 :35 AM 3 Enter new unit price Eggs R3 :35 AM 4 Press key to print label :35 AM Note: - If you set program menu 873(Save unit price change), changed priced is saved after printing a label. - If you set parameter 50(Ride Second Position), you can change unit price of bycount PLU and pcs of by-pcs PLU directly. - Discount function is not available when you use OVERRIDE key. 3.6 Sales Operation 3.6. Weighed Item Operation EXAMPLE: - PLU No: 29, PLU Name: ONION, PLU type: by weight, Unit Price:.50$, - Sales Weight=.0kg Press Speed key to call up a PLU. ONION ONION :35 AM 4
142 User may call up a PLU by pressing speed key or numeric key. Please refer to chapter 3.4 for details. 2 Place the item(s) on the platter ONION :35 AM 3 Press key to print a label and complete current transaction. This transaction(s) is saved in the sales record ONION :35 AM 4 Remove the item(s) from the platter :36 AM * Total Price= Sales weight X Unit price Note: - In SAVE & Prepack mode the PLU is not automatically cleared when you remove the item from the platter. - If you set PLU clr Aft sale(wt.ontray) to Y in Menu 873, PLU is cleared even though you do not remove the item from the platter. (See chapter for menu 873) 42
143 3.6.2 By Count Item EXAMPLE: - PLU No: 3, PLU Name: MANGO, PLU type= By-Count, Unit Price:.99$, - Sales 20 pieces. Press numeric key(s) to call up a PLU. 3 PLU MANGO :35 AM User may call up a PLU by pressing speed key or numeric key. Please refer to chapter 3.4 for details. 2 Enter the number of pieces. EX) 20 pieces MANGO :35 AM 3 Press key to print a label and complete current transaction. This transaction(s) is saved in the sales record. * Total Price= Piece(s) X Unit price Note: In SAVE & Prepack mode, the PLU called up is not automatically cleared when you remove the item from the platter By PCS Item EXAMPLE: - PLU No: 30, PLU Name: ORANGE, PLU type= By PCS, PIECES: 5, Unit Price:.99$ - Sales=20 pieces. [QUANTITY item] 43
144 Press numeric key(s) to call up a PLU. 3 0 PLU ORANGE :35 AM User may call up a PLU by pressing speed key or numeric key. Please refer to page 43 for details. 2 Enter QUANTITY [the number of Pieces]. EX) 20 pieces ORANGE :35 AM 3 Press key to print a label and complete current transaction. This transaction(s) is saved in the sales record. * Total Price= QUANTITY X [Unit price / PIECES] Note: In SAVE & Prepack mode the PLU is not automatically cleared when you remove the item from the platter. 3.7 Discount Before using discount function, you have to set discount data in menu 30 of program mode. Discount is different depending on PLU type. (For details, see chapter 2.4.) 3.7. Unit Price Discount - By Weight PLU EXAMPLE : PLU# 29=Water Melon (By-Weight PLU), Unit price=20.00 st Target of Discount: Discount amount from unit price =0.50 for weight
145 2 nd Target of Discount: Discount amount from unit price =.00 for weight.000. Calll up a PLU. 2 9 PLU DC W.Melon :35 AM 2 Place an item on the platter. In this case, discount is not available because the weight of this item(0.489 kg) is lower than st target(0.500 kg) DC W.Melon :36 AM 3 Place an item on the platte. In this case, discount is possible because the weight of item(0.526 kg) is greater than st target(0.500kg) therefore the total price is DC W.Melon :36 AM 4 Place items on the platter. In this case, discount is possible because the weight of item(.076 kg) is greater than st target(0.500 kg) therefore the total price is 20.44$ DC W.Melon :36 AM 5 Press the key. Markdown(STRIKE THROUGH) is printed on label as figure. Note : 45
146 - You can set four markdown information in menu 720 of program mode.(see chapter 2.3.3) - If you set display discount info. to Y in menu 87 of program mode, you can see total price and discount information on the display. (See chapter 2.4.2) % Unit Price Discount - By Weight PLU EXAMPLE: PLU# 29=ORANGE (By-Weight PLU), Unit price=20.00 st Target of Discount: 0 % off from unit price for sales weight kg. 2 nd Target of Discount: 20 % off from unit price for sales weight.000 kg. Call up a PLU. 2 9 PLU DC ORANGE :35 AM * User may call up a PLU by pressing speed key or numeric key. Please refer to chapter 3.4 for details. 46
147 2 Place an item on the platter. In this case, discount is not available because the weight of this item(0.489 kg) is lower than st target(0.500 kg) DC ORANGE :36 AM 3 Place items on the platter. In this case, the weight of items(0.526 kg) is greater than st target(0.500 kg) therefore you can have 0% discount. (Total price is 9.47) DC ORANGE :36 AM 4 Place items on the platter. In this case, the weight of items(.076kg) is greater than 2 nd target(.000kg) therefore you can have 20% discount. (Total price is 7.22) DC ORANGE :36 AM 5 Press the key. Markdown(STRIKE THROUGH) is printed on label as figure Unit Price Discount - By PCS PLU EXAMPLE 2: PLU# 30=PREMIUM MANGO, 3 pieces FOR 6.00 st Target of Discount: Discount amount from unit price =0.20 for sales 5 pieces. 2 nd Target of Discount: Discount amount from unit price =0.50 for sales 0 pieces. 47
, unit price(0.50$) is discounted. 0.000-3 5.50 20.7 DC 22.002-.83 P.MANGO :35 AM 4 Press the key.")
148 Call up a PLU. 3 0 PLU DC P.MANGO :35 AM 2 Enter quantity. In this case, 5 is greater than st Target (5), unit price(0.20$) is discounted DC P.MANGO :35 AM 3 Enter quantity. In this case, is greater than 2 nd Target (0), unit price(0.50$) is discounted DC P.MANGO :35 AM 4 Press the key. Markdown(STRIKE THROUGH)s printed on label as figure. Note : - You can set four markdown information in menu 720 of program mode. (See chapter 2.3.3) 48
149 3.8 Add-Up Transaction If you press the ADD key instead of the key, you will initiate the ADD-UP process. You can ADD-UP 00 items maximum. EXAMPLE: PLU# 32=SIRLOIN, PLU Type = By-Weight, Unit Price=20.00, PLU# 35=T-bone Steak, PLU Type = By-PCS, Pieces=3, Unit Price=6.00 Call up a PLU and place item on the platter. 3 2 PLU SIRLOIN :35 AM 2 Press ADD key. PLU is cleared automatically. You will see the display as below. ADD ADD W 9780 :36 AM 3 Remove item from the platter and call up a PLU. 3 5 PLU T-BONE :36 AM 4 Press ADD key. PLU is cleared automatically. You will see the display as below. ADD ADD 2 W 080 :36 AM 49
 0.000 0.000 0.00 0.00 04-03-02 Note: - You can press the VOID key to undo the transaction. (See chapter 3.")
150 5 You can repeat the ADD-UP process up to 00 times or you can press the ST/TTL key at anytime to see the grand-total ST TTL TEST Total Count 2, Void Count 0 Total $ To complete the sale, press the key. (To repeat the ADD-UP process, press the ESC key.) Note: - You can press the VOID key to undo the transaction. (See chapter 3.0). - If you set Print Item Label to Y in menu 750 of program mode, label will be printed whenever you press the ADD key. (See chapter 2.3.3) - Even though you turn off the scale before printing a grand total label, add-up data is not cleared. 50
151 3.9 Clerk Operation There are three clerk modes as below. Clerk Modes No. Clerk Modes Description No Clerk Sales clerk does not log in and makes sales using key. 2 Standard Clerk Generating a standard clerk transaction is the same as any sales mode transaction except that you do NOT press the key; instead you must press one of the V(Clerk-Speed) keys ( through 4) You can print total price label depending on the setting. 3 Floating Clerk Generating a standard clerk transaction is the same as any sales mode transaction except that you do NOT press the key; instead you must press one of the V(Clerk-Speed) keys ( through 4) You can print total price label depending on the setting. Sales data is added automatically. To register clerk, refer to menu code 850 of program mode. (See chapter 2.4.6) Assumption - Clerk should be registered on menu 850. (See chater 2.4.6) - Clerk number should be set on menu 856 to use V, V2, V3, and V4 keys (See chapter 2.4.2) If the clerk is not assigned to V~V4, this clerk has to enter password after pressing V key. - All clerks can use V key. * Up to 00 transactions are available in Clerk mode * Sales data is saved in memory. * If you press key to complete transaction, grand total price is printed and sales data is cleared from memory. * If you want to see total price before completing transaction, press the ST/TTL key. To print, press the key. * Even though you turn off the scale before printing, sales data is not cleared. * If you want to print ticket when you log out, press V, V2, V3 or V4 to log on and press the key. You can also check total price by pressing ST/TTL key after log on. 5
152 Note: - You have to set Clerk log out time in menu 874 of program mode. (See chapter 2.4.2) If you do not call a PLU and do not operate the scale, time is computed. To set 30 seconds for logout time, enter 300. If you do not want to log out, enter 0. - When there is no PLU, you can print ticket again by pressing X key (It depends on the setting of parameter 599, Print last ticket) 3.9. Standard Clerk Operation Assumption - You have to set Select Clerk Sale mode to 2 (Standard Clerk) in menu 820 of program mode. (See chapter 2.4.3) Example: Clerk No: 2, Clerk Name: Christine, Clerk Key: V PLU#=Apple, Unit Price 0.00, Weight,.2 kg PLU#2=Orange, Unit Price 20.00, Weight,.2 kg Call up a PLU. PLU APPLE :35 AM 2 Place an item and press V key. You will get a label automatically. V INSERT APPLE :35 AM 3 Call up a PLU. 2 PLU ORANGE :35 AM 52
153 4 Place an item and press V key. You will get a label automatically. V INSERT ORANGE :35 AM 5 Press the key to complete transaction. If you are in ADD-UP mode, you can have label for grand total price :35 AM Note - If you are in ADD-UP mode, you can have label for grand total price by pressing key. When you turn on the scale, this function is not active so you have to press ADD key Floating Clerk Operations Assumption - You have to set Select Clerk Sale mode to 3 (Floating Clerk) in menu 820 of program mode. (See chapter 2.4.3) Example: Clerk No: 2, Clerk Name: Christine, Clerk Key: V PLU#=Apple, Unit Price PLU#2=Orange, Unit Price Call up a PLU #. PLU APPLE :35 AM 53
154 2 Place an item on the platter and press the V key. This transaction is save to memory APPLE V INSERT :35 AM 3 Call up a PLU #2. 2 PLU ORANGE :35 AM 4 Place an item on the platter and press the V key. This transaction is saved to memory. V INSERT ORANGE :35 AM 5 Press the key to complete transaction. Grand total price label is printed and sales data is cleared in memory :36 AM Note: - Print mode of floating clerk operation is ticket type as default. If you want to use label type, you have to change setting in menu 73 of program mode. (See chapter 2.3.5) - You can set ticket item in menu 76 of program mode. (See chapter 2.3.5) 54
155 3.0 Void You can press the VOID key to undo transaction in add-up process or floating clerk operation. Assumption) You sold several items If there is no PLU or price is zero. Press the VOID key, you will see following screen. VOID NUMBER [ 0] 3 list ORANGE BANANA APPLE 2 To void ORNAGE, enter by pressing numeric key and press the. VOID NUMBER [ ] 3 list. void 9.78 ORANGE BANANA APPLE 3 To finish, press the ESC key You can use the PG UP and PG DOWN keys or the Arrow keys to navigate up and down the list. If there is same PLU and same price to void 2 Place item on the platter ORANGE :35 AM
156 2 Press VOID key then this sale is cleared VOIDED $ 9.78 :36 AM If price is not same, void list screen is shown on the display automatically. 3. Payment & Change Payment No. Type 0 Cash Pin/chip 2 Check 3 Credit card 4 Credit note 5 Coupon 6 Bonus point 7 Credit You can use PAY key in the add-up process or floating clerk operation. EX) Total price : 5.00 $ If customer give 6.00 coupon and cash 0.00 $ to clerk Press PAY key when there is subtotal price SUBTOTAL $ 5.00 Payment [5] Coupon 2 Select payment type 5(coupon) and press key. See Payment table. SUBTOTAL $ 5.00 Payment [5] Coupon COUPON [ 5.00 ] 56
157 3 Enter 6.00 SUBTOTAL $ 5.00 Payment [5] Coupon COUPON [ 6.00] 4 Press key then you can select payment type again. SUBTOTAL $ 5.00 Payment [5] Coupon COUPON [ 9.00] 5 Select Payment type (0 cash) and press key. SUBTOTAL $ 5.00 Payment [0] Cash CASH [ 9.00 ] 5 Enter SUBTOTAL $ 5.00 Payment [0] Cash CASH [ 0.00] 6 Press key. The label is issued. SUBTOTAL $ 5.00 RECEIVE $ 6.00 CHANGE $.00 Total price, receive and change is printed. Note : - You can set print item in menu 760 of program mode. (See chapter 2.3.4) - If there is credit, a receipt is printed additionally. 57
158 3.2 Return The RETURN key is used to delete erroneous sale transactions. You can use the RETURN key to undo erroneous sales transactions like pressing the key inadvertently, selecting and printing the wrong PLU, an inadvertent Auto-Print in Pre-Pack mode, or perhaps adjusting the sales totals for a damaged or ruined package. Whatever the reason, the RETURN function will decrement returned PLU s transaction counter and sales totals by the specified amount. You need to call-up the PLU that you wish to return by either pressing its corresponding speed key or typing its number. When the price is zero, 0) By weight PLU : You need to enter the total price and weight that was printed on the return PLU s label ) By count PLU: You need to enter the total price and quantity that was printed on the return PLU s label When the price is higher than zero, Return function is performed by pressing RETURN key Note : - If you set Shift key instead return key to Y in menu 873 of program mode, you cannot use return function. (See chapter 2.4.2) - If parameter 596 X/Z Report is not set, this function is not operated. 58
159 3.3 Prepack Key When the scale is in Pre-Pack mode, it prints labels automatically. When it is in MANUAL mode, you must press the key (or ADD key) to get a label. In Pre-Pack mode, you cannot select AUTO mode. Pre-Pack works like AUTO and SAVE mode except that the weight does not need to return to zero for every auto-print. Pre-pack mode is very useful in back-room applications. This mode increases productivity by not requiring the user to press the key for every package. Instead the user can concentrate on weighing, wrapping, and labeling. This function is only available for by-weight PLU. EXAMPLE: Speed key #= Onion Unit price=.50, Sales Weight=.0kg, Press PREPACK key and call up a PLU Prepack A ONION :35 AM * User may call up a PLU by pressing speed key or numeric key. Please refer to Menu code Place the item(s) on the platter ONION :35 AM 3 Label is issued automatically. 59
160 4 Remove the item(s) from the platter ONION :35 AM Note : If the scale is in Prepack mode then it will always auto-print if the Total price is greater than 0.00 and:. The weight deviates by an amount greater than or equal to the Parameter 862 setting(min. weight for sale) and the weight stabilizes at a weight greater than zero. 2. The weight deviates by an amount greater than or equal to the Parameter 86 setting(auto threshold) and the weight stabilizes at a weight greater than zero. 3.4 X Key The X key is used to print multiple transactions for the same PLU. The X key operation is called the Multi-Label function By-Weight PLU Note : If you want to use X key for by-weight PLU, you must set Parameter 582, Use 'X' key (by WT.). EXAMPLE) Speed key #= Onion preset key, Unit price=.50, Sales Weight=.0kg, Call up a PLU A ONION :35 AM * User may call up a PLU by pressing speed key key or numeric key. Please refer to chapter 3.4 for details. 60
161 2 Place the item(s) on the platter ONION :35 AM 3 Type the number of labels you require and press the key X 00 LABELS ONION :35 AM 4 Remove the item(s) from the platter :36 AM Note : - If you set Label Prt. w.o Rewind (X Key) to Y in menu 872 of program mode, the scale does not check peel-off, so you have to press FEED key after printing is done. (See chapter 2.4.2) - If you set Use double print(auto) to Y in menu 872 of program mode, you will have two same labels in auto mode. - If you set 2 nd label in PLU programming, 2 nd label is issued automatically. 6
162 3.4.2 Non-Weighed PLU You can use X key for by Count, By PCS PLU without any setting. The way of using X key is same as by-weight PLU except weighing item. 3.5 How to Change Sell By Date/Time Call up a PLU. ONION ONION :35 AM. 2 Press EDIT SELL key to enter both of effective date and time EDIT SELL CHANGE SELL DATE (/) Sell by date : [ 56] Sell by time : [ 0] 3 Press key to complete saving ONION :35 AM Note: - To use EDIT SELL key, you have to set this key in menu 880 of program mode. (See chapter ) 62
163 3.6 How to Change Origin Call up a PLU. ONION ONION :35 AM 2 Press ORIGIN key to retrieve one of origin data saved. Origin CHANGE ORIGIN (/) Origin No : [ ]. USA Note: - To use ORIGIN key, you have to set this key in menu 880 of program mode. (See chapter ) 3.7 How to Change PLU Type Note : If you set Save Type change to Y in menu 873 of program mode, changed PLU type is saved. (See chapter 2.4.2) Press WT/CT key to change PLU type from By-weight to By-count PLU or vice versa. WT/CT DEL ONION :35 AM If you change by-weight PLU to by-count PLU, quantity is set and unit price is same. If you change by-count PLU to by-weight PLU, unit price is same. If there is discount information in PLU, you can not change PLU type. 63
164 3.8 Direct Discount If there is no discount information in PLU, you can use this function Fixed Price Key Call up a PLU # and press Fixed Price key. PLU Fixed Price FP APPLE :35 AM 2 Press Override Key OVER RIDE FP APPLE R :35 AM 3 Type fixed price 2.00 than press key Print FP APPLE :35 AM Note: - To use Fixed Price Key, you have to set this key in menu 880 of program mode. (See chapter ) 64
165 3.8.2 % Discount Price Key Call up a PLU(#.APPLE) and press %Discount key PLU DISC% APPLE :35 AM 2 Enter % amount to discount and press key - Ex) 20% 2 0 Print DISCOUNT (%) [20] APPLE 3 Place item on the platter and press key. Print DC APPLE :35 AM Note: - To use % DISCOUNT key, you have to set this key in menu 880 of program mode. (See chapter ) 3.9 PLU Connection 3.9. Referenced PLU Function If you press REFERENCE key after calling up a PLU which has reference information, reference will be shown on the display. To use this function, you have to set reference department and reference PLU when you create PLU. 65
166 3.9.2 Coupled PLU Function Automatically coupled PLU is called up after transaction. You can use this function when you sell two or more items as package. To use this function, you have to set coupled department and coupled PLU when you create PLU Linked PLU Function You can use this function when you sell two or more items at a time. To use this function, you have to set linked department and linked PLU when you create PLU Sales Operation Control Parameters Fixed Weight - You can set fixed weight when you create PLU If you call up this PLU, the weight is not changed. - You can use IN WEIGHT key. Call up a PLU and enter a fixed weight by using OVERRIDE key and press IN WEIGHT key Prepack Without Report The transaction data is not added to report while using prepack mode. - You have to set Parameter 597(Prepack report) to use this function. Also, Parameter 596 should be set to Y 66
167 4. Appendix 4. Label Format There are fixed label format and user label format Fixed Label Format User Label Format No. ~50 5~99 Quantity Method Built in CL5000 Download from PC Features You cannot edit format. Using the PC program, you can program format numbers 5 to 99. Fixed Label Format No Name Width (mm) Height (mm) No In ticket mode, it is available to use Head/Tail format. Name Width (mm) Height (mm) IS IS IS IS IS IS IS IS IS IS IS IC IS IC IS IS6040-KR IS IS6030-KR IS IS6032-KR IS IS6060-KR IS IS6032-KR IS IS6042-KR IS IS6045-KR IS IS6050-KR IS IS6045-KR IS IS6040-KR IS IS6040-KR IS IS6045-KR IS IS6044-KR IS IS6055-KR IS IS6060-KR IS


168


169


170 *Total Label 70


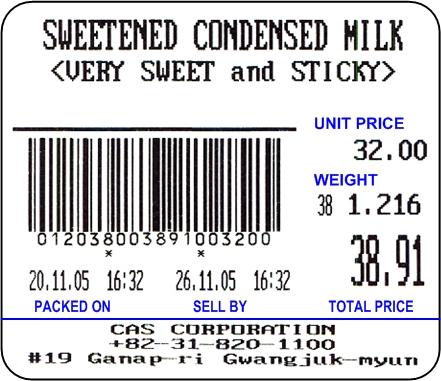


171


172
 Label Sample 2 PLU Name2")

173 4.2 Label Format Sample () Label Sample PLU Name2 Barcode Store Name Store Tel PLU Name Packed On Date Sell By Date Weight PLU Number Total Price Unit Price Store Text Label Serial No (2) Label Sample 2 PLU Name2 Packed On Date Caption Sell by Date Caption Packed On Date Barcode Tare Caption Tare Weight Store Name PLU Name Sell By Date Unit Price Caption Label Serial No Weight Caption Weight Total Price Caption Total Price Unit Price 73
Operating Manual Printing Scale NETS
 Operating Manual Printing Scale NETS Ver 2.1 ACOM Inc. Specifications are subject to change without notice to improve Vol. No. NO200301 2004 Hycom Equipment Pty Ltd www.hycom.com.au - 1 - GRATITUTE We
LE.3k Operation Manual
 LE.3k Operation Manual Contents subject to change without notice Version 01.02 LE.3k OPERATIONS MANUAL E 06292017 Ce manuel est disponible en français à www.kilotech.com Table of contents Table of contents...
Top quality For industrial use
 HAND PALLET TRUCK SCALES RAVAS-110 Pallet truck scale with basic scale functions BENEFITS: The RAVAS work horse All basic scale functions Competitive pricing Low power consumption For checking incoming
ELECTRONIC CASH REGISTER CAISSE ENREGISTREUSE ELECTRONIQUE MODEL MODELE XE-A302
 ELECTRONIC CASH REGISTER CAISSE ENREGISTREUSE ELECTRONIQUE MODEL MODELE XE-A302 INSTRUCTION MANUAL MANUEL D INSTRUCTIONS CAUTION The socket-outlet shall be installed near the equipment and shall be easily
TP Series OWNER S MANUAL. Price Computing Scale (VER.2)
") Price Computing Scale TP Series (VER.2) OWNER S MANUAL CONTENTS PRECAUTIONS 4 PREFACE 6 NAMES AND FUNCTIONS 6 OPERATIONS 8 1. General Weighing 8 2. Weighing with Tare 9 3. How to Set % 10 4. How to Use
Price Computing Scale TP Series (VER.2) OWNER S MANUAL CONTENTS PRECAUTIONS 4 PREFACE 6 NAMES AND FUNCTIONS 6 OPERATIONS 8 1. General Weighing 8 2. Weighing with Tare 9 3. How to Set % 10 4. How to Use
ER-230 Series Operation and Program Manual
 ER-230 Series Operation and Program Manual All specifications are subject to change without notice Precaution Statements Follow these safety, servicing and ESD precautions to prevent damage and to protect
GENERAL INFORMATION AVOID PLACING THE SCALE IN LOCATIONS THAT MAY AFFECT ACCURACY:
 π H-4564 PALLET TRUCK SCALE WITH PRINTER 1-800-295-5510 uline.com AVOID PLACING THE SCALE IN LOCATIONS THAT MAY AFFECT ACCURACY: 1. Temperature extremes Do not place in direct sunlight or near air conditioning
GENERAL INFORMATION. H-1649, H-1650, H-1651 H-1653, H-1654 Easy-Count. uline.com. that may hurt accuracy:
 π H-1649, H-1650, H-1651 H-1653, H-1654 Easy-Count counting scale 1-800-295-5510 uline.com 1-800-295-5510 GENERAL INFORMATION Avoid placing the scale in locations that may hurt accuracy: 1. Temperature
Precaution Statements
 Precaution Statements Follow these safety, servicing and ESD precautions to prevent damage and to protect against potential hazards such as electrical shock. 1-1 Safety Precautions 1. Be sure that all
uline.com
 π H-1679 H-2331 PALLET TRUCK SCALE 1-800-295-5510 uline.com Avoid placing the scale in locations that may AFFECT accuracy: 1. Temperature extremes Do not place in direct sunlight or near air conditioning
SAC SERIES CONTENTS TRIPLE-INTERVAL HIGH PRECISION COUNTING SCALE OPERATION MANUAL 1. INSTALLATION 2. SPECIFICATIONS
 CONTENTS SAC SERIES TRIPLE-INTERVAL HIGH PRECISION COUNTING SCALE 1. INSTALLATION 2. SPECIFICATIONS 2.1 GENERAL SPECIFICATIONS 2.2 MINIMUM PIECES, WEIGHT APPLIED & SAMPLE SIZE WEIGHT SPECIFICATIONS OPERATION
Easy Weigh ADVANCED COUNTING SCALE MODEL: AC-100 OWNER S MANUAL VER 1.00
 Easy Weigh OWNER S MANUAL MODEL: AC-100 ADVANCED COUNTING SCALE VER 1.00 TABLE OF CONTENTS SPECIFICATIONS... 1 NOMENCLATURE... 1 FUNCTION KEYS... 2 DISPLAY... 3 ACCURACY SPECIFICATIONS... 4 UNPACKING &
CITIZEN. series. Precision Balances
 CITIZEN CZ series Precision Balances - 9 - CZ [NTEP ] User s Guide Contents SECTION 1 INTRODUCTION 1 SECTION 2 SPECIFICATIONS. 2 SECTION 3 INSTALLATION....3 SECTION 4 KEY DESCRIPTIONS.. 4 SECTION 5 OPERATION.....5
Top quality Plug & weigh
 FORKLIFT TRUCK SCALES iforks Completely wireless fork scale BENEFITS 5 Minutes installation Completely wireless: no cabling Digital calibration Weight correction for forklift mast tilt No de-rating of
OVERVIEW OF CONTROLS
 π H-5819, H-5820 H-5821, H-5822 DELUXE COUNTING SCALE 1-800-295-5510 uline.com OVERVIEW OF CONTROLS DISPLAY DEFINITIONS # NAME DESCRIPTION 1 DISPLAY 2 1 3 STABLE 4 RECHARGE PAGE 1 OF 8 Displays the total
GFX2000. Fuel Management System. User Guide
 R GFX2000 Fuel Management System User Guide Contents Introduction Quick Start 1 1 Setup General Tab 2 Key or Card 2 Fueling Time/MPG Flag Tab 3 Address/Message Tab 3 Pump Configuration 4 View Vehicle Data
USER S MANUAL G SERIES USER S MANUAL. Ref.49-MG000EN08
 USER S MANUAL G SERIES USER S MANUAL Ref.49-MG000EN08 Index USER S MANUAL 1. DESCRIPTION OF THE SERIE G SCALE... 1 1.1. KEYBOARD...1 2. INTRODUCTION... 2 2.1. GENERAL SPECIFICATIONS...2 2.2. OPERATIONAL
TECHNICAL MANUAL FOR ELECTRONIC SPEEDOMETER STR-RIEJU MATRIX 2
 FOR ELECTRONIC SPEEDOMETER STR-RIEJU MATRIX 2 Rel. 4.0 3.0 2.0 1.0 0.0 Release Disposal Aim Modifications on chapter 8 and 13 Deleted automatic and manual test procedure General modifications Added par.
OPERATION MANUAL SX-7000/7500 SX-8000/8500 SX-700/800
 OPERATION MANUAL SX-7000/7500 SX-8000/8500 SX-700/800 Jan. 23. 2004 [SX7k/8k] ORN-009 THE SOCKET-OUTLET SHALL BE INSTALLED NEAR THE EQUIPMENT AND SHALL BE EASILY ACCESSIBLE. LA PRISE DOIT ETRE PRES DE
GPI (Gas Pump Interface) with Cash Register Express - Integration Manual
 with Cash Register Express - Integration Manual") One Blue Hill Plaza, Second Floor, PO Box 1546 Pearl River, NY 10965 1-800-PC-AMERICA, 1-800-722-6374 (Voice) 845-920-0800 (Fax) 845-920-0880 GPI (Gas Pump Interface) with Cash Register Express - Integration
One Blue Hill Plaza, Second Floor, PO Box 1546 Pearl River, NY 10965 1-800-PC-AMERICA, 1-800-722-6374 (Voice) 845-920-0800 (Fax) 845-920-0880 GPI (Gas Pump Interface) with Cash Register Express - Integration
2016 Reporting Guide W Sharp Avenue, Spokane, WA POOL (7665)
") 2016 Reporting Guide 1212 W Sharp Avenue, Spokane, WA 99201 STAvanpool@spokanetransit.com 509-326-POOL (7665) May 2016 Table of Contents Thank You Bookkeepers... 2 On-line Reporting for mileage & Ridership...
2016 Reporting Guide 1212 W Sharp Avenue, Spokane, WA 99201 STAvanpool@spokanetransit.com 509-326-POOL (7665) May 2016 Table of Contents Thank You Bookkeepers... 2 On-line Reporting for mileage & Ridership...
OCS-T High Resolution Digital Crane Scale
 OCS-T High Resolution Digital Crane Scale User Guide Content 1. Safety Guide... 1 2. Features... 1 3. Specifications... 2 4. Capacity... 3 5. Dimension & Weight... 3 6. Display & Keys... 4 Scale Keys...4
OCS Series. High Resolution Digital Crane Scale. User Guide
 OCS Series High Resolution Digital Crane Scale Content 1. Safety Guide...1 2. Features...1 3. Specifications...2 4. Capacity...2 5. Display & Keys...3 Scale Keys...3 Remote Keys...4 Indicators...4 Message...5
Operator s Manual. Fairbanks FH Series by Fairbanks Scales, Inc. All rights reserved. . Revision 1 06/2017
 Operator s Manual Fairbanks FH Series 2017 by Fairbanks Scales, Inc. All rights reserved 51393. Revision 1 06/2017 Amendment Record Fairbanks FH Series Operator s Manual Operator s Manual Document 51393
2004, 2008 Autosoft, Inc. All rights reserved.
 Copyright 2004, 2008 Autosoft, Inc. All rights reserved. The information in this document is subject to change without notice. No part of this document may be reproduced, stored in a retrieval system,
KEMKRAFT ENGINEERING, INC. MODEL KEI-234 STEERING WHEEL TORQUE/INCLINOMETER TESTER
 INSTRUCTION MANUAL STEERING WHEEL TORQUE/ INCLINOMETER SYSTEM MODEL KEI-234 W / INTERNAL BARCODE SCANNER REVISION DATE: 17-AUG-1999 1 GENERAL DESCRIPTION... 3 INSTALLATION... 3 SYSTEM SETUP... 4 To change
Weighing Scale IDS-802. User Manual
 Weighing Scale IDS-802 User Manual A. MAIN SPECIFICATION Model: Capacity: Accuracy: Display: IDS-802 Weighing scale 3kgx0.1g,6kgx0.2g,15kgx0.5g,30kgx1g Grade III, n=30,000 Single 6 digits LCD with Blue
NGW & HGW SERIES CONTENTS OPERATION MANUAL CAUTIONS HIGH RESOLUTION MULTI-FUNCTION DIGITAL SCALE 1. INSTALLATION 2. SPECIFICATIONS
 NGW & HGW SERIES HIGH RESOLUTION MULTI-FUNCTION DIGITAL SCALE CONTENTS CAUTIONS 1. INSTALLATION 2. SPECIFICATIONS OPERATION MANUAL 3. KEYBOARD LAYOUT AND DESCRIPTION 4. INITIAL SETUP PLEASE READ THIS MANUAL
Replacing the pick rollers P.N X
 Instruction Sheet Replacing the pick rollers P.N. 118-9717-0X For assistance while replacing the pick rollers, contact you local Tektronix representative. In the U.S. and Canada, call 1-800-835-6100. 1.
NexSysLink. Operation Manual. NMEA 2000 SAE J1939 Indmar Engines. CAN Instruments Product Family
 NexSysLink CAN Instruments Product Family Operation Manual NMEA 2000 SAE J1939 Indmar Engines Contact Beede Beede Electrical Instrument Company, Inc. 88 Village Street Penacook, NH 03303 (603) 753-6362
User manual. Standard Modular Chiller HP 1/8 compressors with CAREL driver Application program for pco 1, pco 2, pco 3, pco C and pco XS.
 Standard Modular Chiller HP 1/8 compressors with CAREL driver Application program for pco 1, pco 2, pco 3, pco C and pco XS. User manual Manual version: 2.4 dated 27/02/08 Program code: FLSTDmMCDE LEGGI
ITA / ITB - AS / AP / AP SERIES Electronic Table Top Weighing Balance
 TM ITA / ITB - AS / AP / AP SERIES Electronic Table Top Weighing Balance Scale Users Guide ISHTAA SCALES INC., INDIA www.ishtaascales.com 14 Content 1. Technical Data... 1 2. Installation... 2 3. Controls
ECONOMY COUNTING SCALE OPERATION & SERVICE MANUAL
 ECONOMY COUNTING SCALE OPERATION & SERVICE MANUAL Models XTCII ECONOMY COUNTING SCALE www.mt.com/xpress 2 ECONOMY COUNTING SCALE ABOUT THIS MANUAL AND MT EXPRESS Thank you for purchasing an MT Xpress product.
MoistureMatch A next generation grain tester
 MoistureMatch A next generation grain tester A next generation moisture tester incorporating new and unique technology. Finally, a portable tester that will more accurately match and track with the commercial
MAGPOWR Spyder-Plus-S1 Tension Control
 MAGPOWR TENSION CONTROL MAGPOWR Spyder-Plus-S1 Tension Control Instruction Manual Figure 1 EN MI 850A351 1 A COPYRIGHT All of the information herein is the exclusive proprietary property of Maxcess International,
The RCS-6V kit. Page of Contents. 1. This Book 1.1. Warning & safety What can I do with the RCS-kit? Tips 3
 The RCS-6V kit Page of Contents Page 1. This Book 1.1. Warning & safety 3 1.2. What can I do with the RCS-kit? 3 1.3. Tips 3 2. The principle of the system 2.1. How the load measurement system works 5
BRAKE TESTER DECELEROMETER
 OC3010_GBM_21009 BRAKE TESTER DECELEROMETER OWNER S MANUAL Version 8.++ ORBIT CONTROLS AG Zürcherstrasse 137 CH-8952 Schlieren/ZH Tel: + 41 44 730 2753 Fax: + 41 44 730 2783 info@orbitcontrols.ch www.orbitcontrols.ch
SAM4s SPS Operation Manual. All specifications are subject to change without notice. 2005, CRS, Inc. OM-SPS1000 Version 2.1
 SAM4s SPS-1000 Operation Manual All specifications are subject to change without notice. 2005, CRS, Inc. OM-SPS1000 Version 2.1 CRS, Inc. Limited Warranty and Disclaimers of Warranty This manual has been
GRAVITY MEASUREMENT, INC.
 COUNTING SCALE User and Service Manual Model: CCT10/CCT20 Please read this manual carefully before operation ----General Precautions ----Operating condition and other attentions ----Warranty GRAVITY MEASUREMENT,
MARINER MODEL WPS12 WATERPROOF DIGITAL PORTION SCALE OWNER S MANUAL
 MARINER MODEL WPS12 WATERPROOF DIGITAL PORTION SCALE OWNER S MANUAL CARDINAL SCALE MFG. CO. 8528-0409-0M Rev A PO BOX 151 WEBB CITY, MO 64870 04/15 PH (417) 673-4631 FAX (417) 673-5001 www.detectoscale.com
FL-100-R (109) Operations and Installation Manual
 Operations and Installation Manual") Page 1 of 23 All specification subject to change 2002-2005 FL-100-R (109) Operations and Installation Manual This manual is certified for use with instrument serial number ASL000000 Use of this manual
Page 1 of 23 All specification subject to change 2002-2005 FL-100-R (109) Operations and Installation Manual This manual is certified for use with instrument serial number ASL000000 Use of this manual
OPERATING MANUAL Digital Diesel Control Remote control panel for WhisperPower generator sets
 Art. nr. 40200261 OPERATING MANUAL Digital Diesel Control Remote control panel for WhisperPower generator sets WHISPERPOWER BV Kelvinlaan 82 9207 JB Drachten Netherlands Tel.: +31-512-571550 Fax.: +31-512-571599
Virtual Measurements & Control. VC210 Operators Manual
 Virtual Measurements & Control VC210 Operators Manual Safety Notice 2 Technical Specification 3 Features 3 Theory of Operation 4 Operation 4 Enunciators 4 Buttons 5 Power Down Timer and Buzzer Setting
835 Health Care Claim Payment / Advice
 Companion Document 835 835 Health Care Claim Payment / Advice This companion document is for informational purposes only to describe certain aspects and expectations regarding the transaction and is not
SmartPak Welding Controller WK-MPS-16 Constant Current
 SmartPak Welding Controller WK-MPS-16 Constant Current Features Latest state of the art ATMEL 8 bit microprocessor technology Synchronous digital welding control allows absolute precision Up to16 programmers
Digital Diesel Control Remote control panel for GENVERTER GV4 and GV7i
 OPERATING MANUAL Digital Diesel Control Remote control panel for GENVERTER GV4 and GV7i Art. nr. 40200801 WHISPER POWER BV ENGLISH: PAGE 1 Kelvinlaan 82 9207 JB Drachten NEDERLANDS: PAGINA 41 Netherlands
Revision 6, January , Electronics Diversified, Inc.
 Revision 6, January 1999 070-0130 1998, Electronics Diversified, Inc. 1 2 3 1. FADER CONTROL BUTTONS: 2. MANUAL FADER CONTROLS: 3. CONTROL KEYS: 4. ENCODER WHEEL: 5. KEY SWITCH: 6. DISK DRIVE (located
Owner s Guide CA2LCD5
 PROFESSIONAL SERIES Owner s Guide For Model: CA2LCD5 AS9234E RF Upgrade Kit IMPORTANT NOTE: The operation of the Security and Convenience System as described in this manual is applicable to most vehicles.
ELIOS 25 DIGITAL CONTROL UNIT WITH LCD DISPLAY FOR THERMAL SOLAR SYSTEMS TDS 006 M00 0SE A
 ELIOS 25 DIGITAL CONTROL UNIT WITH LCD DISPLAY FOR THERMAL SOLAR SYSTEMS TDS 006 M00 0SE 012945A0 040906 1 MAIN FEATURES Power supply 230V~ ±10% 50Hz Backlit alphanumeric LCD display Management of 5 output
Rev. 12/14/2001. PC-5500 PC-5750 Operation Manual
 Rev. 12/14/2001 PC-5500 PC-5750 Operation Manual Operation Configuration Troubleshooting PC-5500 PC-5750 Custom Control Systems Inc. 2007 Beech Grove Place Utica, NY 13501 (315) 732-1990 www.customcontrolsystems.com
Buypass Sales Reference
 Buypass Sales Reference Software Version: 4.08 Part Number: 55333-00 Revision: F Buypass Sales Reference October 15, 2007 VeriFone, Inc. 2099 Gateway Place Suite 600 San Jose, CA 95110 Telephone: 408-232-7800
Operator Manual. brite Standard Retail scale
 Operator Manual brite Standard Retail scale 2 METTLER TOLEDO Operator Manual brite Standard Contents 1 Your new retail scale...4 1.1 Most important functions...4 1.2 Device overview...4 1.3 Safety instructions...7
Service Manual. Model L500 and L600 Smart Lift. WARNING: Cancer and Reproductive Harm - Form #1-144 Rev.
 Service Manual Model L500 and L600 Smart Lift WARNING: Cancer and Reproductive Harm - www.p65warnings.ca.gov. Form #1-144 Rev. 2/5/19 Table of Contents Parts Breakdown 3 Monthly Maintenance Checklist 5
ADAM TM Advanced Digital Audio Matrix
 ADAM TM Advanced Digital Audio Matrix USER MANUAL CSedit Intercom Configuration Software for ADAM and ADAM CS Intercom Systems 9350-7077-300 Rev C, 8/00 CONTENTS Introduction iii If You Are in a Hurry!
NEVADA GOLD II ARROW INTERNATIONAL CAPITOL BINGO
 ARROW INTERNATIONAL CAPITOL BINGO TABLE OF CONTENTS Introduction 4 Existing Nevada Gold features 4 Nevada Gold II 5 Player Interface Improvements 5 Operator Interface Improvements 6 System Improvements
SP PRO ABB Managed AC Coupling
 SP PRO ABB Managed AC Coupling Introduction The SP PRO ABB Managed AC Coupling provides a method of linking the ABB PVI-3.0/3.6/4.2- TL-OUTD and ABB PVI-5000/6000-TL-OUTD string inverters to the SP PRO
Inlet Controller TC5-ITA USER'S MANUAL. M rev. 02 K rev. 00
 Inlet Controller TC5-ITA USER'S MANUAL M 890-00047 rev. 02 K 895-00458 rev. 00 TABLE OF CONTENTS PRECAUTIONS... 3 FEATURES... 4 LOCATION OF THE CONTROLS... 5 Status Leds...5 Internal Switches...6 INSTALLATION
NPS Series. Pallet Jack Scale Operator s Guide (V1611)
") NPS Series Pallet Jack Scale Operator s Guide (V1611) Anyload Transducer Co. Ltd Website: www.anyload.com Email: info@anyload.com Fax: +1 866 612 9088 North America Toll Free: 1-855-ANYLOAD (269 5623)
NPS Series Pallet Jack Scale Operator s Guide (V1611) Anyload Transducer Co. Ltd Website: www.anyload.com Email: info@anyload.com Fax: +1 866 612 9088 North America Toll Free: 1-855-ANYLOAD (269 5623)
Service Manual Model L1000 Smart Lift
 Service Manual Model L1000 Smart Lift Form #1-147 Rev. 10/1/13 Table of Contents Parts Breakdown 3 Monthly Maintenance Checklist 5 Smart Lift Operating Instructions 7 Scale Calibration 8 Advanced Smart
SNMP dedicated to ORVALDI Solar Infini
 SNMP dedicated to ORVALDI Solar Infini User s Manual Management Software for Solar Inverter Table of Contents 1. 2. 3. Overview...1 1.1 Introduction...1 1.2 Features...1 1.3 Overlook...1 1.4 Installation
Solution / Instructions
 Error 20001 Tranax & Hyosung Error Code List Error Description Unable to load a cassette 20002 Low Cash 20003 20004 20010 20012 20013 20014 2xx15 Axxx1 Axxx2 Axxx3 Axxx4 Axxx5 Axxx8 Reject Bin is Full
Owner smanual Banks OttoMind Programmer
 with Installation Instructions Owner smanual Banks OttoMind Programmer w/economind Features 01-07 GM 8.1L Workhorse Class-A Motor Home 99-07 4.8L, 5.3L, 6.0L, 8.1L Trucks THIS MANUAL IS FOR USE WITH P/N
PCS GEAR SELECT MODULE USER GUIDE v4.0
 PCS GEAR SELECT MODULE USER GUIDE v4.0 Ph: 1.804.227.3023 www.powertraincontrolsolutions.com Powertrain Control Solutions 1 Introduction 1.1 Included Components 1 - GSM Cable Motor Enclosur 1 - GSM Driver
INDEX 1 Introduction 2- Software installation 3 Open the program 4 General - F2 5 Configuration - F3 6 - Calibration - F5 7 Model - F6 8 - Map - F7
 SET UP MANUAL INDEX 1 Introduction 1.1 Features of the Software 2- Software installation 3 Open the program 3.1 Language 3.2 Connection 4 General - F2 4.1 The sub-folder Error visualization 5 Configuration
PRECAUTIONS... 4 OVERALL VIEW(CASTON-III)... 7 OVERALL VIEW(CASTON-II)...
... 7 OVERALL VIEW(CASTON-II)...") CONTENTS PRECAUTIONS... 4 OVERALL VIEW(CASTON-III)... 7 OVERALL VIEW(CASTON-II)... 8 DISPLAY & KEY FUNCTIONS... 9 BATTERY USAGE... 10 USE OF BATTERY CHARGER...11 FUNCTIONS & DESCRIPTIONS... 12 AP MODE...
CONTENTS PRECAUTIONS... 4 OVERALL VIEW(CASTON-III)... 7 OVERALL VIEW(CASTON-II)... 8 DISPLAY & KEY FUNCTIONS... 9 BATTERY USAGE... 10 USE OF BATTERY CHARGER...11 FUNCTIONS & DESCRIPTIONS... 12 AP MODE...
P-touch SERVICE MANUAL. MODEL: PT-1300 (For U.S.A.) LS-7 (Panduit ) REVISED
 LS-7 (Panduit ) REVISED") P-touch SERVICE MANUAL MODEL: PT-300 (For U.S.A.) LS-7 (Panduit ) REVISED PREFACE This publication is a service manual covering the specifications, theory of operation, disassembly/reassembly procedure,
P-touch SERVICE MANUAL MODEL: PT-300 (For U.S.A.) LS-7 (Panduit ) REVISED PREFACE This publication is a service manual covering the specifications, theory of operation, disassembly/reassembly procedure,
Grain Moisture Meter. Operators manual
 Grain Moisture Meter Operators manual Operation EN COMPONENTS 1 TESTER 2 BATTERY DOOR 3 USB DOOR 4 USB CABLE 5 CARRYING CASE 1 4 2 5 3 A A - Test Cell B - Display C - Keyboard D - Cap E - Pressure-indicator
Price Computing Scale D Series Operation Manual
 This Document is Hosted by: www.oldwillknottscales.com Price Computing Scale D Series Operation Manual Cardinal Scale Manufacturing Co. 8529-M400-O1 Rev. A PO BOX 151 WEBB CITY, MO 64870 04/13 PH (417)
Rally computer 3 Rally computer 3.GPS *
 Rally computer 3 Rally computer 3.GPS * User manual. Installation and configuration instructions. (with links to video instructions online at : www.rallycomputer.com ) * Content marked applies only to
PowerJet Sequential Injection INDEX. 1 Introduction 1.1 Features of the Software. 2- Software installation
 INDEX 1 Introduction 1.1 Features of the Software 2- Software installation 3 Open the program 3.1 Language 3.2 Connection 4 Folder General - F2. 4.1 The sub-folder Error visualization 5 Folder Configuration
MODEL. TI-500 RF Series. User Manual. Digital Weight Indicator (with wireless weighing capability)
") MODEL TI-500 RF Series Digital Weight Indicator (with wireless weighing capability) User Manual Revision 1.4 July 6, 2018 Table of Contents OVERVIEW... 3 Scope of TI-500 RF Series... 3 BASIC OPERATION...
MODEL TI-500 RF Series Digital Weight Indicator (with wireless weighing capability) User Manual Revision 1.4 July 6, 2018 Table of Contents OVERVIEW... 3 Scope of TI-500 RF Series... 3 BASIC OPERATION...
Service Manual Model S800 Smart Stand
 Service Manual Model S800 Smart Stand Form #1-146 Rev. 10/3/13 Table of Contents Parts Breakdown 3 Monthly Maintenance Checklist 7 Smart Stand Operating Instructions 9 Scale Calibration 10 Advanced Smart
January 10, 2017 # Rev. B. Model 464 Mk3 Electronic Pump Control Unit User Guide
 January 10, 2017 #109652 Rev. B Model 464 Mk3 Electronic Pump Control Unit User Guide Model 464 Electronic Control Unit User Guide - Contents 1.0 Introduction 1 1.1 Operating Principles 1 1.2 Model 464
Quick Setup Guide for IntelliAg Model YP40 20 Air Pro
 STEP 1: Pre-Programming Preparation: The Quick Guide assumes the Virtual Terminal, Master Switch, Working Set Master, Working Set Member, and all sensors have been connected and properly installed. Reference
OWNERS MANUAL iforks. Rev OWNERS MANUAL iforks 1
 OWNERS MANUAL iforks Rev.18.02.09 OWNERS MANUAL iforks 1 PLEASE RETAIN THESE INSTRUCTIONS FOR FUTURE REFERENCE If you have any queries concerning the duration and terms of the guarantee, please contact
e-track Certified Driver Operating Manual
 e-track Certified Driver Operating Manual Copyright 2016 all rights reserved. Page: Table of Contents System Overview 4 Login 5 Certifying Logs 6 Unidentified Driver Records 8 Requested Edits 9 ECM Link
CUSTOMER- FACING TRANSACTIONS
 ENTERING ITEMS (ALTERNATIVES TO SCANNING) MANUAL ENTRY UPC/SKU/Description Enter UPC, SKU or description in Item field. Select desired item from list in popup window. USE HOT KEYS Hot keys allow entry
CASTON OWNER S MANUAL
 Crane Scale CASTON OWNER S MANUAL CONTENTS PRECAUTIONS 4 PREFACE 6 NAMES AND FUNCTIONS 6 USE OF BATTERY 8 OPERATION 9 FUNCTIONS & DESCRIPTIONS 9 1. ZERO FUNCTION 9 2. SETTING TARE WEIGHT FUNCTION 9 3.
T29 series. Wash Down S cale. Technical Manual. TotalcompR. Scales & Components
 T29 series Wash Down S cale Technical Manual TotalcompR Scales & Components T29 Series Technical Manual Manufacturer Model Report No Applicable Standards Totalcomp Inc. T29 ASZ091201012S-2 IP65 Totalcomp
June 25, 2013 # Model 464 Electronic Pump Control Unit User Guide
 June 25, 2013 #109652 Model 464 Electronic Pump Control Unit User Guide Model 464 Electronic Control Unit User Guide - Contents 1.0 Introduction 1 1.1 Operating Principles 1 1.2 Model 464 Electronic Control
Signet Pressure Transmitter
 Signet 80 Pressure 80.090 80.090 Rev. J 0/ English CAUTION! Remove power to unit before wiring input and output connections. Follow instructions carefully to avoid personal injury. Contents. Installation.
Adam Equipment CBK SERIES
 Adam Equipment CBK SERIES (P.N. 8509, Revision A7, August 2007) Software Rev.: 4.28 & above 4.25H & above for CBK 8H/16aH Adam Equipment Company 2007 Adam Equipment Company 2007 CONTENTS 1.0 INTRODUCTION...
GENERAL The AuRACLE Engine Management System primary display provides a graphical representation of the following engine instrumentation:
 GENERAL The AuRACLE Engine Management System primary display provides a graphical representation of the following engine instrumentation: o Manifold Pressure (MAP) o RPM o Fuel Flow (FF) o Turbine Inlet
Service Manual Model S400 and S500 Smart Stand
 Service Manual Model S400 and S500 Smart Stand Form #1-145 Rev. 10/3/13 Table of Contents Parts Breakdown 3 Monthly Maintenance Checklist 7 Smart Stand Operating Instructions 9 Scale Calibration 10 Advanced
Omni-Directional Laser Scanner Configuration Guide
 Omni-Directional Laser Scanner Configuration Guide TABLE OF CONTENTS Introduction Symbol Key... ix Bar Code Configuration Methods Single-Code Method...x Multi-Code Method...x Need to Start Over? Recall
Price Computing Scale DS Series Operation Manual
 Price Computing Scale DS Series Operation Manual Cardinal Scale Manufacturing Co. 8529-M635-01 Rev B PO BOX 151 WEBB CITY, MO 64870 Printed in USA 04/09 PH (417) 673-4631 - FAX (417) 673-5001 www.detectoscale.com
SRM 7.0 Detailed Requisitioning
 SRM 7.0 Detailed Requisitioning Rev. October 2014 Course Number: V001 Welcome! Thank you for taking time to complete this course. 1 MENU Course Navigation You can navigate through this course using the
MicroGuard 510 Retrofit Rated Capacity Indicator System. Calibration and Testing for:
 Greer Company Page 1 of 27 MicroGuard 510 Retrofit Rated Capacity Indicator System Calibration and Testing for: Machine Model Serial Number Tester Date Greer Company Page 2 of 27 Notice This document and
Lingenfelter NCC-002 Nitrous Control Center Quick Setup Guide
 Introduction: Lingenfelter NCC-002 Nitrous Control Center Quick Setup Guide The NCC-002 is capable of controlling two stages of progressive nitrous and fuel. If the NCC-002 is configured only for nitrous,
Cafitesse Excellence Touch
 Cafitesse Excellence Touch Operator Manual EXCELLENCE TOUCH - 2019-03 Copyright 2019 JACOBS DOUWE EGBERTS, the Netherlands The English version is the original version of the operator manual. Other languages
Volkswagen Information System. Introduction
 Volkswagen Information System Introduction In this section you ll find information about: Using the instrument cluster menus: Basic version Using the instrument cluster menus: Premium version with multi-function
Quick Setup Guide for IntelliAg Model YP Air Pro
 STEP 1: Pre-Programming Preparation: The Quick Guide assumes the Virtual Terminal, Master Switch, Working Set Master, Working Set Member, and all sensors have been connected and properly installed. Reference
Manual Balanza dosificadora PCE-ABZ 200C
 www.pce-industrial-needs.com ursdale echnical Services Ltd Unit N12B ursdale Business Park Co. Durham DH6 5PG United Kingdom Phone: +44 ( 0 ) 191 377 3398 Fax: +44 ( 0 ) 191 377 3357 info@tursdaletechnicalservices.co.uk
Copyright 2017 Integrated Environmental Solutions Limited. All rights reserved.
 Tariff Analysis IES Virtual Environment Copyright 2017 Integrated Environmental Solutions Limited. All rights reserved. No part of the manual is to be copied or reproduced in any form without the express
User Manual Compact Temperature Calibrator Jofra CTC-155/350/660 A/C
 User Manual Compact Temperature Calibrator Jofra CTC-155/350/660 A/C User Manual Compact Temperature Calibrator JOFRA CTC-155/350/660 A/C Copyright 2016 AMETEK Denmark A/S List of contents 1.0 Introduction...
βeta 20A AUTO 12V/24V SOLAR CHARGE CONTROLLER WITH REMOTE METER
 βeta 20A AUTO 12V/24V SOLAR CHARGE CONTROLLER WITH REMOTE METER USER MANUAL βeta 20A AUTO 12V/24V SOLAR CHARGE CONTROLLER WITH REMOTE METER (OPTIONAL) CHARACTERISTICS LCD display: all systems parameters
Standard Operating Procedure for the Struers Grinding and Polishing Tools
 Standard Operating Procedure for the Struers Grinding and Polishing Tools Page 1 of 19 Contents About the Struers Grinding and Polishing System... 2 RotoPol 31... 2 Rotoforce 4... 3 Multidoser... 4 Rotocom...
OPERATIONS MANUAL M-520. Please take the time to read these instructions before starting to use the scales. Page 1
 OPERATIONS MANUAL M-520 Please take the time to read these instructions before starting to use the scales Page 1 Contents Power supply 3 Specifications 3 Maintenance and general care 3 Key functions 4
Error Code List for ecash & Nanocash
 Error Code List for ecash & Nanocash 20001 Unable to load a cassette. Removed and replace cassette Check the microswitch located on the inside left wall of the dispenser. 20002 Low cash. Replenish the
Operation Manual. For technical help please contact Livorsi Marine at or us at
 For technical help please contact Livorsi Marine at 4-5- or email us at info@livorsi.com This Operation Manual system is compatible with any Smartcraft, NMEA, J99 or Indmar engine. Livorsi Marine Inc 5