COMPRESSOR OPERATION: Get it right first time. Your simple steps to successful operation.
|
|
|
- Hilda Harrington
- 6 years ago
- Views:
Transcription


1
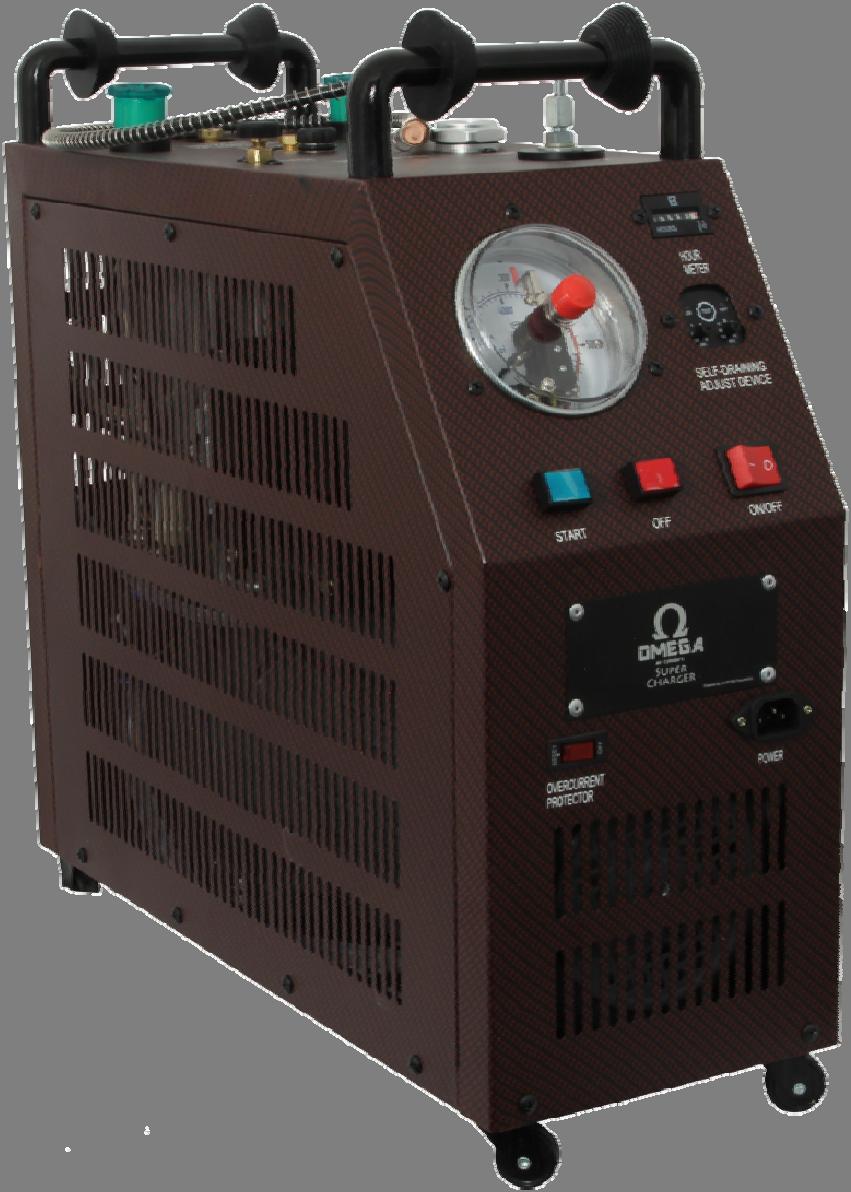
2 COMPRESSOR OPERATION: Get it right first time. Your simple steps to successful operation. 1. Unscrew the Water Tank Cap, on the top of Turbo Charger. Pour in contents of both bottles (Ice & Antifreeze). Then, top up with water to an inch below the rim. Pure / filtered water is best, tap water is OK, but NEVER use distilled water. Screw glass top cover back on. 2. The self drainage adjust device (right hand side of front panel) allows you to set the moisture drainage frequency. This is dependent on humidity in the environment. The damper it is, the more venting you'll need. Set the knob on the left for the length of venting in seconds. It is suggested that you set it, initially, at 0.5. The knob on the right controls how often it vents in minutes. If filling an air cylinder, set the left hand knob to 1 second and the right hand knob to vent every 15 minutes as a good start point. In warm, dry conditions, you can set it to min.. Frequent and long venting slows down the fill speed. 3. The over-current protector switch should be set to RESET. 4. Plug the power cable in to the Turbo Charger. Turn on using on/off rocker switch. This activates the water pump and fan. Check that water is flowing by looking through sight glass in the water cap. 5. At the top of the compressor, screw the fill hose in firmly. 6. Set the PSI you require on the main dial by pushing in the knob and turning. The short metal arm pushes the needles into position. Set both needles so they are together. Do not fill air tanks above 4500 PSI, as the burst disc is set to 4800 PSI. If disc bursts, there are spares in the kit pack. (Small, gold circular discs). Use the supplied tweezers, if necessary. 7. Attach the other end of the hose firmly to the tank/cylinder using 1/8 inch quick-connect adaptor. 8. Push green button to start tank-filling. It's normal to hear a rocking/ tapping sound. 9. The Turbo Charger stops automatically at the correct PSI. Then, close air tank & bleed out excess air from compressor using the Bleed Valve. Air is expelled at rear of compressor. Be sure to release excess air from hose before removing adaptor from tank/gun. ALL RIGHTS RESERVED Copyright and Trademark 2014 Raptor Pneumatics, LLC

3 Where to put your Omega Turbo Charger Place your Turbo Charger on a smooth flat surface. Do not operate / store in dusty humid conditions or below 35 F. Allow 2 space behind compressor for air exiting. For long term storage, keep indoors and away from freezing temps. In sub-zero temps, drain water tank and fill with pure antifreeze, run for 1 min. Use supplied cover. Fill times Typically, for a rifle 2-3 min A 12cf tanks takes min from psi A 75cf tank take hrs from psi Maintenance After every 6 hrs of compressor operation or when the red indicating light comes on, turn green grease screw 1 click (1/3 turn). Fill cavity when low (use white grease syringe). Push the red indicating light to reset. When refilling the grease, open air gap screw on top of the unit nearest to each grease port. Tighten the green grease knob until the air pocket burps and then replace the screw. This pushes grease into position ready for each maintenence click. Topoffwatertankasnecessary If changing the water, use ½ ounce of Royal Purple ICE and regular 1 ounce of regulator antifreeze. Fill with purified water, never use distilled water. Fill below water flume.
4 Troubleshooting Compressor not on (no lights) Make sure there is power at outlet Make sure power cord is pushed in on the compressor Make sure the red circuit breaker hasn t tripped Take off side panels and look for loose wires Compressor is not running but lights are on Make sure there is water in tank and its flowing, the compressor is equipped with a flow switch, so if the water pump is not working the compressor will not turn on. Tap on water pump to unblock trapped air. Loose wires Compressor not building pressure Make sure bleed screw is tight, as the compressor builds PSI, you might need to retighten. Check burst disc for damage (is air coming out of the tiny hole?). Replacement disc in maintenance bag. Tighten fitting to firm snug. Check main check valve (under 19mm brass fitting). Look for burnt or dirty valve, clean hole where valve is located. New valves are in maintenance bag. Place small end of spring on valve and center, replace brass fitting,tighten to about 5lb. No water flow Make sure there is water in tank, turn the master switch on and off many times so as to prime and push any air bubbles out Check for 12 volts at water pump, if no volts, replace / check wires at circuit board If there is volts, replace water pump
5
6 No name No name No name 1 level 1 cylinder sleeve 36 rubber sleeve 71 gauge connect pipe 2 level 2 cylinder sleeve 37 inner sealed ring 72 gauge 3 level 3 cylinder sleeve 38 locating pad 73 bleed valve connect pipe 4 cylinder seat 39 high pressure pole 74 grease port seat clamp ring 5 grease port 40 oil-way catch 75 bleed valve seat 6 grease port seat 41 sealing seat 76 bleed valve gasket 7 oil column 42 high pressure pole fixed sea 77 bleed valve nut 8 cylinder bolt 43 3mm pin 78 bleed valve 9 burst nut 44 fixed seat at bottom 79 handle 10 burst disc 45 85*6 guide ring 80 water tank cap 11 burst nut seat 46 Connecting rod pin 81 grease port 12 check valve 47 Connecting rod 82 grease port seat 13 check valve gasket 48 high pressure air pipe 83 filter's clamp ring 14 high pressure pipe 49 crankshaft box 84 filter body 15 oil-way connect pipe 50 crankshaft 1 85 right cover 16 oil-way locating pin 51 bearing gasket 86 filter cover 17 oil-way liner 52 bearing sleeve 87 Drain valve gasket 18 level 2 piston 53 needle roller bearing 88 Drain valve sealing gasket 19 5mm rubber ball 54 crankshaft 2 89 Drain valve core 20 Level 2 cylinder piston guide ring bear 90 Drain valve body 21 Level 2 cylinder piston sealing ri 56 crankshaft box section 2 91 solenoid 22 Level 2 cylinder piston sealing ri 57 locating sleeve Level 2 cylinder piston thread nut 58 Conversion shaft Level 2 cylinder piston guide ring 59 support shaft mm rubber ball needle roller bearing fixed panel 61 crankshaft cover *4 guide ring 62 Filter mask cushion High pressure piston cover 63 Air intake filter cover High pressure piston gasket 64 valves High pressure valve core 65 crankshaft box cover sealed ring outside 66 outside shell bottom panel high pressure piston sealing ring 67 motor high pressure piston body 68 left cover stop ring 69 outside shell Cone pad 70 water tank 105
7
 7.Level 2 cylinder piston sealing ring 8.Level 2 cylinder piston sealing gasket 9.High pressure piston sealing ring 10.")
8 1.Level 2 cylinder piston guide ring 2.Level 2 cylinder piston sealing ring 3.Level 2 cylinder piston guide ring 4.Level 2 cylinder sealing ring 5.Level 2 cylinder piston sealing ring (up) 6.Level 2 cylinder piston sealing ring (down) 7.Level 2 cylinder piston sealing ring 8.Level 2 cylinder piston sealing gasket 9.High pressure piston sealing ring 10.High-pressure piston sealing gasket 11.sealed ring outside 12.rubber ball 13.High pressure valve core 14.φ 3 spring 15.φ 4-φ 7 pagoda spring 16.check valve gasket 17.Burst disc 18.Sealing gasket of bleed valve 19. Nozzle Cleaner 20.special spanner 21.7mm allen wrench 22.open spanner
9 RAPTOR PNEUMATICS, LLC ONE YEAR RETAIL LIMITED WARRANTY RAPTOR PNEUMATICS, LLC (RP) warranties to the original consumer of this product that it will be free from workmanship and material defects based upon normal usage during the time of the warranty, or 12 months from the date of purchase. This warranty covers the, materials, labour and parts needed to repair.rebuild or replace the faulty part or equipment, at RP's option, for a period of one (1) year (shipping not included). The warranty period commences from the date on which the original buyer purchases the equipment. This limited warranty covers manufacturing defects that occur during the warranty period. RP will, at its discretion, repair, rebuild or replace the faulty part or equipment in accordance with the terms set forth below. If the customer chooses to repair the problem at their home or facility, then thedamaged part must first be returned to RP and then a replacement part will be shipped out, at the customer's expense, to the address that the customer specifies. Warranty Terms During this 12 month warranty period, the product will be repaired, rebuilt, or replaced at no charge to the consumer, when returned to RP with the sale receipt or invoice (containing date of purchase)according to the following terms. This warranty covers the, materials, labour and parts needed to repair, rebuild or replace the faulty part or equipment, at RP's option, for a period of one (1) year (shipping not included). This owner's limited warranty is only valid, if the item is used in an environment approved by RP for that particular equipment. The warranty is invalid if the product has been misused, abused or damaged from causes not arising out of defects in material or workmanship. RP cannot be held responsible for any subsequent damages to the machine or to the user's human body that may arise from use of this unit after the defect or damage has occurred. This owner's limited warranty applies to the EZ- FILL 4500 PCP, Paint Ball or Scuba Compressor. Warranty repairs will not extend the warranty period. Warranty Restrictions This owner's warranty only covers the following: a. Flaws caused by materials or labour in the equipment that existed when the equipment was originally assembled. b. Faults that occur in normal use as defined in the owner's manual and providing that RP's instructions on start-up, maintenance and use have been followed. c. The original purchaser of the equipment who holds an original proof of purchase. (Continued ) ALL RIGHTS RESERVED Copyright and Trademark 2014 Raptor Pneumatics, LLC
10 This warranty does not extend to, or cover, any of the following: a. Equipment or components that have been modified without the consent of RP. b. Faults resulting from natural wear and tear, use in conditions for which the equipment is not intended, corrosion, or damage incurred during loading or shipping not provided by RP, or by accident, fire, flood, war or acts or God. c. Maintenance activities, such as cleaning, lubricating, or normal checking of parts: or installation procedures that customers can do themselves. d. Damage or equipment failure caused by faulty electrical wiring used to power the equipment. (i) electrical wiring not in compliance with applicable electrical codes. (ii) electrical wiring not in compliance with the owner's manual or (iii) electrical wiring that has not been maintained as outlined in owner's manual. e. Repairs performed by someone other than an authorized RP representative. f. Repairs due to limitations or corrections in the equipment's software. g. Repairs to consumable or cosmetic items, e.g., grips, seals, labels, or wheels. h. Repairs performed on equipment missing a serial number or with a serial tag that has been altered or removed. i. Service calls to correct installation of the equipment or instruct owners on how to use the equipment. j. Pick-up, delivery, or freight charges involved with repairs. RP MAKES NO EXPRESS WARRANTIES OR CONDITIONS BEYOND THOSE STATED IN THIS OWNER'S WARRANTY. RP DISCLAIMS ALL OTHER WARRANTIES AND CONDITIONS, EXPRESS, OR IMPLIED, INCLUDING WITHOUT LIMITATION IMPLIED WARRANTIES AND CONDITION OF MERCHANTABILITY AND FITNESS FOR A PARTICULAR PURPOSE. SOME STATES (OR JURISDICTIONS) DO NO ALLOW LIMITATIONS ON IMPLIED WARRANTIES OR CONDITIONS, SO THIS LIMITATION MAY NOT APPLY TO THE USER OR OWNER. RP'S RESPONSIBILITY FOR MALFUNCTIONS AND DEFECTS IN THE EQUIPMENT IS LIMITED TO REPAIR AND REPLACEMENT AS SET FORTH IN THIS OWNER'S WARRANTY. THESE WARRANTIES GIVE THE USER OR OWNER SPECIFIC LEGAL RIGHTS, AND THE USER OR OWNER MAY ALSO HAVE OTHER RIGHTS, WHICH VARY FROM STATE TO STATE (OR JURISDICTION). RP DOES NOT ACCEPT LIABILITY BEYOND THE REMEDIES SET FORTH IN THIS WARRANTY STATEMENT OR LIABILITY FOR INCIDENTAL OR CONSEQUENTIAL DAMAGES. SOME STATES (OR JURISDICTIONS) DO NOT ALLOW THE EXCLUSION OR LIMITATION OF INCIDENTAL OR CONSEQUENTIAL DAMAGES, SO THE PRECEDING EXCLUSION OR LIMITATION MAY NOT APPLY TO THE USER OR OWNER. Despite continuous quality control, faults or operating errors in equipment may result from individual components. Delivering the complete piece of equipment for repair is often unnecessary, because the flaw can usually be fixed by replacing just the faulty part. It is preferable that you make any inquiries about the warranty directly to your RP retailer or to RP directly. Please contact the store where you purchased your compressor or to Gilbert Distribution Ltd : info@gilbertdistribution.co.uk ALL RIGHTS RESERVED Copyright and Trademark 2014 Raptor Pneumatics, LLC
11 We, at RP, want to develop our products and services continuously according to the needs and wishes of our customers. For this reason, we kindly ask you to complete the registration card and send it to us as soon as possible, preferably within ten days of purchasing the equipment. If registration is intended, it must be made within two (2) months of the date of purchase. Please fill in all the fields to ensure that we can serve you as efficiently as possible. PLEASE COMPLETE, SCAN, SIGN AND BACK TO: Registration Card Name of Owner: Address: City, State: Zip Code: Phone Number: Serial Number: Date of Purchase: Place or Purchase: Purchaser's Signature: - ALL RIGHTS RESERVED Copyright and Trademark 2014 Raptor Pneumatics, LLC
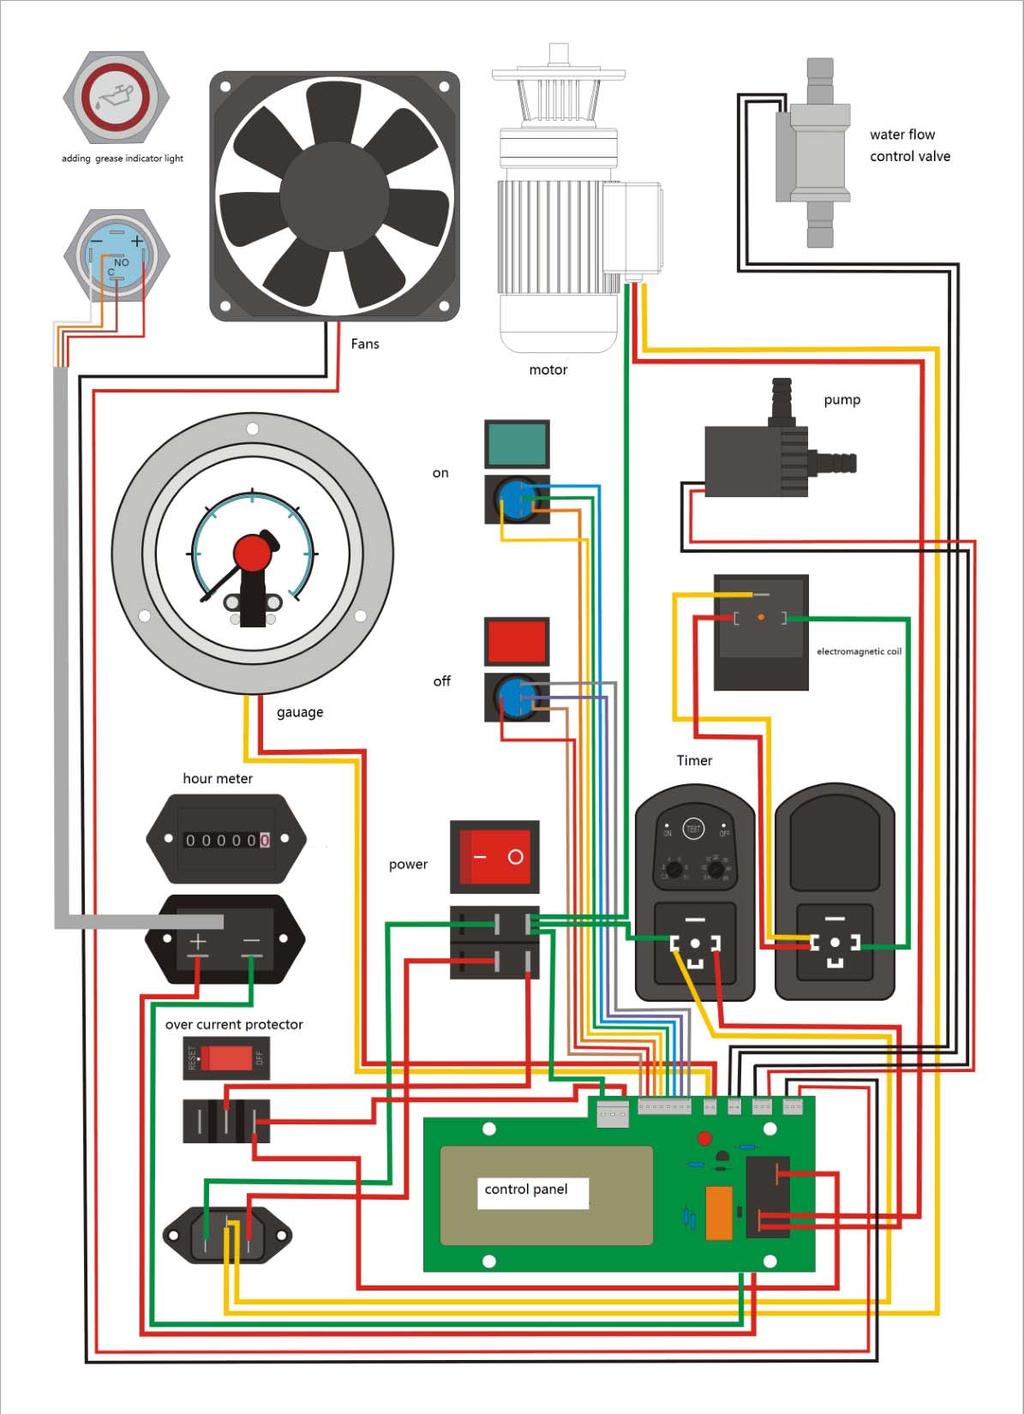
12 This repair guide applies to the following Omega Compressor Models: Omega Super Charger and Turbocharger Warning Prior to Starting any Repair or Service Make sure the power cord is disconnected from the compressor All air is completely released from the compressor 1. Gauge replacement disconnect the connector on the back of the gauge, unscrew the 3 Philip head screws, take out old gauge, install new gauge and push connector back on, tighten screws. 2. Water pump replacement Drain water from unit, disconnect quick connector at the circuit board, loosen the two (2) hose clamps. Install new water pump and reconnect the connector at circuit board. 3. Fan replacement Disconnect quick connector. Unscrew four (4) Philip head screws. Please Note: The fan placement should be directed so that the air blows into fan. Install new fan and replace all the hardware. 4. Fill hose replacement Use a 14 mm wrench, unscrew fill hose and install the new hose, tighten the new fill hose. Use soapy water to test for any air leaks. 5. Air/Water separator replacement and Automatic solenoid Disconnect the 3 wires on the side of the solenoid, make note of the color and position of wires. Use (2) 14mm wrenches and undo the steel line from the bottom and from the top inside of the air/water separator. Remove all the screws that hold the case on. Carefully remove the case, watch out for wires and hoses that might get caught up. Take out the 2 small screws on top of separator. Carefully pull out and disconnect solenoid. To take apart solenoid, loosen nut on top of black coil, unscrew plunger housing from air/water separator, being careful not to lose the small spring that is inside of plunger, clean plunger and oil it.. Install the new Air/Water separator and put solenoid back together making sure small spring is inside of plunger. Replace all the lines and wires. 6.BurstDiscreplacement Usea19mmwrenchtoholdthebrassfittingtightlywhilea14mmwrenchis used to undo the brass fitting that holds the burst disc in place. Remove the damaged burst disc. Install the new burst disc and gently tighten the brass fitting. Then spray soapy water around the burst disk and check for any air leaks. 7. Piston Isolation Tool The enclosed tool is used to isolate each piston in order to determine whether the other is malfunctioning. To use, remove the brass 19mm fitting on top of the compressor. Remove the spring and check valve. Screw in the Piston Isolation Tool until hand tight. Set the gauge to psi, install the test plug into the fill hose disconnect and run compressor as normal. If the system does not build pressure, then the piston opposite the tool is malfunctioning and should repaired. Contact a repair facility for troubleshooting. If the pressure builds up to the psi setting, the piston opposite the tool is functioning normally. Bleed the system, re-install the spring and check valve, and tighten the 19mm brassing until wrench tight. You can then test the opposite piston by doing the same steps to install the Piston Isolation Tool into the opposite 19mm brass fitting.
Super Charger psi Compressor
 Super Charger 4500 psi Compressor COMPRESSOR OPERATION: Get it right first time. Your simple steps to successful operation. 1. Unscrew the Water Tank Cap, on the top of Supercharger. Pour in contents of
Compressor Operation and initial start up Procedure: Please read directions carefully and follow operatingproceduresbeforeeachuse.
 Thank you for purchasing Omega Air Charger compressor for PCP and carbon fiber tank filling. Rapidly fill tank sizes from 6 cubic feet to 120 cubic feet. Aircraft machined aluminum is used extensively
HALLMARK INDUSTRIES INC
 Performance Part No. HP. CONVERTIBLE JET PUMP USER S MANUAL GPH of Water @ Total Discharge Pressure of 40 psi Max. Pressure Max suction (shallow well) Max Suction (deep well) Max GPM (@0 head) Max Discharge
User Instruction Manual
 User Instruction Manual NOMAD 4500 PSI Portable Air Compressor AV-MCOMP4500 Ver 1, 7/18 Contents Parts Included...3 Setting up your Nomad Compressor...4 Operation Instructions: 110V or 220V outlet...5-6
User Instruction Manual
 User Instruction Manual Nomad II 4500 PSI Portable Air Compressor AV-MCOMP4500-2 Ver. 1, 10/18 Contents Parts Included...3 Setting up your Nomad II Compressor...4 Operation Instructions: 110V or 220V outlet...5-6
Operating Instructions & Parts Manual. Supa-Lite Lever Grease Gun. Model 48UJ77
 Operating Instructions & Parts Manual EN Supa-Lite Lever Grease Gun Model 48UJ77 PLEASE READ AND SAVE THESE INSTRUCTIONS. READ CAREFULLY BEFORE ATTEMPTING TO ASSEMBLE, INSTALL, OPERATE OR MAINTAIN THE
12 Volt Heavy-Duty Air Inflator
 12 Volt Heavy-Duty Air Inflator Owner s Manual WARNING: Read carefully and understand all ASSEMBLY AND OPERATION INSTRUCTIONS before operating. Failure to follow the safety rules and other basic safety
Q-Series Winch. Assembly and Installation Manual # X. The Trusted Source REQUIRED TOOLS: SAFETY GLASSES GLOVES TORQUE WRENCH
 Q-Series Winch Assembly and Installation Manual # 92122.202X READ ALL SAFETY MESSAGES AND UNDERSTAND ALL INSTRUCTIONS AND PROCEDURE NOTICES BEFORE ATTEMPTING TO INSTALL OR USE THIS PRODUCT. REQUIRED TOOLS:
CRD610 Automatic Fitting Inserter
 CRD610 Automatic Fitting Inserter OPERATIONS MANUAL VERSION 1.2 LAST EDITED 12.12.2018 cleanroomdevices.com 1 Table of Contents Title Page. 1 Table of Contents...2 1.0 General Product & Safety Information....3
OWNER/OPERATOR MANUAL. Airmotor effective dia. in. 2.5
 MODELS 282050, 282716 & 283513 AIR OPERATED CHASSIS PUMP SERIES A OWNER/OPERATOR MANUAL SPECIFICATIONS Airmotor effective dia. in. 2.5 Airinlet Material outlet 1/4 NPTF 1/4 NPTF Liquid to Air Pressure
Single shot MODEL EGA700 OWNERS MANUAL
 Single shot AIR OPERATED GREASE GUN MODEL EGA700 OWNERS MANUAL www.eaglecompressor.com 1-800-551-2406 READ THE ENTIRE MANUAL BEFORE PUTTING THIS TOOL IN SERVICE Limited Air Tool Warranty Eagle warrants
INSTRUCTIONS AND SERVICE MANUAL WITH PARTS LIST
 CMP SERIES CPM15-15B (25905F300) CPM15-15B-H/D (25905F301) CPM18-15B (25905F303) CPM18-15B-H/D (25905F304) INDUSTRIAL PUMPS INSTRUCTIONS AND SERVICE MANUAL WITH PARTS LIST NOTE! To the installer: Please
Power. On Your Terms.
 Power. On Your Terms. 10 YEAR LIMITED WARRANTY PHI 1310 TM 1 SIMPLIPHI POWER, INC. REV102016 10 YEAR LIMITED WARRANTY: PHI 1310 TM LIMITED PRO-RATED WARRANTY COVERAGE The SimpliPhi Power PHI 1310 as supplied
User s Guide. Oreck Air Purifier with HEPA Filtration. Important! Read this manual carefully, and keep for future reference.
 User s Guide Oreck Air Purifier with HEPA Filtration Important! Read this manual carefully, and keep for future reference. Enjoy Congratulations on your purchase of the Oreck Air Purifier with HEPA Filtration.
CLEAN ROOM DEVICES, LLC "WHERE TUBING AND FITTINGS COME TOGETHER"
 CLEAN ROOM DEVICES, LLC "WHERE TUBING AND FITTINGS COME TOGETHER" CRD600 Automatic Fitting Inserter OPERATIONS MANUAL VERSION 2.1 LAST EDITED 7.25.14 DOCUMENT NUMBER 001 cleanroomdevices.com 1 Table of
PARTS MANUAL FOR TWO STAGE AIR COMPRESSOR
 PARTS MANUAL FOR TWO STAGE AIR COMPRESSOR SPECIFICATION CHART Model No. Horsepower Voltage-Single Phase Minimum Branch Circuit Requirement *Fuse Type Air Tank Capacity Approximate Cut-in Pressure Approximate
110 Volt/12 Volt Portable Inflator
 110 Volt/12 Volt Portable Inflator Owner s Manual WARNING: Read carefully and understand all ASSEMBLY AND OPERATION INSTRUCTIONS before operating. Failure to follow the safety rules and other basic safety
Hydraulic Drum Transporter
 Hydraulic Drum Transporter Owner s Manual WARNING: Read carefully and understand all ASSEMBLY AND OPERATION INSTRUCTIONS before operating. Failure to follow the safety rules and other basic safety precautions
10 Year Limited Warranty
 Power. On Your Terms. 10 Year Limited Warranty PHI 2.7 TM PHI 3.5 TM 60A SIMPLIPHI POWER, INC. REV020618 10 Year Limited Warranty: PHI 2.7 TM PHI 3.5 TM 60A 24V 48V Limited Pro-Rated Warranty Coverage
Model T2642 Wall Mount. Television Wall Mount with Tilt Option
 Model T2642 Wall Mount Television Wall Mount with Tilt Option Getting Started Introduction Congratulations on the purchase of your new Audio Solutions T2642 Television Wall Mount. For maximum benefit,
Water Broom. Instruction manual ESPAÑOL: PÁGINA 7 FRANÇAIS : PAGE 13 MODEL PCA270
 ESPAÑOL: PÁGINA 7 FRANÇAIS : PAGE 13 Instruction manual Water Broom MODEL PCA270 To learn more about Porter-Cable visit our website at: http://www.porter-cable.com IMPORTANT Please make certain that the
 CUSTOMER SERVICE: 800-973-8374 Frame Assembly Instructions Headboard Installation E 1. Use the remote control to raise the head of the adjustable foundation in order to gain access to the foundation
SLR / SLR-S/N. Instruction Manual. Walrus America Inc
 SLR / SLR-S/N Instruction Manual Walrus America Inc 1. Installation and Connection 1.1. Pump Installation The pump should be sited in a well ventilated and frost-free position. The distance between pumps-motors
203 TRANSFER CASE CONVERSION
 203 TRANSFER CASE CONVERSION PN:501 OUR FOUR TRANSFER CASE WEDGES REPLACE THE SPIDER GEARS AND CONNECT THE PLANETARY GEAR AND REAR OUTPUT SHAFT MAKING ONE UNIT. SIMILAR IN DESIGN & FUNCTION TO THE BEST
SEWAGE PUMP MODEL # Zoeller is a registered trademark of Zoeller Co. All Rights Reserved. Español p. 14
 SEWAGE PUMP Zoeller is a registered trademark of Zoeller Co. All Rights Reserved. MODEL #1261-0001 Español p. 14 ATTACH YOUR RECEIPT HERE Serial Number Purchase Date Questions, problems, missing parts?
CRD600 Automatic Fitting Inserter
 CRD600 Automatic Fitting Inserter OPERATIONS MANUAL VERSION 2.3 LAST EDITED 12.07.2018 cleanroomdevices.com 1 Table of Contents Title Page.. 1 Table of Contents. 2 1.0 General Product & Safety Information...3
Thompson Performance, LLC - POWERBLAST PLATE
 Thompson Performance, LLC - POWERBLAST PLATE INSTALLATION INSTRUCTIONS and LIMITED WARRANTY FOR PBP H-1, HD-1 AND HD-2 IMPORTANT NOTE: Proper installation is the responsibility of the purchaser. Improper
Model AS-RC3260 TV Cart. Rolling Cart for Audio Mount System & Flat Panel TVs
 Model AS-RC3260 TV Cart Rolling Cart for Audio Mount System & Flat Panel TVs GETTING STARTED Introduction Congratulations on the purchase of your new Helios AS-RC3260 Rolling Cart. For maximum benefit,
ADJUSTABLE COMFORT ASSEMBLY INSTRUCTIONS
 ASSEMBLY INSTRUCTIONS ASSEMBLY INSTRUCTIONS For customer service call 1-877-707-7533 or email azcustomerservice@classicbrands.org STEP 1: Carefully open the carton and remove all boxes then lay out the
Series CP200. Triplex Ceramic Plunger Pump Operating Instructions/ Repair and Service Manual. For Models: CP218 CP219 CP220 CP230
 Series CP200 Triplex Ceramic Plunger Pump Operating Instructions/ Repair and Service Manual For Models: CP218 CP219 CP220 CP230 Updated 10/02 Contents: Installation Instructions: page 2 Pump Specifications:
Customer Support
 Portable auxiliary air tanks owner's Manual aux05 aux05a aux10 WWW.CALIFORNIAAIRTOOLS.COM Customer Support 1-866-409-4581 TAbLe OF CONTeNTS INTROduCTION IntroductIon Important Safety InStructIonS components
CLEAN ROOM DEVICES, LLC "WHERE TUBING AND FITTINGS COME TOGETHER"
 CLEAN ROOM DEVICES, LLC "WHERE TUBING AND FITTINGS COME TOGETHER" CRD600AF Automatic Fitting Inserter With Auto Feed OPERATIONS MANUAL (Shown with optional alcohol dispenser) 1 VERSION 1.1 LAST EDITED
MODEL G300 Brake Bleeder
 MODEL G300 Brake Bleeder Installation, Operation & Repair Parts Information Branick Industries, Inc. 4245 Main Avenue P.O. Box 1937 Fargo, North Dakota 58103 Rev013107 P/N: 81-0035C CAUTION Before using
22427 SWAY BAR SET 2002-UP SUBARU WRX WAGON
 22427 SWAY BAR SET 2002-UP SUBARU WRX WAGON Thank you for your purchase from our line of Subaru WRX parts. Please call us at (877) 4NO-ROLL if you have any questions regarding the service or installation
Smoke Leak Locator. User Manual. For Models: Pro S 25, Pro S 75, Pro S 500T, Pro S 600T, Pro S 1000HD. Ceramic Heating Technology
 Smoke Leak Locator User Manual For Models: Pro S 25, Pro S 75, Pro S 500T, Pro S 600T, Pro S 1000HD Ceramic Heating Technology www.proflex-plus.com All models come with a User Manual, Quick Start Guide,
QUALITY MISTING PUMPS
 DIRECT DRIVE TOTALLY ENCLOSED FAN COOLED 60200KH, 60201KH MISTING PUMP MANUAL INCLUDING: SPECIFICATION DATA, GENERAL SAFETY PRECAUTIONS, OPERATION, INSTALLATION, PARTS, MAINTENANCE & WARRANTY QUALITY MISTING
Level One Electric Vehicle Charging Station FREE STANDING Product Guide
 Level One Electric Vehicle Charging Station FREE STANDING Product Guide Model # SC2-120 Shorepower Technologies 2351 NW York St. Portland, OR 98664 503-892-7345 info@shorepower.com www.shorepower.com 2
Model GX Series. Consumer Pump. Triplex Plunger Pump Operating Instructions/ Repair Instructions Manual
 Model GX Series Triplex Plunger Pump Operating Instructions/ Repair Instructions Manual Consumer Pump Horizontal/Vertical Pump with built-in Thermal Relief Valve and Siphon Injector Contents: Installation
INSTALL GUIDE Jeep Wrangler JK 3.6L V6
 INSTALL GUIDE 2012-2017 Jeep Wrangler JK 3.6L V6 TABLE OF CONTENTS 3 GETTING STARTED 3 PARTS LIST 4 INSTALLATION INSTRUCTIONS 4 REMOVING THE STOCK INTAKE ASSEMBLY 6 INSTALLING THE HOUSING 7 INSTALLING
2015 & 2018 Fender Brace Installation Instructions
 2015 & 2018 Fender Brace Installation Instructions Thank you for your purchase of this Hotchkis Performance product. Your Fender Brace set was designed with the performance and durability you ve come to
INSTALL GUIDE Dodge/RAM 5.7L HEMI
 INSTALL GUIDE 2009-2017 Dodge/RAM 5.7L HEMI TABLE OF CONTENTS 3 GETTING STARTED 3 PARTS LIST 4 INSTALLATION INSTRUCTIONS 4 REMOVING THE STOCK INTAKE ASSEMBLY 6 INSTALLING THE AIR FILTER 7 INSTALLING THE
Agxcel GX12i Chemical Injection System
 Agxcel GX12i Chemical Injection System Table of Contents System Contents... 3 Specifications... 4 Safety Precautions and Tips... 5 Operations... 6 Installation... 7 Maintenance... 8-9 Troubleshooting...
4/6 Coil Spring Kit C-10 Truck
 4/6 Coil Spring Kit 19390 67-72 C-10 Truck Thank you for your purchase from our new line of Chevy parts. Please call us at 877-4NO - ROLL if you have any questions regarding the service or installation
SPECIFICATIONS CONTENTS:
 Model 3052A 1,100 Lbs Air Assist 2 Stage Transmission Jack INSTRUCTION MANUAL CONTENTS: Page 1 Specifications Page 2 Warning Information Page 3 Assembly Page 4 Operating Instructions Page 4 Preventative
Users Manual Certified Series Direct Drive Pump 1-7 LPM
 Users Manual Certified Series Direct Drive Pump 1-7 LPM Safety, Operating, Installation, and Maintenance Instructions 600 S 56 th Street #9 Chandler, AZ 85226 Phone: 480-507-6478 Fax: 480-838-2232 www.fogco.com
Air Compressor. Owner s Manual
 35 WARNING! READ AND UNDERSTAND ALL SAFETY PRECAUTIONS IN THIS MANUAL BEFORE OPERATING. FAILURE TO COMPLY WITH INSTRUCTIONS IN THIS MANUAL COULD RESULT IN PERSONAL INJURY, PROPERTY DAMAGE, AND/ OR VOIDING
Thompson Performance, LLC - POWERBLAST PLATE
 Thompson Performance, LLC - POWERBLAST PLATE INSTALLATION INSTRUCTIONS FOR PBP EC-56 AND PBP EC-78 IMPORTANT NOTE: Proper installation and safe use of the POWERBLAST PLATE is the responsibility of the
P/N# Performance Lowering Springs Installation Instructions
 P/N# 19110 Performance Lowering Springs Installation Instructions Thank you for your purchase of this Hotchkis Performance product. Your Lowering Spring set was designed with the performance and durability
PREDICTIVE STEERING HUBS. Service Manual
 2015 PREDICTIVE STEERING HUBS Service Manual SRAM LLC WARRANTY EXTENT OF LIMITED WARRANTY Except as otherwise set forth herein, SRAM warrants its products to be free from defects in materials or workmanship
SPORT COIL SPRINGS Scion xa & xb Part #19412 INSTALLATION OF HOTCHKIS FRONT COIL SPRINGS
 SPORT COIL SPRINGS 2004+ Scion xa & xb Part #19412 Thank you for your purchase from our new line of Scion xa / xb parts. Please call us at (877) 4NO-ROLL if you have any questions regarding the service
PSX-240 Enclosed Autotransformer Installation Manual
 PSX-240 Enclosed Autotransformer Installation Manual IMPORTANT SAFETY INSTRUCTIONS SAVE THESE INSTRUCTIONS! This manual contains important instructions for the OutBack PSX-240 Autotransformer. All of the
22421 SPORT SWAY BAR SET TOYOTA COROLLA
 22421 SPORT SWAY BAR SET 98-01 TOYOTA COROLLA Thank you for your purchase from our line of Corolla parts. Please call us at (877) 4NO-ROLL if you have any questions regarding the service or installation
Model GXR Series. Consumer Pump. Triplex Plunger Pump Operating Instructions/ Repair Instructions Manual
 Model GXR Series Triplex Plunger Pump Operating Instructions/ Repair Instructions Manual Consumer Pump Horizontal/Vertical Pump with built-in Regulator, Thermal Relief Valve and Siphon Injector Updated
Aqua Ultraviolet Sunami Series Pumps 1/3HP, 3/4HP, 3HP, 4HP, 5HP
 TM 42371 Avenida Alvarado Temecula, CA 92590 TOLL FREE (800) 454-2725 TEL (951) 296-3480 FAX (951) 296-3490 www.aquauv.com Aqua Ultraviolet Sunami Series Pumps 1/3HP, 3/4HP, 3HP, 4HP, 5HP Sunami Warranty
P SERIES PUMPS. 18mm Versions Nickle-Aluminum Bronze Models: P , P , P , P , P , P , P
 P200-3100 SERIES PUMPS 18mm Versions Nickle-Aluminum Bronze Models: P217-3100, P218-3100, P219-3100, P220-3100, P221-3100, P227-3100, P230-3100 Triplex Ceramic Plunger Pump Operating Instructions/ Repair
User Manual. Posture+ Adjustable Base. For customer service call:
 User Manual Posture+ Adjustable Base For customer service call: 1-877-707-7533 1 IMPORTANT INFORMATION PLEASE READ THESE INSTRUCTIONS THOROUGHLY BEFORE USING THIS PRODUCT. PROPER OPERATION OF YOUR ADJUSTABLE
MK Rittenhouse & Sons Ltd. 115 Litre/30 US Gallon Greenhouse Sprayer Manual
 MK Rittenhouse & Sons Ltd. 115 Litre/30 US Gallon Greenhouse Sprayer Manual TABLE OF CONTENTS Introduction 3 Precautions & Maintenance 4-5 Piston pump Care & Maintenance 5-6 Shut Down & Winterizing 6 Troubleshooting
Models P420A-3100 & P420A-5100
 Models P420A-3100 & P420A-5100 Triplex Ceramic Plunger Pump Operating Instructions/ Repair and Service Manual Corrossion Resistant Pumps Contents: Installation Instructions: page 2 Specifications: page
Specialty Pond Sprayer
 Specialty Pond Sprayer 2.75 Gallon Capacity Sprayer Installation & Maintenance Manual (Item # 580121) 1 Year Warranty Specialty Pond Sprayer 2.75 Gallon Capacity Sprayer Thank you for purchasing this compression
PRE-PLUMBED SEWAGE SYSTEM
 PRE-PLUMBED SEWAGE SYSTEM Zoeller is a registered trademark of Zoeller Co. All Rights Reserved. MODEL #1910-0009 Español p. 13 ATTACH YOUR RECEIPT HERE Serial Number Purchase Date Questions, problems,
Model GXR Series. Consumer Pump. Triplex Plunger Pump Operating Instructions/ Repair Instructions Manual
 Model GXR Series Triplex Plunger Pump Operating Instructions/ Repair Instructions Manual Consumer Pump Horizontal/Vertical Pump with built-in Regulator, Thermal Relief Valve and Siphon Injector MADE IN
Shock Absorber Rebuild Manual
 Shock Absorber Rebuild Manual Model PODIUM RC3 FOX RACING SHOX 130 Hangar Way, Watsonville, CA 95076 PHONE 800.369.7469 FAX 831.768.7026 Email: psservicemw@ridefox.com Website: www.ridefox.com Disclaimer
Tubular Lower A-Arms GM A-Body Tubular Lower A-Arms GM F-Body
 1104 - Tubular Lower A-Arms 64-72 GM A-Body 1108 - Tubular Lower A-Arms 70-81 GM F-Body Tubular Lower A-Arms: Thank you for your purchase from our new line of A-Body parts. Please call us at (877) 4NO
Model BP6150. Triplex Ceramic Plunger Pump Operating Instructions/ Manual
 Model BP6150 Triplex Ceramic Plunger Pump Operating Instructions/ Manual Contents: Installation Instructions: page 2 Pump Specs: page 3 Exploded View: page 4 Parts List / Kits Torque Specifications: page
Where to Find Us. Pressure Washer. Model Number Revision Serial Number. Date Purchased
 Thank you for purchasing this quality-built Troy-Bilt pressure washer. We are pleased that you ve placed your confidence in the Troy-Bilt brand. When operated and maintained according to the instructions
Rear Upper Camber Link (12425) Scion tc
 Scion tc") Rear Upper Camber Link (12425) Scion tc Thank you for your purchase from our new line of Scion tc parts. Please call us at (877) 4NO-ROLL if you have any questions regarding the service or installation
Rear Upper Camber Link (12425) Scion tc Thank you for your purchase from our new line of Scion tc parts. Please call us at (877) 4NO-ROLL if you have any questions regarding the service or installation
StormPro BA Series Sump Pump
 Page 1 of 8 Marks & Meanings DANGER: Keep the pump equipment out of the reach of children! Warns that the failure to follow the directions given could cause serious risk to individuals or objects. WARNING:
(R86049) WARNING: To reduce the risk of injury, the user must read and understand the operator s manual before using this product.
 WARNING: To reduce the risk of injury, the user must read and understand the operator s manual before using this product.") OPERATOR S MANUAL 12 VOLT LITHIUM-ION BATTERY CHARGER 140446001 (R86049) Your charger has been engineered and manufactured to our high standards for dependability, ease of operation, and operator safety.
OPERATOR S MANUAL 12 VOLT LITHIUM-ION BATTERY CHARGER 140446001 (R86049) Your charger has been engineered and manufactured to our high standards for dependability, ease of operation, and operator safety.
Operating Manual High Viscosity Dispense Valve Item #
 Operating Manual High Viscosity Dispense Valve Item # 984594 CLOSE OPEN Item # 984594 Label # 8901197 Warnings INJECTION HAZARD Spray from the valve, hose leaks, or ruptured components can inject fluid
QUICK START GUIDE OWNER S MANUAL AL50 SERIES SAND FILTRATION TECHNOLOGY PLEASE CALL DO NOT RETURN TO STORE
 QUICK START GUIDE OWNER S MANUAL SAFETY, INSTALLATION, OPERATION & PARTS AL50 SERIES SAND FILTRATION TECHNOLOGY PLEASE CALL 877-278-2797 DO NOT RETURN TO STORE! WARNING This equipment must be installed
MOVE ON TO THE REAR BAR INSTALLATION
 22410 STREET SWAY BAR SET 2001-UP LEXUS IS300 Thank you for your purchase from our line of Lexus parts. Please call us at (877) 4NO-ROLL if you have any questions regarding the service or installation
Model AS-FM64 Wall Mount. Full Motion Television Wall Mount
 Model AS-FM64 Wall Mount Full Motion Television Wall Mount Getting Started Introduction Congratulations on the purchase of your new Audio Solutions AS-FM64 Television Wall Mount. For maximum benefit, please
ActuLink ABS Module - ABS-MOD-400
 Installation Instructions ActuLink ABS Module - ABS-MOD-400 For more information on the installation and operation of Tuson s towable ABS system, consult the installation and operations manuals for the
Hydraulic Bead Breaker Kit
 Hydraulic Bead Breaker Kit Owner s Manual WARNING: Read carefully and understand all ASSEMBLY AND OPERATION INSTRUCTIONS before operating. Failure to follow the safety rules and other basic safety precautions
AGRI-COVERTM SWITCH CONTROL INSTRUCTIONS
 AGRI-COVERTM SWITCH CONTROL INSTRUCTIONS Use these instructions in place of the rocker switch and solenoid sections in your roll tarp or ROLTECTM Electric Hopper Conversion instructions. Some installs
Source Capture Air Purification System
 Source Capture Air Purification System HA-SCP-G3 Owner s Manual Table of Contents HealthyAir HA-IFM-1111 Filter 1 Important Safety Instructions 2 Technical Specifications 3 Packaging Reference 4 Packing
MODEL G300 BRAKE BLEEDER
 MODEL G300 BRAKE BLEEDER Installation, Operation & Repair Parts Information Branick Industries, Inc. 4245 Main Avenue P.O. Box 1937 Fargo, North Dakota 58103 REV120716 P/N: 81-0035H THIS PAGE INTENTIONALLY
SPECIFICATIONS CONTENTS:
 Model 3052 1,100 Lbs 2 Stage Transmission Jack INSTRUCTION MANUAL CONTENTS: Page 1 Specifications Page 2 Warning Information Page 3 Assembly Page 4 Operating Instructions Page 4 Preventative Maintenance
Model GXR Series. Consumer Pump. Triplex Plunger Pump Operating Instructions/ Repair Instructions Manual
 Model GXR Series Triplex Plunger Pump Operating Instructions/ Repair Instructions Manual Consumer Pump Horizontal/Vertical Pump with built-in Regulator, Thermal Relief Valve and Siphon Injector Updated
SUNC1200 / ITEM #40882 SUBMERSIBLE UTILITY PUMP OPERATIONS MANUAL
 SUNC1200 / ITEM #40882 SUBMERSIBLE UTILITY PUMP OPERATIONS MANUAL WWW.SUNRUNNERPOOL.COM Performance Model HP GPH of Water @ Total Feet Of Lift 0 ft. 5 ft. 10 ft. 15 ft. 20 ft. 25 ft. Max. Lift SUNC1200
Warranty Information North America
 Publication No. 47705137 January 1, 2014 Warranty Information North America Industrial and Power Generation Power Systems Parts and Accessories Includes: Power Systems Warranty Statement Parts and Accessories
Installation Instructions
 Installation Instructions Bradley Touch Time Valve for Column Showers Table of Contents Pre-Installation Information...............2 Touch Time Valve Installation............3 Touch Time Valve Wiring Diagram........4
1109 Tubular Lower A-Arms Camaro/Firebird
 1109 Tubular Lower A-Arms 67-69 Camaro/Firebird Tubular Lower A-Arms: Thank you for your purchase from our new line of F-Body parts. Please call us at (877) 4NO - ROLL if you have any questions regarding
SUBMERSIBLE SUMP PUMPS
 SUBMERSIBLE SUMP PUMPS Zoeller is a registered trademark of Zoeller Co. All Rights Reserved. MODELS #1073-0001, 1075-0001 Español p. 9 ATTACH YOUR RECEIPT HERE Serial Number Purchase Date Questions, problems,
Rechargeable Inflator
 See Warranty on page 6 for important information about commercial use of this product. Operating Instructions and Parts Manual HDC230 Please read and save these instructions. Read carefully before attempting
COOL DRAFT INSTRUCTIONS OWNER S MANUAL CONTENTS. Cool Draft MiniMister 14 Misting Fan CDMP1420BLU
 COOL DRAFT BY INSTRUCTIONS OWNER S MANUAL! Keep for future reference. Common problems and solutions are listed within this booklet. IMPORTANT INFORMATION INSIDE: Read, understand, and follow all safety
Model FM2642 Wall Mount. Full Motion Television Wall Mount
 Model FM2642 Wall Mount Full Motion Television Wall Mount Getting Started Introduction Congratulations on the purchase of your new Audio Solutions FM2642 Television Wall Mount. For maximum benefit, please
ESE Series Cast Iron Sewage Pumps
 Owner s Manual ESE Series Cast Iron Sewage Pumps TABLE OF CONTENTS General Safety.................... 2 Specifications..................... 3 Installation.................... 4 & 5 Troubleshooting...................
Getz Equipment Innovators 450 lb Portable / Wheeled Unit Dry Chemical Fill System Part No: 3G0061/3G0063
 Getz Equipment Innovators 450 lb Portable / Wheeled Unit Dry Chemical Fill System Part No: 3G0061/3G0063 1 Revised 4/12/17 2320 Lakecrest Drive, Pekin IL 61554 PH. (888) 747-4389 Fax (309) 495-0625 Website:
c EDR /11. ShipShape OWNERS MANUAL. [ power foundations ]
![c EDR /11. ShipShape OWNERS MANUAL. [ power foundations ]](/thumbs/87/96491649.jpg "c EDR /11. ShipShape OWNERS MANUAL. [ power foundations ]") 99301115-c EDR11746 4/11 ShipShape OWNERS MANUAL [ power foundations ] contents Advisory... 4 Assembly... 6 Hand Control Function... 15 Accessories... 16 Troubleshooting... 17 1-2-Lifetime Warranty...
99301115-c EDR11746 4/11 ShipShape OWNERS MANUAL [ power foundations ] contents Advisory... 4 Assembly... 6 Hand Control Function... 15 Accessories... 16 Troubleshooting... 17 1-2-Lifetime Warranty...
Blue Air. Commercial Refrigeration Inc. Installation & Operation Manual Chef Bases
 Blue Air Commercial Refrigeration Inc. Installation & Operation Manual Chef Bases Please read this manual completely before installing or operating this unit! BACB53 BACB71 BACB74 BACB83 BACB86 BACB96
IMPORTANT OPERATING CONDITIONS. Failure to comply with any of these conditions invalidates the warranty. STANDARD CONFIGURATIONS
 X-SERIES TRIPLEX CERAMIC PLUNGER PUMPS OPERATING MANUAL MODELS X8 X10 X20 IMPORTANT OPERATING CONDITIONS Failure to comply with any of these conditions invalidates the warranty. Lubrication - Prior to
GRUNDFOS INSTRUCTIONS MTC. Installation and operating instructions
 GRUNDFOS INSTRUCTIONS MTC Installation and operating instructions LIMITED WARRANTY Products manufactured by GRUNDFOS PUMPS CORPORATION (Grundfos) are warranted to the original user only to be free of defects
# SAVE THESE INSTRUCTIONS
 400-Ft.Wagon Hose Reel Cart Owner s Manual WARNING: Read and understand all instructions, warnings, and cautions before using this product. Failure to follow the instructions, warnings, and cautions may
Owner s Manual Nitrate Series Salt Based Filter System
 Owner s Manual Nitrate Series Salt Based Filter System Page 2 Copyright 2012 Enviro Water Solutions Inc. All rights reserved. All information contained herein is the property of Pelican Water Systems.
4000SS. For other repair kits and service parts, send for Ames Repair Parts Price List, PL-A-RP-BPD.
 Series 4000SS RP/IS-A-4000SS 4000SS Reduced Pressure Zone Assemblies Sizes: 8" 10" (200 250mm) Installation Service Repair Kits Maintenance For other repair kits and service parts, send for Ames Repair
OWNER S MANUAL. Model: PLATINUM55 ( ) (55 Gallon Deluxe Lawn & Garden Spot Sprayer)
 (55 Gallon Deluxe Lawn & Garden Spot Sprayer)") Model: PLATINUM55 (5302852) (55 Gallon Deluxe Lawn & Garden Spot Sprayer) OWNER S MANUAL 55 Gal. Corrosion-Resistant Polyethylene Tank 12 Volt Diaphragm Pump, 2.2 GPM, 100 PSI Aluminum GunJet Pistol Grip
Model: PLATINUM55 (5302852) (55 Gallon Deluxe Lawn & Garden Spot Sprayer) OWNER S MANUAL 55 Gal. Corrosion-Resistant Polyethylene Tank 12 Volt Diaphragm Pump, 2.2 GPM, 100 PSI Aluminum GunJet Pistol Grip
Parkit360 Force. Owner s Manual V2.6.2
 Parkit360 Force Owner s Manual V2.6.2 2 Introduction We know you re busy, and need to get that trailer moved. Now. So with that in mind, we ve kept these instructions as brief as possible, but they are
INSTALLATION INSTRUCTIONS AND OWNER S MANUAL
 INSTALLATION INSTRUCTIONS AND OWNER S MANUAL Thank you for purchasing the AlloyCover from WeatherTech. Manufactured with pride using superior quality materials and workmanship. With proper care, your cover
GRINDER PUMP MODEL # Zoeller is a registered trademark of Zoeller Co. All Rights Reserved. Español p. 13
 GRINDER PUMP Zoeller is a registered trademark of Zoeller Co. All Rights Reserved. MODEL #2701-0005 Español p. 13 ATTACH YOUR RECEIPT HERE Serial Number Purchase Date Questions, problems, missing parts?