Daymak warranties, services, and stocks parts for everything it sells. We support our products.
|
|
|
- Regina Kennedy
- 5 years ago
- Views:
Transcription


1 Falcon User Manual
2 About Daymak Daymak is one of Canada s largest Alternative Vehicle providers. We design, engineer, manufacture, import and repair everything from recreational dirt bikes, go-karts and electric golf cars to alternative transportation solutions such as e-bikes and gas scooters. Our electric bicycles represent an energy-efficient and eco-friendly alternative for people who need to get around the city. They greatly increase the practicality of bicycle transportation in urban centres. Costing only a few cents to charge, an e-bike can make city life more convenient and much less expensive. While there are many new Green technologies that are still in their infancy, electric bicycles have been developing over the last 40 years or more. E-bike technology has been dramatically refined since the introduction of the first custom-conversion bicycles. Today, electric bicycles are a supremely reliable and affordable means of transportation. Daymak is constantly developing new eco-friendly alternative transportation strategies, led by its own Research and Development department in Toronto, Canada. We are always improving our products. Our innovative in-house engineering and quality testing provide customers with many new kinds of reliable, eco-friendly vehicles, designed to help change the lives of our customers and the world. Daymak warranties, services, and stocks parts for everything it sells. We support our products. Please feel free to visit our website. You ll find the latest in cool transportation solutions, support for the products you ve purchased and contact information.
3 Table of Contents Introduction...4 Part Diagrams...5 Product Specifications...6 Components...7 Operating Instructions...10 Operational Conditions and Maintenance...11 Parts Replacement Schedule...12 Annex
4 Introduction E-Bikes Riding an electric bicycle is a great way to hop around town conveniently and cheaply. E- Bikes represent a natural progression in the development of urban transportation. Using only small amounts of electricity, e-bikes have the potential to radically reduce the amount of pollution in our cities. As well, they are very quiet, so they do not add to the high levels of noise pollution which we often take for granted. They are easy, and usually free, to park. They are unobtrusive and highly practical additions to the urban landscape. E-bikes are also inexpensive. They (currently) require no registration, no insurance, no licence and do not incur parking charges. As well, compared to internal combustion engines, the engines in electric vehicles have fewer moving parts and require far less maintenance. Your Daymak e-bike is the result of Daymak s years of experience, the highly trained technical skills of our staff and careful, ongoing design work by our engineers. We hope you enjoy using this product and welcome any feedback that you may have. New Laws Most provinces in Canada, most states in the U.S.A, the United Kingdom and many European countries have new laws that permit cyclists to use electric motors to assist the regular operation of bicycles. Please check with your provincial or state government to learn about your local laws. At the back of this manual you will find the some of the common Canadian provincial regulations that govern e-bikes. Liability Daymak does not assume any liability for damages, loss of profits, or claims from third parties due to improper use of this product. Daymak does not assume any liability for damages due to problems with the product resulting from service by a third party that is not certified by Daymak. The information in this guide may be subject to change without notice. For the latest information available, please contact your local Daymak dealer or visit our website. We have taken all possible measures to ensure the accuracy and completeness of the information in this guide. However, if you do find anything missing, incomplete or wrong, do not hesitate to contact us. 4

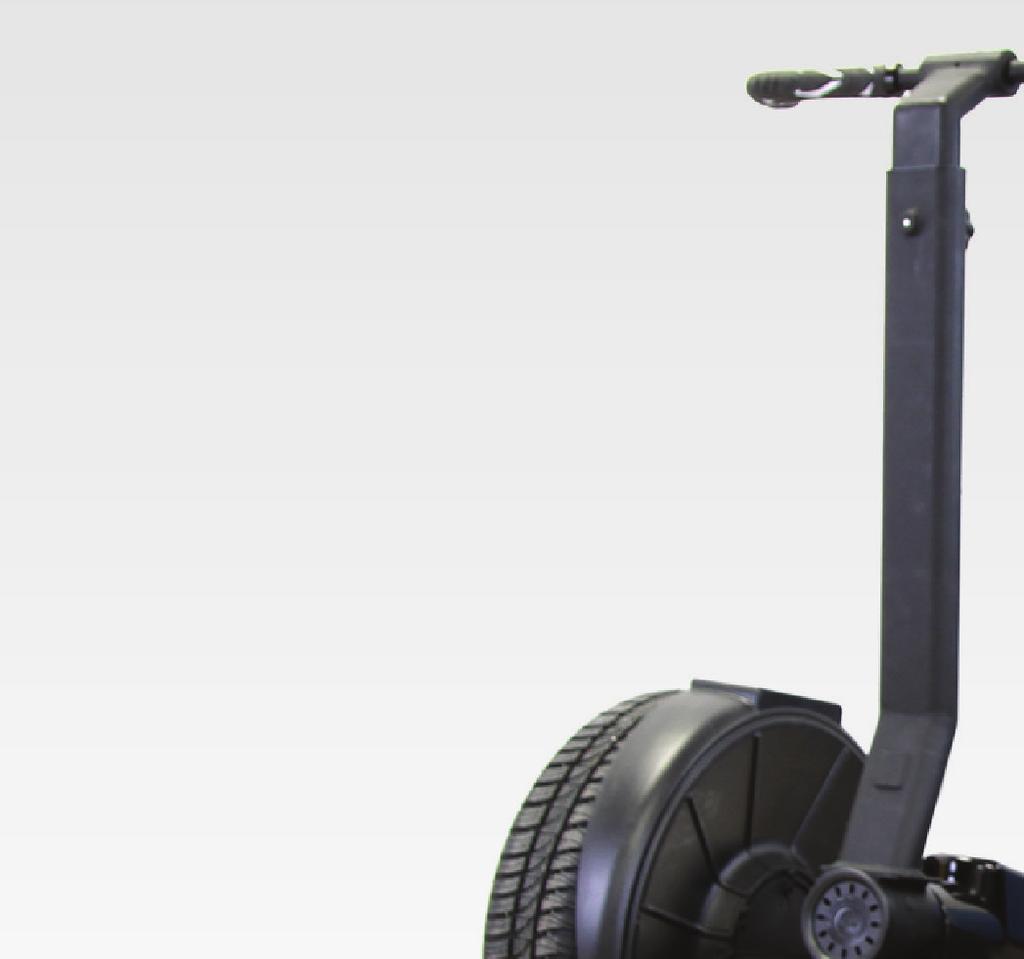
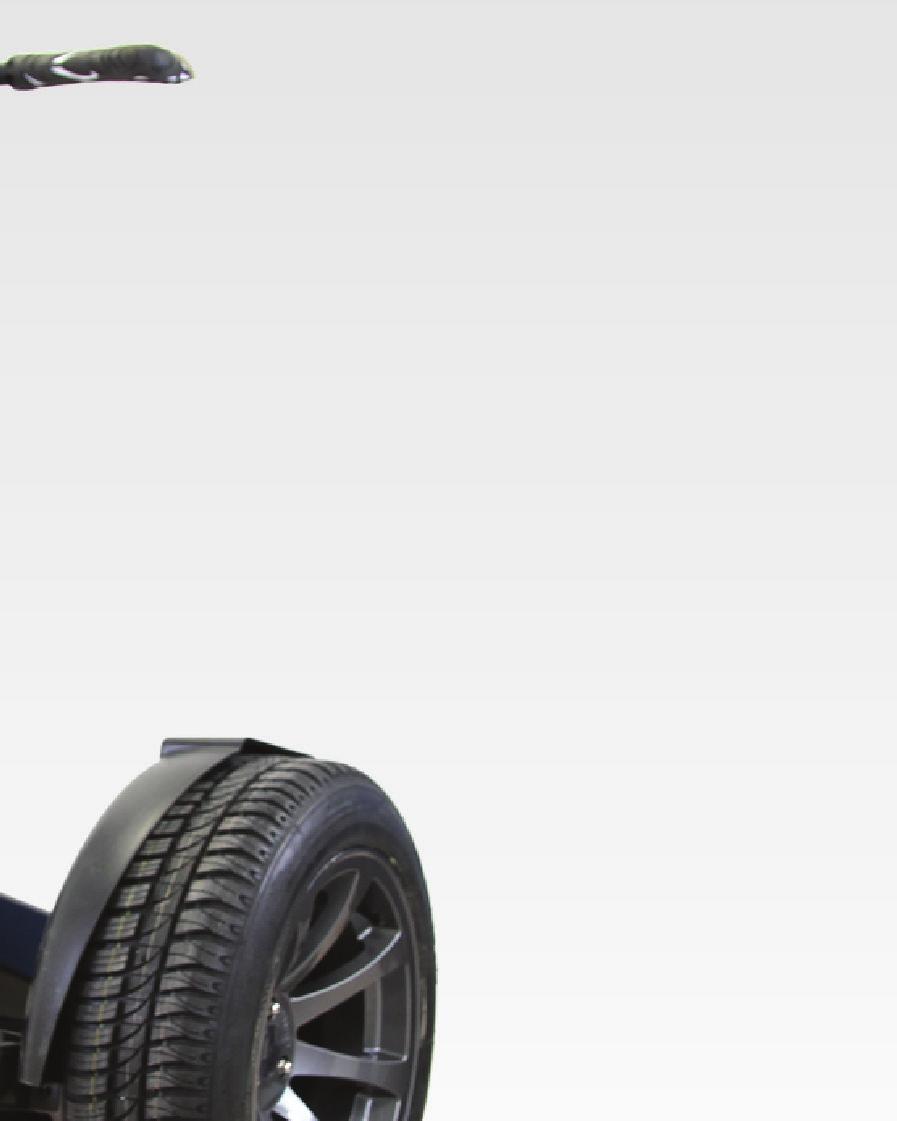
5 Part Diagrams Diagram 1: The Falcon This diagram illustrates the various parts of your Falcon. Please note that many of these parts are not user-serviceable and should be repaired only by trained professionals. This is especially true of the electrical systems and the mechanical components Handlebars 2. Display panel 3. Wheel Guards 4. Wheels 5. Foot Pads 6. Battery 5
6 Product Specifications Max Speed Battery Range (from full charge) Minimum Turning Radius Optimum Tire Pressure Vehicle Weight Vehicle Footprint Chassis Height Handlebar Height Tire Diameter Maximum Carrying Capacity Minimum Carrying Capacity 20 km/h Lithium Battery 55 km Zero (turns on the spot) 1.0Bar/100kPa/15psi 55 kg 65 x 49 cm 10.0 cm 90 ~120 cm (adjustable) 50.5 cm 120 kg 30 kg Maximum Climbing Gradient 260 6


7 Components Handlebar The handlebar maintains balance and controls the direction of the vehicle. The front and rear of the handlebar is shown below. The height of the handlebar can be adjusted to suit the rider: Warning The handlebars cannot tilt in excess of 450 left or right around the axis point. 7
 should both turn on when installed correctly. The speedometer can display current speed and track accumulated mileage.")
8 Warning To avoid injury, always hold the handlebar firmly during power-up, while riding or when shutting the power off. Display Panel The display panel shows information about the Falcon s operations. Make sure to install both batteries - the battery indicator(s) should both turn on when installed correctly. The speedometer can display current speed and track accumulated mileage. Display lights indicate whether the Falcon is on high speed or low speed. The battery indicator consists of 6 lamp lights, all of which gradually turn off as the battery is drained. If only a single lamp light on the battery indicator is lit, it is a good idea to charge the battery. Warning In the event that the battery runs out of charge, the rider must shut off the power, and charge the batteries immediately. Continued use of the vehicle may become hazardous due to insufficient power. Wheel Guards The wheel guards prevent dirt splashing the rider, the foot mats and display panel protect the rider from the rotating wheels while riding. If desired, the height of the fender can be adjusted to accomodate ordinary or off-road tires. 8

9 Wheels The wheels bear the weight of the vehicle and the rider. The tire pressure is 15psi/100kPa. Please ensure that both tires are equally pressurized before riding the Falcon. Foot Pads The foot pads support the rider s feet. While riding, both feet should always be positioned in the middle of the pad as shown below. Battery The battery provides power to the Falcon. The battery voltage is 70VDC. Do not open the battery compartment or the vehicle s control panel - you may be subject to electric shock. Always shut off the power and dismount the Falcon before charging the battery. To charge the battery, open the cover at the back of the display panel and plug in the charger included with the vehicle into the socket. 9

10 Warning In the event that the vehicle is not used for an extended period, it is advised to charge the batteries once every 30 days, otherwise irreversible damage to the battery can occur. At the bare minimum the battery must be charged once every three months. If the vehicle is to be stored, disconnect the battery first. Do not disassemble or reassemble the battery box, expose it to high pressure, fire, or any heat sources under any circumstances. Battery The charger provided uses AC 160V-240V, 50/60Hz. When charging, a red indicator light should turn on. The light should turn green once the battery is fully charged. When charging the battery for the first time, it is normal for it take 5-6 hours. The battery lasts approximately 4 hours per full charge. If the Falcon is not used immediately, it is also advised to close the circuit breaker to save power. Operating Instructions When riding for the first time or if the Falcon has been in a reclined position for a long time, you must first initialize the positioner. See Annex 1. To switch on the vehicle, hold the handlebar while standing in the centre near the rear of the vehicle. Switch on the vehicle - the display panel should illuminate indicating normal operation. When status lights stop circulating, audio cues should be heard from both left and right motors. This indicates that motors and control system are operating normally. 10
11 To mount the vehicle, wait for the 4 red indicator lights in the middle to stop flashing. Step onto the unit with one foot to feel the balance. If the unit feels balanced, step on the vehicle with your other foot. Keep your body upright to control the unit and achieve stability. While holding the handlebars, lean forward and the vehicle should move forward slowly. Lean backwards and it should gradually come to a stop. The Falcon s forward and reverse movement is controlled by the rider s body movement. Tilting the handlebar controls the direction of the vehicle. You can also lean your body left or right while turning the handlebars to maintain balance. The turn rate and turning angle varies according to speed. In general, the greater the angle of the handlebar, the faster the turn speed. When reversing, the control direction of the handlebars is reversed. When dismounting, pull back the handlebar and shift your bodyweight to an upright position. When the vehicle has stopped completely, remove one foot, while holding the handlebar to maintain stability, then completely dismount. When the vehicle is on, do not release the handlebar to remain in control of the vehicle. Remember to shut off the vehicle completely before dismounting. Warning If the Anti-Fall function is in use, the safety strap must be attached to the rider s body before stepping on the vehicle; if the vehicle loses balance, the power will shut off. Operating Conditions and Maintenance If the alarm goes off and the handlebars vibrate while riding, slow down. When riding forward at excessive speeds, the handlebar and the whole vehicle will automatically begin to lean backward to lower the speed - this is a normal function to limit the speed. Before riding, ensure that the handlebar, wheels, batteries, wheel guards and other parts are installed correctly and securely. Screws may loosen from vibration during operation. You may need to tighten screws to avoid loss of power, unwanted vibration or other unwanted vibration that may cause injury. While riding, if any abnormal sounds are heard, stop the vehicle, dismount, and check the entire vehicle before proceeding. Do not attempt to perform a maintenance check or repair the Falcon. In the event of failure, please bring it to an authorized professional. Unauthorized repairs or any attempted repairs by a non-certified professional will invalidate warranties and may incur more repair costs. 11
12 Parts Replacement Schedule Directional Potentiometer Handlebar Suspension Gas Springs Tires Gearbox oil replace annually or for every 1,000 km traveled replace annually or for every 1,000 km traveled replace both tires if tread depth is less than 0.5mm change oil for every 2,000 km traveled 12


13 Annex 1 Using the Remote Control The top left button controls the power, the lower left button is the mode key button. The upper right button locks the vehicle, and the lower right button is the display key. In the off-state, press and hold the power button for 5 seconds to hear the buzzer beep. The battery indicator lights should turn on. At this time, the status lights should flash. All light indicators may cycle - if this is the case, the systems are working to properly balance the vehicle. If the lights continue to cycle, do NOT ride the vehicle - wait for the status lights to stop flashing before riding. To power off the Falcon, press the power button while in standby mode and you should hear a beeping sound before it turns off. Locking and Unlocking the Falcon In standby mode, press the lock key until you hear a beep sound. The status lights should flash on the display panel, and the lights will eventually turn off. It is now in the lock state - an alarm will trigger and the handlebars will vibrate if the vehicle is touched. To unlock the vehicle, press the lock button on the remote control again. The status lights on the display panel should turn on. 13
14 Calibrating the Balance Point When riding for the first time or after an extended period, it is a good idea to calibrate the system to find a balance point. While in the off state, press the power button and the mode button together for two seconds. After a few beeps, the vehicle will calibrate its systems. At this point, the vehicle shoud level the platform and a final beep will confirm that the calibration is complete. After calibrating, the system will automatically shut down. Correcting the platform level and directional data While in standby mode, press the power button and mode display button until you hear a beep. The display lights shouldturn on - from here you can configure 5 different parameters represented on the battery indicator. The first light adjusts the controls for the left platform step, the second light controls the right platform. The third and fourth light adjusts the abatement for both left and right platforms. The fifth light adjusts the sensitivity of the steering. To increase the values for each, press the display button to gradually increase the desired parameter. Upon each button press, the light increases in brightness incrementally. Set the running time Press the power button and lock button until you hear a beep to enter the setup. The digital display should read 0. Press the mode key to reduce the number, the power button to cancel the setting and revert to default, the lock key to save and exit, and the display key to increase the value. Digital tube numerical switch While in standby mode, press the display key to switch the display value - this will display the value in running time - press it again to cycle display of speed and mileage. To set the default of which to display on the panel, press the mode key and display key at the same time while the display is on the desired parameter (running time, speed, or mileage) until you hear a beep. Press the mode and display key again to save this setting. Change between high and low speed By default, the Falcon is set to high speed (20km/h) - press the mode key upon seeing the frequency display on the panel- the status lights should display a new frequency that represents low speed mode (10km/h). 14
Roadstar. User Manual
 Roadstar User Manual About Daymak Daymak is one of Canada s largest Alternative Vehicle providers. We design, engineer, manufacture, import and repair everything from recreational dirt bikes, go-karts
Daymak warranties, services, and stocks parts for everything it sells. We support our products.
 EC1 User Manual About Daymak Daymak is one of Canada s largest Alternative Vehicle providers. We design, engineer, manufacture, import and repair everything from recreational dirt bikes, go-karts and electric
Daymak Drive Application ios. User Guide
 Daymak Drive Application ios User Guide Thank You Thank you for your purchase of our Daymak product. By choosing to utilize an electric vehicle, you are actively doing your part to reduce your carbon footprint.
Vermont 48V User Manual
 Vermont 48V User Manual About Daymak Daymak is one of Canada s largest Alternative Vehicle providers. We design, engineer, manufacture, import and repair everything from recreational dirt bikes, go-karts
Gatto Electric Bik Rickshaw King e Manual
 Gatto Rickshaw Electric King Bike Manual User Manual Table of Contents About Daymak 3 Safety 4 Mobility Scooter Diagram 5 Riding Instructions 6 Starting The Vehicle 6 Steering Lock 6 Driving the Vehicle
User Manual Journey Onward
 User Manual 2018 Journey Onward Introduction & Disclaimer First of all we would like to thank you for buying our X1 Explorer electric bike. Our ebike has been refined and perfected for almost 2 years by
Operation and Maintenance Instructions
 X-Treme TM Electric Moped Operation and Maintenance Instructions Electric Moped XM-3100 Revised 11/6/08 Operation and Maintenance Instructions We strongly recommend that you read this entire manual before
ELECTRIC FOLDING BIKE OWNERS MANUAL. e-power 36v. Go City-Lite
 P o w e r ELECTRIC FOLDING BIKE OWNERS MANUAL e-power 36v Go City-Lite Thank you for purchasing a Seago electric folding bike. In order to get the best out of your new bike you must read and fully understand
Folding Scooter. User Manual
 Folding Scooter User Manual CONTENTS 1. Safety Instructions 2. Electromagnetic Interference (EMI) 3. Transporting the Scooter 4. Specification 5. Folding Out the Scooter 6. Folding Up the Scooter 7. Scooter
When operating the EM2 please make sure you adhere to the following: Always check your mirrors and blind spots when operating the vehicle.
 EM2 User Manual Safety When operating the EM2 please make sure you adhere to the following: Always where a helmet when riding the EM2 Always check your mirrors and blind spots when operating the vehicle.
Contents Page General Instruction before riding Page 3 Point Inspection Page 4 Assembly Instructions Page 5 Technical Specifications
 TM Owner's Manual Ride the Future TM Operation and Maintenance Instructions We strongly recommend that you read this entire manual before using your vehicle for the first time Contents Page General Instruction
Emmo S6. Owner s Manual
 Emmo S6 Owner s Manual 2 P a g e Table of Contents E-bike MTO Label..3 Specifications...4 Charging Your E-bike. 5-6 Brakes...7 Kickstand...8 Pedals 9 Greasing Bike Chain and Rear Drum Brakes..... 10 Front
1 P a g e. Emmo Urban 2.0. Owner s Manual. T. Lac V 1.0
 1 P a g e Emmo Urban 2.0 Owner s Manual T. Lac V 1.0 2 P a g e Table of Contents E-bike MTO Label..3 Specifications...4 Charging Your E-bike. 5-9 Brakes...10 Back Drum Brakes and Tires.... 11 Pedals, Center
Model S-777NA USER MANUAL. Please ensure this manual is read and understood before using the scooter.
 Model S-777NA USER MANUAL Please ensure this manual is read and understood before using the scooter. CONTENTS Introduction 3 Feature Guide 3 Safety Advice 4 Adjustments 5 Tiller Angle Adjustment Seat Swivel
Amalfi Electric Bike. User Manual
 Amalfi Electric Bike User Manual About Daymak Daymak is one of Canada s largest Alternative Vehicle providers. We design, engineer, manufacture, import and repair everything from recreational dirt bikes,
The Cairo E-Bike By Daymak. Electric Bicycle User s Guide
 The Cairo E-Bike By Daymak Electric Bicycle User s Guide For Use in Canada Only Updated July, 2008 Page 2 About Daymak DAYMAK INC., a developer, importer and distributor of alternative energy and fuel
Emmo Urban. Owner s Manual
 Emmo Urban Owner s Manual 2 P a g e Table of Contents E-bike MTO Label..3 Specifications...4 Charging Your E-bike. 5-9 Brakes, Tire Pressure, and Front Carrying Case.....10 Adjusting Brakes 11 Kickstand,
1 P age. Emmo Soho. Owner s Manual. T. Lac V 1.0
 1 P age Emmo Soho Owner s Manual T. Lac V 1.0 2 P age Table of Contents E-bike MTO Label..3 Specifications...4 Charging Your E-bike. 5-6 Brakes...7 Kickstand...8 Pedals 9 Greasing Bike Chain and Rear Drum
1 P a g e. Emmo GT80. Owner s Manual. T. Lac V 1.0
 1 P a g e Emmo GT80 Owner s Manual T. Lac V 1.0 2 P a g e Table of Contents E-bike MTO Label..3 Specifications...4 Charging Your E-bike. 5-6 Brakes...7 Kickstand...8 Pedals 9 Greasing Bike Chain and Rear
Rickshaw Mobility Scooter. User Manual
 Rickshaw Mobility Scooter User Manual Preface Thank you for choosing Daymak s Rickshaw mobility scooter. The Rickshaw is the latest innovation in electric mobility providing absolute safety; for both its
Falcon. Owner s Manual
 Falcon Owner s Manual Your ebike can provide years of use as long as you take care of it. The most common issues you will face will be battery care and small hardware adjustments. The most important thing
Hamilton. Version Daymak Inc.
 Hamilton User Manual Version 1 2015 Daymak Inc. About Daymak Daymak is one of Canada s largest Alternative Vehicle providers. We design, engineer, manufacture, import and repair everything from recreational
Rickshaw Deluxe. User Manual
 Rickshaw Deluxe User Manual About Daymak Daymak, a Toronto-based company, incorporated in 2002, is a leading developer and distributor of personal light electric vehicles. Daymak s goal is to reduce the
TOYOTA PRIUS
 Head Office: CAA-Québec 444, rue Bouvier Québec (Québec) G2J 1E3 2004-2005 TOYOTA PRIUS The second-generation Prius is larger, more fuel efficient, more powerful, more environmentally friendly and, with
Power Assisted Bikes. Owner s Manual
 Power Assisted Bikes Owner s Manual Version 2 April 2016 Introduction Thank you for buying a PowaCycle Windsor electric bike. We hope it brings you many hours of enjoyment. For safe and compact shipping,
Instruction manual DENVER DBO
 Instruction manual DENVER DBO-6500 www.facebook.dk/denver-electronics Before operating this vehicle, read all the instructions for safe assembly and operations. User s manual can guide you through the
ELECTRIC BICYCLE USER MANUAL
 ELECTRIC BICYCLE USER MANUAL 1 Main Technical Parameters and Specification Weight: 23 kg Wheel size: 20 Maximum speed: 25 km/h E BIKE URBAN Range: Up to 45km (with pedal assist) Type: lithium Voltage:
FEATURES AND OPERATIONS
 REMOTE STARTER - ANTI-START SYSTEM SECURITY SYSTEM For An Automatic Or Manual Transmission Vehicles Table Of Contents Welcome Important Information Remote starter with Automatic Transmission Keyless running
1 P age. Emmo Titan. Owner s Manual. T. Lac V 1.0
 1 P age Emmo Titan Owner s Manual T. Lac V 1.0 2 P age Table of Contents E-bike MTO Label..3 Specifications...4 Charging Your E-bike. 5-6 Brakes...7 Kickstand...8 Pedals 9 Greasing Bike Chain and Rear
1 P age. Emmo Prestige. Owner s Manual. T. Lac V 1.0
 1 P age Emmo Prestige Owner s Manual T. Lac V 1.0 2 P age Table of Contents E-bike MTO Label..3 Specifications...4 Charging Your E-bike. 5-6 Brakes...7 Kickstand...8 Pedals 9 Greasing Bike Chain and Rear
MODEL : QUICK 3 USER GUIDE MANUAL
 MODEL : QUICK 3 USER GUIDE MANUAL EN 6100-6-3:2007 + A1 EN 6100-6-1:2007 3 Table of Contents: QUICK 3 Features........... 3 QUICK 3 Main Parts...4-5 Warnings & General information............ 6-7 Serial
1 P a g e. Emmo Steel. Owner s Manual. T. Lac V 1.0
 1 P a g e Emmo Steel Owner s Manual T. Lac V 1.0 2 P a g e Table of Contents E-bike MTO Label..3 Specifications...4 Charging Your E-bike. 5-6 Brakes...7 Kickstand...8 Pedals 9 Greasing Bike Chain and Rear
Please make sure you pay close attention to any details in this manual for instructions on proper maintenance and overall usage of our product.
 NEW YORKER LAB Introduction Please always remember to wear an approved safety helmet and other safety gear when operating this electric bicycle. Make sure you comply with all road regulations and any local
Emmo T350 MOBILITY SCOOTER. Owner s Manual
 Emmo T350 MOBILITY SCOOTER Owner s Manual 2 P a g e Table of Contents A Message from MTO...3 Specifications.....4 Charging Your E-bike.... 5-6 Gear Switch... 7 Tire and Brakes.....8 Ignition....9 Seat
The following procedures should be observed to ensure safe driving.
 Driving the vehicle The following procedures should be observed to ensure safe driving. n Starting the hybrid system ( P. 162) n Driving STEP 1 With the brake pedal depressed, shift the shift lever to
Table of Contents. Technical Information Warning Statement
 Table of Contents Technical Information-----------------------------------1 Warning Statement--------------------------------------2 Read Before Riding-------------------------------------3 List of Parts-----------------------------------------------4
User Manual EN. Front Bolt
 User Manual EN Front Bolt 1 V V I Thank you for purchasing one of our products!!! We are truly honored to be able to serve you and provide you with the best Experience possible. If you ve enjoyed our product,
IPS INSTRUCTION MANUAL
 IPS INSTRUCTION MANUAL CAUTIONS 1. PLEASE READ THE INSTRUCTION MANUAL CAREFULLY BEFORE USING THE IPS SELF BALANCING UNICYCLE; 2. PLEASE KEEP THE SPEED IN THE SAFE RANGE WHICH IS UNDER 10km/h; 3. THE PEDALS
OPERATOR S MANUAL CUSTOMER SERVICE CHECKBOOK
 OPERATOR S MANUAL CUSTOMER SERVICE CHECKBOOK Valid for e-max versions: August 2010 Dear Vmoto e-max riders, We are pleased that you have chosen one of our brand name vehicles and we welcome you warmly
Nemesis-TCS system manual release /11/2011 Author Mick Boasman. UK Tel
 Nemesis-TCS Traction Control System Firmware TCS 2 cylinder 1.21 onwards Firmware TCS 4 cylinder 1.08 onwards TC-Pod 1.05 WinTC Software 1.11 -User Onwards 2 cylinder WinTC Software 2.04 -User Onwards
1 P a g e. Emmo SOHO. Owner s Manual EMMO E-BIKE 1
 1 P a g e Emmo SOHO Owner s Manual EMMO E-BIKE 1 ABOUT EMMO Emmo Inc. is a proud Canadian venture that is focused on creating a more sustainable future by providing high quality electric bicycles (otherwise
The Beast Standard / Deluxe / Ultimate
 The Beast Standard / Deluxe / Ultimate User Manual About Daymak Daymak, a Toronto-based company, incorporated in 2002, is a leading developer and distributor of personal light electric vehicles. Daymak
User Manual. Product: Smart Balance Scooter. Model: K1
 Product: Smart Balance Scooter Model: K1 User Manual Self-balancing scooter, is a new high-tech product with self-balance, It s a good helper for leisure and entertainment. Brief Introduction Self-balancing
Light & Motion. Urban 180, 300, & 500 Instruction Manual
 2011-2012 Light & Motion Urban 180, 300, & 500 Instruction Manual Congratulations! You ve purchased what we consider the best commuter lighting system available the Light & Motion Urban 500, 300 or 180.
QUICK GUIDE BULTACO BRINCO R
 QUICK GUIDE BULTACO BRINCO R Index 1. Welcome kit 2. Know your Brinco 3. Get your Brinco ready 4. Drive and enjoy Welcome bultaquista First of all thanks for buying a Bultaco. We are proud of having your
MODEL MCL /8 SPEEDOMETER/TACHOMETER for 2004 up
 MODEL MCL-3204 3-3/8 SPEEDOMETER/TACHOMETER for 2004 up IMPORTANT NOTE! This gauge has an odometer preset option that is only available one time in the first 100 miles (160km) of operation. See Odometer
Diagram. Packing list. Joystick Joystick base Power switch. Backrest. Brake handle. Armrest. Cushion. Upper frame. Frame. Storage bag.
 H8 EN USER MANUAL Diagram Backrest Brake handle Joystick Joystick base Power switch Armrest Cushion Upper frame Storage bag Battery Controller Motor Frame Footrest Front wheel Packing list Wheelchair body
EN USER MANUAL
 R3 EN USER MANUAL - 01 - Check Packing Contents Bike body Tool Battery holder Charger Pedal Saddle components Instruction Packing list Bike body 1 pcs Tool 1 unit Charger 1 pcs Saddle components 1 unit
Warning Statement Read Before Riding
 Table of Contents Technical Information-----------------------------------1 Warning Statement--------------------------------------2 Read Before Riding------------------------------------- List Of Parts-----------------------------------------------4
MODEL MCL-3212 SPEEDOMETER/TACHOMETER for 2012 up Dyna and Softail with 4 gauge
 MODEL MCL-3212 SPEEDOMETER/TACHOMETER for 2012 up Dyna and Softail with 4 gauge IMPORTANT NOTE! This gauge has an odometer preset option that is only available one time in the first 100 miles (160km) of
User Manuel. Titan Hummer XL
 User Manuel Titan Hummer XL Dear User, Tzora Active Systems Ltd. thanks you for choosing the Titan Hummer-XL and wishes you safe and enjoyable journeys. For proper operation and to maintain the scooter
Electric Bike User Manual
 Electric Bike User Manual HAVE A QUESTION? NEED HELP? Contact us on Facebook for a quick reply. westhillbikes.com CLASSIC / ENERGISE / VOGUE WARRANTY Westhill bikes are covered by a limited 3-year warranty.
Mobility Scooters. Owners Manual
 Mobility Scooters Owners Manual 1 Electromagnetic Interference ( EMI ) It is very important that you read this manual before using the scooter for the first time including the following information regarding
Specifications. General
 For sales & service call Transport Support Tel: +44 (0)1204 368 111 TS Rigid Inclinometer Installation and Operating Instructions ISO9001 CERTIFIED COMPANY United Registrar of Systems Cert. No.1820 Transport
User Manual EN. White LED Headlight & Red Tail Bolt COMBO
 User Manual EN White LED Headlight & Red Tail Bolt COMBO 1 V I Thank you for purchasing one of our products!!! We are truly honored to be able to serve you and provide you with the best Experience possible.
2006 CHEVROLET IMPALA LTZ
 2006 CHEVROLET IMPALA LTZ The 2006 Impala has gone through big changes at virtually all levels. The platform has been reinforced to increase total vehicle rigidity. In addition to producing two new V6s,
Multi Wheel Bluetooth Tire Pressure Monitoring System User Manual Model: External
 T P M S Multi Wheel Bluetooth Tire Pressure Monitoring System User Manual Model: External Table of Contents 1. PRODUCT INTRODUCTION... 2 2. NOTICE... 2 3. BLE TPMS SPECIFICATION... 3 4. BLE TPMS PACKAGE...
POWER ASSISTED BICYCLES OWNERS MANUAL
 OWNERS MANUAL Simply explained this is how your e.life bike basically works. Firstly may we congratulate you on purchasing your new electric power assisted e.bike. Please take time to read your manual.
OPERATOR S MANUAL CUSTOMER SERVICE CHECKBOOK
 OPERATOR S MANUAL CUSTOMER SERVICE CHECKBOOK Valid for e-max versions: English Status as of January 2008 1 Dear e-max riders, We are pleased that you have chosen one of our brand name vehicles and we welcome
T P M S. Multi Wheel Bluetooth. Tire Pressure Monitoring System. User Manual. Model: External
 T P M S Multi Wheel Bluetooth Tire Pressure Monitoring System User Manual Model: External Table of Contents 1. PRODUCT INTRODUCTION... 2 2. NOTICE... 2 3. BLE TPMS SPECIFICATION... 3 4. BLE TPMS PACKAGE...
SECTION 1 7 OPERATION OF INSTRUMENTS AND CONTROLS Ignition switch, Transmission and Parking brake
 SECTION 1 7 OPERATION OF INSTRUMENTS AND CONTROLS Ignition switch, Transmission and Parking brake Ignition switch.............................................. 114 Automatic transmission.....................................
Wireless Tire Pressure and Temperature Monitoring System Instruction Manual Model #: TM Cap Sensors
 Wireless Tire Pressure and Temperature Monitoring System Instruction Manual Model #: TM-510 510 Cap Sensors Thank you for purchasing the TST Tire Pressure Monitoring System. With minimal care, your new
B-RAD Select USER MANUAL TABLE OF CONTENTS
 TABLE OF CONTENTS TABLE OF CONTENTS... 1 MANUAL REVISION HISTORY... 2 IMPORTANT SAFETY NOTICE... 3 1.0 General Information... 5 1.1 System Components... 5 1.2 Specifications... 5 1.2.1 Torque Ranges...
US Patent 0540, 400 Other Patents Pending. Read this manual completely before assembling and riding our PET PRO-FLEX 500. Always wear a Helmet!
 US Patent 0540, 400 Other Patents Pending Read this manual completely before assembling and riding our 500 Always wear a Helmet! Priority Electric Transportation, LLC. 1007 West College Ave. #293 Santa
Wireless Tire Pressure and Temperature Monitoring System Instruction Manual Model #: TM-507 SCE 507 Commercial Cap Sensors with Monochrome Display
 Wireless Tire Pressure and Temperature Monitoring System Instruction Manual Model #: TM-507 SCE 507 Commercial Cap Sensors with Monochrome Display Thank you for purchasing the TST Tire Pressure Monitoring
Optional Equipment. Ridley Motorcycles 35 N.W. 42 nd Street Oklahoma City, OK Windshield. Handlebar Risers. Backrest.
 Optional Equipment Driving Lights Windshield At Ridley we understand that your bike is a reflection of who you are, or at least a little bit of your wild side. So we offer many optional features to make
Table of Contents. Technical Information Warning Statement
 Table of Contents Technical Information-----------------------------------1 Warning Statement--------------------------------------2 Read Before Riding-------------------------------------3 List of Parts-----------------------------------------------4
PACE 500 OWNER S MANUAL
 PACE 500 OWNER S MANUAL AVENTON PACE 500 OWNER S MANUAL Thank you for purchasing an Aventon Pace 500 E-Bike! Before riding, please take a moment to review these instructions. Need service or support? Visit
EW-54. Owners Manual.
 EW-54 Owners Manual www.electricwheelstore.com Dear consumers, Foreword Welcome to the big family of Electric Wheels, and thank you for your choice of Electric Wheels electric tricycle! The electric tricycle
KILOTECH. KWD 500 Water tight. Portion/Weighing Scale
 KILOTECH KWD 500 Water tight Portion/Weighing Scale Operation Manual Version 1.0 Last Modified: Jan 2006 1 Industrial Weighing Systems 9 Richmond St. Picton, ON Canada K0K 2T0 Ph: 613-786-0016 Cell: 613-921-0397
MODEL C HOVERBOARD USER MANUAL
 MODEL C HOVERBOARD USER MANUAL Thank you for purchasing High Roller Hoverboard Model C. Before you begin, please make sure to read the User Manual and follow all safety precautions. The User Manual can
Introduction. TyreGuard 400 Assembly. Unit Conversion DAVIES, CRAIG PTY LTD TYREGUARD
 Issue date: December 2012 DAVIES, CRAIG PTY LTD Introduction Congratulations on purchasing your new 400 TYRE PRESSURE MONITORING SYSTEM (TPMS). Please check the assembly list (opposite page) to ensure
User Manual Version 2. Copyright 2009, Pete Giarrusso, Inc. D/B/A Chopper Design Services All Rights Reserved
 User Manual Version 2 Copyright 2009, Pete Giarrusso, Inc. D/B/A Chopper Design Services All Rights Reserved Table of Contents INTRODUCTION...3 WARRANTY...4 USER INSTRUCTIONS...5 COMPONENTS:... 5 1) Control
ELECTRIC BICYCLE OWNER S MANUAL.
 ELECTRIC BICYCLE OWNER S MANUAL www.gowattson.com Hello. 1 Assembly. 2 Overview. 2 Step One: Removing the Front Basket. 3 Step Two: Mounting the Handlebars & Display. 4 Step Three: Replacing the Front
Electrically Assisted Pedal Cycles. Assembly Instructions
 Electrically Assisted Pedal Cycles Assembly Instructions Version 4 23 Sept 2005 Introduction Thank you for buying a PowaCycle Freeway electric bike. We hope it brings you many hours of enjoyment. For safe
Compact, lightweight folding electric bike. User manual
 Compact, lightweight folding electric bike User manual Specification Bike Weight: 20 kg Wheel size: 20 Maximum speed: Range: 25 km/h Up to 40km (with pedal assist) Battery Type: Voltage: lithium 24V Capacity:
The safety warning sign: or a suggestion for a dangerous operation that may hurt you or others.
 Q Chair Manual Signs and Technical Parameters 2-4 Operating Environment 4-5 Load Capacity 5 Safety Belt Installation 6 Joystick Installation 6-7 Joystick Operation 8 Brakes 9 Battery 10-12 Fold and Unfold
Sunshine User Manual
 Sunshine User Manual Safety When operating the Chameleon please make sure you adhere to the following: - Always where a helmet when riding the Chameleon - Always check your mirrors and blind spots when
Wren Inverted Suspension Forks with Keyed Stanchions and TwinAir System
 Owner s Manual Wren Inverted Suspension Forks with Keyed Stanchions and TwinAir System Congratulations You have just purchased a Wren Inverted Suspension Fork. The culmination of years of design, testing
Useful Information. About your scooter: Important Notice 2 SCOOTIX. Vehicle Identification Number (VIN) Registration Number: Date of Registration:
 Registration Number: Date of Registration:") Manual SPEED5000 Useful Information About your scooter: Vehicle Identification Number (VIN) Registration Number: Date of Registration: Name of Selling Dealer: Contact Number of Selling Dealer: Please take
Manual SPEED5000 Useful Information About your scooter: Vehicle Identification Number (VIN) Registration Number: Date of Registration: Name of Selling Dealer: Contact Number of Selling Dealer: Please take
FREE INTELLIGENT LIFE EN FR IT DE NL ES RU / / / / / / / 85-98
 USER MANUAL R5 R5 FREE INTELLIGENT LIFE EN FR IT DE NL ES RU / 01-14 / 15-28 / 29-42 / 43-56 / 57-70 / 71-84 / 85-98 EN R5 USER MANUAL - 01 - Check Packing Contents Saddle components Bike body Front and
Owner s Manual for the Travelite Electric Wheelchair
 Tel: 083 284 2973 Fax:086 232 5223 Email:ruan@cheapest-wheelchairs.co.za OR rosslyn@adpwheelchairs.co.za Web: www.cheapest-wheelchairs.co.za ORwww.adpwheelchairs.co.za Owner s Manual for the Travelite
Thank you for purchasing a Dillenger F1 Folding Bike, please read this manual before using your new electric bike.
 F1 Folding Bike Thank you for purchasing a Dillenger F1 Folding Bike, please read this manual before using your new electric bike. Before the first use, please fully charge the battery, this can take up
PCBL 1600/1800 POWER WHEELCHAIR MODERN USER'S MANUAL Edition
 PCBL 1600/1800 POWER WHEELCHAIR MODERN USER'S MANUAL Edition 09.2013 mdh sp. z o.o. 90-349 Łódź, ul. Tymienieckiego 22/24 tel. (+48) 42 212 32 08 fax: (+48) 42 674 04 99 www.mdh.pl viteacare@mdh.pl 1 TABLE
SATURN KICK SCOOTER -MANUAL-
 SATURN KICK SCOOTER -MANUAL- 2 TABLE OF CONTENTS 1. INTRODUCTION 4 2. INCLUDED IN THE BOX 5 3. FEATURES AND SPECS 5 4. UNFOLDING AND FOLDING 6 5. ADJUSTING THE HANDLEBAR 7 6. HOW TO CHANGE BATTERIES 7
USER GUIDE MANUAL MODEL#: JMY3000-BLK VERSION:
 USER GUIDE MANUAL MODEL#: JMY3000-BLK VERSION: 042016 Congratulations on purchasing your brand new Jetson Breeze Electric Scooter. The Jetson Breeze is a stylish and reliable folding electric scooter.
Pedelec Operating Instructions Pedelec handleiding Pédélec manuel
 Pedelec Operating Instructions Pedelec handleiding Pédélec manuel Introduction ( GB ) Dear Customer, congratulations on the purchase of your new KETTLER Pedelec Cycle. These instructions will help you
1 P a g e. Emmo Knight GTS. Owner s Manual. T. Lac V 1.0
 1 P a g e Emmo Knight GTS Owner s Manual T. Lac V 1.0 2 P a g e Table of Contents E-bike MTO Label..3 Specifications...4 Charging Your E-bike. 5-6 Brakes...7 Kickstand...8 Pedals 9 Greasing Bike Chain
A. Control Panel/Dash board buttons
 CONTENT I. Specifications II. Important Information III. Bike Overview IV. Safety guidelines V. Charging A. Indoor Charging B. Outdoor Charging VI. How to start the e-bike A. Key start B. Remote Start
Model S888NR & Model S889NR USER MANUAL. Please ensure this manual is read and understood before using the scooter.
 Model S888NR & Model S889NR USER MANUAL Please ensure this manual is read and understood before using the scooter. CONTENTS Introduction 3 Feature Guide 3 Safety Advice 4 Adjustments 4 Tiller angle Seat
Remove the 3-11mm nuts holding mirror on. Don t drop the nuts!
 2005-2012 Ford Mustang Puddle Lamp Kit Parts List: Quantity: Tool List: LED Lamps 2 Flat head screwdriver Seals 2 Ratchet & Socket set OR Nuts 2 Adjustable Wrench Wiring harness 1 Drill & 11/16 th bit
Operation and Maintenance Instructions XM-5000Li Revised 11/09/08
 X-reme M Electric Moped Operation and Maintenance Instructions XM-5000Li Revised 11/09/08 1ZERO EMISSION LEAN ENERGY HIGH POWER ELERI SOOER We strongly recommend that you read this entire manual before
FUZION V1000 LITHIUM POWERED owner s manual. 500 W of Power 18 MPH Full Suspension Disc Brake
 FUZION V1000 LITHIUM POWERED 500 W of Power 18 MPH Full Suspension Disc Brake Maximum Weight: 220 lbs (100 kilograms) Manual Version 1A-2015 CONTENTS WELCOME / Before You Start page 1 Components & Parts
User manual of King Song Electric Unicycle
 User manual of King Song Electric Unicycle www.szkingsong.com Thanks for purchasing KingSong Self-balancing Unicycle. The user manual below is a quick and convenient guide to its main functions providing
GT MAGNETIC POWER BICYCLES (SMART CYCLE)
") GT MAGNETIC POWER BICYCLES (SMART CYCLE) Congratulations on selecting the GT Magnetic Power Bicycle (Smart Cycle in short). In order to use and enjoy your Smart Cycle safely and to get the best performance
GT MAGNETIC POWER BICYCLES (SMART CYCLE) Congratulations on selecting the GT Magnetic Power Bicycle (Smart Cycle in short). In order to use and enjoy your Smart Cycle safely and to get the best performance
Riding Your Halo Go Before You Begin Safety Alerts
 HALO GOTM Before You Begin---------------------01 Riding Your Halo Go-----------07-10 Main Components-------------------02 Safety Alerts--------------------------11 Charging Your Batteries------------03
Platinum Folding Bike
 Platinum Folding Bike Thank you for purchasing a Dillenger Platinum Folding Bike, please read this manual before using your new electric bike. Before the first use, please fully charge the battery, this
User Manual.
 User Manual E- www.kangaroobike.com Version 1.3 2014 We wish you every success with your investment in a Winther E- Kangaroo, which has set new standards in comfort and userfriendliness. Read through this
INSTALLATION MANUAL SPECTRUM BRAKE CONTROL
 INSTALLATION MANUAL 51170 SPECTRUM BRAKE CONTROL TABLE OF CONTENTS Controls & Components Tools List Before You Begin Wiring Wiring Diagram Mounting the LED Display Rotary Knob Wiring the Plug Connector
The Grasshopper. Golf Buggy. Owners Manual Classic - Cobra - Junior (Twin Motor)
") The Grasshopper Golf Buggy Owners Manual Classic - Cobra - Junior (Twin Motor) Grasshopper Golf Buggies Ltd 86-88 Mason Street Sutton-in-Ashfield Nottinghamshire NG17 4HP Tel: (+44) 01623 404730 email:
The Grasshopper Golf Buggy Owners Manual Classic - Cobra - Junior (Twin Motor) Grasshopper Golf Buggies Ltd 86-88 Mason Street Sutton-in-Ashfield Nottinghamshire NG17 4HP Tel: (+44) 01623 404730 email: