PHEV Conversion Kit User Manual
|
|
|
- Dylan Foster
- 5 years ago
- Views:
Transcription
 Direct Current (DC) Warning: Traction battery packs, motors, chargers, and other HV sources could cause serious injury or death if proper precautions are not taken while working on")

1 PHEV Conversion Kit User Manual for Prius Warning: You are strongly recommended to have a qualified professional to undertake this installation! High Voltage (HV) Direct Current (DC) Warning: Traction battery packs, motors, chargers, and other HV sources could cause serious injury or death if proper precautions are not taken while working on or around such high voltage direct current sources. Please note that anyone attempting to install this conversion kit and modify their vehicle is doing so at their own discretion and risk. Warranty: In performing some of these modifications it is possible though unlikely, to void your warranty with the vehicles manufacturer. Please check with your original vehicle manufacturer / dealer for confirmation. This is a patent pending technology. 1
2 Driving Techniques for Maximizing Enginer Prius PHEV Mileage: 1. Maintain steady speed as frequently as you can; 2. When attaining the speed you desire on the road, feather the accelerator or lifting your foot off entirely, then very lightly easing back in to maintain a steady speed of under 34 miles or 70km per hour. That motion activates your Prius EV feature that merely consumes stock and Enginer batteries. * Tests in this driving style on Enginer Prius PHEV have shown way better than 100MPG or 100KM/2.83L, with the best factory field test outcome of 160MPG or 100KM/1.7L for accumulated test drive distance of 165KM. Attention 1. Please read instructions before installation. 2. Never connect wires improperly. Do recheck wires at least 3 times before switch on power. 3. New batteries should be re-charged to full and balanced before driving. 4. Please check the batteries' voltages and balance regularly for the first few times you drive the vehicle. 5. To extend battery life, equipment must be recharged, using the 110VAC (for USA or the right voltage in other countries, watching the label on Enginer charger.) household electricity powered charger provided, to full each time and the cells need to be fully balanced after charging. 6. The circuit breaker on the right hand side of the enclosure box is set to be switched off automatically if the current exceeds a pre-set limit (100A). In the event this breaker switches off you will then need to manually switch it back on before use. 7. Please switch the equipment off immediately if damage or defect is found. 8. Please do not disassemble the components if the equipment is working normally, and if you are not a qualified profeesional Product Overview The (PHEV) is a rechargeable battery set that is supplementary to prius OEM battery. It supplies electricity which is charged from an AC wall socket, stored in PHEV kit providing for 40 miles of electrically assisted driving per charge, sufficient for most normal daily commutes. It is safe, reliable and user and environment friendly. 2
3 What is Included in this Product 32 cells for 4KWH Lithium-Ion batteries BMS monitoring and balancing battery voltages to avoid over or under charges to individual cells. This can extend battery life by a factor of VAC - 48VDC / 15A high power charger 5000W DC / DC converter and controller Fire extinguisher will be activated once the inside temperature exceeds 221F First of all, please remove the cover and pull out the blue insulative inserter. Automatic DC circuit breaker to disconnect high voltage equipment operation in the event of a high current fault. Steel enclosure. How the System Works 110VAC(USA) household electricity Enginer PHEV conversion kit Prius OEM stock battery Prius electric motor Batteries Type Capacity Average Gas Mileage EV/Mixed Range Charge time 32 Cells Lithium-Ion 80 AH 85mpg 20 (40) 5 hours Use 110V AC source (USA, or other AC source matching PHEV charger) only. Warranty Two-year limited parts warranty applies. If equipment defect occurs in normal use conditions, Enginer shall repair the equipment or change the defective component in this conversion kit only. Use this information at your own risk: Other than as specified above there is no additional warranty expressed nor implied and Enginer shall not be liable for any of your past, present, nor future actions. Even if you perform these modifications to the letter you could still damage any number of components in your vehicle causing it to no longer function. Even if it appears to function properly your actions may cause it to self destruct with collateral damage to surrounding properties other than your vehicle. By utilizing these ideas and instructions in an attempt to enhance national security, reduce gas consumption, vehicle "emissions", your carbon footprint, or smog, you do so at your own risk & peril. Contacts US Distributor: AutomationTech Inc. Web: Toll Free: Address: 1562 Hamlet Drive, Troy, MI 48084, USA Made By: Enginer, Inc. Shanghai Web: Address: 1010 / 1701 Beijing Xi Road, Shanghai , China 3
4 Preparing and Assembling the PHEV Conversion Kit Please carefully read and understand these instructions before opening the product box. Installation and Use 1. Prepare a flat area of at least a 7x7 feet on the ground near the end of your Prius, and cover the floor with 5x5 feet soft and flat cloth or cardboard. 2. The equipment is heavy and should be removed and handled by at least two adults. As industry standard it is suggested that the system should be lift by lifting machine. 3. Knock open the wooden box, if there is one, and then open the cardboard box in-side. 4. Take out accessories and place them in a place not impeding your later installation. Take out the foam plastic cover from the cardboard box and pull out the steel box, this requires at least two people with both hands, carefully and steadily move out the entire steel box and place it gently on the floor. Do not tilt or turn over the equipment. 5. The equipment weights about 165 lbs. Enginer strongly suggests you use professional lifting equipment, or operators that are strong enough to lift this much weight. Slowly handle the equipment to avoid physical injury or equipment damage. 6. Take the supporting pole from accessories and hold it with your right hand. Open the enclosure box cover and stick the pole in the hole at right hand side close to your body and prop up the cover on the other end. 7. After popping up the cover firmly and checking that it is being safe with no risk of dropping down, take out all insulating foam gently and check inside component and accessory bags against the following list: ECU signal wires (green, brown and white) One switch panel with on/off switch, red and green LED lights 6 pin phone wire Converter high voltage core (red and black core with blue bullet connectors) Power core for charger input 2 sets of equipment mounting screws (size M8) One charger input bumper socket One double-sized spanner One thread for converter and charger 4pcs plastic clamps for connecting ECU signal wires to Prius Two rubber blanket, longer one for left hand side, shorter one for the right hand side. Three copper connect bars for batteries One 50cm long vent pipe for left hand size corner ventilation fan 1:1 mounting hole positions template. Two long wires for connecting the batteries in parallel. (Installed in the battery box) Two screws for mounting the box cover. (Installed on the battery box) Fire extinguisher holder and mounting screws. (Installed in the battery box) One 45cm lid supporting pole. (Installed on right hand side of the battery box) One plastic holding bracket. (Installed in the battery box) Stainless steel box and cover (833 x x 152mm) Batteries: 8 sets of 4 cells (4KWH). Please make sure batteries match your order. Two battery mounting frames to fix the two rows of batteries. One converter mounted back left, connecting batteries with one red and one black power inlet wires with a pair of Anderson plug. It also contains one red and one black power outlet, and a 6 pin cable. One charger mounted on right back connecting black power inlet cable, with left hand side one red and one black cable with an Anderson plug (shared with converter). BMS fixed upon the charger(the side close to your body). 4


5 One ventilation fan fixed on the converter at left corner. One circuit breaker mounted on top of charger. Figure 1: Component Layout 8. Wiring Check: Make sure circuit breaker is in the OFF position, Anderson connector from charger / converter are disconnected, BMS interfaces off; Charger and converter connections are connected firmly; Connection between black wires from converter and circuit breaker is connected firmly; Connection between circuit breaker and another black wire is connected firmly. Positive and negative of each group of batteries are connected correctly as following chart, firmly, terminal plastic covers are in position. Figure 2: Connection of batteries (4KWH) Connection between BMS and batteries are firm and correct as shown follow: 5
 between two battery packs, insert the copper connect bar and tighten the screws to put them in series as shown in")

; White wire: Null Line (N); Green wire: Ground Line(E). Take the wire of charger through the back panel and reach to bumper outlet.")
6 Figure 3: BMS Connection (4KWH) 9. Wiring: Pull off the protection cap of the battery terminals (positive and negative) between two battery packs, insert the copper connect bar and tighten the screws to put them in series as shown in Figure 2; Connect the DC/DC converter to the end terminals of the battery pack, red to positive and black for negative; Connect the high voltage core(red and black core with blue bullet connectors) to the converter output connectors; Connect the 6 pin phone wire to the converter; Connect the white connectors to the BMS. Connect the grey Anderson connector to the charger. 10. Remove the lid supporting pole, close the cover. 11. The conversion kit assemble is completed and ready to be installed into the vehicle. 12. Bumper outlet for charger connection. Black wire: Live line (L); White wire: Null Line (N); Green wire: Ground Line(E). Take the wire of charger through the back panel and reach to bumper outlet. You need to get your hand in from under the car and tighten the silver ring of bumper plug. 13. PHEV switch panel operation: ON Turn on PHEV DC/DC Converter (LED Green---On; Red Battery Low) OFF Turn off PHEV DC/DC Converter (LED Green Off) 6


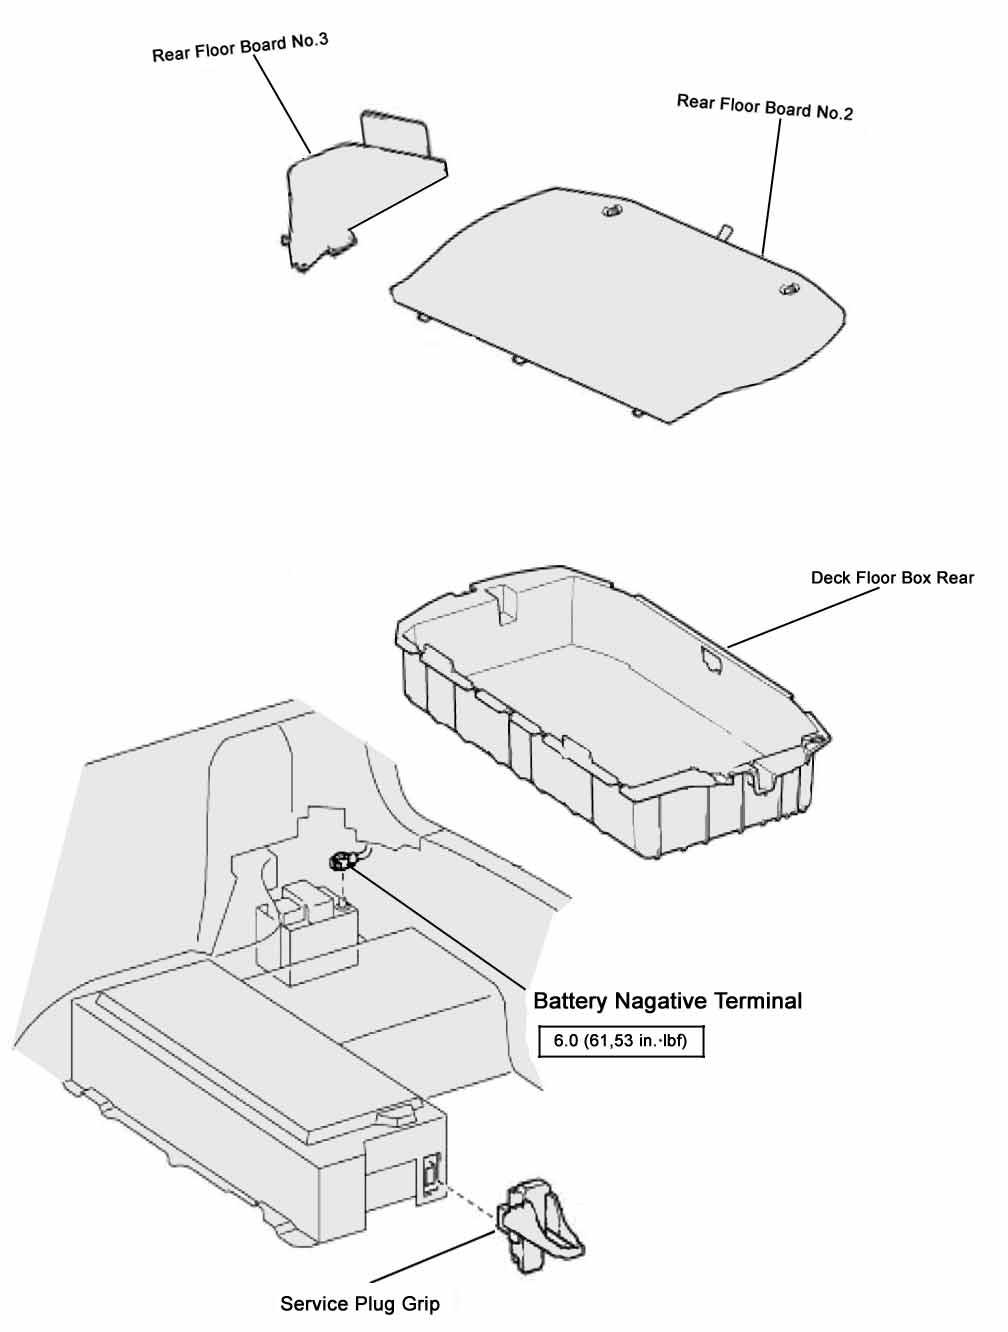
7 Connecting Enginer PHEV Conversion Kit to your Prius Installation Time: 1 hours by professionals. Before installation, please be advised to login to Toyota Technical Website techinfo.toyota.com for Reference Instructions. ($15 for two day usage as of June 2009) Preparation tools Required: Screw shell M6~M14 Crosshead screwdriver Electric drill Installation Procedure: 1. Stop your Prius engine completely by taking away your car key. 2. Remove trunk interior cover on the back of the back seat to gain access to OEM stock battery orange service plug and unplug it. 3. Remove auxiliary battery negative terminal. 4. Remove back seat and gain access to the OEM stock battery output terminals. Reference: HYBRID CONTROL SYSTEM-HV BATTERY (for Prius) 7
8 8
9 9
10 10

11 11

12 5. Connect the conversion kit's power cable to positive and negative terminals of the stock battery output power cable. 6. Install on/off switch panel. A. Take off the blank panel on the left hand side of your meter board B. Loosen the switch bolt, place it on through the panel hole and tighten it on the panel. 12


 Green: Ignition Ready (Connect to")
 White-Black: Ground (Connect to")
 Blank Pin: EV Mode (Connect to")

13 Before replace panel: After replace panel: 7. Hook up ECU Ignition Ready signal to on/off switch panel. Reference: DIAGNOSTICS HYBRID CONTROL SYSTEM (for Prius) CON2 (H16 2) Green: Ignition Ready (Connect to the Green wire of PHEV switch panel) GND1 (H14 1) White-Black: Ground (Connect to the Brown wire of PHEV switch panel) EV (H14-27) Blank Pin: EV Mode (Connect to the White wire of PHEV switch panel) Add EV switch wire (Reference: 13


14 Power Management Control ECU 9. Hookup 6-Pin on/off switch panel cable to your Enginer battery box. 10. Drill a hole and mount Bumper AC Outlet 11. Re-Install back seat and trunk panels. Reposition tightly Service Plug Grip, otherwise electric power can not be started. 14
15 Your Enginer PHEV Conversion Kit installation is now complete. Please test the equipment in the following steps: 1. Turn the the Enginer circuit breaker off. 2. Disconnect the converter high voltage output to the OEM battery (red and black wires with blue bullet connectors). 3. Turn on the car. 4. If the car can't start and has check engine light, do step Check Toyota battery orange high voltage service plug to make sure it is plug in correctly and secured. 6. Check splice wires to make sure the connectivity is not compromised and the wire is correct. Sometime, the splice could cut off the original wire. 7. Use scan tool to reset error code or disconnect the 12V battery and wait for 15 minutes to reset the error code. 8. re-check the car to make sure it is operational. 9. Turn on Enginer circuit breaker. But keep HV output wires disconnected. 10. Turn on the car. 11. Check if only the green light on Enginer PHEV switch panel is on when the switch is ON. Also check the light on the converter output panel in the battery box. 12. If the green light is not on,use a meter to check if the Ignition 12V signal is 12V on the PHEV switch panel. Also check the phone cable connector on the converter side to make sure pin 5,6 has 12V signal. 13. Check OEM battery high voltage. Play attention to the polarity of the wire. 14. Check PHEV converter output high voltage. Play attention to the polarity. The voltage should be higher (5-10V higher) than the OEM battery voltage. 15. Turn off the car, connect converter high voltage to the OEM battery. 16. Turn on the car in Park, check PHEV battery voltage, it should drop 1-5V when it charges the OEM battery. 17. If the PHEV voltage drops more than 5 volt, check the individual cell voltages to see if any cell is weak and significantly lower than the peer. 18. Charging batteries. 19. Wait overnight for the cell to be balanced. At last, Mount your Enginer PHEV Conversion Kit: A. Mark eight mounting holes according to size and dimension of the Kit s mounting brackets. Remove one screw on the right side of truck avoiding bumping against brackets. B. Drill eight 13mm holes on the truck floor plate. C. Put the rubber blankets under the brackets (the long one for left bracket, the short one for the end of right bracket). D. Tighten eight mounting screws with washer and spring ring. E. Remove implements on the left side of trunk and put the vent pipe for circulating air inside PHEV. F. Then you may tighten buckles on two sides of the enclosure box to mount the entire equipment. 15


16 Once all the above steps are completed and no defect occurs, so tighten two screws on both sides of the steel lid, you are now safe to drive your Enginer Plug-in Hybrid Electric Vehicle! Please dial Enginer Assistance Hotline at if you encounter difficulty or risk during and after installation. Enginer very much appreciates your effort to save the earth and wishes you enjoy your driving with your PHEV. 16
17 17
18 NOTE: 18
PHEV Conversion Kit User Manual
 PHEV Conversion Kit User Manual for 2003-2009 Prius Warning: You are strongly recommended to have a specialist to undertake this installation! High Voltage (HV) Direct Current (DC) Warning: Traction battery
PHEV Conversion Kit User Manual
 PHEV Conversion Kit User Manual for 2010 Prius Warning: You are strongly recommended to have a specialist to undertake this installation! High Voltage (HV) Direct Current (DC) Warning: Traction battery
PHEV Conversion Kit Users Manual for Prius
 PHEV Conversion Kit Users Manual for 1997-2003 Prius Warning: You are strongly recommended to have this kit professionally installed! High Voltage (HV), Direct Current (DC) Warning: Traction battery Packs,
User and Installation Manual MD-Tech PHEV Conversion Kit Version 7 with BMS Version 1.0
 User and Installation Manual MD-Tech PHEV Conversion Kit Version 7 with BMS Version 1.0 Version 1.0 2013 Plug-in Autos P a g e 1 11. November. 2013 DECLARATION OF CONFORMITY Table of Contents 1 For your
SCC-MPPT Solar Charge Controller
 Table 3: Charging voltage for 4 types of battery Battery Battery 12V battery system 24V battery system Type Type Code Bulk Floating Bulk Floating Vented 01 14.3 V 13.2 V 28.6 V 26.4 V Sealed 02 14.3 V
Solar Charge Controller
 Table 3: Charging voltage for 4 types of battery Battery Type Battery Type Code SC-600W MPPT Bulk Voltage Floating Voltage Vented 01 28.6 V 26.4 V Sealed 02 28.6 V 26.8 V Gel 03 28.6 V 27.4 V NiCd 04 28.6
SCC-MPPT Solar Charge Controller
 Solar Charge Controller Quick Guide 200W 300W 400W 600W 850W V. 2.2 1. Introduction solar charge controller uses PWM-based DSP controller to keep the batteries regulated and prevent batteries from overcharging
SCC-MPPT Solar Charge Controller
 Table 4: Alarm point for low battery voltage table Model Alarm point SCC-MPPT-300 10.5 V SCC-MPPT-600 21.0 V Table 5: Charging hour table for reference Battery Capacity To 90% capacity @ 25A charging current
mygrid Installation Notes
 mygrid Introduction mygrid kits provide an easy to install, compliant, Solar Hybrid (On-Grid) or Off-Grid battery system. These installation notes outline all the processes required to effectively install
Cordless Rechargeable Saw Instructions for Use
 Technical data Voltage: DC 10.8V Weight: 1.25Kg Stroke rate: 0-2100/min Stroke: 15mm Cutting capacity: max diameter in wood 80mm / in soft metal 7mm Charging time: Between 5.0-5.5 Hours Battery: 1.3Ah
Cruising Charger Series OWNER S MANUAL
 R Cruising Charger Series OWNER S MANUAL ON BOARD BATTERY CHARGERS Models DC Amperage No. Of Banks Volts 2614A 5,10 Amps 2 Bank 12/12 2614A-230 2621A 5,5,10 Amps 3 Banks 12/12/12 2621A-230 2622A 10,10
BATTERYLESS JUMP STARTER CAPACITOR INSTRUCTION MANUAL. W 2 AFTER SALES SUPPORT
 CAPACITOR BATTERYLESS JUMP STARTER Suitable for vehicles up to: 5L Petrol and 3L Diesel INSTRUCTION MANUAL AFTER SALES SUPPORT AUS 1300 883 104 W 2 www.4x4tough.com.au sales@4x4tough.com.au MODEL: 17-031000
home ELITE CURVE CUSTOM CURVED RAIL STAIRLIFT Operator s Manual Keep this manual in a safe and readily accessible place for future reference.
 home ELITE CURVE CUSTOM CURVED RAIL STAIRLIFT Operator s Manual Keep this manual in a safe and readily accessible place for future reference. REV. 23 January 2015 PRODUCT REGISTRATION FORM home Product
Part No Series 12 to 144 Volt TSM Series. High Efficiency Intelligent Charger. Offered by Lithionics Battery for Use in Conjunction
 Part No. 20-300 Series 12 to 144 Volt TSM Series High Efficiency Intelligent Charger Offered by Lithionics Battery for Use in Conjunction with the NeverDie Battery Management System (BMS) CANbus SoC Meter
Emergency Response Guide
 Emergency Response Guide 2014-2016 Acura RLX Sport Hybrid Prepared for Fire Service, Law Enforcement, Emergency Medical, and Professional Towing Personnel by Honda Canada Inc. Introduction This guide has
ARTICLE BEGINNING SERVICE PRECAUTIONS
 Page 1 of 96 ARTICLE BEGINNING SERVICE PRECAUTIONS WARNING: WARNING: CAUTION: When performing any inspection or service procedure on this vehicle, ensure following service precautions are followed to prevent
CH4100 Series High Efficiency Intelligent Charger. ThunderStruck User Manual Ver. 1.02
 CH4100 Series High Efficiency Intelligent Charger ThunderStruck User Manual Ver. 1.02 Table Of Contents I. Product Overview II. Safety III. Preventing Leakage and Fire 1.Correct use of Breakers, Sockets
Emergency Response Guide
 Emergency Response Guide 2014 2015 Accord Accord Hybrid Hybrid Prepared for Fire Service, Law Enforcement, Emergency Medical, and Professional Towing Personnel by American Honda Motor Co., Inc. Introduction
TSM2500 Series High Efficiency Intelligent Charger. ThunderStruck User Manual Ver. 1.05
 TSM2500 Series High Efficiency Intelligent Charger ThunderStruck User Manual Ver. 1.05 Table Of Contents I. Product Overview II. Safety III. Preventing Leakage and Fire 1.Correct use of Breakers, Sockets
Plug-In. Conversions. C o r p o r a t i o n. There is a better way to get there. Plug-In Conversions PHEV-25 Owner's Manual
 Plug-In PHEV-25 Owner's Manual Conversion specifications: Compatible with Prius Model Years: 2004-2009 Battery capacity: ~6.1 kwhr Battery voltage: 201.6v nominal voltage Battery chemistry: Nickel Metal
Acura NSX Emergency Response Guide
 2017 18 Acura NSX Emergency Response Guide Prepared for Fire Service, Law Enforcement, Emergency Medical, and Professional Towing Personnel Supersedes 2017 Acura NSX Emergency Response Guide, dated June
SB SWITCH CONTROL BOX
 Carson Manufacturing Co., Inc. 5451 North Rural Street Indianapolis, IN 462 Phone: (888) 577-6877 Fax: (317) 254-2667 www.carsonsirens.com SB-008-25 SWITCH CONTROL BOX INSTALLATION AND OPERATING INSTRUCTIONS
WARNING ATTENTION. Please read this information carefully before operating your safe.
 WARNING Please use caution when unbolting this safe from its shipping skid. Sports Afield recommends anchoring your safe to the floor. Failure to do so may cause the safe to fall forward. ATTENTION Please
2017 Acura MDX Sport Hybrid Emergency Response Guide. Prepared for Fire Service, Law Enforcement, Emergency Medical, and Professional Towing Personnel
 2017 Acura MDX Sport Hybrid Emergency Response Guide Prepared for Fire Service, Law Enforcement, Emergency Medical, and Professional Towing Personnel 2017 American Honda Motor Co., Inc. All Rights Reserved.
PANcharge1k Battery Charger User's Manual
 PANcharge1k Battery Charger User's Manual Ver.1.00E Table of Contents 1. Important Safety Instructions... 3 1-1 General Safety Precautions... 3 1-2 Battery Precautions... 3 1-3 Electromagnetic Disturbance...
Towing and Road Service Guide For The Lexus ES300h. Quality and Education Services AAA Automotive 1000 AAA Drive Heathrow, FL 32746
 Towing and Road Service Guide For The Lexus ES300h Quality and Education Services AAA Automotive 1000 AAA Drive Heathrow, FL 32746 September 7, 2012 1 Index General Vehicle Information Major Component
M-9603-SVT mm Cold Air Kit w/premium Calibration INSTALLATION INSTRUCTIONS
 Please contact the Tech Line for the most current instruction information (800) 367-3788.!!! PLEASE READ THE FOLLOWING INSTRUCTIONS CAREFULLY PRIOR TO INSTALLATION!!! OVERVIEW: This kit is designed for
Installation Guide B-BOX Pro2.5 ~ 10.0
 Installation Guide B-BOX Pro2.5 ~ 10.0 20170625 Version:2.1 1 / 37 Content Safety... 4 1 Product overview... 5 2 Cabinet terminal introduction... 6 3 Cable outlet of cabinet... 7 4 B-Plus2.5 interface
2014, Acura RLX Sport Hybrid Emergency Response Guide
 2014, 2016 18 Acura RLX Sport Hybrid Emergency Response Guide Prepared for Fire Service, Law Enforcement, Emergency Medical, and Professional Towing Personnel NOTE: Acura did not produce this model for
LOOKOUT LED LIGHT BAR INSTALLATION MANUAL 7900 SERIES
 LOOKOUT LED LIGHT BAR INSTALLATION MANUAL 7900 SERIES Your purchase of a Wolo warning light is the perfect choice to compliment your vehicle. Wolo s warning lights are manufactured with the finest materials.
PLEASE READ BEFORE CALLING OR RETURNING PRODUCT. EXTREMELY IMPORTANT!!!
 Thank you for your purchase of WeaponX Smart Direct Fire Ignition Coil System for your vehicle. The following are the instruction manuals for your ignition system kit. Please read carefully and enjoy your
Overview of operation modes
 Overview of operation modes There are three main operation modes available. Any of the modes can be selected at any time. The three main modes are: manual, automatic and mappable modes 1 to 4. The MapDCCD
SAVE THESE INSTRUCTIONS
 R MODEL 2611 10 AMP ON BOARD BATTERY CHARGER Two Outputs OWNER S MANUAL Connections at a glance: For the best charging results both 12 Volt independent batteries should be equally discharged. The charger
Digitrip Retrofit System for ITE K-3000, K-3000 S, K-4000 and K-4000 S Breakers
 Supersedes IL 33-858-4 Dated 05/02 Digitrip Retrofit System for ITE K-3000, K-3000 S, K-4000 and K-4000 S Breakers Digitrip Retrofit System for ITE K-3000, Digitrip Retrofit System for ITE K-3000, K-3000
Car Battery Charger Instructions for Use
 BATTERY CHARGER 12Volt 4Amp FOR INDOOR USE ONLY Power Details: Input: 230-240Vac; 50Hz; 52W Output: 12V DC; 2.8A Maximum Charge Rate: 4A RMS Read these instructions before operating this car battery charger
Battery System User Manual for Panasonic LJ-SK56A BATTERY SYSTEM USER MANUAL FOR PANASONIC LJ-SK56A
 Battery System User Manual for Panasonic LJ-SK56A BATTERY SYSTEM USER MANUAL FOR PANASONIC LJ-SK56A TABLE OF CONTENTS 1.0 CONTACT INFORMATION... 3 2.0 IMPORTANT SAFETY INFORMATION... 3 2.1 Warnings...
Turbo M Series onboard charger
 Turbo M Series onboard charger Operation Manual Model # Output Bank Max. Output Turbo M106 1 6 Amps Turbo M108 1 8 Amps Turbo M208 2 8 Amps Turbo M212 2 12 Amps Turbo M220 2 20 Amps Turbo M230 2 30 Amps
PSJ-2212, PSJ-3612, PSJ-4424
 Model: PSJ-2212, PSJ-3612, PSJ-4424 Jump Starter and DC Power Source OWNER S MANUAL PSJ-2212 PLEASE SAVE THIS OWNER S MANUAL AND READ BEFORE EACH USE. This manual will explain how to use your jump starter
User s Manual. ClipperCreek, Inc. Innovative Infrastructure for Electric and Hybrid Vehicles. Model PCS-15
 ClipperCreek, Inc. Innovative Infrastructure for Electric and Hybrid Vehicles User s Manual ClipperCreek, Inc. 11850 Kemper Rd., Suite E Auburn, CA 95603 www.clippercreek.net Model PCS-15 THIS PAGE INTENTIONALLY
MCC Automatic Start-Stop Microcomputer Charger Control
 MCC Automatic Start-Stop Microcomputer Charger Control Installation & Operation Instructions Warning: Read ALL the instructions before starting. If anything is not clear, call your dealer or contact Arrgh!!
General Precautions. Personnel Precautions
 USER MANUAL General Precautions 1. Before using Inverex, read all instructions and cautionary markings on : (1) Inverex (2) the batteries (3) this manual 2. CAUTION --To reduce risk of injury, charge only
BATTERY BOOSTER/CHARGER MODEL NO: DIGICAR 600
 BATTERY BOOSTER/CHARGER MODEL NO: DIGICAR 600 PART NO: 6261200 OPERATION & MAINTENANCE INSTRUCTIONS LS0815 INTRODUCTION Thank you for purchasing this CLARKE Battery booster / charger which is suitable
CX-SERIES ADVANCED BATTERY CHARGER
 CX-SERIES ADVANCED BATTERY CHARGER Table of Content 1. IMPORTANT SAFETY INFORMATION... 2 1-1 General Safety Precautions... 2 1-2 Battery Precautions... 2 2. FEATURES... 3 2-1 Battery Charging Curve...
Lithium Power Supply
 Lithium Power Supply User Manual LPS 1200W-60Ah LPS 1500W-100Ah LPS 2500W-100Ah Compact lithium battery based power supply - for easy acces to 230V and 12V energy, everywhere! V1.1 Safety Instructions
Electric Bike Supplement
 Electric Bike Supplement Electric Bike Instruction. Congratulations on your purchase of a pedal assisted bicycle. This is a supplement to the general bicycle user manual. Please make sure that your new
Stealth Power i-tilt
 Power Tilts OWNERS MANUAL Stealth Power i-tilt User Manual and Maintenance Guide for Stealth s i-tilt Customer Satisfaction 1.0 Stealth Products strives for 100% customer satisfaction. Your complete satisfaction
Installation Instructions
 Equipment Required: Wrenches: 9/16, 3/4, 1-1/8 Drill Bits: 11/32 Torque Wrench capable of reading 260 ft-lbs. Installation Instructions IN DEALERS: Please give these instructions to your customer. Do Not
Orion BMS Purchasing Guide Rev. 1.2
 www.orionbms.com Orion BMS Purchasing Guide Rev. 1.2 Main Components... 2 Orion BMS Unit... 2 Current Sensor... 4 Thermistors... 5 CANdapter... 6 Wiring Harnesses... 7 Cell voltage tap wiring harnesses...
OBE, OBEXU, ON BOARD Battery Chargers
 C O R P O R A T IO N O P E R A T I N G I N S T R U C T I O N S OBE, OBEXU, ON BOARD Battery Chargers INTRODUCTION: These chargers are designed for the permanent installation on battery powered vehicles
LED Canister Light System
 LED 1200 - Canister Light System LED1200 Canister Light System Document Control #HO.11.01.001 Hollis 1540 North 2200 West Salt Lake City, UT 84116 USA Toll-Free: 1-888-270-8595 www.hollis.com 1 TABLE OF
User s Manual. Automatic Switch-Mode Battery Charger
 User s Manual Automatic Switch-Mode Battery Charger IMPORTANT Read, understand, and follow these safety rules and operating instructions before using this battery charger. Only authorized and trained service
ELITE 1000/1500 Dodge SRT QUICK START GUIDE HT
 E N G I N E M A N A G E M E N T S Y S T E M S ELITE 1000/1500 Dodge SRT4 03-05 QUICK START GUIDE HT-140940 LIMITED WARRANTY Lockin Pty Ltd trading as Haltech warrants the HaltechTM Programmable Fuel Injection
Table of Contents 文管中心 發行章
 ST600-XXX Series Pure Sine Wave Power Inverter User s Manual Table of Contents 1. Important Safety Instructions 1-1 General Safety Precautions 1 1-2 Battery Precautions. 1 2. Basic Descriptions 2-1 Mechanical
7 Stage Automatic Smart Battery Charger (FOR CHARGING 12V / 24V AGM, GEL,SLA AND WET BATTERIES) USER MANUAL
 USER MANUAL") 7 Stage Automatic Smart Battery Charger Desulphuration& Maintainer (FOR CHARGING 12V / 24V AGM, GEL,SLA AND WET BATTERIES) USER MANUAL THIS MANUAL CONTAINS IMPORTANT SAFETY AND OPERATING INSTRUCTIONS 1
7 Stage Automatic Smart Battery Charger Desulphuration& Maintainer (FOR CHARGING 12V / 24V AGM, GEL,SLA AND WET BATTERIES) USER MANUAL THIS MANUAL CONTAINS IMPORTANT SAFETY AND OPERATING INSTRUCTIONS 1
1200W INVERTER GENERATOR
 1200W INVERTER GENERATOR MODEL NO: IG1200 PART NO: 8877070 OPERATION & MAINTENANCE INSTRUCTIONS LS0117 INTRODUCTION Thank you for purchasing this CLARKE 1200W Inverter Generator. Before attempting to use
BC12M248 7 Stage Automatic Smart Battery Charger, Desulfator & Maintainer 12V, 2 / 4 / 8A FOR AGM, GEL AND WET BATTERIES USER MANUAL
 BC12M248 7 Stage Automatic Smart Battery Charger, Desulfator & Maintainer 12V, 2 / 4 / 8A FOR AGM, GEL AND WET BATTERIES USER MANUAL THIS MANUAL CONTAINS IMPORTANT SAFETY AND OPERATING INSTRUCTIONS 1 IMPORTANT
Honda Clarity Electric Emergency Response Guide
 2017 18 Honda Clarity Electric Emergency Response Guide Prepared for Fire Service, Law Enforcement, Emergency Medical, and Professional Towing Personnel Supersedes 2017 Honda Clarity Electric Emergency
ACCUSENSE CHARGE SERIES ON/OFF BOARD FULLY AUTOMATIC BATTERY CHARGER
 ACCUSENSE CHARGE SERIES ON/OFF BOARD FULLY AUTOMATIC BATTERY CHARGER SPECIFICATIONS: *Photo for reference only* Part number 8890439 Mode Select: Selects Battery Type Refer to Section 6. IMPORTANT: READ
M-9603-SVT mm Cold Air Kit w/premium Calibration INSTALLATION INSTRUCTIONS
 Please visit www.fordracingparts.com for the most current instruction information!!! PLEASE READ ALL OF THE FOLLOWING INSTRUCTIONS CAREFULLY PRIOR TO INSTALLATION. AT ANY TIME YOU DO NOT UNDERSTAND THE
USER MANUAL. Your ZINGO DRIFTA 360 warranty must be registered online within 7 days of purchase.
 USER MANUAL Your ZINGO DRIFTA 360 warranty must be registered online within 7 days of purchase. To activate your warranty visit www.tevo.co.za and click the Register your warranty tab at the top of the
EV Power - A-Series 8 Cell, 16 Cell and 24Cell Chargers Installation & Usage Instructions.
 A-CHARGERS MANUAL 1.1 EV Power - A-Series 8 Cell, 16 Cell and 24Cell Chargers Installation & Usage Instructions. A-Series Charger Features - Simple to install and use, microprocessor control. - LiFePO4
Recommended Tools: Phillips Screwdriver, Flat Blade Screwdriver, 13mm and 10mm Wrench, 5/16 nut driver,
 UPS-ST-120 UPSPro Outdoor UPS System Wireless Base Stations and Client Devices Surveillance Cameras Mission Critical Backup Power Remote Sensors Congratulations! on your purchase of the UPSPro Outdoor
Towing and Road Service Guide For The 2010 Lexus HS250H. Quality and Education Services AAA Automotive 1000 AAA Drive Heathrow, FL 32746
 Towing and Road Service Guide For The 2010 Lexus HS250H Quality and Education Services AAA Automotive 1000 AAA Drive Heathrow, FL 32746 October 7, 2009 Index General Vehicle Information Major Component
E E VDC COOLEDGE TILE INTERIOR INSTALLATION INSTRUCTIONS. Caution: Observe precautions for handling electrostatic sensitive devices.
 5 YEAR WARRANTY 5 YEAR WARRANTY COOLEDGE TILE INTERIOR INSTALLATION INSTRUCTIONS E354088 LISTED AC E354088 58VDC E354088 E354088 5 5 YEAR WARRANTY 5 YEAR WARRANTY E354088 Caution: Observe precautions for
HOME CHARGER MODE 2. Series to /32A single phase CONTENTS. Manual IMPORTANT SAFETY INSTRUCTIONS 3 SAFETY INFORMATION 4 INSTALLATION 5
 CONTENTS IMPORTANT SAFETY INSTRUCTIONS 3 SAFETY INFORMATION 4 INSTALLATION 5 OPERATION 8 SPECIFICATIONS 8 MAINTENANCE 9 HOME CHARGER MODE 2 Series 31328 to 31340 16/32A single phase FCC INFORMATION 9 WARRANTY
BX Dodge Nitro Jeep Liberty Limited 4x4 Installation Instructions
 1. Blue Ox towing products and accessories are intended to be installed by Blue Ox Dealers who are familiar with our products and have the equipment and knowledge to do fit work. When necessary Blue Ox
Owner and Operating Manual for
 Owner and Operating Manual for 120VAC Manual Control 12VDC Solar Battery Manual Control 120VAC Remote Control 12VDC Solar Battery Remote Control GEN2 Remote Versions Only Boat Lifts Please read this manual
C.fm Page 1 Thursday, February 21, :28 AM Raptor user manual
 Raptor user manual 1 mounting bracket 2 swivel lock 3 clamp hole 4 lamp access screws 5 air vents 6 AC input & main fuse 7 cooling fan Thank you for selecting the Martin Raptor. This Martin lighting fixture
PSU1 Power Supply Unit
 OM2443 PSU1 Power Supply Unit Distributed By: GMW Associates 955 Industrial Road, San Carlos, CA, 94070 USA PHONE: +1 650-802-8292 FAX: +1 650-802-8298 EMAIL: sales@gmw.com WEB: www.gmw.com Table of Contents
2017~ Honda NSX Emergency Response Guide
 2017~ Honda NSX Emergency Response Guide Honda Motor Europe Ltd. All Rights Reserved. Version 1(0816) Introduction This guide has been prepared to assist emergency service professionals in identifying
Product Catalog. To place an order or, for more information,
 Product Catalog To place an order or, for more information, email Fleets today face lots of challenges. Driver retention. A shrinking pool of technicians. Increased competition. Increased regulation. The
Installing the gate post bracket with the cardboard arm template
 ......... Installing the gate post bracket with the cardboard arm template... Installing gate posts brackets and arms for Push-to-Open or Pull-to-Open gates... Connection of Power Source 240Vac or Solar...
Eazipole Cordless. Installation & Set Up Instructions. Electric Blinds & Curtains
 Eazipole Cordless Installation & Set Up Instructions Electric Blinds & Curtains Pole Installation - Deciding The Best Position Points to consider when planning the installation of your pole It may be easiest
Installation Manual TWM Performance Short Shifter Cobalt SS/SC, SS/TC, HHR SS, Ion Redline and Saab 9-3
 Page 1 Installation Manual TWM Performance Short Shifter Cobalt SS/SC, SS/TC, HHR SS, Ion Redline and Saab 9-3 Please Note: It is preferable to park on a flat surface, as you will have to engage and disengage
RK Standby Battery Operator s Manual
 49-8104RK Standby Battery Operator s Manual Part Number: 71-0118RK Revision: C Released: 8/4/17 www.rkiinstruments.com Product Warranty RKI Instruments, Inc. warrants gas alarm equipment sold by us to
OWNER S MANUAL Soco TS1200R Soco TS800R
 OWNER S MANUAL Soco TS1200R Soco TS800R Version 1.0 May 2017 Congratulations on purchasing your Soco electric motorcycle. We wish you an enjoyable and safe riding experience. For your safety and comfort,
GP-1000 Inverter. Go Power! Electric Inc. PO Box 6033 Victoria, BC V8P 5L4 Tel: Fax:
 Go Power! Manual GP-1000 Inverter Go Power! Electric Inc. PO Box 6033 Victoria, BC V8P 5L4 Tel: 866-247-6527 Fax: 866-607-6527 Email: info@gpelectric.com Table of Contents 1. INTRODUCTION 3 2. SPECIFICATIONS
OWNER S MANUAL Soco TS1200R Soco TS800R
 OWNER S MANUAL Soco TS1200R Soco TS800R Congratulations on purchasing your Soco electric motorcycle. We wish you an enjoyable and safe riding experience. For your safety and comfort, we recommend that
Smart Battery Charger GPC-35-MAX GPC-45-MAX GPC-55-MAX GPC-75-MAX GPC-100-MAX. Owner s Manual
 Smart Battery Charger GPC-35-MAX GPC-45-MAX GPC-55-MAX GPC-75-MAX GPC-100-MAX Owner s Manual Table of Contents Important Safety Instructions 2 Features 3 Installation Guidelines 5 Warranty 8 1.0 Important
TOYOTA PRIUS 2004 TVIP V2 (GBS ADD ON) Section I Installation Preparation
 Section I Installation Preparation") Section I Installation Preparation Part Number: 08586 47840 Section I Installation Preparation Kit Contents Item # Quantity Reqd. Description 1 1 Wire Harness 2 1 3 1 ECU Mounting Bracket Hardware Bag
Section I Installation Preparation Part Number: 08586 47840 Section I Installation Preparation Kit Contents Item # Quantity Reqd. Description 1 1 Wire Harness 2 1 3 1 ECU Mounting Bracket Hardware Bag
ELECTRIC FOLDING BIKE OWNERS MANUAL. e-power 36v. Go City-Lite
 P o w e r ELECTRIC FOLDING BIKE OWNERS MANUAL e-power 36v Go City-Lite Thank you for purchasing a Seago electric folding bike. In order to get the best out of your new bike you must read and fully understand
INSTALLATION AND OPERATING INSTRUCTIONS
 INSTALLATION AND OPERATING INSTRUCTIONS MANUAL TRANSFER SWITCHES FROM 0 Residential Wattage Requirements Appliance Running Watts Add watts for starting Furnace blower, gas or fuel 1/8 hp 300 500 1/8 hp
c-go 24V/6A 24V/8A 24V/12A
 c-go 24V/6A 24V/8A 24V/12A Battery charger GB Instruction manual 1 Index 1. Product description... 2 2. Safety advices... 3 3. Quick start guide... 4 4. Operation... 4 5. Problem solving... 6 6. Specifications...
Sylvania 7.5' Pre-Lit Troy Fir Tree LED Color Changing and Multi Function One Plug Tree Tree ID #T1, Item # V
 Sylvania 7.5' Pre-Lit Troy Fir Tree LED Color Changing and Multi Function One Plug Tree Tree ID #T1, Item # V67656-13 Thank you for purchasing this tree. This tree assembles in minutes and is decorated
The following procedures should be observed to ensure safe driving.
 Driving the vehicle The following procedures should be observed to ensure safe driving. n Starting the hybrid system ( P. 162) n Driving STEP 1 With the brake pedal depressed, shift the shift lever to
D.fm Page 1 Wednesday, March 5, :21 PM Raptor user manual
 Raptor user manual 1 mounting bracket 2 swivel lock 3 clamp hole 4 lamp access screws 5 air vents 2001-2002 Martin Professional A/S, Denmark. All rights reserved. No part of this manual may be reproduced,
INSTALLATION INFORMATION
 INSTALLATION INFORMATION BMS ZE6000i-PCBT.xxxx / ver. 2 Programmable battery management system for Lithium Ion battery cells, for up to 32 round or prismatic cells, 10 to 400Ah NOTE: This installation
MODEL 2602A-12 3 STAGE AUTOMATIC BATTERY CHARGER OWNER S MANUAL SAVE THESE INSTRUCTIONS
 R A Valley Forge Company MODEL 2602A-12 3 STAGE AUTOMATIC BATTERY CHARGER OWNER S MANUAL SAVE THESE INSTRUCTIONS 1. INTRODUCING THE CHARGER The 2602A-12 is a 3-stage electronic battery charger. Rainproof,
rtable Electric Scooter USER MANUAL A new era in urban mobility PLEASE CAREFULLY READ THE USER MANUAL AND WARRANTY BOOK BEFORE USING!
 rtable Electric Scooter USER MANUAL A new era in urban mobility PLEASE CAREFULLY READ THE USER MANUAL AND WARRANTY BOOK BEFORE USING! The most economical vehicle in history User Manual Page 1 / 20 04/2017
BATTERY BOOSTER/CHARGER MODEL NO: DIGICAR 900
 BATTERY BOOSTER/CHARGER MODEL NO: DIGICAR 900 PART NO: 6261205 OPERATION & MAINTENANCE INSTRUCTIONS LS0715 INTRODUCTION Thank you for purchasing this CLARKE Battery booster / charger which is suitable
12V POWER PACK WITH 230V/A.C. OUTPUT INVERTER INSTRUCTIONS
 12V POWER PACK WITH 230V/A.C. OUTPUT INVERTER STOCK No.56364. PART No.PP12/230V. INSTRUCTIONS IMPORTANT: PLEASE READ THESE INSTRUCTIONS CAREFULLY TO ENSURE THE SAFE AND EFFECTIVE USE OF THIS POWER PACK.
OBAE, OBAEXU, ON BOARD Battery Chargers
 C O R P O R A T IO N O P E R A T I N G I N S T R U C T I O N S OBAE, OBAEXU, ON BOARD Battery Chargers INTRODUCTION: The OBAE line of chargers are designed for the permanent installation on battery powered
P/N Wheeler. user manual
 P/N 35000068 Wheeler user manual 1998, 1999 Martin Professional A/S, Denmark. All rights reserved. No part of this manual may be reproduced, in any form or by any means, without permission in writing from
Safety, Installation And Operating Instructions For The Following Battery Charger Models: i2412, i3612, i4809, i2425, i3625, and i4818
 Safety, Installation And Operating Instructions For The Following Battery Charger Models: i2412, i3612, i4809, i2425, i3625, and i4818 IMPORTANT NOTICE: Please save and read these safety, operating and
12V 160A/24V 185A MANUAL WORKSHOP BATTERY CHARGER
 12V 160A/24V 185A MANUAL WORKSHOP BATTERY CHARGER P/No. HDBC200 IMPORTANT SAFETY INFORMATION Please read this manual thoroughly before use and store in a safe place for future reference. WARNING Explosive
24V 3A EN54 Ancillary Power Supply
 24V 3A EN54 Ancillary Power Supply Normal supply - green light on Fault condition - call Engineer Control relay - activated 3A Power Supply C-TEC Manufactured in England by C-Tec EN 54-4 : 1997 INSTALLATION
2018 Honda Accord Hybrid Emergency Response Guide
 2018 Honda Accord Hybrid Emergency Response Guide Prepared for Fire Service, Law Enforcement, Emergency Medical, and Professional Towing Personnel 2018 American Honda Motor Co., Inc. All Rights Reserved.
Go Power! Manual. GP-1750HD Inverter GP-2500 Inverter
 Go Power! Manual GP-1750HD Inverter GP-2500 Inverter Go Power! Electric Inc. PO Box 6033 Victoria, BC V8P 5L4 Tel: 866-247-6527 Fax: 866-607-6527 Email: info@gpelectric.com Table of Contents 1. INTRODUCTION...
Model 700 Microarray Oven
 www.scigene.com Model 700 Microarray Oven USER MANUAL Cat. #1070-00-1, 1070-00-2 FOR RESEARCH USE ONLY Not for Use in Diagnostic Procedures SciGene 306 Potrero Ave, Sunnyvale, CA 94085 USA 408-733-7337
TOYOTA HIGHLANDER 2016 ON BOARD VACUUM CLEANER
 2016 Part Numbers: 00016-48017- (01, 02, 04) Accessory Code: SV1000 NOTE: Will not work in Highlander HV Kit Contents Item # Quantity Reqd. Description 1 1 Vacuum Assembly 2 1 Hose Assembly 3 1 Tool Kit