Crestline Dampening System Installation Instructions
|
|
|
- Maria Robbins
- 5 years ago
- Views:
Transcription
1 Crestline Dampening System Installation Instructions Hamada RS/ VS 34 II Parent Unit DU 34 II Upper Unit X Rev-B 01/2001
2 GENERAL INFORMATION ATTENTION CRESTLINE DAMPENER OWNER! Accel Graphic Systems provides parts and service through its authorized distributors and dealers. Therefore, all requests for parts and service should be directed to your local dealer. The philosophy of Accel Graphic Systems is to continually improve all of its products. Written notices of changes and improvements are sent to Accel Graphic Systems' Dealers. If the operating characteristics or the appearance of your product differs from those described in this manual, please contact your local Accel Graphic Systems Dealer for updated information and assistance. Always update your dampener when improvements are made available, especially those related to safety. YOUR AUTHORIZED CRESTLINE DEALER IS: THE SERIAL NUMBER OF YOUR CRESTLINE DAMPENER(S) IS: SAFETY INFORMATION FOR YOUR SAFETY, DO NOT DISENGAGE OR REMOVE ANY GUARDS FROM THE CRESTLINE DAMPENER. THE DAMPENER CONTAINS SOME INWARD ROTATING ROLLER NIPS THAT CAN CAUSE INJURY IF LEFT UNGUARDED. 2
3 GENERAL INFORMATION BASIC CONFIGURATION OF CRESTLINE c. 3/16" (5mm) P M I b. 1/8" - 5/32" (3.5-4mm) d. 3/32" (2.5mm) B F a. 5/32" (4mm) Adjustments a. Form to Plate b. Metering to Intermediate c. Metering to Pan d. Bridge to Water Form PLATE CYLINDER Roller Description P = Pan M = Metering I = Intermediate F = Form B = Bridge TERMINOLOGY OPS = Operator's Side NOPS = Non Operator's Side TECHNICAL ASSISTANCE For technical assistance during the installation, please contact: Accel Graphic Systems Indian Trail Dallas, TX (972) FAX (800) accel@dallas.net WEB SITE Crestline is covered by U.S. Patents and Patents Pending 3
4 REQUIRED TOOLS 1. Phillips Screwdriver 2. Standard Screwdriver mm Open End mm Open End mm Allen Wrench mm Allen Wrench 7. 3 mm Allen Wrench 8. 4 mm Allen Wrench 9. 5 mm Allen Wrench mm Allen Wrench mm Punch mm Punch mm Punch 14. Hammer GENERAL INFORMATION 4
5 PRE-INSTALLATION INFORMATION 1. Cut the ties holding the rollers and examine rollers for gouges, scratches, or nicks. 2. Check box and parts board to make sure all pieces are present and nothing has broken in shipping. 3. Check the dampener for parallel. (Cutter bed works best.) If dampener rocks, it needs to be realigned. Loosen tie bar bolts at OPS and align the frames on the flat surface. Retighten bolts. 5
6 6
7 INSTALLATION 1 Install form roller stripe stop to the press frame using M5 x 35MM cap screw. 2 Slip thick black washer over spring stud and install in press frame. 3 On each end of the lift shaft, first place a 12MM set collar and then a thrust washer. Insert shaft into large holes in press frame. Slip the bearing housing over each end of shaft and into large hole in press frame. Secure the bearing housing with the M5 flat-head screws. After the housing is secure, install the lift arm assembly at OPS end of lift shaft and tighten screw in arm into the dimple on the shaft. 7
8 8
9 INSTALLATION 4 Install the mounting blocks as shown using the M5 x 12 MM cap screws in the upper set of holes. 5 Install the water pan mounting blocks as shown using the M5 x 12MM cap screws. 6 Install the tie bar between the press frames using the M6 x 35MM cap screws. 9
10 10
11 INSTALLATION 7 Place the dampener assembly into the press. The ball bearing protruding from each side of the dampener will fit into the pockets of the mounting blocks. Center the dampener in the press and scure by installing the bearing caps onto the mounting blocks using the M5 x 12MM cap screws. When the dampener is secure, install the extension springs between the spring studs on the press frame and the spring studs on the dampener frame. Finally, position the lift shaft so that the cams line up with the eccentric bearings on the dampener frame and secure by pushing the set collars out against the bearing housings and tightening. 8 Install new safety cover over the dampener. 11

12 12
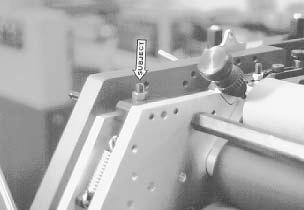
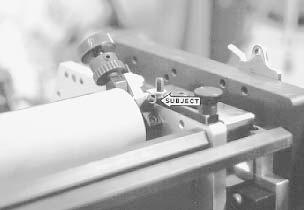
13 FINAL ADJUSTMENTS 1 Mount a metal plate to the plate cylinder With the single lever in the "Off" position, adjust the amount of lift of the water form off the plate. Lift is adjusted by changing the position of the eccentric cams on the dampener frame (subject arrow). Adjust each eccentric until there is an even.050 gap between the plate and form roller. 2 Dab ink on the dampener on a hard roller and turn the press by hand at first to distribute the ink. Slowly jog and run the press until the ink is distributed evenly on all the dampener rollers. P B M I F 3 Water Form to Plate Drop the water form roller to the plate and check the stripe. It should be 5/32" (4mm). Adjust the stripe using the stop screws on the dampener frame (subject arrow). Turning the screw down decreases the stripe. Lock in place using lock nut. 5/32" (4mm) PLATE CYLINDER 13
14 14
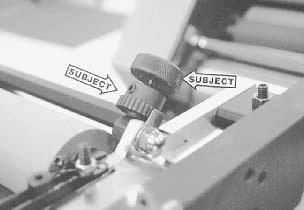
15 FINAL ADJUSTMENTS O B M I F 4 1/8" - 5/32" (3.5-4mm) Metering to Intermediate Check the stripe between the metering and intermediate rollers by dropping the water form to the plate and rotating the press backwards. (Clutches prevent dampener from turning backwards with the water form off the plate. Dropping the form to the plate allows the ink to drive the unit backwards.) PLATE CYLINDER Stripe should be 1/8" - 5/32" (3.5mm - 4mm). Adjust by turning the screw on top of the hanger (subject arrow). Turning the screw down increases the stripe. Tighten lock nut when finished. 5 Intermediate to Form This pressure is set automatically when setting the metering to intermediate in set 4 above. 3/16" (5mm) P B M I F PLATE CYLINDER 6 Metering to Pan Jog the press forward and observe the stripe on the pan roller. It should be 3/16" (4.5mm - 5mm). Turn the knurled metering knobs (right subject arrow) clockwise to increase the stripe. When the proper stripe has been obtained, spin the ratchet gears (left subject arrow) down until they bottom out on the stud and secure the ratchet gear to the knurled knobs with the set screws. 15

16 16
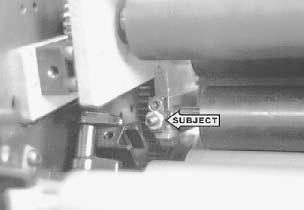
17 FINAL ADJUSTMENTS 1/8" (2.5mm) O B M I F 7 Bridge to Water Form Adjust the pressure by turning the adjusting screw (subject arrow) on the bridge roller cap. Turning the screw in increases the stripe. The stripe should be no more than 1/8" (2.5 mm) and even all the way across the roller. Overpressuring the roller can cause the oscillating mechanism to fail. Lock in place with lock nut. PLATE CYLINDER The bridge roller is intended to make inking and washing up the dampener easier. See sections entitled "Start of Day" and "Wash Ups During The Day". The bridge should not be used during normal operation of the press. 8 Adjust water level in pan by raising or lowering the original water bottle mechanism. 17
18 BASIC OPERATION START OF DAY A. Make sure all the rollers are in place. B. Spin knurled knobs until the ratchet stops. C. Mount plate to cylinder. Wipe down all plates before running. Pre-ink the Crestline dampener before running the plates with an extremely light coverage of ink by engaging the bridge roller. Bridge roller engages by rotating the levers at the OPS & NOPS towards the delivery end of the press, dropping the bridge onto the ink form roller. Disengage by pulling back on the levers until bearing on bridge roller drops into detent. D. Place water bottle in bracket. NOTE: Accel recommends using the proper fountain solution for the plate material being run on the press. A good acid/gum etch should be used with metal plates. RUNNING DURING THE DAY A. In general, the Crestline should not have to be adjusted from job to job. The form roller setting should never be changed unless it has deviated from the factory specification of 5/32" (4mm) to the plate. B. Adjustments to the amount of water fed to the plate are made by the knurled knobs that apply pressure to the metering roller. The dampener has been set up for minimum water. To increase the water to the plate, turn the knurled knobs counter clockwise 1 or 2 clicks at a time. This opens the gap between the metering and pan rollers and allows more water to the plate. C. In general, more water will only be required when going from a metal plate to an electrostatic or Silvermaster type plate. 18
19 CLEANING & MAINTENANCE WASH UPS DURING THE DAY 1. Remove bottle and drain the excess water from the pan. 2. Mount a metal plate to the press. 3. Turn on the press and squirt a small amount of press wash on the ink rollers. 4. Engage the bridge roller by rotating the levers at the OPS & NOPS towards the delivery end of the press, dropping the bridge onto the ink form roller. 5. Use wash up attachment as normal. When the press is clean disengage bridge roller by pulling back on the levers until bearing on bridge roller drops into detent. 6. Remove water pan and clean any solution left in it. 7. Be sure to wipe excess clean up solution from the ends of the dampener metering and pan rollers. END OF THE DAY 1. Wash up press. Pay close attention to cleaning the ends of the pan and metering rollers that extend past the form rollers. 2. Spin the knurled knobs up until the metering roller can be removed. 3. Remove metering roller and wipe down thoroughly to remove any excess wash that may be on the roller. 19
20 CLEANING & MAINTENANCE DEGLAZING THE DAMPENER If you are running electrostatic masters on a daily basis, the dampener should be deglazed at least once a week with Accel's Compound X, deep cleaner and deglazer. If using other plate materials, this should be done every 2-4 weeks. ACCEL RECOMMENDS AVOIDING DEGLAZERS CONTAINING PUMICE OR GRITTY SUBSTANCES. Avoid washes that are extremely fast drying. Crestline 's form and pan rollers are made of relatively soft rubber and should not be subjected to harsh, fast drying washers, especially those containing acetone. Fast drying washes should be used for blankets only! OILING AND GREASING THE DAMPENER A. Place a small amount of grease on the gears once a month. B. Inject grease into the oscillator grease fitting once a month. 20
21 CLEANING & MAINTENANCE CRESTLINE CLEANING & MAINTENANCE CHART Daily Weekly Bi-Weekly Monthly Wash Rollers Deglaze Rollers Metal Plate Users Silvermaster Plate Users Electrostatic Plate Users Grease Gears Inspect Ball Bearings Check Roller Pressures Check Roller Surfaces 21
22 22
23 23
24 24
25 25
26 26
27 27
28 28
29 29
30 30
31 31
32
33 11103 Indian Trail Dallas, TX 75229, Phone , Fax Web Site
Crestline Dampening System. Installation Instructions. Hamada RS34 & VS34 Satellite Unit. For Presses Originally Equipped With. Integrated Dampeners
 Crestline Dampening System Installation Instructions Hamada RS34 & VS34 Satellite Unit For Presses Originally Equipped With Integrated Dampeners X88-113 01/2001 Rev-A GENERAL INFORMATION ATTENTION CRESTLINE
Crestline Dampening System
 Crestline Dampening System Installation Instructions Ryobi 3200 MCD Itek 985 X88-31 Rev-A 5/98 GENERAL INFORMATION ATTENTION CRESTLINE DAMPENER OWNER! Accel Graphic Systems provides parts and service through
CRESTLINE DAMPENING SYSTEM INSTALLATION INSTRUCTIONS. Ryobi 3302M Itek 3985 A.B. Dick 9985 X /99
 CRESTLINE DAMPENING SYSTEM INSTALLATION INSTRUCTIONS Ryobi 3302M Itek 3985 A.B. Dick 9985 X88-32 3/99 GENERAL INFORMATION ATTENTION CRESTLINE DAMPENER OWNER Accel Graphic Systems provides parts and service
Crestline Dampening System. Installation Instructions. A.B. Dick 350, 360, 375 Single & Dual Lever Machines. X /01 Rev-A
 Crestline Dampening System Installation Instructions A.B. Dick 350, 360, 375 Single & Dual Lever Machines X88-20 01/01 Rev-A GENERAL INFORMATION ATTENTION CRESTLINE DAMPENER OWNER! Accel Graphic Systems
Crestline Altra TM Series Dampener. Installation Instructions. Didde MCP/Conserver. X /2001 Rev-A
 Crestline Altra TM Series Dampener Installation Instructions Didde MCP/Conserver X88-55 01/2001 Rev-A GENERAL INFORMATION ATTENTION CRESTLINE ALTRA TM SERIES DAMPENER OWNER! Accel Graphic Systems provides
Crestline Dampening System. Installation Instructions. Ryobi 500N X /98
 Crestline Dampening System Installation Instructions Ryobi 500N X88-33 7/98 GENERAL INFORMATION ATTENTION CRESTLINE DAMPENER OWNER! Accel Graphic Systems provides parts and service through its authorized
Altra Series Dampener
 Crestline TM Altra Series Dampener Installation Instructions Ryobi 512 X88-69 10/98 Rev-A GENERAL INFORMATION ATTENTION CRESTLINE ALTRA SERIES TM DAMPENER OWNER! Accel Graphic Systems provides parts and
Crestline Altra Series TM Dampener. Installation Instructions. Heidelberg GTO. X /98 Rev-A
 Crestline Altra Series TM Dampener Installation Instructions Heidelberg GTO X88-63 7/98 Rev-A GENERAL INFORMATION ATTENTION CRESTLINE ALTRA SERIES TM DAMPENER OWNER! Accel Graphic Systems provides parts
PowderPro Spray System
 PowderPro Spray System Installation Instructions Hamada C248 X88-72 10/98 REV-C 2657 GENERAL INFORMATION ATTENTION POWDERPRO OWNER! Accel Graphic Systems provides parts and service through its authorized
Roller Removal Instructions
 Roller Removal Instructions Rollers for the Crestline dampener are broken down into numerical categories as follows: Prefix Roller Position Prefix Roller Position x07-01.. Form Roller x07-04.. Oscillator
CALIFORNIA TRIMMER MOWER MAINTENANCE MANUAL
 CALIFORNIA TRIMMER MOWER MAINTENANCE MANUAL 2 Table of Contents Section 1: General Information Page Handle Assembly Instructions 4 Maintenance All Models 6 Oil Change Procedures All Models 9 Height Adjustment
9905/9910/9910D/ 9910XCS/9910XC2 Service Reference Manual
 9905/9910/9910D/ 9910XCS/9910XC2 Service Reference Manual 1996, A.B.Dick Company P/N 177187 (REV. 0) WARNING: This equipment must be connected to a properly grounded three (3) wire outlet. Failure to do
INSTALLATION INSTRUCTIONS FOR DSP9600/9100 WHEEL BALANCER
 Form 5063T, 06-05 Supersedes Form 5063T, 02-04 INSTALLATION INSTRUCTIONS FOR DSP9600/9100 WHEEL BALANCER This document provides the information needed to install the DSP9600/9100 Wheel Balancer. NOTE:
Maintenance and Repair
 Maintenance and Repair WARNING ALWAYS shut off the engine, remove key from ignition, make sure the engine is cool, and disconnect the spark plug and positive battery terminal from the battery before cleaning,
HYDRAULICS. TX420 & & lower. Hydraulic Tandem Pump Removal. 4. Remove the LH side panel (Fig. 0388).
.") TX420 & 425 240000299 & lower 4. Remove the LH side panel (Fig. 0388). Hydraulic Tandem Pump Removal Note: Cleanliness is a key factor in a successful repair of any hydraulic system. Thoroughly clean all
TX420 & 425 240000299 & lower 4. Remove the LH side panel (Fig. 0388). Hydraulic Tandem Pump Removal Note: Cleanliness is a key factor in a successful repair of any hydraulic system. Thoroughly clean all
phone
 AS-25-59 Ball AS-035508 Pinion Housing AS-035512 AS-036552 Ink Fountain Adjusting Screw AS-053111 Cam Follower sliding block fountain AS-085015 AS-087459 Idler Gear AS-1001705 Set Screw AS-1023953 Top
N41421 Peacemakers Exhaust for Harley- Davidson Dyna Series
 Please read these instructions carefully and thoroughly before beginning work. Before installing accessory, carefully consider whether one possesses the necessary technical skills and workshop tools to
Tel/Fax: Replacement parts for : MULTI 1210, 1250OS, 1250W, 1250N, 1250DOM.
 Replacement parts for : MULTI 1210, 1250OS, 1250W, 1250N, 1250DOM., 1215CD, VARIABLE SPEED PULLEY 1250 O.S. - 1/2 Shaft P-1629 1250 N.S. - 5/8 Shaft P-1649 V-BELTS 35 Motor to printing head P-4904 33 Pump
Honda Civic Oil Change
 1988-1991 Honda Civic Oil Change Change the oil in your '88-'91 Honda Civic to improve engine performance and longevity. Written By: Phillip Takahashi ifixit CC BY-NC-SA www.ifixit.com Page 1 of 13 INTRODUCTION
Installation Instructions
 Installation Instructions (2) 10-24 Black flathead Allen Screws Tailgate End Front Cover Passenger Side Rail (has inspected by sticker under rail) (4) 10-32 Screws (stainless) Front Cover Exploded View
Disassembling and assembling transmission
 27-640 Disassembling and assembling transmission Preceding work: Removing and installing transmission with torque converter (27-600). Operation number of operation texts and operation values or standard
Mitsubishi Lancer Oil Change (2.0L I4 DOHC)
") 2002-2007 Mitsubishi Lancer Oil Change (2.0L I4 DOHC) Change the oil in your '02-'07 Mitsubishi Lancer, with 2.0L I4 DOHC engine, to improve engine performance and longevity. Written By: Phillip Takahashi
2002-2007 Mitsubishi Lancer Oil Change (2.0L I4 DOHC) Change the oil in your '02-'07 Mitsubishi Lancer, with 2.0L I4 DOHC engine, to improve engine performance and longevity. Written By: Phillip Takahashi
AmTryke Adult Recumbent Model JT2000 #50-FC-2000
 AmTryke Adult Recumbent Model JT2000 #50-FC-2000 TOOLS Needed for Assembly 5 mm Allen Wrench 8 mm Socket or Wrench 10 mm Socket or Wrench 14 mm Socket or Wrench 15 mm Socket or Wrench 22 mm Socket or Adjustable
Heidelberg Speedmaster SM 52 Roller diagramm
 Heidelberg Speedmaster SM 52 Roller diagramm 4 13 A 9 10 The numbering 1-13 denotes the recommended installation sequence. A - are not removeable. C 12 7 6 3 1 2 5 11 B 8 rubber roller ø 48 mm rubber roller
Maintenance Instructions 100, 150, 200 & 400 Series Water & Waste Water Safety Element Torque Limiters with Externally Adjustable Modules
 World Leader in Modular Torque Limiters PROTECTING EQUIPMENT& MACHINERYYEARSInstallation and Maintenance Instructions 00, 50, 200 & 400 Series Water & Waste Water Safety Element Torque Limiters with Externally
8G Brake Assembly Alignment
 8G Brake Assembly Alignment 8G (9-5250) This document explains how to do the 8G (9-5250) brake assembly alignment in order to eliminate noise in the drive system coming from the mis-aligned brake plates.
UNIFLO Control Valve
 Severe Service Control Valves MAINTENANCE AND INSTRUCTION MANUAL UNIFLO Control Valve The Problem Solver TM BOTTOM COVER DESIGN DFT INC. 2 www.dft-valves.com DFT INC. 3 www.dft-valves.com WARNING: USER
POR SERIES Pneumatic Overload Release Clutches
 POR SERIES Pneumatic Overload Release Clutches P-3030-BG Installation and Operation POR Series Model H2000 An Altra Industrial Motion Company Contents I. Operating Principle...2 Il. Ill. Mounting Adapters
phone
 AS-035508 Pinion Housing AS-035511 AS-035512 AS-040502 AS-040504 Locknut sliding block fountain AS-053111 Cam Follower AS-082220 Lockwasher AS-085015 AS-087459 Idler Gear AS-1001705 Nylon Tip Set Screw
 Page 1 of 6 Axle Shaft, Hub, Oil Seal and Outer Wheel Bearing SPECIAL SERVICE TOOL(S) REQUIRED Description Tool Number Locknut Wrench T85T-4252-AH Removal 1. Set the parking brake and loosen the eight
1989 Jeep Cherokee. STEERING COLUMN' '1989 STEERING Jeep Steering Columns STEERING COLUMN STEERING Jeep Steering Columns
 STEERING COLUMN 1989 STEERING Jeep Steering Columns DESCRIPTION All models use collapsible steering columns. All columns have integral ignition switch and locking device. Optional tilt wheel is available
CERTAIN MODEL YEAR FUSION AND ESCAPE VEHICLES EQUIPPED WITH A 6F35 TRANSMISSION SHIFTER CABLE BUSHING REPLACEMENT
 PAGE 1 OF 9 CERTAIN 2013-2016 MODEL YEAR FUSION AND 2013-2014 ESCAPE VEHICLES EQUIPPED WITH A 6F35 TRANSMISSION SHIFTER CABLE BUSHING REPLACEMENT OVERVIEW In some of the affected vehicles, the bushing
Installation and Maintenance Instructions JSE2-0241MAEAD Extruder Clutch. World Leader in Modular Torque Limiters
 World Leader in Modular Torque Limiters Installation and Maintenance Instructions JSE2-0241MAEAD Extruder Clutch 1304 Twin Oaks Street Wichita Falls, Texas 76302 (940) 723-7800 Fax: (940) 723-7888 E-mail:
phone
 AS-25-59 Ball AS-035508 Pinion Housing Bearing AS-035515 Bearing AS-036552 Ink Fountain Adjusting Screw AS-051120 Bearing call for details AS-053111 Cam Follower AS-087047 Bearing Hanger Bracket Assembly
Maintenance Information
 16584062 Edition 3 December 2013 High Torque Reversible Angle Screwdrivers and Angle Wrenches QA1L High Torque Series Maintenance Information Save These Instructions Product Safety Information WARNING
Difficulty Grading expert Wrench Time 1 hour Tip, Strip or Tune Strip Spares Needed Oil Seals 4.99 (pr), Dust Seals 5.75 (pr)
, Dust Seals 5.75 (pr)") URFNVKR[VHUYLFH Difficulty Grading expert Wrench Time 1 hour Tip, Strip or Tune Strip Spares Needed Oil Seals 4.99 (pr), Dust Seals 5.75 (pr) 22mm socket Rubber mallet Allen keys Small Phillips screwdriver
URFNVKR[VHUYLFH Difficulty Grading expert Wrench Time 1 hour Tip, Strip or Tune Strip Spares Needed Oil Seals 4.99 (pr), Dust Seals 5.75 (pr) 22mm socket Rubber mallet Allen keys Small Phillips screwdriver
SINGLE WIDE MASTER CATALOG GOSS COMMUNITY UNIT GOSS COMMUNITY FOLDER
 SINGLE WIDE MASTER CATALOG GOSS COMMUNITY UNIT GOSS (Click on the name to be taken to that section) Stocking Manufacturer of Quality Replacement Parts (815) 965-0884 Fax (815)965-1049 Welcome to the Quality
Installation and Maintenance Instructions JSE MAEAD Extruder Clutch. World Leader in Modular Torque Limiters
 World Leader in Modular Torque Limiters Installation and Maintenance Instructions JSE.5-0104MAEAD Extruder Clutch 1304 Twin Oaks Street Wichita Falls, Texas 76302 (940) 723-7800 Fax: (940) 723-7888 E-mail:
CARD RECORDER MECHANISMS
 ITR Engineering Data Sheet 201 September 1927 CARD RECORDER MECHANISMS Card time recorders are used for registering on a card the time that employees enter and leave the factory. The card and the recorder
Property of American Airlines
 Date Maintenance Check list The inspection and preventive maintenance schedule of the Power Stow Rollertrack is as follows: Daily (10 hrs), Weekly (50 hrs.), every 6 months ( hrs.), yearly (1 hrs.) and
Trail-Creeper Dual Transfer Case Adapter
 Trail-Creeper Dual Transfer Case Adapter Installation Instructions For Kits: 100001-1-KIT 21 Spline 100006-1-KIT 23 Spline KIT Contents: 23 or 21 Spline Coupler 1.0 Adapter Plate w/ Bearings Installed
Installation Instructions COMPETITION/PLUS SHIFTER Ford Mustang MT82 6-Speed Manual Transmission Catalog#
 Installation Instructions COMPETITION/PLUS SHIFTER 2015-2017 Ford Mustang MT82 6-Speed Manual Transmission Catalog# 3916037 Rev. 00 WORK SAFELY! For maximum safety, perform this installation on a clean,
SUZUKI SQ 416/420/625 M.Y TRANSMISSION SERVICE MANUAL - MANUAL - AUTOMATIC - TRANSFER - DIFFERENTIALS
 SUZUKI SQ 416/420/625 M.Y 1998-2005 TRANSMISSION SERVICE MANUAL - MANUAL - AUTOMATIC - TRANSFER - DIFFERENTIALS WARNING/CAUTION/NOTE IMPORTANT Please read this manual and follow its instructions carefully.
OLYMPIAN MODEL 740 Operation and Service Manual
 OLYMPIAN MODEL 740 Operation and Service Manual P/N 133911-102 FCI MANUAL P/N 133865-001 Data herein has been verified and validated and believed adequate for the intended use. If the machine or procedures
INSTRUCTION MANUAL INTERNAL GEAR PUMP TITAN G-4124A SERIES=> FLANGED TITAN G-124A SERIES => FLANGED MODELS:
 INSTRUCTION MANUAL INTERNAL GEAR PUMP TITAN G-4124A SERIES=> FLANGED TITAN G-124A SERIES => FLANGED MODELS: G-H, G-HL, G-K, G-KK, G-L, G-LQ, G-LL, GLS, G-Q, G-QS 1 Contents Maintenance Thrust bearing adjustment
INSTALLATION & USER S GUIDE
 REKLUSE MOTOR SPORTS The Rekluse Core EXP Kit with Adjustable Slave Cylinder INSTALLATION & USER S GUIDE Doc ID: 191-7704A Doc Rev: 102915 OVERVIEW This kit replaces the OEM core clutch components including
MANUAL TRANSMISSION MUA 5C (4X2, 4X4) AND TREMEC T5R(4X2)
 AND TREMEC T5R(4X2)") MANUAL TRANSMISSION 7B 1 RODEO TRANSMISSION MANUAL TRANSMISSION MUA 5C (4X2, 4X4) AND TREMEC T5R(4X2) CONTENTS Service Precaution...................... 7B 2 General Description..................... 7B
MANUAL TRANSMISSION 7B 1 RODEO TRANSMISSION MANUAL TRANSMISSION MUA 5C (4X2, 4X4) AND TREMEC T5R(4X2) CONTENTS Service Precaution...................... 7B 2 General Description..................... 7B
Servicing a Poljot 3133 movement
 Servicing a Poljot 3133 movement A service guide made by WUS member SLLS, June 2015 Editor: WUS member Polmax3133 Use this guide at your own risk. To dismantle a 3133 movement, just start at the end of
SE-1200-MP ECO - SERIES
 Inc. SE-1200-MP ECO - SERIES Operation & Parts Manual SE 1200 MP ECO -SERIES OWNERS MANUAL Table of Contents 1. Installation guide 2. Set-up instructions 3. Operation instructions 4. Cleaning 5. Troubleshooting
Dethatcher Kit Greensmaster 3000 Series
 Form No. 338 944 Dethatcher Kit Greensmaster 3000 Series Model No. 04493 Serial No. 3000000 and Up Operator s Manual English (EN) Contents Page Specifications............................... General Specifications.....................
AmTryke Adult Recumbent Model HP1000 #50-HC-1000
 AmTryke Adult Recumbent Model HP1000 #50-HC-1000 TOOLS Needed for Assembly 5 mm Allen Wrench 8 mm Socket or Wrench 10 mm Socket or Wrench 14 mm Socket or Wrench 15 mm Socket or Wrench 22 mm Socket or Adjustable
Honda CRV Oil Change
 1995-2001 Honda CRV Oil Change Change the oil in your '95-'01 Honda CRV to improve engine performance and longevity. Written By: Phillip Takahashi ifixit CC BY-NC-SA www.ifixit.com Page 1 of 16 INTRODUCTION
Backhoe for Dingo Compact Utility Loaders
 Form No. 50-5 Backhoe for Dingo Compact Utility Loaders Model No. 60 000000 & Up Operator s Manual Original Instructions (EN/GB) Contents Page Introduction................................. Safety......................................
Tooling Assistance Center
 Safeguards are designed into this application equipment to protect operators and maintenance personnel from most hazards during equipment operation. However, certain safety precautions must be taken by
phone
 AS-035508 Pinion Housing AS-040502 AS-040504 Locknut AS-085015 AS-1023953 Top Plate Seal AS-1080-AY Ink Fountain Divider AS-229246 Retaining Ring AS-236250 Retaining Ring AS-250-833 Water Union Tube 90
Maintenance Information
 16573370 Edition 2 February 2014 Air Grinder 99V Series Maintenance Information Save These Instructions Product Safety Information WARNING Failure to observe the following warnings, and to avoid these
N41422 Peacemakers Exhaust for Harley- Davidson Dyna Series 2006
 Please read these instructions carefully and thoroughly before beginning work. Before installing accessory, carefully consider whether one possesses the necessary technical skills and workshop tools to
2016 & Up Miata MX-5 Coilover Installation Instructions
 Page1 2016 & Up Miata MX-5 Coilover Installation Instructions Tooling: Jack, jack stands or lift Socket wrench Torque wrench 10mm, 12mm, 14mm and 17mm sockets 14mm and 17mm wrenches Flat head screwdriver
97-06 Jeep TJ Wrangler 2. 5 " & 4 " S u s p e n s i o n L i f t Installation Instructions
 97-06 Jeep TJ Wrangler 2. 5 " & 4 " S u s p e n s i o n L i f t Installation Instructions Safety Glasses Metric / Standard Wrenches & Sockets Drill / Assorted Drill Bits Floor Jack Jack Stands Measuring
EPS LH DRIVE KIT P/N APPLICATION BEFORE YOU BEGIN KIT CONTENTS. Instr Rev 01 04/16 Page 1 of 11. E2, E4, E6, and el XD
 EPS LH DRIVE KIT P/N 2881862 APPLICATION E2, E4, E6, and el XD BEFORE YOU BEGIN Read these instructions and check to be sure all parts and tools are accounted for. Please retain these installation instructions
Installation Guide Philips MP2 IntelliVue M-Series Arm (12'' or 8'') Rail Mount Kit
 Rail Mount Kit") Installation Guide Philips MP2 IntelliVue M-Series Arm (12'' or 8'') Rail Mount Kit The purpose of this guide is to: 1. Describe mounting of MP2 equipment on Mounting Bracket (page 2). 2. Describe mounting
Installation Guide Philips MP2 IntelliVue M-Series Arm (12'' or 8'') Rail Mount Kit The purpose of this guide is to: 1. Describe mounting of MP2 equipment on Mounting Bracket (page 2). 2. Describe mounting
HURST COMP/PLUS SHIFTER 2015 Ford Mustang (Getrag MT82 six-speed manual transmission) Catalog # by Hurst Performance
 Catalog # by Hurst Performance") FORM 159 0205 07/15 HURST COMP/PLUS SHIFTER 2015 Ford Mustang (Getrag MT82 six-speed manual transmission) Catalog #391 0205 2015 by Hurst Performance Thank you for purchasing the Hurst Comp/Plus Shifter.
FORM 159 0205 07/15 HURST COMP/PLUS SHIFTER 2015 Ford Mustang (Getrag MT82 six-speed manual transmission) Catalog #391 0205 2015 by Hurst Performance Thank you for purchasing the Hurst Comp/Plus Shifter.
I-317. AWWA Check Valves WARNING INSTALLATION AND MAINTENANCE INSTRUCTIONS SERIES 317 WARNING
 Read and understand all instructions before attempting to install, remove, adjust, or perform maintenance on any Victaulic piping products Wear safety glasses, hardhat, and foot protection. Failure to
Installation Manual TWM Performance Short Shifter Cobalt SS/SC, SS/TC, HHR SS, Ion Redline and Saab 9-3
 Page 1 Installation Manual TWM Performance Short Shifter Cobalt SS/SC, SS/TC, HHR SS, Ion Redline and Saab 9-3 Please Note: It is preferable to park on a flat surface, as you will have to engage and disengage
Start Up & Troubleshooting Manual. Resfab Equipment Inc. St Jean Sur Richelieu Website: resfab.com
 Start Up & Troubleshooting Manual Resfab Equipment Inc. 725 Rossiter St Jean Sur Richelieu 1 450 359 0800 Website: resfab.com Yogurt Blender Service Manual Page SECTION 1: Start Up and Repair... 3 thru
D40C HINGE # x Support Plate x M8 Bolt 8 x M8 Washer 6 x M6 20mm Bolts 6 x M6 Washers 19 x Screws
 HINGE # 1017 2 x Support Plate 1018 8 x M8 Bolt 8 x M8 Washer 6 x M6 20mm Bolts 6 x M6 Washers 19 x Screws 2 x Lid mount gas strut bracket 1041 2 x Self tap strut mount 1040 1 x Central Lock bracket 1510
Di-Acro 12 & 24 Slip Rollers
 OPERATOR S MANUAL & INSTRUCTIONS Di-Acro & Slip Rollers Di-Acro, Incorporated PO Box 9 Canton, Ohio Progress Street N.E. Canton, Ohio --9 -- (fax) Revised / Sale or distribution of manuals is strictly
INSTALLATION & OWNER S MANUAL
 Rev. E p. of 3 INSTALLATION & OWNER S MANUAL V446 Front Cab Kit and V446 Rear Cab Kit for RTV 40 INSTALLATION & OWNER S MANUAL The contents of this envelope are the property of the owner. Be sure to leave
INSTALLATION & OWNER S MANUAL
 Pg. 1 of 14 INSTALLATION & OWNER S MANUAL John Deere Gator XUV 825i S4 Cab (p/n: 1GTRXUV4 Steel Cab with Doors) The contents of this envelope are the property of the owner. Be sure to leave with the owner
Four Wheel Drive Kit Groundsmaster 580D
 Four Wheel Drive Kit Groundsmaster 580D FORM NO. 957 Rev B Model No. 0599 00 thru 99999 INSTALLATION INSTRUCTIONS POTENTIAL HAZARD Traction Unit rolls over. WHAT CAN HAPPEN Bodily injury could occur. 4
MailStar Maintenance and Adjustment March 2002
 MailStar Maintenance and Adjustment March 2002 The MailStar bicycle incorporates many new features to ease maintenance and improve handling and performance. The majority of components are similar to those
Operation and Maintenance Instructions
 Operation and Maintenance Instructions One Research Drive Stratford, CT 06615 (203) 375-0063 www.sonicmixing.com 1 Installation and Start-up Do not perform following adjustments without disconnecting power
Installation and Maintenance Instructions JSE1-0128MAEAD Extruder Clutch. World Leader in Modular Torque Limiters
 World Leader in Modular Torque Limiters Installation and Maintenance Instructions JSE1-0128MAEAD Extruder Clutch 1304 Twin Oaks Street Wichita Falls, Texas 76302 (940) 723-7800 Fax: (940) 723-7888 E-mail:
Maintenance Instructions. World Leader in Modular Torque Limiters. JSE AEA Extruder Clutch
 World Leader in Modular Torque Limiters PROTECTING EQUIPMENT& MACHINERYYEARSInstallation and Maintenance Instructions JSE.5-0234AEA Extruder Clutch 1304 Twin Oaks Street Wichita Falls, Texas 76302 (940)
C15C C15C. Page 1 of 20
 2 x Lid Front Hinge 1135 8 x M8 Bolt 8 x M8 Washer (3mm Thick) 4 x M6 Large washers 4 x M6 Spring washers 4 x M6 x 40mm Bolts 6 x M6 20mm Bolts 6 x M6 Washers 20 x Screws 2 x Lid mount gas strut bracket
SPICER SERVICE MANUAL MANUAL HUB LOK EXTERNAL TYPE INTERNAL TYPE SPICER AXLE DIVISION DANA CORPORATION FORT WAYNE, INDIANA
 SPICER SERVICE MANUAL EXTERNAL TYPE INTERNAL TYPE MANUAL HUB LOK SPICER AXLE DIVISION DANA CORPORATION FORT WAYNE, INDIANA INDEX PAGE IMPORTANT SAFETY NOTICE................................... GENERAL
OWI 35C-7/ 35C-7H PIPE SPINNER
 OWI 35C-7/ 35C-7H PIPE SPINNER OIL WORKS, INC.. manufactures the OWI 35C-7 pipe spinner in Pneumatic and Hydraulic Versions at our facility in Odessa, TX. We offer new and rebuilt units, and stock a full
LoMax 205 CASE & 3:1 GEAR SET. Manufactured by JB CONVERSIONS, INC. Phone: Installation Instructions for the GM NP205 Transfer Case
 LoMax 205 CASE & 3:1 GEAR SET Part No. 2800 Instruction Rev: 2007.08.16 Manufactured by JB CONVERSIONS, INC. Phone: Installation Instructions for the GM NP205 Transfer Case Kit Components: 1. (1) 42x25
Steering Damper MX SD 2.1. Workshop Manual
 Steering Damper MX SD 2.1 Workshop Manual Safety Precautions Before you begin Warning! Öhlins Racing AB can not be held responsible for any damage to the Steering Damper, vehicle, other property or injury
SERVICE INSTRUCTIONS ASSEMBLY & DISASSEMBLY T50X DOUBLE ACTING HYDRAULIC SERIES ACTUATORS
 Page 1 of 7 SERVICE INSTRUCTIONS ASSEMBLY & DISASSEMBLY T50X DOUBLE ACTING HYDRAULIC SERIES ACTUATORS INTRODUCTION This service procedure is offered as a guide to enable general maintenance to be performed
HOR Series Mechanical Overload Release Clutches
 HOR Series Mechanical Overload Release Clutches P-328-BG Installation & Maintenance Instructions HOR Series Model H16 Contents I. Operating Principle...2 Il. Mounting Adapters and Sprockets or Sheaves
INSTALLATION GUIDE. Kawasaki KLR Manual Revision:
 REKLUSE MOTOR SPORTS The z-start Pro Clutch INSTALLATION GUIDE Kawasaki KLR650 191-640 Manual Revision: 030308 2007 Rekluse Motor Sports Rekluse Motor Sports, Inc. 110 E. 43rd Street Boise, Idaho 83714
Maintenance Information
 16575219 Edition 4 October 2013 Air Screwdrivers QP1P, QP1S and QP1T Series Maintenance Information Save These Instructions Product Safety Information WARNING Failure to observe the following warnings,
1. Get fork mounted in stand. You can leave it in the bike, but you must remove the wheel and front brake.
 Tools Needed: Bike stand Lint free shop Towels 1.5mm Allen Key Pick Set Grease (We recommend Slick Honey) Oil Measuring Cup (with cc Scale) Small Metal Drift Shop Vise Oil Bucket 13mm Deep Socket (6 point)
GM 3000 AIRLESS PAINT SPRAYERS Drive Housing Replacement Kit Pinion Housing Replacement Kit
 INSTRUCTIONS 08660 INSTRUCTIONS This manual contains important warnings and information. READ AND KEEP FOR REFERENCE. Rev. B GM 000 AIRLESS PAINT SPRAYERS Drive Housing Replacement Kit 869 Pinion Housing
Subaru 5-Speed Double Adjustable Short Throw Shifter
 Subaru 5-Speed Double Adjustable Short Throw Shifter 1999+ Subaru Impreza 5-Speed 2004-2005 Subaru Forester XT 5-Speed Congratulations on your purchase of the COBB Tuning Double Adjustable Short Throw
Rev. B Page 1 of 7 SPEC. ASSY INST, REMOTE ADJUSTABLE PRE-LOAD (30-25XX & SA XX)
") Page 1 of 7 SPEC. ASSY INST, REMOTE ADJUSTABLE PRE-LOAD (30-25XX & SA-5057-5XX) 19 3 10 11 4 7 20 16 14 15 12 13 21 5 9 6 17 2 1 Fig. 1 Reservoir Components Fig. 2 Housing Components 30-25XX & SA-5057-5XX
Page 1 of 7 SPEC. ASSY INST, REMOTE ADJUSTABLE PRE-LOAD (30-25XX & SA-5057-5XX) 19 3 10 11 4 7 20 16 14 15 12 13 21 5 9 6 17 2 1 Fig. 1 Reservoir Components Fig. 2 Housing Components 30-25XX & SA-5057-5XX
INSTALLATION GUIDE CRF150R Manual Revision:
 REKLUSE MOTOR SPORTS The z-start Pro Clutch INSTALLATION GUIDE CRF150R 191-810 Manual Revision: 032508 2002 Rekluse Motor Sports Rekluse Motor Sports, Inc. 110 E. 43rd Street Boise, Idaho 83714 208-426-0659
S-Drive Performance Trainer
 S-Drive Performance Trainer SERVICE MANUAl Table of contents CHAPTER 1: Serial number location... 1 CHAPTER 2: Important Safety instructions 2.1 Read and Save These Instructions... 2 2.2 Before Getting
USER S GUIDE KENDON STAND-UP MOTO LIFT. Stand-Up Lift Parts & Accessories
 Stand-Up Lift Parts & Accessories USER S GUIDE Frame Jack BLFJ107 Oil Drain Pan OD107 18" Service Tool Tray BLST18 36" Service Tool Tray BLST36 Visit us at www.kendonusa.com for product updates, new products,
InstalLation Instructions
 Trail-Creeper tacoma dual transfer case adapter Kit 107523-1-KIT Kit Contents 111111111262525- Coupler Adapter Plate w/bearings installed Bearing Spacer Snap Ring Washer, Flat M10 Washer, Lock M10 Washer,
How to install the Barnett clutch and the stronger Oil Pump Drive Gear
 How to install the Barnett clutch and the stronger Oil Pump Drive Gear Written by WildFred I m from Germany so please excuse my English and the spelling. The following procedure is a combination of the
Shimano Trinidad\Torium Drag Upgrade Tutorial
 Shimano Trinidad\Torium Drag Upgrade Tutorial Introduction: This tutorial is provided to assist those of you who may be interested in performing upgrade of the drag system of your Shimano Trinidad 16,
ShowBoat 66. For Factory racks: Check fitlist. notes, for your vehicle s crossbar spread. CROSSBAR SPREAD
 For Factory racks: Check fitlist notes, for your vehicle s crossbar spread. ShowBoat 66 Support Bar (2x) ROLLER (1x) END CAP (4x) END CAP (2x) STOP COLLAR (1x) TORX WRENCH (1x) Tape Measure (1x) Front
Connector Systems Inc. SS-20 MACHINE MANUAL
 Connector Systems Inc. SS-20 MACHINE MANUAL INTRODUCTION Your SS-20 machine comes to you fully equipped and set up to terminate the style of plug you have requested. Our SS-20N will accommodate those
Sure-Feed Engineering Inc. SE-900-EI. Operation & Parts Manual
 . SE-900-EI Operation & Parts Manual SE 900 EI OWNERS MANUAL Table of Contents 1. Installation guide 2. Set-up instructions 3. Operation instructions 4. Cleaning 5. Troubleshooting 6. Parts manual 7. Electrical
Hayes Performance Systems 5800 W. Donges Bay Rd. Mequon, WI Tel: Web:
 Hayes Performance Systems 5800 W. Donges Bay Rd. Mequon, WI 53092 Tel: 888.686.3472 Email: techsupport@hayesbicycle.com Web: www.hayescomponents.com Hayes Components Europe Dirnismaning 20 a 85748 Garching
97-06 Jeep TJ Wrangler Installation Instructions Models Kit# TJ251K/TJ401K-SX -DX 03 Models Kit# TJ253K/TJ403K-SX -DX
 97-06 Jeep TJ Wrangler Installation Instructions 97-02 Models Kit# TJ251K/TJ401K-SX -DX 03 Models Kit# TJ253K/TJ403K-SX -DX Before beginning the installation, read these instructions and the enclosed driver
Sentinel 250 Fire Hydrant
 Maintenance Instructions manual table of contents PAGE Sentinel 250 Fire Hydrant Inspection and Lubrication 2 Rotating Hydrant to Face Desired Direction 3 Installing Extension Section 3-6 Restoring Service
Tech Note Truck 14 & 15.5 Twin Plate Cast Iron Type Installation Guidelines
 1. (14 & 15.5 ) Check condition of the flywheel. Grind to resurface or replace flywheel. Surface MUST BE machined or premature clutch failure can occur. Flywheel depth must be 2.938 (74.62mm) for 14 (350mm)